

Milwaukee 48-08-0561 Operator's Manual
OPERATOR'S MANUAL
MANUEL de L'UTILISATEUR
MANUAL del OPERADOR
Cat. No. / No de cat.
48-08-0561
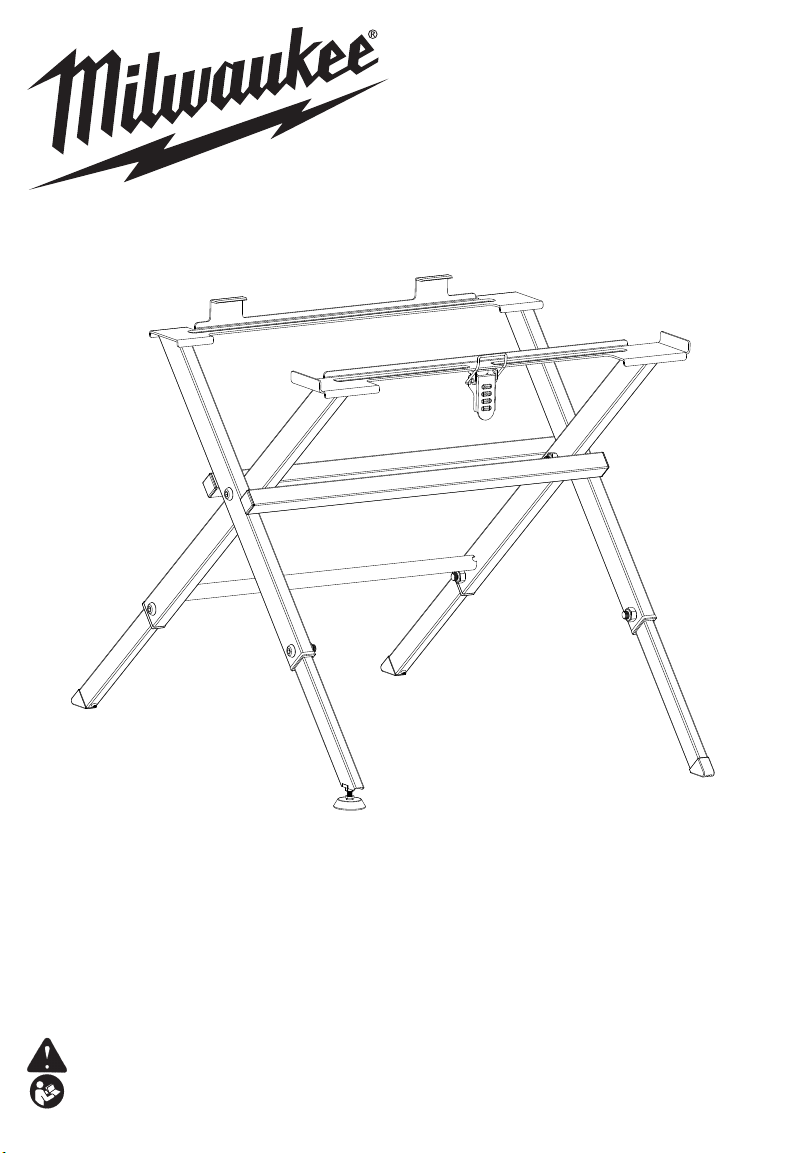
FOLDING TABLE SAW STAND
SUPPORT DE SCIE À TABLE PLIANT
BASE PLEGABLE PARA SIERRA FIJA
WARNING To reduce the risk of injury, user must read and understand operator's manual.
AVERTISSEMENT An de réduire le risque de blessures, l'utilisateur doit lire et bien
comprendre le manuel.
ADVERTENCIA Para reducir el riesgo de lesiones, el usuario debe leer y entender el manual.
SPECIFIC SAFETY RULES
WARNING
WARNING
TABLE SAW STAND
Read all safety warnings and all
ble saw stand and the table saw to be mounted.
Failure to follow the warnings and instructions may
result in electric shock, re and/or serious injury.
Save all warnings and instructions for future
reference.
• Disconnect the battery pack from the table saw
before making any adjustments or changing
accessories. Accidental starting of the power tool
is a cause of some accidents.
• Properly assemble the table saw stand before
mounting the tool. Proper assembly is important
to prevent risk of collapse.
• Securely fasten the table saw to the table saw
stand before use. Table saw shifting on the table
saw stand can cause loss of control.
• Place the table saw stand on a solid, at and level
surface. If the table saw stand can shift or rock, the
table saw or workpiece cannot be safely controlled.
• Do not overload the table saw stand or use as
ladder or scaolding. Overloading or standing on
the table saw stand causes the stand to be “top-
heavy” and likely to tip over.
• Use only with MILWAUKEE Table Saws 2736-20,
and mount securely, according to these instructions. Improperly installed Table Saws can cause
injury or property damage.
• Avoid dangerous environments. Use your tool stand
on at, level, dry, and hard surfaces only.
• Keep work area clean and well lit. Cluttered, dark
work areas invite accidents.
• The table saw stand weight limit is 180 lb (82 kg).
If more than 180 lbs is placed on the table saw stand it
may be damaged and may cause personal injury.
• Maintain control. Keep proper footing and balance at
all times.
• Maintain table saw stand carefully. Keep table saw
stand dry, clean and free from oil and grease. Follow
instructions for changing accessories. Periodically
inspect table saw stand for damage and wear.
• Maintain labels. These carry important information. If
unreadable or missing, contact a MILWAUKEE service
facility for a free replacement.
• Keep bystanders away. Children and bystanders
should be kept at a safe distance from the work area
to avoid distracting the operator.
• To reduce the risk of injury, always wear eye protection.
• Fingers can be pinched between the legs of the
table saw stand. To reduce the risk of injury, keep
your ngers out of the areas where the legs will
fold.
• Always use common sense and be cautious
when using tools. It is not possible to anticipate
every situation that could result in a dangerous out-
come. Do not use this tool if you do not understand
these operating instructions or you feel the work is
beyond your capability; contact Milwaukee Tool or
a trained professional for additional information or
training.
instructions provided with the ta-
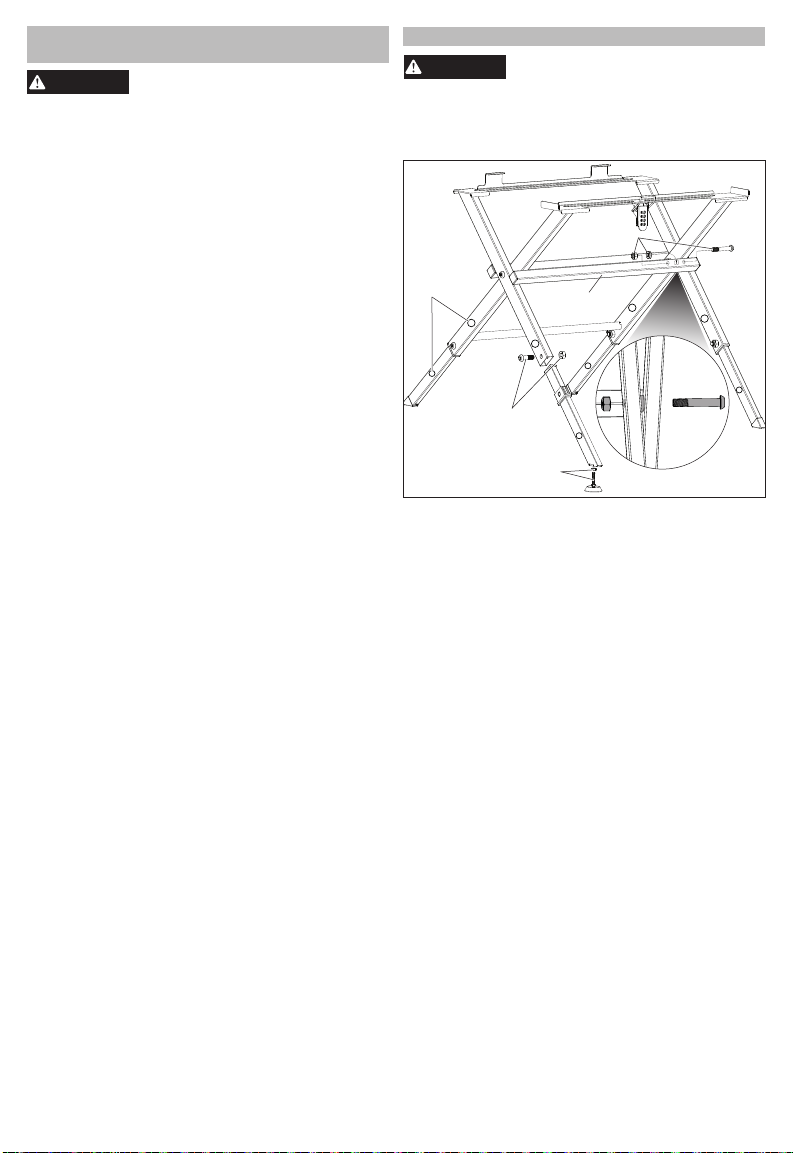
ASSEMBLY
Properly assemble the table saw
Proper assembly is important to ensure stability.
Legs must match with corresponding number
indicators on the stand.
Indicators
1
1. Remove all packaging and zip ties.
2. Insert the legs into the frame according to the in-
dicator stickers. Mismatched leg/frame assembly
will cause the frame to wobble.
3. Insert a small bolt through the frame/legs assembly
and thread on the nut. Use a 6 mm hex wrench
and an adjustable (or 17 mm open end) wrench
to securely tighten.
4. Insert the legs of narrower frame through the
opening between the cross bar and top of the
wider frame. To complete this step and align the
bolt holes, you will need to tip the narrow frame
side to side to pass the cross bar through the
opening of the wider frame. For assembly assistance, go to the product information page at
www.milwaukeetool.com.
5. Lay the assembly on its side and align the bolt
holes, placing the plastic spacer between the
frame sections, as shown.
6. Insert the long bolt through the wider frame,
spacer, and narrower frame and secure with the
nut. Use a 6 mm hex wrench and an adjustable
(or 17 mm open end) wrench to securely tighten.
7. Screw the nut onto the adjustable foot (the nut
may come factory assembled)
8. Screw in the adjustable foot into the stand until the
stand sits level. Turn the nut back until it contacts
the frame, locking the adjustable foot in place.
stand before mounting the tool.
Assembling the Stand
Long Bolt,
Spacer, & Nut
Crossbar
1
Short
Bolt & Nut
3
Adjustable
Foot & Nut
1
1
3
2
2
2
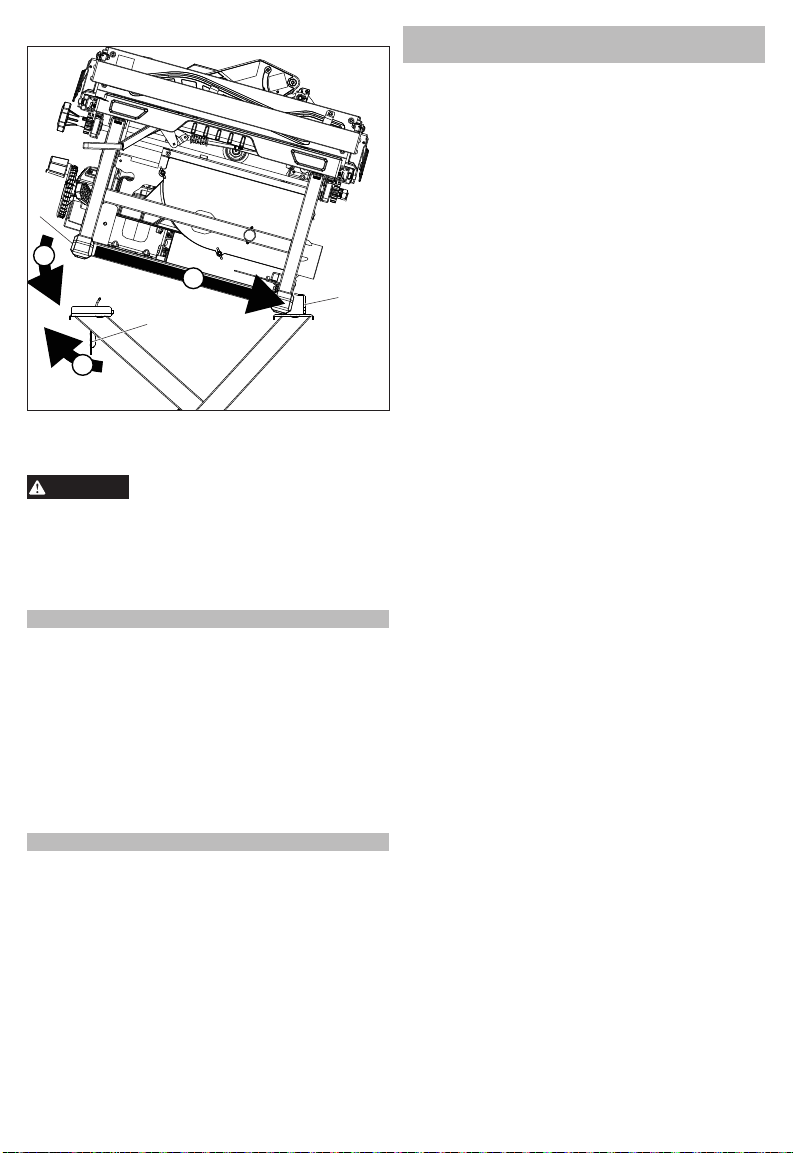
Installing the Table Saw
1
2
3
WARNING
Tab
Rear
Latch
1. Hook the back of the saw into the rear brackets.
2. Lower the front of the saw onto the frame.
3. Secure the latch onto the saw's front tab.
Brackets
Properly level the table saw stand
stand can shift or rock, the table saw or workpiece cannot be safely controlled.
1. Loosen the locking nut.
2. Screw in or out the foot to level the stand.
3. Tighten the locking nut ush with stand.
before each use. If the table saw
Leveling
SERVICE - UNITED STATES
1-800-SAWDUST (1.800.729.3878)
Monday-Friday, 7:00 AM - 6:30 PM CST
or visit www.milwaukeetool.com
Contact Corporate After Sales Service Technical
Support with technical, service/repair, or warranty
questions.
Email: metproductsupport@milwaukeetool.com
Become a Heavy Duty Club Member at
www.milwaukeetool.com to receive important
notications regarding your tool purchases.
SERVICE - CANADA
Milwaukee Tool (Canada) Ltd
Monday-Friday, 7:00 AM - 4:30 PM CST
1.800.268.4015
or visit www.milwaukeetool.ca
LIMITED WARRANTY
Every MILWAUKEE power tool* (see exceptions below) is warranted
to the original purchaser only to be free from defects in material and
workmanship. Subject to certain exceptions, MILWAUKEE will repair
or replace any part on an electric power tool which, after examination,
is determined by MILWAUKEE to be defective in material or workman-
ship for a period of ve (5) years** after the date of purchase unless
otherwise noted. Return of the power tool to a MILWAUKEE factory
Service Center location or MILWAUKEE Authorized Service Station,
freight prepaid and insured, is required. A copy of the proof of purchase
should be included with the return product. This warranty does not
apply to damage that MILWAUKEE determines to be from repairs
made or attempted by anyone other than MILWAUKEE authorized
personnel, misuse, alterations, abuse, normal wear and tear, lack of
maintenance, or accidents.
Normal Wear: Many power tools need periodic parts replacement and
service to achieve best performance. This warranty does not cover
repair when normal use has exhausted the life of a part including,
but not limited to, chucks, brushes, cords, saw shoes, blade clamps,
o-rings, seals, bumpers, driver blades, pistons, strikers, lifters, and
bumper cover washers.
*This warranty does not cover Air Nailers & Staplers; Airless Paint
Sprayer; Cordless Battery Packs; Gasoline Driven Portable Power
Generators; Hand Tools; Hoist – Electric, Lever & Hand Chain; M12™
Heated Gear; Reconditioned Product; and Test & Measurement
Products. There are separate and distinct warranties available for
these products.
**The warranty period for Job Site Radios, M12™ Power Port, M18™
Power Source, Jobsite Fan and Trade Titan™ Industrial Work Carts
is one (1) year from the date of purchase. The warranty period for
the Drain Cleaning Cables is two (2) years from the date of purchase.
The warranty period for the LED in the LED Work Light and the LED
Upgrade Bulb for the Work Light is the lifetime of the product subject
to the limitations above. If during normal use the LED or LED Bulb
fails, the part will be replaced free of charge.
Warranty Registration is not necessary to obtain the applicable war-
ranty on a MILWAUKEE power tool product. The manufacturing date
of the product will be used to determine the warranty period if no proof
of purchase is provided at the time warranty service is requested.
ACCEPTANCE OF THE EXCLUSIVE REPAIR AND REPLACEMENT
REMEDIES DESCRIBED HEREIN IS A CONDITION OF THE CONTRACT FOR THE PURCHASE OF EVERY MILWAUKEE PRODUCT.
IF YOU DO NOT AGREE TO THIS CONDITION, YOU SHOULD NOT
PURCHASE THE PRODUCT. IN NO EVENT SHALL MILWAUKEE
BE LIABLE FOR ANY INCIDENTAL, SPECIAL, CONSEQUENTIAL
OR PUNITIVE DAMAGES, OR FOR ANY COSTS, ATTORNEY FEES,
EXPENSES, LOSSES OR DELAYS ALLEGED TO BE AS A CONSEQUENCE OF ANY DAMAGE TO, FAILURE OF, OR DEFECT IN ANY
PRODUCT INCLUDING, BUT NOT LIMITED TO, ANY CLAIMS FOR
LOSS OF PROFITS. SOME STATES DO NOT ALLOW THE EXCLUSION OR LIMITATION OF INCIDENTAL OR CONSEQUENTIAL
DAMAGES, SO THE ABOVE LIMITATION OR EXCLUSION MAY NOT
APPLY TO YOU. THIS WARRANTY IS EXCLUSIVE AND IN LIEU
OF ALL OTHER EXPRESS WARRANTIES, WRITTEN OR ORAL.
TO THE EXTENT PERMITTED BY LAW, MILWAUKEE DISCLAIMS
ANY IMPLIED WARRANTIES, INCLUDING WITHOUT LIMITATION
ANY IMPLIED WARRANTY OF MERCHANTABILITY OR FITNESS
FOR A PARTICULAR USE OR PURPOSE; TO THE EXTENT SUCH
DISCLAIMER IS NOT PERMITTED BY LAW, SUCH IMPLIED WARRANTIES ARE LIMITED TO THE DURATION OF THE APPLICABLE
EXPRESS WARRANTY AS DESCRIBED ABOVE. SOME STATES
DO NOT ALLOW LIMITATIONS ON HOW LONG AN IMPLIED WAR-
RANTY LASTS, SO THE ABOVE LIMITATION MAY NOT APPLY TO
YOU, THIS WARRANTY GIVES YOU SPECIFIC LEGAL RIGHTS,
AND YOU MAY ALSO HAVE OTHER RIGHTS WHICH VARY FROM
STATE TO STATE.
This warranty applies to product sold in the U.S.A. and Canada only.
Please consult the ‘Service Center Search’ in the Parts & Service sec-
tion of MILWAUKEE’s website www.milwaukeetool.com or call 1.800.
SAWDUST (1.800.729.3878) to locate your nearest service facility for
warranty and non-warranty service on a Milwaukee electric power tool.
USA & CANADA
3
 Loading...