


OPERATOR'S MANUAL
MANUEL de L'UTILISATEUR
MANUAL del OPERADOR
Cat. No. / No de cat.
2848-20
M18™ INFLATOR
GONFLEUR M18™
INFLADOR M18™
WARNING To reduce the risk of injury, user must read and understand operator's manual.
WARNING To reduce the risk of injury, user must read and understand operator's manual.
AVERTISSEMENT An de réduire le risque de blessures, l'utilisateur doit lire et bien
AVERTISSEMENT An de réduire le risque de blessures, l'utilisateur doit lire et bien
comprendre le manuel.
comprendre le manuel.
ADVERTENCIA Para reducir el riesgo de lesiones, el usuario debe leer y entender el manual.
ADVERTENCIA Para reducir el riesgo de lesiones, el usuario debe leer y entender el manual.

GENERAL POWER TOOL
WARNING
SAFETY WARNINGS
Read all safety warnings, instruc-
tions provided with this power tool. Failure to
follow all instructions listed below may result in
electric shock, re and/or serious injury. Save all
warnings and instructions for future reference.
The term "power tool" in the warnings refers to your
mains-operated (corded) power tool or battery-oper-
ated (cordless) power tool.
tions, illustrations and specica-
WORK AREA SAFETY
• Keep work area clean and well lit. Cluttered or
dark areas invite accidents.
• Do not operate power tools in explosive atmo-
spheres, such as in the presence of ammable
liquids, gases or dust. Power tools create sparks
which may ignite the dust or fumes.
• Keep children and bystanders away while operat-
ing a power tool. Distractions can cause you to lose
control.
ELECTRICAL SAFETY
• Power tool plugs must match the outlet. Never
modify the plug in any way. Do not use any
adapter plugs with earthed (grounded) power
tools. Unmodied plugs and matching outlets will
reduce risk of electric shock.
• Avoid body contact with earthed or grounded
surfaces, such as pipes, radiators, ranges and
refrigerators. There is an increased risk of electric
shock if your body is earthed or grounded.
• Do not expose power tools to rain or wet conditions. Water entering a power tool will increase the
risk of electric shock.
• Do not abuse the cord. Never use the cord for
carrying, pulling or unplugging the power tool.
Keep cord away from heat, oil, sharp edges or
moving parts. Damaged or entangled cords increase
the risk of electric shock.
• When operating a power tool outdoors, use an
extension cord suitable for outdoor use. Use of
a cord suitable for outdoor use reduces the risk of
electric shock.
• If operating a power tool in a damp location is
unavoidable, use a ground fault circuit interrupter
(GFCI) protected supply. Use of an GFCI reduces
the risk of electric shock.
PERSONAL SAFETY
• Stay alert, watch what you are doing and use
common sense when operating a power tool. Do
not use a power tool while you are tired or under
the inuence of drugs, alcohol or medication. A
moment of inattention while operating power tools
may result in serious personal injury.
• Use personal protective equipment. Always
wear eye protection. Protective equipment such
as a dust mask, non-skid safety shoes, hard hat or
hearing protection used for appropriate conditions
will reduce personal injuries.
• Prevent unintentional starting. Ensure the switch
is in the o-position before connecting to power
source and/or battery pack, picking up or carrying
the tool. Carrying power tools with your nger on
the switch or energizing power tools that have the
switch on invites accidents.
• Remove any adjusting key or wrench before
turning the power tool on. A wrench or a key left
attached to a rotating part of the power tool may
result in personal injury.
• Do not overreach. Keep proper footing and
balance at all times. This enables better control
of the power tool in unexpected situations.
• Dress properly. Do not wear loose clothing or
jewelry. Keep your hair and clothing away from
moving parts. Loose clothes, jewelry or long hair
can be caught in moving parts.
• If devices are provided for the connection of
dust extraction and collection facilities, ensure
these are connected and properly used. Use of
dust collection can reduce dust-related hazards.
• Do not let familiarity gained from frequent use
of tools allow you to become complacent and
ignore tool safety principles. A careless action can
cause severe injury within a fraction of a second.
POWER TOOL USE AND CARE
• Do not force the power tool. Use the correct power
tool for your application. The correct power tool
will do the job better and safer at the rate for which
it was designed.
• Do not use the power tool if the switch does not
turn it on and o. Any power tool that cannot be
controlled with the switch is dangerous and must be
repaired.
• Disconnect the plug from the power source and/
or remove the battery pack, if detachable, from
the power tool before making any adjustments,
changing accessories, or storing power tools.
Such preventive safety measures reduce the risk of
starting the power tool accidentally.
• Store idle power tools out of the reach of children
and do not allow persons unfamiliar with the
power tool or these instructions to operate the
power tool. Power tools are dangerous in the hands
of untrained users.
• Maintain power tools and accessories. Check
for misalignment or binding of moving parts,
breakage of parts and any other condition that
may aect the power tool’s operation. If damaged,
have the power tool repaired before use. Many
accidents are caused by poorly maintained power
tools.
• Keep cutting tools sharp and clean. Properly
maintained cutting tools with sharp cutting edges
are less likely to bind and are easier to control.
• Use the power tool, accessories and tool bits
etc. in accordance with these instructions,
taking into account the working conditions and
the work to be performed. Use of the power tool
for operations dierent from those intended could
result in a hazardous situation.
• Keep handles and grasping surfaces dry, clean
and free from oil and grease. Slippery handles and
grasping surfaces do not allow for safe handling and
control of the tool in unexpected situations.
BATTERY TOOL USE AND CARE
• Recharge only with the charger specied by the
manufacturer. A charger that is suitable for one type
of battery pack may create a risk of re when used
with another battery pack.
• Use power tools only with specically designated
battery packs. Use of any other battery packs may
create a risk of injury and re.
2

• When battery pack is not in use, keep it away
CAUTION
WARNING
WARNING
C
US
from other metal objects, like paper clips, coins,
keys, nails, screws or other small metal objects,
that can make a connection from one terminal
to another. Shorting the battery terminals together
may cause burns or a re.
• Under abusive conditions, liquid may be ejected
from the battery; avoid contact. If contact accidentally occurs, flush with water. If liquid
contacts eyes, additionally seek medical help.
Liquid ejected from the battery may cause irritation
or burns.
• Do not use a battery pack or tool that is damaged or modied. Damaged or modied batteries
may exhibit unpredictable behavior resulting in re,
explosion or risk of injury.
• Do not expose a battery pack or tool to re or
excessive temperature. Exposure to re or tem-
perature above 265°F (130°C) may cause explosion.
• Follow all charging instructions and do not charge
the battery pack or tool outside the temperature
range specied in the instructions. Charging
improperly or at temperatures outside the specied
range may damage the battery and increase the risk
of re.
SERVICE
• Have your power tool serviced by a qualied
repair person using only identical replacement
parts. This will ensure that the safety of the power
tool is maintained.
• Never service damaged battery packs. Service
of battery packs should only be performed by the
manufacturer or authorized service providers.
SPECIFIC SAFETY RULES FOR
INFLATOR
• Do not use this tool for purposes other than
inating items such as car tires, bike tires, lawn
equipment tires, sports equipment, air mattresses,
beach toys and other inatables. Use of the tool
for operations dierent from those intended could
result in a hazardous situation. Do NOT use this tool
to ll air tanks or shocks. Do NOT use this tool as
a breathing device. Do NOT use this tool to spray
chemicals.
• Do not leave the tool unattended during operation.
•
inate properly. Ination of some types of tires and
wheel rims require special training and restraining
devices/barriers. Do not set the tool to an output
pressure greater than marked maximum pressure
of the item to be inated. Do not use at pressure
greater than 150 psi.
• Use only recommended MILWAUKEE inator
accessories. Others may be hazardous.
• Never block or plug the air outlet during operation.
• Never carry tool by the air hose. Damage may
occur.
•Check air hose for wear or damage before each
use. Check all accessory connections are secure.
Repair all damaged parts before use. Contact a
MILWAUKEE service facility for ALL repairs.
• NOTE: To avoid tool damage from overheating, allow
tool to cool for 40 minutes after each 20 minutes of
continuous use.
Risk of bursting. Always follow
manufacturer’s instructions and
•
appropriate respiratory protection or use an
OSHA compliant dust extraction solution.
• Always use common sense and be cautious when
using tools. It is not possible to anticipate every
situation that could result in a dangerous outcome.
Do not use this tool if you do not understand these
operating instructions or you feel the work is beyond
your capability; contact Milwaukee Tool or a trained
professional for additional information or training.
• Maintain labels and nameplates. These carry
important information. If unreadable or missing,
contact a MILWAUKEE service facility for a free
replacement.
•
construction activities contains chemicals known to
cause cancer, birth defects or other reproductive
harm. Some examples of these chemicals are:
• lead from lead-based paint
• crystalline silica from bricks and cement and other
masonry products, and
• arsenic and chromium from chemically-treated
lumber.
Your risk from these exposures varies, depending on
how often you do this type of work. To reduce your
exposure to these chemicals: work in a well ventilated
area, and work with approved safety equipment, such
as those dust masks that are specially designed to
lter out microscopic particles.
To reduce the risk of injury, when
working in dusty situations, wear
Some dust created by power sanding,
sawing, grinding, drilling, and other
SYMBOLOGY
Volts
Direct Current
Read Operator's Manual
Pressure adjustment
On/O
Inate
UL Listing for Canada and U.S.
SPECIFICATIONS
Cat. No. ..................................................... 2848-20
Volts.............................................................. 18 DC
Battery Type .................................................M18™
Charger Type................................................M18™
Maximum Pressure..150 PSI, 10.3 BAR, 1030 kPa
Output .................................... 1.41 SCFM @ 0 PSI
Recommended Ambient
Operating Temperature ......................0°F to 125°F
1.10 SCFM @ 35 PSI
3

WARNING
WARNING
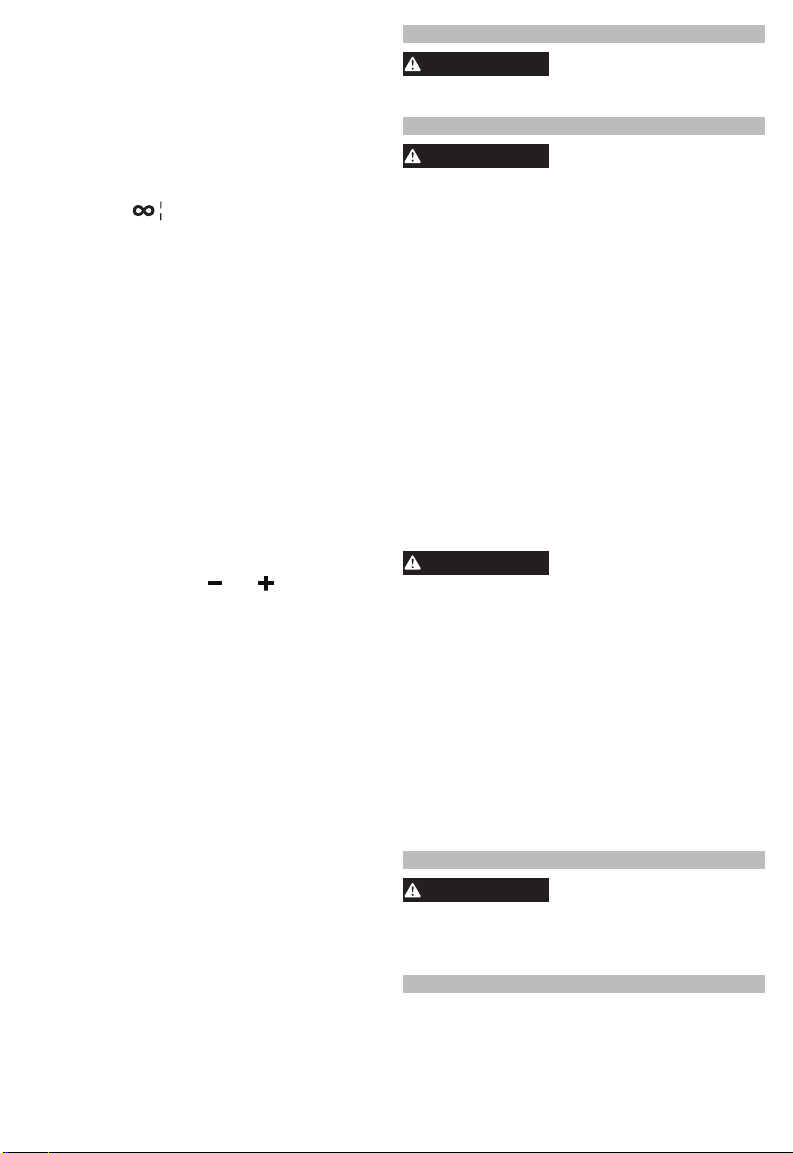
FUNCTIONAL DESCRIPTION
WARNING
WARNING
9
6
7
8
10
5
4
3
UNITS
MEMORY
2
1
11
12
13
15
14
19
18
1. Memory button
2. Overload indicator
3. Units button
4. Power button
5. Temperature protection
indicator
6. Reached target
indicator
7. Manual inate
8. Target input value
9. Actual value
16
17
10. Units
11. Ination button
12. Digital pressure
gauge
13. - / + buttons
14. Handle
15. Hose
16. Schrader chuck
17. Sports needle
18. Inator nozzle
19. Presta valve
ASSEMBLY
Recharge only with the charger
cic charging instructions, read the operator’s
manual supplied with your charger and battery.
To remove the battery, push in the release buttons
and pull the battery pack away from the tool.
To insert the battery, slide the pack into the body
of the tool. Make sure it latches securely into place.
specied for the battery. For spe-
Removing/Inserting the Battery
Always remove the battery pack
any time the tool is not in use.
Only use accessories specically
may be hazardous.
Setting the Units (PSI, kPa, or BAR)
To select desired unit of pressure, press and hold
the units buttons. Repeat until the desired unit is
displayed (PSI, kPa, or BAR).
During extended use or constricted air ow, the tool
temperature may rise. If the Temperature Protection
Indicator comes on, allow the tool to cool at least
10 minutes before continuing. In extremely low temperatures, the Temperature Protection Indicator
may come on if the battery is too cold.
NOTICE: To avoid tool damage from overheating,
allow tool to cool for 40 minutes after each 20 minutes
of continuous use.
The inator will pause at the end of a ll for the pressure to stabilize and then check the system pressure.
After checking the system pressure, if the target PSI
has not been reached, it will continue to inate to
achieve the most accurate results.
The Auto Pressure Check feature may occur up to 5
times. Once the target PSI is achieved, the inator
will Auto Shut O to prevent overination.
If airow is constricted during use, the Overload
Protection Indicator may come on. Check all
connections for blockages before continuing use.
Accessories provided with the inator can be stored
on the back of the tool. The hose can be wrapped
around the storage area and secured in the hose
clamp.
recommended for this tool. Others
Temperature Protection
Auto Pressure Check Feature
Overload Protection
Accessories/Hose Storage
OPERATION
To reduce the risk of injury, always
to comply with ANSI Z87.1.
When working in dusty situations, wear appro-
priate respiratory protection or use an OSHA
compliant dust extraction solution.
Do not leave the tool unattended during operation.
Risk of Bursting. Do not overinate. Follow all
manufacturer's instructions for the item.
1. Place the tool on at surface.
2. Insert the proper accessory on the inator.
3. Attach the item to be inated.
• Always attach the inator to desired object before
starting ination.
• No accessory is needed for common car/truck
tire schrader valves.
• For car/truck tires, screw schrader chuck onto
tire valve and ensure it is tight.
4. Insert the battery pack.
5. To turn on, press the Power button. The tool
will detect the current air pressure of the item.
6. Use the and buttons to set the target pres-
sure, if desired. Press and hold or buttons
to set target pressure quicker.
NOTE: Setting target pressure is not recom-
mended when using the accessory nozzles.
wear proper eye protection marked
Using the Inator
4

NOTE: If the current pressure item to be inated
WARNING
WARNING
WARNING
is greater than the target pressure, the tool will not
begin ination.
7. To start, press the Ination button. The
minimum setting for the automatic stop feature is
10 PSI.
8. The tool will shut o automatically once the target
pressure has been reached.
NOTE: Ination may continue after Auto Pressure
Check Feature is engaged to hit the most accurate
results.
NOTICE: To avoid tool damage from overheating,
allow tool to cool for 40 minutes after each 20
minutes of continuous use.
9. To stop, press the Ination button or power
button.
NOTE: The tool will shut down after 5 minutes of
inactivity.
NOTE: The tool's cooling fan will run until the pump
head cools or the tool is turned o.
The inator can also be used to manually inate
items. When a target input value is not set, the
inator will show 0 PSI. Press and hold the ination
button until desired pressure is reached. When the
ination button is released, ination will stop. For
small inatables and bike tires it is recommended to
use manual inate mode for most accurate results.
NOTE: For anything under 10 PSI, manually inate
the item using the manual Inate mode.
To view memory settings, press the memory button
to navigate through memory slots M1 - M4. After
reaching memory slot M4, pressing the memory
button again will return to the homescreen.
To adjust memory settings:
1. Press the memory button to navigate to the desired
M1 - M4 memory slot.
2. Press or to adjust to the desired ination
value.
3. Press and hold the memory button for 2 seconds
to store the pressure in the current memory slot.
To inate to a saved memory setting:
1. Press the memory button to navigate to the de-
sired M1 - M4 memory slot.
2. Press the ination button.
NOTE: The actual value indicator will increase until
it reaches the saved memory value.
If pressure accuracy becomes poor or the inator's
actual value reads greater than zero when not con-
nected to any object, the pressure sensor may have
drifted due to altitude or other factors.
To re-zero:
With nothing connected to the inflator, hold
the and the Ination button for 3 seconds
to re-zero the pressure.
NOTE: This function will re-zero up to 5 PSI.
Insert needle or nozzle onto the inator. Attach to the
item. Be careful not to bend the accessory. Remove
after ination.
Use the Presta valve with Presta valve stems. Before
inating, loosen the locking nut on the valve stem.
Once ination is complete, tighten the locking nut to
seal the valve.
Sports Needle/Raft Nozzle
Manual Inate
Memory Settings
Troubleshooting
Presta Valve
MAINTENANCE
To reduce the risk of injury, always
battery pack from the charger or tool before
performing any maintenance. Never disassemble
the tool, battery pack or charger. Contact a
MILWAUKEE service facility for ALL repairs.
Keep your tool, battery pack and charger in good
repair by adopting a regular maintenance program.
Inspect your tool for issues such as undue noise,
misalignment or binding of moving parts, breakage of
parts, or any other condition that may aect the tool
operation. Return the tool, battery pack, and charger
to a MILWAUKEE service facility for repair. After six
months to one year, depending on use, return the
tool, battery pack and charger to a MILWAUKEE
service facility for inspection.
If the tool does not start or operate at full power with
a fully charged battery pack, clean the contacts on
the battery pack. If the tool still does not work properly, return the tool, charger and battery pack, to a
MILWAUKEE service facility for repairs.
your tool, battery pack or charger in liquid or
allow a liquid to ow inside them.
Clean dust and debris from any vents. Keep tool
clean, dry and free of oil or grease. Use only mild
soap and a damp cloth to clean, since certain cleaning agents and solvents are harmful to plastics and
other insulated parts. Some of these include gasoline,
turpentine, lacquer thinner, paint thinner, chlorinated
cleaning solvents, ammonia and household deter-
gents containing ammonia. Never use ammable or
combustible solvents around tools.
For repairs, return the tool, battery pack and charger
to the nearest authorized service center.
unplug the charger and remove the
Maintaining Tool
To reduce the risk of personal injury and damage, never immerse
Cleaning
Repairs
ACCESSORIES
Use only recommended accesso-
For a complete listing of accessories, go online to
www.milwaukeetool.com or contact a distributor.
ries. Others may be hazardous.
SERVICE - UNITED STATES
1-800-SAWDUST (1.800.729.3878)
Monday-Friday, 7:00 AM - 6:30 PM CST
or visit www.milwaukeetool.com
Contact Corporate After Sales Service Technical
Support with technical, service/repair, or warranty
questions.
Email: metproductsupport@milwaukeetool.com
Become a Heavy Duty Club Member at
www.milwaukeetool.com to receive important
notications regarding your tool purchases.
SERVICE - CANADA
Milwaukee Tool (Canada) Ltd
Monday-Friday, 7:00 AM - 4:30 PM CST
5
1.877.948.2360
or visit www.milwaukeetool.ca

LIMITED WARRANTY
AVERTISSEMENT
This MILWAUKEE power tool* is warranted to the original purchaser
from an authorized MILWAUKEE distributor only to be free from
defects in material and workmanship. Subject to certain exceptions,
MILWAUKEE will repair or replace any part on this power tool which,
after examination, is determined by MILWAUKEE to be defective
in material or workmanship for a period of ve (5) years after the
date of purchase unless otherwise noted. Return of the power tool
to a MILWAUKEE factory Service Center location or MILWAUKEE
Authorized Service Station, freight prepaid and insured, is required.
A copy of the proof of purchase should be included with the return
product. This warranty does not apply to damage that MILWAUKEE
determines to be from repairs made or attempted by anyone other
than MILWAUKEE authorized personnel, misuse, alterations, abuse,
normal wear and tear, lack of maintenance, or accidents.
Normal Wear: Many power tools need periodic parts replacement and
service to achieve best performance. This warranty does not cover
repair when normal use has exhausted the life of a part including,
but not limited to, chucks, brushes, cords, saw shoes, blade clamps,
o-rings, seals, bumpers, driver blades, pistons, strikers, lifters, and
bumper cover washers.
*This warranty does not cover battery packs or all power tools. Refer
to the separate and distinct warranties available for those products.
The warranty period for the LED in the LED Work Light (49-24-0171)
and the LED Upgrade Bulb (49-81-0090) is the lifetime of the product
subject to the limitations above. If during normal use the LED or LED
Upgrade Bulb fails, the part will be replaced free of charge.
Warranty Registration is not necessary to obtain the applicable war-
ranty on a MILWAUKEE power tool product. The manufacturing date
of the product will be used to determine the warranty period if no proof
of purchase is provided at the time warranty service is requested.
ACCEPTANCE OF THE EXCLUSIVE REPAIR AND REPLACEMENT
REMEDIES DESCRIBED HEREIN IS A CONDITION OF THE CONTRACT FOR THE PURCHASE OF EVERY MILWAUKEE PRODUCT.
IF YOU DO NOT AGREE TO THIS CONDITION, YOU SHOULD NOT
PURCHASE THE PRODUCT. IN NO EVENT SHALL MILWAUKEE BE
LIABLE FOR ANY INCIDENTAL, SPECIAL, CONSEQUENTIAL, OR
PUNITIVE DAMAGES, OR FOR ANY COSTS, ATTORNEY FEES,
EXPENSES, LOSSES OR DELAYS ALLEGED TO BE AS A CONSEQUENCE OF ANY DAMAGE TO, FAILURE OF, OR DEFECT IN
ANY PRODUCT INCLUDING, BUT NOT LIMITED TO, ANY CLAIMS
FOR LOSS OF PROFITS. SOME STATES DO NOT ALLOW THE EXCLUSION OR LIMITATION OF INCIDENTAL OR CONSEQUENTIAL
DAMAGES, SO THE ABOVE LIMITATION OR EXCLUSION MAY NOT
APPLY TO YOU. THIS WARRANTY IS EXCLUSIVE AND IN LIEU
OF ALL OTHER EXPRESS WARRANTIES, WRITTEN OR ORAL.
TO THE EXTENT PERMITTED BY LAW, MILWAUKEE DISCLAIMS
ANY IMPLIED WARRANTIES, INCLUDING WITHOUT LIMITATION
ANY IMPLIED WARRANTY OF MERCHANTABILITY OR FITNESS
FOR A PARTICULAR USE OR PURPOSE; TO THE EXTENT SUCH
DISCLAIMER IS NOT PERMITTED BY LAW, SUCH IMPLIED WARRANTIES ARE LIMITED TO THE DURATION OF THE APPLICABLE
EXPRESS WARRANTY AS DESCRIBED ABOVE. SOME STATES
DO NOT ALLOW LIMITATIONS ON HOW LONG AN IMPLIED WARRANTY LASTS, SO THE ABOVE LIMITATION MAY NOT APPLY TO
YOU, THIS WARRANTY GIVES YOU SPECIFIC LEGAL RIGHTS,
AND YOU MAY ALSO HAVE OTHER RIGHTS WHICH VARY FROM
STATE TO STATE.
This warranty applies to product sold in the U.S.A. and Canada only.
Please consult the ‘Service Center Search’ in the Parts & Service sec-
tion of MILWAUKEE’s website www.milwaukeetool.com or call 1.800.
SAWDUST (1.800.729.3878) to locate your nearest service facility
for warranty and non-warranty service on a MILWAUKEE power tool.
USA & CANADA
RÈGLES DE SÉCURITÉ GÉNÉRALES
RELATIVES AUX OUTILS ÉLECTRIQUES
Lire toutes les consignes
de sécurité, consignes,
illustrations et spécications fournies avec cet
outil électrique. Ne pas suivre l’ensemble des règles
et instructions peut entraîner une électrocution, un
incendie ou des blessures graves. Conserver les
règles et les instructions à des ns de référence
ultérieure. Le terme «outil électrique» gurant dans
les avertissements ci-dessous renvoie à l’outil électrique à alimentation par le réseau (à cordon) ou par
batterie (sans l).
SÉCURITÉ DU LIEU DE TRAVAIL
• Veillez à ce que l’aire de travail soit propre et
bien éclairée. Le désordre et le manque de lumière
favorisent les accidents.
• Ne pas utiliser d’outils électriques dans des at-
mosphères explosives, par exemple en présence
de liquides, gaz ou poussières inammables. Les
outils électriques produisent des étincelles risquant
d'enammer les poussières ou vapeurs.
• S’assurer que les enfants et les curieux se trou-
vent à une bonne distance au moment d’utiliser
un outil électrique. Les distractions peuvent causer
une perte de contrôle.
SÉCURITÉ ÉLECTRIQUE
• Les ches des outils électriques doivent cor-
respondre à la prise secteur utilisée. Ne jamais
modier la che, de quelque façon que ce soit.
Ne jamais utiliser d'adaptateurs de che avec
des outils mis à la terre. Les ches et prises non
modiées réduisent le risque de choc électrique.
• Éviter tout contact avec des surfaces mises à
la terre comme des tuyaux, des radiateurs, des
cuisinières et des réfrigérateurs. Le risque de
choc électrique est accru lorsque le corps est mis
à la terre.
• Ne pas exposer les outils électriques à l'eau ou
l'humidité. La pénétration d’eau dans ces outils
accroît le risque de choc électrique.
• Ne pas maltraiter le cordon d'alimentation.
Ne jamais utiliser le cordon d’alimentation
pour transporter l’outil électrique et ne jamais
débrancher ce dernier en tirant sur le cordon.
Garder le cordon à l'écart de la chaleur, de
l'huile, des objets tranchants et des pièces en
mouvement. Un cordon endommagé ou emmêlé
accroît le risque de choc électrique.
• Pour les travaux à l’extérieur, utiliser un cordon
spécialement conçu à cet eet. Utiliser un cordon
conçu pour l'usage extérieur réduit les risques de
choc électrique.
• Si l’utilisation d’un outil électrique est inévitable
dans un endroit humide, utiliser une source
d’alimentation munie d’un disjoncteur de fuite
de terre. L’utilisation d’un disjoncteur de fuite de
terre réduit le risque de choc électrique.
SÉCURITÉ INDIVIDUELLE
• Rester attentif, prêter attention au travail et faire
preuve de bon sens lors de l'utilisation de tout
outil électrique. Ne pas utiliser cet appareil en
cas de fatigue ou sous l’inuence de l’alcool,
de drogues ou de médicaments. Un moment
d’inattention pendant l’utilisation d’un outil électrique
peut entraîner des blessures graves.
6

• Porter l’équipement de protection individuel
requis. Toujours porter une protection oculaire.
Selon les conditions, porter aussi un masque anti-
poussières, des bottes de sécurité antidérapantes,
un casque protecteur ou une protection auditive an
de réduire les blessures.
• Empêcher les démarrages accidentels. S’assurer
que la gâchette est en position d’arrêt avant de
brancher l’outil à une source de courant, d’insérer
la batterie, de le ramasser ou de le transporter.
Le fait de transporter un outil électrique en gardant
le doigt sur la gâchette ou de mettre sous tension
un outil électrique lorsque la gâchette est en position
de marche favorise les accidents.
• Retirer les clés de réglage avant de mettre l’outil
en marche. Une clé laissée sur une pièce rotative
de l’outil peut causer des blessures.
• Ne pas travailler hors de portée. Toujours se tenir
bien campé et en équilibre. Une bonne stabilité
procure un meilleur contrôle de l’outil électrique en
cas d’imprévus.
• Porter une tenue appropriée. Ne porter ni vêtements amples, ni bijoux. Garder les cheveux et
les vêtements à l’écart des pièces en mouvement.
Les vêtements ottants, les bijoux ou les cheveux
longs risquent d’être happés par les pièces en
mouvement.
• Si les outils sont équipés de dispositifs de
dépoussiérage, s'assurer qu'ils sont connectés
et correctement utilisés. L’utilisation d’un collecteur
de poussière permet de réduire les dangers liés à
la poussière.
• Ne pas laisser la familiarité avec l'outil acquise
par une utilisation fréquente vous rendre susant
et vous amener à ignorer les règles de sécurité.
Une utilisation négligée peut causer une blessure
grave en une fraction de seconde.
UTILISATION ET ENTRETIEN
DE L’OUTIL ÉLECTRIQUE
• Ne pas forcer l'outil électrique. Utiliser l'outil
électrique approprié pour l'application. Un outil
électrique approprié exécutera le travail mieux et
de façon moins dangereuse s’il est utilisé dans les
limites prévues.
• Ne pas utiliser l'outil électrique si le commutateur
ne permet pas de le mettre en marche ou de
l'arrêter. Tout outil électrique qui ne peut pas être
contrôlé par son commutateur est dangereux et doit
être réparé.
• Débrancher l'outil et/ou retirer le bloc-piles, si
possible, avant d’eectuer des réglages, de
changer d’accessoire ou de remiser l’outil. Ces
mesures de sécurité préventives réduisent les risques
de démarrage accidentel de l'outil.
• Entreposer l’outil électrique hors de la portée des
enfants et interdire à quiconque de l’utiliser si la
personne ne connaît pas bien le produit ou les
instructions. Les outils électriques sont dangereux
dans les mains d’utilisateurs novices.
• Entretenir les outils électriques et les accessoires. Vérier qu'aucune pièce mobile n'est mal
alignée ou bloquée, qu'aucune pièce n'est brisée
et s'assurer qu'aucun autre problème risque
d'aecter le bon fonctionnement de l'outil. En
cas de dommages, faire réparer l’outil avant de
l’utiliser. Plusieurs accidents sont causés par des
produits mal entretenus.
• Garder les outils bien aûtés et propres. Des
outils correctement entretenus et dont les tranchants
sont bien aûtés risquent moins de se bloquer et
sont plus faciles à contrôler.
• Utiliser l’outil électrique, les accessoires, les
embouts etc. conformément à ces instructions
en tenant compte des conditions de travail et de
la tâche à eectuer. L'usage d'un outil électrique
pour des applications pour lesquelles il n'est pas
conçu peut être dangereux.
• Garder les poignées et les surfaces de préhension sèches, propres et exemptes d’huile ou de
graisse. Des poignées et des surfaces de préhension
glissantes ne permettent pas de manipuler et de
contrôler l'outil en toute sécurité en cas de situation
imprévue.
UTILISATION ET ENTRETIEN
DE LA BATTERIE
• Pour recharger le bloc-piles, utiliser seulement
le chargeur spécié par le fabricant. Un chargeur
pouvant convenir à un type de bloc-piles peut
entraîner un risque d’incendie lorsqu’il est utilisé
avec un autre type de bloc-piles.
• N’utiliser l’outil électrique qu’avec une batterie
recommandée. L’utilisation de tout autre bloc-piles
peut créer un risque de blessures et d’incendie.
• Lorsque le bloc-piles n’est pas utilisé, le tenir
éloigné des objets en métal tels que les trombones, les pièces de monnaie, les clés, les clous,
les vis ou d’autres petits objets métalliques qui
pourraient connecter les bornes. Le court-circuitage
des bornes d’une pile peut entraîner des brûlures
ou un incendie.
• Éviter tout contact avec le liquide pouvant être
éjecté de la pile en cas de manutention abusive. En
cas de contact accidentel, rincer immédiatement
les parties atteintes avec de l’eau. Si le liquide
entre en contact avec les yeux, consulter un
médecin. Le liquide éjecté des piles peut causer
des irritations ou des brûlures.
• N’utiliser aucun bloc-piles ni aucun outil ayant été
endommagé ou modié. Des piles endommagées
ou modiées peuvent adopter un comportement
imprévisible pouvant causer un incendie, une
explosion ou le risque de blessures.
• Ne pas exposer le bloc-piles ou l’outil aux ammes
ou à une température excessive. Une exposition
aux ammes ou à une température supérieure à
130°C (265°F) peut causer une explosion.
• Suivre toutes les instructions de charge et ne
pas charger le bloc-piles ou l’outil en dehors de
la plage de température spéciée. Une charge
incorrecte ou à des températures en dehors de la
plage spéciée peut endommager la pile et augmenter
le risque d’incendie.
ENTRETIEN
• Les réparations de l’outil électrique doivent
être conées à un technicien qualié, utilisant
exclusivement des pièces identiques à celles
d’origine. Le maintien de la sûreté de l’outil électrique
sera ainsi assuré.
• Ne jamais eectuer la réparation d’un bloc-piles
endommagé. La réparation du bloc-piles doit être
réalisée par le fabricant ou les fournisseurs de service
agréés uniquement.
7

RÈGLES DE SÉCURITÉ
ATTENTION
AVERTISSEMENT
AVERTISSEMENT
SPÉCIFIQUES POUR GONFLEUR
• Ne pas utiliser cet outil à d’autres ns que le
gonage d’articles tels que les pneus des automobiles, les pneus de bicyclettes, les pneus
d’équipement de jardin, l’équipement sportif,
les lits pneumatiques, les jouets de plage et
d’autres articles gonflables. L’utilisation de
l’outil pour d’autres opérations pour lesquelles il
n’a pas été conçu peut entraîner des situations
dangereuses. NE PAS utiliser cet outil pour remplir
des réservoirs ou des amortisseurs à air. NE PAS
utiliser cet outil en tant qu’appareil respiratoire. NE
PAS utiliser cet outil pour pulvériser des produits
chimiques.
• Ne pas laisser l’outil sans surveillance pendant
son opération.
•
du fabricant et le goner correctement. Goner
certains types de pneus et des roues exige une
formation particulière ainsi que des appareils de
séparation / des barrières. Ne pas régler l’outil pour
obtenir une pression de sortie supérieure à la pres-
sion maximale nominale de l’article à goner. Ne
pas utiliser une pression de plus de 150 PSI.
• Utiliser uniquement les accessoires pour le
goneur MILWAUKEE. En utiliser d’autres pourra
poser un danger.
• Ne jamais bloquer ou brancher la prise d’air
durant une opération.
• Ne jamais transporter l’outil par le exible d’air.
Des dommages pourront survenir.
• Vérier, avant chaque usage, le exible d’air pour
savoir s’il a des dommages ou de l’usure. Vérier que tous les raccords des accessoires soient
fermes. Réparer toutes les pièces endommagées
avant d’utiliser l’outil. Pour TOUTE réparation, contacter un centre de service MILWAUKEE.
• REMARQUE : An d’éviter que l’outil subisse des
dommages causés par la surchaue, laisser refroidir l’outil pendant 40 minutes après toutes les 20
minutes d’utilisation continue.
•
travaux sont faits dans de situations poussiéreuses, porter une protection respiratoire ou
bien, utiliser une solution d'extraction de
poussière conforme aux normes OSHA.
• Toujours faire preuve de bons sens et procéder
avec prudence lors de l’utilisation d’outils. C’est
impossible de prévoir toutes les situations dont le
résultat est dangereux. Ne pas utiliser cet outil si vous
ne comprenez pas ces instructions d’opération ou si
vous pensez que le travail dépasse votre capacité ;
veuillez contacter Milwaukee Tool ou un professionnel
formé pour recevoir plus d’information ou formation.
• Maintenir en l’état les étiquettes et les plaques
d’identication.Des informations importantes y
gurent. Si elles sont illisibles ou manquantes,
contacter un centre de services et d’entretien
MILWAUKEE pour un remplacement gratuit.
•
ponçage, de coupe, de rectication, de perforage
et d’autres activités de construction contiennent des
substances considérées être la cause de malformations congénitales et de troubles de l’appareil repro-
ducteur. Parmi ces substances gurent:
Risque d’éclatement. Toujours
veiller à suivre les instructions
An de minimiser le risque
de blessures, lorsque de
Certaines poussières générées par les activités de
• le plomb contenu dans les peintures à base de
plomb;
• la silice cristalline des briques, du ciment et d’autres
matériaux de maçonnerie, ainsi que
• l’arsenic et le chrome des sciages traités chimiquement.
Les risques encourus par l’opérateur envers ces
expositions varient en fonction de la fréquence de
ce type de travail. Pour réduire l’exposition à ces
substances chimiques, l’opérateur doit: travailler
dans une zone bien ventilée et porter l’équipement de
sécurité approprié, tel qu’un masque anti-poussière
spécialement conçu pour filtrer les particules
microscopiques.
DESCRIPTION FONCTIONNELLE
9
16
17
numérique
gonage
14
8
10
11
12
13
15
6
5
4
3
2
1
19
18
1. Touche « mémoire »
2. Voyant de surcharge
3. Bouton unités
4. Bouton d’alimentation
5. Voyant de protection
de température
6. Indicateur de pression
cible achevée
7. Gonage manuel
8. Valeur d’entrée cible
9. Valeur réelle
10. Unités
8
7
UNITS
MEMORY
11. Touche de gonage
12. Manomètre
13. Touches - / +
14. Poignée
15. Flexible
16. Mandrin Schrader
17. Aiguille sportive
18. Embout de
19. Soupape presta

PICTOGRAPHIE
C
US
AVERTISSEMENT
AVERTISSEMENT
AVERTISSEMENT
AVERTISSEMENT
Volts
Courant direct
Lire le manuel d’utilisation
Réglage de pression
Marche / Arrêt
Goner
et États-unis
UL Listing Mark pour Canada
SPÉCIFICATIONS
No de Cat. ................................................. 2848-20
Volts.............................................................. 18 CD
Type de batterie ...........................................M18™
Type de chargeur ........................................M18™
Pression maximale .. 150 PSI, 10,3 BAR, 1030 kPa
Sortie .................................... 1,41 SCFM @ 0 PSI
Température ambiante de fonctionnement
recommandée ........... -18°C à 50°C (0°F à 125°F)
1,10 SCFM @ 35 PSI
MONTAGE DE L'OUTIL
Ne recharger la batterie
é. Pour les instructions de charge spéciques,
lire le manuel d’utilisation fourni avec le chargeur
et les batteries.
Insertion/Retrait de la batterie
Pour retirer la batterie, enfoncer les boutons de
déverrouillage et la tirer hors de l’outil.
terie les fois que l’outil est inutilisé.
Pour insérer la batterie, la glisser dans le corps de
l’outil. S’assurer qu’elle est xée solidement.
utilisé.
Réglage des unités (PSI, BAR ou kPa)
Pour sélectionner l’unité de pression désirée, ap-
puyer, sans relâcher, sur les touches d’unités.
Répéter cette étape jusqu’à ce que l’unité désirée
s’ache (PSI, kPa ou BAR).
Durant une utilisation étendue ou un débit d’air limité, il se peut que la température de l’outil soit plus
haute. Si le voyant de protection de température
s’active, il faudra laisser refroidir l’outil pour une
période d’au moins 10 minutes avant de reprendre
la tâche. Dans des températures extrêmement
basses, il se peut que le voyant de protection de
température s’active si la batterie est trop froide.
AVIS : An d’éviter que l’outil subisse des dommages
causés par la surchaue, laisser refroidir l’outil pendant
40 minutes après toutes les 20 minutes d’utilisation
continue.
Protection de température
qu’avec le chargeur spéci-
Toujours verrouiller la
détente ou retirer la bat-
Toujours retirer la batterie
les fois que l’outil est in-
Fonction de vérication automatique de
Le goneur prendra une pause à la n d’une tâche
de gonage pour que la pression devienne stable.
Ensuite, le goneur vériera la pression dans le
système.
Une fois vériée la pression dans le système, si le
PSI cible n’est pas encore achevé, l’outil continuera
à goner pour obtenir les résultats les plus précis.
La fonction de vérication automatique de pression
pourra s’engager jusqu’à 5 fois. Une fois achevé le
PSI cible, le goneur s’arrêtera automatiquement
an d’éviter un surgonage.
Si le débit d’air est limité durant l’utilisation, il se peut
que le voyant de protection contre la surcharge
s’active. Vérier toutes les connexions à la recherche
d’obstructions avant de continuer.
Il est possible de ranger les accessoires qui com-
porte le goneur dans le dos de l’outil. Il est possible
d’enrouler le exible autour de l’espace de rangement, en le xant sur le collier pour exible.
Protection contre la surcharge
Rangement du exible / des accessoires
pression
MANIEMENT
An de minimiser le risque
porter la protection oculaire appropriée certiée
conforme à la norme ANSI Z87.1.
Lorsque de travaux sont faits dans de situations
poussiéreuses, porter une protection respiratoire
ou bien, utiliser une solution d'extraction de
poussière conforme aux normes OSHA.
Ne pas laisser l’outil sans surveillance pendant
son opération. Risque d’éclatement. Ne pas surgoner. Suivre toutes les consignes indiquées
par le fabricant sur cet article.
1. Poser l’outil sur une surface plate.
2. Insérer l’accessoire correspondant sur le goneur.
3. Fixer l’article à goner.
• Toujours relier le goneur à l’objet avant de com-
• Aucun accessoire n’est nécessaire pour les
• Pour les pneus de camion/voiture, visser le
4. Insérer le bloc-piles.
5. Pour l’allumer, appuyer sur le bouton
d’alimentation. L’outil détectera la pression actuelle de débit d’air de l’article.
6. Utiliser les touches et pour régler la pres-
sion cible, si désiré. Appuyer, sans relâcher, sur
les touches + et - pour régler la pression
cible plusvite.
REMARQUE: Il est déconseillé de régler a pres-
sion cible lors de l’utilisation des embouts pour
des accessoires.
REMARQUE : Si la pression actuelle de l’article à
goner est plus haute que la pression cible, l’outil
ne gonera pas.
7. Pour commencer, appuyer sur la touche de
gonage. Pour changer la vitesse de gonage pour
qu’elle soit plus puissante ou plus faible, il faut
appuyer sur l’option « Vitesse de remplissage ».
9
Utilisation du goneur
mencer la tâche de gonage.
soupapes Schrader des pneus conventionnels
de camion / voiture.
mandrin Schrader à la soupape pour pneus et
veuillez s’assurer qu’il soit bien serré.
de blessures, toujours

Le réglage minimal pour la fonction d’arrêt au-
AVERTISSEMENT
AVERTISSEMENT
AVERTISSEMENT
tomatique est de 10 PSI.
8. L'outil s’arrête automatiquement lorsque la pression cible est atteinte.
REMARQUE : Le gonage pourra continuer même
après l’activation de la fonction de vérication
automatique de pression, ceci pour obtenir les
résultats les plus précis.
AVIS
: An d’éviter que l’outil subisse des dommages causés par la surchaue, laisser refroidir
l’outil pendant 40 minutes après toutes les 20
minutes d’utilisation continue.
9. Pour arrêter, appuyer sur la touche de gon-
age ou le bouton d’alimentation.
REMARQUE : L’outil s’arrêtera après 5 minutes
d’inactivité.
REMARQUE : Le ventilateur de refroidissement de
l’outil s’activera jusqu’à ce que la tête de pompage
se refroidisse ou l’outil s’arrête.
Il est possible d’utiliser le goneur manuellement
pour goner des articles. Si la valeur d’entrée cible
n’aura pas été préétablie, le goneur achera 0 PSI.
Appuyer, sans relâcher, sur la touche de gonage
jusqu’à achever la pression désirée. Quand la touche
de gonage aura été relâchée, le gonage s’arrêtera.
Pour les petits pneumatiques et les pneus de vélo, il
est recommandé d’utiliser le mode gonage manuel
pour des résultats plus précis.
REMARQUE : Pour tout ce qui est en dessous de
10 PSI, goner manuellement l’élément à l’aide du
mode gonage manuel.
Pour visualiser les paramètres de mémoire, appuyer
sur la touche « Mémoire » pour faire déler les emplacements mémoire M1 à M4. Une fois visualisé
l’emplacement mémoire M4, vous reviendrez à
l’écran d’accueil après avoir appuyée à nouveau sur
la touche « Mémoire ».
Pour régler les paramètres de mémoire :
1. Appuyer sur la touche « Mémoire » pour faire
déler l’emplacement mémoire M1 à M4 désiré.
2. Appuyer sur les touches + ou - pour ajuster la
valeur de gonage désirée.
3. Appuyer, sans relâcher, la touche « Mémoire »
durant 2 secondes pour enregistrer la pression
dans l’emplacement mémoire actuel.
Pour goner d’après le paramètre de mémoire
enregistré :
1. Appuyer sur la touche « Mémoire » pour faire
déler l’emplacement mémoire M1 à M4 désiré.
2. Appuyer sur la touche de gonage.
REMARQUE : L’indicateur de la valeur réelle
augmentera jusqu’à achever la valeur mémoire
enregistrée.
Si la précision de pression devient pauvre ou la
valeur réelle du goneur se lit plus haute que zéro
lorsqu’il n’est pas connecté à un article, il est possible
que le détecteur de la pression puisse avoir subi une
déviation à cause de l’altitude ou d’autres facteurs.
Pour le remettre à zéro :
Quand rien n’est connecté au goneur, appuyer, sans
relâcher, sur la touche - et la touche de gonage
durant 3 secondes pour remettre la pression à zéro.
REMARQUE : Cette fonction se remettra à une
puissance de 5 PSI.
Gonage manuel
Paramètres de mémoire
Dépannage
Aiguille sportive / embout pour radeaux
Insérer l’aiguille ou l’embout sur le goneur. Relier à
l’article. Veiller à ne pas échir l’accessoire. Enlever
après le gonage.
Utiliser la soupape Presta à l'aide des tiges pour soupape Presta. Avant de procéder à goner un article,
desserrer l’écrou de verrouillage qui se trouve sur
la tige de la soupape. Une fois terminée la tâche de
gonage, serrer l’écrou de verrouillage pour fermer
la soupape en étanchéité.
Soupape Presta
ENTRETIEN
Pour minimiser les risques
débranchez le chargeur et retirez la batterie du
chargeur ou de l’outil avant d’y eectuer des
travaux d’entretien. Ne démontez jamais l’outil,
la batterie ou le chargeur. Pour toute réparation,
consultez un centre de service MILWAUKEE accrédité.
Gardez l’outil en bon état en adoptant un programme
d’entretien ponctuel. Inspectez votre outil pour des
questions telles que le bruit excessif, de grippage
des pièces mobiles, de pièces cassées ou toute
autre condition qui peut aecter le fonctionnement
de l'outil. Retournez votre outil à un centre de service
MILWAUKEE accrédité pour obtenir le service. Après
une période pouvant aller de 6 mois à un an, selon
l’usage, retournez votre outil à un centre de service
MILWAUKEE accrédité pour d'inspection.
Si l’outil ne démarre pas ou ne fonctionne pas à
pleine puissance alors qu’il est branché sur une
batterie complètement chargée, nettoyez les points
de contact entre la batterie et l’outil. Si l’outil ne
fonctionne toujours pas correctement, renvoyez
l’outil, le chargeur et la batterie à un centre de service
MILWAUKEE accrédité.
mages à l'outil, n'immergez jamais l'outil, la batterie ou le chargeur et ne laissez pas de liquide
s'y inltrer.
Débarrassez les tous évents des débris et de la pous-
sière. Gardez les outil propres, à sec et exemptes
d’huile ou de graisse. Le nettoyage doit se faire
avec un linge humide et un savon doux. Certains
nettoyants tels l’essence, la térébenthine, les diluants à laque ou à peinture, les solvants chlorés,
l’ammoniaque et les détergents d’usage domestique
qui en contiennent pourraient détériorer le plastique
et l’isolation des pièces. Ne laissez jamais de solvants
inammables ou combustibles auprès des outils.
Pour les réparations, retournez outil, batterie et chargeur
en entier au centre-service autorisé le plus près.
Entretien de l’outil
de blessures corporelles,
Pour minimiser les risques
de blessures ou de dom-
Nettoyage
Réparations
ACCESOIRES
L’utilisation d’autres ac-
sont spécifiquement recommandés pour cet
outil peut comporter des risques.
Pour une liste complète des accessoires, visiter le
site internet www.milwaukeetool.com ou contactez
un distributeur.
10
cessoires que ceux qui

SERVICE - CANADA
ADVERTENCIA
Milwaukee Tool (Canada) Ltd
1.877.948.2360
Monday-Friday, 7:00 AM - 4:30 PM CST
www.milwaukeetool.ca
GARANTIE LIMITÉE -
AUX ÉTATS-UNIS ET AU CANADA
Cet outil électrique MILWAUKEE* est garanti à l’acheteur d’origine
uniquement par un distributeur agréé de MILWAUKEE d’être exempt
de vice du matériau et de fabrication. Sous réserve de certaines
exceptions, MILWAUKEE réparera ou remplacera toute pièce de cet
outil électrique qui, après examen par MILWAUKEE, est aectée d’un
vice de matériau ou de fabrication pendant une période de cinq (5) ans
après la date d’achat, sauf indication contraire. Il faudra retourner l’outil
électrique à un centre de service en usine MILWAUKEE ou à un poste
d’entretien agréé MILWAUKEE, en port prépayé et assuré. Une copie
de la preuve d’achat doit être présentée lors du retour du produit. Cette
garantie ne couvre pas les dommages que MILWAUKEE détermine
d’être causés par des réparations ou des tentatives de réparation
par quiconque d’autre que le personnel agréé par MILWAUKEE, des
utilisations incorrectes, des altérations, des utilisations abusives, une
usure normale, une carence d’entretien ou les accidents.
Usure normale : Par rapport à plusieurs outils électriques, il faut
remplacer et entretenir leurs pièces an de jouir de leur rendement
optimal. Cette garantie ne couvre pas les cas de réparation lorsque la
vie utile normale de la pièce s’est terminée, incluant, sans s’y limiter, les
mandrins, les balais, les câbles, les patins de scie, les brides de lame,
les joints toriques, les embouts, les butoirs, les lames d’entraînement,
les pistons, les percuteurs, les poussoirs et les rondelles de protec-
tion de butoir.
*Cette garantie ne couvre ni les blocs-piles ni tous les outils électriques.
Veuillez vous reporter aux autres garanties diérentes disponibles
pour ces produits.
La période durant lequel la garantie est valable pour la lumière à DEL
de la lampe de travail à DEL (49-24-0171) et l’ampoule transformée
à DEL (49-81-0090) est d’une durée égale à la vie utile du produit
en raison des limites au-dessus. Si la lumière à DEL ou l’ampoule
transformée à DEL tombent en panne durant l’utilisation normale, la
pièce sera remplacée gratuitement.
L’inscription de la garantie n’est pas nécessaire pour bénécier de
la garantie en vigueur d’un outil électrique MILWAUKEE. La date
de fabrication du produit servira à établir la période de garantie si
aucune preuve d’achat n’est fournie lorsqu’une demande de service
sous garantie est faite.
L’ACCEPTATION DES RECOURS EXCLUSIFS DE RÉPARATION ET
DE REMPLACEMENT DÉCRITS PAR LA PRÉSENTE EST UNE CONDITION DU CONTRAT D’ACHAT DE TOUT PRODUIT MILWAUKEE.
SI VOUS N’ACCEPTEZ PAS CETTE CONDITION, VOUS NE DEVEZ
PAS ACHETER LE PRODUIT. EN AUCUN CAS MILWAUKEE NE
SAURAIT ÊTRE RESPONSABLE DE TOUT DOMMAGE ACCESSOIRE, SPÉCIAL OU INDIRECT, DE DOMMAGES-INTÉRÊTS
PUNITIFS OU DE TOUTE DÉPENSE, D’HONORAIRES D’AVOCATS,
DE FRAIS, DE PERTE OU DE DÉLAIS ACCESSOIRES À TOUT
DOMMAGE, DÉFAILLANCE OU DÉFAUT DE TOUT PRODUIT, Y
COMPRIS NOTAMMENT LES PERTES DE PROFIT. CERTAINS
ÉTATS ET PROVINCES NE PERMETTANT L'EXCLUSION OU LA
LIMITATION DES DOMMAGES DIRECTS OU INDIRECTS, LES
RESTRICTIONS CI-DESSOUS PEUVENT NE PAS ÊTRE APPLICABLES. CETTE GARANTIE EST EXCLUSIVE ET REMPLACE
TOUTE AUTRE GARANTIE EXPRESSE, QU’ELLE SOIT VERBALE
OU ÉCRITE. DANS LA MESURE PERMISE PAR LA LOI, MILWAUKEE
RENONCE À TOUTE GARANTIE IMPLICITE, Y COMPRIS, SANS
S’Y LIMITER, TOUTE GARANTIE IMPLICITE DE COMMERCIABILITÉ OU D’ADAPTATION À UNE UTILISATION OU À UNE FIN
PARTICULIÈRE. DANS LA MESURE OÙ UNE TELLE STIPULATION
D’EXONÉRATION N’EST PAS PERMISE PAR LA LOI, LA DURÉE
DE CES GARANTIES IMPLICITES EST LIMITÉE À LA PÉRIODE
APPLICABLE DE LA GARANTIE EXPRESSE, TELLE QUE CELA
EST DÉCRIT PRÉCÉDEMMENT. CERTAINES PROVINCES NE
PERMETTANT PAS DE LIMITATION DE DURÉE DES GARANTIES
IMPLICITES, LES RESTRICTIONS CI-DESSUS PEUVENT NE PAS
ÊTRE APPLICABLES. LA PRÉSENTE CONFÈRE À L’UTILISATEUR
DES DROITS LÉGAUX PARTICULIERS ; IL BÉNÉFICIE ÉGALEMENT
D’AUTRES DROITS QUI VARIENT D’UNE PROVINCE À L’AUTRE.
Cette garantie s’applique uniquement aux produits vendus aux États-
Unis et au Canada.
Veuillez consulter l’onglet « Trouver un centre Service », dans
la section « Pièces et service » du site web de MILWAUKEE, à
l’adresse www.milwaukeetool.com, ou composer le 1.800.SAWDUST
(1.800.729.3878) an de trouver le centre de service le plus proche
dans votre région pour l’entretien, sous garantie ou non, de votre outil
électrique MILWAUKEE.
ADVERTENCIAS DE SEGURIDAD
GENERALES PARA LA
HERRAMIENTA ELÉCTRICA
Lea todas las advertencias
ilustraciones y especicaciones con esta herramienta eléctrica. Si no sigue todas las adverten-
cias e instrucciones, se pueden provocar una des-
carga eléctrica, un incendio o lesiones graves. Guarde
todas las advertencias e instrucciones para
consultarlas en el futuro. El término “herramienta
eléctrica” en todas las advertencias incluidas más
abajo se reere a su herramienta operada por conexión (cable) a la red eléctrica o por medio de una
de seguridad, instrucciones,
batería (inalámbrica).
SEGURIDAD EN EL ÁREA
DE TRABAJO
• Mantenga el área de trabajo limpia y bien iluminada. Las áreas desordenadas u oscuras son
propicias para los accidentes.
• No utilice herramientas eléctricas en atmósferas
explosivas, tales como en presencia de líquidos,
gases o polvos inamables. Las herramientas
eléctricas generan chispas que pueden encender
el polvo o los vapores.
• Mantenga a los niños y a los espectadores ale-
jados mientras utiliza una herramienta eléctrica.
Las distracciones pueden ocasionar la pérdida de
control.
SEGURIDAD ELÉCTRICA
• Los enchufes de la herramienta eléctrica deben
coincidir con el tomacorriente. Nunca modique
el enchufe de ninguna manera. No utilice adap-
tadores de enchufe con herramientas eléctricas
aterrizadas. Los enchufes y tomacorrientes cor-
respondientes sin modicar reducirán el riesgo de
descarga eléctrica.
• Evite el contacto corporal con superficies
aterrizadas, tales como tuberías, radiadores,
estufas y refrigeradores. Existe un riesgo mayor
de descarga eléctrica si su cuerpo está aterrizado.
• No exponga las herramientas eléctricas a la lluvia
ni a condiciones húmedas. Si se introduce agua
en una herramienta eléctrica, aumentará el riesgo
de descarga eléctrica.
• No maltrate el cable. Nunca utilice el cable
para cargar, jalar o desconectar la herramienta
eléctrica. Mantenga el cable alejado del calor,
el aceite, los bordes alados o las partes en
movimiento. Los cables dañados o enredados
aumentan el riesgo de descarga eléctrica.
• Al utilizar una herramienta eléctrica en exteriores,
utilice una extensión adecuada para uso en exteri-
ores. El uso de una extensión adecuada para el uso en
exteriores disminuye el riesgo de descarga eléctrica.
• Si es inevitable utilizar una herramienta eléctrica
en un lugar húmedo, utilice un alimentador de
corriente protegido con un interruptor de circuito
por falla de conexión a tierra (GFCI). El uso de
un GFCI reduce el riesgo de descarga eléctrica.
SEGURIDAD PERSONAL
• Manténgase alerta, atento a lo que está haciendo y
utilice el sentido común al utilizar una herramienta
eléctrica. No utilice una herramienta eléctrica
mientras está cansado o bajo la inuencia de
drogas, alcohol o medicamentos. Un momento de
distracción al utilizar herramientas eléctricas puede
ocasionar lesiones personales graves.
11

• Utilice equipo de protección personal. Siempre
use protección para los ojos. El equipo de protec-
ción, tal como una máscara contra polvo, calzado
antideslizante, casco o protección auditiva, utilizado
para condiciones adecuadas disminuirá las lesiones
personales.
• Evite el arranque accidental. Asegúrese de que
el interruptor esté en la posición de apagado
antes de conectarlo a una fuente de poder y/o
batería, levantar o trasladar la herramienta.
Trasladar herramientas con el dedo en el interruptor
o energizar herramientas eléctricas que tienen el
interruptor encendido propicia accidentes.
• Retire cualquier llave de ajuste antes de entender
la herramienta. Una llave que se deje insertada en
una parte giratoria de la herramienta eléctrica puede
ocasionar lesiones personales.
• No estire el cuerpo demasiado. Mantenga un buen
contacto entre los pies y el suelo y mantenga el
equilibrio en todo momento. Esto permite un mejor
control de la herramienta eléctrica en situaciones
inesperadas.
• Vístase adecuadamente. No utilice ropa o joyería
holgada. Mantenga el cabello y la ropa alejados
de las partes móviles. La ropa holgada, las alhajas
o el cabello largo pueden quedarse atrapados en
las partes móviles.
• Si se proporcionan dispositivos para la conexión
de instalaciones de extracción y recolección de
polvo, cerciórese de que estén conectados y
se utilicen correctamente. El uso de dispositivos
recolectores de polvo puede disminuir los riesgos
relacionados con el polvo.
• No permita que la familiaridad por el uso frecuente
de las herramientas lo hagan sentirse seguro e
ignorar los principios de seguridad de las herramientas. Un descuido puede provocar lesiones
graves en una fracción de segundo.
USO Y CUIDADO DE LAS
HERRAMIENTAS ELÉCTRICAS
• No fuerce la herramienta eléctrica. Utilice la herramienta eléctrica correcta para su aplicación.
La herramienta eléctrica correcta realizará el trabajo
mejor y con mayor seguridad a la velocidad para la
que fue diseñada.
• No utilice la herramienta eléctrica si el interruptor
no la enciende y la apaga. Cualquier herramienta
eléctrica que no pueda controlarse con el interruptor
es peligrosa y debe repararse.
•Desconecte el enchufe de la fuente de energía
y/o quite la batería de la herramienta eléctrica,
si es posible, antes de realizar cualquier ajuste,
cambiar accesorios o almacenar las herramientas
eléctricas. Tales medidas preventivas de seguridad
disminuyen el riesgo de que la herramienta eléctrica
se encienda accidentalmente.
• Almacene las herramientas eléctricas que no se
estén utilizando fuera del alcance de los niños y no
permita que personas que no estén familiarizadas
con la herramienta eléctrica o con estas instruc-
ciones la utilicen. Las herramientas eléctricas son
peligrosas en manos de usuarios sin capacitación.
• Dé mantenimiento a las herramientas eléctricas
y accesorios. Verique que no haya desalineación, amarre de partes móviles, partes rotas
o alguna otra condición que pueda afectar el
funcionamiento de la herramienta eléctrica. Si se
daña, asegúrese de que la herramienta eléctrica
sea reparada antes de que se utilice. Muchos
accidentes son ocasionados por herramientas
eléctricas con mantenimiento deciente.
• Mantenga las herramientas de corte aladas y
limpias. Las herramientas de corte correctamente
mantenidas con bordes de corte alados son menos
propensas a atorarse y son más fáciles de controlar.
• Utilice la herramienta eléctrica, los accesorios
y las puntas, etc. de acuerdo con estas instrucciones, tomando en cuenta las condiciones
de trabajo y el trabajo a realizar. El uso de la
herramienta eléctrica para operaciones diferentes a
las previstas podría generar una situación peligrosa.
• Mantenga las empuñaduras y ñas supercies
de sujeción secas, limpias y libres de aceite y
grasa. Las empuñaduras y supercies de sujeción
resbalosas no permiten el manejo y control seguros
de la herramienta en situaciones inesperadas.
USO Y CUIDADO DE LAS
HERRAMIENTAS CON BATERÍA
• Recargue únicamente con el cargador espe-
cicado por el fabricante. Un cargador que es
adecuado para un tipo de batería puede crear un
riesgo de incendio si se utiliza con otra batería.
• Utilice las herramientas eléctricas únicamente
con baterías especícamente diseñadas. El uso
de cualquier otra batería puede producir un riesgo
de lesiones e incendio.
• Cuando la batería no esté en uso, manténgala
alejada de otros objetos metálicos como su-
jetapapeles, monedas, llaves, clavos, tornillos
u otros objetos metálicos pequeños que puedan
formar una conexión de una terminal a otra. Crear
un corto entre las terminales de la batería puede
ocasionar quemaduras o un incendio.
• Bajo condiciones de maltrato, el líquido puede
ser expulsado de la batería, evite el contacto. En
caso de contacto accidental, lave con agua. Si el
líquido entra en contacto con los ojos, busque
además ayuda médica. El líquido expulsado de la
batería puede causar irritación o quemaduras.
• No use una batería o herramienta que se haya
dañado o modicado. Las baterías dañadas o
modicadas pueden mostrar un comportamiento
impredecible, causando incendios, explosión o
riesgo de lesión.
• No exponga una batería o herramienta al fuego
o a temperatura excesiva. La exposición a fuego
o temperatura a más de 130° C (265° F) puede
causar explosiones.
• Siga todas las instrucciones de carga y no cargue
la batería o la herramienta fuera del rango de
temperatura especicado en las instrucciones.
La carga incorrecta o a temperaturas fuera del rango
especicado puede dañar la batería y aumentar el
riesgo de incendio.
MANTENIMIENTO
• Lleve su herramienta eléctrica a servicio con un
técnico calicado que use únicamente piezas
de reemplazo idénticas. Esto asegurará que la
seguridad de la herramienta eléctrica se mantenga.
• Nunca dé servicio a baterías dañadas. Únicamente
el fabricante o proveedores de servicio autorizados
deben dar servicio a las baterías.
REGLAS ESPECIFICAS DE
SEGURIDAD PARA INFLADOR
• No utilice esta herramienta para otros nes
distintos al inado de artículos como neumáticos de vehículos, neumáticos de bicicletas,
12

neumáticos de equipamiento de jardinería,
ATENCIÓN
ADVERTENCIA
ADVERTENCIA
equipamiento deportivo, colchones de aire,
juguetes de playa y otros artículos inables. El
uso de la herramienta para operaciones diferentes
a las previstas podría generar una situación pelig-
rosa. NO use esta herramienta para llenar tanques
de aire o amortiguadores. NO use esta herramienta
como dispositivo para respirar. NO use esta herramienta para rociar químicos.
• No deje la herramienta sin supervisión durante
la operación.
•
e ine el producto correctamente. El inado de
algunos tipos de neumáticos y de ruedas exige
contar con una formación especial así como dis-
positivos de contención / barreras. No congure la
herramienta a una presión de salida mayor a la
presión máxima marcada del artículo que se inará.
No utilice a una presión mayor de 150 psi.
• Use solamente con los accesorios del inador
MILWAUKEE. Utilizar otros accesorios podrá ser
peligroso.
• Nunca obstruya ni conecte la salida de aire
durante la operación.
• Nunca transporte la herramienta sujetándola por la
manguera de aire. Pueden ocurrir daños.
• Revise la manguera de aire para detectar si hay
desgaste o daños antes de cada uso. Revise que
todas las conexiones de los accesorios estén jas.
Repare todas las piezas dañadas antes de usar. Co-
muníquese con un centro de servicio MILWAUKEE
para TODAS las reparaciones.
• NOTA: Para evitar que la herramienta sufra daños
ocasionados por el sobrecalentamiento, permita
que la herramienta se enfríe durante 40 minutos
después de 20 minutos de uso continuo.
•
realizar trabajos en situaciones donde haya
presencia de polvo, utilice la protección respiratoria adecuada o utilice una solución de extracción de polvo que cumpla con los requisitos de
la OSHA.
• Válgase siempre de su sentido común y sea
cuidadoso cuando utilice herramientas. No es
posible anticipar todas las situaciones que podrían
tener un desenlace peligroso. No utilice esta herramienta si no entiende estas instrucciones de uso
o si considera que el trabajo a realizar supera sus
capacidades, comuníquese con Milwaukee Tool o con
un profesional capacitado para recibir capacitación
o información adicional.
• Conserve las etiquetas y las placas nominales.
Contienen información importante. Si son ilegibles o no
están presentes, comuníquese con un centro de servi-
cio MILWAUKEE para obtener un reemplazo gratuito.
•
pulido, taladrado y otras actividades de construcción
contienen químicos identicados como causantes
de cáncer, defectos congénitos u otros daños repro-
ductivos. Algunos ejemplos de estos químicos son:
• plomo de pintura basada en plomo
• dióxido de silicio de los ladrillos y el cemento y otros
productos de albañilería y
• arsénico y cromo de madera con tratamiento químico.
Su riesgo por estas exposiciones varía, dependiendo
de la frecuencia con que realice este tipo de trabajo.
Riesgo de estallido. Siempre siga
las instrucciones del fabricante
Para reducir el riesgo de
lesiones, al momento de
Algunos polvos generados por
el lijado eléctrico, aserrado,
Para reducir su exposición a estos químicos: trabaje
en un área bien ventilada y trabaje con equipo de
seguridad aprobado, como mascarillas protectoras
contra polvo especialmente diseñadas para ltrar
partículas microscópicas.
DESCRIPCION FUNCIONAL
9
6
7
8
10
5
4
3
UNITS
MEMORY
2
1
11
12
13
15
14
19
18
16
1. Botón de memoria
2. Indicador de sobrecarga
3. Memoria
4. Botón de encendido
5. Indicador de protección
de temperatura
6. Indicador de presión
objetivo alcanzada
7. Inado manual
8. Valor de entrada de
objetivo
9. Valor real
17
10. Unidades
11. Botón de inado
12. Manómetro digital
13. Botones de - / +
14. Empuñadura
15. Manguera
16. Mandril Schrader
17. Aguja deportiva
18. Boquilla de inado
19. Válvula presta
ESPECIFICACIONES
Cat. No.. .................................................... 2848-20
Presión máxima .......150 PSI, 10,3 BAR, 1030 kPa
Potencia ................................ 1,41 SCFM @ 0 PSI
Volts.............................................................. 18 CD
Tipo de batería .............................................M18™
Tipo de cargador ..........................................M18™
Temperatura ambiente recomendada
para operar ................-18°C a 50°C (0°F a 125°F)
1,10 SCFM @ 35 PSI
13

SIMBOLOGÍA
C
US
ADVERTENCIA
ADVERTENCIA
ADVERTENCIA
ADVERTENCIA
Volts
Corriente continua
Leer el manual del operador
Ajuste de presión
Encendido/apagado
Inar
Canadá y Estados Unidos
UL Listing Mark para
ENSAMBLAJE
Recargue la batería sólo con
para ella. Para instrucciones especícas sobre
cómo cargar, lea el manual del operador suministrado con su cargador y la batería.
Como se inserta/quita la batería en la
Para retirar la batería, presione los botones de
liberación y jale de la batería para sacarla de la
herramienta.
no esté en uso.
Para introducir la batería, deslícela en el cuerpo de
la herramienta. Asegúrese de que quede bien rme
en su posición.
mendados para esta herramienta. El uso de accesorios no recomendados podría resultar
peligroso.
Para seleccionar la unidad de presión deseada,
mantenga presionados los botones de las unidades.
Repita este paso hasta que se muestre la unidad
deseada (PSI, kPa o BAR).
Durante el uso prolongado o un ujo de aire limitado,
puede aumentar la temperatura de la herramienta. Si
se enciende el indicador de protección de temperatura, permita que la herramienta se enfríe durante,
al menos, 10 minutos antes de continuar. En temperaturas extremadamente bajas, es posible que se
encienda el indicador de protección de temperatura
si la batería está demasiado fría.
AVISO: Para evitar que la herramienta sufra daños
ocasionados por el sobrecalentamiento, permita que
la herramienta se enfríe durante 40 minutos después
de 20 minutos de uso continuo
Función de revisión automática de presión
El inador se detendrá por un momento al nal de la
operación de inado para que se estabilice la presión
y, posteriormente, revisará la presión en el sistema.
Al terminar de revisar la presión en el sistema, si no
se ha llegado al PSI previsto, continuará inando
para arrojar los resultados más precisos.
unidades (PSI, BAR o kPa)
Protección de temperatura
el cargador especificado
herramienta
Siempre el retire la batería
cada vez que la herramienta
Utilice únicamente acceso-
rios especícamente reco-
Conguración de las
La función de revisión automática de presión podría
activarse hasta en 5 ocasiones. Cuando se llegue al
PSI previsto, el inador de apagará automáticamente
para evitar que se ine de más
Si el ujo de aire está limitado durante el uso, es posi-
ble que se encienda el indicador de protección contra
sobrecarga. Revise todas las conexiones para ver que
no tengan ninguna obstrucción antes de continuar.
Almacenamiento de accesorios/manguera
Es posible almacenar los accesorios incluidos con
el inador en la parte trasera de la herramienta. La
manguera puede enroscarse alrededor del área de al-
macenamiento y jarse en la prensa de la manguera.
Protección contra sobrecargas
OPERACIÓN
Con el n de minimizar el
utilice la protección de ojos adecuada indicada
para cumplir con lo dispuesto en la norma ANSI
Z87.1.
Al momento de realizar trabajos en situaciones
donde haya presencia de polvo, utilice la protec-
ción respiratoria adecuada o utilice una solución
de extracción de polvo que cumpla con los req-
uisitos de la OSHA.
No deje la herramienta sin supervisión durante
la operación. Riesgo de estallido. No ine de
más. Siga las instrucciones del fabricante para
el artículo.
1. Coloque la herramienta sobre una superficie
plana.
2. Inserte el accesorio adecuado al inador.
3. Fije el artículo a inar.
• Siempre je el inador a un objeto deseado antes
de iniciar el inado.
• No se necesita ningún accesorio para las válvulas Schrader de neumáticos de camiones/
automóviles comunes.
• Para los neumáticos de automóviles/camiones,
atornille el mandril Schrader a la válvula del
neumático y asegúrese de que esté apretado.
4. IInserte la batería.
5. Para encender, oprima el botón de encendido.
La herramienta detectará la presión de aire ac-
tual del artículo.
6. Utilice los botones y para denir la presión
objetivo, si así lo desea. Mantenga presionado los
botones y para denir la presión objetivo
más rápido.
NOTA: No se sugiere denir la presión objetivo al
momento de usar las boquillas de los accesorios.
NOTA: Si la presión actual del artículo a inar es
mayor que la presión objetivo, la herramienta no
comenzará a inar.
7. Para comenzar, presione el botón de inado. Para
cambiar la velocidad de inado a alta o baja,
presione el botón “Velocidad de llenado”. La
conguración mínima para la función de detención
automática es de 10 PSI.
8. La herramienta se apagará automáticamente una
vez que se ha alcanzado la presión objetivo.
NOTA: El proceso de inado podrá continuar
después de que se active la función de revisión
automática de presión, esto con el n de que se
arrojen los resultados más precisos.
14
riesgo de lesiones, siempre
Uso del inador
AVISO: Para evitar que la herramienta sufra daños
ADVERTENCIA
ADVERTENCIA
ADVERTENCIA
ADVERTENCIA
ocasionados por el sobrecalentamiento, permita
que la herramienta se enfríe durante 40 minutos
después de 20 minutos de uso continuo.
9. Para detenerse, presione el botón de inado o el
botón de encendido.
NOTA: La herramienta se apagará después de 5
minutos de inactividad.
NOTA: El ventilador de enfriamiento de la herramien-
ta se encenderá hasta que el cabezal de bombeo se
enfríe o se apague la herramienta.
El inador también se puede utilizar para inar manualmente los elementos. Cuando no se establece un
valor de entrada objetivo, el inador mostrará 0 PSI.
Mantenga presionado el botón de inado hasta que
se alcance la presión deseada. Cuando se suba el
botón de inación, la inación se detendrá. Para
inables pequeños y neumáticos de bicicleta se
recomienda utilizar el modo de inado manual para
obtener resultados más precisos.
NOTA: para cualquier cosa por debajo de 10 PSI,
inar manualmente el elemento mediante el modo
de inar manual.
Conguraciones de memoria
Para visualizar las conguraciones de memoria,
presione el botón de memoria para pasar entre las
ranuras de memoria M1 a M4. Al llegar a la ranura
de memoria M4, regresará a la pantalla de inicio si
vuelve a presionar el botón de memoria.
Para ajustar las conguraciones de memoria:
1. Presione el botón de memoria para pasar entre
las ranuras de memoria M1 a M4 hasta llegar a
la memoria deseada.
2. Presione los botones y para ajustar el
valor de inado deseado.
3. Mantenga presionado el botón de memoria du-
rante 2 segundos para guardar la presión en la
ranura de memoria actual.
Para inar de acuerdo con una conguración de
memoria guardada:
1. Presione el botón de memoria para pasar entre
las ranuras de memoria M1 a M4 hasta llegar a
la memoria deseada.
2. Presione el botón de inado.
NOTA: El indicador de valor actual aumentará con-
forme se acerque al valor de memoria guardado.
Si la precisión de presión se vuelve muy deciente
o el valor actual del inador se lee mayor que cero
cuando no está conectado a ningún objeto, el sen-
sor de presión podría haber sufrido una desviación
debido a la altitud o a otros factores.
Para restablecerse a cero:
Sin tener nada conectado al inador, mantenga
presionado el botón - y el botón de inado durante 3
segundos para restablecer la presión a cero.
NOTA: Esta función restablecerá la presión a un
valor de 5 PSI.
Inserte la aguja o la boquilla en el inador. Fíjelo al
artículo. Tenga cuidado de no doblar el accesorio.
Retire después de inar.
Use la válvula Presta con vástagos para válvula Pres-
ta. Antes de inar, aoje la tuerca de bloqueo en el
vástago de la válvula. Cuando haya terminado de inar, apriete la tuerca de bloqueo para sellar la válvula.
Resolución de problemas
Aguja deportiva/boquilla de balsa
Inado manual
Válvula Presta
APLICACIONES
Para reducir el riesgo de
adrar o colocar tornillos verique que en el área
de trabajo no hayan tuberías o cables ocultos.
electrocución, antes de tal-
MANTENIMIENTO
Para reducir el riesgo de una
la herramienta antes de darle cualquier mantenimiento. Nunca desarme la herramienta ni trate
de hacer modicaciones en el sistema eléctrico
de la misma. Acuda siempre a un Centro de Servicio MILWAUKEE para TODAS las reparaciones.
Mantenimiento de las herramientas
Adopte un programa regular de mantenimiento y
mantenga su herramienta en buenas condiciones.
Inspeccione la herramienta para problemas como
ruidos indebidos, desalineadas o agarrotadas
de partes móviles, piezas rotas o cualquier otra
condición que pueda afectar el funcionamiento de
la herramienta. Envíe su herramienta al Centro de
Servicio MILWAUKEE para reparación. Después
de 6 meses a un año, dependiendo del uso
dado, envíe su herramienta al Centro de Servicio
MILWAUKEE más cercano para la inspección.
Si la herramienta no arranca u opera a toda su
potencia con una batería completamente cargada,
limpie, con una goma o borrador, los contactos de la
batería y de la herramienta. Si aun asi la herramienta
no trabaja correctamente, regrésela, con el cargador
y la batería, a un centro de servicio MILWAUKEE.
daño a la herramienta, nunca la sumerja en líquidos ni permita que estos uyan dentro de la misma.
Limpie el polvo y suciedad de las cualquier ventilas.
Mantenga los herramienta, limpios, secos y libres
de aceite o grasa. Use solo jabón neutro y un trapo
húmedo para limpiar, ya que algunos substancias y
solventes limpiadores son dañinos a los plásticos y
partes aislantes. Algunos de estos incluyen: gasolina,
turpentina,thíner, lacas, thíner para pinturas, solventes para limpieza con cloro, amoníaco y detergentes
caseros que tengan amonia. Nunca usa solventes inamables o combustibles cerca de una herramienta.
Si su herramienta, batería o cargador están dañados,
envíela al centro de servicio autorizado más cercano.
lesión, desconecte siempre
Para reducir el riesgo de le-
siones, descarga eléctrica o
Limpieza
Reparaciones
ACCESORIOS
Utilice sólo los accesorios
dos. Otros accesorios puede ser peligroso.
Para una lista completa de accessorios, visite
nuestro sitio en Internet: www.milwaukeetool.com o
póngase en contacto con un distribuidor.
especícamente recomenda-
SOPORTE DE SERVICIO - MEXICO
CENTRO DE ATENCION A CLIENTES
Techtronic Industries Mexico, S.A. de C.V.
Av. Presidente Masarik 29 Piso 7
11560 Polanco V Seccion
Miguel Hidalgo, Distrito Federal, México
01 (800) 030-7777 o (55) 4160-3540
O contáctanos en www.milwaukeetool.com.mx
15
Lunes a Viernes (9am a 6pm)

GARANTÍA LIMITADA -
Esta herramienta eléctrica de MILWAUKEE* está garantizada, ante el
comprador original únicamente, por parte de un distribuidor autorizado
MILWAUKEE, de que no tenga material y mano de obra defectuosos.
Sujeto a ciertas excepciones, MILWAUKEE reparará o sustituirá
cualquier pieza de esta herramienta eléctrica que tenga defectos de
material o mano de obra según lo determine MILWAUKEE mediante
una revisión, por un periodo de cinco (5) años después de la fecha de
compra a menos que se indique lo contrario. Al devolver la herramienta
eléctrica a un centro de servicio de fábrica de MILWAUKEE o a una
estación de servicio autorizada de MILWAUKEE, es necesario que la
devolución se haga con ete pagado por adelantado y asegurado. Se
debe incluir una copia del comprobante de compra con el producto
devuelto. Esta garantía no aplica a daños que MILWAUKEE determine
que son ocasionados por reparaciones o intentos de reparaciones
realizados por una persona que no sea personal autorizado de
MILWAUKEE, uso indebido, alteraciones, maltrato, desgaste normal,
falta de mantenimiento o accidentes.
Desgaste normal: Muchas herramientas eléctricas necesitan cambios
de piezas y mantenimiento periódicos para alcanzar su máximo rendimiento Esta garantía no cubre la reparación cuando el uso normal ha
agotado la vida útil de una pieza, incluyendo, entre otros, mandriles,
cepillos, cables, zapatas de la sierra, abrazaderas de la hoja, juntas
tóricas, sellos, protectores, hojas de accionamiento, pistones, herrajes,
levantadores y arandelas de cubierta de los protectores.
*La presente garantía no cubre ni las baterías ni todas las herramientas
eléctricas. Consulte las distintas garantías independientes que están
disponibles para estos productos.
La vigencia de la garantía de la luz LED en la lámpara LED de trabajo
(49-24-0171) y el foco mejorado de LED (49-81-0090) es la misma
que la vida útil del producto sujeto a las limitaciones anteriores. Si
la luz LED o el foco mejorado LED presentan fallas durante su suso
normal, se cambiará la pieza sin costo.
No es necesario realizar el registro de la garantía para recibir la
garantía correspondiente a un producto de herramienta eléctrica
de MILWAUKEE. La fecha de fabricación del producto servirá para
determinar la vigencia de la garantía en caso de que no presente
ningún comprobante de compra al solicitar el servicio en garantía.
LA ACEPTACIÓN DE LOS RESARCIMIENTOS EXCLUSIVOS
DE REPARACIÓN Y SUSTITUCIÓN AQUÍ DESCRITOS ES UNA
CONDICIÓN DEL CONTRATO EN CUANTO A LA COMPRA DE
TODO PRODUCTO DE MILWAUKEE. SI USTED NO ACEPTA ESTA
CONDICIÓN, NO DEBE COMPRAR EL PRODUCTO. MILWAUKEE
NO SERÁ RESPONSABLE EN NINGÚN CASO DE DAÑOS INCIDENTALES, ESPECIALES, EMERGENTES O PUNITIVOS NI DE NINGÚN
COSTO, HONORARIOS DE ABOGADOS, GASTOS, PÉRDIDAS O
DEMORAS QUE SUPUESTAMENTE SEAN CONSECUENCIA DE
ALGÚN DAÑO, FALLA O DEFECTO DE ALGUNO DE LOS PRODUCTOS, INCLUYENDO, ENTRE OTROS, RECLAMACIONES POR
PÉRDIDA DE UTILIDADES. ALGUNOS ESTADOS NO PERMITEN LA
EXCLUSIÓN O LIMITACIÓN DE RESPONSABILIDAD POR DAÑOS
INCIDENTALES O EMERGENTES, POR LO QUE LA ANTERIOR
LIMITACIÓN O EXCLUSIÓN PODRÍA NO APLICARSE EN SU
CASO. ESTA GARANTÍA ES EXCLUSIVA Y SUSTITUYE TODAS
LAS DEMÁS GARANTÍAS EXPRESAS, SEAN ESTAS ESCRITAS U
ORALES. HASTA DONDE PERMITA LA LEY, MILWAUKEE DESCONOCE CUALQUIER GARANTÍA IMPLÍCITA, INCLUYENDO, SIN LIMITACIÓN, CUALQUIER GARANTÍA IMPLÍCITA DE COMERCIABILIDAD
O IDONEIDAD PARA UN FIN O USO ESPECÍFICO; HASTA EN QUE
DICHO DESCONOCIMIENTO NO SEA PERMITIDO POR LA LEY,
E.U.A. Y CANADÁ
DICHAS GARANTÍAS IMPLÍCITAS SE LIMITAN A LA DURACIÓN DE
LA GARANTÍA EXPRESA CORRESPONDIENTE SEGÚN LO ARRIBA
DESCRITO. ALGUNOS ESTADOS NO PERMITEN LIMITACIONES
EN LA VIGENCIA DE UNA GARANTÍA IMPLÍCITA, POR LO QUE LA
ANTERIOR LIMITACIÓN PUDIERA NO APLICAR A USTED. ESTA
GARANTÍA LE CONFIERE DERECHOS JURÍDICOS ESPECÍFICOS
Y USTED PODRÍA, ADEMÁS, TENER OTROS DERECHOS QUE
VARÍAN SEGÚN EL ESTADO.
Esta garantía aplica únicamente a los productos vendidos en EE.
UU. y Canadá.
Consulte la pestaña “Búsqueda de centro de servicio” en la sección de
Partes y servicio del sitio web de MILWAUKEE en www.milwaukeetool.
com o llame al 1.800.SAWDUST (1.800.729.3878) para localizar su
centro de servicio más cercano para darle servicio, con y sin garantía,
a una herramienta de MILWAUKEE.
PÓLIZA DE GARANTÍA - VALIDA
SOLO PARA MÉXICO, AMÉRICA
La garantía de TECHTRONIC INDUSTRIES es por 5 años a partir de
la fecha original de compra.
Esta tarjeta de garantía cubre cualquier defecto de material y mano
de obra en ese Producto.
Para hacer válida esta garantía, presente esta tarjeta de garantía,
cerrada/sellada por el distribuidor o la tienda donde compró el producto, al Centro de Servicio Autorizado (ASC). O, si esta tarjeta no
se ha cerrado/sellado, presente la prueba original de compra a ASC.
Llame 55 4160-3547 para encontrar el ASC más cercano, para ser-
vicio, partes, accesorios o componentes.
Procedimiento para hacer válida esta garantía
Lleve el producto a ASC, junto con la tarjeta de garantía cerrada/
sellada por el distribuidor o la tienda donde compró el producto, y
cualquier pieza o componente defectuoso se reemplazará sin costo
para usted. Cubriremos todos los costos de ete con relación a este
proceso de garantía.
Excepciones
Esta garantía no tendrá validez en las siguientes situaciones:
a) Cuando el producto se use de manera distinta a la que indica el
b) Cuando las condiciones de uso no sean normales.
c)
Nota: si el juego de cables está dañado, tiene que reemplazarse
en un Centro de Servicio Autorizado para evitar riesgos eléctricos.
CENTRO DE SERVICIO Y ATENCIÓN
Llame al 55 4160-3547
IMPORTADO Y COMERCIALIZADO POR
TECHTRONIC INDUSTRIES, MÉXICO, S.A. DE C.V.
Miguel de Cervantes Saavedra No.301 Piso 5, Torre Norte
11520 Colonia Ampliación Granada
Miguel Hidalgo, Ciudad de Mexico, Mexico
CENTRAL Y EL CARIBE
manual del usuario nal o de instrucciones.
Cuando otras personas no autorizadas por TECHTRONIC INDUSTRIES
modiquen o reparen el producto.
Modelo:
Fecha de Compra:
Sello del Distribuidor:
MILWAUKEE TOOL
13135 West Lisbon Road
58140222d2 01610000101Q-02(A)
10/22 Printed in TaiwanTaiwan
Brookeld, WI 53005 USA
 Loading...