


OPERATOR'S MANUAL
MANUEL de L'UTILISATEUR
MANUAL del OPERADOR
Cat. No. / No de cat.
2120-20
M18™
DUAL PACK TOWER LIGHT w/ONE-KEY
LUMIÈRE TOUR AVEC DOUBLES BATTERIES AVEC ONE-KEY
M18™
TORRE DE LÁMPARA CON DOBLE BATERÍAS CON ONE-KEY DE
M18™
WARNING To reduce the risk of injury, user must read and understand operator's manual.
AVERTISSEMENT An de réduire le risque de blessures, l'utilisateur doit lire et bien
comprendre le manuel.
ADVERTENCIA Para reducir el riesgo de lesiones, el usuario debe leer y entender el manual.

IMPORTANT SAFETY
CAUTION
C
US
INSTRUCTIONS
WARNING Read and understand all
instructions. When using electric appliances, basic
precautions should always be followed, including
the following:
• Before using, read this operator’s manual, your
battery pack and charger operator’s manual, and
all labels on the battery pack, charger and light.
Learn your light’s applications and limitations as well
as potential hazards associated with this type of tool.
• Read and understand all the instructions before
using the appliance.
• To reduce the risk of injury, close supervision is
necessary when an appliance is used near children.
• Warning - The lens may get hot during use. To reduce
the risk of burns, do not touch hot lens.
• Store idle light out of reach of children. Warm lights
can become hazardous in the hands of children.
• Suitable for rain and wet locations. Store indoors.
• Batteries must be recharged only with the charger
specied by the manufacturer. A charger that may be
suitable for one type of battery may create a risk of re
when used with another battery.
• Use light only with specically designated battery
pack. Use of any other batteries may create a risk of re.
• When battery pack is not in use, keep it away from
metal objects like: paper clips, coins, keys, nails,
screws, or other small metal objects that can make
a connection from one terminal to another. Shorting
the battery terminals together may cause sparks, burns,
or a re.
•Under abusive conditions, liquid may be ejected
from the battery; avoid contact. If contact accidentally occurs, ush with water. If liquid contacts eyes,
additionally seek medical help. Liquid ejected from
the battery may cause irritation or burns.
•Do not use a battery pack or tool that is damaged or
modied. Damaged or modied batteries may exhibit
unpredictable behavior resulting in re, explosion or
risk of injury.
•Do not expose a battery pack or tool to re or excessive temperature. Exposure to re or temperature
above 265°F (130°C) may cause explosion.
•Follow all charging instructions and do not charge
the battery pack or tool outside the temperature
range specied in the instructions. Charging improp-
erly or at temperatures outside the specied range may
damage the battery and increase the risk of re.
•Never service damaged battery packs. Service of
battery packs should only be performed by the manu
facturer or authorized service providers.
• Maintain labels and nameplates. These carry important information. If unreadable or missing, contact a
MILWAUKEE service facility for a free replacement.
-
SAVE THESE
INSTRUCTIONS
SYMBOLOGY
Volts
Direct Current
Do Not Stare Into Light
UL Listing for Canada and U.S.
SPECIFICATIONS
Cat. No. .................................................... 2120-20
Volts .............................................................18 DC
Battery Type .................................................M18™
Charger Type ................................................M18™
Ingress Protection............................................ IP67
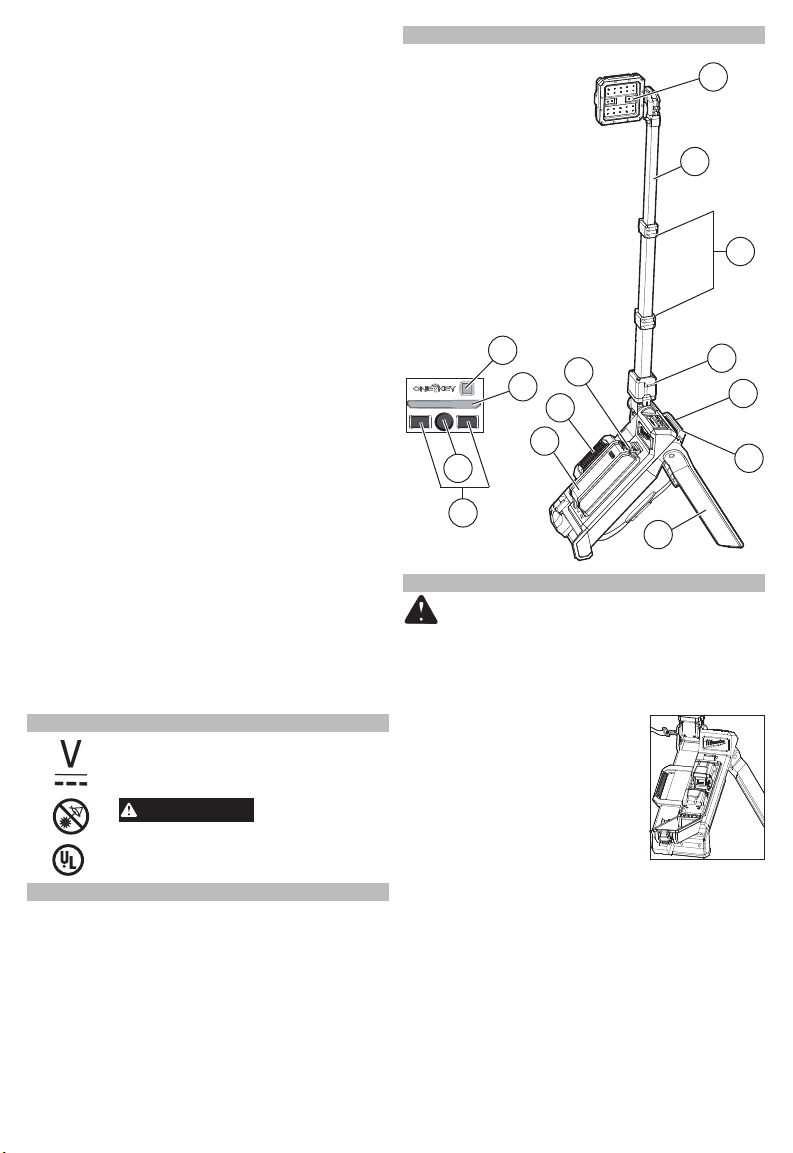
FUNCTIONAL DESCRIPTION
1. Head
2. Extension poles
3. Extension buttons
4. Extension release bracket
5. Leg release button
6. Handles
7. Legs
8. Battery bay
9. Battery door latch
10. ONE-KEY indicator
11. Brightness indicator
12. Power button
13. Brightness selector
10
11
12
13
1
6
8
Bright Light -
9
2
3
4
5
6
7
2

ASSEMBLY
WARNING Recharge only with
the charger specied for the battery. For specic
charging instructions, read the operator’s manual
supplied with your charger and battery.
Inserting/Removing Battery Pack
Unlatch the battery door and open
to access the battery bays.
Insert a battery pack by sliding bat
tery pack into a battery bay. Insert
the battery pack until the battery
latches lock.
Close and latch the battery door.
To remove a battery pack, press in
both battery latches and slide the
battery pack out of the battery bay.
NOTE: Always ensure the battery door gasket is clean
and clear of dirt and debris. Close battery door latch
securely to ensure water cannot enter the battery
compartment.
-
WARNING To reduce the risk of
injury, do not look directly into the light when the
light is on.
To reduce the risk of injury, always fully extend and
lock legs into position before raising the poles.
Light may tip and cause injury.
To reduce the risk of injury, keep hands clear of
the housing area when collapsing the extension
poles. Head may descend rapidly, pinching hands
and ngers.
Extending/Collapsing the Legs
Always extend and lock the legs before raising the
poles.
1. To extend the legs, stand light on end and press
the leg release button.
2. Rotate the legs out to the standing position or
stabilizing position. Ensure the legs lock into place.
3. To collapse the legs, press the leg release button
and rotate the legs back to the closed position. Keep
hands clear of the legs as they collapse.
Use the stabilizing position
when positioning
the light over a
ditch or hole
6. To collapse the poles, press the extension buttons
and slide the poles back into position. Keep hands
clear of the brackets as the poles collapse.
7. Rotate the head into the
"protected" position or "use"
position, then lift the exten
sion release bracket and
rotate the extension to the
closed position.
To learn more about the ONE-KEY functionality for
this tool, please reference the Quick Start guide included with this product or go to milwaukeetool.com/
One-Key. To download the ONE-KEY app, visit the
App Store or Google Play from your smart device.
ONE-KEY™
-
Head rotated out for "use"
position. Rotate 180° for
"protected" position.
OPERATION
WARNING
injury, do not look directly into the light when
the light is on.
1. Insert battery pack(s). Close and latch the battery
door.
2. Press the Power
3. Press the - and + buttons to cycle through High,
Medium, and Low.
NOTE: The light will default to the selected brightness
the next time it is turned on.
4. Press the Power
NOTE: When multiple batteries are installed, the second battery pack inserted will begin operation when
the rst pack inserted has reached end-of-charge.
WARNING
product as shown below. It may be overturned.
Using the Light
To reduce the risk of
button to turn on the light.
button to turn the light off.
Do not position the
Extending/Collapsing the Extension Poles
1. To extend the poles, position and lock the legs.
2. Pull up on the extension release
bracket and rotate the extension to
the desired angle. Ensure the
bracket locks into a detent.
3. Press the top extension button and
raise the head. Extend the pole to
the desired height.
4. If more height is needed, repeat
with the lower extension.
5. Rotate the head to the desired
position.
2
1
3

MAINTENANCE
WARNING
injury, always unplug the charger and remove
the battery pack from the charger or tool before
performing any maintenance. Never disassemble
the tool, battery pack or charger. Contact a
MILWAUKEE service facility for ALL repairs.
Keep your light, battery pack and charger in good
repair by adopting a regular maintenance program.
If the light does not work properly, return the light to
a MILWAUKEE service facility for repairs.
WARNING
Burn Hazard. This device contains a
lithium button/coin cell battery. A new
or used battery can cause severe internal burns and lead to death in as
little as 2 hours if swallowed or enters the body.
Always secure the battery cover. If it does not
close securely, stop using the device, remove the
batteries, and keep it away from children. If you
think batteries may have been swallowed or
entered the body, seek immediate medical atten-
tion.
An internal battery is used to facilitate full ONE-KEY™
functionality.
To replace the battery:
1. Remove the battery pack.
2. Remove the screw and open the battery door.
3. Remove the old battery, keep it away from children,
and dispose of it properly.
4. Insert the new battery (3V CR2032), with the positive side facing up.
5. Close the battery door and tighten the screw
securely.
WARNING
personal injury and damage, never immerse your
tool, battery pack or charger in liquid or allow a
liquid to ow inside them.
Clean dust and debris from vents. Keep handles
clean, dry and free of oil or grease. Use only mild
soap and a damp cloth to clean, since certain cleaning agents and solvents are harmful to plastics and
other insulated parts. Do not use sprays or solvents.
Some of these include gasoline, turpentine, lacquer
thinner, paint thinner, chlorinated cleaning solvents,
ammonia and household detergents containing am-
monia. Never use ammable or combustible solvents
around tools.
Maintain Light
Internal Battery
Cleaning
To reduce the risk of
Chemical
To reduce the risk of
ACCESSORIES
WARNING
mended accessories. Others may be hazardous.
For a complete listing of accessories, go online to
www.milwaukeetool.com or contact a distributor.
Use only recom-
SERVICE - UNITED STATES
1-800-SAWDUST (1.800.729.3878)
Monday-Friday, 7:00 AM - 6:30 PM CST
or visit www.milwaukeetool.com
Contact Corporate After Sales Service Technical
Support with technical, service/repair, or warranty
questions.
Email: metproductsupport@milwaukeetool.com
Become a Heavy Duty Club Member at
www.milwaukeetool.com to receive important
notications regarding your tool purchases.
SERVICE - CANADA
Milwaukee Tool (Canada) Ltd
1.800.268.4015
Monday-Friday, 7:00 AM - 4:30 PM CST
or visit www.milwaukeetool.ca
LIMITED WARRANTY
Every MILWAUKEE power tool* (see exceptions below) is warranted
to the original purchaser only to be free from defects in material and
workmanship. Subject to certain exceptions, MILWAUKEE will repair
or replace any part on an electric power tool which, after examination, is
determined by MILWAUKEE to be defective in material or workmanship
for a period of ve (5) years** after the date of purchase unless otherwise
noted. Return of the power tool to a MILWAUKEE factory Service Center
location or MILWAUKEE Authorized Service Station, freight prepaid and
insured, is required. A copy of the proof of purchase should be included
with the return product. This warranty does not apply to damage that
MILWAUKEE determines to be from repairs made or attempted by
anyone other than MILWAUKEE authorized personnel, misuse, altera
tions, abuse, normal wear and tear, lack of maintenance, or accidents.
Normal Wear: Many power tools need periodic parts replacement and
service to achieve best performance. This warranty does not cover
repair when normal use has exhausted the life of a part including,
but not limited to, chucks, brushes, cords, saw shoes, blade clamps,
o-rings, seals, bumpers, driver blades, pistons, strikers, lifters, and
bumper cover washers.
*This warranty does not cover Air Nailers & Staplers; Airless Paint
Sprayer; Cordless Battery Packs; Gasoline Driven Portable Power
Generators; Hand Tools; Hoist – Electric, Lever & Hand Chain; M12™
Heated Gear; Reconditioned Product; and Test & Measurement Products.
There are separate and distinct warranties available for these products.
**The warranty period for Job Site Radios, M12™ Power Port, M18™
Power Source, Jobsite Fan and Trade Titan™ Industrial Work Carts is
one (1) year from the date of purchase. The warranty period for the
Drain Cleaning Cables is two (2) years from the date of purchase. The
warranty period for the M18™ Compact Heat Gun and the 8 Gallon Dust
Extractor is three (3) years from the date of purchase. The warranty
period for the LED in the LED Work Light and the LED Upgrade Bulb
for the Work Light is the lifetime of the product subject to the limitations
above. If during normal use the LED or LED Bulb fails, the part will be
replaced free of charge.
Warranty Registration is not necessary to obtain the applicable warranty
on a MILWAUKEE power tool product. The manufacturing date of the
product will be used to determine the warranty period if no proof of
purchase is provided at the time warranty service is requested.
ACCEPTANCE OF THE EXCLUSIVE REPAIR AND REPLACEMENT
REMEDIES DESCRIBED HEREIN IS A CONDITION OF THE CON
TRACT FOR THE PURCHASE OF EVERY MILWAUKEE PRODUCT.
IF YOU DO NOT AGREE TO THIS CONDITION, YOU SHOULD NOT
PURCHASE THE PRODUCT. IN NO EVENT SHALL MILWAUKEE
BE LIABLE FOR ANY INCIDENTAL, SPECIAL, CONSEQUENTIAL
OR PUNITIVE DAMAGES, OR FOR ANY COSTS, ATTORNEY FEES,
EXPENSES, LOSSES OR DELAYS ALLEGED TO BE AS A CON
SEQUENCE OF ANY DAMAGE TO, FAILURE OF, OR DEFECT IN
ANY PRODUCT INCLUDING, BUT NOT LIMITED TO, ANY CLAIMS
FOR LOSS OF PROFITS. SOME STATES DO NOT ALLOW THE
EXCLUSION OR LIMITATION OF INCIDENTAL OR CONSEQUENTIAL
DAMAGES, SO THE ABOVE LIMITATION OR EXCLUSION MAY NOT
APPLY TO YOU. THIS WARRANTY IS EXCLUSIVE AND IN LIEU
OF ALL OTHER EXPRESS WARRANTIES, WRITTEN OR ORAL.
TO THE EXTENT PERMITTED BY LAW, MILWAUKEE DISCLAIMS
ANY IMPLIED WARRANTIES, INCLUDING WITHOUT LIMITATION
ANY IMPLIED WARRANTY OF MERCHANTABILITY OR FITNESS
FOR A PARTICULAR USE OR PURPOSE; TO THE EXTENT SUCH
DISCLAIMER IS NOT PERMITTED BY LAW, SUCH IMPLIED WAR
RANTIES ARE LIMITED TO THE DURATION OF THE APPLICABLE
EXPRESS WARRANTY AS DESCRIBED ABOVE. SOME STATES DO
NOT ALLOW LIMITATIONS ON HOW LONG AN IMPLIED WARRANTY
LASTS, SO THE ABOVE LIMITATION MAY NOT APPLY TO YOU, THIS
WARRANTY GIVES YOU SPECIFIC LEGAL RIGHTS, AND YOU MAY
ALSO HAVE OTHER RIGHTS WHICH VARY FROM STATE TO STATE.
This warranty applies to product sold in the U.S.A. and Canada only.
Please consult the ‘Service Center Search’ in the Parts & Service sec
tion of MILWAUKEE’s website www.milwaukeetool.com or call 1.800.
SAWDUST (1.800.729.3878) to locate your nearest service facility for
warranty and non-warranty service on a Milwaukee electric power tool.
4
USA & CANADA
-
-
-
-
-

LIMITED WARRANTY - MEXICO,
ATTENTION
C
US
CENTRAL AMERICA & CARIBBEAN
TECHTRONIC INDUSTRIES' warranty is for 5 years since the original
purchase date.
This warranty card covers any defect in material and workmanship on
this Product.
To make this warranty valid, present this warranty card, sealed/stamped
by the distributor or store where you purchased the product, to the
Authorized Service Center (ASC). Or, if this card has not been sealed/
stamped, present the original proof of purchase to the ASC.
Call toll-free1 01 (800) 030-7777 to nd the nearest ASC, for service,
parts, accessories or components.
Procedure to make this warranty valid
Take the product to the ASC, along with the warranty card sealed/
stamped by the distributor or store where you purchased the product,
and any faulty piece or component will be replaced without cost for
you. We will cover all freight costs relative with this warranty process.
Exceptions
This warranty is not valid in the following situations
a) When the product is used in a different manner from the end-user
guide or instruction manual.
b) When the conditions of use are not normal.
c) When the product was modied or repaired by people not authorized
by TECHTRONIC INDUSTRIES.
Note: If cord set is damaged, it should be replaced by an Authorized
Service Center to avoid electric risks.
SERVICE AND ATTENTION CENTER
Call to 01 (800) 030-7777
IMPORTED AND COMMERCIALIZED BY
TECHTRONIC INDUSTRIES MEXICO, SA DE CV
Av President Masarik #29 piso 7, Col. Polanco V Sección
CP 11560, Deleg. Miguel Hidalgo, CDMX
Model:
Date of Purchase:
Distributor or Store Stamp:
CONSIGNES
DE SÉCURITÉ
IMPORTANTES
AVERTISSEMENTLire et
veiller à bien comprendre toutes les instructions.
Lors de l’utilisation d’outils électriques, toujours
suivre les consignes de base, notamment :
• Avant d’utiliser, lire le présent manuel d’utilisation,
le manuel d’utilisation du bloc-piles et du chargeur,
ainsi que toutes les étiquettes se trouvant sur le bloc-
piles, le chargeur et la lampe. Lire le manuel de la lampe
pour apprendre les applications et les limites, ainsi que
les risques spéciques relatifs à l’utilisation de cet outil.
• Lire et comprendre toutes les instructions avant
d’utiliser l’appareil.
• Pour réduire les risques de blessure, porter une
attention particulière lorsque le produit est utilisé en
présence d’enfants.
• Avertissement – La lentille devient très chaude pen
dant l’utilisation. Pour réduire les risques de brûlures,
ne pas toucher la lentille chaude.
• Entreposer la lampe non utilisée hors de la portée
des enfants. Les lampes chaudes peuvent être dan
gereuses dans les mains des enfants.
•
Peut être utilisé sous la pluie ou endroit humide.
Entreposer à l’intérieur.
-
-
• Les piles doivent être chargées uniquement avec
le chargeur spécié par le fabricant. Un chargeur
approprié pour un type de piles peut créer un risque
d'incendie s'il est utilisé avec un autre type de piles.
• N’utiliser la lampe qu’avec un bloc-piles recom
mandé. L'usage de tout autre bloc-piles peut créer un
risque d'incendie.
• Lorsque le bloc-piles n’est pas en usage, le tenir à
l’écart des articles métalliques tels que : les attaches
trombones, pièces de monnaie, clés, clous, vis et
autres petits objets métalliques risquant d'établir
le contact entre les deux bornes. La mise en court-
circuit des bornes des piles peut causer des étincelles,
des brûlures ou un incendie.
• Éviter tout contact avec le liquide pouvant être
éjecté de la pile en cas de manutention abusive. En
cas de contact accidentel, rincer immédiatement les
parties atteintes avec de l’eau. Si le liquide entre en
contact avec les yeux, consulter un médecin. Le
liquide éjecté des piles peut causer des irritations ou
des brûlures.
• N’utiliser aucun bloc-piles ni aucun outil ayant été
endommagé ou modié. Des piles endommagées ou
modiées peuvent adopter un comportement imprévis
ible pouvant causer un incendie, une explosion ou le
risque de blessures.
• Ne pas exposer le bloc-piles ou l’outil aux ammes
ou à une température excessive. Une exposition
aux ammes ou à une température supérieure à 130°C
(265°F) peut causer une explosion.
• Suivre toutes les instructions de charge et ne pas
charger le bloc-piles ou l’outil en dehors de la plage
de température spéciée. Une charge incorrecte ou à
des températures en dehors de la plage spéciée peut
endommager la pile et augmenter le risque d’incendie.
• Ne jamais effectuer la réparation d’un bloc-piles
endommagé. La réparation du bloc-piles doit être
réalisée par le fabricant ou les fournisseurs de service
agréés uniquement.
• Maintenir en état les étiquettes et les plaques sig
nalétiques. Des informations importantes y gurent.
Si elles sont illisibles ou manquantes, contacter un
centre de service et d’entretien MILWAUKEE pour un
remplacement gratuit.
CONSERVER CES
INSTRUCTIONS
No de Cat. ................................................ 2120-20
Volts.............................................................18 CD
Type de batterie ...........................................M18™
Type de chargeur ........................................M18™
Protection contre l’inltration .......................... IP67
Volts
Courant direct
Ne pas xer directement le faisceau
Canada et États-unis
SPECIFICATIONS
PICTOGRAPHIE
UL Listing Mark pour
Éclairage lumineux -
-
-
-
5

DESCRIPTION FONCTIONNELLE
1. Tête
2. Poteaux extensibles
3. Boutons d’extension
4. Support de verrouillage
d’extension
5. Bouton de verrouillage
de pieds
6. Poignées
7. Pieds
8. Compartiment de piles
9. Loquet de la porte du
compartiment des piles
10. Indicateur ONE KEY
11. Indicateur de luminosité
12. Bouton d'alimentation
13. Sélecteur de luminosité
10
11
12
9
6
8
Pour réduire les risques de blessure, toujours
étendre complètement les pattes et les verrouiller
en place avant de soulever les tiges de rallonge. La
1
2
4
lampe peut se renverser et causer des blessures.
Pour réduire les risques de blessure, garder les
mains à l’écart du boîtier en repliant les tiges de ral-
longe. La tête peut descendre rapidement, pinçant
les mains et les doigts.
Extension / rétraction des pieds
Rallongez toujours et verrouillez les pieds avant de
rehausser les poteaux.
1. Pour rallonger les pieds, mettez légèrement un bout
et appuyez sur le bouton de verrouillage de pieds.
2. Faites tourner les pieds dehors à la position debout
3
ou de stabilité. Veuillez s’assurer que les pieds soi
ent verrouillés sur place.
3. Pour rétracter les pieds, appuyez sur le bouton de
déverrouillage et tournez les pieds à leur position
de fermeture. Gardez les mains à l'écart des pieds
lorsqu’ils se rétractent.
5
Utilisez la position de stabilité
lorsque vous mettez
la lumière dans un
fossé ou trou.
-
6
13
7
MONTAGE
AVERTISSEMENT
Recharge only with the charger specied for the
battery. For specic charging instructions, read
the operator’s manual supplied with your charger
and battery.
Insertion/retrait d’un bloc-piles
Soulevez le loquet des piles et ouvrez
pour accéder au compartiment des
piles.
Insérer le bloc-piles en le glissant
dans le compartiment des piles.
Insérer le bloc-piles jusqu’à ce que
les verrous de pile se verrouillent.
Fermez et remettez le loquet du
compartiment des piles.
Pour retirer le bloc-piles, appuyer
sur les deux verrous de pile et glisser le bloc-piles hors
du compartiment.
REMARQUE :
la puerta de la batería esté limpia y libre de suciedad y
desechos. Cierre rmemente el pestillo de la puerta de
la batería para asegurar que el agua no pueda entrar
en el compartimento de la batería.
Asegúrese siempre de que la Junta de
AVERTISSEMENT
Pour réduire les risques de blessure, ne pas
regarder directement dans la lumière lorsque
l'éclairage est allumé.
Extension / rétraction des poteaux extensibles
1. Pour rallonger les poteaux, mettez et verrouillez
les pieds.
2. Tirez le support de verrouillage
d’extension et faites tourner
l'extension à l’angle requis. Veuillez
s’assurer que les supports se ver
rouillent dans une goupille.
3. Appuyez sur le bouton de
l’extension supérieure et rehaus
sez la tête. Rallongez le poteau à
la hauteur désirée.
4. S’il est nécessaire d’avoir plus de
hauteur, répétez avec l'extension
inférieure.
5. Faites tourner la tête à la position désirée.
6. Pour rétracter les poteaux, appuyez sur les boutons
d'extension et glissez les poteaux dans leur position
originale. Gardez les mains à
l'écart des supports lorsque
les poteaux se rétractent.
7. Faites tourner la tête vers
la position « protégé » ou «
utilisation », après rehaussez
le support de verrouillage
d’extension et faites tourner
l’extension à la position «
fermé ».
Pour en savoir plus à propos de la fonctionnalité
ONE-KEY de cet outil, veuillez consulter la guide de
démarrage rapide qui est incluse avec ce produit ou
visitez le site d’Internet milwaukeetool.com/One-Key.
Pour télécharger l'appli ONE-KEY, visitez App Store ou
Google Play dans votre téléphone cellulaire.
6
ONE-KEY™
Tête tournée dehors à la
position « utilisation ».
Faites tourner 180º à la
position « protégé ».
2
-
-
1

MANIEMENT
AVERTISSEMENT
An de réduire le risque de blessures, ne regardez pas directement dans la lumière lorsqu’elle
est allumée.
1. Insérez le bloc-piles. Fermez et remettez le loquet
du compartiment des piles.
2. Appuyez sur le bouton
mettre en marche la lumière.
3. Appuyez sur les boutons - et + pour passer entre
les niveaux Haut, Modéré et Bas.
REMARQUE : La lumière aura la luminosité choisie
auparavant comme prédéterminé la prochaine fois
qu’elle est allumée.
4. Appuyez sur le bouton
éteindre la lumière.
REMARQUE : Lorsque plusieurs piles sont installées,
le deuxième bloc-piles mis commencera à opérer quand
le premier bloc-piles mis ait épuisé sa charge.
placez pas le produit comme indiqué ci-dessous.
Il peut tomber.
Utilisation de la lumière
d’alimentation pour
d’alimentation pour
AVERTISSEMENT
Ne
ENTRETIEN
AVERTISSEMENT
Pour minimiser les risques de blessures corporelles, débranchez le chargeur et retirez la batterie
du chargeur ou de l’outil avant d’y effectuer des
travaux d’entretien. Ne démontez jamais l’outil, la
batterie ou le chargeur. Pour toute réparation, consultez un centre de service MILWAUKEE accrédité.
Entretien de la lampe de travail
Gardez la lampe de travail, la batterie et le chargeur
en bonne condition en adoptant un programme de
maintenance ponctuel.
Si la lampe n’éclaire toujours pas correctement, faites-la
réparer à un centre de service MILWAUKEE accrédité.
AVERTISSEMENT
Risque de brûlure chimique. Ce dispositif contient une pile bouton au
lithium. Une pile neuve ou usée peut
causer des brûlures internes graves
entraînant la mort en seulement 2
heures si avalée ou entrée dans le corps. Toujours xer le couvercle du compartiment des piles.
Si le couvercle ne se ferme pas bien, arrêter
d’utiliser le dispositif, retirer les piles et les
garder hors de la portée des enfants. Si vous
soupçonnez que les piles ont été avalées ou
entrées dans le corps, consultez immédiatement
un médecin.
Une pile interne est utilisée pour faciliter la fonctionnalité complète ONE-KEY™.
Pour remplacer la pile :
1. Retirer le bloc-piles.
2. Retirer la vis et ouvrir la porte du compartiment de
la pile.
3. Retirer le panneau de la pile et enlever la pile
usagée. Tenez hors de la portée des enfants et
éliminez-la adéquatement.
4. Insérer la nouvelle pile (3V CR2032), avec le côté
positif vers le haut.
5. Fermer la porte du compartiment de la pile et
serrer la vis fermement.
Pile interne
AVERTISSEMENT
Pour minimiser les risques de blessures ou de
dommages à l'outil, n'immergez jamais l'outil, la
batterie ou le chargeur et ne laissez pas de liquide
s'y inltrer.
Gardez les poignées de l’outil propres, à sec et exemptes d’huile ou de graisse. Le nettoyage de l’outil,
du chargeur et de la batterie doit se faire avec un
linge humide et un savon doux. Certains nettoyants
tels l’essence, la térébenthine, lesdiluants à laque ou
à peinture, les solvants chlorés, l’ammoniaque et les
détergents d’usage domestique qui en contiennent
pourraient détériorer le plastique et l’isolation des
pièces. Ne laissez jamais de solvants inammables ou
combustibles auprès de l’outil.
Nettoyage
ACCESOIRES
AVERTISSEMENT
L’utilisation d’autres accessoires que ceux qui
sont spéciquement recommandés pour cet outil
peut comporter des risques.
Pour une liste complète des accessoires, visiter le
site internet www.milwaukeetool.com ou contactez
un distributeur.
SERVICE - CANADA
Milwaukee Tool (Canada) Ltd
Monday-Friday, 7:00 AM - 4:30 PM CST
1.800.268.4015
www.milwaukeetool.ca
7
AUX ÉTATS-UNIS ET AU CANADA
GARANTIE LIMITÉE -
Chaque outil électrique* MILWAUKEE (voir exceptions ci-dessous) est
garanti à l’acheteur d’origine uniquement pour être exempt de vices
de matériaux et de fabrication. Sous réserve de certaines exceptions,
MILWAUKEE réparera ou remplacera toute pièce d’un outil électrique qui,
après examen par MILWAUKEE, s’est avérée être affectée d’un vice de
matériau ou de fabrication et ce pendant une période de cinq (5) ans**
à compter de la date d’achat, sauf indication contraire. Retourner l’outil
électrique à un centre de réparation en usine MILWAUKEE ou à un poste
d’entretien agréé MILWAUKEE, en port prépayé et assuré. Une copie
de la preuve d’achat doit être présentée lors du retour du produit. Cette
garantie ne couvre pas les dommages que MILWAUKEE détermine être
causés par des réparations ou des tentatives de réparation par quiconque
autre que le personnel agréé par MILWAUKEE, ou par des utilisations
incorrectes, des altérations, des utilisations abusives, une usure normale,
une carence d’entretien ou des accidents.
Usure normale : Plusieurs outils électriques requièrent un remplacement
et un entretien périodique de leurs pièces pour un meilleur rendement.
Cette garantie ne couvre pas la réparation des pièces due à l’utilisation
normale de l’outil, y compris, mais sans s’y limiter, les mandrins, les
brosses, les cordes, les sabots de scie, les porte-lames, les joints to
riques, les joints, les amortisseurs, les lames d’entraînement, les pistons,
les percuteurs, les crochets et les rondelles à couvercle amortisseur.
*Cette garantie ne s’applique pas aux cloueuses-agrafeuses pneuma
tiques, aux pulvérisateurs à peinture sans air, aux blocs-piles pour outils
sans l, aux génératrices d’alimentation portatives à essence, aux outils à
main, aux monte-charges – électriques, à levier et à chaîne, aux vestes
chauffantes M12™, aux produits ré-usinés, ni aux produits d’essai et de
mesure. Il existe des garanties séparées distinctes pour ces produits.
**La période de garantie applicable pour les radios de chantier, le port
d’alimentation M12™, la source électrique M18™, le ventilateur de
chantier et les chariots de travail industriels Trade Titan™ est d’une durée
d’un (1) an à compter de la date d’achat. La période de garantie pour les
Câbles de nettoyage des canalisations est de deux (2) ans à compter de
la date d’achat. La période de garantie pour le Pistolet thermique compact
M18™ et Dépoussiéreur de 8 gallons est de trois (3) ans à compter de
la date d’achat. La période de garantie couvrant la DEL de la lampe de
travail à DEL et l’ampoule améliorée à DEL de la lampe de travail est
une garantie à vie du produit soumise aux limitations ci-dessus. En cas
de défaillance de la DEL ou de l’ampoule à DEL pendant son utilisation
normale, la pièce défaillante sera remplacée gratuitement.
L’enregistrement de la garantie n’est pas nécessaire pour bénécier de
la garantie en vigueur sur un outil électrique MILWAUKEE. La date de
fabrication du produit servira à établir la période de garantie, si aucune
preuve d’achat n’est fournie lorsqu’une demande de service sous
garantie est déposée.
L’ACCEPTATION DES RECOURS EXCLUSIFS DE RÉPARATION ET DE
REMPLACEMENT DÉCRITS DANS LES PRÉSENTES EST UNE CON
DITION DU CONTRAT D’ACHAT DE TOUT PRODUIT MILWAUKEE. SI
VOUS N’ACCEPTEZ PAS CETTE CONDITION, VOUS NE DEVEZ PAS
ACHETER LE PRODUIT. EN AUCUN CAS, MILWAUKEE NE SAURAIT
ÊTRE RESPONSABLE DE TOUT DOMMAGE ACCESSOIRE, SPÉCIAL
OU INDIRECT, DE DOMMAGES-INTÉRÊTS PUNITIFS OU DE TOUTE
DÉPENSE, D’HONORAIRES D’AVOCAT, DE FRAIS, DE PERTE OU
DE DÉLAIS ACCESSOIRES À TOUT DOMMAGE, DÉFAILLANCE OU
DÉFAUT DE TOUT PRODUIT, Y COMPRIS NOTAMMENT LES PERTES
DE PROFIT. CERTAINS ÉTATS ET PROVINCES NE PERMETTANT
L'EXCLUSION OU LA LIMITATION DES DOMMAGES DIRECTS OU
INDIRECTS, LES RESTRICTIONS CI-DESSUS PEUVENT NE PAS
VOUS ÊTRE APPLICABLES. CETTE GARANTIE EST EXCLUSIVE
ET REMPLACE TOUTE AUTRE GARANTIE EXPRESSE, QU’ELLE
SOIT VERBALE OU ÉCRITE. DANS LA MESURE PERMISE PAR
LA LOI, MILWAUKEE RENONCE À TOUTE GARANTIE IMPLICITE, Y
COMPRIS, MAIS SANS S’Y LIMITER, TOUTE GARANTIE IMPLICITE
DE QUALITÉ MARCHANDE OU D’ADAPTATION À UNE UTILISATION
OU À UNE FIN PARTICULIÈRE. DANS LA MESURE OÙ UNE TELLE
STIPULATION D’EXONÉRATION N’EST PAS PERMISE PAR LA LOI,
LA DURÉE DE CES GARANTIES IMPLICITES EST LIMITÉE À LA
PÉRIODE APPLICABLE DE LA GARANTIE EXPRESSE, TEL QUE CELA
EST DÉCRIT PRÉCÉDEMMENT. CERTAINS ÉTATS ET PROVINCES
NE PERMETTANT PAS DE LIMITATION DE DURÉE DES GARANTIES
IMPLICITES, LES RESTRICTIONS CI¬DESSUS PEUVENT DONC NE
PAS VOUS ÊTRE APPLICABLES. LA PRÉSENTE VOUS CONFÈRE
DES DROITS LÉGAUX PARTICULIERS; VOUS BÉNÉFICIEZ ÉGALE
MENT D’AUTRES DROITS QUI VARIENT D’UN ÉTAT À UN AUTRE.
Cette garantie s’applique aux produits vendus aux États-Unis et au
Canada uniquement.
Veuillez consulter la rubrique Centre SAV Milwaukee, dans la sec
tion Pièces et Services du site Web de MILWAUKEE, à l’adresse
www.milwaukeetool.com, ou composer le 1-800-SAWDUST (1-800-729-
3878) an de trouver le centre de service de votre région le plus proche
pour l’entretien, sous garantie ou non, de votre outil électrique Milwaukee.
-
-
-
-
-
GARANTIE LIMITÉE – MEXIQUE,
AMÉRIQUE CENTRALE ET CARAÏBES
TECHTRONIC INDUSTRIES' garantit le produit pendant 5 ans à partir
de la date d’achat d’origine.
Le présent bon de garantie couvre tous les vices de matériau et de
fabrication que peut afcher ce produit.
Pour assurer la validité de la présente garantie, veuillez présenter ce
bon de garantie, estampillé du sceau du distributeur ou du magasin où
le produit a été acheté, au centre de réparations agréé. Si le bon de
garantie n’a pas été estampillé, veuillez fournir la preuve d’achat d’origine
au centre de réparations agréé.
Pour un entretien des pièces, des accessoires ou des composants,
composer sans frais le 1-800-030-7777 an d’obtenir les coordonnées
du centre de réparations agréé le plus près
Procédure pour assurer la validité de la garantie
Présenter le produit au centre de réparations agréé, accompagné du
bon de garantie estampillé du sceau du distributeur ou du magasin où
le produit a été acheté. Toute pièce défectueuse ou tout composant
défectueux sera remplacé(e) sans frais. Milwaukee assume tous les frais
de transport liés à ce processus de garantie.
Exceptions
Cette garantie ne s’applique pas dans les situations suivantes :
a) Si le produit a été utilisé pour une n autre que celle indiquée dans le
guide de l’utilisateur nal ou le manuel d’instructions.
b) Si les conditions d’utilisations ne sont pas habituelles.
c) Si le produit a été modié ou réparé par une personne non autorisée
par TECHTRONIC INDUSTRIES.
Remarque : Si le cordon électrique est endommagé, il doit être remplacé
par un centre de réparations agréé pour éviter les risques d’électrocution.
CENTRE DE RÉPARATIONS ET DE SERVICE
Composer le 01 (800) 030-7777
IMPORTÉ ET COMMERCIALISÉ PAR
TECHTRONIC INDUSTRIES, MEXIQUE, SA DE CV
Av President Masarik #29 piso 7, Col. Polanco V Sección
CP 11560, Deleg. Miguel Hidalgo, CDMX
Modèle :
Date d’achat :
Sceau du distributeur ou du magasin :
INSTRUCCIONES
IMPORTANTES DE
SEGURIDAD
ADVERTENCIA Lea y
comprenda todas las instrucciones. Al utilizar
aparatos eléctricos, siempre se deben seguir las
precauciones básicas, incluyendo las siguientes:
• Antes de utilizar la linterna, lea este manual del op-
erador, el manual de su batería y cargador y todas
las etiquetas de la batería, el cargador y la lámpara.
Infórmese acerca de las aplicaciones y limitaciones de
su lámpara, así como los riesgos potenciales relacionados con este tipo de herramienta.
• Lea y comprenda todas las instrucciones antes de
utilizar el aparato.
• Para re
ducir el riesgo de lesiones, se requiere supervisión
estrecha al utilizar un aparato cerca de donde hay niños.
• Advertencia - La lente puede calentarse durante el
uso. Para reducir el riesgo de quemaduras, no toque
la lente caliente.
• Cuando no se esté usando, guarde la lámpara fuera
del alcance de los niños. Las lámparas calientes
pueden ser peligrosas en manos de menores de edad.
•
Adecuado para lugares con la lluvia y húmedo.
Guarde en interiores.
8
• Las baterías deben recargarse únicamente con el car-
PRECAUCIÓN
C
US
gador especicado por el fabricante. Un cargador que
pudiera ser adecuado para un tipo de batería puede crear
un riesgo de incendio cuando se usa con otra batería.
• Utilice la lámpara únicamente con baterías especícamente diseñadas para la misma. El uso de otras
baterías puede crear un riesgo de incendio.
• Cuando la batería no esté en uso, manténgala
alejada de objetos metálicos como sujetapapeles,
monedas, llaves, clavos, tornillos u otros objetos
metálicos pequeños que puedan formar una conexión de una terminal a otra. Provocar un cortocircuito
al juntar las terminales de las baterías puede causar
chispas, quemaduras o un incendio.
• Bajo condiciones de maltrato, el líquido puede ser
expulsado de la batería, evite el contacto. En caso
de contacto accidental, lave con agua. Si el líquido
entra en contacto con los ojos, busque además
ayuda médica. El líquido expulsado de la batería puede
causar irritación o quemaduras.
• No use una batería o herramienta que se haya
dañado o modicado. Las baterías dañadas o modi-
cadas pueden mostrar un comportamiento impredecible, causando incendios, explosión o riesgo de lesión.
• No exponga una batería o herramienta al fuego
o a temperatura excesiva. La exposición a fuego o
temperatura a más de 130° C (265° F) puede causar
explosiones.
• Siga todas las instrucciones de carga y no cargue
la batería o la herramienta fuera del rango de temperatura especicado en las instrucciones. La carga
incorrecta o a temperaturas fuera del rango especicado
puede dañar la batería y aumentar el riesgo de incendio.
• Nunca dé servicio a baterías dañadas. Únicamente el
fabricante o proveedores de servicio autorizados deben
dar servicio a las baterías.
• Conserve las etiquetas y las placas nominales.
Contienen información importante. Si son ilegibles o no
están presentes, comuníquese con un centro de servicio
MILWAUKEE para obtener un reemplazo gratuito.
GUARDE ESTAS
INSTRUCCIONES
SIMBOLOGÍA
Volts
Corriente continua
No mire directamente el haz
Canadá y Estados Unidos
Cat. No.. .................................................... 2120-20
Volts.............................................................. 18 CD
Tipo de batería .............................................M18™
Tipo de cargador ..........................................M18™
Protección de ingreso ...................................... IP67
UL Listing Mark para
ESPECIFICACIONES
Luz intensa -
DESCRIPCION FUNCIONAL
1. Cabeza
2. Postes de extensión
3. Botones de extensión
4. Soporte de liberación
de la extensión
5. Botón de liberación de la pata
6. Empuñaduras
7. Patas
8. Compartimiento para baterías
9. Pestillo de la puerta de la
batería
10. Indicador de ONE-KEY
11. Indicador de iluminación
12. Botón de encendido
13. Selector de iluminación
10
11
9
6
1
2
3
4
5
8
12
6
13
7
ENSAMBLAJE
ADVERTENCIA Recargue
la batería sólo con el cargador especicado para
ella. Para instrucciones especícas sobre cómo
cargar, lea el manual del operador suministrado
con su cargador y la batería.
Cómo insertar/extraer la batería
Desenganche la puerta de la batería
y abra el acceso al compartimiento
de la batería.
Para insertar la batería, deslícela
hacia el interior del compartimiento
de la batería. Inserte la batería
hasta que los pestillos de la misma
se traben.
Fermez et remettez le loquet du
compartiment des piles.
Para extraer la batería, presione ambos pestillos de
la batería y deslice la batería para sacarla del com
partimiento.
NOTA:
Asegúrese siempre de que la Junta de la
puerta de la batería esté limpia y libre de suciedad y
desechos. Cierre rmemente el pestillo de la puerta de
la batería para asegurar que el agua no pueda entrar
en el compartimento de la batería.
-
9

ADVERTENCIA Para re-
ducir el riesgo de lesiones, no mire directamente
hacia la luz cuando la lámpara esté encendida.
Para reducir el riesgo de lesiones, siempre extienda
por completo y trabe las patas en su lugar antes
de elevar los postes. La lámpara podría volcarse y
provocar lesiones.
Para reducir el riesgo de lesiones, mantenga las ma
nos alejadas del área de la carcasa al colapsar los
postes de extensión. La cabeza pudiera descender
rápidamente, pellizcando manos y dedos.
Siempre extienda y je las patas antes de elevar los
postes.
1. Para extender las patas, ponga de pie la lámpara en
2. Gire las patas hacia afuera a la posición de pie o
3. Para colapsar las patas, presione el botón de lib
Extender/contraer los postes de extensión
1. Para extender los postes, posicione y asegure
2. Jale el soporte de liberación de la
3. Presione el botón de extensión y
4. Si se necesita más altura, repita
5. Gire la cabeza a la posición de
6. Para contraer los postes, presione los botones de
7. Gire la cabeza en posición
Extender/contraer las patas
el extremo y presione el botón de liberación de la pata.
posición de estabilización. Fije el seguro de las
patas en su lugar.
eración de la pata y gire las patas a la posición de
cierre. Mantenga las manos alejadas de las patas
al momento que se contraen.
Use la posición estabilizante
al posicionar la
lámpara sobre una
zanja o agujero.
las patas.
extensión y gire la extensión al
ángulo deseado. Asegúrese de
que el soporte se je a un retén.
eleve la cabeza. Extienda el poste
a la altura deseada.
con la extensión inferior.
seada.
extensión y deslice los postes en posición. Man
tenga las manos alejadas de los soportes al momento que se contraen los
postes.
“protegida” o posición de
“uso”, luego eleve el soporte
de liberación de la exten
sión y gire la extensión a la
posición de cierre.
-
-
-
-
2
1
-
Para conocer más acerca de la funcionalidad ONEKEY para esta herramienta, consulte la referencia de
la guía de Inicio Rápido incluida con este producto o
visite milwaukeetool.com/One-Key. Para descargar la
aplicación ONE-KEY, visite App Store o Google Play
en su dispositivo inteligente.
ONE-KEY™
OPERACION
ADVERTENCIA
ducir el riesgo de lesiones, no mire directamente
hacia la luz cuando la lámpara esté encendida.
1. Inserte la(s) batería(s). Cierre y je la puerta de
la batería
2. Presione el botón
la lámpara.
3. Presione los botones - y + para elegir entre Alto,
Medio y Bajo.
NOTA: la lámpara se encenderá a la iluminación
seleccionada la próxima vez que se encienda.
4. Presione el botón
la lámpara.
NOTA: ccuando se instalan varias baterías, la segunda
batería insertada iniciará su operación cuando la prim
era batería insertada haya agotado la carga.
ADVERTENCIA
el producto como se muestra a continuación.
Puede caerse.
Usar la lámpara
de encendido para encender
de encendido para apagar
Para re-
-
No coloque
Cabeza girada para
posición de “uso”. Gire
180° para la posición
“protegida”.
10

MANTENIMIENTO
ADVERTENCIA Para re-
ducir el riesgo de una lesión, desconecte siempre
la herramienta antes de darle cualquier manten-
imiento. Nunca desarme la herramienta ni trate de
hacer modicaciones en el sistema eléctrico de
la misma. Acuda siempre a un Centro de Servicio
MILWAUKEE para TODAS las reparaciones.
Mantenimiento de la lámpara de trabajo
Mantenga la lámpara de trabajo, el paquete de la batería y el cargador en buenas condiciones adoptando un
programa regular de mantenimiento. Si la lámpara de
trabajo todavía no funciona correctamente, devuelva la
lámpara de trabajo a un centro de servicio MILWAUKEE
para que se realicen reparaciones.
ADVERTENCIA
Riesgo de quemadura química. Este
dispositivo contiene una batería de
botón/tipo moneda de litio. Una batería nueva o usada puede causar quemaduras
internas graves y causar la muerte tan solo en 2
horas si se ingiere o entra al cuerpo. Siempre
asegure la cubierta de la batería. Si no se cierra
con rmeza, deje de usar el dispositivo, retire las
baterías y manténgala alejada de los niños. Si
cree que las baterías pudieron ser ingeridas o
entraron al cuerpo, busque atención médica de
inmediato.
Se usa una batería interna para facilitar toda la
funcionalidad de ONE-KEY™.
Para reemplazar la batería:
1. Retire el paquete de baterías.
2. Retire el tornillo y abra la tapa de la batería.
3. Saque el panel de las baterías y retire la batería
vieja. Mantenga fuera del alcance de los niños y
deseche correctamente.
4. Inserte la nueva batería (3V CR2032), con el lado
positivo hacia arriba.
5. Cierre la tapa de la batería y atornille con rmeza.
ADVERTENCIA
el riesgo de una explosión, no queme nunca una
batería, aun si está dañada, “muerta” o completamente descargada.
Mantenga los mangos y empuñaduras limpios, secos
y libres de aceite o grasa. Use solo jabón neutro y un
trapo húmedo para limpiar la herramienta, batería y el
cargador, ya que algunos substancias y solventes lim
piadores son dañinos a los plásticos y partes aislantes.
Algunos de estos incluyen: gasolina, turpentina,thíner,
lacas, thíner para pinturas, solventes para limpieza
con cloro, amoníaco y detergentes caseros que tengan
amonia. Nunca usa solventes inamables o combustibles cerca de una herramienta..
Batería interna
Para reducir
Limpieza
-
ACCESORIOS
ADVERTENCIA
los accesorios especícamente recomendados.
Otros accesorios puede ser peligroso.
Para una lista completa de accessorios, visite
nuestro sitio en Internet: www.milwaukeetool.com o
póngase en contacto con un distribuidor.
Utilice sólo
SOPORTE DE SERVICIO - MEXICO
CENTRO DE ATENCION A CLIENTES
Techtronic Industries Mexico, S.A. de C.V.
Av. Presidente Masarik 29 Piso 7
11560 Polanco V Seccion
Miguel Hidalgo, Distrito Federal, México
01 (800) 030-7777 o (55) 4160-3540
O contáctanos en www.milwaukeetool.com.mx
GARANTÍA LIMITADA - E.U.A. Y CANADÁ
Cada herramienta eléctrica* de MILWAUKEE (ver excepciones a continuación) está garantizada para el comprador original únicamente de
que no tenga material y mano de obra defectuosos. Sujeto a ciertas
excepciones, MILWAUKEE reparará o reemplazará cualquier parte en
una herramienta eléctrica que tenga defectos de material o mano de
obra según lo determine MILWAUKEE mediante una revisión, por un
periodo de cinco (5) años** después de la fecha de compra a menos que
se indique lo contrario. Al devolver la herramienta eléctrica a un Centro
de Servicio de la fábrica de MILWAUKEE o a una Estación de Servicio
Autorizada de MILWAUKEE, se requiere que el ete esté pagado por
adelantado y asegurado. Se debe incluir una copia del comprobante
de compra con el producto devuelto. Esta garantía no aplica a daños
que MILWAUKEE determine que son ocasionados por reparaciones o
intentos de reparaciones realizados por una persona que no sea per
sonal autorizado de MILWAUKEE, uso indebido, alteraciones, maltrato,
desgaste normal, falta de mantenimiento o accidentes.
Desgaste normal: Muchas herramientas eléctricas necesitan un reem
plazo periódico de partes y servicio para lograr el mejor desempeño.
Esta garantía no cubre la reparación cuando el uso normal ha agotado
la vida de una parte, incluyendo sin limitar a mandriles, cepillos, cables,
zapatas de la sierra, abrazaderas de la hoja, anillos en O, sellos, pro
tectores, hojas de desatornilladores, pistones, herrajes, levantadores y
arandelas de cubierta de los protectores.
*Esta garantía no cubre clavadoras y grapadoras neumáticas, pistola
de pintura a presión, baterías inalámbricas, generadores de energía
portátil de gasolina, herramientas de mano, palanca y cadena de mano
de polipasto - eléctricas, indumentaria calefactada M12™, producto
reacondicionado y productos de prueba y medición. Existen garantías
por separado y distintas disponibles para estos productos.
**El periodo de garantía para los radios para obra, puerto de energía
M12™, fuente de poder M18™, ventiladores para obra y carretillas de
trabajo industrial Trade Titan™ es de un (1) año a partir de la fecha de
compra. El periodo de garantía para los Cables de limpieza de drenaje
es de dos (2) años a partir de la fecha de compra. El periodo de garantía
de la Pistola de calor compacta M18™ de la Extractor de polvo de 8
galones es de tres (3) años a partir de la fecha de compra. El periodo
de garantía de las lámparas de LED en la Lámpara de trabajo LED y el
Bulbo mejorado de LED para la Luz de trabajo es por la vida del producto
sujeto a las limitaciones anteriores. Si durante el uso normal el LED o
Bulbo de LED falla, la parte será reemplazada sin cargo.
No se requiere el registro de la garantía para obtener la garantía cor
respondiente a un producto de herramienta eléctrica de MILWAUKEE.
La fecha de manufactura del producto se utilizará para determinar el
periodo de garantía si no se proporciona comprobante de compra al
solicitar el servicio en garantía.
Lunes a Viernes (9am a 6pm)
-
-
-
-
11

LA ACEPTACIÓN DE LOS REMEDIOS EXCLUSIVOS DE REPARACIÓN Y REEMPLAZO AQUÍ DESCRITOS ES UNA CONDICIÓN DEL
CONTRATO PARA LA COMPRA DE TODO PRODUCTO DE MILWAU
KEE. SI USTED NO ACEPTA ESTA CONDICIÓN, NO DEBE COMPRAR
EL PRODUCTO. MILWAUKEE NO SERÁ RESPONSABLE EN NINGÚN
CASO DE DAÑOS INCIDENTALES, ESPECIALES, EMERGENTES O
PUNITIVOS NI DE NINGÚN COSTO, HONORARIOS LEGALES, GAS
TOS, PÉRDIDAS O DEMORAS ALEGADOS COMO CONSECUENCIA
DE ALGÚN DAÑO, FALLA O DEFECTO EN NINGÚN PRODUCTO,
INCLUYENDO, ENTRE OTROS, RECLAMACIONES POR PÉRDIDA DE
UTILIDADES. ALGUNOS ESTADOS NO PERMITEN LA EXCLUSIÓN
O LIMITACIÓN DE RESPONSABILIDAD POR DAÑOS INCIDENTALES
O EMERGENTES, POR LO QUE LA ANTERIOR LIMITACIÓN O EX
CLUSIÓN PODRÍA NO APLICARSE EN SU CASO. ESTA GARANTÍA
ES EXCLUSIVA Y REEMPLAZA TODAS LAS DEMÁS GARANTÍAS
EXPRESAS, ESCRITAS U ORALES. EN LA MEDIDA EN QUE LO
PERMITA LA LEY, MILWAUKEE DESCONOCE CUALQUIER GARANTÍA
IMPLÍCITA, INCLUYENDO SIN LIMITACIÓN CUALQUIER GARANTÍA
IMPLÍCITA DE COMERCIABILIDAD O IDONEIDAD PARA UN FIN O
USO ESPECÍFICO; EN LA MEDIDA EN QUE DICHO DESCONO
CIMIENTO NO SEA PERMITIDO POR LA LEY, DICHAS GARANTÍAS
IMPLÍCITAS SE LIMITAN A LA DURACIÓN DE LA GARANTÍA EXPRESA
CORRESPONDIENTE SEGÚN SE DESCRIBIÓ ANTERIORMENTE.
ALGUNOS ESTADOS NO PERMITEN LIMITACIONES SOBRE LA DU
RACIÓN DE UNA GARANTÍA IMPLÍCITA, POR LO QUE LA ANTERIOR
LIMITACIÓN PUDIERA NO APLICARSE A USTED. ESTA GARANTÍA LE
DA DERECHOS LEGALES ESPECÍFICOS Y USTED PODRÍA ADEMÁS
TENER OTROS DERECHOS QUE VARÍAN DE UN ESTADO A OTRO.
Esta garantía aplica al producto vendido en los Estados Unidos y
Canadá únicamente.
Consulte la “Búsqueda de centro de servicio” en la sección de Partes
y servicio del sitio web de MILWAUKEE en www.milwaukeetool.com o
llame al 1.800.SAWDUST (1.800.729.3878) para localizar su centro
de servicio más cercano para darle servicio con y sin garantía a una
herramienta eléctrica de Milwaukee.
-
-
-
-
-
PÓLIZA DE GARANTÍA - VALIDA
SOLO PARA MÉXICO, AMÉRICA
La garantía de TECHTRONIC INDUSTRIES es por 5 años a partir de
la fecha original de compra.
Esta tarjeta de garantía cubre cualquier defecto de material y mano de
obra en ese Producto.
Para hacer válida esta garantía, presente esta tarjeta de garantía, cer
rada/sellada por el distribuidor o la tienda donde compró el producto, al
Centro de Servicio Autorizado (ASC). O, si esta tarjeta no se ha cerrado/
sellado, presente la prueba original de compra a ASC.
Llame gratis al 01 (800) 030-7777 para encontrar el ASC más cercano,
para servicio, partes, accesorios o componentes.
Procedimiento para hacer válida esta garantía
Lleve el producto a ASC, junto con la tarjeta de garantía cerrada/sellada
por el distribuidor o la tienda donde compró el producto, y cualquier pieza
o componente defectuoso se reemplazará sin costo para usted. Cubri
remos todos los costos de ete con relación a este proceso de garantía
Excepciones
Esta garantía no tendrá validez en las siguientes situaciones:
a) Cuando el producto se use de manera distinta a la que indica el
b) Cuando las condiciones de uso no sean normales.
c) Cuando otras personas no autorizadas por TECHTRONIC INDUSTRIES
Nota: si el juego de cables está dañado, tiene que reemplazarse en un
Centro de Servicio Autorizado para evitar riesgos eléctricos.
CENTRO DE SERVICIO Y ATENCIÓN
Llame al 01 (800) 030-7777
IMPORTADO Y COMERCIALIZADO POR
TECHTRONIC INDUSTRIES, MÉXICO, SA DE CV
Av. President Masarik #29 piso 7, Col. Polanco V Sección
CP 11560, Deleg. Miguel Hidalgo, CDMX
CENTRAL Y EL CARIBE
-
-
manual del usuario nal o de instrucciones.
modiquen o reparen el producto.
Modelo:
Fecha de Compra:
Sello del Distribuidor:
MILWAUKEE TOOL
13135 West Lisbon Road
Brookeld, Wisconsin, U.S.A. 53005
58141015d2 961012180-02(A)
06/17 Printed in China
 Loading...