

Page 1

4500WestCortland Street* Chicago,IL60639* 773
-
235-9400*Fax773
-
235-3221*www.miltonindustries.com
MiltonForm # 9X027
Date:
October31,2008
Subject:
UNIVERSALPRESSURESWITCHES
INSTRUCTIONSHEET
The Milton Universal Pressure Switch is designed to replace pressure switches on most air compressor
applications. The
y
are designed to work with most major brands such a
s DeVilbiss, Sears Craftsman, Campbell
Hausfeld, Coleman
-
Powermate, Emglo, and Douglas/Shraeder
-
Bridgeport.
The Milton by Furnas Pressure
S
witches
is
ULlistedand CSA certified.
TheMilton1060 hasa 95
-
125PSI setting; the Milton 1062 has a 140
-
175PSI s
etting. Bothswitches are suitable
to replace pressure switches up to 2 HP @ 120V, 1 phase or 3 HP @ 240V 1 phase or 5 HP @ 240V 3 phase.
TheUniversal PressureSwitcheshave 4 port, ¼” femalepipefittingmanifoldsthat comecompletewith hole plugs
to
allowusageon1, 2 or 4 port applications.
Pressure switches have combination terminals so they can be used with either the quick connect (slip on
terminals) orthe standardscrewterminals,
auto-off disconnectleversand u
nloadervalve.
DDAANNGGEERR!!Hazardou
s voltage.
Will cause death or serious injury.
Toavoidelectricalshock orburn, unplug theline powercable beforeperformingpressure switchinstallationor
maintenance.
REMOVINGTHEEXISTING PRESSURE SWITCH.
1.
Turn thepressure switchauto
-
off levertoO
FF.2.Unplugthe powertothe compressor andbleedthe compressedair outof thecompressor tank.
3.
Removethe coverfromthe existingpressureswitch.
4.
Slide blackandwhitewiresoffquickconnect
OR removeblack andwhite wiresby looseningbut notremoving
screws.
5.
Thetwo greenwires areground wires. Removegroundscrewsand retain. Disconnectgroundwires.
6.
Removebothpower cablesfrompressureswitch.
7.
Removeany accessoriesi.e.regulators, gagesorsafetyvalves
that areattached to
thepressure swi
tch.8.
Ifthepressureswitchhasan
u
nloadervalveconnected,loosen½”compressionnut, anddisconnecttubing.
9.
Removepressureswitchwithawrenchbyturningcounterclockwise.
Page 2

4500WestCortland Street* Chicago,IL60639* 773
-
235-9400*Fax773
-
235-3221*www.miltonindustries.com
MiltonForm # 9X027
UNIVERSAL PRESSURE SWITCHES
–
INSTRUCTION SHEET
INSTALLATION
WARNING: M
akesure thatthe replacement pressureswitchdoes notexceedthe compressormanufacturer’s
airpressure specifications.
Seewiring diagramoninside coverofthe replacement pressure switch.
1.
Determinewhatportson the replacementpressureswitch will be
in use. Plugthose portsthatwill not bein
use. Addpipedopeto thepor
t plugs. D
o
notattachaccessories at thistime.
2.
Make sure thepressure switchis in theoff position.
3.
Attachthe pressureswitch tothecompressor,makingsurethattheUnloade
r Valveisin thesamepositionas
theoriginal
p
ressure
s
witch
u
nloader
v
alve. The
p
ressure
s
witch
u
nloader
v
alve rotatesfor ease in
installation. Re
-
connectthe
u
nloader
v
alvetubing. If the
u
nloader
v
alve wasnot previouslyin use, simply
ignorethe
u
nloader
valveonthe p
ressure
s
witch.
4.
Putpipedopeon allmalethreads. We donotrecommendusingTeflon
tape,
asparticlesof thetape tendto
clogfilter screensand regulators.
5.
Remove
p
ressure
s
witchcoverand connectany accessories to the
p
ressure
s
witch(Gages,Regulators,
and
Safety
Valves.)
6.Re-
insertt
hecablefromthemotorto the pressure s
witch.
7.
Move blackand whitewires outof the way andattachthegreenground wire totheframe,using eitherholein
theframe.
8.
Attachblackwireto T1 te
rminal. Ifusing screwtype terminals, removequick connectterminalsfrom the
replacement
p
ressure
s
witch.
9.
Attachwhitewireto T2 terminal.
10.
Reconnect linepowercableto the
pressure s
witch.
11.
Attachgreengroundwire tosecondholeinthe frame.
12.
Attach
blackwireto terminal L1(samesideasblack wire frommotorcable).
13.
Attachwhitewireto terminal L2(samesideaswhite wireform motor cable).
14.
Tuck wiresunder cover and screwcover
back onthe
p
ressure
s
witch.
WARNING: NEVER OPERATECOMPRESSORWITHO
UTPRESSURE SWITCH COVER INPLACE
Page 3
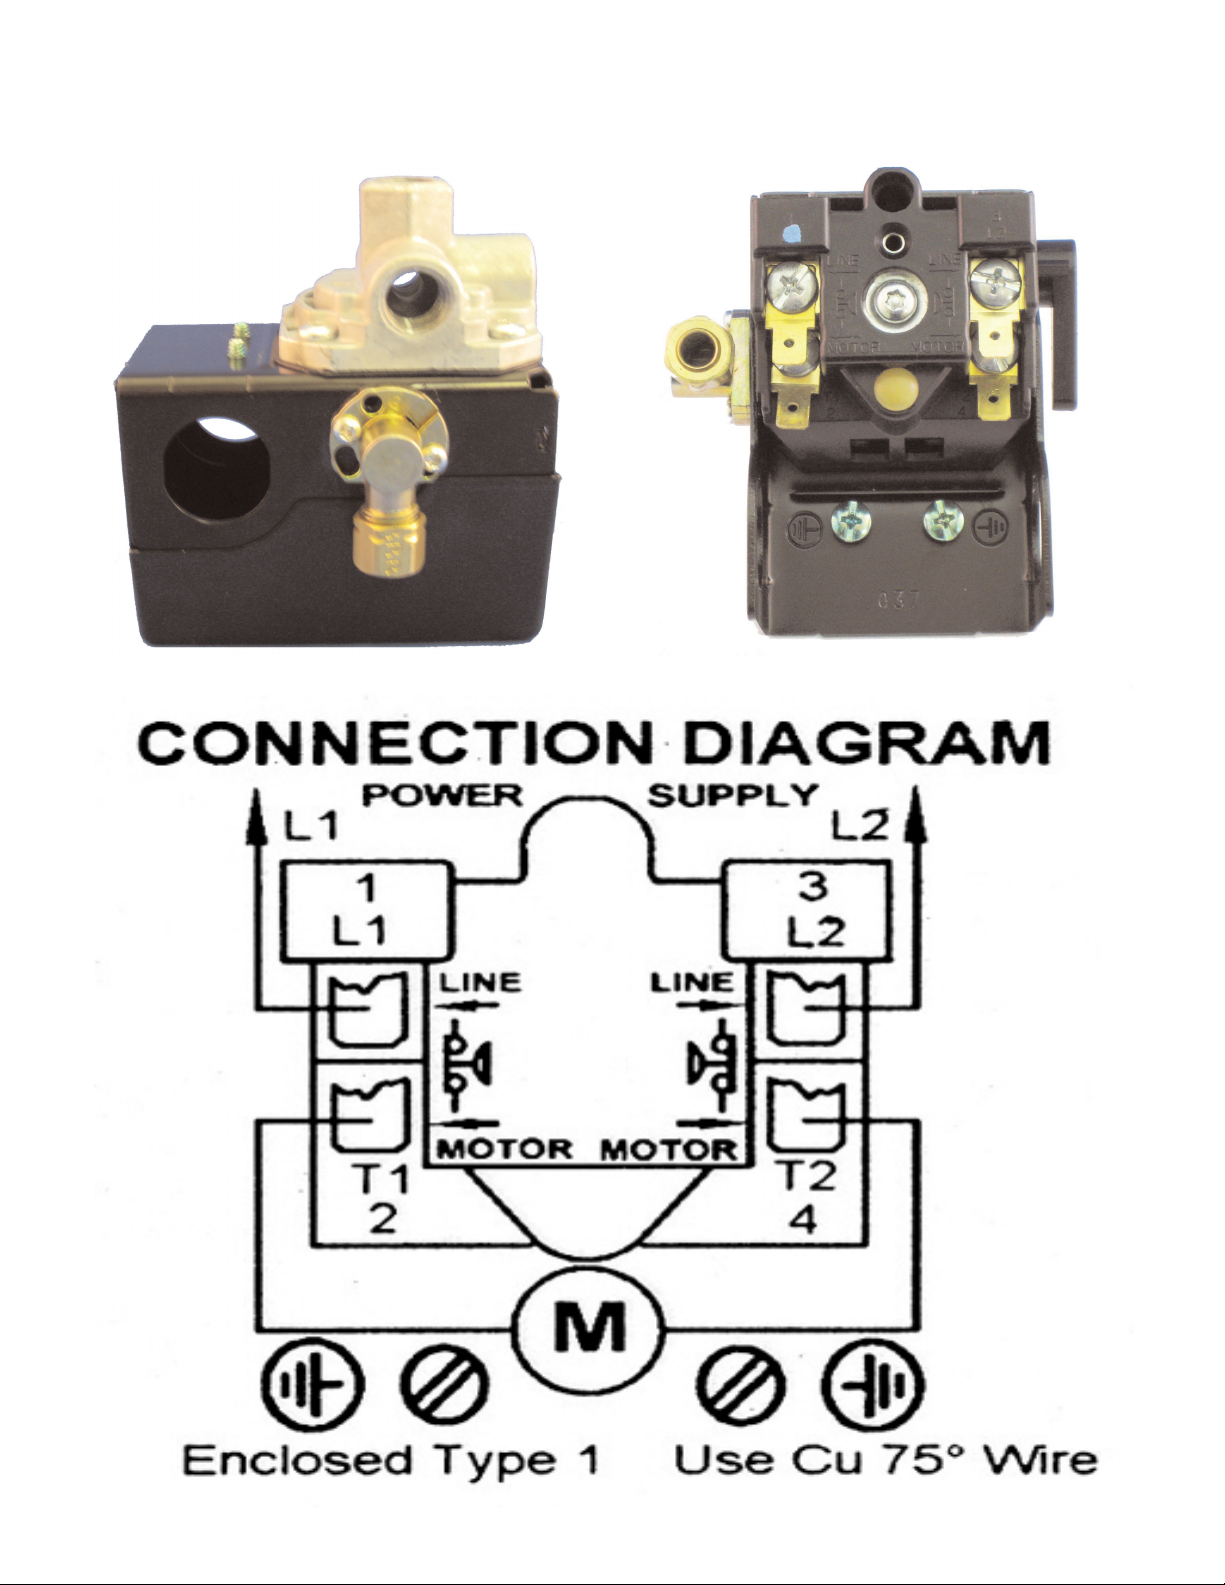
Milton - S1060 1/4" Pressure Switch, UL Listed-CSA Certified 95-125PSI
 Loading...