

Page 1
TM
http://www.millipore.com
For units produced from February 1997 to
present (cat. no. EZDI SP0 01)
View previous manual on Worldwide Web
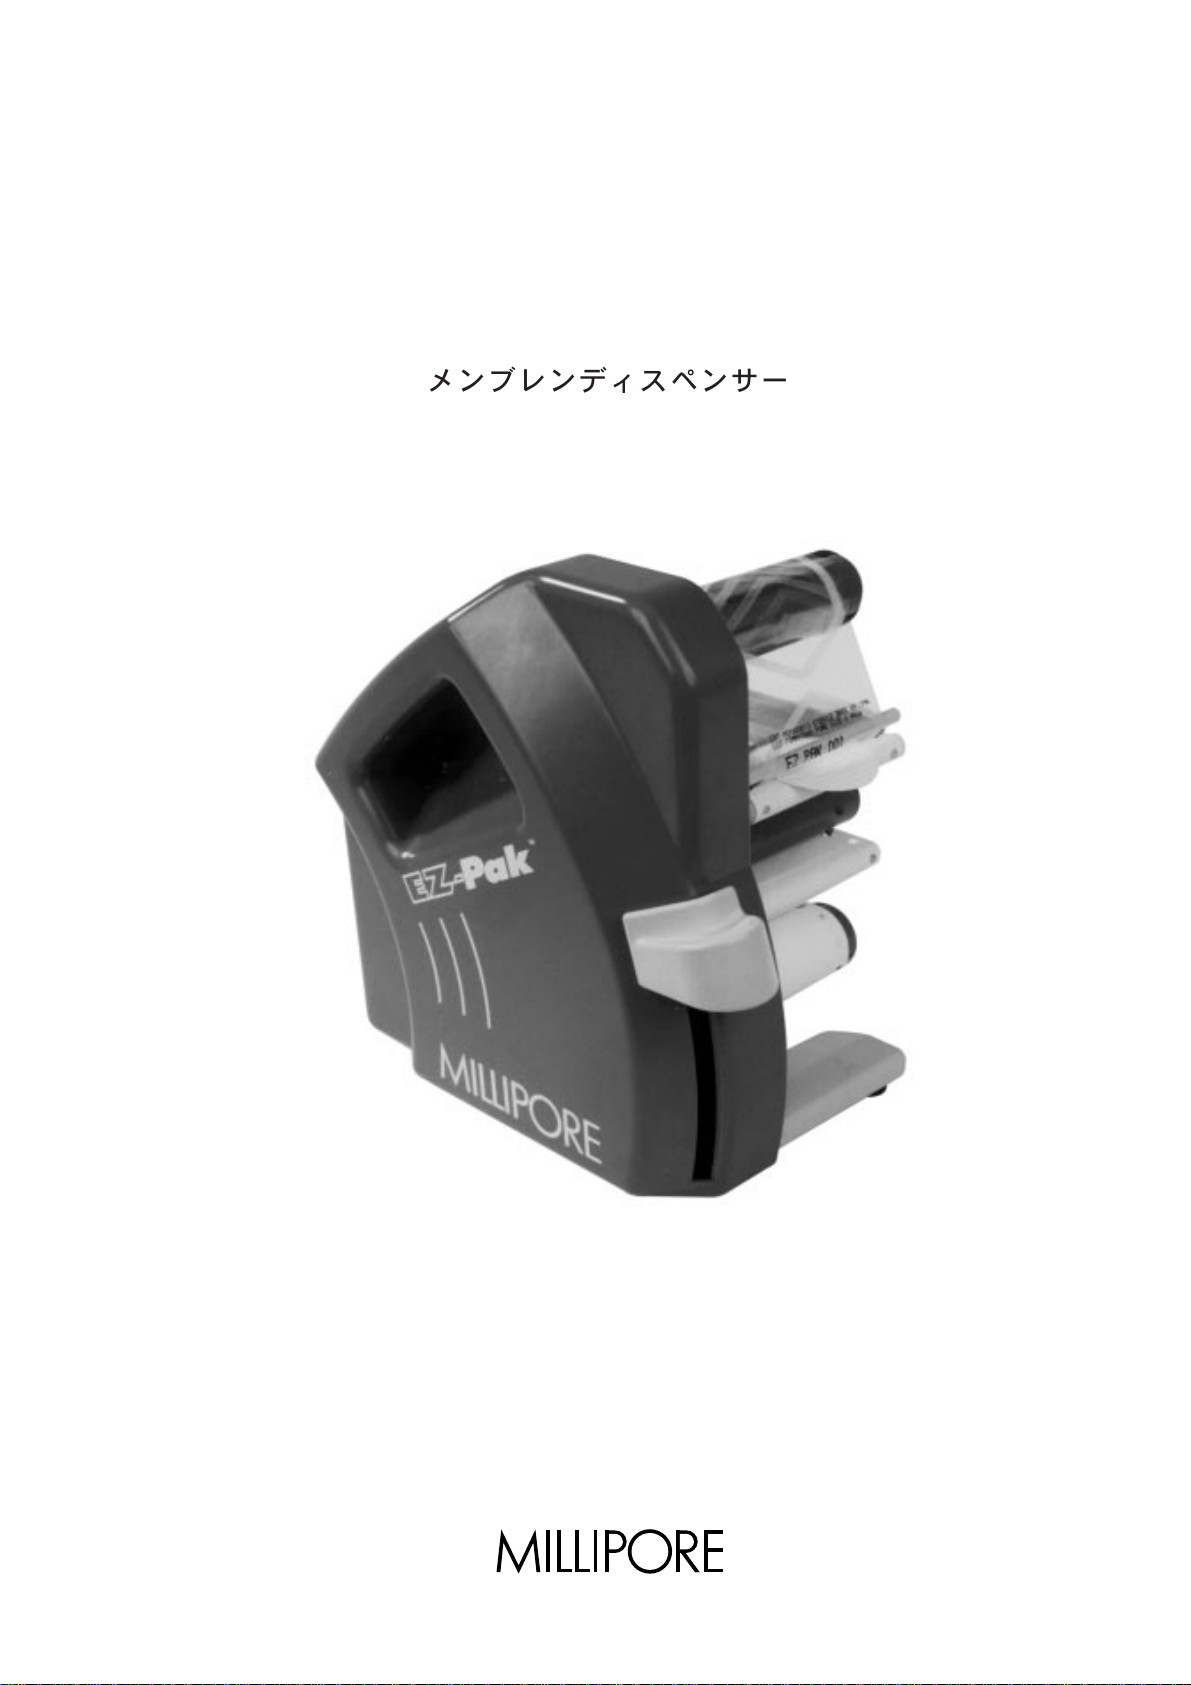
EZ--Pak
Membrane␣ Dispenser – Distributeur de membranes
Membran–Dispenser – Dispensador de membranas
Dispensatore di membrane – Membrane␣ Dispenser
!"#$%&'
Operation␣ and␣ Maintenance␣ Instructions – Manuel␣ d'utilisation␣ et␣ d'entretien
Betriebs-␣ und␣ Wartungsanleitung – Instrucciones␣ de␣ utilización␣ y␣ mantenimiento
Manuale␣ operativo␣ e␣ di␣ manutenzione
!"
Page 2

ENGLISH
○○○○○○○○○○○○○○○○○○○○○○○○○○○○○○○○○○○○○○○○○○○○○○○○○○○○○○○○○
EZ--Pak
Membrane Dispenser
Operation and Maintenance Instructions
○○○○○○○○○○○○○○○○○○○○○○○○○○○○○○○○○○○○○○○○○○○○○○○○○○○○○○○○○
1
Page 3
CONTENTS
○○○○○○○○○○○○○○○○○○○○○○○○○○○○○○○○○○○○○○○○○○○○○○○○○○○○○○○○○
Page
1-Introduction 4
2-Component Parts 5
3-Start-up 6 to 8
4-Using the Membrane Dispenser 9
5-Maintenance 10
6-Specifications 10
7-Troubleshooting 11 to 13
8-Replacing Wear Parts 14 to 16
9-Ordering Information 17
10 - Warranty 18
Millipore Offices Worldwide
○○○○○○○○○○○○○○○○○○○○○○○○○○○○○○○○○○○○○○○○○○○○○○○○○○○○○○○○○
3
Page 4
1 INTRODUCTION
○○○○○○○○○○○○○○○○○○○○○○○○○○○○○○○○○○○○○○○○○○○○○○○○○○○○○○○○○
Congratulations for your choice of EZ-PakTM membranes and dispenser
for microbiological analysis of liquid samples.
The EZ-Pak system consists of sterile membranes packed in a special
pleated band within a cartridge and specially designed equipment to
allow individual membrane dispensing.
EZ-Pak is designed to be used under standard «clean conditions»
and with traditional membrane filtration methods.
With EZ-Pak, three delicate manipulations are eliminated: opening
individual sterile envelopes, separating the membrane from its protective
papers and removing the fragile membranes from their packaging.
The EZ-Pak cartridges contain 150 black or white gridded 47-mm or
50-mm diameter membranes, and should be used with the Microfil
TM
filtration system for maximum ease of use, speed and cleanliness. Of
course, EZ-Pak is also an ideal complement to traditional filtration
equipment.
○○○○○○○○○○○○○○○○○○○○○○○○○○○○○○○○○○○○○○○○○○○○○○○○○○○○○○○○○
4
Page 5
2COMPONENT PARTS
○○○○○○○○○○○○○○○○○○○○○○○○○○○○○○○○○○○○○○○○○○○○○○○○○○○○○○○○○
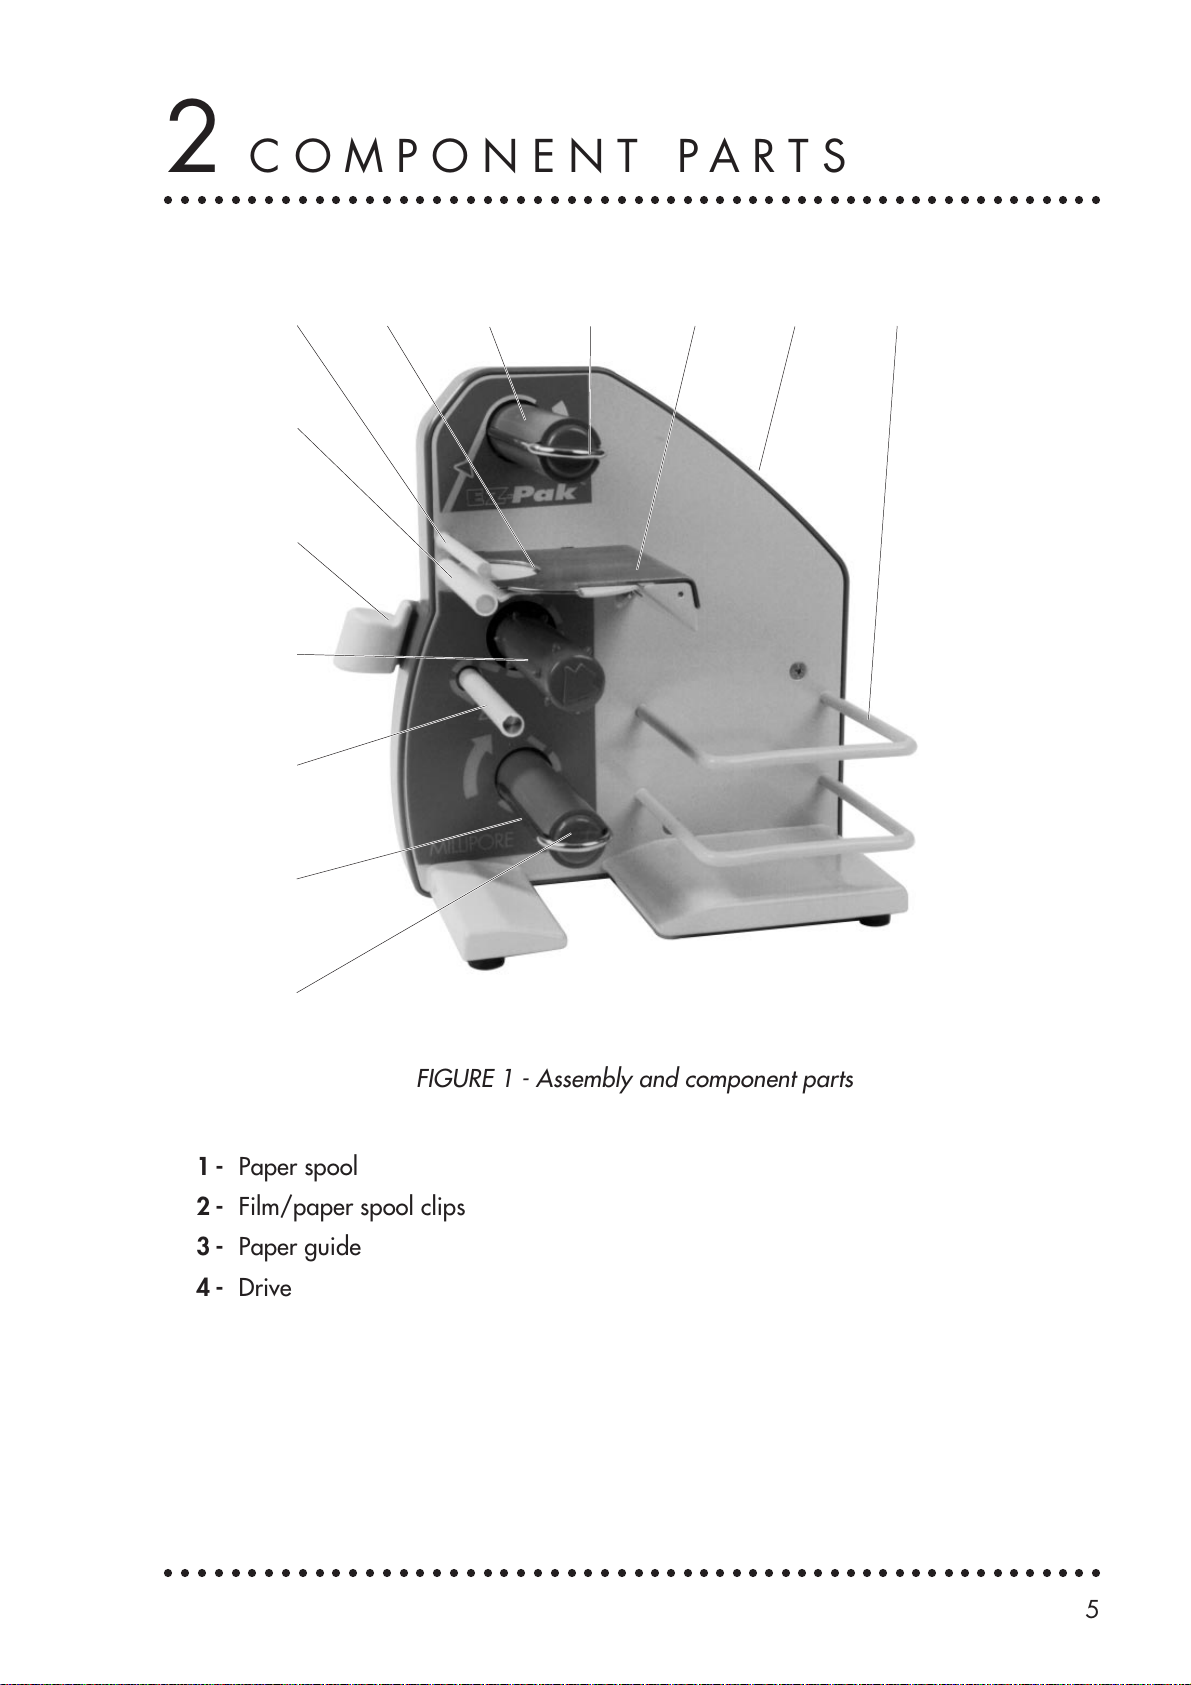
7 89210
6
5
4
3
2
11 12
1
FIGURE 1 - Assembly and component parts
1- Paper spool
2- Film/paper spool clips
3- Paper guide
4- Drive roller
5- Actuator
6- Plate
7- Separating bar
○○○○○○○○○○○○○○○○○○○○○○○○○○○○○○○○○○○○○○○○○○○○○○○○○○○○○○○○○
8- Tensionning spring
(located under the back cover)
9- Film spool
10 - Metal cover
11 - Carrying handle
(moulded in the external case)
12 - Membrane cartridge holder
5
Page 6
3START-UP
○○○○○○○○○○○○○○○○○○○○○○○○○○○○○○○○○○○○○○○○○○○○○○○○○○○○○○○○○
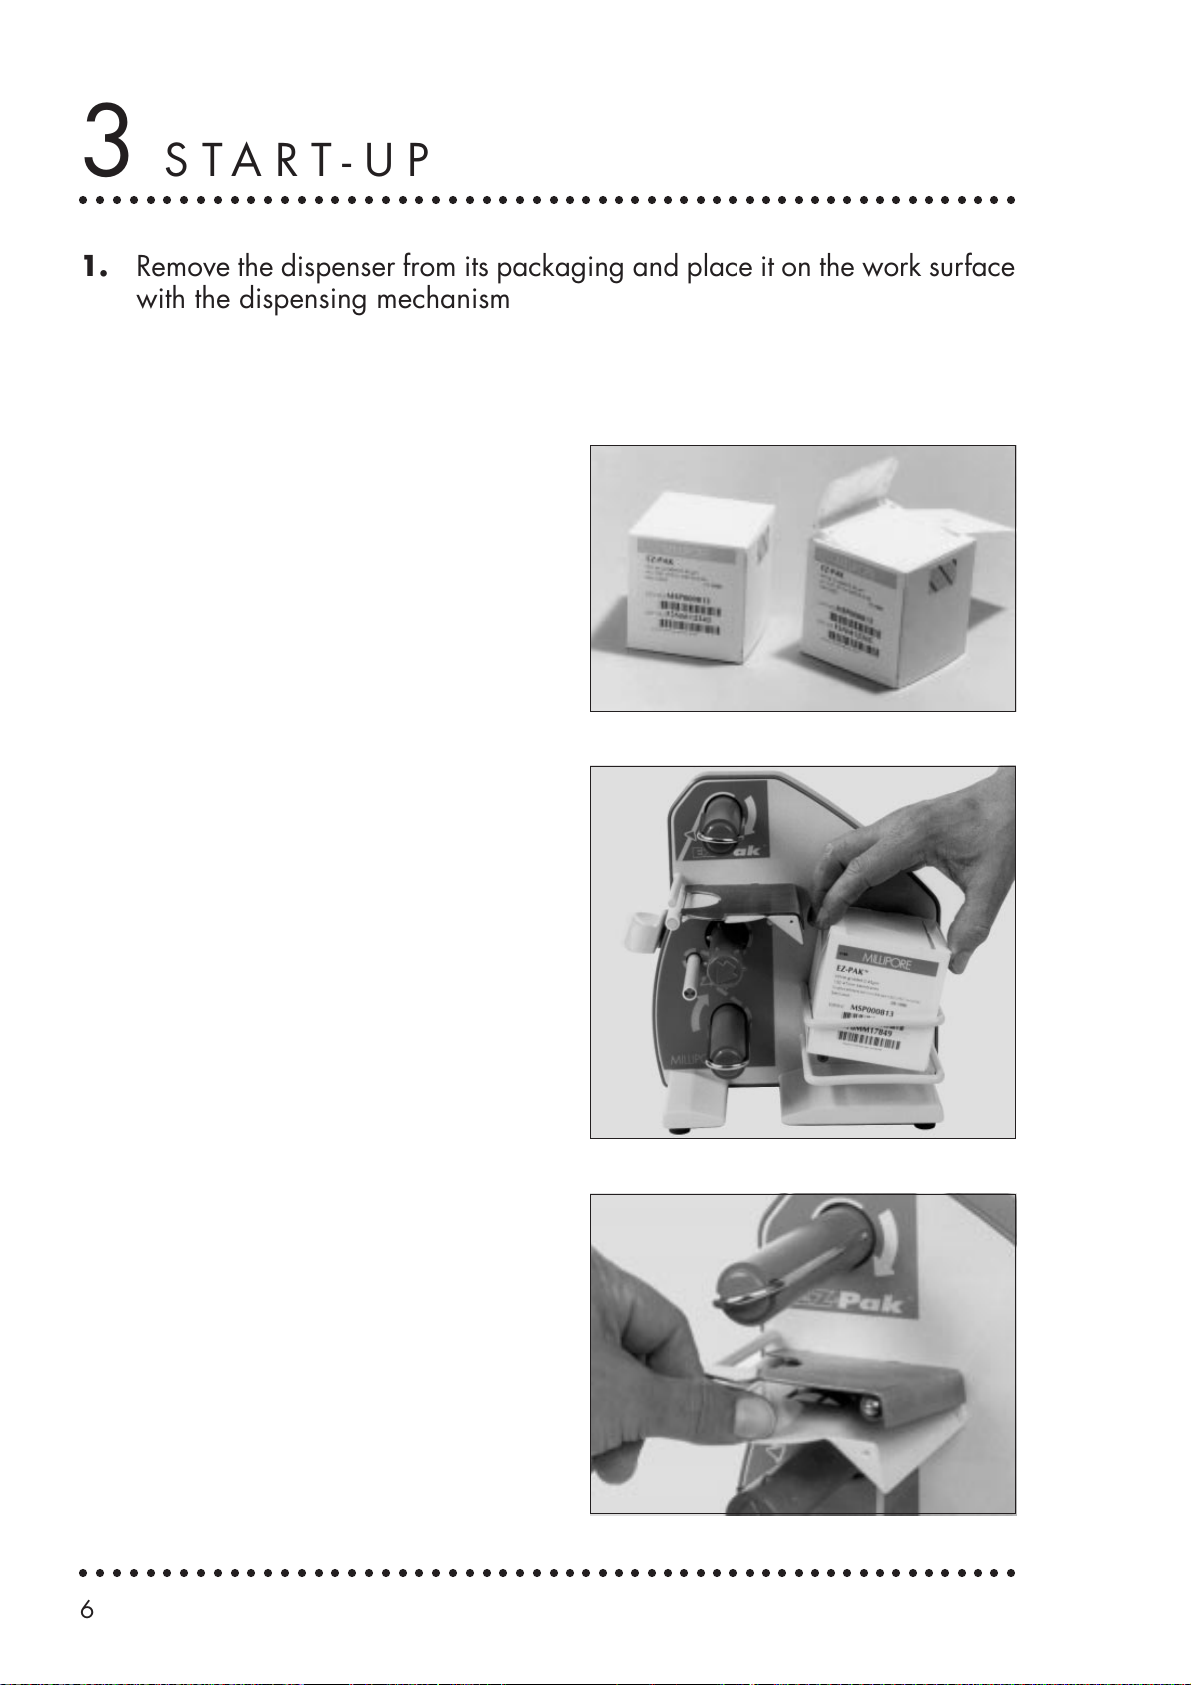
1. Remove the dispenser from its packaging and place it on the work surface
with the dispensing mechanism facing you.
2. Check that all the component parts are undamaged and in place as shown
in Figure 1.
3. Open an EZ-Pak
cartridge
cut top cover and folding it over
backwards (see Fig. 2).
4. Insert the
so that the label is visible (see
Fig. 3).
Important operation:
5.
Fully depress the
proceeding to ensure correct
indexing of the
arrow on the
point vertically upwards.
by detaching the pre-
cartridge
membranes
in the
actuator
drive roller.
drive roller
holder
Fig.␣ 2
before
The
must
Caution: Avoid letting the
actuator
Slow the movement with the
spring back into place.
Fig.␣ 3
finger.
6. Remove the
separating the
the
plate
tab (see Fig. 4).
○○○○○○○○○○○○○○○○○○○○○○○○○○○○○○○○○○○○○○○○○○○○○○○○○○○○○○○○○
6
metal cover
cover
tab from
by
Fig.␣ 4
Page 7
○○○○○○○○○○○○○○○○○○○○○○○○○○○○○○○○○○○○○○○○○○○○○○○○○○○○○○○○○
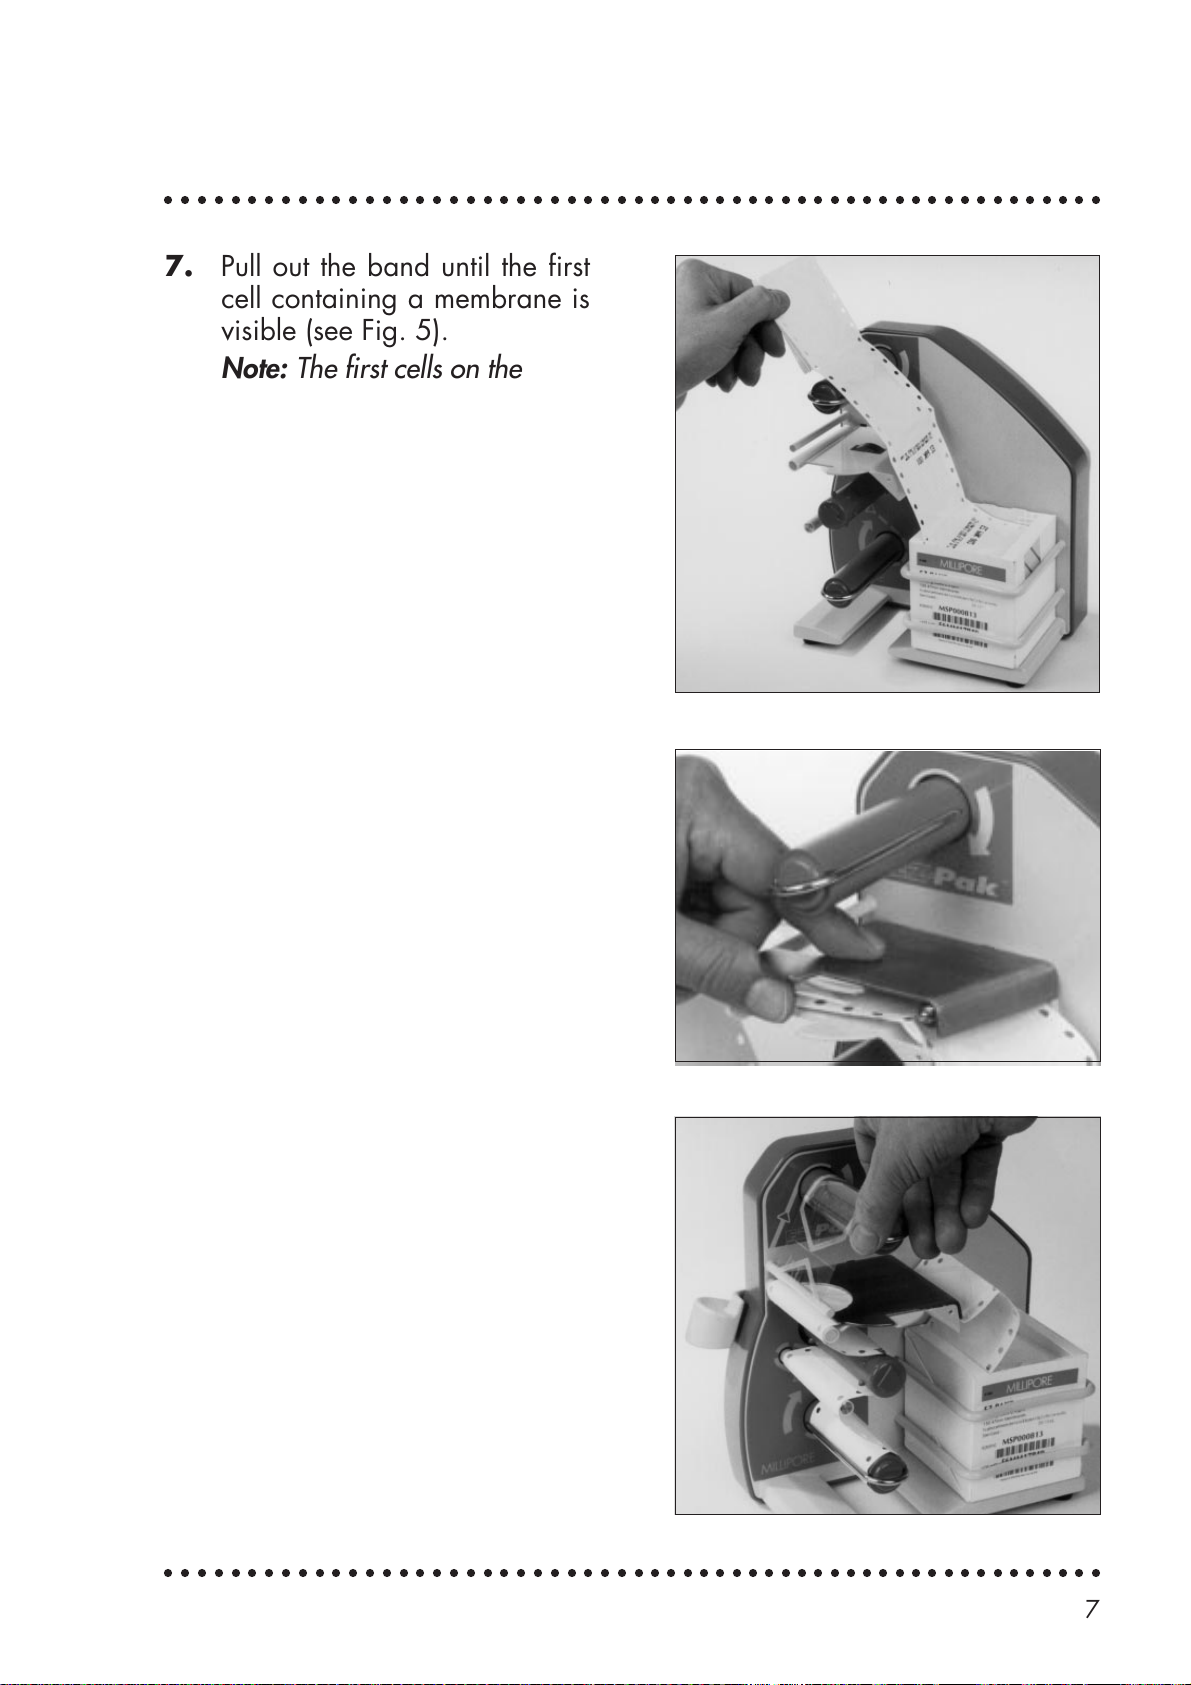
7. Pull out the band until the first
cell containing a membrane is
visible (see Fig. 5).
Note: The first cells on the band
do not contain membranes.
This
avoids wasting membranes
when installing the band.
8. Introduce the EZ-Pak band
under the
separating bar
. Pull
gently on the band to pass
3␣ empty cells under the
separating bar
.
Fig.␣ 5
9. Reinstall the
metal cover
by
inserting the pins in the
housings, then aligning the
cover
tab with the
plate
tab (see
Fig. 6). The locking ball should
audibly «snap» into place.
10. Peel away the transparent plas-
tic film from the paper backing
of the first cells up to the
separating bar.
11. Pull the backing paper through
the mechanism as shown in Figure 1.
Important operation:
Make sure the red arrow on the
paper after the second fold is
located above the vertical arrow
on the
drive roller.
Engage the
backing paper on the sprockets.
Fig.␣ 6
Fig.␣ 7
○○○○○○○○○○○○○○○○○○○○○○○○○○○○○○○○○○○○○○○○○○○○○○○○○○○○○○○○○
7
Page 8
○○○○○○○○○○○○○○○○○○○○○○○○○○○○○○○○○○○○○○○○○○○○○○○○○○○○○○○○○
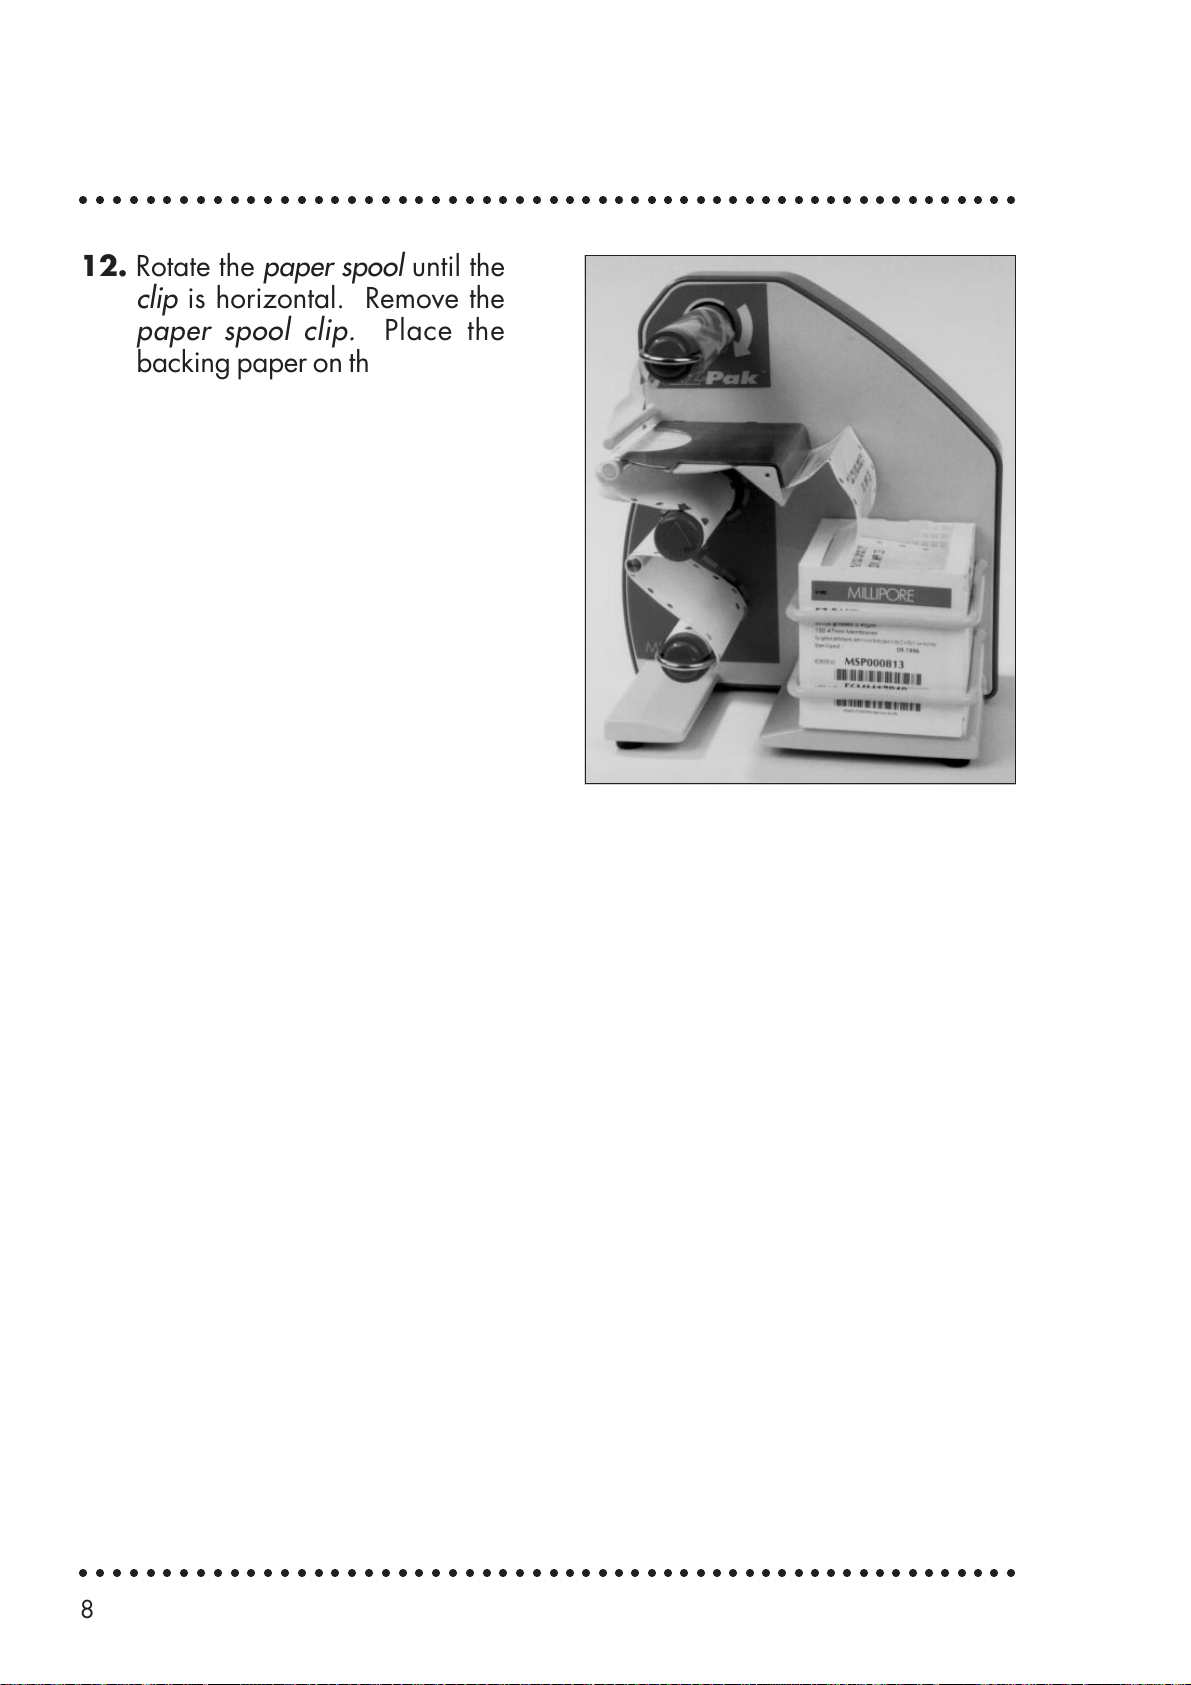
12. Rotate the
clip
is horizontal. Remove the
paper spool clip.
paper spool
Place the
until the
backing paper on the spool and
secure it with the
clip
. If
necessary, manually rotate the
paper spool
clockwise to take
up any slack.
13. If necessary, slightly pull the
backing paper back from the
cover
toward the
holder
until
there is no slack left in the paper
between the
drive roller.
the
separating bar
and
Fig.␣ 8
14. Remove the
secure it with the
firmly held between the
Manually rotate the
15. Fully depress the
film spool clip
clip,
being careful not to twist the film. The film should be
clip
film spool
actuator
once then release it, slowing the upward movement
, place the end of the
film
on the
film spool
and spool.
clockwise to take up the slack (see Fig. 7).
and
with the finger.
16. Verify that the membrane band is correctly installed by checking that the
cell dispensed is approximately one-third open (the bluish seal should be
peeled off around one-third of the edge) and that there is no slack in either
the film or the backing paper.
The EZ-Pak membrane dispenser is now ready for use.
○○○○○○○○○○○○○○○○○○○○○○○○○○○○○○○○○○○○○○○○○○○○○○○○○○○○○○○○○
8
Page 9
4USING␣ THE␣ MEMBRANE␣ DISPENSER
○○○○○○○○○○○○○○○○○○○○○○○○○○○○○○○○○○○○○○○○○○○○○○○○○○○○○○○○○
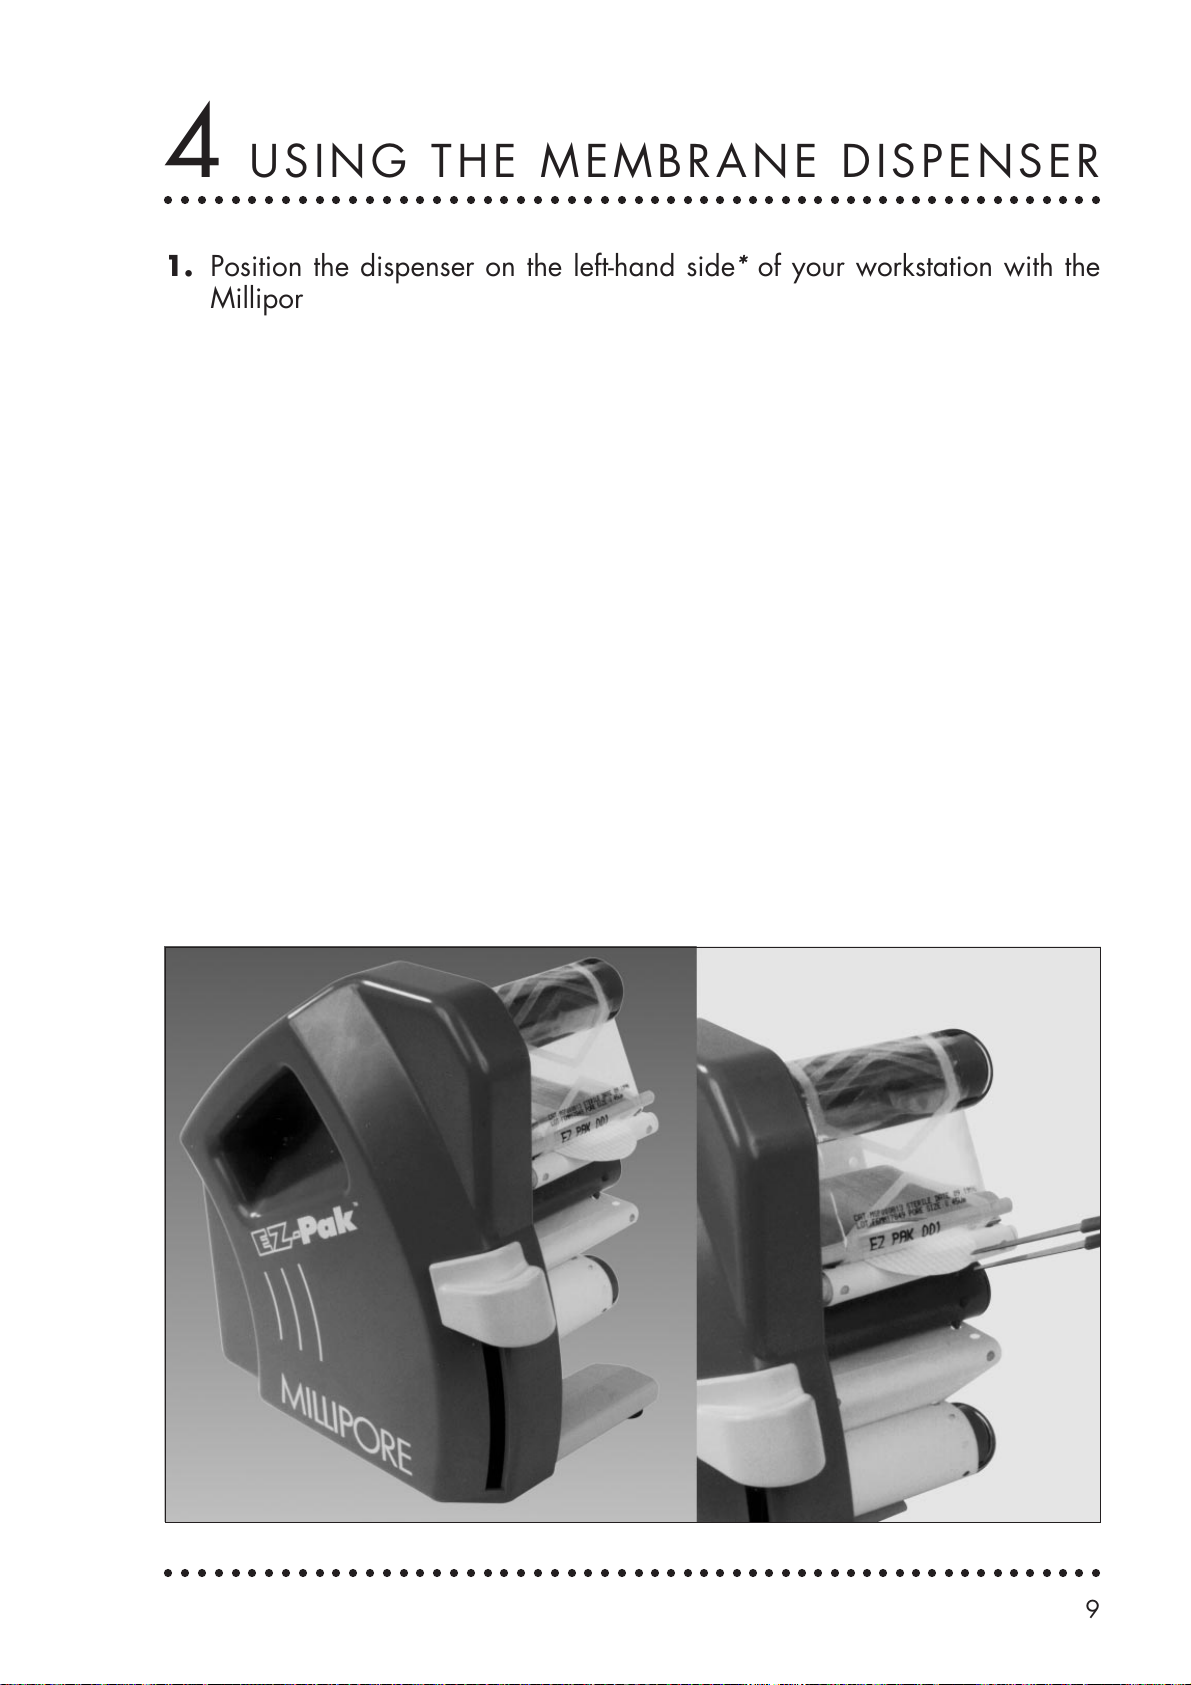
1. Position the dispenser on the left-hand side* of your workstation with the
Millipore logo directly facing you as shown in Figure 9.
2. To aseptically dispense a membrane, fully depress the
left* hand. Repeat this step if the cell released does not contain a membrane. The number 001 indicating the first membrane can be seen on the
film above the
actuator spring back into place. Slow the movement with the finger.
3. The membrane will be dispensed horizontally and held in place in the semi-
opened cell (see Fig. 9). Use a flamed and cooled forceps (see Fig.␣ 9) to
remove the membrane with the right hand
and setting it on a Microfil or conventional Millipore filtration support.
4. Proceed with filtration in the normal manner.
5. After dispensing the last membrane, pull off the
used packaging.
* invert if the operator is left handed
separating bar
. During these operations, avoid letting the
*
by pulling it straight out from the cell
clips
actuator
and remove the rolls of
with your
Fig.␣ 9
○○○○○○○○○○○○○○○○○○○○○○○○○○○○○○○○○○○○○○○○○○○○○○○○○○○○○○○○○
9
Page 10
5 MAINTENANCE
○○○○○○○○○○○○○○○○○○○○○○○○○○○○○○○○○○○○○○○○○○○○○○○○○○○○○○○○○
The case surfaces may be cleaned using a mild detergent or decontaminated
with alcohol. No other maintenance is required.
If the outside case was exposed to UV rays often for relatively long periods, it
may have become slightly dull. Wiping it off with a cloth moistened with alcohol
will restore its original appearance almost completely.
Precautions
Avoid spraying liquids into the mechanism.
Do not autoclave.
Never use the
carrying handle
If it proves necessary to lubricate certain mechanical parts, use only thick
silicone grease, never oil, and be careful not to allow the grease to come
in contact with the spools and drive belts.
film spool
for this purpose.
to lift or carry the dispenser. Use only the
6SPECIFICATIONS
○○○○○○○○○○○○○○○○○○○○○○○○○○○○○○○○○○○○○○○○○○○○○○○○○○○○○○○○○
Materials of construction
External case: Ultem®.
Internal case: Stainless steel.
Paint: Epoxy-baked.
Dimensions and Weight
Height: 240 mm. Width: 160 mm. Depth: 235 mm.
Weight empty: 2.4 kg.
○○○○○○○○○○○○○○○○○○○○○○○○○○○○○○○○○○○○○○○○○○○○○○○○○○○○○○○○○
10
Page 11
7 TROUBLESHOOTING
Send E-mail to Technical Service
○○○○○○○○○○○○○○○○○○○○○○○○○○○○○○○○○○○○○○○○○○○○○○○○○○○○○○○○○
Symptom Probable cause Corrective action
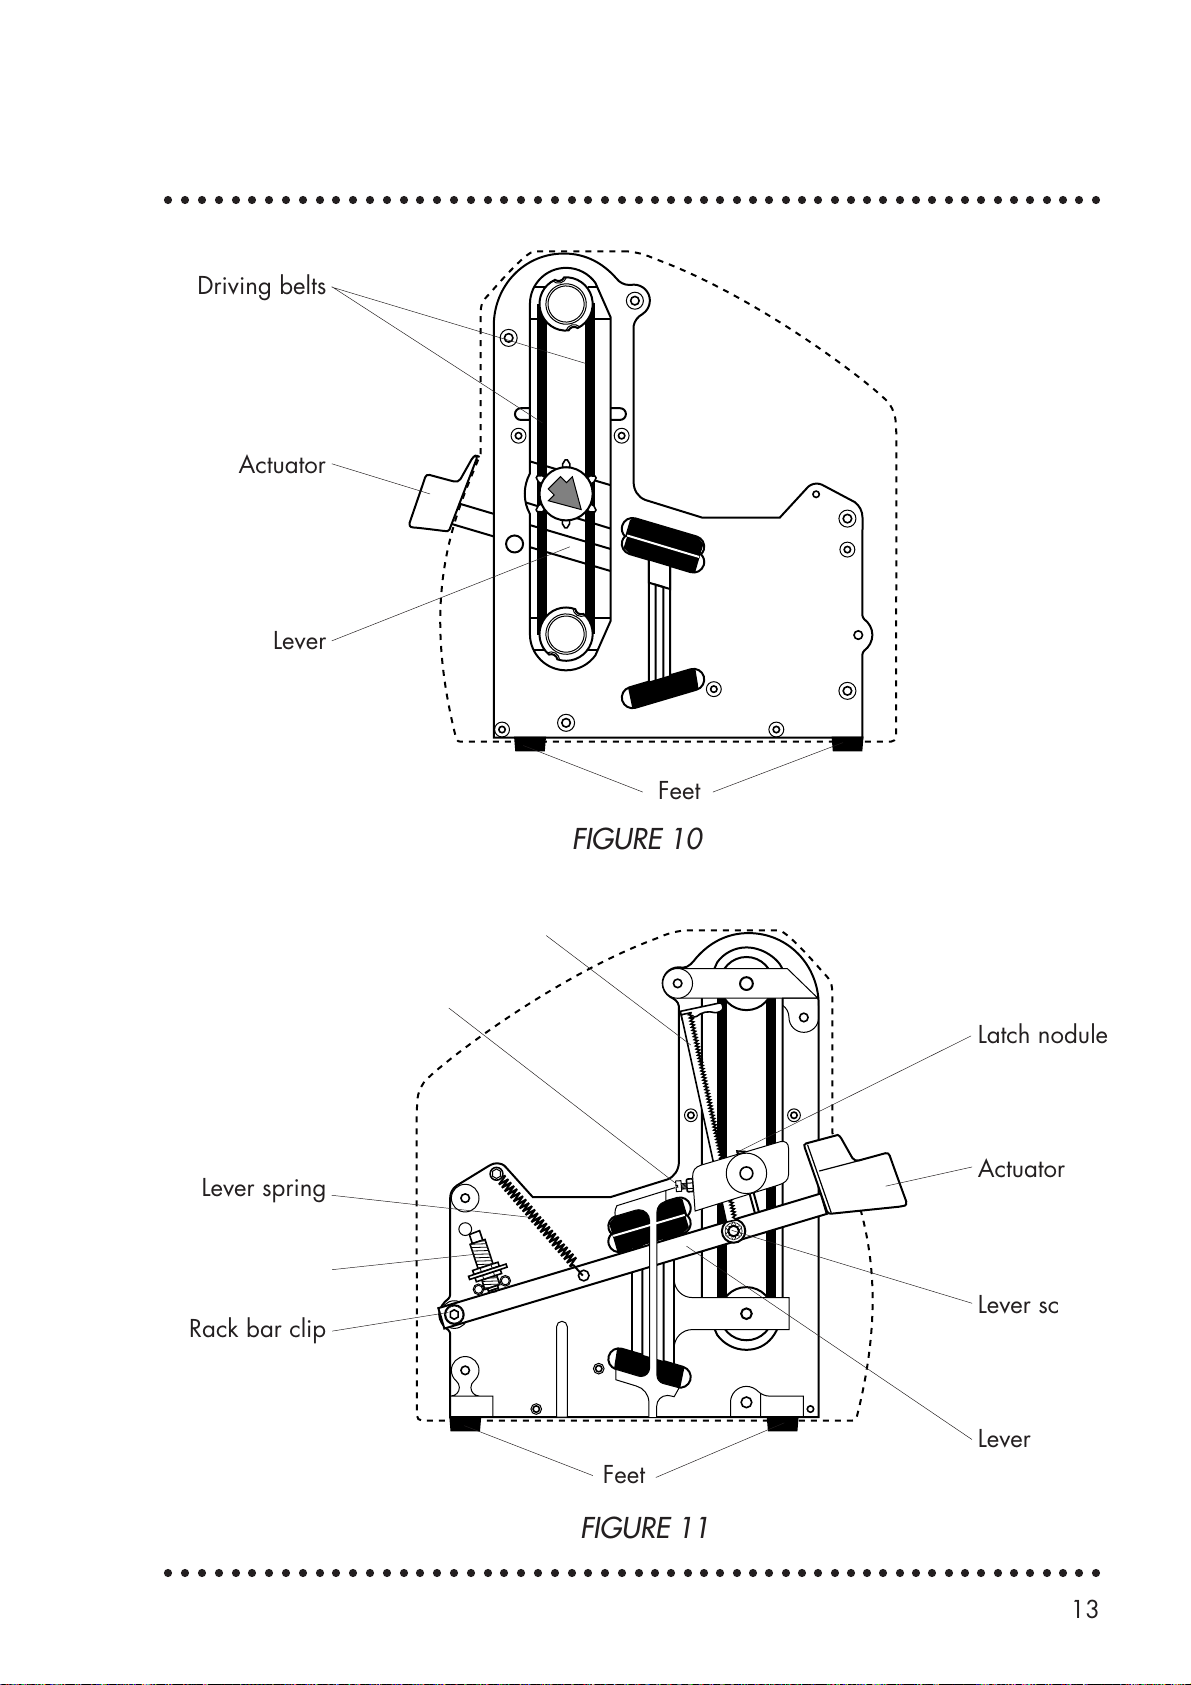
Refer to Figures 10 and 11 on the page 13 for the list of component parts.
Membranes not dispensed correctly
1. The film is not separated
from the paper backing
on the
film is pulled by the
backing).
2. The paper backing
catches on the sprockets
(slack in the backing
between
paper spool).
3. There is slack in the
paper backing between
the
roller:
plate
edge (the
drive roller
plate
and the
The film is no longer
separated from the
backing at the
edge.
The film is separated
from the backing at
the
plate
edge.
and
drive
plate
Separate the film from the
paper backing up to the
separating bar. If the fault
persists, the
driving belt is worn
The
film
is worn.
The
film spool
is worn.
The
tensioning spring
not taut enough.
film spool
spool driving belt
driving belt
is
Replace the driving belts
and the
Replace the driving belts
and the
Replace the driving belts
and the
Replace the
spring
tensioning spring
tensioning spring
tensioning spring
tensioning
and the driving belts.
.
.
.
4. The
○○○○○○○○○○○○○○○○○○○○○○○○○○○○○○○○○○○○○○○○○○○○○○○○○○○○○○○○○
actuator
drive the
The symptom persists,
but disappears when
the
all the way against
the stop.
The symptom persists
when the
depressed then raised
fully against the stop.
does not
drive roller:
actuator
actuator
is raised
is
The lever spring is no
longer taut enough.
The latch springs are
damaged.
Check whether the symptom
persists after fully
depressing the
all the way down against
the stop.
Replace the lever spring.
Replace the latch springs.
It is recommended that the
driving belts
spring
same time.
be replaced at the
pushbutton
and
tensioning
11
Page 12
○○○○○○○○○○○○○○○○○○○○○○○○○○○○○○○○○○○○○○○○○○○○○○○○○○○○○○○○○
Symptom Probable cause Corrective action
The
metal cover
is difficult to install or is not securely held in the
housing.
The locking ball is out of
adjustment.
Adjust the position of the
locking ball with a
screwdriver.
Removing a partially used band from the spools and reinstalling
it after repair:
1. Rotate the
paper spool
counterclockwise by two turns to slacken the paper
backing.
2. Remove the
3. Remove the paper backing by pulling it straight out of the
4. Take the paper backing off the sprockets on the
guide
.
paper spool clip
.
paper spool.
drive roller
and the
paper
5. To remove the film, repeat steps 1 to 3 above on the film spool.
6. Lay the film on the paper backing.
7. Cut the film and paper off at the fourth empty cell (the fourth cell ahead of
the first membrane).
8. Repeat steps 11 to 16 (page 7–8) to reinstall the band. To position the
backing paper (step 11), the vertical arrow must be located two sprocket
holes ahead of a fold (the closest fold is located to the left of the
arrowhead).
For additional information, contact your nearest Millipore office, specifying the
catalogue number and serial number on the nameplate under the dispenser.
○○○○○○○○○○○○○○○○○○○○○○○○○○○○○○○○○○○○○○○○○○○○○○○○○○○○○○○○○
12
Page 13
○○○○○○○○○○○○○○○○○○○○○○○○○○○○○○○○○○○○○○○○○○○○○○○○○○○○○○○○○
Driving belts
Actuator
Lever
Rack positioning screw
Lever spring
Lever return
damper
Rack bar clip
Feet
FIGURE 10
Rack bar
Latch nodule
Actuator
Lever screw
Lever
Feet
FIGURE 11
○○○○○○○○○○○○○○○○○○○○○○○○○○○○○○○○○○○○○○○○○○○○○○○○○○○○○○○○○
13
Page 14
8 REPLACING WEAR PARTS
○○○○○○○○○○○○○○○○○○○○○○○○○○○○○○○○○○○○○○○○○○○○○○○○○○○○○○○○○
Driving Belts and Latch Springs
These parts should be replaced together.
Tools
2.5 mm and 3 mm Allen keys
Latch spring installation tool
Set of latch belts and springs
Scissors or cutter
Cloth and cleaning agent
Procedure
1. Unscrew the 6 socket head screws with the 2.5 mm Allen key and
remove the inside cover (located on the side of the spools).
2. Remove the outside cover as follows:
Break the retaining tab located under the actuator with a screwdriver
or other strong pointed object and remove the actuator.
Remove the two feet by pushing the internal shaft and pulling on
the feet.
Unscrew the five socket head screws from the cover with the 3␣ mm
Allen key.
Push the lever down against the stop and hold it there.
Remove the cover.
3. Cut the two drive belts.
Replacing the Latch Springs
4. Lift the latch and cut the two retaining springs.
5. Remove the latch.
6. Engage the spring installation tool on the
7. Fit two new springs on the tool to place them in their grooves.
drive roller
.
8. Remove the installation tool.
9. Lift the two springs and fit the latch in its housing.
○○○○○○○○○○○○○○○○○○○○○○○○○○○○○○○○○○○○○○○○○○○○○○○○○○○○○○○○○
14
Page 15

○○○○○○○○○○○○○○○○○○○○○○○○○○○○○○○○○○○○○○○○○○○○○○○○○○○○○○○○○
Replacing the Driving Belts
10. Clean the spool grooves with a clean cloth slightly moistened with a
cleaning agent (e.g. acetone).
11. Set the two belts on a flat surface, one inside the other.
12. Engage the larger belt (the outside one) on the
film spool
and
drive roller
13. Move the belt along the spools, fitting it over the sprockets, until it is in
the grooves.
14. Engage the second, smaller belt on the
paper spool
and
drive roller
.
15. Move the belt along the spools, fitting it over the sprockets, until it is in
the grooves.
16. Install the inside and outside covers by carrying out steps 1 and 2 of
page 14 in reverse order.
17. Check that the belts are correctly positioned by operating the
actuator
several times.
Tensioning Spring
The
tensioning spring
belts and springs.
should always be replaced at the same time as the latch
.
Tools
Adjustable wrench
Tensioning spring
Procedure
1. Unscrew the spring-nut and lock-nut located under the
plate
. Remove the
two washers and the old spring.
2. Install a new spring, the flat washer then the self-locking washer, the nut
and the lock-nut.
3. Check that the spring does not rub against the sides of the oblong hole.
○○○○○○○○○○○○○○○○○○○○○○○○○○○○○○○○○○○○○○○○○○○○○○○○○○○○○○○○○
15
Page 16
○○○○○○○○○○○○○○○○○○○○○○○○○○○○○○○○○○○○○○○○○○○○○○○○○○○○○○○○○
Lever Spring
Tools
2.5 mm Allen key
3 mm Allen key
Lever spring
Procedure
1. Unscrew the 6 socket head screws with a 2.5 mm Allen key and remove
the inside cover (located on the side of the spools).
2. Remove the outside cover as follows:
Break the retaining tab located under the actuator with a screwdriver
or other strong pointed object and remove the actuator.
Remove the two feet by pushing the internal shaft and pulling on
the feet.
Unscrew the five socket head screws from the cover with the 3 mm
Allen key.
Push the lever down against the stop and hold it there.
Remove the cover.
3. The spring is then accessible and can be replaced without using any
tools.
4. Install the inside and outside covers by carrying out steps 1 and 2 on in
reverse order.
For additional information, contact your nearest Millipore office, specifying
the catalogue number and serial number on the nameplate under the dispenser.
○○○○○○○○○○○○○○○○○○○○○○○○○○○○○○○○○○○○○○○○○○○○○○○○○○○○○○○○○
16
Page 17
9 ORDERING INFORMATION
○○○○○○○○○○○○○○○○○○○○○○○○○○○○○○○○○○○○○○○○○○○○○○○○○○○○○○○○○
Ordering Information
Description Catalogue No.
EZ-Pak membrane dispenser (Qty 1) EZDI SP0 01
Kit of spare parts including: EZDI KIT 01
- 3 actuators
- 1 clip
- 4 feet
- 2 sets of latch springs
- 2 sets of driving belts
- 2.5 mm and 3 mm Allen keys
- latch spring installation tool
- latch
- cover attaching screws
- 2 tensioning springs
EZ-Pak Membranes (4 cartridges, each containing 150 membranes)
EZ-Pak membranes, 0.45 µm, white, MSP0 008 13
gridded, 47 mm diameter, Q 600
EZ-Pak membranes, 0.45 µm, black, MSP0 008 14
gridded, 47 mm diameter, Q 600
EZ-Pak Membranes (150 membranes with 150 Microfil funnels)
EZ-Pak membranes, 0.45 µm, white, MZHA WG1 01
gridded, diameter 47 mm, Q150
and 6 packets of 25 Microfil funnels, 100 ml
EZ-Pak membranes, 0.45 µm, white, MZHA WG2 51
gridded, diameter 47 mm, Q150
and 5 packets of 30 Microfil funnels, 250 ml
EZ-Pak membranes, 0.45 µm, black, MZHA BG1 01
gridded, diameter 47 mm, Q150
and 6 packets of 25 Microfil funnels, 100 ml
EZ-Pak membranes, 0.45 µm, black, MZHA BG2 51
gridded, diameter 47 mm, Q150
and 5 packets of 30 Microfil funnels, 250 ml
The range of available membranes is growing rapidly. Contact your nearest
Millipore office for further information on the other types of EZ-Pak membranes or to place an order.
○○○○○○○○○○○○○○○○○○○○○○○○○○○○○○○○○○○○○○○○○○○○○○○○○○○○○○○○○
17
Page 18

10 WARRANTY
○○○○○○○○○○○○○○○○○○○○○○○○○○○○○○○○○○○○○○○○○○○○○○○○○○○○○○○○○
Millipore warrants its products against defects in manufacturing and workmanship
for a period of one (1) year from the date of delivery, provided that they have
been used under the conditions described in this manual.
Millipore offers no other warranty neither explicit nor implicit, in particular no
warranty of merchantability or fitness for a particular purpose. The terms of this
warranty, as well as information, characteristics and descriptions of Millipore
products shown on brochures and catalogues published by the Company may
not be modified without express authorization signed by a duly qualified Millipore
representative. Any written or oral interpretation not in accordance with this
warranty or to the said publications shall be considered null and void.
In case of non-respect of the terms of the above-mentioned warranty, Millipore’s
sole obligation shall be to repair or replace, at its discretion, all or part of a
product found to be defective during the period of warranty, due to defects in
workmanship or manufacturing, on condition that the customer notifies the fault
immediately.
The present service obligation cannot be considered as not having been fulfilled
if Millipore has demonstrated its good faith in repairing or replacing any defective
Millipore product or part.
Millipore cannot be held responsible for prejudice due to non-operation or
damage to property where its products could have been the cause, nor
consequently be required to award indirect damages.
The terms of this warranty do not affect the buyer’s statutory rights.
○○○○○○○○○○○○○○○○○○○○○○○○○○○○○○○○○○○○○○○○○○○○○○○○○○○○○○○○○
18
Page 19

Millipore␣ Worldwide␣ –␣ Millipore␣ dans␣ le␣ monde␣ –
Millipore␣ weltweit␣ –␣ Millipore␣ en␣ el␣ mundo␣ –
Millipore␣ nel␣ mondo – !"#$$%&
○○○○○○○○○○○○○○○○○○○○○○○○○○○○○○○○○○○○○○○○○○○○○○○○○○○○○○○○○○
AUSTRALIA
Millipore Australia Pty. Ltd.
A.C.N. 001 239 818
Private Bag No. 18
87–89 Mars Road
Lane Cove, N.S.W.2066
Tel. Toll-Free: (008) 222–111
In Sydney Area (02) 428–7333
FAX (02) 427–0611
AUSTRIA, CENTRAL EUROPE,
C.I.S., AFRICA, MIDDLE EAST
AND GULF
Millipore Ges.m.b.H.
Hietzinger Hauptstraße 145
A–1130 Wien, Austria
Tel. (43) 1 877 8926
Telex 131464 miliv a
FAX (43) 1 877 1654
BALTIC REPUBLICS
Millipore Oy
Lanttikatu 2
FIN–02770 Espoo
Finland
Tel. 358-0-804 51 10
FAX 358-0-859 66 16
BELGIUM AND
LUXEMBURG
Millipore S.A.–N.V.
Rue de la Fusée 60
Raketstraat 60
B–1130 Bruxelles–Brussels
Tel. (02) 726.88.40
FAX (02) 726.98.84
BRAZIL
Millipore Indústria
e Comércio Ltda.
Rua Prof. Campos
de Oliveira, 430
CEP 04675
São Paulo–SP
Tel. (011) 548–7011
Telex (011) 57751 MILY BR
FAX (011) 548–7923
CANADA
Millipore (Canada) Ltd.
36 Antares Drive/
Suite 700/
Nepean, Ontario, K2E 7W5
Tel. Toll-Free 1–800 Millipore
FAX (613) 225–9366
CHINA
PEOPLE’S REPUBLIC OF
Millipore China Ltd.
Room 302 Office Bldg.
Asia Jinjiang Hotel
8 Xinzhong Xijie Gongti
Bei Lu, Beijing (100027)
Tel. (86–1) 5008063
FAX (86–1) 5007372
Millipore China Ltd.
Room 615
China Hotel Office Tower
Linhua Lu
Guangzhou
Postal Code 510015
Tel. (86) 20–686217
○○○○○○○○○○○○○○○○○○○○○○○○○○○○○○○○○○○○○○○○○○○○○○○○○○○○○○○○○○
CHINA
PEOPLE’S REPUBLIC OF
Millipore China Ltd.
Suite 2806, Union Building
100 Yan An Road (E)
Shanghai 200002, P.R.C.
Tel. (86) 21–3737256
FAX (86) 21–3200236
CZECH REPUBLIC
Millipore spol.s.r.o
Obchodní Zastoupení
Rícanova 21
CZ–169 00 Praha 6
Tel. 42-2 205 13841
FAX 42-2-235 2375
DENMARK
Millipore A/S
Baldersbuen 46
DK–2640 Hedehusene
Tel. 46 59 00 23
FAX 46 59 13 14
FINLAND
Millipore Oy
Lanttikatu 2
FIN–02770 Espoo
Tel. (90) 804 51 10
FAX (90) 859 66 16
FRANCE
Millipore S.A.
BP 307
F–78054 Saint–Quentin
Yvelines Cedex
Tel. 01.30.12.70.00
Telex 698 371 F
FAX 01.30.12.71.80
GERMANY
Millipore GmbH
Hauptstraße 87
D–65760 Eschbom
Tel. 49-6196494 0
Telex 40 72 704 mil d
FAX 49-6196 439 01
HONG KONG
Millipore China Ltd.
Millipore Asia Ltd.
1406 Cityplaza 4
12 Taikoo Wan Road
Hong Kong
Tel. (852)-2-803 9111
Telex 331 40 MWBHK HX
FAX (852)-2-513 0313
HUNGARY
Millipore kft
Andor u. 47–49
H–1119 Budapest
Tel. (1) 166 86 74
(1) 185 11 22
Telex 22 30 57
FAX (1) 185 32 36
INDIA
Millipore (India) Pvt. Ltd.
50–A, 2nd Phase,
Ring Road Peenya
Bangalore 560 058
Tel. 91 (808) 394657, 396320
Telex 845–5089 MLPR IN
Cable: Millipore
FAX 91 (808) 396345
ITALY
Millipore S.p.A.
Via B. Buozzi, 4
I–20090 Vimodrone MI
Tel. (02) 25078.1
FAX (02) 2650324
Millipore S.p.A.
Via D. Sansotta 100
I–00144 Roma
Tel. (06) 5203600
FAX (06) 5295735
JAPAN
Nihon Millipore Ltd.
Dai 5 Koike Bldg. 3–12
Kitashinagawa 1–Chome
Shinagawa-Ku
Tokyo 140
Tel. (03) 3474–9111
Telex 24948 MILLIPOR J
FAX (03) 3474–9130
KOREA
Millipore Korea Ltd.
13F, Yusung Bldg.
706-25, Yoksam-Dong
Kangnam-Ku, Seoul 135–080
Tel. (82–2) 5386211
FAX (82–2) 5636253
MALAYSIA
Millipore Asia Ltd.
Malaysia Branch
B4 – 05/06, PJ. Industrial Park
Section 13 Jalan Kemajuan
46200 Petaling Jaya, Selangor
Tel. (603) 757 1322
FAX (603) 757 1711
MEXICO
Millipore S.A. de C.V.
Avenida Ingenieros Militares 85–PB
México 11230 D.F.
Tel. (525) 576–96–88
FAX (525) 576–87–06
THE NETHERLANDS
Millipore B.V.
Penningweg 33
Postbus 166
NL–4870 AD Etten-Leur (N.B.)
Tel. (076) 5022000
Telex 54 840 milwa nl
FAX (076) 5022436
NORWAY
Millipore AS
Postboks 39, Simensbraten
N–1107 Oslo
Tel. (47) 22 67 82 53
FAX (47) 22 68 53 15
POLAND
Millipore Sp.z.o.o.
Oddzial w Warszawie
Ul. Jasnodworska 7
PL–01–745 Warszawa
Tel. 22 669 12–25/663 70 31
Telex 825 422
FAX 22 663 70 33
PUERTO RICO
Millipore Corporation
Puerto Rico Branch
P.O. Box 11977
Cidra, Puerto Rico 00739
Tel. (809) 273–8495
FAX (809) 747–8449
SINGAPORE
Millipore Asia Ltd.
Singapore Branch
#07–01/02 Jumbo Industrial Bldg.
19 Kim Keat Road
Singapore 328804
Tel. (65) 253–2733
FAX (65) 254–4056
SPAIN AND PORTUGAL
Millipore Ibérica, S.A.
Avda. del Llano Castellano, 13–3°
E–28034 Madrid
Tel. 91–729 03 00
FAX 91–729 29 09
Millipore Ibérica, S.A.
Entenza, 28°
E–08015 Barcelona
Tel. 93–325 96 16
FAX 93–325 98 96
SWEDEN
Millipore AB
Box 7090
S–172 07 Sundbyberg
Tel. 08–628 69 60
FAX 08–628 64 57
SWITZERLAND
Millipore AG
Chriesbaumstrasse 6
CH–8604 Volketswil
Tel. (01) 908 30 60
Telex 82 94 08 MILAG CH
FAX (01) 908 30 80
Millipore SA
Avenue de Maillefer 43
CH–1052 Le Mont-sur-Lausanne
Tel. (021) 648 51 18
FAX (021) 648 51 37
TAIWAN
Millipore Asia Ltd.
Unit #707, 7/th, fl
136 Jen-Ai Road, Sec. 3
Taipei Tawai R.O.C.
Tel. (886–2) 7001742
FAX (886–2) 7553267
U.K. AND IRELAND
Millipore (U.K.) Ltd.
“The Boulevard”
Blackmoor Lane Watford,
Hertfordshire WD1 8YW
Tel. (01923) 816375
Telex 24191 milpor g
FAX (01923) 818297
U.S.A.
Millipore Corporation
P.O. Box 255
Bedford, MA 01730
Tel. Toll-Free
(including Massachusetts)
1-800 Millipore
or 1-800-645-5476
In Western States,
Alaska & Hawaii
800–632–2708
In Puerto Rico (809) 273-8495
IN ALL OTHER COUNTRIES
Millipore Intertech
80 Ashby Road
Bedford, MA 01730
U.S.A.
Tel. 1-617 275 9200
FAX 1-617 275 5550
Cat. No. PF 05600. Printed in France, 11/96. Copyright © 1996, Millipore Corporation, Bedford, MA, U.S.A., or affiliated company. Millipore is a registered
trademark of Millipore Corporation or an affiliated company. EZ-Pak and Microfil are trademarks of Millipore Corporation or an affiliated company.
 Loading...