

Page 1

Quick Start Guide
1
V 4.03
www.milesight.com
Page 2

Page 3

Table of Contents
Quick Start Guide
1.Package Contents
2.Hardware Overview
3.Interfaces
4. Installation
4.1 Mini (PoE) NVR 1000 Series Installation
4.2 Pro/PoE NVR 5000 Series Installation
4.3 Pro/PoE NVR 7000 Series Installation
4.4 Pro NVR 8000 Series Installation
5. Connection Overview
6. Ready to Start
......................................................................................................................
.................................................................................................................
.........................................................................................................
.....................................................................................................
................................................................................................
............................................................................................................
...........................................................
...............................................................
...............................................................
......................................................................
1
3
6
11
11
14
21
26
32
34
7. Access to NVR
7.1 Search the NVR via Smart Tools
7.2 Via WEB
7.2.1 Log-in
7.2.2 Live View
7.3 Via Monitor
............................................................................................................
.............................................................................................................
........................................................................................................
..................................................................................................
.......................................................................................................
........................................................................
35
35
36
36
38
39
www.milesight.com
Page 4
1
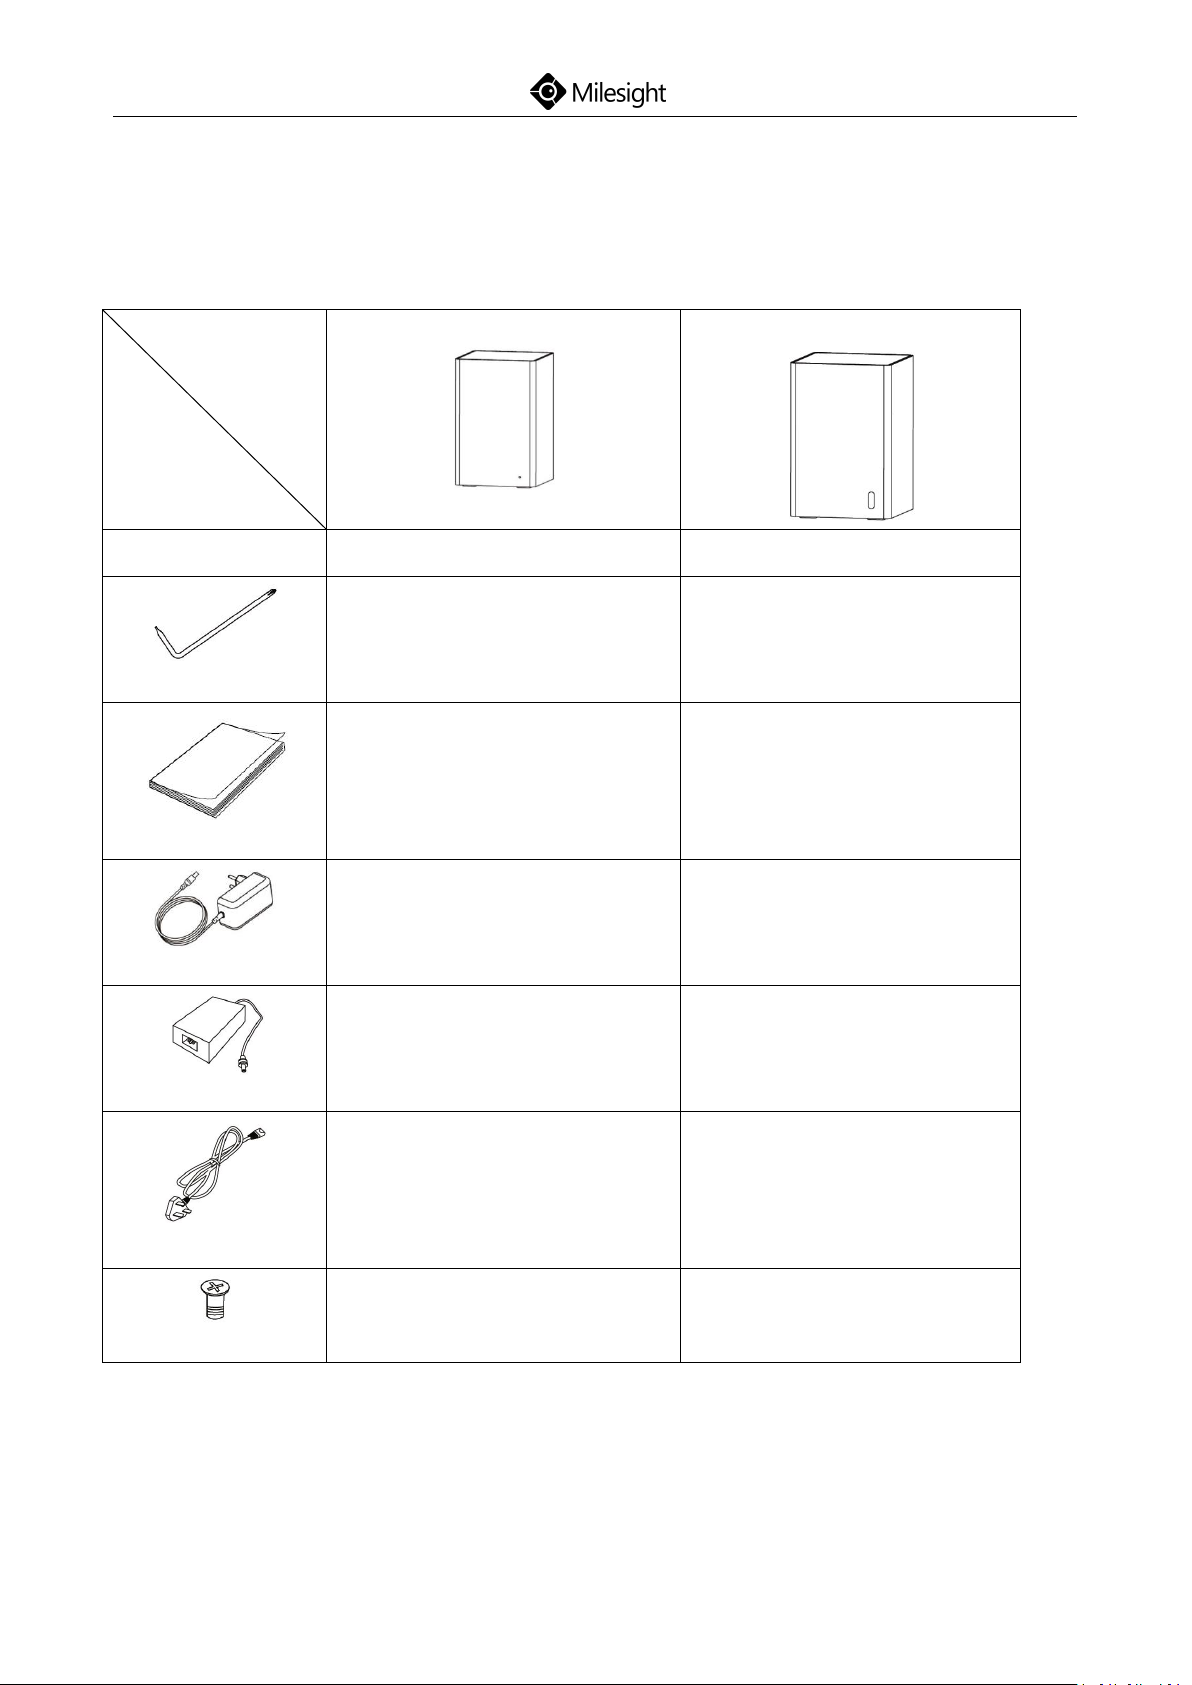
1.Package Contents
NVR
Contents
Mini NVR
Mini PoE NVR
NVR
x 1
x 1
Screwdriver
x 1
x 1
Quick Start Guide
x 1
x 1
Power Adaptor
x 1
-
Power Adaptor
-
x 1
Power Cord
-
x 1
HDD Screw
x 8
x 4
Mini (PoE) NVR:
Quick Start Guide
www.milesight.com
Page 5
2
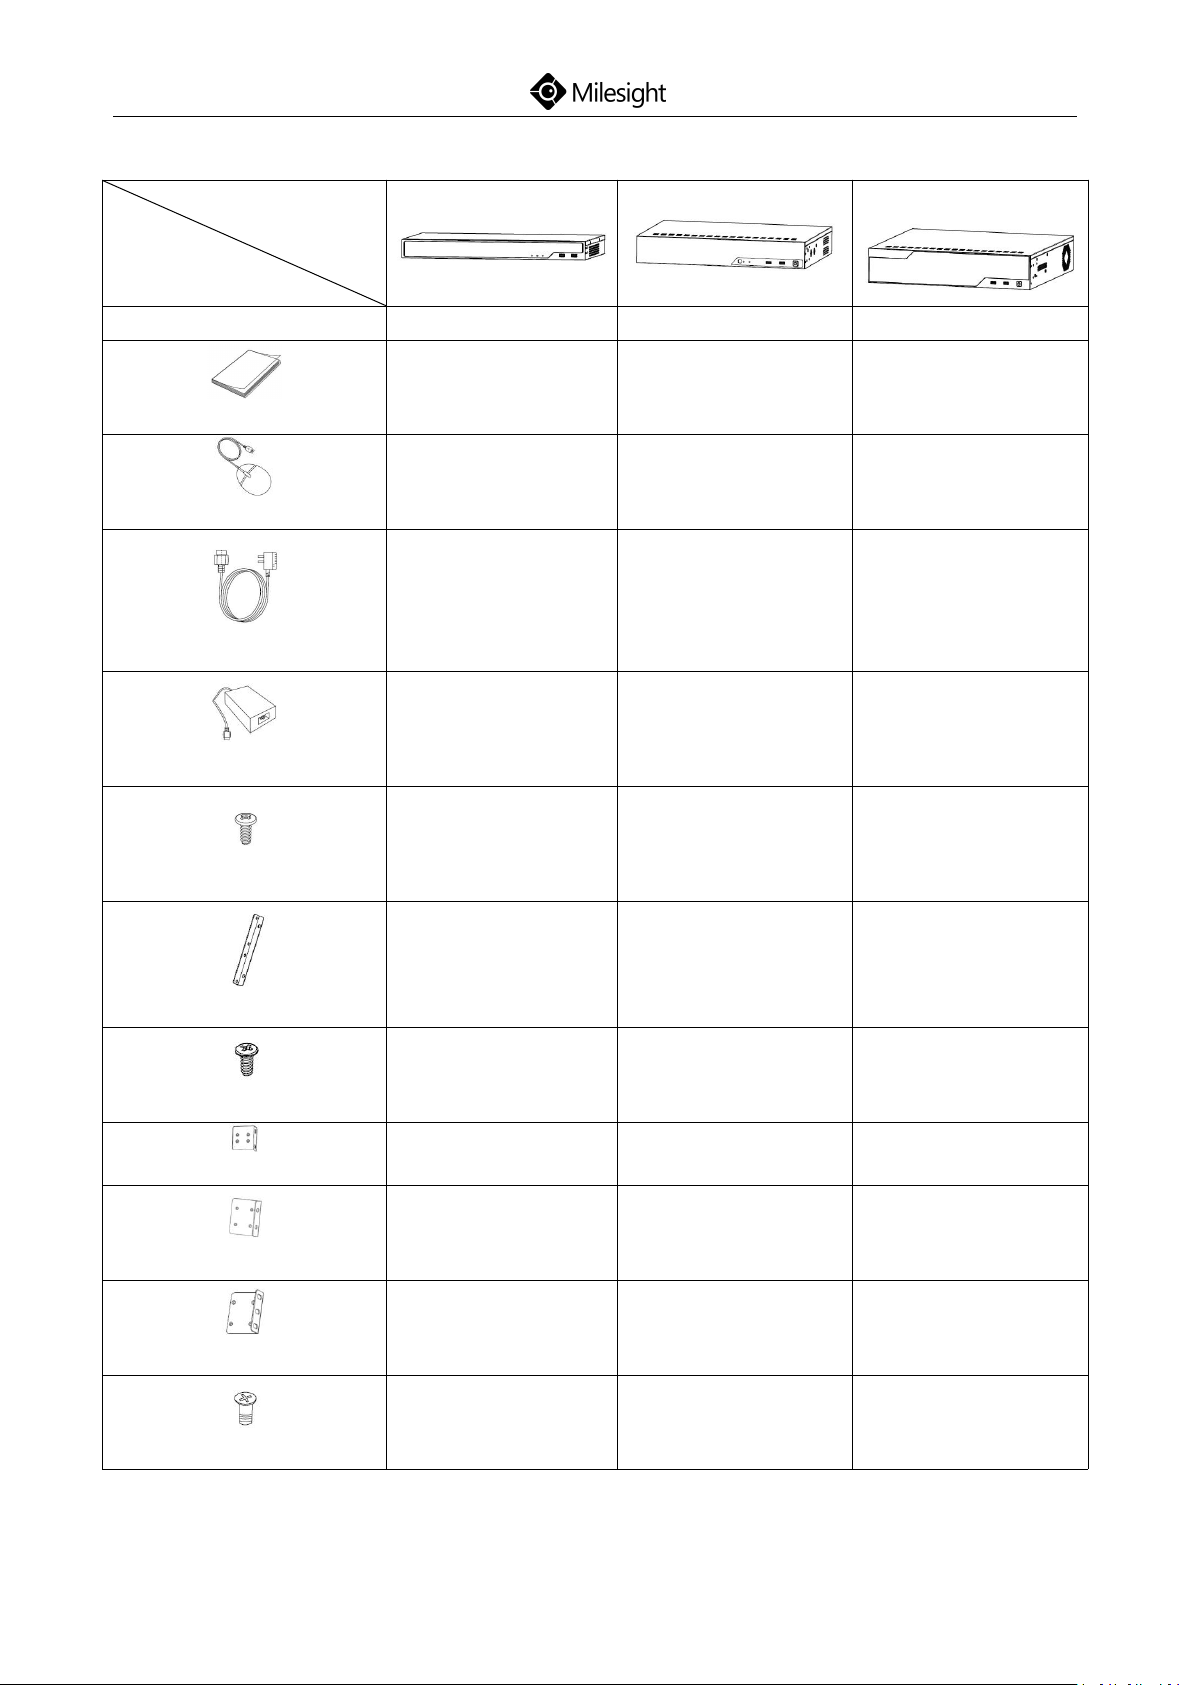
Pro/PoE NVR:
NVR
Contents
Pro/PoE 5000
Pro/PoE 7000
Pro 8000
NVR
x 1
x 1
x 1
Quick Start Guide
x 1
x 1
x 1
Mouse
x 1
x 1
x 1
Power Cord
x 1
x 1
x 1
Power Adaptor
x 1 (Pro 5000)
-
-
HDD Screw
x 12
x 16
x 32
HDD Bracket
x 4--
HDD Bracket Screw
x 8--
Mounting Bracket
x 2--
Mounting Bracket
-
x 2
-
Mounting Bracket
--x 2
Mounting Bracket Screw
x 8
x 8
x 8
Quick Start Guide
www.milesight.com
Page 6
3
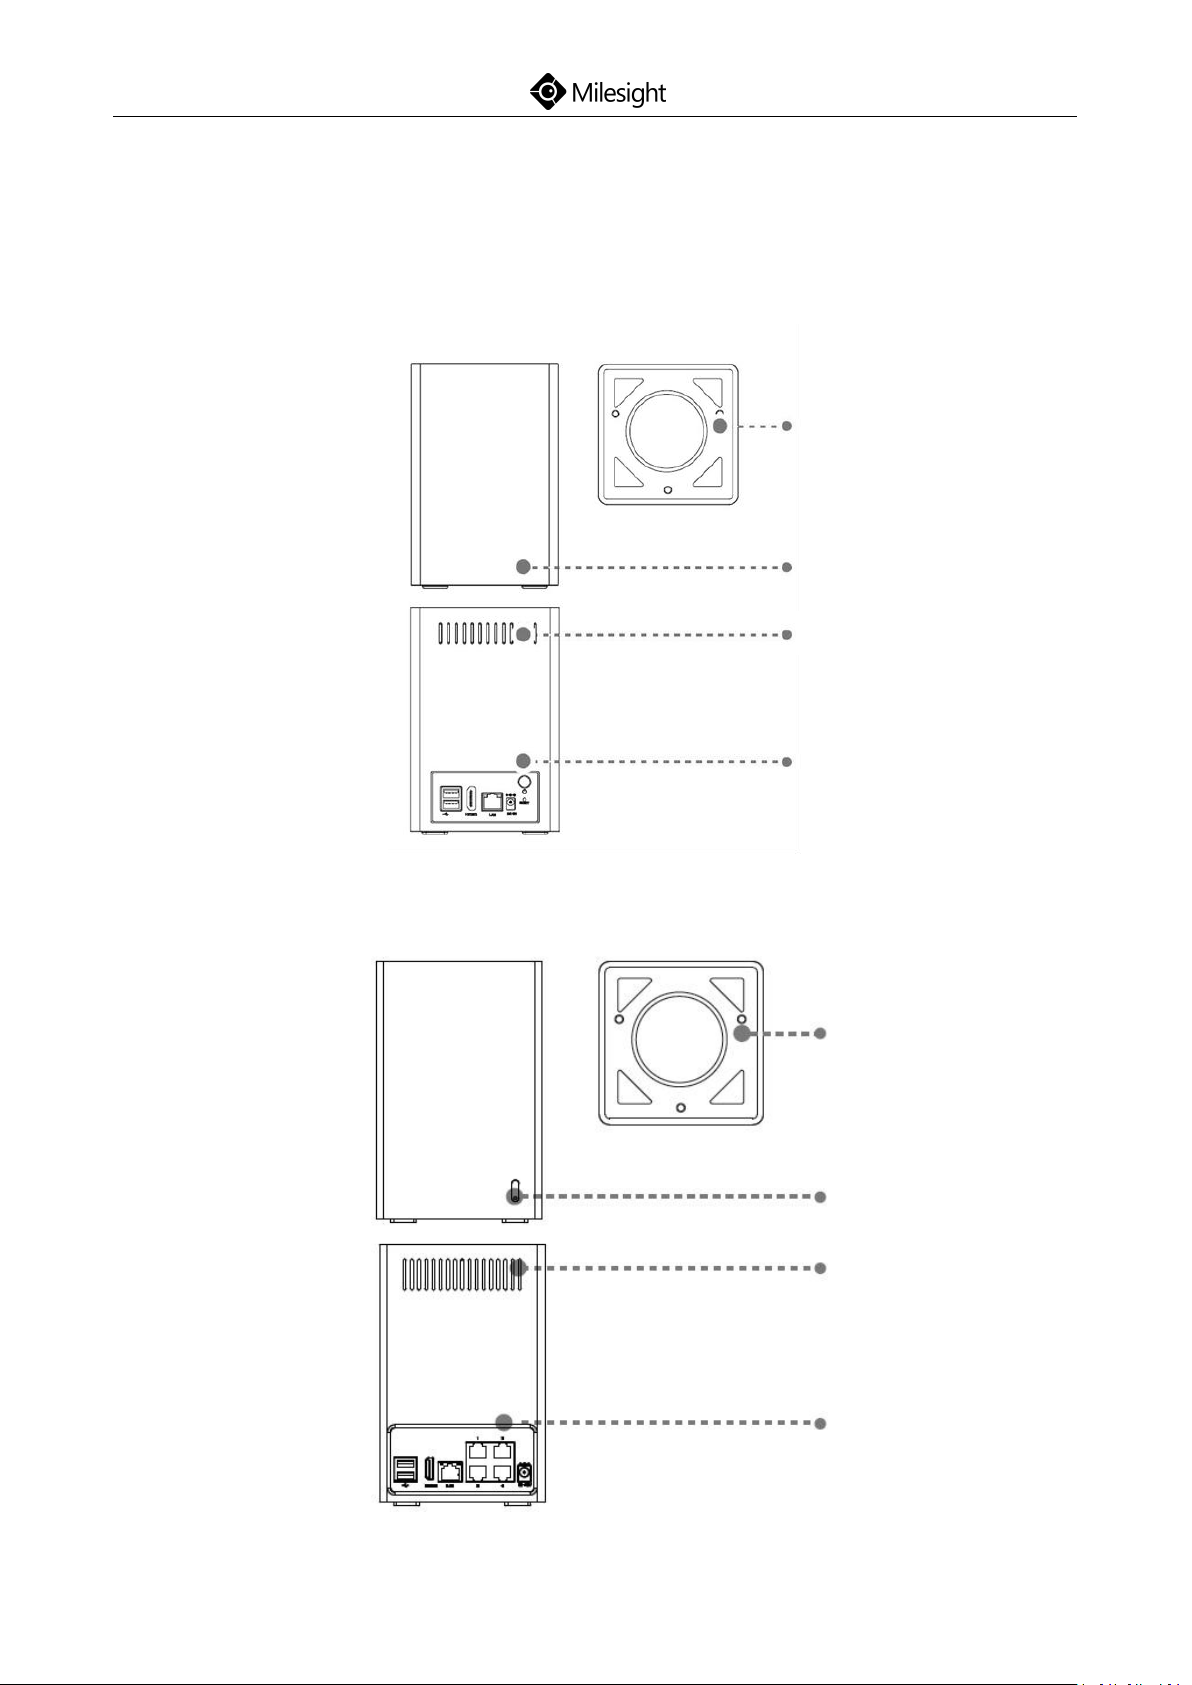
2.Hardware Overview
Interface Panel
Ventilation Hole
LED Indicator
Screws
LED Indicator
Ventilation Hole
Screws
Interface Panel
Mini NVR:
Quick Start Guide
Mini PoE NVR:
www.milesight.com
Page 7

4
Mini NVR:
80mm
120mm
80mm
180mm
115mm
115mm
Quick Start Guide
Mini PoE NVR:
www.milesight.com
Page 8
5
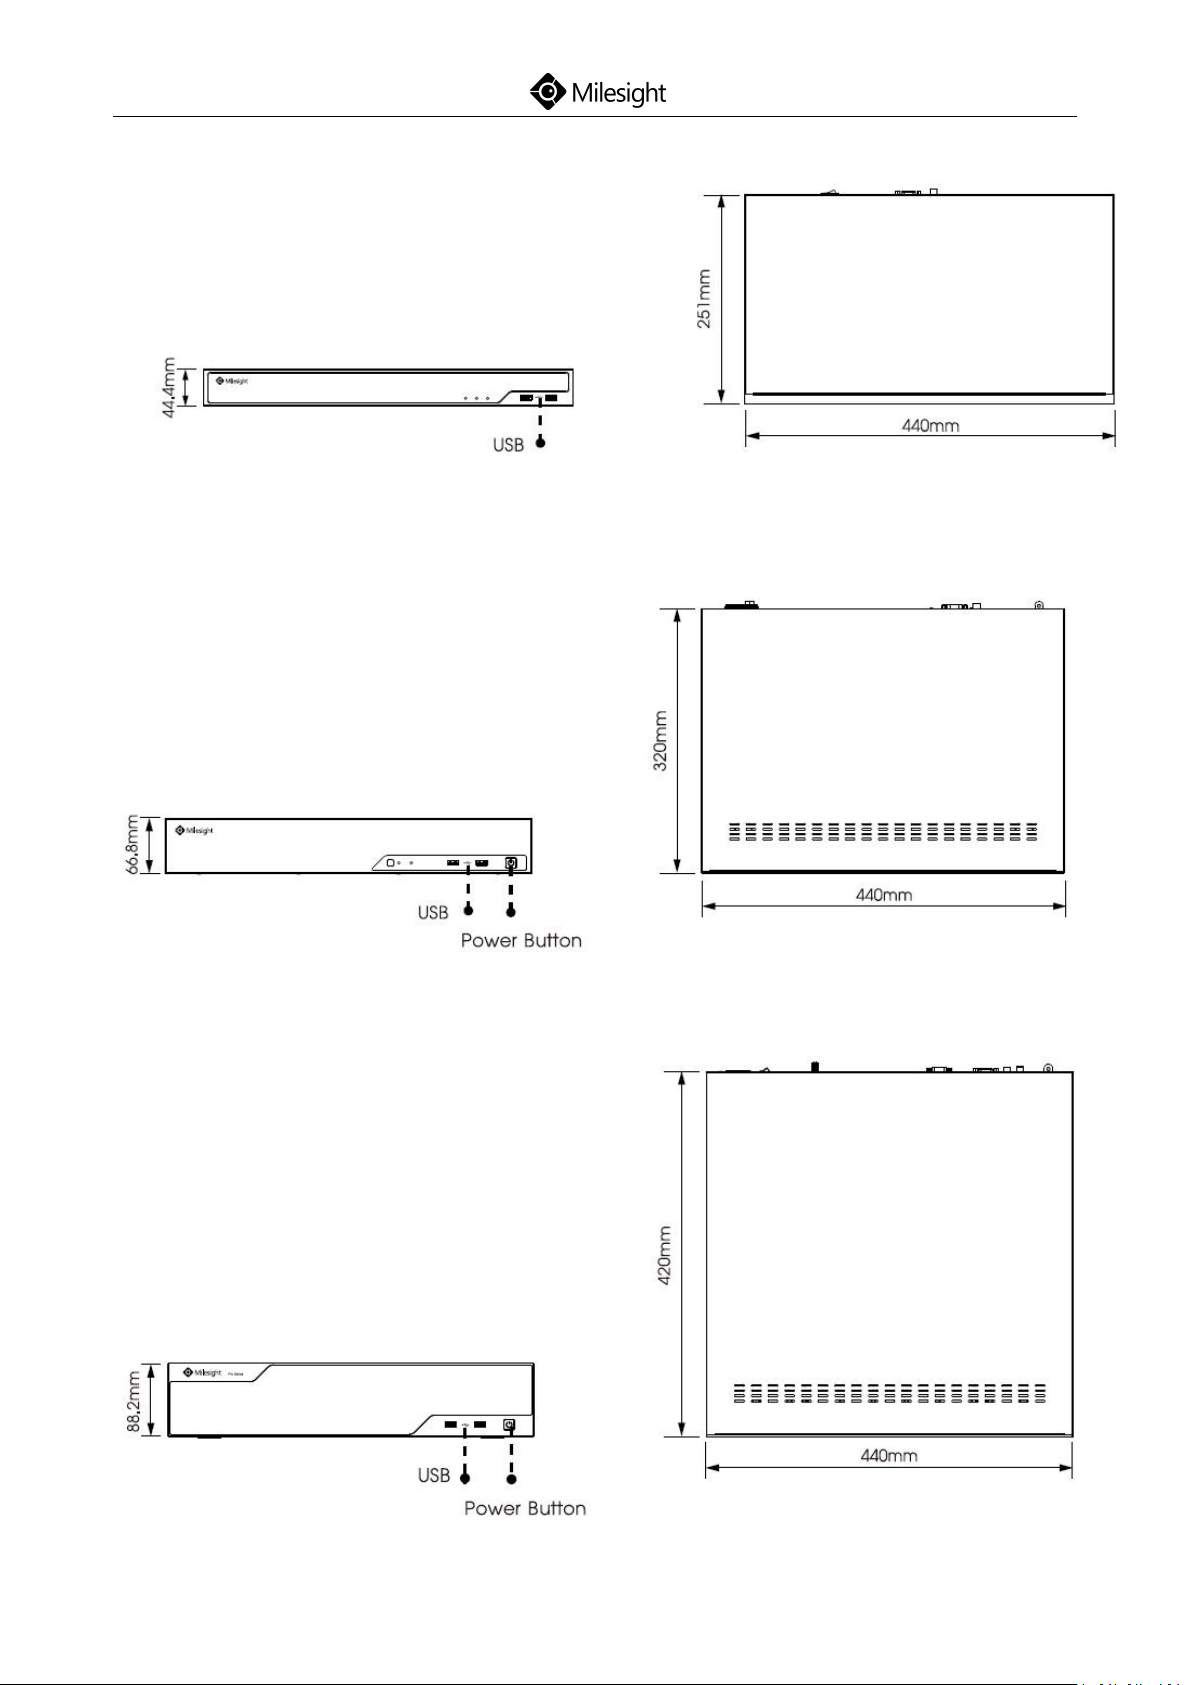
Pro/PoE 5000:
Pro/PoE 7000:
Quick Start Guide
Pro 8000:
www.milesight.com
Page 9
6
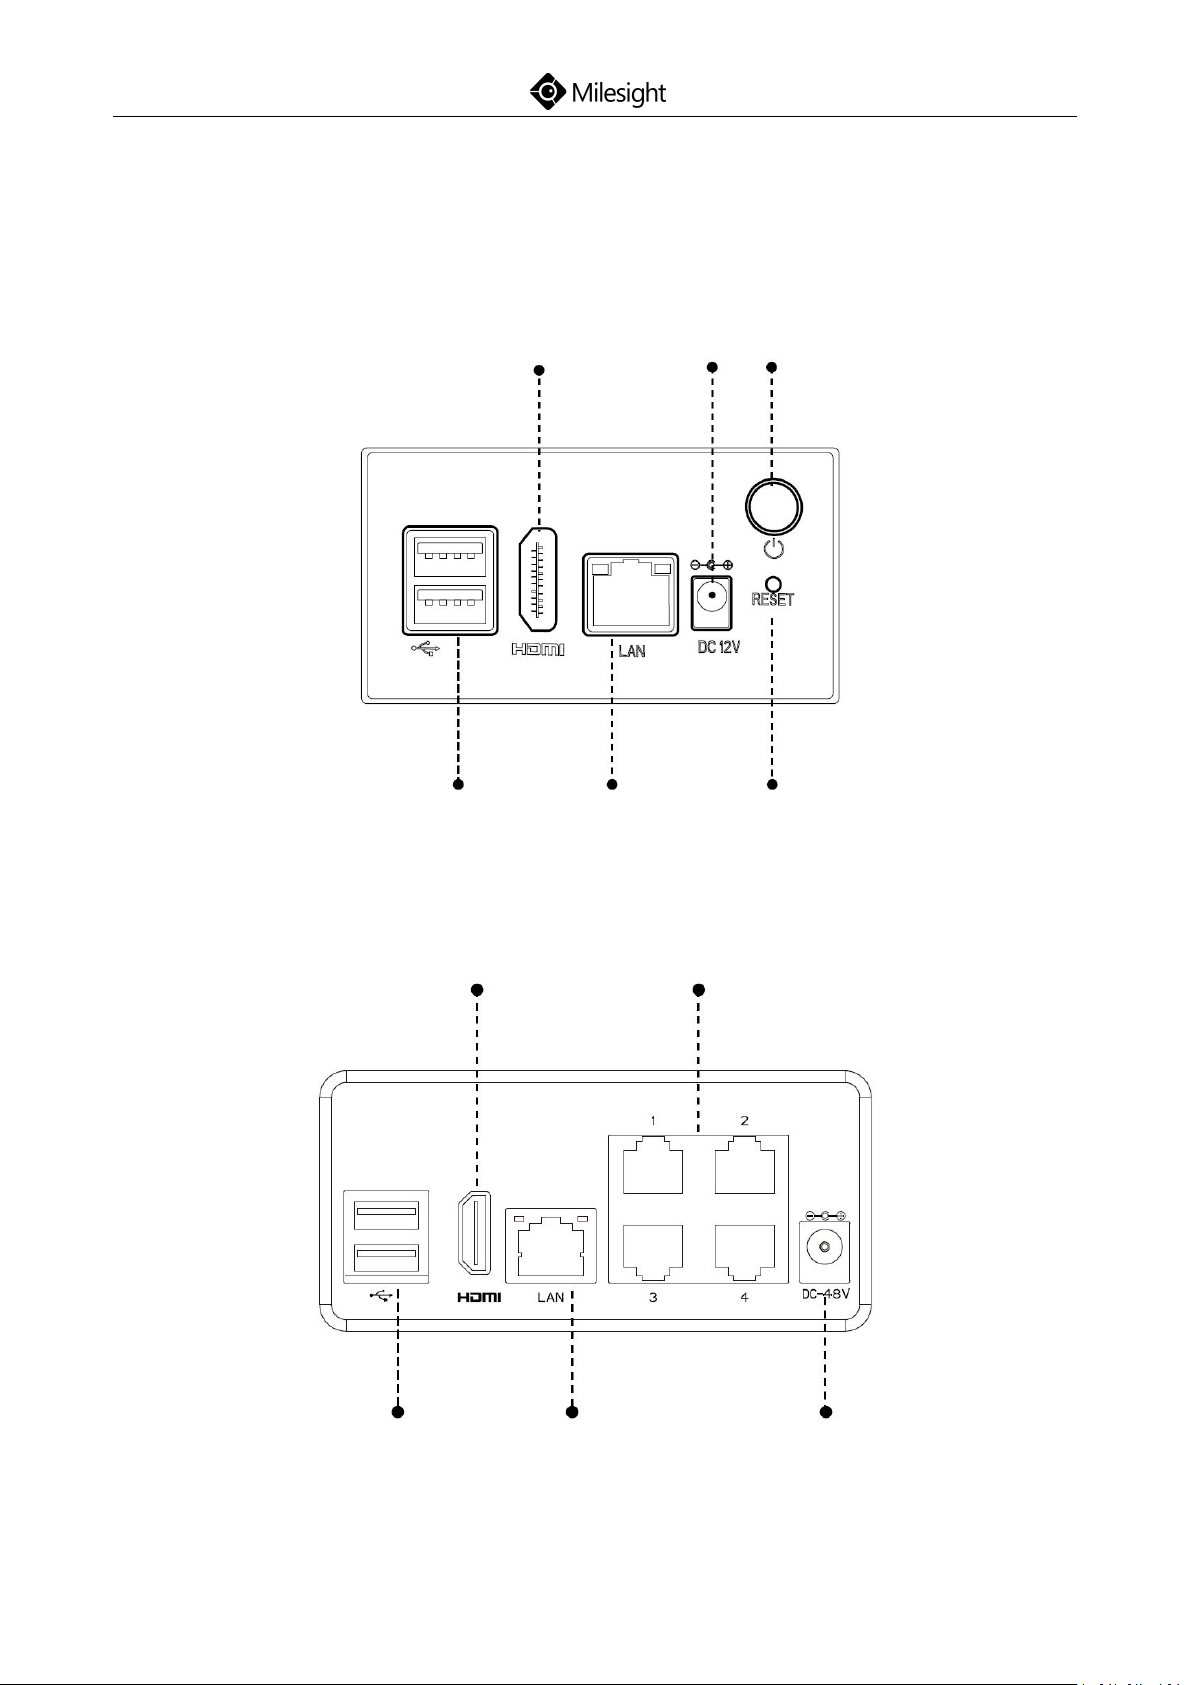
3.Interfaces
DC 12V
Power
HDMI
USB
Reset
LAN
PoE Port 1/2/3/4
HDMI
Power
LAN
USB
Mini NVR:
Quick Start Guide
Mini PoE NVR:
www.milesight.com
Page 10
7
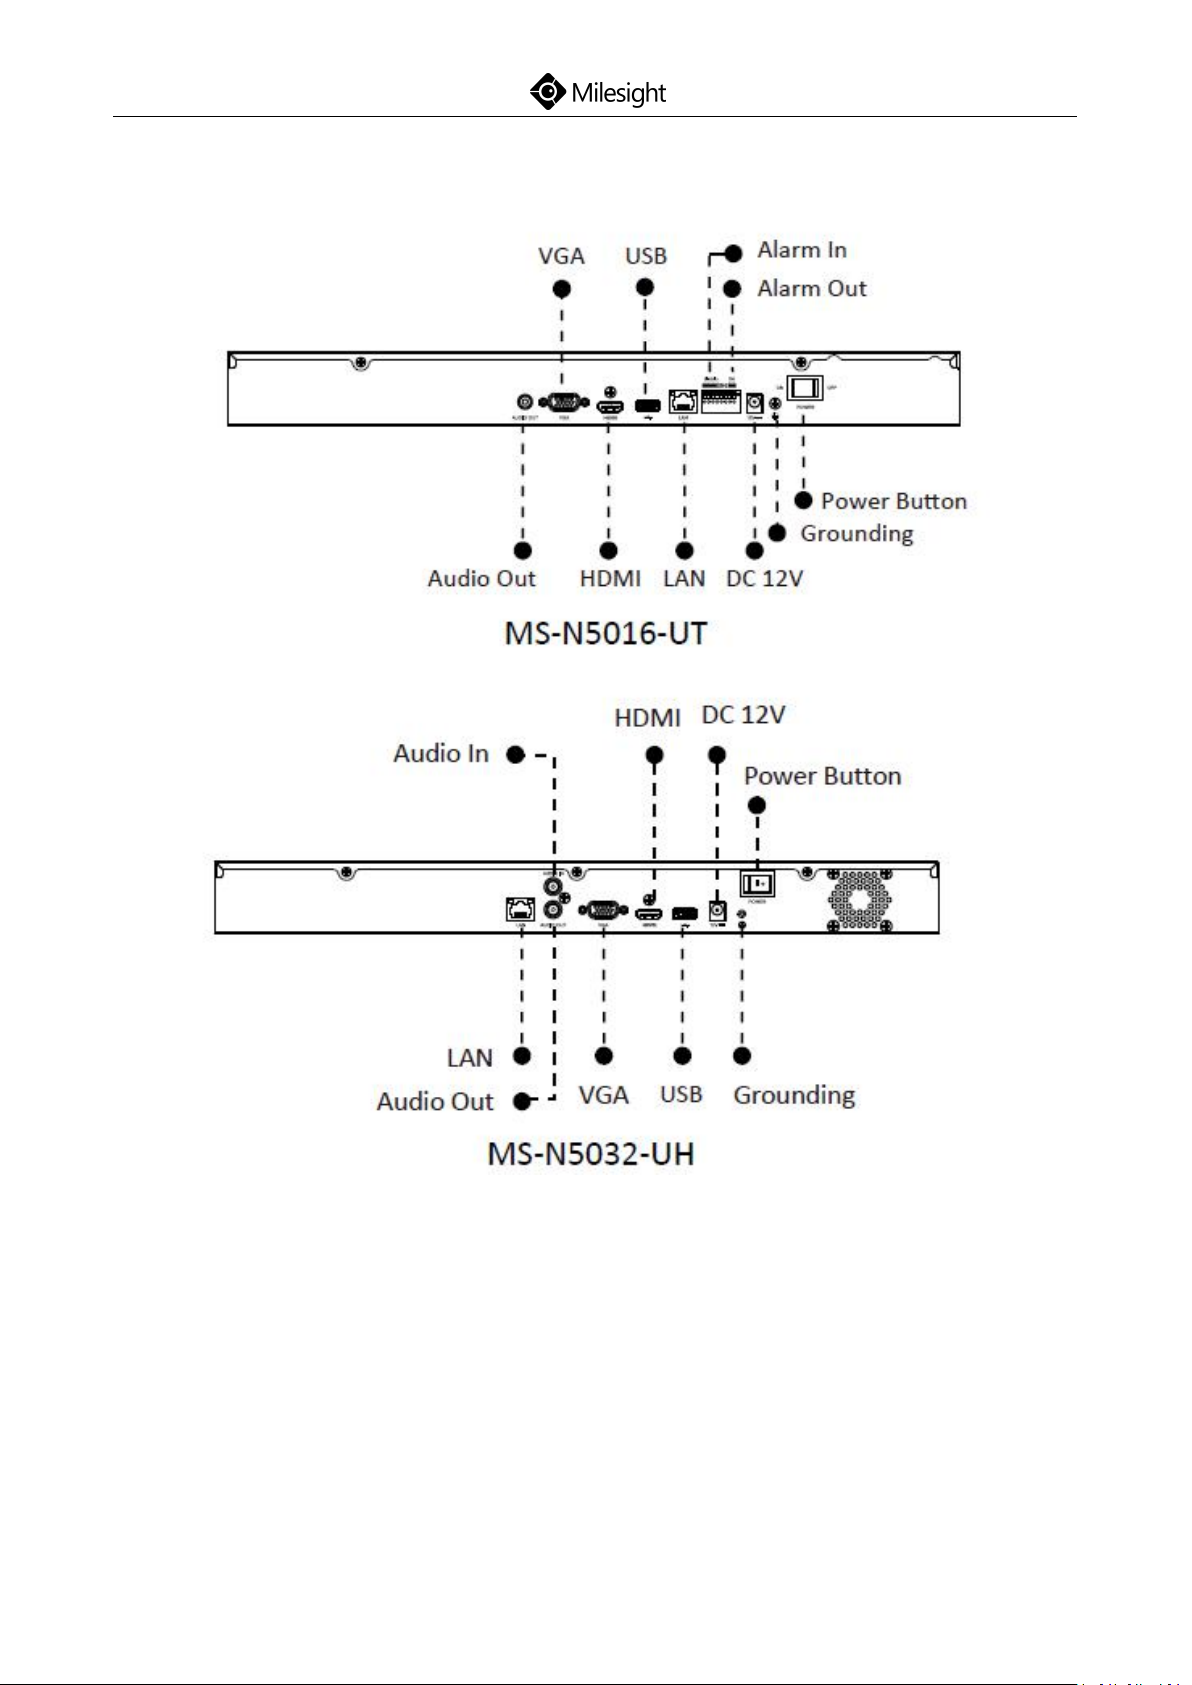
Pro 5000:
Quick Start Guide
www.milesight.com
Page 11
8
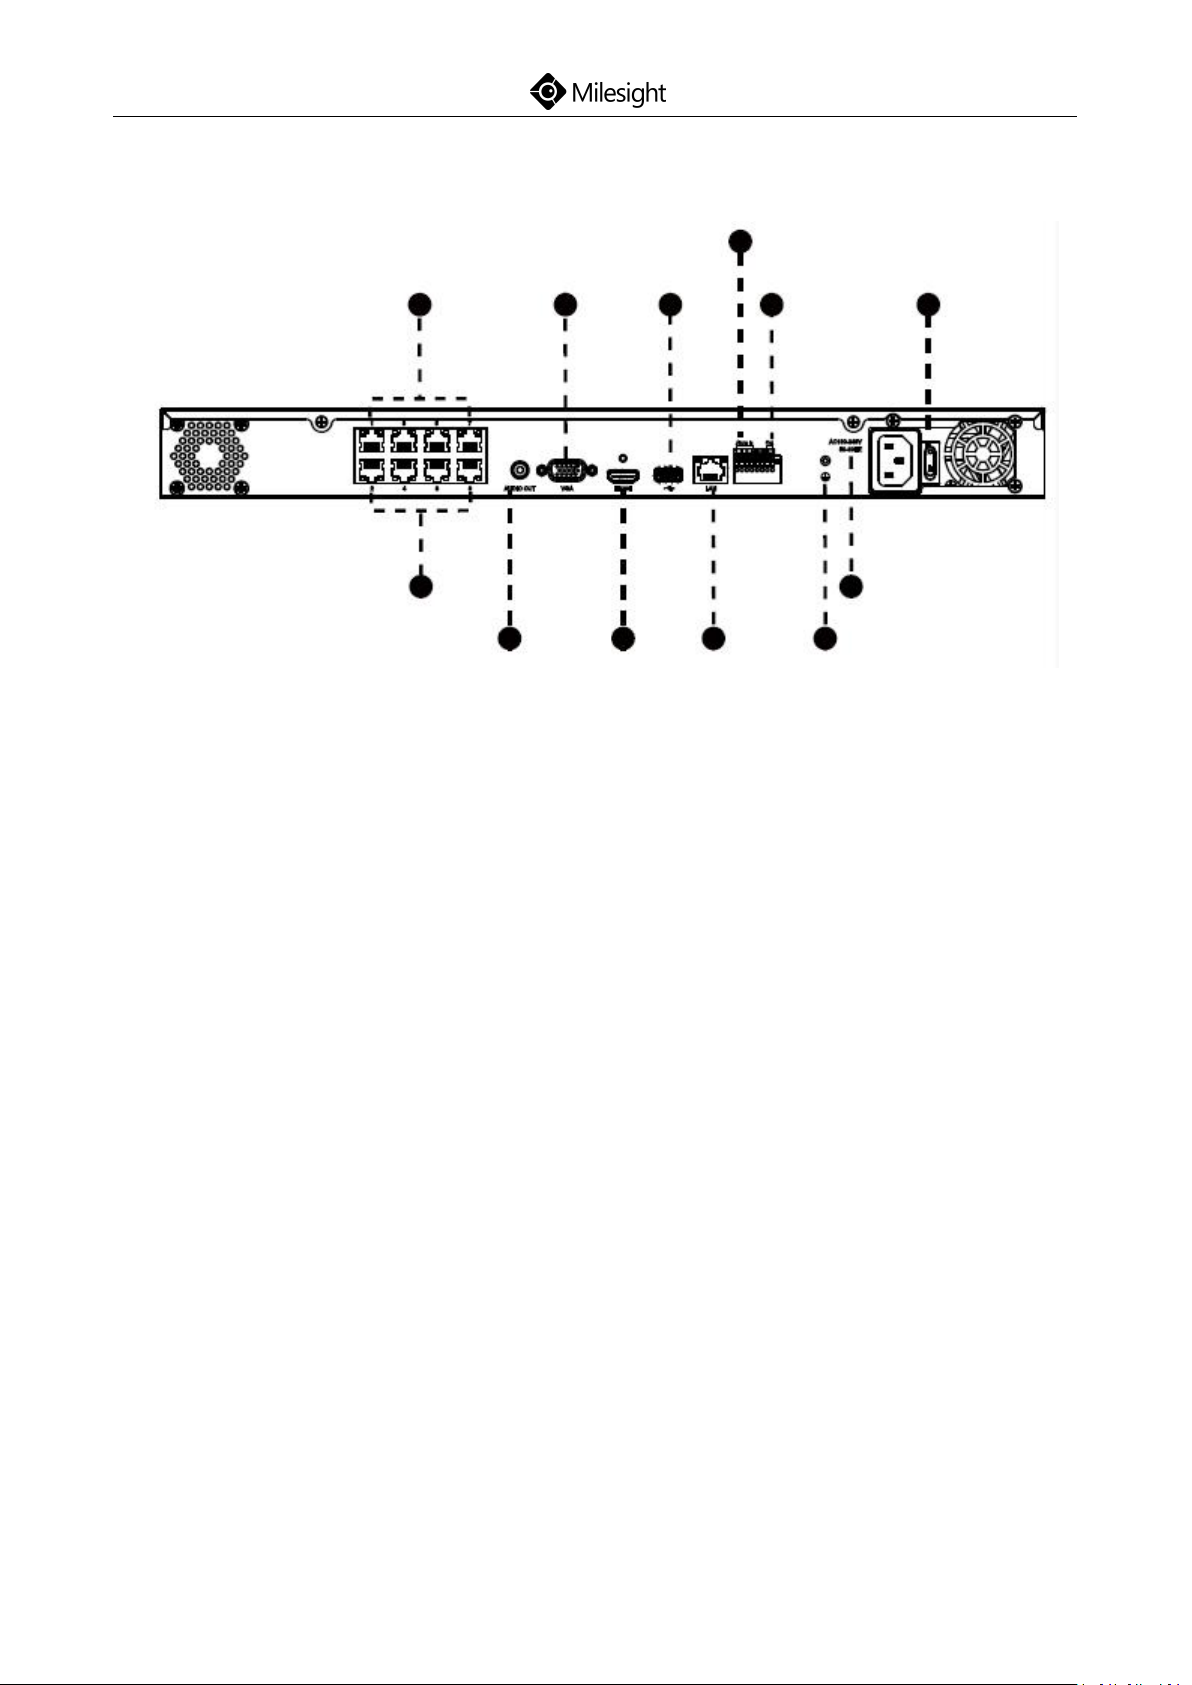
PoE 5000:
Alarm In
PoE Port 2/4/6/8
PoE Port 1/3/5/7
AC 100-240V
50-60HZ
Grounding
LAN
HDMI
Power Button
Alarm Out
USB
VGA
Audio Out
Quick Start Guide
www.milesight.com
Page 12
9
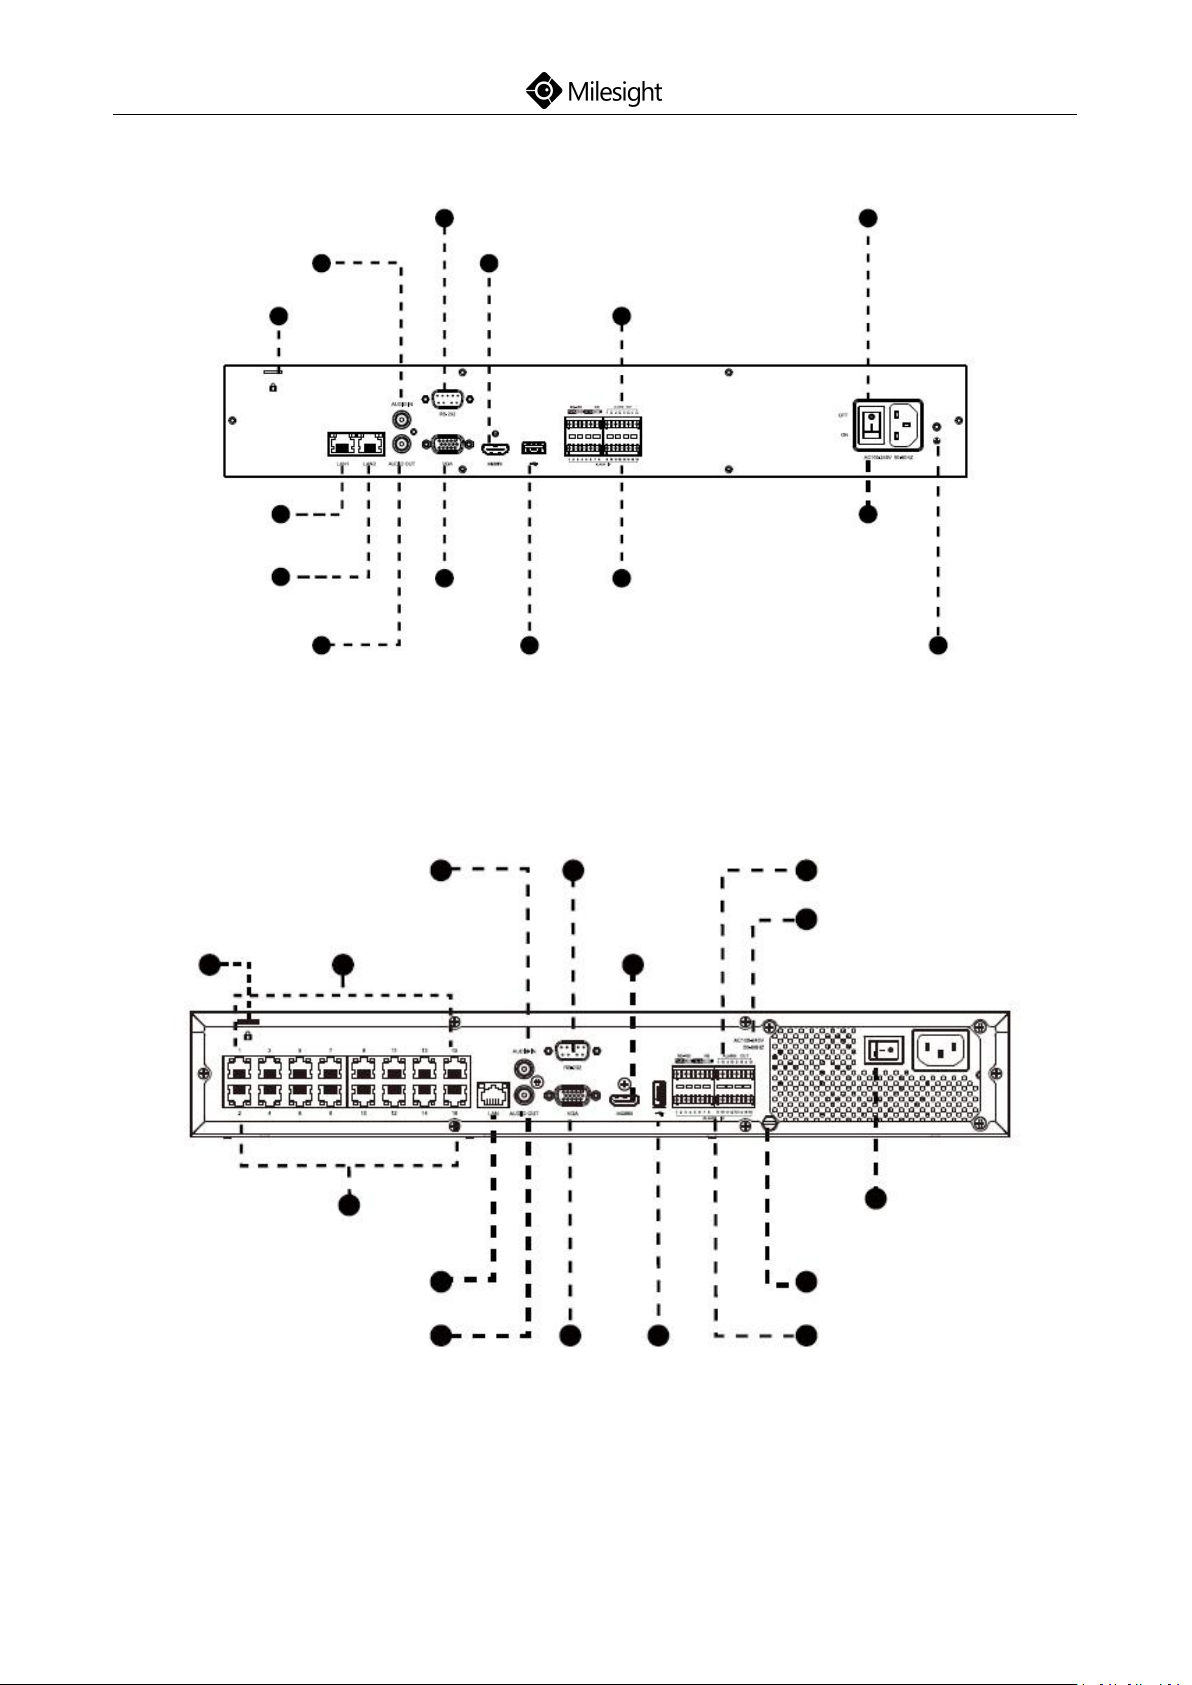
Pro 7000:
Power
RS-232
Grounding
AC 100-240V
50-60HZ
HDMI
Alarm Out
Alarm In
USB
VGA
LAN2
Audio Out
LAN1
Lock Hole
Audio In
Alarm Out
RS-232
PoE Port 2/4/6/8/10/12/14/16
PoE Port
AC 100-240V
50-60HZ
Alarm In
Grounding
Power
USB
VGA
Audio Out
LAN
Lock Hole
HDMI
Audio In
Quick Start Guide
PoE 7000:
www.milesight.com
Page 13
10
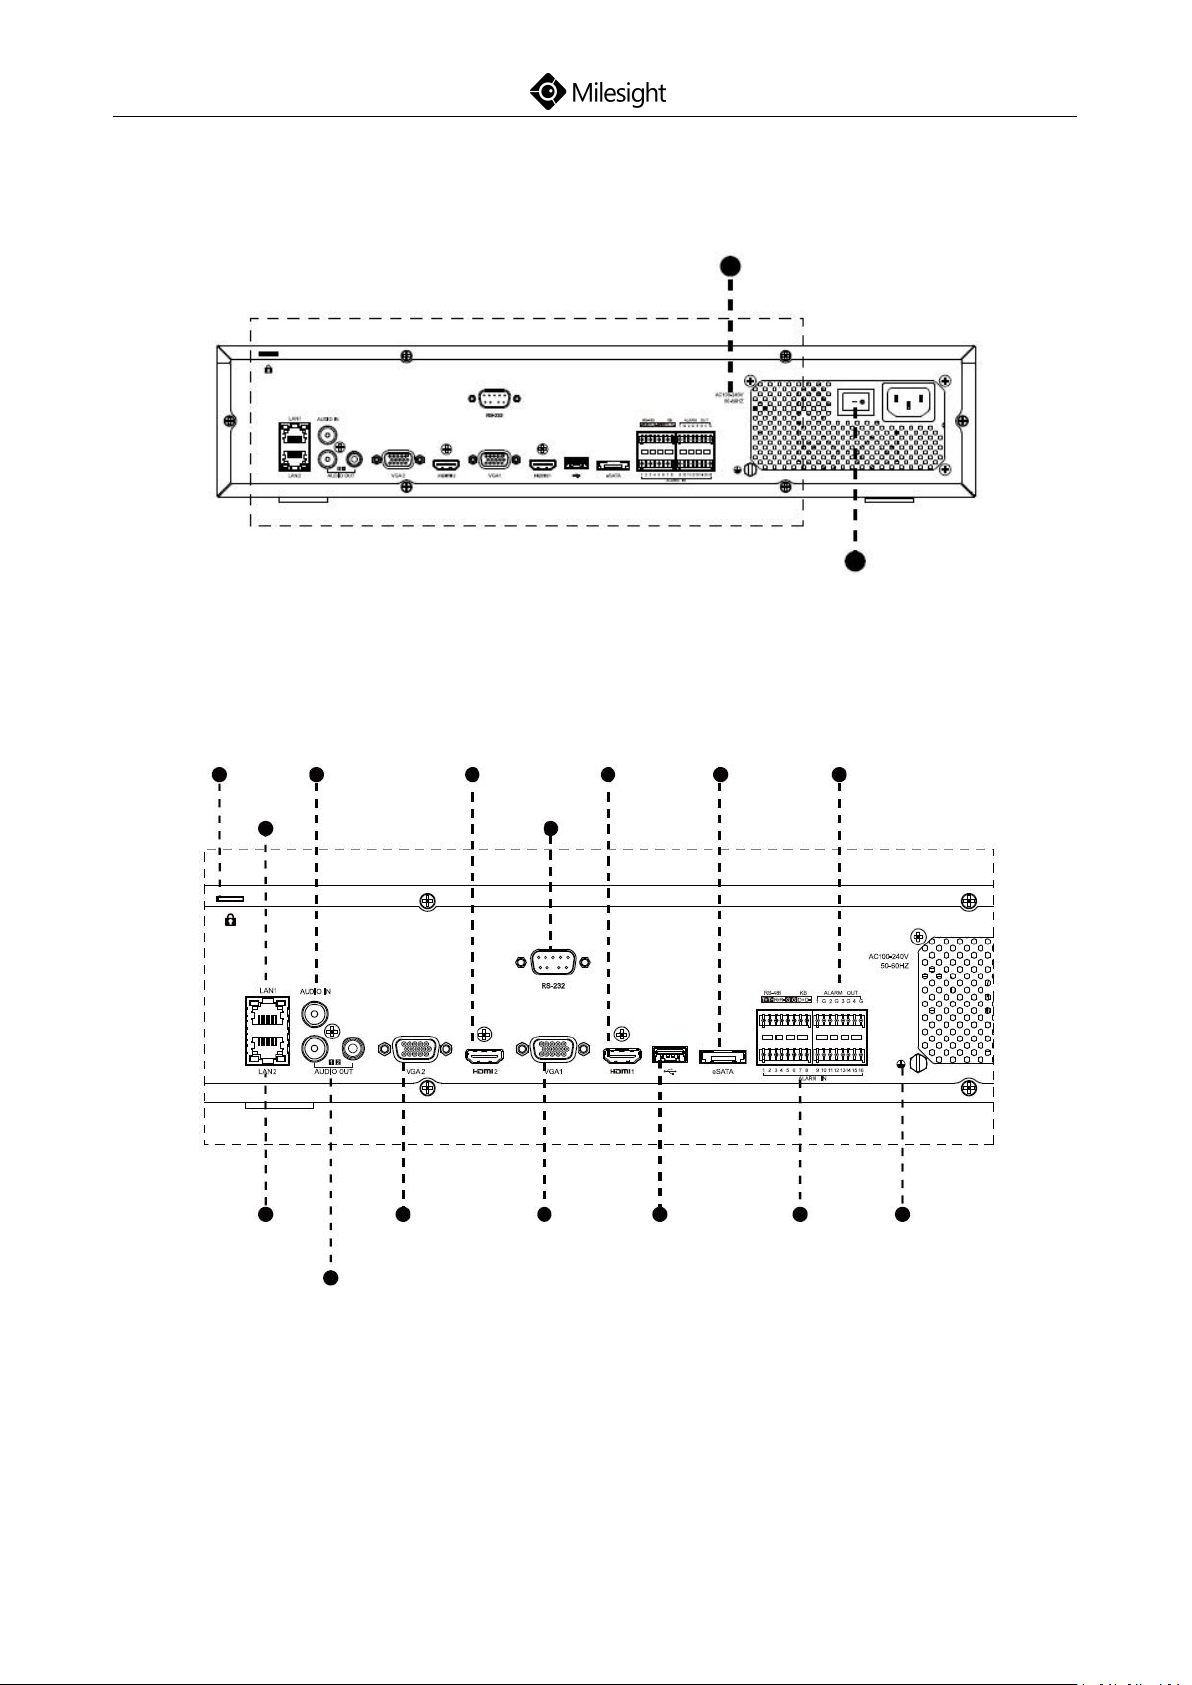
Pro 8000:
AC 100-240V 50-60HZ
Power Button
Alarm Out
eSATA
HDMI 1
HDMI 2
Audio In
Lock Hole
RS-232
LAN 1
LAN 2
VGA 2
Grounding
Alarm In
USB
VGA 1
Audio Out
Quick Start Guide
www.milesight.com
Page 14
Quick Start Guide
4. Installation
4.1 Mini (PoE) NVR 1000 Series Installation
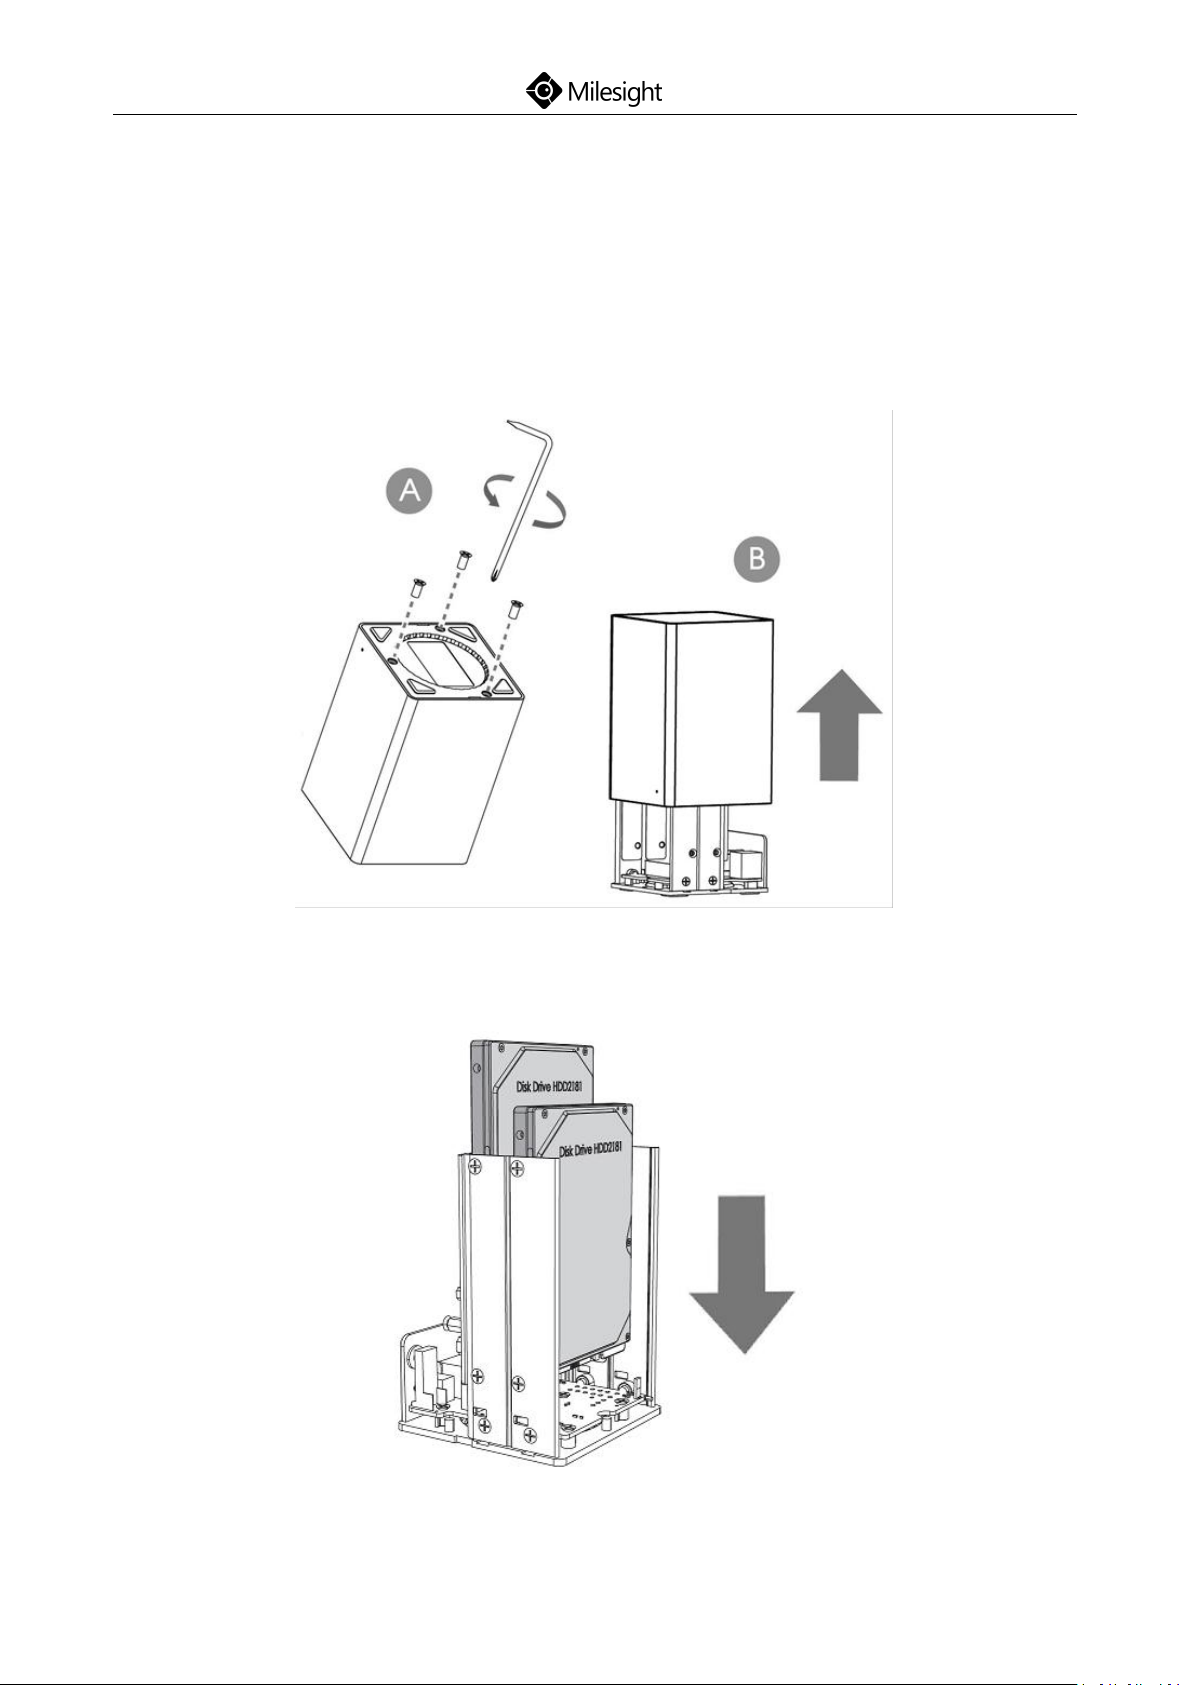
Step1: Remove the screws at the bottom panel and pull up the casing.
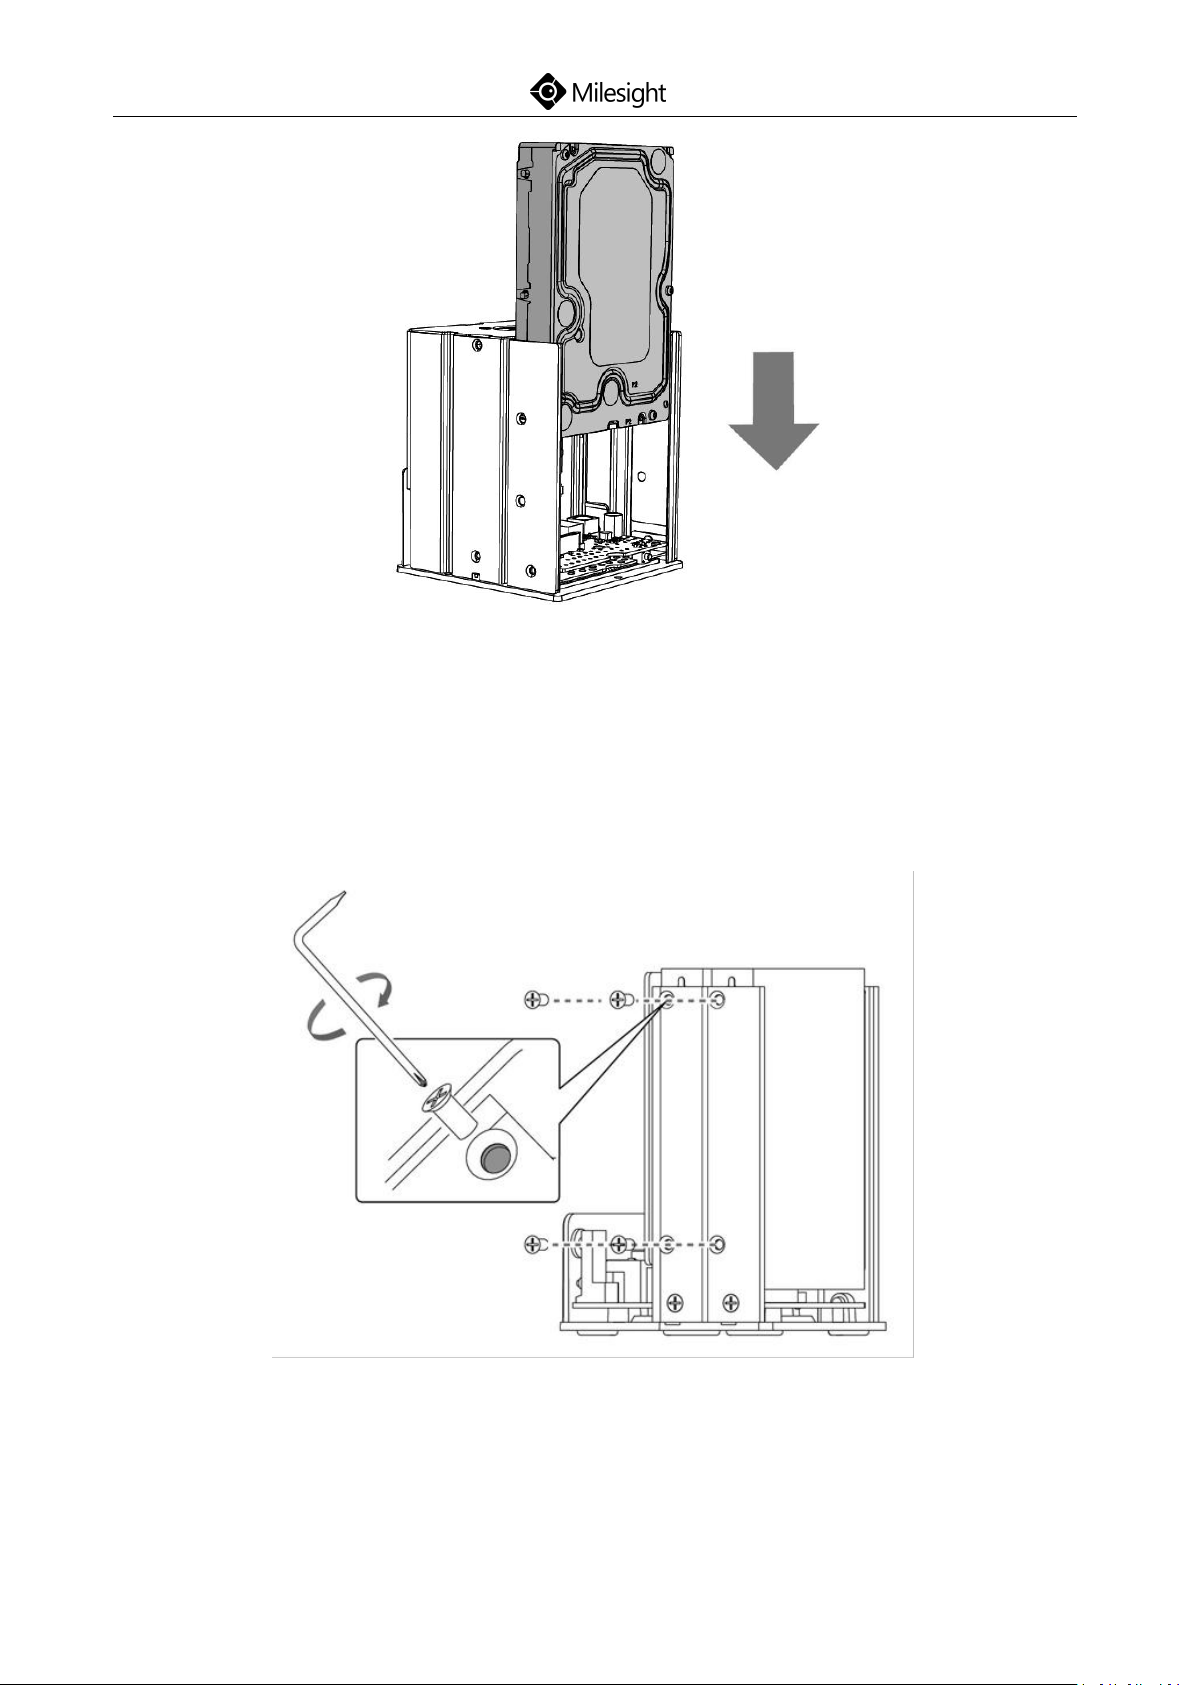
Step2: Insert SATA HDD in the slot as required.
(Mini NVR)
Page 15
12
(Mini PoE NVR)
Quick Start Guide
Note: Mini NVR supports two SATA HDD (2.5”). Mini PoE NVR supports one
SATA HDD (3.5”).
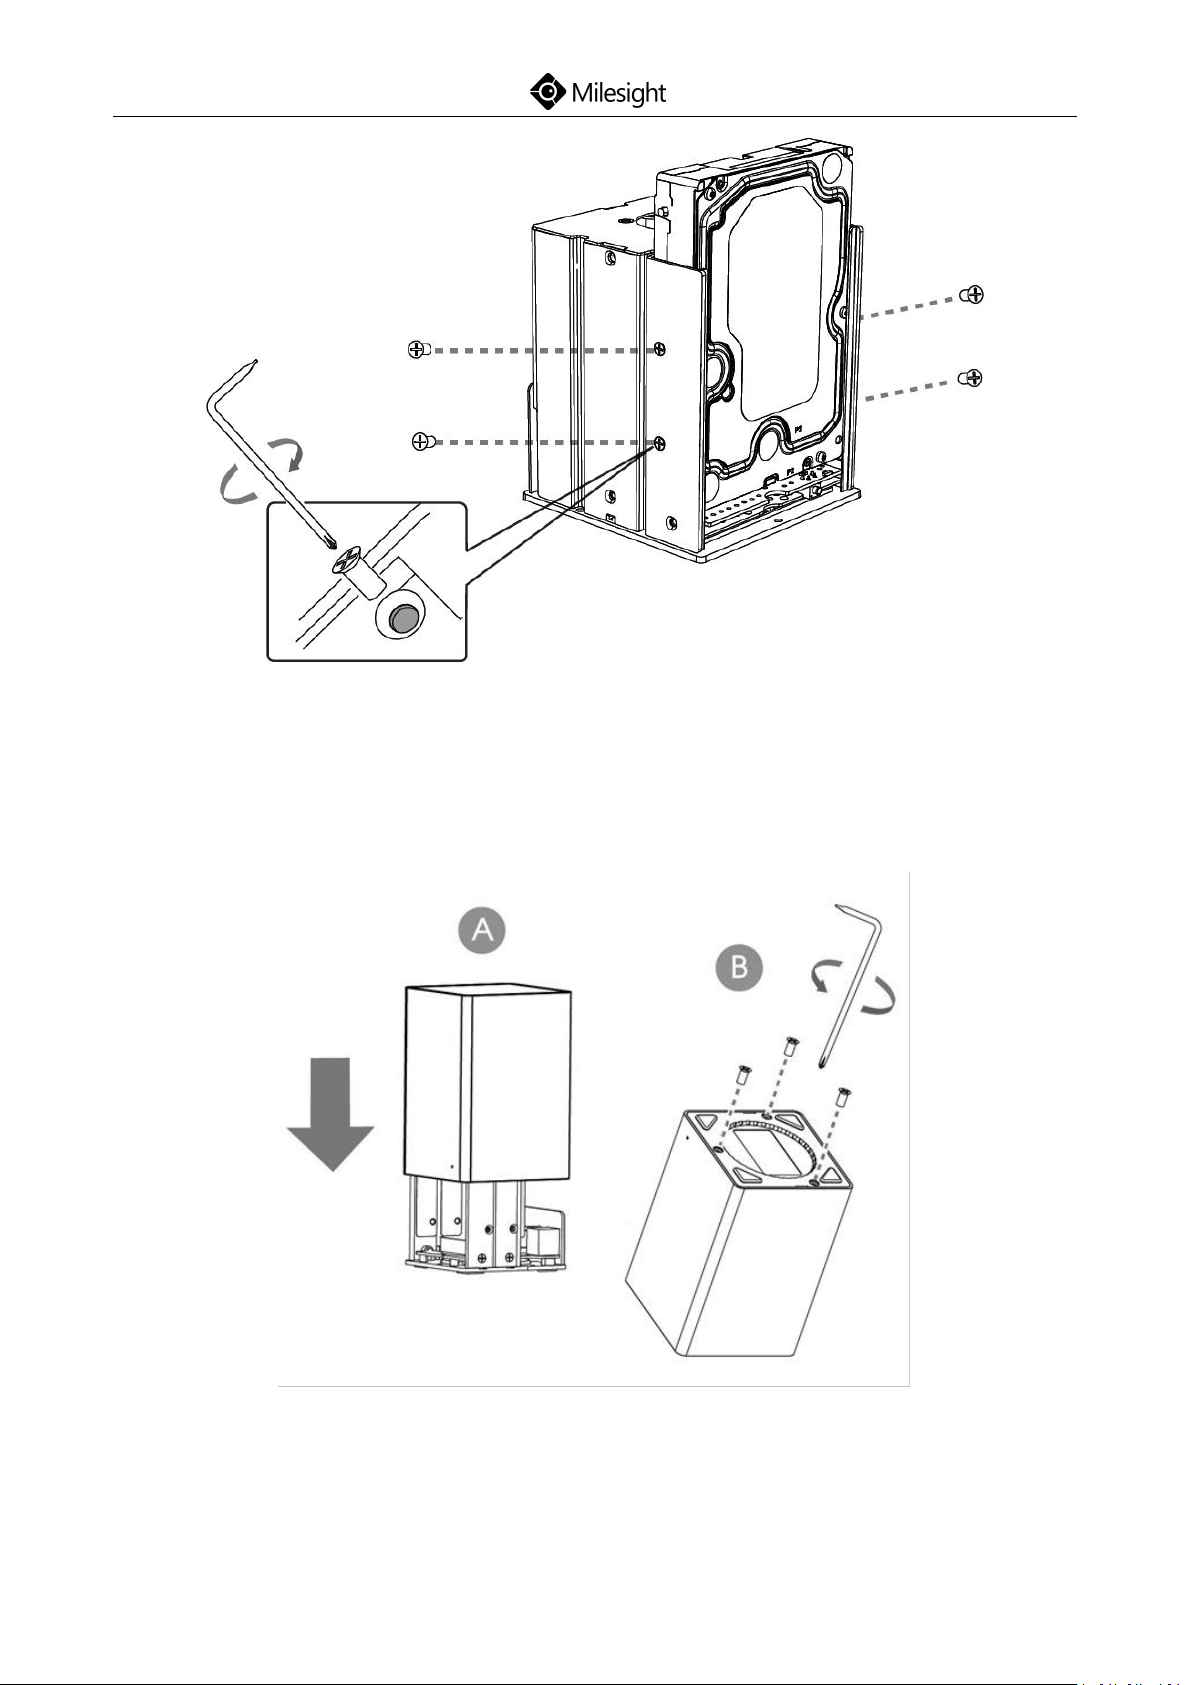
Step3: Secure the HDD with screws.
(Mini NVR)
www.milesight.com
Page 16
Quick Start Guide
13
(Mini PoE NVR)
Step4: Push down the casing and tighten the screws.
www.milesight.com
Page 17
Quick Start Guide
14
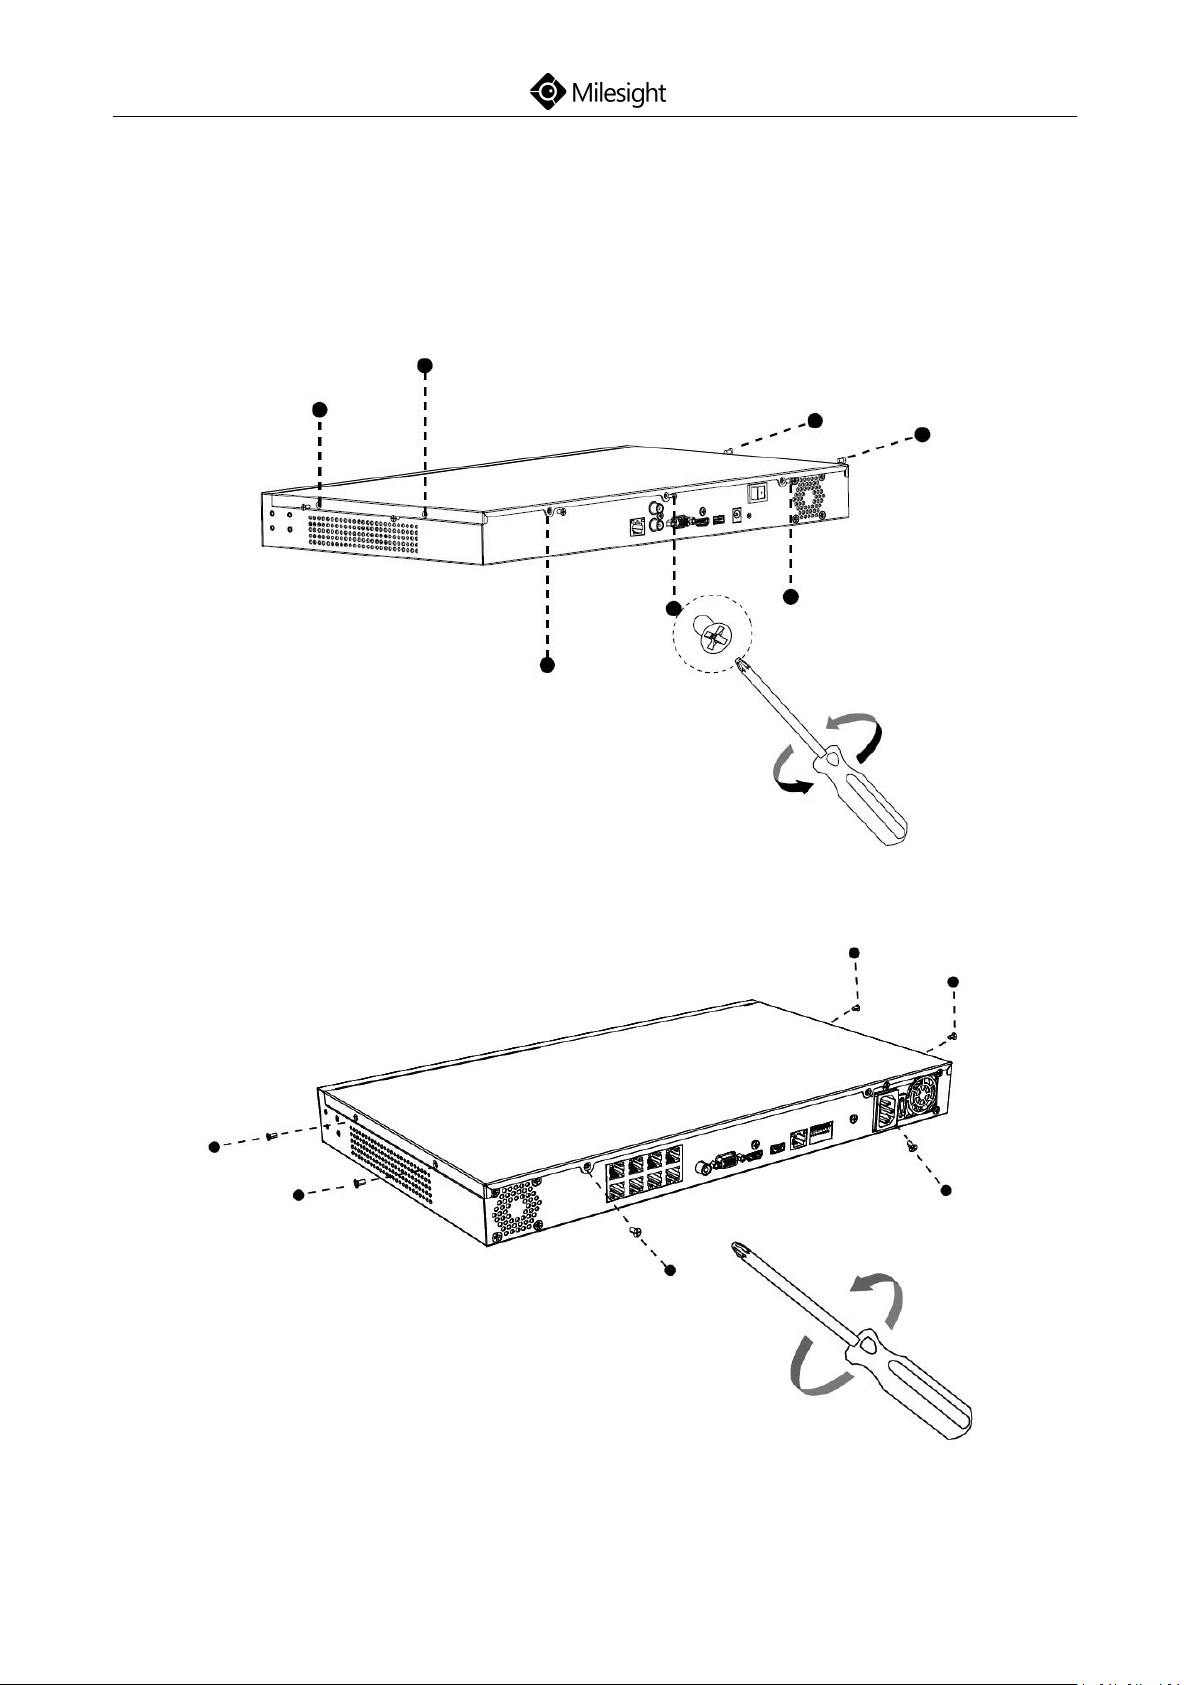
4.2 Pro/PoE NVR 5000 Series Installation
Step1: Using a cross screwdriver to remove the screws at the back panel in an
anticlockwise direction.
(Pro 5000)
(PoE 5000)
www.milesight.com
Page 18
15
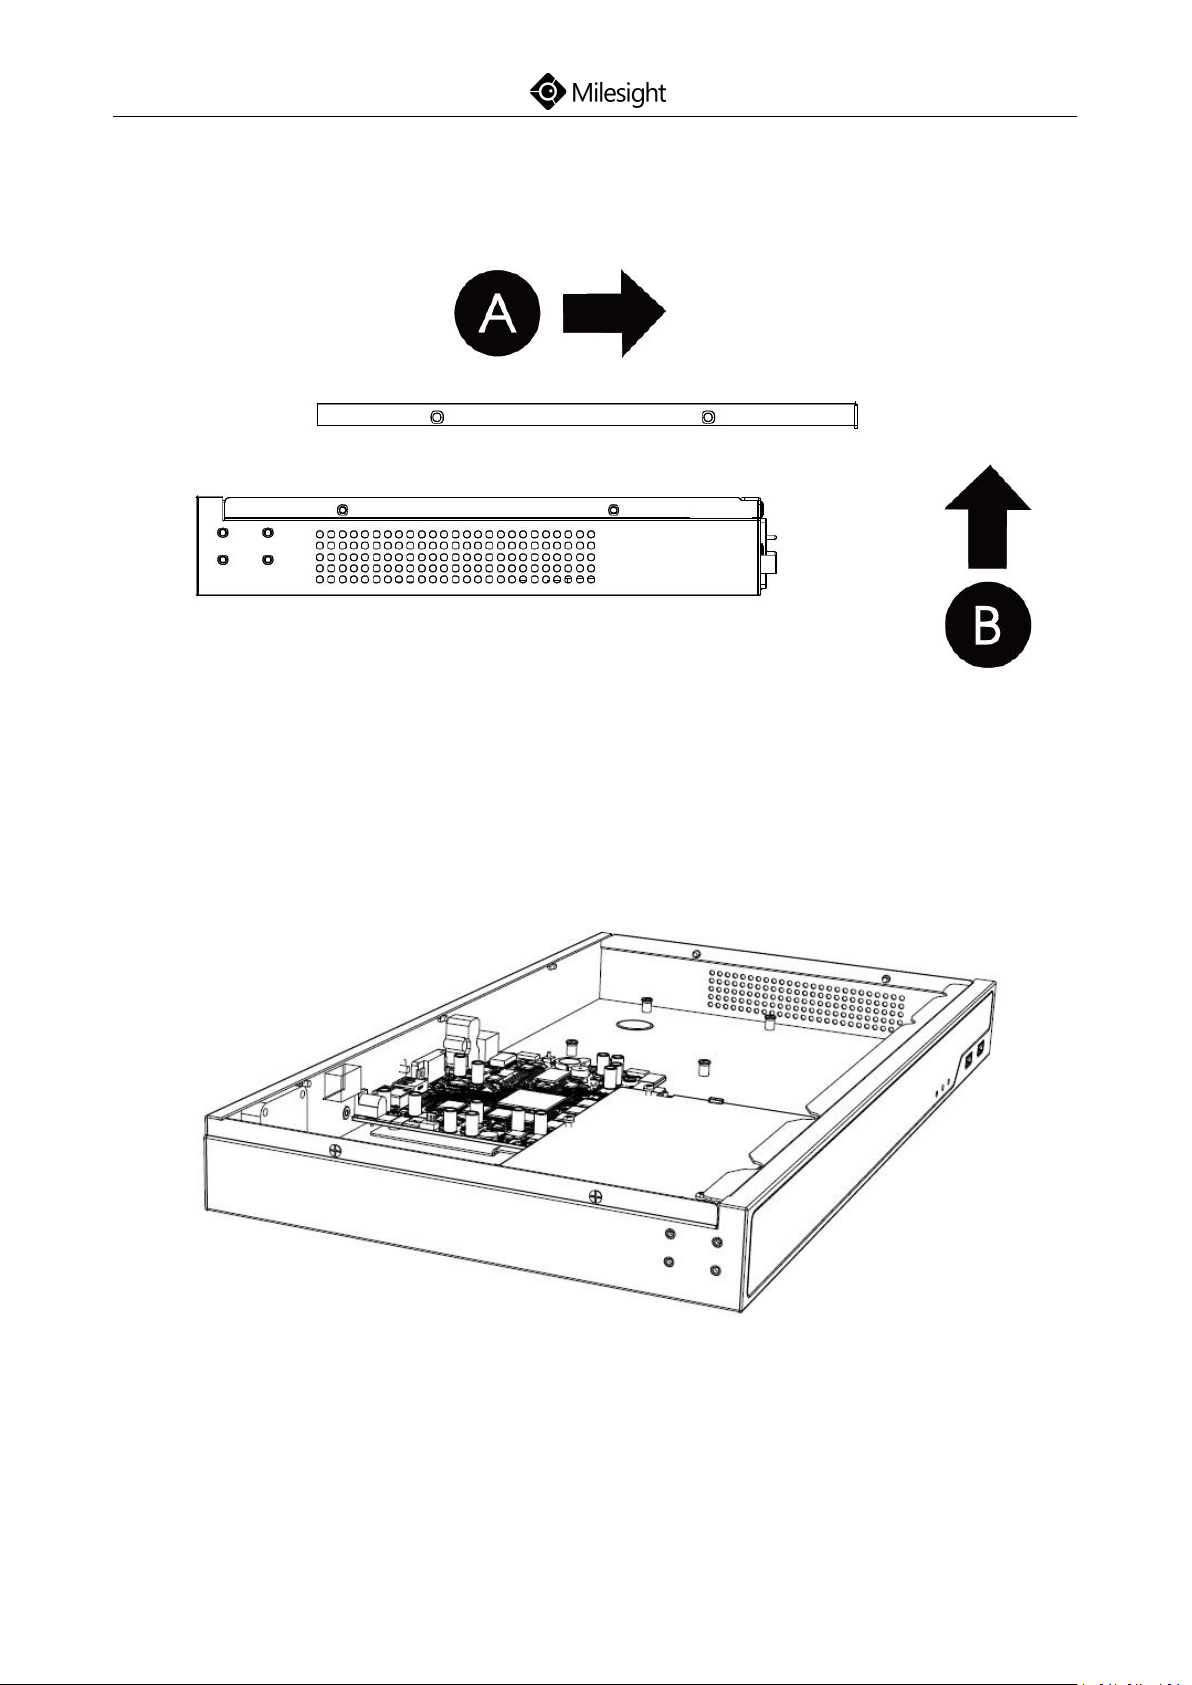
Step2: Slide the upper casing to the right first and lift it up.
Quick Start Guide
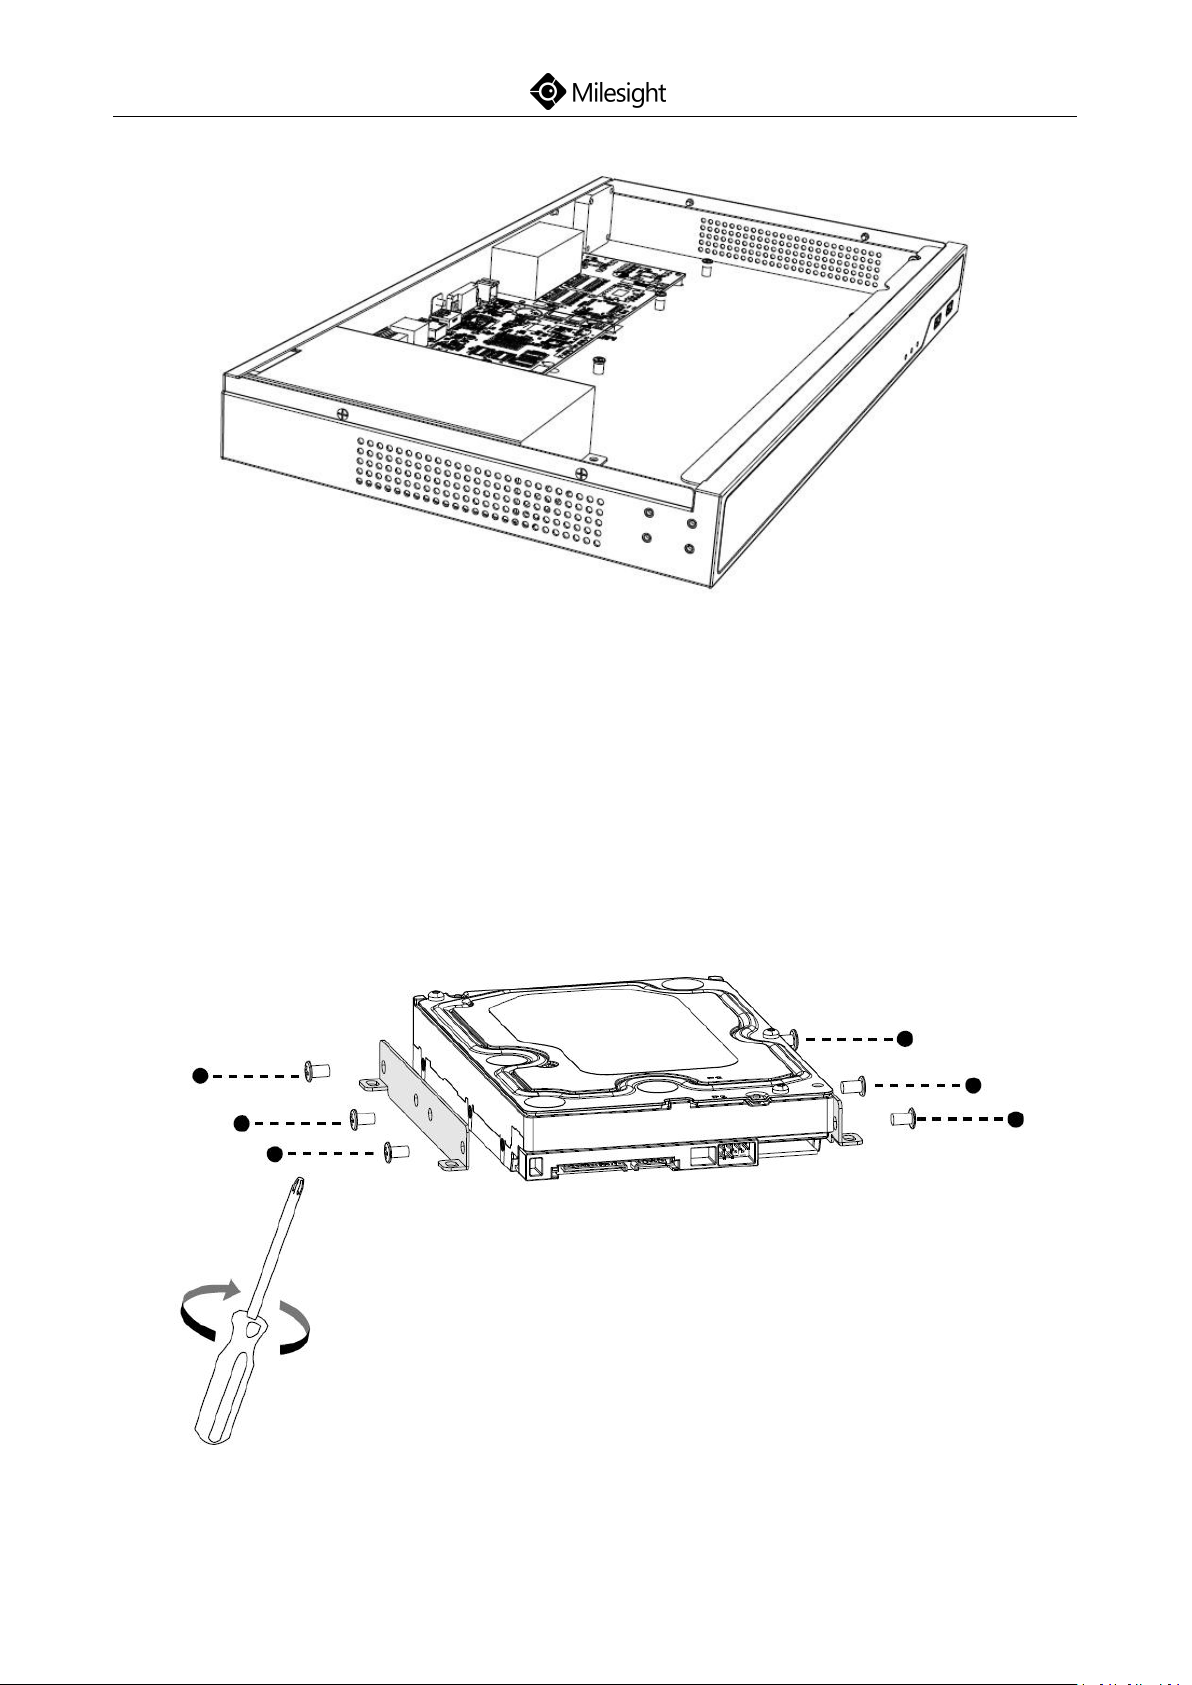
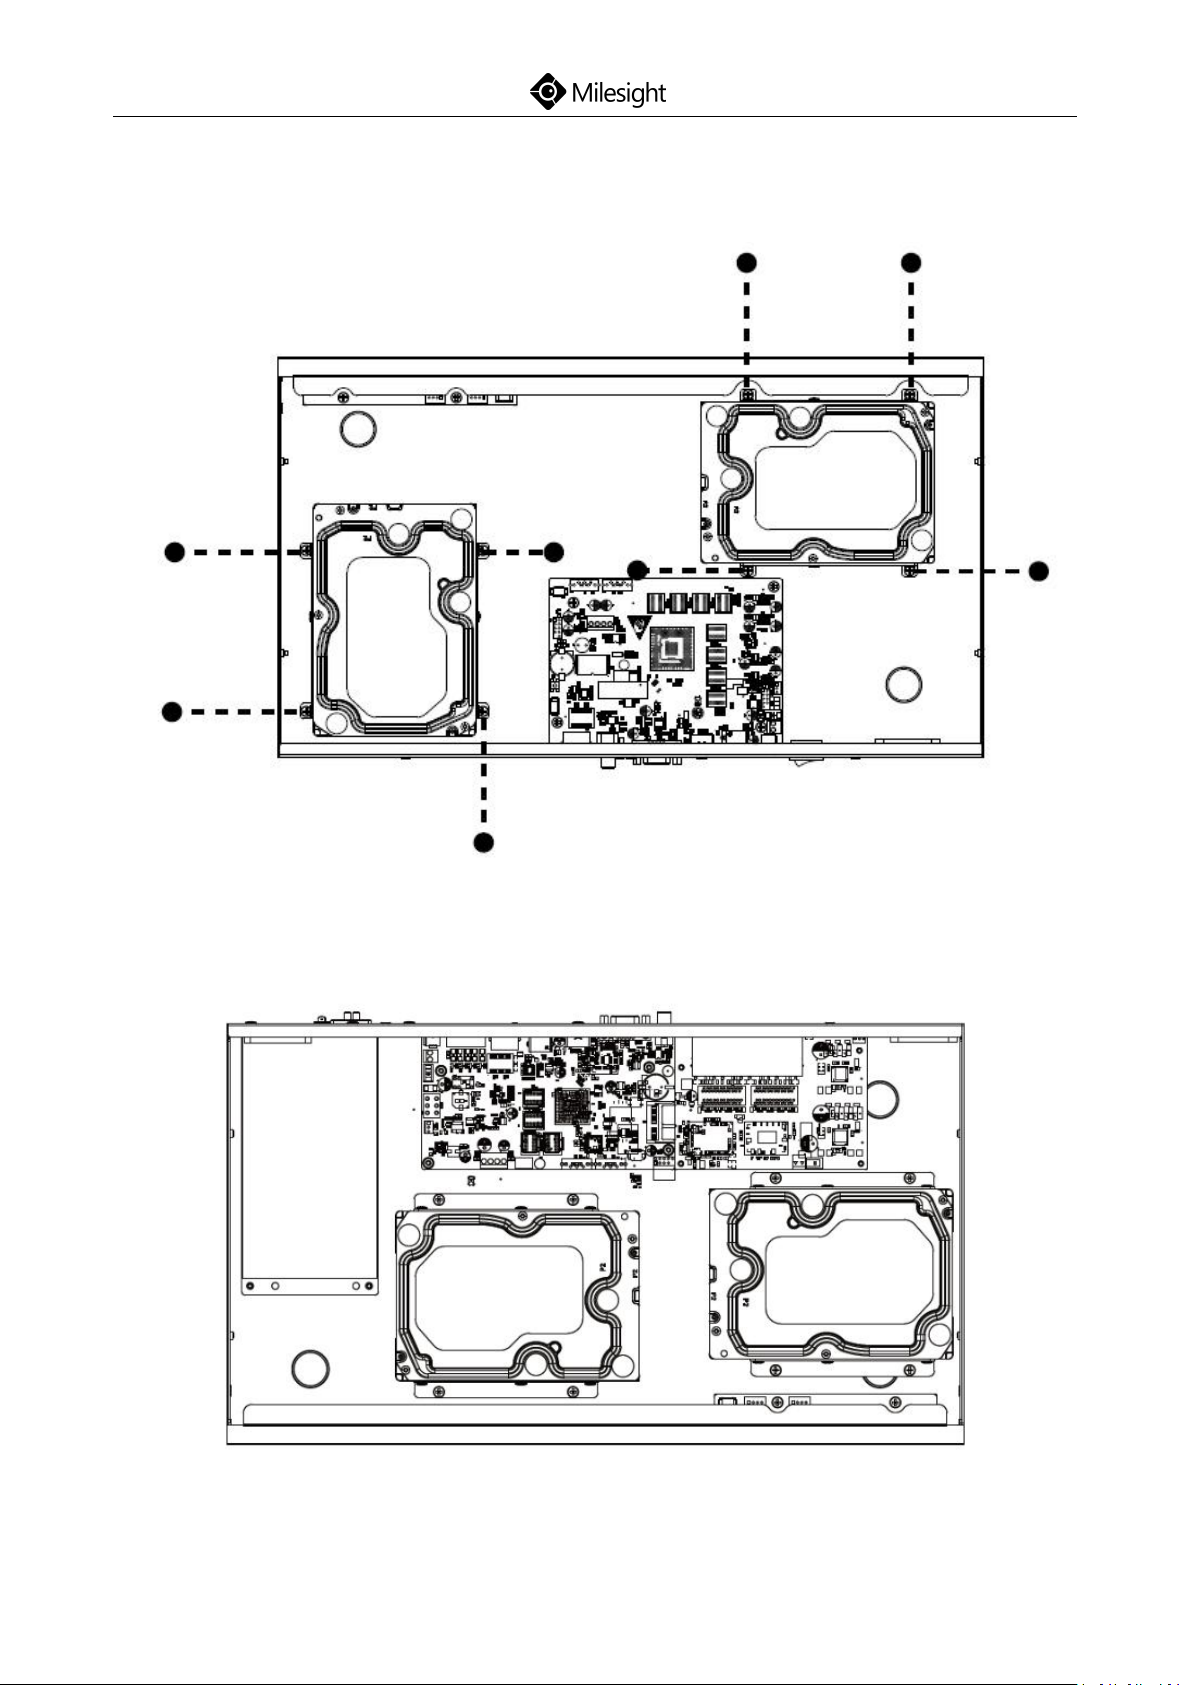
Step3: The internal structure of Pro/PoE 5000 is shown as below.
(Pro 5000)
www.milesight.com
Page 19
16
(PoE 5000)
Quick Start Guide
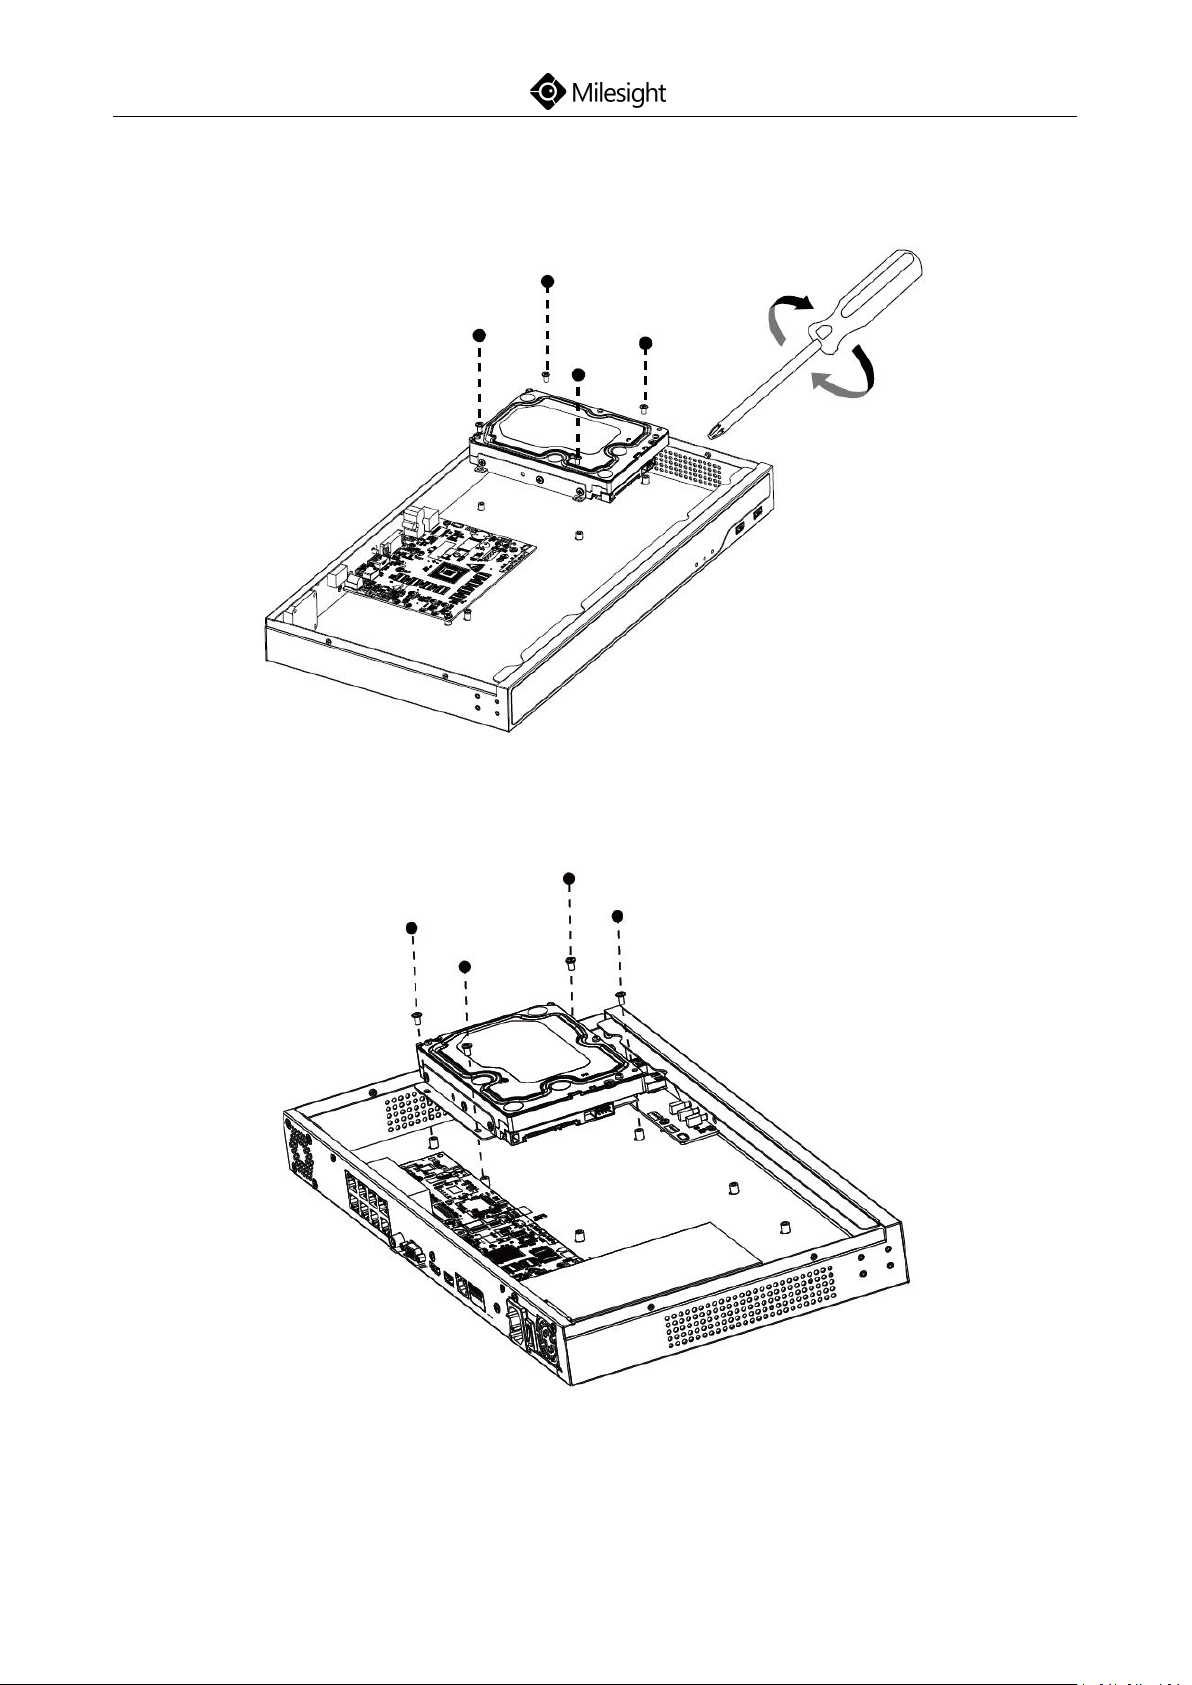
Step4: Hard Disk Installation: Lock the hard disk with the HDD bracket. 6
screws for each hard disk installation.
www.milesight.com
Page 20
Quick Start Guide
17
Step5: Secure the HDD brackets with hark disks in the casing. 4 screws for each
HDD bracket.
(Pro 5000)
(PoE 5000)
www.milesight.com
Page 21
Quick Start Guide
18
Step6: After that, check if all the screws are tightened. Then connect the
power cable and data cable to each HDD.
(Pro 5000)
(PoE 5000)
www.milesight.com
Page 22
19
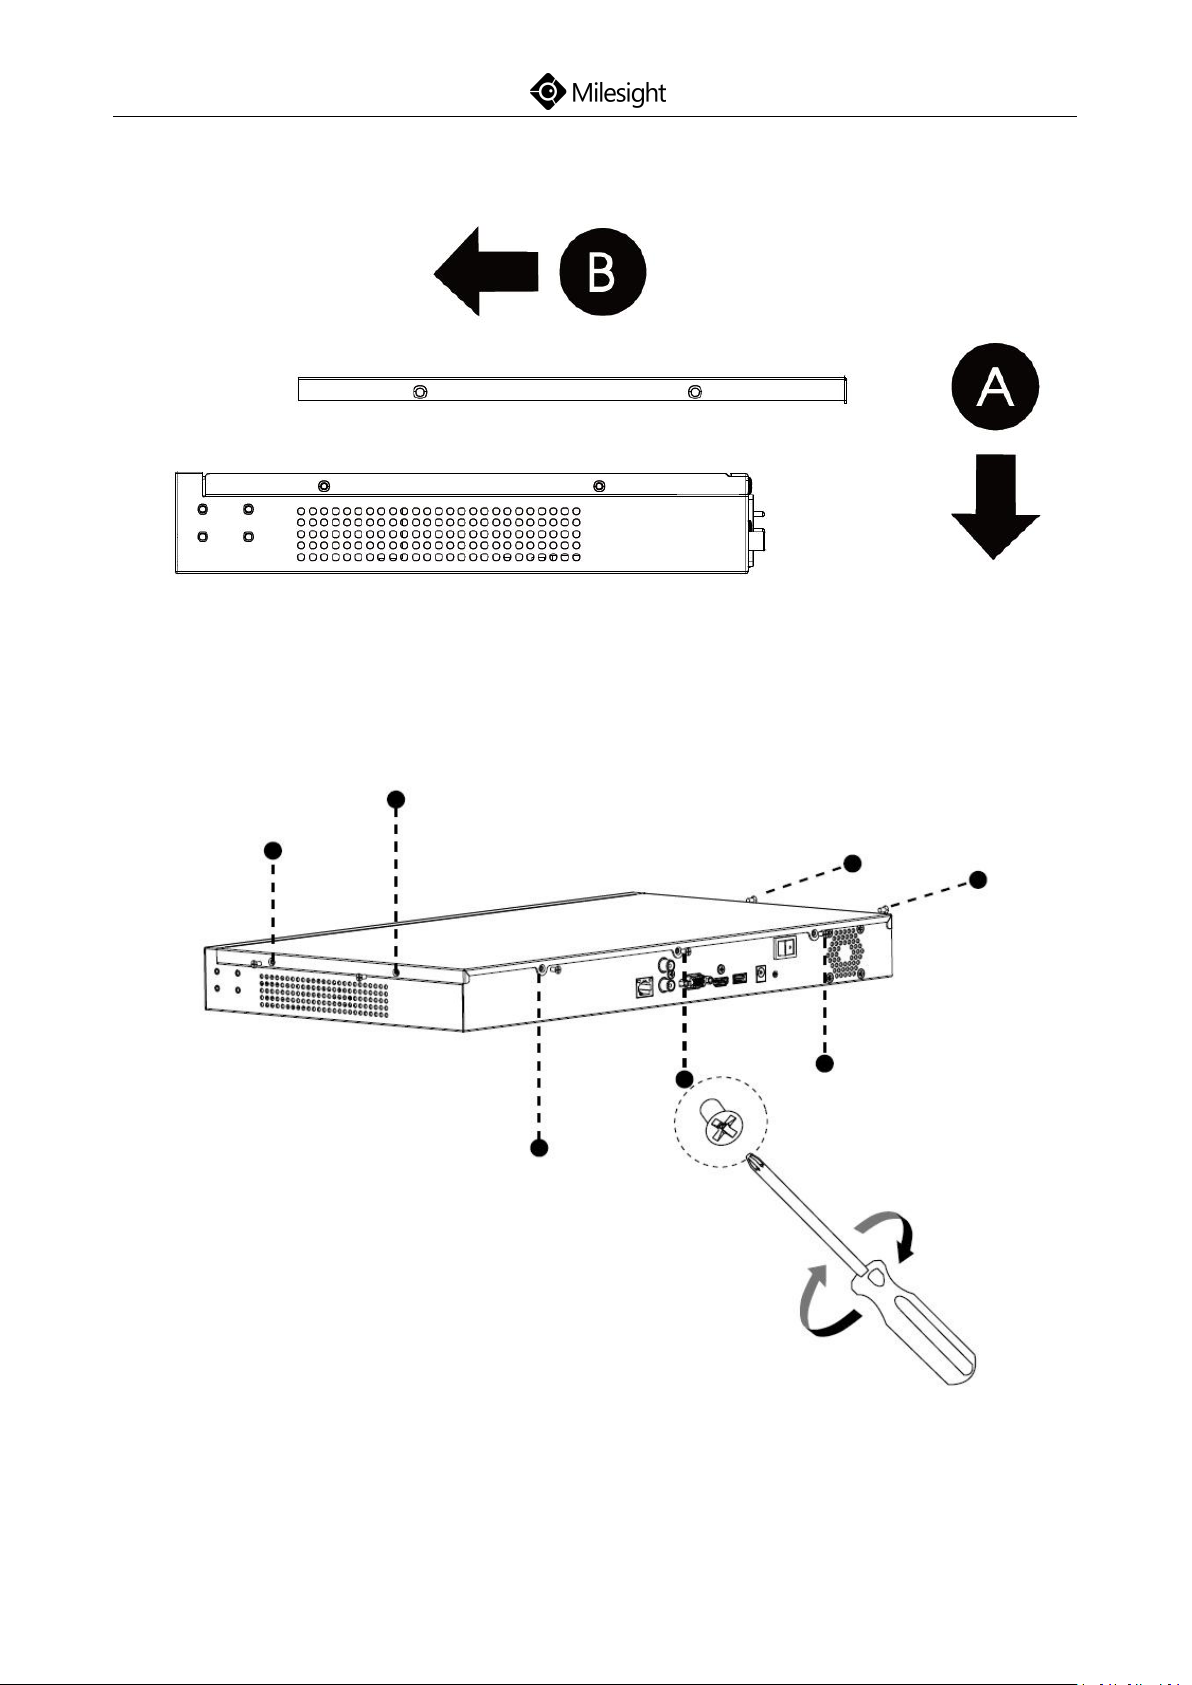
Step7: Pull down the upper casing and slide it to the left.
Quick Start Guide
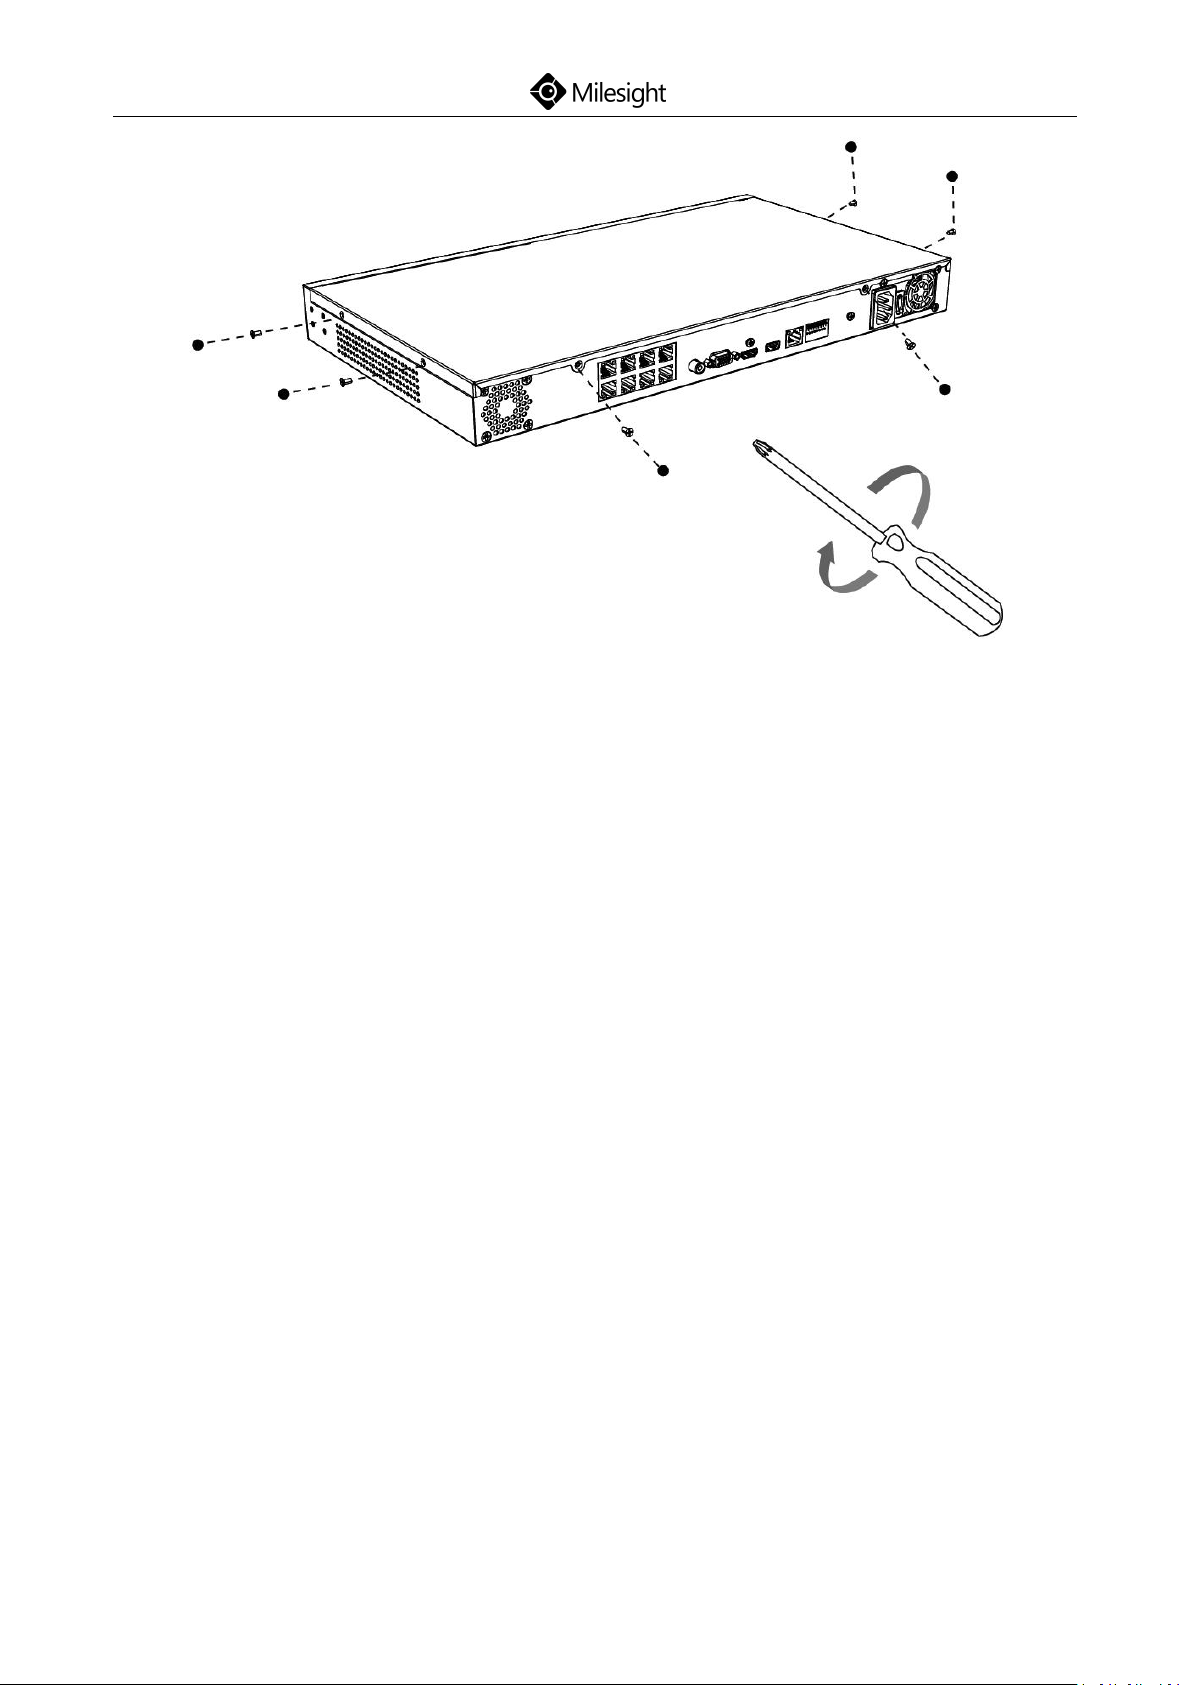
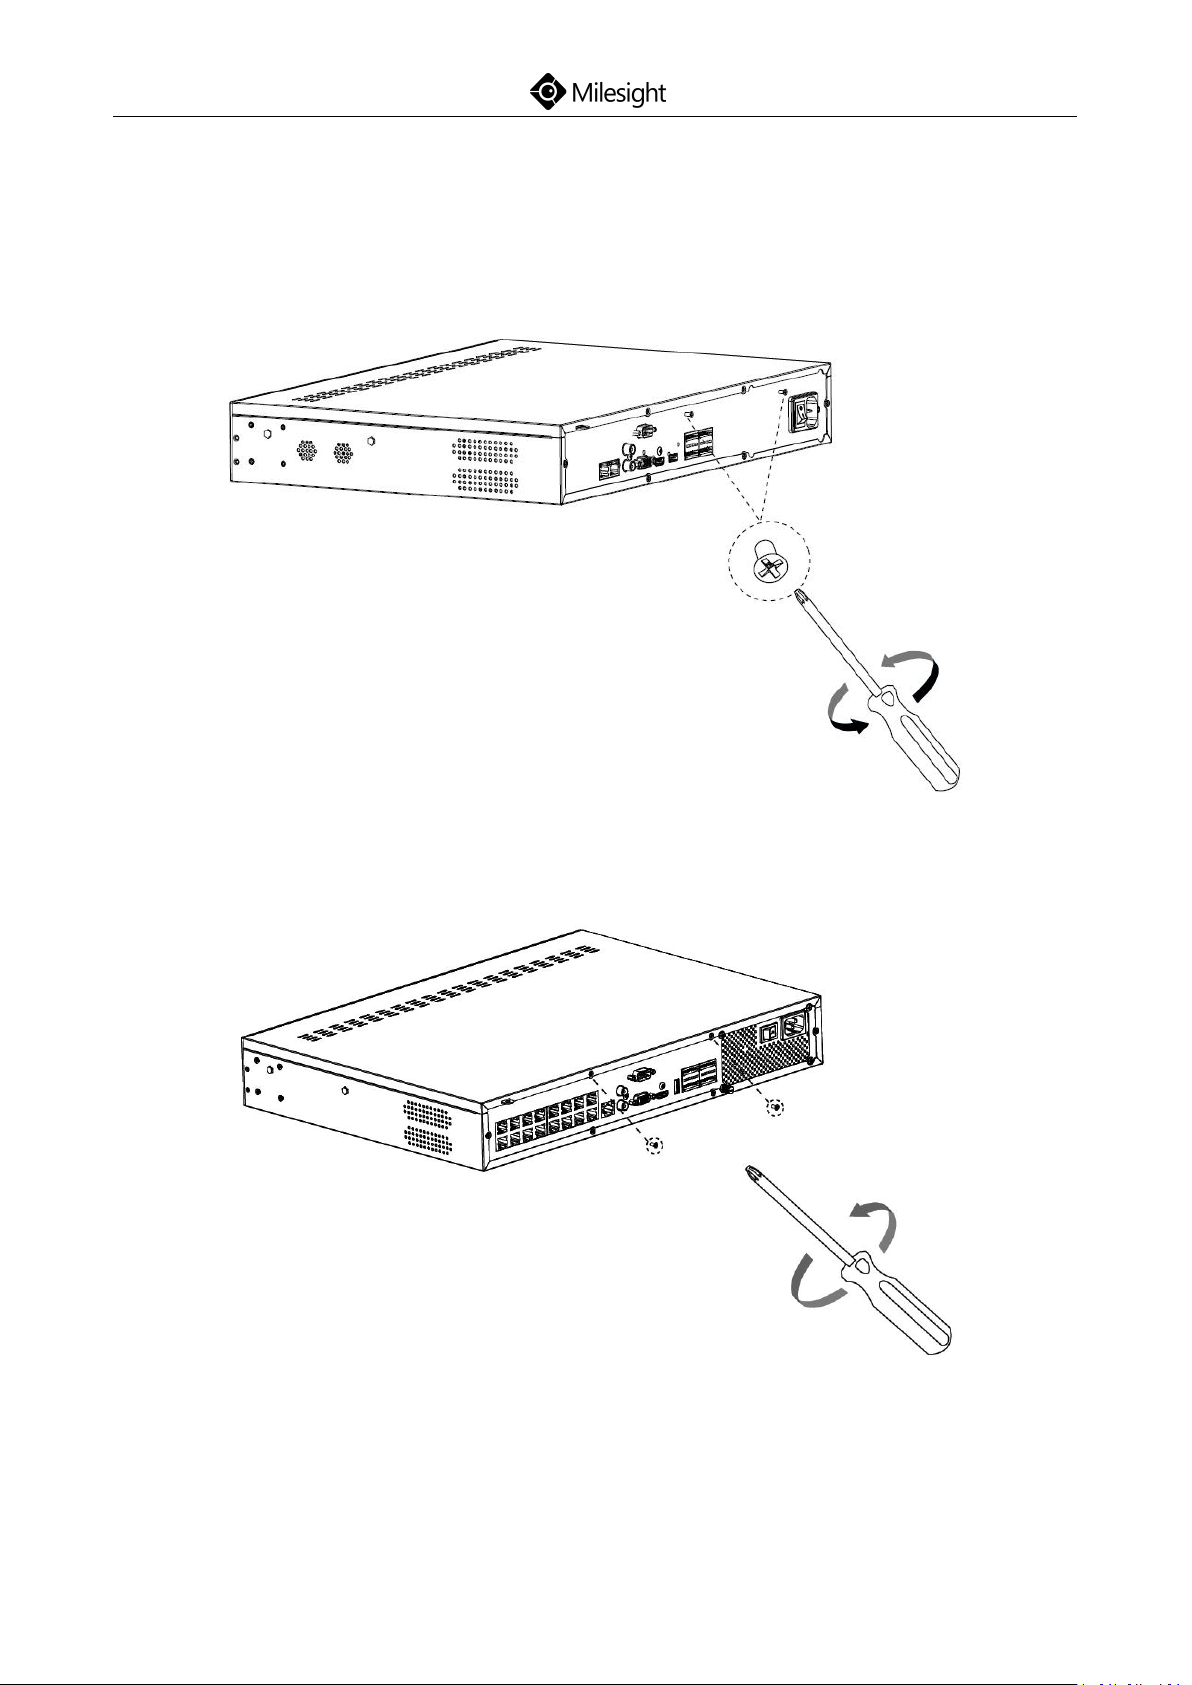
Step8: Retighten the screws on the back.
(Pro 5000)
www.milesight.com
Page 23
Quick Start Guide
20
(PoE 5000)
www.milesight.com
Page 24
Quick Start Guide
21
4.3 Pro/PoE NVR 7000 Series Installation
Step1: Using a cross screwdriver to remove the screws at the back panel in an
anticlockwise direction.
(Pro 7000)
(PoE 7000)
www.milesight.com
Page 25
22
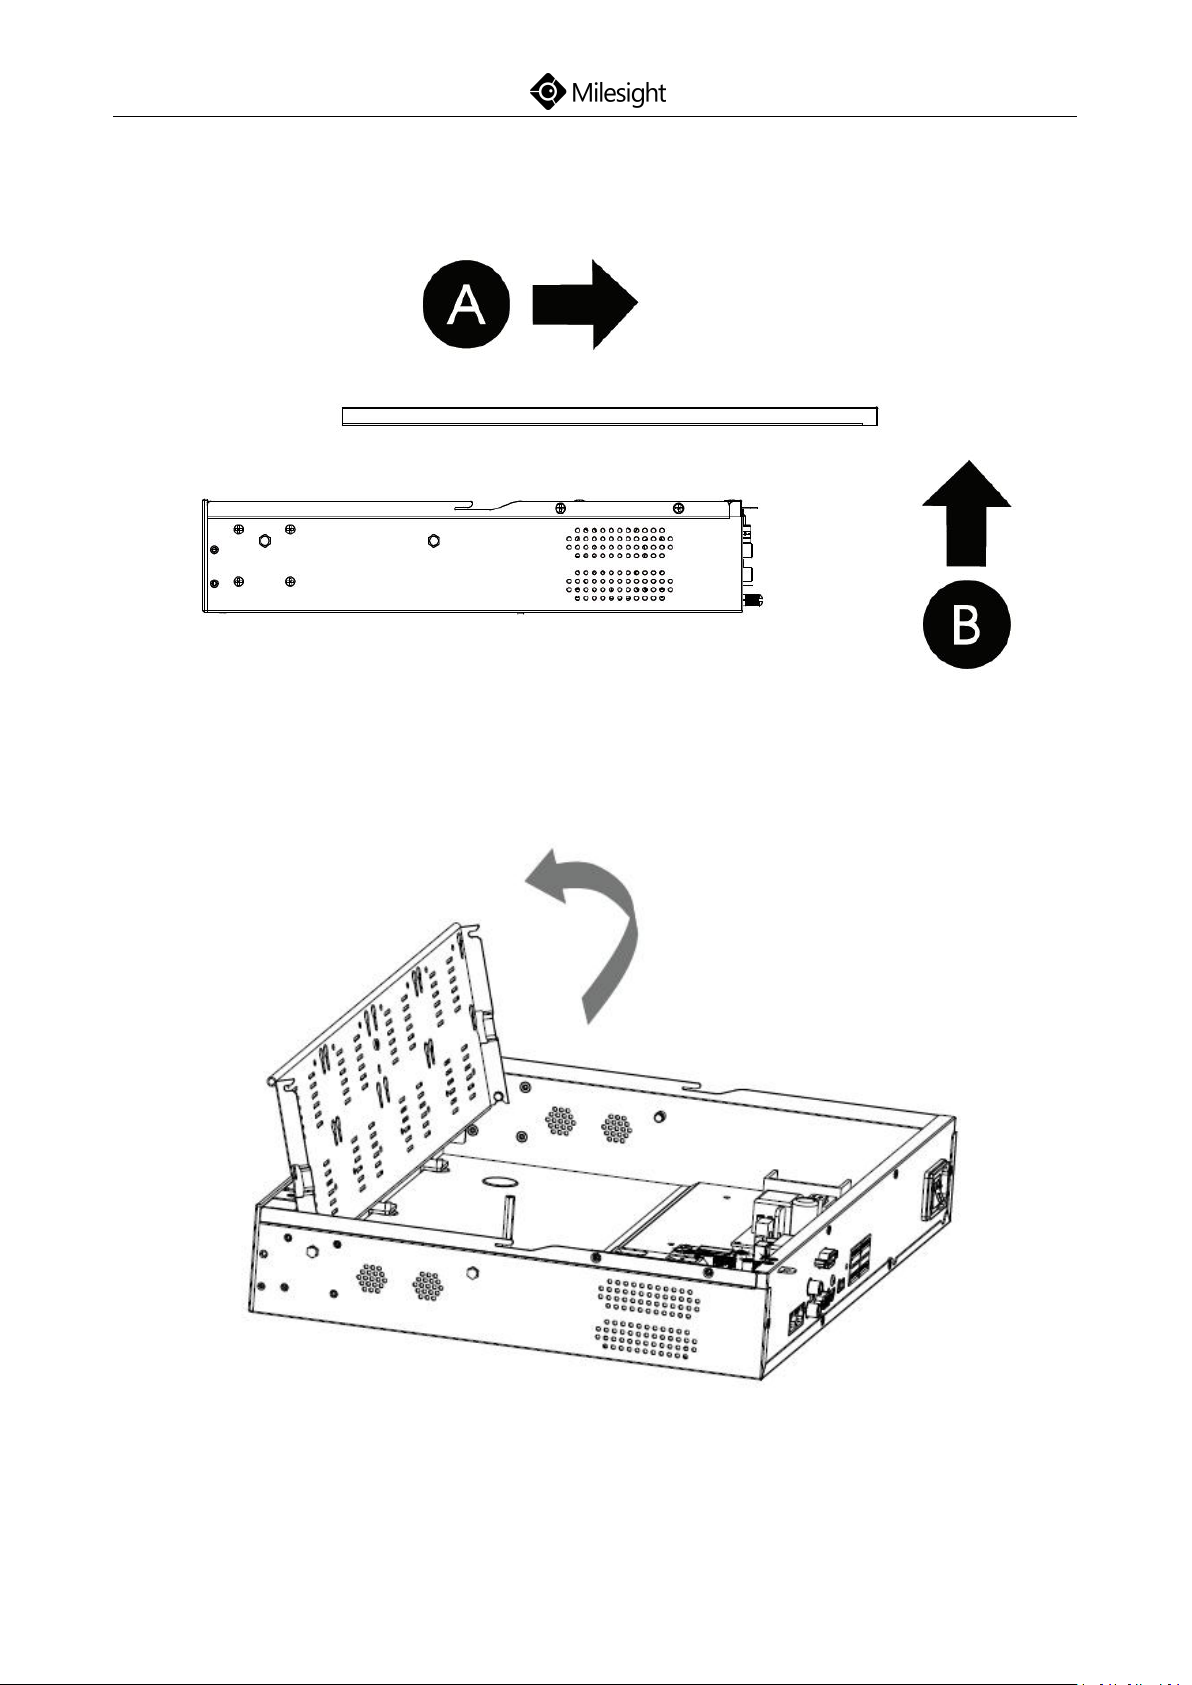
Step2: Slide the upper casing to the right first and lift it up.
Quick Start Guide
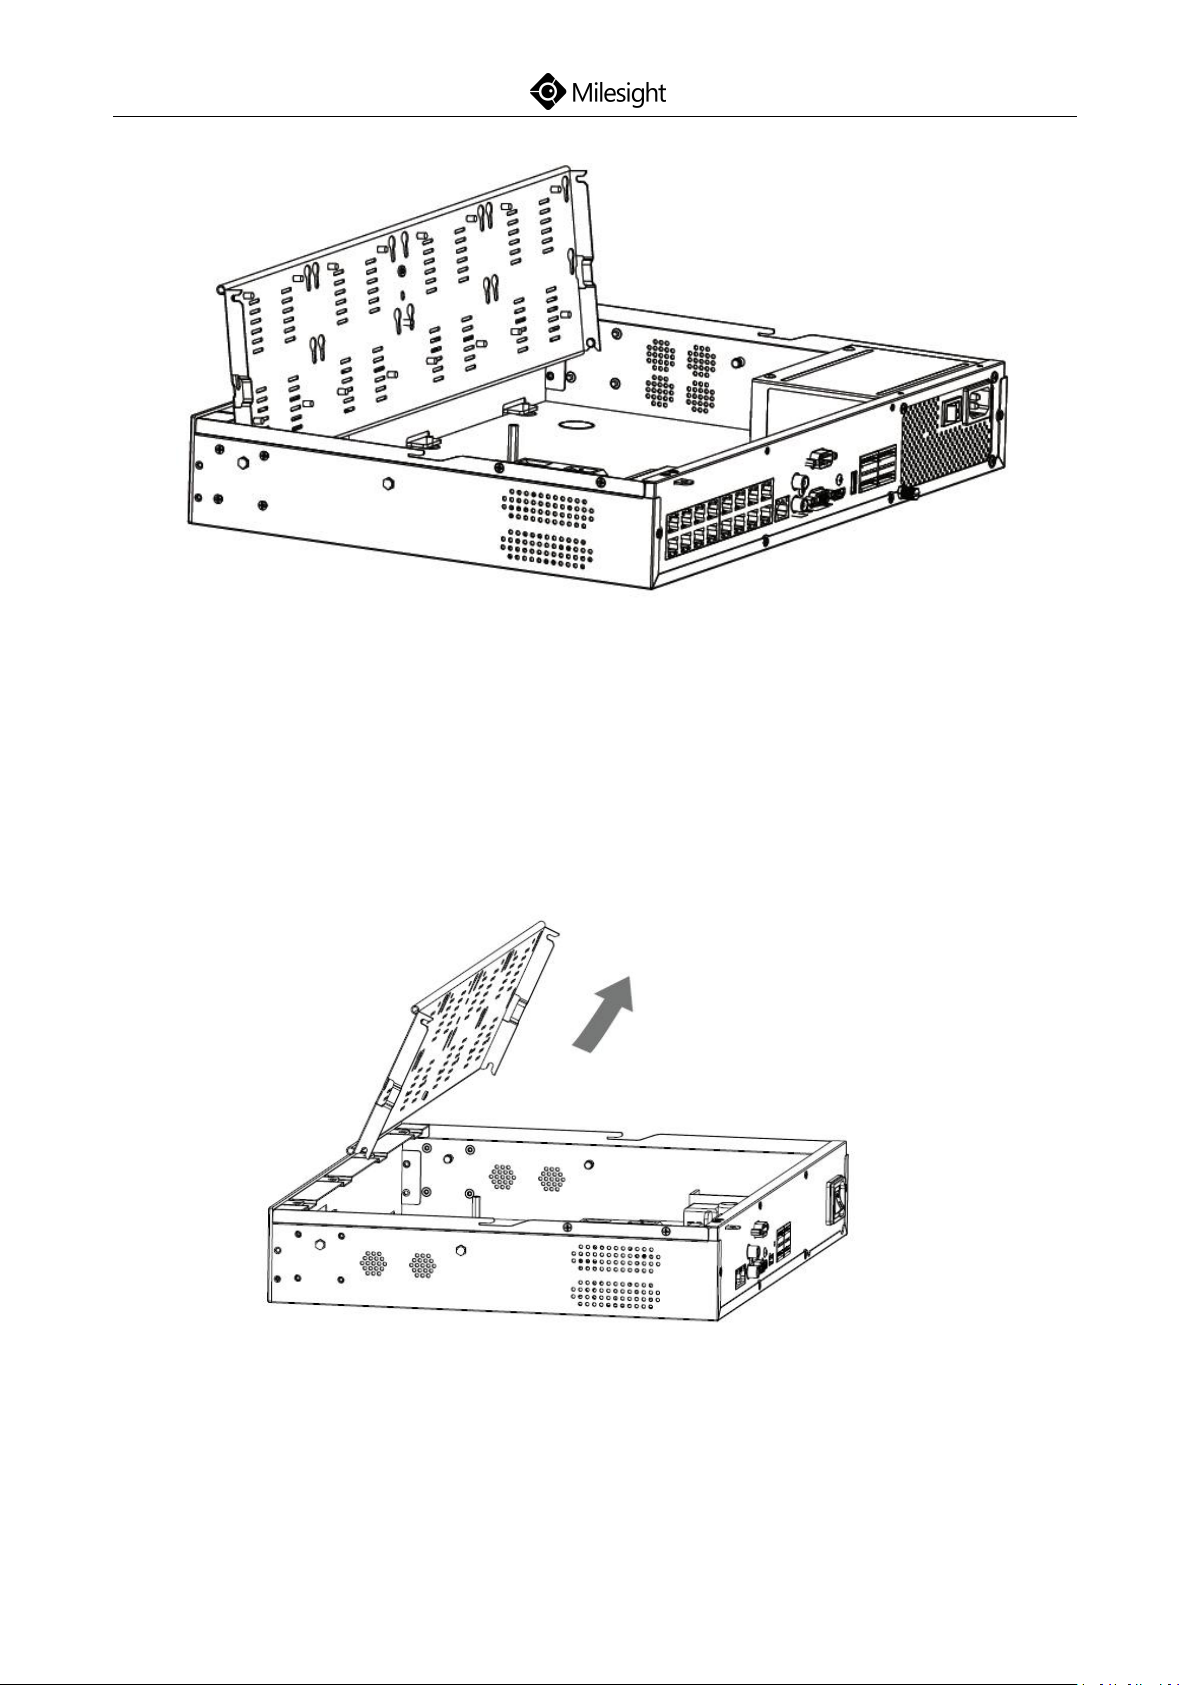
Step3: The HDD bracket is rotatable and can be taken down by pulling up and
rotating one side of it.
(Pro 7000)
www.milesight.com
Page 26
23
(PoE 7000)
Quick Start Guide
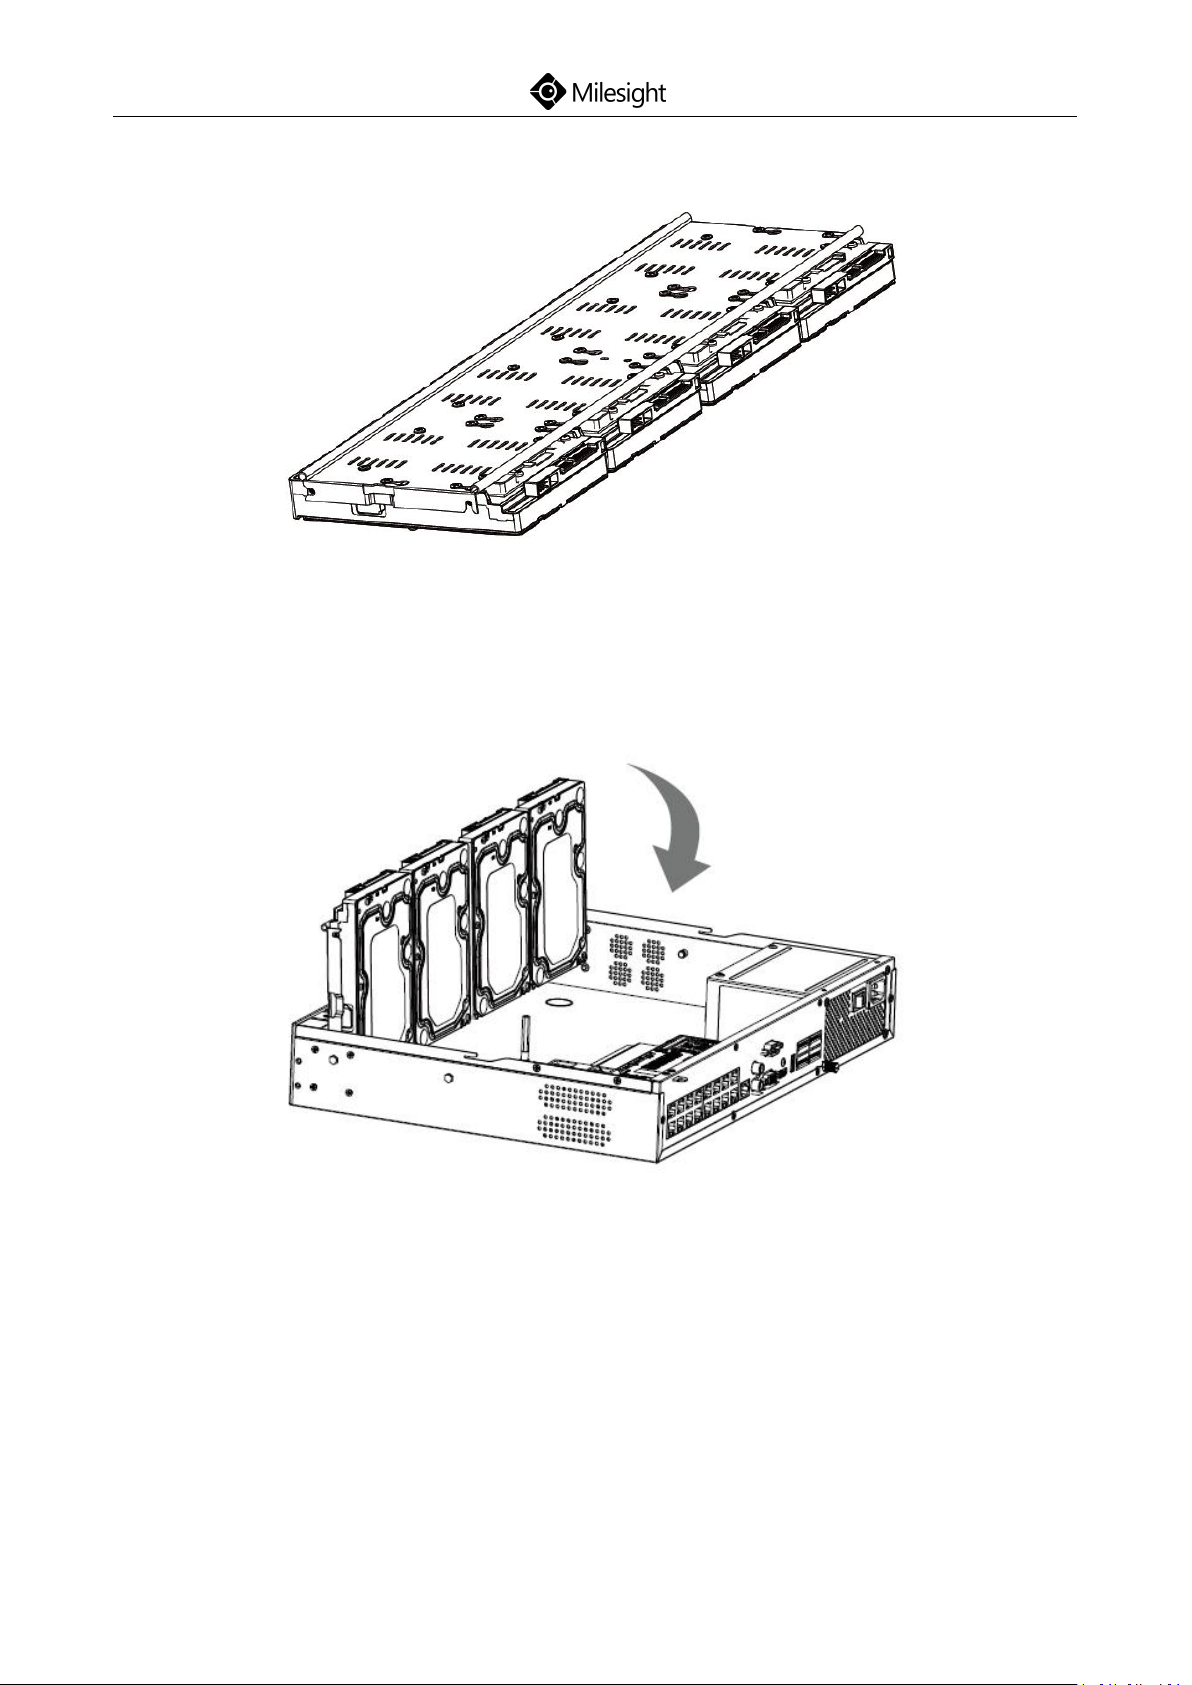
Step4: To install HDD more conveniently, you can
1) Remove the bracket.
:
(Pro 7000)
www.milesight.com
Page 27
Quick Start Guide
24
2) Install the HDD on the bracket.
3) After securing the HDD on bracket, insert the bracket back to the NVR.
(PoE 7000)
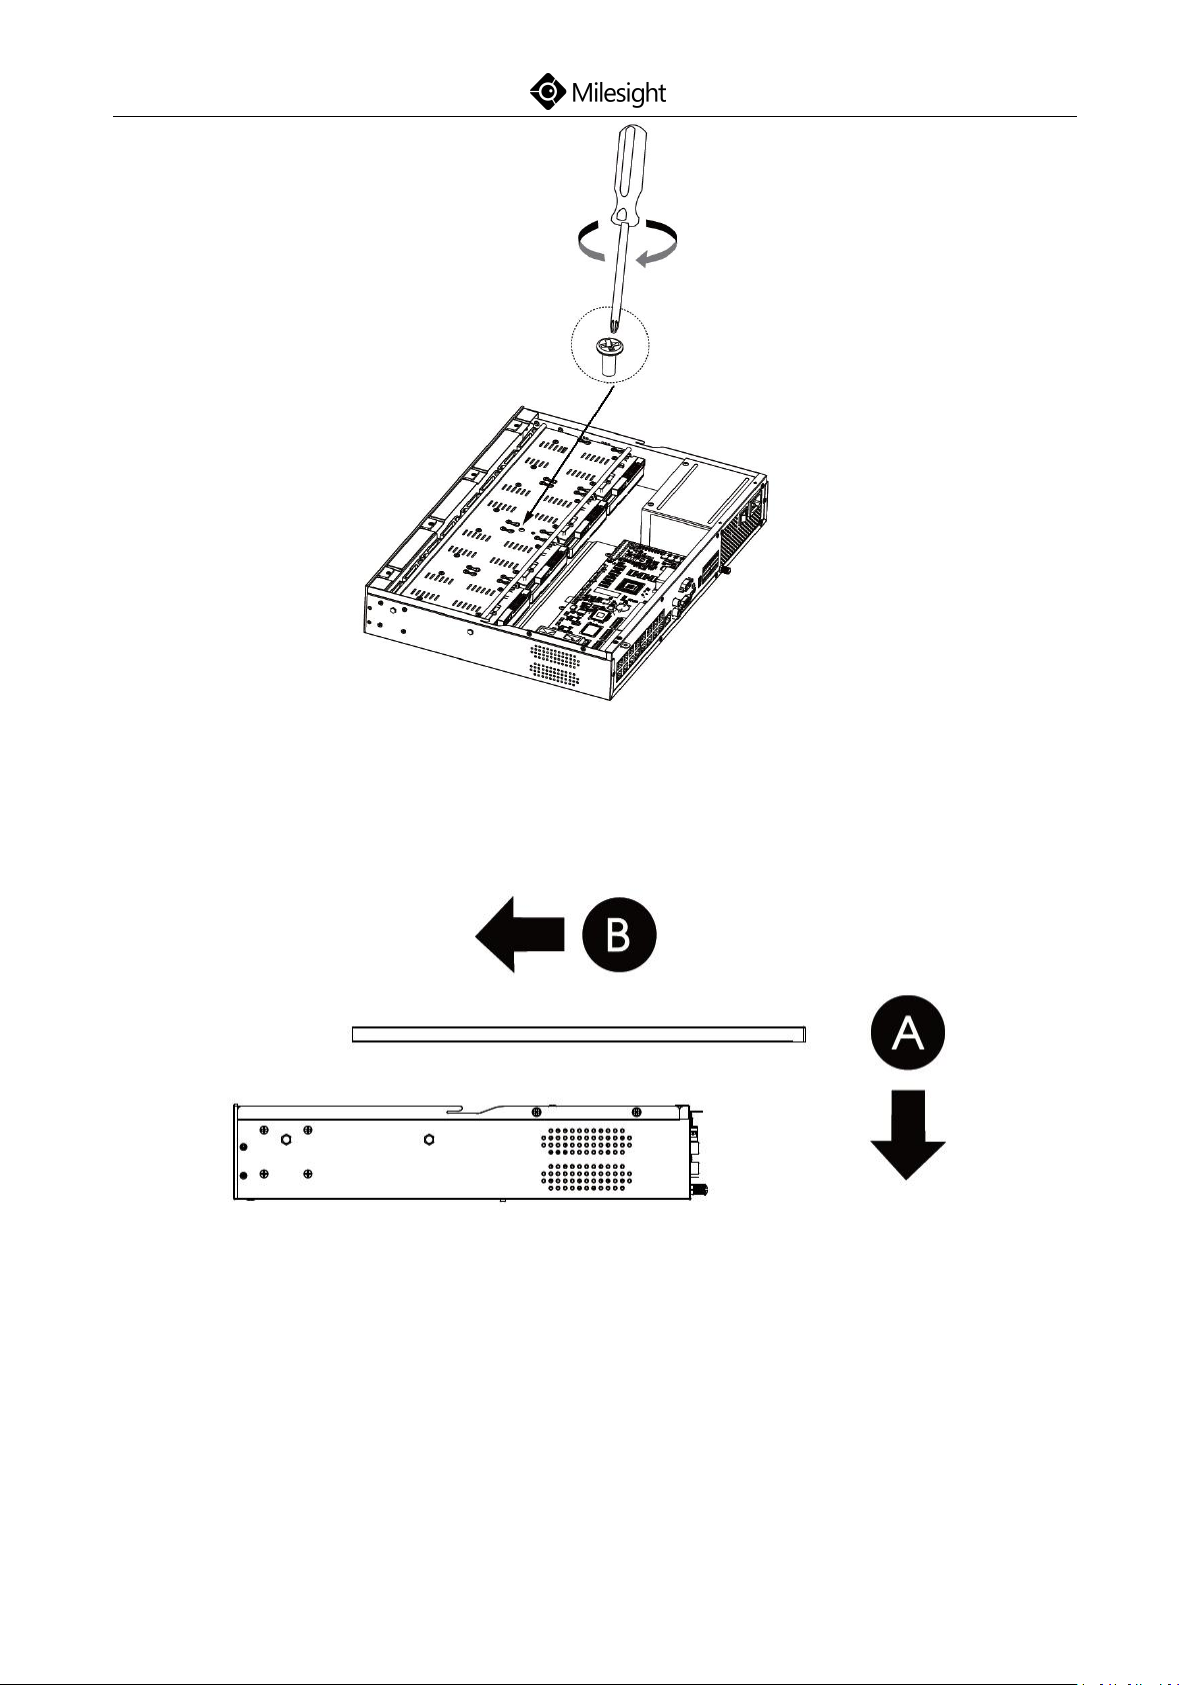
Step5: Check if all the 16 screws in HDD bracket are screwed tightly, if not,
screw them tightly in an clockwise direction. And fix the bracket with a screw
in the middle of bracket. Then connect the power cable and data cable to each
HDD.
www.milesight.com
Page 28
Quick Start Guide
25
(PoE 7000)
Step6: Pull down the upper casing and slide it to the left.
Step7: Retighten the screws on the back.
www.milesight.com
Page 29
Quick Start Guide
26
(Pro 7000)
(PoE 7000)
4.4 Pro NVR 8000 Series Installation
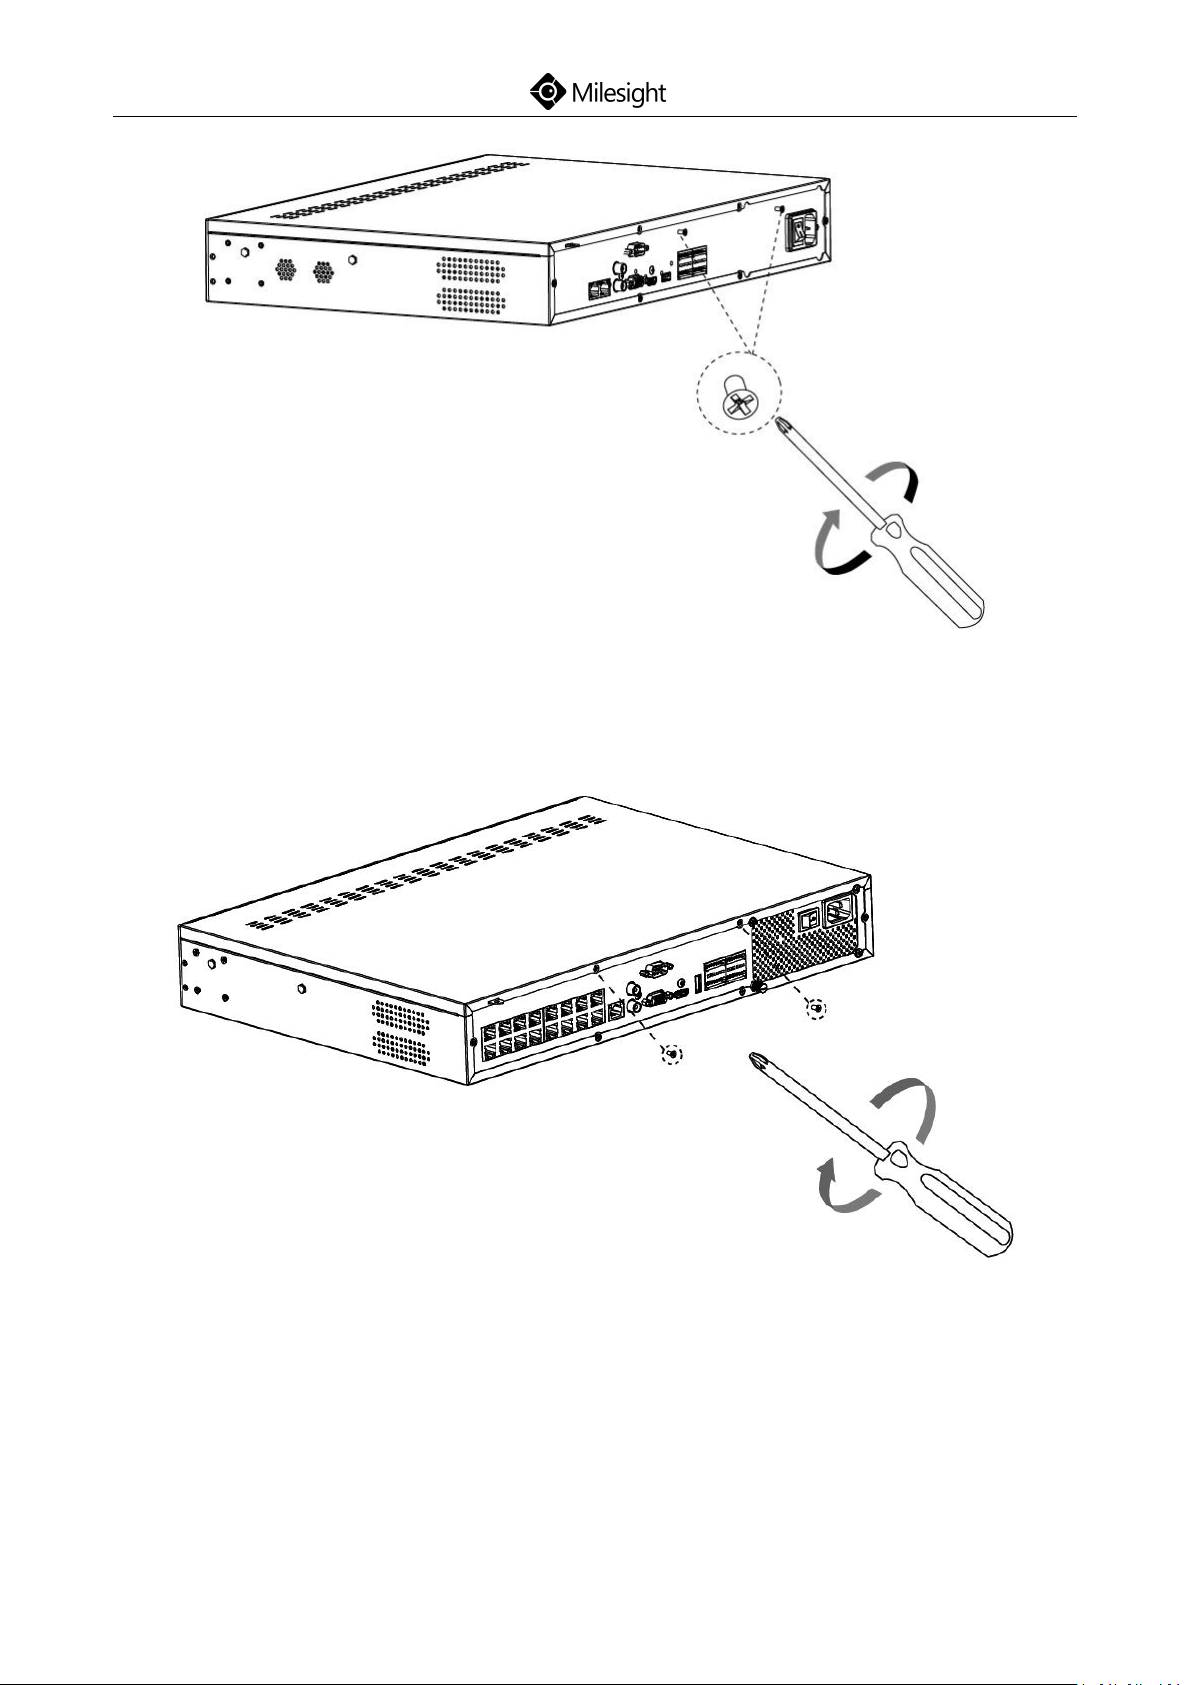
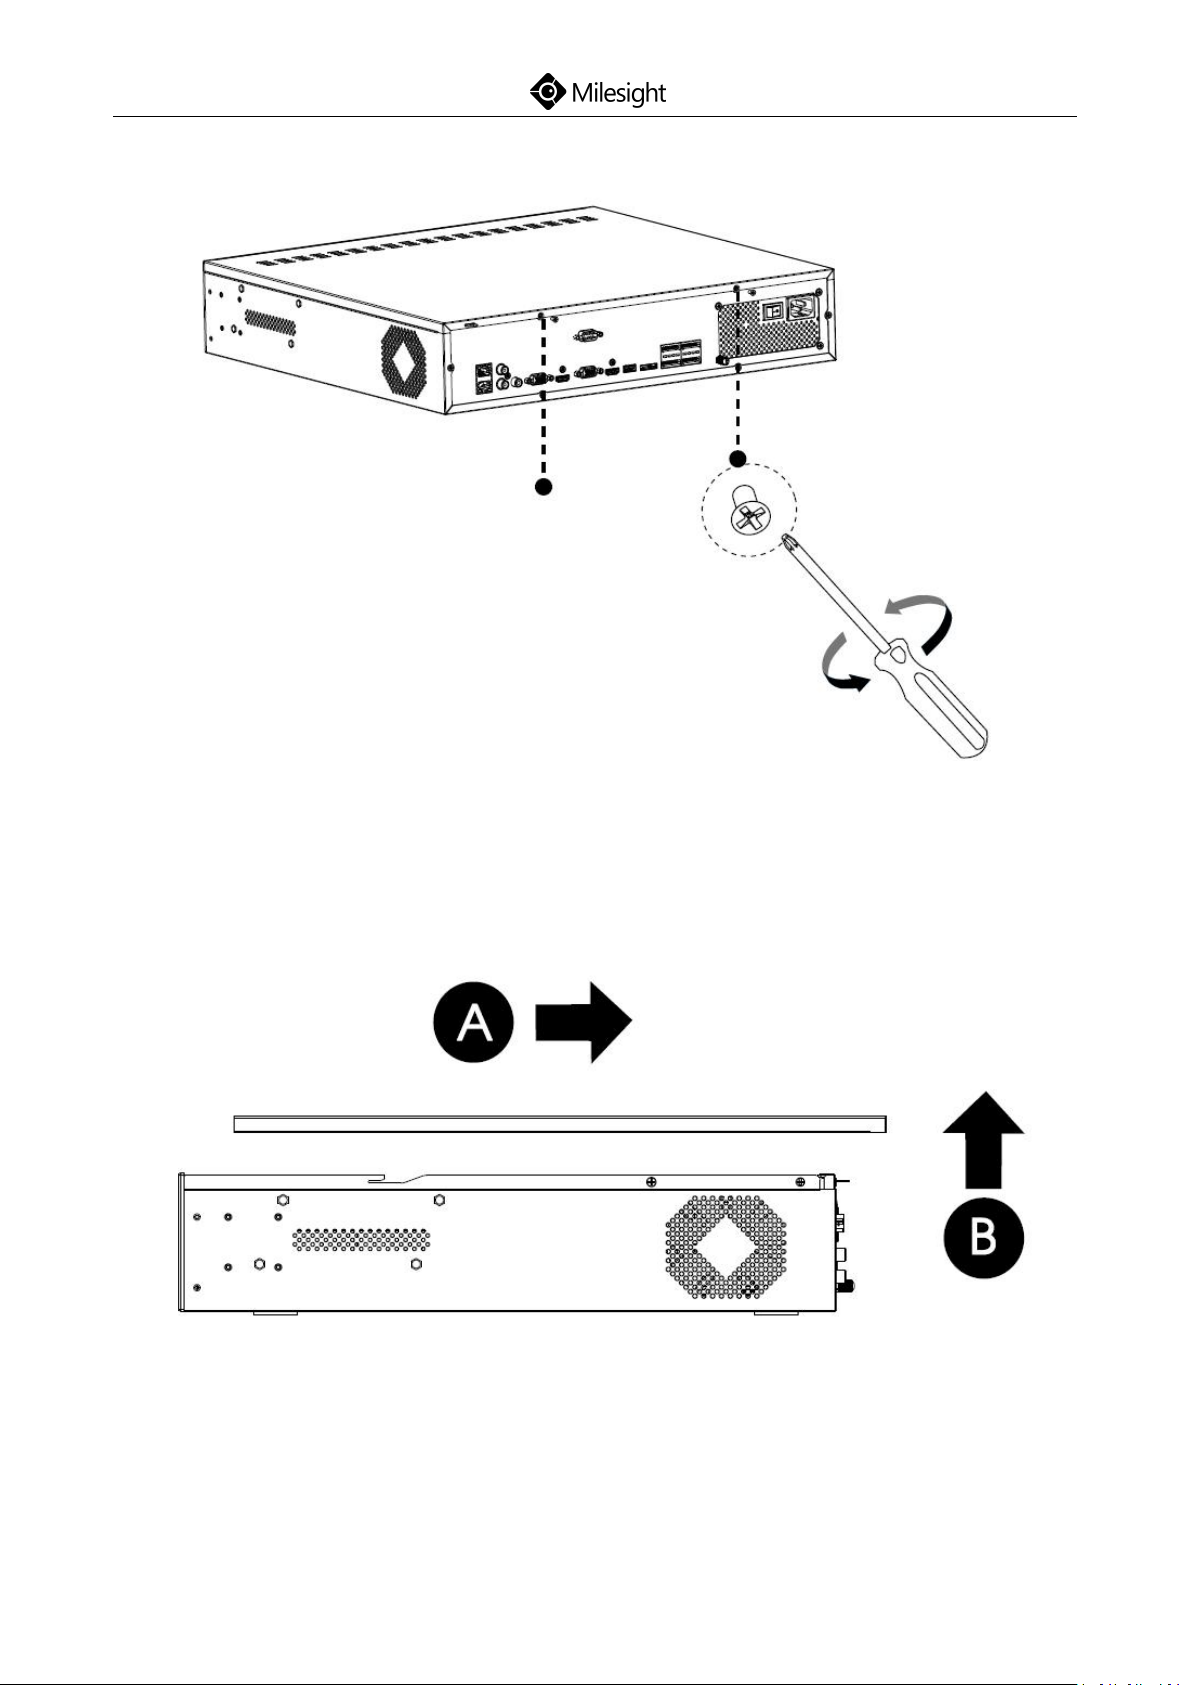
Step1: Using a cross screwdriver to remove the screws at the back panel in an
www.milesight.com
Page 30
27
anticlockwise direction.
Quick Start Guide
(Pro 8000)
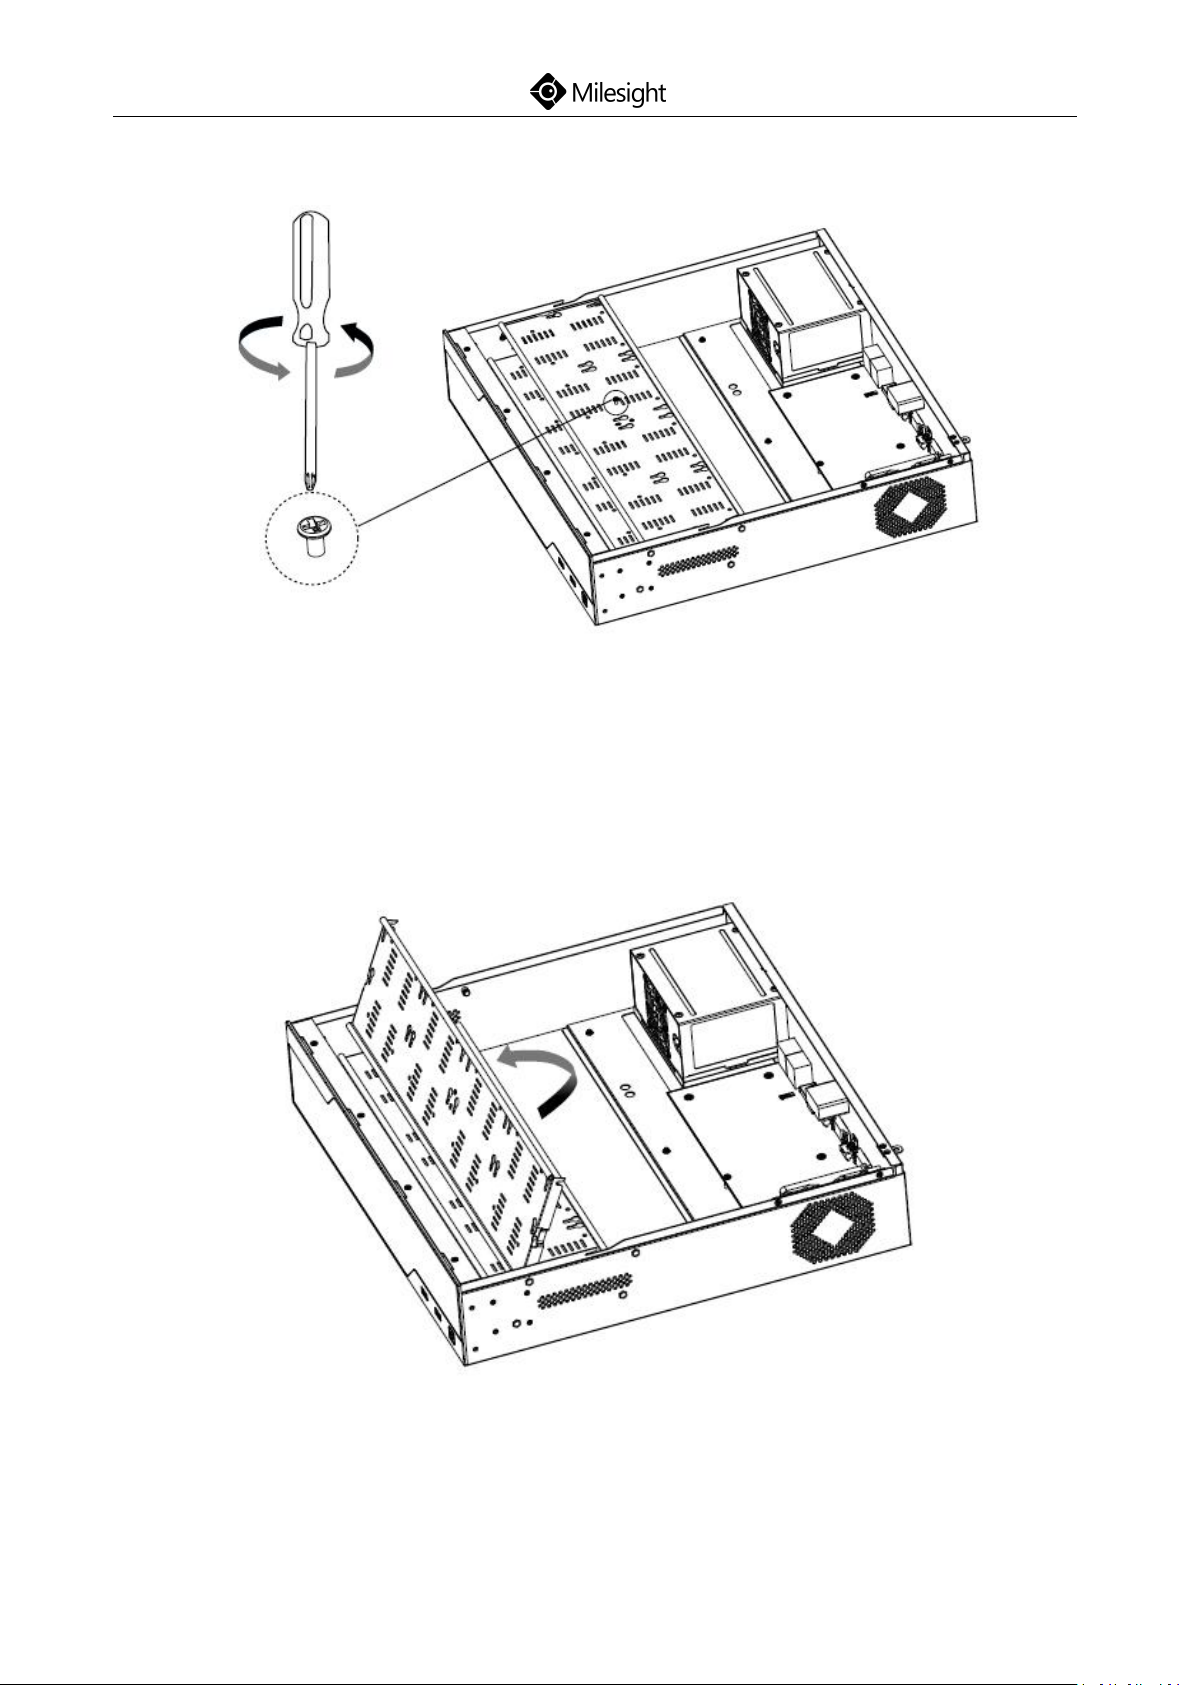
Step2: Slide the upper casing to the right first and lift it up.
Step3: Using the screwdriver to remove the screw in the middle of HDD
bracket in an anticlockwise direction (Pro 7000 has only one HDD bracket and
www.milesight.com
Page 31
28
Pro 8000 has two, while the installation steps are the same).
Quick Start Guide
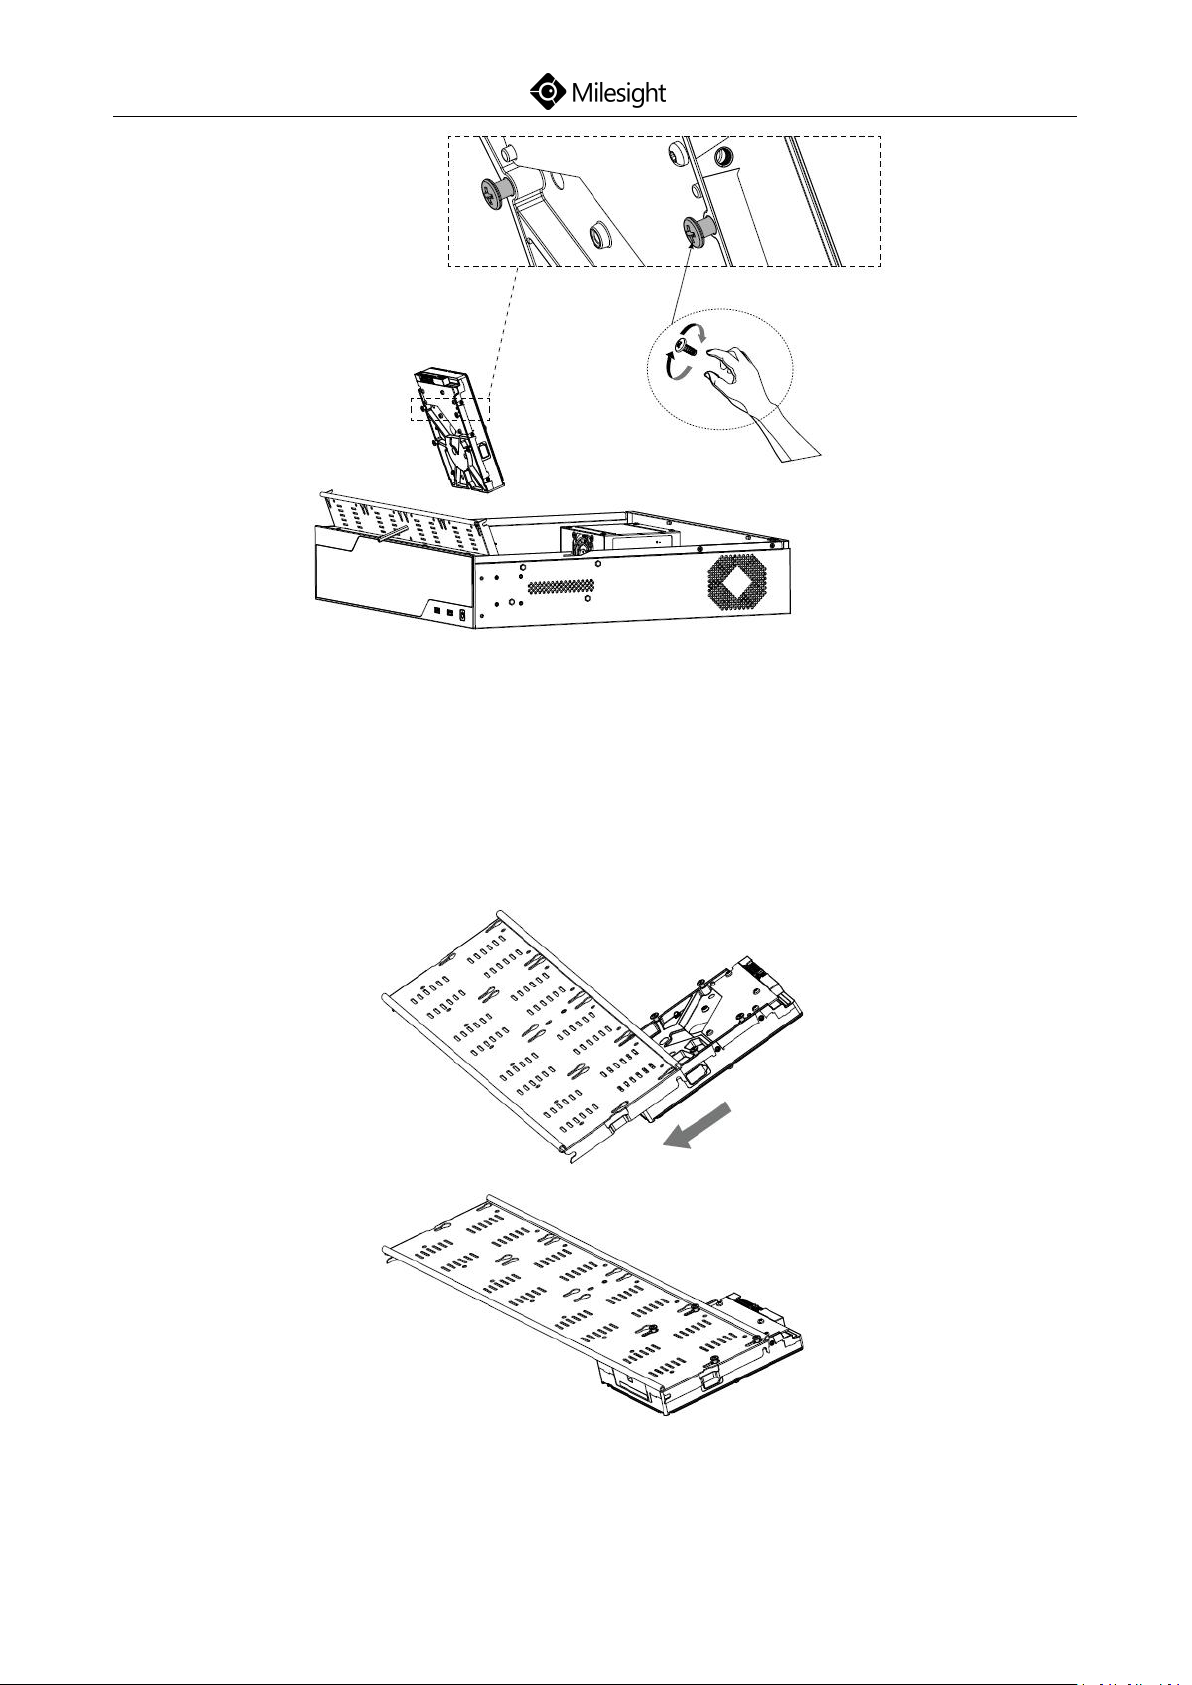
Step4: The HDD bracket is rotatable and can be taken down by pulling up and
rotating one side of it.
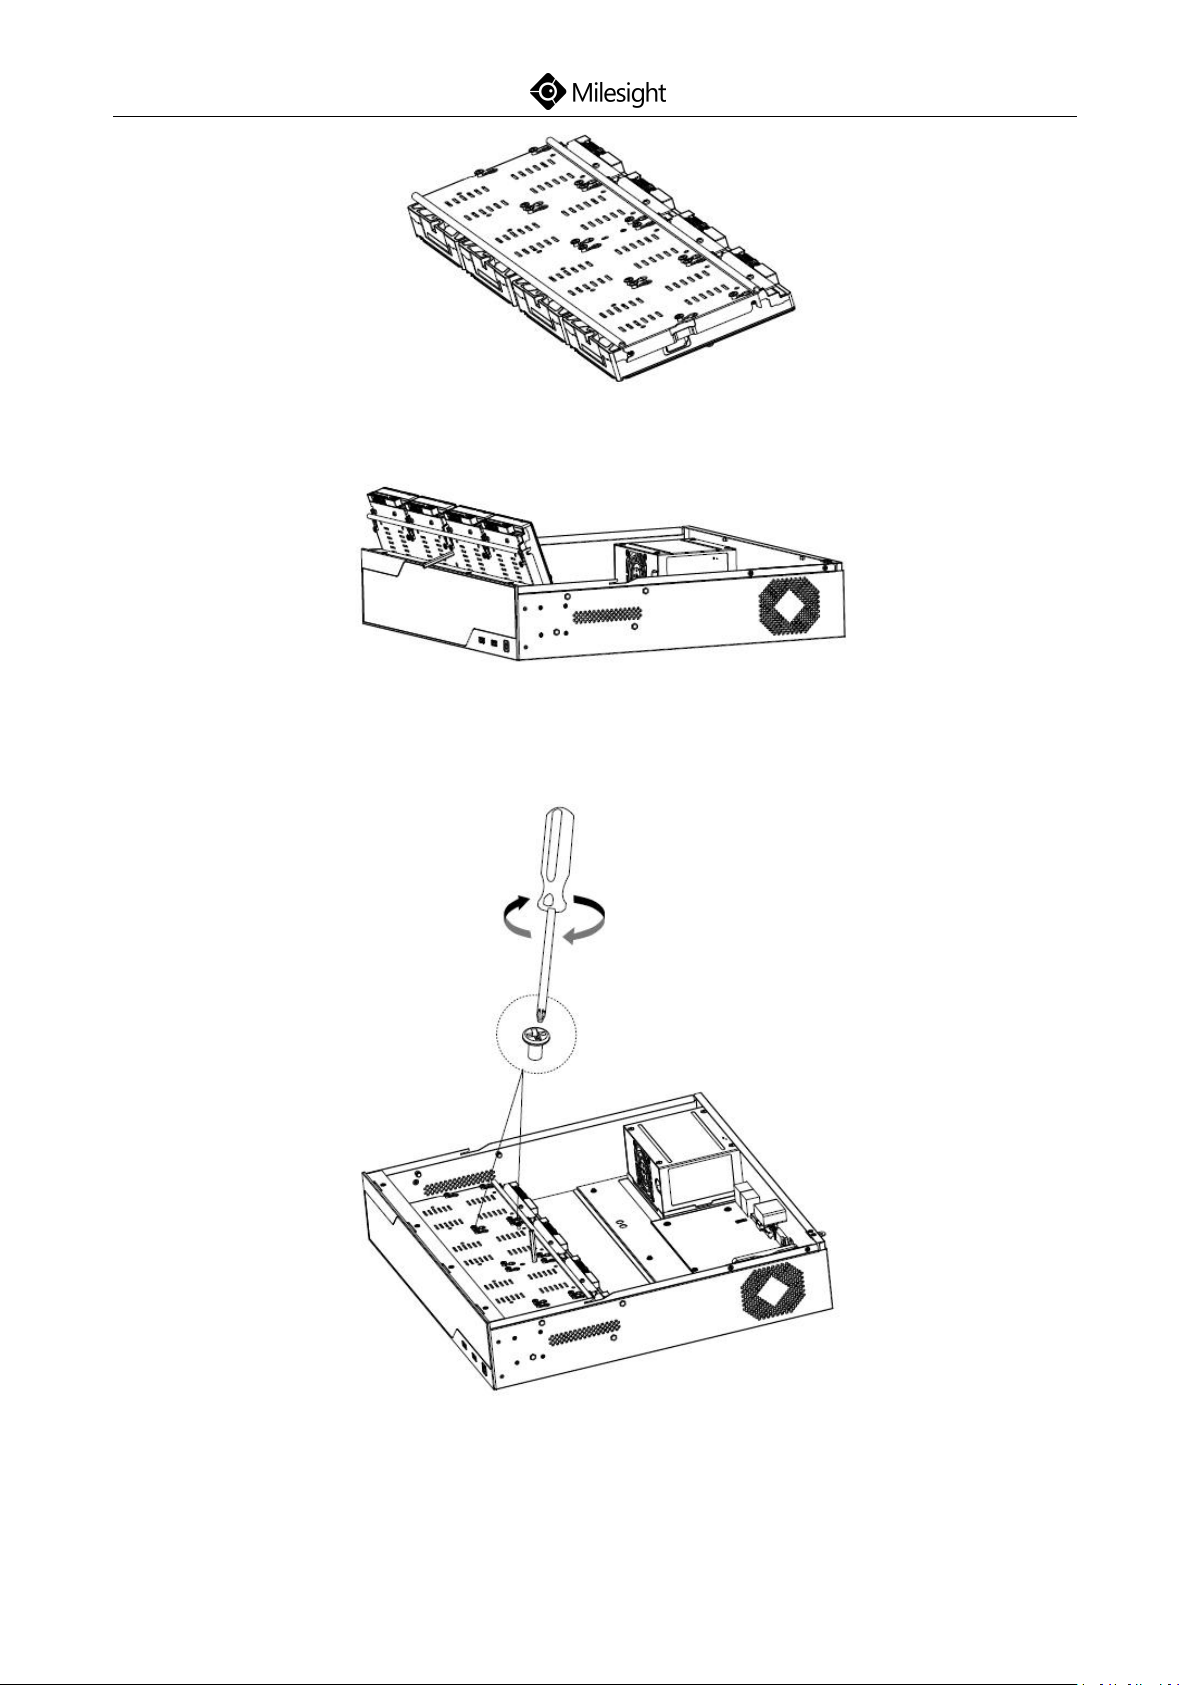
Step5: Secure the HDD with 4 screws. Don’t screw tight and leave about 4mm
distance at the side of each screw nut. As the enlarged drawing shows:
www.milesight.com
Page 32
Quick Start Guide
29
Step6: After securing each HDD with 4 screws, stuck the side with screw nuts in
the bracket’s slots and then slide down to fix the HDD in the bracket. Screw
tight with screwdriver.
Step7: Repeat the above steps to install HDD in the bracket. Remember to
check if you have screwed tight.
www.milesight.com
Page 33
Quick Start Guide
30
Step8: Secure the 16 screws in HDD and fix the bracket with a screw in the
middle of it. Then connect the power cable and data cable to each HDD.
Step9: Pull down the upper casing and slide it to the left.
www.milesight.com
Page 34
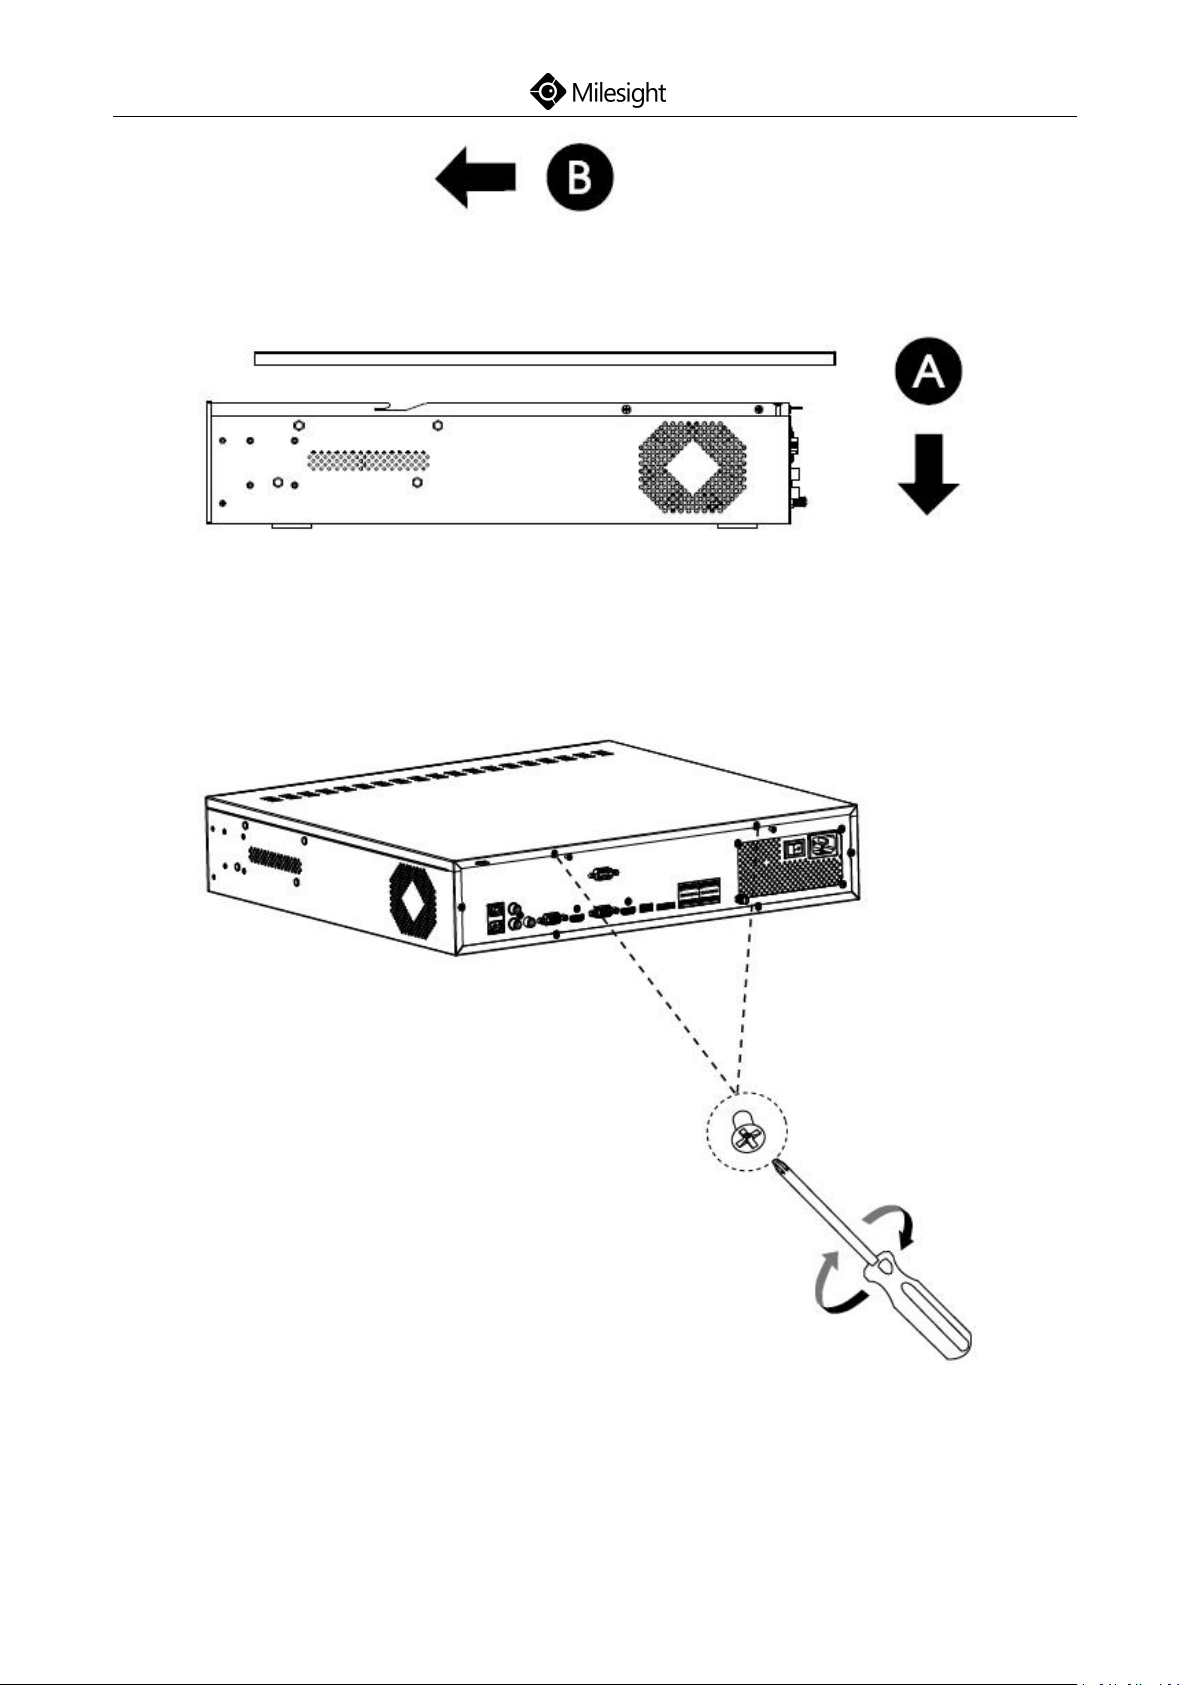
Quick Start Guide
31
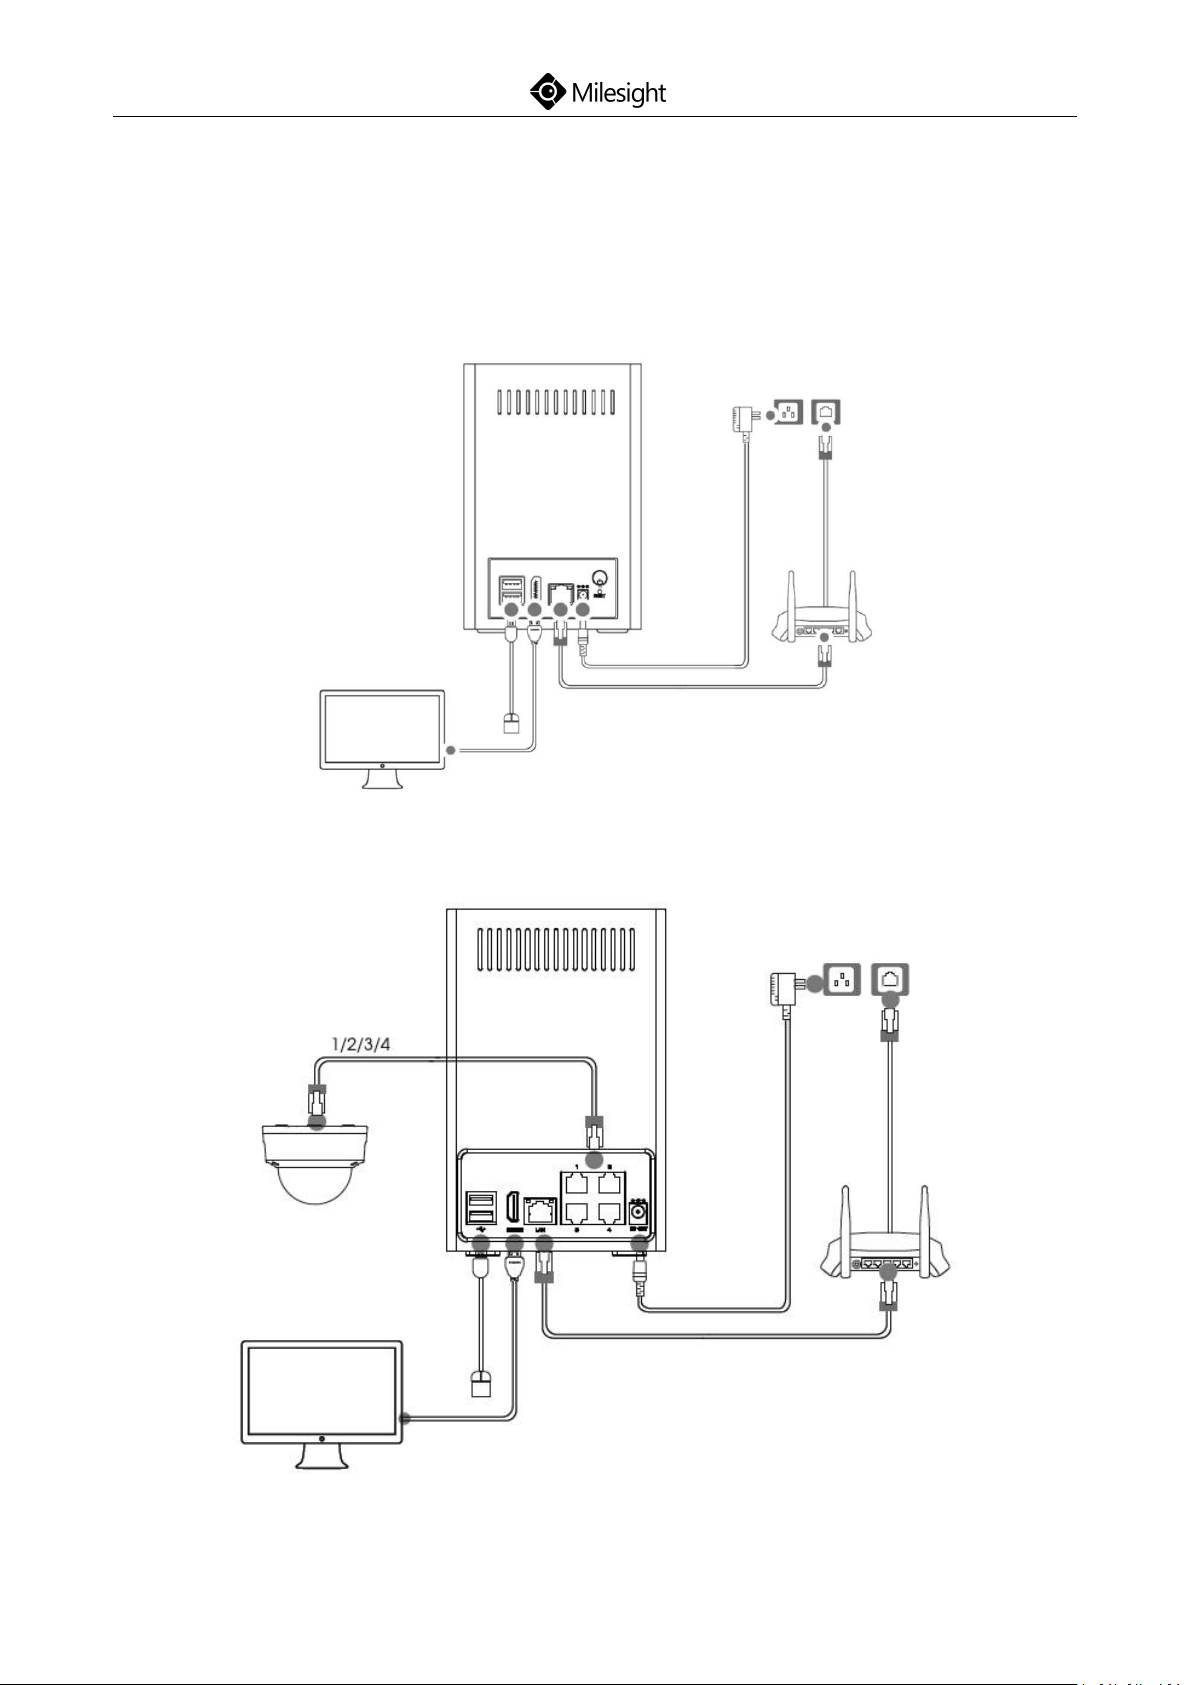
Step10: Retighten the screws on the back.
(Pro 8000)
www.milesight.com
Page 35
Quick Start Guide
32
5. Connection Overview
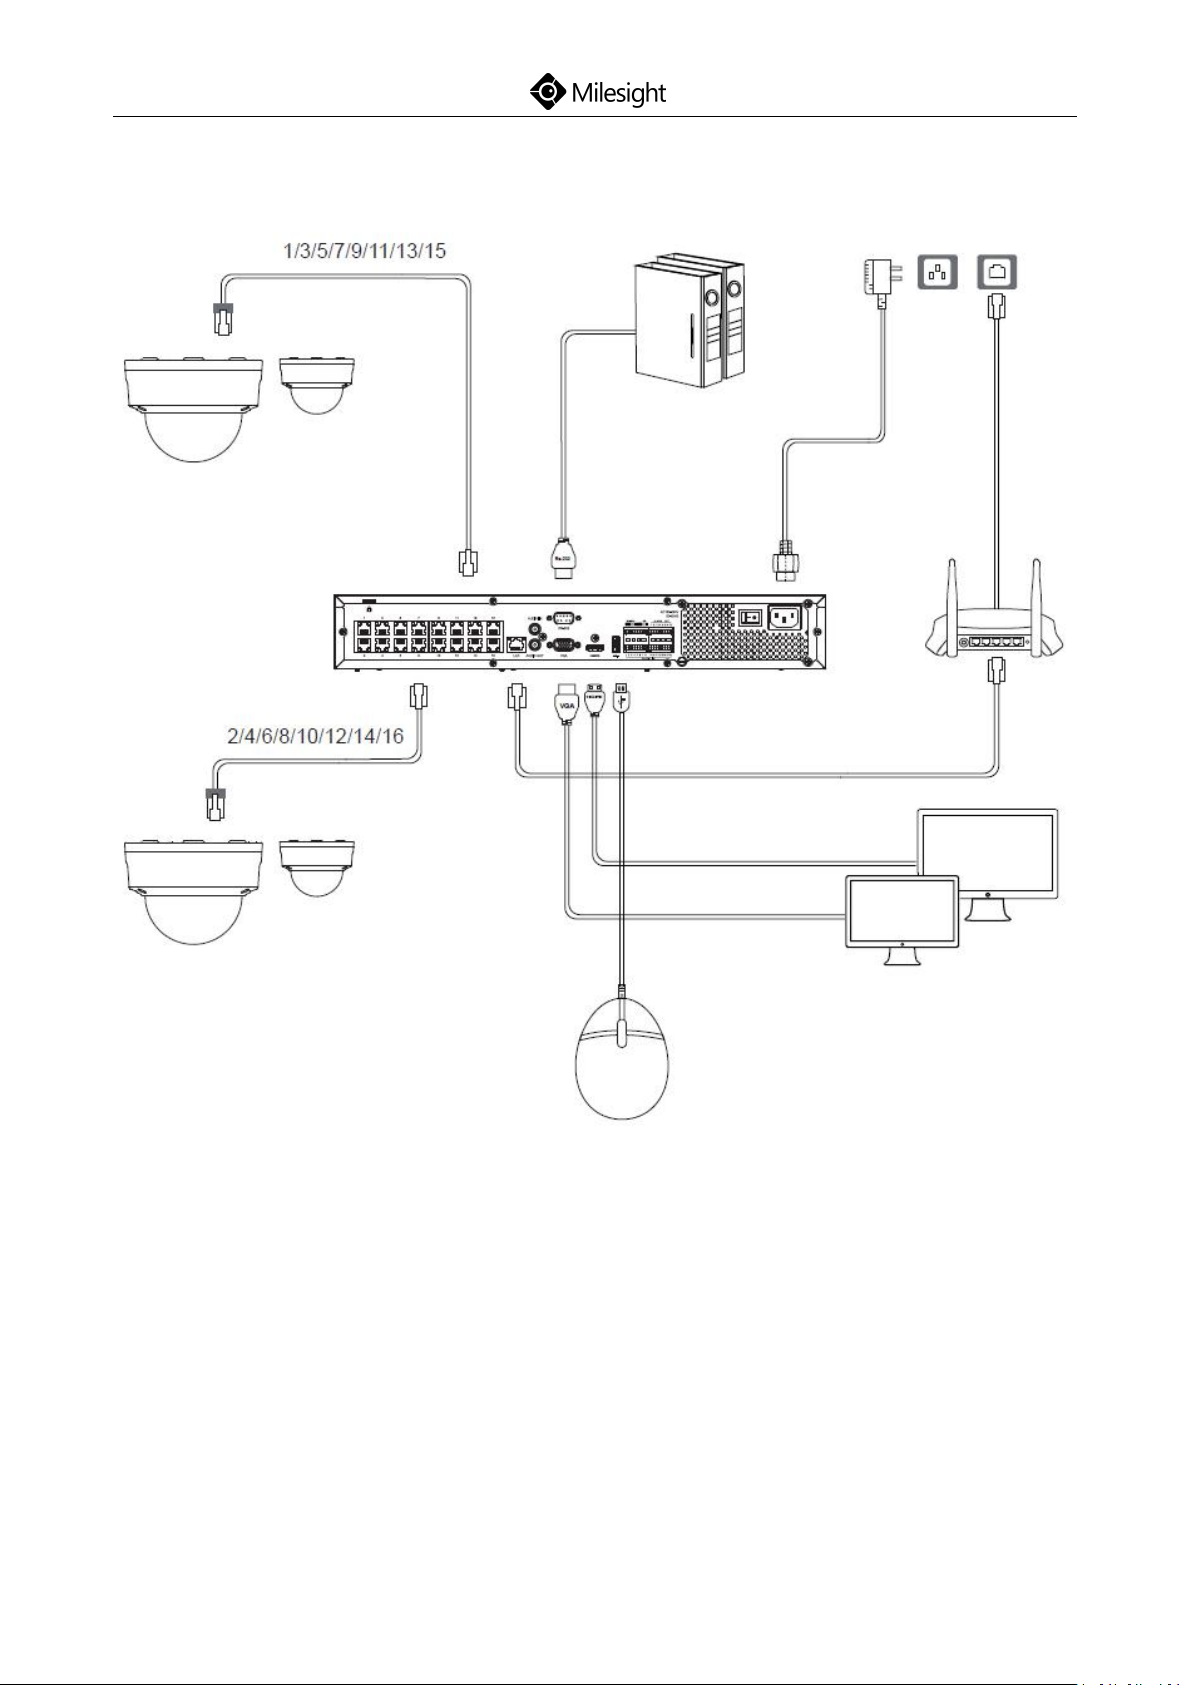
Connect different devices to the interfaces of NVR, taking Mini (PoE) NVR and
PoE 7000 NVR for example:
(Mini NVR)
(Mini PoE NVR)
www.milesight.com
Page 36
Quick Start Guide
33
(PoE 7000)
www.milesight.com
Page 37
Quick Start Guide
34
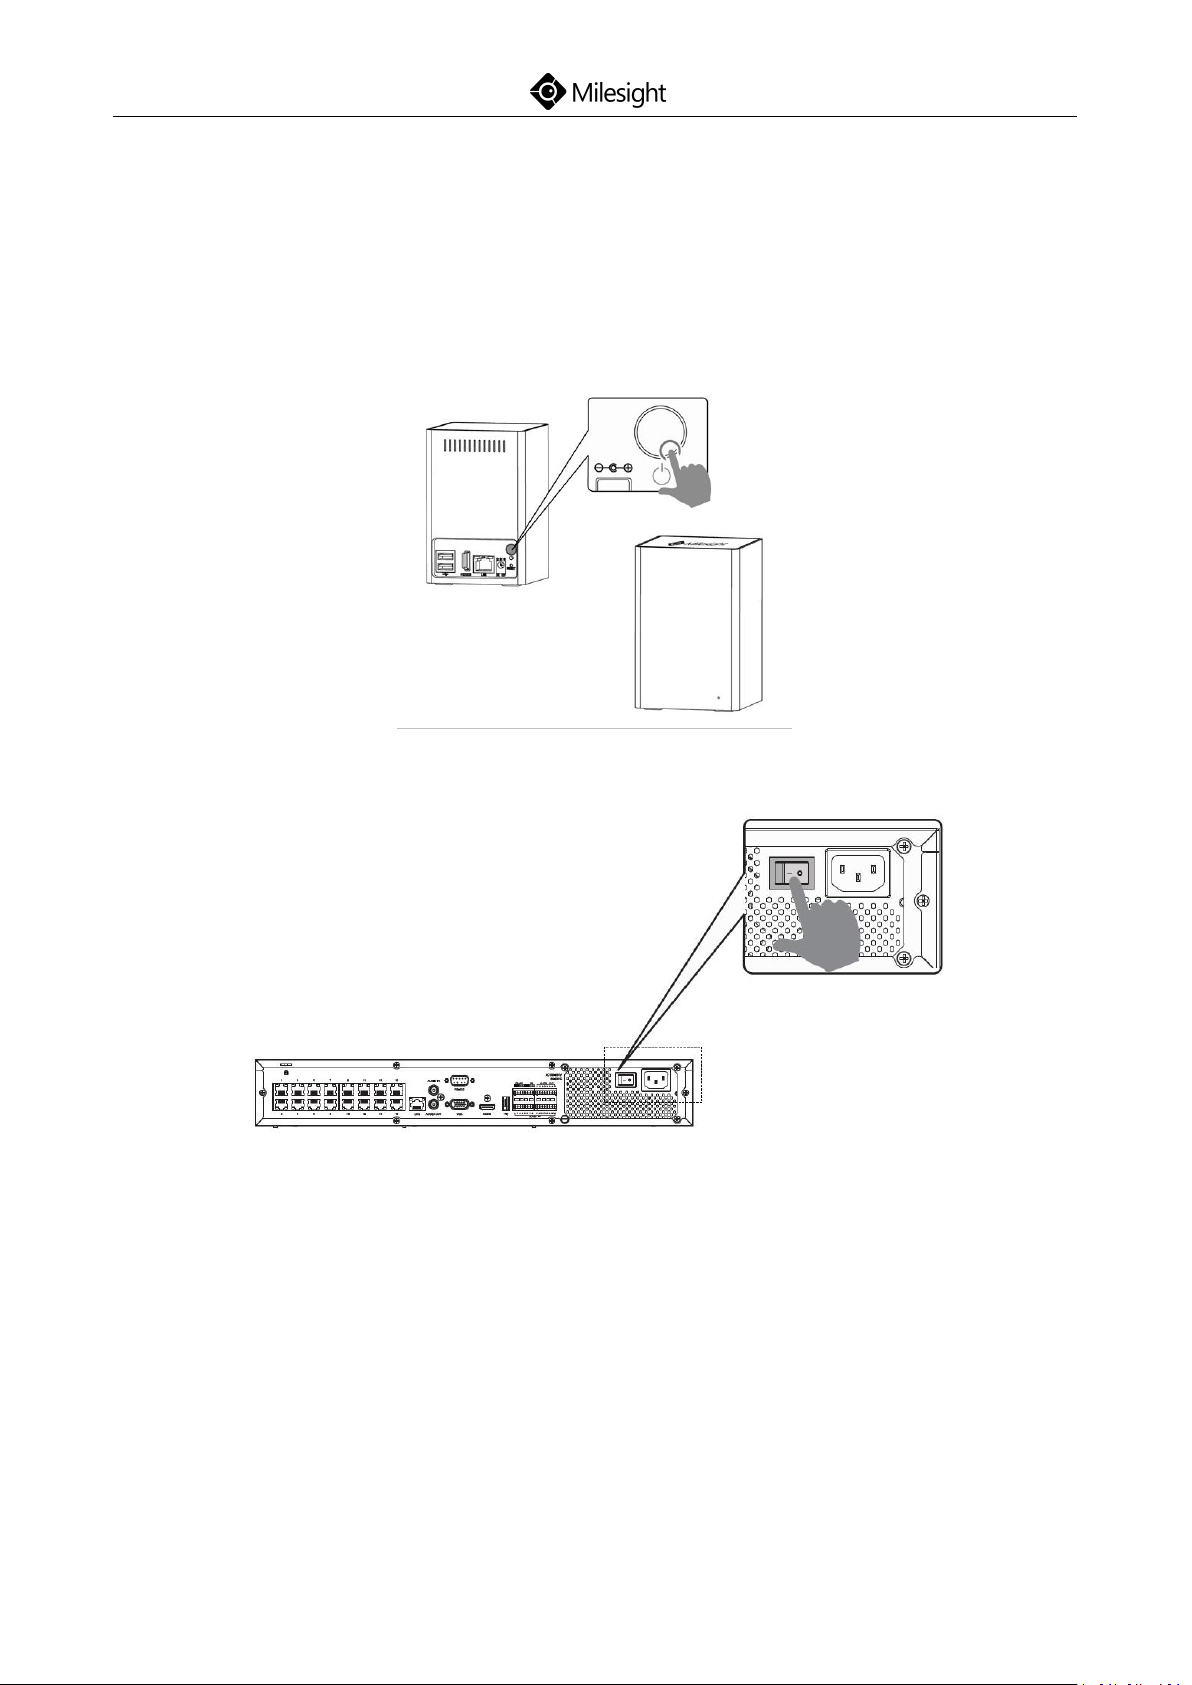
6. Ready to Start
Press the power button(this button is not available on Mini PoE NVR), the LED
Indicator will light steadily when it is connected to a power source, taking Mini
NVR and PoE 7000 NVR for example:
(Mini NVR)
(PoE 7000)
Note: Milesight 4-CH/8-CH/16-CH Plug and Play NVR features 4/8/16
independent PoE Ports. The software can automatically detect and configure
the network cameras just after being plugged the cable, greatly eliminating
the need for much time and expertise, and achieving a virtually hassle-free
installation process.
www.milesight.com
Page 38
Quick Start Guide
35
7. Access to NVR
7.1 Search the NVR via Smart Tools
If the IP address of the NVR is unknown, please use the Smart Tools to search
the IP address. Smart Tools can automatically detect online Milesight NVRs
connected in the LAN. You can get the IP address of the NVR by searching in
the Tools.
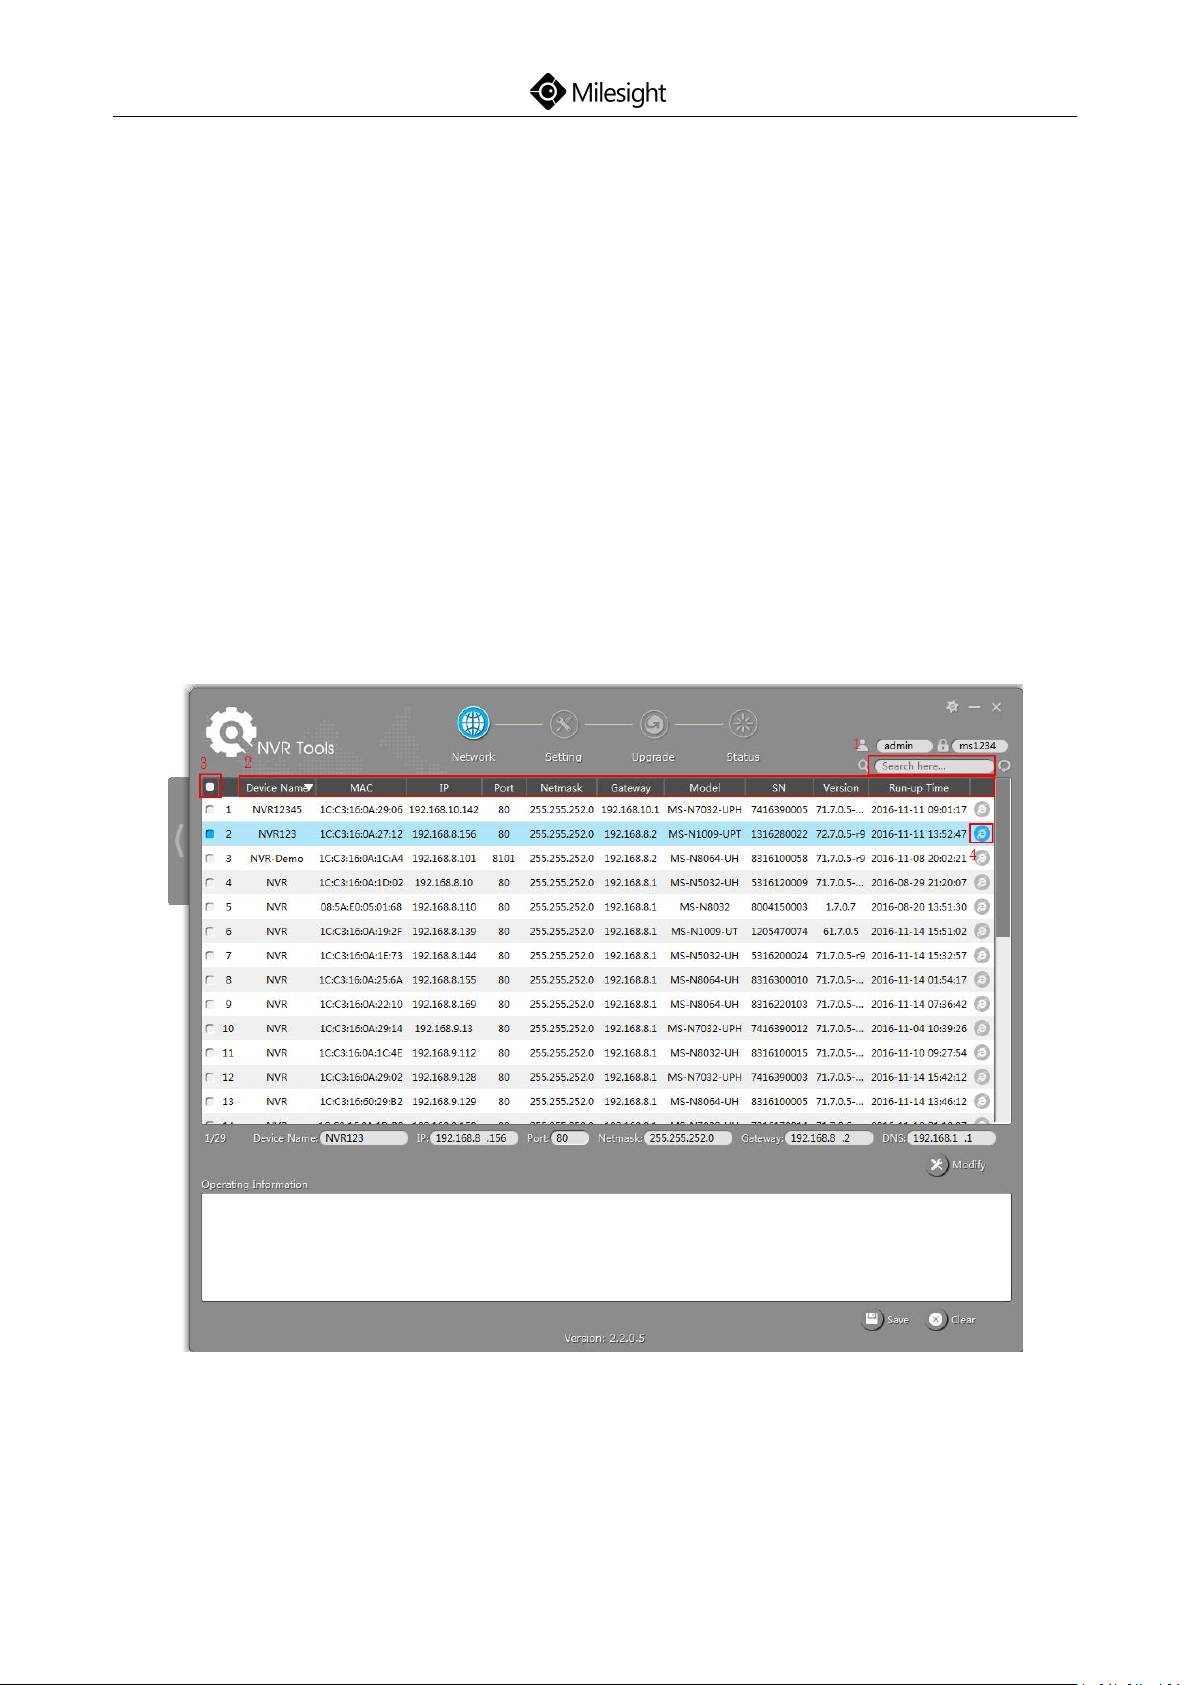
Click on the NVR Tools button to enter the NVR Tools interface:
Network Page
www.milesight.com
Page 39

Quick Start Guide
36
The specific steps are as follows:
Step1: Input the MAC address (marked as 1) to search your NVR;
Step2: Click on the area (marked as 2) to list the NVR one by one;
Step3: Click on your NVR in the list (marked as 3), then you can change the
parameters including the IP address, Port, Netmask, Gateway and DNS. Click on
“Modify” button to apply the settings. (Default IP address of NVR is
192.168.5.200. )
Step4: Click on the Browser button (marked as 4) to access to the web page of
the NVR;
(Default user name and password of NVR are “admin” and “ms1234”.)
Note: You can get more information about Smart Tools from the User Manual.
7.2 Via WEB
7.2.1 Log-in
After the NVR being connected to the Internet, you can access to NVR via WEB
by IP address.
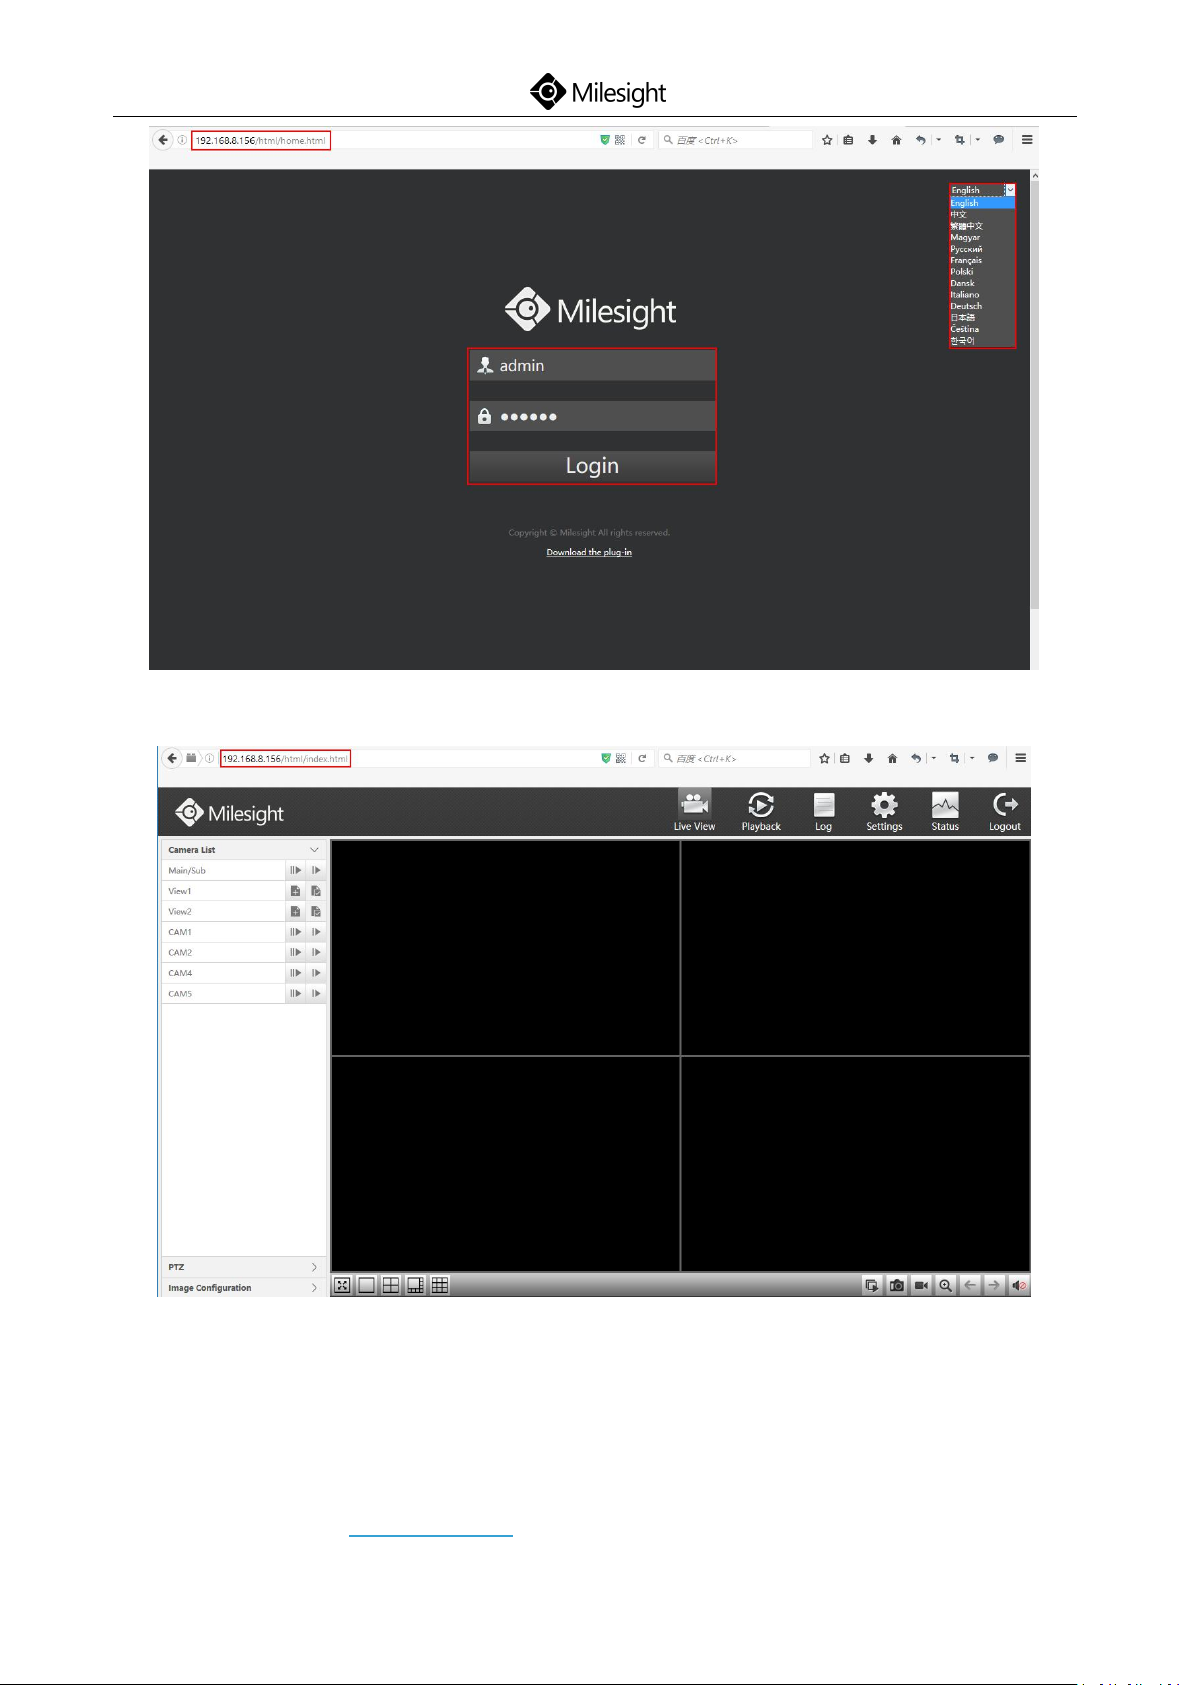
The specific steps are shown as follows:
Step1: Launch the Firefox or other browsers;
Step2: In the address bar of the browser, input the IP address of the device. For
example, http://192.168.8.156 . After that, the log-in page will pop up;
Step3: (You can choose the language before logging in) Input the correct user
name and password. Click on the Log-in button to enter the Live View page.
(Default user name and password of NVR are “admin” and “ms1234”.)
www.milesight.com
Page 40
Quick Start Guide
37
Note:
1. If the HTTP Port number is not the default number 80, please input the IP
address as follows: http://IP:Port .
www.milesight.com
Page 41
Quick Start Guide
38
2. If it’s your first time to access to NVR via WEB, please install the plug-in. And
please close the browser before installing the plug-in.
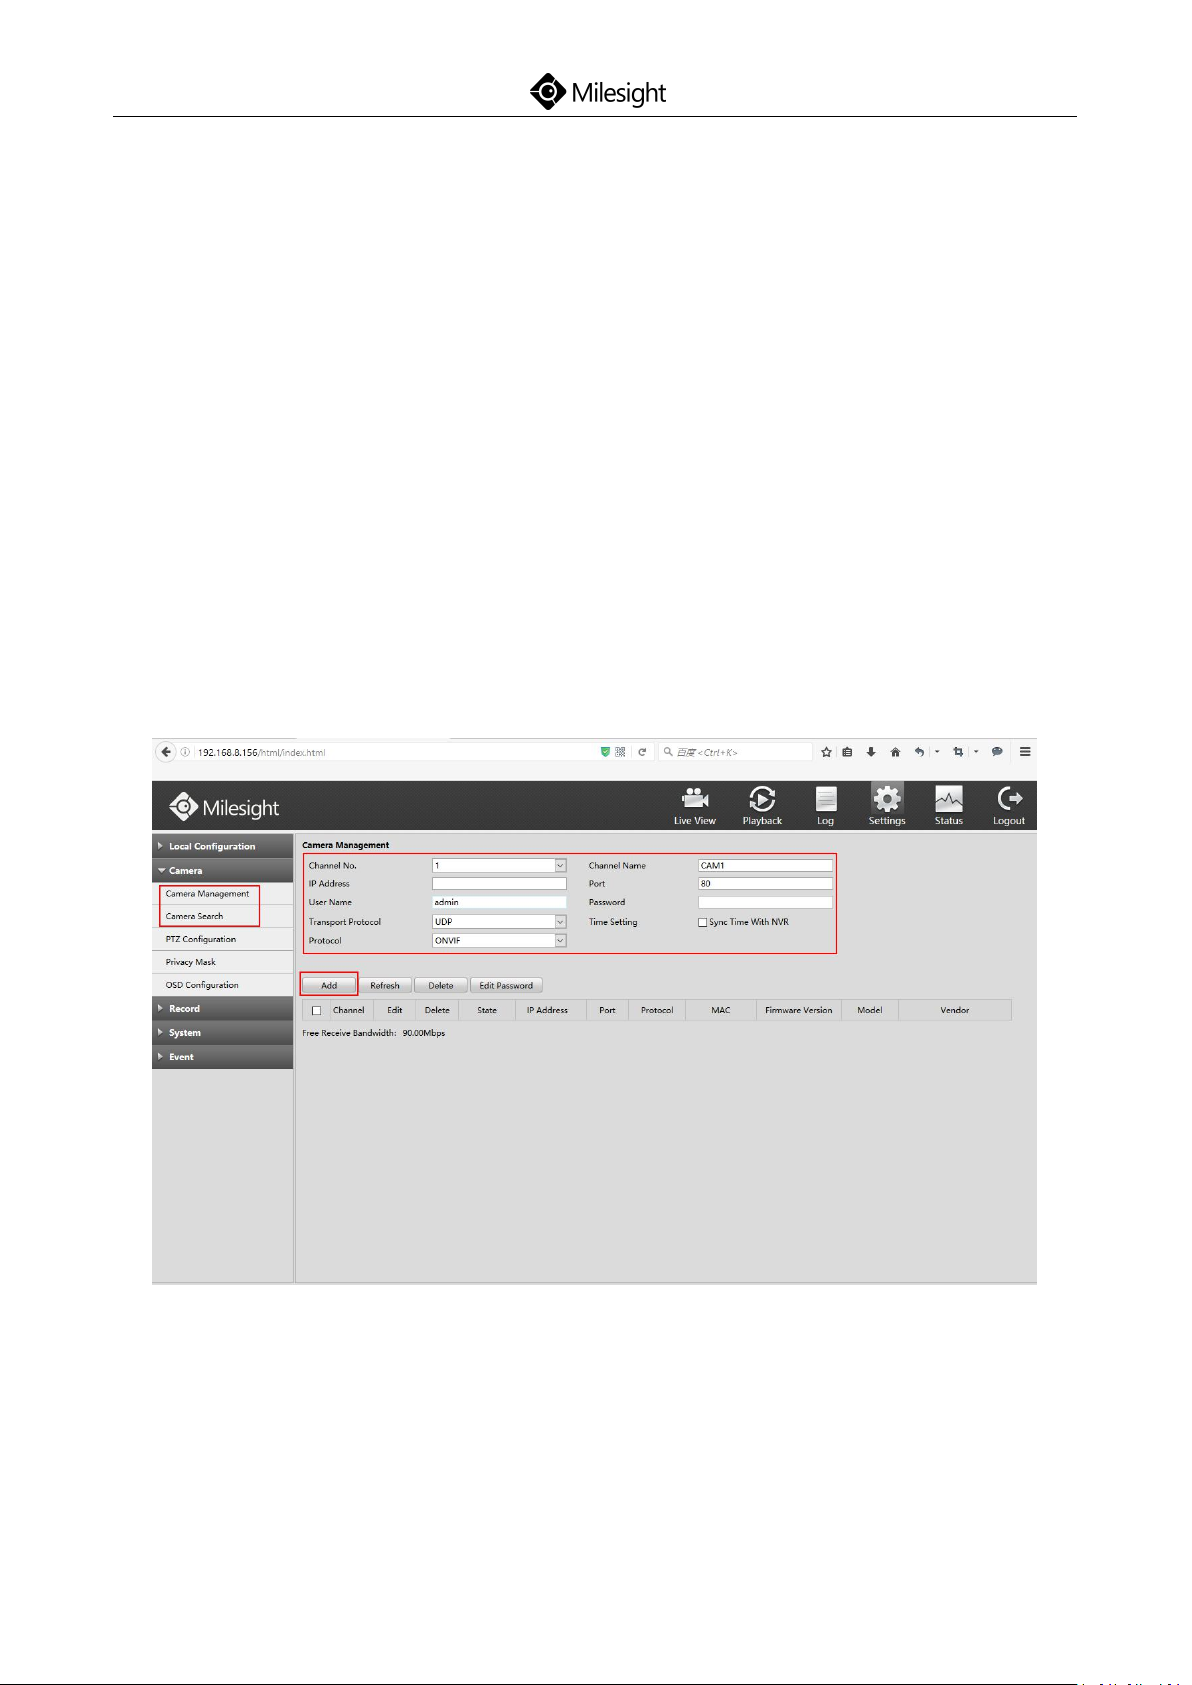
7.2.2 Live View
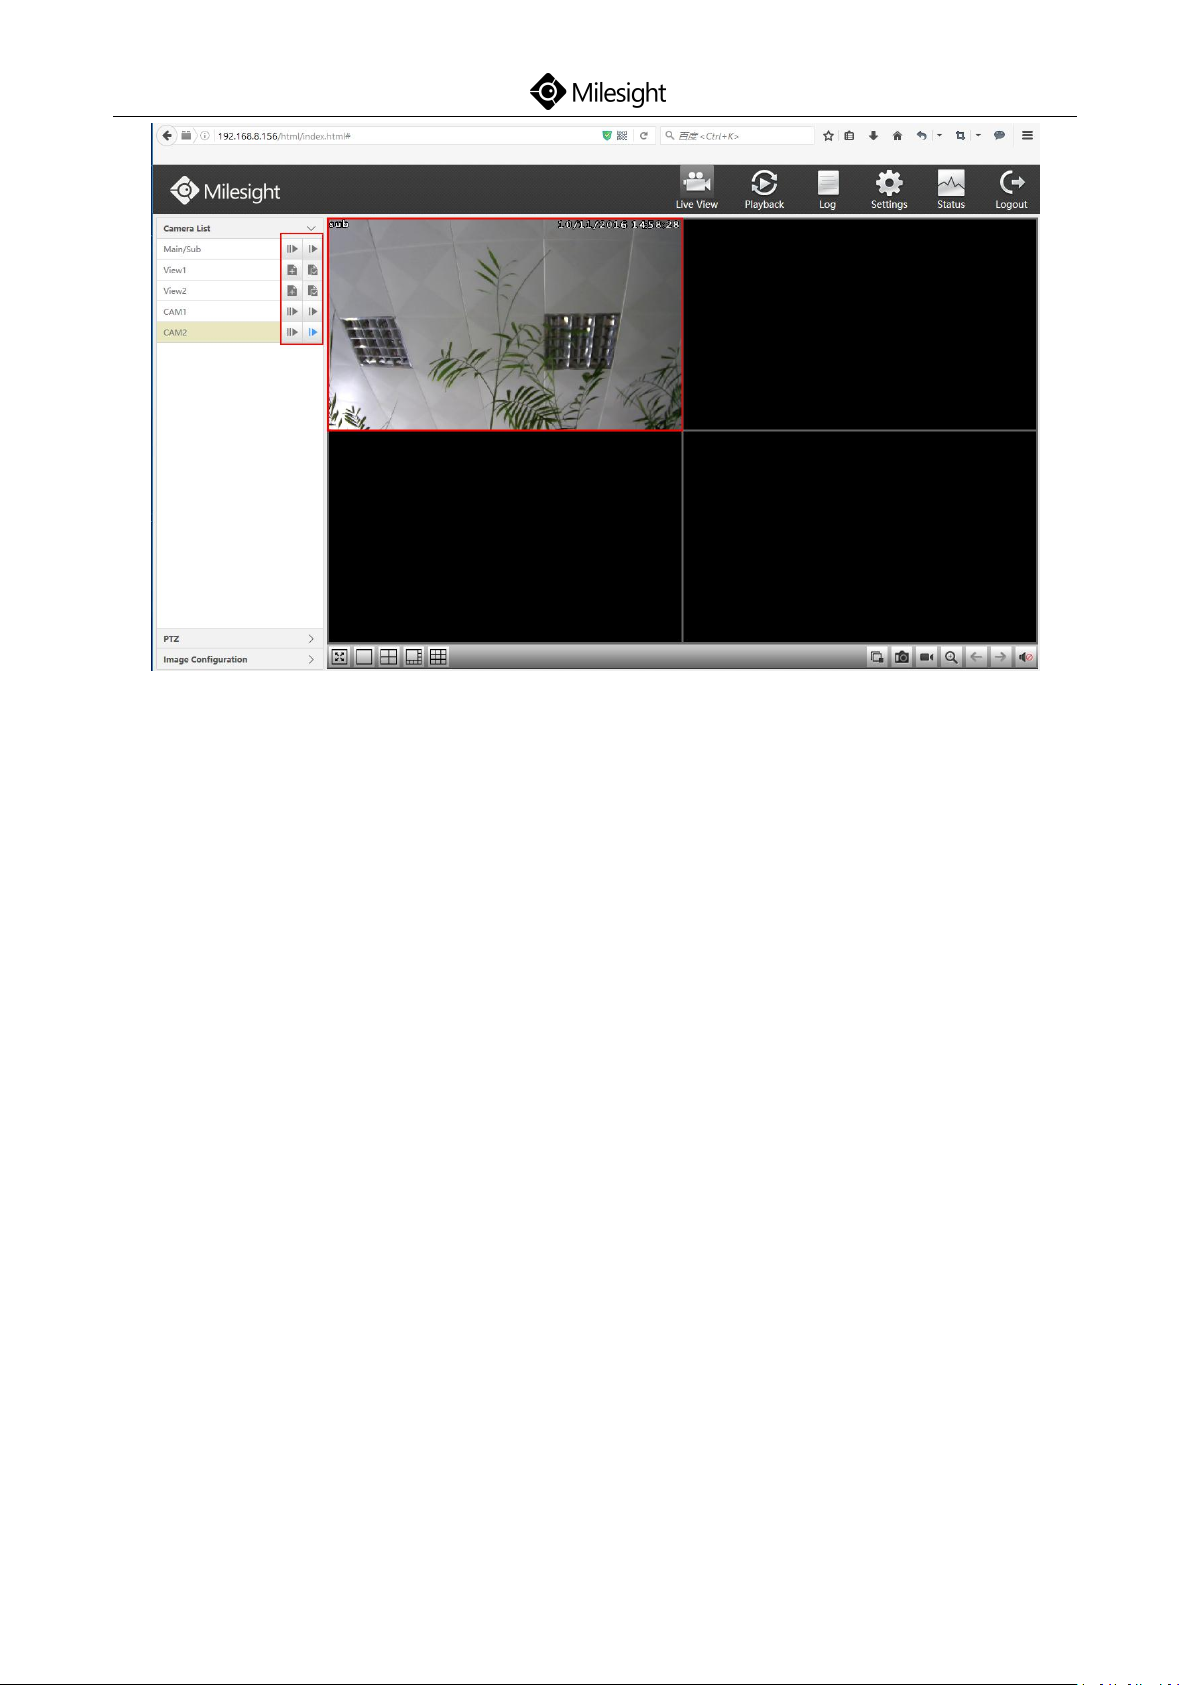
After logging in the NVR, you can add cameras to the NVR through the camera
settings. After adding cameras, please click on the Live View button to get the
preview. (Default user name and password of network camera are “admin” and
“ms1234”.)
Details are shown as follows:
www.milesight.com
Page 42
Quick Start Guide
39
Note: About other configurations, you can refer to the user manual of NVR.
7.3 Via Monitor
There is another way to access to NVR which you can use the HDMI cable to let
the NVR combine with monitor.
(Default user name and password of NVR are “admin” and “ms1234”.)
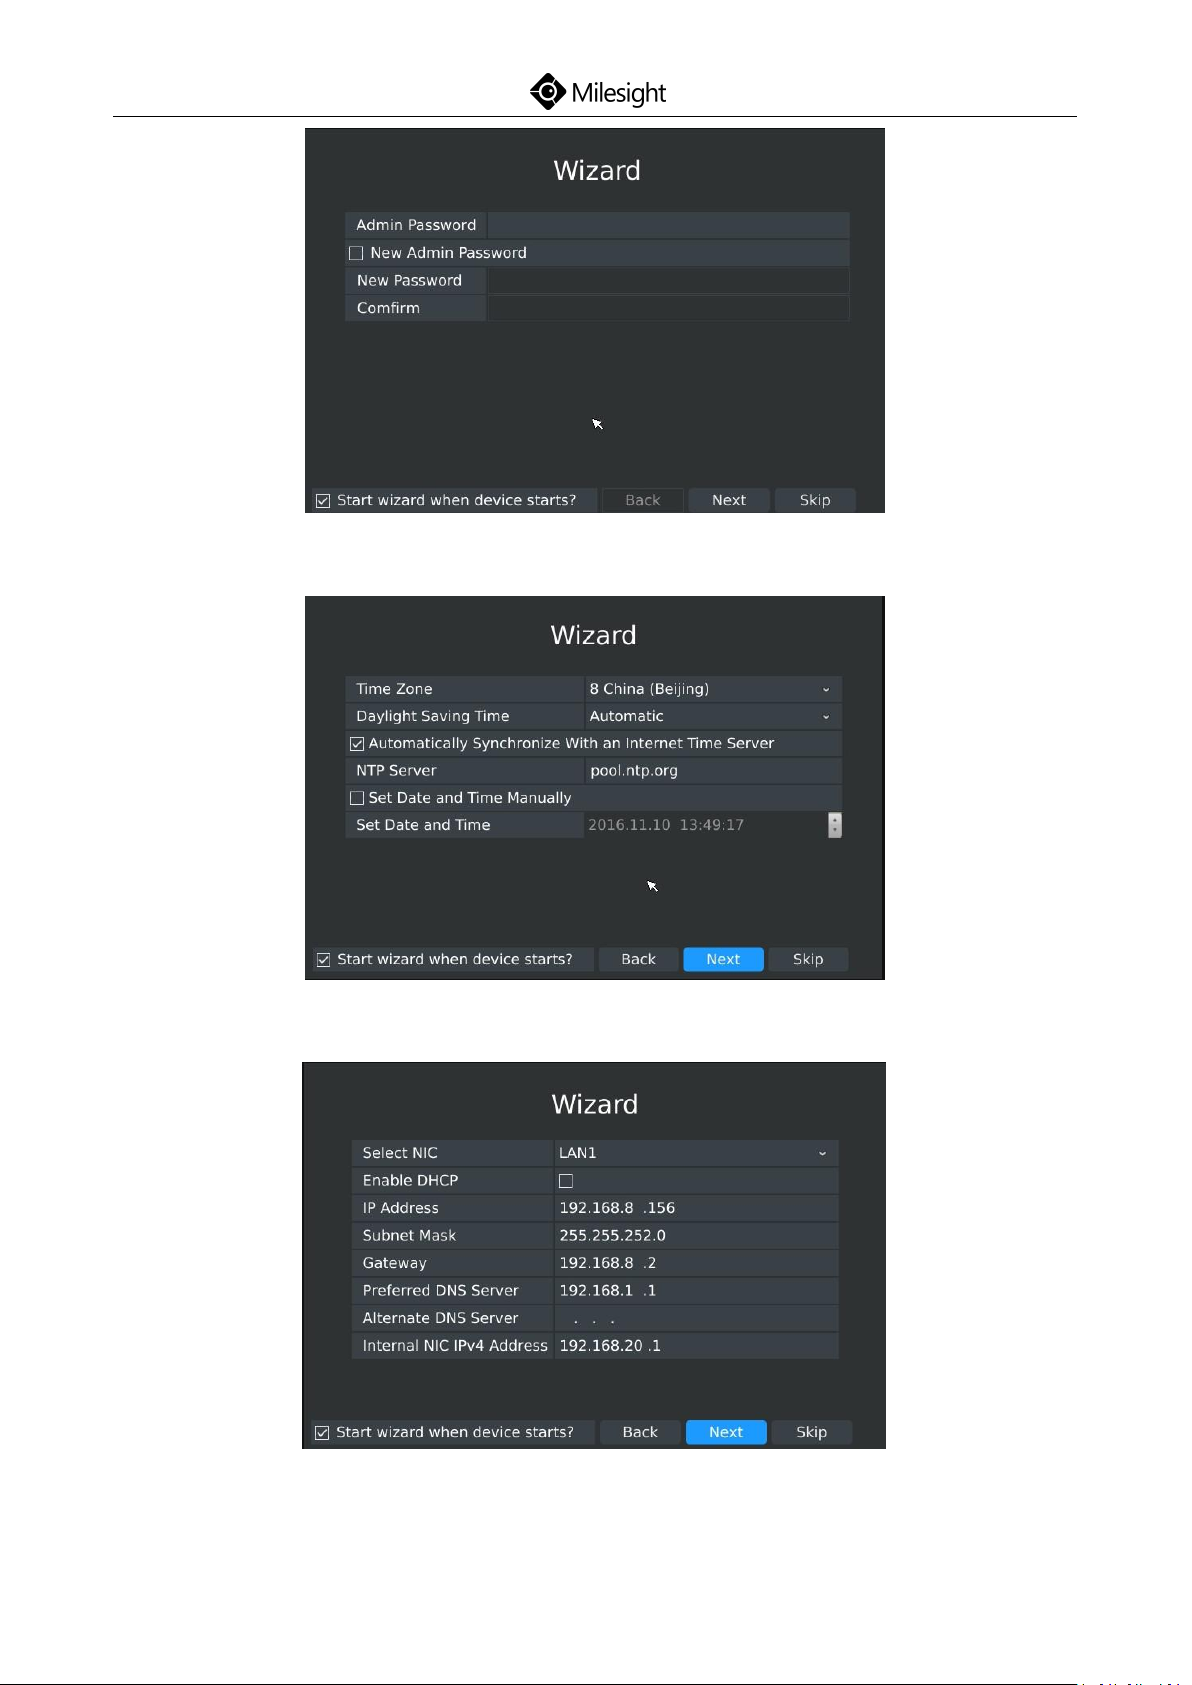
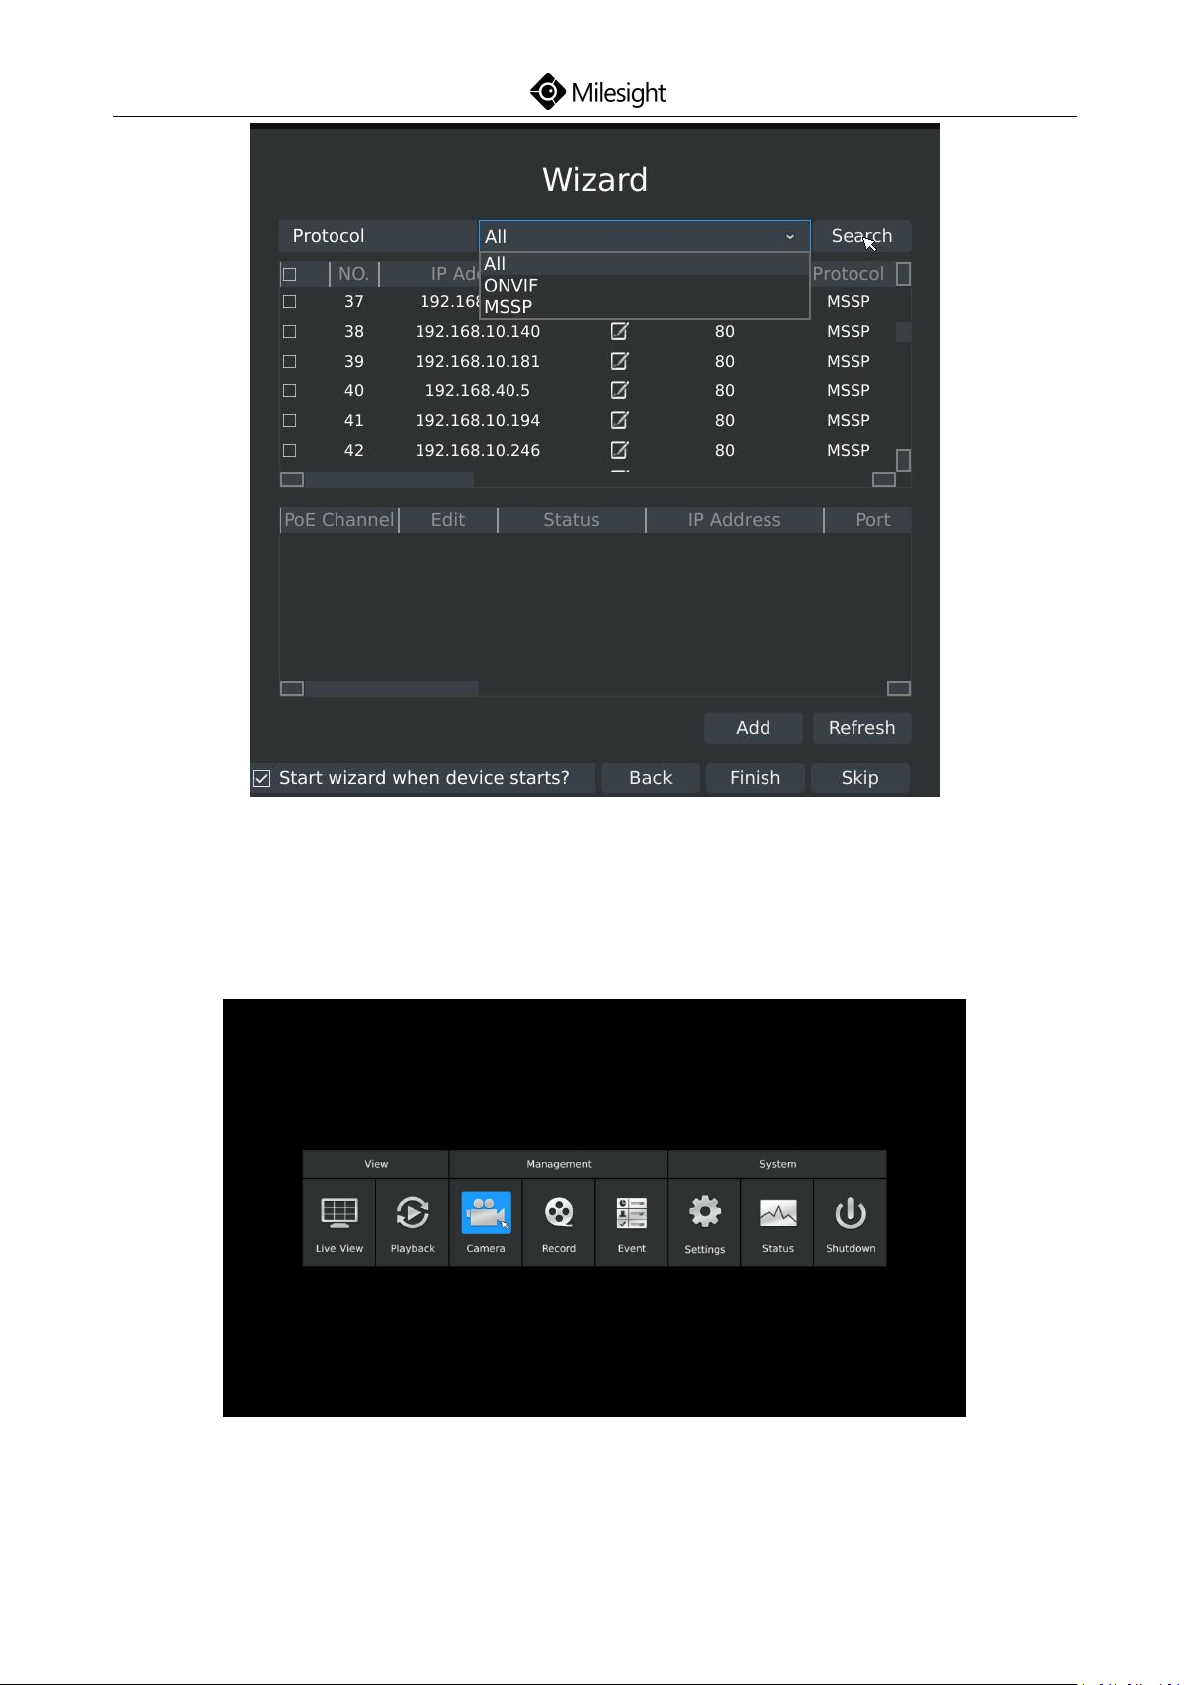
After running the NVR, you can do some configurations according to the
wizard.
Details are shown as follows:
www.milesight.com
Page 43
40
Password Modifying
Quick Start Guide
Time Setting
Network Setting
www.milesight.com
Page 44
Quick Start Guide
41
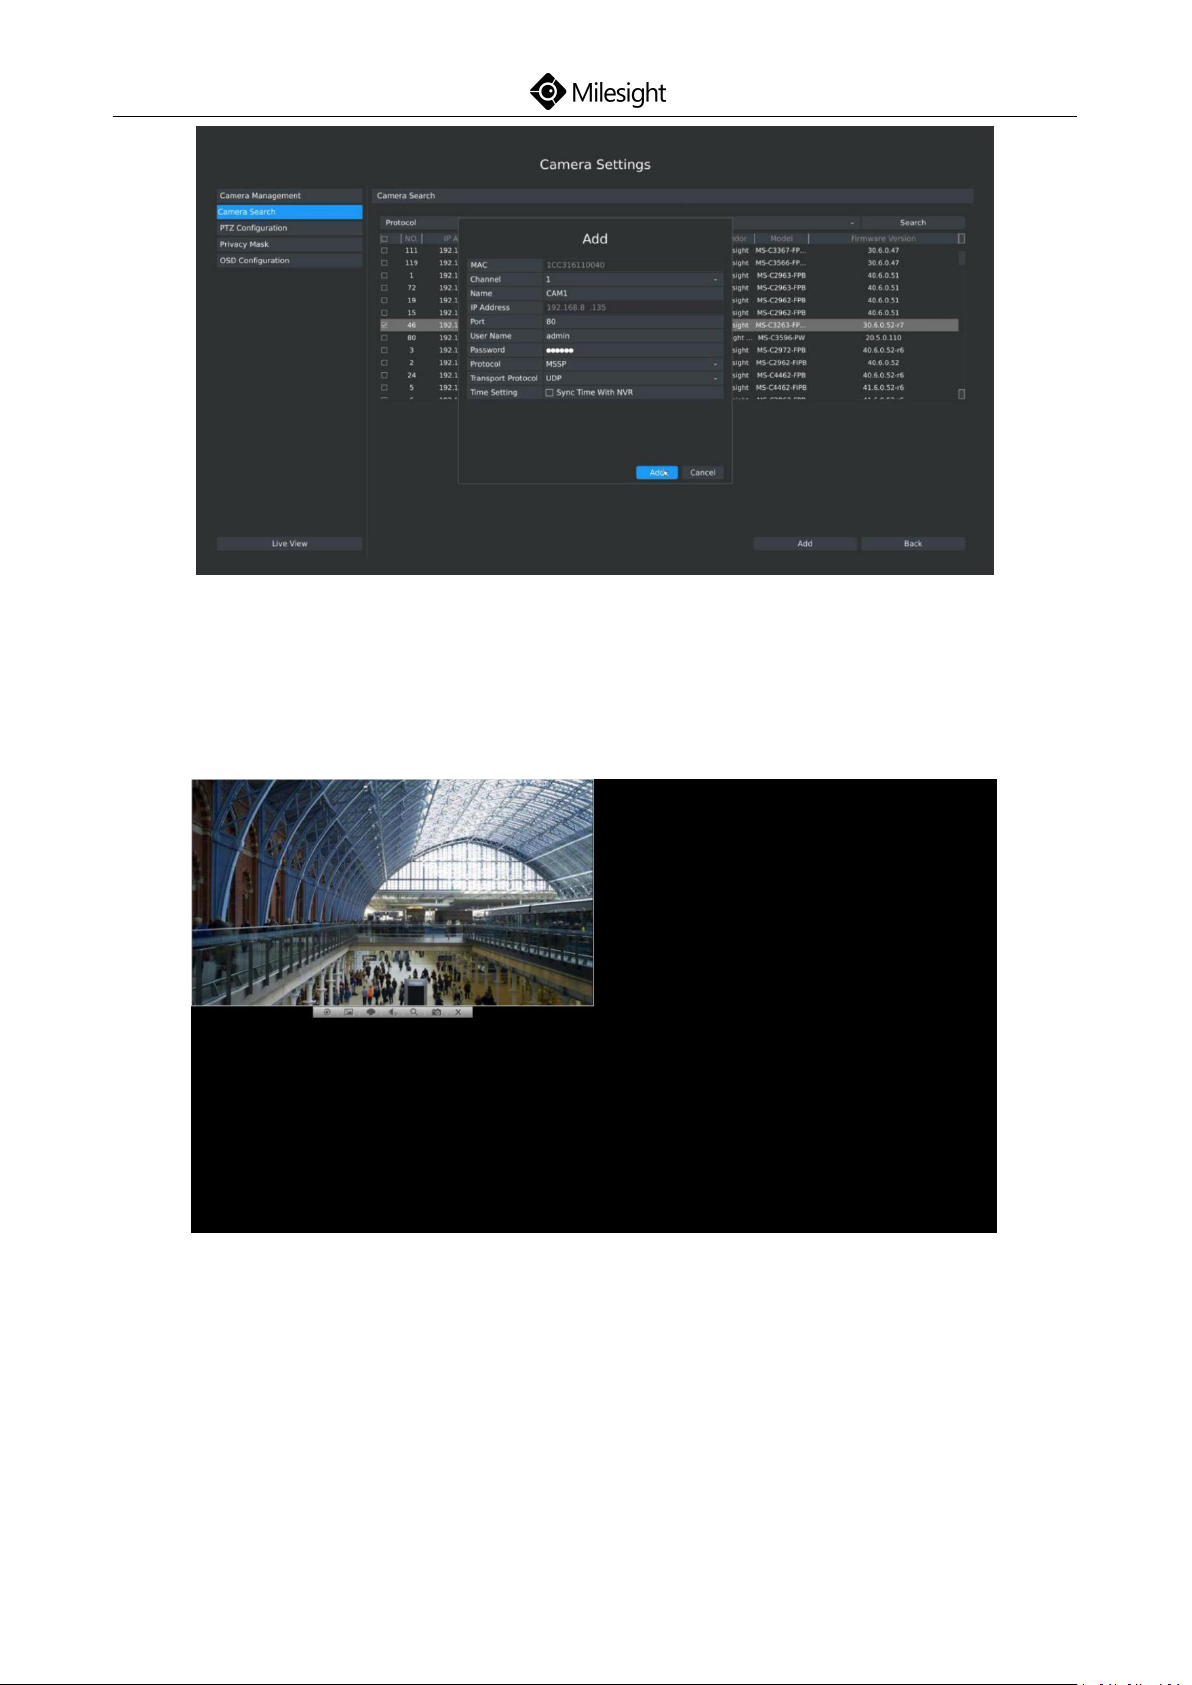
Camera Adding
Also you can skip the wizard, then add cameras in Camera Management.
Details are shown as follows:
Camera Management
www.milesight.com
Page 45
42
Camera Settings
Quick Start Guide
After adding cameras successfully, you can choose the Live View to preview.
Live View
www.milesight.com
Page 46

Quick Start Guide
43
NVR Series
Thank you
for choosing
Milesight Product
© 2016 Milesight Technology Co., Ltd.
www.milesight.com
Page 47

Page 48

www.milesight.com
 Loading...