

Milesight MS-N5016-UH, MS-N7016-UH, MS-N5016-UT, MS-N1009-UT, MS-N7032-UH User Manual
...
Network Video Recorder
User Manual
V5.03
Safety Instruction
These instructions are intended to ensure that user can use the product correctly to
avoid danger or property loss. The precaution measures are divided into “Warnings”
and “Cautions”
Warnings: Serious injury or death may be caused if any of these warnings is
neglected.
Cautions: Injury or equipment damage may be caused if any of these cautions are
neglected.
Warnings: Please follow these safeguards to
prevent injury or death.
Cautions: Please follow these safeguards to
prevent potential injury or material damage.
Warnings
This installation must be conducted by a qualified service person and should
strictly comply with the electrical safety regulations of the local region
To avoid risk of fire and electric shock, do keep the product away from rain
and moisture
Do not touch components such as heat sinks, power regulators, and
processors, which may be hot
Source with DC 12V or PoE
Please make sure the plug is firmly inserted into the power socket
When the product is installed on a wall or ceiling, the device should be firmly
fixed
If the product does not work properly, please contact your dealer. Never
attempt to disassemble the camera by yourself
Cautions
Make sure that the power supply voltage is correct before using the camera
Do not store or install the device in extremely hot or cold temperatures,
dusty or damp locations, and do not expose it to high electromagnetic
radiation
Only use components and parts recommended by manufacturer
Do not drop the camera or subject it to physical shock
To prevent heat accumulation, do not block air circulation around the
camera
Laser beams may damage image sensors. The surface of image sensors
should not be exposed to where a laser beam equipment is used
Use a blower to remove dust from the lens cover
Use a soft, dry cloth to clean the surface of the camera. Stubborn stains can
be removed using a soft cloth dampened with a small quantity of detergent
solution, then wipe dry
Do not use volatile solvents such as alcohol, benzene or thinners as they may
damage the surface finishes
Save the package to ensure availability of shipping containers for future
transportation
EU Conformity Statement
2012/19/EU (WEEE directive): Products marked with this symbol cannot
be disposed of as unsorted municipal waste in the European Union. For
proper recycling, return this product to your local supplier upon the
purchase of equivalent new equipment, or dispose of it at designated
collection points. For more information see: www.recyclethis.info.
2006/66/EC (battery directive): This product contains a battery that
cannot be disposed of as unsorted municipal waste in the European
Union. See the product documentation for specific battery information.
The battery is marked with this symbol, which may include lettering to
indicate cadmium (Cd), lead (Pb), or mercury(Hg). For proper recycling, return the
battery to your supplier or to a designated collection point. For more information
see: www.recyclethis.info.

Content
1. Product Introduction
.......................................................................................................................
6
1.1 Introduction
...........................................................................................................................
6
1.2 Product Key Functions
...........................................................................................................
6
2. Hardware
.........................................................................................................................................
8
2.1 Panel Buttons
........................................................................................................................
8
2.2 Using a USB Mouse
.............................................................................................................
10
2.3 Hard Disk Installation
..........................................................................................................
10
2.3.1 MS-N7000 series Hard Disk Installation
..................................................................
10
2.3.2 MS-N8000 series Hard Disk Installation
..................................................................
12
3. Local Operation
.............................................................................................................................
14
3.1 Wizard Setting
.....................................................................................................................
14
3.2 Live View
..............................................................................................................................
17
3.2.1 Live View
..................................................................................................................
17
3.2.2 Layout
.......................................................................................................................
20
3.3 Playback
...............................................................................................................................
21
3.3.1 Video Playback
.........................................................................................................
21
3.3.2 Video Files Backup
...................................................................................................
23
3.3.3 Picture Playback
.......................................................................................................
25
3.3.4 Picture Files Backup
.................................................................................................
26
3.4 Camera Settings
...................................................................................................................
27
3.4.1 Camera Management
..............................................................................................
27
3.4.2 Device Search
...........................................................................................................
32
3.4.3 PTZ Configuration
.....................................................................................................
33
3.4.4 Privacy Mask
.............................................................................................................
37
3.4.5 OSD configuration
....................................................................................................
37
3.4.6 Image Enhancement
................................................................................................
39
3.5 Record
..................................................................................................................................
39
3.5.1 Preparation for Record
.............................................................................................
39
3.5.2 Record Schedule
.......................................................................................................
40
3.5.3 Advanced
..................................................................................................................
42
3.6 Event Settings
......................................................................................................................
43
3.6.1 Motion Detection
.....................................................................................................
43
3.6.2 Video Loss
.................................................................................................................
46
3.6.3 Alarm Input
..............................................................................................................
48
3.6.4 Alarm Output
...........................................................................................................
51
3.6.5 Exception
..................................................................................................................
52
3.7 Settings
................................................................................................................................
53
3.7.1 General
.....................................................................................................................
53
3.7.2 Network
....................................................................................................................
54
3.7.3 Disk Management
....................................................................................................
60
3.7.4 Holiday
......................................................................................................................
62
3.7.5 User
..........................................................................................................................
63

3.7.6 Upgrade
....................................................................................................................
65
3.7.7 Save/Load Configuration
..........................................................................................
65
3.7.8 Maintenance
............................................................................................................
66
3.7.9 Auto Reboot
.............................................................................................................
67
3.8 Status
...................................................................................................................................
67
3.8.1 Device Information
...................................................................................................
68
3.8.2 Network Status
.........................................................................................................
68
3.8.3 Camera Status
..........................................................................................................
68
3.8.4 Disk Status
................................................................................................................
69
3.8.5 Event Status
..............................................................................................................
70
3.8.6 Logs
...........................................................................................................................
71
3.9 Logout
..................................................................................................................................
72
4. WEB Settings
.................................................................................................................................
73
4.1 Login
....................................................................................................................................
73
4.2 Menu
...................................................................................................................................
73
4.3 Live View
..............................................................................................................................
74
4.3.1 Camera List
...............................................................................................................
74
4.3.2 PTZ
............................................................................................................................
75
4.3.3 Image Configuration
.................................................................................................
76
4.4 Playback
...............................................................................................................................
76
4.4.1 How to playback
.......................................................................................................
77
4.4.2 Video Files Backup
...................................................................................................
78
4.4.3 Picture Files Backup
.................................................................................................
79
4.5 Settings
................................................................................................................................
80
4.5.1 Local Configuration
..................................................................................................
80
4.5.2 Camera
.....................................................................................................................
80
4.5.3 Record
.......................................................................................................................
90
4.5.4 Event
.........................................................................................................................
93
4.5.5 System
....................................................................................................................
101
4.6 Status
.................................................................................................................................
112
4.6.1 Device Information
.................................................................................................
112
4.6.2 Network Status
.......................................................................................................
113
4.6.3 Camera Status
........................................................................................................
113
4.6.4 Disk Status
..............................................................................................................
114
4.6.5 Event Status
............................................................................................................
114
4.6.6 Packet Capture Tool
................................................................................................
115
4.7 Logs
....................................................................................................................................
115
4.8 Logout
................................................................................................................................
116
5. Services
........................................................................................................................................
117

6
1. Product Introduction
1.1 Introduction
Based on embedded Linux operation system, Milesight NVR Series manages and stores HD video
data. It owns multi-disc management systems, front end HD device management system, HD
video analysis system and high-capacity system for video. Also, it adopts the technology of high
flow capacity data network transmitting&transmission, with multi-channel video decoding, to
achieve functions like intelligent management, safe storage, HD decoding, etc.
1.2 Product Key Functions
Basic Information
Milesight NVR Series includes NVR Series (Mini NVR 1000 Series, Pro NVR 5000 Series,
Pro NVR 7000 Series, Pro NVR 8000 Series), and PoE NVR Series (Mini PoE NVR 1000
Series, PoE NVR 5000 Series and PoE NVR 7000 Series), which can work with Milesight
network cameras and connect with third party network cameras that support ONVIF.
Monitoring
Support HDMI video output, maximum to 3840*2160 resolution.
Support 1/4/8/9/12/14/16/32 screen live view, channel sequence is adjustable.
Support quick menu in live view .
Support batch IP editing, setting camera’s video parameters and record schedule.
Support live view group switch, manual switch and automatic patrol. The interval of
automatic sequence is adjustable.
Support motion detection and video loss alert.
Support various PTZ protocols and PTZ operations such as preset, patrol, etc.
Support central zoom in by clicking the mouse at arbitrary area.
Support privacy mask.
Support OSD title and date configuration.
Equipped with PoE ports for PoE cameras(only available for PoE NVR).
HDD Management
Support S.M.A.R.T technology.
Support RAID technology.
Recording/Snapshot and Playback
Support holiday schedule.
Support recycle and non-recycle recording mode.
Support multiple recording types, including timing, alarm, motion detection, motion or
alarm, motion and alarm, etc.

7
Support 12 recording time periods with separate recording types.
Support pre-record and post-record time for motion detection, alarm recording, motion
and alarm recording, motion or alarm recording. And support pre-record for manual
and timing.
Support recording/snapshot manually.
Support digital zoom function at arbitrary area in playback.
Support video data playback.
Support pause, fast play, slow play, skip forward and skip backward when playback,
locating in progress bar by dragging the mouse.
Backup
Support USB port backup.
Support FAT32 format backup.
Support backup device maintenance and management.
Alarm & Exception
Support video loss alarm.
Support motion detect configure and alarm.
Support Network Disconnected/HDD Full/Record Failed/HDD Failed/HDD Unformat/No
Disk alarms.
Support various alarm response such as audible warning, sending email, recording and
on/off relay out.
Other Functions
Support multi-level user management, administrator can create multiple users with
access rights.
Support manual triggering and clearing of alarms.
Support operating and configuring information import/export.
Network
Support remote search, playback and download of video files.
Support remote acquiring and configuring of parameters.
Support remote import and export of device parameters.
Support P2P remote access.
Support IPv4 and IPv6.
Support remote acquiring of device status, system log and alarm status.
Support remote operate system maintenance by format of hard disk, upgrade and auto
reboot, etc.
Support upload alarm and exceptions to remote host.
Support remote manual start or stop of recording.
Support remote manual start or stop of alarm output.
Support remote BMP image capturing.
Support remote PTZ control.
Built-in WEB Server.
8
2. Hardware
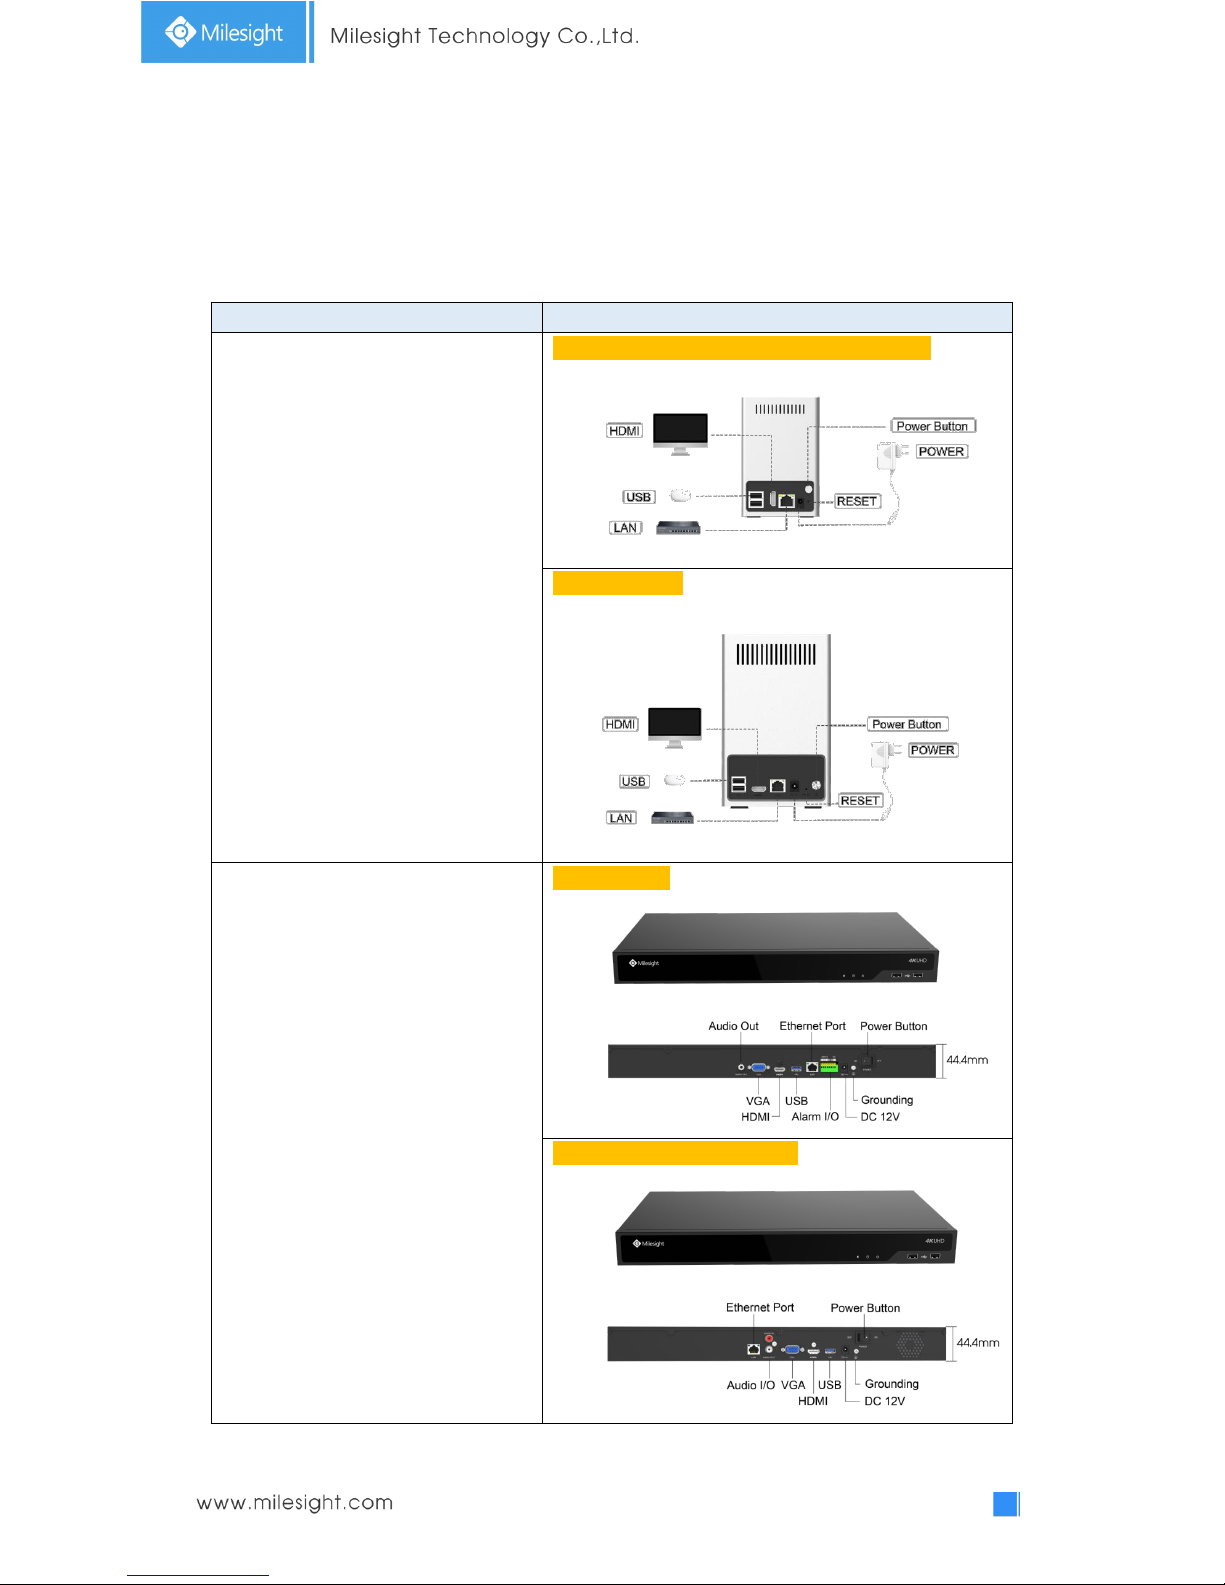
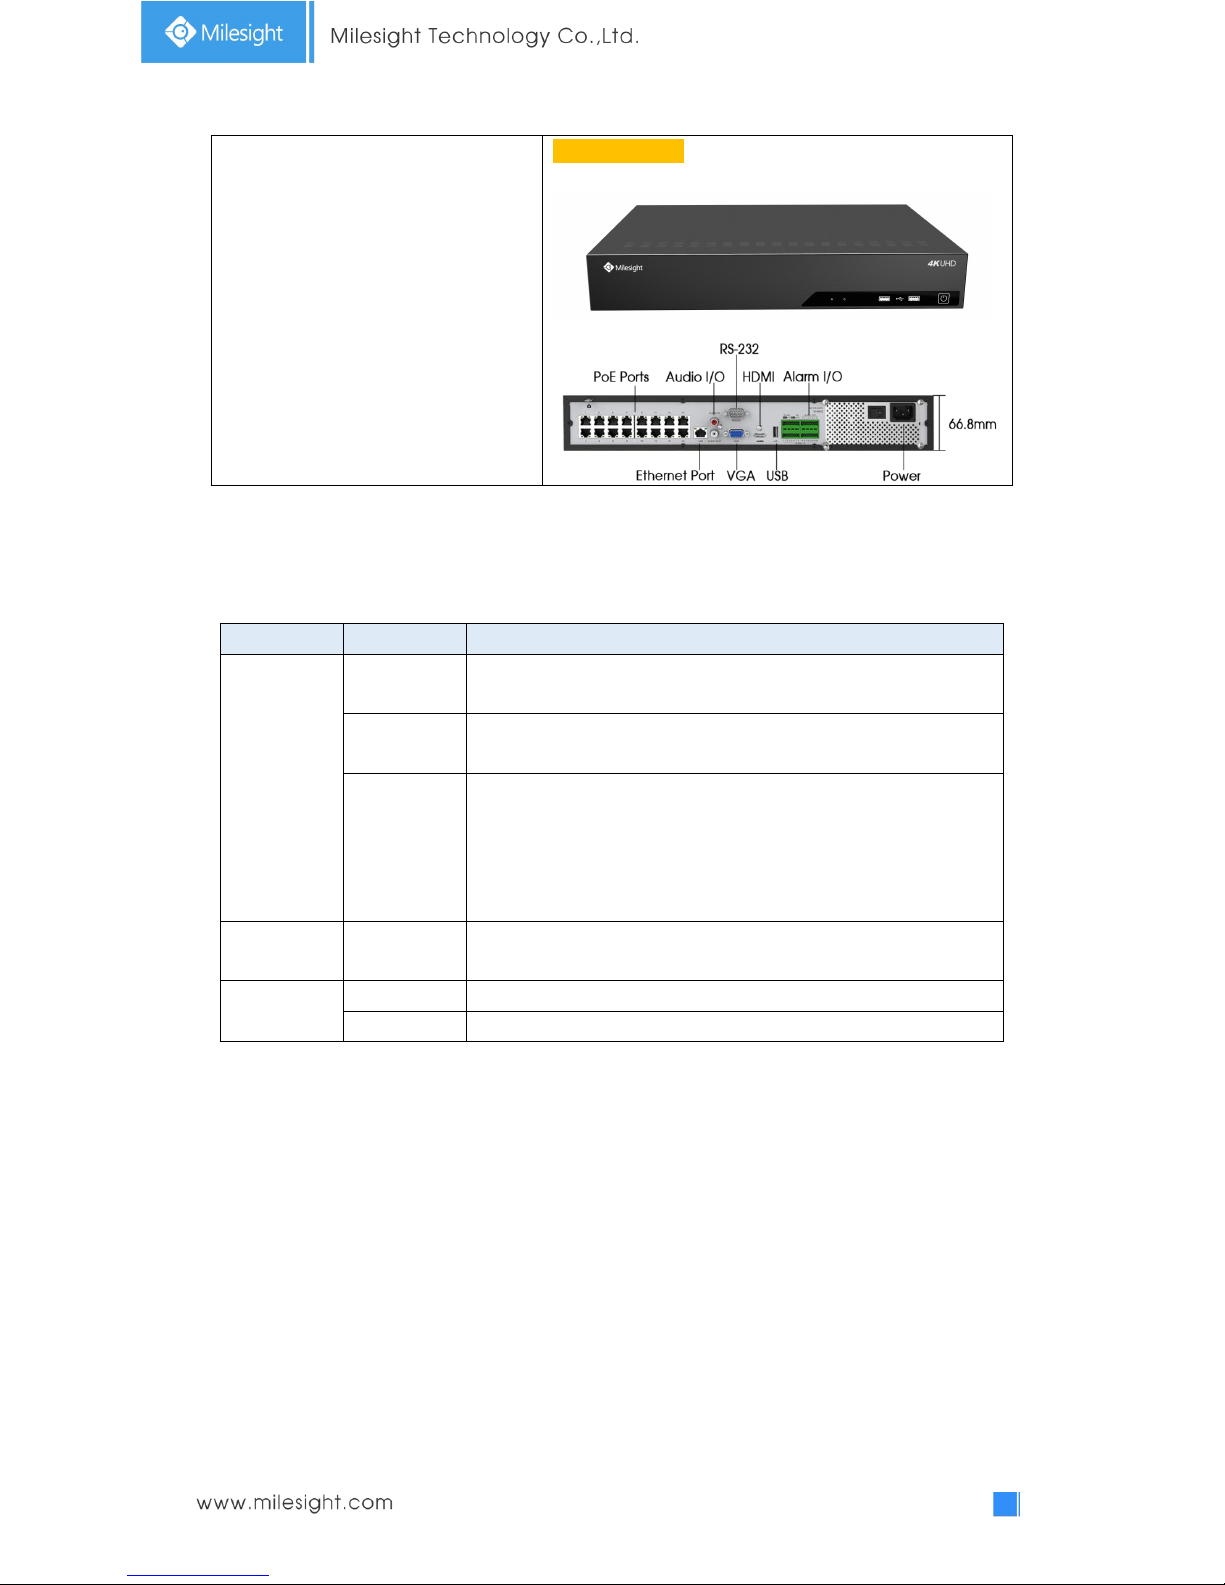
2.1 Panel Buttons
Model
Hardware/Interface
4K H.265 Mini NVR 1000 Series
MS-N1009-UT (Firmware version: 71.xx.xx.xx):
MS-N1009-UNT:
4K H.265 Pro NVR 5000 Series
MS-N5016-UT:
MS-N5016-UH/MS-N5032-UH:
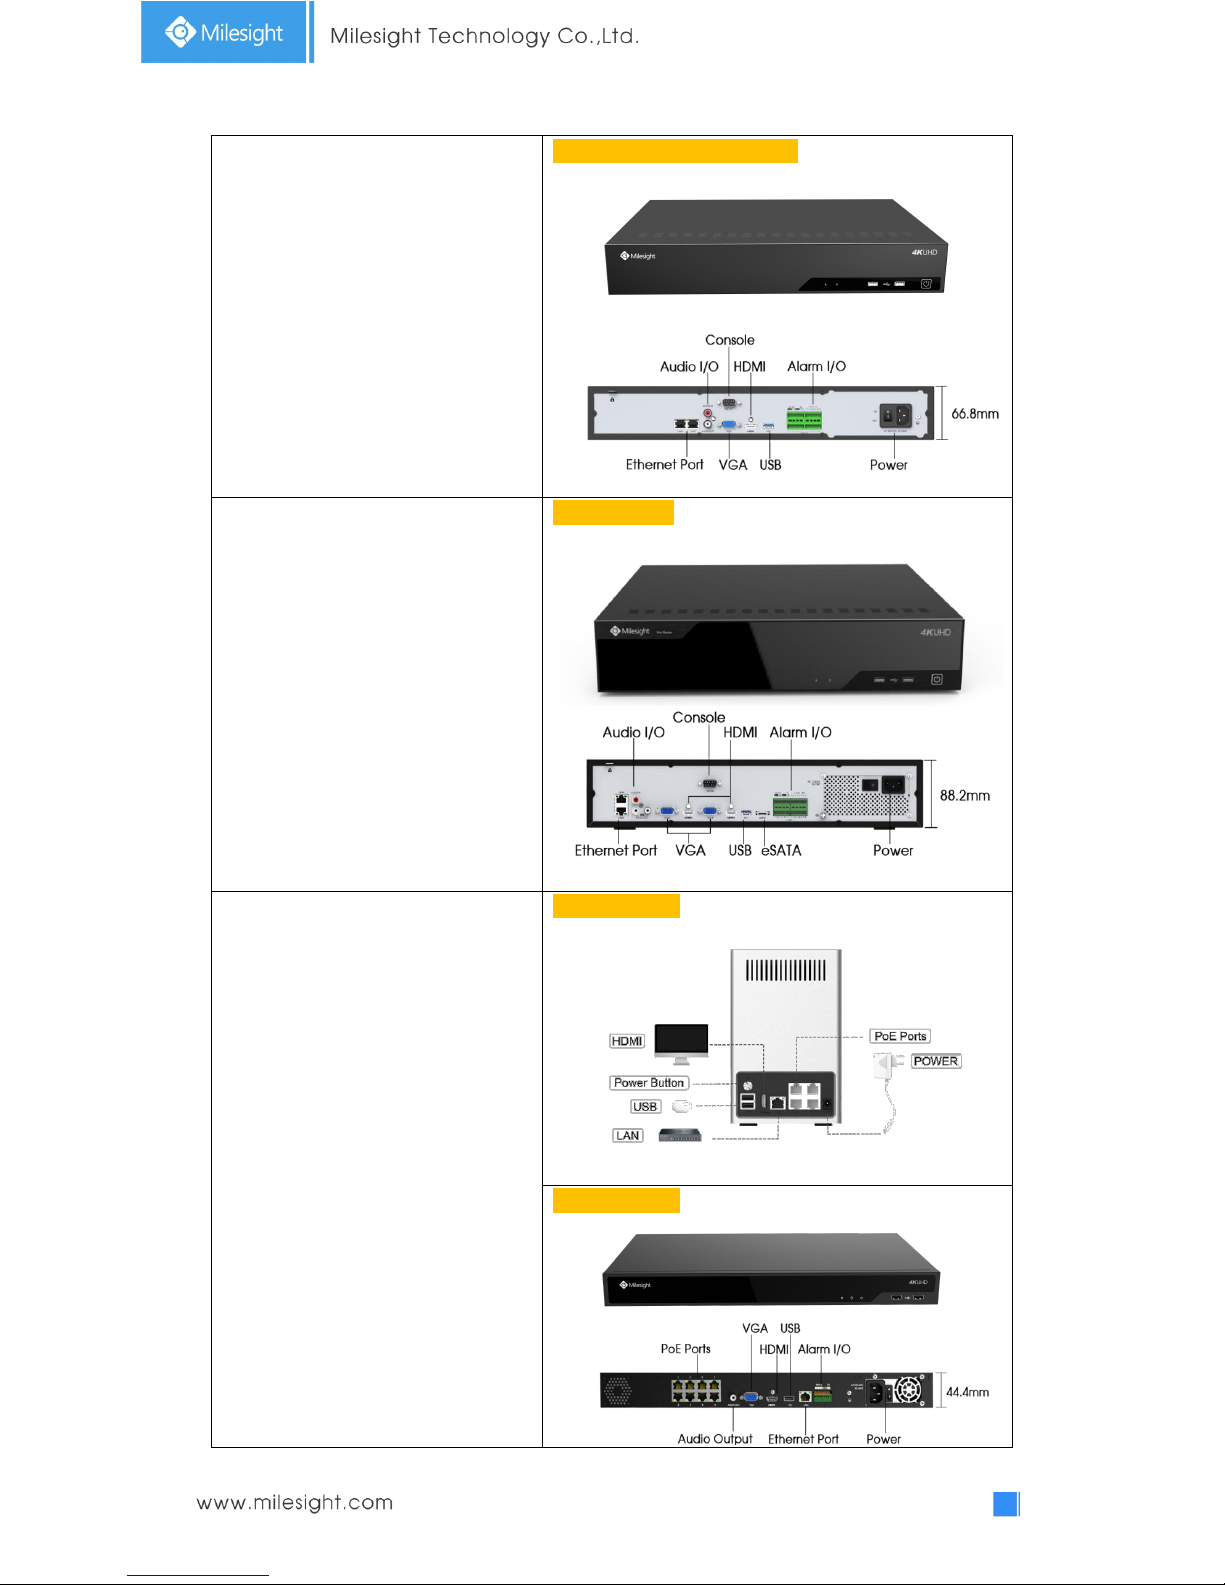
9
4K H.265 Pro NVR 7000 Series
MS-N7016-UH/MS-N7032-UH:
4K H.265 Pro NVR 8000 Series
MS-N8032-UH:
4K H.265 PoE NVR Series
MS-N1009-UPT:
MS-N5016-UPT:
10
MS-N7032-UPH:
2.2 Using a USB Mouse
Item
Click
Description
Left Button
Single- click
Live view: select the channel and show the toolbar of live view.
Menu: select and confirm.
Double-click
Switch between single screen to multi-screen when in live view
mode and playback mode.
Click and
drag
(1) Control rotation direction in PTZ mode.
(2) Set the target area in tamper-proof, motion detection and
privacy mask alarm settings.
(3) Drag the digital zoom area.
(4) Drag the channel and the time scroll bar.
Right Button
Single-click
Live view: shows pop-up menu.
Menu: exit and go to Live View.
Scroll-wheel
Scroll up
Scroll up the page.
Scroll down
Scroll down the page.
2.3 Hard Disk Installation
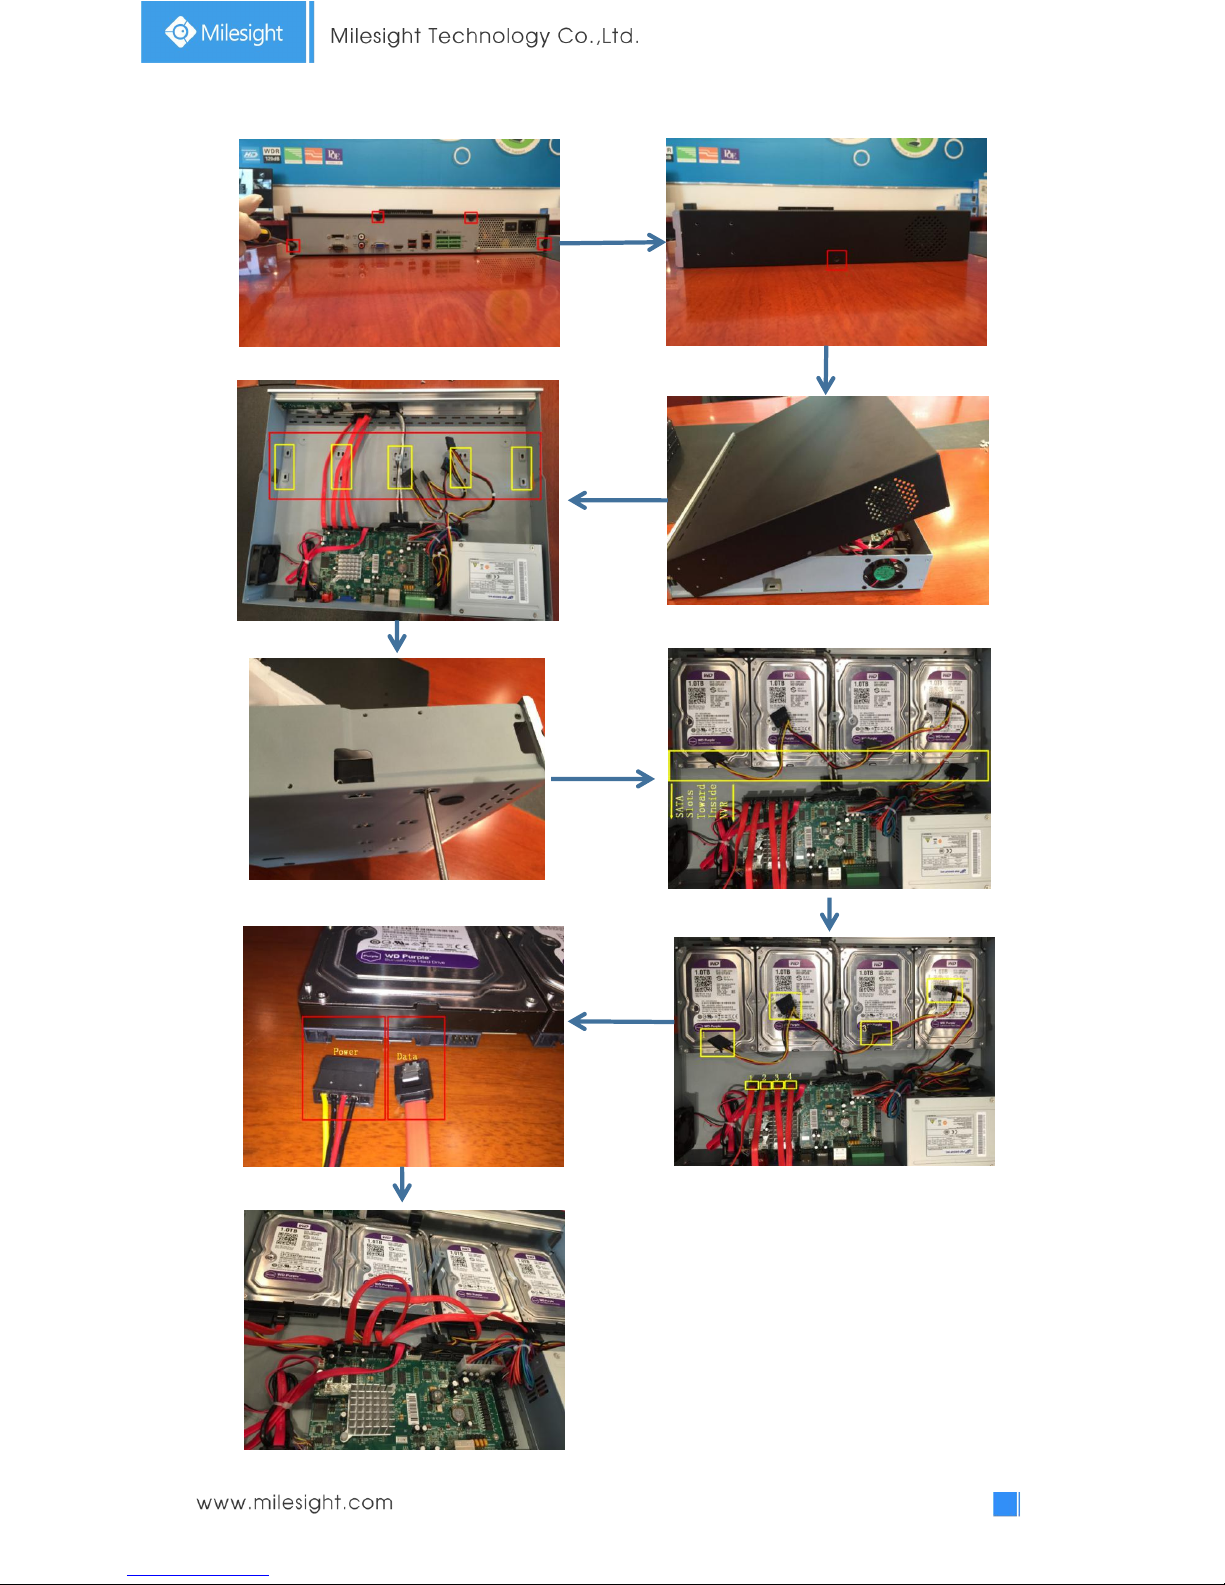
2.3.1 MS-N7000 series Hard Disk Installation
Step1. Unscrew the back and both sides’ screws to open the upper lid.
Step2. Install the hard disks into NVR with screws shown in below pictures. (SATA Slots of hard
disk should be toward inside NVR.)
Step3. Join the power and data connectors to corresponding hard disk.
11
Step1
Step2
Step3
12
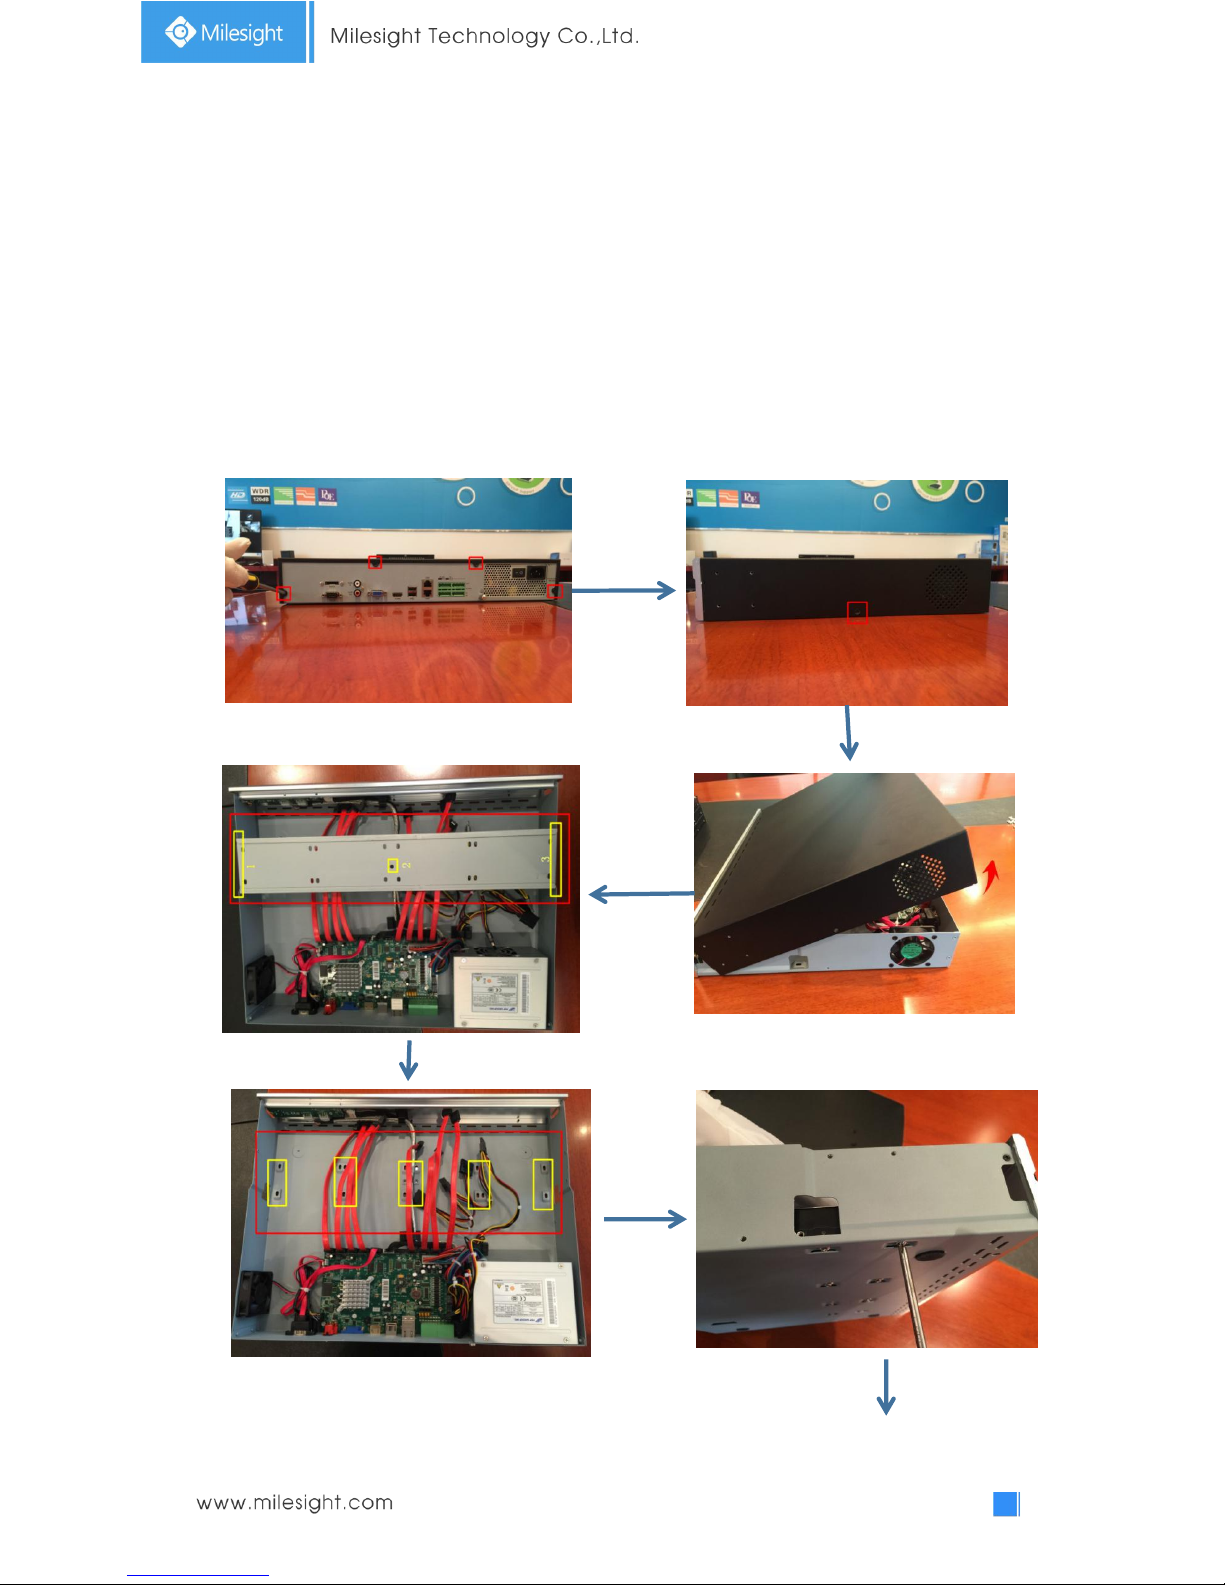
2.3.2 MS-N8000 series Hard Disk Installation
Step1. Unscrew the back and both sides’ screws to open the upper lid.
Step2. Uninstall the upper hard disk panel.
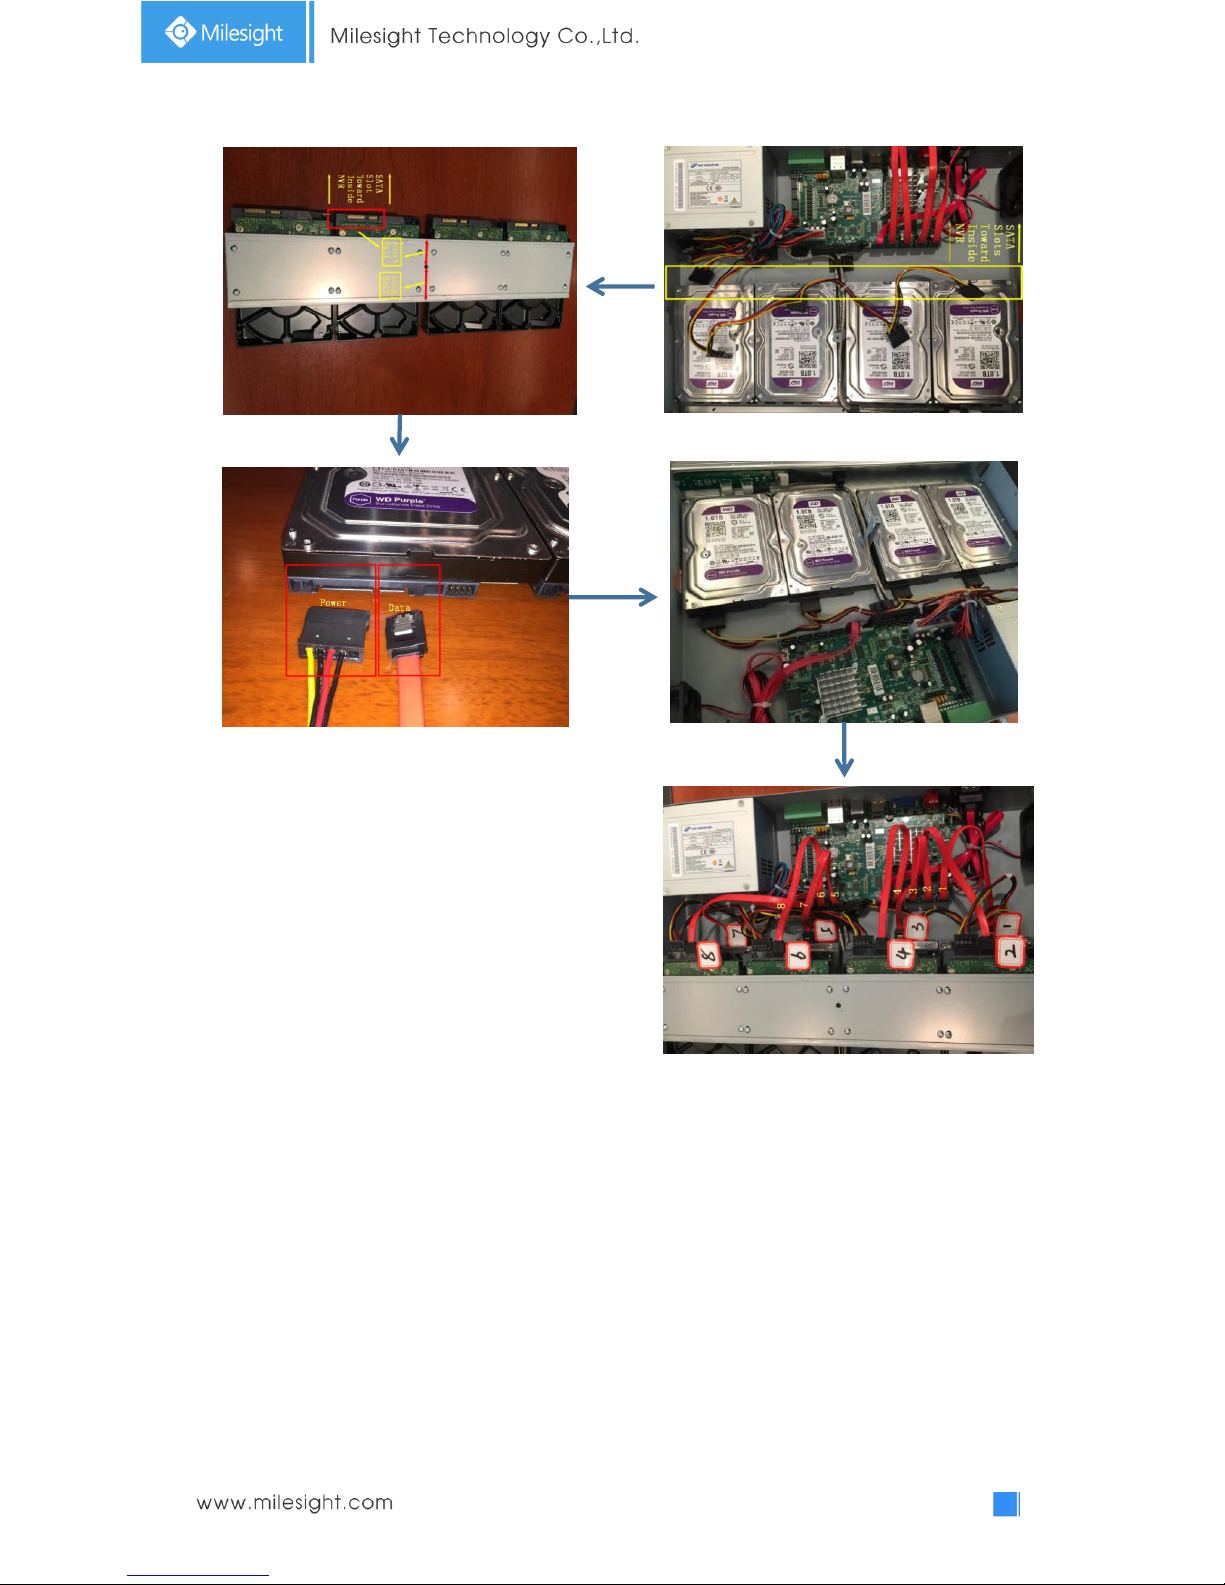
Step3. Install the hard disks into NVR with screws shown in below pictures.(SATA slots of hard
disks should be toward inside NVR)
Step4. Join the power connectors to corresponding hard disks.(Install lower hard disk panel
before upper one)
Step5. Join the data connectors to corresponding hard disk.(Check the connection by below
sequence)
Step1
Step2
Step3
13
Step4
Step5
Note:
1. The SATA slots are in SHORT HALF side and the SATA slot toward inside NVR.
2. The data connector sequence of MS-N7000 series is different from MS-N8000 series’.
14
3. Local Operation
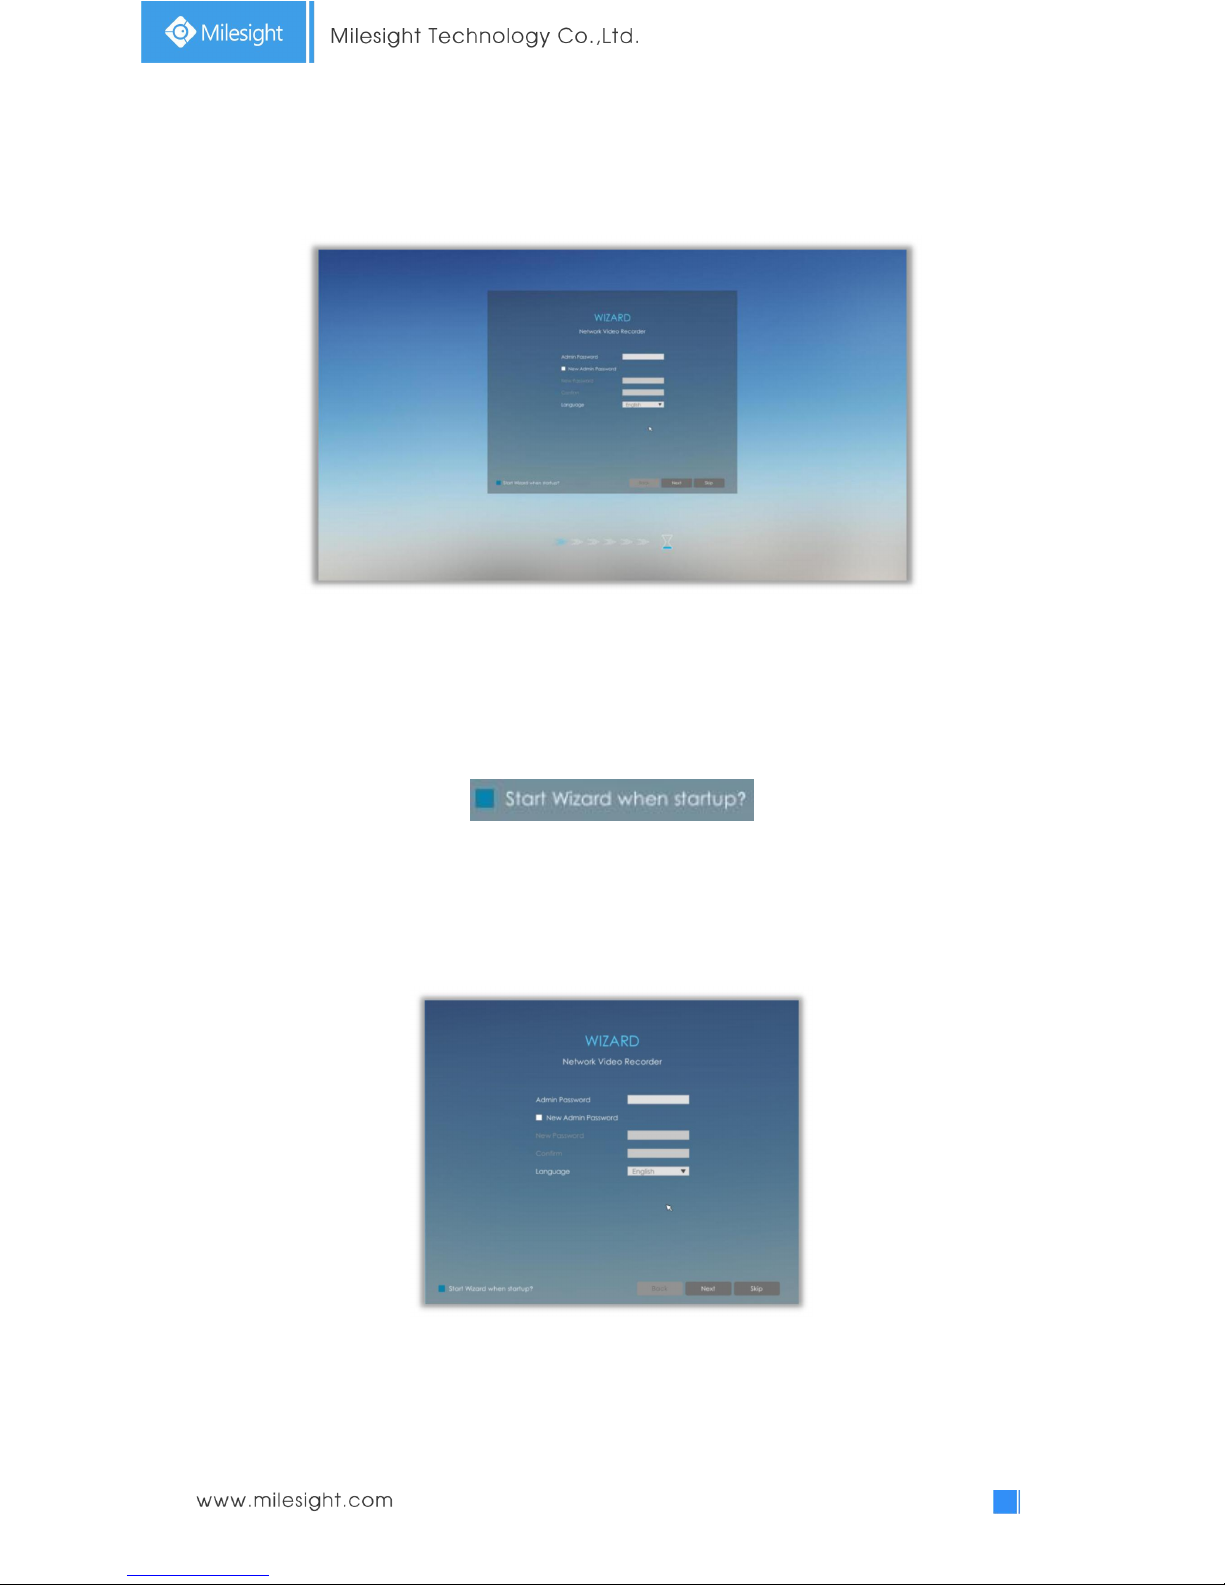
3.1 Wizard Setting
By default, the Setup Wizard will start once the NVR has been loaded. You can click check-box to
turn off the Wizard when startup.
The Setup Wizard will guide you to complete important settings, which makes NVR more
user-friendly.
Step1. Input the user name, password and select system language.
Input new password to modify password .
It is recommended to change the initial password for the safety of your equipment.
Note:
1. If the NVR firmware version out of the factory is xx.7.0.6 or above, the default user name is
“admin” and the default password is “ms1234”;
2. If the NVR firmware is upgraded to xx.7.0.6 or above from a lower version, the default

15
password will turn to “ms1234” after a reset, or it will keep the old default password
“123456”;
3.
If the NVR firmware version is below xx.7.0.6, the default user name is “admin” and the
default password is “123456”.
Step2. Date and time setting.
Select the Time Zone and date via NTP or you can set date and time manually.
Step3. Network setting.
Input the IP Address, Subnet Mask, Gateway and Preferred DNS Server.
Internal NIC IPv4 Address option is only for PoE NVR Series.
Step4. Disk Management.
Automatically detect the hard disk installed in NVR, and it supports formatting hard disk.
You can create RAID in this page as well. (RAID is only supported on Pro NVR 7000 series, PoE
NVR 7000 series and Pro NVR 8000 series)
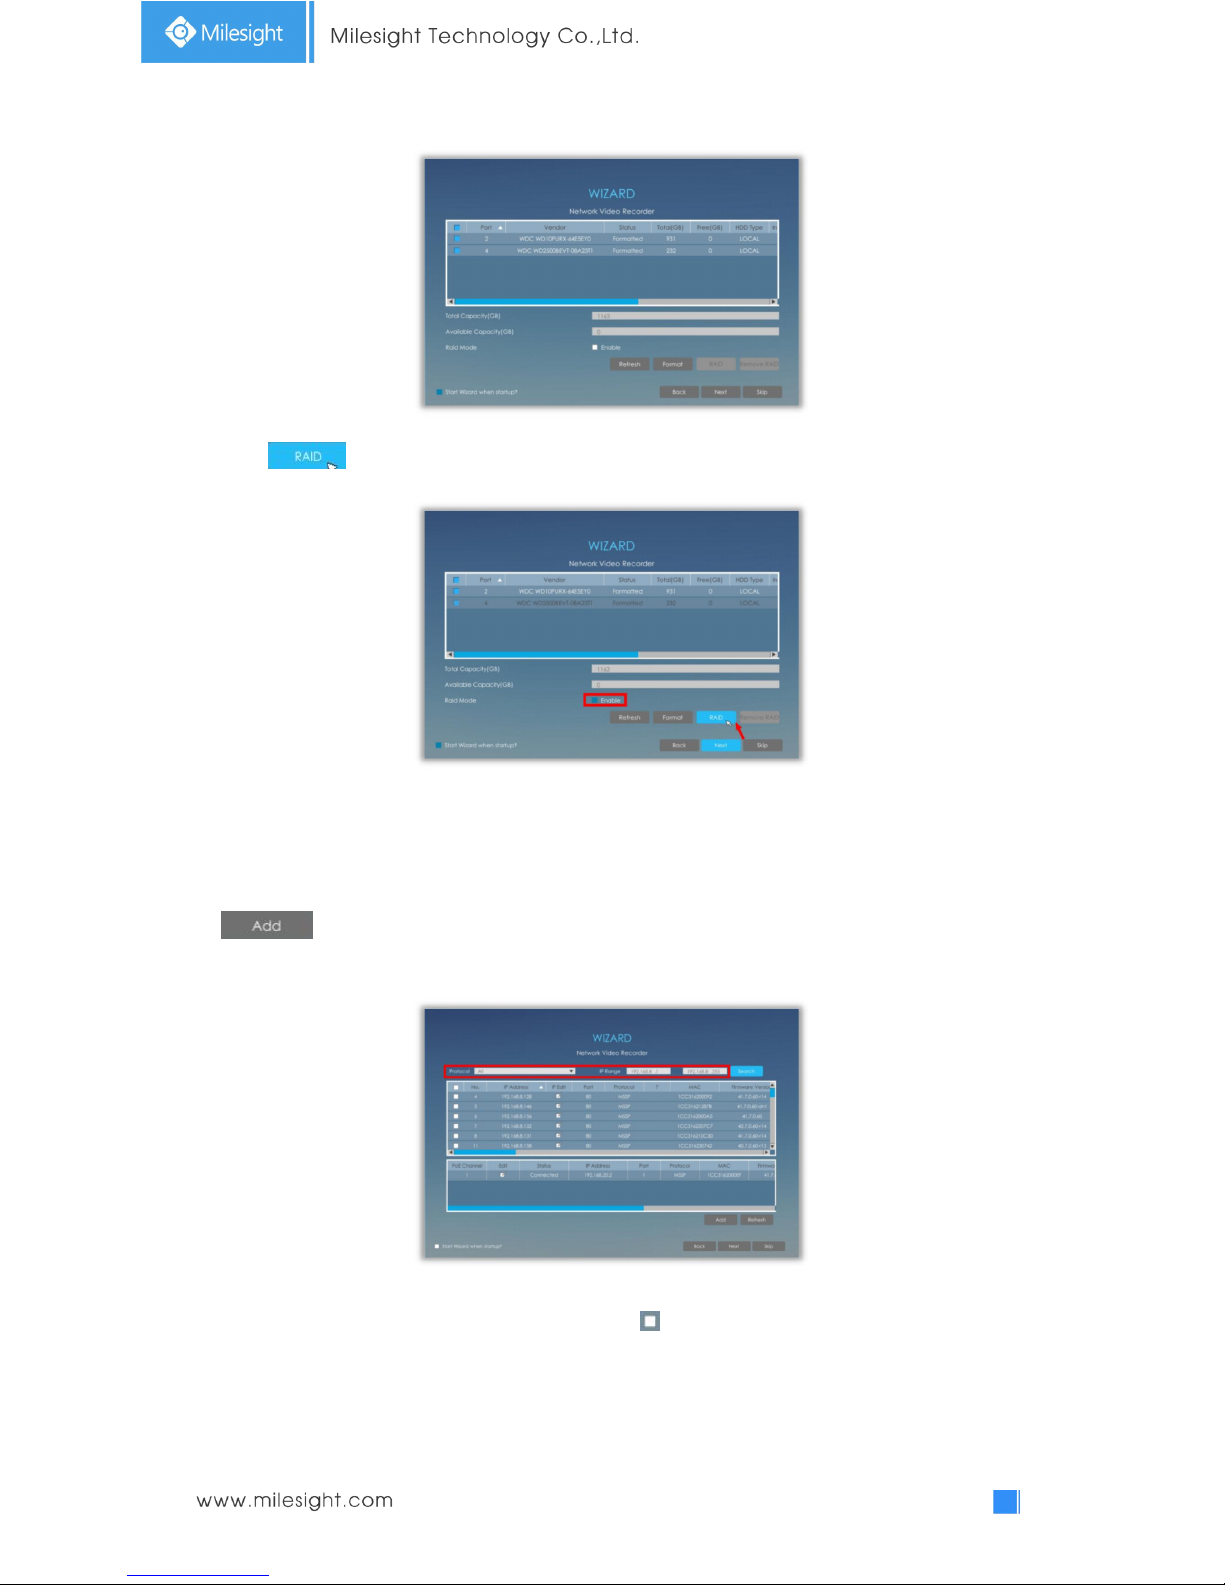
16
Click to set up RAID for selected disk.
Note:
RAID will be available after it was enabled and the device rebooted.
Step5. Camera Management.
Search all the cameras in LAN by filtering Protocol and IP Range. Select cameras and click
to add them to NVR.
It can auto detect cameras that connected to PoE ports (only for PoE NVR).
Step6. Record
The user can start all channels recording by clicking .
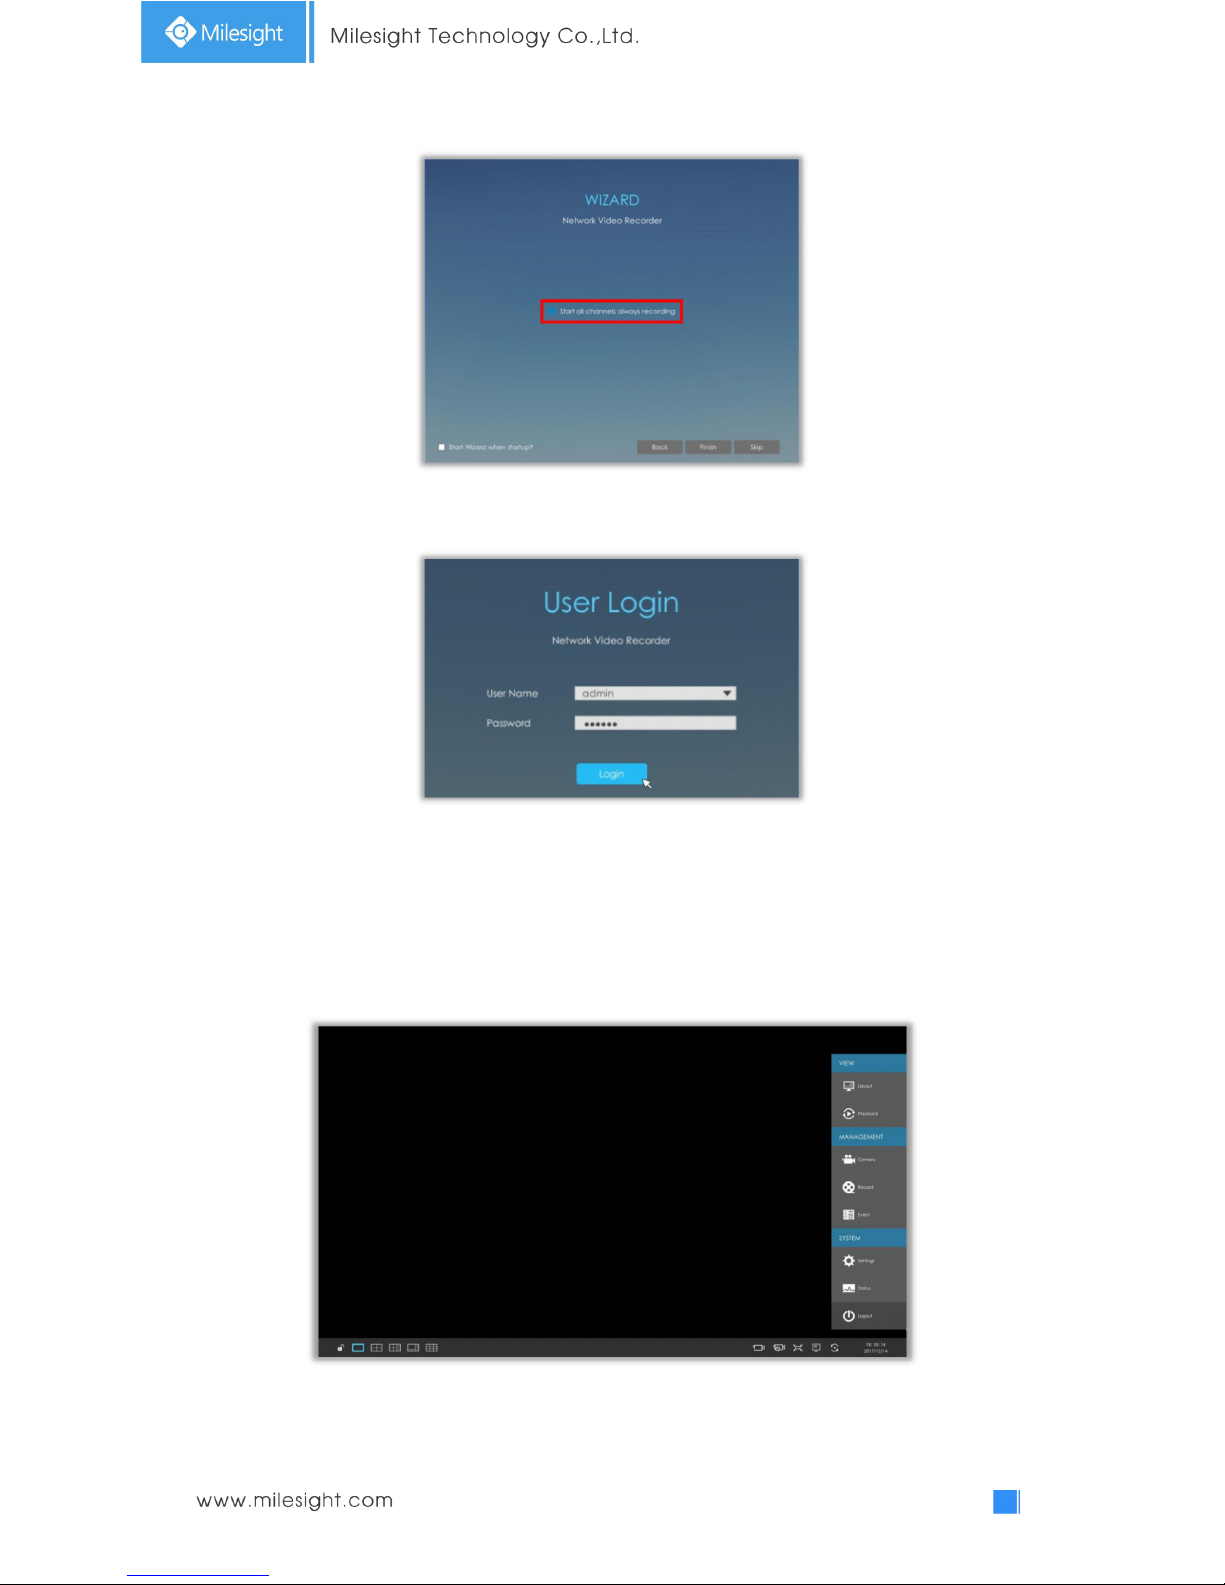
17
Step6. Login
Input the user name and password to login the system.
3.2 Live View
3.2.1 Live View
Main Menu and Tool Bar can pop up and hide automatically at the right side or bottom of the
interface.
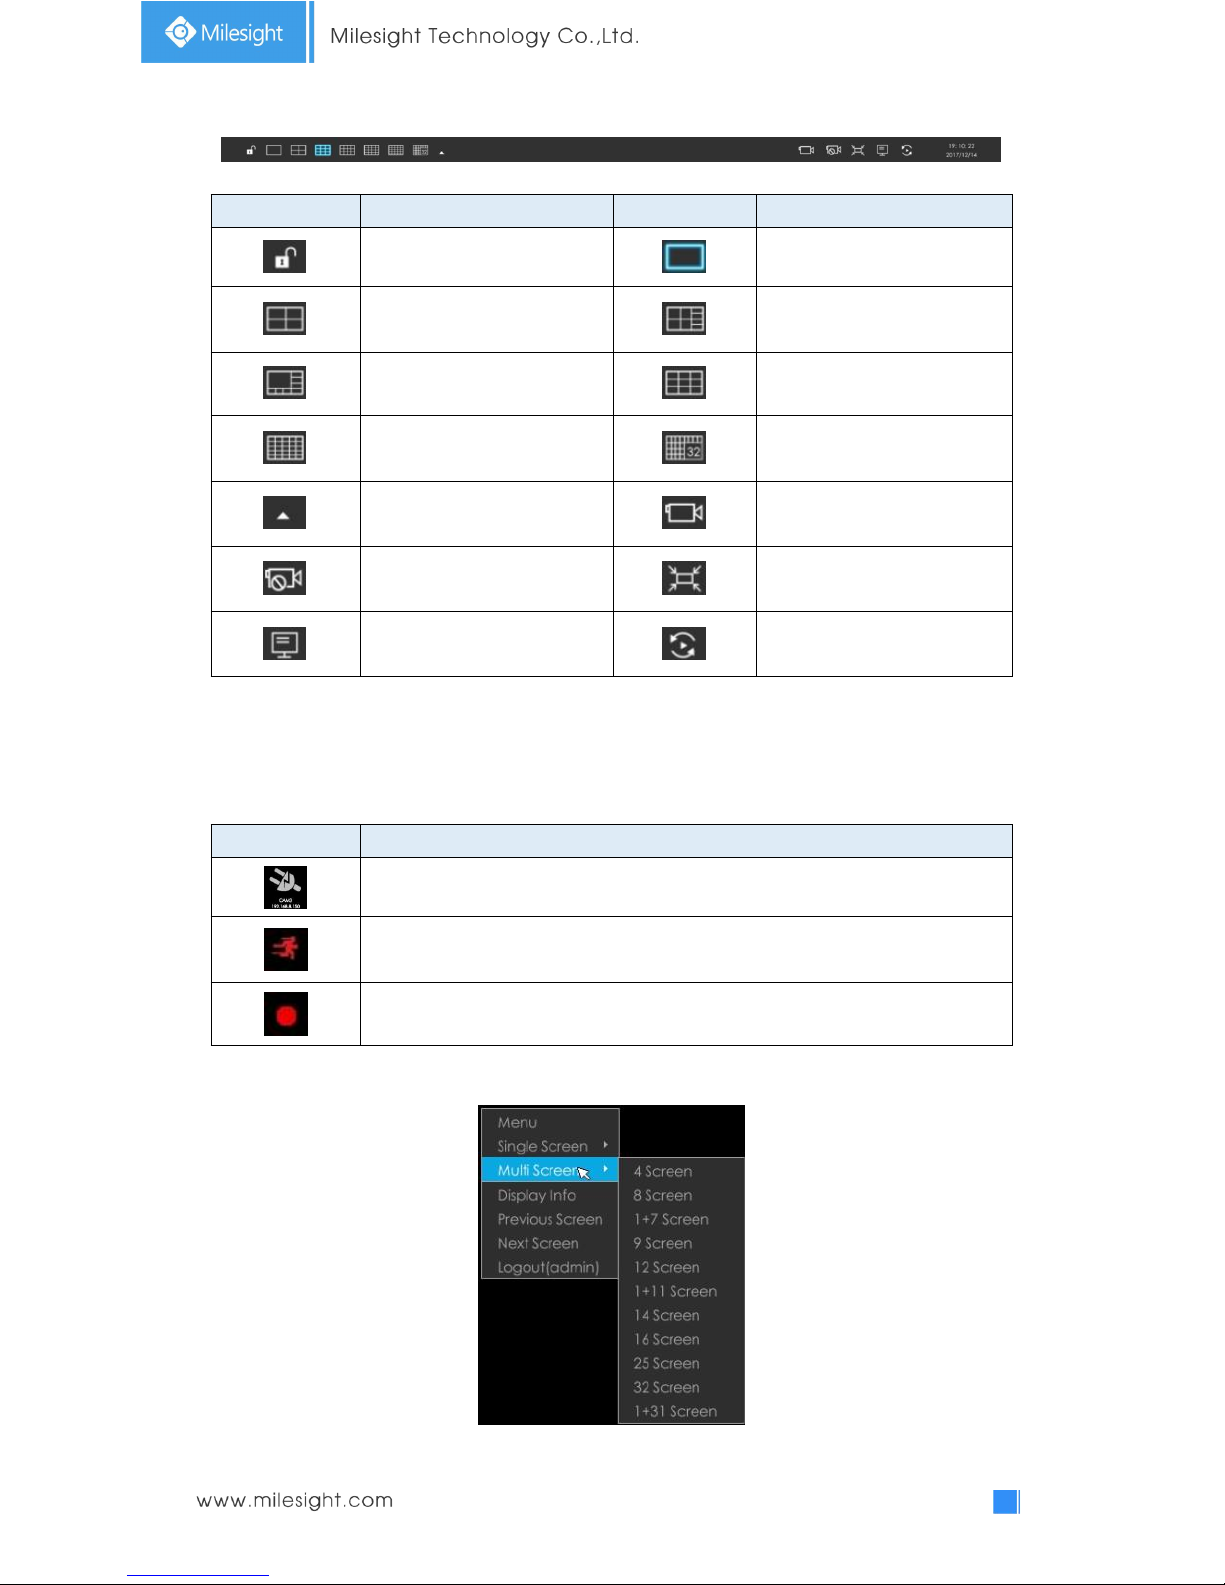
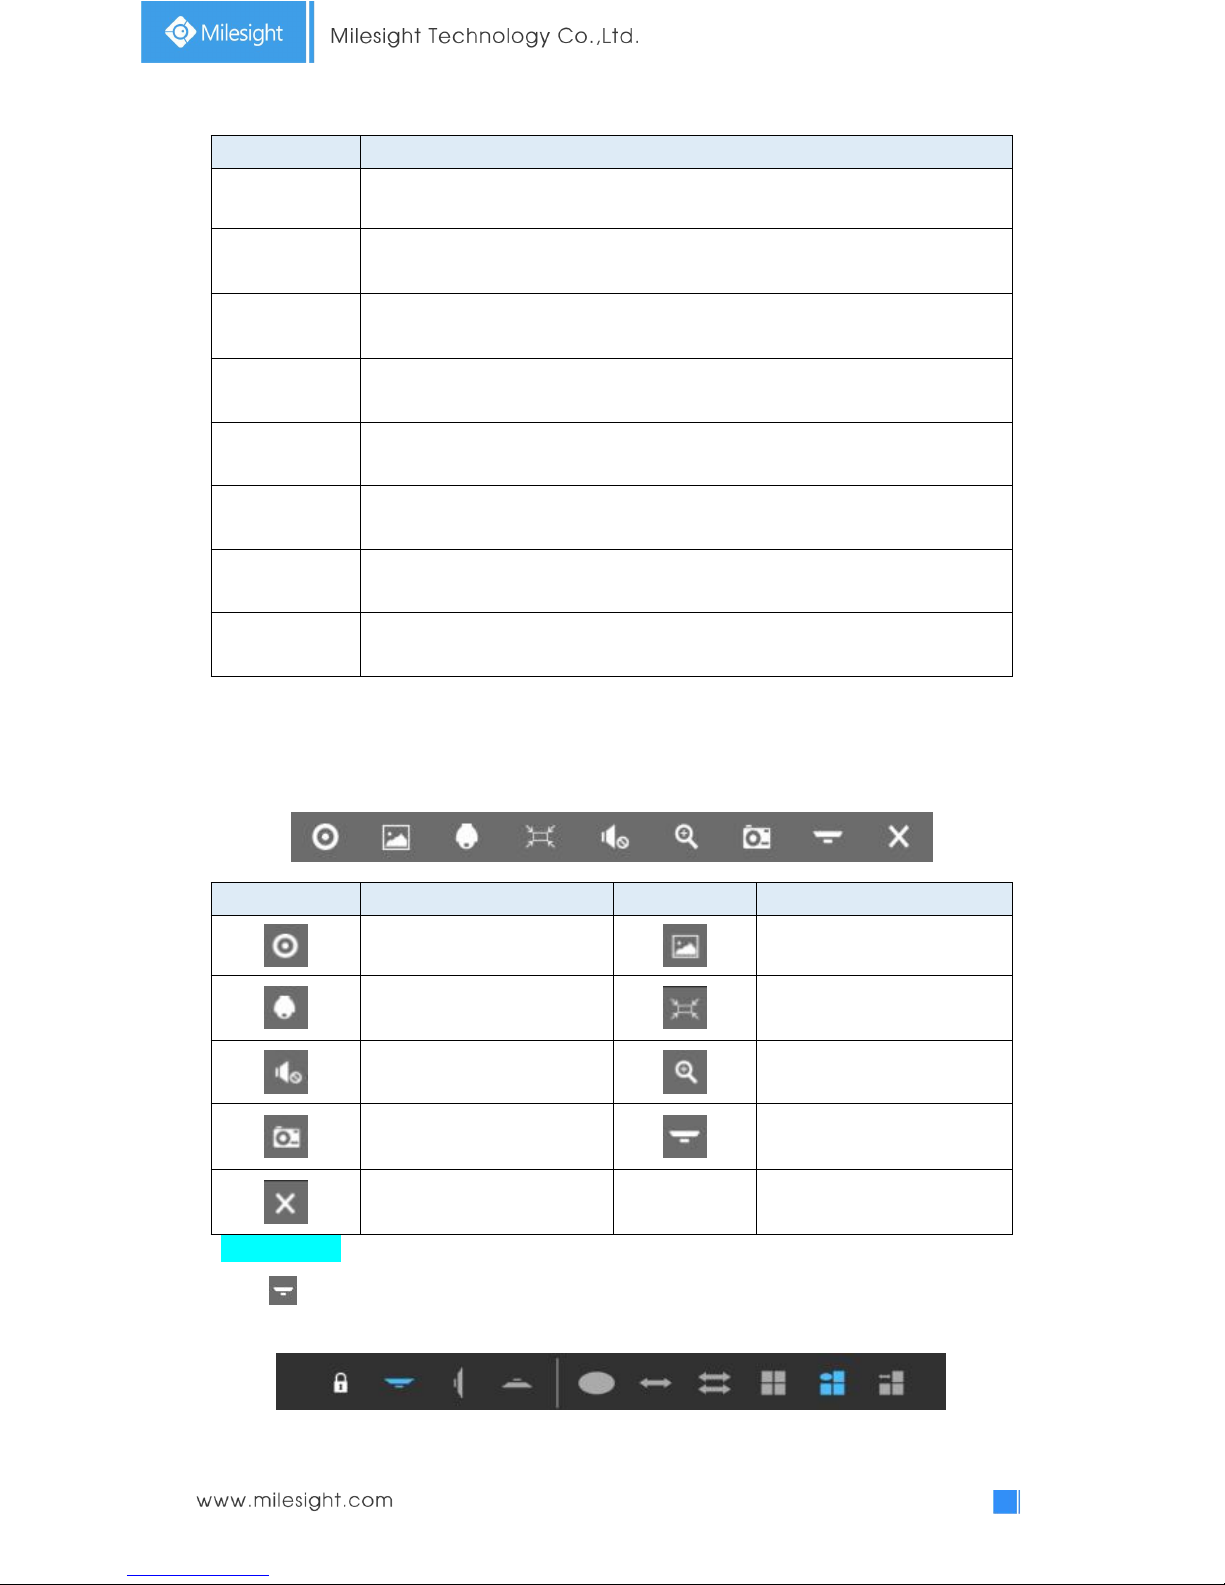
18
Icons
Descriptions
Icons
Descriptions
Lock/Unlock the tool bar
One screen layout
4 screen layout
8 screens layout
1+7 screens layout
9 screens layout
16 screens layout
32 screens layout
Select other screen layouts
Start all channels recording
Stop all channels recording
Adjust image in proportion
Display settings
Sequence
Note:
Start all channels recording, Stop all channels recording, Adjust image in proportion and Display
settings are for all displaying channels.
There are multiple icons on each channel displayed in live view, indicating different status of the
channel.
Icons
Descriptions
It indicates video loss
It indicates motion detection alarm
It indicates that the current channel is recording.
Right click in the Live View and the quick operation menu pops up.
19
Item
Descriptions
Menu
Display Main Menu
Single Screen
The selected channel will be full screen. You could go back to previous screen layout by
double clicking the channel
Sub Screen Ctrl
Switch to sub screen to operate (Only for Pro NVR 8000 Series)
Multi Screen
Switch to multiple screen layouts
Display Info
Show channel information, including Camera Number, Bit Rate, Frame Rate and Frame Size
Previous Screen
Switch to previous screen
Next Screen
Switch to next screen
Logout
Log out current user account
Quick Operation for single channel
In live view interface, left click the channel, the quick menu will appear.
Icons
Descriptions
Icons
Descriptions
Manually record
Image Configure
PTZ control
Original/Resize the image
Audio on/off
Digital zoom
Snapshot manually
Fisheye Mode
Close menu
Fisheye Mode:
Click to enter Fisheye Mode, which will full screen fisheye channel. You can set installation
modes and display modes for the camera on the Fisheye tool bar.
Installation Mode: Ceiling Mount/ Wall Mount/ Table Mount
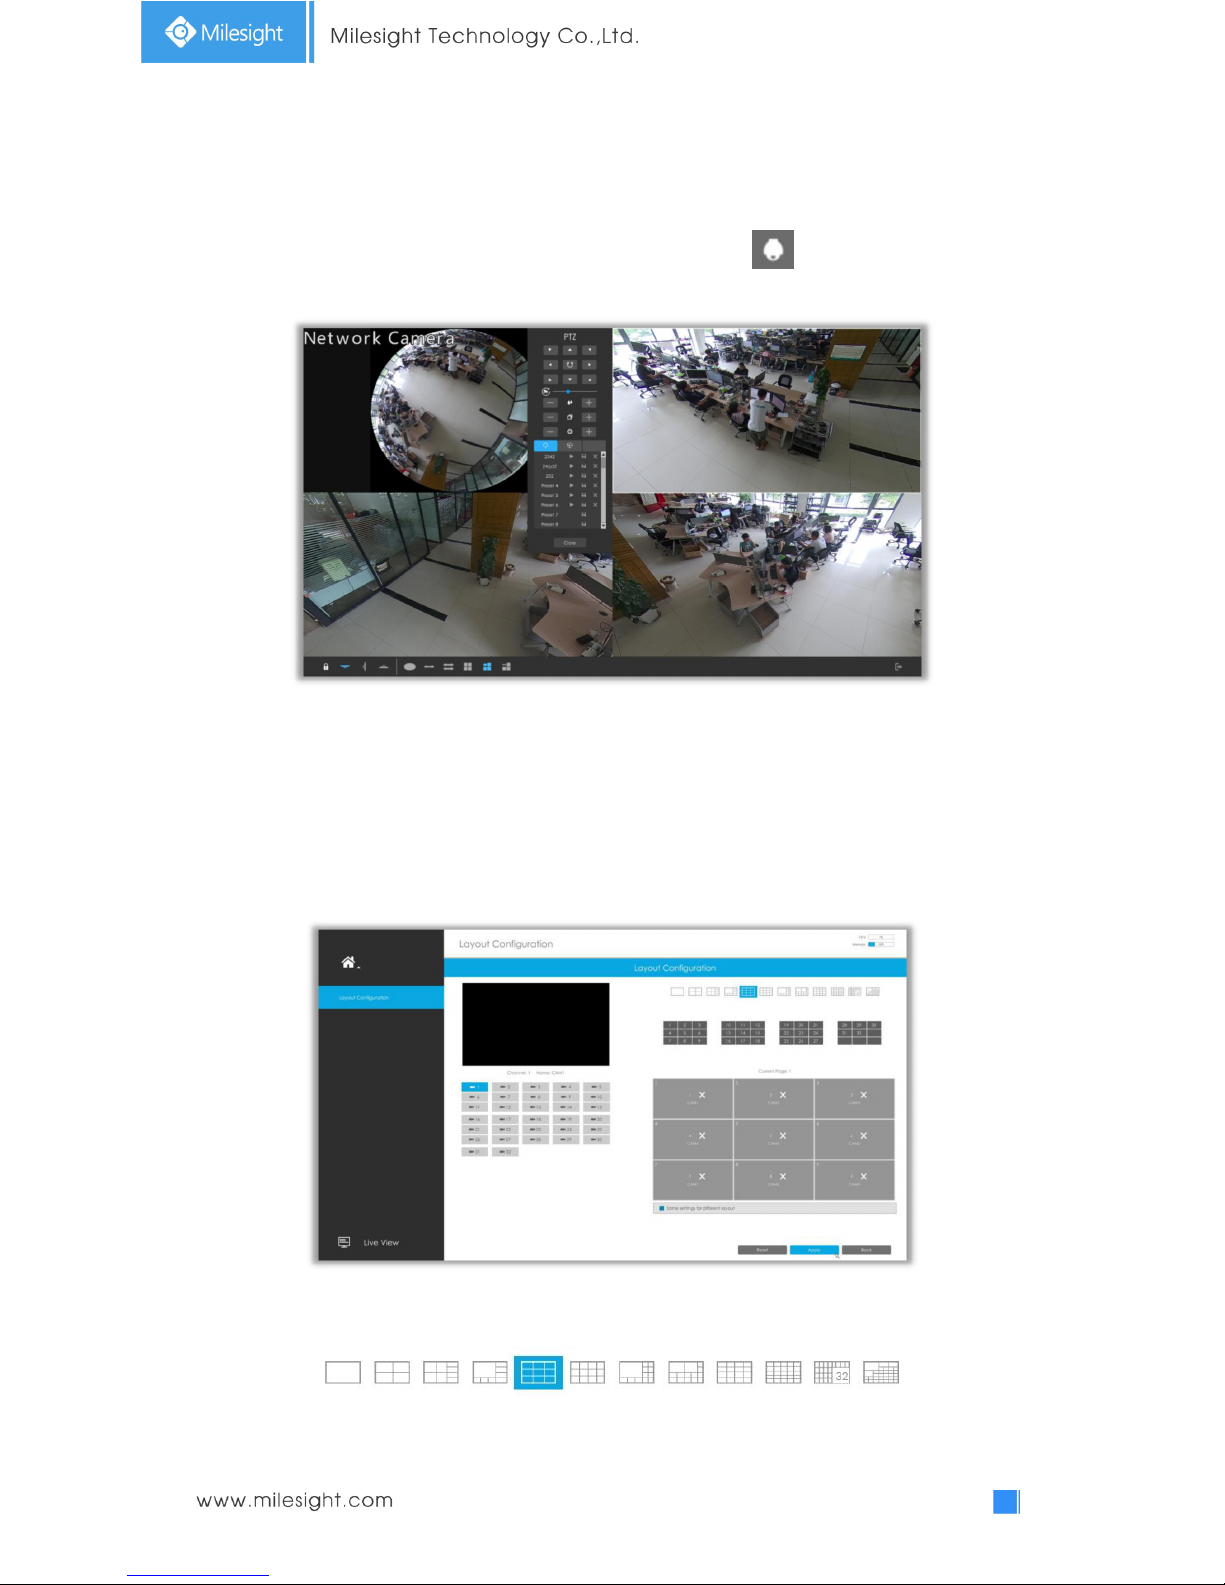
20
Display Mode: Original Fisheye View/ 360 °Panorama View/ Two 180° Panorama Views/ Four
Regional Views/ One Original Fisheye View and Three Regional Views/ One 360°Panorama View
and Three Regional Views
Select a fisheye channel(except for the original view), and click to enter PTZ Mode. You
can operate PTZ, Preset and Patrol of this channel separately.
Note:
Only for Milesight Fisheye Camera in Bundle-Stream Mode.
3.2.2 Layout
Step1. Select a layout format.
Step2. Set desired channels.
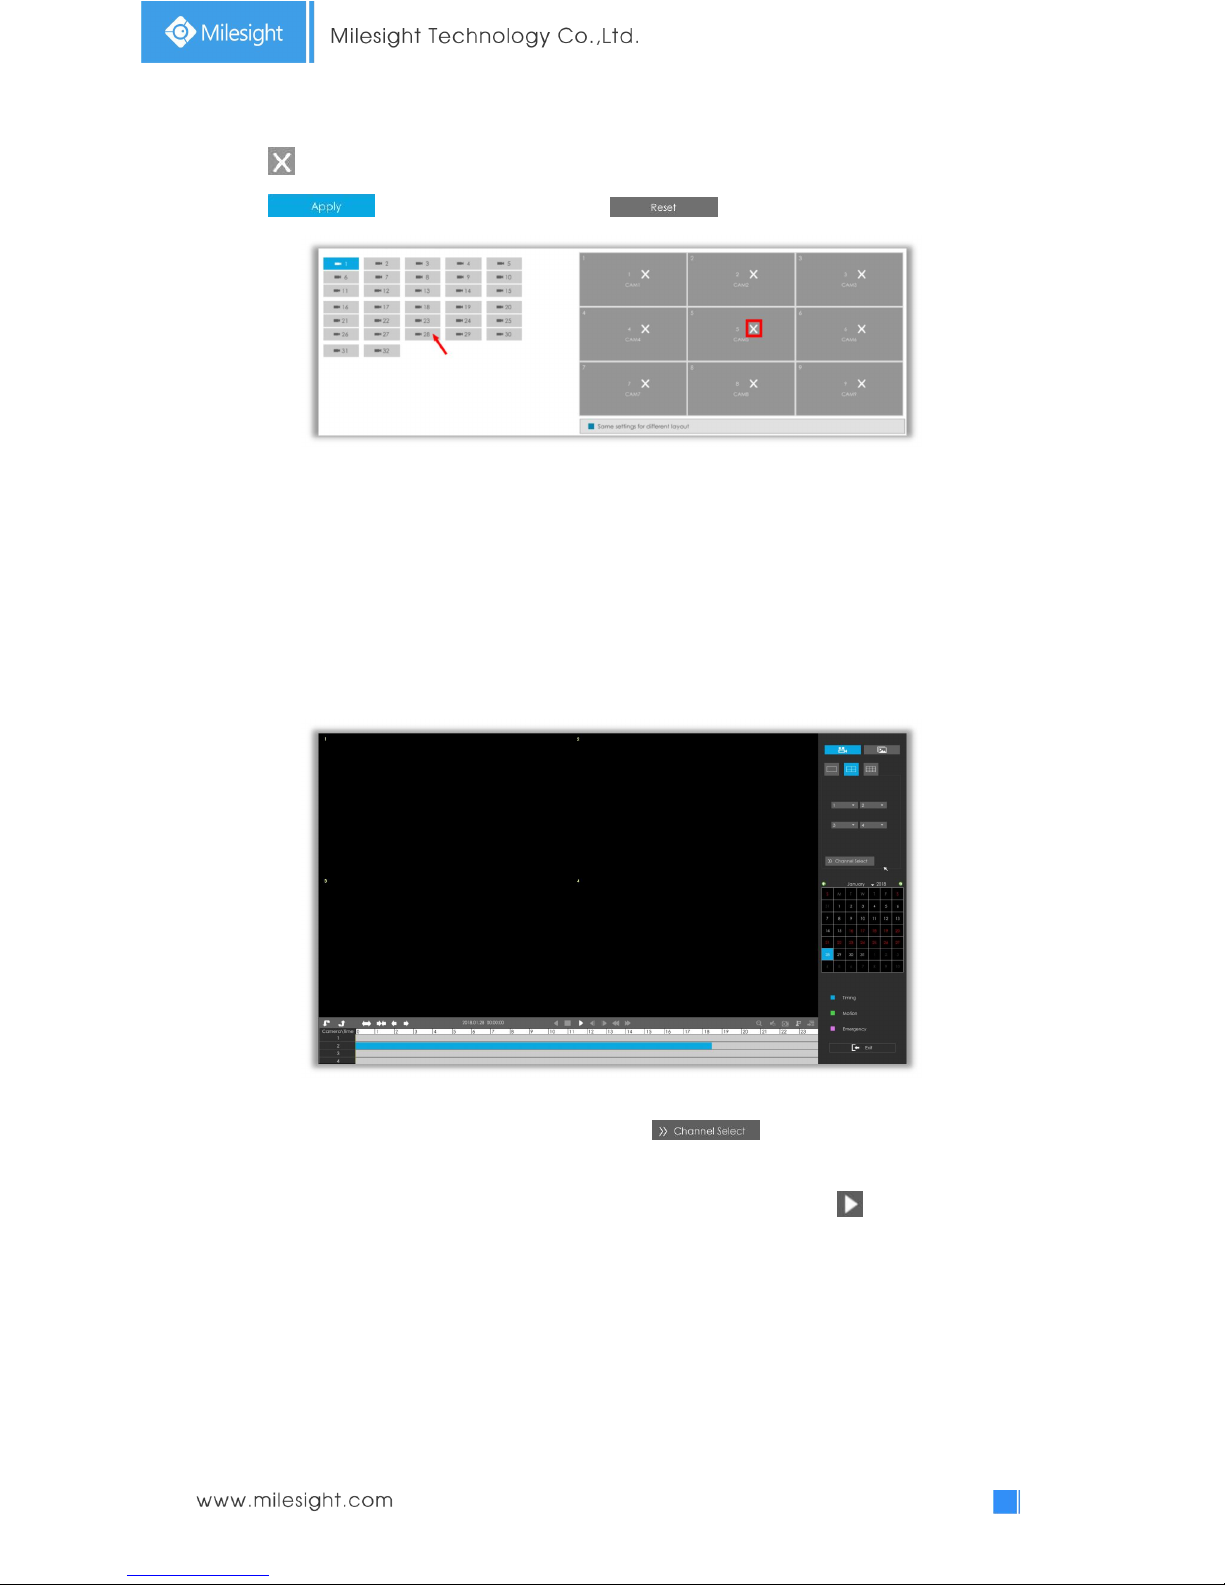
21
Click to close a channel. Select a window and then select a desired channel to add in.
Click to save the settings or click to reset the layout.
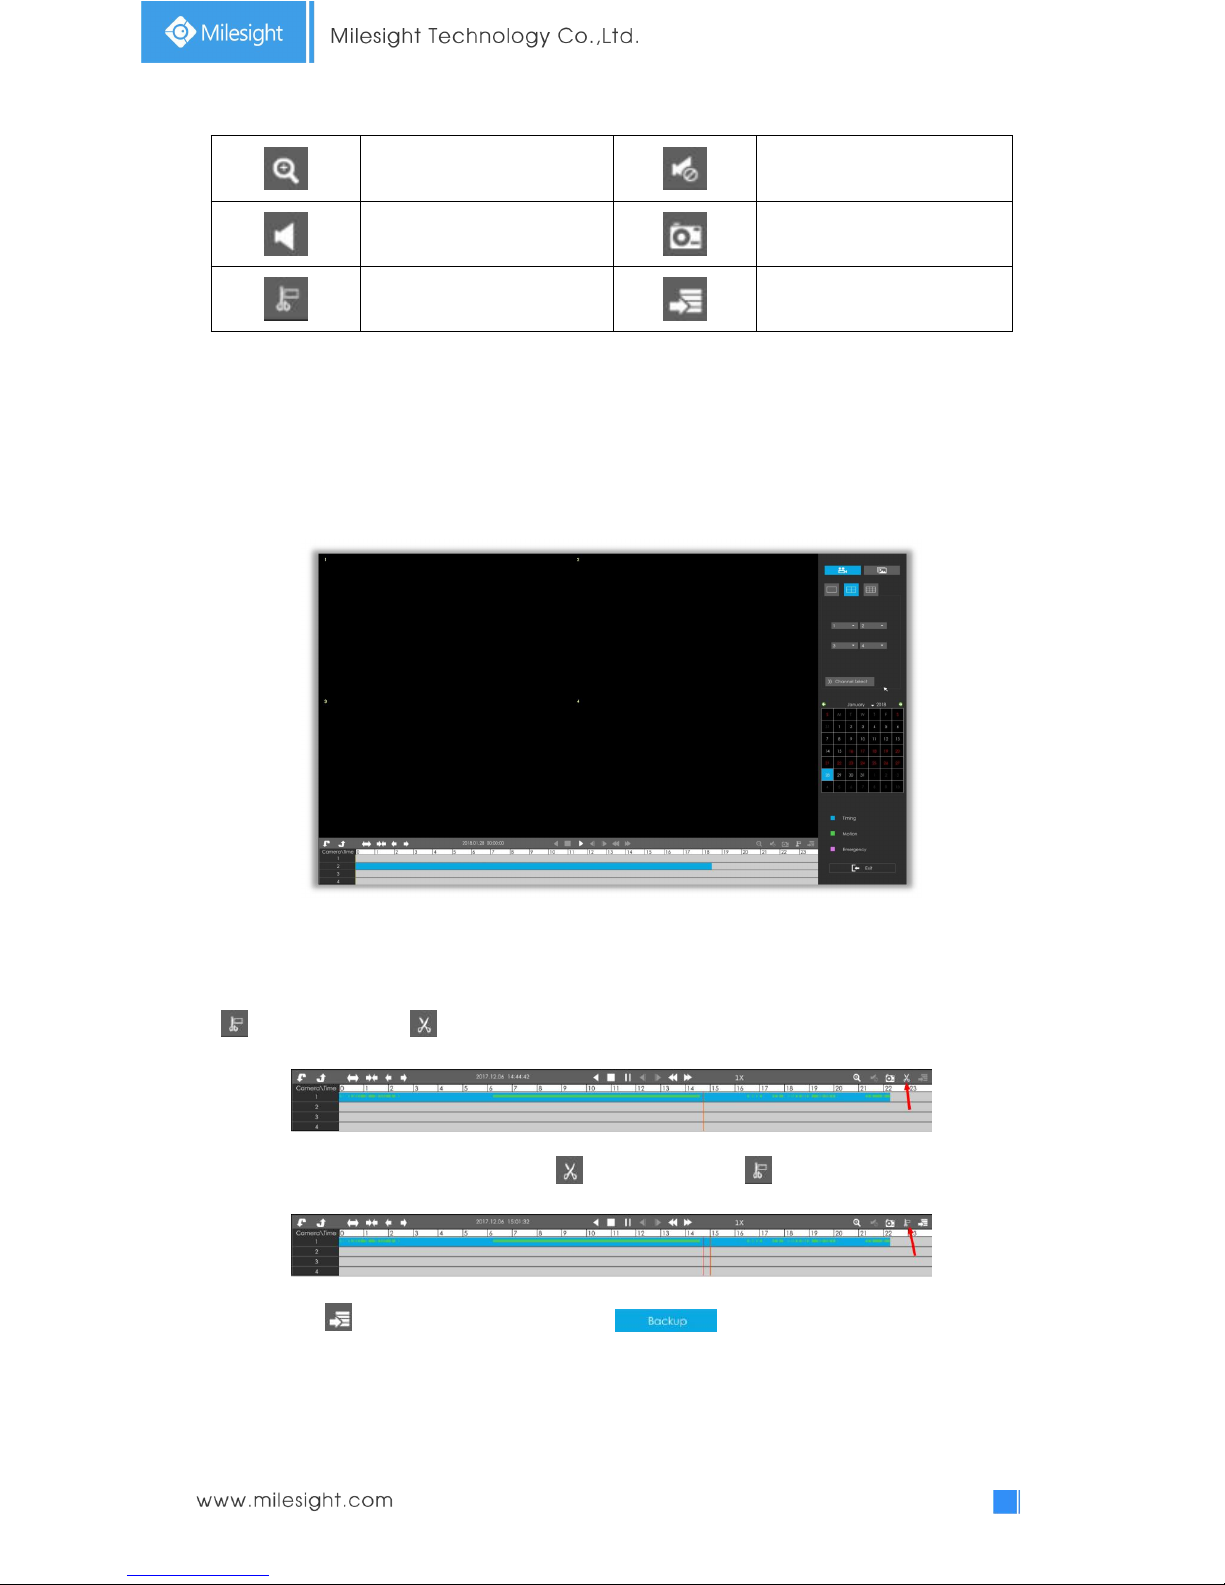
3.3 Playback
3.3.1 Video Playback
Playback supports to playback video according to recorded time and to play recorded video files
in specified time period. Synchronous playback of multi-channel is supported.
Step1. Select screen layout, channels date and recording type.
Select playback layout and channels. User can click for quick selecting channels.
Click the date in red when there are recorded files of the selected channels, the record type with
recording data will be shown as below. Select the record type and then click to playback.
22
Note:
Only the day with red letters means that there are record files.
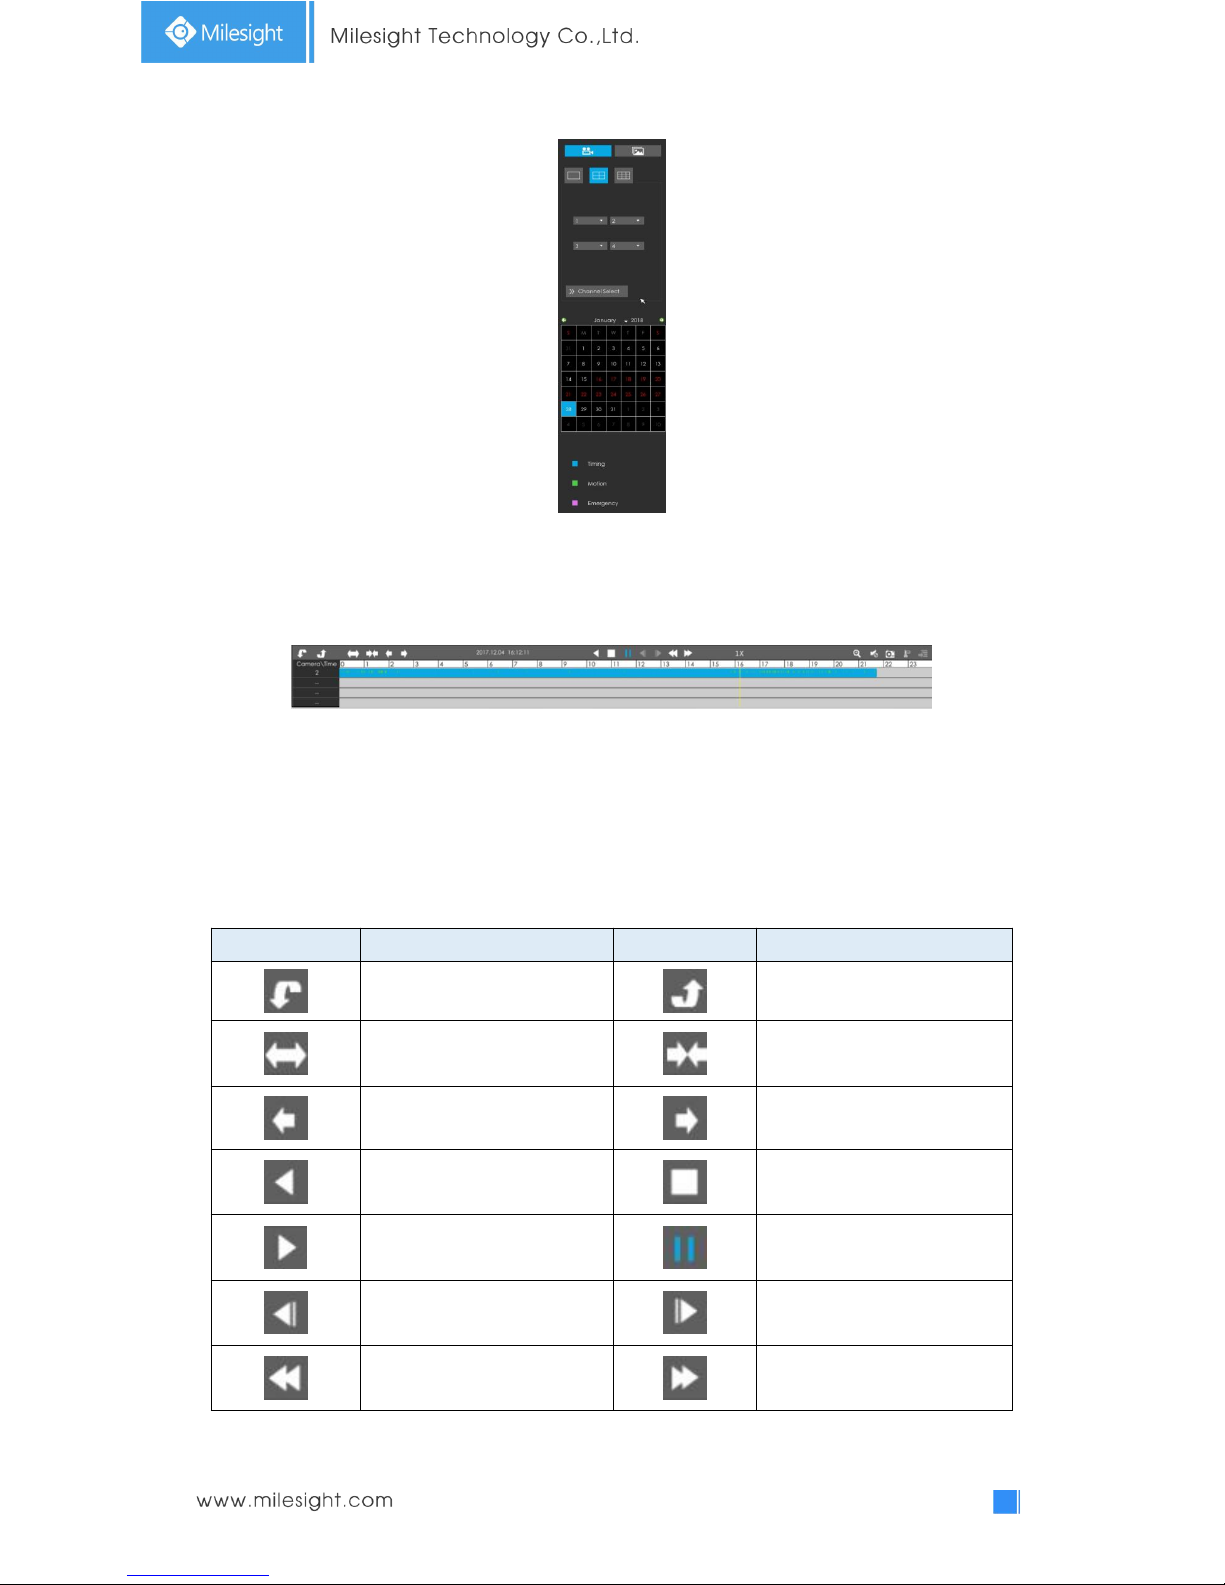
Video Playback Tool Bar Description
The tool bar can display multi-event record. It shows that in this record period what kind of event
has happened. The symbolic meaning of each color is:
Blue—Timing Green --- Motion
Red --- Alarm Purple --- Emergency
And take this bar above as an example, it means that in this recording period, timing and motion
event have been triggered.
Icons
Descriptions
Icons
Descriptions
Next 4 cameras
Previous 4 cameras
Timeline zoom in
Timeline zoom out
Timeline forward
Timeline backward
Rewind
Stop
Play
Pause
Step reverse
Step forward
Speed down
Speed up
23
Digital zoom
Audio on
Audio off
Snapshot
Timeline cutting
Download
3.3.2 Video Files Backup
Recorded files can be backed up by various devices, including USB flash drives (USB flash disk,
USB HDD, USB writer) and eSATA, etc.
Step1. Select Recorded files.
Select the channel and date you want to backup, then select the start time at timeline and click
, it will change into which means cut begins.
Select the end time at time line and click , it will change into , which means cut ends.
Step2. Click , select Backup media and click .
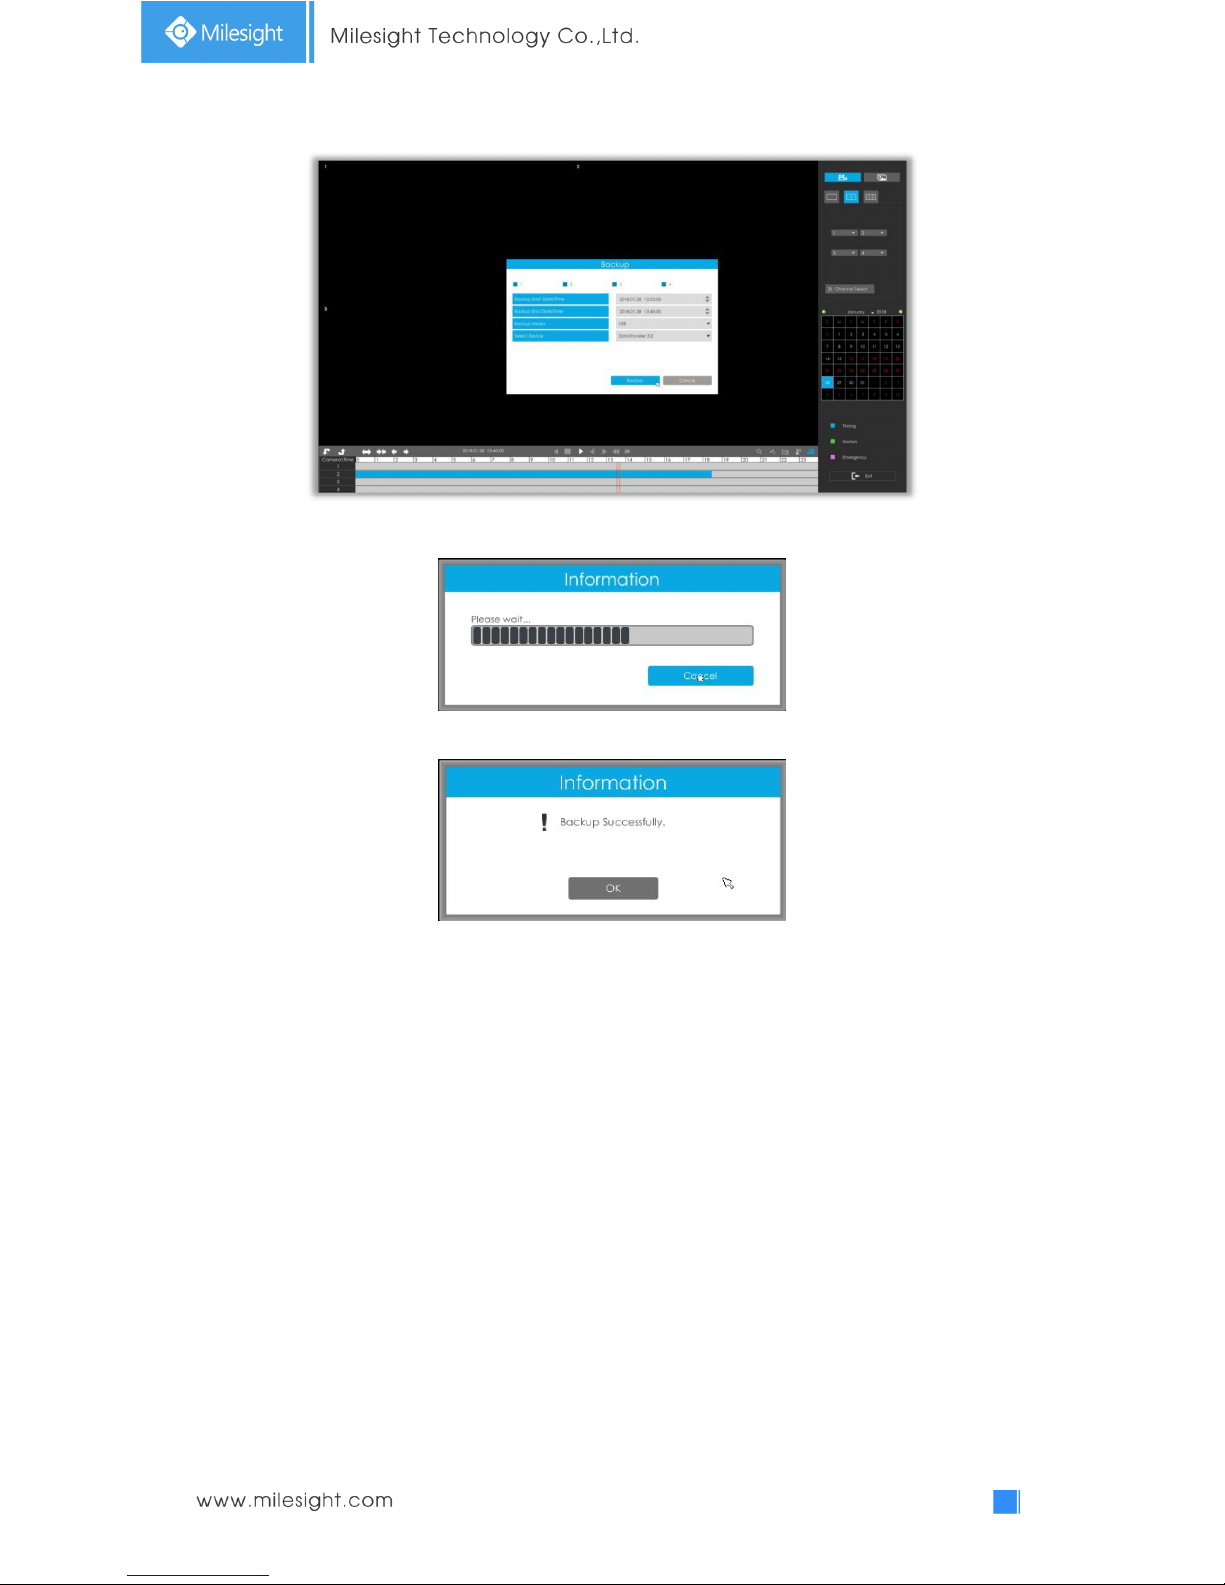
24
Step3. The window will prompt: Please wait…
Step4. When all backup files have been exported, ‘Backup Successfully’ will be prompted.
Note:
The download time of files depends on the time length of video you want to backup.
25
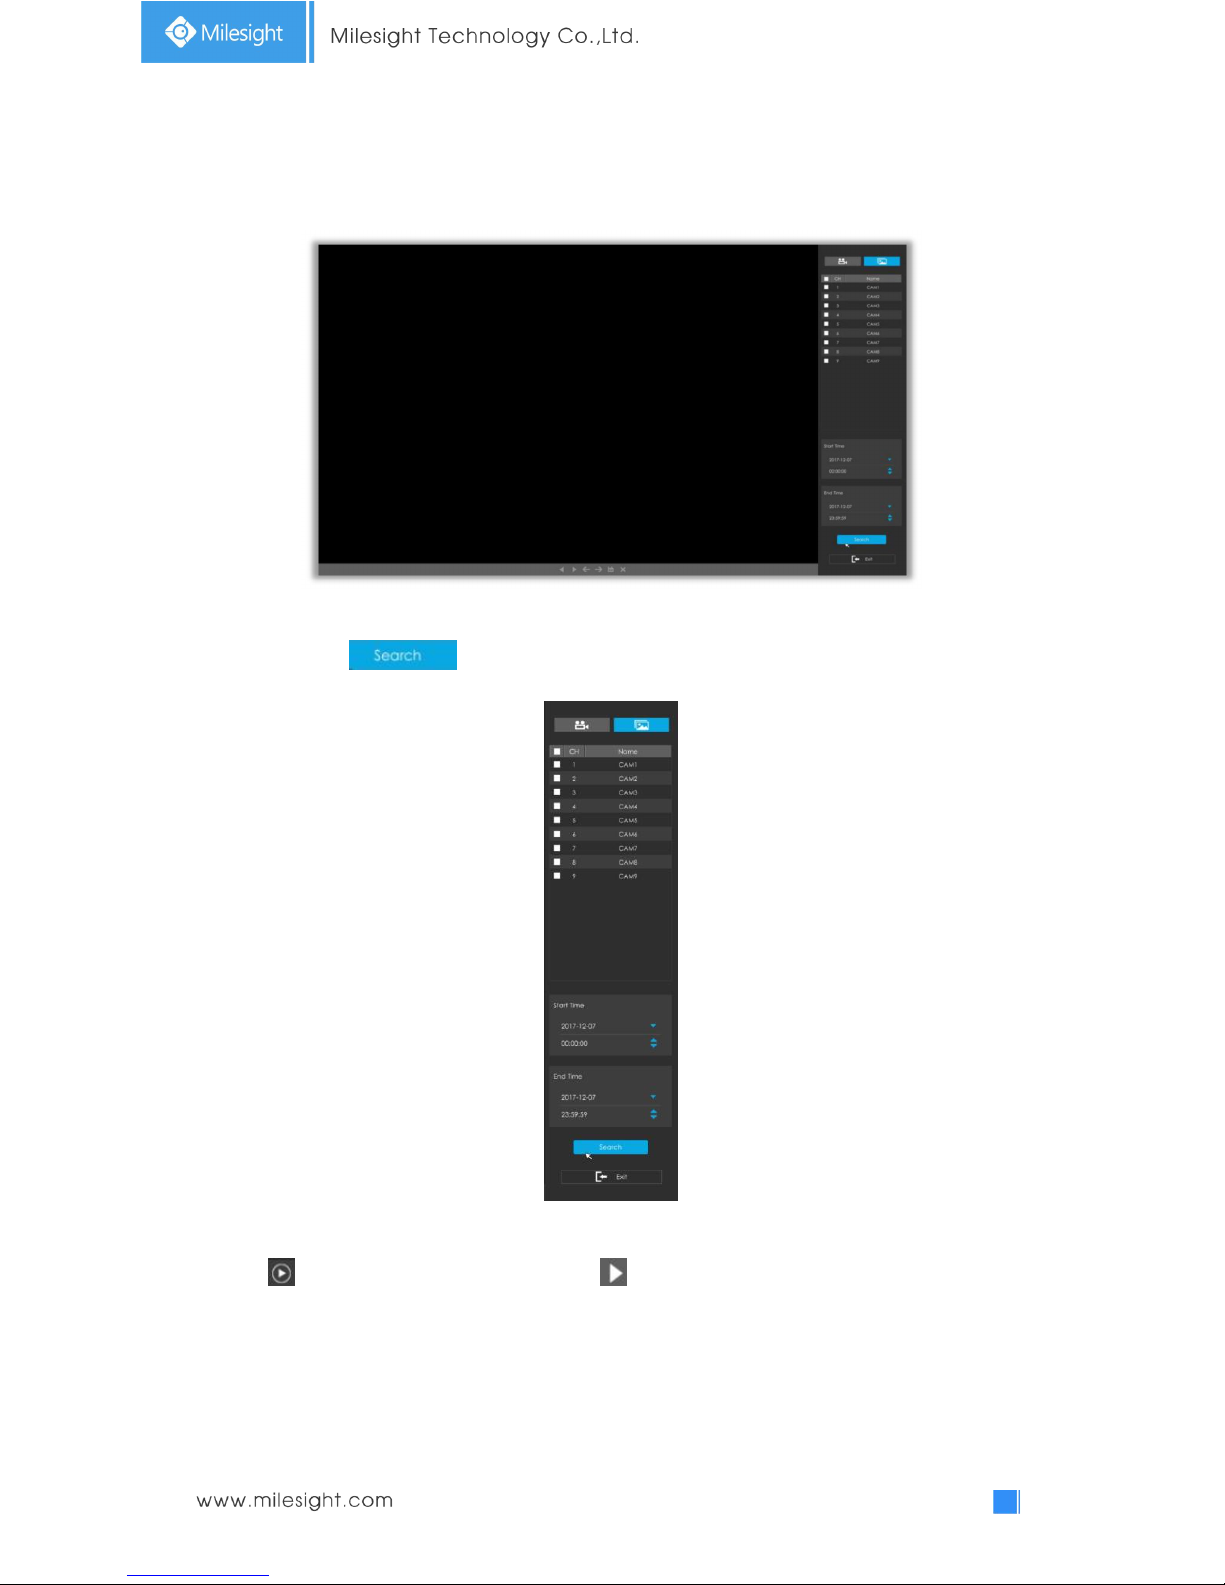
3.3.3 Picture Playback
Step1. Search and look for the snapshot files saved in HDD by selecting channels, start time and
end time, click .
Step2. Enter Picture Info List and look up the pictures.
Click to play the selected picture, or click to auto play pictures.
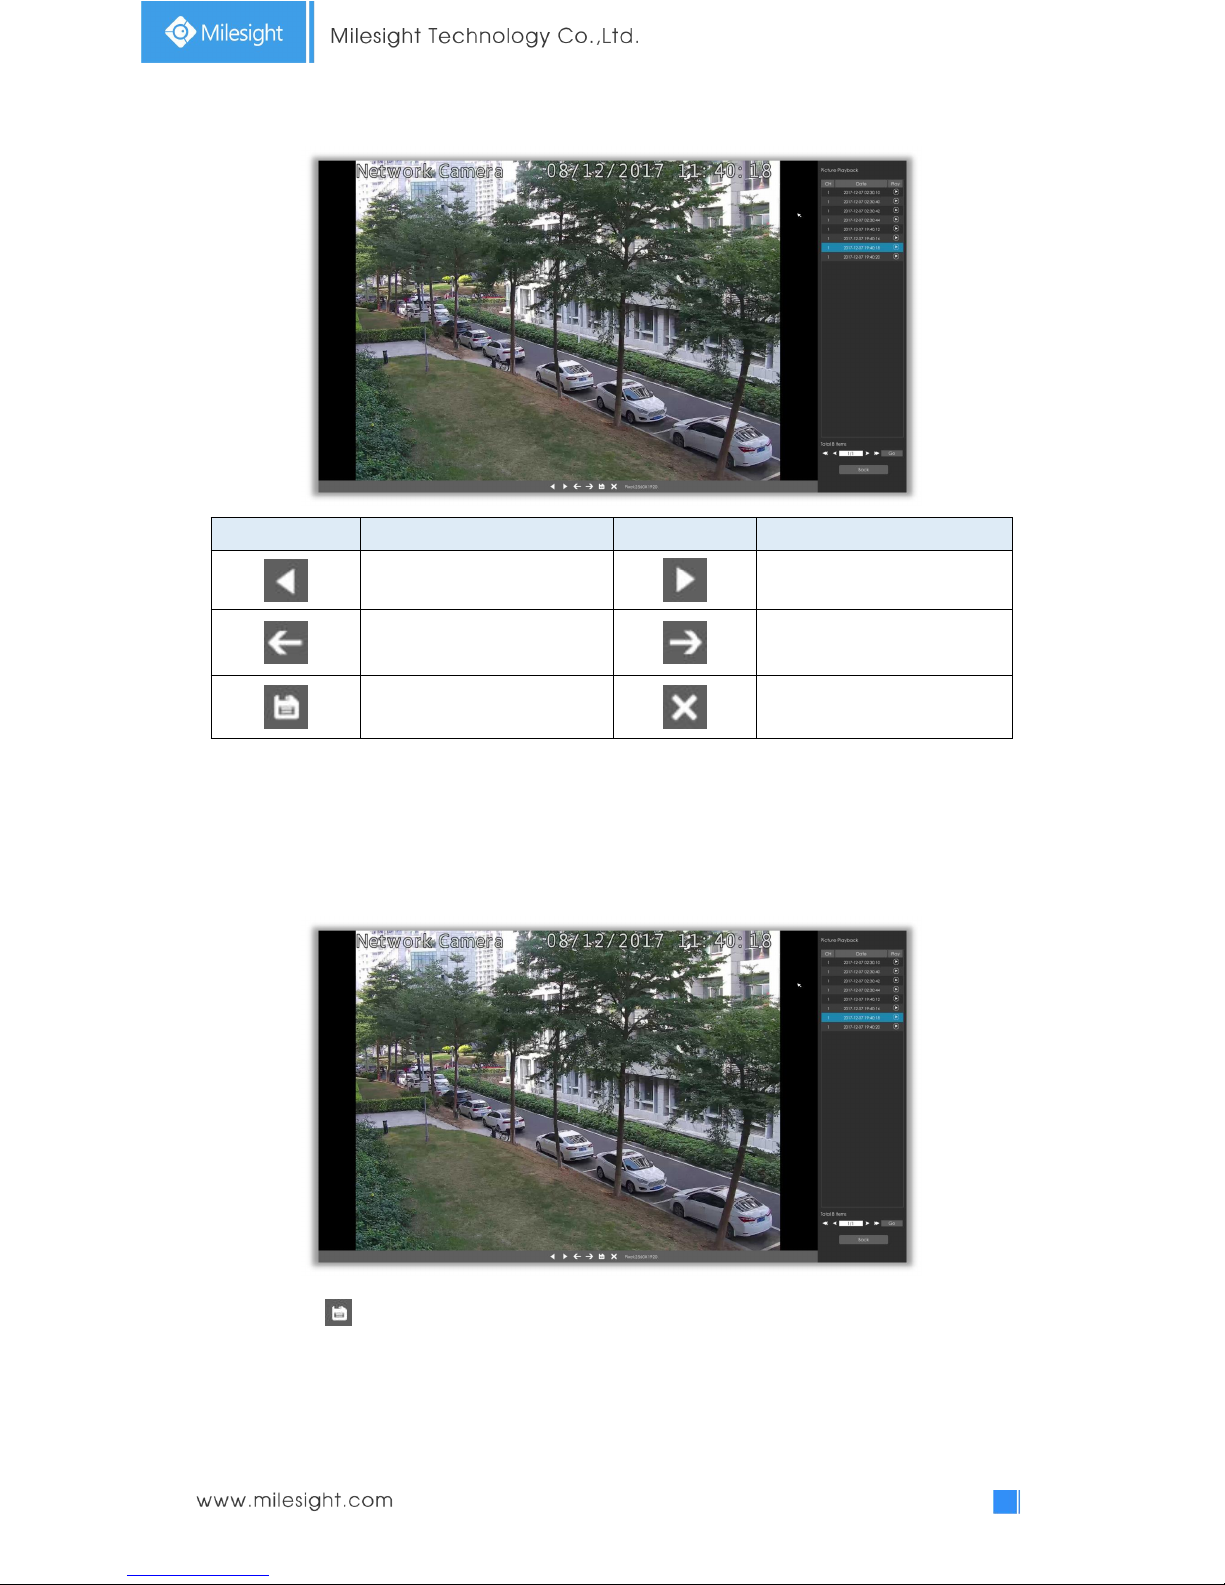
26
Icons
Descriptions
Icons
Descriptions
Play backward
Play
Previous picture
Next picture
Download picture
Back to search interface
3.3.4 Picture Files Backup
Step1. Select pictures you want to backup in picture playback interface.
Step2. Click and select backup media to save picture.
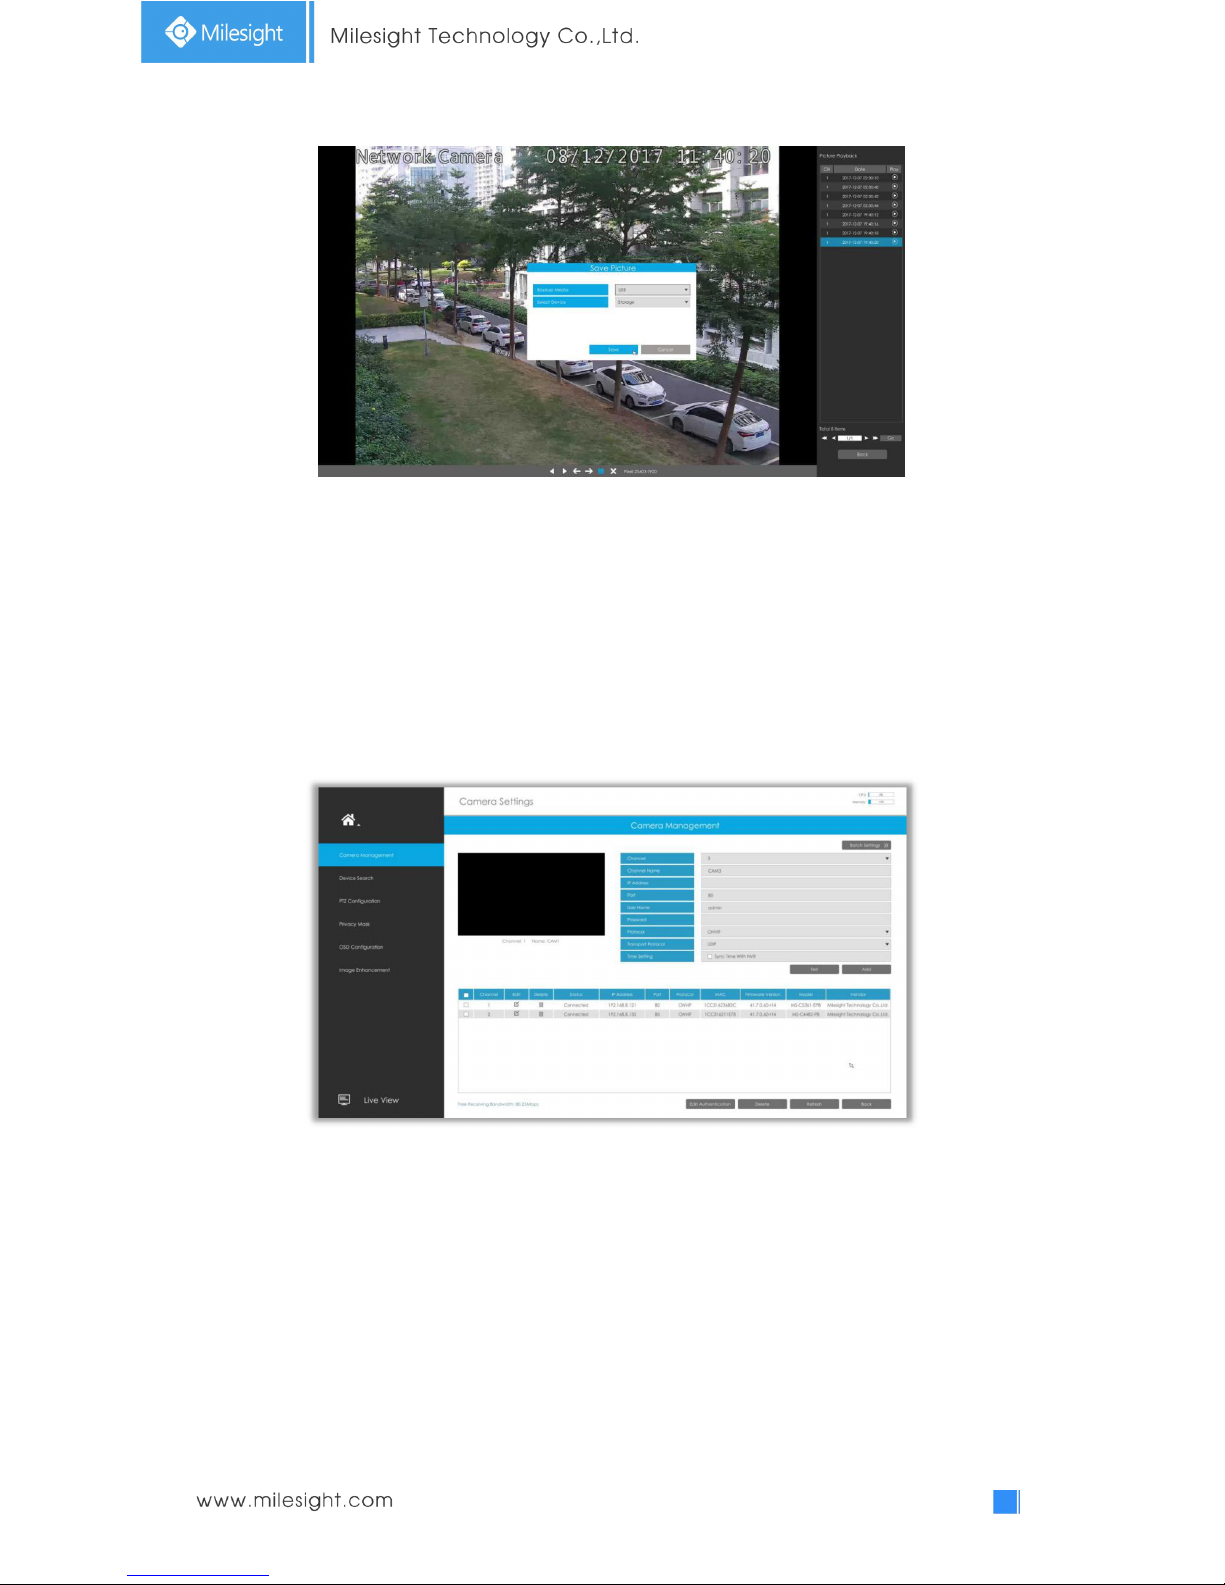
27
3.4 Camera Settings
Before configuration, please ensure that the camera is connected to the same network as your
NVR and that the network setting for your NVR is properly set.
3.4.1 Camera Management
Step1. Add camera.
Method1. Add camera through Device Search interface. ‘Settings’‘Camera’‘Device
Search’.

28
1. Select IP Range, NIC and Protocol, which includes ALL, ONVIF and MSSP.
MSSP: You can search out all Milesight camera which has different network segment in the LAN.
2. Click button to search cameras at the same LAN with NVR.
3. Select one channel, click button, input password and click button to
finish.
29
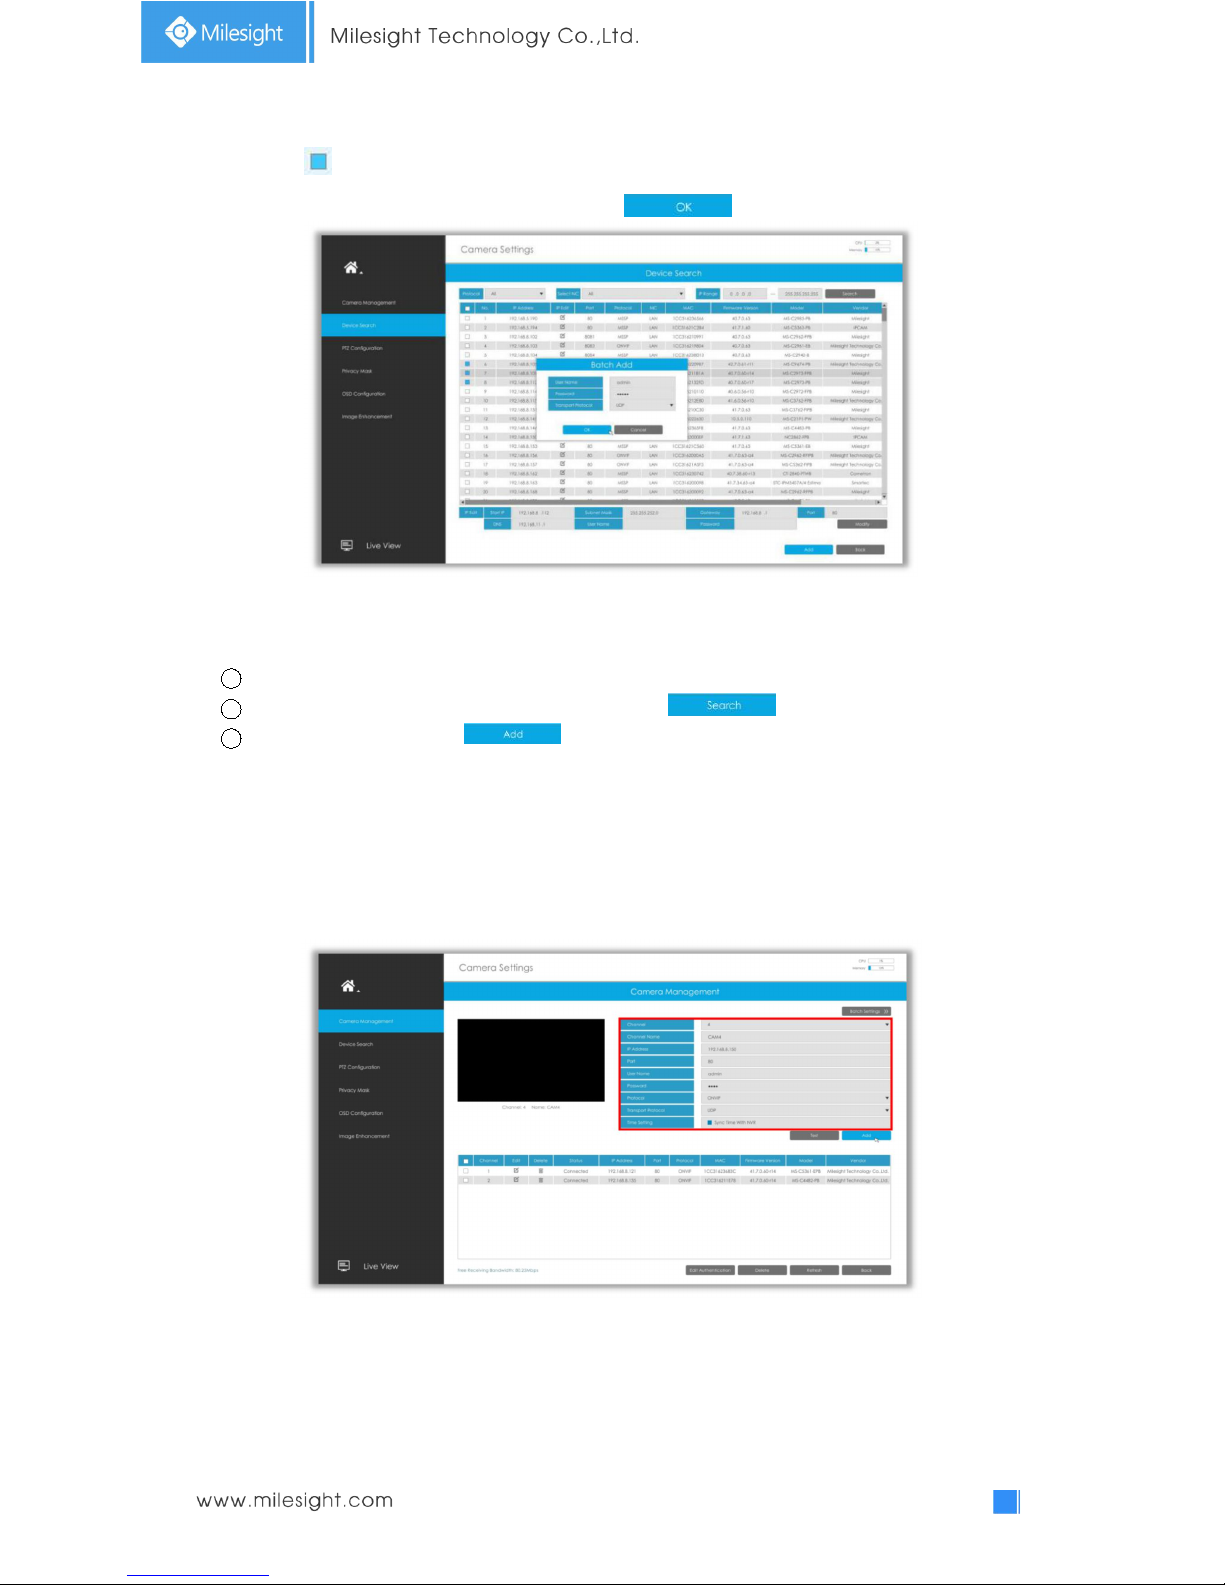
3. Check to batch adding the network cameras if they are with the same password, you can
choose TCP or UDP transport protocol for it. Click to finish batch adding.
Note:
The steps for adding the third party PoE cameras plugged into Milesight PoE NVR:
1 Set camera’s IP segment to the same as NVR PoE NIC before plugging to PoE NVR;
2
Select PoE for NIC in Device Search interface, click to search out cameras;
3
Select cameras and click to add them.
Method2. Add camera through camera management interface. ‘Settings‘
‘Camera’
‘Camera Management’.
Select channel ID, input complete information, then click [Add] button.
There are three protocols available for camera connection:
ONVIF: You can add any ONVIF IP cameras with ONVIF protocols.
RTSP: You can add any IP cameras with RTSP protocol streams (Port: 554). It needs you to
input complete resource path of the IP camera to add it. Take Milesight device for example,
the resource path of main stream is “rtsp://IP:port/main” and secondary stream is
“rtsp://IP:port/sub”.
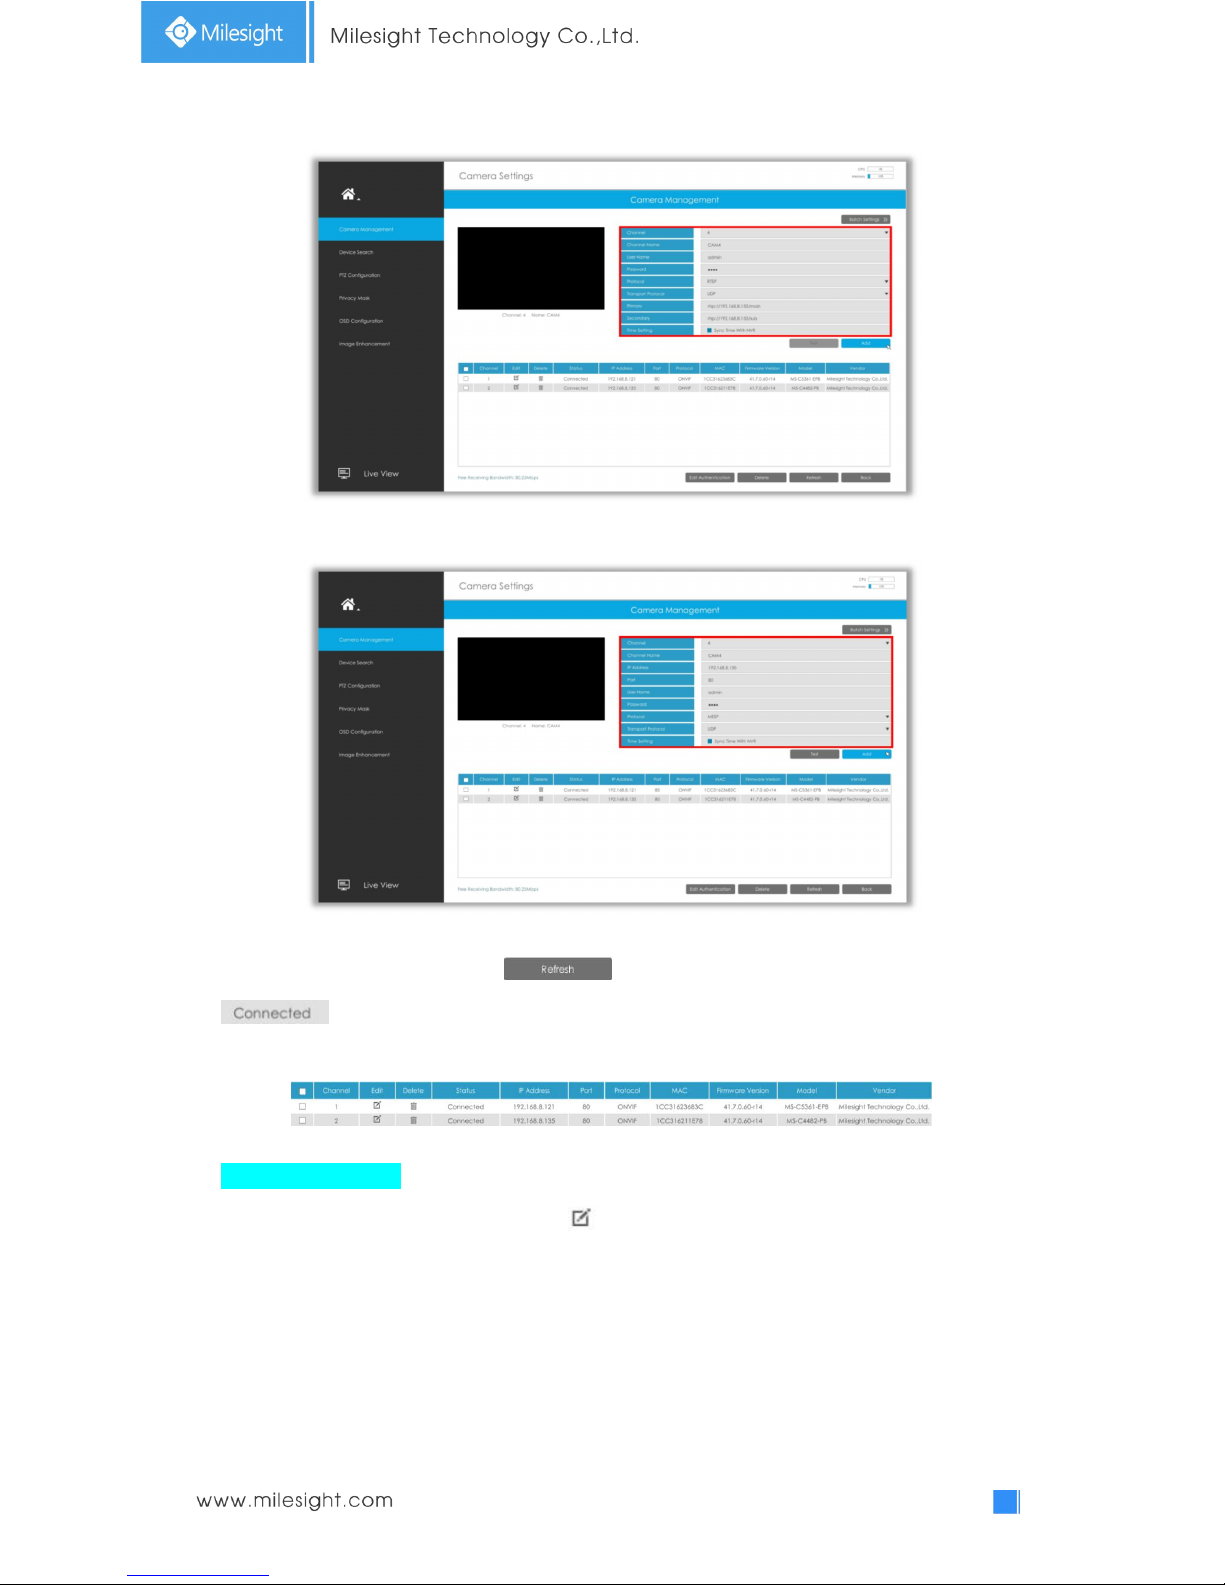
30
MSSP: You can add Milesight cameras which are in the same LAN with MSSP protocol.
Step2. Check the connection status.
After adding the IP channels, click button on Camera Management interface, then
appears under Status. If it doesn’t appear, you need to check if the network is
connected or whether the user name or password is correct or not.
Step3. Configure camera.
Configure one camera
After successfully adding the camera, click to re-edit the channel info.
 Loading...