

Page 1
Version: V3.01
Page 2

User Manual
1
About this Document
This Manual explains how to use and manage Milesight network cameras on your network.
Previous experience of networking will be of use when using the products. This manual applies to
the following camera models, except where otherwise indicated.
Type
Megapixel
Model
Day/Night Box Camera
1.3MP
MS-C2651-P(MW)
MS-C2351-P(MW)
MS-C2451-P(MW)
2MP
MS-C3651-P(MW)
MS-C3351-P(MW)
3MP
MS-C3656-P(MW)
MS-C3356-P(MW)
5MP
MS-C3658-P(MW)
IR Bullet Camera
1.3MP
MS-C2661-(PM)
MS-C2662-(PM)
MS-C2361-(PM)
MS-C2362-(PM)
2MP
MS-C3661-(PM)
MS-C3662-(PM)
MS-C3361-(PM)
MS-C3362-(PM)
3MP
MS-C3366(PM)
Dome Camera
1.3MP
MS-C2671-P(M)
MS-C2973-P(M)
MS-C2471-P(M)
MS-C2672-P(M)
MS-C2372-P(M)
2MP
MS-C3671-P(M)
MS-C3273-P(M)
MS-C3672-P(M)
MS-C3372-P(M)
3MP
MS-C3676-P(M)
MS-C3376-P(M)
5MP
MS-C3678-P(M)
Please read this manual carefully before operation and retain it for future reference.
Copyright Statement
Page 3

User Manual
2
This manual may not be reproduced in any form or by any means to create any derivative such
as translation, transformation, or adaptation without the prior written permission of Milesight
Technology Co., Ltd (Hereinafter referred to as Milesight).
Milesight reserves the right to change this manual and the specifications without prior notice.
The latest specifications and user documentation for all Milesight products are available on our
official website www.milesight.com
Warnings Serious injury or death may be caused if any of these warnings are neglected.
Cautions Injury or equipment damage may be caused if any of these cautions are neglected.
Warnings Please follow these safeguards to
prevent injury or death.
Cautions Please follow these precautions to
prevent potential injury or material damage.
Warning
This installation must be conducted by a qualified service person and should strictly
comply with the electrical safety regulations of the local region
To avoid risk of fire and electric shock, do keep the product away from rain and moisture
Do not touch components such as heat sinks, power regulators, and processors, which
may be hot
Source with DC 12V or PoE
Please make sure the plug is firmly inserted into the power socket
When the product is installed on a wall or ceiling, the device should be firmly fixed
If the product does not work properly, please contact your dealer. Never attempt to
disassemble the camera yourself
Cautions
Make sure that the power supply voltage is correct before using the camera
Do not store or install the device in extremely hot or cold temperatures, dusty or damp
locations, and do not expose it to high electromagnetic radiation
Only use components and parts recommended by manufacturer
Do not drop the camera or subject it to physical shock
To prevent heat accumulation, do not block air circulation around the camera
Laser beams may damage image sensors. The surface of image sensors should not be
exposed to laser beam where a laser beam equipment is used
Use a blower to remove dust from the lens cover
Use a soft, dry cloth to clean the surface of the camera. Stubborn stains can be removed
using a soft cloth dampened with a small quantity of detergent solution, then wipe dry
Do not use volatile solvents such as alcohol, benzene or thinners as they may damage the
Page 4

User Manual
3
surface finishes
Save the package to ensure availability of shipping containers for future transportation
Environmental Protection
Please recycle this device in a responsible manner. Refer to local environmental regulations for
proper recycling. Do not dispose of devices in unsorted municipal waste.
Page 5

User Manual
4
Table of Contents
Chapter I Product Description ......................................................................................................... 6
1.1 Product Overview ............................................................................................................... 6
1.2 Key Features ....................................................................................................................... 6
1.3 Hardware Overview ............................................................................................................ 7
1.4 Hardware Installation ....................................................................................................... 10
1.5 System Requirment .......................................................................................................... 14
Chapter II Network Connection ..................................................................................................... 15
2.1 Setting the camera over the LAN ...................................................................................... 15
2.1.1 Connect the camera to the PC directly .................................................................... 15
2.1.2 Connect via a Switch or a Router ............................................................................. 15
2.2 Setting the camera over the WAN ..................................................................................... 16
2.2.1 Static IP Connection ................................................................................................ 16
2.2.2 Dynamic IP Connection ........................................................................................... 16
Chapter III Accessing the Network Camera .................................................................................... 18
3.1 Assigning An IP Address .................................................................................................... 18
3.1.1 Assigning An IP Address Using IPCTools ................................................................... 18
3.1.2 Assign An IP Address Manually ................................................................................ 22
3.2 Accessing from the Web Browser ..................................................................................... 24
3.2.1 Access over IE Browser ............................................................................................ 25
3.2.2 Access over Firefox browser .................................................................................... 28
3.3 Accessing from MilesightVMS (Video Management Software) .......................................... 30
Chapter IV System Operation Guide .............................................................................................. 31
4.1 Live Video ......................................................................................................................... 31
4.2 Basic Settings .................................................................................................................... 32
4.2.1 Video ...................................................................................................................... 32
4.2.2 Image ...................................................................................................................... 34
4.2.3 Audio ...................................................................................................................... 36
4.2.4 Network .................................................................................................................. 36
4.2.5 Wi-Fi* ..................................................................................................................... 37
4.2.6 Date &Time ............................................................................................................. 38
4.3 Advanced Settings ............................................................................................................ 38
4.3.1 DDNS ...................................................................................................................... 38
4.3.2 SMTP ...................................................................................................................... 39
4.3.3 FTP .......................................................................................................................... 40
4.3.4 Alarm ...................................................................................................................... 40
4.3.5 Privacy Masking ...................................................................................................... 41
4.3.6 SD Card ................................................................................................................... 42
4.3.7 PTZ .......................................................................................................................... 43
4.3.8 User ........................................................................................................................ 43
4.3.9 Access List ............................................................................................................... 44
4.3.10 Logs ...................................................................................................................... 45
Page 6

User Manual
5
4.4 System .............................................................................................................................. 45
4.5 Maintenance .................................................................................................................... 46
Chapter V Services ........................................................................................................................ 48
Page 7

User Manual
6
Chapter I Product Description
1.1 Product Overview
Milesight provides a consistent range of cost-effective and reliable network cameras to fully
meet your requirements. Based on embedded LINUX operating system, Milesight network
cameras could be easily accessed and managed either locally or remotely with great reliability.
With the TI DaVinci processor and built-in high-performance DSP video processing modules, the
cameras pride on low power consumption and high stability. They support state-of-the-art H.264
video compression algorithm and industry-leading HD dual-stream technology to achieve the
highest level of video image quality under the limited network resources. It is fully functional,
supporting for flexible and comprehensive alarm linkage mechanism, day and night auto switch,
smart PTZ control and privacy masking, etc.
In practical applications, Milesight network camera could either work independently in the local,
or be networked to form a powerful safety monitoring system. It is widely used in fields such as
finance, education, industrial, civil defense, health care for security’s sake.
1.2 Key Features
Based on LINUX OS with high reliability
H.264/MPEG-4/MJPEG video compression capability
G.711 u-law audio compression capability
Support ONVIF, PSIA protocol
Dual-stream
Power over Ethernet
Audio input/output, alarm input/output (built-in for box cameras, optional for bullet and
dome cameras)
IR cut filter with auto switch, true day/night
Built-in WEB server, support IE browser(compatible with Firefox too)
Real-time video electronic amplification
Three-privilege levels of users for flexible management
SD/SDHC card local storage support, expand the edge storage (applicable for box and
Dome cameras)
Local PAL/NTSC signal output
Standard RS485 interface, multiple PTZ control protocol
Motion detection, privacy masking, network fault detection and image snapping
UPNP protocol for the easy management of IPC
True Wide Dynamic Range (Optional feature according to the model selected)
Page 8
1.3 Hardware Overview
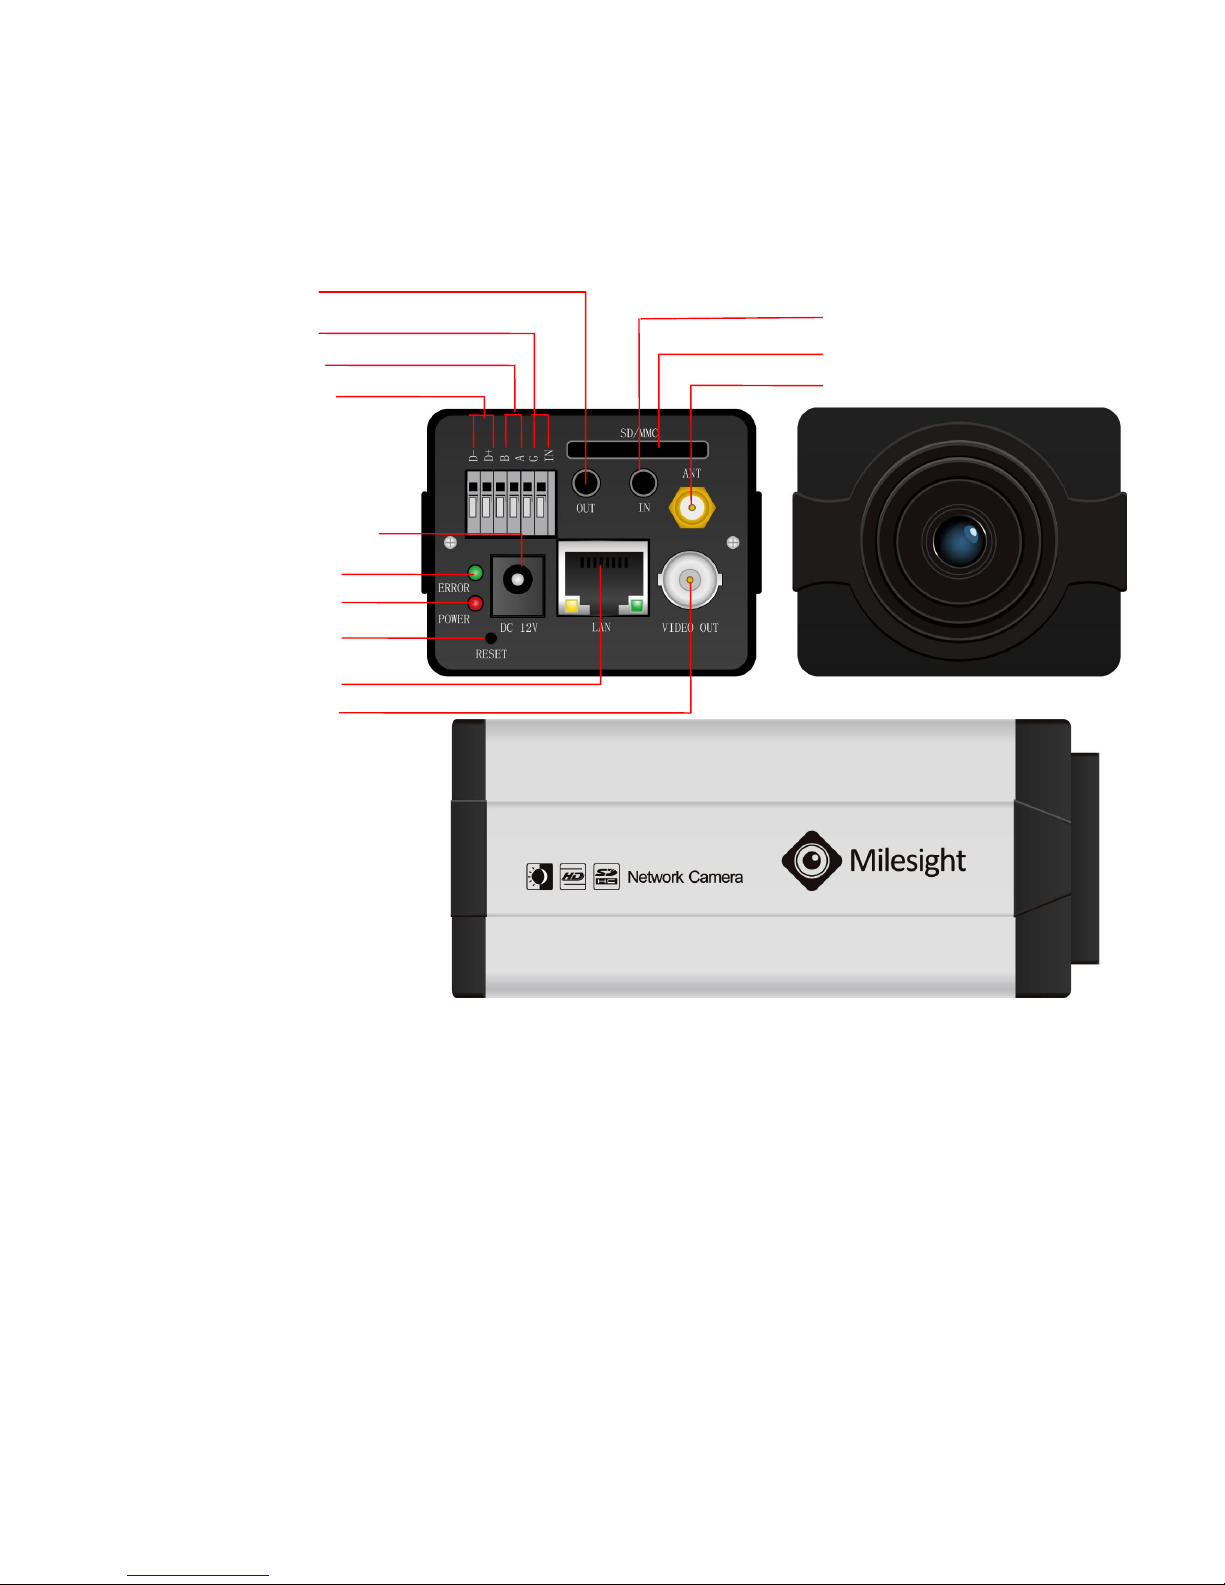
1. Box Camera
Figure1-1
*Note:
1) Error LED: Error LED is on when the device starts up or runs error.
2) Reset Button: Press ‘Reset’ button for 5 seconds, the device will be restored to factory default.
3) The network camera provides a general I/O terminal block which is used to connect external
input/output devices. Please refer to the following instruction for the connection method.
*Error LED
Power LED
*Reset Button
Ethernet Port
BNC Video Out
Power Connector (DC12V)
Alarm Output
RS-485 PTZ control
Alarm Input
Antenna for WIFI (Optional)
Audio Input
SD/SDHC Card Slot
Audio Output
Page 9

User Manual
8
Figure1-2
2. Bullet Camera
Figure 1-3
IR LED
Light Sensor
LENs
Power Connector (DC 12V)
Video Output
RS-485 PTZ control
Alarm Input/Output
Ethernet Port
Audio Output
Audio Input
Page 10
User Manual
9
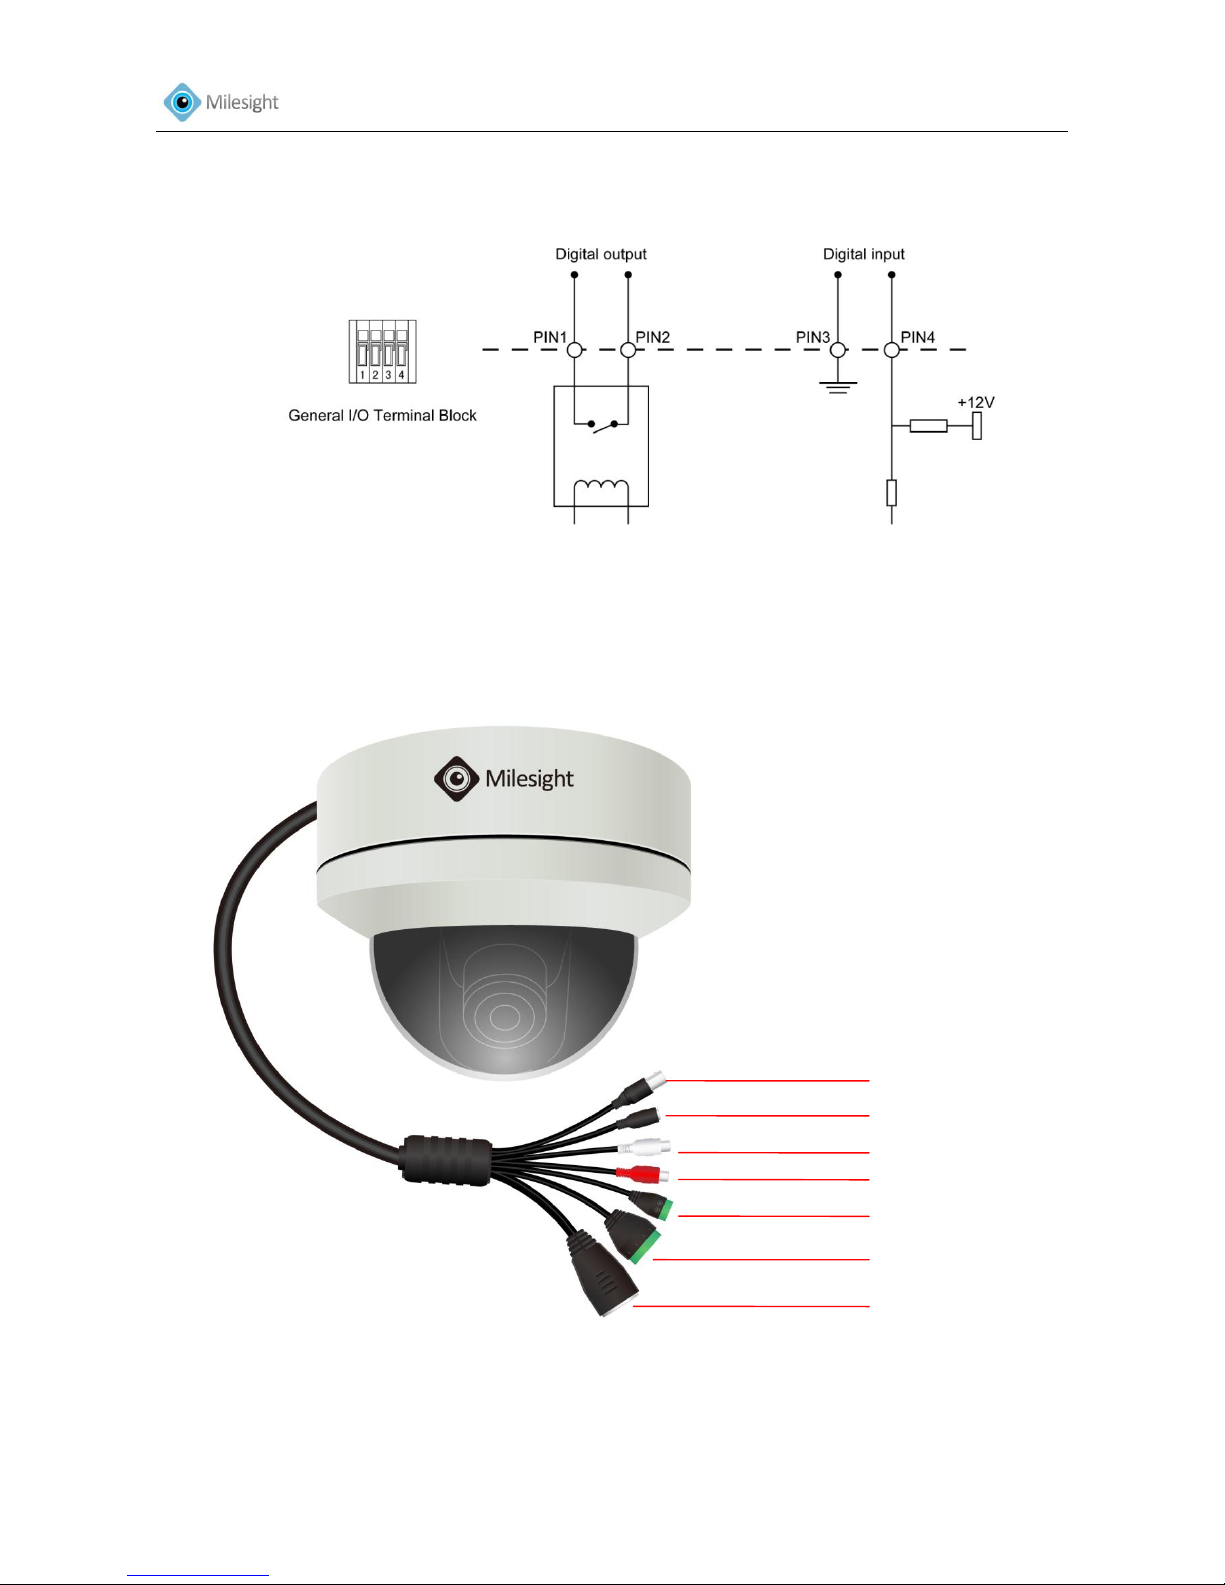
*Note:
1) The network camera provides a general I/O terminal block which is used to connect external
input/output devices. Please refer to the following instruction for the connection method.
Figure 1-4
3. Dome Camera
Figure 1- 5
Video Output
Power Connector (DC 12V)
Audio Output
Audio Input
RS-485 PTZ control
Alarm Input/Output
Ethernet Port
Page 11
User Manual
10
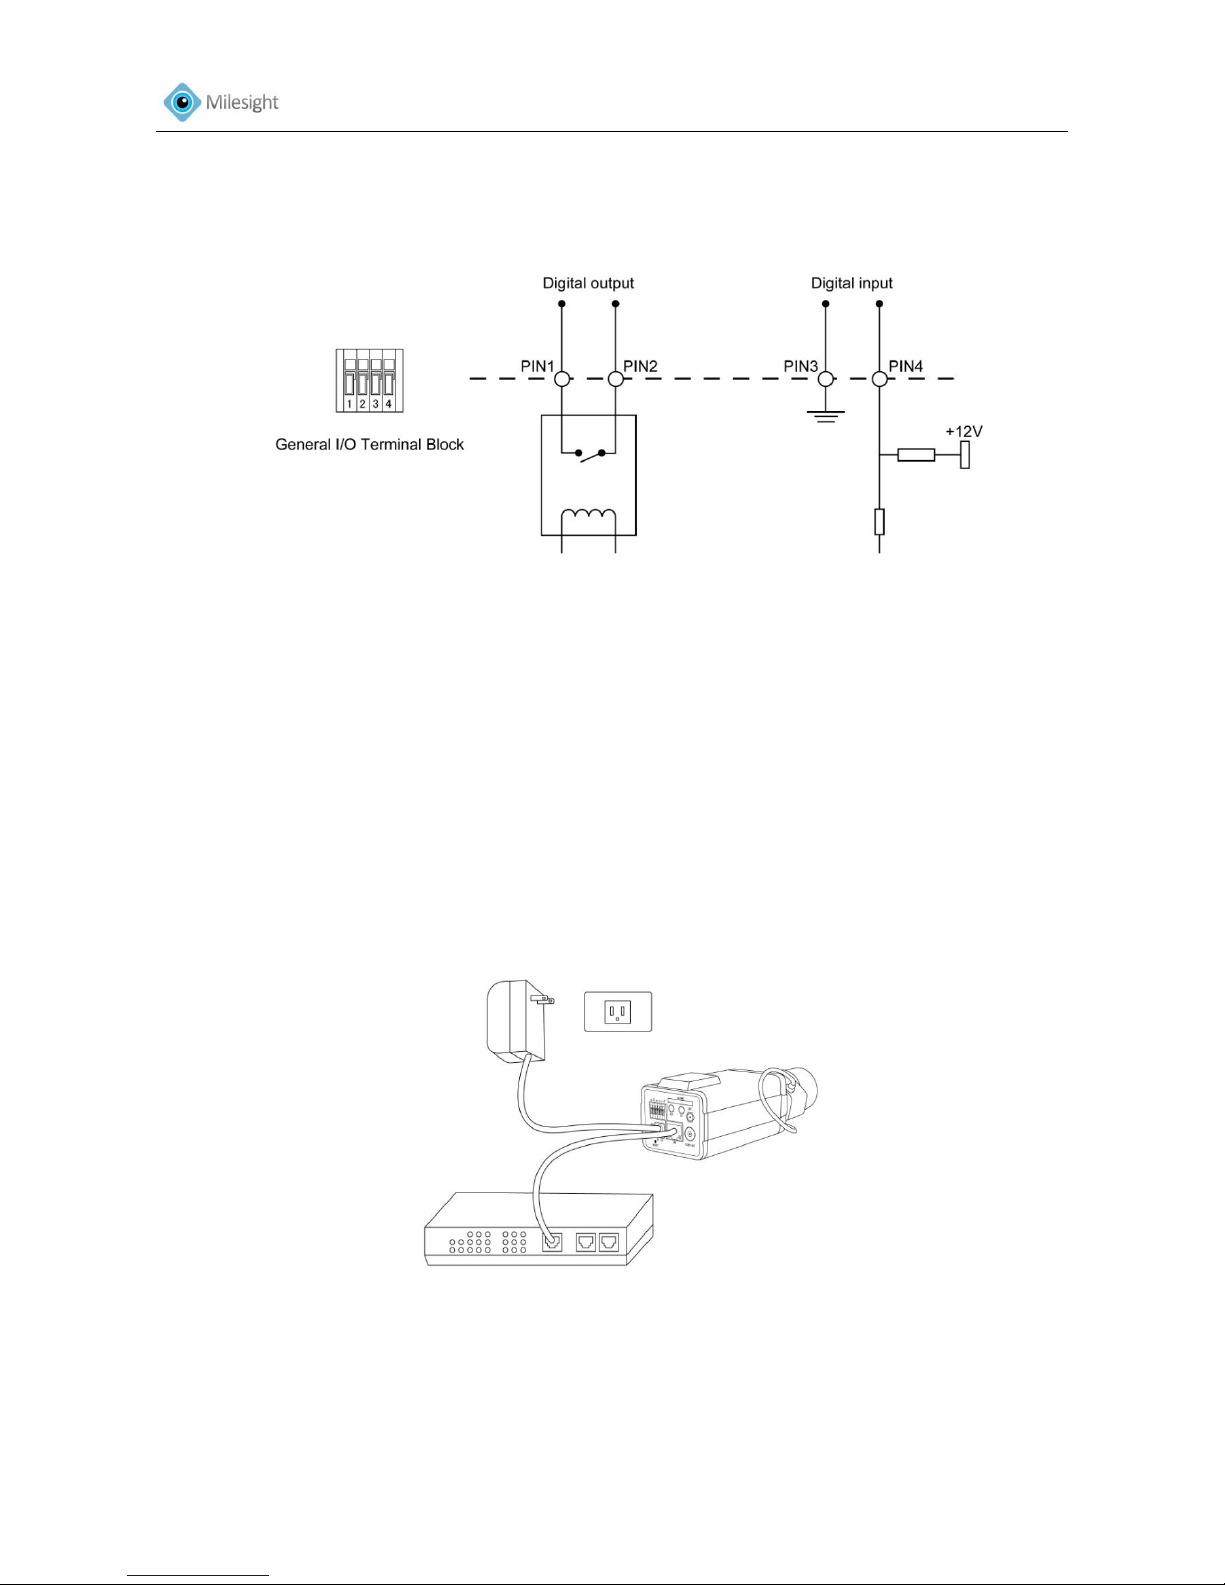
*Note:
1) The network camera provides a general I/O terminal block which is used to connect external
input/output devices. Please refer to the following instruction for the connection method.
Figure 1-6
1.4 Hardware Installation
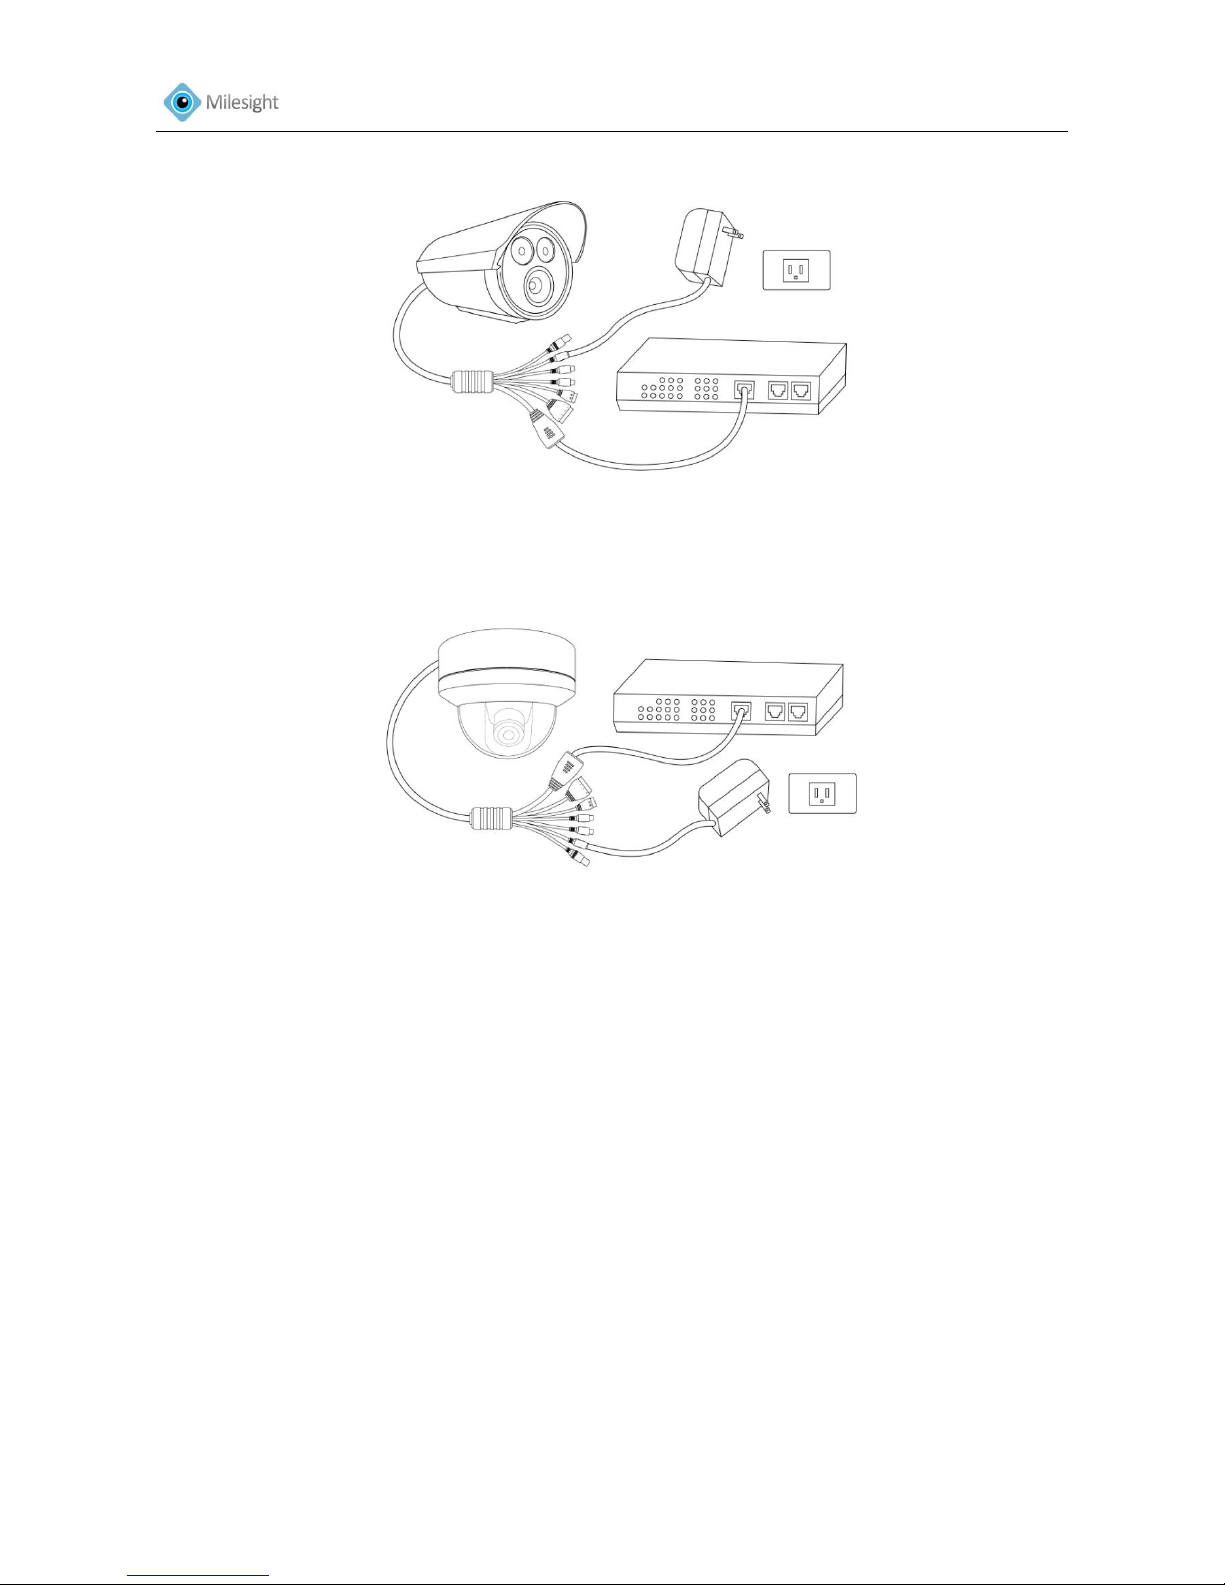
1. Connect the camera to the network and power using one of the methods listed below:
1) Basic connection (without PoE):
Step 1: connect the DC 12V end of the power adapter to the power port of the camera and
connect the other end to a wall outlet;
Step 2: connect the camera to a switch using an Ethernet cable.
Figure 1-7 Box Camera
Page 12
User Manual
11
Figure 1-8 Bullet Camera
Figure 1-9 Dome Camera
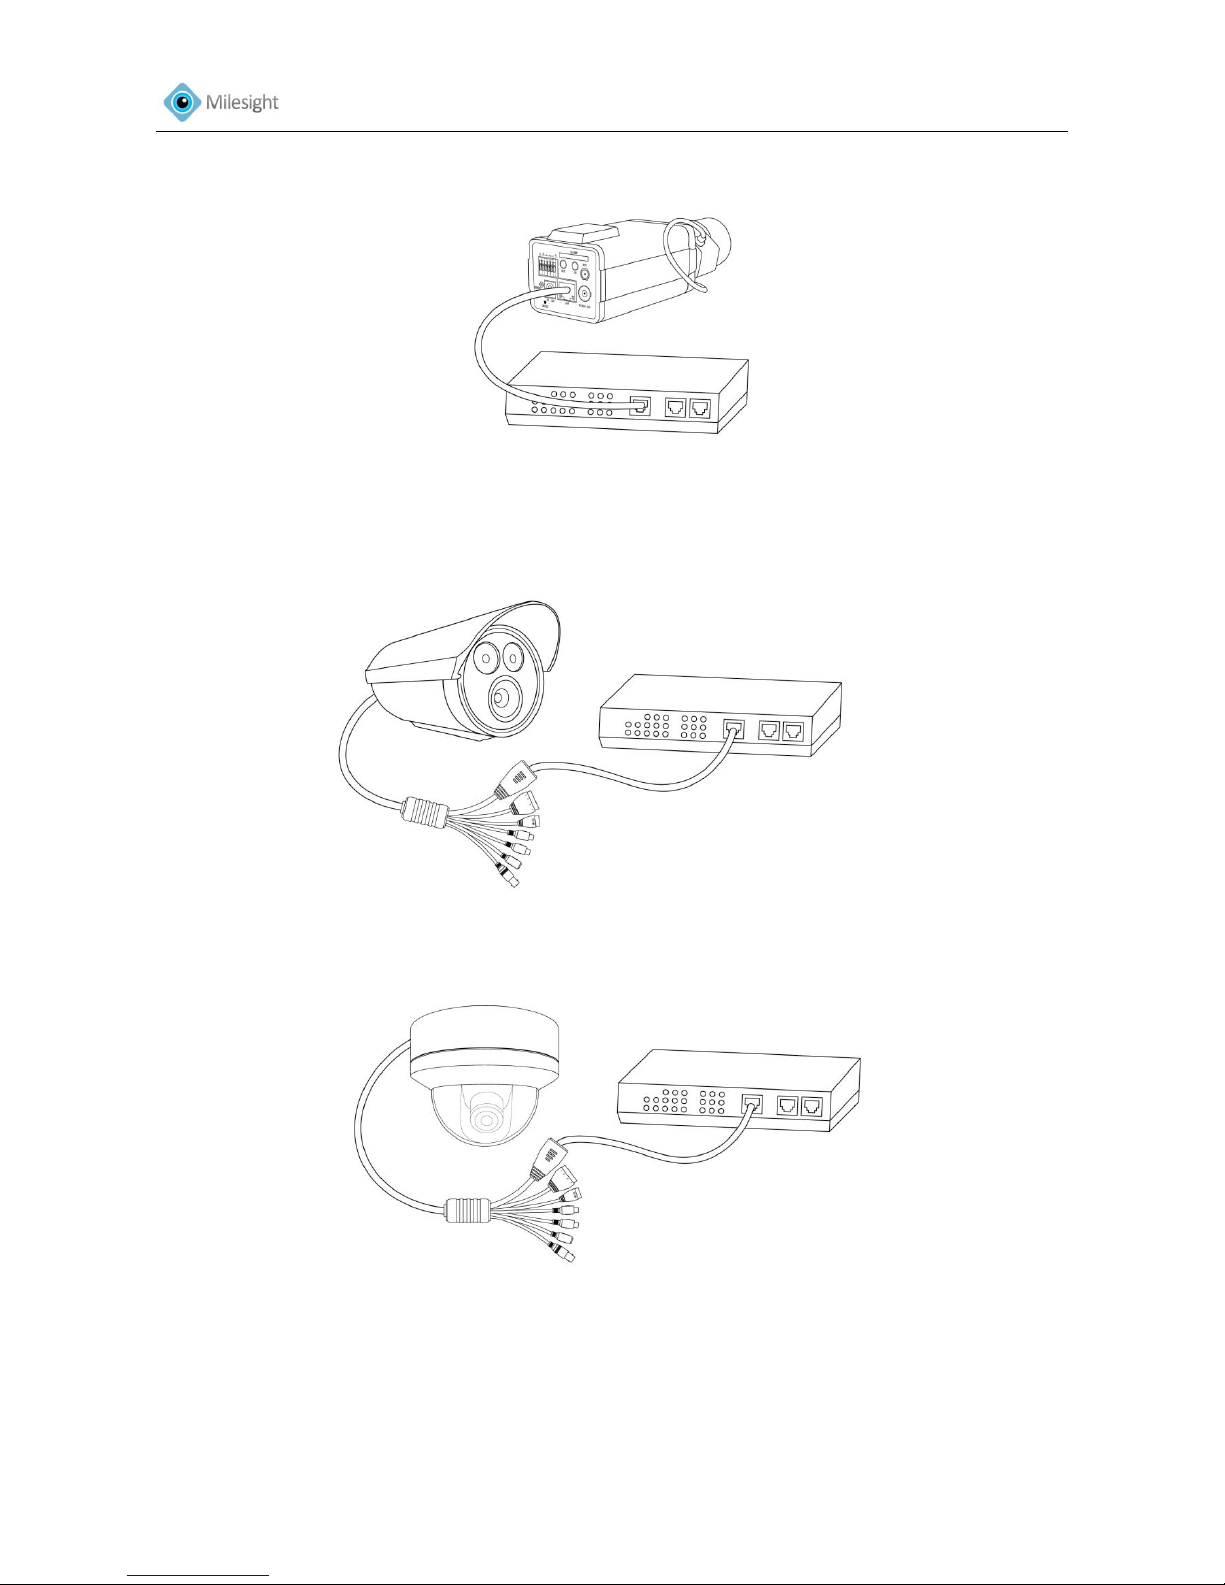
2) Power over Ethernet (PoE) connection. PoE will be automatically detected when the Ethernet
cable is connected. The camera can either be connected to a PoE-enabled switch or a non-PoE
switch.
A. Connect the camera to a PoE switch using a single Ethernet cable.
Page 13
User Manual
12
Figure 1-10 Box Camera
Figure 1-11 Bullet Camera
Figure 1-12 Dome Camera
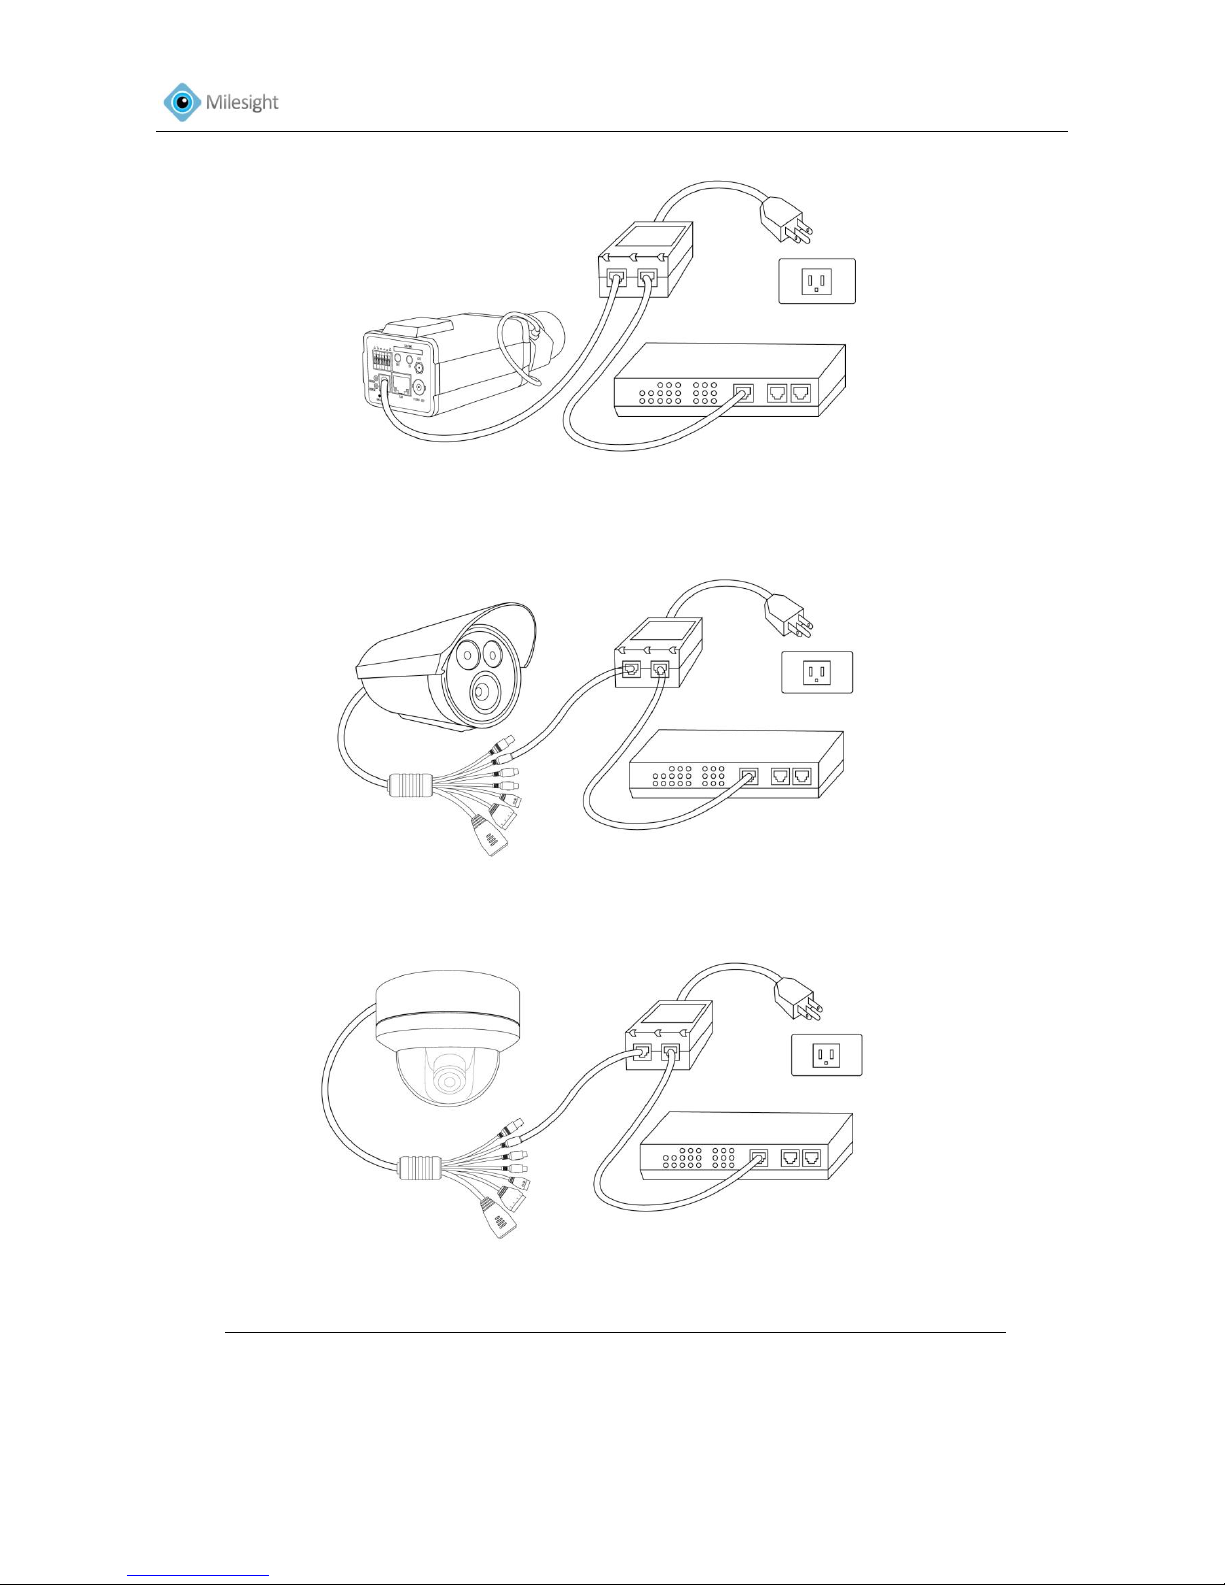
B. Connect the camera to a non-PoE switch using the PoE injector
Step 1: Connect the camera to a PoE injector using an Ethernet cable.
Step 2: Connect the PoE injector to the non-PoE switch using an Ethernet cable.
Step 3: Connect the PoE injector to a power outlet.
Page 14
User Manual
13
Figure 1-13 Box Camera
Figure 1-14 Bullet Camera
Figure 1-15 Dome Camera
The power LED will light steady red when the camera is connected to a power source
2. Optionally connect external input/output devices, such as alarm devices.
3. Optionally connect an active speaker or external microphone.
4. Optionally connect the camera to a monitor using a BNC cable.
Page 15

User Manual
14
1.5 System Requirements
OS: Windows XP/7/Vista/Server 2000/Server 2008(Please use IE browser to operate)
CPU: 1.66GHz or higher
Memory: 1G MB or higher
Graphic memory: 128MB or more
Internet protocol: TCP/IP (IPv4)
Page 16
User Manual
15
Chapter II Network Connection
There are several methods to connect the camera to the network.
2.1 Setting the camera over the LAN
Connecting the camera to a switch or a router is the most common connection method. The
camera must be assigned an IP address that is compatible with its LAN.
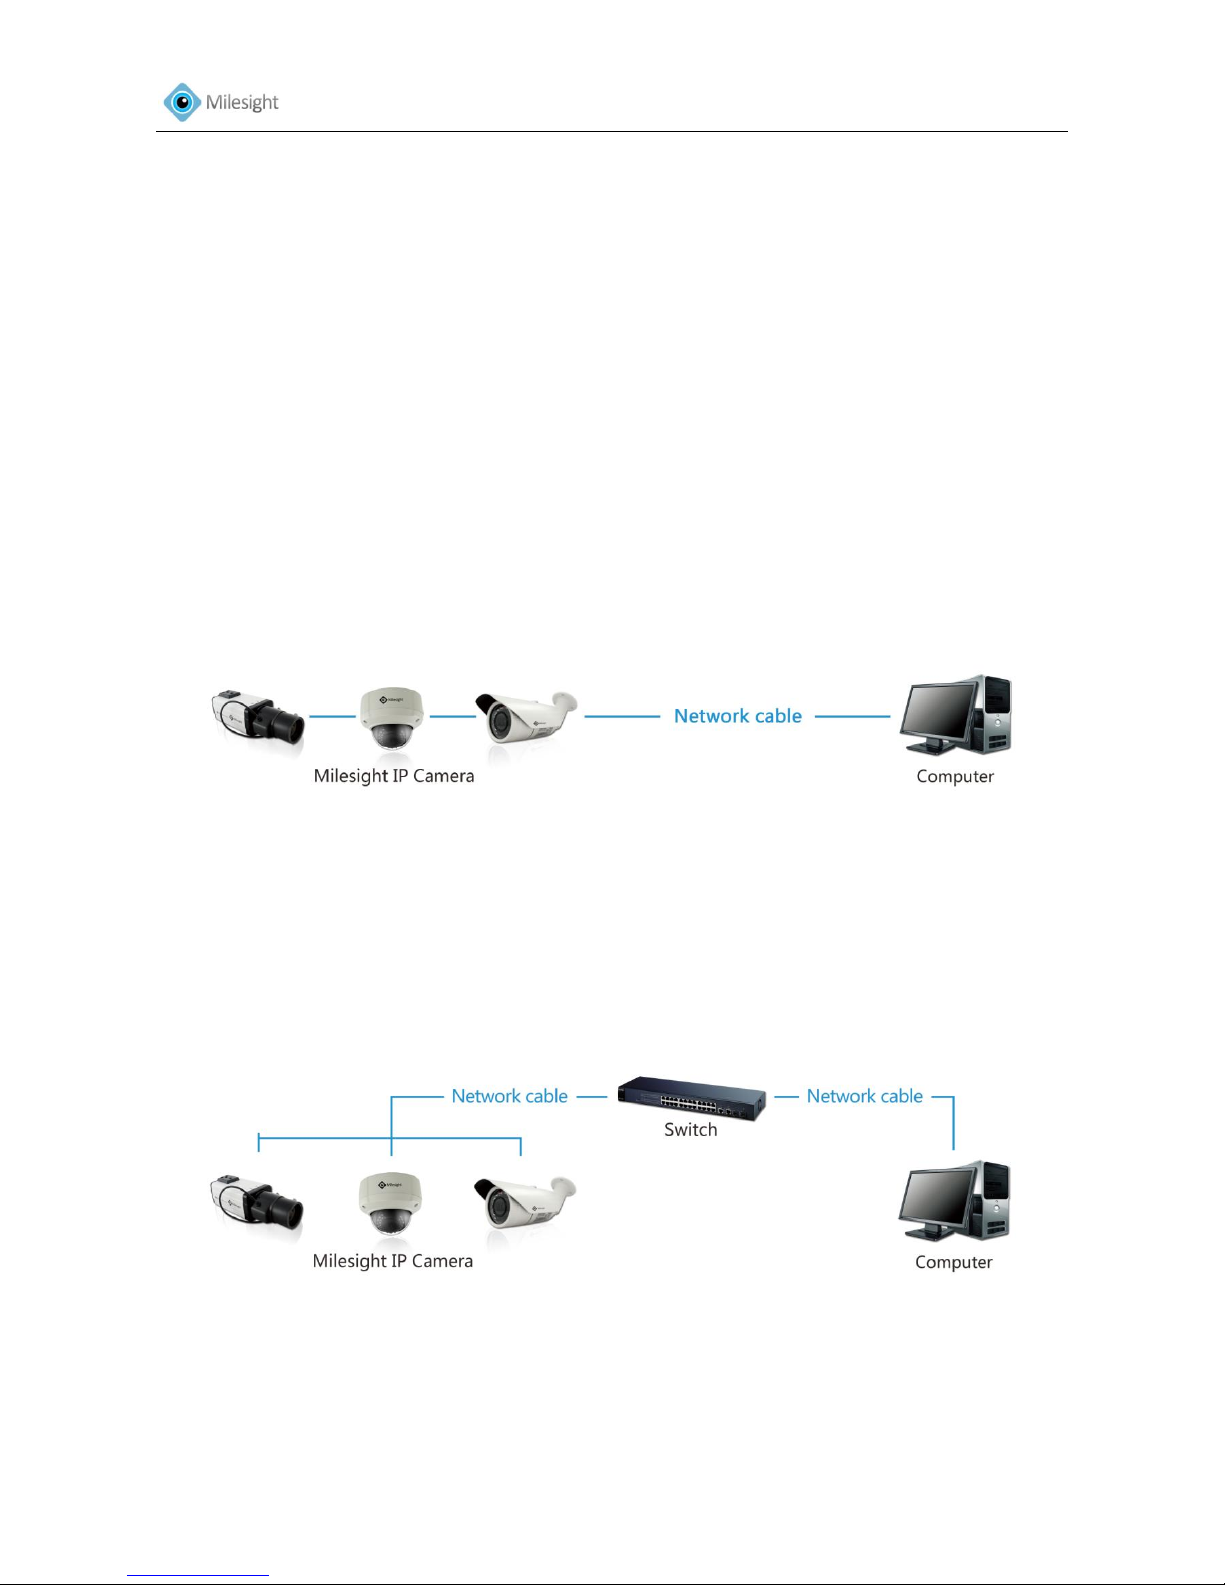
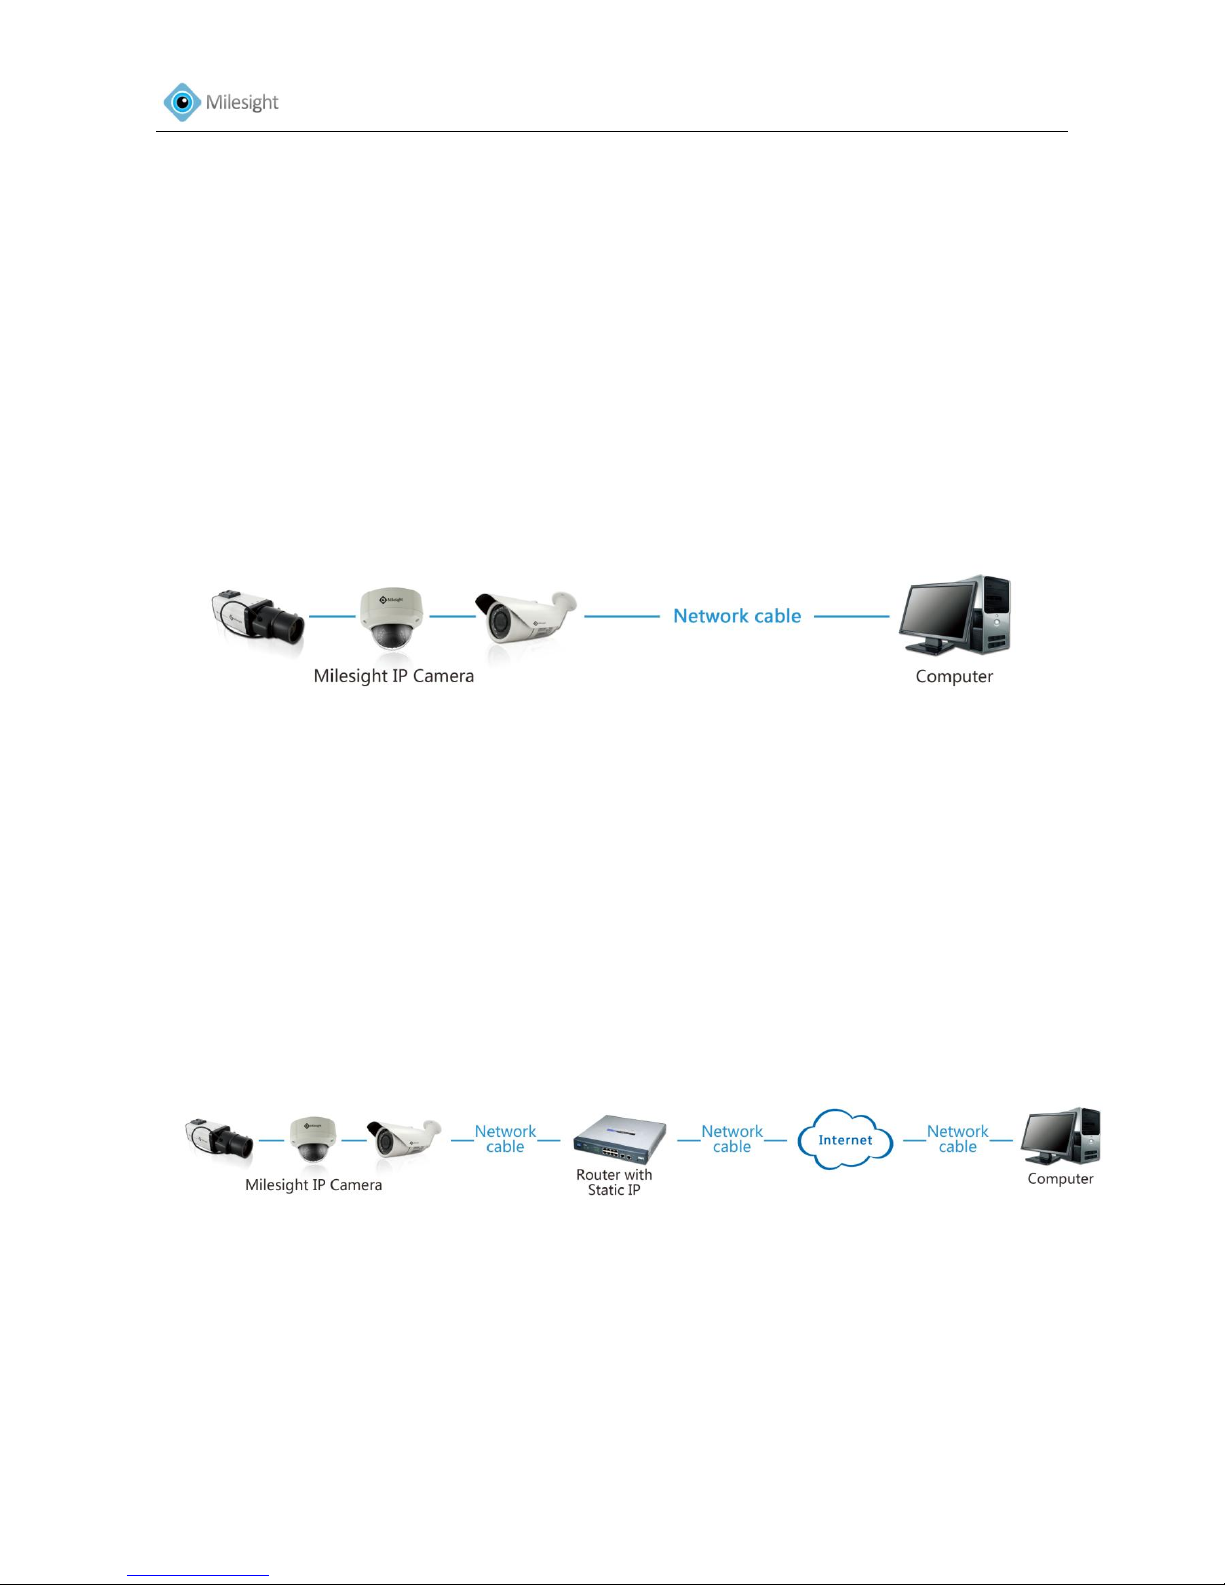
2.1.1 Connect the camera to the PC directly
In this method, only the computer connected to the camera will be able to view the camera. The
camera must be assigned a compatible IP address to the computer. Details are shown as below
figure.
Figure 2-1 Connect the camera to the PC directly
2.1.2 Connect via a Switch or a Router
Refer to the following figure to set network camera over the LAN via the switch or router.
Figure 2-2 Connect via a Switch or a Router
Page 17
User Manual
16
2.2 Setting the camera over the WAN
The camera could be connected to the WAN directly. You need to set the static or dynamic WAN IP
address assigned by the ISP (Internet Service Provider).
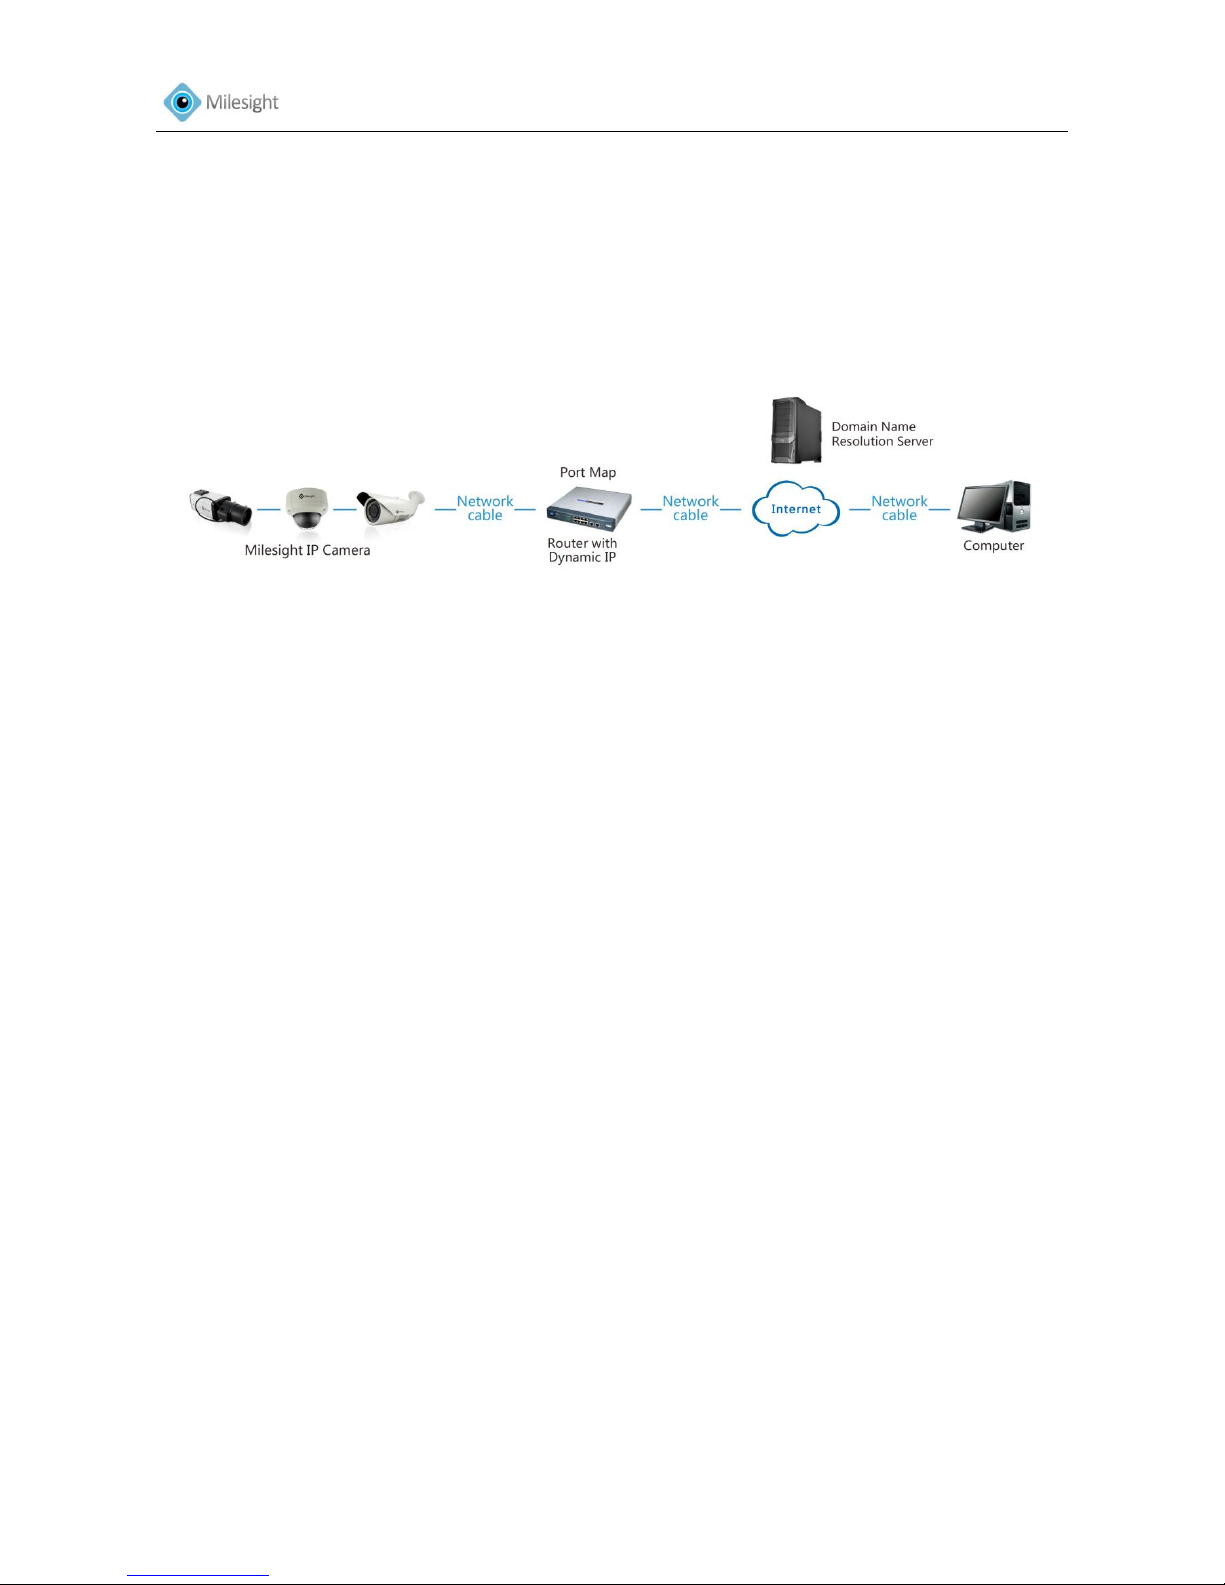
2.2.1 Static IP Connection
Connecting the network camera with static IP directly
You can also save the static IP in the camera and directly connect it to the internet without using a
router. Details as follow.
Figure 2-3 Connecting the network camera with static IP directly
Connecting the network camera via a router
Steps:
1. Connect the network camera to the router.
2. Assign a LAN IP address, the subnet mask and the gateway.
3. Save the static IP in the router.
4. Set port mapping, E.g., 80, 8000 and 554 ports. The steps for port mapping vary depending on different
routers. Please call the router manufacturer for assistance with port mapping.
5. Visit the network camera through a web browser or MilesightVMS over the internet.
Figure 2-4 Connecting the network camera via a router using static IP
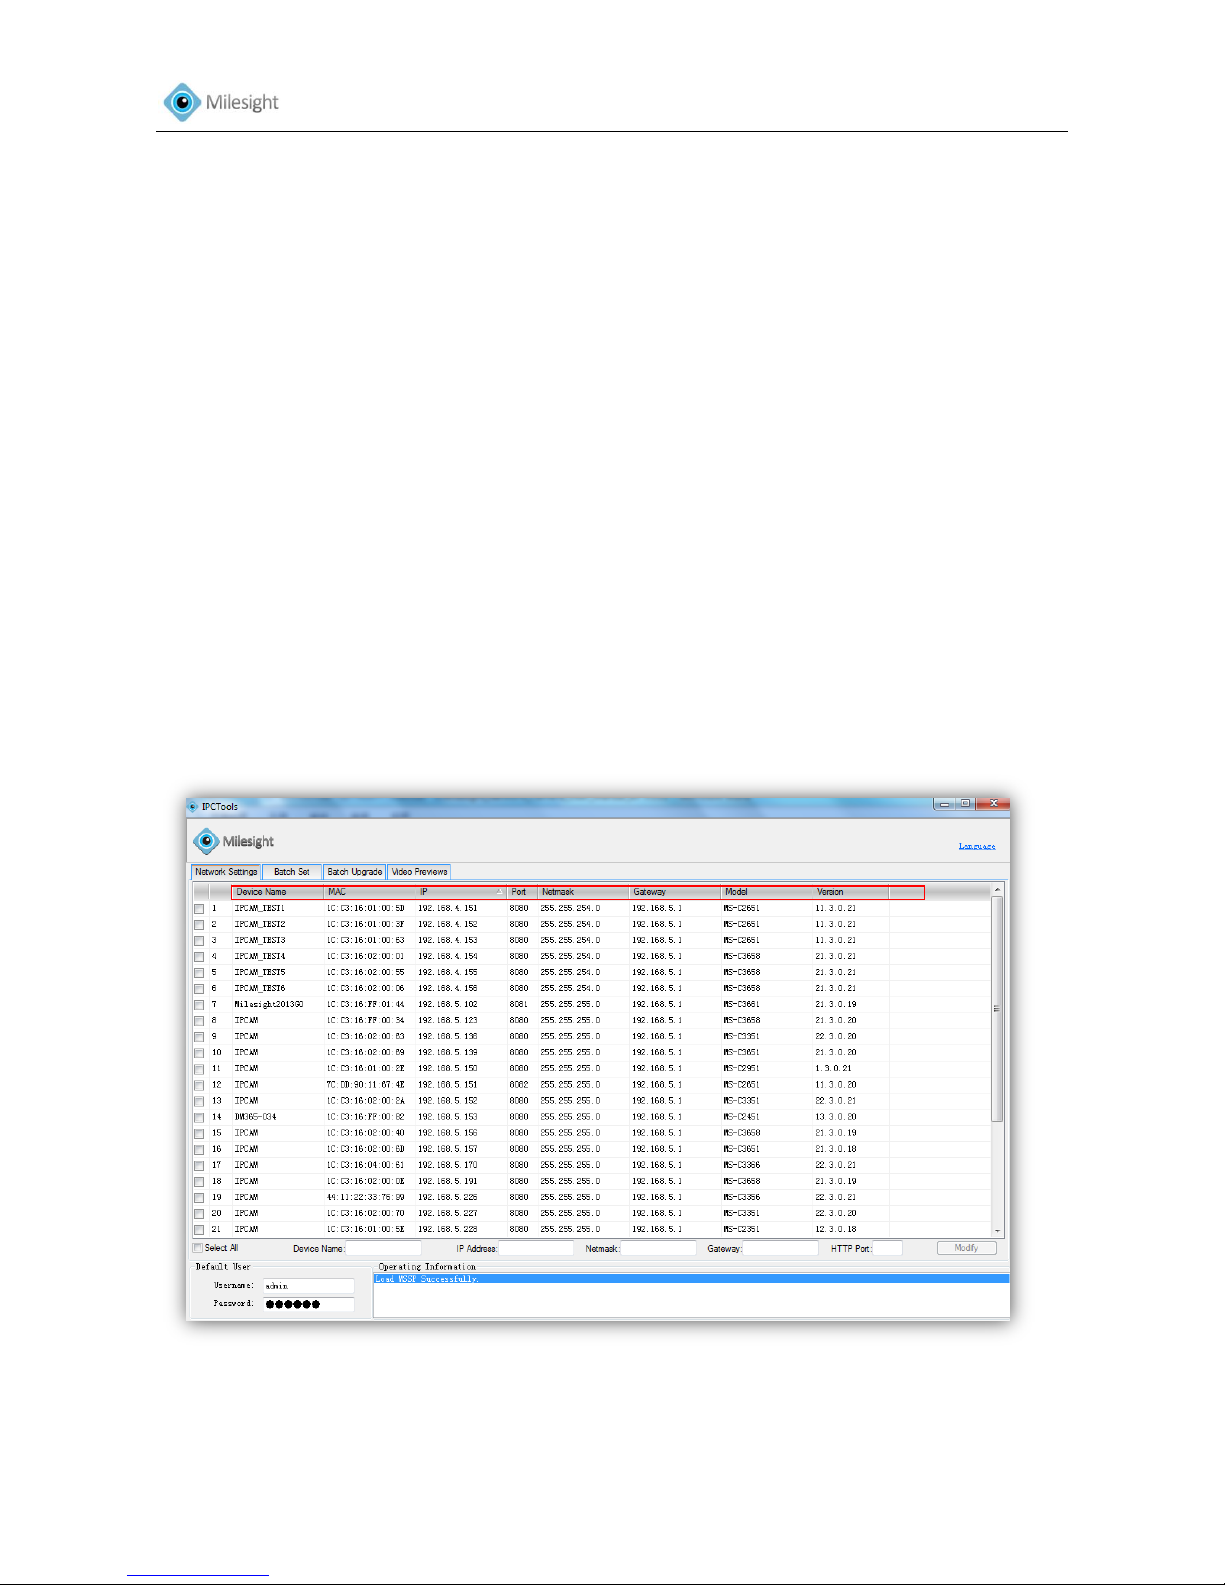
2.2.2 Dynamic IP Connection
Connecting the network camera via a router
Steps:
Page 18
User Manual
17
1. Connect the network camera to the router.
2. In the camera, assign a LAN IP address, the subnet mask and the gateway.
3. In the router, set port mapping. E.g. 80, 8000 and 554 ports. The steps for port mapping vary
depending on different routers. Please call the router manufacturer for assistance with port
mapping.
4. Apply a domain name from a domain name provider.
5. Configure the DDNS settings in the setting interface of the router.
6. Visit the camera via the domain name.
Figure 2-5 Connecting the network camera via a router using dynamic IP
Page 19
User Manual
18
Chapter III Accessing the Network Camera
3.1 Assigning An IP Address
The camera must be assigned an IP address to be accessible. The default IP address of Milesight
network camera is 192.168.5.190. The default user name is admin, and password is ms1234.
You can either change the IP address of the camera via IPCTools or manually. Please connect the
camera in the same LAN of your computer.
3.1.1 Assigning An IP Address Using IPCTools
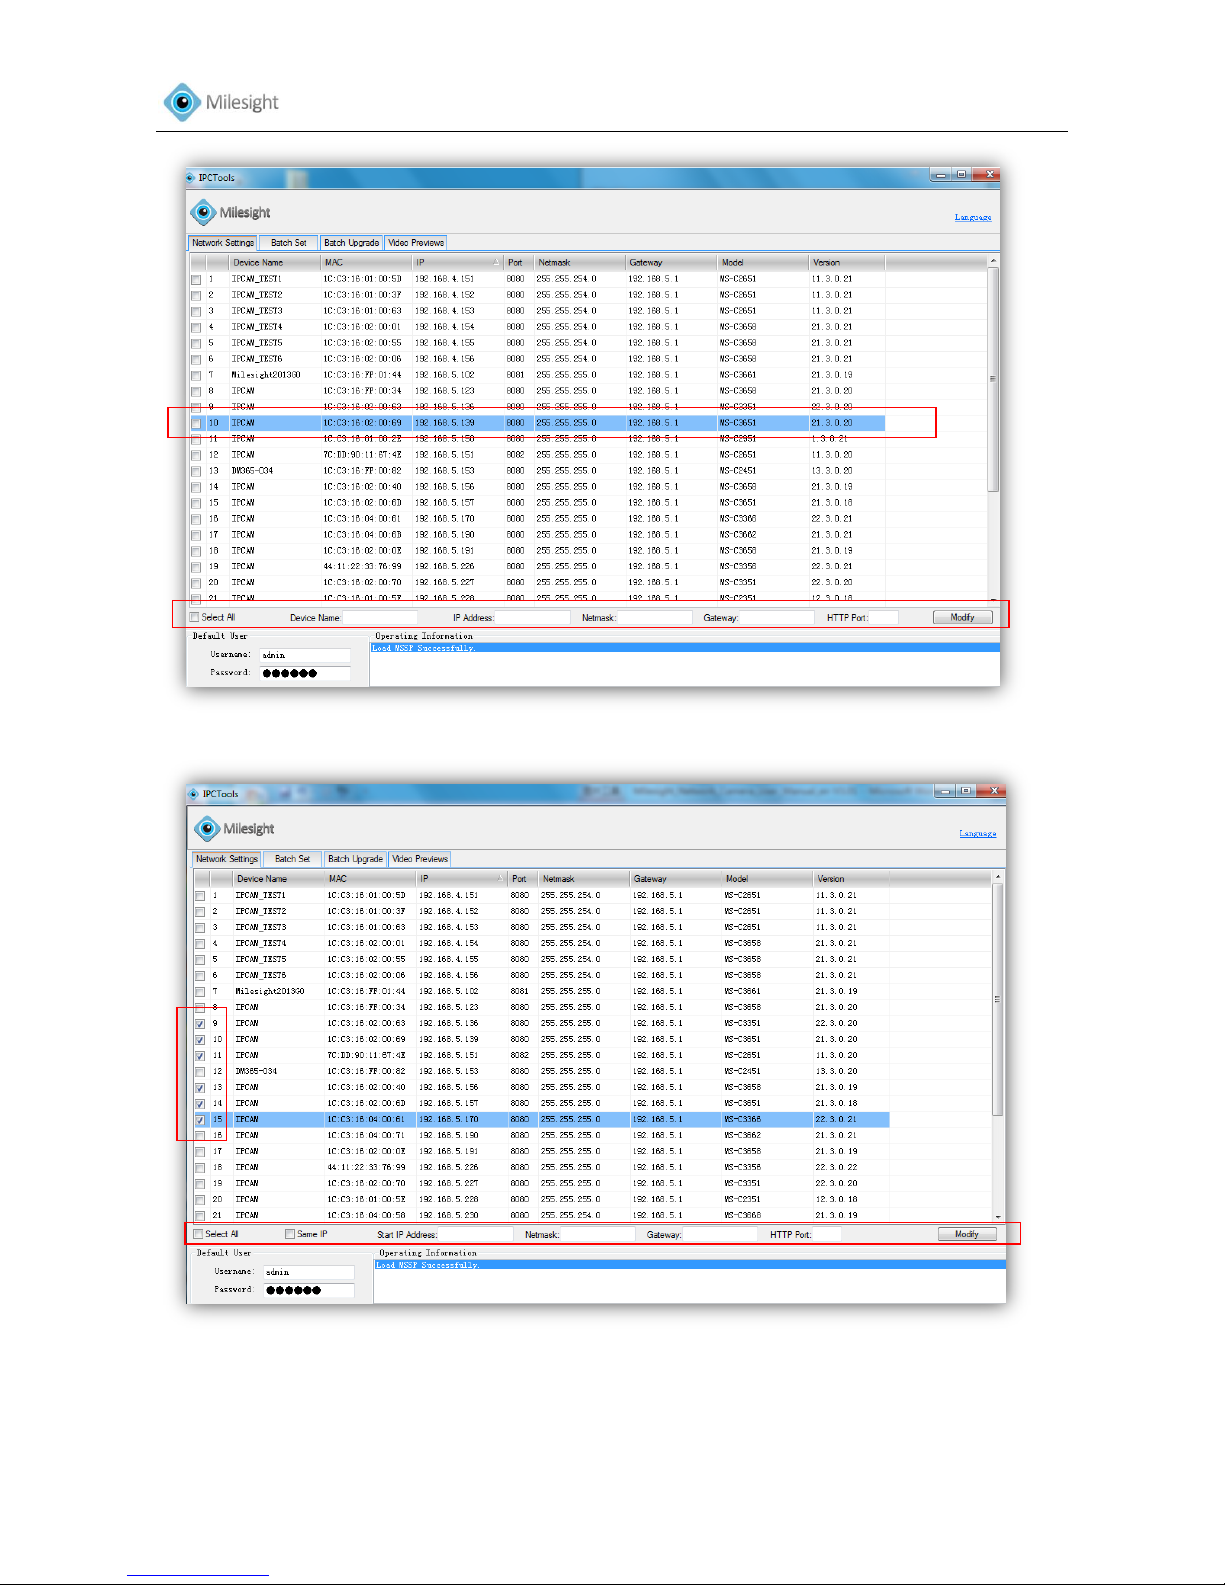
IPCTools is a software tool which can automatically detect multiple online Milesight network
cameras connected in the LAN, set IP addresses, and manage firmware upgrades. It’s
recommended when assigning IP addresses for multiple cameras.
Step 1 : Install IPCTools (The software could be downloaded from CD.)
Step 2: Start IPCTools, and the device information including IP address, MAC address, Port number,
Netmask, and Gateway of all Milesight network cameras will be displayed. Details are
shown as Figure 3-1.
Figure 3-1
Step 3: Select a camera or multiple cameras according to the MAC address.
Page 20
User Manual
19
Figure 3-2 Select single camera
Figure 3-3 Select multiple cameras
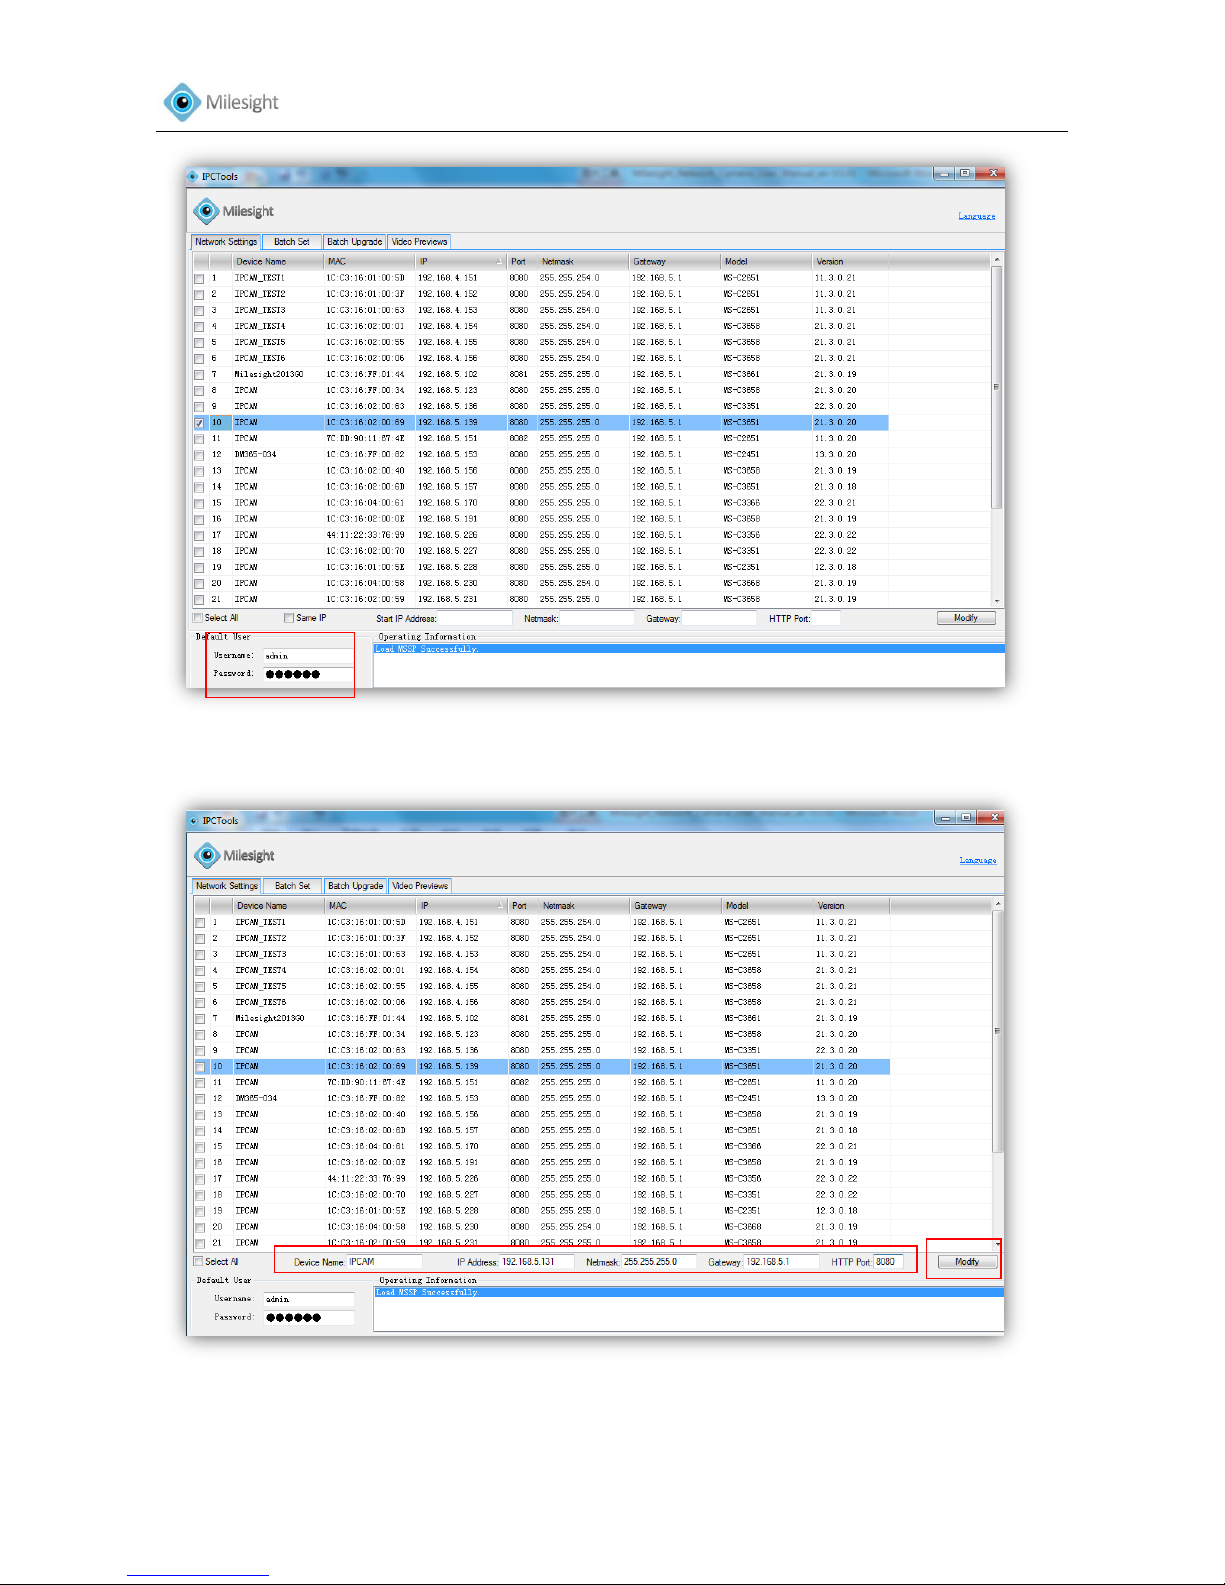
Step 4: Type the User Name and Password (if they are not default value.)
Page 21
User Manual
20
Figure 3-4
Step 5: Change the IP address or other network values, and then click “Modify” button.
Figure 3-5
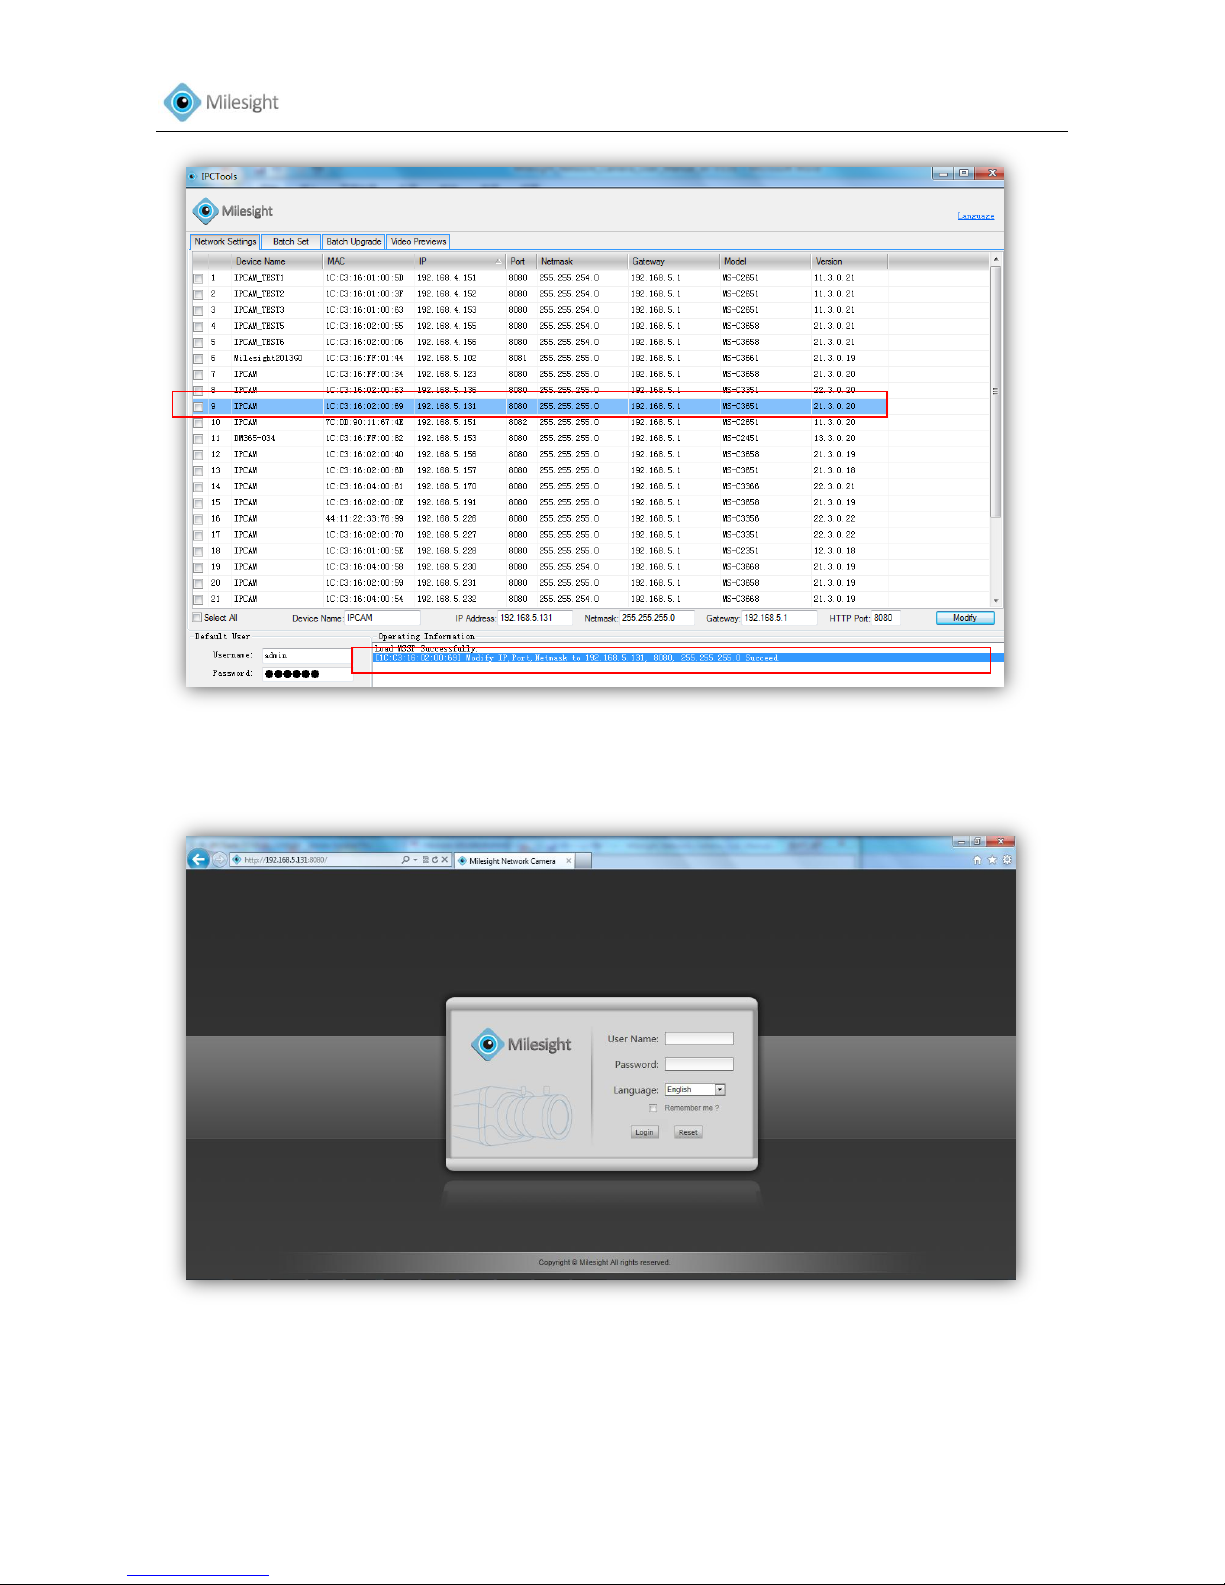
Step 6: Change the IP address successfully.
Page 22
User Manual
21
Figure 3-6
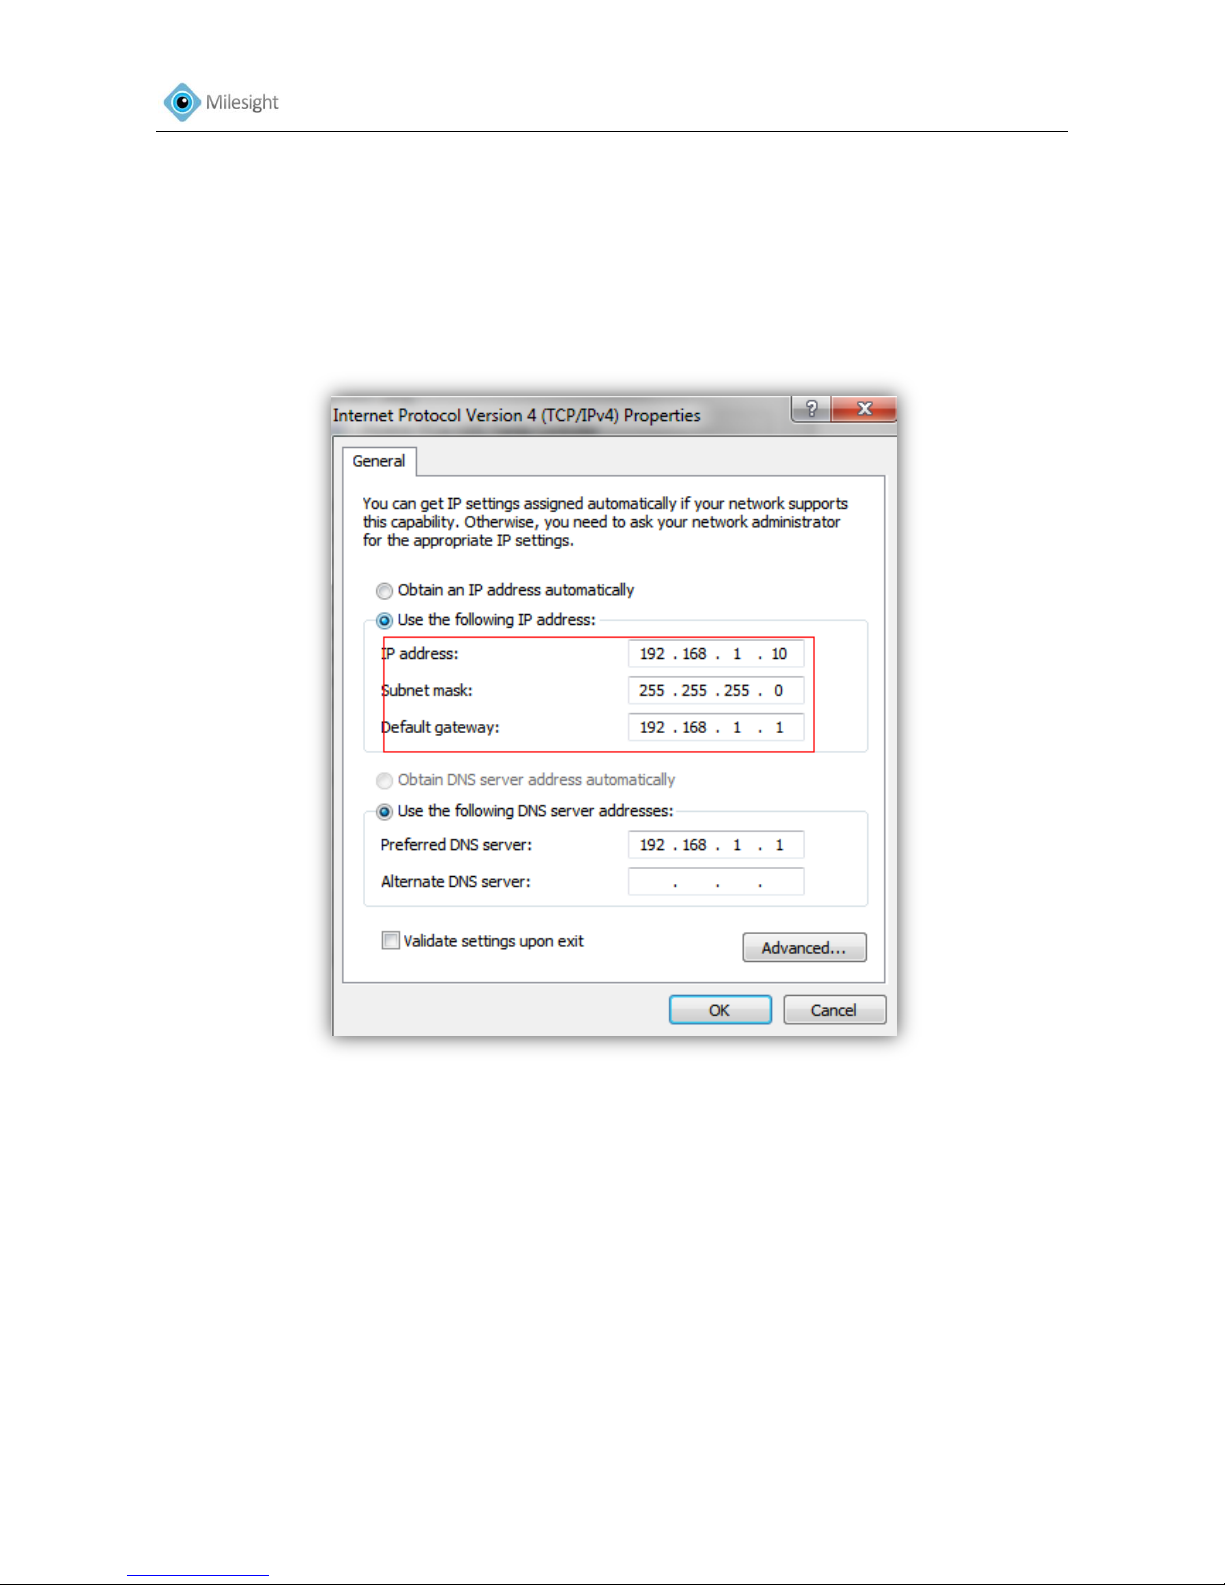
Step 7: By double clicking the selected camera, you can access the camera via web browser directly.
The Internet Explorer window will pop up.
Figure 3-7
Page 23
User Manual
22
3.1.2 Assign An IP Address Manually
If the network segments of the computer and that of the camera are different, please follow the
steps to change the IP address:
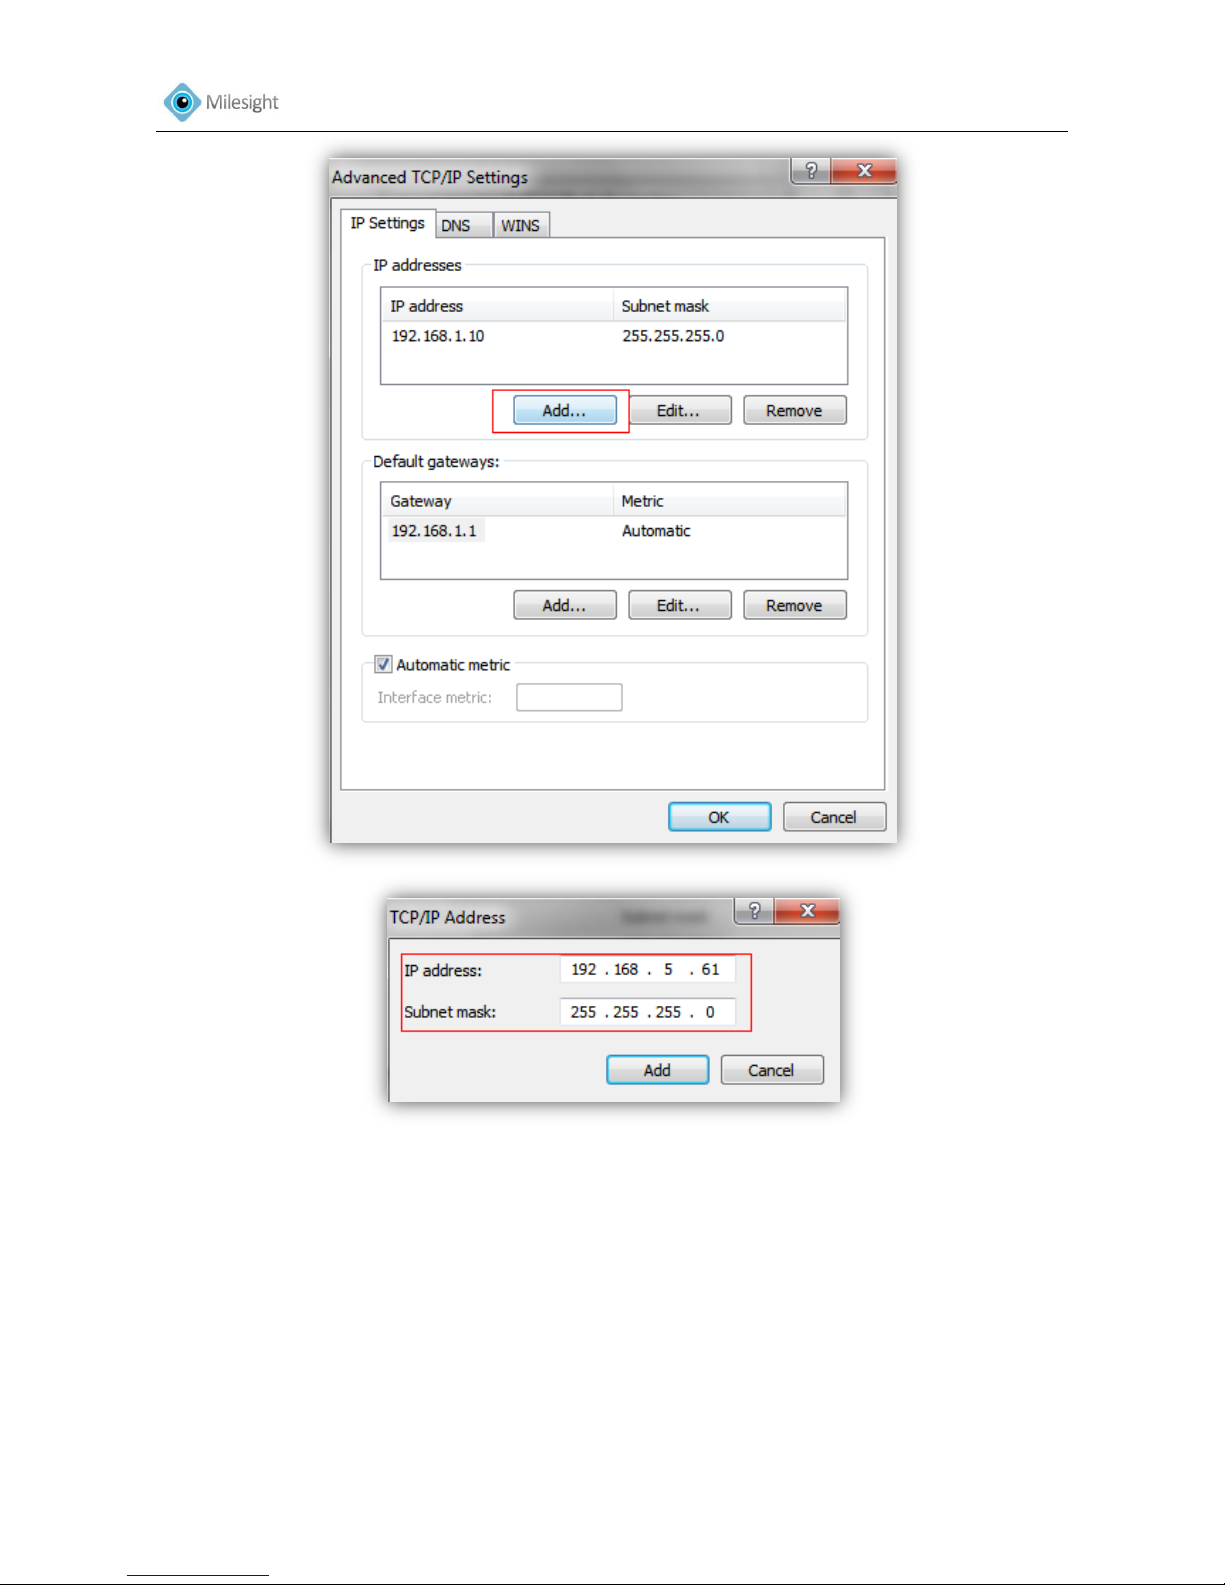
Step 1: Change the IP address of computer to 192.168.5.0 segment.
a. Start-> Control Panel->Network and Internet Connection->Network Connection->Local Area
Connection, and double click it. (See Figure 3-8)
Figure 3-8
b. Click “Advanced”, and then click “IP settings”->”IP address”->”Add” (See Figure 3-9). In the
popup window, enter an IP address with a same segment with Milesight network camera (e.g.:
192.168.5.61, but please note that this IP address shall not conflict with the IP address on the
existing network), see Figure 3-9.
Page 24
User Manual
23
Figure 3-9
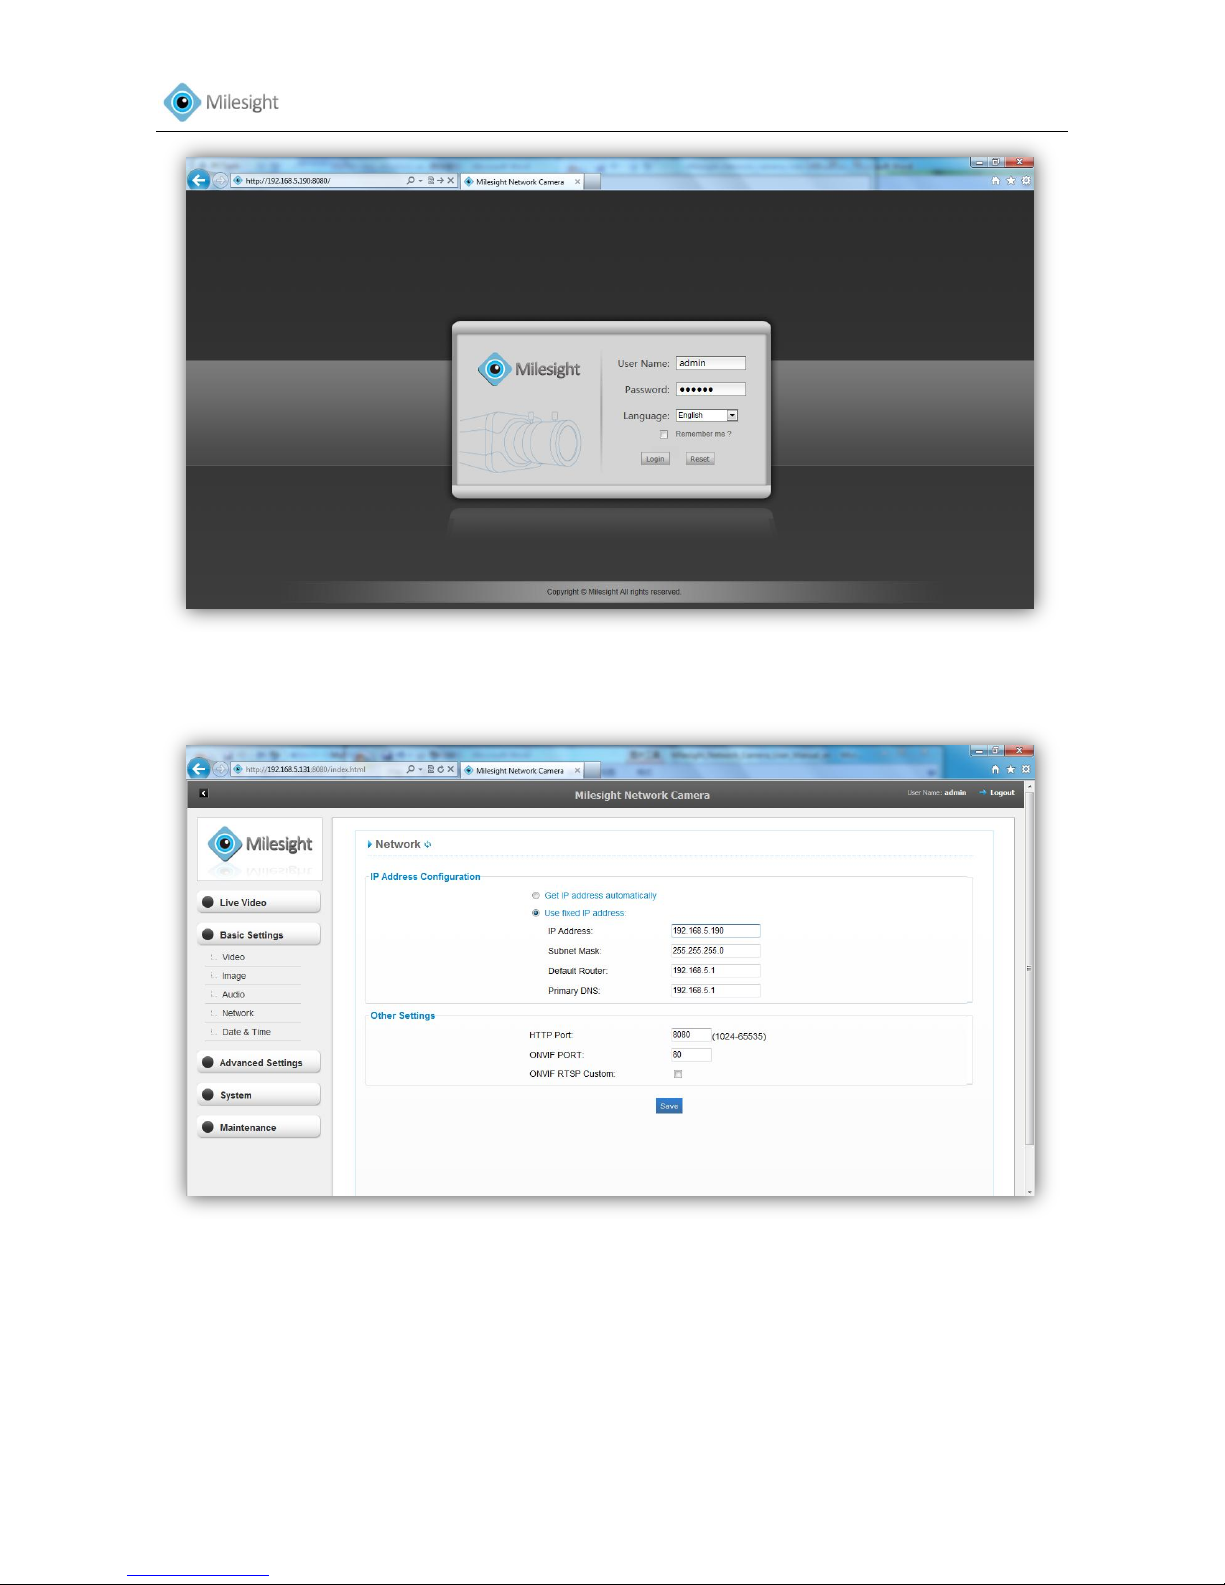
Step.2: Start the IE browser. In the address bar, enter the default IP address of the camera:
http://192.168.5.190.
Step.3: Enter the user name and password when the login page appears.
Default user name: admin
Default password: ms1234
Page 25
User Manual
24
Figure 3-10
Step.4: After login, please select the “Configuration” ”Basic Settings” ”Network”. The Network
Settings page appears. (Shown as Figure 3-11)
Figure 3-11
Step.5: Change the IP address or other network values. Then click “Save” button.
Step.6: The change of default IP address is completed.
3.2 Accessing from the Web Browser
The camera can be used with the most standard operating systems and browsers. The
Page 26
User Manual
25
recommended browsers are Internet Explorer and Firefox.
3.2.1 Access over IE Browser
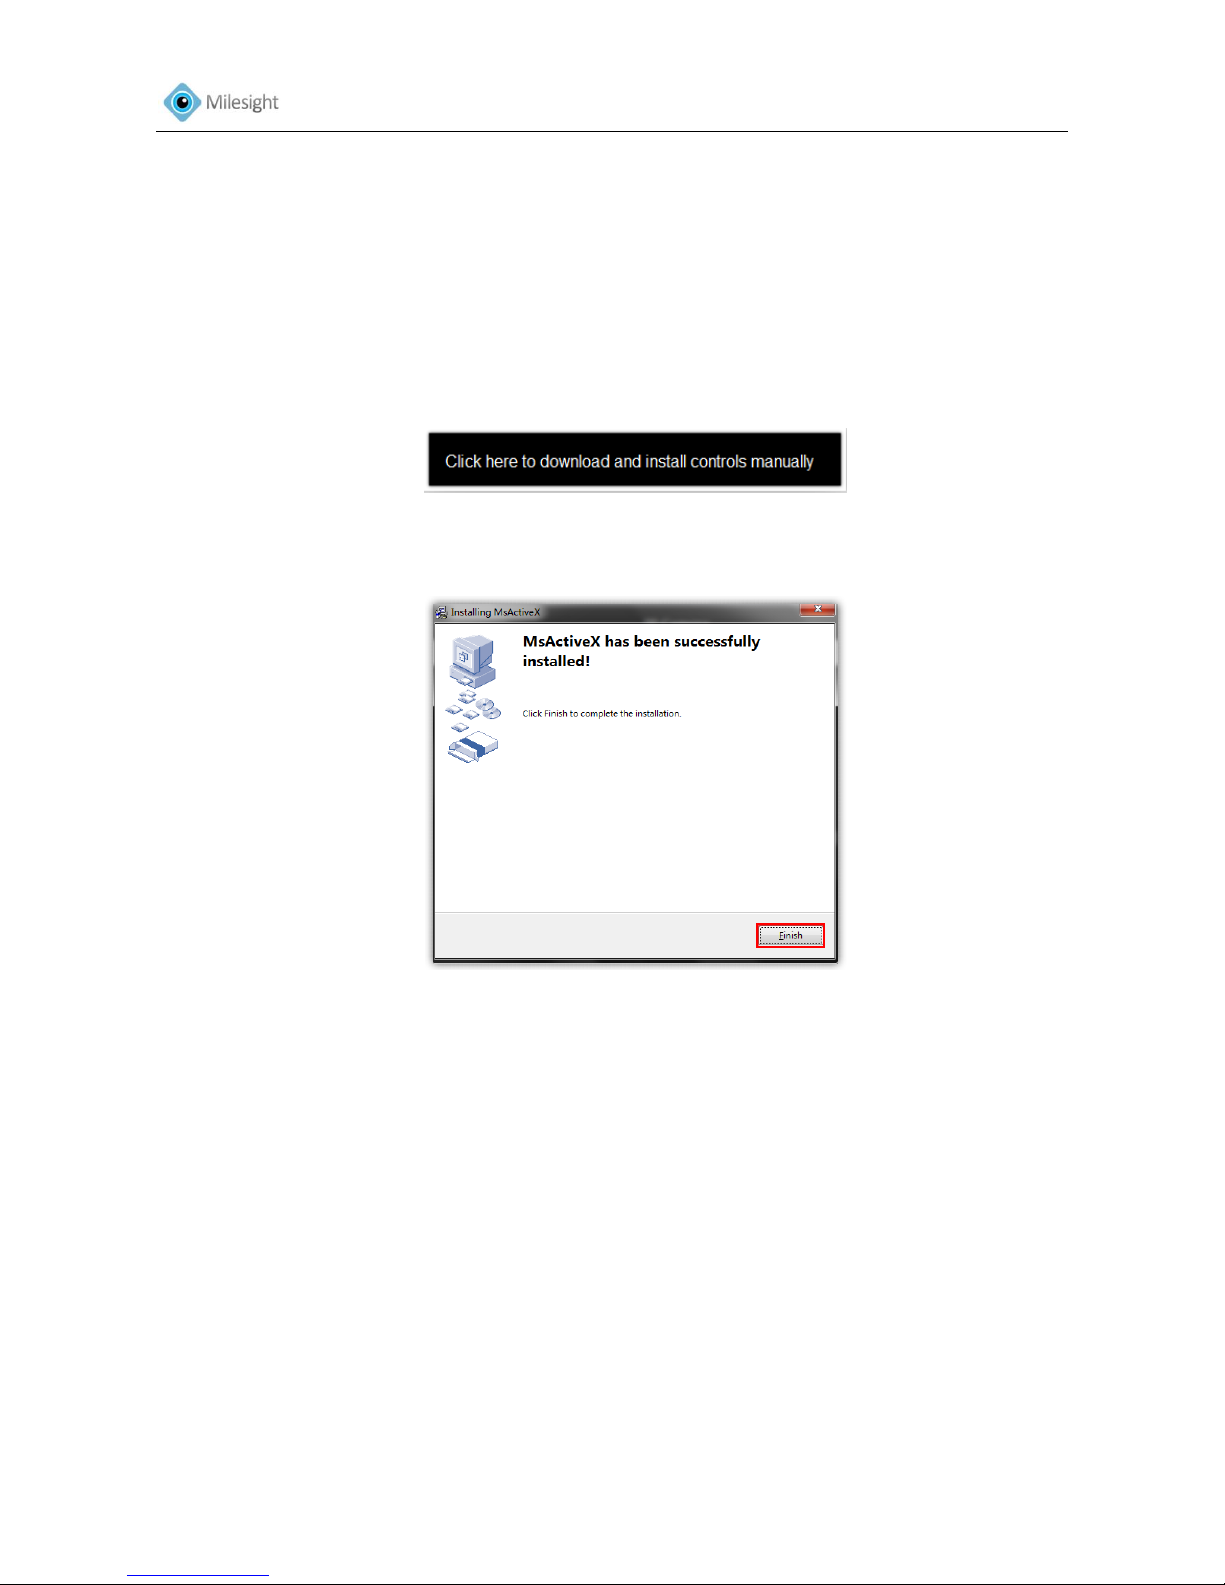
Launch the IE browser and enter the IP address of the camera.
Enter the User Name and Password and click “Login”.
Note: The default user name is “admin”, password is “ms1234”
At the first time to log on the device, the browser will prompt to install controls, please click
'Click here to download and install controls manually' as Figure 3-12.
Figure 3-12
Follow the prompts to install the controls, when it`s finished, it will pop out a window as
Figure 3-13. Please click 'Finish' and refresh the browser, then you will see the video.
Figure 3-13
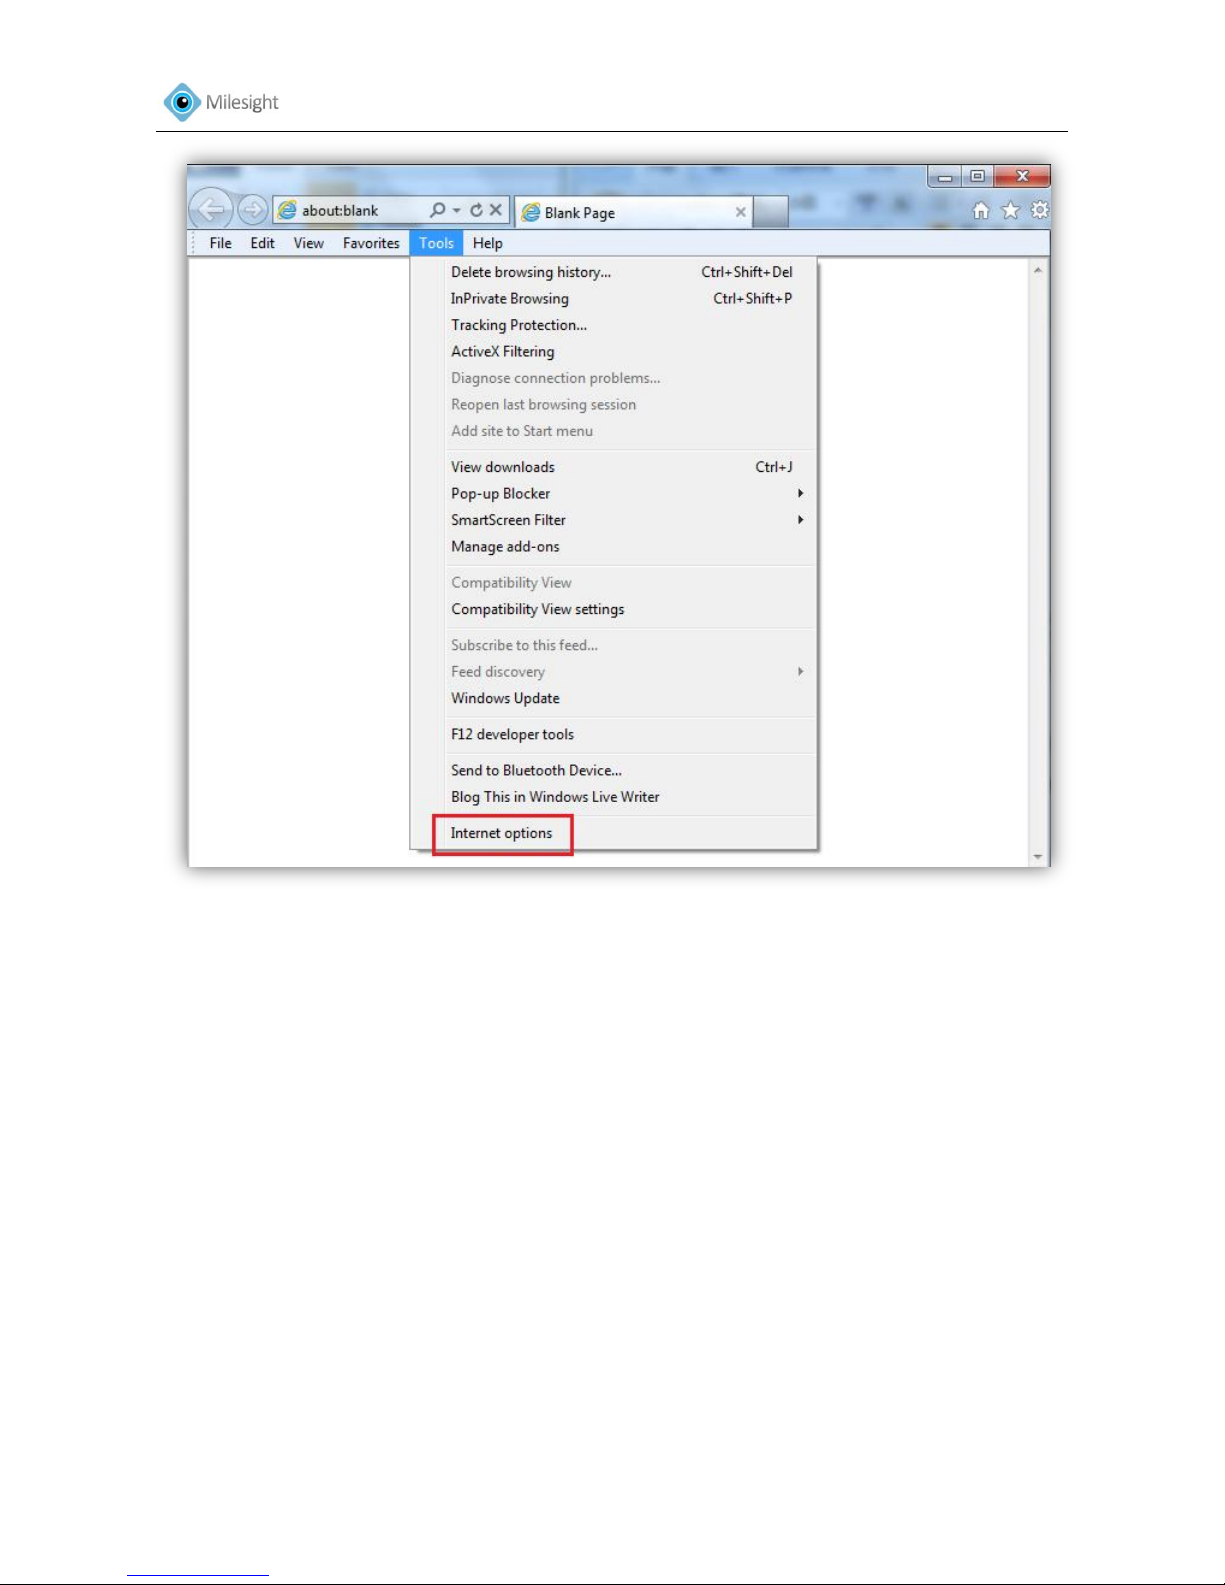
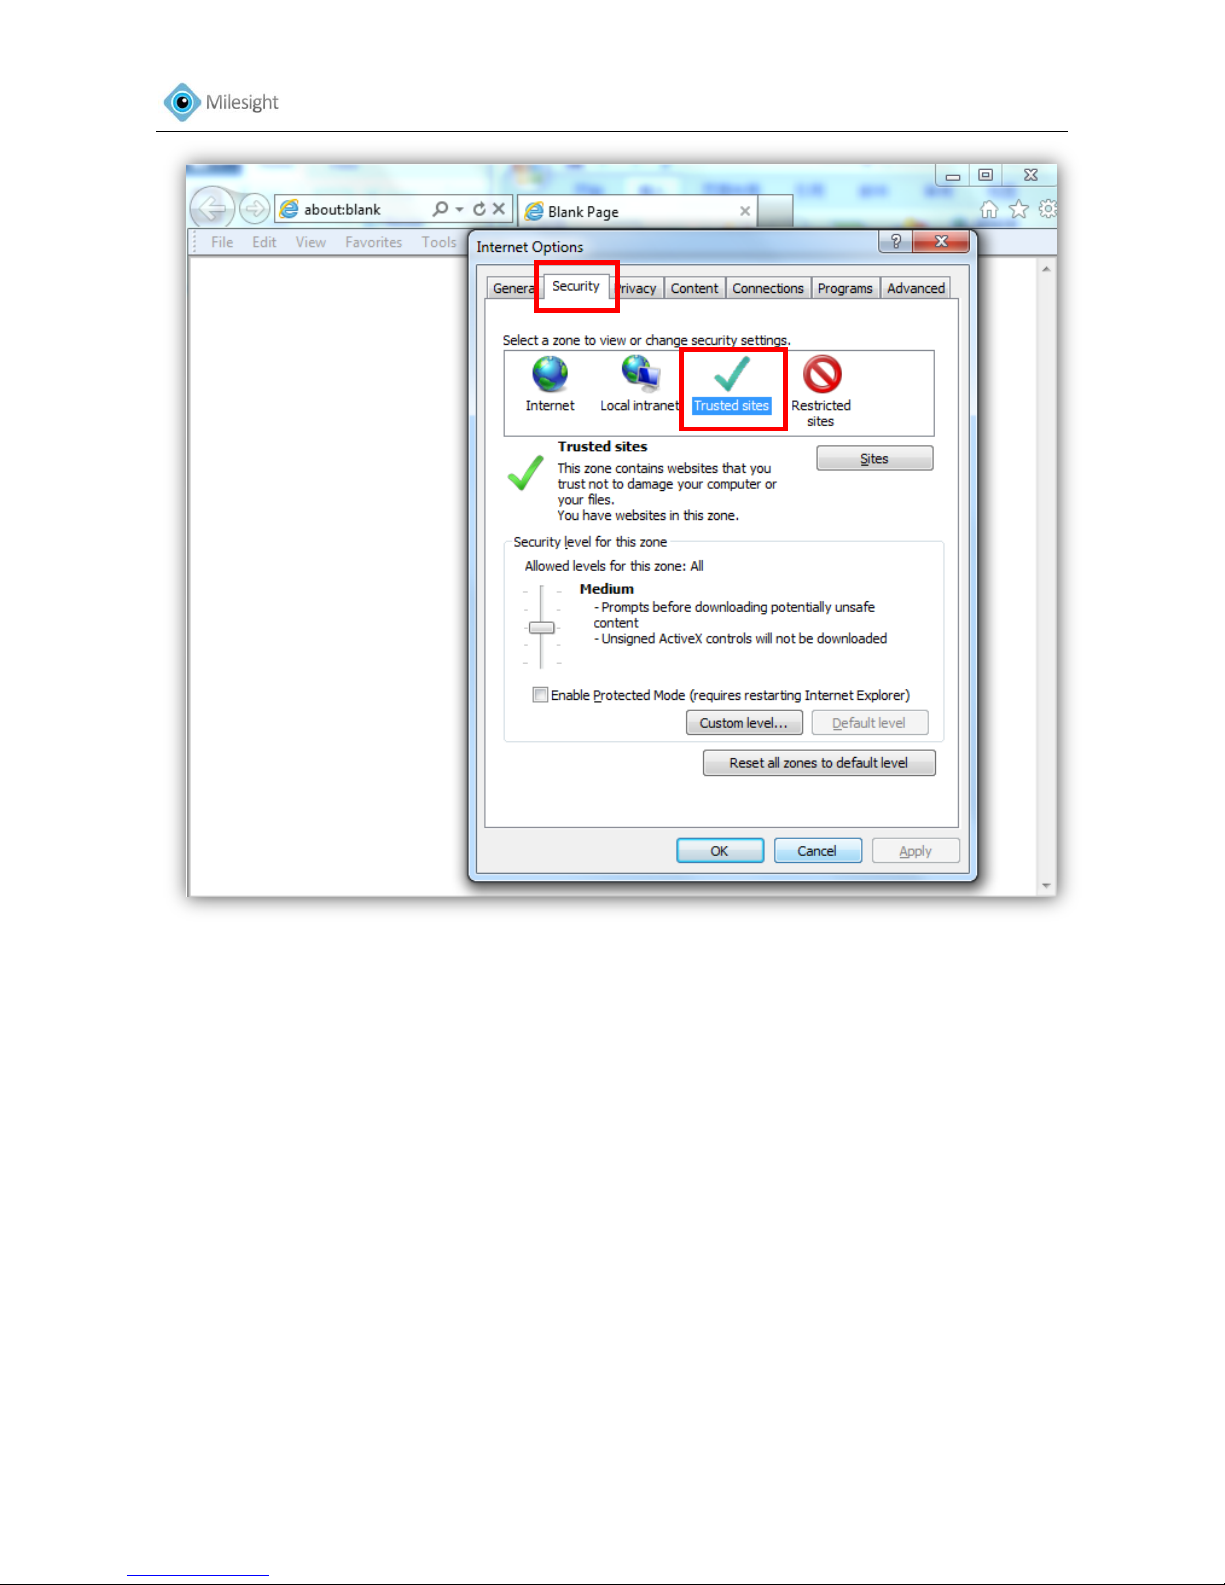
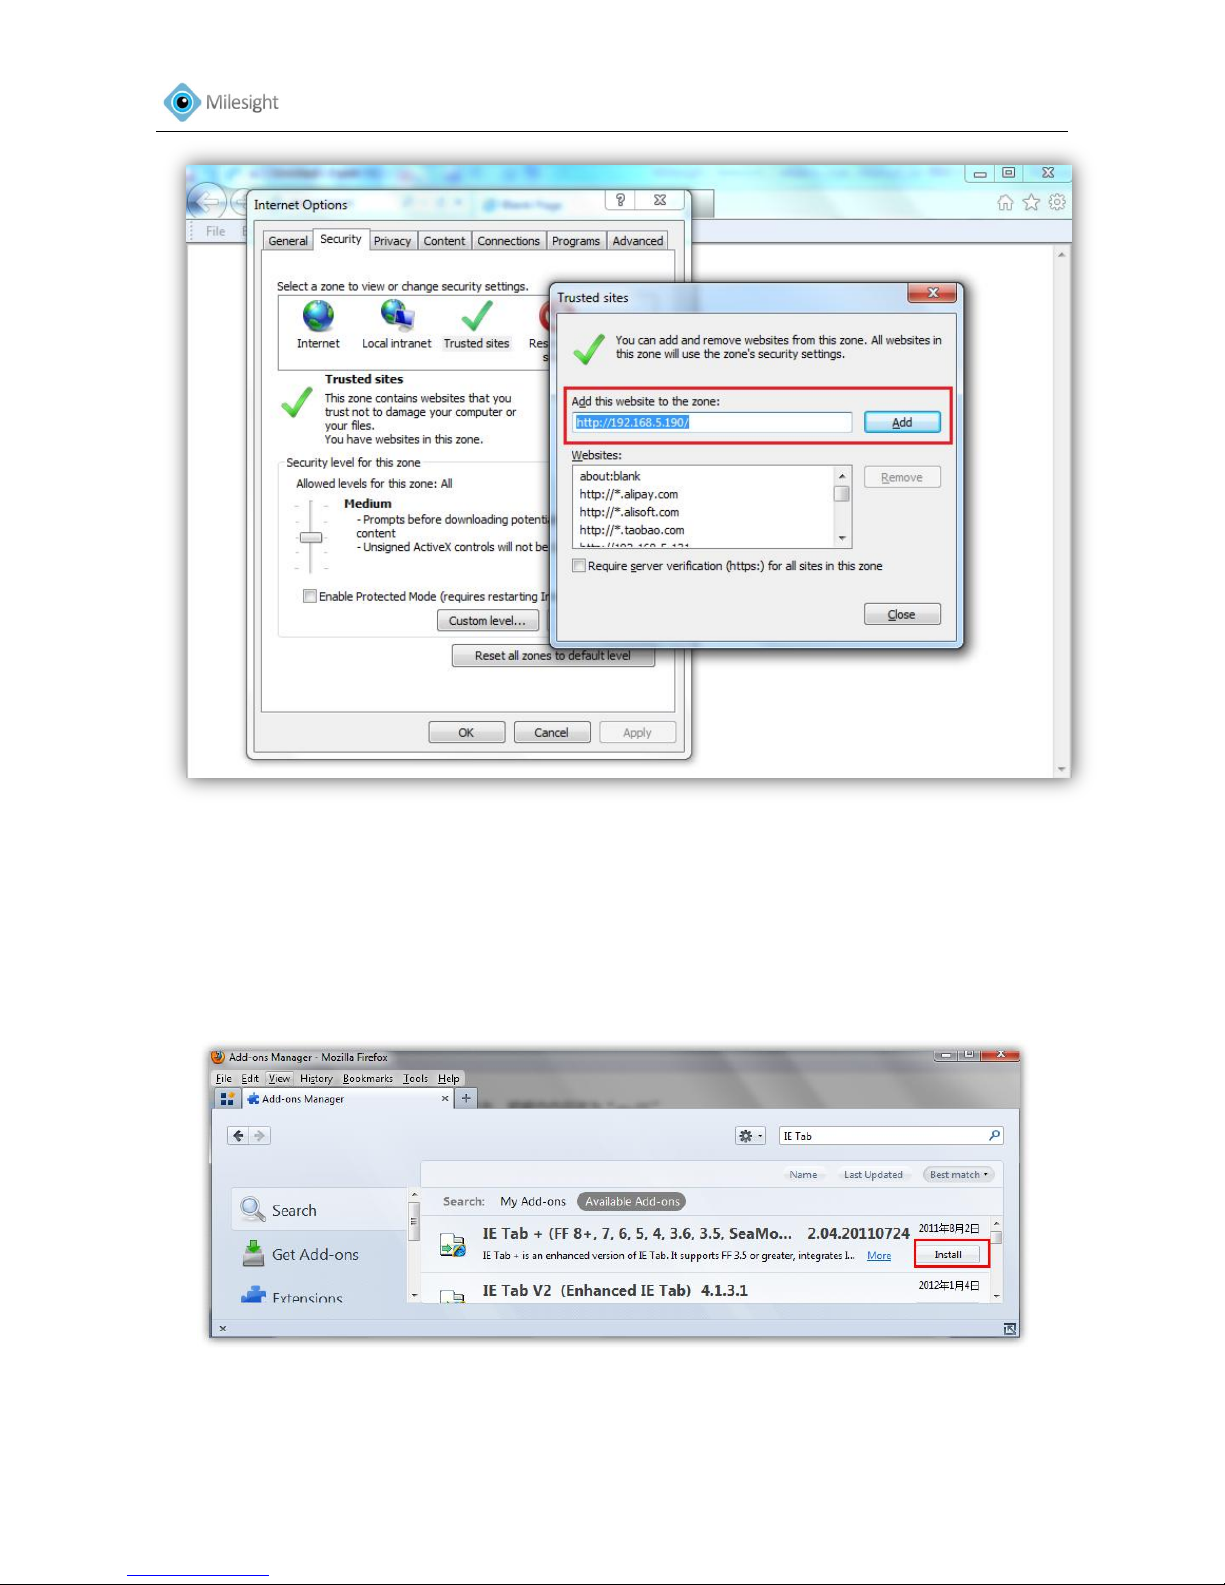
Note: If IE9 or higher version browser is used, it is suggested that the Milesight camera web link
should be added as a trusted site. See the instructions as below:
Step 1: Start the IE9 or higher version browser, and select “Tools”select”Internet Options”.
Page 27
User Manual
26
Figure 3-14
Step 2: Select “Security””Trusted sites”.
Page 28
User Manual
27
Figure 3-15
Step 3: Enter the IP address of the camera in the blank and click “Add”.
Page 29
User Manual
28
Figure 3-16
3.2.2 Access over Firefox browser
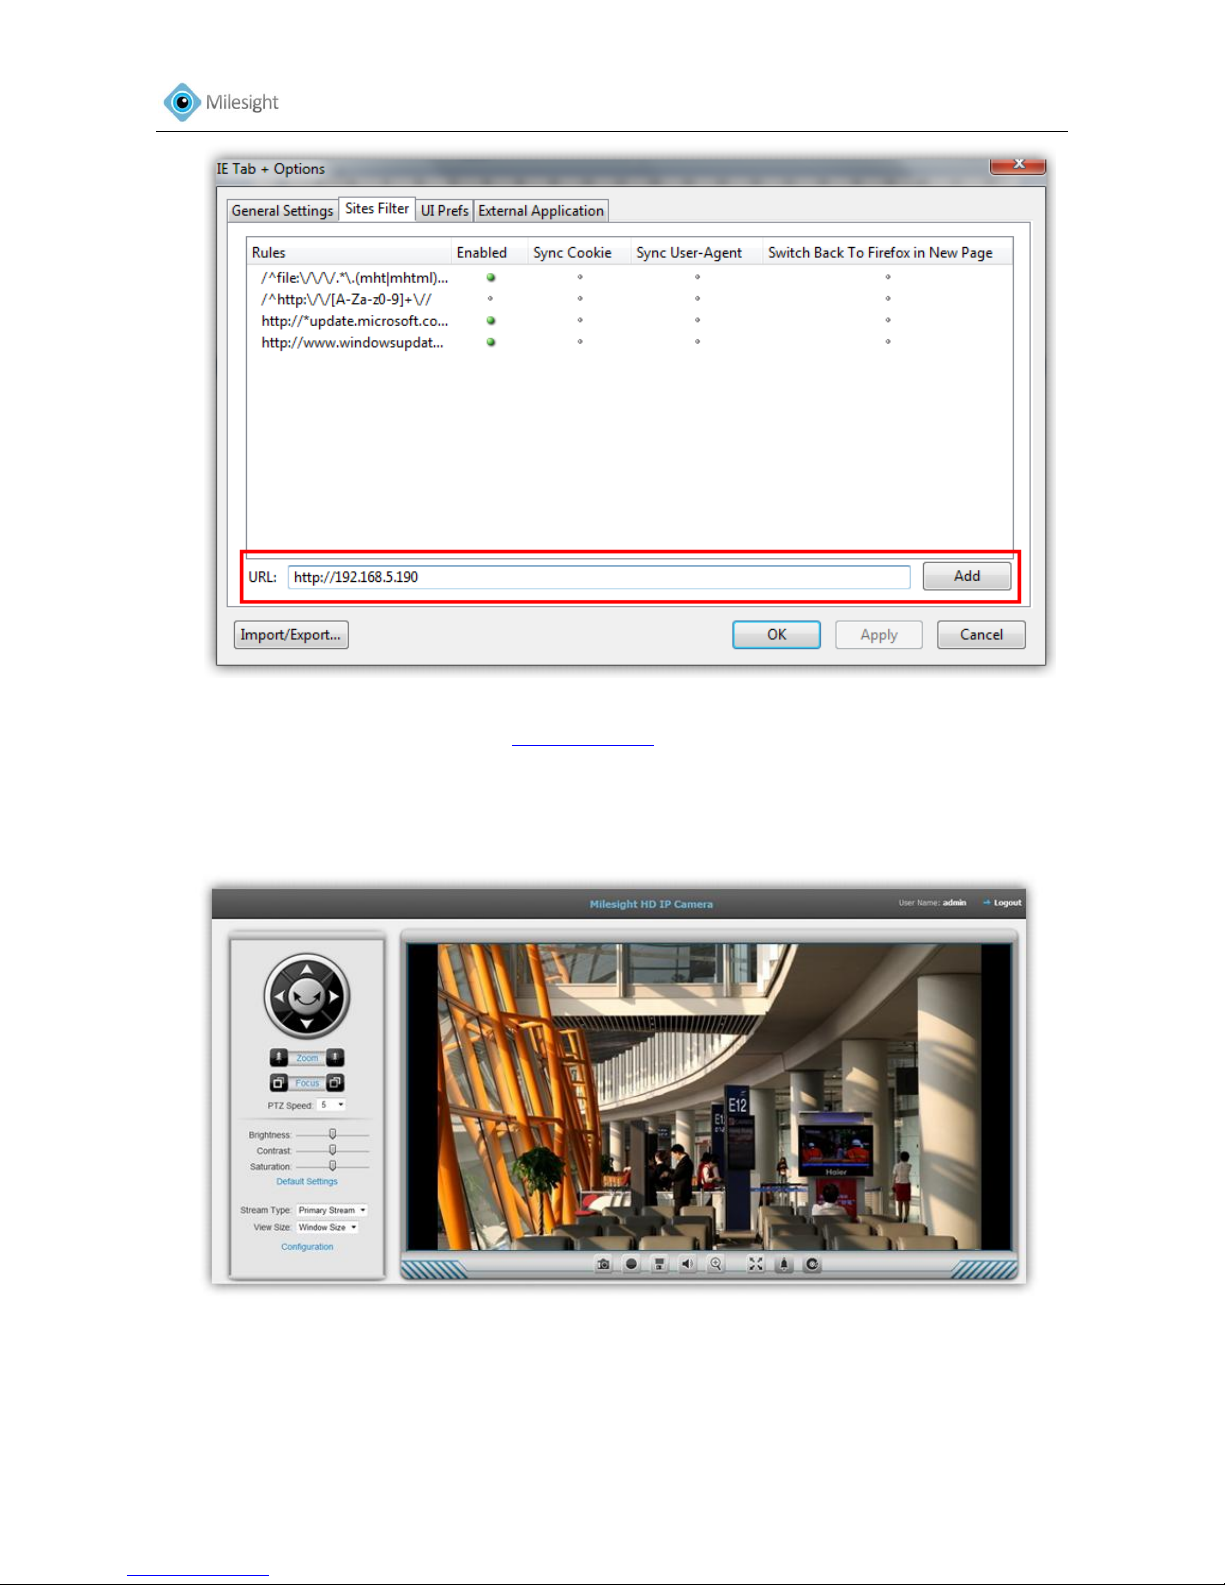
If you want to browse the video via Firefox browser, you must install 'IE Tab' on your Firefox first.
Please do as follows:
Click 'Tools->Add-ons' and search 'IE Tab' then install. As Figure 3-17
Figure 3-17
Restart the Firefox when the installation is done. Click 'Tools->IE Tab + Options' to add the IP
address of the camera in the 'Sites Filter' page as Figure 3-18.
Page 30
User Manual
29
Figure 3-18
Access to the camera web GUI as with IE browser.
Note: If you change the IP address of the device, please add the new URL in the IE Tab+ Sites
Filter.
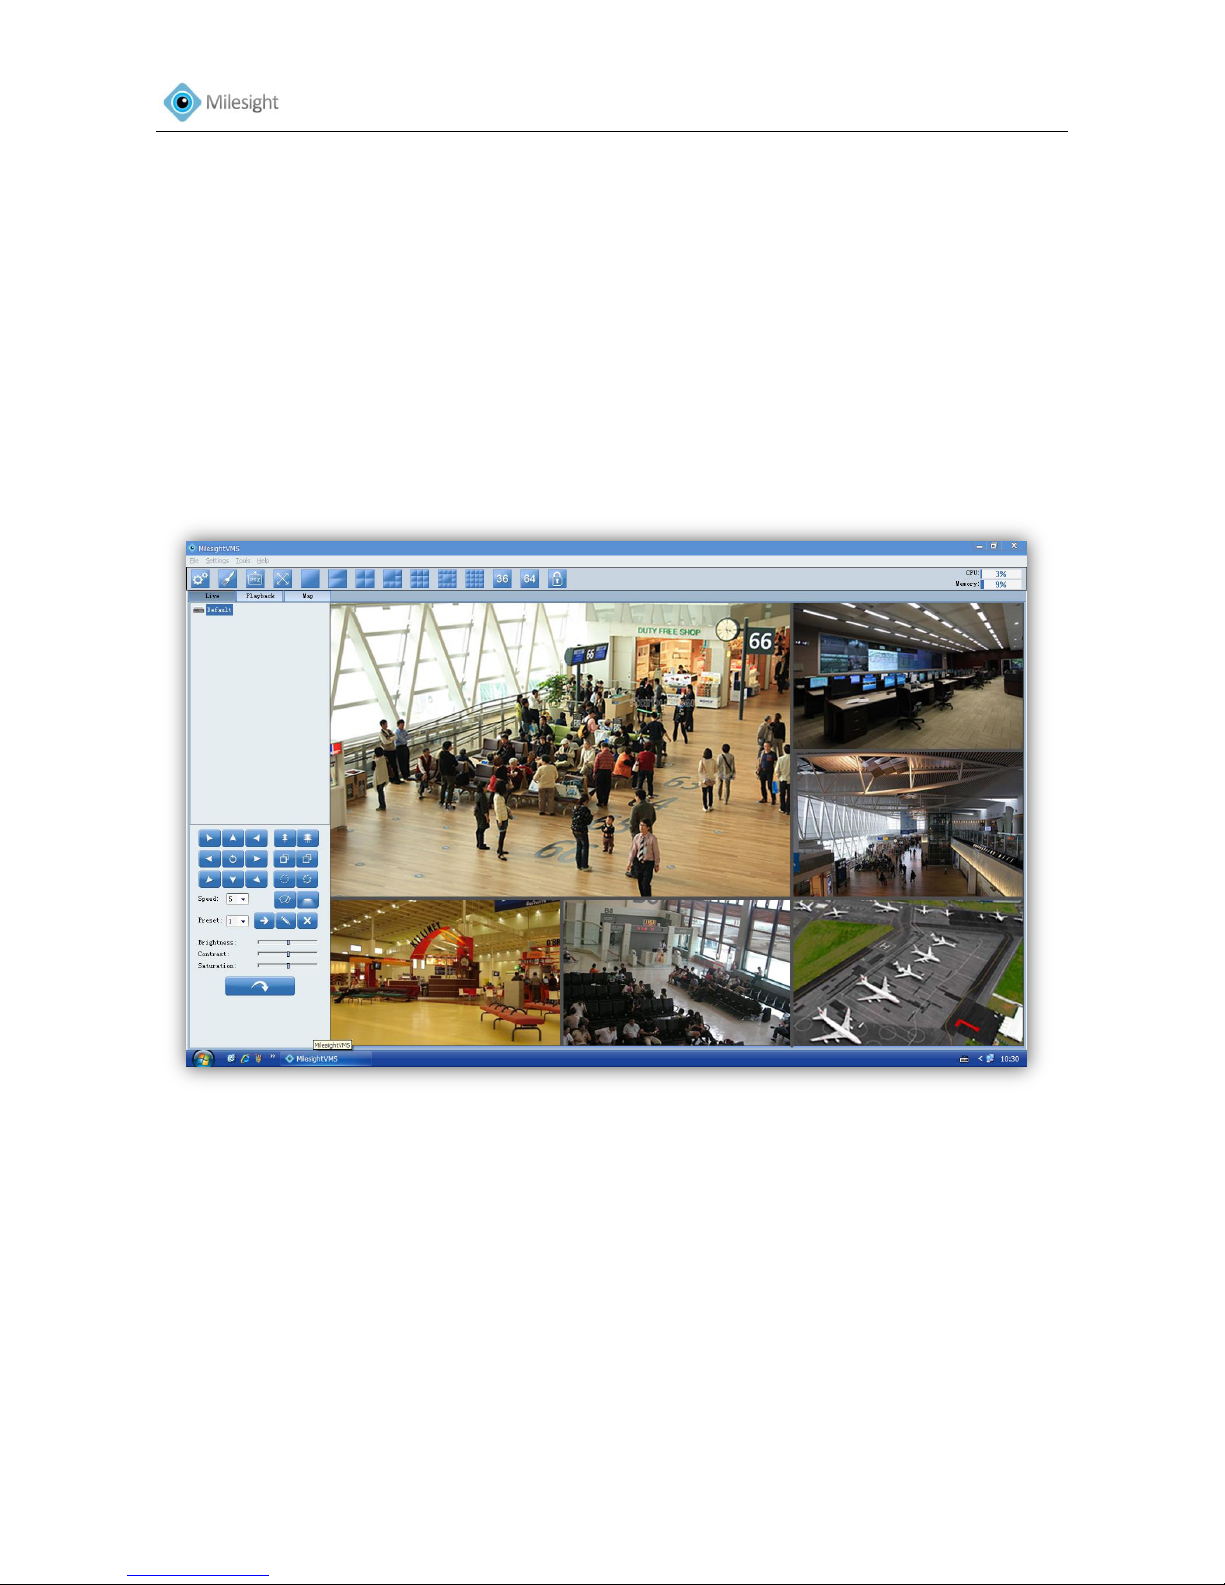
After logging on IP camera`s web GUI successfully, user is allowed to view live video as bellow.
Figure 3-19
Page 31
User Manual
30
3.3 Accessing from MilesightVMS (Video Management Software)
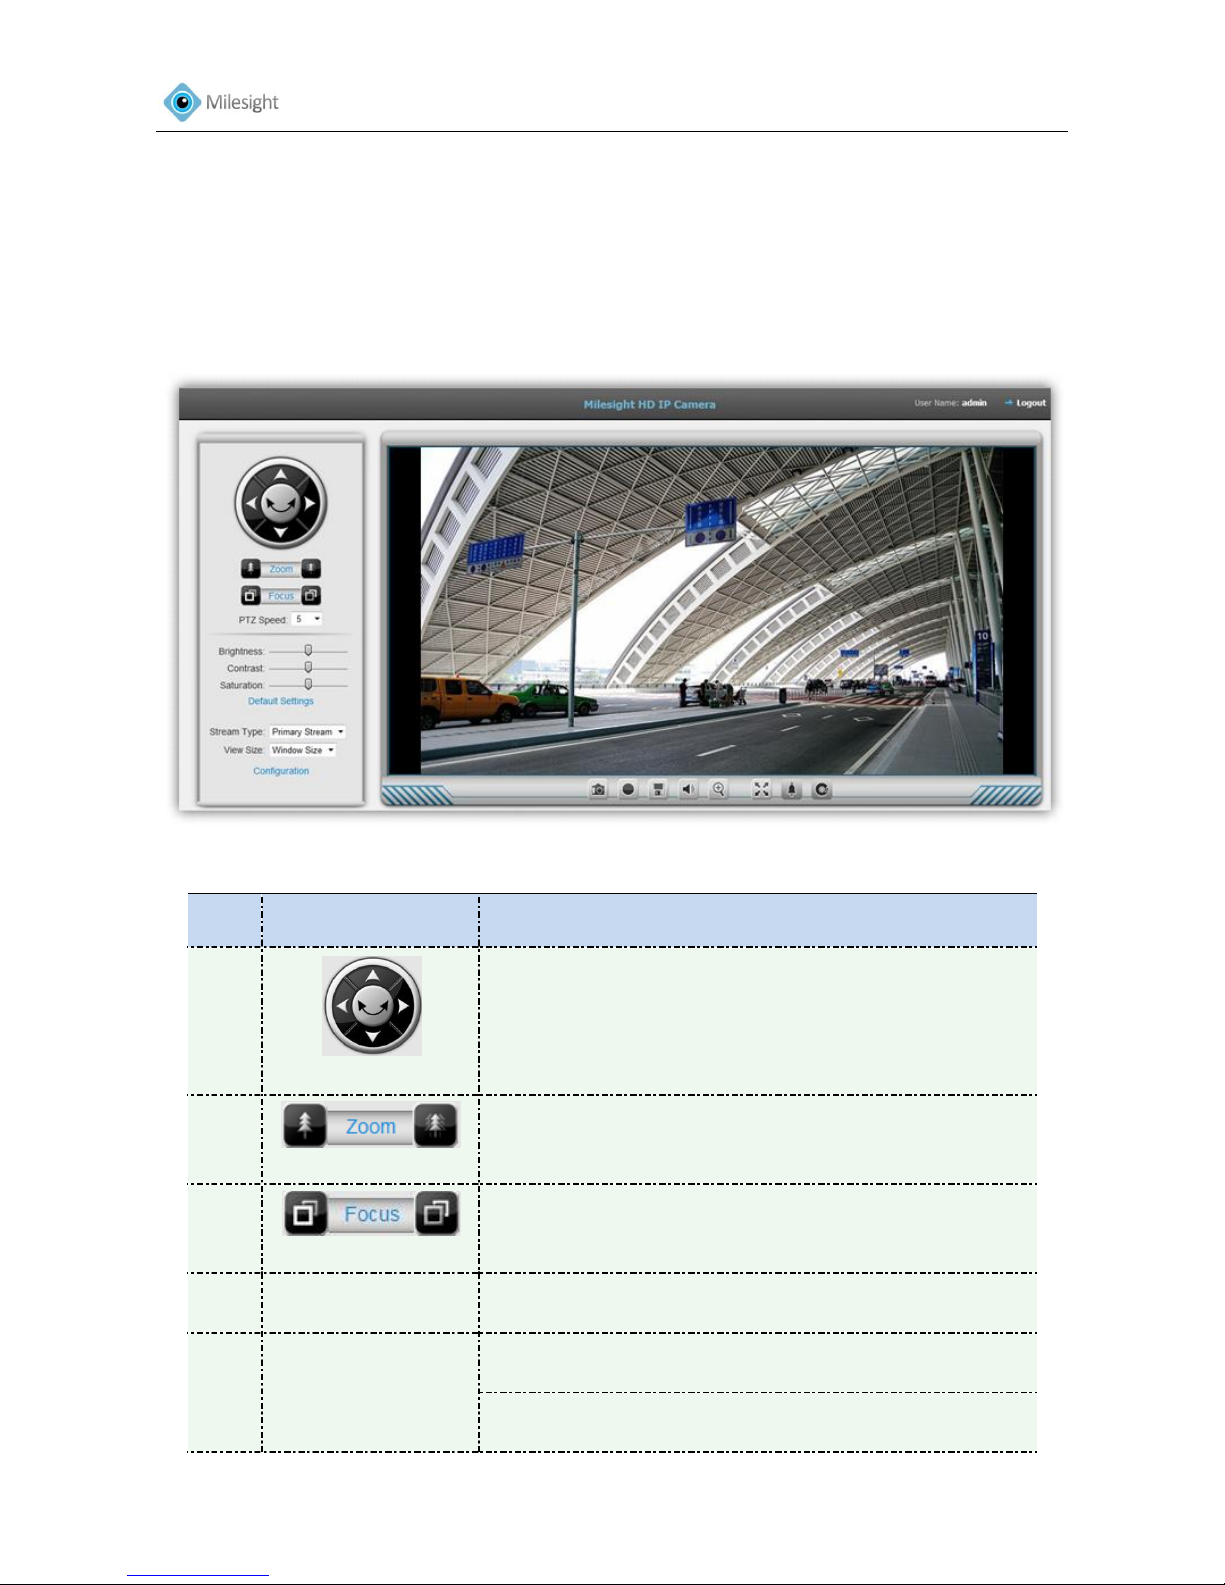
MilesightVMS(ONVIF compatible) is a handy and reliable application designed to work with IP
cameras in order to provide video surveillance, recording settings and event management
functions. The interface of MilesightVMS is very easy to use, intuitive, with easy access to the most
common activities, such as viewing live video, searching through recordings and exporting videos
and snapshots. It's able to integrate with other devices through ONVIF and you can connect up to
64 cameras. It is designed to work on Windows XP/7/8/Vista/Server 2000/Server 2008. The
software is contained in the CD or could be downloaded from our website www.milesight.com.
Please install MilesightVMS; then launch the program to add the camera to the channel list. For
detailed information about how to use the software, please refer to user manual of MilesightVMS.
Figure 3-20
Page 32
User Manual
31
Chapter IV System Operation Guide
4.1 Live Video
After logging on the network camera web GUI successfully, user is allowed to view live video as
bellow.
Figure 4-1
No.
Parameter
Description
○
1
PTZ Control
Navigation key is used to control the direction. The
rotation key is used for auto-rotation
○
2
ZOOM
Adjust the focal length of the lens
○
3
Focus
Adjust focus of the lens
○
4
PTZ Speed
PTZ rotation speed control
○
5
Brightness
Adjustment
Brightness A brighter scene appears, if a higher level of
brightness is chose
Contrast The difference in color and light between parts
of an image
Page 33
User Manual
32
Saturation A vivid scene appears, if a higher level of
saturation is chose
Default Settings Restore brightness, contrast and
saturation to default settings
○
6
Stream Type
Choose the Stream to show on the current video window
○
7
View Size
The size of the current video window
○
8
Configuration
Click to access the configuration page
○
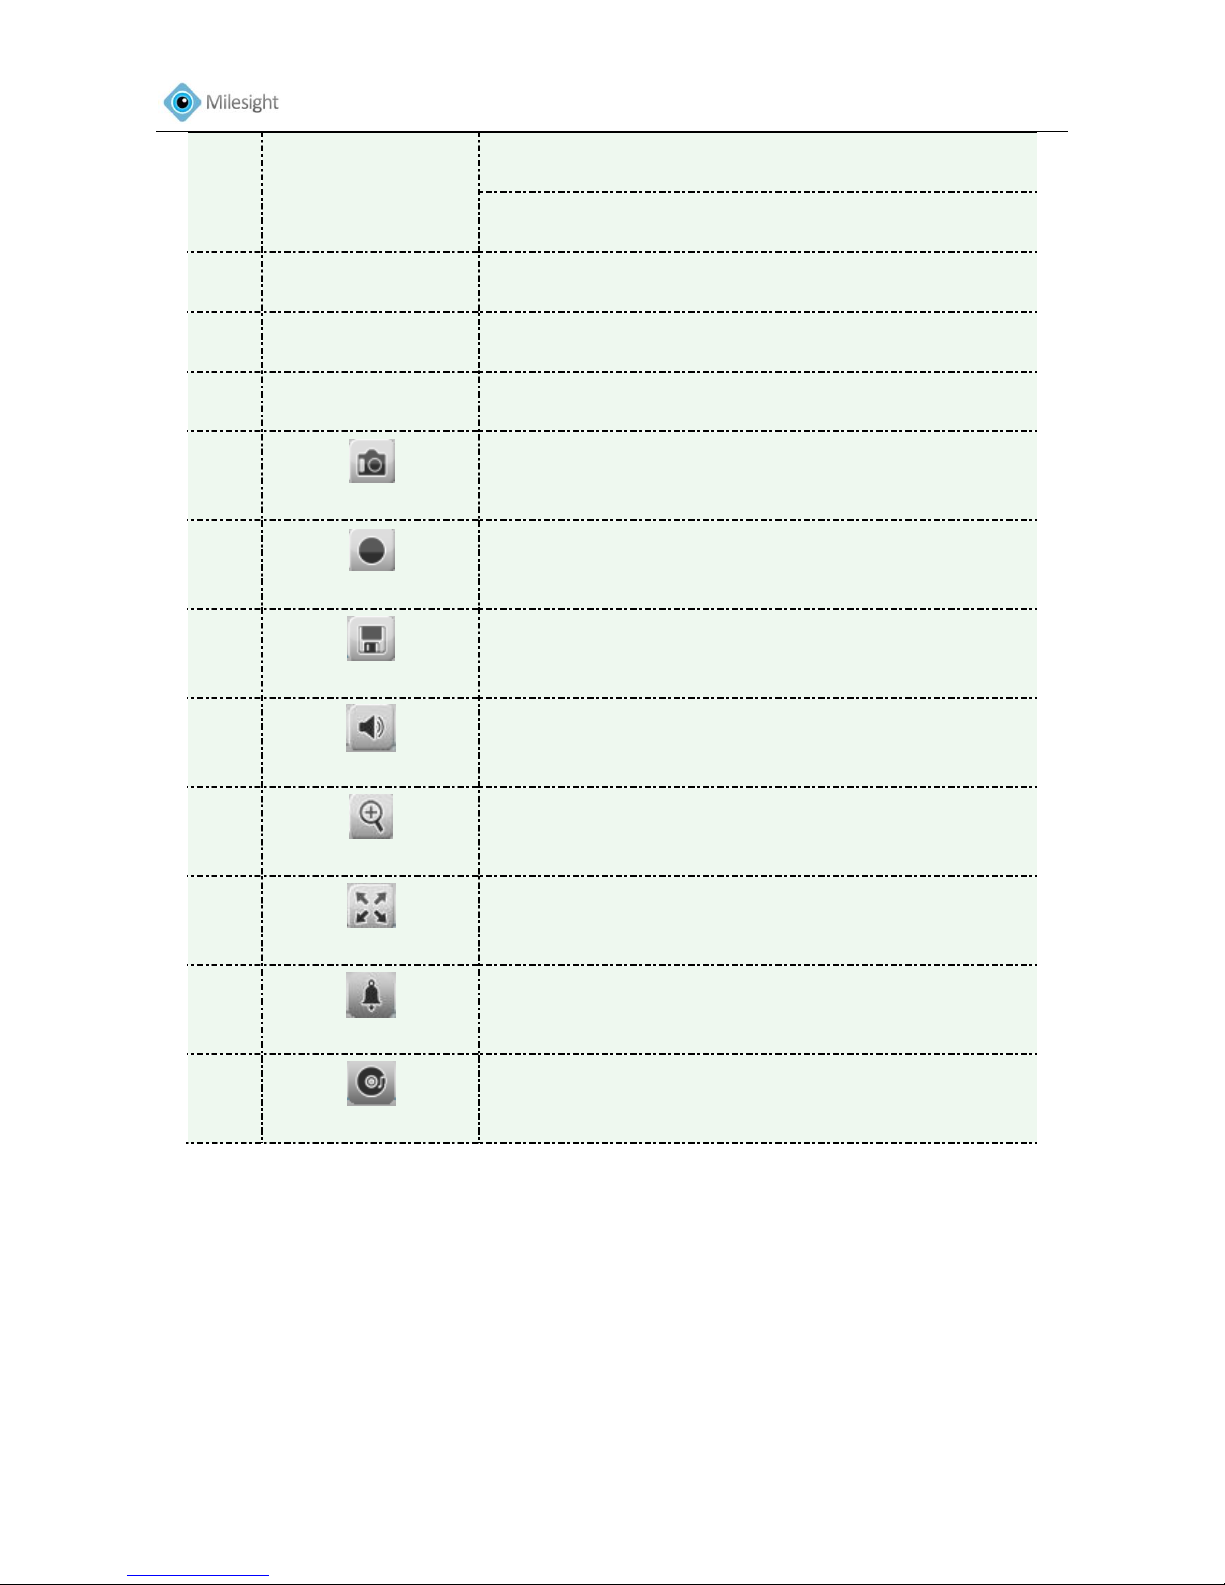
9
Capture
Click to capture the current image and save to the
configured path. Default path is C:VMS\+-1\
IMAGE-MANUAL
○
10
Start Recording
Click to start recording video and save to the configured
path. Default path is C: VMS\+-1\MS_Record. Click again
to stop recording
○
11
Saving Path Settings
Set the saving path for capture and recording
○
12
Play Audio
Enable Audio Input/output. It can also be set in Audio
configuration page
○
13
Enable Zoom
When enabled, you can zoom in on a specific area of video
image with your mouse wheel
○
14
Full Screen
Click to display images in a full-screen
○
15
Alarm
When an alarm occurs, the icon will turn blue
○
16
Recording
When an alarm causes recording, the icon will turn blue
4.2 Basic Settings
4.2.1 Video
OSD (On Screen Display) content and video time can be displayed to rich the video information.
Stream parameters can also be set on this page, to adapt to different network environments and
demands.
Page 34
User Manual
33
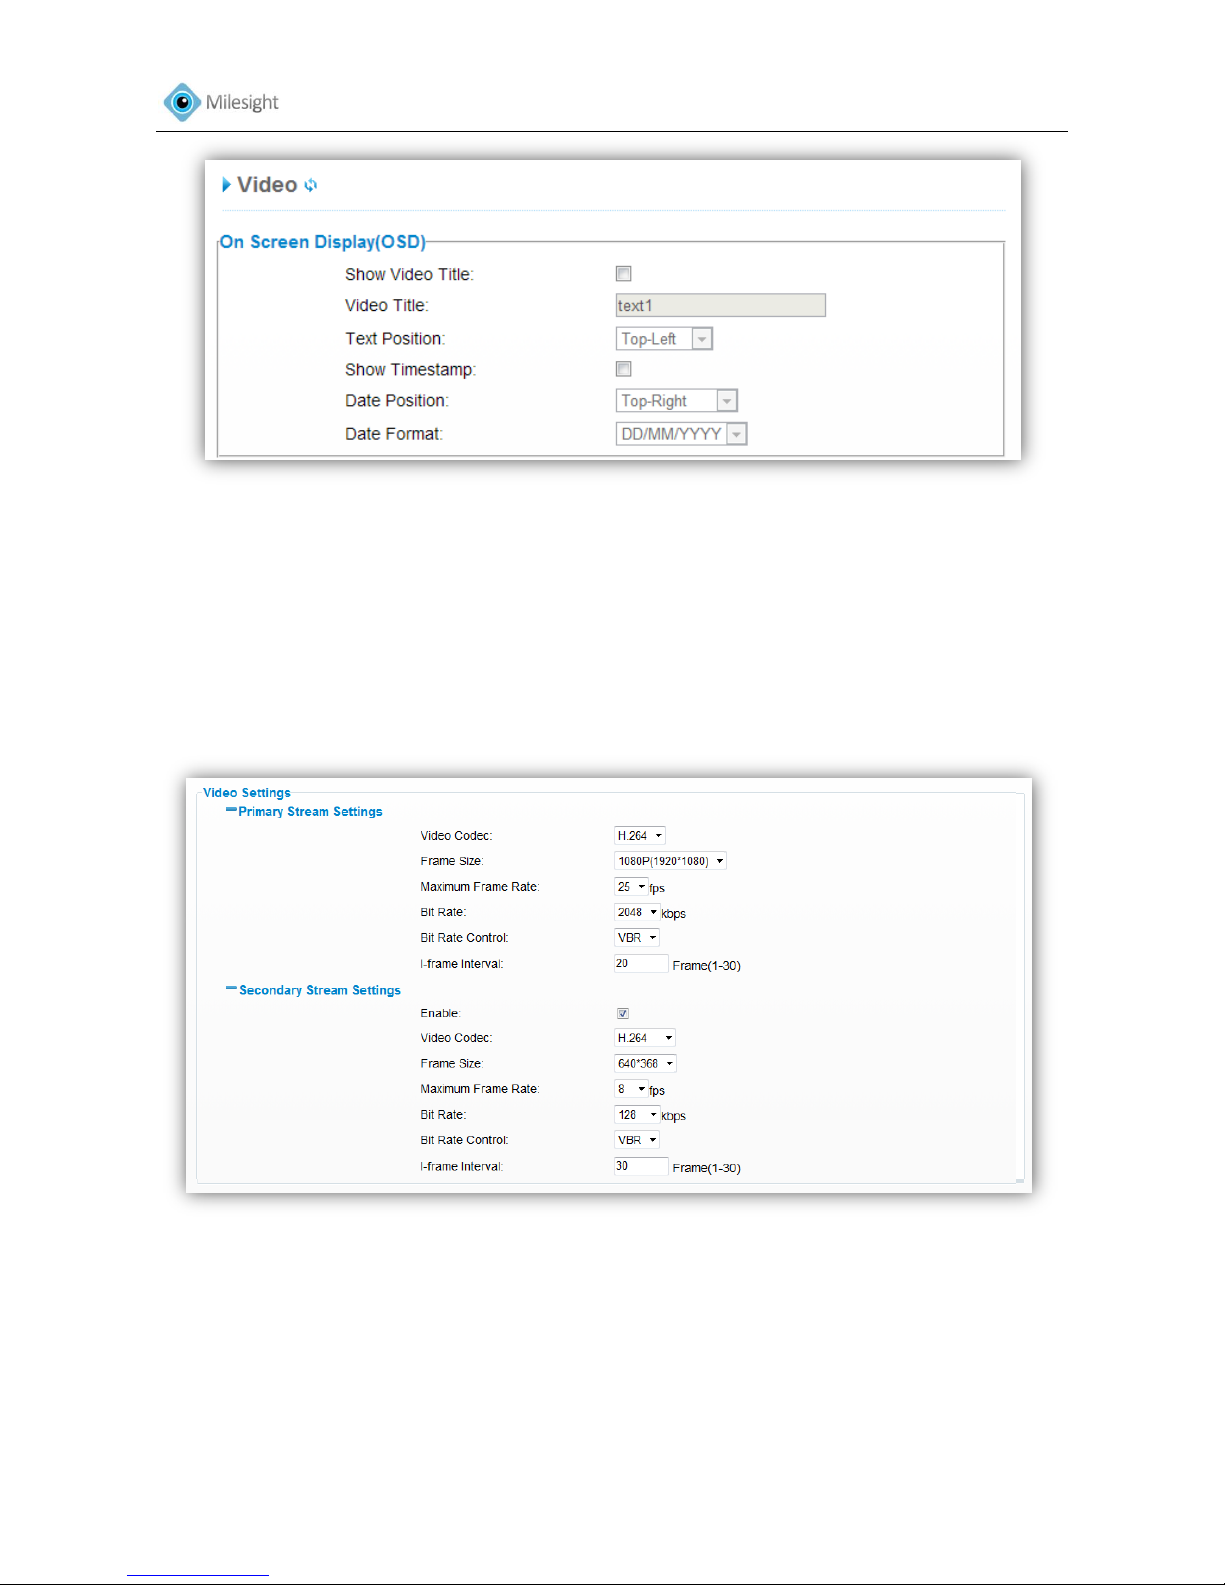
Figure 4-2
On Screen Display (OSD)
Show Video Title Check the checkbox to show video title
Video Title OSD content customized
Text Position OSD display position on the image
Show Timestamp Check the checkbox to display date on the image
Date Position Date display position on the image
Date Format The format of date
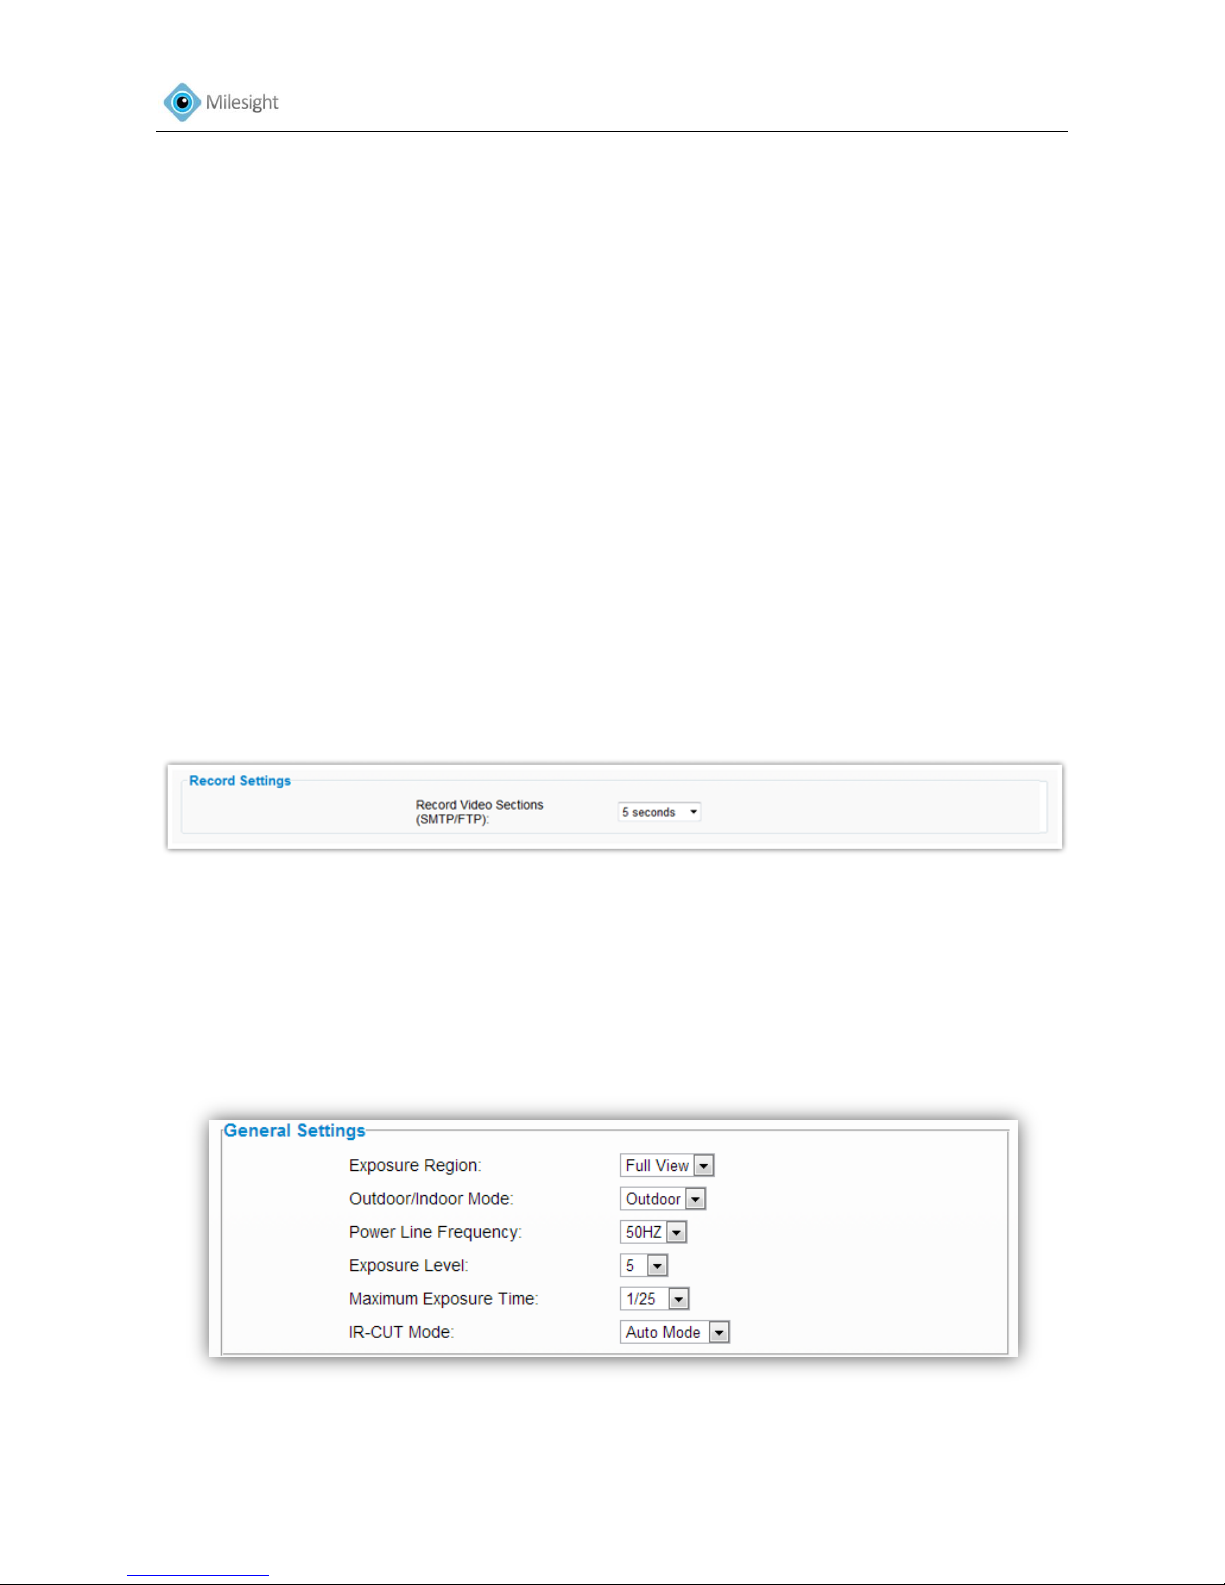
Figure 4-3
Primary Stream Settings
Video Codec H.264/MPEG-4/MJPEG available
Frame Size* Options include 5M(2560 × 1920), 3M(2048 × 1536), 1080P(1920 × 1080),
2M(1600 ×1200), 1.3M(1280×960), 720P(1280×720), D1 (704×576)
Maximum Frame Rate Maximum refresh frame rate of per second
Bit Rate Transmitting bits of data per second
Page 35
User Manual
34
Bit Rate Control
CBR Constant Bitrate. The rate at which a codec's output data should be consumed is
constant.
VBR Variable Bitrate. VBR files vary the amount of output date per time segment
I-frame Interval Set the I-frame interval to 1~30
Note:
The options of Frame Size are variable according to the model selected.
Secondary Stream Settings
Click to enable the secondary steam
Video Codec H.264/MPEG-4/MJPEG available
Frame Size The optional resolutions of the secondary stream depend on the Codec of the
primary stream and the secondary stream
Maximum Frame Rate Maximum refresh frame rate of per second
Bit Rate Transmitting bits of data per second
Bit Rate Control
CBR Constant Bitrate. The rate at which a codec's output data should be consumed is
constant.
VBR Variable Bitrate. VBR files vary the amount of output date per time segment
I-frame Interval Set the I-frame interval to 1~30
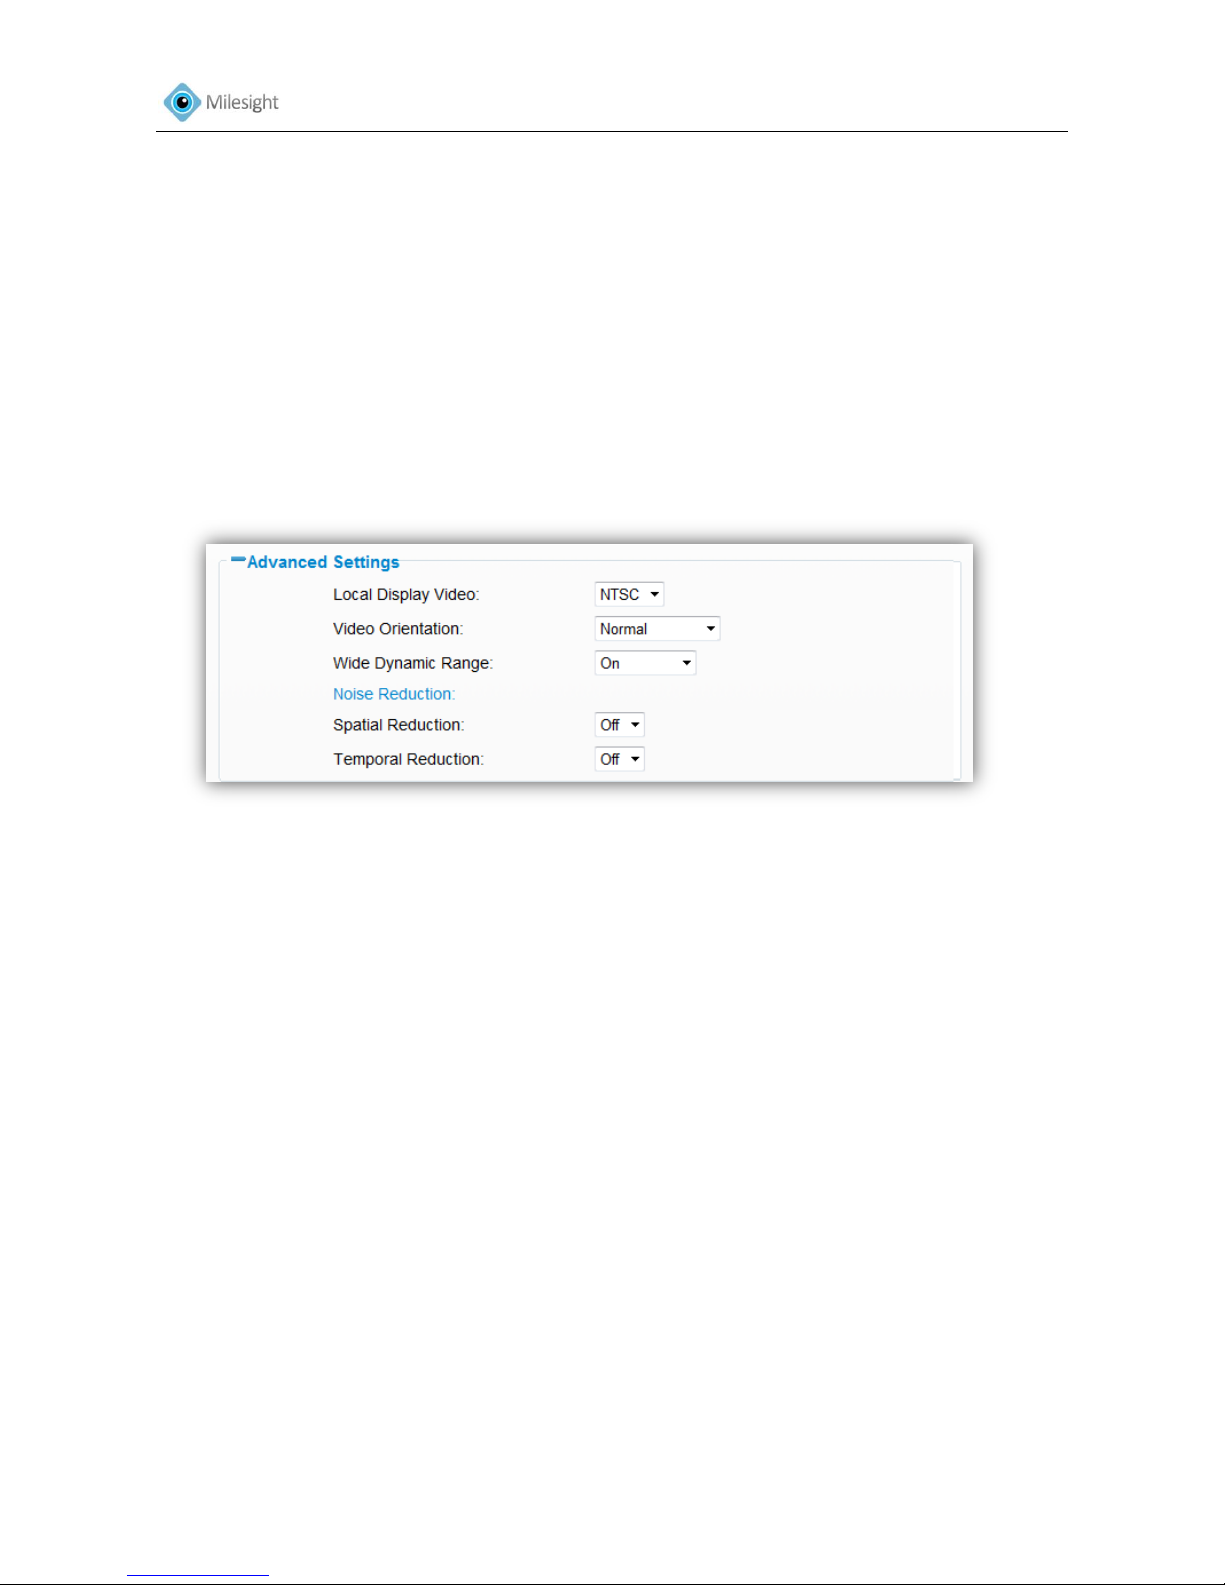
Figure 4-4
Recording Settings
Record Video Sections Length of each video file
4.2.2 Image
Figure 4-5
General Settings
Page 36
User Manual
35
Exposure Region Full View, Custom, and BLC are selectable
Full view: Calculate the full range of view and offer appropriate light compensation
Custom: This option enables you to add customized windows as inclusive or exclusive
regions manually
BLC (Back Light Compensation): This option will automatically add an inclusive region in the
middle of the window and give the necessary light compensation
Outdoor/Indoor Mode Select indoor or outdoor mode according to your needs
Power Line Frequency 60HZ flicker for NTSC mode and 50HZ flicker for PAL mode
Exposure Level Set the exposure level to 0~10
Maximum Exposure Time Set the maximum exposure time to 1/5~1/100(for 50HZ) or
1/5~1/120(for 60HZ)
IR-CUT Mode Select Day/Night/Auto/Customize mode. Day and night will auto switch under
auto mode
Figure 4-6
Advanced Settings
Local Display Video
Off Switch off the Video
NTSC Switch video to NTSC standard
PAL Switch video to PAL standard
Video Orientation
Normal Remain the image in normal direction
Flip Horizontal Flip the image horizontally
Flip vertical Flip the image vertically
Rotating 180° The images is presented upside down
Wide Dynamic Range* This function enables the capture and display of both bright and dark areas
in the same frame, in a way that there are details in both areas
Off Disable WDR function
On Enable WDR function
Customize Customize the time when the WDR function will be enabled
Noise Reduction
Spatial Reduction Enable/disable spatial reduction
Temporal Reduction Enable/disable temporal reduction
Note:
Page 37
User Manual
36
Wide Dynamic Range function is only applicable for models MS-C2351-P(MW), MS-C3351-P(MW),
MS-C3356-P(MW),MS-C2361-(PM),MS-C3361-(PM),MS-C2371-P(M),MS-C2372-P(M),
MS-C3371-P(M), MS-C3372-P(M) and MS-C3376-P(M).
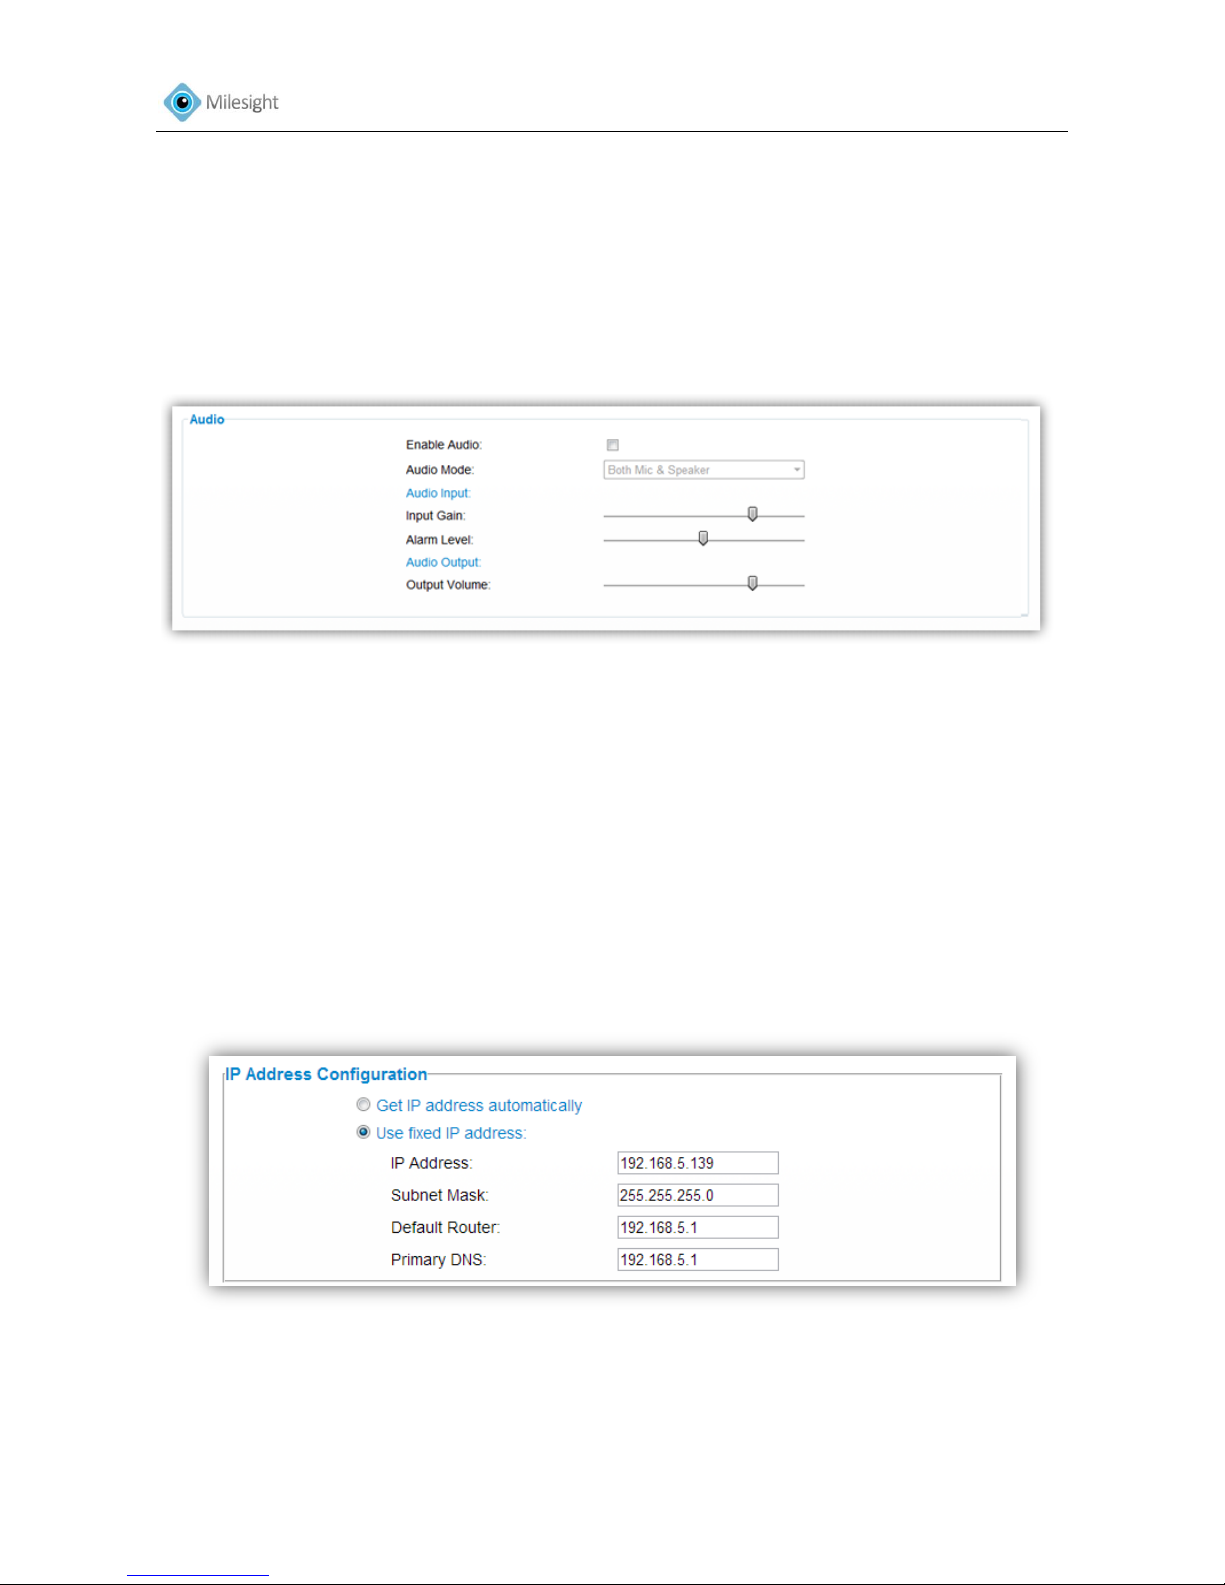
4.2.3 Audio
Audio input and output can work with alarms to achieve various alarm functions. Alarm will be
triggered when there is audio input or play the configured audio when an alarm occurs.
Figure 4-7
Audio
Enable Audio Check the checkbox to enable audio feature
Audio Mode Enable audio input/output
Input Gain Input audio gain level
Alarm level Alarm will be triggered if voice alarm is enabled and input gained volume is higher
than the alarm level
Output Volume The volume of alarm audio output
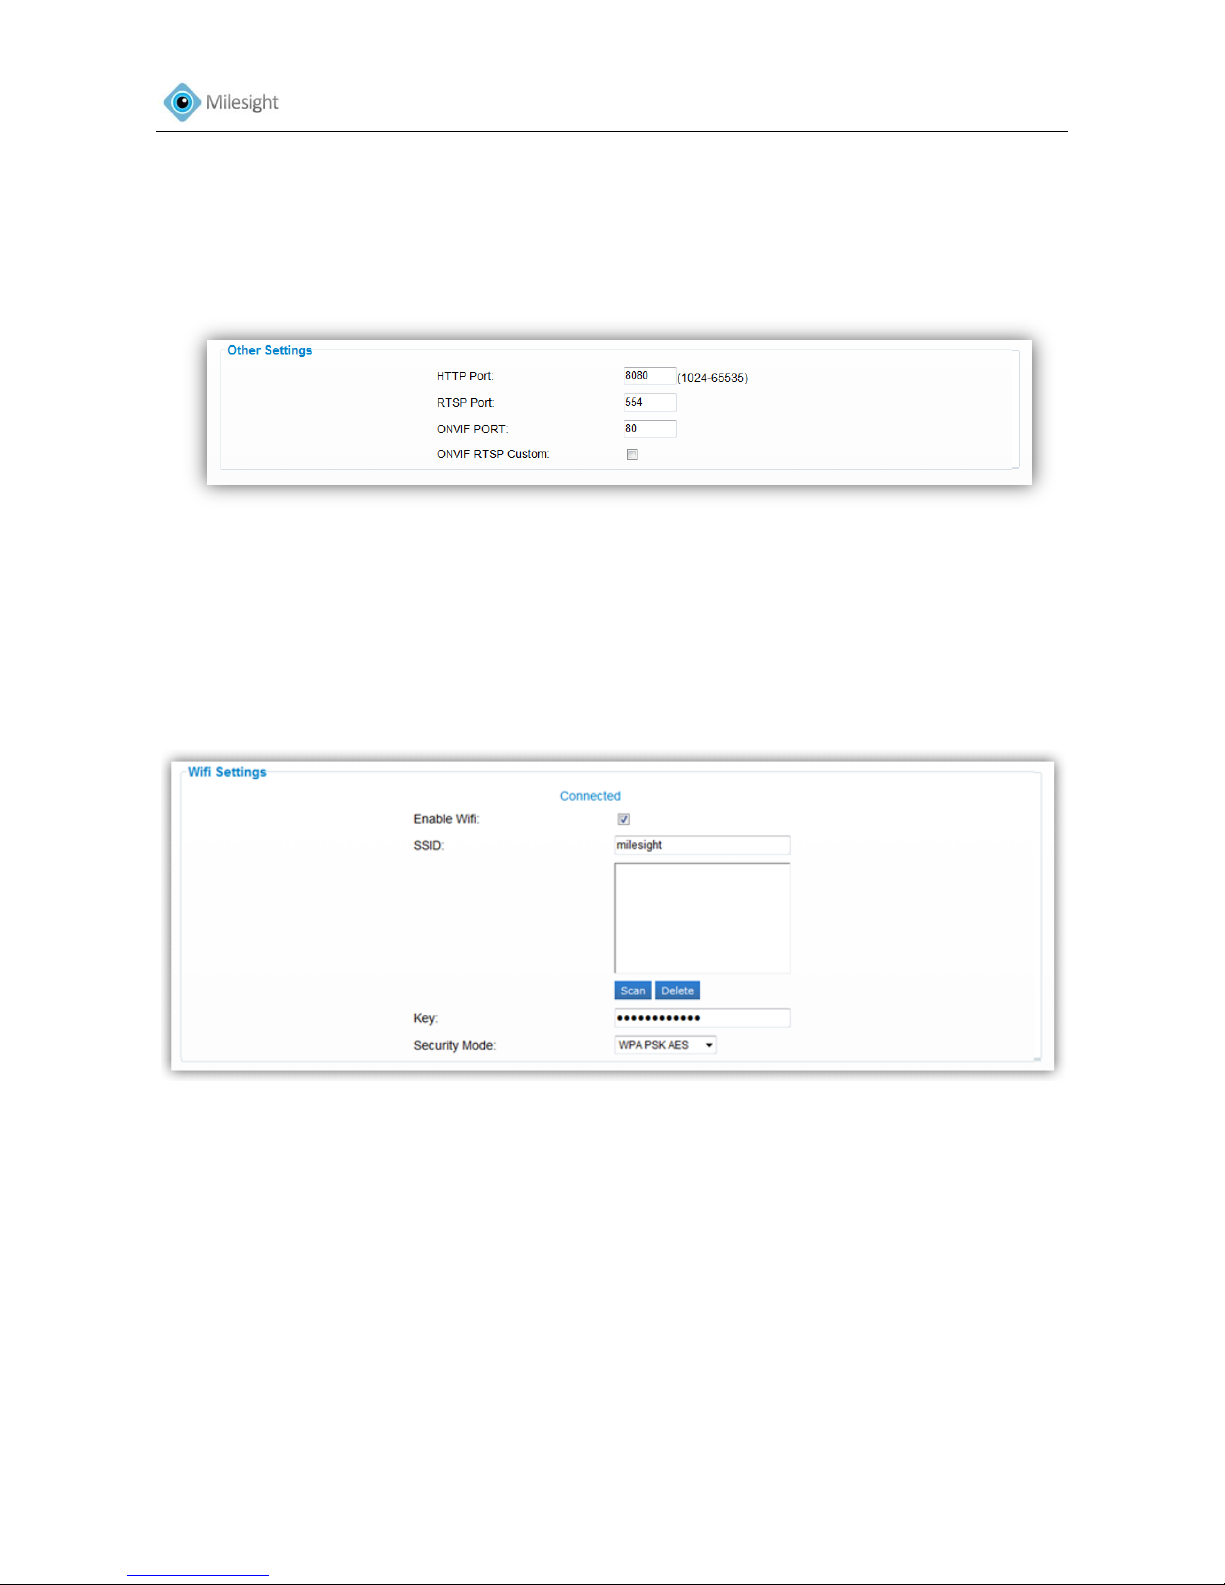
4.2.4 Network
Figure 4-8
IP Address Configuration
Get IP address automatically Get an IP address from the DHCP server automatically
Use fixed IP address
Page 38
User Manual
37
IP Address Address used to identify an network camera on the network
Subnet Mask It is used to identify the subnet where the network camera is located
Default Router It is used when the device accesses the external network
Primary DNS The DNS Server translates the domain name to IP address
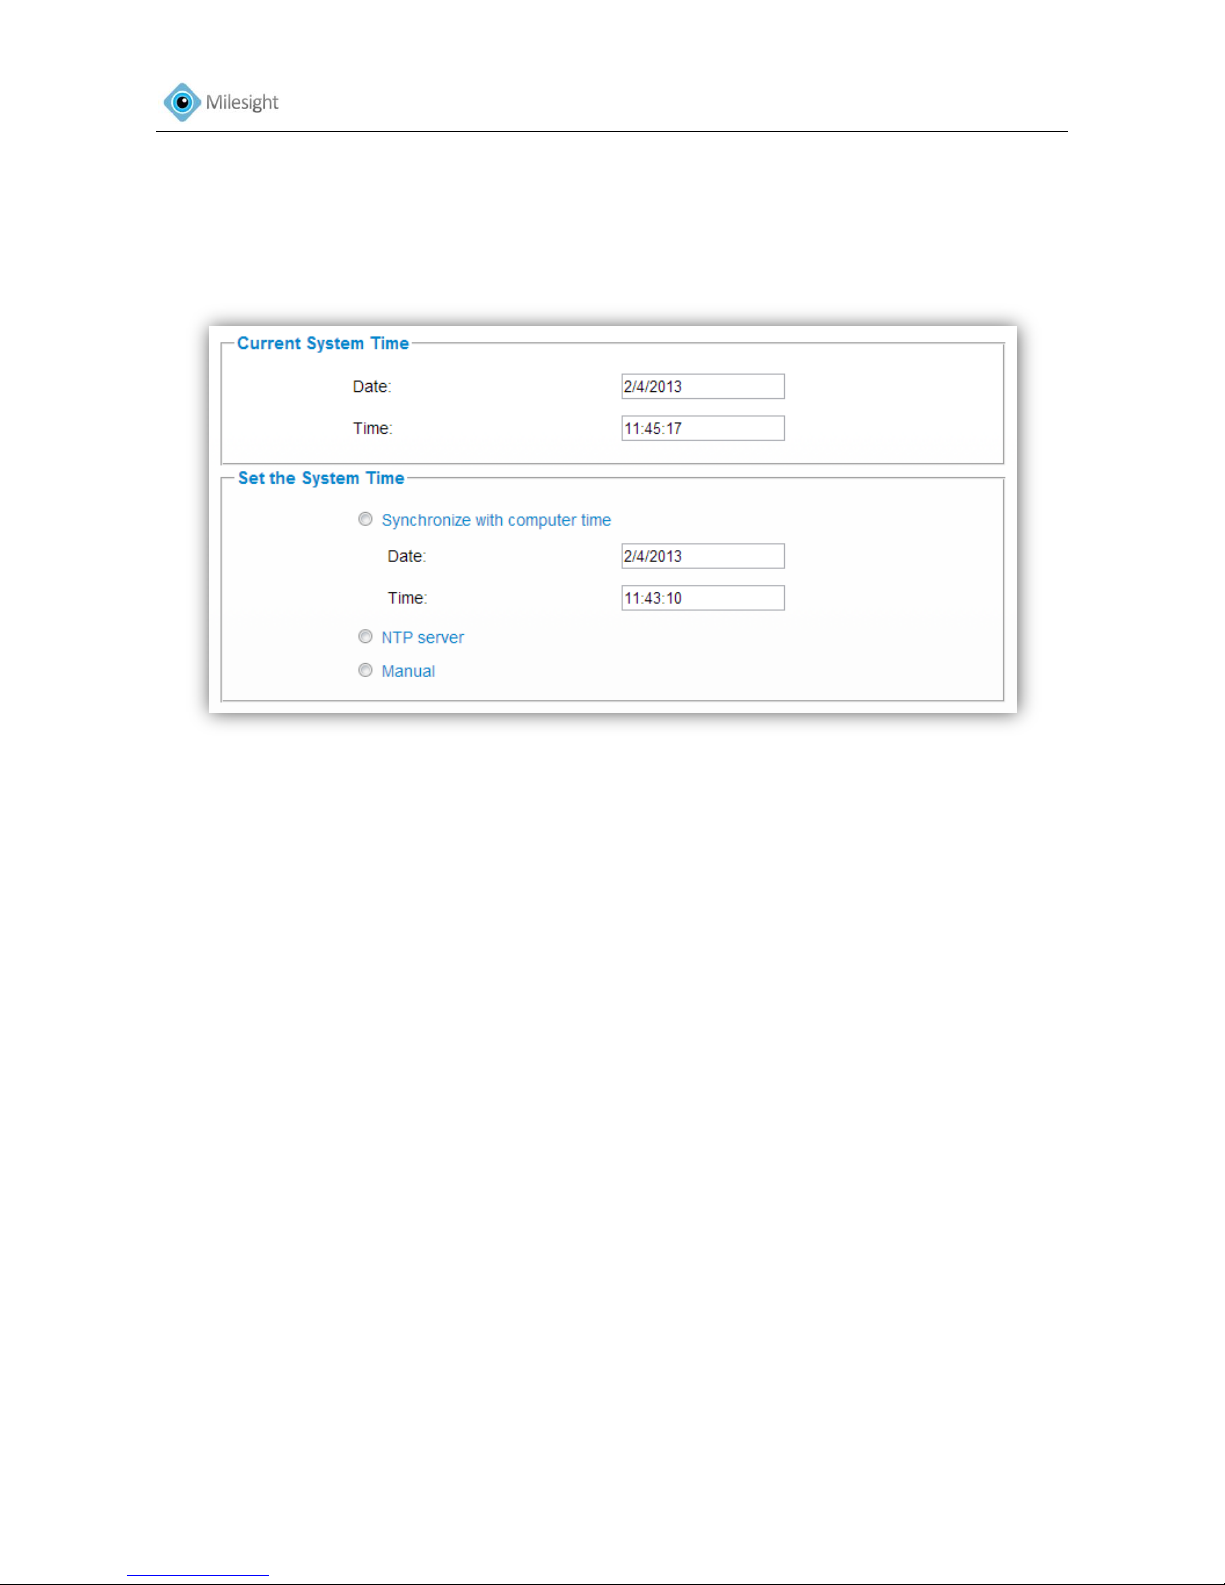
Other Settings
Figure 4-9
HTTP Port Web GUI log on port
RTSP Port Port to connect Network Camera via RTSP protocol
ONVIF PORT Port to connect Network Camera via ONVIF protocol
4.2.5 Wi-Fi*
Figure 4-10
WI-FI Settings*
Enable WI-FI Check the checkbox to enable WI-FI
SSID
Scan Click Scan to search all available wireless networks
Delete Click Delete to remove the network you choose
Key Enter the password of your SSID
Security Mode Select one mode from WEP/Shared, WEP/Open, WPA PSK TKIP, WPA PSK AES,
WPA2 PSK TKIP, WPA2 PSK AES and None.
WEP Default Key Only visible when WEP/Open or WEP/Shared mode is selected.
Page 39
User Manual
38
Note:
WI-FI function is only applicable for box cameras if purchased.
4.2.6 Date &Time
Figure 4-11
Current System Time
Current date &time of the system
Set the System Time
Synchronize with computer time Synchronize the time with your computer
NTP server Synchronize the time with configured SNTP server and selected time zone
Manual Set the system time Manually
4.3 Advanced Settings
4.3.1 DDNS
DDNS allows you to access the camera via domain names instead of IP address. It manages to
change IP address and update your domain information dynamically.
Page 40
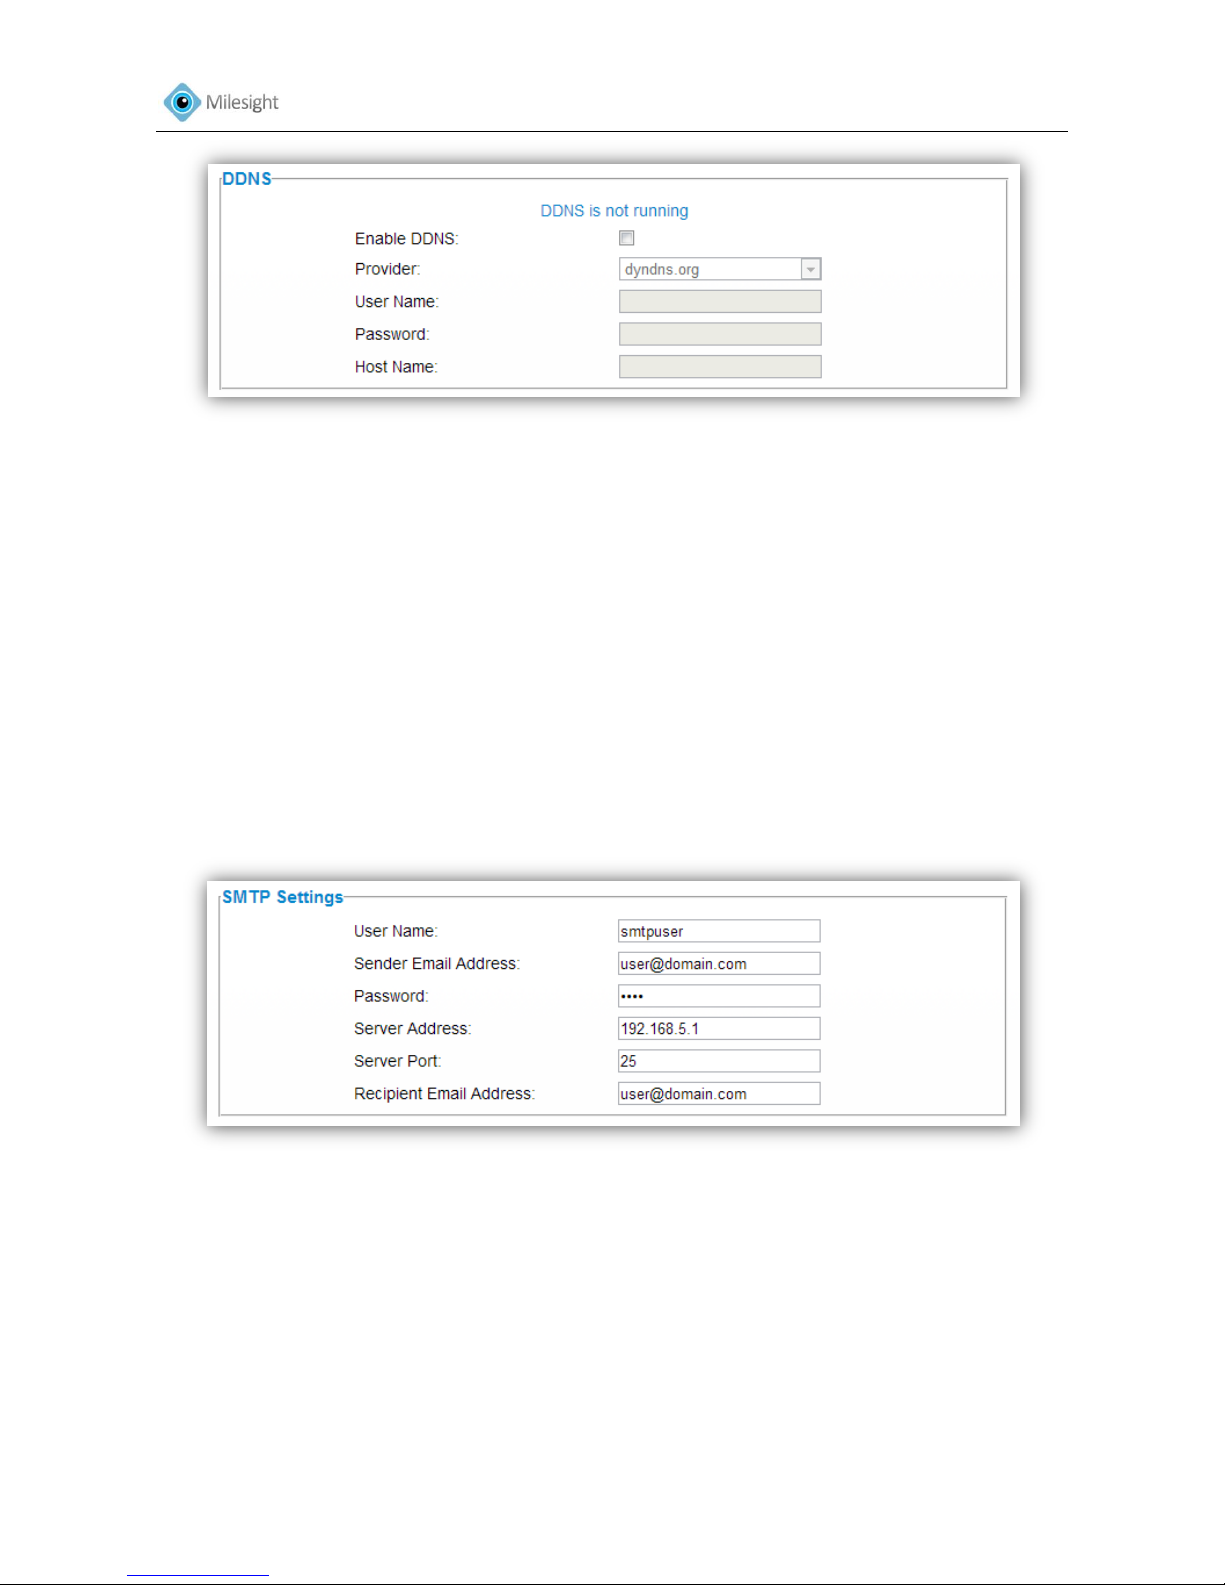
User Manual
39
Figure 4-12
DDNS
Enable DDNS Check the checkbox to enable DDNS service
Provider Support DDNS from now dyndns.org, freedns.afraid.org, www.no-ip.com,
www.zoneedit.com
User name Account name from the DDNS provider
Password Account password
Host name DDNS name enabled in the account
4.3.2 SMTP
Alarm video files can be sent to specific mail account through SMTP server. You must configure
the SMTP settings correctly before using it.
Figure 4-13
SMTP
User Name The sender's name. It is usually the same as the account name
Sender Email Address Email address to send video files attached emails
Password The password of the sender
Server Address SMTP server of the sender
Server Port The port of SMTP server
Recipient Email Address Email address to receive video files
Page 41
User Manual
40
4.3.3 FTP
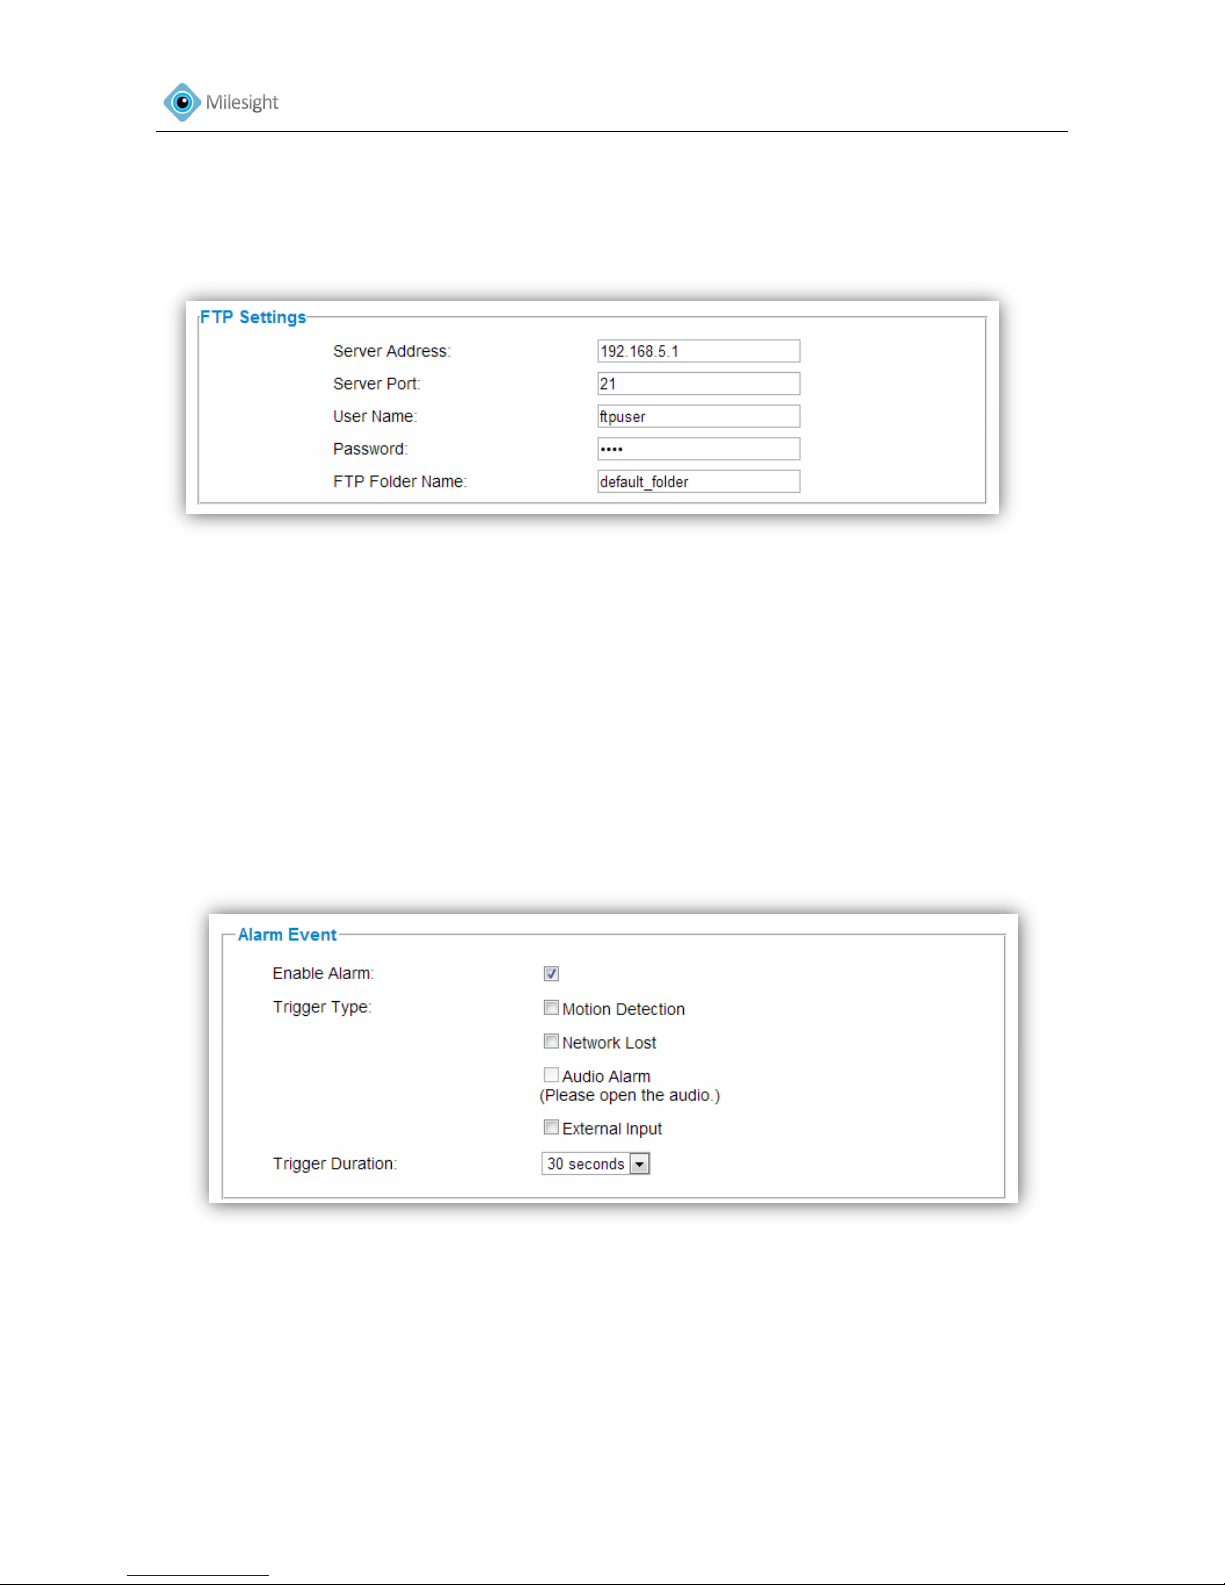
Alarm video files can be sent to specific FTP server. You must configure the FTP settings correctly
before using it.
Figure 4-14
FTP
Server Address FTP server address
Server Port The port of the FTP server. Generally it is 21
User Name User name used to log on the FTP sever
Password User password
FTP Folder Name Path where video will be uploaded to on the FTP server
4.3.4 Alarm
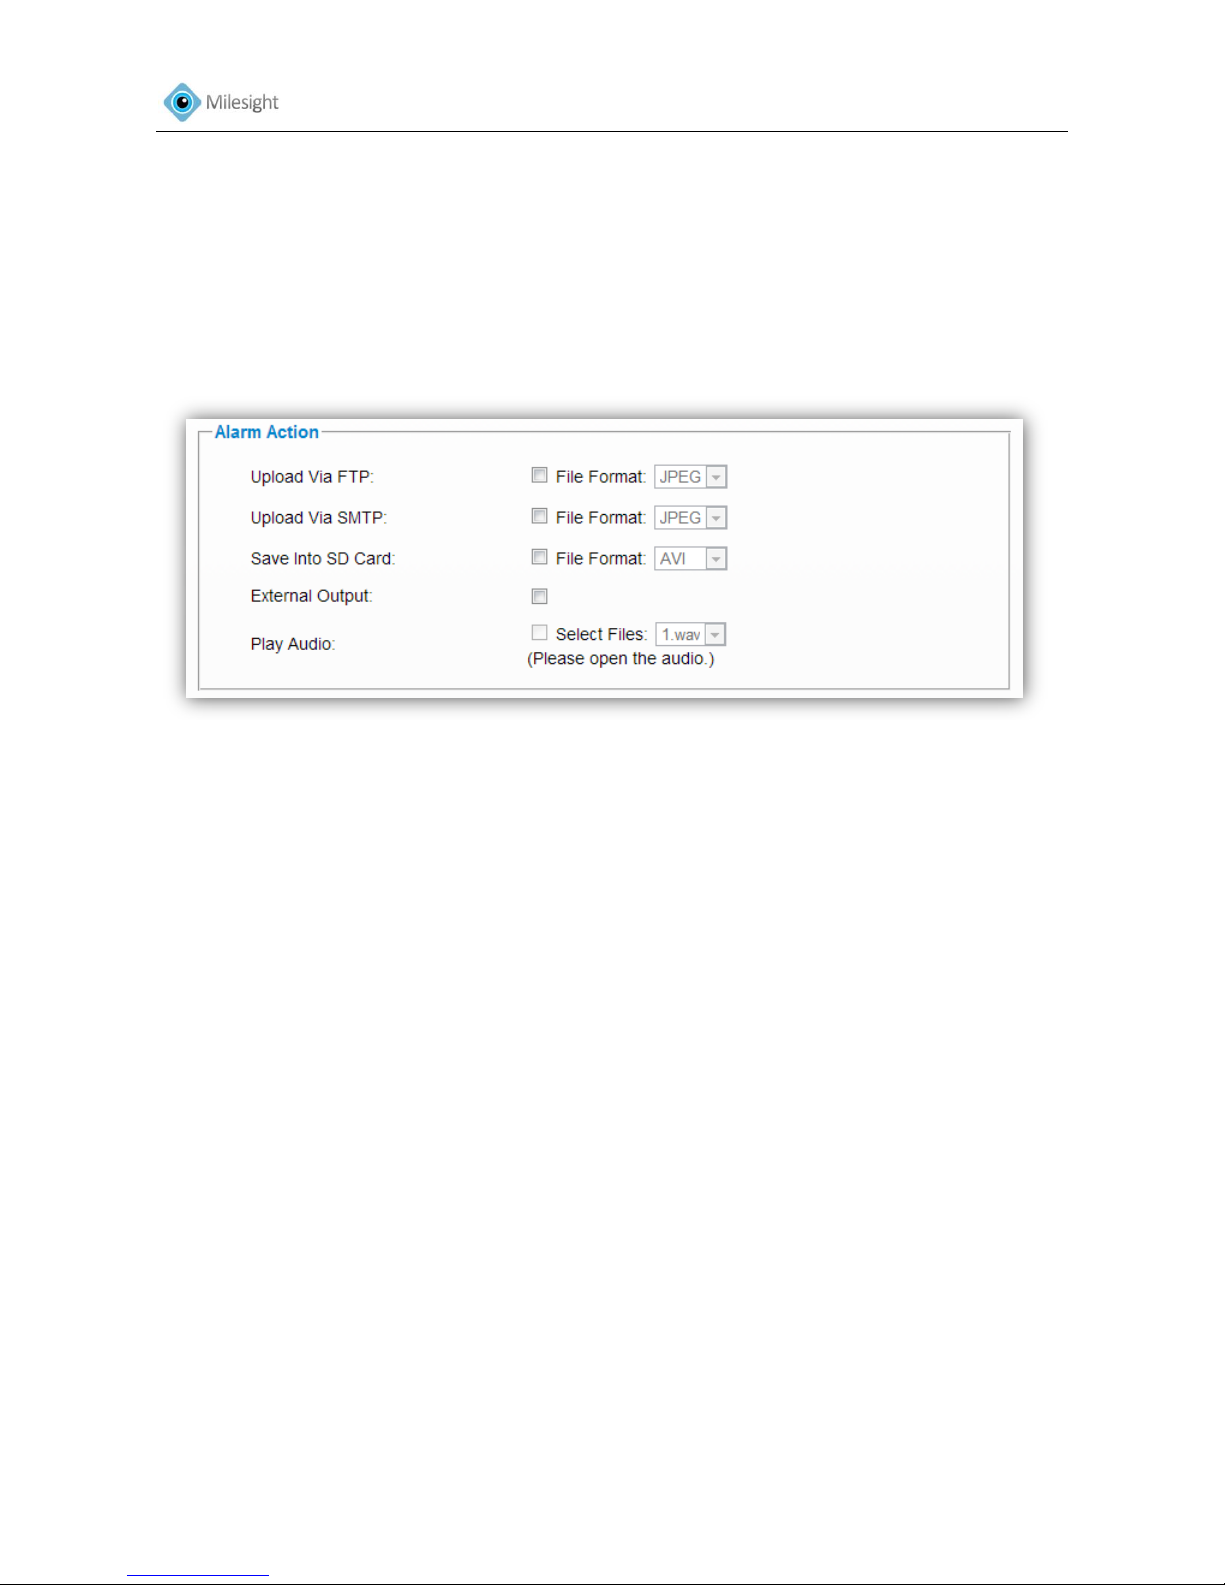
Figure 4-15
Alarm Event
Enable Alarm Check the checkbox to enable alarm feature
Trigger Type
Motion Detection Trigger alarm when any movement is detected in motion detection
monitored area. The image is divided into 4*3 areas, and you can select your preferred areas.
Network Lost Trigger alarm when the network connection is down or network cable is
Page 42
User Manual
41
tampered with
Audio Alarm (Please open the audio) Trigger alarm when the input gained volume is higher
than alarm level.
External Input Trigger alarm when there is external input
Trigger Duration Length of time an alarm lasts
Note:
Audio Alarm and External Input functions are only applicable when the selected model has
“Audio Input” and “Alarm Input” interfaces.
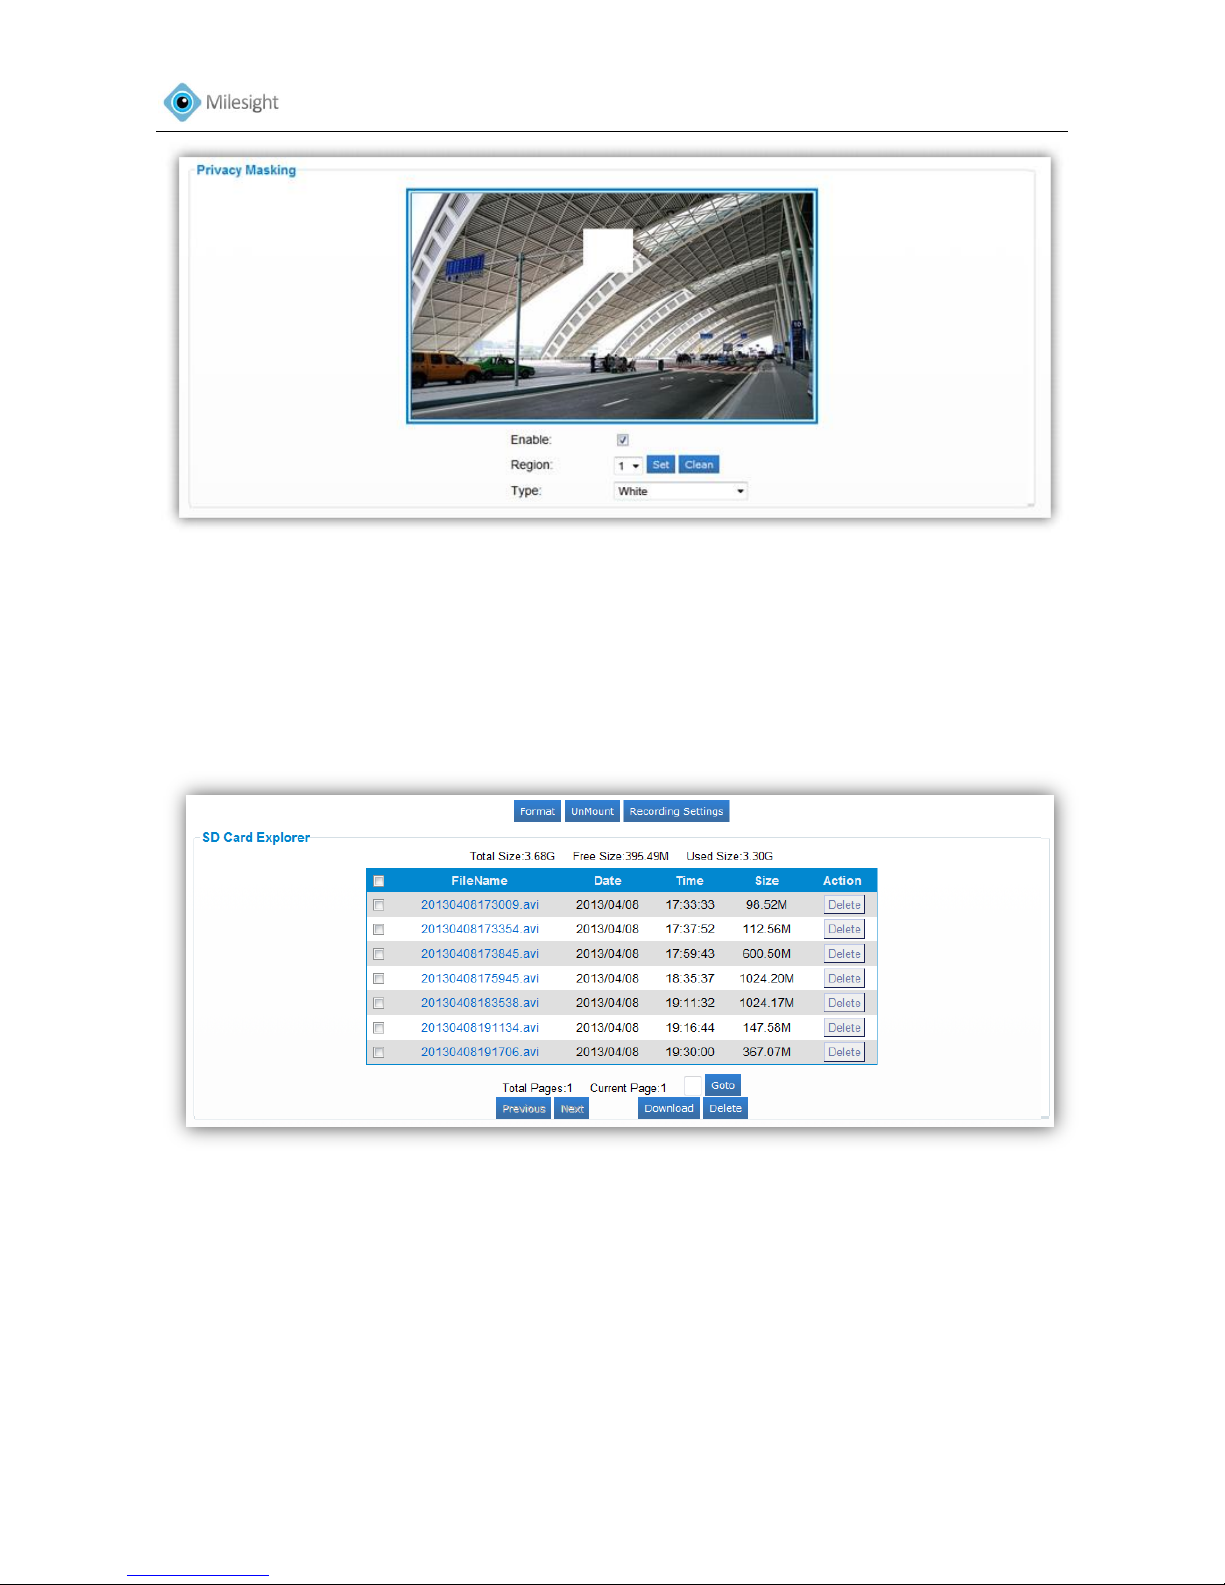
Figure 4-16
Alarm Action
Upload Via FTP Upload alarm recording files to the configured FTP server
Upload Via SMTP Upload alarm recording files to SMTP with the configured format
Save Into SD Card Save alarm recording files into the SD card inserted
External Output Output a level signal when an alarm is triggered
Play Audio Play specific audio file when an alarm is triggered
Note:
External Output and Play Audio functions are only applicable when the selected model has
“Alarm Output” and “Audio Output” interfaces.
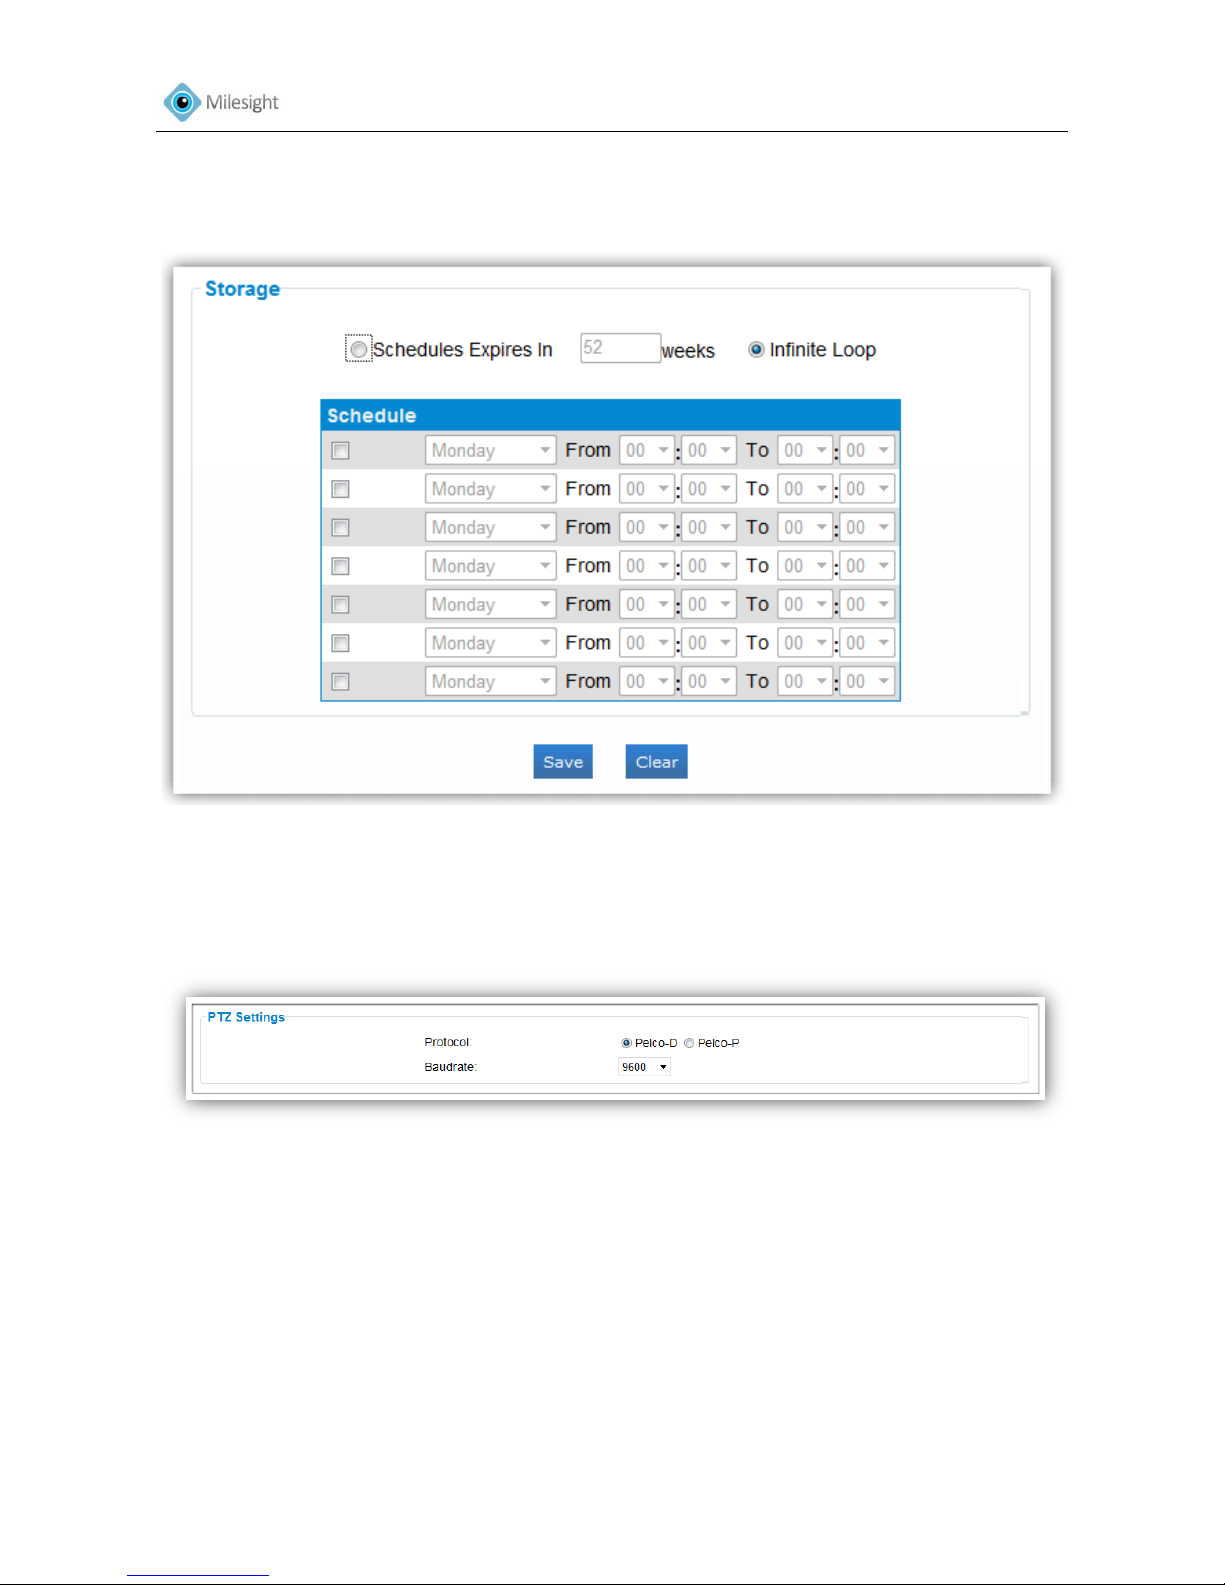
4.3.5 Privacy Masking
Privacy Masking is used to protect personal privacy by concealing parts of the image from view
with a masked area. Examples of this use would be masking windows of domestic properties or
car number plates which are not subject to surveillance.
After enabling the privacy masking, you can select a region No.1-4 and type of mask. Then draw
a square covering your sensitive area by mouse. Click ‘set‘ will bring the masking into effect. Click
‘Clean’ to cancel a specific privacy masking area.
Page 43
User Manual
42
Figure 4-17
4.3.6 SD Card
Files will be seen on this page when they are configured to save onto SD card. You can configure
time schedules of video recording everyday and save video files to your desired location.
Note: Files are visible once SD card is inserted. Don’t insert or plug out SD card when power on.
Figure 4-18
SD Card
Format Format the SD card
UnMount Unmount the SD card. Once unmounted, the files will not be listed.
File Name File name of the video files
Date Date files saved
Time Length of the files in seconds
Size File size
Action Delete files
Page 44
User Manual
43
Storage settings
Schedules Expires in Set the expire time of video files. Infinite Loop means video files will not
expire. Old ones will be deleted when there is not enough space
Schedule Set the time table for video recording
Figure 4-19
4.3.7 PTZ
Figure 4-20
PTZ Settings
Protocol Select the PTZ protocol your camera support
Baudrate Select the Baudrate from the drop down menu. Baud rate is the number of distinct
symbol changes (signaling events) made to the transmission medium per second in a digitally
modulated signal or a line code.
4.3.8 User
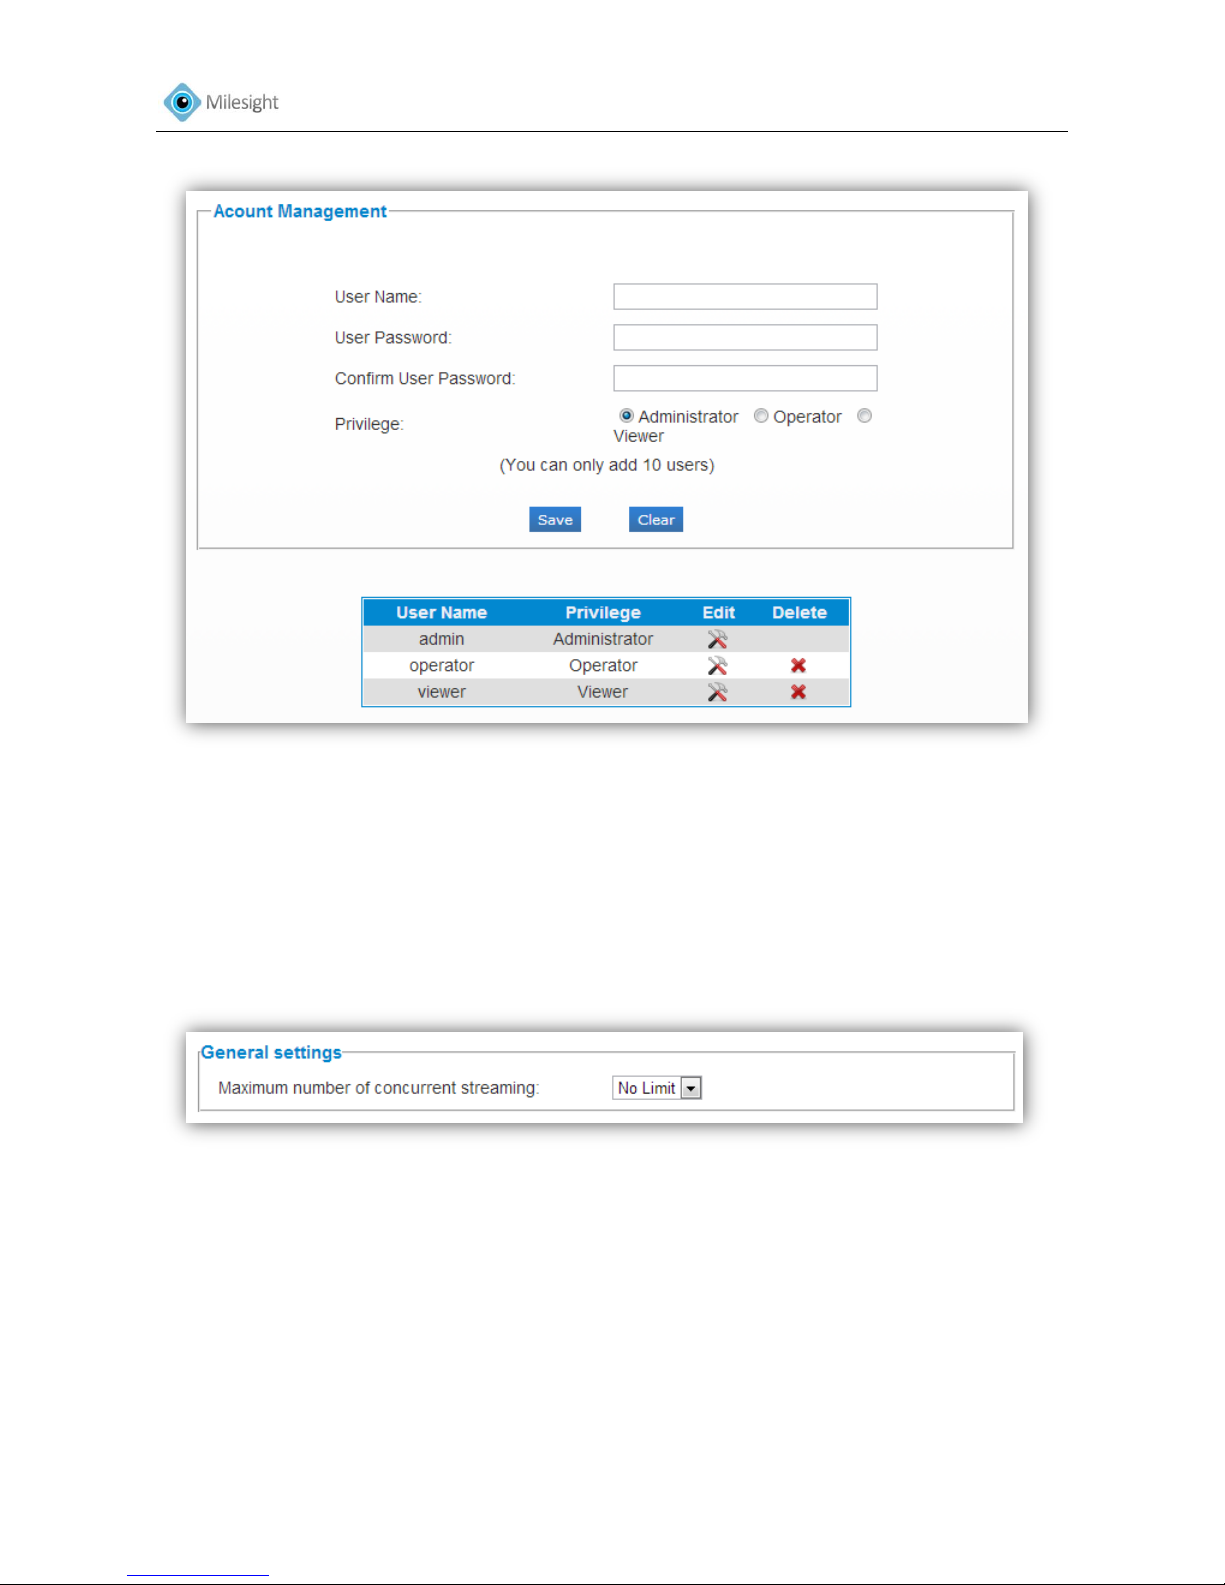
Three privilege levels are available, including admin, operator and viewer. Up to 10 users can be
Page 45
User Manual
44
added to this system.
Figure 4-21
Administrator An administrator can manage all configuration pages of the device. Including
change user password, add or delete users (the default user 'admin' cannot be deleted).
Operator An operator can manage all configuration pages except the User page.
Viewer A viewer can`t change any settings.
4.3.9 Access List
Figure 4-22
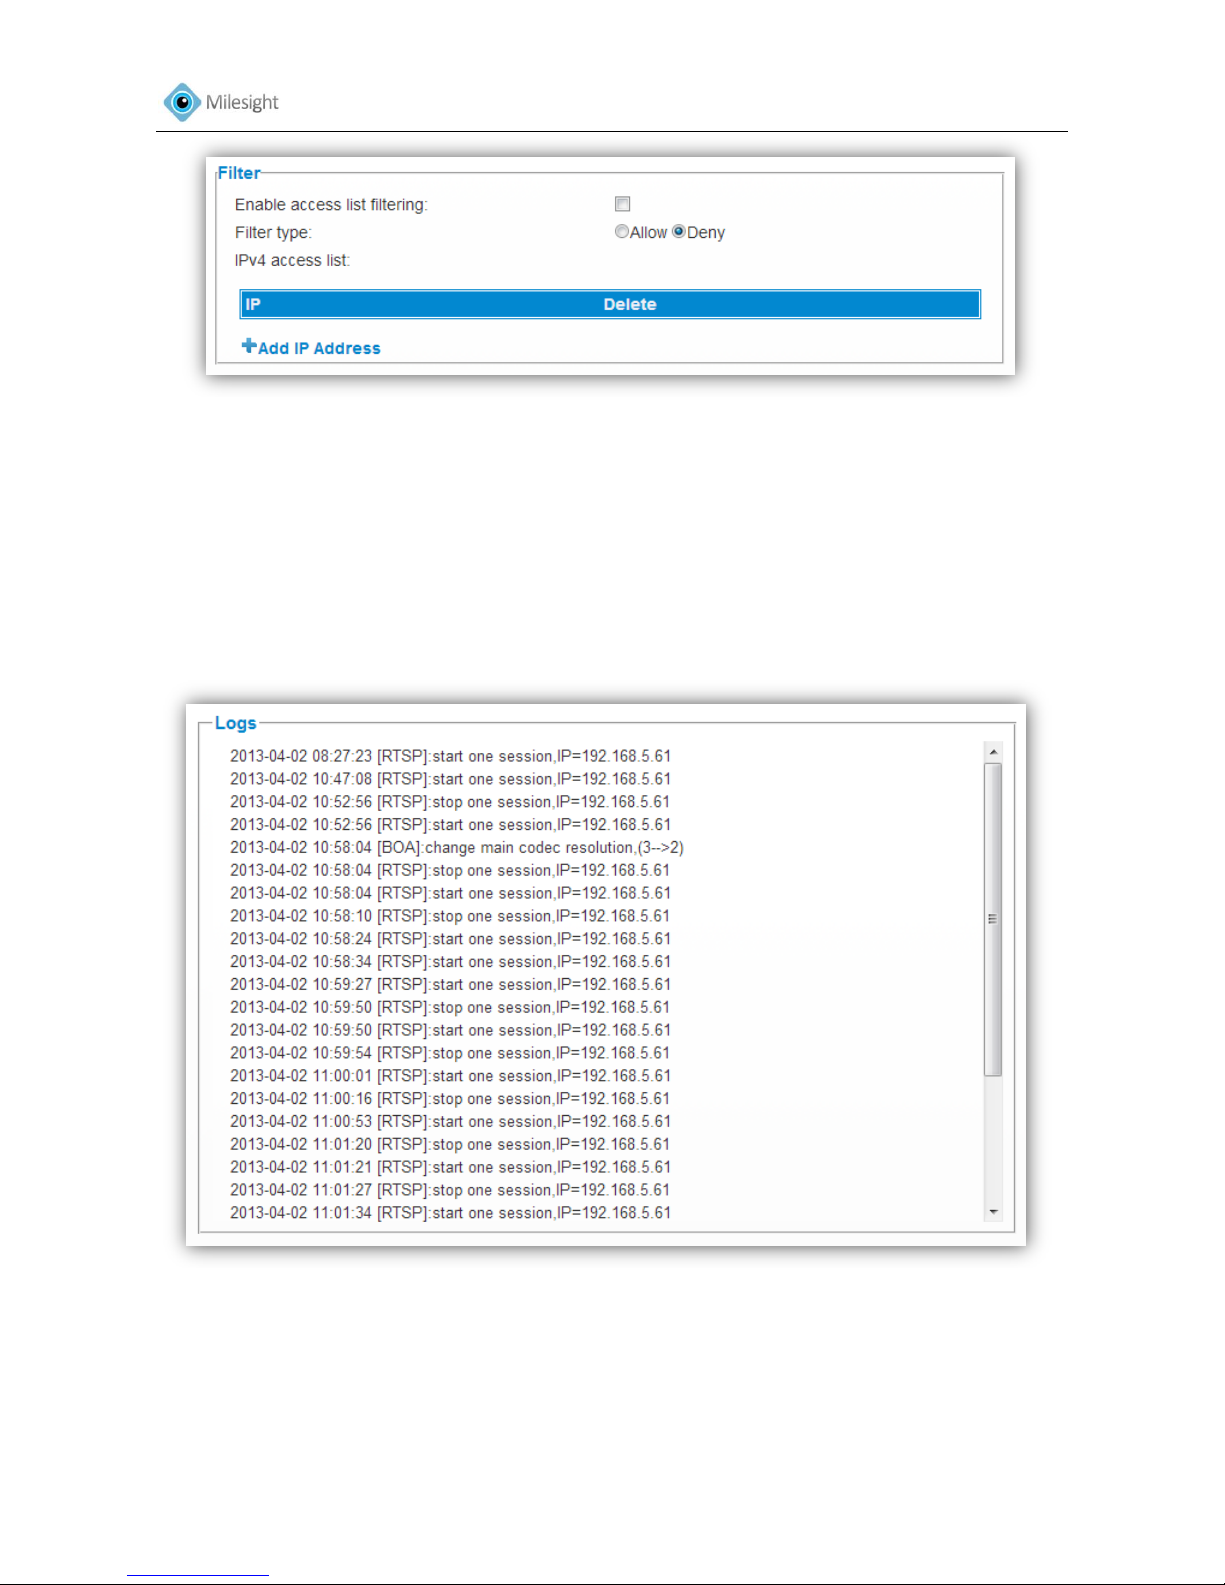
General Settings
Maximum number of concurrent streaming Select the maximum number of concurrent
Streaming. Options include No Limit, 1, 2, 3, 4, 5
Filter
Page 46
User Manual
45
Figure 4-23
Enable access list filtering Able to access or restrict access for some IP address
Filter type Access or restrict access
IPv4 access list The IP address to access or restrict access
4.3.10 Logs
The logs contain the information about the time and IP that has accessed the camera through
web.
Figure 4-24
4.4 System
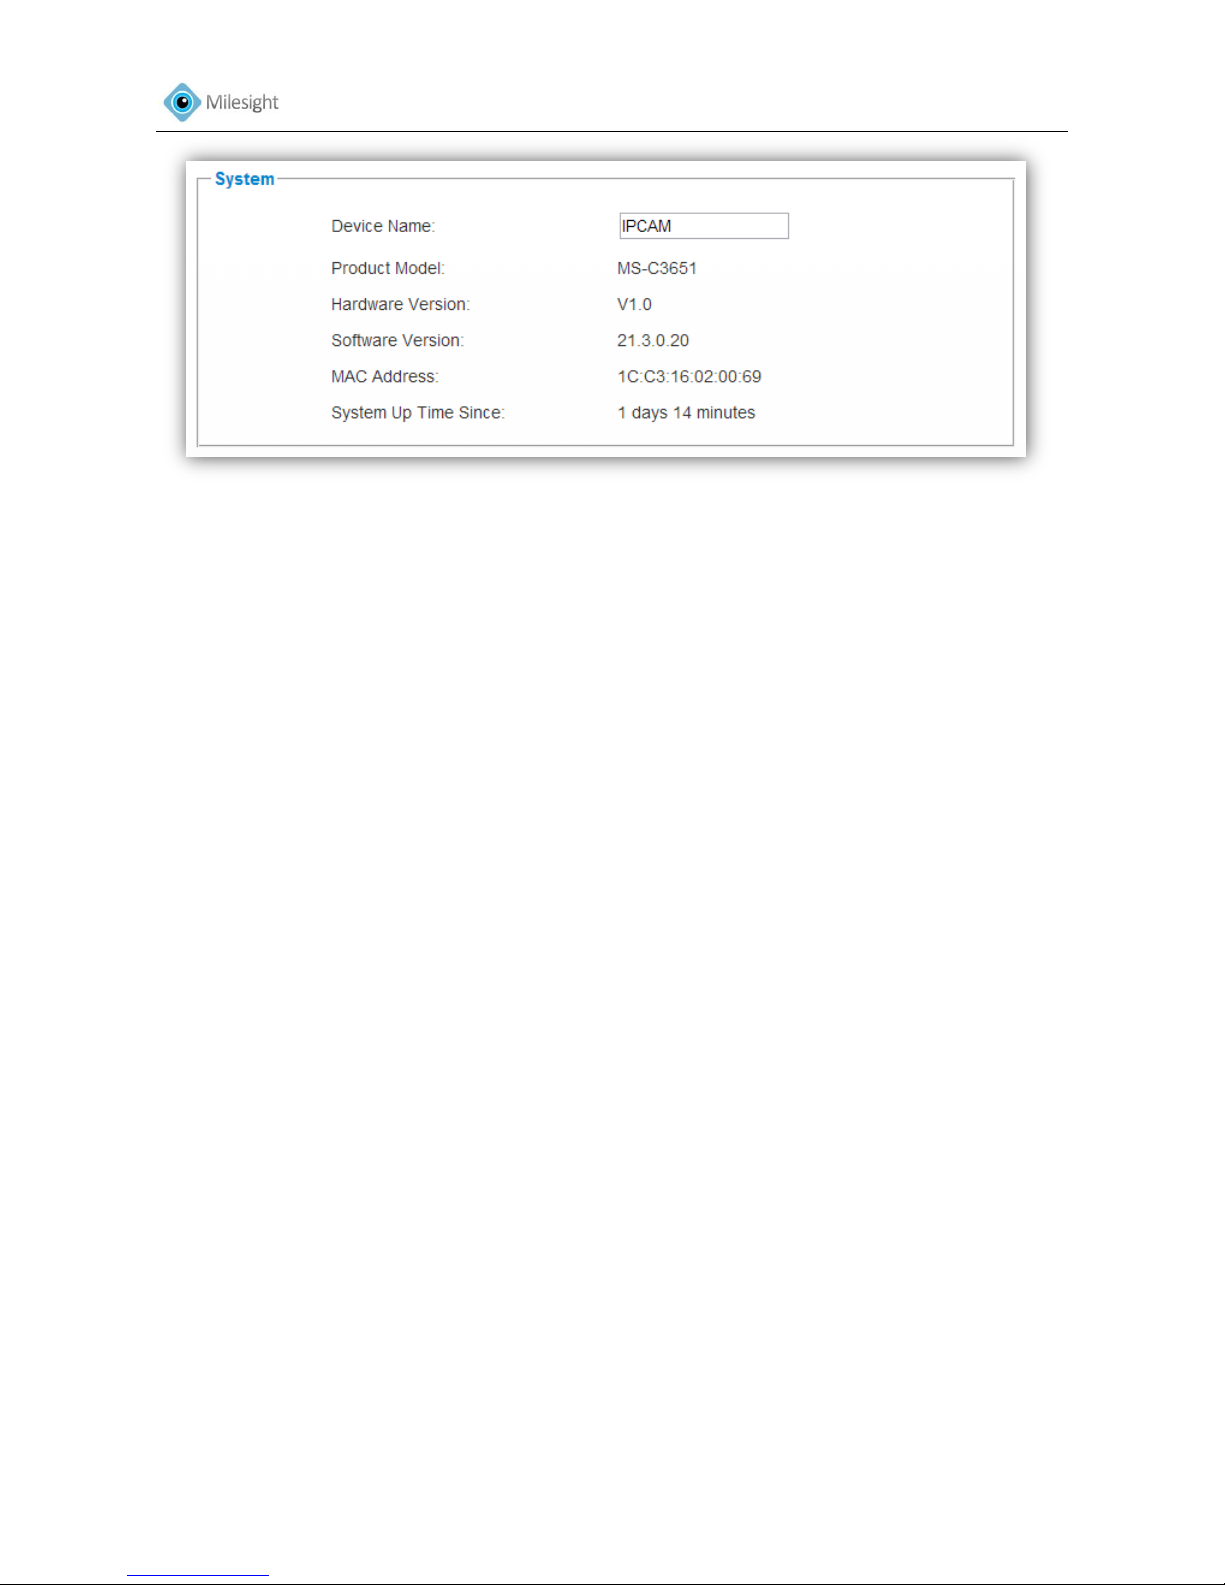
All information about the hardware and software of the camera can be checked on this page.
Page 47
User Manual
46
Figure 4-25
System
Device Name The device name can be customized. It will be seen in file names of video files
Product Model The product model of the camera
Hardware Version The hardware version of the camera
Software Version The software version of the camera can be upgraded
MAC Address Media Access Control address
System Up Time Since The elapsed time since the device was last restarted
4.5 Maintenance
The software can be upgraded by the following steps
1. Browse and select the upgrading file.
2. Click the 'update' button after it prompts upload file successfully. After the system reboots
successfully, the update is done.
Note: Do not disconnect the power of the device during the update. The device will be restarted to complete
the upgrading.
.
Page 48
User Manual
47
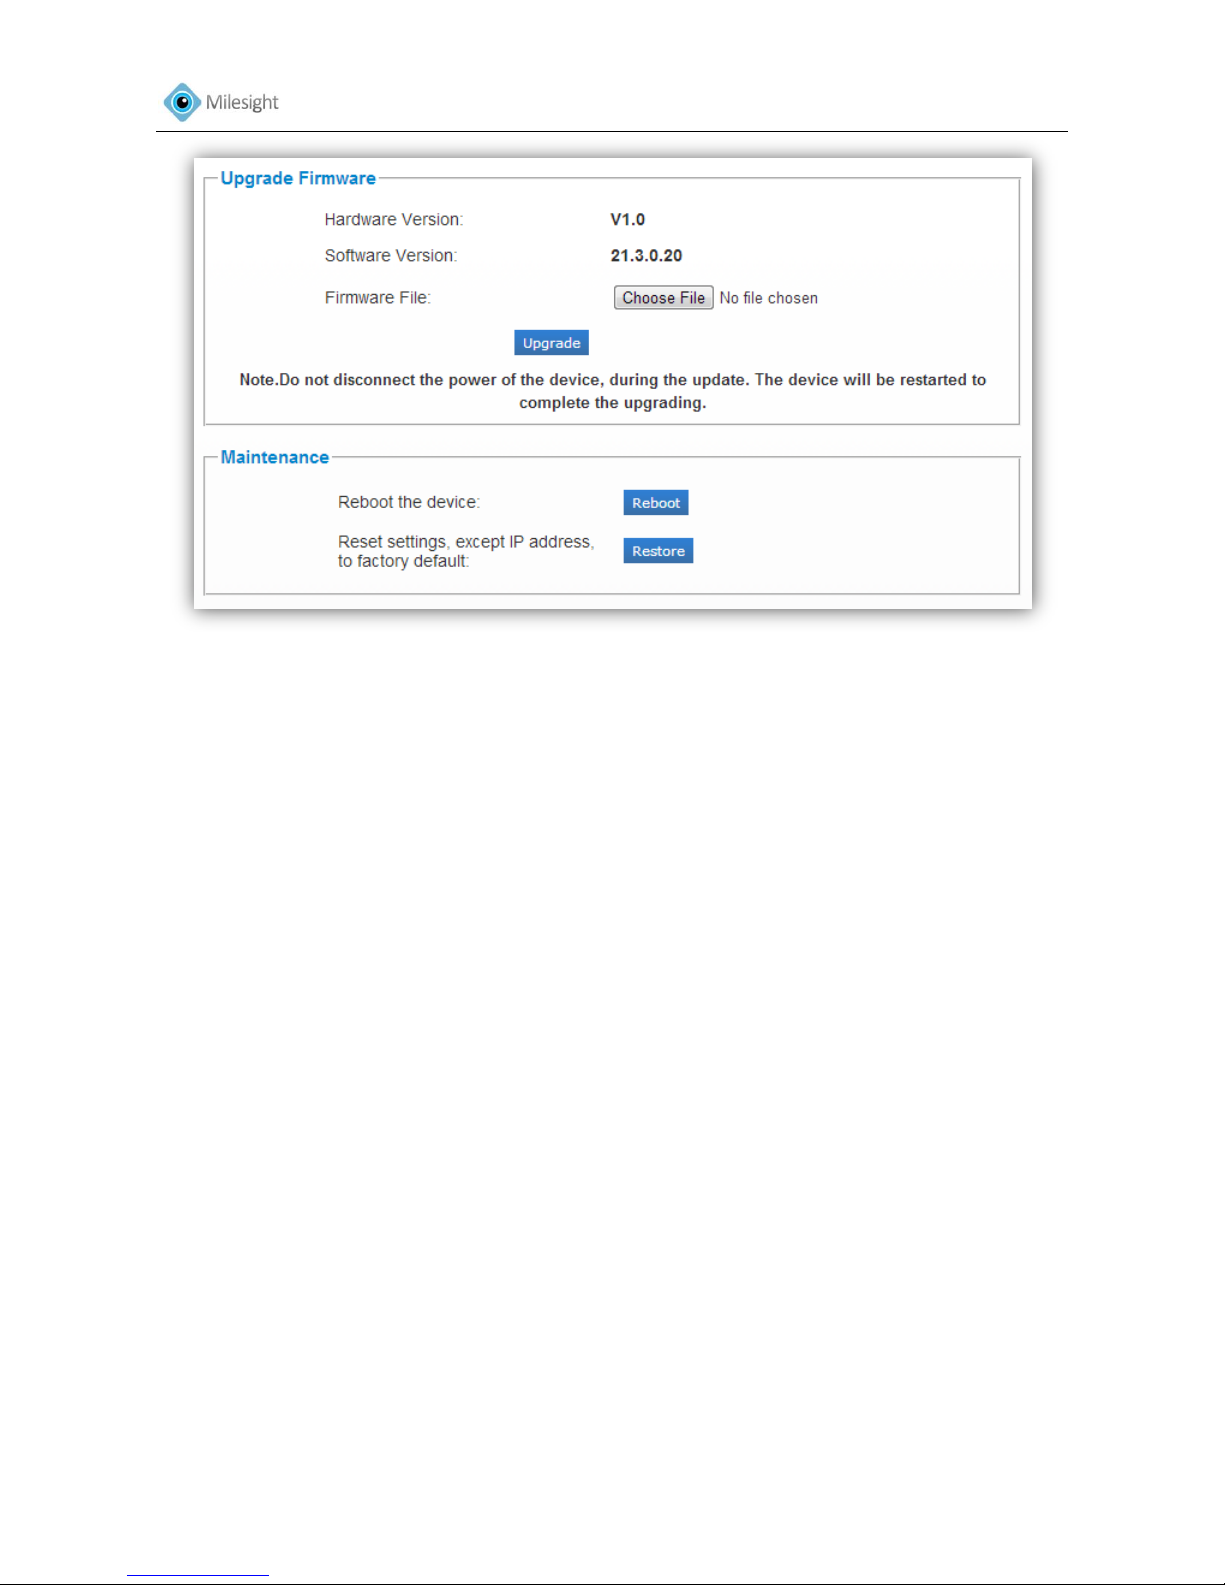
Figure 4-26
Upgrade Firmware
Hardware Version The hardware version of the camera
Software Version The software version of the camera
Firmware File Select the firmware used to upgrade
Maintenance
Restart the device Click 'restart' button to restart the device immediately
Restore settings, except IP address to Factory Default Click 'Restore' button to restore the
camera to factory default settings
Page 49

User Manual
48
Chapter V Services
Milesight Technology Co., Ltd provides customers with timely and comprehensive technical
support services. End-users can contact your local dealer to obtain technical support.
Distributors and resellers can contact directly with Milesight for technical support.
Te chnical Support Mailbox: [email protected]
Web: http://www.milesight.com
Online Problem Submission System: http://www.milesight.com/service/feedback.asp
Address: Room 606, No.23 Wanghai Road, 2nd Software Park, Xiamen, China
Zip Code: 361006
TEL: +86-592-5922772
FAX: +86-592-5922775
Milesight
More in Sight
 Loading...