

Page 1

MILAN CLIMAX 2.1 CHANNEL SOUND BAR WITH HDMI
USER MANUAL
Page 2

ELAS02
Milan Climax 2.1 Channel Sound Bar with HDMI
User Manual
Promoting Enjoyable Living
Offered by
www.milanity.com
Page 3

1. Introduction
1.1 Product Description
1.2 Features and Specifications
1.3 Overview of IR Remote
1.4 Connecting the sound bar to your television
1.5 Connecting a TV, DVD or GAME CONSOLE using a RCA – RCA audio cable
1.6 Connecting a MP3 player
2. Operating the sound bar
3. Care and Maintenance
4. Warranty Policy
Table of contents
Page 4

1.0 Introduction
Thank you for purchasing Milanity’s digital living products. We have designed and developed our
products with emphasis on ease-of-use and cost-effectiveness. This manual contains information on the
features and specifications of this product and its installation procedures. When this product is installed
and used in the recommended manner, you will be able to enjoy the vast benefits that Milan Digital
Living Experience (DLE) has to offer.
1.1 Product Description
The Milan Climax 2.1 Channel Sound Bar delivers excellent audio quality for a great music and TV
viewing experience. It has an array of connectivity options such as HDMI, Bluetooth, USB, Coaxial and
Optical. When integrated with Milan DLE, it is transformed into a “Smart Sound Bar” and is able to
respond to commands (such as Mute, Volume +/-, and Input Source) from the Milan DLE app for
smartphones and tablets. When paired with the Milan Climax Media Player, the sound bar can play
music playlists such as Relax or Entertain from the MoodPro feature in the Milan DLE app (in addition to
complementary lighting scenes when available) or automatically play music playlists at certain times of
the day or week (such as every morning at 6 AM). The Milan Climax 2.1 Channel Sound Bar integrated
with Milan DLE will completely transform your family’s entertainment experience.
Page 5
1.2 Features and Specifications
Features
Specifications
Attractive design and sleek
appearance
Power Output
60 W
Inbuilt tweeter/midrange speakers (two)
Frequency Response
20 Hz
– 20K Hz ± 3 db
Multiple input connectivity for audio
Input Sensitivity
550 mV
Play music directly from smartphones
Power Consumption
25 W
Easy to integrate with Milan Infoway
Standby Power Consumption
≤0.5 W
HDMI pass
-
through features enables
Dimensions
900 x 90 x 60 mm
Control the Sound Bar using the Milan
Full Range Speaker drivers
Impedance
- 4 ohms
Subwoofer
Impedance
– 8 ohms
Bluetooth Version
2.1
The following are the key features and specifications of this product:
and a subwoofer enable excellent audio
quality for great entertainment
experiences
sources
(TV/AUX/COAX/Bluetooth/OPTC/USB/H
DMI)
and tablets using Bluetooth
using Milan Infomap
video signals to be passed on from
source devices such as the Milan Climax
Media Player to display devices such as
telivisions
DLE app or IR remote control
Frequency response –
250 Hz ~ 20 KHz
Frequency response –
45 – 250 Hz
Page 6
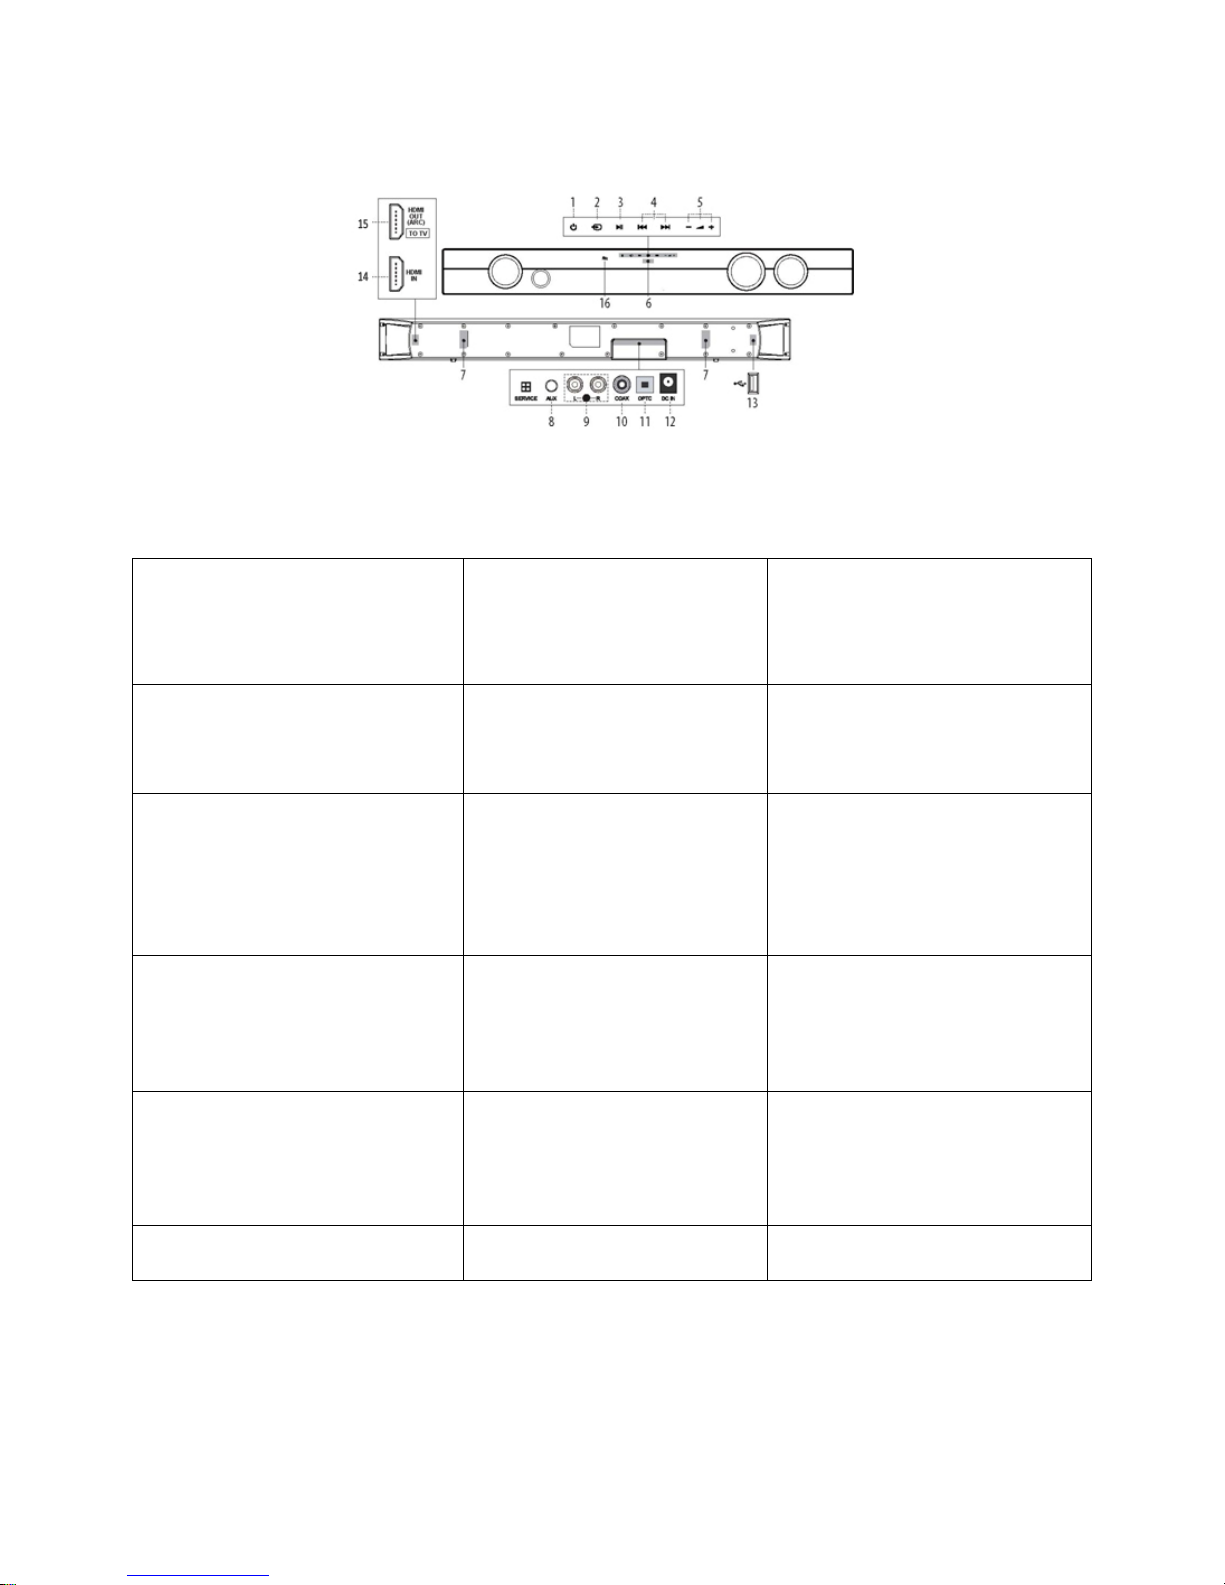
Figure 1: Overview of Milan Climax Sound Bar
1.
STANDBY
: Switch on the Sound
6.
Display:
Indicates the
11. OPTICAL AUDIO INPUT
:
2.
SOURCE
: Select an audio
7.
Wall Bracket:
Use these
12. DC IN SOCKET
of Sound Bar:
3.
PLAY/PAUSE
:
Play, Pause
or
8. AUX AUDIO INPUT (3.5mm):
13. USBPORT:
Audio input from a
4.
SKIP
:
Skip to the previous or
9. TV AUDIO INPUT (RCA):
14. HDMI IN:
Connect to the
5.
Volume + /
- : Increase or
10. COAXIAL AUDIO INPUT
15. TO TV
- HDMI OUT (ARC)
:
16.
NFC Area
Bar or switch to STANDBY Mode
source
TV,AUX,COAX,BT,OPTC,USB or
HDMI
Resume Playback in USB and
Bluetooth Mode
next track USB and Bluetooth
Mode
decrease the output volume
current status of the unit
brackets to fix the unit to a
wall
Connect the analog audio
output from an MP3 player or
similar device using a 3.5mm
audio cable
Connect the analog audio
output from a TV or other
audio source
(RCA): Connect the digital
audio output from a TV, DVD
or Blu-ray player
Connect the digital audio output
from a TV, DVD or Blu-ray player
Connect to the power adapter
24V, 1.5A
USB storage device
HDMI output on a digital device
Connect to the HDMI input on
the TV
Page 7
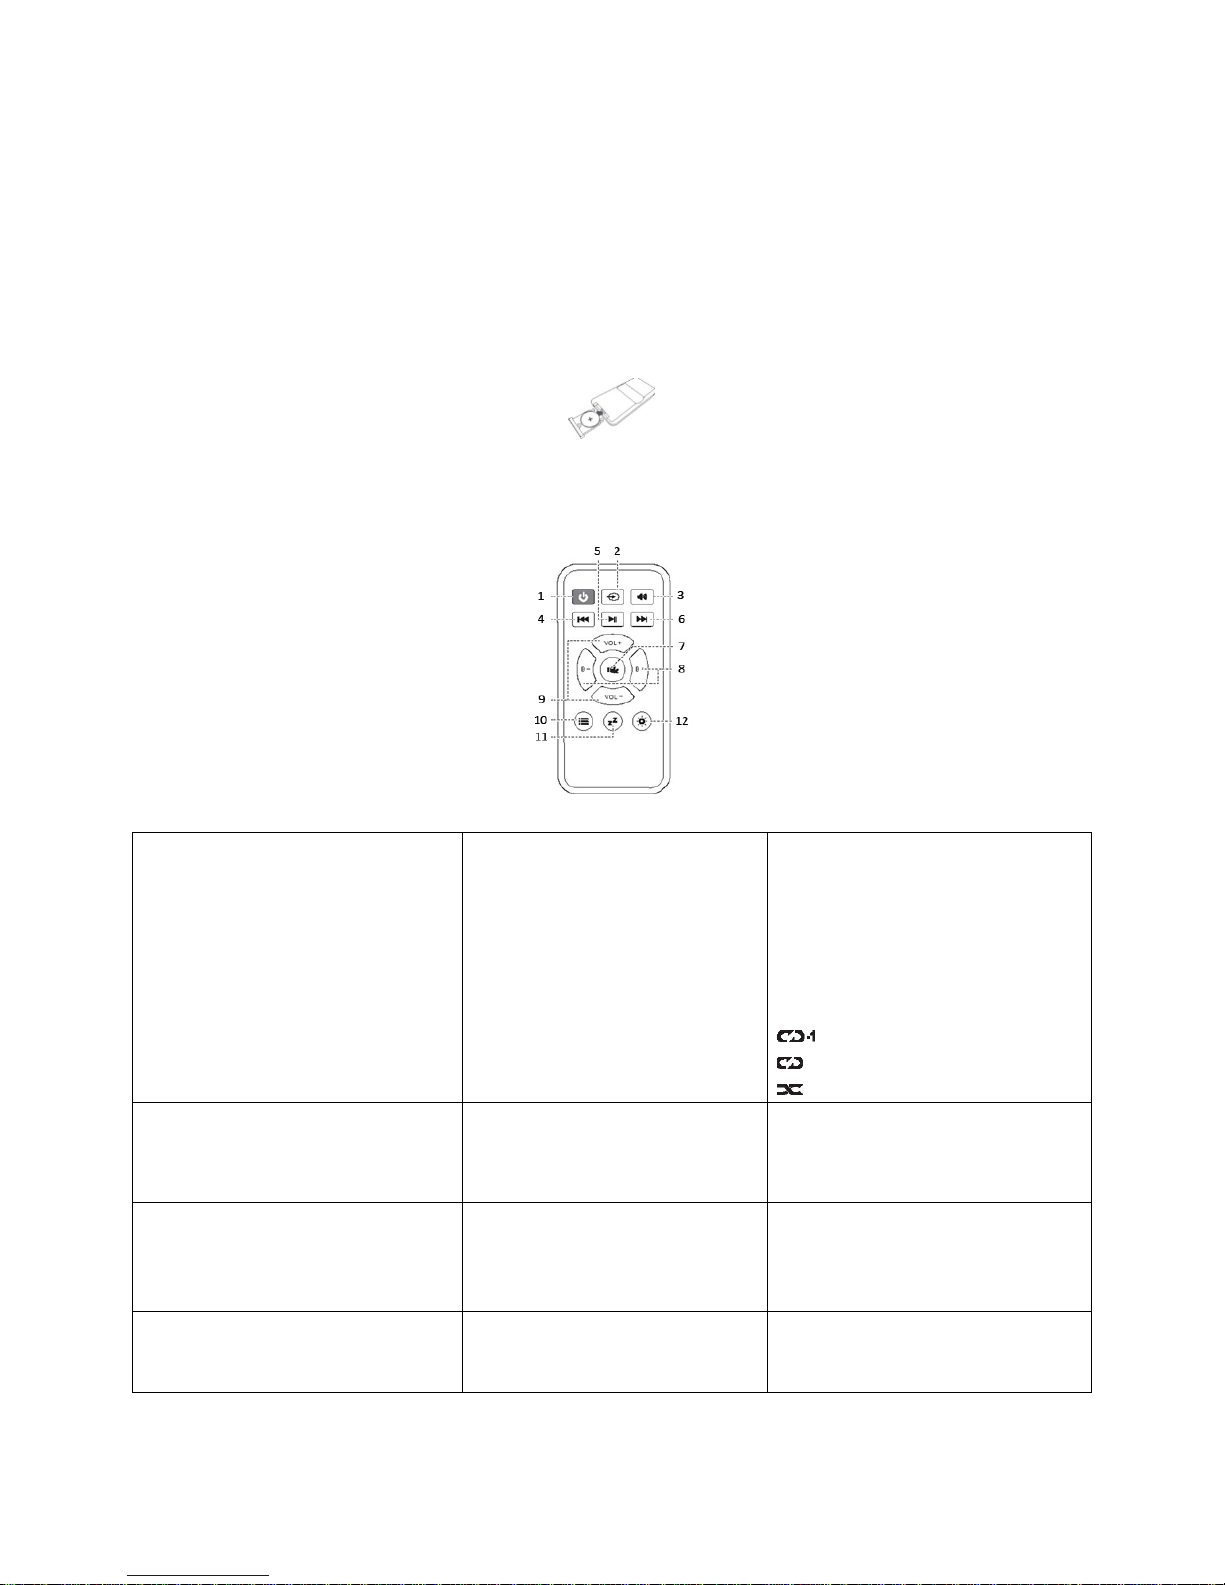
1.3 Overview of IR Remote
1.
STANDBY:
Switch on the Sound
5. PLAY/PAUSE
: PLAY, PAUSE
10. BLUETOOTH MODE
: press
2. SOURCE:
Select an audio from
7. MUTE:
Press to mute the
11. SLEEP:
Activates the sleep
3. SOUND EQ MODES:
Press
8.
BASS
-
/ +:
Increase or
12. DIM:
Press this button to
4 and 6.
SKIP
:
Skip to the previous
9. VOLUME
+ / -
: Increase or
Before using the remote for the first time, pull the tab out from the bottom of the remote control. This
allows the terminals to contact with the pre-installed batteries.
Inserting Batteries in the remote
Push and open the battery compartment on the bottom of the remote control using a finger nail.
Insert a CR2025 battery into the space make sure the + and – polarities. Replace the battery
compartment.
Bar or USB and switch to
STANDBY mode
TV, AUX, COAX, BT,
OPTICAL USB or HDMI inputs
repeatedly to assign different
sound EQ modes: STANDARD,
MOVIE, MUSIC or NEWS
or next track USB and Bluetooth
Mode
or RESUME USB and Bluetooth
playback
sound output
decrease the bass output
decrease the output volume
and hold for 3 seconds to
"unpair" a connected Bluetooth
device
● In USB mode, press repeatedly
to cycle through the repeat
modes:
(REPEAT)
(REPEAT ALL)
(RANDOM PLAY)
timer function
adjust the display brightness
Page 8
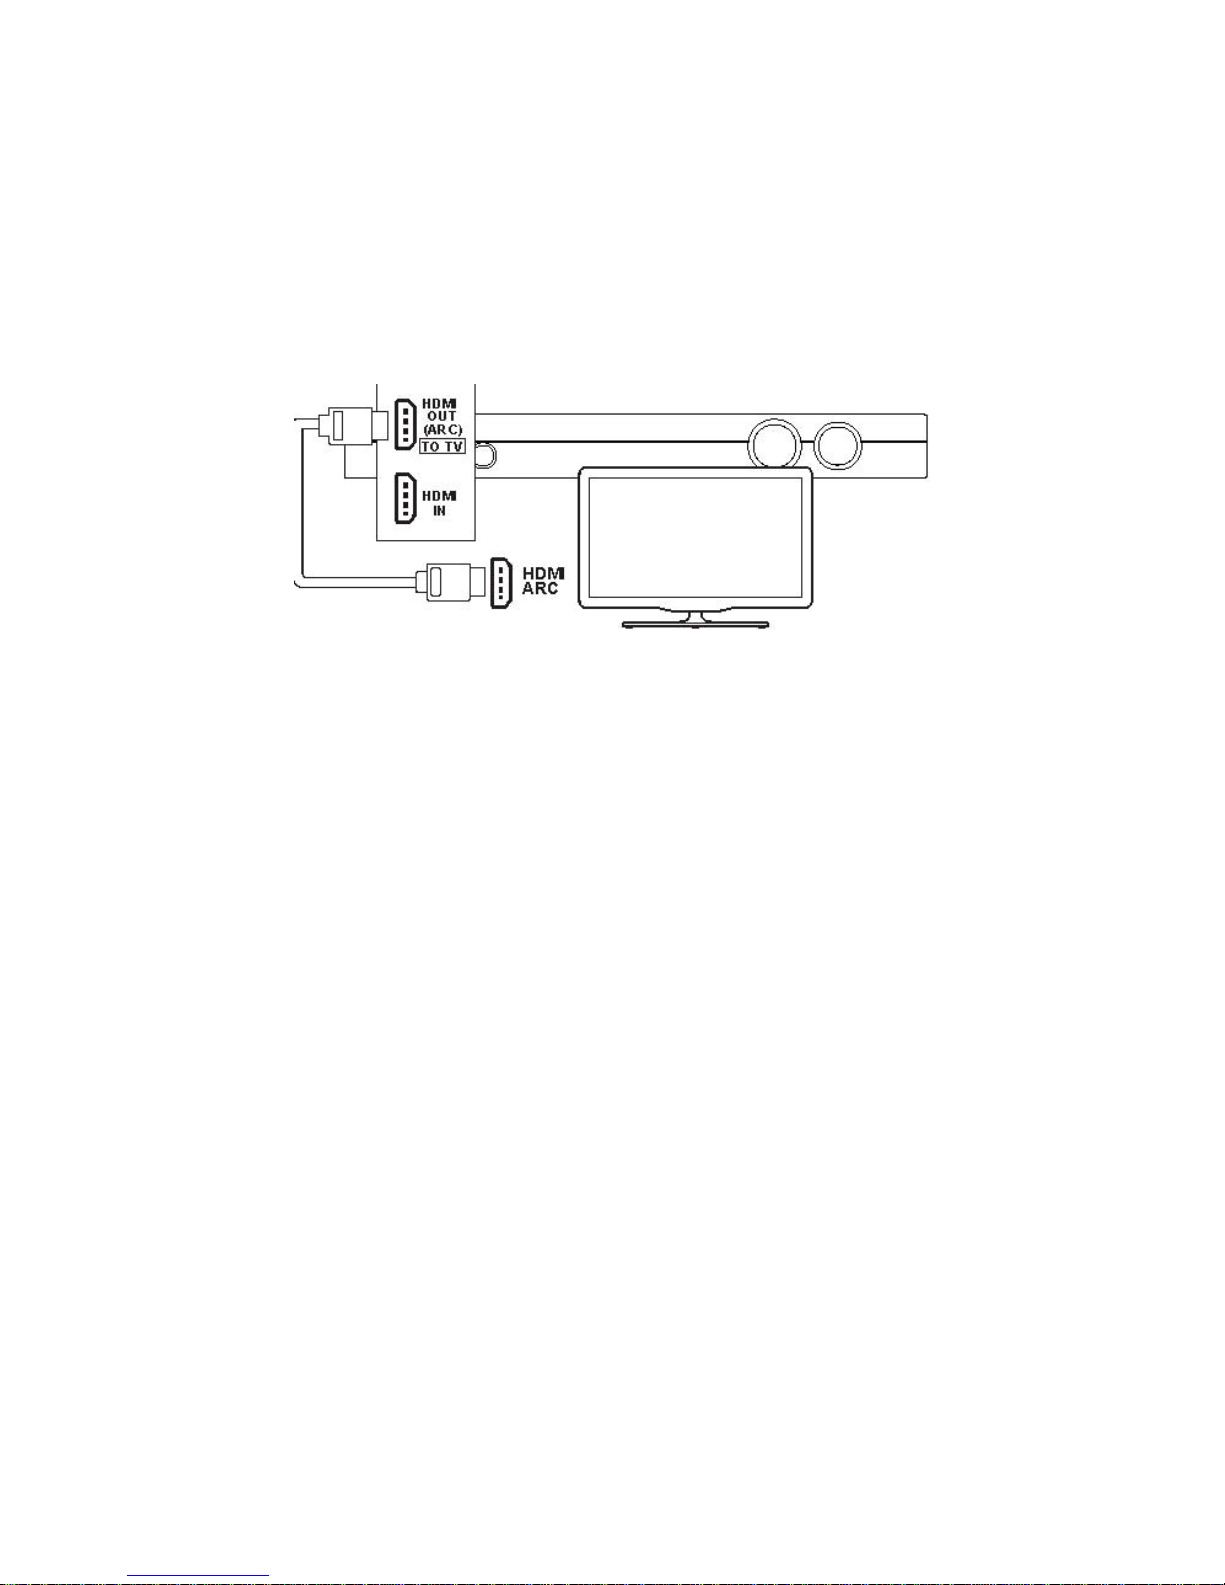
1.4 Connecting the Sound Bar to your Television
Connection to a TV using HDMI (ARC) cable: Your Sound Bar supports HDMI 1.4 with Audio Return
Channel (ARC). If your TV is HDMI ARC compliant, you can hear TV audio through your Sound Bar by
using a single HDMI cable.
Figure 2: Connecting the Sound Bar to a Television with a HDMI Cable
Connect one end of the HDMI cable (Type A, High Speed HDMI cable with Ethernet) to the HDMI ARC
socket on TV.
NOTE:
1. The HDMI ARC socket on TV might be labeled differently (see the TV manual for details).
2. Connect the other end to the [TO TV- HDMI OUT (ARC)] Input (15 in Figure 1) at the side of
Sound Bar.
3. On your TV, turn on the HDMI-CEC operations. For details, see the TV user manual.
4. If your TV is not HDMI ARC compliant, connect an audio cable to hear the TV audio through your
Sound Bar.
5. The setting method of HDMI-CEC and ARC may differ depending on the TV. For details about
ARC function, refer to your TV manual.
6. You may need to activate PCM (Downmix) on your TV.
Page 9
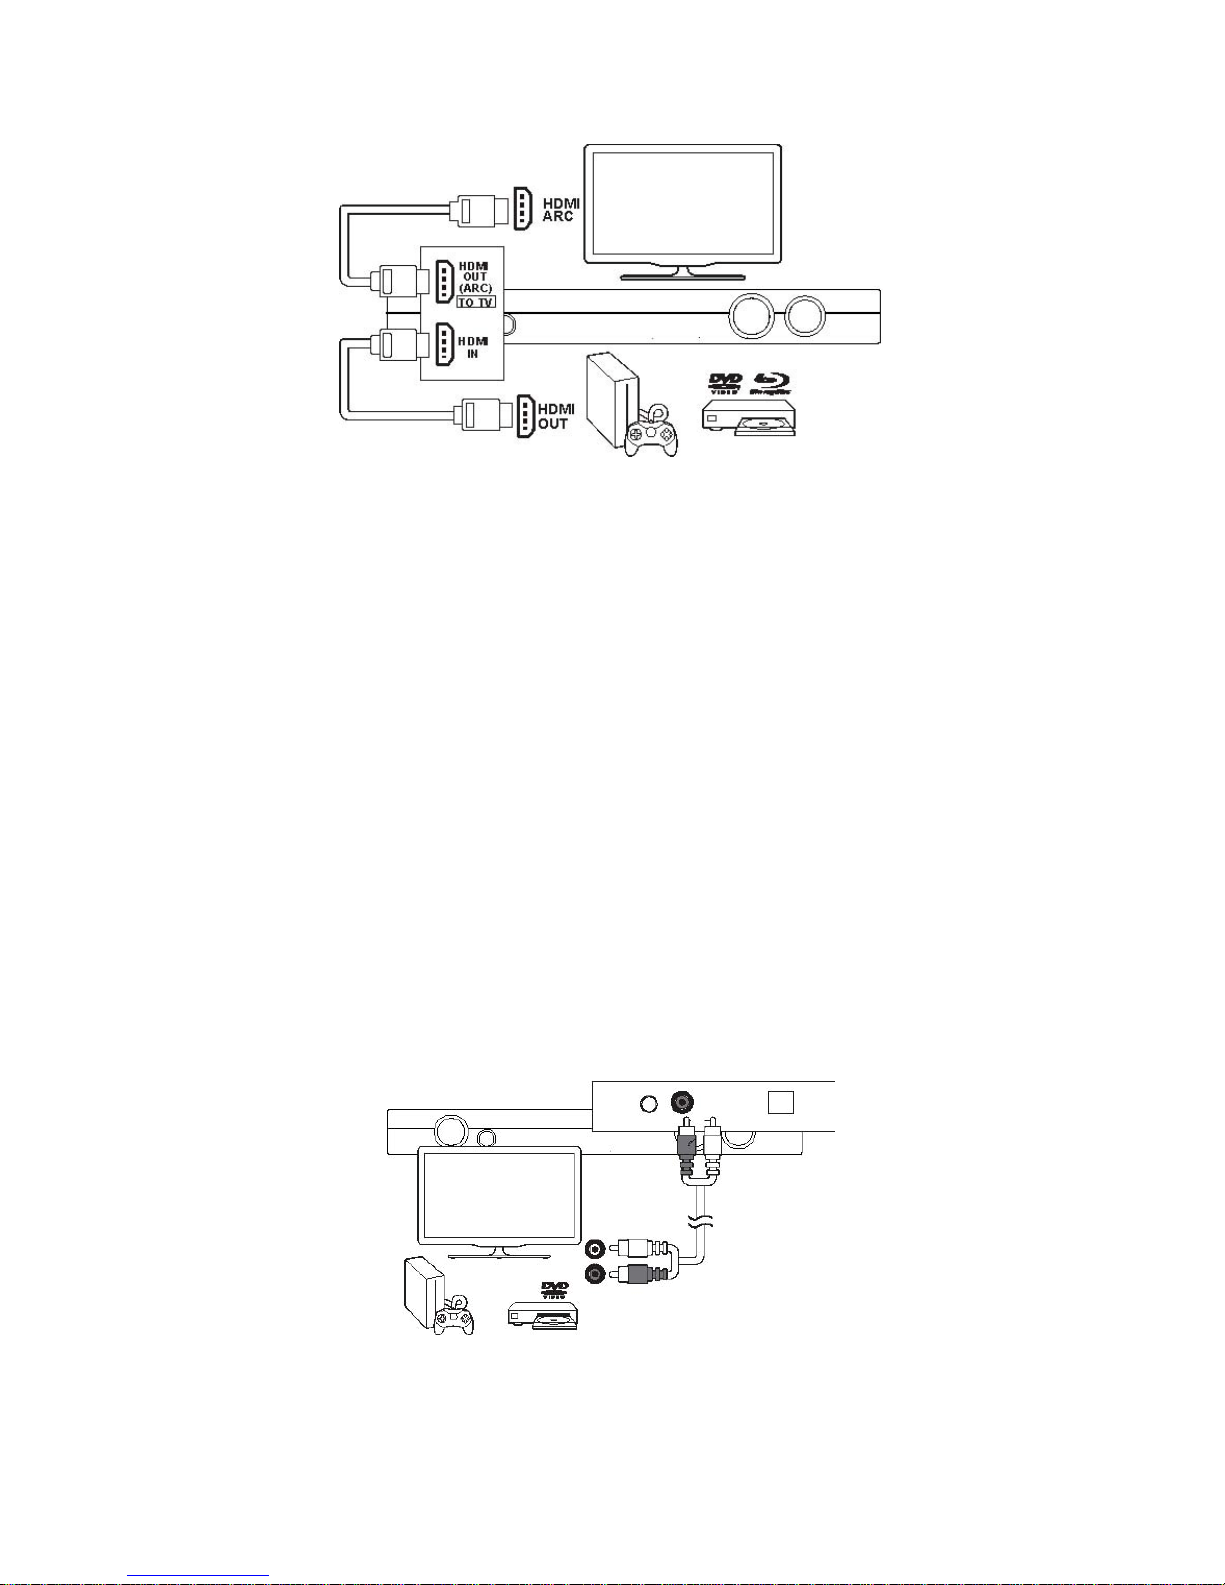
Figure 3: Connecting digital devices using HDMI cable
Connect a digital device such as a set-top box, DVD/Blu-ray player or games console to your Sound Bar
using a single HDMI cable and play a file or game. The video is automatically displayed on your TV, and
the audio is automatically played on your Sound Bar.
1. Use a High Speed HDMI cable to connect the HDMI OUT socket on your digital device to the
HDMI IN socket (14 in Figure 1) at the side of your Sound Bar.
2. Use a High Speed HDMI cable to connect the HDMI ARC socket on your TV to the [TO TV-HDMI
OUT (ARC)] socket (15 in Figure 1) at the side of your Sound Bar.
NOTE: You may need to activate PCM (Downmix) on your source devices such as Set-top Box, DVD/ Bluray player, games console or TV.
1.5 Connecting a TV, DVD or GAME CONSOLE using a RCA -RCA audio cable
1. Connect one end of the RCA cable to the TV, DVD or Game Console audio output RCA sockets.
2. Connect the other end to the TV inputs on the back of the Sound Bar (9).
Page 10
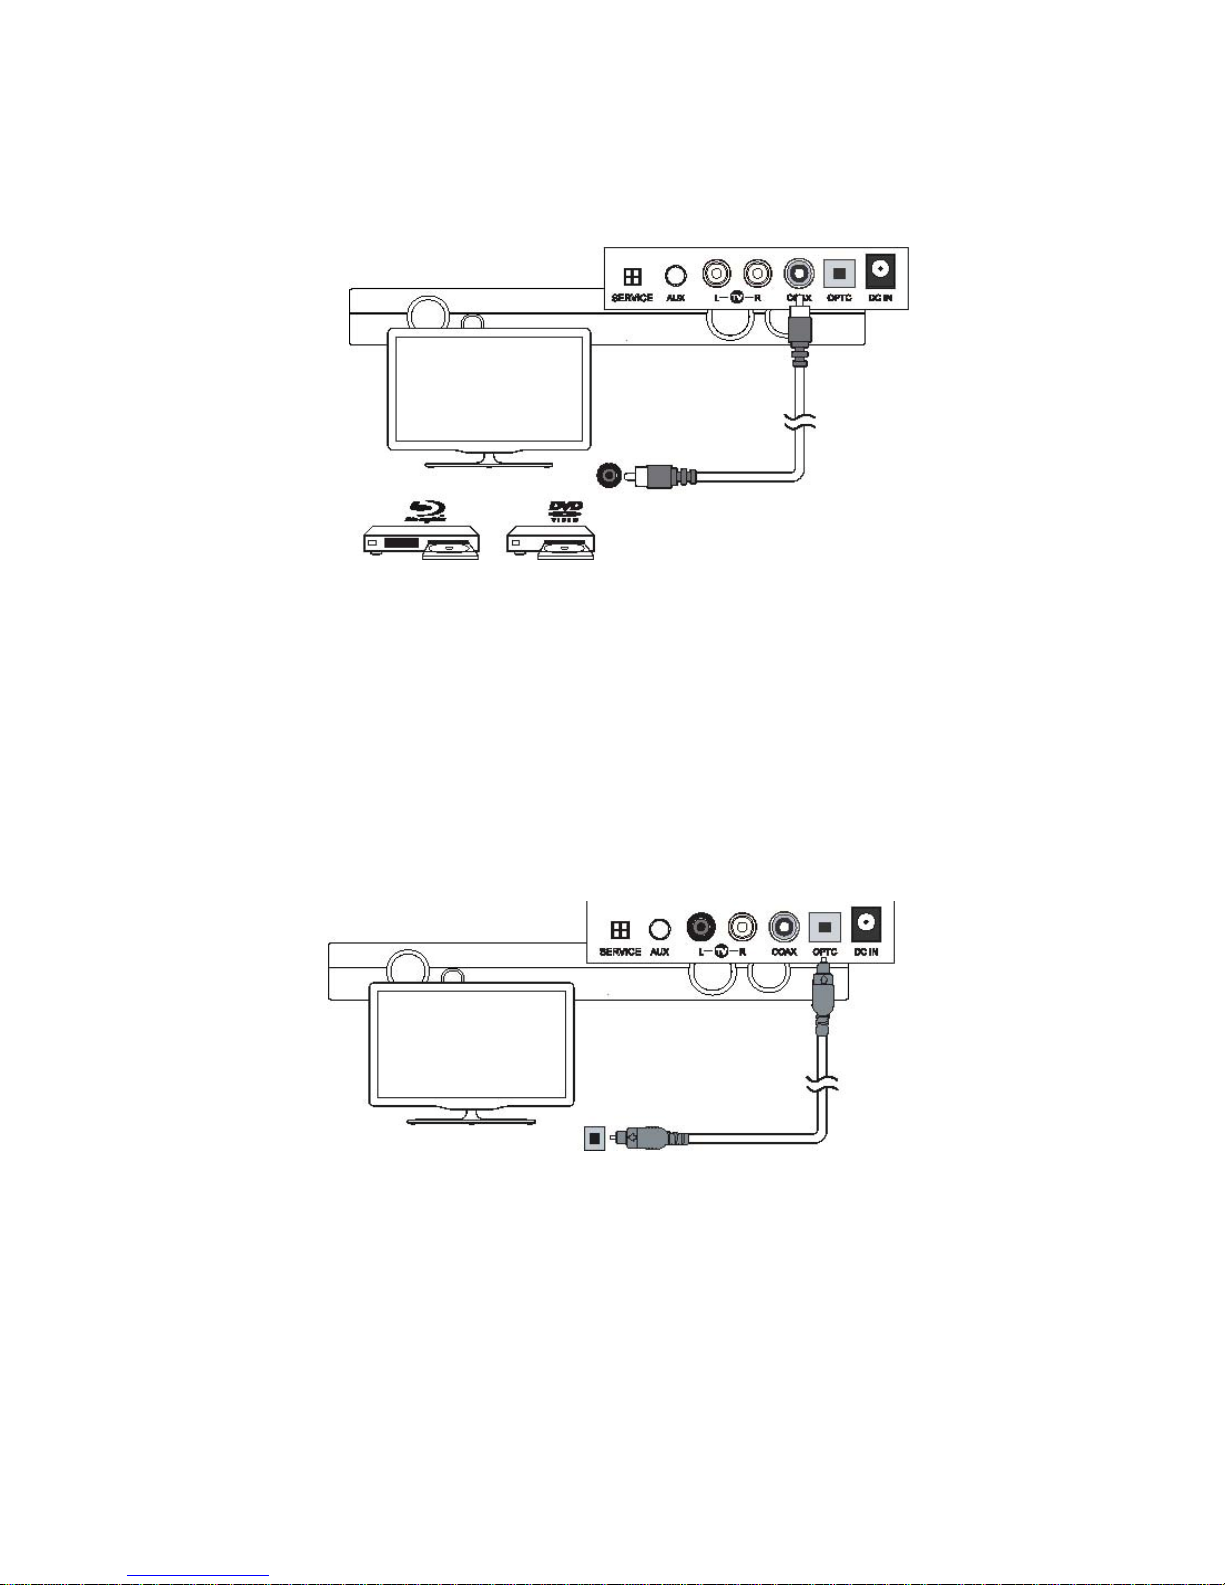
NOTE: Take care to match the RED plug to the RED socket and the WHITE plug to the WHITE socket.
Figure 4: DIGITAL connection to a TV, DVD or Blu-ray player using a COAXIAL cable
1. Connect one end of the RCA COAX cable to your TV, DVD or Blu-ray COAXIAL audio output RCA
socket.
2. Connect the other end to the COAX input on the back of the Sound Bar (10 in Figure 1).
NOTE: You may need to activate PCM (Downmix) on your source devices such as TV, DVD or Blu-ray
player.
Figure 5: DIGITAL connection to a TV, DVD or Blu-ray player using an OPTICAL cable
1. Connect one end of the OPTICAL cable to your TV, DVD or Blu-ray OPTICAL audio output socket.
2. Connect the other end to the OPTICAL input on the side of the Sound Bar (11 in Figure 1).
Page 11
NOTE: You may need to activate PCM (Downmix) on your source devices such as TV, DVD or Blu-ray
player.
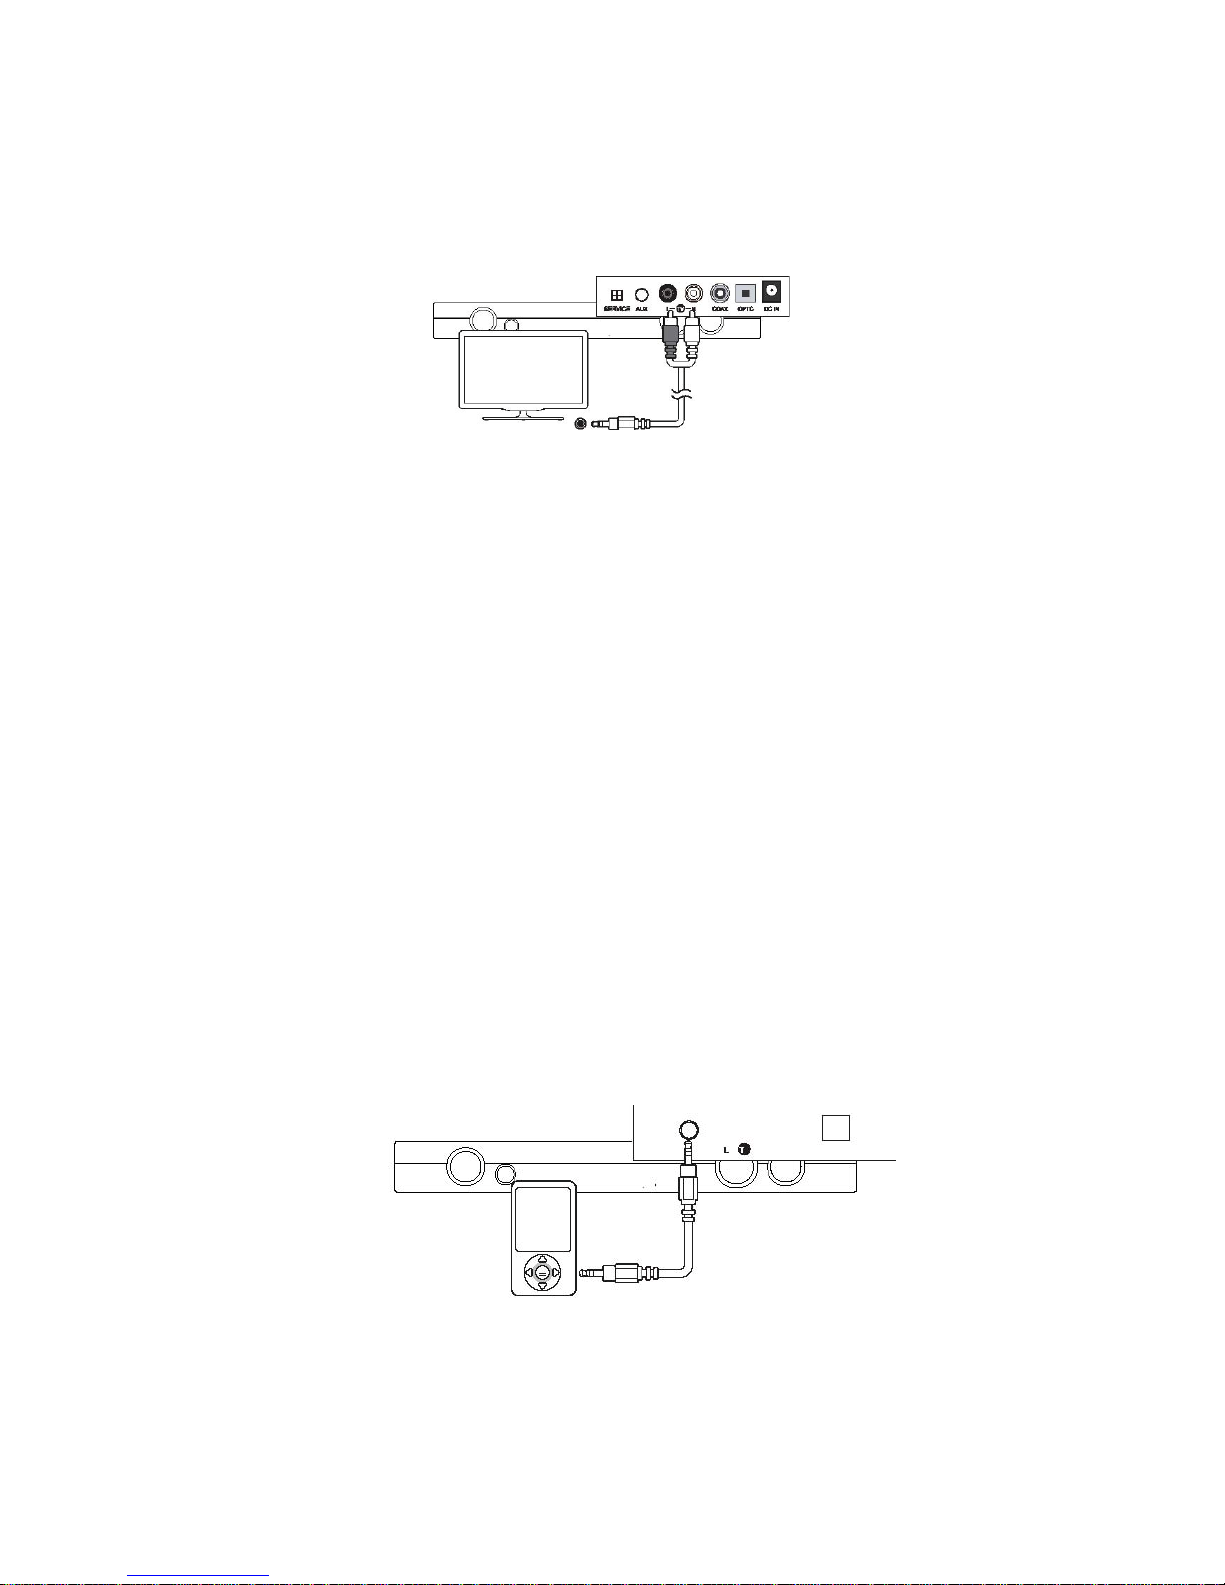
Figure 6: Connection to a TV using an RCA -3.5mm audio cable
1. You need to use a 3.5mm to RCA Cable.
2. Connect the 3.5mm end of the cable to your TV headphone jack (3.5mm audio output).
3. Connect the other RED & WHITE ends to the TV inputs on the side of the Sound Bar (9), taking
care to match the RED plug to the RED socket and the WHITE plug to the WHITE socket.
NOTE:
1. In some cases the Sound Bar volume output is affected by the volume level on the TV. In this
case adjust the TV volume to increase the audio output from the Sound Bar.
2. If no sound can be heard from the Sound Bar using this connection, you may need to check your
TV settings to enable the headphone socket output.
1.6 Connecting a MP3 player
The following diagram shows the connection to an audio device such as an MP3 player, using a 3.5mm
audio cable.
1. Connect one end of the 3.5mm audio cable to the headphone output of your MP3 player.
2. Connect the other end to the AUX input (3.5 mm socket) on the back of the sound bar (8).
Page 12

2.0 Operating the Sound Bar
Standby mode
1. Press the STANDBY button to wake-up the unit from STANDBY mode.
2. To enter STANDBY mode press either STANDBY buttons.
NOTE: As part of the power saving mode, the unit will enter STANDBY mode automatically after 20
minutes (approx) of no audio output.
Switching Inputs
Ensure that the Sound Bar is powered ON. If not press the STANDBY button from your remote control or
directly on the Sound Bar.
Press the SOURCE button repeatedly until you reach the required input mode.
Source Inputs Reference:
TV input - TV
Auxiliary - AUX
Coaxial input - COAX
Bluetooth input - BT
Optical input - OPTC
USB input - USB
HDMI input – HDMI
NOTE: When switching inputs there will be a 5 second pause after selecting BT while the unit scans for
paired devices.
Adjusting the Volume:
To increase/decrease the volume level, press the VOLUME +/- button repeatedly or press and hold for
fast adjustment.
Sound Effects Preset:
During playback pressing the SOUND EQ button on the remote control repeatedly cycles through the
available sound modes.
Choose between: STANDARD (STD), MOVIE, MUSIC or NEWS.
As you select a sound mode the corresponding name appears on the display to indicate that sound
mode is active.
NOTE: The STANDARD sound mode when selected does not show an icon on the display.
Page 13

Bass enhancement
To increase/decrease the bass level press the BASS (B) +/- button repeatedly.
NOTE: The BASS levels range from -3 to +3.
Mute
Pressing the MUTE button on the remote control will temporarily silence the audio output. You will see
‘MUTE’ flash on the display to indicate that the mute function is active.
Sleep timer
The unit can be set to enter STANDBY mode after a period of time
1. During playback mode, press the SLEEP button on your remote control to enter the timer
settings.
2. Press the SLEEP button repeatedly to cycle through the available time duration options of: 5, 10,
15, 30, 45, 60, 90 minutes and OFF.
3. When you have selected the required timer duration, just leave all buttons untouched for 2
seconds and the timer will begin the countdown.
4. When the time elapses, the STANDBY mode will be activated.
Adjusting the display brightness
Press the DIM button from your remote control repeatedly to cycle through the 3 brightness states
LOW, MED & HIGH.
Connecting a Bluetooth device
Before you can use the Sound Bar with your phone or other BT capable device, you will need to pair the
Device to the Sound Bar.
NFC Compatible Smart Phone
Touch the NFC-Mark on the unit with the Smart Phone.
1. Touch and hold until the smart phone responds. If prompted for a confirmation, enter ’yes’ or
’confirm’.
2. To remove the pairing, touch the NFC-Mark again.
Page 14
BT Solid (No Flash)
Bluetooth Connected
BT Flash
Trying to Reconnect/Paring Mode
Non-NFC compatible devices
1. Press the SOURCE button repeatedly until you see ‘BT’ appear on the display.
2. When selected, the ‘BT’ text on the display will flash while the unit tries to connect to previously
paired devices. If no devices are found, the ‘BT’ text will still flash to indicate it is ready for
pairing a new device.
3. Enable the Bluetooth function on your smart phone and search for a device labeled ‘MilanDLESpeaker’ in the available list.
4. Select and enable pairing for the ‘Milan DLE-Speaker’ device. If prompted for a password, enter
‘0000’.
5. If pairing is successful the Sound Bar will beep and the ‘BT’ text will stop flashing.
6. If the connected device goes out of range, the Sound Bar will attempt to connect for 2 minutes.
When the device comes into range, the Sound Bar will reconnect again automatically.
To remove the paired device using only the sound Bar, press and hold the OPTION button for 3 seconds
on the remote control. The ‘BT’ text will begin flashing again.
Bluetooth Status:
NOTE:
1. The operation range of Bluetooth is approximately 10 meters (30 Feet). Any obstacles in the
path between devices may reduce this range.
2. Only one Bluetooth device can be paired at a time.
3. Not all Bluetooth devices are compatible.
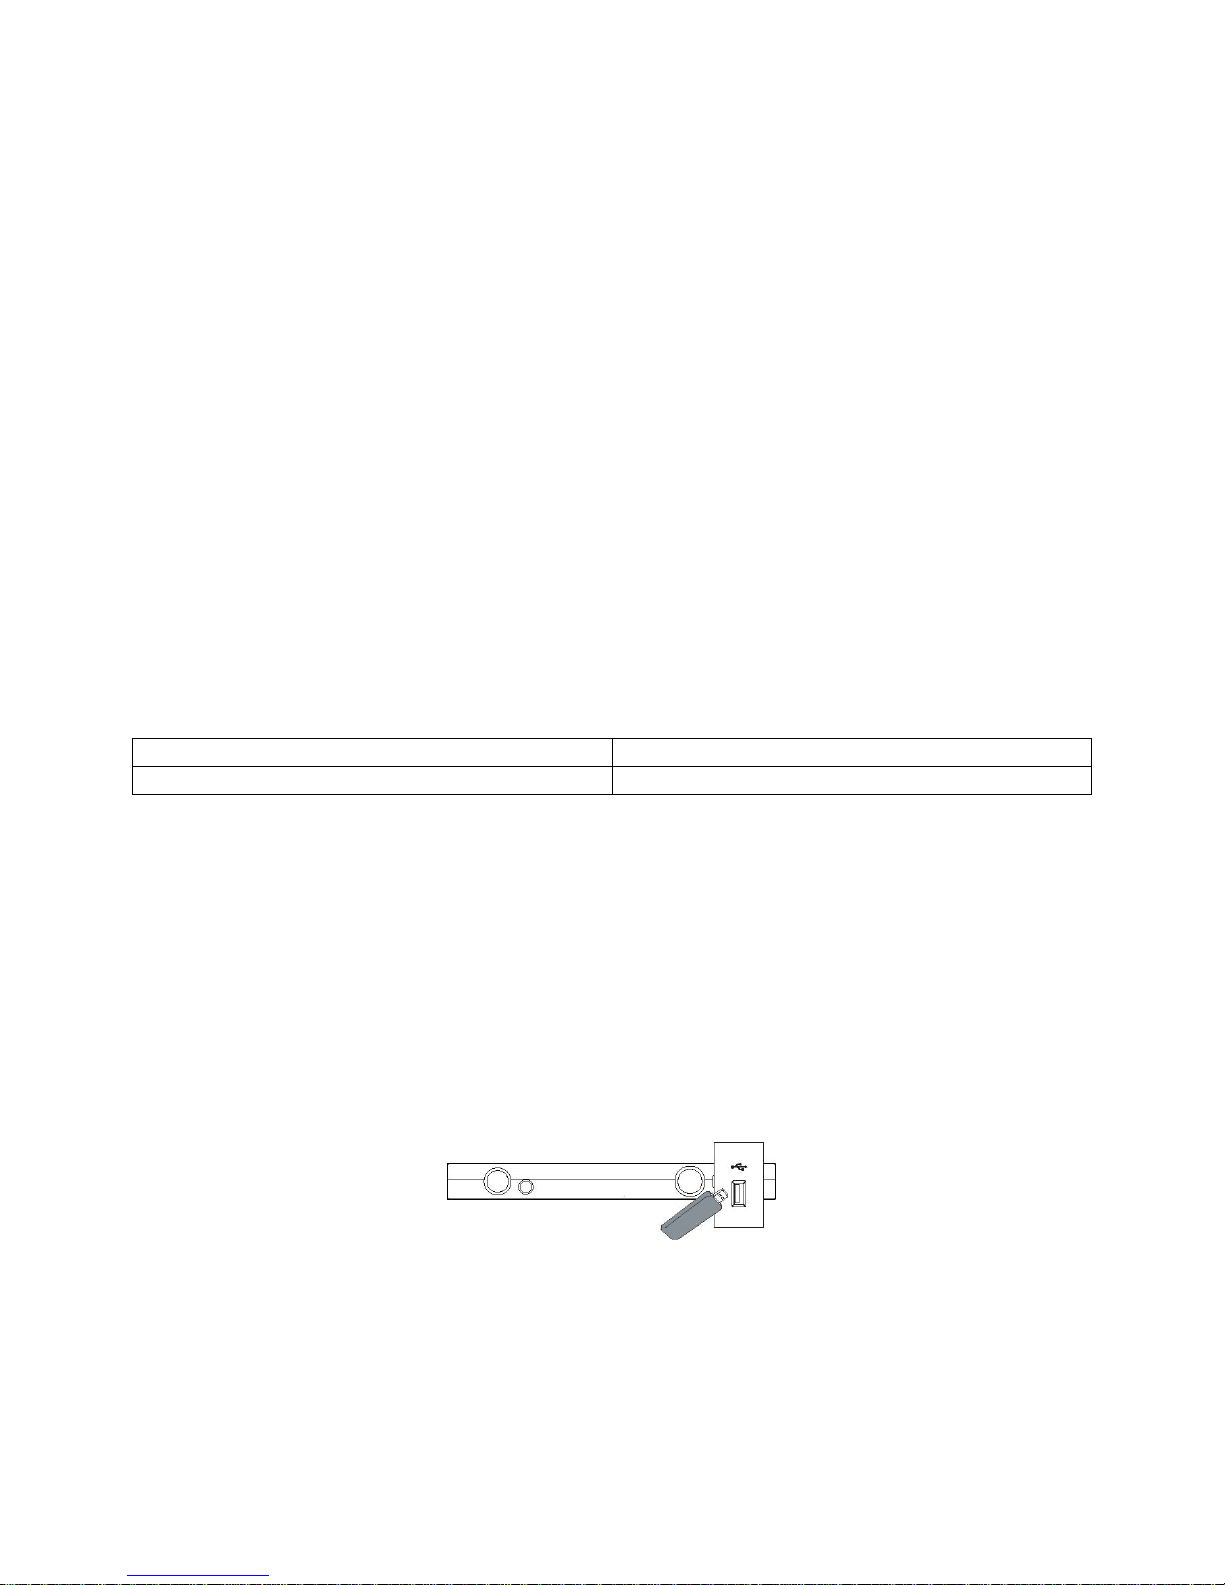
Playing Music from USB Storage Devices:
Enjoy audio on a USB storage device, such as an MP3 player and USB flash memory
What you need
1. A USB storage device that is formatted for FAT file systems, and complies with the Mass Storage
Class.
2. An MP3 or WMA file on the USB storage device.
Page 15

Steps:
PROBLEM
POSSIBLE SOLUTION
No Power
• Ensure the mains plug is connected to a power
No Sound
• Make sure if playing from the AUX input, the
No response from the unit
• Unplug the power cable for 1 minute then plug
Remote Control not working
•Reduce the distance between the remote and
Unit powers off after 20 minutes
•
This unit is designed to enter STANDBY mode
1. Connect a USB storage device to the sound Bar.
2. Press SOURCE button repeatedly until USB text appears on the display.
3. Select a file you want to play.
CAUTION: Do not remove the USB storage device while it is being read/ music is being played.
NOTE:
1. This product may not be compatible with certain types of USB storage devices.
2. DRM-protected music files (MP3, WMA) are not supported.
In the unlikely event of difficulties with your Sound Bar please follow the trouble shooting guide below.
If the problem persists, contact your seller if the Sound Bar is still under warranty.
supply and is switched ON
• Make sure there is power to the mains socket
external source has the volume turned up and is
playing a track
• Make sure the volume is turned up
• If using the digital coaxial or optical cable
connection ensure the source DIGITAL output is
set to PCM, LPCM, PCM 2Ch stereo or PCM
downmix
• Bluetooth device not paired Check ‘Bluetooth
operation’
back in again
main unit
• Check that the batteries are installed correctly
• Replace the batteries
• Aim the remote directly at the Sound Bar
automatically after 20 minutes of inactivity.
• Press the STANDBY button to wake-up the unit.
Page 16

3.0 Care and Maintenance
Important: Always unplug the Sound Bar from the power socket during cleaning and maintenance.
Ensure the unit is switched off and unplugged from any electrical outlet.
Wipe the case with a slightly moist lint free cloth.
Do not use any cleaning fluids containing alcohol, ammonia or abrasives.
Do not spray an aerosol at or near the object.
Do not allow liquids to spill or objects to drop into any openings.
Do not insert sharp items into speaker grills or any other openings.
Always use the original packaging if it is necessary to transport the unit at any time.
If the unit is used in a dusty environment, it may be necessary to have the unit serviced
periodically. It is not advisable to allow large deposits of dust to accumulate within the unit as it
may prevent adequate cooling. Similarly, dust deposits which become damp can sometimes lead
to electrical problems which may cause severe damage to the delicate electronics within this
unit.
4.0 Warranty Policy
This Limited Warranty offered to the original purchaser only applied to products purchased directly from
a Milanity authorized partner by the original purchaser. Milanity warrants this product for one (1) year
from the date of purchase with respect to defects arising from materials or workmanship, with the
exceptions as stated below.
This Limited Warranty does not cover damages resulting from misuse, accident, modifications or
alterations to the hardware or software, tampering, using the product in an unsuitable environment,
improper maintenance or failure to use the product as specified in the instructions.
All Rights Reserved. © 2015 Milanity. All non-Milan DLE brands and product names are trademarks or
registered trademarks of their respective companies. Product appearance and/or specifications are
subject to change without notice.
Page 17

 Loading...