

Page 1

PM5
Handheld Condenser Microphone
Owner’s Manual
Introduction
ank you and congratulations on your purchase of
the Miktek PM5 , Performance Series handheld stage
microphone. You work hard to give a better than average
performance, so you demand a better than average
microphone to reproduce the sound of your voice. Miktek
Performance Series handheld microphones offer way
above average sound and build quality impressing the
most discriminating engineers and artists. Featuring
cutting edge capsule designs that are perfectly matched
to Miktek’s proprietary output transformers; the
Performance Series Microphones produce a modern, yet
truly classic sound, well suited to today’s contemporary
performers.
In the following sections of this manual you will find
a description of the PM5’s features, step-by-step setup and operating instructions along with detailed
specifications. In addition, we’ve also included some basic
miking fundamentals for typical live sound and recording
applications. To some of us these may seem quite basic.
However, at Miktek we want to encourage young or new
engineers to use our microphones, or at least to read
our manuals and learn something about recording and
live sound. We know you’re serous about your sound
because you purchased an outstanding audio instrument,
and at Miktek, we’re serous about providing superior
products and service to our customers. We appreciate your
patronage and hope you enjoying using your microphones
as much as we enjoy making them.
Sincerely,
Michael Ketchell - Managing Director
PM5 Features
• Studio Quality Handheld Condenser
• MK5a 0.5-inch Cardioid Capsule with 5-micron Mylar,
Evaporated Gold Diaphragm
• AMI T5 Transformer
• Hand-selected Transistors
• Packaged Protective Case and Mic Clip
Description
The Miktek PM5 cardioid, condenser microphone brings
the sound of a high-end studio condenser to vocalists
for live stage use. Sharing the capsule, electronics and
output transformer of the Miktek PM5 small diaphragm
condenser, the PM5 is a truly world-class mic that offers
detail and nuance. The PM5’s frequency response is
extremely linear, with rich lows, a present yet sweet
mid-range, and airy highs that please artists and
engineers alike. In fact, the PM5 is perfectly at home in
the recording studio for miking acoustic guitar, piano
and as drum overheads. The PM5 employs a multistage
windscreen to help ensure a minimum amount of
p-popping. The steel grill and die cast body ensure
durability and reliability night after night. An ultra sleek,
black finish with stainless steel appointments make the
PM5 an attractive complement to any stage setting.
Understanding Polar Patterns
Perhaps the most important aspect of using your PM5,
or any other microphone, is to understand its polar pick
up pattern. Every microphone has a characteristic polar
pattern that determines how well it accepts or rejects
signal coming from various areas around the microphone
capsule. There are many types and variations of polar
patterns but the three most common are omnidirectional,
bidirectional or figure-eight and unidirectional or
cardioid. Omnidirectional microphones pick up sound
from everywhere, producing the same frequency response
regardless of where the sound source originates (in front
of the mic, behind it, to the side, etc.). A bidirectional or
figure-eight microphone picks up sound directly from
the front and back while rejecting the sound at the sides.
In contrast, cardioid mics are specifically designed to
accept the sound coming from directly in front, and
to reject sound coming from behind or from the sides.
The PM5’s capsule provides a super cardioid polar
pattern with an even tighter response. While Omni and
Bidirectional microphones are very useful for a variety
of applications, the majority of miking situations in live
sound applications require unidirectional or cardioid
microphones. When positioned correctly, the cardioid
pattern allows you to pick up more of the sound you
want and less of the sound you don’t want. In live sound
situations, the polar pattern greatly determines how
prone a particular microphone is to inducing feedback.
Feedback is that nasty howling sound that occurs when
a mic is placed too close to a loudspeaker—the signal
from the loudspeaker is fed into the mic, then into the
loudspeaker, then into the mic, over and over. The super
cardioid pick-up pattern allows for better separation of
instruments on stage and more control over feedback in
live sound reinforcement.
Page 2
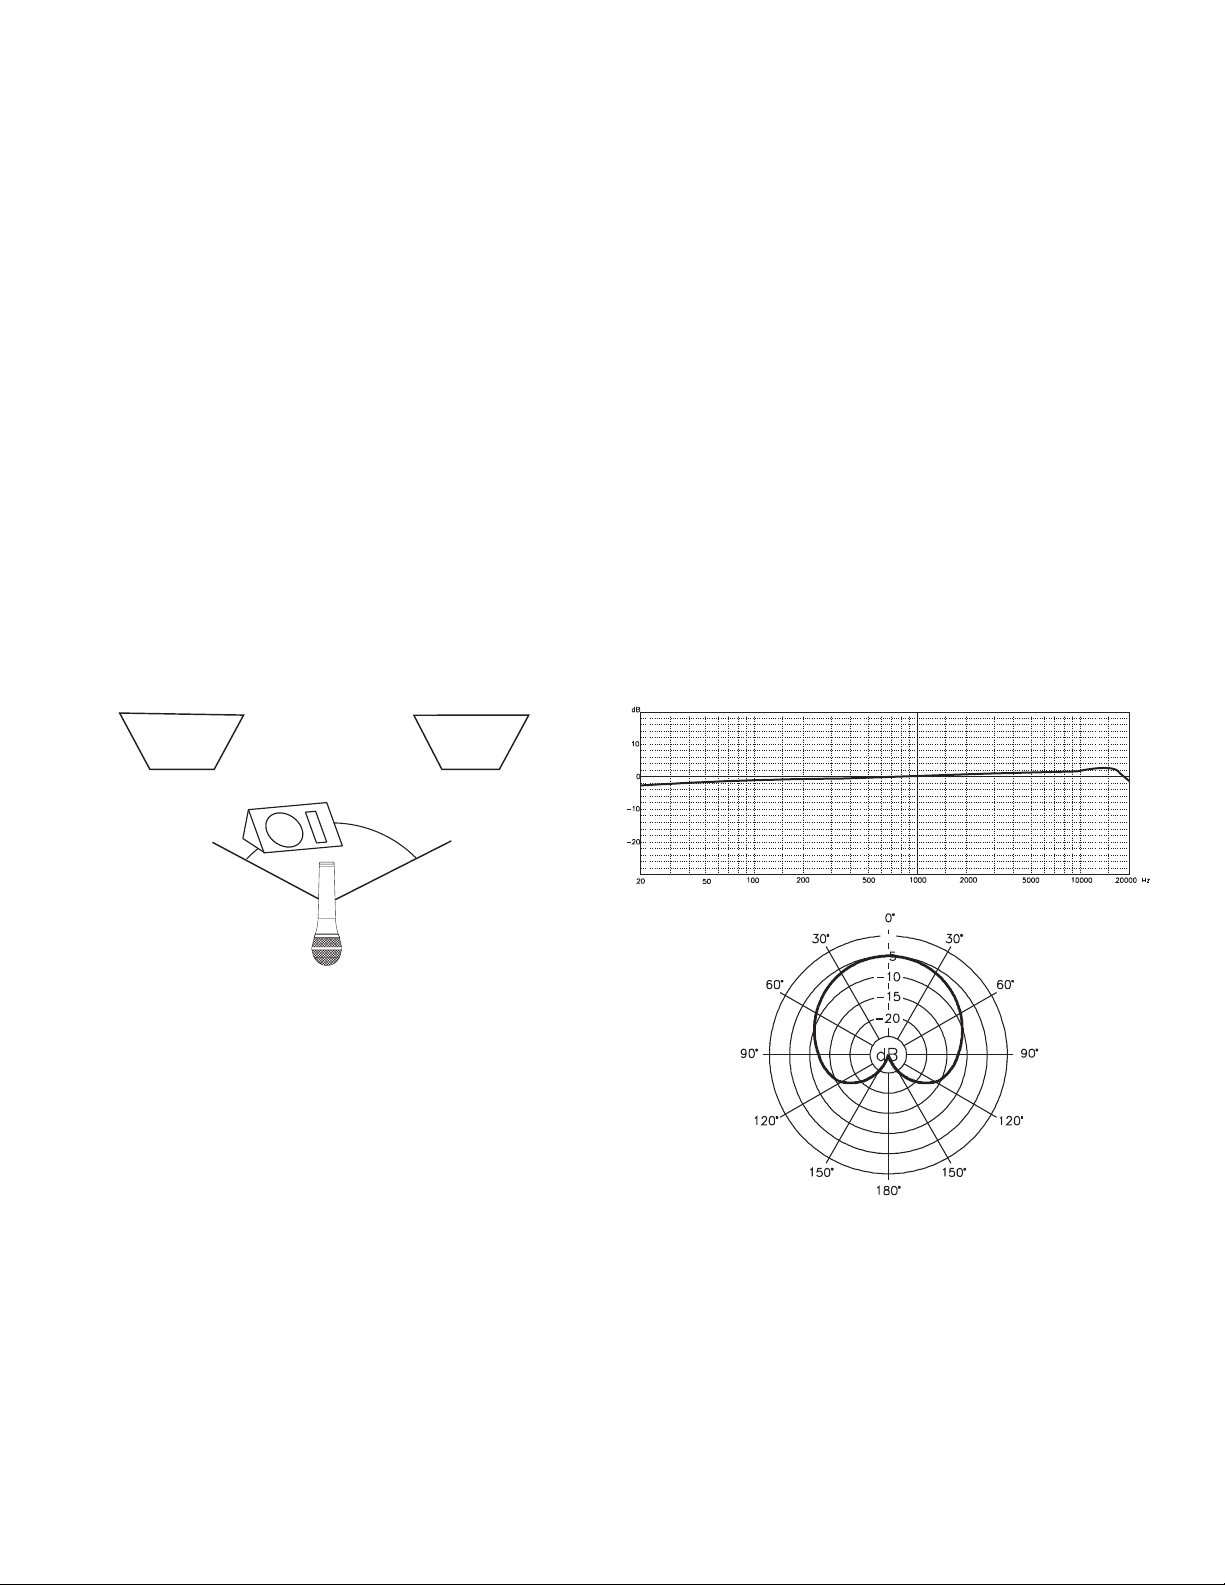
Stand Mounting the PM5
Front of House Speaker
Monitor Speaker
Front of House Speaker
1
1
0
º
The PM5 can be mounted to any standard microphone stand
using the included mic stand holder. If you are using a US
standard 5/8-inch mic stand, remove the Euro adapter by
unscrewing it from the mic holder. Slide the microphone
into the holder from the rear to the front with a downward
motion until it snaps into place.
Microphone Placement
To help maximize the quality of your performance, you
must pay careful attention to the placement of your PM5,
and specifically, how it is positioned for the instrument or
vocalist that you’re miking. As you become more experienced
in miking techniques, you’ll quickly realize the microphone
placement is critical to getting the sound you want while
maximizing gain before feedback. When placing the mic
around any instrument or sound source, take notice of the
postion of the front of house and monitor loudspeakers. In
general, it’s good practice to set the microphone behind the
main or front of house PA speakers to avoid feedback from
those speakers. Also, position the microphone in front of a
monitor loudspeaker within a 110 degree arch a shown nin
the diagram below. As you’re changing the microphone’s
position, be sure to check that the mic input is still set to
a good level without clipping, as described in the previous
section.
the level which distortion begins to occur. To set a good
clean level, set the PM5 up in front of the desired sound
source and slowly turn up the mic trim until you see the Clip
LED light up. Then, turn the trim control down until the
LED does not light any more. On most microphone inputs,
the best setting is when the trim control is turned up as high
as possible without lighting the PEAK LED.
The Proximity Effect
All cardioid or uni-directional microphones exhibit a
phenomenon known as “proximity effect”. The proximity
effect is the increase in low frequency response a
microphone exhibits as it is moved closer to the sound
source. Vocalist tend to love this effect since when they
get really close to the mic they get the “FM radio”, big
bass sound. A good vocalist with good mic technique will
use the proximity effect to adjust their tonal response in
real time. The key to developing the best mic technique
is experimentation, along with awareness of the general
principle that, the closer your PM5 is to a signal source,
the greater the bass response. The proximity effect’s bass
lift is caused by the amount of pressure present at the
ports that are used to create the directional pattern. Since
omnidirectional microphones do not have ports, they do not
have proximity effect.
Powering the PM5
Since the PM5 is a condenser microphone it needs to be
operated by connecting it to a 48 volt Phantom power
source. Most quality mixers, outboard mic pres and DAW
mic channels have Phantom power available as a standard
feature. You can also use an external phantom supply, if
necessary. Since most mixers and outboard mic pres have
a dedicated switch to engage the phantom power, be sure
to check that the Phantom power is on. Once the Phantom
power source is turned on, the PM5 receives the Phantom
power directly from a mic cable. Note: Without Phantom
power the PM5 will not pass audio.
Setting Up the Signal Level
In order to get a good signal, first be sure that the PM5 is
connected to a mixer or recorder input that is microphone
level. Most quality mixers, mic pre’s and recorders provide
microphone inputs with a mic trim (“Trim” AKA Mic Gain or
Level) control. The purpose of the mic trim control is to set a
good signal level and minimize any noise associated with the
mic inputs electronics. A good mic pre will also have a Clip or
Peak LED to show you when the input is at overload;
PM5 Specifications
Type ..................... Condenser
Polar Pattern: .............Cardioid
Frequency Response: .......20Hz - 20KHz
Impedance: ............... 200 Ohms
Sensitivity . . . . . . . . . . . . . . . . -35dBV/Pa
Low Cut Filter ............. 80 Hz
Length: .................. 7.1 inches
Width: ...................2.0 inches
Depth: ...................2.0 inches
Net Weight: ............... 0.65 pounds
 Loading...