

Page 1

WARNING
WARNING
!
SENSOR with Direct
Burial Cable
Warning Signs (2)
Wire Nuts (2)
Battery Connection Wires (2)
Double Spade
Connectors (2)
Ty-Wraps (4)
Wire Clamp
!
WARNING
GATE OPENING
SENSOR IN USE
The Automatic Gate Opener is activated when a
vehicle comes within range of the sensor buried
along side the driveway and could possibly be
activated by a child on a bicycle, tricycle or other
metal play equipment.
VEHICLE SENSOR
INSTALLATION MANUAL
WARNING
When an VEHICLE SENSOR is in use, the automatic gate opener could be
activated by a child on a bicycle or other metal play equipment. This Product
is not recommended for applications exposed to children.
Parts Identication:
Gates that Open, LLC • 3121 Hartseld Road • Tallahassee, Florida 32303
1-800-543-GATE (4283) • Technical Support 1-800-543-1236
www.mightymule.com
RWINST01MM
rev-12/28/11
Page 2
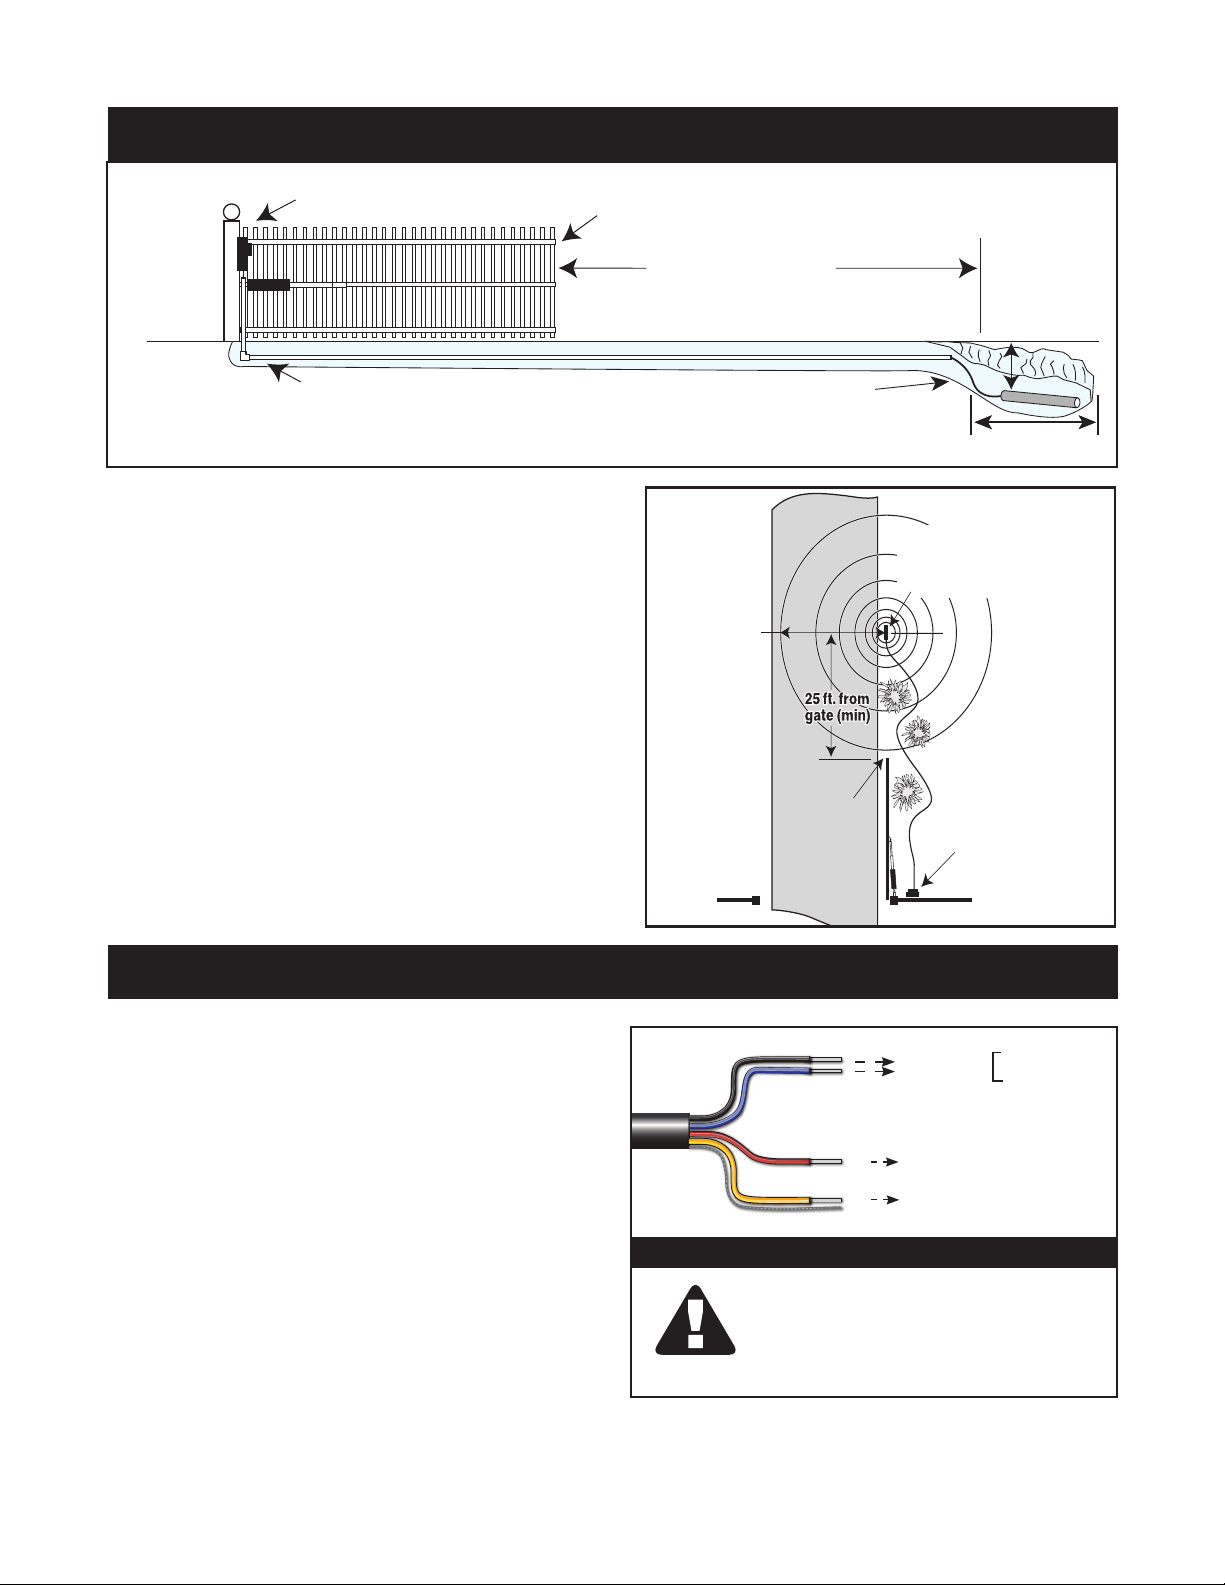
Gate Opener
Control Box
Driveway
RANGE:
12 ft. radius
(max)
SENSOR:
2 ft. from Driveway (max)
and12 in. deep
Open Gate
Outside Sensor
Range
( allow 5 ft. for wiring
to Control Box)
Gate Opener
Control Box
12”
Minimum of 25 feet
SENSOR: 2 feet from
driveway edge and
1 foot in ground
Open Gate
Outside Sensor
Range
PVC conduit in ground
and up to control box
recommended
24”
INSTALLATION OVERVIEW
• The SENSOR is designed to detect iron-
based metal in motion.
• The SENSOR’s ability to detect iron-based
metal objects is based on the mass, velocity
and proximity of the object to the sensor.
EXAMPLE - A child’s bicycle moving at 2
mph @ 1’ from the sensor has a similar
effect as a car moving at 2 mph @ 6’ from
the sensor.
• The SENSOR must be stationary to function
properly.
WIRING THE WAND
1.
Obtain the instruction manual for the
gate opener.
2.
Locate the control terminals (2) that
will ONLY OPEN the gate.
3.
Verify that the above inputs when
shorted (a small wire connecting
the 2 terminals) will do all of the
following:
• OPEN the gate if the gate is idle.
• STOP and then OPEN the gate if gate is closing.
• DO NOTHING if the gate is opening.
2 GTO Exit Wand Instructions 12.28.11
WAND
WIRING
Braided
Ground
Black
Blue
Normally open relay contacts,
closes for 2 seconds when
moving vehicle is detected.
Red
Yellow
+
–
RELAY OUTPUT
POWER INPUT =
TO OPEN ONLY
INPUT OF GATE
OPENER CONTROL
11-30 Vdc
or
8-26 Vac
IMPORTANT
DO NOT CONNECT THE POWER
INPUT WIRES TO THE POWER
SOURCE (i.e. 12 V battery) UNTIL
INSTRUCTED TO DO SO.
Page 3

TURN GATE OPENER OFF
wire from the
BRAIDED GROUND
from SENSOR Cable
YELLOW wire from
SENSOR CABLE
RED wire from SENSOR Cable
Battery Cable
BLACK (-)
BLACK BATTERY CONNECTION WIRE
with Spade Connector included with SENSOR
RED BATTERY CONNECTION WIRE
with Spade Connector included with SENSOR
Double Spade Connectors
included with SENSOR
Battery Cable
RED (+)
VAR5
K1
PF1
K2
BATT +
K3
K4
VAR4
VAR3
VAR2
VAR1
PWR.
SFTY.
EXIT
CYCLE
EDGE
SENSOR
COMMON
LOCK+
LOCK–
WHT
GRN
RED
BLK
WHT
GRN
SECOND OPR.FIRST OPR.
RED
BLK
14 VAC
OR
SOLAR
4.
Connect the BLACK to the terminal labeled COMMON, and
the BLUE wire to terminal in STEP 3 to open gate.
WIRING DIAGRAM EXAMPLES
NOTE: Power Input Connections Not Shown.
(See gate instruction manual for complete instructions)
SEQ1
SEQ2
ON
LEARN
BLU
ORG
WHT
ALARM ACCESSORY RCVR
Connect the Black
wire from the SENSOR
CABLE to one of the
COMMON terminals on the
opener control board.
BLACK
BLUE
GRN
R B G
Connect the BLUE wire from
the SENSOR CABLE to the
BLU terminal on the opener
control board.
5.
Connect the POWER INPUT wires to power source.
• Connect the YELLOW and
BRAIDED GROUND wires
to the
power source. (i.e. battery)
• Connect the RED wire to the
(+)
source. (i.e. battery)
(–)
NEGATIVE side of
POSITIVE side of power
Connect the BLUE wire from
the SENSOR CABLE to the
EXIT terminal on the opener
control board.
Connect the BLUE wire from
the SENSOR CABLE to the
EXIT terminal on the opener
control board.
BLUE
BLACK
Connect the BLACK wire from
the SENSOR CABLE to one
of the COMMON terminals on
the opener control board.
LINK
EXIT
CONTROL INPUTS
COM
COM
GRN
EDGE
CYCLE
SAFETY
RECR
COMMON
Connect the BLACK
SENSOR CABLE to one of the
COMMON terminals on the
opener control board.
Connect the Black
wire from the SENSOR
CABLE to one of the
COMMON terminals on the
opener control board.
EXIT
CYCLE
EDGE
CLOSE
SAFETY
SHADOW
Connect the BLUE wire from the
SENSOR CABLE to the EXIT
terminal on the opener control
board.
BLK
RED
BLUE
EDGE
OPEN
BLACK
RECEIVER
BLK
GRN
GTO RCVR.
BLUE
BLACK
RED
ALM
WHEN THE WAND IS FIRST POWERED UP IT
MUST BE UNDISTURBED FOR 60 SECONDS TO
PERFORM THE SELF TEST AND CALIBRATIONS.
BEFORE POWERING THE WAND MAKE SURE
THERE ARE NO MOVING METAL OBJECTS OR
MOVING VEHICLES WITHIN THE RANGE OF
THE WAND
6.
Turn opener ON and TEST.
IMPORTANT
POWER
EXIT
COM
CHGR
CHGR
Connect the BLUE wire from
the SENSOR CABLE to the
EXIT terminal on the opener
control board.
BLUE
BLACK
LOOP
CYCLE
SAFETY
SHADOW
Connect the BLUE wire
from the SENSOR CABLE
to the OPEN terminal on
the opener control board.
SAFETY
OPEN EDGE
EDGE
CYCLE
OPEN
RUN 2
CLOSE
COM
LOCK+
Connect the Black
wire from the SENSOR
CABLE to one of the
COMMON terminals on the
opener control board.
COM
COM
COM
COM
STOP
Connect the BLACK wire from
the SENSOR CABLE to one
of the COMMON terminals on
the opener control board.
GTO Exit Wand Instructions 12.28.11 3
LOCK -
COM
GTO Inc.
SX4000 L
COM
BLACK
BLUE
Page 4

TECHNICAL SPECIFICATIONS:
• Power Supply: 8-26 Vac - 11-30 Vdc
• Current consumption 3 mA. typical
• Relay rating: 1 amp max, 30 Vdc
• Relay Pulse Time: 2 seconds
• Operating Temperature: 25°F (-14°C)
to 125°F (-69°C), or battery operating temperature
• Dimensions: 1¾” (44.5 mm) diameter x 16½”
(42cm) long
TROUBLESHOOTING: Make sure all connections are correct
• Disconnect the power (battery) to the WAND.
• Reconnect the power to the WAND and make sure that no metal object or vehicle is moving
around the WAND for 60 seconds while it is calibrating.
• Test the WAND to verify that it is working properly.
Conversion Chart
This product and
any accessory you
purchase should only
be installed on a gate opener that
meets the current safety standard,
UL325. If you have a gate opener
that is not listed with the current
standard please contact GTO sales
department for consultation on a
gate opener that can meet your
specic needs.
Converting Metric Units to English Equivalents
When You Know Multiply by To Find Symbol
Centimeters 0.3937 Inches in. ( “)
Meters 3.2808 Feet ft. ( ‘)
Kilograms 2.2046 Pounds lb. (#)
Converting English Units to Metric Equivalents
When You Know Multiply by To Find Symbol
Inches 2.5400 Centimeters cm
Feet 0.3048 Meters m
Pounds 0.4535 Kilograms kg
Converting Temperature
deg. Celsius (ºC x 1.8) + 32 deg. Fahrenheit ºF
deg. Fahrenheit (ºF-32) ÷ 1.8 deg. Celsius ºC
GTO LIMITED ONE YEAR WARRANTY
Gates that Open, LLC (GTO), accessories are warranted by the manufacturer against defects in materials and manufacturer
workmanship for a period of one (1) year from date of purchase, provided the recommended installation procedures have been
followed.
In the case of product failure due to defective material or manufacturer workmanship within the one (1) year warranty period, the
product will be repaired or replaced (at the manufacturer’s option) at no charge to the customer, if returned freight prepaid to
GTO, 3121 Hartseld Road, Tallahassee, Florida, USA 32303. IMPORTANT: Call (800) 543-1236 for a Return Goods Authorization
(RGA) number before returning accessory to factory. Products received at the factory without an RGA number will not be accepted.
Replacement or repaired parts are covered by this warranty for the remainder of the one (1) year warranty period or six (6) months,
whichever is greater.
GTO will pay the shipping charges (equal to United Parcel Service GROUND rate) for return to the owner of items repaired under
warranty.
The manufacturer will not be responsible for any charges or damages incurred in the removal of the defective parts for repair, or for
the reinstallation of those parts after repair. This warranty shall be considered void if damage to the product(s) was due to improper
installation or use, connection to an improper power source, or if damage was caused by electrical power surge or lightning, wind,
re, ood, insects or other natural agent.
After the one (1) year warranty period, GTO will make any necessary repairs for a nominal fee. Call GTO at (800) 543-1236 for more
information. This warranty gives you specic legal rights, and you may also have other rights which may vary from state to state.
This warranty is in lieu of all other warranties, expressed or implied. NOTE: Verication of the warranty period requires copies of
receipts or other proof of purchase. Please retain these records.
For your nearest dealer, please call 1-800-543-GATE (4283)
or visit www.mightymule.com
 Loading...