

Page 1
1
Produktgruppe 19 Umbau- und Montageanweisung
1 von 46 M.-Nr. 07104212
13.11.2012 Diese Unterlagen dürfen ohne unsere Genehmigung weder vervielfältigt noch Dritten zugänglich gemacht werden. Eigentumsrechte vorbehalten.
RD 12502
Page 2

x
2
3
Produktgruppe 19 Umbau- und Montageanweisung
2 von 46 M.-Nr. 07104212
13.11.2012 Diese Unterlagen dürfen ohne unsere Genehmigung weder vervielfältigt noch Dritten zugänglich gemacht werden. Eigentumsrechte vorbehalten.
Page 3

x
4
5
Produktgruppe 19 Umbau- und Montageanweisung
3 von 46 M.-Nr. 07104212
13.11.2012 Diese Unterlagen dürfen ohne unsere Genehmigung weder vervielfältigt noch Dritten zugänglich gemacht werden. Eigentumsrechte vorbehalten.
Page 4
x
6
Produktgruppe 19 Umbau- und Montageanweisung
4 von 46 M.-Nr. 07104212
13.11.2012 Diese Unterlagen dürfen ohne unsere Genehmigung weder vervielfältigt noch Dritten zugänglich gemacht werden. Eigentumsrechte vorbehalten.
Page 5
x
7
Produktgruppe 19 Umbau- und Montageanweisung
5 von 46 M.-Nr. 07104212
13.11.2012 Diese Unterlagen dürfen ohne unsere Genehmigung weder vervielfältigt noch Dritten zugänglich gemacht werden. Eigentumsrechte vorbehalten.
Page 6
x
8
9
Produktgruppe 19 Umbau- und Montageanweisung
6 von 46 M.-Nr. 07104212
13.11.2012 Diese Unterlagen dürfen ohne unsere Genehmigung weder vervielfältigt noch Dritten zugänglich gemacht werden. Eigentumsrechte vorbehalten.
Page 7
x
10
Produktgruppe 19 Umbau- und Montageanweisung
7 von 46 M.-Nr. 07104212
13.11.2012 Diese Unterlagen dürfen ohne unsere Genehmigung weder vervielfältigt noch Dritten zugänglich gemacht werden. Eigentumsrechte vorbehalten.
Page 8
x
11
Produktgruppe 19 Umbau- und Montageanweisung
8 von 46 M.-Nr. 07104212
13.11.2012 Diese Unterlagen dürfen ohne unsere Genehmigung weder vervielfältigt noch Dritten zugänglich gemacht werden. Eigentumsrechte vorbehalten.
Page 9
x
12
13
Produktgruppe 19 Umbau- und Montageanweisung
9 von 46 M.-Nr. 07104212
13.11.2012 Diese Unterlagen dürfen ohne unsere Genehmigung weder vervielfältigt noch Dritten zugänglich gemacht werden. Eigentumsrechte vorbehalten.
Page 10

am
Parts required
x
Quantity Mat. no. Designation
1 07104221 Conversion kit
consisting of
1 Release tool for snap connectors
4 M 10 x 50 bolt
4 M 8 x 40 bolt
12 M 10 hex nut
12 M 8 hex nut
4 10.2 x 32 x 2 washer
4 8.5 x 30 x 3 washer
4 #10.5 washer
4 #8 washer
1 Snap connector
4 Plug
4 4x10 fillister-head screws
1 Installation instructions
1 04294300 Floor mounting kit
Produktgruppe 19 Umbau- und Montageanweisung
43 von 46 M.-Nr. 07104212
13.11.2012 Diese Unterlagen dürfen ohne unsere Genehmigung weder vervielfältigt noch Dritten zugänglich gemacht werden. Eigentumsrechte vorbehalten.
Page 11
Installation Instructions
x
Note
All repairs may only be performed by a trained technician in strict accordance with national, state and local codes.
Danger!
Protect from injury during installation.
• Before starting any service or installation work, safely disconnect the appliance from its power source.
• Install the stand only on washers/dryers that are not operational. For disassembly instructions, refer to the operating instructions
for the appliance.
• Wear non-slip palm gloves and safety shoes to protect from injury.
• Make sure that no body parts, especially hands and feet, get stuck under or between the machines.
• Keep children and animals out of the work area during installation.
• Protect from injury: For the installation, tip the washer onto its left side, and the dryer onto its right side.
• Do not stand on the drawer!
Danger of appliance tipping over. Danger of injury due to faulty installation.
• Always bolt the stand and the appliance together.
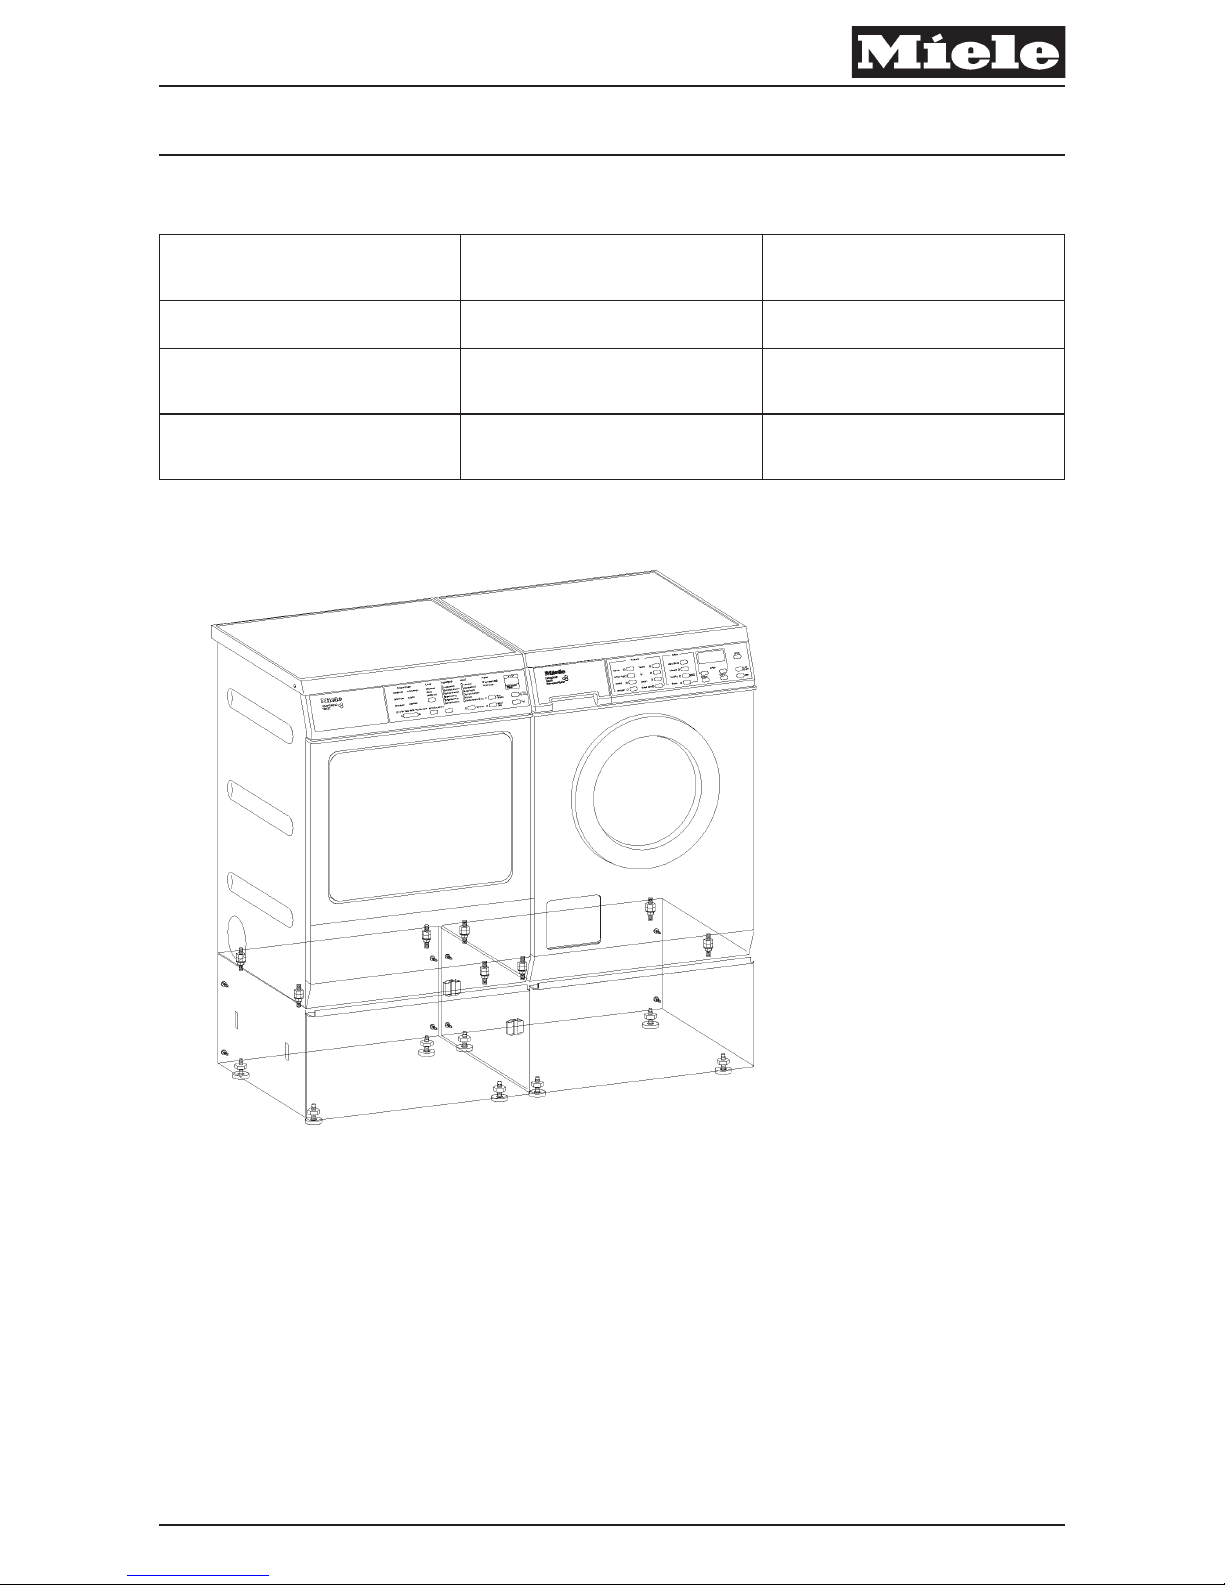
Each stand can be set up solo, or in combination with additional stands.
• When combining several stands, always connect them with a snap connector.
• In a solo setup, it is recommended to bolt the stand to the floor with the floor installation kit, mat. no. 04294300.
• When floor mounting, secure at least two stand feet on the floor (at least one foot in front and one in the rear). A diagonal floor
mounting is ideal.
Fire hazard.
• Do not store flammable materials in the drawers.
Warning!
Do not store wet or damp items in the drawer.
Note
Metric system.
The stand is only for Miele appliances:
• W 2000, W 3000, W 5000, T 200, T 4000, T 8000 series.
• Not to be used for integrable machines or washer-dryer stacks.
Note
Required tools:
• Level for leveling the stand(s).
• 12 mm open-end wrench, to adjust the tilt of the stand front panel.
• 13 mm open-end wrench, for M 8 bolt.
• 17 mm open-end wrench, for M 10 bolt.
• Phillips screwdriver, to adjust the height of the front panel.
• Torx T 20 screwdriver, for back wall.
Pulling the drawer out of the stand
– Pull the drawer out to its stop (Fig. 2).
– Lift the drawer at the railings, release the drawer and take it out.
Installing the feet
– Place the stand where it will ultimately be set up (Fig. 3).
– Turn the feet until the stand is level.
– If combining several stands: Make sure that all stands are set to the same height.
– Check with a level.
– Counterlock.
Produktgruppe 19 Umbau- und Montageanweisung
44 von 46 M.-Nr. 07104212
13.11.2012 Diese Unterlagen dürfen ohne unsere Genehmigung weder vervielfältigt noch Dritten zugänglich gemacht werden. Eigentumsrechte vorbehalten.
Page 12
Installing the stand under a washer
x
Note
Drain all water from the washer.
With transport struts in place, put the washer onto its right side.
Place the washer on a level, soft surface, such as a carpet.
– Put the washer onto its right side.
– Unscrew the washer feet and take them off.
– Thread two M 10 hex nuts each onto the M 10 bolts and counterlock so that 15 mm ± 1 mm (
10
/16“ ±1/16”) of thread is visible (Fig. 4).
– Screw the M 10 bolts with the 15 mm (
10
/16“) side into the washer housing, to a stop, and tighten.
– Put a 10.2 x 32 x 2 washer on each bolt.
– Bolt the stand and washer together.
– From the inside of the stand, screw an M 10 hex nut with #10.5 washer onto each M 10 bolt, and tighten.
– Screw the back wall onto the stand using the 4x10 fillister-head screws.
– Set the washer/stand assembly upright.
– Remove the transport struts.
The side panels of the stand have two holes each (Fig. 5).
– When combining several stands, push plugs into the holes that are not used.
– In a solo setup, push plugs into all four holes.
Installing the stand under a dryer
x
Note
Condenser dryer: Empty the water tank to prevent water leaking from the dryer during installation.
Place the dryer on a level, soft surface, such as a carpet.
– Put the dryer onto its left side.
– Unscrew the dryer feet and take them off.
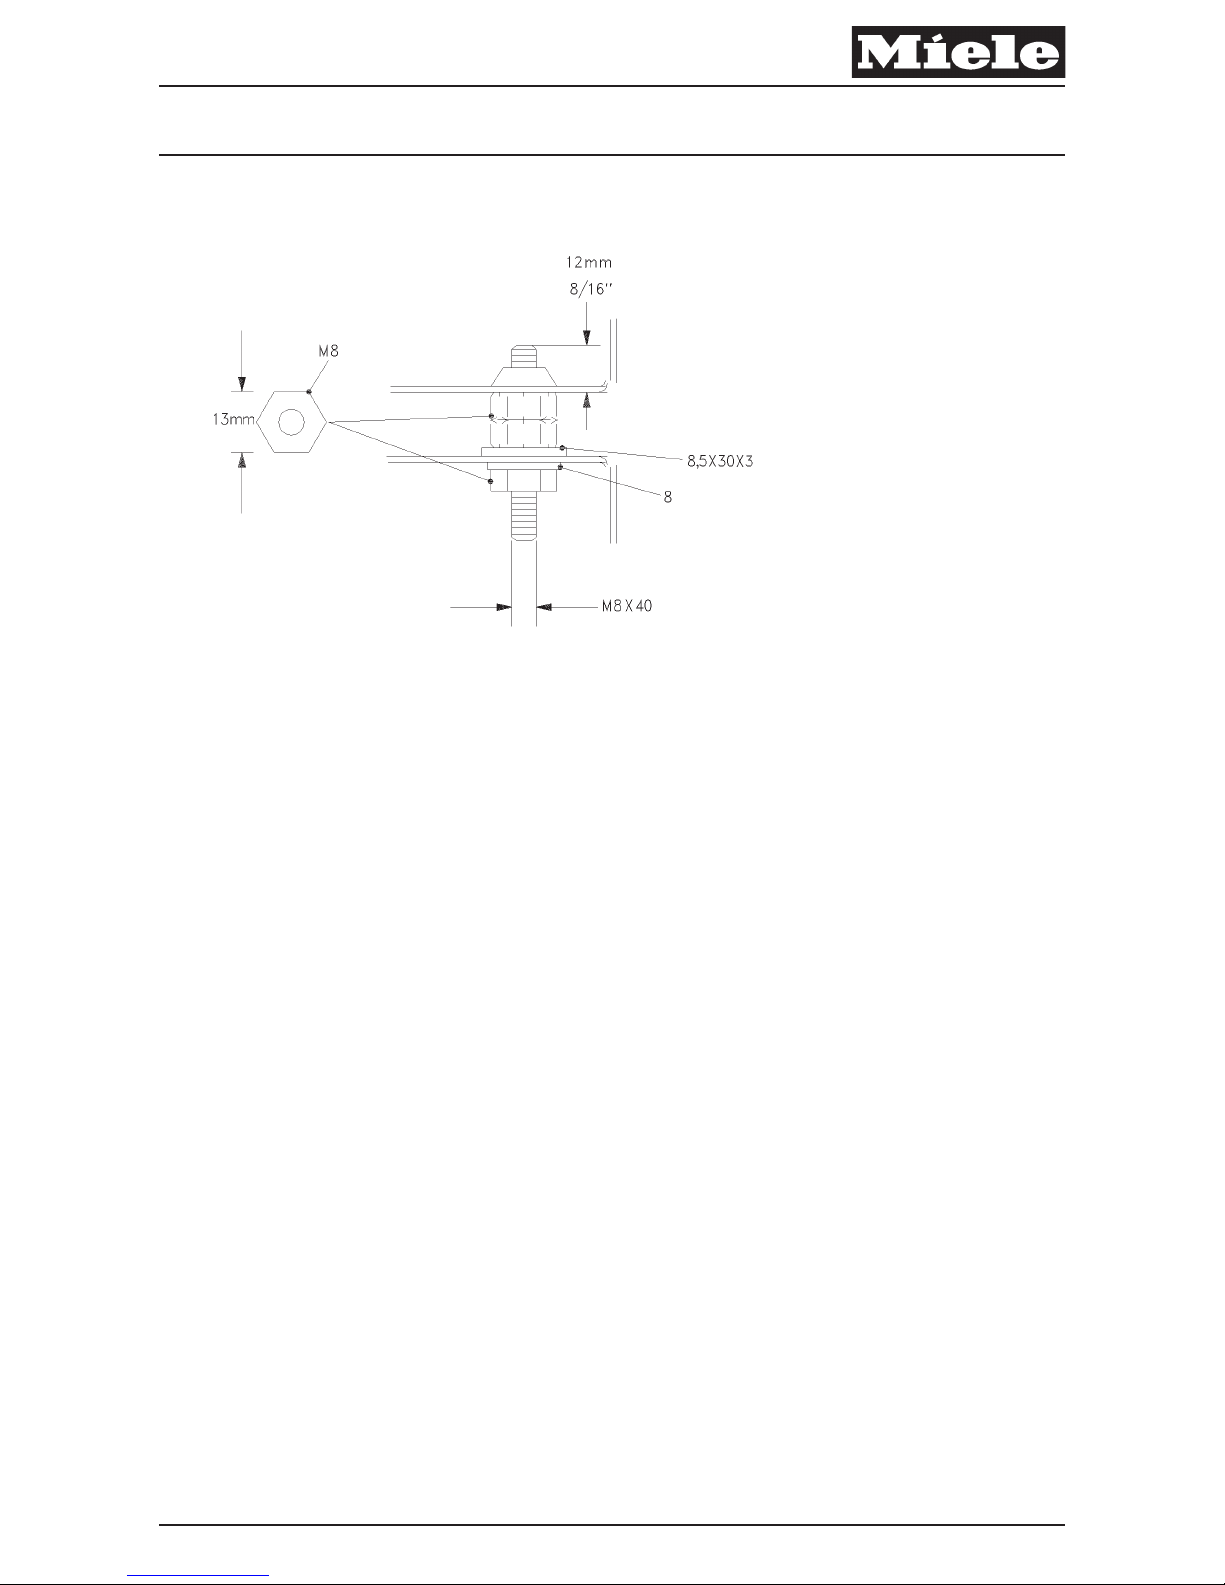
– Thread two M8 hex nuts onto each M8 bolt and counterlock, so that 12 mm ± 1 mm (
8
/16“ ±1/16”) of thread is visible (Fig. 6).
– Screw the M8 bolts with the 12 mm (
8
/16“) side into the dryer, to a stop, and tighten.
– Put a washer 8.5 x 30 x 3 on each bolt.
– Bolt the stand and dryer together.
– From the inside of the stand, screw an M8 hex nut with #8 washer on each M8 bolt, and tighten.
– Screw the back wall onto the stand using the 4x10 fillister-head screws.
– Set the dryer/stand assembly upright.
The side panels of the stand have two holes each (Fig. 5).
– When combining several stands, push plugs into the holes that are not used.
– In a solo setup, push plugs into all four holes.
Connecting the washer and dryer stands
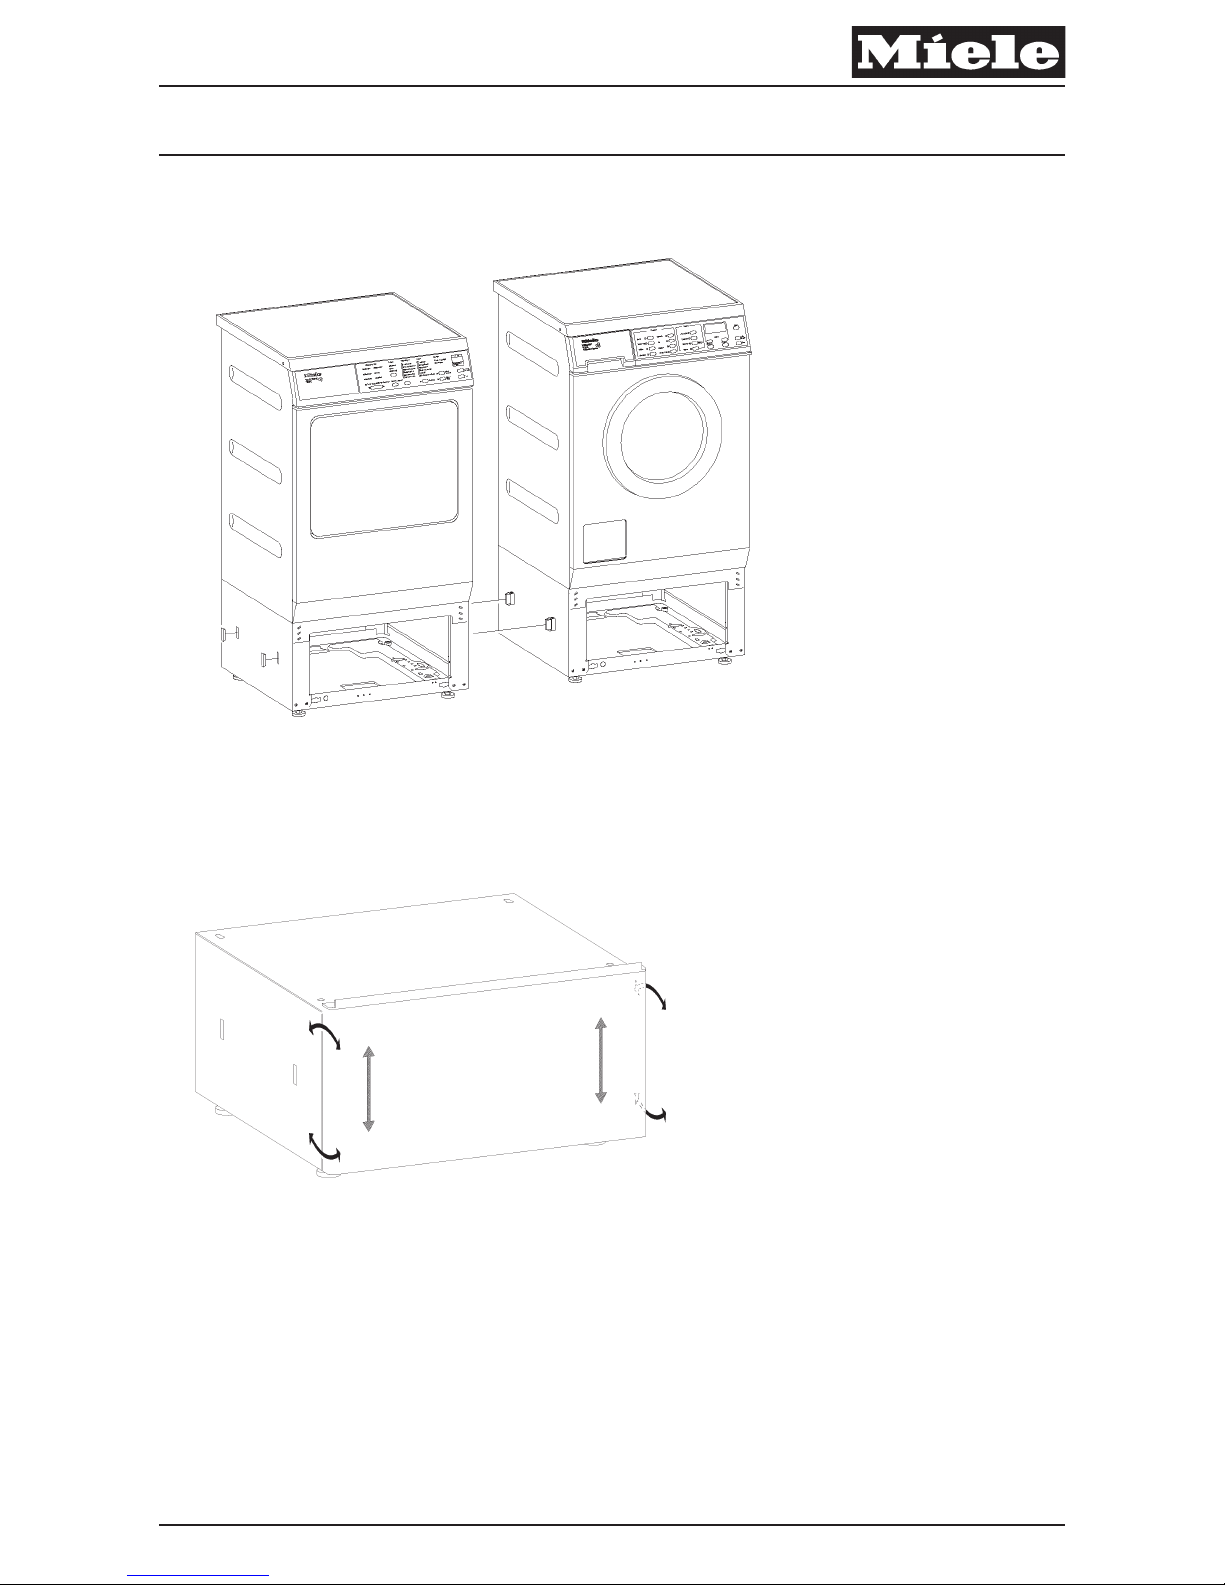
– If there are any plugs in the side walls to be connected, remove the plugs (Fig. 5).
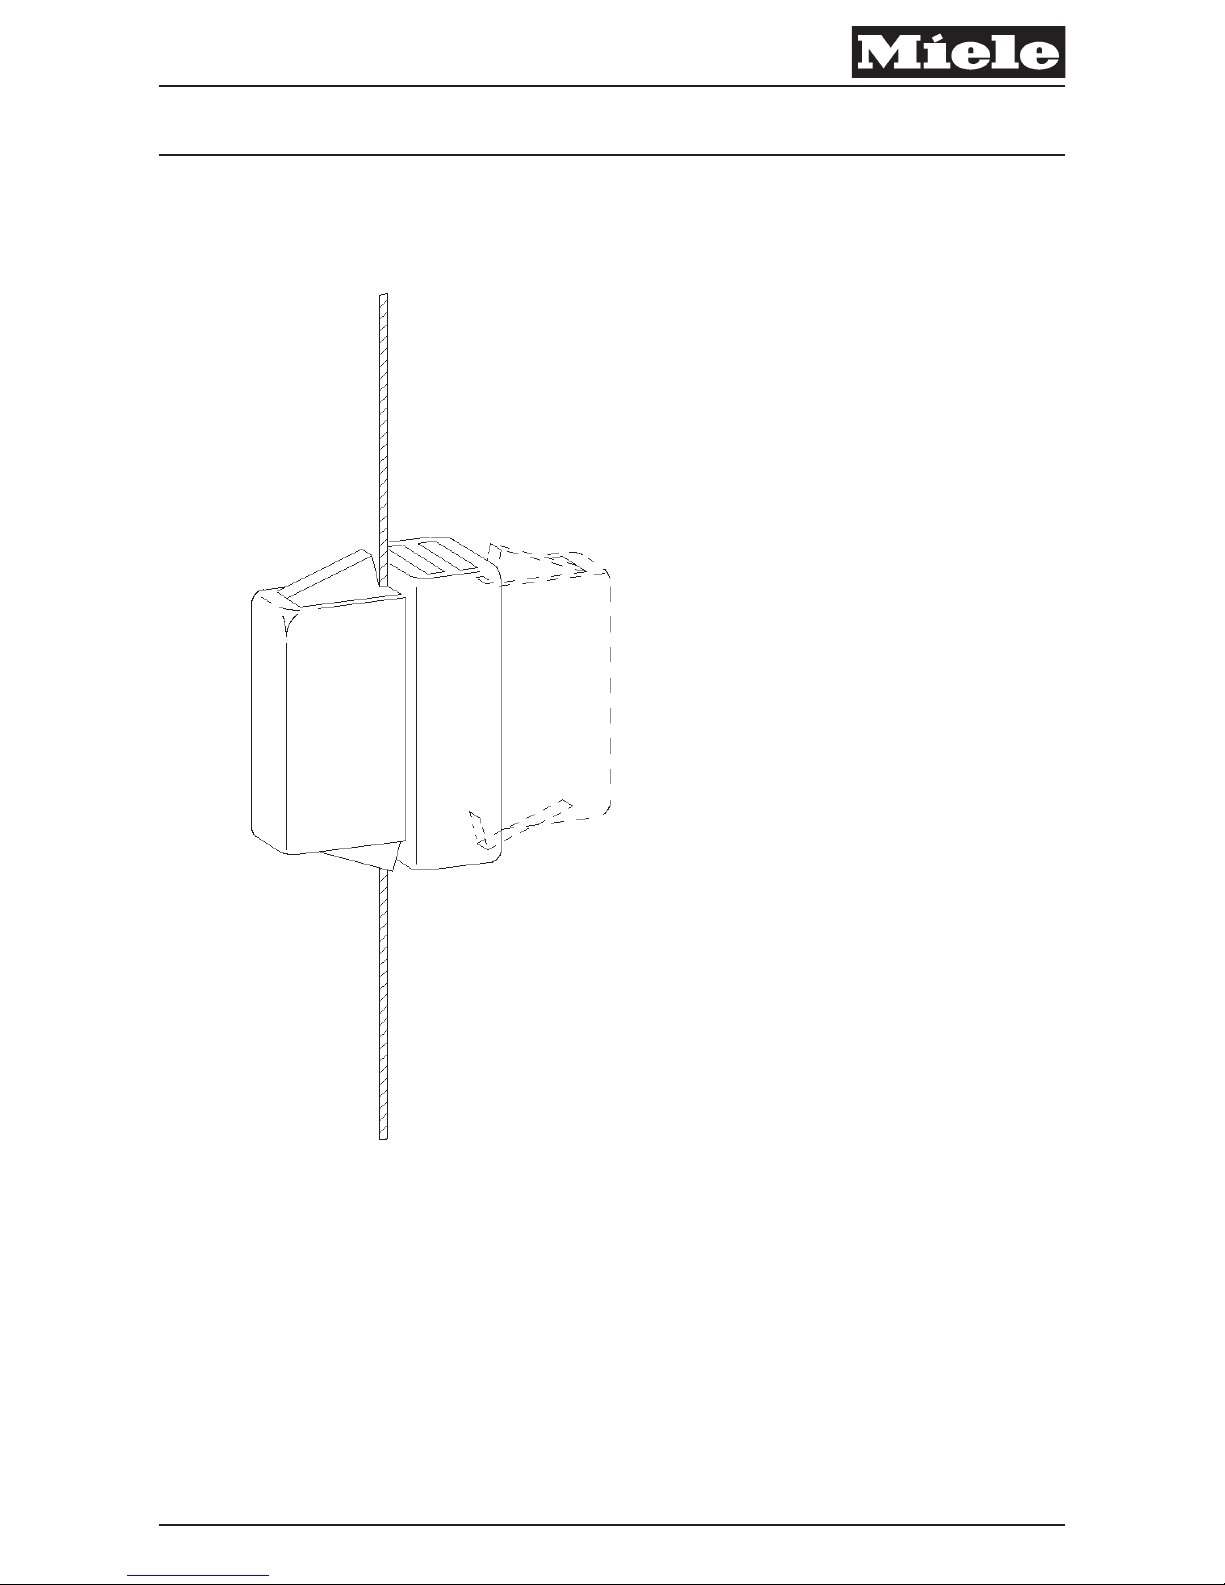
– Snap the snap connectors into the side wall of the washer stand (Fig. 7).
– Push the dryer stand onto the free ends of the snap connectors until the connectors engage (Fig. 8).
x
Note
Washer, dryer and both stands must be aligned.
Connectors must engage with a visible and audible snap.
Inserting the drawers into the stands
– Place the drawer onto the tracks and push it in.
– To check that the drawer is seated correctly, open the drawer to its stop and close it again.
The drawer automatically clicks in as it is closed.
Adjusting the front panel
The front panel of the appliance and the front panel of the drawer must be aligned. After installation it may be necessary to align the
[drawer] front panel. The height and the tilt of the front panel of the drawer can be adjusted (Fig. 9).
Produktgruppe 19 Umbau- und Montageanweisung
45 von 46 M.-Nr. 07104212
13.11.2012 Diese Unterlagen dürfen ohne unsere Genehmigung weder vervielfältigt noch Dritten zugänglich gemacht werden. Eigentumsrechte vorbehalten.
Page 13

Adjusting the height
– Open the drawer.
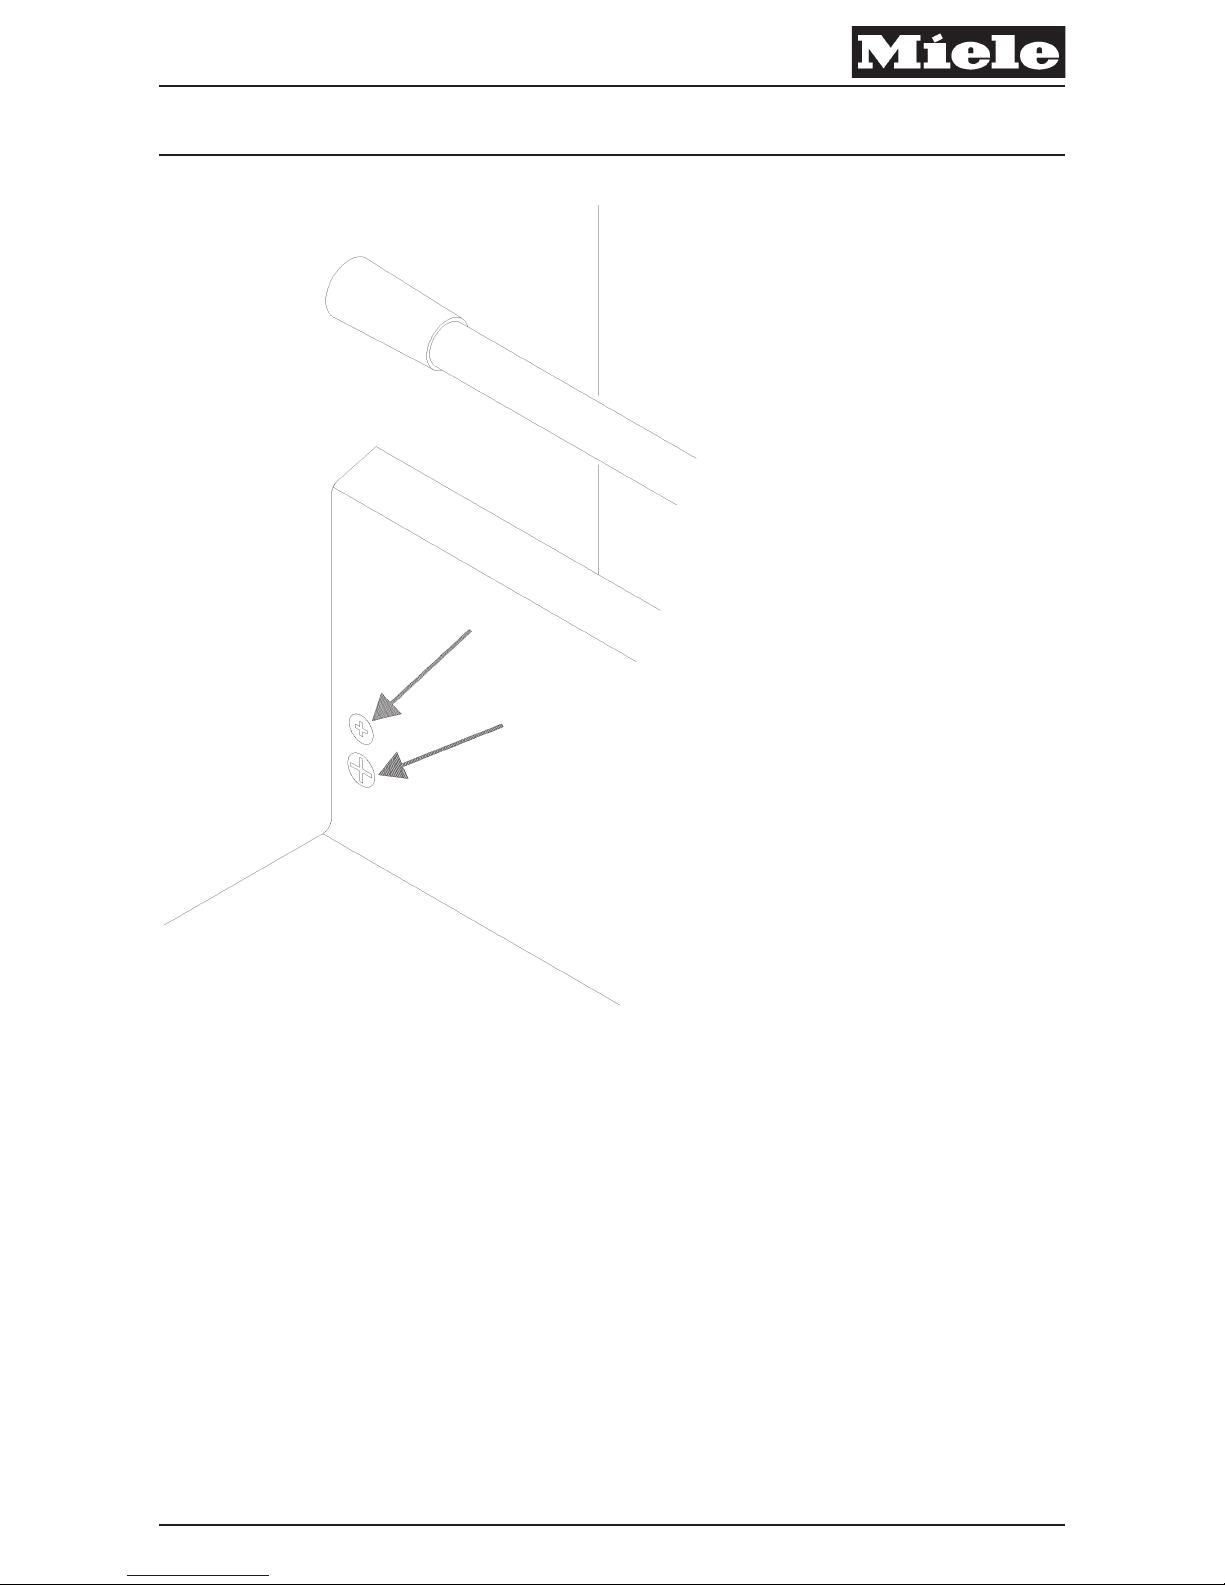
In the drawer, on the side walls, are two screws each which can be used to modify the height (Fig. 10).
– Loosen the top retaining screw.
– Use the adjusting screw below to modify the height of the front panel.
– When the height is correct, tighten the top retaining screw again.
Adjusting the tilt
– Open the drawer.
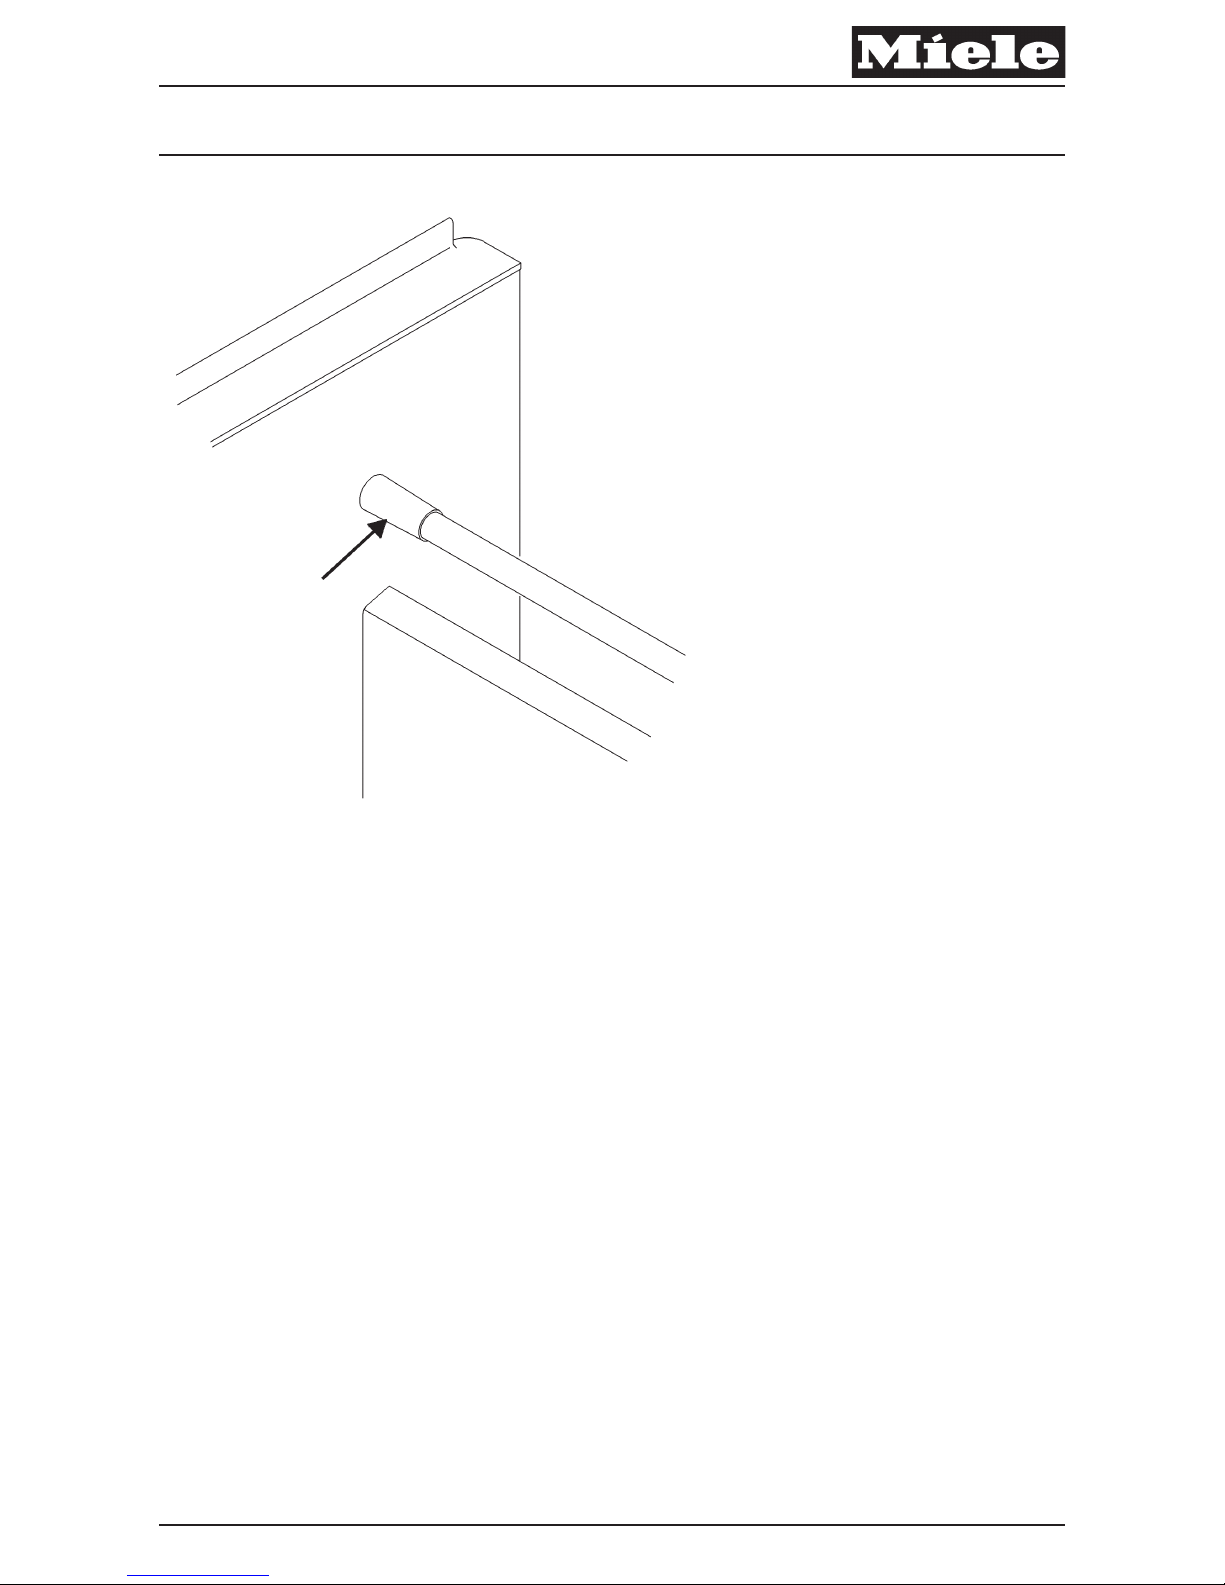
– Push back the cover sleeves on the right and left railings (Fig. 11).
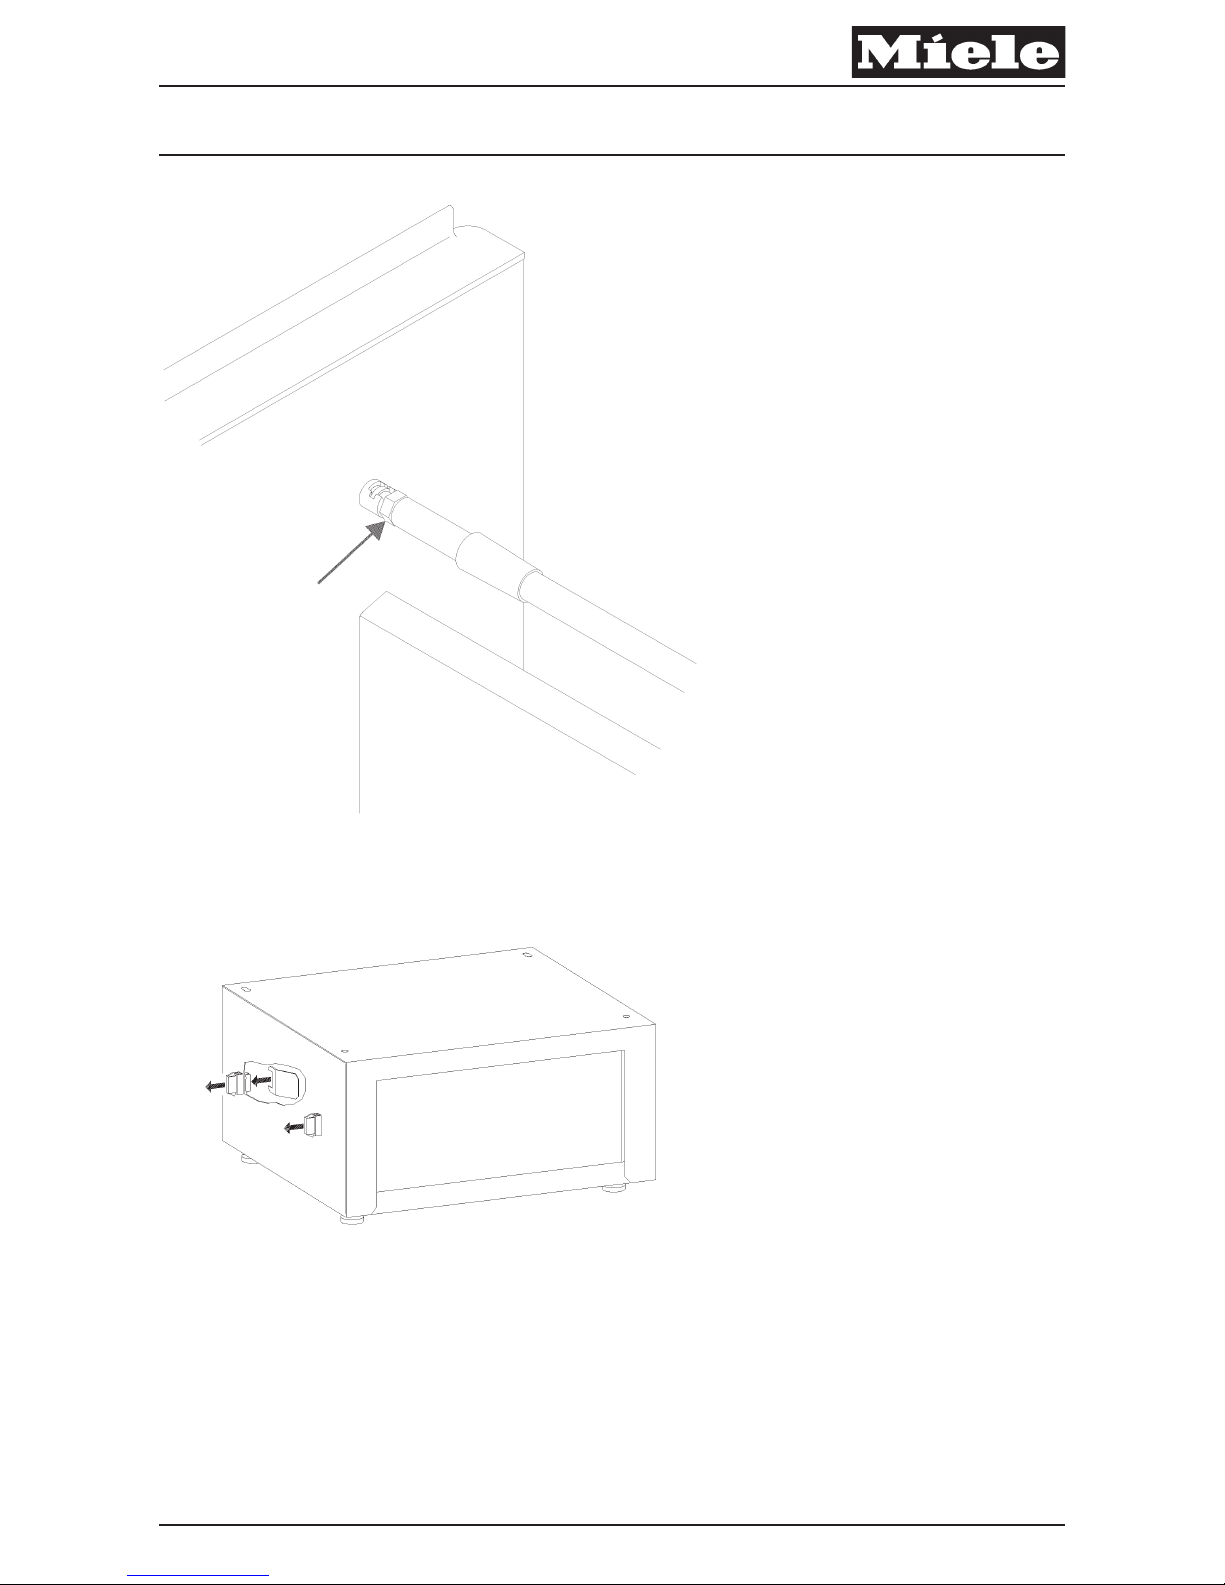
Under the cover sleeves are adjusting screws which can be used to modify the tilt of the panel (Fig. 12).
– Turn the adjusting screws in or out, until the front panel of the stand is straight.
– Slide the cover sleeves back over the adjusting screws.
Disassembling the stand
– Disassemble the stand following the installation steps in reverse order.
– Release the snap connectors with the release tool included with this kit (Fig. 13).
am
Produktgruppe 19 Umbau- und Montageanweisung
46 von 46 M.-Nr. 07104212
13.11.2012 Diese Unterlagen dürfen ohne unsere Genehmigung weder vervielfältigt noch Dritten zugänglich gemacht werden. Eigentumsrechte vorbehalten.
 Loading...