

Page 1

Operating instructions
Vacuum cleaner
S 558
S 658
To prevent accidents
and machine damage,
read these instructions
before installation and use.
UV
M.-Nr. 05 638 551
Page 2

2
Page 3

Contents
IMPORTANT SAFETY INSTRUCTIONS . . . . . . . . . . . . . . . . . . . . . . . . . . . . . . . . . 4
INSTRUCTIONS IMPORTANTES SUR LA SÉCURITÉ . . . . . . . . . . . . . . . . . . . . . 9
Guide to the vacuum cleaner . . . . . . . . . . . . . . . . . . . . . . . . . . . . . . . . . . . . . . . 14
Before using for the first time. . . . . . . . . . . . . . . . . . . . . . . . . . . . . . . . . . . . . . . 16
Included accessories. . . . . . . . . . . . . . . . . . . . . . . . . . . . . . . . . . . . . . . . . . . . . . 20
Using the included accessories . . . . . . . . . . . . . . . . . . . . . . . . . . . . . . . . . . . . . 22
Crevice nozzle . . . . . . . . . . . . . . . . . . . . . . . . . . . . . . . . . . . . . . . . . . . . . . . . . . . . 22
Crevice nozzle extension. . . . . . . . . . . . . . . . . . . . . . . . . . . . . . . . . . . . . . . . . . . . 22
Dusting brush . . . . . . . . . . . . . . . . . . . . . . . . . . . . . . . . . . . . . . . . . . . . . . . . . . . . 23
Upholstery nozzle . . . . . . . . . . . . . . . . . . . . . . . . . . . . . . . . . . . . . . . . . . . . . . . . . 23
Operation . . . . . . . . . . . . . . . . . . . . . . . . . . . . . . . . . . . . . . . . . . . . . . . . . . . . . . . 24
Unwinding and rewinding the power cord. . . . . . . . . . . . . . . . . . . . . . . . . . . . . . . 24
Auto-reverse. . . . . . . . . . . . . . . . . . . . . . . . . . . . . . . . . . . . . . . . . . . . . . . . . . . . . . 24
Turning the vacuum on and off . . . . . . . . . . . . . . . . . . . . . . . . . . . . . . . . . . . . . . . 25
Adjusting the suction . . . . . . . . . . . . . . . . . . . . . . . . . . . . . . . . . . . . . . . . . . . . . . . 26
Turning the Electrobrush on and off. . . . . . . . . . . . . . . . . . . . . . . . . . . . . . . . . . . . 27
Blower connection socket . . . . . . . . . . . . . . . . . . . . . . . . . . . . . . . . . . . . . . . . . . . 28
Setting down, transport and storage . . . . . . . . . . . . . . . . . . . . . . . . . . . . . . . . . 29
Park-System. . . . . . . . . . . . . . . . . . . . . . . . . . . . . . . . . . . . . . . . . . . . . . . . . . . . . . 29
Maintenance and care . . . . . . . . . . . . . . . . . . . . . . . . . . . . . . . . . . . . . . . . . . . . . 30
Purchasing new dustbags and filters . . . . . . . . . . . . . . . . . . . . . . . . . . . . . . . . . . 30
When to change the dustbag . . . . . . . . . . . . . . . . . . . . . . . . . . . . . . . . . . . . . . . . 31
Replacing the dustbag . . . . . . . . . . . . . . . . . . . . . . . . . . . . . . . . . . . . . . . . . . . . . 32
Replacing the exhaust filter . . . . . . . . . . . . . . . . . . . . . . . . . . . . . . . . . . . . . . . . . . 33
Replacing the "ACTIVE HEPA" filter . . . . . . . . . . . . . . . . . . . . . . . . . . . . . . . . . . . . 34
Replacing one type of filter with another . . . . . . . . . . . . . . . . . . . . . . . . . . . . . . . . 35
When to change the dust compartment filter (motor protection). . . . . . . . . . . . . . 36
Replacing the dust compartment filter . . . . . . . . . . . . . . . . . . . . . . . . . . . . . . . . . 36
Cleaning and care . . . . . . . . . . . . . . . . . . . . . . . . . . . . . . . . . . . . . . . . . . . . . . . . 37
Problem solving guide. . . . . . . . . . . . . . . . . . . . . . . . . . . . . . . . . . . . . . . . . . . . . 38
Technical Service. . . . . . . . . . . . . . . . . . . . . . . . . . . . . . . . . . . . . . . . . . . . . . . . . 39
Optional accessories. . . . . . . . . . . . . . . . . . . . . . . . . . . . . . . . . . . . . . . . . . . . . . 40
Electrical connection. . . . . . . . . . . . . . . . . . . . . . . . . . . . . . . . . . . . . . . . . . . . . . 45
Caring for the environment . . . . . . . . . . . . . . . . . . . . . . . . . . . . . . . . . . . . . . . . . 46
3
Page 4

IMPORTANT SAFETY INSTRUCTIONS
When using an electrical appliance, basic precautions should always be followed,
including the following:
READ ALL INSTRUCTIONS BEFORE
USING THIS APPLIANCE
The manufacturer cannot be held responsible for any damage caused
through non-observance of these Important Safety Instructions.
WARNING-
To reduce the risk of fire, electric
shock or injury:
Before using
Check the voltage rating of the
vacuum cleaner before connecting
the power cord to an electrical outlet.
Your power source should correspond
with the voltage rating plate located on
the underside of the vacuum. Use only
household AC outlets. Never use DC
power sources. If you are not sure of
your home’s voltage supply, consult a
qualified electrician. Connecting the
vacuum cleaner to a higher voltage
than indicated in these instructions may
result in damage to the vacuum cleaner
or injury.
To reduce the the risk of electric
shock, this appliance has a
polarized plug (one blade is wider than
the other.) This plug will fit in a
polarized outlet only one way. If the
plug does not fit fully in the outlet,
reverse the plug. If it still does not fit,
contact a qualified electrician to install
the proper outlet. Do not change the
plug in any way.
A damaged vacuum cleaner can
be dangerous. Check the
packaging, the vacuum cleaner and
accessories for any signs of damage.
Do not use a damaged appliance.
Do not use with a damaged cord or
plug. If the appliance is not
working as it should, has been
dropped, damaged, left outdoors or
immersed in water, bring it to a service
center.
4
Page 5

IMPORTANT SAFETY INSTRUCTIONS
Use
Do not use on people or on
animals.
Do not use outdoors or on wet
surfaces. Only dry surfaces should
be vacuumed.
Use only as described in this
manual. Use only Miele
recommended accessories.
The manufacturer cannot be held
responsible for damage caused by
non-compliance with these Important
Safety Instructions. This appliance is
intended strictly for household use only.
Under absolutely no circumstances
should this vacuum cleaner be
used to arrest, retain and/or contain the
anthrax virus or any other hazardous
chemical or biological particles. While
Miele’s HEPA filter is certified to retain
micro-particles, once any biohazardous
material is introduced into the vacuum,
the entire vacuum cleaner unit, floor
tools, wand, and hose become
contaminated, rendering them all a
biohazard. Thereafter, this
contaminated appliance and the entire
environment would require the attention
of the Center for Disease Control and
Prevention (CDC) to employ biohazard
cleanup procedures.
Daily use
Do not pull or carry by the cord,
use the cord as a handle, close a
door on the cord, or pull the cord
around sharp edges or corners. Do not
run the appliance over the cord. Keep
the cord away from heated surfaces.
The suction hose and the
telescopic wand contain electrical
wires. Do not use the vacuum cleaner if
these parts are damaged, cut or
punctured. Danger of electric shock!
Do not unplug by pulling on the
cord. To unplug, grasp the plug,
not the cord.
Do not handle the plug or vacuum
with wet hands.
Keep hair, loose clothing, fingers
and all parts of the body away from
openings and moving parts.
Turn off all controls before
unplugging.
Use extra care when cleaning on
stairs.
Child safety
Do not allow the vacuum cleaner to
be used as a toy. Close attention is
necessary when used by or near
children.
5
Page 6

IMPORTANT SAFETY INSTRUCTIONS
Do not use to pick up flammable or
combustible liquids, such as
gasoline, or use in areas where they
may be present.
Do not use the vacuum cleaner to
pick up liquids, as this could impair
the electrical safety of the vacuum
cleaner. This applies to freshly
shampooed carpets. Wait until they dry.
Do not pick up anything that is
burning or smoking, such as
cigarettes, matches, or hot ashes.
Do not vacuum up items which are
heavy, hard or have sharp edges.
They could cause a blockage and
damage the appliance.
Do not vacuum toner dust. Toner,
such as that used in printers and
photocopiers can conduct electricity.
Always turn off the vacuum before
connecting or disconnecting the
Electrobrush, Turbobrush or
accessories.
To aid the vacuum in dissipating
heat during extended operation
(longer than 1 hour), the Auto-Reverse
feature should be turned off and the
power cord should be unwound from
the cable reel at least two thirds of the
way.
A temperature limiter automatically
switches off the vacuum cleaner if
it gets too hot, see "Problem solving
guide".
On the underside of the vacuum
hand piece is a metal insert
designed to absorb electrostatic
charge. Please make certain that your
hand remains around this metal insert.
Do not use without dustbag and/or
filters in place.
Do not turn on or attempt to operate the
vacuum cleaner unless a dustbag, dust
compartment filter and exhaust filter are
in place. Use only genuine Miele
double-layer dustbags and filters (see
"Maintenance" for instructions on how to
insert the dustbag and filters.) If a
dustbag has not been inserted, the
dust compartment cover will not close.
Do not use force!
6
Page 7

IMPORTANT SAFETY INSTRUCTIONS
Accessory use
The Miele Electrobrush is a motor
driven accessory for use only with
Miele vacuum cleaners. It must not be
used with vacuum cleaners produced
by other manufacturers.
When vacuuming with the Miele
Electrobrush or Turbobrush, do not
touch the rotating brush.
When using the vacuum with an
Electrobrush and current-carrying
hose: The hose contains electrical
wires. Do not use when damaged, cut,
or punctured. Avoid picking up sharp
objects.
The socket on the vacuum cleaner
must only be used for the Miele
Electrobrush specified for use with this
appliance.
Use only attachments specified by
Miele. Do not use the blower to
operate paint sprayers or similar
devices that emit volatile or toxic
vapors.
Monitor the dustbag change
indicator and inspect all filters
regularly. To ensure efficient suction,
clean or replace them when necessary
according to the operating instructions.
To guarantee safety, only use genuine
Miele dustbags, filters and accessories.
Miele vacuum cleaner bags are
disposable and intended to be
used only once. Do not attempt to
reuse them.
Do not use the vacuum without an
accessory attached. The rim could
be damaged and injuries could result
from sharp edges.
7
Page 8

IMPORTANT SAFETY INSTRUCTIONS
Maintenance and care
A damaged power cord must only
be replaced with a genuine Miele
cord by an authorized service agent.
Do not leave the vacuum plugged
in. Unplug from the outlet when not
in use and before servicing.
Do not put any object into
openings. Do not use with any
opening blocked; keep free of dust, lint,
hair, and anything that may reduce air
flow.
Clean only with a dry or slightly
damp cloth when disconnected
from the power supply. Never immerse
in water.
The suction hose and the
telescopic wand contain electrical
wires. The plug connectors must not
come in contact with water. These items
may only be cleaned with a dry cloth,
no moisture must touch them. Danger
of electric shock.
Disposal
When disposing of an old
appliance, the power cord should
be removed. Unplug the vacuum. Cut
the power cord off the appliance as
close to the vacuum as possible and
cut the plug off the cord. The plug cut
from the cord should be disabled and
thrown away. Under no circumstance
should this plug be inserted into a
socket (electric shock hazard.)
SAVE THESE
INSTRUCTIONS
This appliance is equipped with a
power cord reel. Hold plug when
rewinding onto cord reel. Do not allow
plug to whip when rewinding.
Do not attempt any repairs other
than those listed under
"Maintenance." Other repairs should be
performed by an authorized Miele
Service Agent.
The manufacturer can not be held
responsible for any work performed by
an unauthorized servicer.
8
Page 9

INSTRUCTIONS IMPORTANTES SUR LA SÉCURITÉ
Lorsque vous utilisez un appareil électrique, vous devez toujours prendre des
précautions essentielles, y compris ce qui suit.
LISEZ TOUTES LES INSTRUCTIONS
AVANT D’UTILISER CET APPAREIL.
Le fabricant n’est pas responsable des dommages causés par le non-respect
des présentes instructions.
ATTENTION-
Afin de réduire le risque d’incendie,
de choc électrique ou de blessures :
Avant l’utilisation
Vérifiez la tension nominale de
l’aspirateur avant de le brancher.
La tension électrique de votre
résidence doit correspondre à celle qui
est indiquée sur la plaque signalétique
située sous l’aspirateur. N’utilisez que
des prises domestiques de courant
alternatif. N’utilisez jamais de prise de
courant continu. Si vous ne connaissez
pas le type d’alimentation électrique de
votre résidence, consultez un
électricien qualifié. Si vous branchez
votre aspirateur à une source
d’alimentation électrique de tension
supérieure à celle indiquée dans les
présentes instructions, vous pourriez
endommager l’appareil ou vous
blesser.
Afin de réduire le risque de choc
électrique, cet appareil est muni
d’une fiche polarisée (l’une des
broches est plus large que l’autre). La
fiche ne peut être insérée que d’un seul
côté. Si vous n’arrivez pas à l’insérer
entièrement dans la prise, retournez-la.
Si vous ne pouvez toujours pas l’insérer
même après l’avoir retournée, faites
appel à un électricien qualifié pour faire
installer une prise appropriée. Ne
modifiez d’aucune façon la fiche.
Un aspirateur endommagé peut
s’avérer dangereux. Vérifiez bien
l’emballage, l’appareil lui-même et les
accessoires pour constater des
dommages éventuels. N’utilisez pas
d’appareil endommagé.
N’utilisez pas l’appareil avec un
cordon d’alimentation ou une fiche
endommagés. Si l’appareil ne
fonctionne pas correctement, s’il a subi
une chute ou un dommage, s’il a été
laissé à l’extérieur ou s’il a été immergé
dans l’eau, faites-le vérifier dans un
centre de service technique.
9
Page 10

INSTRUCTIONS IMPORTANTES SUR LA SÉCURITÉ
Utilisation
N’utilisez pas l’appareil pour
nettoyer des personnes ou des
animaux.
N’utilisez pas l’appareil à l’extérieur
ou pour nettoyer des surfaces
mouillées. Ne nettoyez que des
surfaces sèches.
Pour utiliser l’aspirateur, suivez
uniquement les instructions
d’utilisation contenues dans le présent
manuel. N’utilisez que les accessoires
Miele recommandés.
Le fabricant décline toute
responsabilité quant à des
dommages causés par la
non-conformité aux présentes
instructions. Cet appareil est destiné
uniquement à l’usage domestique.
L’appareil ne doit être utilisé en
aucun cas pour contenir,
circonscrire ou aspirer les spores de la
maladie du charbon ou toute autre
substance chimique ou biologique
dangereuse. Le filtre HEPA de Miele
retient les particules microscopiques,
mais lorsqu’une substance nocive pour
l’organisme s’introduit dans l’appareil,
celle-ci contamine l’aspirateur en entier,
les embouts, le tube et le tuyau, qui
deviennent tous des dangers
biologiques. Par la suite, l’appareil
contaminé et l’endroit où il a été utilisé
devront être signalés aux Centers for
Disease Control and Prevention (CDC)
pour procéder à l’élimination des
dangers biologiques.
Sécurité des enfants
Ne laissez pas les enfants jouer
avec l’aspirateur. Si un enfant
l’utilise ou si vous l’utilisez dans un
endroit où se trouvent des enfants,
soyez vigilant.
Utilisation quotidienne
Ne tirez pas sur le cordon
d’alimentation pour transporter
l’appareil, n’utilisez pas le cordon
d’alimentation comme poignée, ne
fermez pas une porte sur le cordon
d’alimentation, ne le passez pas sur des
extrémités ou des recoins tranchants.
Ne passez pas l’appareil sur le cordon
d’alimentation. Veillez à ce que le
cordon d’alimentation ne se trouve pas à
proximité de surfaces chaudes.
Le tuyau d’aspiration et le tube
télescopique renferment des fils
électriques. N’utilisez pas l’aspirateur si
ces pièces sont endommagées,
coupées ou perforées. Danger de choc
électrique!
Ne tirez pas sur le cordon
d’alimentation pour débrancher
l’appareil. Pour le débrancher, tirez sur
la fiche et non sur le cordon
d’alimentation.
Ne manipulez pas la fiche ou
l’aspirateur avec des mains
mouillées.
Veillez à ce que vos cheveux, vos
vêtements - s’ils sont amples - vos
doigts et toutes les autres extrémités de
votre corps ne se trouvent pas à
proximité des ouvertures et des parties
motrices de l’appareil.
10
Page 11

INSTRUCTIONS IMPORTANTES SUR LA SÉCURITÉ
Mettez hors service toutes les
commandes avant de débrancher
l’appareil.
Redoublez d’attention lorsque vous
nettoyez un escalier.
N’utilisez pas les brosses à
parquet, les accessoires et les
tubes à hauteur de la tête pour éviter
des blessures aux yeux et aux oreilles.
N’utilisez pas l’appareil pour
éponger des liquides inflammables
ou combustibles, tels que l’essence, ou
dans des pièces où de tels liquides
pourraient être entreposés.
N’utilisez pas l’aspirateur pour
éponger des liquides, car cela
pourrait nuire à la sécurité électrique de
l’appareil. Attendez que les tapis
fraîchement lavés soient secs.
N’utilisez pas l’aspirateur pour
ramasser un objet brûlant ou
fumant, tel que cigarettes, allumettes
ou cendres encore chaudes.
N’aspirez pas des articles lourds,
durs ou ayant des bords
tranchants ou pointus. Ils pourraient
boucher et endommager l’appareil.
Ne nettoyez pas de l’encre en
poudre avec l’aspirateur. L’encre
en poudre utilisée pour les imprimantes
et les photocopieurs peut être
conductrice d’électricité.
N’utilisez pas l’aspirateur sans le
sac à poussière ou les filtres.
Ne faites fonctionner l’aspirateur que si
le sac à poussière, le filtre du réservoir
à poussière et le filtre d’évacuation sont
bien en place. N’utilisez que des sacs à
poussière doublés et des filtres Miele
(consultez la section « Entretien » pour
les instructions d’insertion du sac à
poussière et des filtres). Si vous n’avez
pas inséré un sac à poussière, le
couvercle du réservoir à poussière ne
se refermera pas. Ne le forcez pas !
Pour aider à dissiper la chaleur
produite si vous faites fonctionner
l’aspirateur pendant plus d’une heure,
l’enrouleur de cordon automatique doit
être désactivé et le cordon
d’alimentation doit être déroulé de
l’enrouleur aux deux tiers au moins.
L’aspirateur est muni d’un limiteur
de température qui éteint
automatiquement l’appareil s’il chauffe
trop. Consultez la section portant sur la
résolution de problèmes.
Pour absorber la charge
électrostatique qui se produit
lorsque l’aspirateur fonctionne, une
pièce métallique est placée sous la
poignée de l’appareil. Assurez-vous
que votre main enveloppe bien cette
pièce métallique.
Éteignez toujours l’aspirateur avant
de mettre ou d’enlever
l’électrobrosse, la turbobrosse ou un
accessoire.
11
Page 12

INSTRUCTIONS IMPORTANTES SUR LA SÉCURITÉ
Utilisation des accessoires
L’électrobrosse Miele est un
accessoire électrique utilisable
uniquement avec les aspirateurs Miele.
Elle ne doit pas être utilisée avec des
aspirateurs d’une marque autre que
Miele.
Lorsque vous nettoyez avec
l’électrobrosse ou la turbobrosse
Miele, ne touchez pas la brosse
rotative.
Lorsque vous utilisez l’aspirateur
avec l’électrobrosse et un tuyau
porteur de courant Le tuyau contient des fils électriques.
N’utilisez pas le tuyau s’il est
endommagé, perforé ou s’il porte des
entailles. Évitez d’aspirer des objets
tranchants.
La prise de l’aspirateur ne doit
servir que pour l’électrobrosse
Miele destinée à cet appareil.
Utilisez uniquement des
accessoires désignés par Miele.
N’utilisez pas la soufflerie pour faire
fonctionner des pistolets à peinture ou
des dispositifs semblables qui émettent
des substances volatiles ou toxiques.
Les sacs à poussière Miele sont
jetables et sont conçus pour usage
unique. Ne les réutilisez pas.
N’utilisez pas l’aspirateur sans
accessoire. Vous pourriez en
endommager le pourtour et vous
blesser en touchant l’extrémité
coupante.
Entretien
Si le cordon d’alimentation est
endommagé, ne le remplacez que
par un cordon d’alimentation original
Miele que vous pouvez vous procurer
chez un agent de service technique
autorisé.
Ne laissez pas l’aspirateur
branché. Débranchez-le lorsque
vous ne l’utilisez pas et avant de
procéder à son entretien.
Ne placez aucun objet dans
aucune des ouvertures. N’utilisez
pas l’aspirateur si une des ouvertures
est bloquée. Veillez à ce que poussière,
peluches, cheveux ou autres
n’obstruent pas l’aspirateur, ce qui
pourrait réduire le débit d’air.
Surveillez le voyant de remplissage
du sac et vérifiez régulièrement
tous les filtres. Afin d’assurer une
succion efficace, nettoyez-les ou
remplacez-les, lorsque nécessaire,
selon les instructions d’utilisation. Pour
garantir la sécurité de l’appareil, utilisez
uniquement des sacs à poussière,
filtres et accessoires originaux de
Miele.
12
Page 13

INSTRUCTIONS IMPORTANTES SUR LA SÉCURITÉ
Nettoyez l’aspirateur seulement
avec un tissu sec ou légèrement
humide lorsqu’il est débranché. Ne
l’immergez jamais dans l’eau.
Le tuyau d’aspiration et le tube
télescopique renferment des fils
électriques. Les prises mâles ne
doivent pas se trouver en contact avec
de l’eau. Ces éléments peuvent être
nettoyés seulement avec un tissu sec et
non humide. L’humidité constitue un
risque de choc électrique.
Cet appareil est muni d’un
enrouleur. Tenez la fiche lorsque
vous rembobinez le cordon
d’alimentation et ne la laissez pas
fouetter le plancher.
Ne procédez pas à des
réparations à l’exception de celles
précisées dans la section « Entretien ».
Toute autre réparation devrait être
effectuée par un agent de service
technique autorisé. Le fabricant ne peut
être tenu responsable de réparations
effectuées par un technicien non
autorisé.
Mise au rebut
Avant de jeter un vieil aspirateur,
vous devez couper le cordon
d’alimentation. Débranchez l’aspirateur,
coupez le cordon le plus près possible
de l’appareil ainsi que la fiche. La fiche
doit être mise hors d’état de fonctionner
et jetée. En aucun cas vous ne devez
brancher cette fiche dans une prise
(risque de choc électrique).
VEUILLEZ
CONSERVER CES
INSTRUCTIONS
13
Page 14
Guide to the vacuum cleaner
14
Page 15

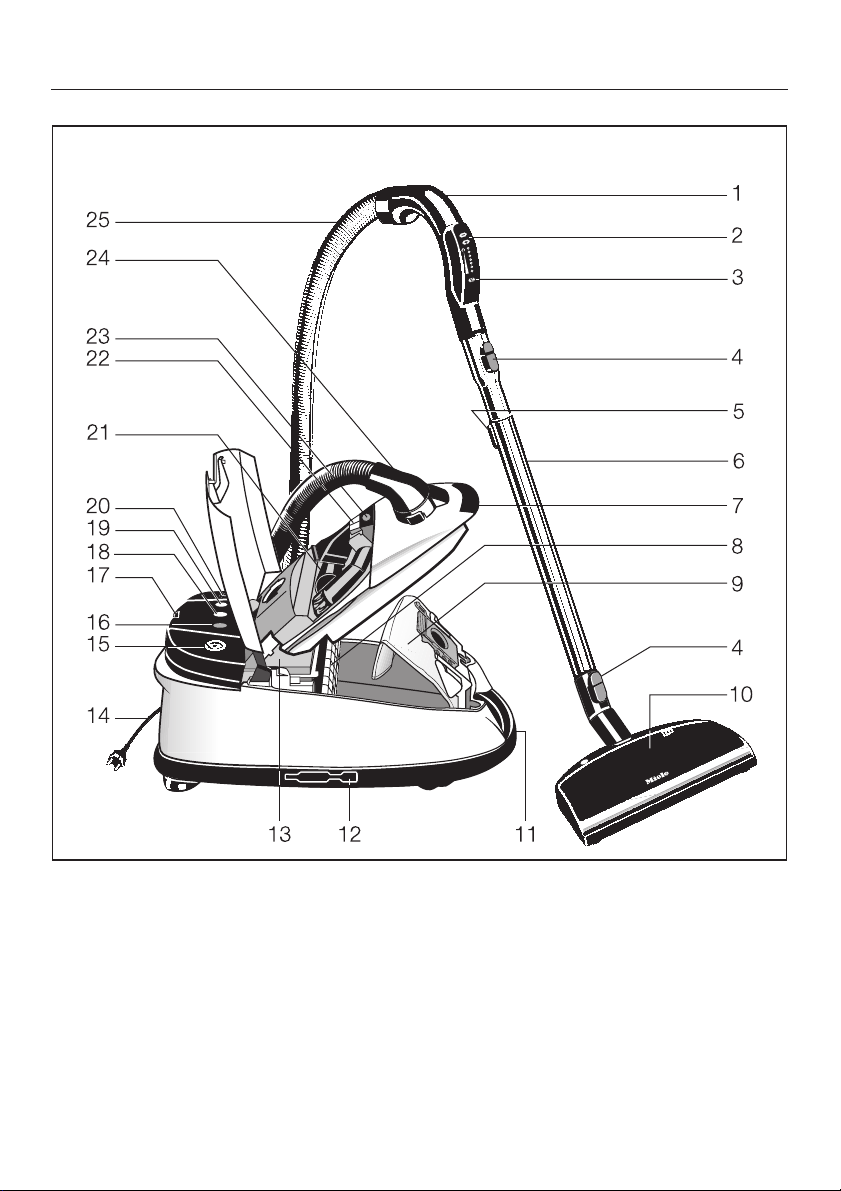
Guide to the vacuum cleaner
a Handpiece
b Suction power selector
c Electrobrush switch
d Locking button
e Telescopic wand release button
f Telescopic wand
g Dust compartment lid release
h Dust compartment filter (motor protection)
i Dust bag
j Electrobrush
k Carrying handle
l Suction wand holder
m Exhaust filter
n Power cord with plug
o Cord rewind switch
p Exhaust filter change indicator (Re-set button 7)
q Park-System
r Stand-by light
s Thermo indicator ,
t On / Off switch
u Accessories compartment
v Dustbag change indicator
w Accessory compartment lid release
x Elbow
y Suction hose
15
Page 16

Before using for the first time
Attaching the suction hose
Open the dust compartment shutter.
^
The dust compartment shutter is
designed for clean handling and
prevents dust and odors from
escaping. If you remove the suction
hose from the vacuum cleaner for
storage purposes close the dust
compartment shutter before putting it
away.
^ Insert the elbow into the suction
socket.
When inserting the elbow ensure that
the plug connectors line up correctly.
Removing the suction hose
^
Press the release buttons at the side
of the elbow and lift the hose from the
socket.
16
Page 17

Connecting the suction hose
and the suction wand
Fit the handpiece of the suction hose
^
firmly into the suction wand. (Ensure
that the plug connectors line up.)
They must lock together with a click.
To release the handpiece from the
^
suction wand press the locking
button and pull apart (see arrow).
Adjusting the suction wand
One part of the telescopic wand is
inside the other and can be adjusted to
your height for comfortable vacuum
cleaning.
To adjust
Before using for the first time
^ Press the telescopic wand release
button (see arrow) to release the
tubes. Draw out or push in the inner
tube to adjust to the height, then
release the button. The wand is
locked in position.
,
When a resistance is felt it has
reached its maximum length. Do not
force it beyond this length!
17
Page 18

Before using for the first time
Using the Electrobrush
The Electrobrush is particularly suitable
for cleaning and restoring crushed
carpet pile of wall to wall carpeting and
floor coverings subject to hard wear,
especially in high traffic areas.
The SEB 217, SEB 226 and SEB 236
are compatibel with this vacuum. The
Electrobrush can also be used on
smooth flooring surfaces.
The standard floor brush (optional
accessory) or the Miele parquet
floorbrush should be used to clean
delicate hard flooring and floor surfaces
susceptible to scratching.
Do not use the powerbrush on:
– Floors with a variable or uneven
surface. The brush might come into
contact with the floor and cause
damage.
– High quality, hand knotted rugs, for
example Berber or Persian rugs, as
well as extremly long piled area rugs
and carpets. There is a danger of the
threads being pulled out. Turn the
Electrobrush off to vacuum these
types of floor coverings and use only
suction.
Attaching the Electrobrush to
the vacuum cleaner
^
Insert the telescopic wand into the
Electrobrush. (Ensure that the plug
connectors line up). They must lock
together with a click.
For more information on use and
maintenance please refer to the
instructions supplied with the
Electrobrush.
18
Page 19

Using the parquet floor brush
Special brush with natural bristles for
cleaning parquet and laminate floors,
floorboards and flooring susceptible to
scratching (e.g. with a high shine).
Regard primarily the Cleaning and
Care instructions of the floor
covering manufacturer.
Attaching the parquet floor
brush
^ Push the telescopic wand into the
floor brush and turn clockwise or
counterclockwise until it clicks into
position.
^ To release the parquet floor brush
from the telescopic wand, press the
locking button (see arrow) and pull
the wand out of the floor brush.
Before using for the first time
The adapter a is inserted to use the
suction wand holder on the vacuum
canister. This allows the vacuum to be
transported or stored in an upright
position. See "Description of the
appliance" Line 12.
19
Page 20

Included accessories
Other tools, in addition to the floor
brush(es), are supplied with the
vacuum cleaner to help with various
types of cleaning.
a Crevice nozzle
b Crevice nozzle extension *
c Dusting brush with natural bristles
d Upholstery brush
e Filter grill
(supplied seperately in the box)
f Blower connection socket,
not illustrated
(see "Operation")
* only for S 658
The filter grill e is required if you wish
to replace the "ACTIVE HEPA" filter with
a "SUPER air clean" filter.
20
Page 21

Taking the accessories out
Press the release button to open the
^
accessory compartment lid.
^ Take out the accessory needed.
^ Close the lid securely.
Included accessories
Crevice nozzle extension
(only for the S 658)
The crevice nozzle extension is located
in the compartment underneath the
crevice nozzle.
21
Page 22

Using the included accessories
The different tools can either be fitted to
the handpiece or to the suction wand.
Crevice nozzle
For cleaning in folds, crevices and
corners.
Crevice nozzle extension
(only with model S 658)
This accessory can be used to extend
the length of the crevice nozzle. Further
length is provided by pulling out the
inner section.
^ Press the locking button to pull the
extension piece out or to push it in.
22
Page 23

Using the included accessories
Dusting brush
For cleaning moldings, ornate or
carved articles, etc.
The head of the dusting brush can be
swivelled to attain the best cleaning
position.
Upholstery nozzle
For cleaning upholstery, mattresses,
cushions, curtains, covers etc.
23
Page 24

Operation
Unwinding and rewinding the
power cord
Unwinding
Hold the plug and pull out the power
^
cord to the required length:
S 558: maximum 24 ft. (7.5 m)
S 658: maximum 31 ft. (9.5 m)
If the vacuum cleaner is
,
operated more than 30 minutes the
power cord must be unwind at least
two thirds of the way. To reduce the
risk of electric shock, the vacuum
has a polarized plug (one blade is
wider than the other). This plug will
fit in a polarized outlet only one way.
If the plug does not fit fully in the
outlet, reverse the plug. If it still does
not fit, contact a qualified electrician.
Do not alter the plug in any way.
Danger of over-heating and
damage.
Rewinding
^
Unplug the vacuum from the outlet.
^
Press the rewind button and the
power cord will rewind automatically.
Auto-reverse
To use this function, move the slide
switch to "Auto-Reverse". This releases
the cable reel brake and allows the
spring loaded reel to take up the slack
between the vacuum and the outlet.
24
Page 25

Turning the vacuum on and off
To turn the vacuum cleaner on:
Press the On-Off switch.
^
The Stand-by indicator light comes on
to show that the vacuum cleaner is
ready for use.
While vacuuming
The vacuum cleaner can also stand on
its end for vacuuming stairs, drapes
etc.
Vacuuming fine dust, flour or sawdust
can create static charge which can
discharge in certain circumstances.
To prevent static discharge your
,
hand must touch the metal inlay on
the underside of the vacuum
handpiece. Be certain to continously
touch this inlay when vacuuming fine
dust, flour or sawdust as these
materials are most likely to create
static discharge. To further prevent
static discharge while vacuuming,
pull the vacuum along by the hose
with one hand while continuing to
hold the handpiece in the othe hand.
Operation
To turn the vacuum cleaner off:
^
Press the On-Off switch again.
The Stand-by indicator goes out.
,
Turn off the vacuum before
opening the dust compartment lid.
Otherwise the vacuum turns on
automatically (this allows the
operating mode "Blow").
25
Page 26

Operation
Adjusting the suction
Turn the vacuum cleaner on.
^
Use the p and m on the handpiece
to adjust the suction to suit the type of
flooring.
Setting 9 = no suction
Low setting = weak suction
High setting = strong suction
The floor brush will require less effort to
maneuver when the suction power is
reduced. Adjust the suction according
to the degree of soiling and type of
flooring being cleaned.
26
Page 27

Turning the Electrobrush on
and off
The Electrobrush is turned on and off
seperately from the vacuum cleaner by
pressing the j switch on the
handpiece.
This means that you can turn the
Electrobrush off during vacuuming and
the vacuum cleaner will continue to
operate using suction only. This is
useful, for example when moving from
carpeting to a rug.
Selecting setting 9 also turns the
Electrobrush off. To continue
vacuuming select a suitable setting.
Operation
27
Page 28

Operation
Blower connection socket
The blower connection socket can be
used to connect the suction hose to the
"blower" outlet of the vacuum cleaner,
e.g. for dusting multi-layered radiators.
It can also be used to "blow out" the
suction hose if it should ever become
blocked.
^ Ensure that the vacuum cleaner is
turned off.
^ Press the release button for the dust
compartment lid and raise the lid so
that it clicks into place.
^ Take out the exhaust filter or the filter
grill if present and replace with the
blower connection socket.
^ Close the dust compartment lid.
^
Open the accessories compartment
and insert the elbow of the suction
wand into the blower connection
socket.
^
Turn the vacuum on.
28
Page 29

Setting down, transport and storage
Park-System
A Park-System has been designed for
conveniently parking the vacuum
cleaner during pauses and for carrying
as well as for storage. A special
parking attachment is fitted to all floor
brushes, except the Electrobrush
SEB 236 which can stand by itself.
Insert the lower clip on the floor brush
^
into the slot on the end of the vacuum
cleaner from above.
Turning on and off with the
Park-System
Parking the floor brush while
vacuuming automatically turns off the
vacuum without needing to press the
On-Off switch. Lifting the floor brush out
of the Park-System turns the vacuum
back on.
Transport and storage
^
Stand the vacuum cleaner vertically.
^
Fit both clips on the floor brush into
the two point holder on the side of the
vacuum.
The adapter a has to be inserted
when using the standard floor brush,
the turbobrush, the hard floor brush
and the parquet floor brush.
29
Page 30

Maintenance and care
Turn off the vacuum and unplug
,
it from the outlet before performing
any maintenance work.
The Miele filter system consists of three
filters which must be replaced from time
to time to ensure efficient suction.
Dustbag (filter bag)
–
Exhaust filter
–
Dust compartment filter (motor
–
protection).
Purchasing new dustbags and
filters
Replacement dustbags and filters can
be obtained from your local Miele
Dealer.
Order original Miele dustbags with the
letter:
F/J/M for model S 558
–
G/N for model S 658
–
You will find the model number given on
the data plate located underneath the
appliance.
Use only genuine Miele dustbags
and filters, making sure they are the
correct ones for your model. This
ensures optimum performance of
the suction power and also ensures
that the bag is used to capacity.
A "SUPER air clean" exhaust filter and a
dust compartment filter are supplied
with every box of Miele dustbags.
If you wish to purchase exhaust filters
or dust compartment filters separately,
please quote the model number of your
appliance when ordering.
The "ACTIVE HEPA" filter supplied with
the vacuum can be replaced by a
"SUPER air clean" or an "ACTIVE air
clean" filter if you wish (see "Replacing
one type of filter with another").
30
Page 31

When to change the dustbag
Change the dustbag when the colored
marker in the dustbag change indicator
fills the display.
Miele dust bags are disposable and
intended to be used only once. Do
not attempt to reuse.
Checking the dustbag change
indicator
Attach the floor brush to the vacuum
^
cleaner. Only test with the floor brush,
since other attachments can affect
the function of the dustbag change
indicator.
^ Turn the vacuum cleaner on and
select the highest power setting.
^ Lift the floor brush off the floor a little.
If the marker completely fills the
indicator window, then the bag needs
to be changed.
Maintenance and care
How the dustbag change indicator
works
The indicator is designed to show when
the bag is full of common household
dust and works by measuring the air
permeability of the dustbag. Normal
household dust is a mixture of dust,
hair, carpet fluff, threads, sand etc.
However, if fine dust, such as drill dust,
sand, plaster or flour is vacuumed, the
pores of the dustbag become blocked.
The marker will indicate that the bag is
"full" even when it is not. In this instance
the dustbag must be changed as
suction power is reduced when the
pores of the dustbag are blocked.
If, on the other hand, a large quantity of
hair, wool or carpet fluff is vacuumed,
the dustbag change indicator may not
register "full" even though the bag is
full. This is because the air permeability
of the dustbag may still be high enough
not to activate the marker to show
maximum. The dustbag should still be
changed.
31
Page 32

Maintenance and care
Replacing the dustbag
Open the dust compartment lid.
^
The dustbag has a flap which closes
automatically when the dustbag is
removed to prevent any dust from
escaping.
^ Grasp the collar by the two finger
holes and pull it out from the dustbag
holder.
It can then be thrown out with the
household trash as long as it has only
been used for vacuuming household
dust.
Do not unfold the dustbag when taking
it out of the box. Keeping it folded will
prevent it from getting caught when the
dust compartment lid is closed.
^
To insert a new dustbag push the
collar securely into the frame as far
as it will go. If it is not correctly
located the dust compartment lid will
not close.
^
Close the dust compartment lid firmly
until it clicks into place.
32
Page 33

Replacing the exhaust filter
Always change the ACTIVE HEPA filter
when the filter change indicator (Reset
button 7) lights up. It is designed to
light up after approximately 50 hours of
operation which is about a year of
average use. The vacuum cleaner can
still be used with the exhaust filter
indicator lit. However, the suction power
will be reduced as will the effectiveness
of the filter if it is not replaced.
You can replace the "ACTIVE HEPA"
filter supplied with the cleaner with a
"SUPER air clean" or an "ACTIVE air
clean" filter if you wish (see "Replacing
one type of filter with another").
Maintenance and care
33
Page 34

Maintenance and care
Replacing the "ACTIVE HEPA"
filter
Open the dust compartment lid.
^
Release the catch and remove the
^
filter.
^ To insert the new filter, fit it so that it
engages at the back, then close the
catch.
^ Close the dust compartment lid firmly
until it clicks into place.
Resetting the filter change indicator
The filter change indicator (Reset
button 7) needs to be reset each time
the filter is replaced. To do this the
vacuum cleaner must be plugged in.
^
Press the filter change indicator light
until it goes out. The display is now
back in the starting position.
34
Page 35

Replacing one type of filter
with another
You can replace the c ACTIVE HEPA
filter which is fitted as standard to your
vacuum cleaner with either:
a a SUPER air clean filter or
b an ACTIVE air clean filter.
If replacing c with a, please note:
If you wish to replace the c ACTIVE
HEPA filter with the a SUPER air clean
filter you must also insert the filter grill
(see "Included accessories").
Maintenance and care
The built-in exhaust filter change
indicator (Reset button 7) is
designed for the change cycle of an
ACTIVE air clean or an ACTIVE
HEPA filter.
The filter change indicator light will
have no significance if a SUPER air
clean filter has been fitted. The
SUPER air clean filter should be
replaced every time you start a new
box of dustbags. (A SUPER air clean
filter is supplied with every box of
Miele dustbags).
Pressing on the filter change
indicator light will reset it.
35
Page 36

Maintenance and care
When to change the dust
compartment filter (motor
protection)
Replace the dust compartment filter
every time you start a new box of
dustbags.
A dust compartment filter is supplied
with each box of Miele dustbags.
Replacing the dust
compartment filter
^ Open the dust compartment lid.
^ Open the filter frame, remove the old
filter and replace with a new one.
^ Close the filter frame.
36
Page 37

Turn off the vacuum and unplug
,
it from the outlet when not in use and
before service.
Vacuum cleaner and accessories
The suction hose, the telescopic
,
wand and the electrobrush contain
electrical wires and pomponents.
The plug connectors must not come
in contact with water. These items
may only be cleaned with a dry
cloth, no moisture must touch them.
Danger of electric shock.
External surfaces of the vacuum
cleaner and accessories can be
cleaned with a dry or slightly damp
cloth or with a cleaner for plastic.
,
Do not use an abrasive cleaner,
a glass or an all purpose cleaner!
They will damage the surface.
Cleaning and care
Dust compartment
The dust compartment can be cleaned
using another vacuum, if available, or a
dry cloth or brush.
Monitor the change dustbag indicator
and inspect all filters regularly. Clean or
replace them when necessary
according to the Operating Instructions.
,
Never immerse the vacuum
cleaner in water! If moisture gets into
the appliance, there is a risk of an
electric shock.
37
Page 38

Problem solving guide
If the vacuum cleaner switches itself
off automatically and the overheating
indicator , lights up:
A temperature limiter switches the the
vacuum cleaner off automatically if it
gets too hot. The warning light , will
then come on to indicate "Warning Overheating".
This can occur if, for instance, large
items block the suction wand or when
the dustbag is full or contains particles
of fine dust.
A heavily soiled exhaust or dust
compartment filter can also be the
cause of overheating.
In this case, turn off the vacuum
cleaner using the On-Off switch.
After removing the cause, wait for
20 - 30 minutes, so that the vacuum
cleaner can cool. After the cool down
period, the vacuum can be used.
38
Page 39

In the event of a fault which you cannot
correct, please contact the Miele
Technical Service Department.
U 1-800-999-1360
techserv@mieleusa.com
V 1-800-565-6435
service@miele.ca
Technical Service
39
Page 40

Optional accessories
Turbobrush STB 205
Recommended for cleaning and
restoring crushed pile on low nap rugs
or carpeting.
The turbobrush is mechanically driven
by the suction power of the vacuum. No
electrical connection or electric hose is
necessary.
Observe the cleaning instructions of
the floor manufacturer.
Hand Turbobrush STB 101
The hand Turbobrush is intended for
vacuuming upholstery, mattresses, car
seats, carpeted stairs, etc.
40
Page 41

Hard floor brush
For cleaning smooth floors (e.g. stone,
ceramic, vinyl).
Standard floor brush
The standard floor brush can be used
for normal cleaning of carpets, rugs,
and hard surfaces.
Optional accessories
41
Page 42

Optional accessories
Radiator brush
For cleaning radiators, narrow shelves
or crevices.
Fit the radiator brush to the crevice
^
nozzle.
Universal brush
For dusting books, shelves, etc.
42
Page 43

Mattress tool
For vacuuming mattresses and
upholstery. Even deep crevices
between mattresses can be vacuumed
easily.
Crevice tool 12" (300 mm)
For cleaning in folds, crevices and
corners.
Optional accessories
43
Page 44

Optional accessories
ACTIVE air clean filter
This is a special active charcoal filter
which absorbs odors from dust
collected in the dustbag helping to
prevent odors.
MicroSet
This set is specially designed for
cleaning intricate small objects and
difficult to reach areas (such as PC
keyboards, stereo equipment, carved
furniture and ornaments, models etc).
Accessory set consists of:
– micro hose with combi nozzle
(crevice nozzle and dusting brush)
– micro dusting brush
–
micro crevice nozzle and
–
angled extension
CarClean Set Plus
Specially designed for cleaning narrow
crevices, tight upholstery, loose floor
mats and tight spaces in a car.
Accessory carrying case consists of:
–
the Miele hand turbobrush
–
micro hose with Combi nozzle
–
crevice nozzle 12" (300 mm)
–
a 10 foot (3 m) long suction hose
with holder.
44
Page 45

Connect the vacuum cleaner only to
^
a 120 V, 60 Hz, 15 A outlet.
Electrical connection
45
Page 46

Caring for the environment
Disposal of the packing
materials
The cardboard box and packing
materials protect the appliance during
shipping. They have been designed to
be biodegradable and recyclable.
Ensure that any plastic wrappings,
bags, etc. are disposed of safely and
kept out of the reach of children. These
items pose a danger of suffocation.
Disposing of the dustbag and
filters
Genuine Miele dustbags and filters are
made of environmentally friendly
materials. They can be thrown out with
the household trash provided the
vacuum has been used only for normal
household dust.
46
Page 47

47
Page 48

Alteration rights reserved / 5003
This paper was bleached without the use of chlorine.
M.-Nr. 05 638 551 / 01
 Loading...