

Page 1
Operating manual
Washer
PW 6068 Plus
To prevent accidents
and machine damage
read these instructions
before
installation or use.
en-CA
M.-Nr. 10 457 380
Page 2

Contents
IMPORTANT SAFETY INSTRUCTIONS. . . . . . . . . . . . . . . . . . . . . . . . . . . . . . . . . 3
Guide to the washer. . . . . . . . . . . . . . . . . . . . . . . . . . . . . . . . . . . . . . . . . . . . . . . . 6
Control panel ......................................................6
Before using for the first time. . . . . . . . . . . . . . . . . . . . . . . . . . . . . . . . . . . . . . . . 9
Use . . . . . . . . . . . . . . . . . . . . . . . . . . . . . . . . . . . . . . . . . . . . . . . . . . . . . . . . . . . . 10
To cancel a program ...............................................14
To change a program ..............................................14
Adding/removing laundry during a wash program ........................14
Program guide . . . . . . . . . . . . . . . . . . . . . . . . . . . . . . . . . . . . . . . . . . . . . . . . . . . 15
Program sequence. . . . . . . . . . . . . . . . . . . . . . . . . . . . . . . . . . . . . . . . . . . . . . . . 21
Spin speed . . . . . . . . . . . . . . . . . . . . . . . . . . . . . . . . . . . . . . . . . . . . . . . . . . . . . . 23
Extras . . . . . . . . . . . . . . . . . . . . . . . . . . . . . . . . . . . . . . . . . . . . . . . . . . . . . . . . . . 24
Timer . . . . . . . . . . . . . . . . . . . . . . . . . . . . . . . . . . . . . . . . . . . . . . . . . . . . . . . . . . . 26
Favorites . . . . . . . . . . . . . . . . . . . . . . . . . . . . . . . . . . . . . . . . . . . . . . . . . . . . . . . . 27
Detergent . . . . . . . . . . . . . . . . . . . . . . . . . . . . . . . . . . . . . . . . . . . . . . . . . . . . . . . 30
Cleaning and Care . . . . . . . . . . . . . . . . . . . . . . . . . . . . . . . . . . . . . . . . . . . . . . . . 33
Cleaning the washer ...............................................33
Cleaning the inlet hose filter .........................................34
Frequently asked questions . . . . . . . . . . . . . . . . . . . . . . . . . . . . . . . . . . . . . . . . 35
A wash program cannot be started ....................................35
General problems with the washer ....................................36
Opening the door during a power failure or when the drain is blocked ........39
After sales service . . . . . . . . . . . . . . . . . . . . . . . . . . . . . . . . . . . . . . . . . . . . . . . . 42
Installation instructions . . . . . . . . . . . . . . . . . . . . . . . . . . . . . . . . . . . . . . . . . . . 43
Installation . . . . . . . . . . . . . . . . . . . . . . . . . . . . . . . . . . . . . . . . . . . . . . . . . . . . . . 44
Installation site ....................................................47
Removing the shipping struts ........................................47
Installing the shipping struts .........................................49
Leveling the washer................................................50
Water connection..................................................51
Drainage ........................................................53
Electrical connection ...............................................54
Technical Data . . . . . . . . . . . . . . . . . . . . . . . . . . . . . . . . . . . . . . . . . . . . . . . . . . . 55
Help to protect the environment. . . . . . . . . . . . . . . . . . . . . . . . . . . . . . . . . . . . . 56
Settings J . . . . . . . . . . . . . . . . . . . . . . . . . . . . . . . . . . . . . . . . . . . . . . . . . . . . . . . 58
Settings - Supervisor level . . . . . . . . . . . . . . . . . . . . . . . . . . . . . . . . . . . . . . . . . 61
2
Page 3

IMPORTANT SAFETY INSTRUCTIONS
The machine is built in accordance
with current safety requirements.
The manufacturer cannot be held
responsible for damage or injury
caused by improper use of this
appliance.
Read the operating instructions
before using this machine for the
first time. They contain important
information about the safety, use
and maintenance of the machine.
Doing so will prevent injury and
damage to the dryer.
Save these instructions and pass
them on to any future user.
WARNING - To reduce the risk
of fire, electric shock or injury:
Technical Safety
Check the packaging, the washer
~
and accessories for any signs of
damage. Do not use a damaged
appliance.
Before connecting the machine,
~
ensure that the connection data on the
data plate (fusing, voltage and
frequency) match the mains electrical
supply. If in doubt contact an
electrician.
The appliance must be grounded. It
~
is imperative that this basic safety
requirement be met.
Do not connect the appliance to the
~
mains electrical supply with an
extension cord. Extension cords do not
guarantee the required safety of the
appliance (e.g. danger of overheating).
The machine is built in accordance
~
with current safety requirements.
Incorrectly repaired machines may
pose a considerable risk to the user
which is not covered by the
manufacturer. Repairs should only be
performed by a Miele approved
technician.
Ensure power is not supplied to the
~
appliance while maintenance or repair
work is being performed. The machine
is only completely isolated from the
electrical supply when it is turned off at
the main switch and the plug is pulled
or by tripping the circuit breaker.
Connect the washer, to the water
~
mains. Do not use old hoses. Inspect
the intake hoses regularly for damage.
They should be replaced as needed to
prevent water damage.
Faulty components must only be
~
replaced with genuine Miele spare
parts to maintain safety standards. Only
when these parts are fitted can the
safety standards of the machine be
guaranteed.
If the power cord is damaged it
~
must only be replaced by a Miele Ser
vice technician with a genuine Miele
power cord.
-
3
Page 4

IMPORTANT SAFETY INSTRUCTIONS
Use
The washer must be operated,
~
maintained and checked for function on
a regular basis according to the
Operating and Installation instructions.
Only use the washing machine to
~
wash items which are specified by the
manufacturer to be machine washable
on the fabric care label. Any other
applications may cause undesirable
results. The manufacturer cannot be
held responsible for damage caused
by improper use of the appliance.
Do not wash articles that have been
~
previously cleaned, washed soaked or
spotted with gasoline, organic
substances dry-cleaning solvents, or
any other flammable substances. These
articles give off vapors that could ignite
or explode. Do not add these items to
the washload.
This appliance is not designed for
~
maritime use or for use in mobile
installations such as recreational
vehicles or aircraft. However, under
certain conditions it may be possible for
installation in these applications. Please
contact the Miele Technical Service
Department with specific requirements.
Before using the machine for the
~
first time, check that the shipping struts
at the rear of the machine have been
removed (see "Installation"). If the
shipping struts are still in place during
spinning, damage may result to both
the machine and adjacent furniture or
appliances.
Turn off the water supply if the
~
machine is to be left for any length of
time (e.g. vacation).
Overflow hazard!
~
Check that the drain can accommodate
the water flow before operating the
washer.
Make certain the drain hose is secured
in the drain, otherwise the force of the
expelled water could cause the drain
hose to come out of the drain.
Be sure that foreign objects (e.g.
~
nails, pins, coins, paper clips) do not
find their way into the machine. These
items may damage the machine, which
may also cause damage to the laundry.
Persons which lack physical,
~
sensory or mental abilities or
experience with the machine should not
use it without supervision or instruction
by a responsible person.
Do not install this machine in rooms
~
where temperatures below freezing
may occur. Frozen hoses may burst
under pressure. The reliability of the
electronic control unit may be impaired
at temperatures below freezing.
4
Page 5

IMPORTANT SAFETY INSTRUCTIONS
If the correct amount of detergent is
~
dispensed, the machine should not
need to be descaled. If the washer
needs to be descaled, use a descaling
agent with corrosion protection. These
special descaling agents can be
purchased from the Miele Service
department. Use as directed.
Never use solvent based cleaning
~
agents in this machine, this may result
in damage and create toxic fumes.
They will present a fire and explosion
hazard.
Items which have been pre-treated
~
in solvent based cleaning agents must
be thoroughly rinsed in clean water
before being washed in the machine.
Only use dyes specified by the
~
manufacturer as being suitable for use
in a washing machine. Use as directed
by the manufacturer.
Dye removers may contain sulphur
~
compounds which cause damage such
as corrosion. Do not use dye removers
in this machine.
The drum door glass will be hot
~
when washing at very high
temperatures. Do not touch the glass.
Danger of burns!
The stainless steel casing must not
~
come in contact with liquid cleaning or
disinfection agents containing chlorine.
They may cause corrosion. Do not store
open containers of this agent next to
the machine.
Children
Close supervision is necessary
~
when the appliance is used near
children. Do not allow children to play
on or in the appliance.
Do not let children access the
~
appliance or its controls. Supervise its
use by the elderly or infirm. If allowing
older children to use the appliance
without supervision please ensure that
they are aware of how the appliance
works and understand the dangers of
improper use.
Using accessories
Accessories must only be installed
~
once approved by Miele. Installing
unapproved parts may void the
warranty and product liability.
Disposal of an old appliance
Disconnect the machine from the
electrical supply. Render the plug
useless. Cut off the cable directly
behind the appliance to prevent
misuse.
The manufacturer cannot be held
responsible for damages caused by
non observance of the Important
Safety Instructions in this manual.
SAVE THESE
INSTRUCTIONS
5
Page 6
Guide to the washer
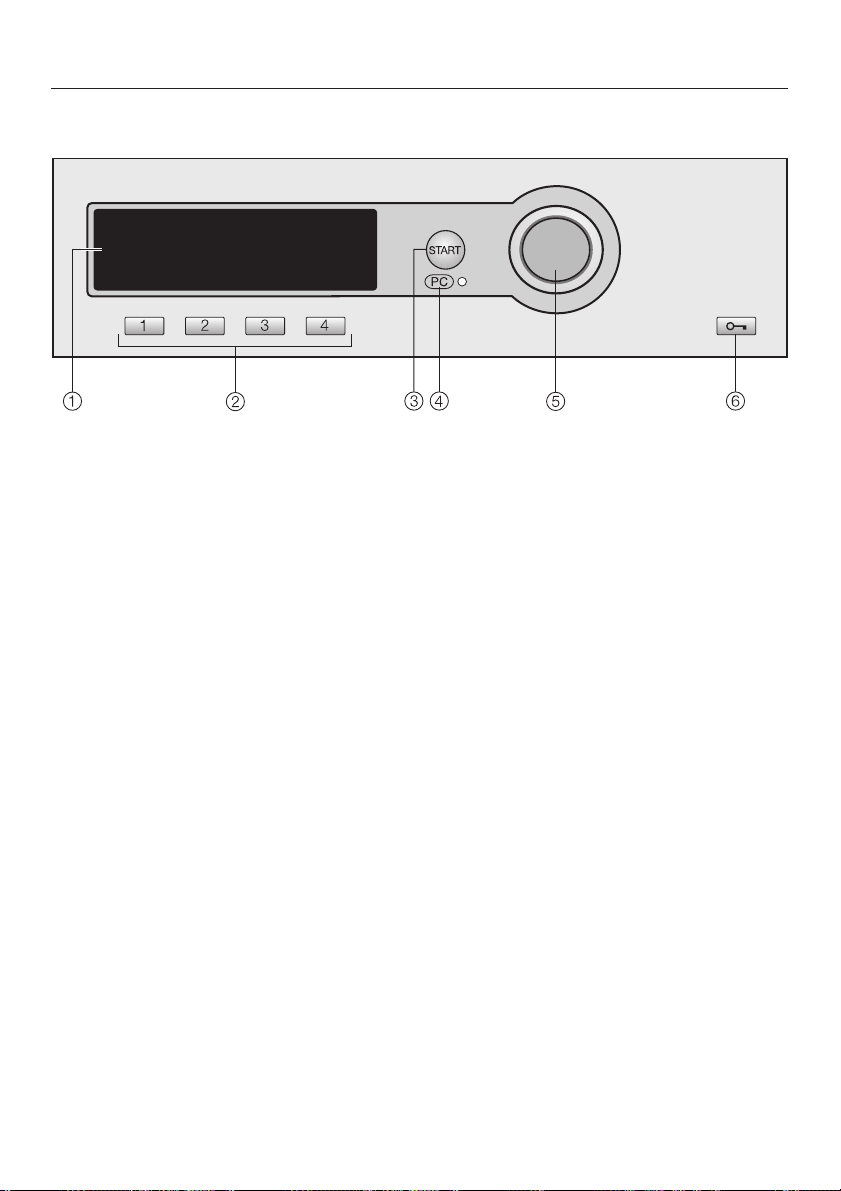
Control panel
a Display*
See the following pages for more
information
b Direct select buttons
To select a wash program directly.
You can also save a "Favorite" wash
program on these buttons.
c "Start" button
* Contents in the display will vary with program offering.
d Optical interface PC
Allows a service technician to check
and update the wash programs
e Multi-function selector
Turn to select menus
Press to confirm the selection
f a Door button to open the drum
door.
6
Page 7

Display function
Main menu
Guide to the washer
Display contents will vary with program offering.
1 Cottons Uni. 140°F
2 Wrinkle-free 104°F Settings F...
3 Delicates 104°F
4 Woollens H 86°F 12:00
The display shows the main menu (with default settings).
"Program selection" is highlighted.
If the display is dark (in Stand-by mode) turn the
Multi-function selector.
Multi-function selector
Turn the Multi-function selector to select a program or
setting.
Press the Multi-function selector to confirm the selection.
Direct select buttons
The first four programs shown in the display on the left are the
"Favorites". They can be selected with the direct select
buttons.
The Favorites can be individually set to your desire. See
"Favorites" for more information.
The direct select buttons have different functions in the other
menus. In these menus an arrow H is displayed above the
respective button with the function description of the button.
Program selection...
Program selection possibility
–
Possibility 1 Select and confirm the menu "Program
selection" in the display with the Multi-function selector.
–
Possibility 2 Press one of the direct select buttons
D E F G and access directly the basic menu of
the program.
7
Page 8

Guide to the washer
Menu Program selection
Program BackA
selection
All pre-set programs can be selected with the Multi-function
selector. Depending on the direction the Multi-function
selector is turned the highlighter moves up or down.
The arrows e- at the right side of the display show that more
selections are available.
Press the Multi-function selector to open the basic menu of
^
the selected program.
Basic menu of a wash program
Cottons 140°F 1400 rpm
Duration 0:47 h
Extras
H
The program components (program, temperature and spin
speed) can be selected by turning the Multi-function selector.
The selected component is highlighted. Press the
Multi-function selector to select the component. The
respective submenu is displayed.
Cottons Hygiene
Cottons Uni.
Minimum Iron H
Timer Y
H
Back A
H
Settings J
8
The submenu "Extras" and "Timer" can be selected by the
direct select buttons.
^
To go back to the main menu, press G "Back".
All components can also be selected and confirmed with the
Multi-function selector only.
The "Settings" menu allows you to adjust the washer to
individual needs. See "Settings" for more information.
Page 9

The appliance must be correctly
installed and connected before the
first use. Please see the "Installation
instructions."
For safety reasons, it is not possible to
run a spin cycle before the first use. A
program must be run without laundry
and detergent to flush out any residual
water from the factory testing process.
Open the water mains.
^
Welcome screen
The Welcome screen shows when the
washer is turned on for the first time:
"Miele Professional Welcome".
The Welcome screen will not show
after the washer has been running for
more than 1 hour.
Before using for the first time
Shipping struts
The display reminds the user to remove
the shipping struts.
If the shipping struts were already
^
removed, confirm with the G
button. Otherwise remove them at
this time then confirm.
Set the time of day
Set the hour by turning the
^
Multi-function selector and press to
confirm.
Repeat to set the minutes and
^
confirm. Press again to save the time
of day.
First wash
^ Select the program "Cottons Uni."
and confirm.
The display then shows the language
selection.
Language J
^
Select the desired language and
confirm with "OK".
The basic program "Cottons Uni."
shows.
^ Press the flashing button "Start".
The drum door must be closed.
Once the program ends the washer can
be used for laundry.
9
Page 10
Use
1. Sort the laundry
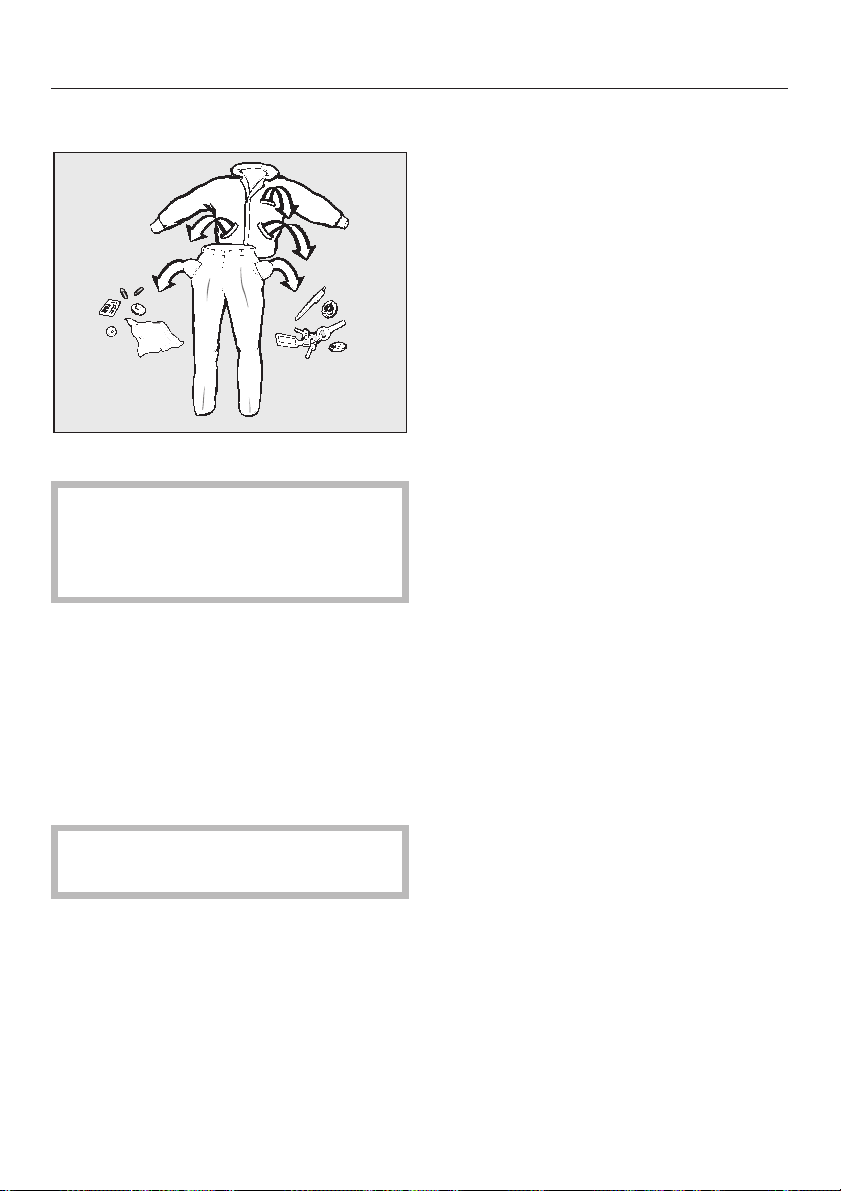
^ Empty all pockets.
Foreign objects left in pockets
,
(e.g. nails, coins, paper clips, etc.)
can cause damage to clothes and
the machine.
^ Pre-treat stains.
Tough stains (blood, egg, coffee, tea
etc.) or badly soiled areas (collars and
cuffs) should be pre-treated with a stain
remover or a paste made from powder
detergent and warm water. Dab stains
with a damp light colored cloth. Do not
rub.
General tips
Dark fabrics often bleed the first few
–
times they are washed. They should
be washed separately several times
before being included in a mixed
load.
Remove any lead weights or strips
–
from curtains before washing.
Loose underwires should be
–
removed or sewn in place before
washing.
Woolens and knitted garments
–
should be turned inside out.
– Close zippers and hooks and eyes
before washing.
– Comforter covers and pillowcases
should be fastened in order to
prevent small items from getting
trapped inside of them.
Do not machine wash items if it is not
recommended on the fabric care label.
,
Do not use chemical solvents in
the machine.
^
Sort the laundry.
10
Page 11

Use
2. Load the washer
Open the drum door using the a
^
button.
The drum light comes on.
Load the laundry loosely into the
^
drum.
For best results, wash mixed loads of
small and large items. This will improve
washing effectiveness and help
distribute the load evenly.
For the lowest energy and water
consumption load the washer to its
max. capacity. See "Program guide".
Note: Overloading the washer will
affect wash results and cause wrinkling.
^ Close the drum door.
Close the drum door. To prevent
damage to the door seal and
clothing, make sure that there are no
clothes caught between the drum
door and the seal.
3. Select a program
Two program selection possibilities:
Select a "Favorite" by pressing the
–
respective direct select button.
Select from the "Program selection"
–
menu by turning the Multi-function
selector.
If desired select "Extras" and/or a
^
"Timer" start time with the respective
submenus.
See "Program Guide", "Spin Speed",
^
"Extras" and "Timer" for more info.
Coin mechanism
If a coin mechanism operates the
machine, please regard the displayed
request to pay.
If the door is opened after a
program has started or if the
program is canceled the credit is
lost.
11
Page 12
Use
4. Adding detergent
Use detergent according to the laundry
soiling and water hardness.
Too little detergent may cause:
ineffective cleaning of laundry;
–
fabrics may become gray and stiff
over time.
grease stains on the laundry.
–
hard water deposits on the heating
–
element.
Too much detergent may cause:
– oversudsing with minimal drum
movement; poor wash, rinse and
spin results.
– higher environmental burden.
See "Detergent" for more information.
Pull out the detergent dispenser
^
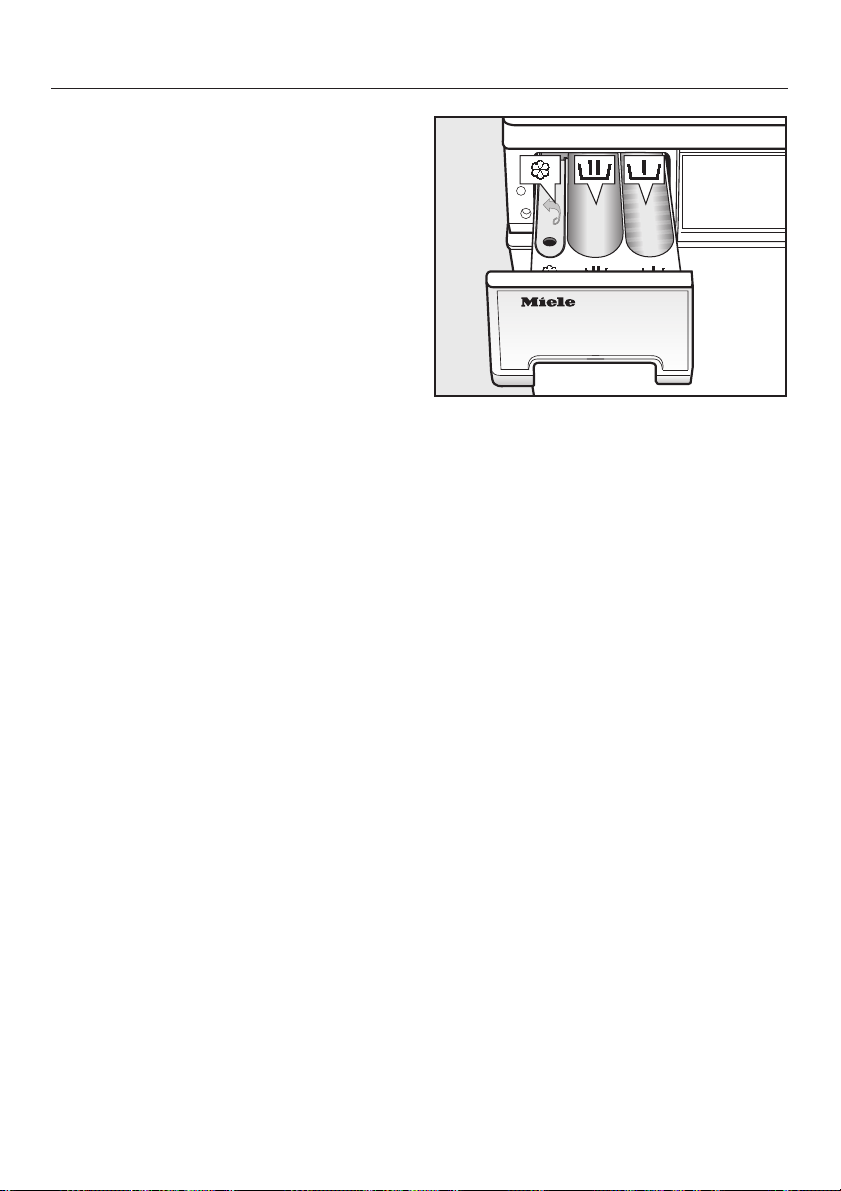
drawer and add detergent.
j = Detergent for the main wash
i = Only add detergent (
total recommended amount of
detergent) to this compartment
for the pre-wash.
§ = Fabric softener or liquid starch.
1
/4of the
12
^ Close the detergent dispenser
drawer.
Page 13
Use
5. Starting a program
"Start" flashes when a program can be
started.
Press the "Start" button.
^
The "Start" button lights.
The display shows the approximate
program run time. It will count down in
minutes. The first 10 minutes the
washer calculates the water
absorbency of the laundry. The overall
program time may be shortened or
lengthened.
Additionally the sequence cycle is
displayed. The washer shows the
current program step.
The drum light turns off after the
program starts.
Press one of the following direct select
buttons during the running program:
– Button D "Extras"
the displayed Extras can be selected
or deselected after the program start.
6. At the end of a program
The anti-crease program starts when
the laundry is not immediately removed
from the washer after the program end.
"Anti-crease" and "End" will flash
alternately in the display.
Use the a "Door" button to open the
^
drum door.
Remove the laundry.
^
Check the drum for any missed
pieces of laundry. Items
inadvertently left in the washer may
get damaged (e.g. shrink or
discolor) during the next wash cycle.
–
Button E "Timer"
the time of day and the approximate
program end is displayed.
–
Button G "Cancel"
to cancel the currently running
program. The wash water will be
drained away.
^
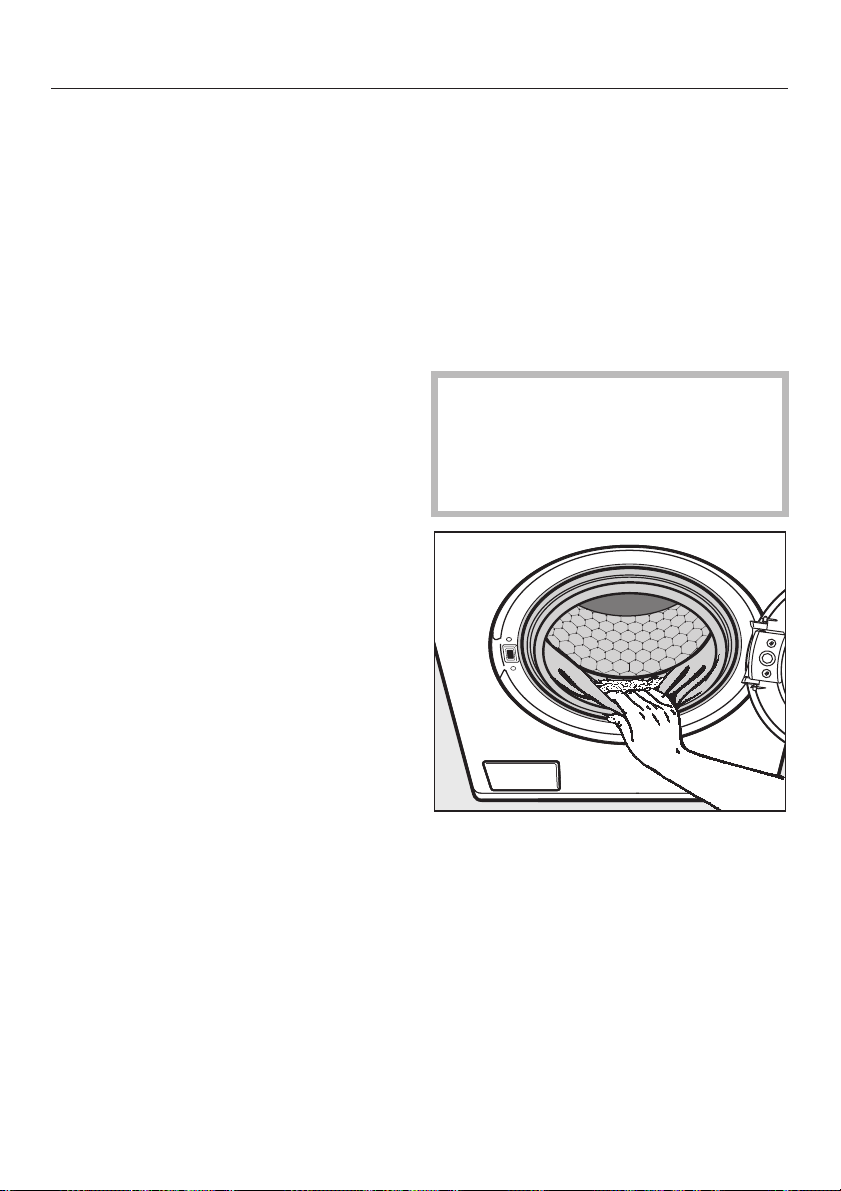
Check the folds of the door seal for
any small articles which may have
been trapped.
^
Close the drum door. Otherwise
foreign objects may find their way
into the drum. These could be
inadvertently washed and cause
damage to laundry.
13
Page 14

Use
To cancel a program
A program can be canceled any time
after a program start.
Press the button G "Cancel".
^
The wash water will be drained away.
Open the drum door before starting a
^
new program.
To change a program
After the program start the spin speed
can be selected until the final spin
starts. The Extras "Starch Stop" and
"Rinse Stop" can be selected or
deselected.
The temperature and the Extra
"Intensive" can be selected or
deselected up to 5 minutes after the
program start.
Adding/removing laundry
during a wash program
Note:
Once the program has started the
washer cannot make adjustments of the
load size. After adding or removing
laundry, the washer will default to the
water and electrical consumption of a
full load.
The time remaining will automatically be
adjusted.
The drum door cannot be opened if:
the water temperature is higher than
–
131°F/55°C.
– the water level is too high.
– the program has reached the "Final
Spin".
When operated with a coin
mechanism the machine will be
locked after 3 minutes. Canceling or
changing a program and opening
the door is no longer possible.
You can interrupt the programs (see
"Program guide") to add or remove a
piece of laundry.
^
Use the a button to open the door.
^
Add or remove the piece of laundry.
^
Close the drum door.
The program will continue
automatically.
14
Page 15
Program guide
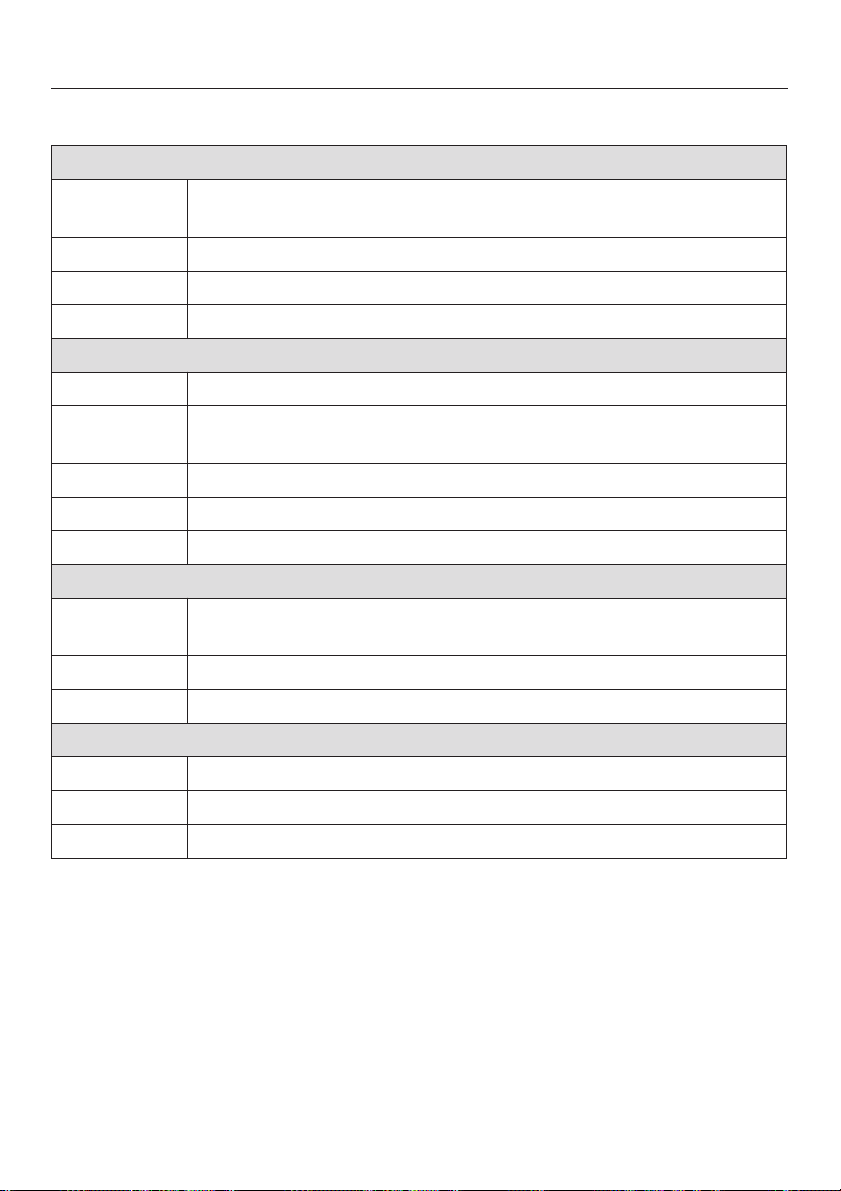
Programs may vary.
Cottons Hygiene 203°F to 158°F (95°C to 70°C) max. 14.3 lbs (6.5 kg)
Items Items made from cotton and linen, i.e. bed linens, baby clothing,
underwear
Detergent Universal detergent
Extras Pre-wash, Starch Stop, Rinse Stop, Intensive*, Water plus*
Note The spin speed (1400 rpm) can not be changed.
Cottons Uni. 140°F (60°C) to cold max. 14.3 lbs (6.5 kg)
Items Items made from cotton or mixed fabrics, i.e. T-Shirts, pants
Tip Wash dark colored fabrics with detergent for colors or a liquid
detergent.
Detergent Universal or color detergent
Extras Pre-wash, Starch Stop, Rinse Stop, Intensive*, Water plus*
Note The spin speed (1400 rpm) can not be changed.
Minimum iron 140°F to 86°F (60°C to 30°C) max. 7.7 lbs (3.5 kg)
Items Items made from synthetic fibers, mixed fabrics or wrinkle free
cottons, i.e. shirts
Detergent Universal or color detergent
Extras Pre-wash, Starch Stop, Rinse Stop, Intensive*, Water plus*
Delicates 140°F to 86°F (60°C to 30°C) max. 5.5 lbs (2.5 kg)
Items Delicates made from synthetic, mixed fabrics or viscose silk
Detergent Detergent for delicates
Extras Pre-wash, Rinse Stop, Intensive*
* "Intensive" and "Water plus" can be added in "Settings - Supervisor level" when
activated by Technical Service.
15
Page 16
Program guide
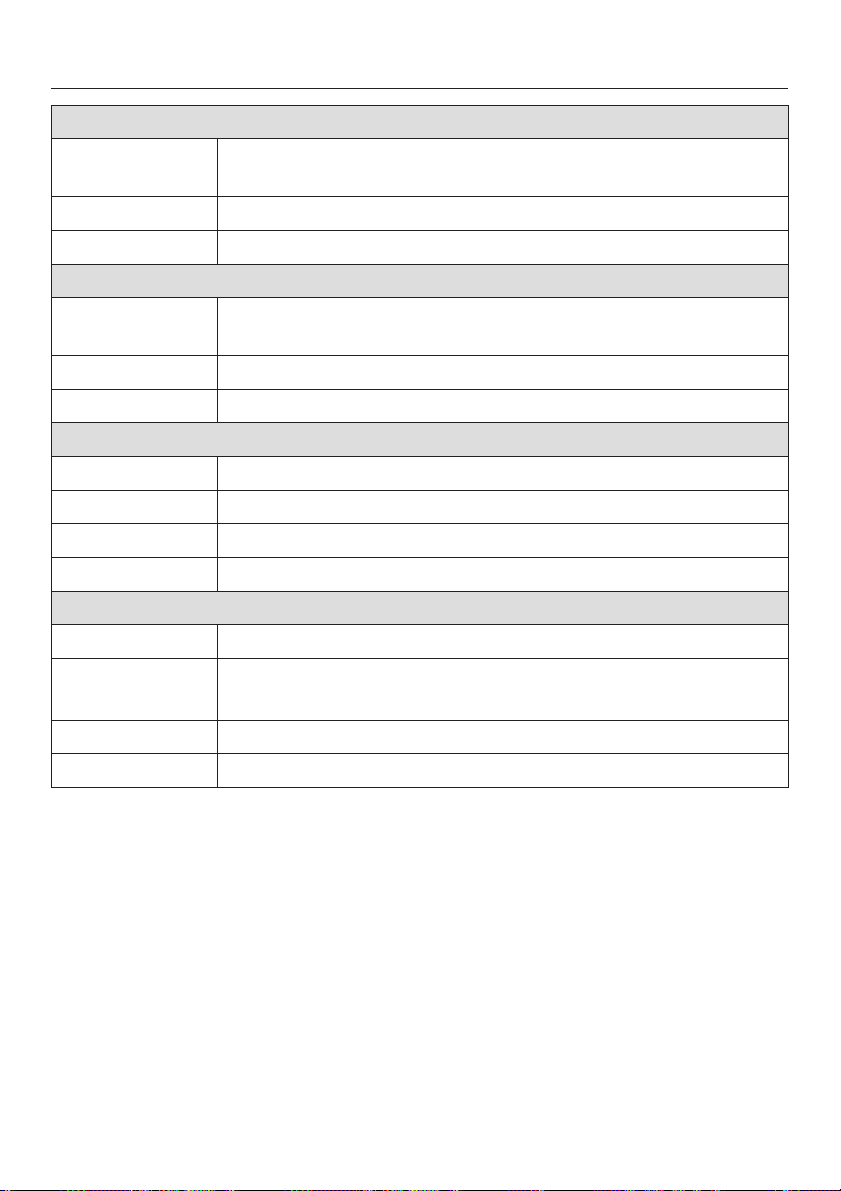
Quick wash 104°F (40°C) to cold max. 7.7 lbs (3.5 kg)
Items Small loads of lightly soiled items, which can be washed in
"Cottons Uni."
Detergent Universal or color detergent
Extras Rinse Stop
Woollens 104°F (40°C) to cold max. 5.5 lbs (2.5 kg)
Items Items made from machine washable wool and wool blend
fabrics.
Detergent Detergent for wool
Extras Rinse Stop
Silks / 86°F (30°C) to cold max. 5.5 lbs (2.5 kg)
Items Hand washable items, that contain no wool.
Tip Wash hosiery and lingerie in a lingerie bag.
Detergent Detergent for delicates
Extras Rinse Stop, Water plus*
Shirts 140°F (60°C) to cold max. 5.5 lbs (2.5 kg)
Items Shirts and dress shirts.
Tip – Pre-treat collars and cuffs if needed.
– Wash silk shirts in the "Silk" program.
Detergent Universal or color detergent
Extras Rinse Stop
* "Intensive" and "Water plus" can be added from the "Settings - Supervisor level"
when activated by Technical Service.
16
Page 17
Program guide
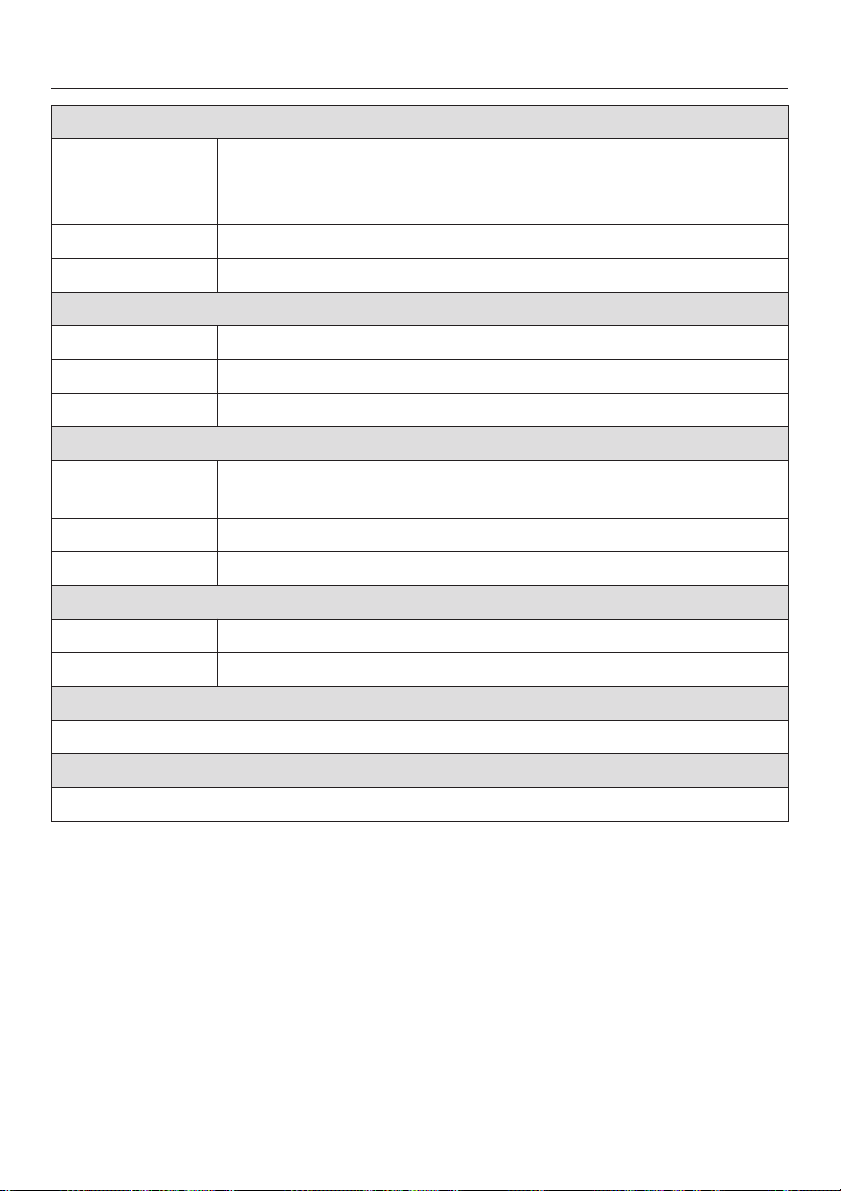
Denim 104°F (40°C) to cold max. 7.7 lbs (3.5 kg)
Tip
Detergent Liquid color detergent
Extras Rinse Stop
Toweling 203°F to 140°F (95°C to 60°C) max. 12.1 lbs (5.5 kg)
Tip Wash dark colors with a color detergent
Detergent Universal detergent
Extras Rinse Stop
Starch max. 14.3 lbs (6.5 kg)
Tip The laundry (table linen, napkins, etc.) should be washed but
Starch Liquid or powder starch
Extras Rinse Stop
Extra rinse max. 14.3 lbs (6.5 kg)
Items For items which need only rinsing and spinning
Extras Rinse Stop
Drain
To drain the water from the drum
Spin max. 14.3 lbs (6.5 kg)
Select an appropriate spin speed
Before washing denim items turn them inside out.
–
Denim items bleed during the first few washes. Wash dark
–
and light colored items separately.
not be treated with fabric softener.
* "Intensive" and "Water plus" can be added from the "Settings - Supervisor level"
when activated by Technical Service.
17
Page 18
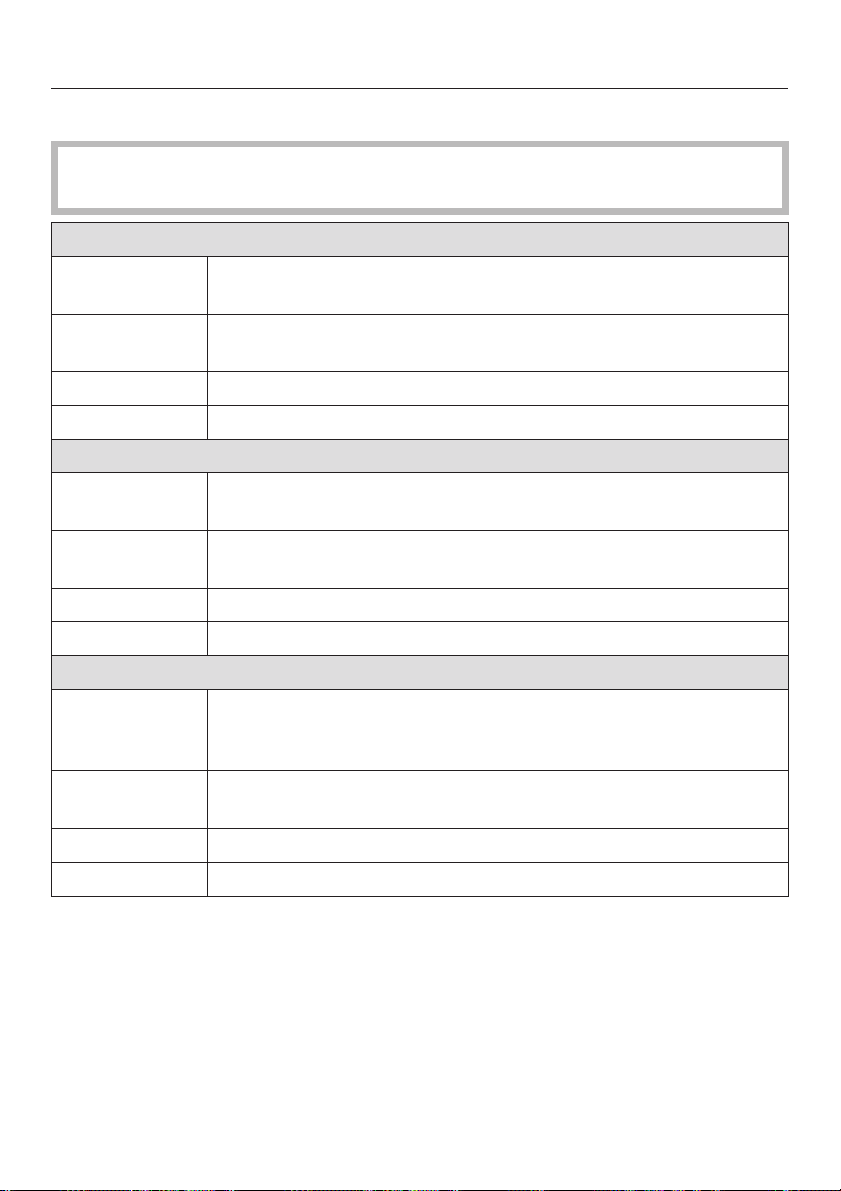
Program guide
Additional programs
The following programs can be added from "Settings - Supervisor level" when
activated by Technical Service.
Kitchen linen 203°F to 140°F (95°C to 60°C) max. 14.3 lbs (6.5 kg)
Items Kitchen linens made from cottons and linen, i.e. chef jackets
and pants, towels, rags
Tip Use the "Pre-wash" program for tough stains. Use a pre-wash
detergent with enzymes.
Detergent Universal detergent
Extras Pre-wash, Rinse Stop
Table linen 140°F to 86°F (60°C to 30°C) max. 5.5 lbs (2.5 kg)
Items Tablecloths and napkins made of cottons, linen or mixed
fabrics.
Tip Use the "Pre-wash" program for tough stains. Use a pre-wash
detergent with enzymes.
Detergent Universal detergent
Extras Pre-wash, Starch Stop, Rinse Stop, Intensive*, Water plus*
Curtains 104°F (40°C) to cold max. 6.6 lbs (3.0 kg)
Items Curtains which are machine washable according to the
manufacturer. To rinse dust, a pre-wash without detergent is
automatically added to the program.
Tip Curtains that wrinkle easily should be washed at a reduced
spin speed or without a spin.
Detergent Curtain, universal and color detergent in powder form.
Extras Pre-wash, Rinse Stop
* "Intensive" and "Water plus" can be added from the "Settings - Supervisor level"
when activated by Technical Service.
18
Page 19
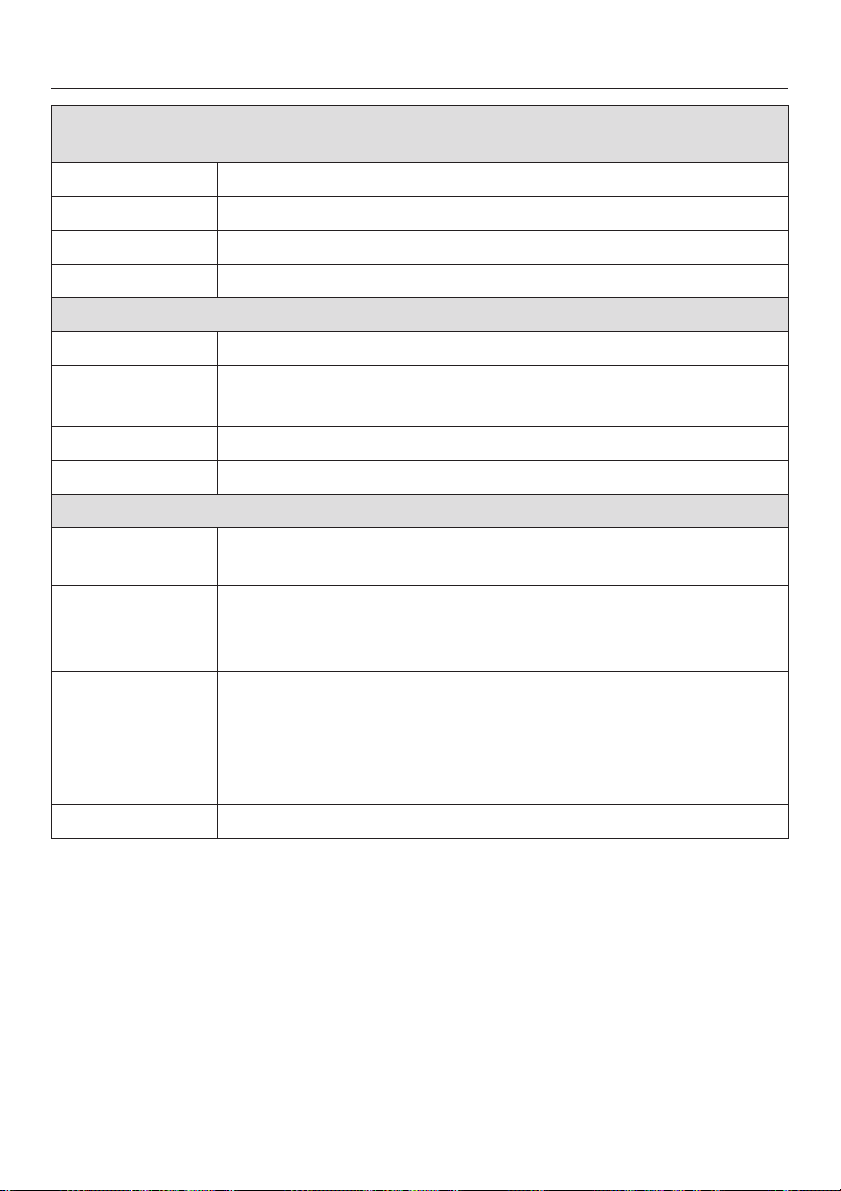
Program guide
Pillows 203°F to 104°F (95°C to 40°C) 1 queen (80x80 cm)
or 2 twin size pillows (40x80 cm)
Items Washable pillows with a filling of feathers, down or synthetics.
Tip Regard the fabric care label!
Detergent Liquid detergent
Extras Rinse Stop
Outerwear 104°F (40°C) to cold max. 6.6 lbs (3.0 kg)
Items Outdoor clothing made from micro fibers.
Tip
Detergent Detergent for delicates
Extras Rinse Stop
Proofing 104°F to 86°F (40°C to 30°C) max. 6.6 lbs (3.0 kg)
Items To treat micro fiber, ski clothing, fine dense cotton (poplin) or
Tip – The item should be washed and rinsed or dried.
Water repellent – Only use water repellent that states it is "Suitable for
Extras Rinse Stop
Close all zippers.
–
Do not use fabric softener
–
tablecloths to make them water repellent and soil resistant.
– To get an optimum result dry the items in a clothes dryer or
iron them.
membrane textiles". They are based on fluorochemicals.
Do not use agents containing paraffin.
–
Place the liquid detergent insert in compartment j an fill
with water repellent.
19
Page 20
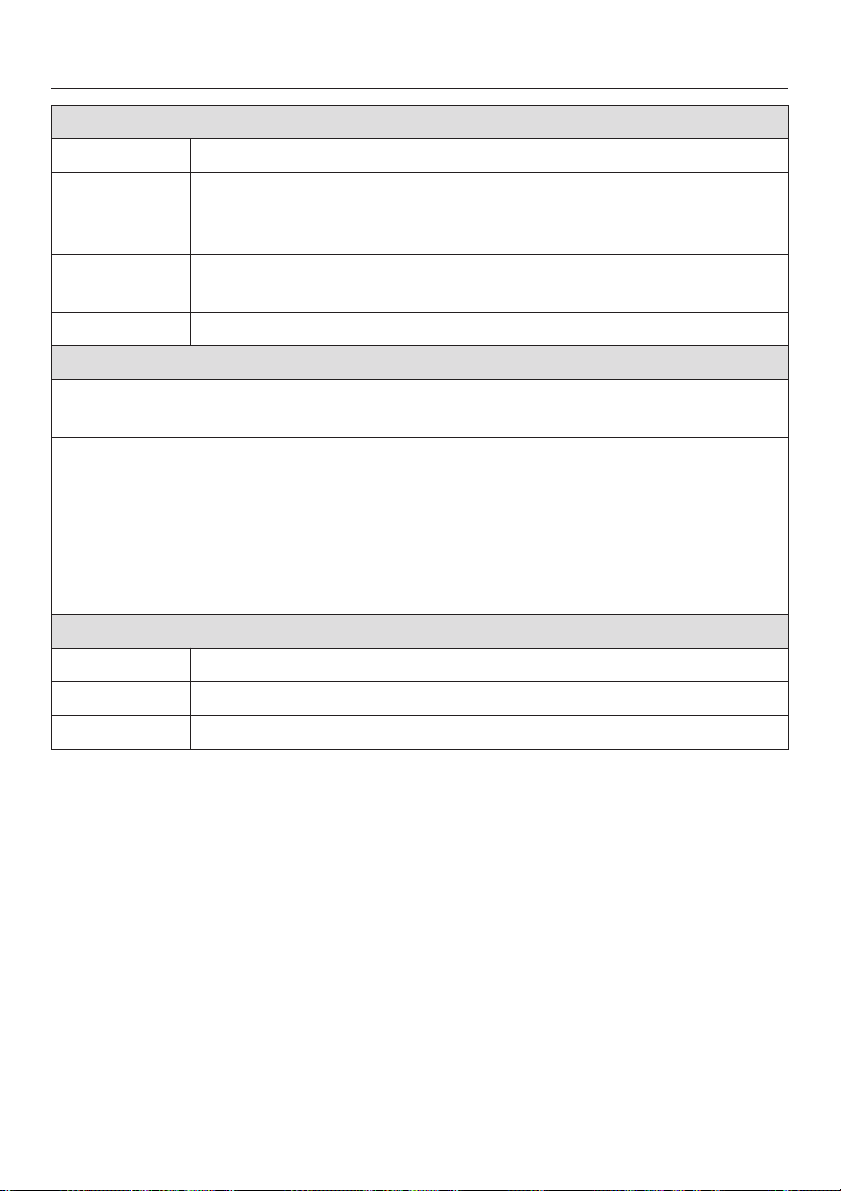
Program guide
Disinfection programs max. 14.3 lbs (6.5 kg)
Items Items made of cotton or mixed fabrics.
Note For different requirements with a temperature selection of 85°C
(thermal) to 40°C (chemothermal) with the respective holding
times.
Detergent Use a detergent for disinfection and chemothermal disinfection.
Regard the temperature level recommended on the packaging.
Extras Pre-wash
Hygiene
If a temperature lower than 55°C was selected for the last wash program or if the
program "Spin" was selected, "Hygiene" is displayed.
When selecting a Hygiene program
– do not put any laundry into the drum, add a small amount of detergent in
compartment j and start the program,
or
– select a wash program with a temperature of 140°F (60°C) or higher.
If the "Hygiene" display is disregarded, each program will run accordingly.
Sluice 75°C or Sluice 65°C max. 14.3 lbs (4.0 kg)
Items Heavily soiled items of cotton, linen or mixed fabrics.
Note To remove heavy soiling the laundry will be pre-rinsed twice.
Detergent Universal detergent
20
Page 21
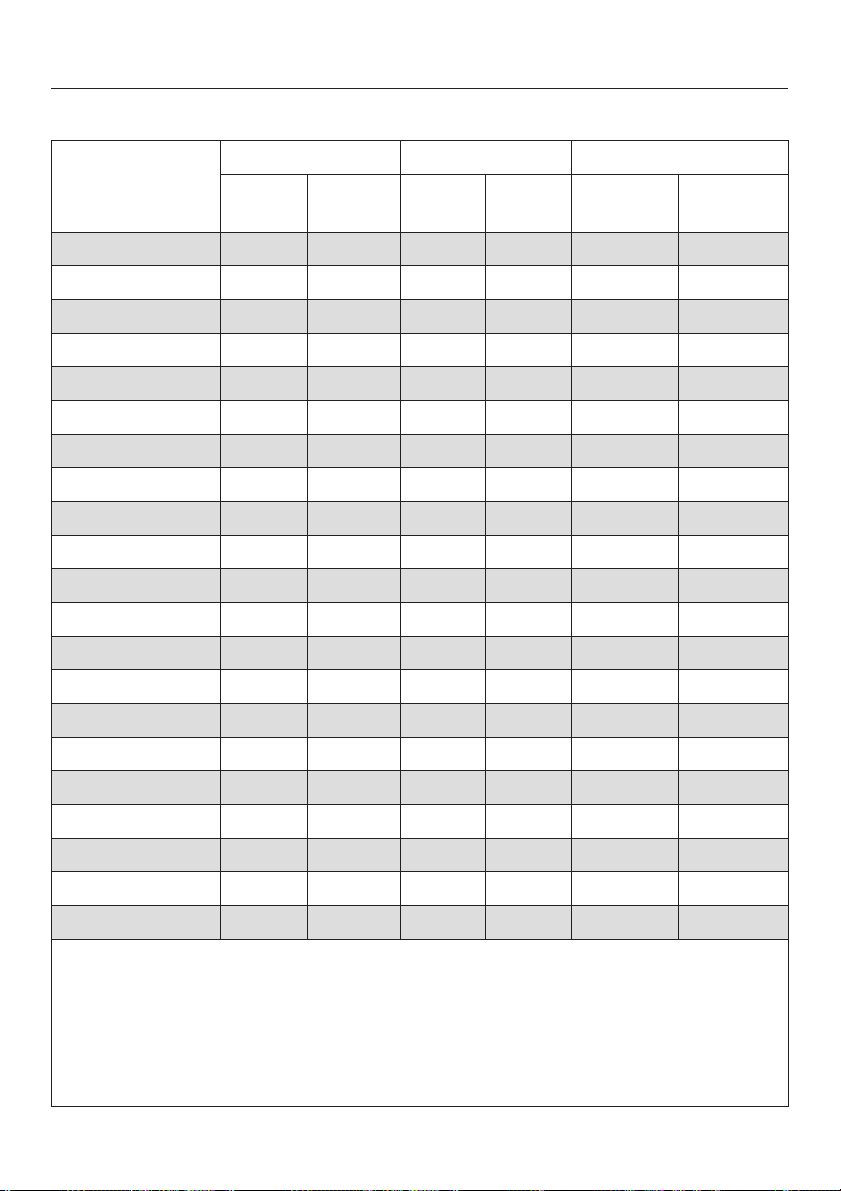
Program sequence
*Programs may vary depending on the offerings of your machine.
Main wash Rinse Spin
Water
level
Cottons Hygiene d a ( 2 LL
Cottons Uni. d a ( 2 LL
Minimum iron d a ( 2 LL
Delicates e b e 2 – L
Quick wash d a ( 2 LL
Woollens ( c ( 2 LL
Silks e d e 2 – L
Shirts ( a ( 2 – L
Disinfection* ( a ( 3 LL
Kitchen linen* ( a ( 2 LL
Table linen* ( a ( 2 LL
1)
Curtains
* ( a ( 3 – L
Pillows2)* ( a ( 3 – L
Outerwear* ( b e 3 L
Proofing* ––( 1 LL
Denim ( a ( 3 – L
Toweling ( a ( 2 – L
Extra Rinse ––e 2 LL
Sluice4)* ( a ( 3 LL
Starch ––( 1 – L
Spin –––– – L
d = low water level
( = middle water level
e = high water level
For program sequence explanations, see the following page.
* Programs may be added from the "Settings - Supervisor level" when activated by Tech. Service.
Wash
rhythm
Water
Rinses Rinse spin Final spin
level
a = normal wash rhythm
b = Gentle wash cycle
c = Woolens
d = Silk
3)
L
21
Page 22

Program sequence
The washer is equipped with an
electronic control which determines the
load size automatically. The washer
determines the required water
consumption for each load depending
on quantity and water absorbency of
the laundry. Different program
sequences and wash times will result.
The program sequence shown here
represents the basic program with a
maximum load. Possible "Extras" are
not considered.
The washer’s sequence display will
indicate the current cycle of the
selected wash programs.
Special features in the program
sequence:
Anti-crease
The drum continues to turn up to
30 minutes after the program ends to
prevent creases. The washer can be
opened at any time. Exception: The
program "Woollens" has no anti-crease
feature.
1)
Pre-rinse
To rinse dust, a pre-wash without
detergent is automatically added to
the program.
2)
High Spin
Before the wash program starts, a
high spin is carried out to remove air
from the pillows. After the spin the
water is taken in by compartment j
for the main wash.
3)
Outerwear
The items will be spun only after the
main wash.
4)
Pre-rinse
To remove heavy soiling the laundry
will be pre-rinsed twice.
22
Page 23
Spin speed
Maximum spin speeds
Program rpm
Cottons Hygiene 1400
Cottons Uni. 1400
Minimum iron 1000
Delicates 600
Quick wash 1400
Woollens 1200
Silks 400
Shirts 600
Disinfection programs* 1400
Kitchen linen* 1400
Table linen* 1200
Curtains* 400
Pillows* 1400
Outerwear* 900
Proofing* 800
Denim 900
Toweling 1400
Extra Rinse 1200
Sluice* 1400
Starch 1400
Spin 1400
Rinse spin
The laundry is spun after the main wash
and between the rinse cycles.
Reducing the final spin speed will also
reduce the rinse spin speeds.
Without final spin
Select "Rinse Stop" from the
^
sub-menu "Extras". The laundry is not
spun and remains soaking in water.
This will prevent wrinkles if the
laundry is not removed immediately
at the end of the wash program.
– Selecting the final spin
The washer is set default to the
maximum spin speed of the wash
program. You can select a lower spin
speed. Press "Start" to start the final
spin.
– To finish the program
Press the a button. The water will
be drained. Press the a door
button to open the door.
* Programs can be added from the
"Settings - Supervisor level" when
activated by Technical Service.
The final spin speed can be reduced.
(Exception: For the Cottons Hygiene
and Cottons Uni. programs the spin
speed can not be changed.)
The speeds above are the highest
available.
Deselect rinse spin and final spin
^
Select "Without spin". The laundry is
not spun after the final rinse but the
water is drained away. After the drain
cycle the washer goes immediately
into the anti-crease cycle.
23
Page 24

Extras
The basic wash programs can be enhanced with "Extras".
Accessing the sub-menu "Extras"
Cottons Uni. 140°F 1400 rpm
Duration 0:47 h
Extras
H
Press the direct select button D. The sub-menu "Extras"
^
shows.
Selecting Extras
Cottons Uni. 140°F 1400 rpm
Timer Y
H
Back A
H
Pre-wash
Starch Stop
Extras
Pre-wash
BackA
Starch Stop Rinse hold
^ Select the desired Extras with the Multi-function selector
and confirm.
– Repeat if another Extra is desired.
– A selected Extra is marked with a check mark.
For laundry with heavy soiling e.g. dust, sand.
The water is drained away before the last rinse and the
program stops.
Add the starch directly to the laundry in the drum and
continue the program. See "Detergent - Separate starch" for
more information.
24
Page 25

Rinse Stop
Intensive*
Water plus*
Extras
The washer stops after the last rinse, the laundry remains
soaking in water. This will prevent wrinkles if the laundry is not
removed immediately at the end of the wash program.
For laundry with normal to heavy soiling or stains.
The total time for the wash program will be extended.
The washer comes factory set with the Extra selection "Water
plus" activated. The water level during washing and rinsing is
increased.
Other settings for "Water plus" can be selected. See "Settings"
for more information.
* "Intensive" and "Water plus" can be added from the
"Settings - Supervisor level" menu, when the access is
activated by Technical Service.
Extras which can be selected are shown in the sub-menu
"Extras". If an Extra is not shown, it is not available for the
selected program.
25
Page 26
Timer
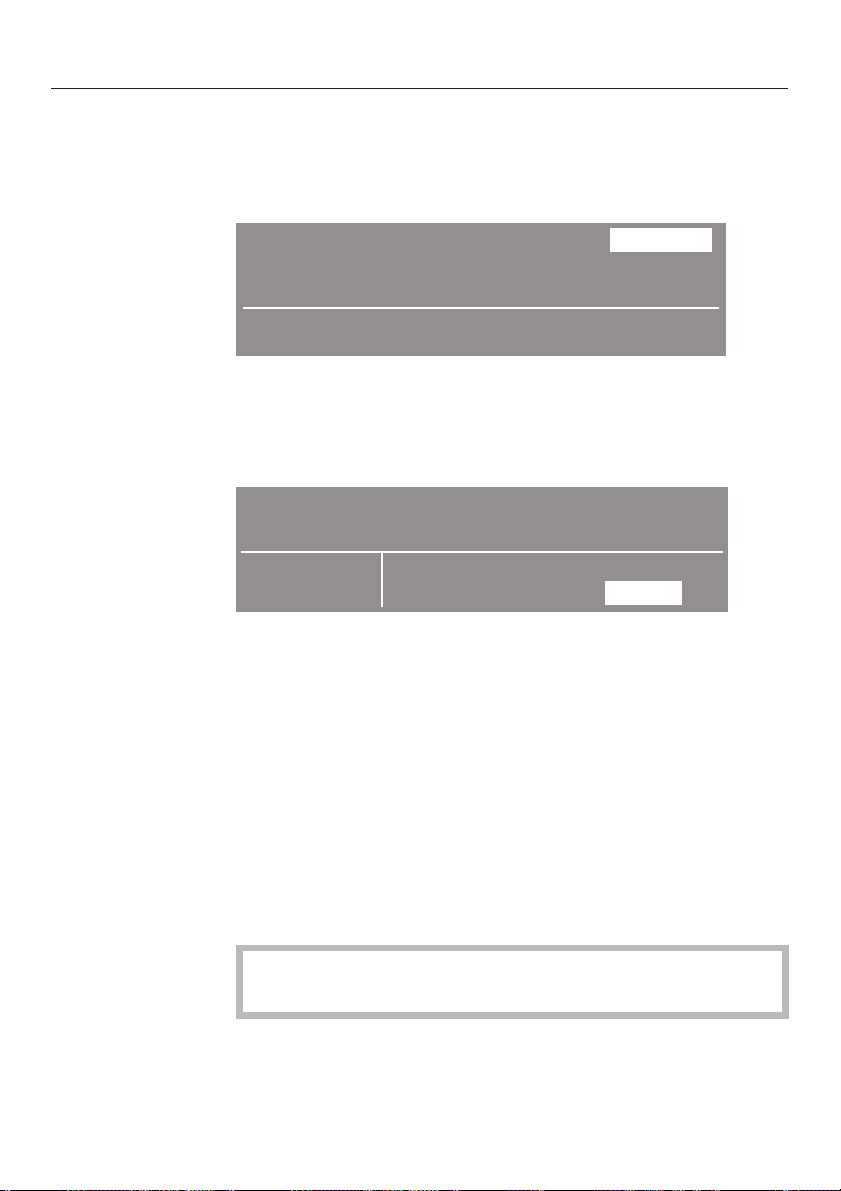
The timer option allows you to select the program end time.
The program start can be delayed from 30 minutes to 24
hours.
Select the sub-menu Timer
Cottons Uni. 140°F 1400 rpm
Duration 0:47 h
Extras
Press the direct select button E. The "Timer" menu
^
shows.
Select the Timer time
The program end can be selected in 30 minute steps.
Cottons Uni. 140°F 1400 rpm
H
Timer Y
H
Back A
H
Starting the Timer
Canceling the Timer
12:00
Start time:
Finish:
3:45 pm
4:30 pm
^ Select the desired program end time with the Multi-function
selector and confirm. The program end time is adjusted to
the next full or half hour. The program start will be delayed
according to the desired program end time.
^
Press the "Start" button.
The elapsed timer time is displayed and will count down in
minutes.
^
The Timer can be canceled with the direct select button
G.
After the program start the actual load size is measured.
This can result in an earlier program end.
26
Page 27
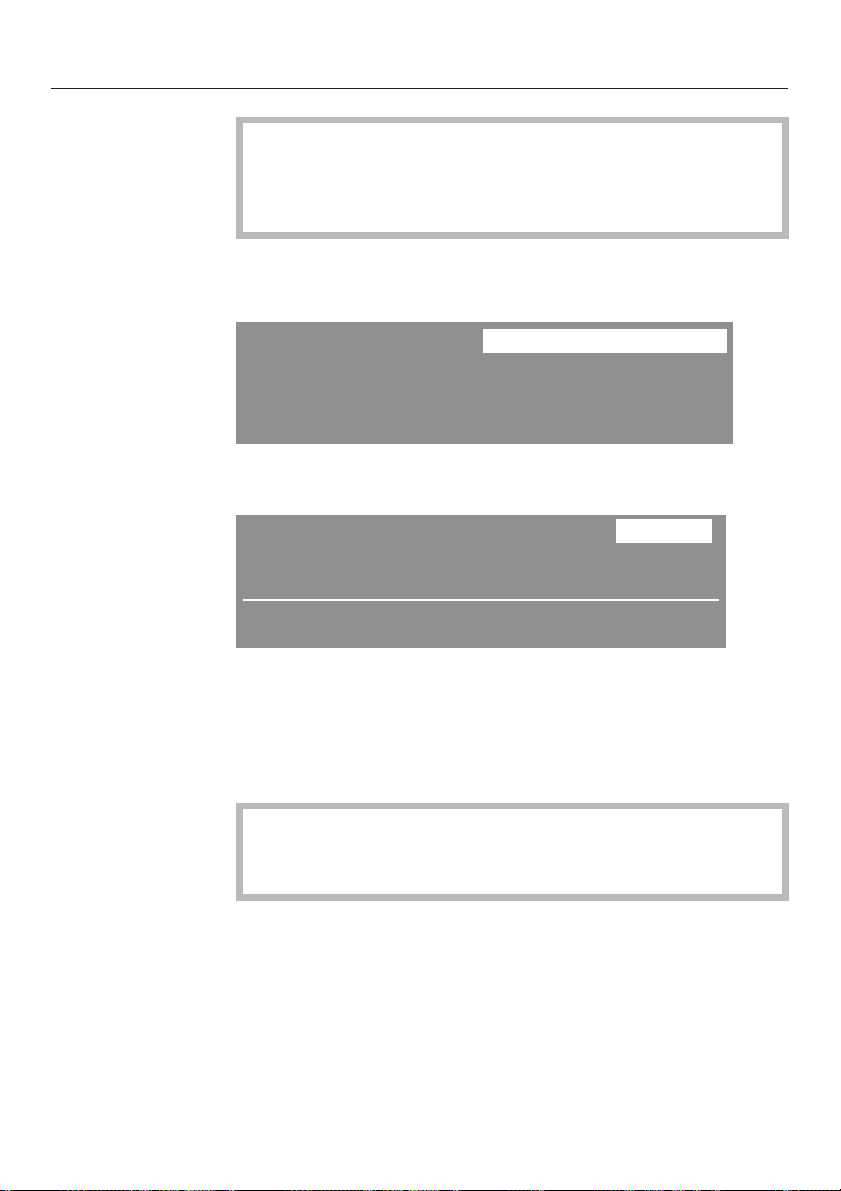
The washer has the option to save the most used wash
programs on the direct select buttons. The option "Save"
must be selected in the "Settings - Supervisor level".
Contact Technical Service for access to this level.
Selecting/Changing a Favorite
Main menu
Favorites
1 Cottons Uni. 140°F
2 Minimum iron 104°F Settings F...
3 Delicates 104°F
4 Woollens H 85°F 12:00
Press the direct select button D.
^
Program selection...
Basic menu
Cottons Uni. 140°F 1400 rpm
Duration 0:47 h
Extras
H
Timer Y
H
Save
H
Back A
H
^ Turn the Multi-function selector to select the component
you want to adjust: program, temperature or spin speed.
^
Press the Multi-function selector to confirm the selection.
Depending on the selection the display shows one of the following
submenus.
Important: If no selection is made in the sub-menu, the
display will switch Back to the basic menu after 20
seconds.
27
Page 28
Favorites
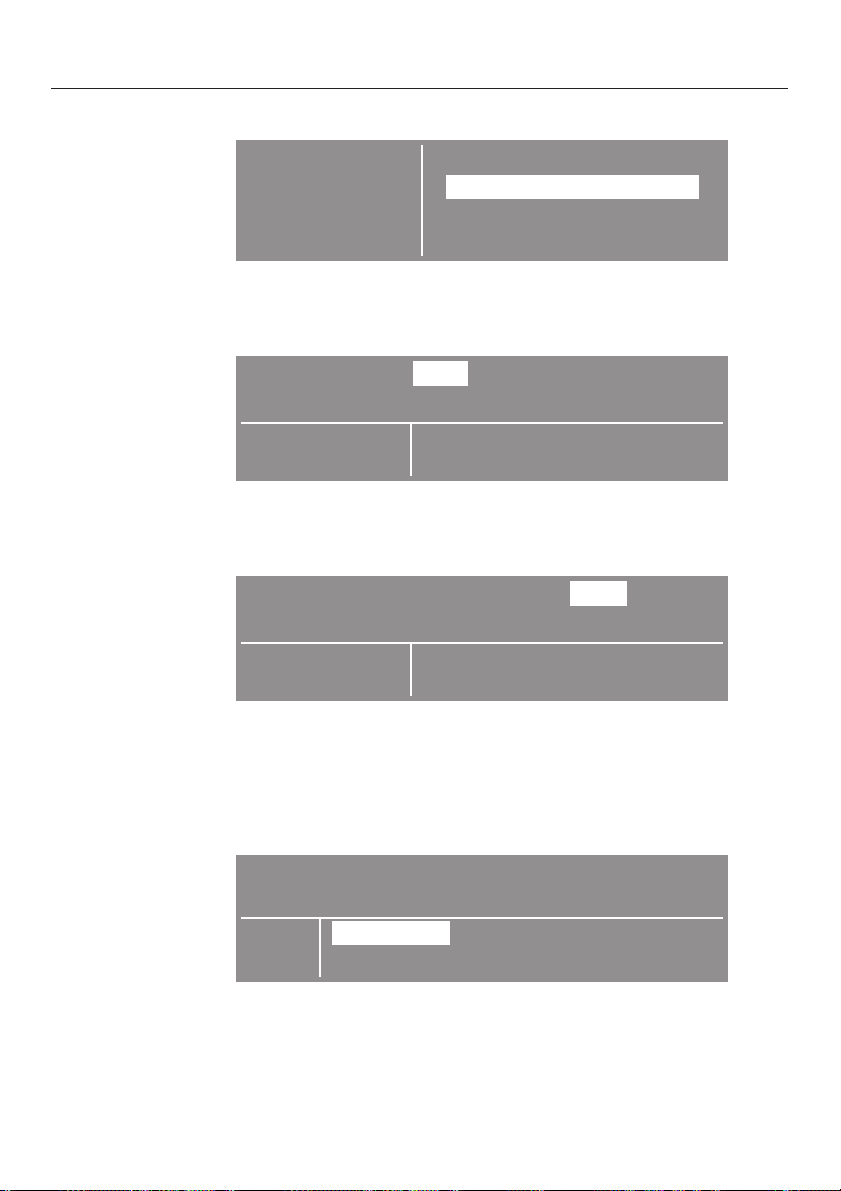
– Select a program
Program BackA
selection
Select the desired program with the Multi-function selector
^
and confirm. The basic menu shows again.
– Selecting a temperature
Cottons Uni. 140 °F 1400 rpm
Temperature
cold - 140°F
^ Select the desired temperature with the Multi-function
selector and confirm. The basic menu shows again.
– Selecting the spin speed
Cottons Uni. 140 °F 1400 rpm
Cottons Hygiene
Cottons Uni.
Minimum iron H
a
Selecting Extras
28
Spin speed
0 - 1400 rpm
^
Select the desired spin speed with the Multi-function
t
selector and confirm. The basic menu shows again.
^
Press the direct select button D. The sub-menu "Extras"
shows.
Cottons Uni. 140°F 1400 rpm
Extras
^
Select the desired Extras with the Multi-function selector
Pre-wash
BackA
Starch Stop Rinse hold
and confirm. The basic menu shows again. Repeat if
another Extra is desired. See "Extras" for more information.
Page 29

Saving a Favorite
The basic menu shows all selected components.
Cottons Uni. 140°F 1400 rpm
Pre-wash
Duration 0:56 h
Extras
H
Press the direct select button F.
^
Assigning a direct select button
Cottons Uni. 140°F 1400 rpm
Pre-wash
Previous : Cottons Uni. 140°F
Save to :
^ Select the desired number for the favorite with the
Multi-function selector and confirm. The favorite is saved
with the individual selections and shows in the main menu.
To assign more favorites, repeat the process with the
remaining direct select buttons.
Timer Y
H
1
2 3 4 BackA
Save
H
Favorites
Back A
H
1400 rpm
29
Page 30

Detergent
Only use laundry detergent formulated
for front loading washing machines.
For wool and wool blend fabrics use a
detergent formulated for wools.
Follow instructions on the detergent
packaging for the correct use and
amount of detergent.
The amount of detergent used
depends on the level of soiling:
Light soiling
No soiling or stains are visible.
Normal soiling
Some visible soiling or a few light
stains.
Heavy soiling
Very visible soiling or stains.
The size of the load and the water
hardness level in your area have an
impact on the amount of detergent
necessary to obtain optimum wash
results. If you do not know the water
hardness level in your area, contact
your local water authority.
Water hardness
Hardness
level
soft (I) 0 - 8.4 0 - 1.5
moderate
hard to
very hard
(III)
Water hardness in
gpg
(also German
hardness in °d)
8.4 - 14 1.5 - 2.5
(II)
over 14 over 2.5
Water hardness
in mmol/l
Water softener
If the water hardness level is between II
and III, you can soften the water to
reduce detergent consumption.
The detergent packaging should
indicate the correct amount to use in
your machine. Add the detergent, then
add the water softener. From then on
you can then use the recommended
amount of detergent for water hardness
level I.
30
Page 31
Detergent
Fabric softener, liquid starch
Fabric softener added to the wash
program will make fabrics feel softer
and will reduce static cling in the dryer.
Liquid starch is a synthetic starch wash
used to give fabrics some stiffness.
Starch can be included in any wash
program as part of the final rinse.
Automatic dispensing of fabric
softener or liquid starch
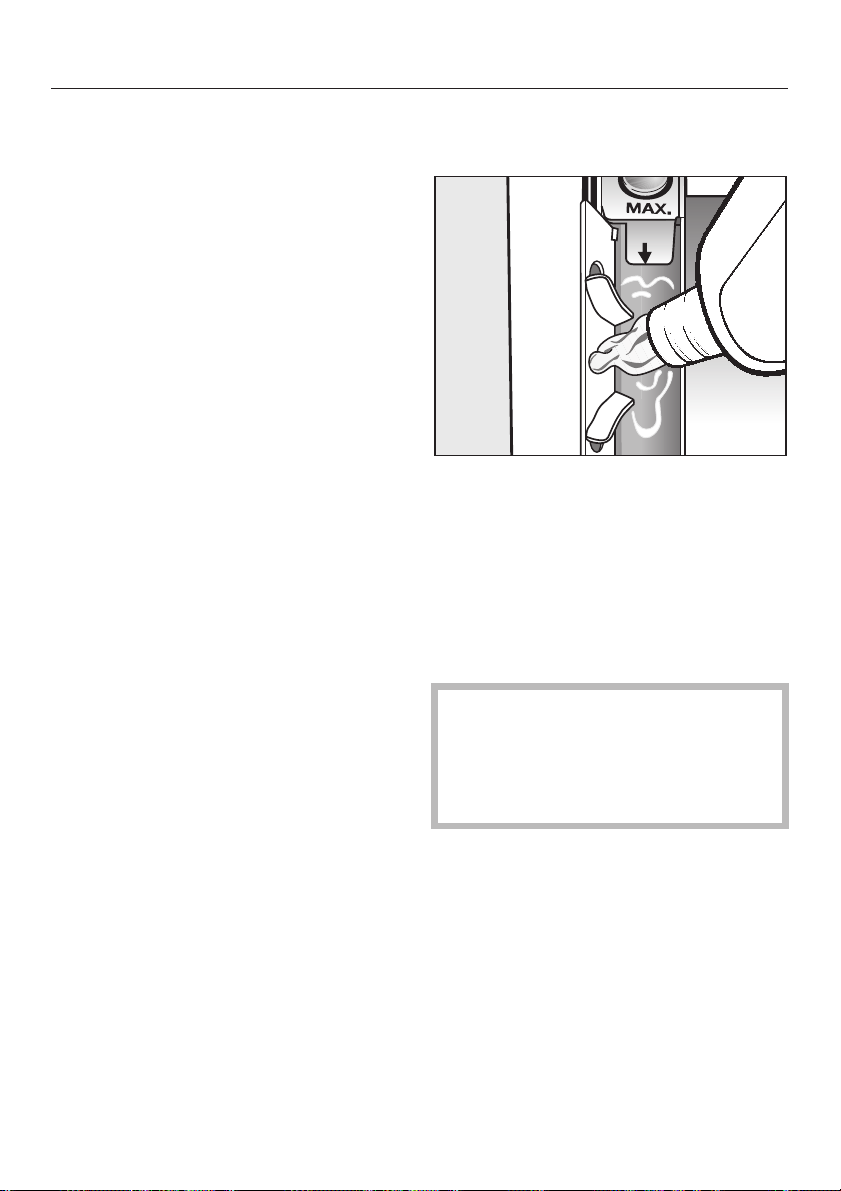
^ Add the fabric softener or liquid
starch to compartment §. Do not
exceed the Max. level mark.
The softener or liquid starch is automatically dispensed in the final rinse. At
the end of the program a small amount
of water remains in the fabric softener
compartment §.
If you use starch frequently, clean
the dispenser compartment and
especially the siphon tube and
conditioner channel. See "Cleaning
the detergent drawer".
31
Page 32

Detergent
Separate fabric softener
Add fabric softener to the
^
§ compartment.
Select the "Starch" program.
^
Press "Start".
^
Separate starch
Dispense and prepare the amount of
^
starch recommended on the
packaging.
Add the starch in the i
^
compartment.
^ Select the program "Starch".
^ Press "Start".
Starching with Starch Stop
^ Dispense and prepare the amount of
starch recommended on the
packaging.
^ Select "Extra Starch" before starting
the program.
Dye removers / Fabric dyes
Do not use dye removers in this
washer.
When dying fabrics in the washer,
^
adhere to the manufacturer’s
instructions.
External dispensing
As an option the washer can be
connected to an external detergent
dosage system. A conversion kit is
necessary which can be purchased
from Miele.
The program and the remaining time
will stop. The display shows "Starch".
^
Open the door and dispense the
starch directly into the drum.
^
Close the drum.
^
Select a spin speed and confirm or
press "Start".
32
Page 33
Before cleaning the appliance,
,
disconnect the power supply by
unplugging the unit or manually
tripping the circuit breaker.
Do not use chemical solvents,
,
abrasive cleaners, glass or all
purpose cleaners. These can
damage plastic surfaces and other
parts.
Cleaning the washer
^ Clean the exterior of the washer with
a mild solution of non-abrasive
detergent or soap and water. Wipe
dry with a soft cloth.
^ Clean the drum with a stainless steel
cleaner specially formulated for use
in a washing machine.
Cleaning and Care
Cleaning the detergent drawer
Detergent residue should be cleaned
out regularly.
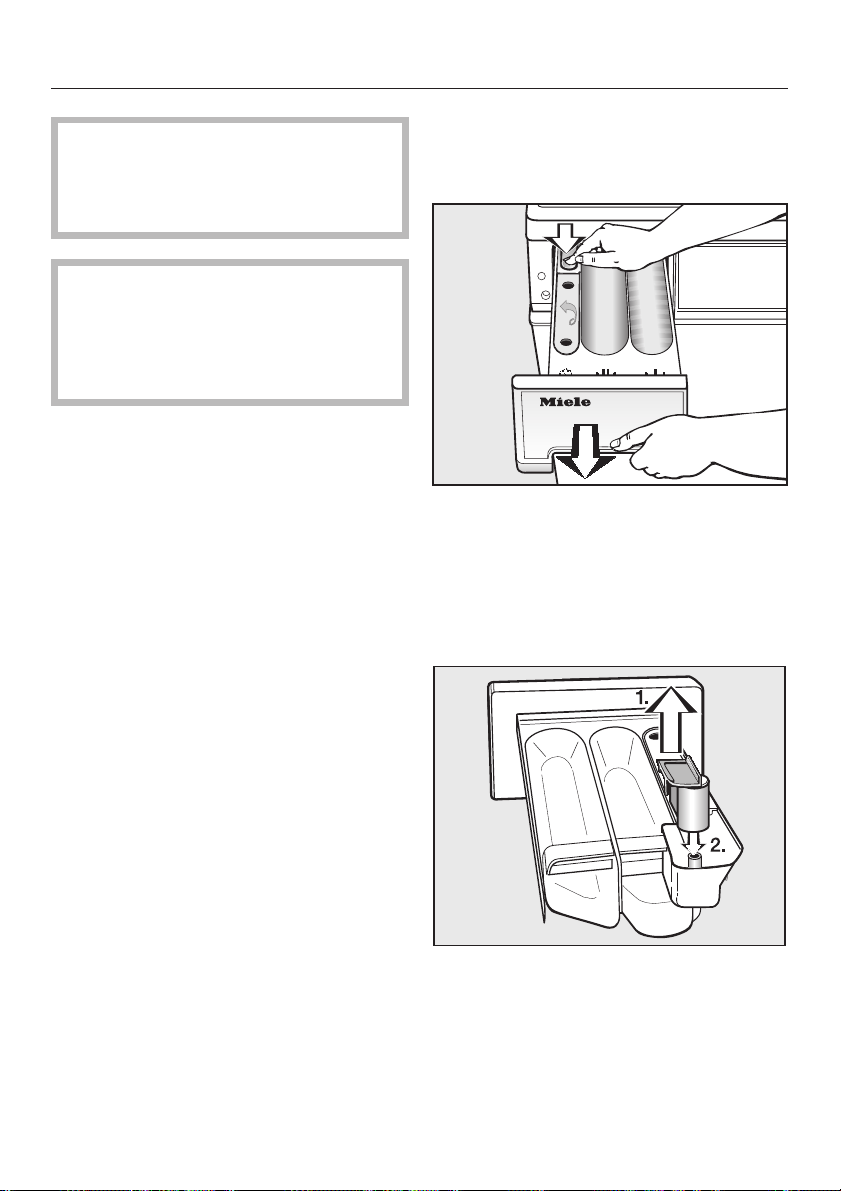
^ Pull out the detergent drawer as far
as it will go. Press the red release
lever down and pull the drawer out of
the machine.
^ Clean the detergent drawer with
warm water.
^
Clean the siphon tube.
1. Remove the siphon tube from the
compartment § and rinse under warm
water. Clean the pipe on which the
siphon tube is attached.
2. Replace the siphon tube.
33
Page 34
Cleaning and Care
Cleaning the inlet hose filter
The washer has two water inlet filters to
protect each inlet valve. Check and
clean these filters every 6 months. This
may have to be done more frequently
with some water supplies.
Cleaning the inlet hose filters
Turn off the water supply.
^
Unscrew the inlet hose from the valve
^
by turning the connector
counterclockwise using a wrench if
necessary.
Cleaning the filter in the inlet valve
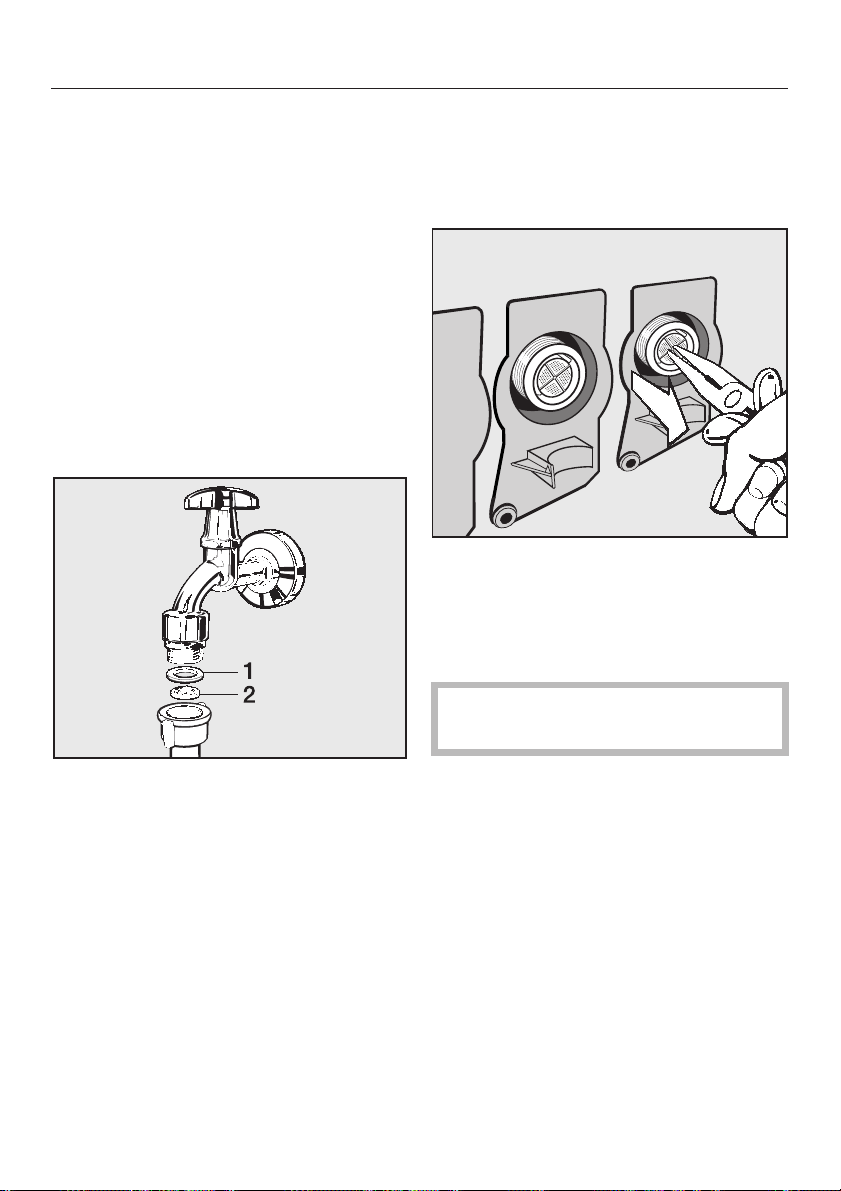
Using pliers carefully loosen and
^
remove the plastic hose connector
from the inlet valve.
^ Using needle nose pliers, remove the
plastic filter by pulling on the bar (see
illustration). Rinse under running
water and return. Replace the filter
and seal then reconnect the hose.
^
Remove the rubber seal, 1, from the
connector.
^
Using needle nose pliers, grasp the
plastic filter, 2, and pull it out of the
hose connector.
^
Clean the filter under running water
and carefully remove any large
particles.
^
Replace the filter and seal and
reconnect the hose.
^
Slowly turn on the water supply and
check for leaks. If water leaks, tighten
the hose connection.
34
Both filters must be put back in
place after cleaning.
Page 35
Frequently asked questions
Repairs to electrical appliances must only be carried out by a qualified and
,
trained person in accordance with local and national safety regulations.
Repairs and other work by unqualified persons could be dangerous. The
manufacturer cannot be held responsible for unauthorized work.
The following section will help you avoid placing a service call by identifying
issues you may encounter while operating the machine:
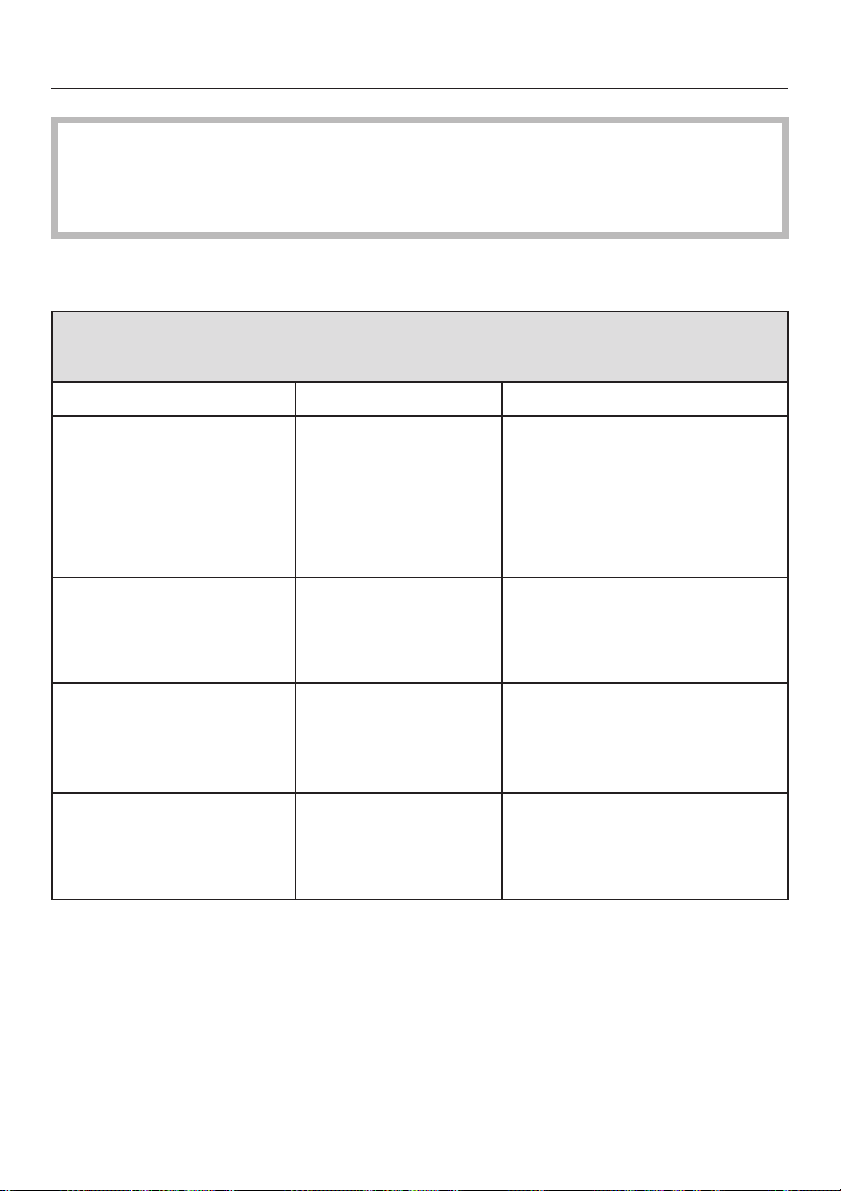
A wash program cannot be started
Issue Possible fault Solution
The display remains off. The washer has no
power.
When selecting the
"Spin" program, the
program does not start.
There is a fault
message in the display.
The display is dark and
the "Start" light flashes
slowly.
The instructions in
"Before using for the
first time" were not
followed.
As long as an error
message is
displayed, a program
cannot be started.
The machine goes
into "Standby". The
display shuts off to
save energy.
Possible fault
– the washer is not
connected to the electrical
supply,
– the circuit breaker has
tripped.
Follow the instructions as
described in the "Before using
for the first time" chapter.
– Regard the display
messages.
–
Confirm by pressing the
Multi-function selector.
Press any direct select button.
The Standby function will be
ended.
35
Page 36
Frequently asked questions
General problems with the washer
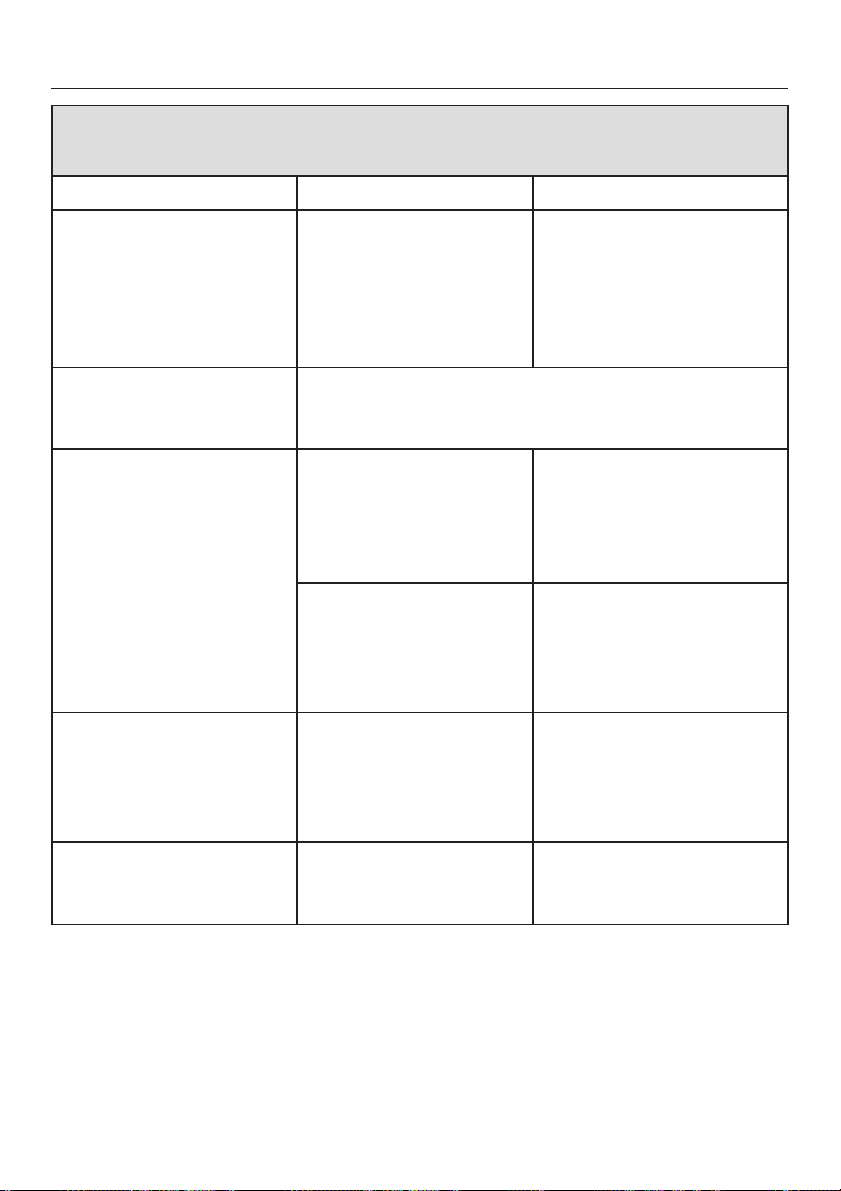
Issue Possible cause Solution
The washer shakes
during the spin cycle.
There are unusual
sounds coming from
the drain pump.
Large residues of
detergent remain in the
dispenser drawer.
The fabric softener is
not completely
dispensed or too much
water remains in the
compartment §.
The display shows a
foreign language.
The four feet are not
–
resting evenly on the
floor.
The floor is not
–
properly reinforced.
There is no fault. Lapping sounds at the beginning
and end of the pump process are normal.
The water pressure is
too low.
Water softening
detergent additives tend
to stick.
The siphon tube is either
incorrectly positioned or
clogged.
A different language was
selected under
"Settings-Language J".
Level the machine (see
–
Installation Instructions).
It is recommended that
–
the machine is installed
on a concrete base.
– Check and clean the
filters in the water inlet
hoses.
– Select the "Water plus"
Extra if desired.
Clean the detergent
drawer. In the future add
the detergent first and then
the water softener to the
compartment.
Clean the siphon tube, see
"Cleaning and careCleaning the detergent
dispenser drawer".
Select the desired
language. The flag symbol
leads you to the setting.
36
Page 37

Poor wash results
Issue Possible cause Solution
The laundry does
not get clean with
liquid detergent.
Laundry has a
gray sticky
residue.
There is white
detergent residue
on dark laundry.
Items with greasy
soiling are not
clean after a wash
program.
Frequently asked questions
Liquid detergents do not
contain bleaching agents.
Fruit, coffee and tea
stains may not be
removed.
– Not enough detergent
was used to dissolve
greasy deposits in
heavily soiled laundry.
– The laundry was soiled
with grease (oils,
lotions).
The powder detergent
was not completely
dissolved because of
hard water. These
residues are difficult to
remove.
–
Add a Pre-wash to the program. Use liquid detergent for
the pre-wash.
–
Use a powder detergent for the main wash.
Use detergent which is specially formulated for heavily
soiled work clothes. Contact the detergent manufacturer
for more information.
Use powder detergent
–
containing bleach.
(Be sure this is suitable
according the fabric care
labels of the laundry.)
Fill powder bleach in
–
compartment j and use a
dispenser ball for the liquid
detergent.
Never put liquid detergent
–
and bleach together in the
same wash compartment.
– Add more detergent to
laundry with grease stains or
use a liquid detergent.
– Run a 140°F (60°C) program
with liquid detergent to clean
the washer before using it for
laundry again.
–
After drying, remove white
residues with a clothes
brush.
–
In the future, use liquid
detergent.
37
Page 38
Frequently asked questions
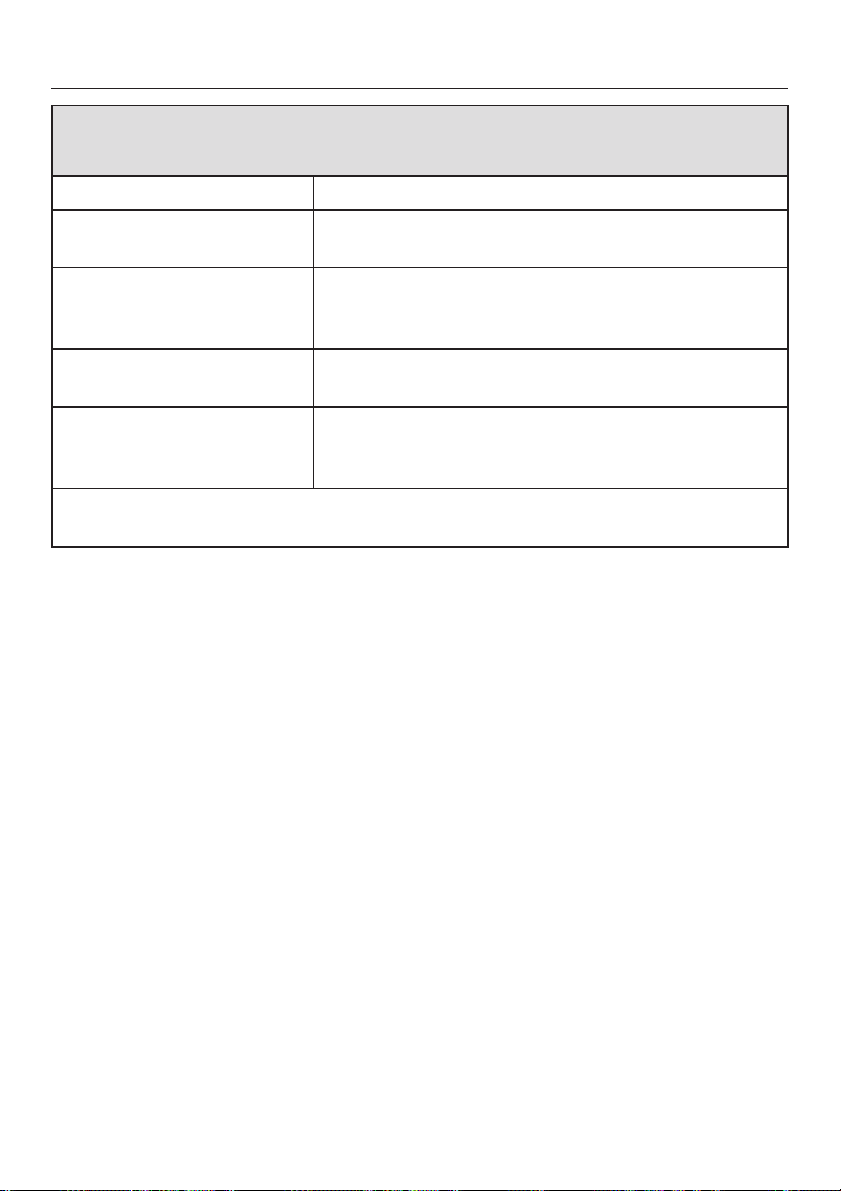
The door will not open when the "a" button is pressed
Issue Solution
The washer has no
power.
Power failure To open the drum door, see "Frequently asked
The door was not
properly closed.
There is still water in the
drum and the washer
cannot drain it away.
As a safeguard against scalding, the drum door cannot be opened if the wash
water temperature is over 131°F (55°C).
Insert the plug into the outlet and ensure the circuit
breaker has not tripped.
questions - Opening the drum door during a power
failure...".
Push the drum door on the locked side. Then press
the "Door" button.
Clean the drain filter and the drain pump as
described in "Frequently asked questions Opening the drum door during a power failure...".
38
Page 39
Frequently asked questions
Opening the door during a
power failure or when the drain
is blocked
Disconnect the machine from the
,
power supply.
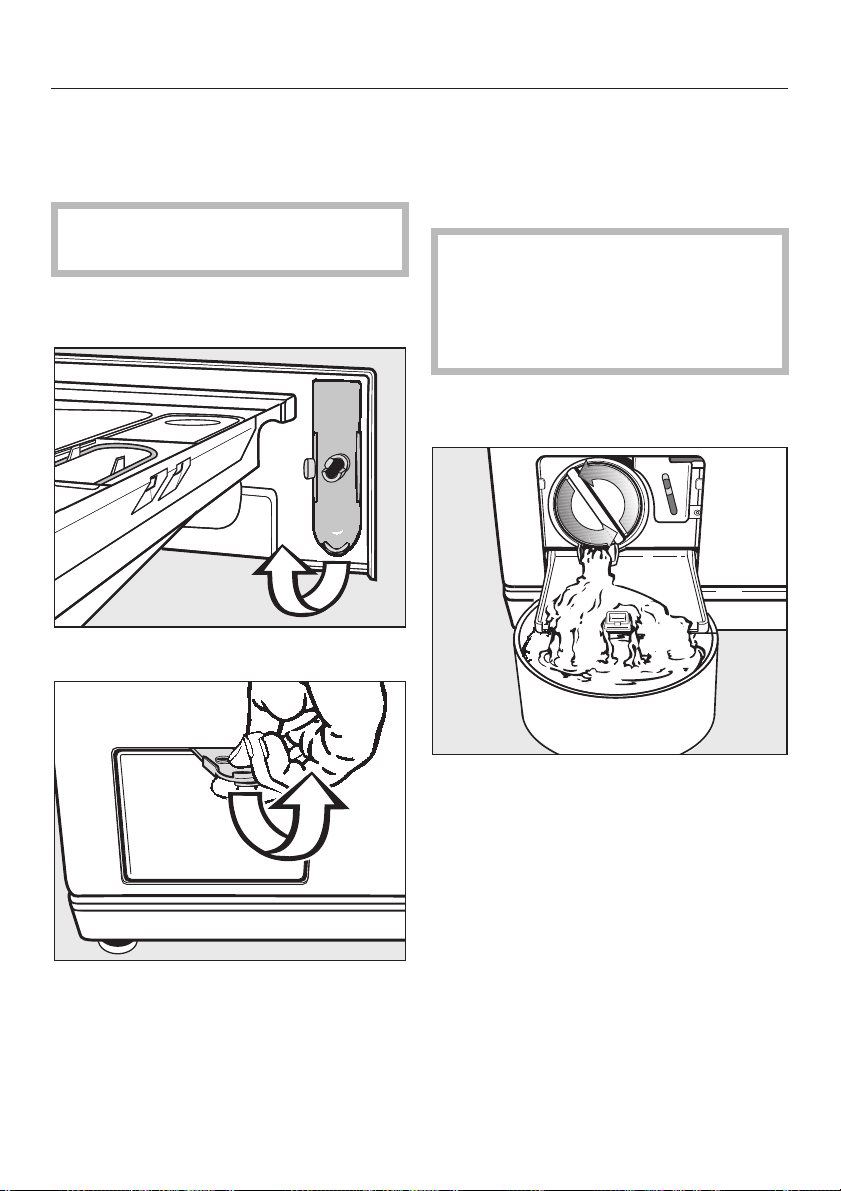
Open the detergent dispenser
^
drawer.
^ Remove the tool.
Machines with a drain pump
If the main drain hose is clogged, water
will be retained in the machine
(max. 6.5 gal [30 l]).
Caution: If laundry has been
,
washed at a high temperature, the
water draining out of the machine
will still be hot! Stop and allow it to
cool before proceeding.
Place a 2 quart capacity container
^
under the drain tube.
^
Open the lint trap door.
^
Turn the lint trap lid counterclock
wise. Do not remove it. About 2
quarts of water will drain out of the
hose.
If additional water remains in the
machine, tighten the lint trap lid and
empty the container. Repeat as
necessary.
-
39
Page 40
Frequently asked questions
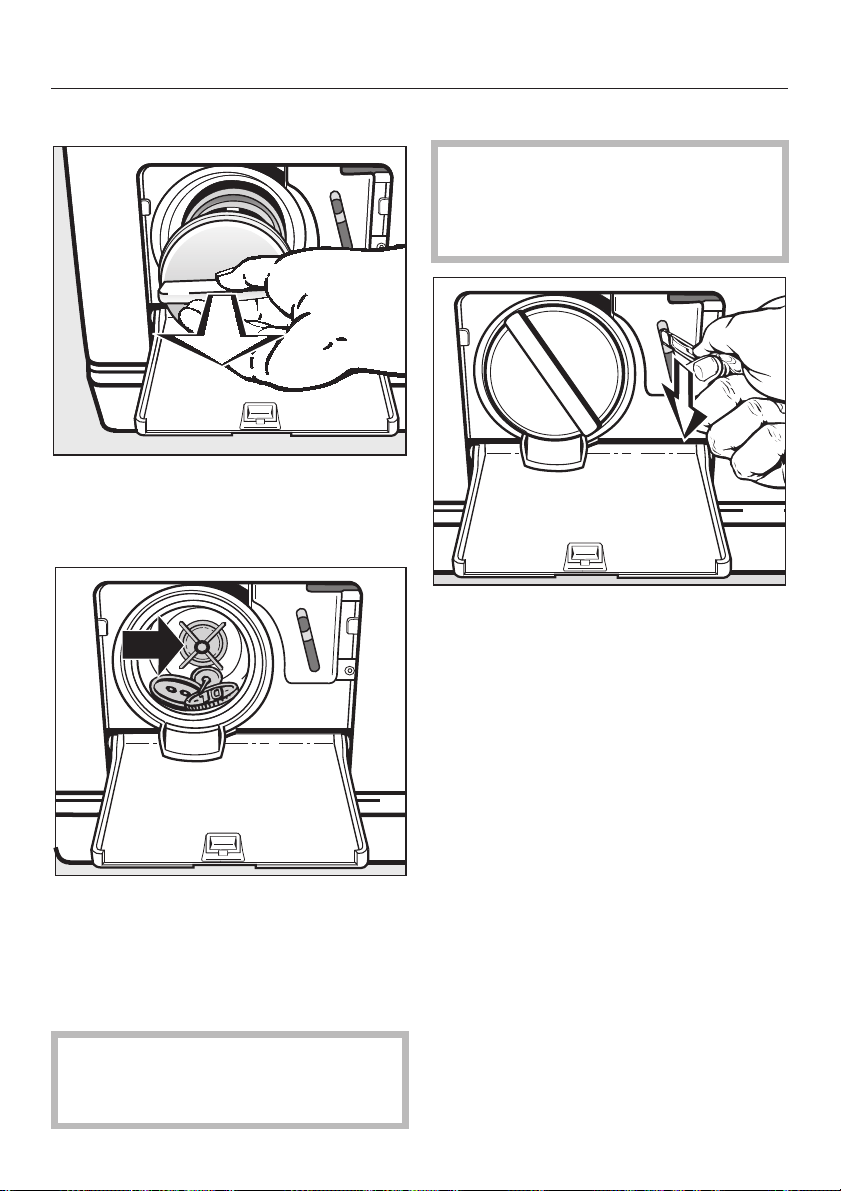
Once the flow of water stops:
^ Remove the lint trap lid.
^ Remove any foreign objects or lint
from the filter.
Open the drum door
Always make sure the drum is
,
stationary before reaching into the
drum to remove laundry. A moving
drum is extremely dangerous.
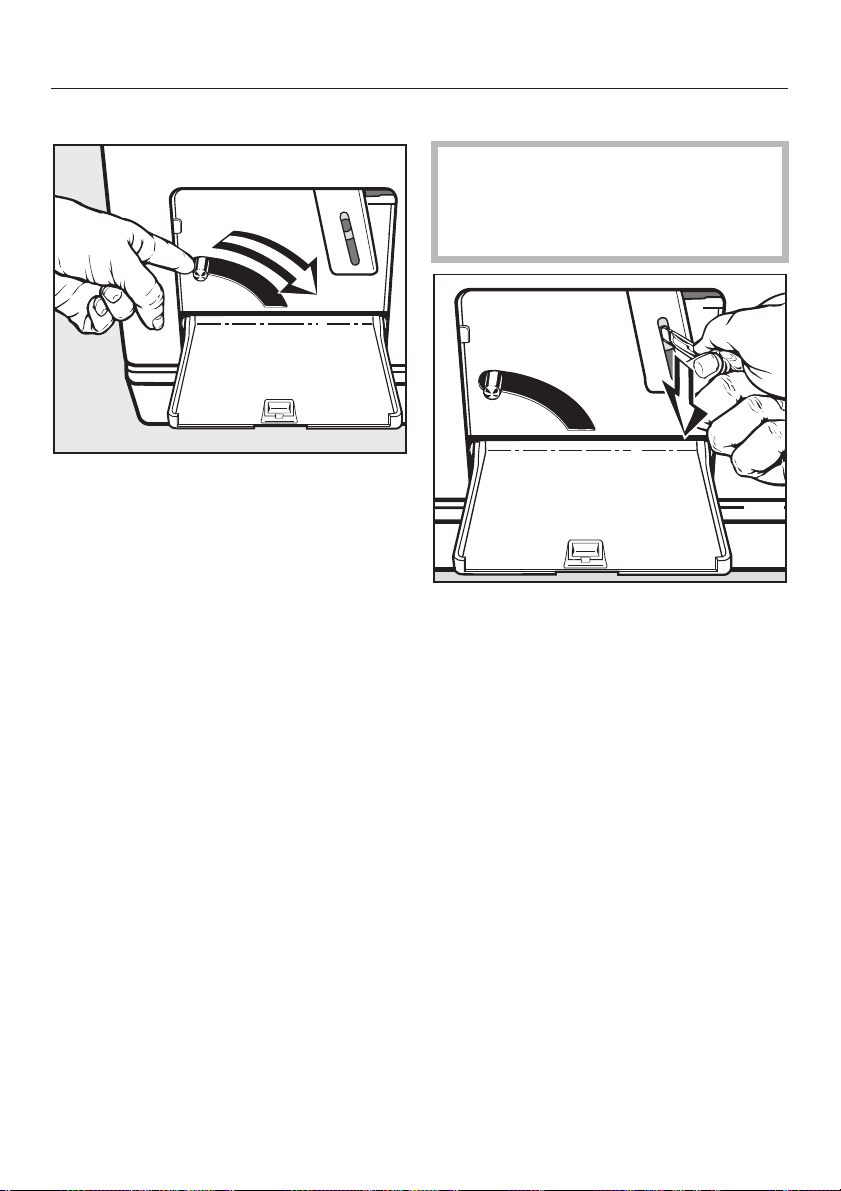
^ Insert a screwdriver into the notch,
beside the lint trap, pull it down. The
door will now open.
^
Check that the impeller (in the back
of the chamber) rotates freely by
spinning it with your hand.
^
Return the lint trap lid and tighten into
place.
If the drain filter is not tightened
securely water will leak out when the
machine is used.
40
Page 41
Frequently asked questions
Machines with a drain valve
^ Press the lever for the emergency
drain down and hold until you hear
no more water running out.
Open the drum door
Always make sure the drum is
,
stationary before reaching into the
drum to remove laundry. A moving
drum is extremely dangerous.
^ Insert a screwdriver into the notch,
beside the lever, pull it down. The
door will now open.
41
Page 42
After sales service
Repairs
In the event of a fault which you cannot
fix yourself, please contact technical
service using the information on the
back of this manual.
Please quote the model and serial
^
number of your appliance when
contacting the Technical Service
Department.
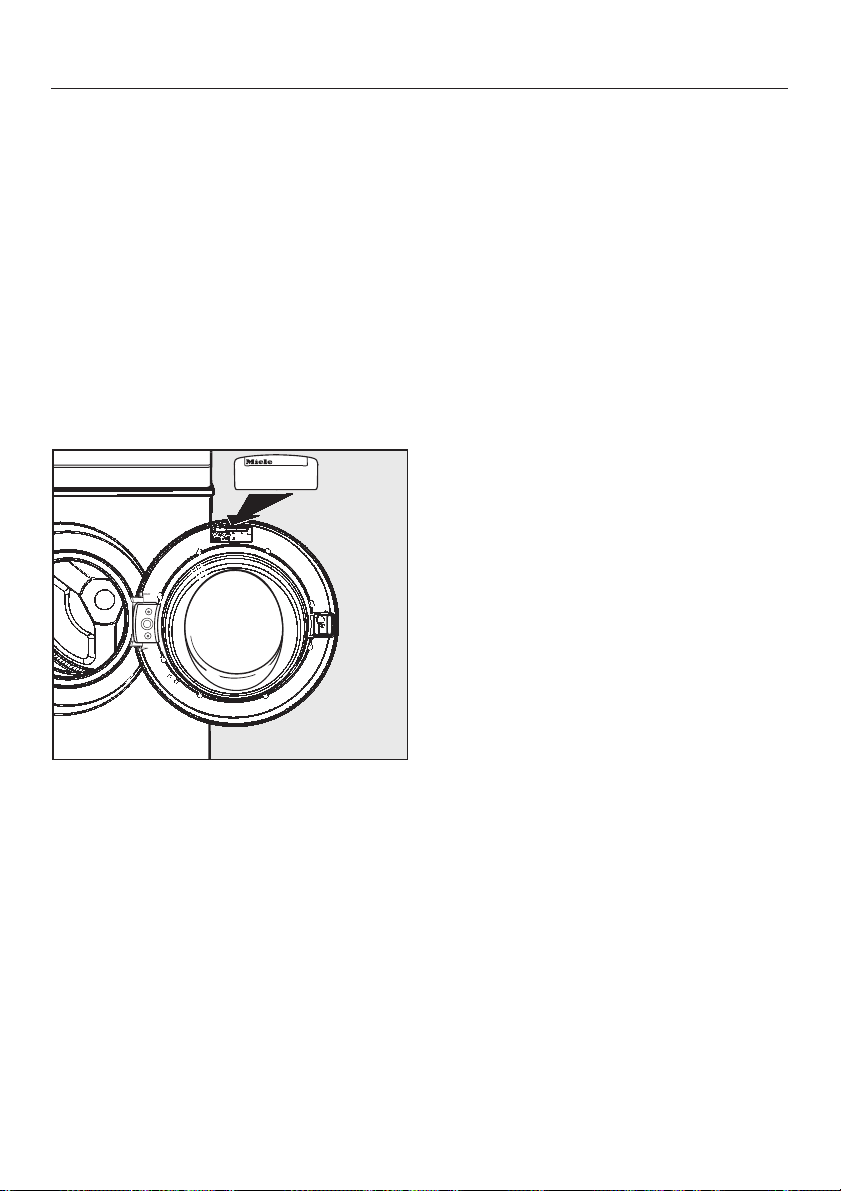
Both can be found on the data plate
visible above the front glass on the
inside of the door.
PC Update
The indicator marked PC allows a
technician to make use of new
technology. When, for example, new
programs are developed or new fabrics
are introduced, a service technician will
be able to modify existing program
cycles accordingly.
Miele will provide information when
such possibilities become available.
Optional accessories
Optional accessories are available
through your Miele dealer or Miele.
42
Page 43
Installation Instructions
To prevent accidents
and machine damage
read these instructions
before
installation or use.
43
Page 44
Installation
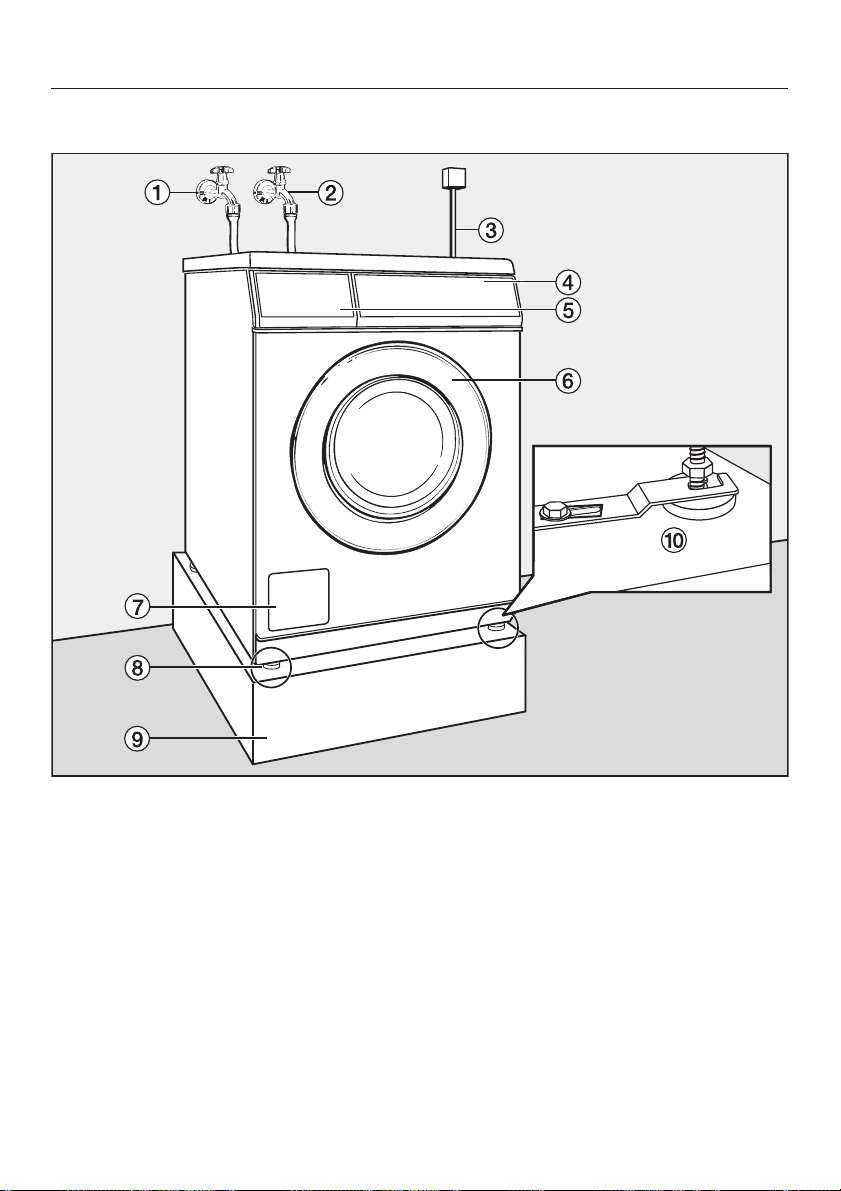
Front view
a Water intake hose hot
b Water intake hose cold
c Electrical connection
d Control panel
e Detergent dispenser drawer
f Drum door
44
g Access panel to drain filter, drain
pump and emergency door release
h Height adjustable feet
i Stand
j Fixing bracket
Page 45
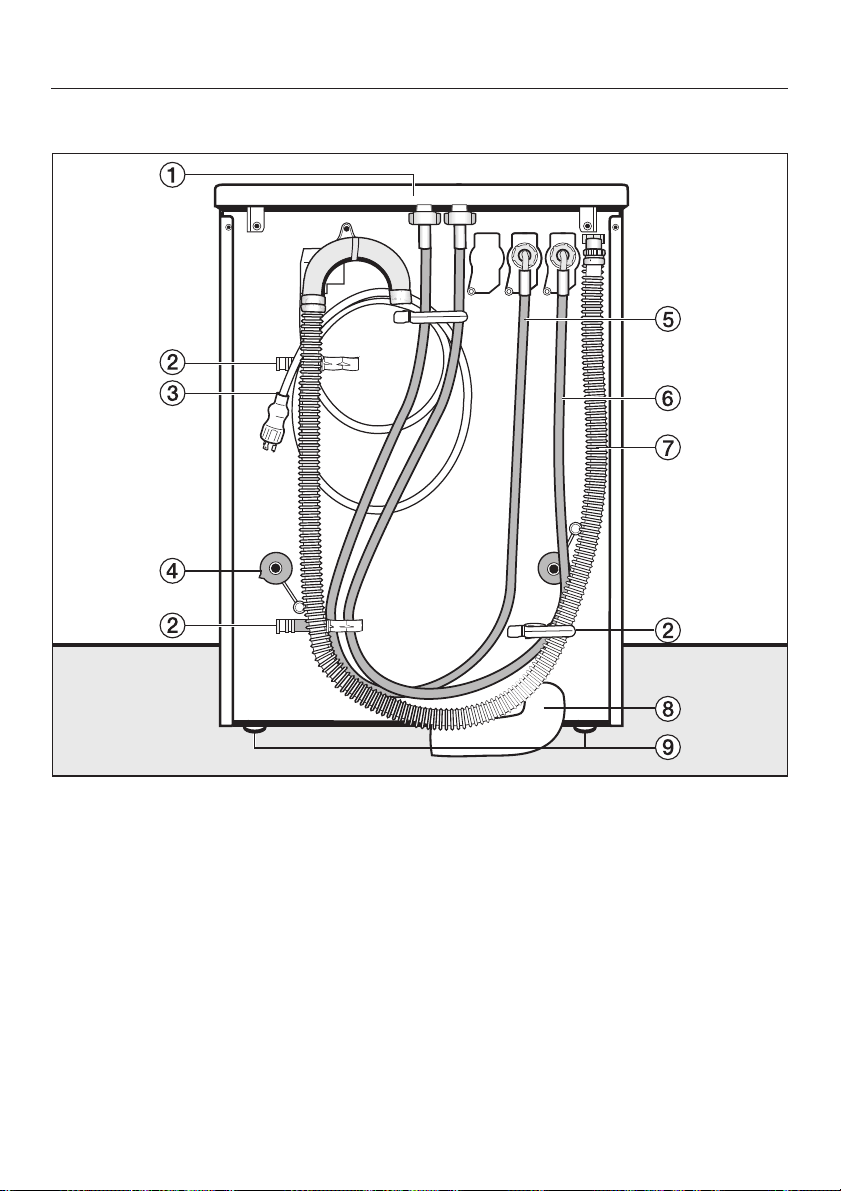
Rear view
Installation
a Lid with transport grips
b Mounting for:
–
Water intake hose
–
Drain hose
–
Withdrawn shipping struts
c Power cord
d Shipping struts with rotary protectors
e Water intake hose (cold)
f Water intake hose (hot)
g Drain hose for drain pump
h Drain hose for drain valve
(optional accessory)
i Height adjustable feet
45
Page 46
Installation
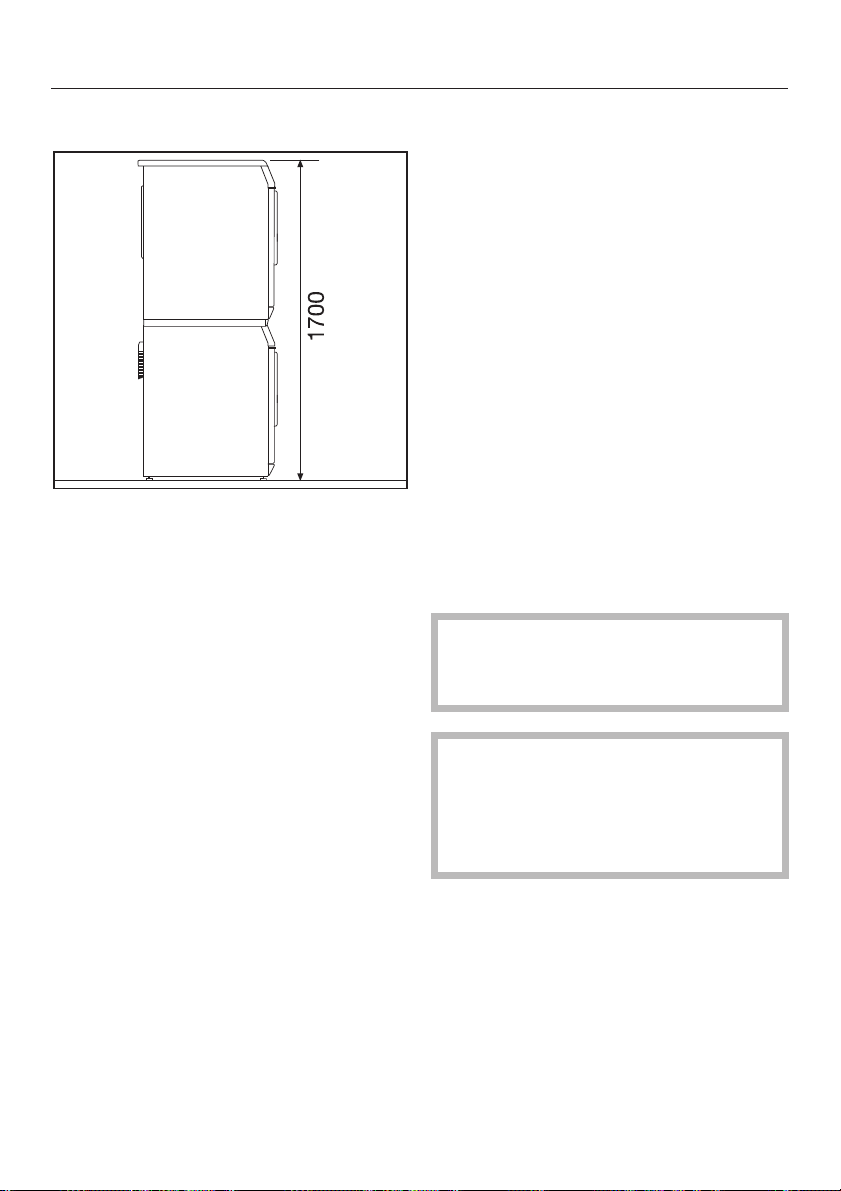
Washer/ Dryer Stack
Height:
Stacking kit with pull out shelf
15
66
/16" (1700 mm)
The Miele washing machine can be
installed as part of a washer-dryer
stack in combination with a Miele
tumble dryer. An appropriate stacking
kit* is required.
Installation on a base
The machine can be installed on an
open or closed steel base, or on a
concrete base. Concrete is
recommended.
Secure the two front feet of the
^
washer with the supplied fixing
bracket when installing on a concrete
base.
Read the supplied Installation
^
manual.
Coin mechanism
The dryer can be equipped with a coin
mechanism*.
The reprogramming necessary for the
coin mechanism must be done by a
Miele Service Technician.
Empty the coin mechanism
regularly. Coins or tokens may get
jammed.
Installation of the stacking kit must be
performed by a Miele Service
Technician.
Reinstallation of the machine lid
When reinstalling the appliance lid,
check the firm fit of the cover at the rear
bracket for a safe transport of the dryer.
46
Do not install devices to auto
matically turn the washer off, e.g. a
clock timer. The washer must be
connected to the power supply to
open the door.
The supplied sticker must be affixed at
or near by the washer: "This washer
must be connected to the power supply
to open the drum door. Do not use
force to open the door."
* Available from your Miele dealer or
Miele.
-
Page 47
Installation
Installation site
The washer cannot be built-in.
Do not install the machine
,
directly next to or over an open floor
drain or drain channel. Moisture can
penetrate the machine and damage
electrical parts.
A concrete floor is the most suitable
surface for the washer. Concrete floors
are less prone to vibration during the
spin cycle than wooden floors.
If the machine is installed on a
,
masonry or concrete base it must
be secured with retaining clips to
prevent the washer from vibrating off
the stand during the spin cycle.
^ The machine must be leveled and
securely positioned.
Installation
Use the front washer feet and the
^
rear excess end to transport the
washer from its shipping pallet to the
installation site.
Do not lift the washer by the drum
door.
Ensure that the machine’s feet
,
and the floor are dry to prevent
slippage during the spin cycle.
Removing the shipping struts
^ To avoid vibration while spinning, the
machine should not be installed on
soft floor coverings.
In case the installation must be on a
wooden joist floor:
^
Install the unit on a 27
3
1
/16" (70 x 60 x 3 cm) plywood
base. Ideally the base should be
large enough to span several joists
and should be anchored to the joists
and not just the floor boards.
It is best to install the washer in the
corner of a room, where the stability of
the floor is at its greatest.
9
/16"x235/8"x
^
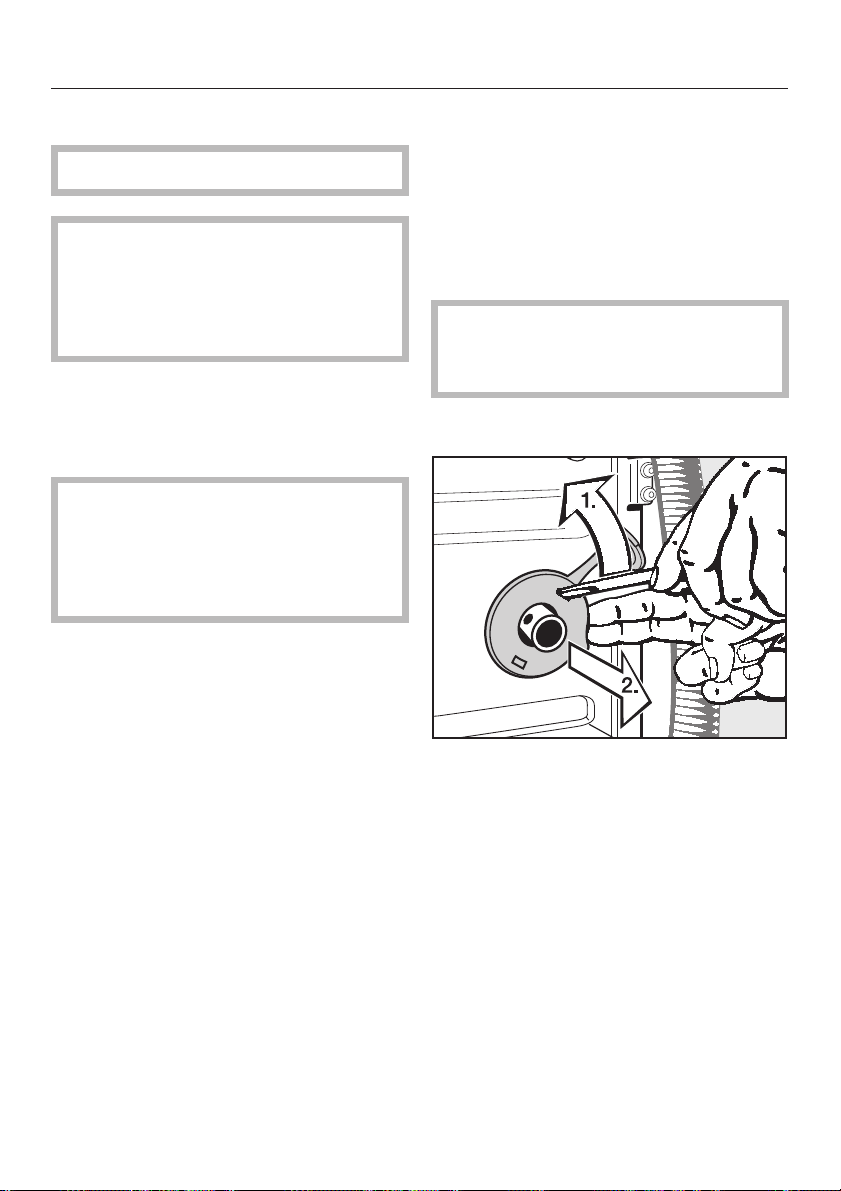
Remove the left and right rotary
protectors.
1. Unhook the rotary protector with a
screw driver.
2. Remove the rotary protectors.
47
Page 48
Installation
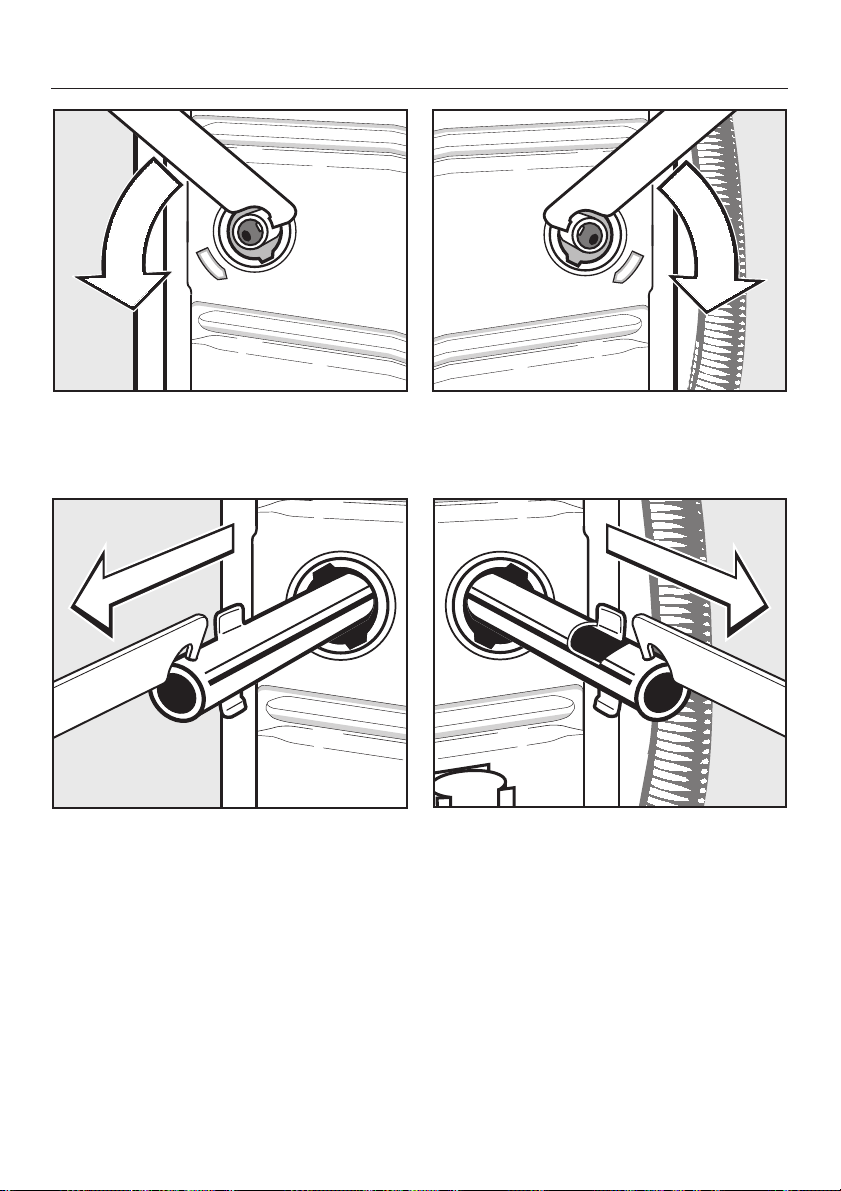
Turn the left shipping strut
^
counterclockwise 90° with the
enclosed combination wrench.
^
Pull the shipping strut out.
Turn the right shipping strut
^
clockwise 90° with the enclosed
combination wrench.
^
Pull out the shipping strut out.
48
Page 49
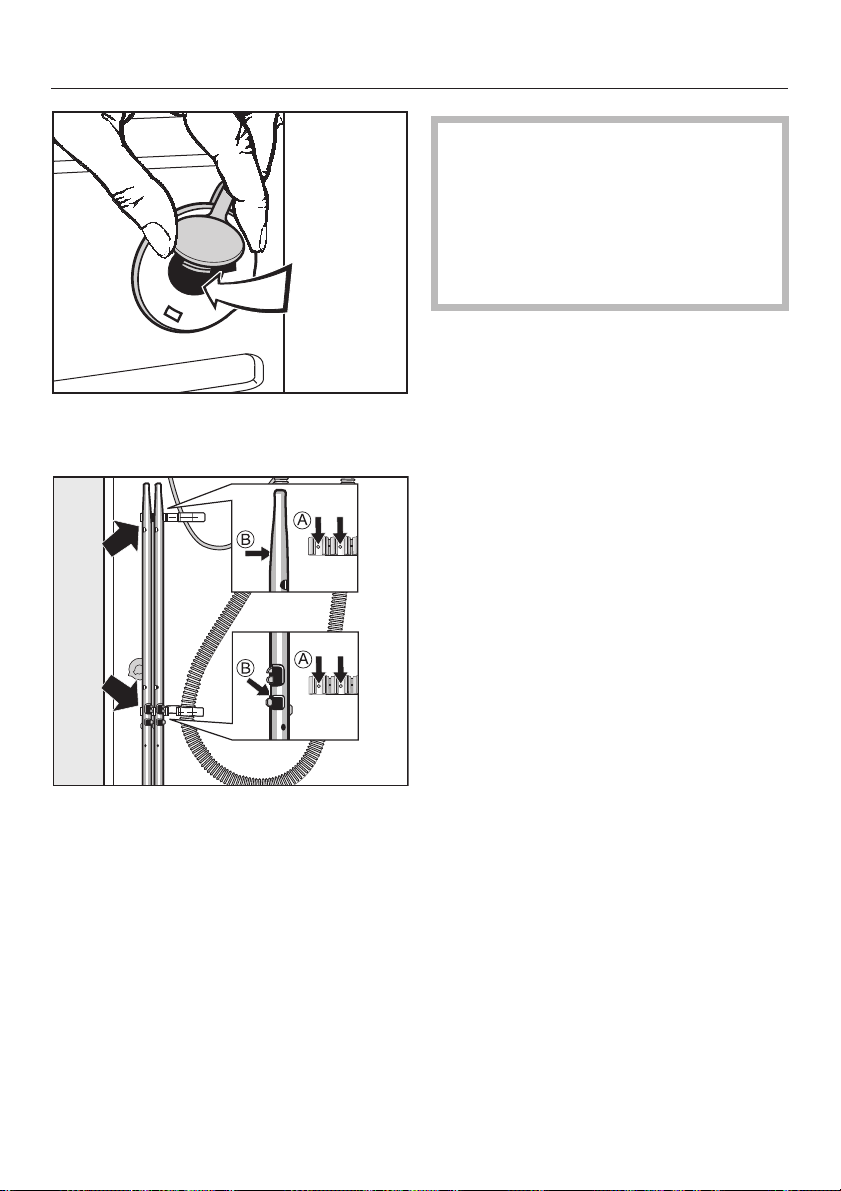
Close the holes with the rotary
^
protectors and their caps.
Installation
Movement of the washer without
,
the shipping struts in place should
be kept to a minimum. The shipping
struts should be stored on the back
of the washer for future use. They
must be reinstalled before moving
the machine.
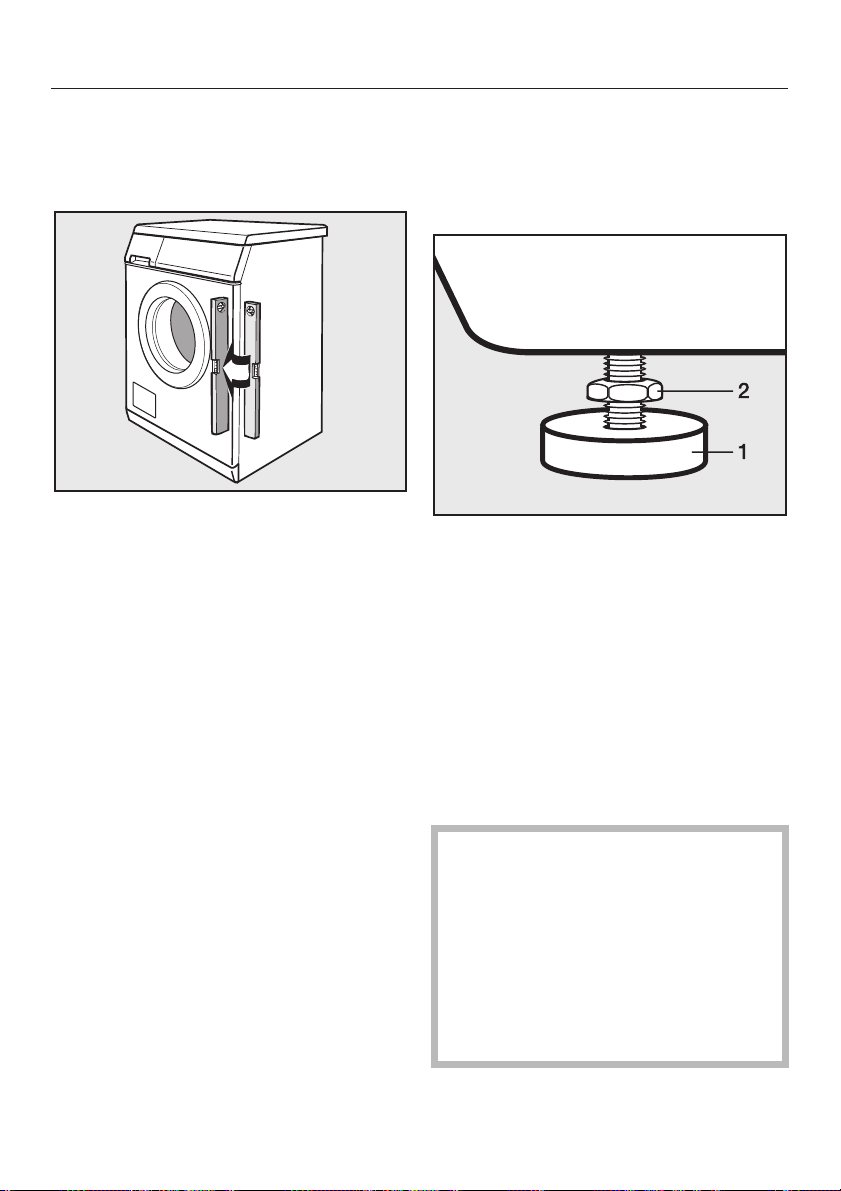
Installing the shipping struts
Reinstall the struts by reversing the
^
installation procedure.
^
Fasten the shipping struts at the rear
side of the washer. Take care to
insert the drill holes, b, into the
clamps, a.
49
Page 50
Installation
Leveling the washer
To ensure smooth operation the washer
must be level.
Failure to level the machine can result
in increased water and energy
consumption as well as the washer
"banging" during the spin cycle or
"walking" across the floor during use.
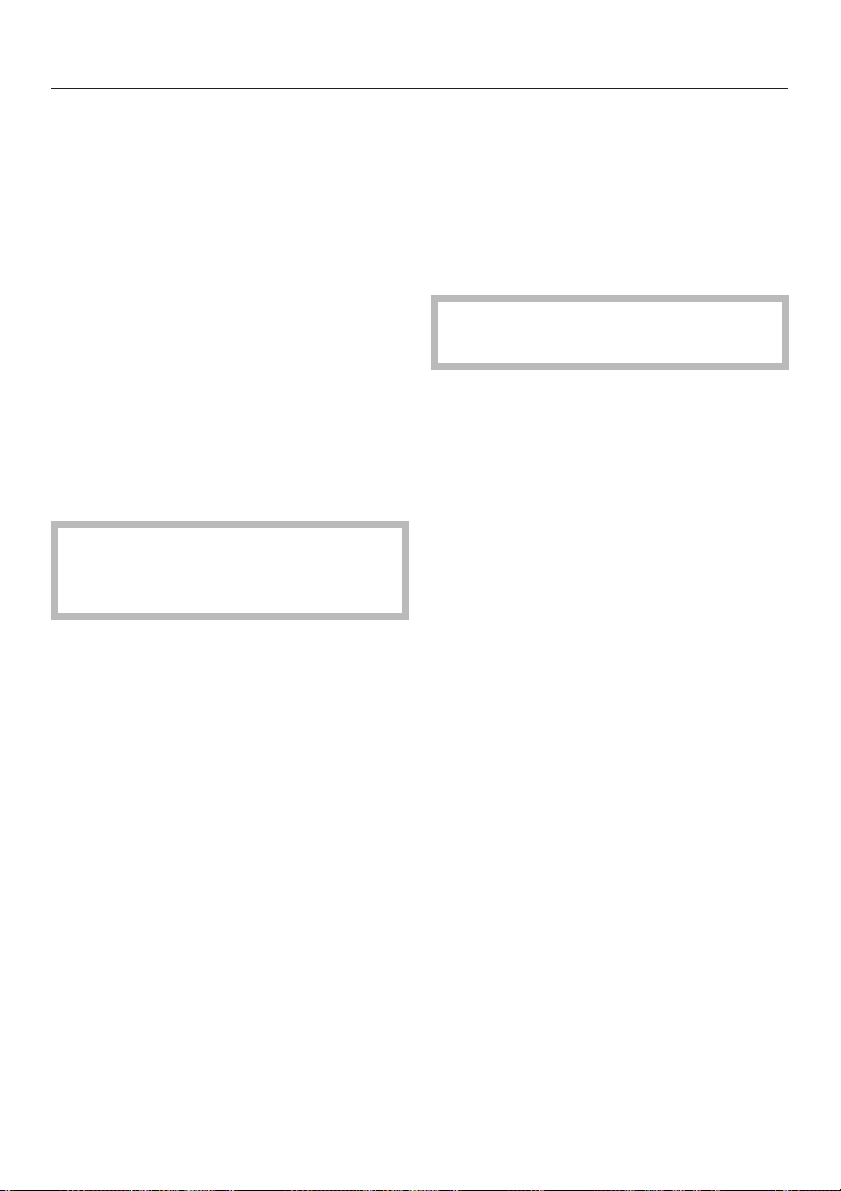
Adjust the four leveling feet
The washer is leveled by adjusting the
four feet. The machine is boxed with the
feet completely screwed in.
^ Turn the locking nut, 2, counter-
clockwise with the enclosed
combination wrench. Unscrew each
of the four feet as much as necessary
by turning both the foot, 1, and the
locking nut, 2, to the left.
^ Check that the machine stands level.
50
^
Once level, hold the foot, 1, steady
with a wrench. Turn the locking nut,
2, with the combination wrench
towards the machine.
,
All four locking nuts must be
tight against the bottom of the
machine. In addition, check to see
that the feet were not inadvertently
unscrewed while tightening the nuts.
Running a machine that is not level
or whose feet are not tight may
cause damage to both the machine
and its surrounding area.
Page 51

Installation
Water connection
Cold water connection
A water faucet with
provided on-site. If none is available the
machine must be connected to a water
line by a qualified plumber.
The water pressure must be between
14.5 -145 psi (1 -10 bar). If the water
pressure is greater than 145 psi
(10 bar), a pressure reducer must be
installed. If the water pressure is below
15 psi (1 bar), there will not be enough
water available for a complete fill.
The cold water hose (blue mark) is
not suitable for a hot water
connection.
^ Connect the cold water intake hose
(blue mark) to the cold water valve.
^ Turn on the valve(s) and check for
leaks.
3
/4" threat must be
Maintenance
Replace the water hoses only with
genuine Miele hoses.
Extension hoses
Extension hoses (8’ 2" or 13’ [2.5 m or
4 m]) may be obtained from Miele.
The water intake hoses are
equipped with screen filters. Do not
remove these filters except for
cleaning.
51
Page 52
Installation
Hot water connection
Connecting the machine to a hot water
supply will lead to low electrical
consumption during hot water
operation. The hot water temperature at
the water faucet must not exceed 158°F
(70°C).
The water in single water lines from the
hot water source cools faster when not
in constant use. To heat the wash water
more electricity must be used. The
same conditions for the hot water as for
the cold water connection will then
apply.
^ Connect the hot water intake hose
(red mark) to the water faucet.
The connection of the machine to a
hot water line only, is not possible
for functional reasons.
If the washer is not to be installed for
hot water connection, the settings "Main
wash", "Pre-wash" and "Rinse" must be
adjusted respectively. The hot water
intake hose must be removed.
Select in "Settings - Supervisor level"
^
the respective extras "cold".
The program times may be
extended.
Unscrew the hot water intake hose
^
(red mark).
Screw on the supplied stopper.
^
52
Page 53

Installation
Drainage
There are two drainage extras for this
machine:
Drain valve
The machine is drained with a
motorized drain valve. A connection
can be made to an on-site floor drain
(gully with an air gap) on an angle.
Drain pump
The wash water is drained using a
pump witha3ft(1m)delivery height.
Make sure there are no kinks in the
drain hose. The elbow on the end of the
drain hose can be turned or removed if
necessary.
Possible connections:
1. Directly into a sink: Hook the hose
over the edge of the sink and secure
it firmly (e.g. by tying the hose to the
water faucet).
If necessary the drain hose can be
extended up to 16’ 5" (5 m). The hose
extension can be purchased from your
Miele dealer or Miele.
2. To a stand pipe: Place the drain
hose into a 1
and secure it firmly.
3. To a floor drain: The machine is
equipped with an air gap/
anti-siphoning system so that no
minimum drain height is required.
1
/2" (4 cm) stand pipe
53
Page 54

Installation
Electrical connection
Ensure that the connection data
,
on the data plate (fusing, voltage
and frequency) match the main
electrical supply. If in doubt contact
an electrician.
This installation should be
,
performed by an experienced and
qualified technician, in accordance
with local codes and regulations.
Do not install devices that
,
automatically turn the washer off
(e.g. a clock timer), as the appliance
must be connected to the power
supply network so that the drum
door can be opened.
The washer comes with a power cord
and NEMA L6-30 plug.
The machine is supplied as standard
for connection to a 208/240 V, 60 Hz,
30 A, 2-phase electrical supply.
For extra safety it is advisable to install
a residual current device (RCD) with a
trip current of 30 mA.
The machine must only be connected
to the voltage and frequency shown on
the data plate.
54
Page 55

Technical Data
Height 33 7/16" (85 cm)
Width 23 7/16" (59.5 cm)
Depth 28 3/8" (72 cm)
Depth with the door open 44 1/8" (112 cm)
Weight 240 lbs (109 kg)
Maximum floor load 2778 Newton (approx. 278 kg)
Capacity 14.3 lbs (6.5 kg) dry laundry
Fuse rating see data plate
Rated load see data plate
Fuse rating see data plate
Noise level during spinning
(Noise emission 3. GSGV)
Minimum water flow pressure 14.5 psi (1 bar)
Maximum water pressure 145 psi (10 bar)
Length of intake hose 63" (1.6 m)
Length of power cord 63" (1.6 m)
Drain height maximum (Drain pump) 39 3/8" (1 m)
LED lighting for drum Class 1
< 70 dB(A)
55
Page 56

Help to protect the environment
Disposal of the packing
materials
The cardboard box and packing
materials protect the appliance during
shipping.
To prevent suffocation of children
ensure that any plastic wrapping, bags,
etc. are disposed of safely and kept out
of the reach of children.
Please recycle.
Disposal of an old appliance
Old appliances may contain materials
that can be recycled. Please contact
your local recycling authority about the
possibility of recycling these materials.
Ensure that the appliance presents no
danger to children while being stored
for disposal. Before discarding an old
appliance, unplug it from the outlet, cut
off its power cord and remove any
doors to prevent hazards.
56
Page 57

Menu Settings J
to adjust standard settings
The washer controls can be adjusted to changing demands through the settings
menu.
Depending on default settings
– some settings are visible and can be changed by all users (Menu "Settings J")
or
– all setting are locked in the "Supervisor level" by a code
(Menu "Settings - Supervisor level").
Contact Miele Technical Service.
57
Page 58

Settings J
Opening the menu Settings
1 Cottons Uni. 140°F Program selection...
2 Minimum iron 104°F
3 Delicates 104°F
4 Woollens H 86°F 12:00
Select the "Settings" J in the main menu and confirm by
^
pressing the Multi-function selector.
Selecting Settings
Settings BackA
^ Select the settings to be changed and confirm.
If no selection was made in the sub-menu, the display will
switch back to the "Settings" menu after 20 seconds.
Leaving the Settings menu
^ Press "Back" and confirm. The display shows the main
menu.
Settings F...
Language F
Water plus
Suds cooling H
58
Page 59
Settings J
Language J
The display contents can be shown
in different languages.
The displayed language can be set in
the sub-menu "Language" J.
Select the desired language and
^
confirm with "OK".
The flag behind the word "Language" is
a guide to find the settings menu in
case a foreign language is shown.
If the language setting was changed, it
is only valid for the current wash
program. Once the program ends, the
display will show the language which is
set under "Settings - Supervisor level".
Suds cooling
Cold water is added at the end of
the main wash to cool the wash
water.
Suds cooling is carried out when a
wash temperature of 158°F (70°C) or
more is selected.
Time of day
The selection allows the clock to be
shown as 24 hours, 12 hours or not
at all. The time of day is also set
here.
If the clock is not selected the timer can
only be shown only as a 24 hour clock
timer. The display will how the timer
counting down until the start of the
program but not he current time of day.
Selecting the clock
^ Select the clock display and confirm.
The display changes to the time of day
setting.
Set the time of day
^ Select the current hour with the
Multi-function selector and confirm.
Repeat with setting the minutes and
confirm. Press again to save the time
of day.
Suds cooling should be activated when
the drain hose is hung into a sink, to
prevent scalding.
Suds cooling is factory set turned on.
59
Page 60

Settings J
Contrast / Brightness
The contrast / brightness of the
display can be set at ten different
levels.
The contrast / brightness changes im
mediately when a different level is
selected.
Confirm the setting with the
^
Multi-function selector.
-
Standby
The display goes out after
10 minutes and the "Start" button
flashes slowly to save energy.
By turning the Multi-function selector or
pressing any button the display is
turned on again.
On
The display will go into Standby mode:
–
if no program was selected after the
machine was turned on.
Memory
The Memory function remembers the
addition of an extra feature to a
program, a change in spin speed or
the temperature the next time that
program is selected.
Once the wash program is selected
again the washer shows the saved
extras.
The memory function is not active when
favorites are selected with the direct
select buttons.
The Memory function is factory set "off".
Temperature unit
The temperature can be shown in
"°C/Celsius" (factory default) or "°F/
Fahrenheit".
^ The delivery status is "°C".
–
after a program has started.
–
at the end of a program.
Not in current prog. (default)
The Standby function will be turned on
if no program was selected after the
machine was turned on.
Off
The display stays turned on.
60
Page 61

Selecting Settings
Entering the code
Settings - Supervisor level
The menu Settings - Supervisor level must be activated
by the Technical Service.
The menu "Settings" (except Languages J) is locked with
a code to prevent unwanted access.
Settings BackA
Language F
Supervisor level
Select "Supervisor level" and confirm.
^
Settings BackA
Supervisor level
^ Select "Access via code" and confirm.
Access via code
^ Enter the code "000" (factory default).
If a wrong code is entered three times, the code entry will
be locked for 1 hour!
0 __
Enter code
^
Turn the Multi-function selector until the first digit shows.
Confirm the digit. Enter the second and third digit.
61
Page 62

Settings - Supervisor level
Confirming the code
0 0 0
Confirm code
OK
H
Confirm the entered code.
^
Back A
H
W Code accepted
Menu opened
The user is now in the "Supervisor level". The previously
described and all the following settings can be changed.
Change the code to prevent unauthorized access to the
settings.
62
Page 63

Settings - Supervisor level
Language J
The display contents can be shown
in different languages.
The fixed default language can be set
in the sub-menu "Languages J".
Select the desired language and
^
confirm with "OK".
Sort languages
The order of the first 4 languages in
the display can be set, when the
option "Language menu international" or "Language menu International 4" is selected.
Supervisor level
The access code for the supervisor
level can be changed.
^
Enter the old code.
Favorites
The 12 programs of the basic menu
for the operating variation
"WS-KW-Button + Logo" can be
configured (only in conjunction with
the setting "Controller" option
"WS-KS-Buttons + Logo".
The programs can be selected from the
complete machine program range. The
first 3 programs of this list are allocated
to the direct select buttons 1 to 3.
Example for changing a program in the
list:
^ Select the setting "Favorites" and
confirm.
^ Select a program from the list.
^ Change one or more components
(program name, temperature, spin
speed, pre-wash).
^ Press the direct select button F
"Save".
The program is saved in the list.
^
Enter the new code.
Once the new code is confirmed, the
display will show the beginning of the
"Settings" menu.
63
Page 64

Settings - Supervisor level
Logo
The Miele Professional logo or your
own logo can be displayed. (Only in
conjunction with the setting
"Controller option "WS-KW-Buttons +
Logo").
The Miele Professional logo is shown by
default.
Language menu
This option allows you to display an
additional welcome screen which
requests a language selection. The
screen can be shown before the
main menu or after the end of a
wash program.
Three selections are available:
National: no additional welcome
–
screen (default).
International: Welcome screen
–
shows, an additional language has to
be selected. Select from all
languages. Note the setting "Sort
languages".
– International 4 languages: Welcome
screen shows, an additional
language has to be selected. Select
from four languages. Note the setting
"Sort languages".
64
Page 65
Settings - Supervisor level
Intensive Water plus
You can select if the extras
"Intensive" and "Water plus" are
shown in the menu "Extras".
The option is factory set to "off".
Water plus
In the setting "Water plus" you can
select the settings for the Extra
"Water plus".
You can select from three options.
Water plus
The water level increases (more water)
in the wash and rinse cycles of the
programs: "Cottons Hygiene", "Cottons
Uni." and "Minimum iron", "Silk" and
"Table linen".
Additional rinse
An extra rinse cycle is added in the
programs "Cottons Hygiene", "Cottons
Uni." and "Minimum iron".
: (default)
Save
The option "Save" can be shown in
the basic menu. The function "Save"
is needed to save for example the
favorite wash programs on the direct
select buttons.
The machine comes factory set with
this option turned off.
Auto load control
The washer has a load size automatic. The water levels and the program
running times are adjusted to the
load size. If the load size automatic
is turned off the program will run as
if for a full load.
The machine comes factory set with
this option turned on.
Water+ and Add. rinse
The water level is increased in the wash
and rinse cycles and an extra rinse
cycle is added to the programs
"Cottons Hygiene", "Cottons Uni." and
"Minimum iron", "Silk" and "Table linen".
An additional rinse cycle is added in
the programs "Cottons Hygiene",
"Cottons Uni." and "Minimum iron".
65
Page 66
Settings - Supervisor level
Pre-wash water
The water type for the pre-wash can
be selected (except for the program
"Woolens, Silk, Curtains and
Proofing"). The hot water intake will
be only accessible at a wash
temperature of 86°F (30°C) or
higher.
This option is set to "hot" by default.
Main wash water
The water type for the main wash
can be selected (except for the
programs "Woollens", "Silk"
"Curtains" and "Proofing"). The hot
water intake will be only accessible
at a wash temperature of 86°F/30°C
or higher.
This option is set to "hot" by default.
Rinse water
The water type for the rinse in the
programs "Cottons Hygiene",
"Cottons Uni.", "Minimum iron",
"Kitchen linen", "Toweling" and
"Sluice" can be selected. The hot
water intake will be only accessible
at a wash temperature of 50°C or
higher.
This option is set to "hot" by default.
If "Recycled water" is used, the
washer must be refitted accordingly.
Low water pressure
If the water pressure is always below
14.5 psi this setting can be activated
to assure trouble free water intake.
This option is set to "Off" by default.
If the washer is not connected to hot
water, the program running times will
be extended and vary from the
displayed remaining times.
If "Recycled water" is used, the
washer must be refitted accordingly.
66
Page 67
Settings - Supervisor level
Water level Cottons
The program "Cottons Hygiene" and
"Cottons Uni." allows you to increase
the water level for the main wash.
This option is set to "Block Parameter"
by default. (The water level will be
controlled by the default program data.)
Water level Min. iron
The program "Minimum iron" allows
to increase the water level for the
main wash.
This option is set to "Block Parameter"
by default. (The water level will be
controlled by the default program data.)
Pre-wash temp. Cot.
Pre-wash duration Cottons
The programs "Cottons Hygiene"
and "Cottons Uni." allow to extend
the wash time for the pre-wash.
This option is set to "Block Parameter"
by default. (The pre-wash time will be
controlled by the default program data.)
Wash time Cottons
The programs "Cottons Hygiene"
and "Cottons Uni." allow to extend
the wash time for the main wash.
This option is set to "Block Parameter"
by default. (The main wash time will be
controlled by the default program data.)
Wash time Min. iron
The Pre-wash temperature for the
programs "Cottons Hygiene" and
"Cottons Uni." can be selected.
This option is set to "Block Parameter"
by default. (The temperature will be
controlled by the default program data.)
The program "Minimum iron" allows
to extend the wash time for the main
wash.
This option is set to "Block Parameter"
by default. (The main wash time will be
controlled by the default program data.)
67
Page 68
Settings - Supervisor level
No. of programs
Additional programs can be added
to the program selection.
0 Additional programs (default)
4 Additional programs ("Table linen",
"Pillows", "Curtains" and "Kitchen
linen")
2 Additional programs ("Outerwear"
and "Proofing")
6 Additional programs (all of the above
programs).
Quick wash
The program "Quick wash" can be
added to the program list.
This program is added by default.
Hygiene
Disinfection
Special disinfection programs can
be added.
0 Additional programs (default)
4 Additional programs
(Thermal disinfection
15 min/185°F (85°C),
Chemo thermal disinfection 10 min/
158°F (70°C),
Chemothermal disinfection 20 min/
140°F (60°C)
Chemothermal disinfection 30 min/
104°F (40°C)).
Pre-wash
In the programs "Cottons Hygiene",
"Cottons Uni." and "Minimum iron" a
pre-wash can be permanently
added to the cycle or it can be
selected in the menu "Extras".
If the last used program had a
temperature of 131°F (55°C) or less,
the display shows the request to
start the "Hygiene" program.
This option turned off by default.
Sluice
The "Sluice" programs will be added
to the program list when this option
is selected.
These programs are not added by
default.
68
This option is set to "Menu selection" by
default.
Page 69
Settings - Supervisor level
2nd pre-wash Kitchen linen
The program "Kitchen linen" allows
an additional pre-wash.
Add the detergent for the additional
^
pre-wash directly in the drum.
This option is set to "off" by default.
No. rinses Cottons
The programs "Cottons Hygiene"
and "Cottons Uni." allow to change
the number of rinse cycles.
2 rinses (default)
3 rinses
4 rinses
5 rinses
No. rinses Min. iron
Pre-rinse Cottons
The programs "Cottons Hygiene"
and "Cottons Uni." allow to add a
pre-rinse.
This option is set to "off" by default.
Pre-rinse Min. iron
The program "Minimum iron" allows
to add a pre-rinse.
This option is set to "off" by default.
Anti-crease
An anti-crease program can be
added at the end of a program.
This option is set to "on" by default.
The program "Minimum iron" allows
to change the number of rinses.
2 rinses (default)
3 rinses
4 rinses
69
Page 70
Settings - Supervisor level
Spin free of charge
When operated by a coin
mechanism, the program "Spin" can
be activated free of charge.
This option is set to "off" by default.
Lock
If a coin mechanism is connected
the washer can be locked immedi
ately or 3 minutes after starting a
program.
You can select from four options:
immediately
The washer is locked immediately.
after 3 minutes
The washer will be locked 3 minutes
after the program start (default setting).
immediately, with cancel option
The washer is locked immediately. If
the Start button is pressed for 4
seconds the display shows "Cancel".
Canceling is possible up to 3 minutes
after starting a program.
-
External dispenser
The washer is set up for connection
to an external dispensing system. To
use the external dispensing system
the setting must be adjusted/set
accordingly.
This option is set to "off" by default.
No detergent
If an external dispensing system is
fitted to the machine it will not be
accessed if "No detergent" is
selected. You have the option to
show the extra "No detergent" in the
menu "Extras".
This option is set to "off" by default.
Temp. reduction
To avoid premature boiling of the
wash water at altitudes over 9842 ft
(3000 m) in the sanitize program, the
wash water temperature can be
lowered by 41°F (5°C).
after 3 minutes, with cancel option
The washer is locked after 3 minutes. If
the Start button is pressed for 4
seconds the display shows "Cancel".
Canceling is possible up to 3 minutes
after starting a program.
70
This option is set to "off" by default..
Page 71

Settings - Supervisor level
Controls
The "Operating variant" of the machine
can be adjusted.
Caution: When selecting
"WS-KW-Buttons simple" or
"WS-KW-Buttons + Logo" the
"Settings" component will not be
offered any longer once the menu
"Settings/Supervisor level" is closed.
The "Supervisor level" cannot be
accessed any longer. Contact
Technical Service if you would like to
change more settings.
D-with speed dial buttons (default
setting).
CH-with speed dial buttons (adjusted
program allocation).
GB-without speed dial buttons (limited
program selection, operation available
only by Multi-function selector).
D-without speed dial buttons (limited
program selection, operation available
only by Multi-function selector).
WS-with KW buttons simple
Only 4 pre-selected (favorite) programs
are offered, which cannot be changed
by the user.
^
Set the 4 favorite programs first,
before activating this variant. See
"Favorites".
GB-with speed dial button (adjusted
program allocation).
GB-with KW-buttons Sluice (adjusted
program allocation).
WS-KW-Buttons + Logo
(special operating variant for
Laundromat owners).
The wash programs for the basic
program menu in the option "WS with
KW-Buttons + Logo" are configured in
the setting "Favorites". You can add
your own logo. See "Logo".
Delay Start
The end of the program can be
selected with the timer. See "Timer"
for more info. The timer can be set
"active" or "inactive" (no function).
"Inactive" (default setting) shows only
the program duration, the estimated
time of day at the program end and the
current time of day when the "Timer"
button is pressed.
Leaving the Settings menu
^
Press "Back" and confirm. The
display shows the main menu.
71
Page 72
Alteration rights reserved / 3816
M.-Nr. 10 457 380 / 00
 Loading...