

Page 1
Operating instructions
Dryers
PT 8301 SL
PT 8303 SL
To avoid the risk of accidents or damage to the machine it is
essential to read these instructions before installing,
commissioning and using it for the first time.
en - CA, US
M.-Nr. 07 985 561
Page 2

2
Page 3

Contents
Warning and Safety instructions...............................................................4
Caring for the environment ...................................................................6
Guide to the machine ........................................................................7
Description of tumble dryer PT 8303 ...........................................................8
Drying.....................................................................................9
Sort the laundry..............................................................................9
Before using for the first time ..................................................................10
Switching the dryer on and loading the drum .....................................................10
Selecting a programme ......................................................................10
Lowering the temperature.....................................................................11
At the end of the programme ..................................................................11
After drying ................................................................................11
Interrupting a programme.....................................................................11
Adding or removing items ..................................................................11
Reprogramming ...........................................................................12
Reprogramming individual drying programmes
(Changing the Standard options) ..............................................................12
Example of reprogramming PT 8303 Profitronic B Plus Residual moisture programme machines ..........12
Programmable functions......................................................................13
Problem solving guide ......................................................................14
Error messages.............................................................................14
Other messages .........................................................................14
Cleaning and care ..........................................................................15
Fluff filter ..................................................................................15
Installation and connection ..................................................................16
Levelling the appliance.......................................................................17
To fit the language insert (programme selection)...................................................17
Communication module XKM RS232 ............................................................17
Electrical connection ........................................................................18
Air inlet and exhaust connection ...............................................................18
Technical data .............................................................................19
3
Page 4
Warning and Safety instructions
Explanation of the Warning and Safety
symbols on the machine
It is essential to read these operating
instructions.
Please refer to specific instructions, e.g.
Installation instructions
Caution, hot surfaces.
Caution, voltage up to 1000 volts.
Earthing
items which have been splashed with hair lacquer,
–
hair spray, nail varnish remover or similar
substances.
items which have been soiled with oils or residues
–
containing grease (kitchen oils, cosmetics etc.).
items soiled with wax or other chemicals (e.g.
–
mops and floor cloths).
items with damaged padding or fillings (e.g.
–
pillows, jackets).
items soiled with grease or oil which have not been
–
properly cleaned beforehand. Use heavy-duty
detergents where necessary to clean heavily soiled
garments, e.g. workwear. If necessary consult the
detergent manufacturer for advice.
With sensitive fabrics there may be a danger of them
self igniting if dried for too long. They should be
removed as soon as the program has finished or if
there is a power cut.
Keep a fire extinguisher near the machine at all times.
Do not unload laundry from the drum until the
~
cooling down phase has been completed.
Hot laundry can self ignite and cause a fire when
folded or put away.
To avoid the risk of accidents and damage to the
machine read the operating instructions carefully
before using it for the first time. They contain
important information about the installation, safety,
use and maintenance of the machine. Keep them
in a safe place and ensure that new users are
familiar with the content. Pass them on to any
future owner of the machine.
This tumble dryer is only intended for industrial or
institutional use and should not be used by anyone
who is not specially trained to operate it. This also
applies to industrial applications performed in
residential environments.
All personnel working with this machine must be
fully trained in all aspects of its use and safety.
Correct application
This dryer must only be used for drying articles
~
which were washed in water and which have a care
label stating that the article is suitable for machine
drying.
To prevent the risk of fire, the following must
~
not be dried in this tumble dryer (with the exception
of those fabrics which can be dried in the Special
Programs specifically designed for them):
–
fabrics which contain a large proportion of rubber,
foam rubber or rubber-like materials.
–
items which have been treated with inflammable
cleaning agents.
Check that all pockets of workwear etc are empty
~
to avoid the danger of inflammable objects, e.g.
cigarette lighters, matches, candles or cosmetics
being placed in the dryer.
If the dryer is installed in a public area the owner
~
must ensure that it can be operated safely.
This dryer must not be used outside.
~
Technical and electrical safety
This machine must only be installed and
~
commissioned by a Miele technician.
The electrical safety of this machine can only be
~
guaranteed if connected to a correctly installed
earthing system on site. It is most important that this
basic safety requirement is present and tested
regularly, and where there is any doubt, the on-site
electrical wiring should be inspected by a qualified
electrician. The manufacturer cannot be held liable
for the consequences of an inadequate earthing
system (e.g. electric shock).
The machine is only completely isolated from the
~
electricity supply either when it is switched off at the
isolator switch or the mains fuse has been withdrawn.
Repairs to electrical heated appliances should
~
only be carried out by a suitably qualified and
competent person in accordance with local and
national safety regulations. Repairs and other work by
unqualified persons could be dangerous. The
manufacturer cannot be held liable for unauthorised
work.
Faulty components must only be replaced by
~
genuine Miele original spare parts. Only when these
parts are fitted can the safety standards of the
machine be guaranteed.
4
Page 5

Warning and Safety instructions
This machine must not be operated in the same
~
room as dry cleaning machines which use solvents
containing chlorofluorocarbons (CFCs). Escaping
vapours break down during combustion into
hydrochloric acid which can have a detrimental effect
on both the laundry and the machine. Even when
such machines are installed in separate rooms, care
should be taken to ensure that no exchange of air
can take place.
The dryer must have a constant supply of fresh air.
~
Vapours containing chlorine, fluorine or other solvents
must not be able to reach the dryer.
The ventilation inlet to the dryer is located at the
~
back of the machine. It must not be blocked or
hindered in any way. Do not cover the machine lid
with cloths or similar items.
Benzine, petrol, paraffin or any easily flammable
~
substance must not be stored or used near the
tumble dryer. Fire and explosion risk.
To ensure the correct performance of the machine
~
and to prevent the risk of faults and fire, it is important
to check the machine and carry out maintenance on
a regular basis.
Whilst the dryer is in use the porthole glass and
~
drum door frame can become very hot. Laundry will
also be very hot if you remove it early.
To prevent the risk of injury or scalding
~
components carrying steam must not be touched.
Always make sure that the drum is stationary
~
before reaching into the machine to remove laundry.
Reaching into a moving drum is extremely
dangerous.
Take care near the drum door hinges and the fluff
~
filter compartment flap. Danger of injury. Ensure that
you always use the handles.
The drum door must be able to be opened to its
~
fullest extent. This area must not be restricted by
doors or structural features.
Do not use the machine without the built-in fluff
~
filter in place. Fire risk.
A damaged fluff filter must be replaced before the
machine is used again.
Otherwise fluff and lint will cause a blockage in the
airways, the heating and the vent ducting, and the
correct functioning of the machine cannot be
assured.
Use
Compliant use of the dryer has been investigated
~
with respect to industrial use only (UL1240).
This tumble dryer must only be used when it is
~
connected to a suitable ducting system. The
installation site must be adequately ventilated.
This tumble dryer is not intended for use by
~
people with reduced physical, sensory or mental
capabilities, or lack of experience or knowledge,
unless they are supervised whilst using it or have
been shown how to use it by a by a person
responsible for their safety.
Keep children away from the tumble dryer at all
~
times. It is not a toy! To avoid the risk of injury do not
allow them to play on or near it or to play with the
controls. Supervise children whilst you are using it.
Always close the drum door and the fluff filter
~
compartment after use to avoid:
–
the risk of children hiding things in the dryer
–
the risk of children and small animals climbing into
the drum and endangering their lives.
Do not use a machine with damaged controls or
~
cables. These must be repaired before it is used
again.
Cleaning and disinfecting agents often contain
~
chlorine-based substances. Do not let such agents
come into contact with the stainless steel surfaces, as
the chlorine can have a corrosive effect and cause
rust. Use chlorine-free agents for washing and
disinfecting and also for cleaning stainless steel
surfaces to protect them from corrosion. If in doubt,
confirm with the manufacturer that their product is
suitable. If any agent containing chlorine comes into
contact with the stainless steel surfaces, wipe it away
immediately with clean water. Then dry with a soft
cloth.
Do not use a pressure washer or hose to clean the
~
machine.
Using accessories
Accessory parts may only be fitted when
~
expressly approved by Miele. Using spare parts or
accessories from other manufacturers will invalidate
the guarantee, and Miele cannot accept liability.
Disposing of your old machine
Before disposing of an old machine, first make the
~
door lock unusable. This way you will prevent
children from accidentally locking themselves in and
endangering their lives.
Do not damage, remove or bypass the safety
~
features, fixtures and control elements of this
machine.
Any removable outer panels must be back in
~
place, and all moving or electrical parts shielded
before the machine is switched on.
Keep these instructions in a safe and
accessible place.
5
Page 6
Caring for the environment
Disposal of the packing material
The transport and protective packing has been
selected from materials which are environmentally
friendly for disposal.
Rather than just throwing these materials away,
please ensure they are recycled.
Ensure that any plastic wrappings, bags, etc
,
are disposed of safely and kept out of the reach of
babies and young children. Danger of suffocation.
Disposing of your old machine
Electrical and electronic machines often contain
materials which, if handled or disposed of incorrectly
could be potentially hazardous to human health and
to the environment. They are, however, essential for
the correct functioning of your machine. Please do
not therefore dispose of it with your household waste.
Tips on saving energy
Make sure that your laundry is thoroughly spun
before drying. This saves time and energy.
Rinsing the laundry using hot water in the final rinse
helps to reduce the residual moisture level, and the
residual heat in the laundry will help keep processing
time down, thus saving energy.
Sort textiles according to:
- fabric and weave,
- drying level required,
- residual moisture levels.
For greater economy dry a full load. Underloading is
uneconomical. Overloading will impair the drying
result and the laundry finish.
Ensure that the room is well ventilated.
Please dispose of it at your local community waste
collection / recycling centre. Ensure that it presents
no danger to children while being stored for disposal.
See the "Warning and Safety" section of this booklet
for further details.
6
Page 7
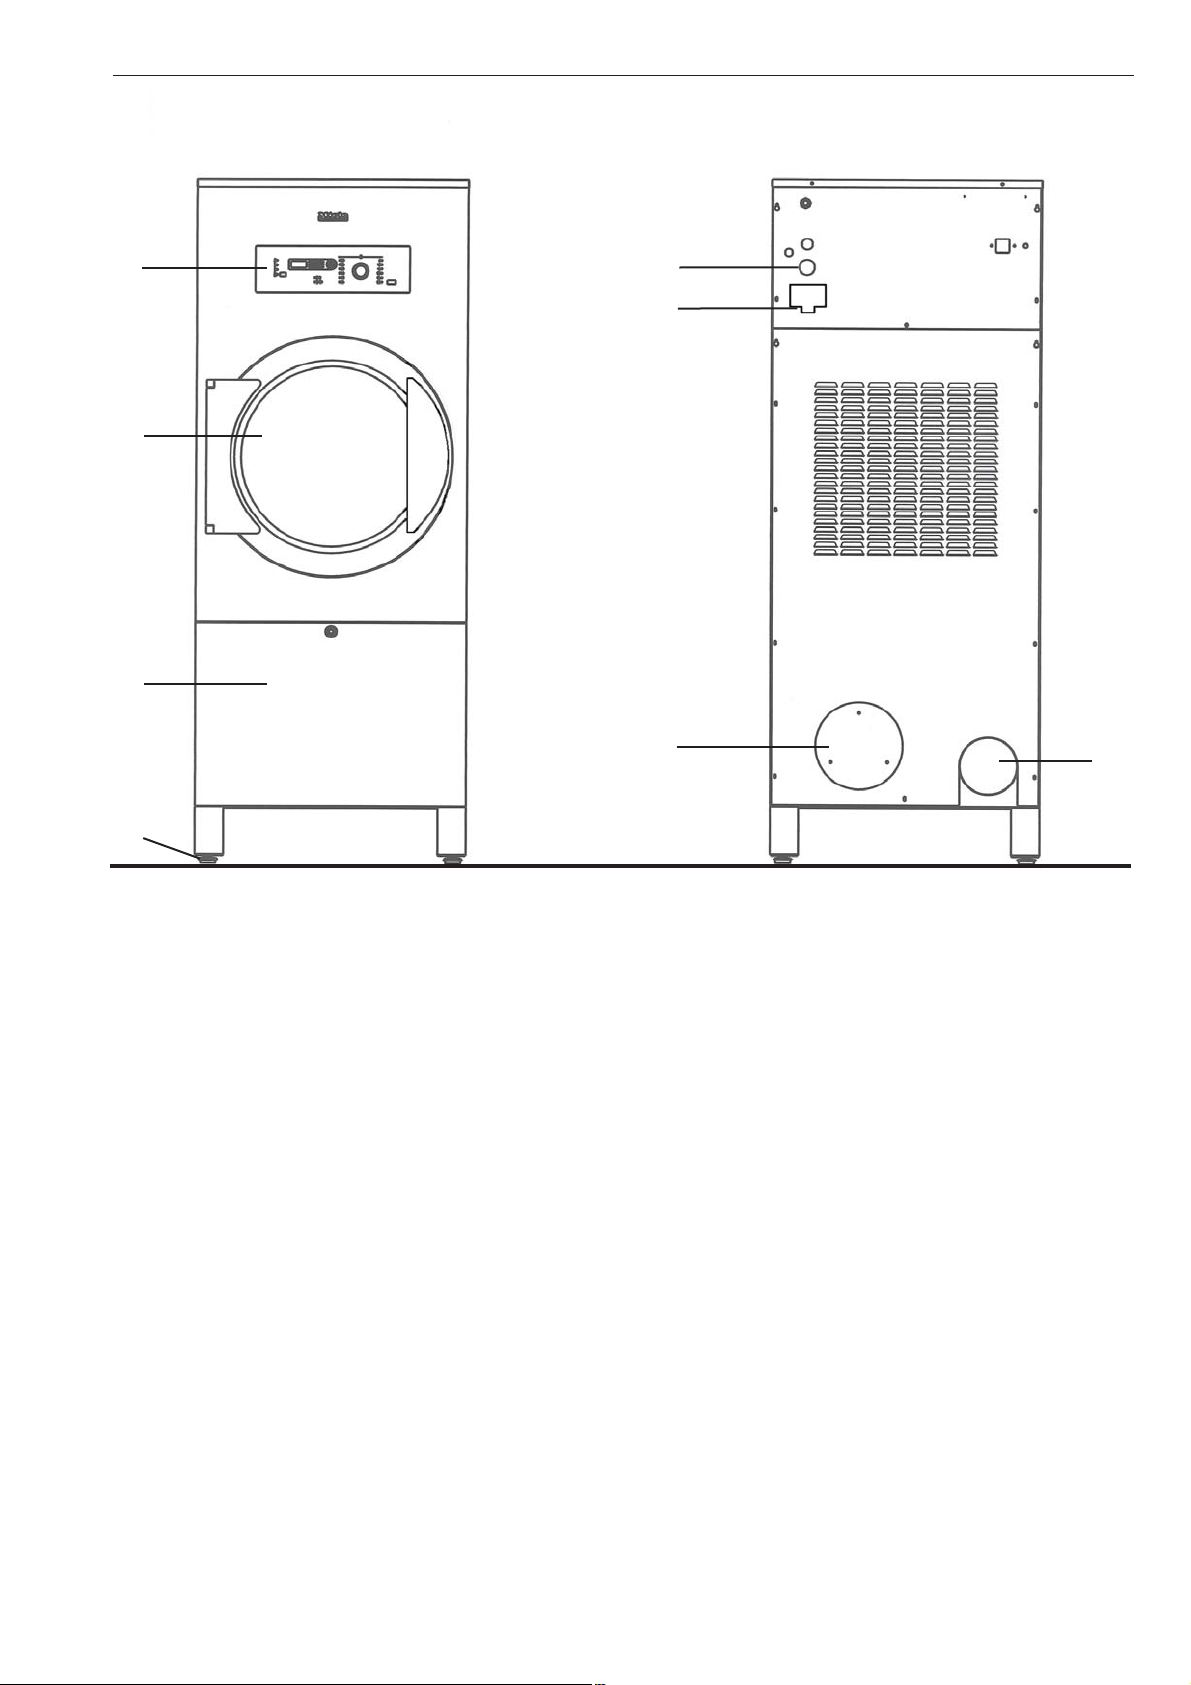
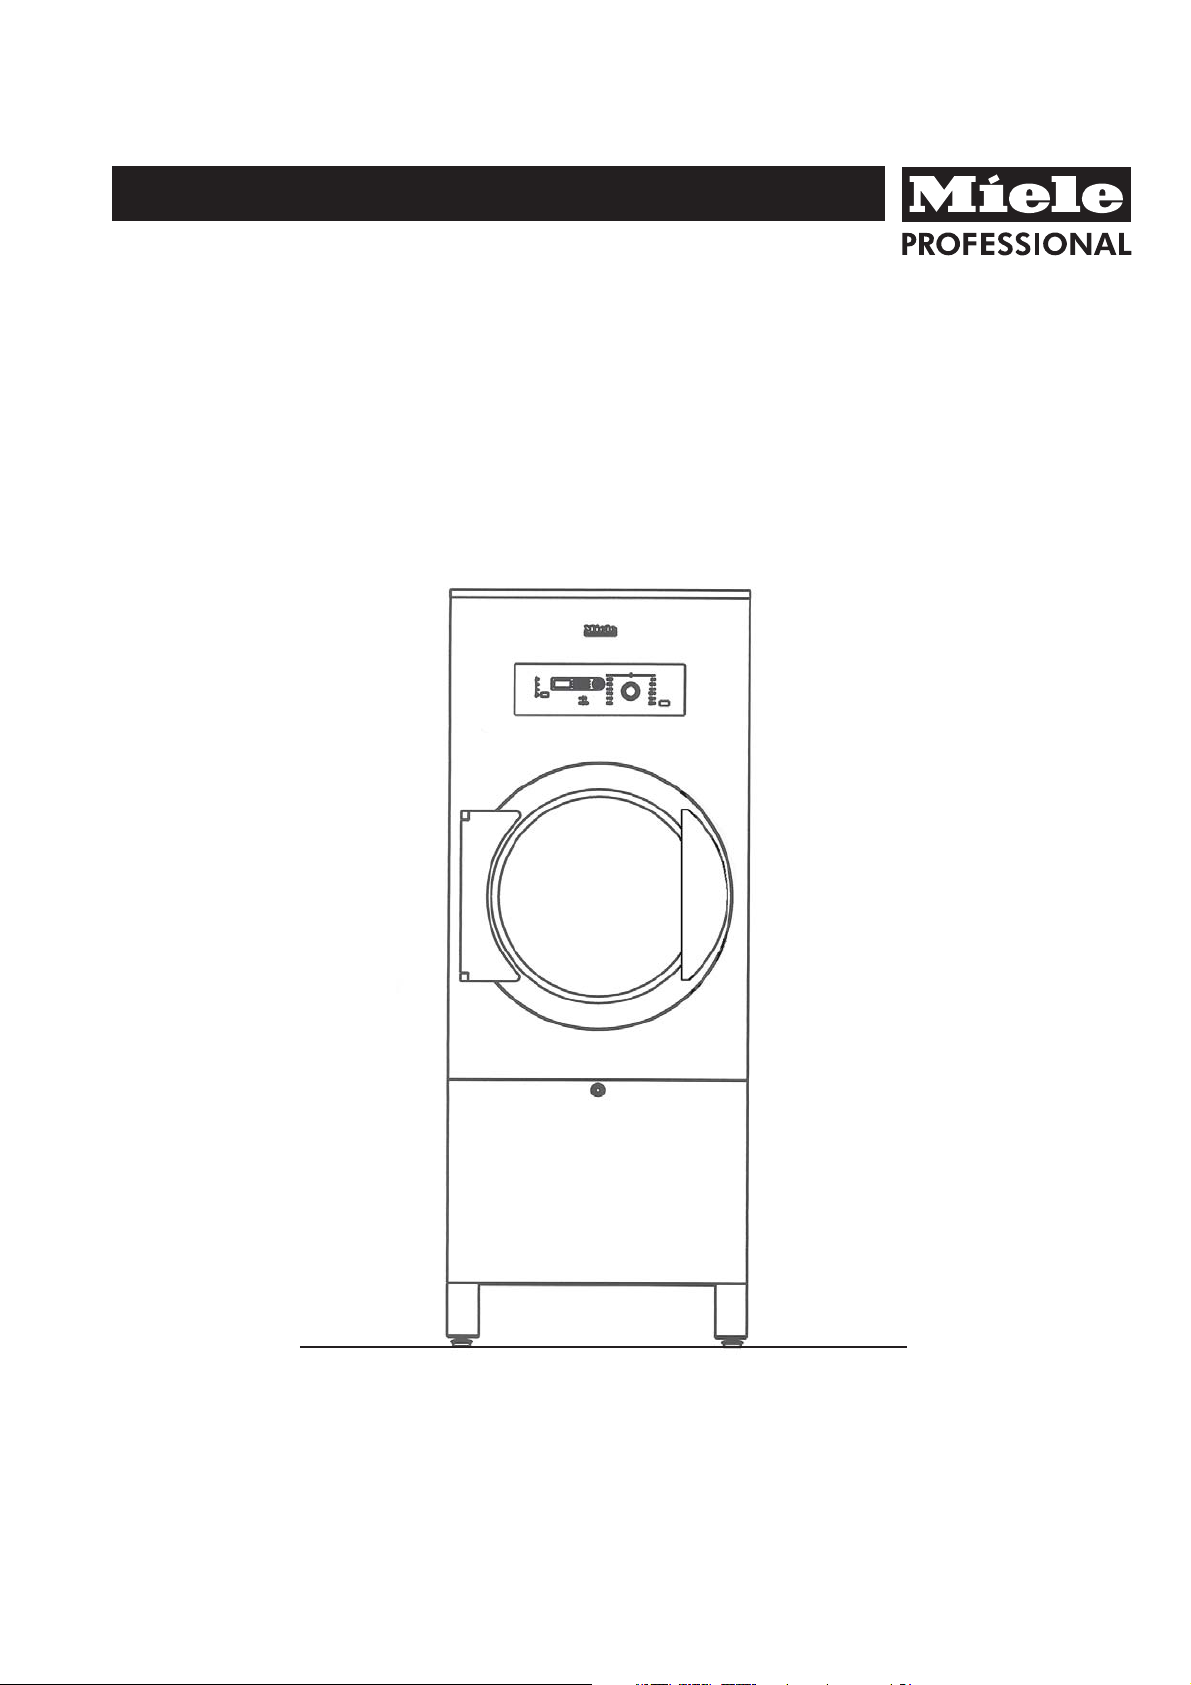
Guide to the machine
a
b
c
d
e
h
f
g
a Control panel
b Drum door
Pull the door handle to open the drum door.
c Access to fluff filter
The fluff filter is opened with a key.
d 4 adjustable screw feet
e Electrical connection
f Air intake
g Exhaust connection
h Communication slot (optional)
7
Page 8
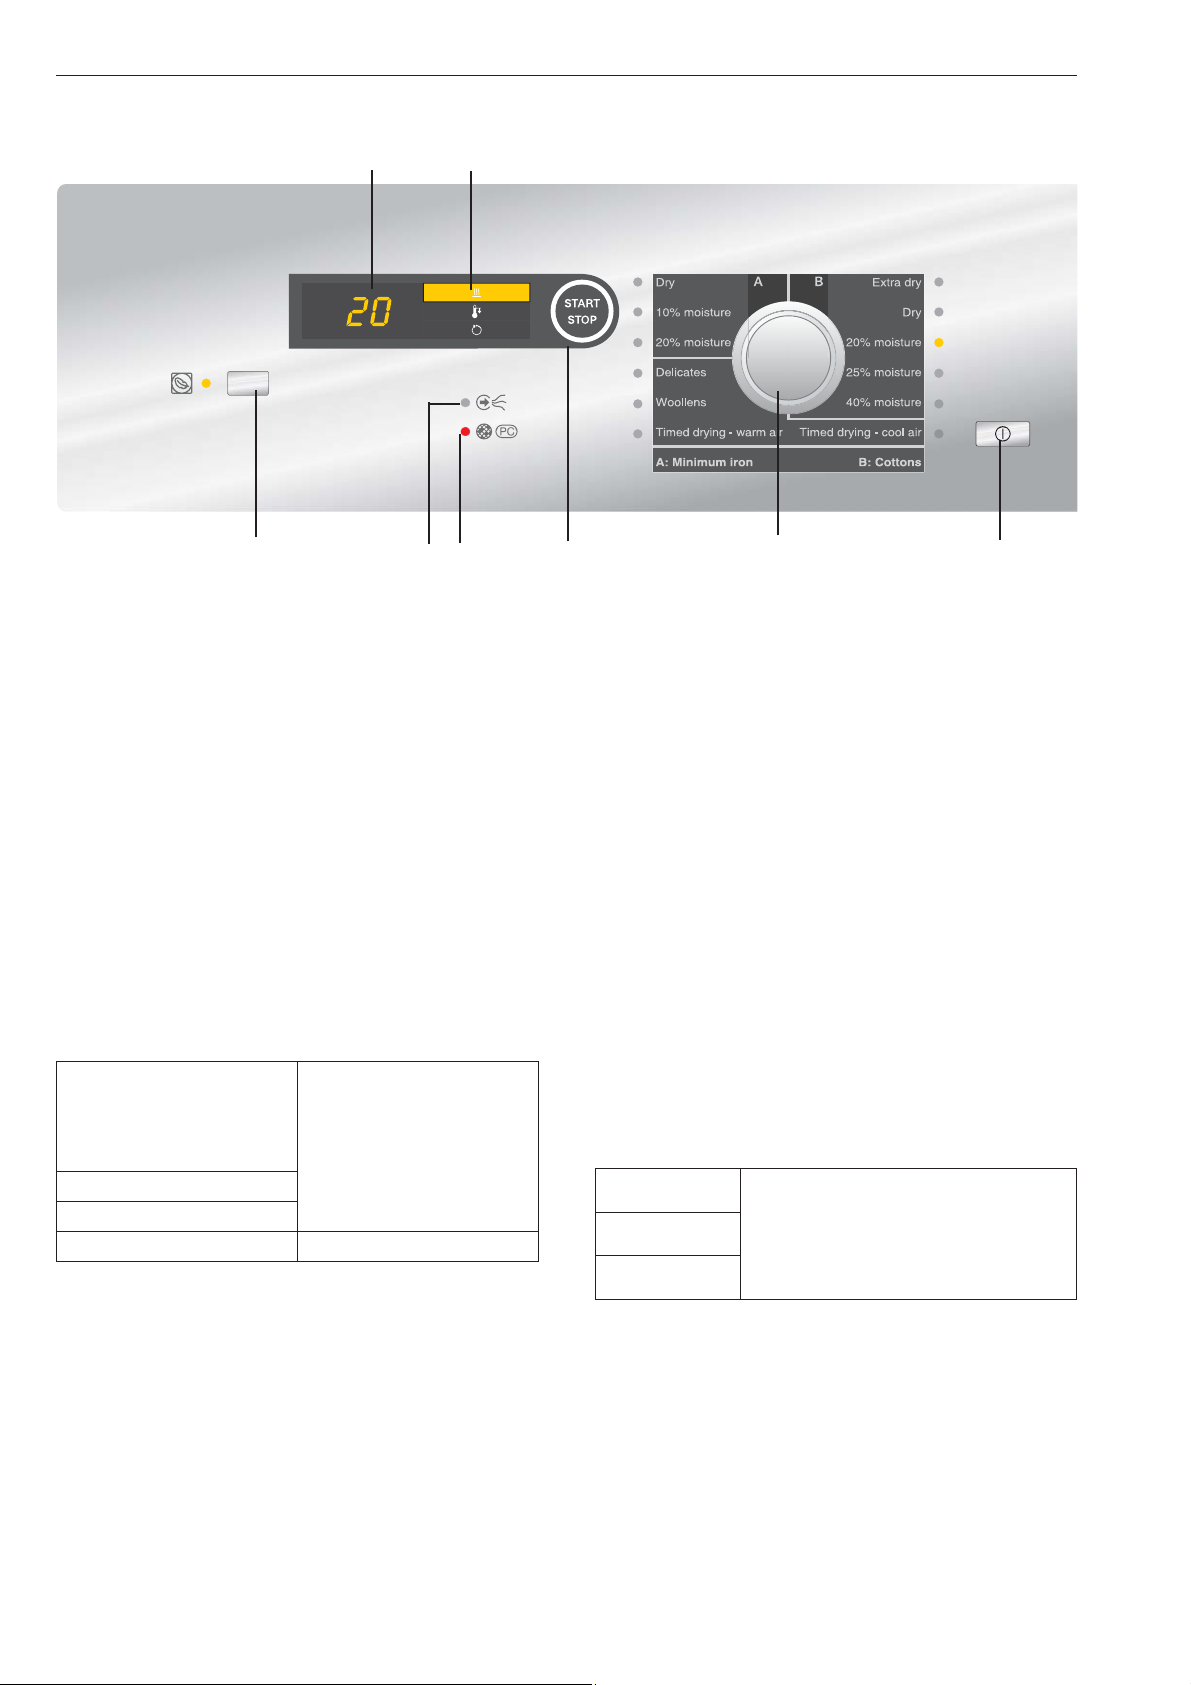
Description of tumble dryer PT 8303
Control panel PT 8303 Profitronic B Plus Residual moisture programmes
12
3456 7 8
1 Segment display - Residual moisture 2 Programme sequence display
3 Low temperature (additional option) button 4 Venting system fault indicator
5 Fluff filter fault indicator 6 START/STOP button
7 Programme selection rotary control 8 On/Off switch
Mains On/Off switch s
Switches the machine on or off.
Low temperature (additional option) button K
Lowers the drying temperature (by approx. 20°C).
Use for delicate fabrics (e.g. synthetics). The LED will
light up.
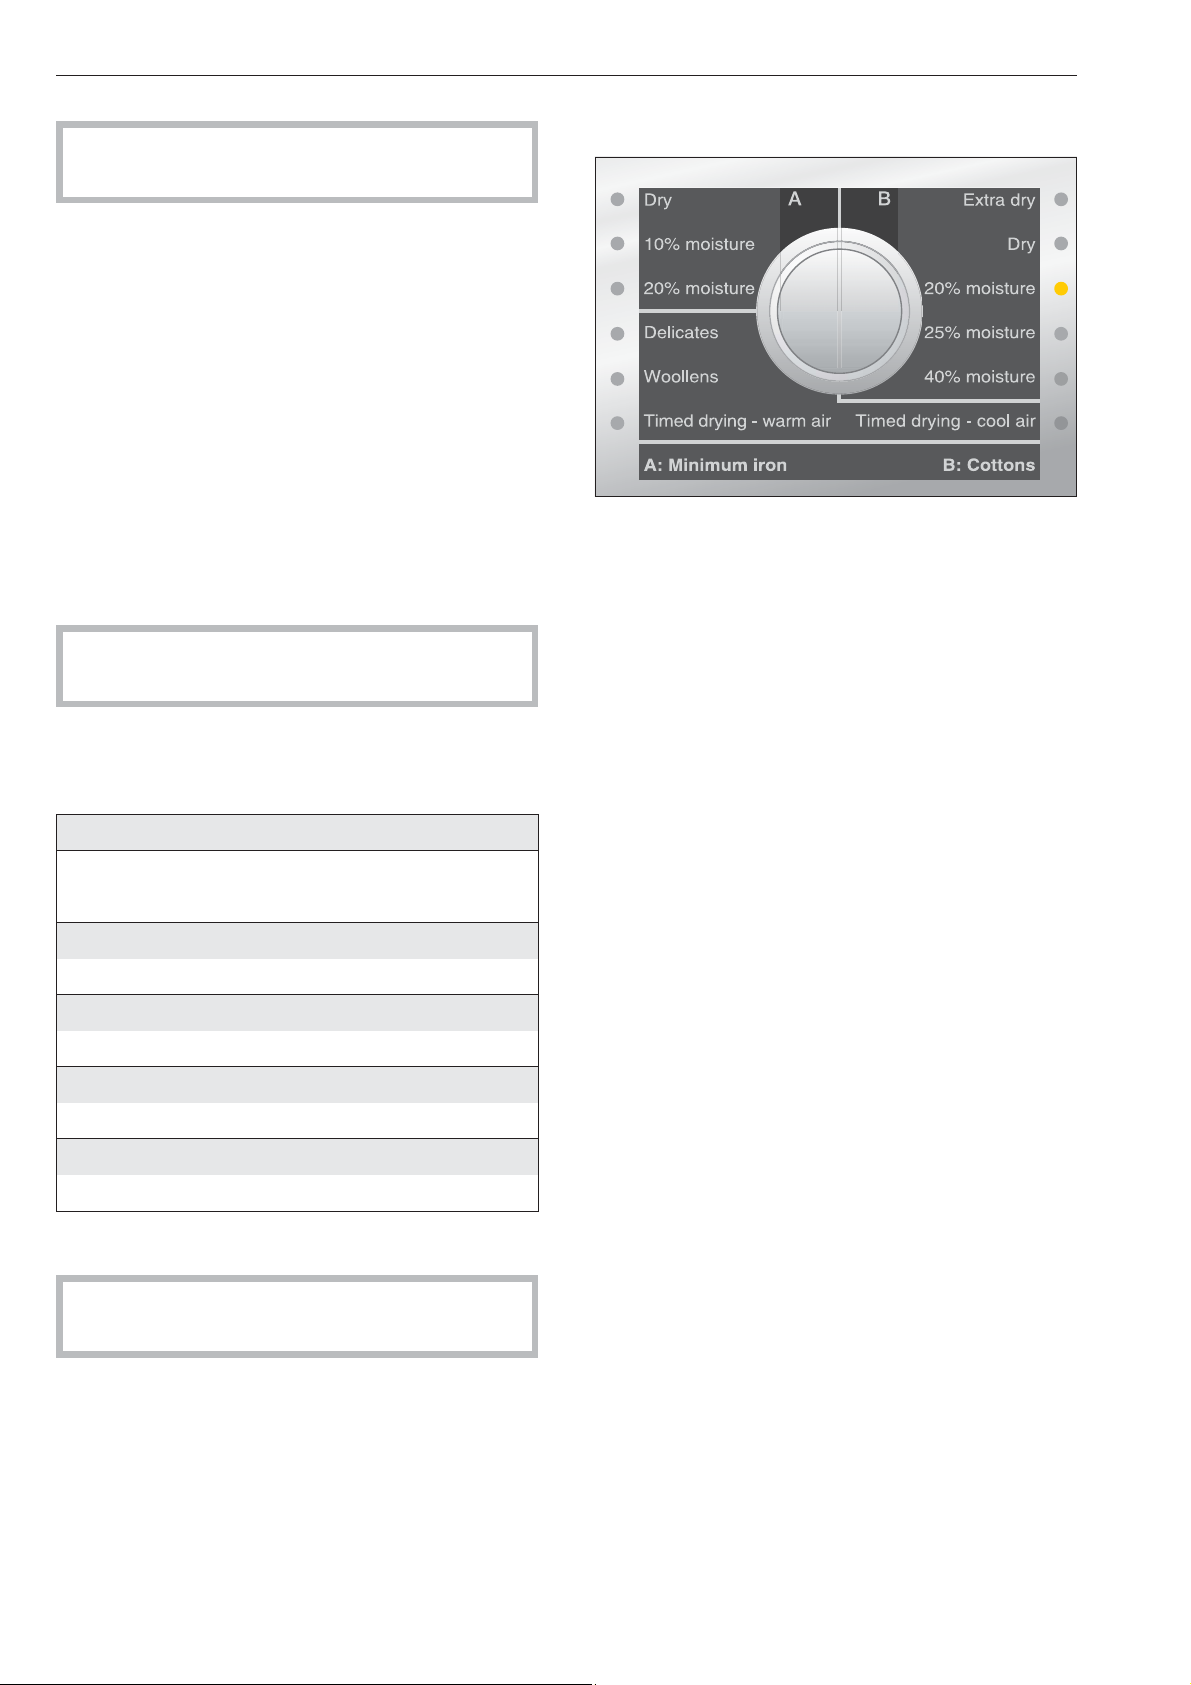
Programme selection rotary control
For selecting the drying programme.
A: Minimum iron
Dry
10% moisture
20% moisture
Delicates 25% moisture
Woollens
Timed drying warm air Timed drying cool air
START/STOP button
Press the Start/Stop button to start or stop the drying
programme.
B: Cottons
Extra dry
Dry
20% moisture
40% moisture
Segment display
Before the start of a programme this shows the
residual moisture which has been allocated to the
programme as a %.
After the start of a programme it shows the residual
moisture which is currently in the laundry until the
programme is finished.
It also shows fault messages, see "Problem solving
guide".
It can also show h for "Peak load cut-out" (optional).
Programme sequence display
The programme sequence is displayed in three
stages. The stage the programme is at will be
highlighted in yellow.
! Drying
L Cooling down
O Programme finished / Anti-crease
Check venting system 0 fault indicator
This will light up if there is a problem with the venting
system.
Clean the fluff filter W fault indicator
This will light up when the fluff filter needs to be
cleaned.
8
Page 9
Drying
Sort the laundry
Not all textiles are suitable for machine drying.
Please read the instructions given on the garment
care label.
The meaning of the care symbols:
q = Dry at normal temperature
r = Dry at low temperature
s = Do not tumble dry
Sort the laundry according to fibre type and weave to
ensure even drying and to prevent the risk of damage
to textiles.
To prevent the risk of fire, the following
,
must not be dried in this tumble dryer (with the
exception of those fabrics which can be dried in
the Special Programmes specifically designed for
them):
- fabrics which contain a large proportion of
rubber, foam rubber or rubber-like materials.
- items which have been treated with inflammable
cleaning agents.
- items which have been splashed with hair
lacquer, hair spray, nail varnish remover or similar
substances.
- items which have been soiled with oils or
residues containing grease (kitchen oils,
cosmetics etc.).
- items soiled with wax or other chemicals (e.g.
mops and floor cloths).
- items with damaged padding or fillings (e.g.
pillows, jackets).
- items soiled with grease or oil which have not
been properly cleaned beforehand. Use
heavy-duty detergents where necessary to clean
heavily soiled garments, e.g. workwear. If
necessary consult the detergent manufacturer for
advice.
The following textiles should not be machine
dried:
Woollens and wool blends as these tend to matt and
shrink. Pre-finish drying these using in the "Woollens"
program.
Pure linen tends to roughen if tumble dried. Please
follow instructions given on the care label.
Important:
Textiles with large metal accessories such as
buckles, hooks and zip tags should be placed in a
laundry bag or a pillow case before drying. This is to
protect the drum from scratches and dents during
drying.
Garments with closed metal zips can cause the
sensor electrodes in the drum ribs to be bridged.
This can cause the drying process to go on for too
long, or to not finish at all. Open zips before drying.
Loopknit and woven textiles (e.g. T-shirts and
underwear) have a tendency to shrink depending on
their quality. This is made worse by over-drying. Do
not use the "Cottons extra dry" for these textiles.
Starched laundry can be machine dried. Select the
most appropriate program for ironing by hand or
machine.
Sort the laundry according to the level of dryness
required. It is not necessary to sort according to size.
Duvet covers and pillow cases should be closed to
prevent smaller items rolling up inside them.
For greater economy dry a full load. Underloading is
uneconomical. Overloading will impair the drying
result and the laundry finish.
Rinsing the laundry using hot water in the final rinse
helps to reduce the residual moisture level, and the
residual heat in the laundry will help keep processing
time down, thus saving energy.
9
Page 10
Drying
This machine must only be installed and
commissioned by a Miele Service technician.
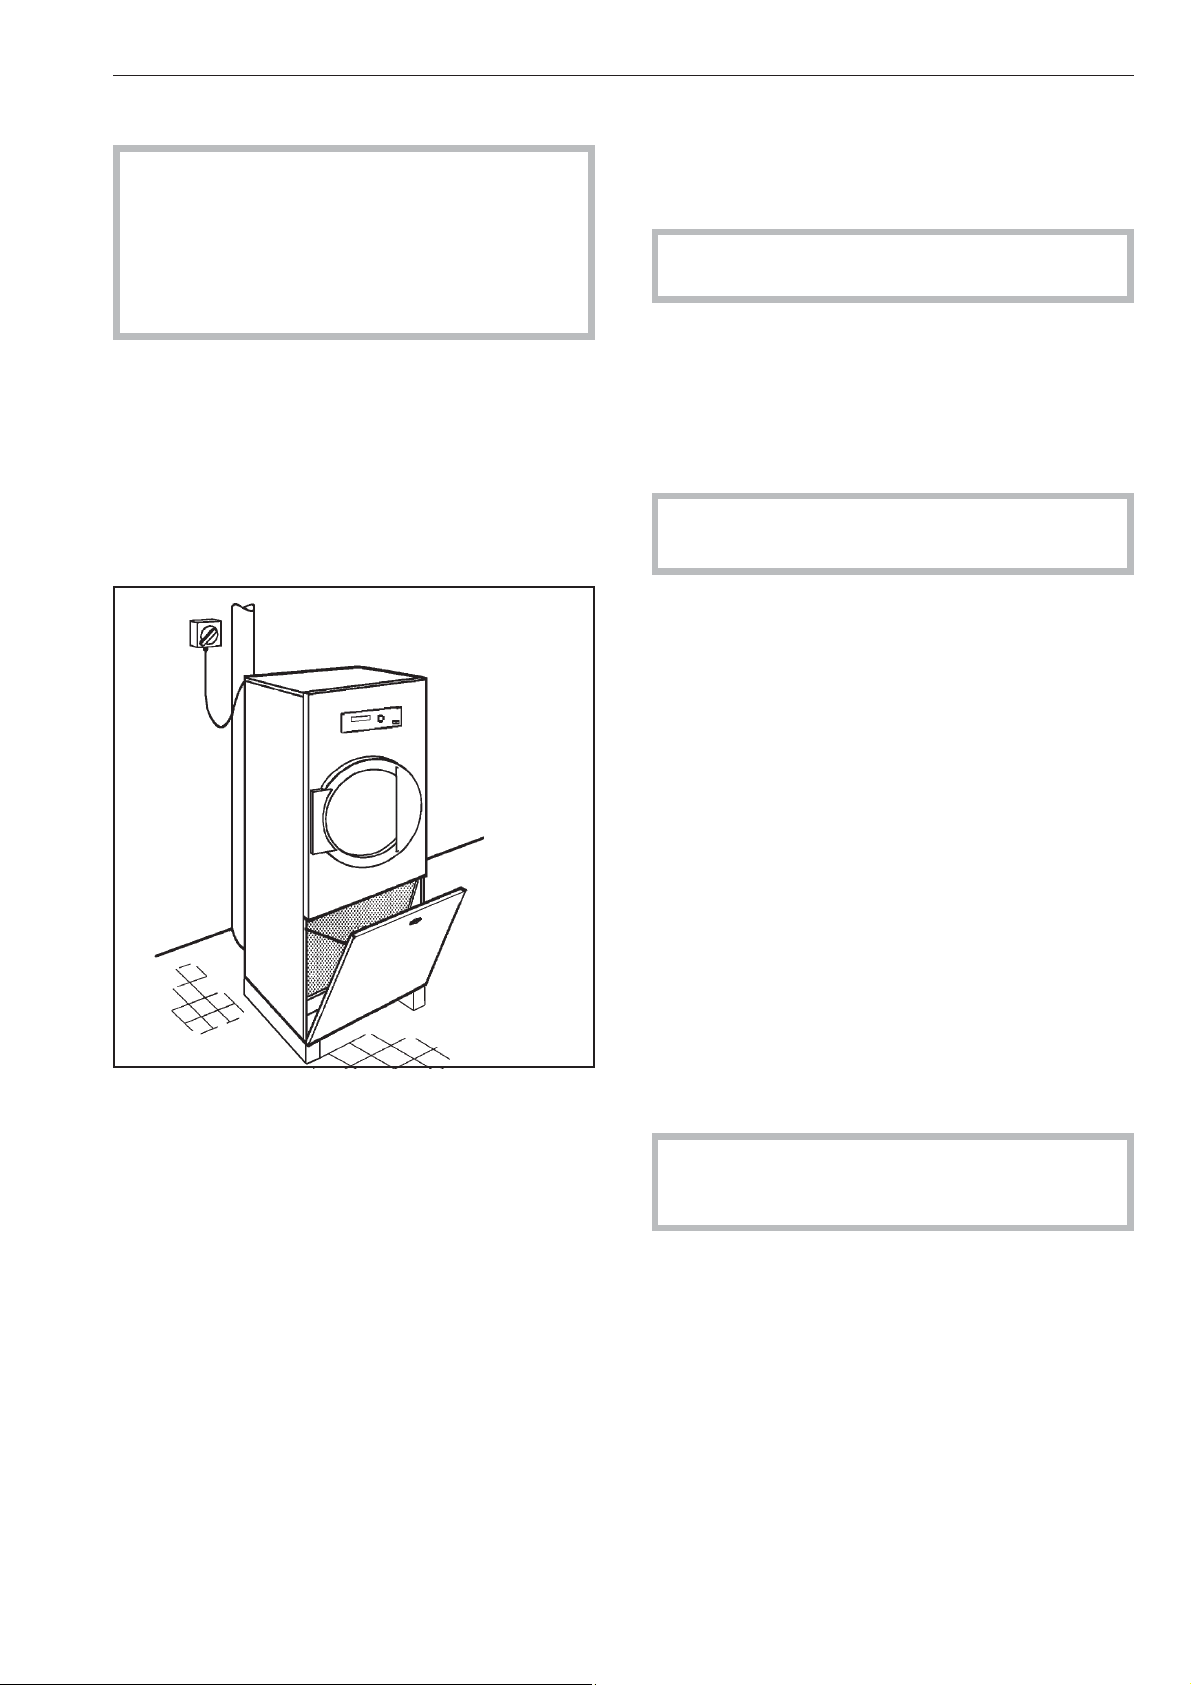
Before using for the first time
Before loading the dryer with laundry, wipe the
internal drum surface with a soft, dry cloth.
Switching the dryer on and loading the
drum
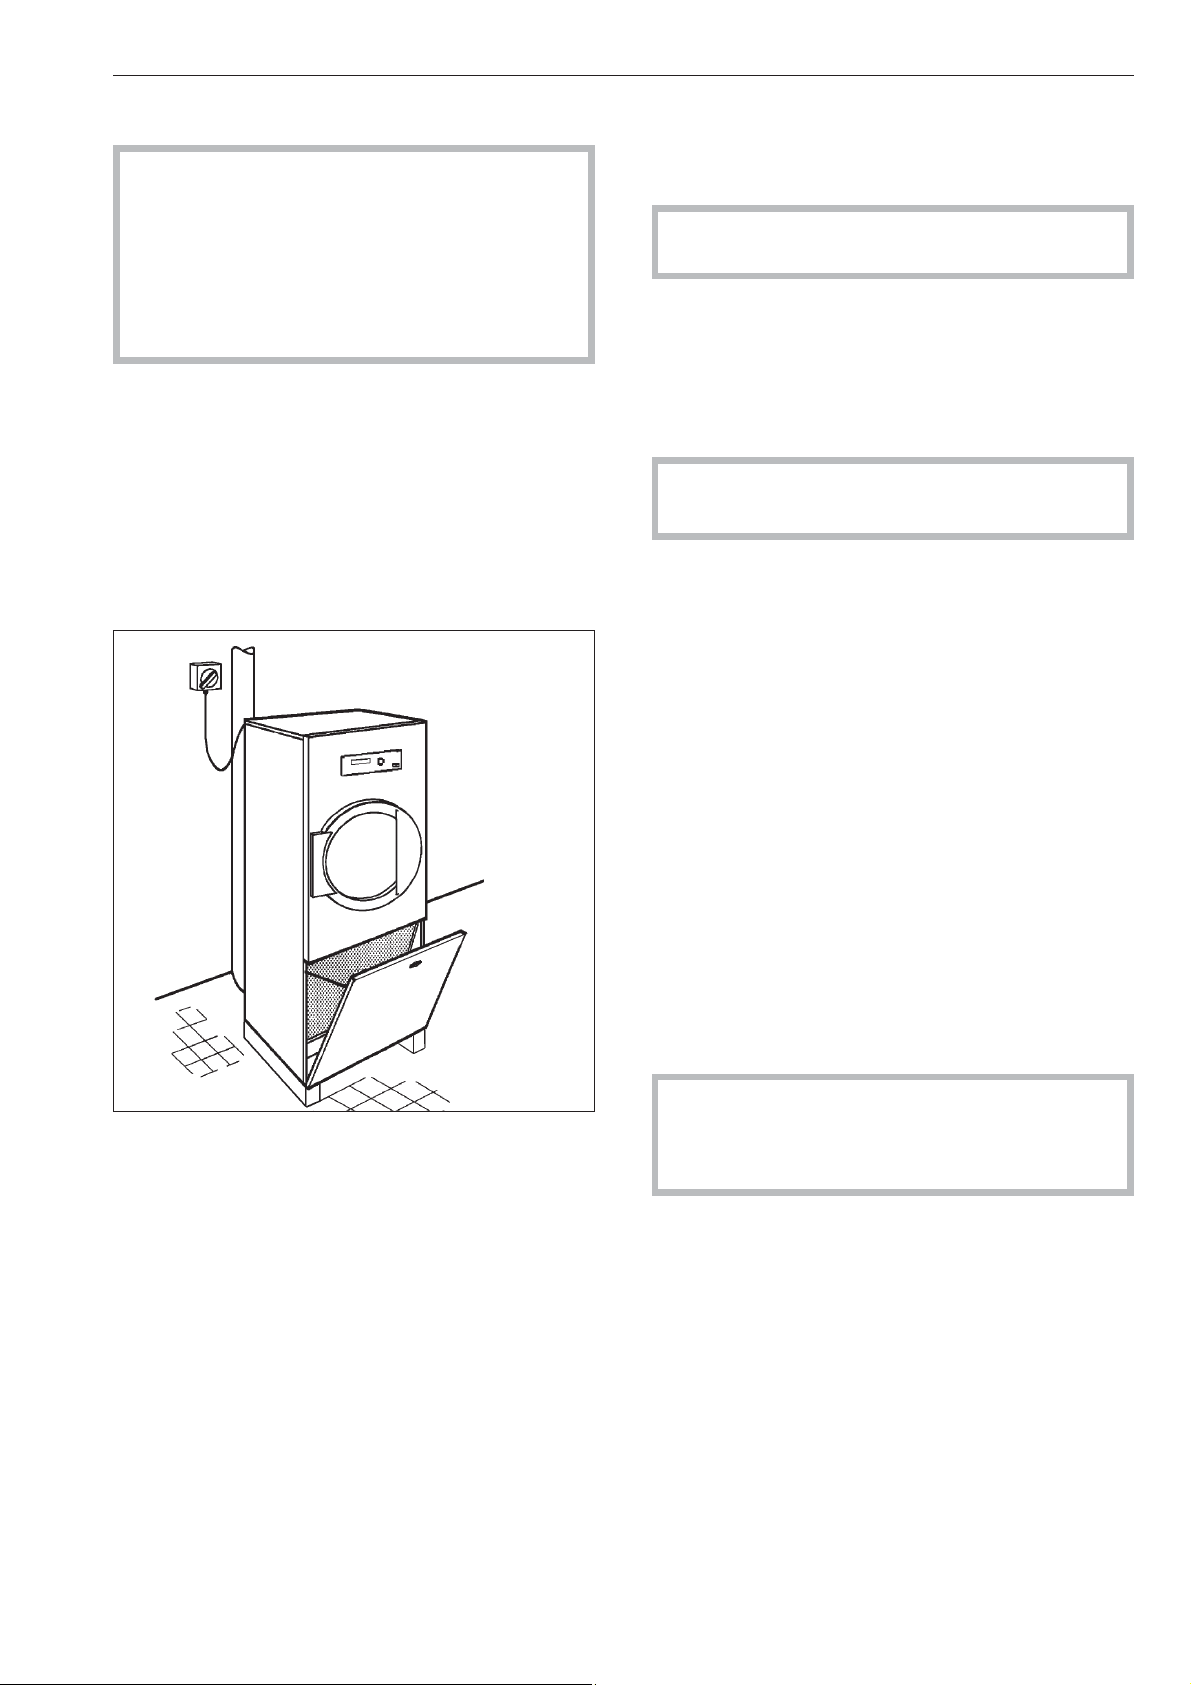
Switch on the on-site mains electricity switch.
^
Press the mains On/Off switch s.
^
Open the drum door.
^
Load the drum.
^
The pre-sorted laundry should be loaded loosely in
the drum.
Make sure any dispensing aids such as detergent
balls have been removed from the laundry.
Max. load (dry weight of laundry)
PT 8303
Drum volume in litres
300
Cottons
12-15 kg
Minimum iron
8.0 kg
Delicates
3.0 kg
Woollens
6.0 kg
Selecting a programme
Use the programme selector rotary dial to select
^
the programme you want. The corresponding LED
will light up.
The segment display shows the residual moisture
which has been allocated to the programme as a %.
Cottons
For drying cotton and linen fabrics
- Extra dry 0% residual moisture + 10 mins
- Dry 0% residual moisture
- 20% moisture 20% residual moisture
- 25% moisture 25% residual moisture
- 40% moisture 40% residual moisture
Minimum iron
For drying synthetic and mixed fibre fabric
- Dry 0% residual moisture
- 10% moisture 10% residual moisture
- 20% moisture 20% residual moisture
Delicates 20% residual moisture
For drying synthetic and rayon fabric.
Woollens 5 minute drying duration
For drying machine washable woollen and wool blend
garments.
Timed drying warm air 20 minutes drying duration at
a high temperature.
Timed drying cool air 15 minute duration for airing
garments.
To prevent the risk of damaging laundry, make
sure it cannot be trapped when the door is closed.
^
Close the drum door.
10
Page 11
Drying
Lowering the temperature
When drying delicate fabric (such as acrylic), press
^
the K Low temperature additional option button.
Press the START/STOP button.
^
The drying programme will begin.
The segment display will show the residual moisture
which is currently in the laundry until the programme
is finished.
! Drying
L Cooling down
O Programme finished / Anti-crease
The programme sequence is displayed in three
stages. The stage the programme is at will be
highlighted in yellow.
At the end of the programme
At the end of the programme a buzzer will sound to
indicate that it has finished. " 0 " will appear in the
segment display.
This is followed by a cooling-down phase.
Interrupting a programme
The programme is interrupted by:
- pressing the mains On/Off switch s,
- opening the drum door,
- opening the fluff compartment flap.
To continue the programme:
Press the mains On/Off switch s, or close the drum
door or fluff compartment flap.
The target residual moisture level will flash in the
segment display, and a cooling-down phase will
follow the end of the programme.
Press the START/STOP button.
^
Do not unload laundry from the drum until after
,
the cooling down phase has been completed.
Hot laundry can self-ignite and cause a fire when
folded or put away.
Adding or removing items
The drum door can be opened during a drying
programme to remove or add items if necessary.
! Drying
L Cooling down
O Programme finished / Anti-crease
If laundry is not removed as soon as the programme
finishes, the anti-crease phase will begin.
The drum will rotate at brief intervals to keep the
laundry from creasing.
After drying
At the end of the programme
^
Open the drum door.
If the door remains closed, the dryer will start up
again briefly after an interval of 30 minutes for
safety reasons.
^
Unload the drum.
Make sure nothing is left behind in the drum. If
items are left in the dryer, they could be damaged
by overdrying when the dryer is next used.
Always make sure that the drum is stationary
,
before reaching into the machine to remove
laundry. Reaching into a moving drum is extremely
dangerous.
To continue the drying programme:
^
Close the drum door.
The target residual moisture level will flash in the
segment display.
The fan will switch itself on automatically if the
temperature in the drum is too high.
^
Press the START/STOP button to continue the
programme.
If no more laundry is to be processed:
^
Close the drum door.
^
Switch the dryer off by pressing the mains On/Off
switch s
^
Switch off the on-site mains electricity switch.
^
Check the fluff filter and clean it if necessary. Close
the fluff filter compartment flap to prevent anyone
tripping over it.
11
Page 12

Reprogramming
Reprogramming individual drying
programmes
(Changing the Standard options)
Individual drying programmes can be altered to suit
specific requirements, practices and processes.
Before you begin, first ensure that:
The dryer is switched off with the "On/Off" switch.
–
The door is closed.
–
To access the programming level:
Press and hold the "START/STOP button and switch
^
the dryer on with the "On/Off" switch.
Hold the START/STOP button pressed in until the
^
light around the button stops flashing and lights up
constantly.
Release the START/STOP button.
^
P will flash alternately with 1 in the segment display.
–
Programmable functions P 1- P 27 (see next page)
are selected by turning the rotary dial clockwise.
Example of reprogramming PT 8303 Profitronic B
Plus Residual moisture programme machines
P 2 to alter the buzzer which sounds at the end of
the programme (see "Programmable functions").
Turn the programme selection rotary dial one click
^
clockwise.
The Low temperature option LED K will flash twice
–
quickly.
P will flash alternately with 1 in the segment display.
–
Programmable option 0 = Off - 1 = On.
Pressing the START/STOP button will change the
^
option to 0.
To save the setting:
Switch the dryer off with the "On/Off" switch.
^
They can also be selected by pressing the Low
temperature additional option button K .
Programmable options, e.g. 0 or 1 are selected with
the START/STOP button.
The Low temperature additional option LED shows
which programmable function is currently
selected.
A short (quick) flash represents one unit, a long
(slow) flash represents ten units.
Example: The 5th Programmable function is
represented by the LED flashing five times quickly.
The 10th Programmable function is represented by
the LED flashing once slowly. Programmable
function 45 is represented by the LED flashing four
times slowly and five times quickly.
12
Page 13
Reprogramming
Programmable functions
No. Programmable function Standard Programmable option
P 1 Buzzer volume
0 = quiet 1 = loud
1
P 2 Buzzer at the end of the programme
P 3 Memory function
P 4 Acoustic tone which sounds when a button is pressed
P 5* Water conductivity setting
P 6 Fan and heating during pauses
P 7 Cottons and Timed progs. cold/hot reversing on (0 to 99 secs)
P 8 Cottons and Timed progs. cold/hot reversing off (3 to 99 secs)
P 9 Minimum iron reversing on (0 to 99 secs)
P 10 Minimum iron reversing off (3 to 99 secs)
P 11 Woollens duration (1 to 99 mins)
P 12 Woollens programme reversing on (0 to 99 secs)
P 13 Woollens reversing off (3 to 99 secs)
P 14 Delicates reversing on (0 to 99 secs)
P 15 Delicates reversing off (3 to 99 secs)
1
1
0
0
1
60
3
60
3
5
20
10
27
3
0=Off 1=On
0=Off 1=On
0=Off 1=On
0 = Normal 1 = Low
0=Off 1=On
0 = 0 sec 99 = 99 secs
3 = 3 secs 99 = 99 secs
0 = 0 secs 99 = 99 secs
3 = 3 secs 99 = 99 secs
1 = 1 min 99 = 99 mins
0 = 0 secs 99 = 99 secs
3 = 3 secs 99 = 99 secs
0 = 0 secs 99 = 99 secs
3 = 3 secs 99 = 99 secs
P 16 Timed programme cold (1 to 99 mins)
P 17 Timed programme warm (1 to 99 mins)
P 19 Residual moisture for Programme 1 Cottons Extra dry
P 20 Residual moisture for Programme 2 Cottons Dry
P 21 Residual moisture for Programme 3 Cottons 20% moisture
P 22 Residual moisture for Programme 4 Cottons 25% moisture
P 23 Residual moisture for Programme 5 Cottons 40% moisture
P 24 Residual moisture for Programme 9 Delicates
P 25 Residual moisture for Programme 10 Minimum iron 20% moisture
P 26 Residual moisture for Programme 11 Minimum iron 10% moisture
P 27 Residual moisture for Programme 12 Minimum iron Dry
15
20
1
1
1
1
1
1
1
1
1
1 = 1 min 99 = 99 mins
1 = 1 mins 99 = 99 mins
1=-2% 2=-4% 0=0%
1=0% 2=-2% 0=2%
1 = 20% 2 = 18% 0 = 22%
1 = 25% 2 = 23% 0 = 27%
1 = 40% 2 = 38% 0 = 42%
1 = 20% 2 = 18% 0 = 22%
1 = 20% 2 = 18% 0 = 22%
1=10% 2=8% 0=12%
1=0% 2=-2% 0=2%
13
Page 14

Problem solving guide
Error messages
Indicator Possible cause Remedy
Over-pressure in vent ducting.
N 0
N W
The dryer does not start. The fluff filter compartment flap is not
Other messages
In the event of any faults please contact the Miele Service Department.
When contacting the Service Department, please quote the Model, Serial number (SN:)
and Material number (M.Nr) of your dryer.
See data plate for details:
Leaks in the airways.
Fluff filter blocked Clean the fluff filter.
closed properly.
Peak load cut-out
The dryer will continue to run without
heating (cold) for the remainder of the
programme.
Check the vent ducting.
Call the Miele Service Department.
Twist the lock for the fluff filter compartment
flap in a clockwise direction as far as it will
go.
If the peak load cut-out is overridden, the
programme will continue as normal.
The data plate is located at the top of the door aperture
with the door open or at the top of the rear of the machine.
14
Page 15
Cleaning and care
Fluff filter
Do not use the machine without the fluff filter in
,
place. Fire risk.
A damaged fluff filter must be replaced before the
machine is used again.
Otherwise fluff and lint will cause a blockage in the
airways, the heating and the vent ducting, and the
correct functioning of the machine cannot be
assured.
The fluff filter collects any fluff and lint from the
laundry. It should be cleaned at least once a day and
when the 0 indicator comes on.
If there is a large amount of fluff and lint, the filter will
need frequent cleaning.
The fluff filter must not be removed. When cleaning it,
do so with care and make sure it does not get
damaged.
Tumble dryer
Before any cleaning or maintenance switch the dryer
off at the on-site mains switch.
Do not use a pressure washer or hose to clean
,
the machine.
The housing, control panel and any plastic
^
components should be cleaned using a suitable
mild cleaning agent, applied with a soft damp
cloth. Rub dry with a soft cloth after cleaning.
If starched laundry has been dried, the drum
^
should be wiped out with a damp cloth afterwards.
Do not clean the machine with abrasive cleaning
agents.
After cleaning, check the seals for any damage and
make sure the door and fluff compartment flap shut
correctly.
The ventilation inlet to the dryer is located at the
back of the machine. It must not be blocked or
hindered in any way. Do not cover the machine lid
with cloths or similar items.
^
Open the fluff compartment flap.
^
Wipe fluff off the filter by hand. Never use pointed
or sharp edged objects to do this.
The area surrounding the machine, in particular
around the air inlet, must be kept free of dust and fluff
at all times. If taken into the dryer, they can cause
faults with the machine.
The following should be checked and cleaned once
a year by a Miele service technician:
– The heaters and heater shaft on electric-heated
dryers.
–
The entire interior of the dryer
–
The fins on the exhaust fan
,
To ensure the correct performance of the
machine and to prevent the risk of faults and fire, it
is important to check the machine and carry out
maintenance on a regular basis.
15
Page 16
Installation and connection
This dryer must only be installed and
commissioned by a Miele Service technician.
This appliance must be installed in accordance with
local and national regulations. It must only be
operated in a room with sufficient ventilation.
Read the instructions supplied with the appliance
before installing and using it for the first time.
Do not install the tumble dryer in a room where there
is a risk of frost occurring.
Use a suitable fork-lift to transport the dryer to its final
location. Caution. Danger of tipping.
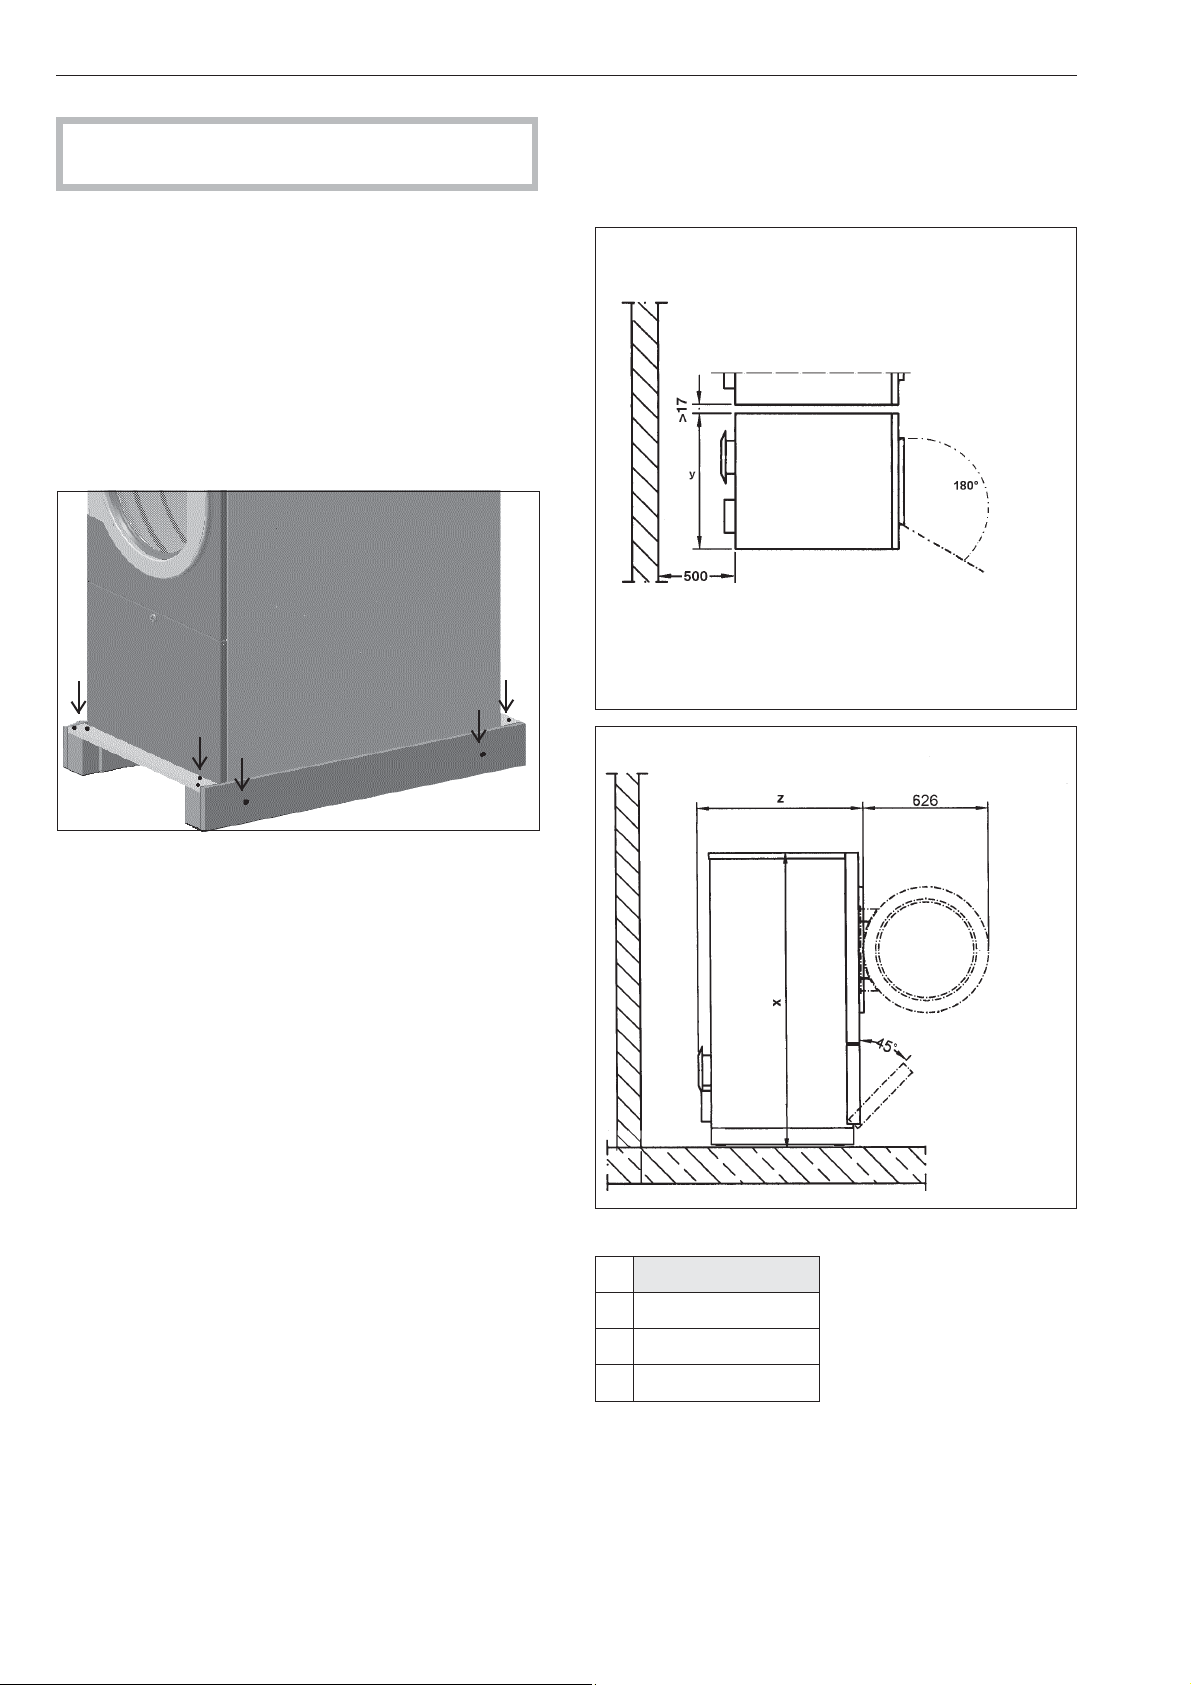
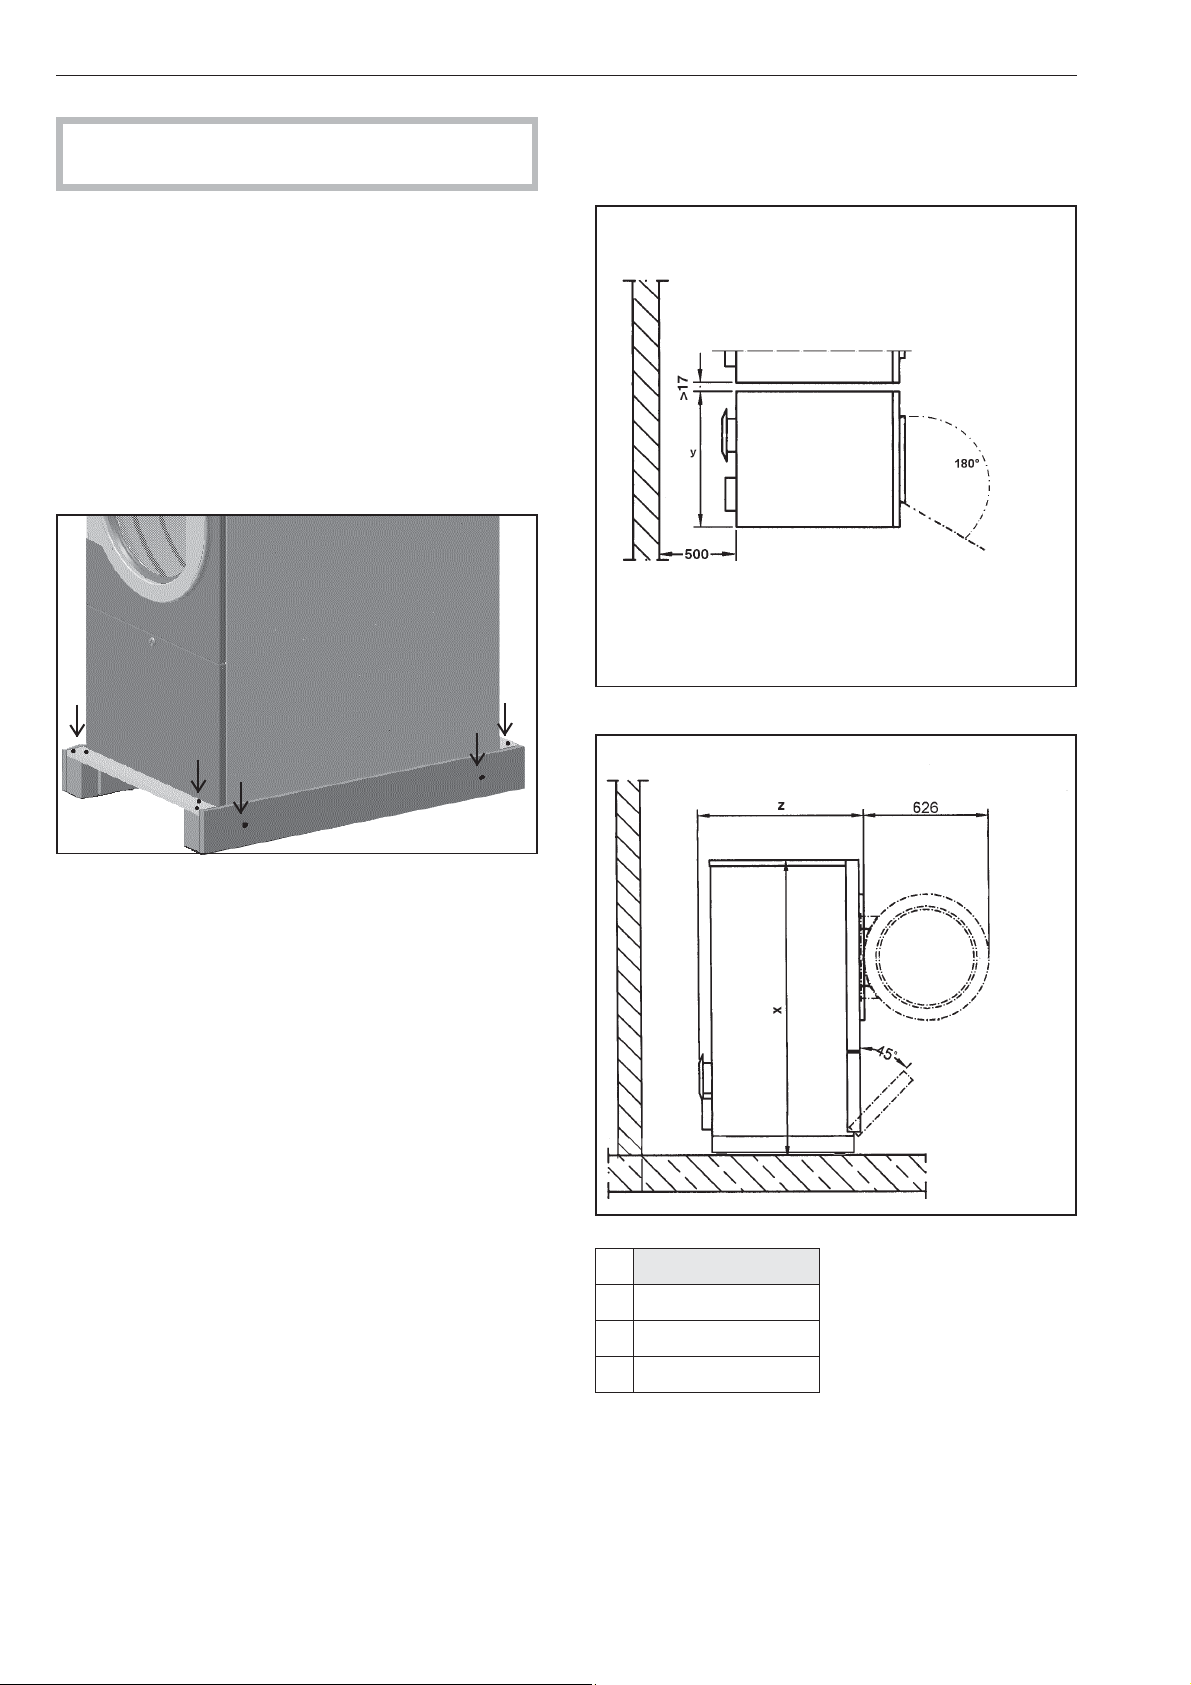
To ensure suitable access for future maintenance and
service work, please ensure that the minimum
distances between the dryer and the wall specified
on the installation diagram are strictly observed.
Remove the transport packaging. Unscrew the Torx T
20 and 30 screws on the wooden pallet and remove
the wooden battens.
Using a suitable fork-lift, raise the dryer and fit the
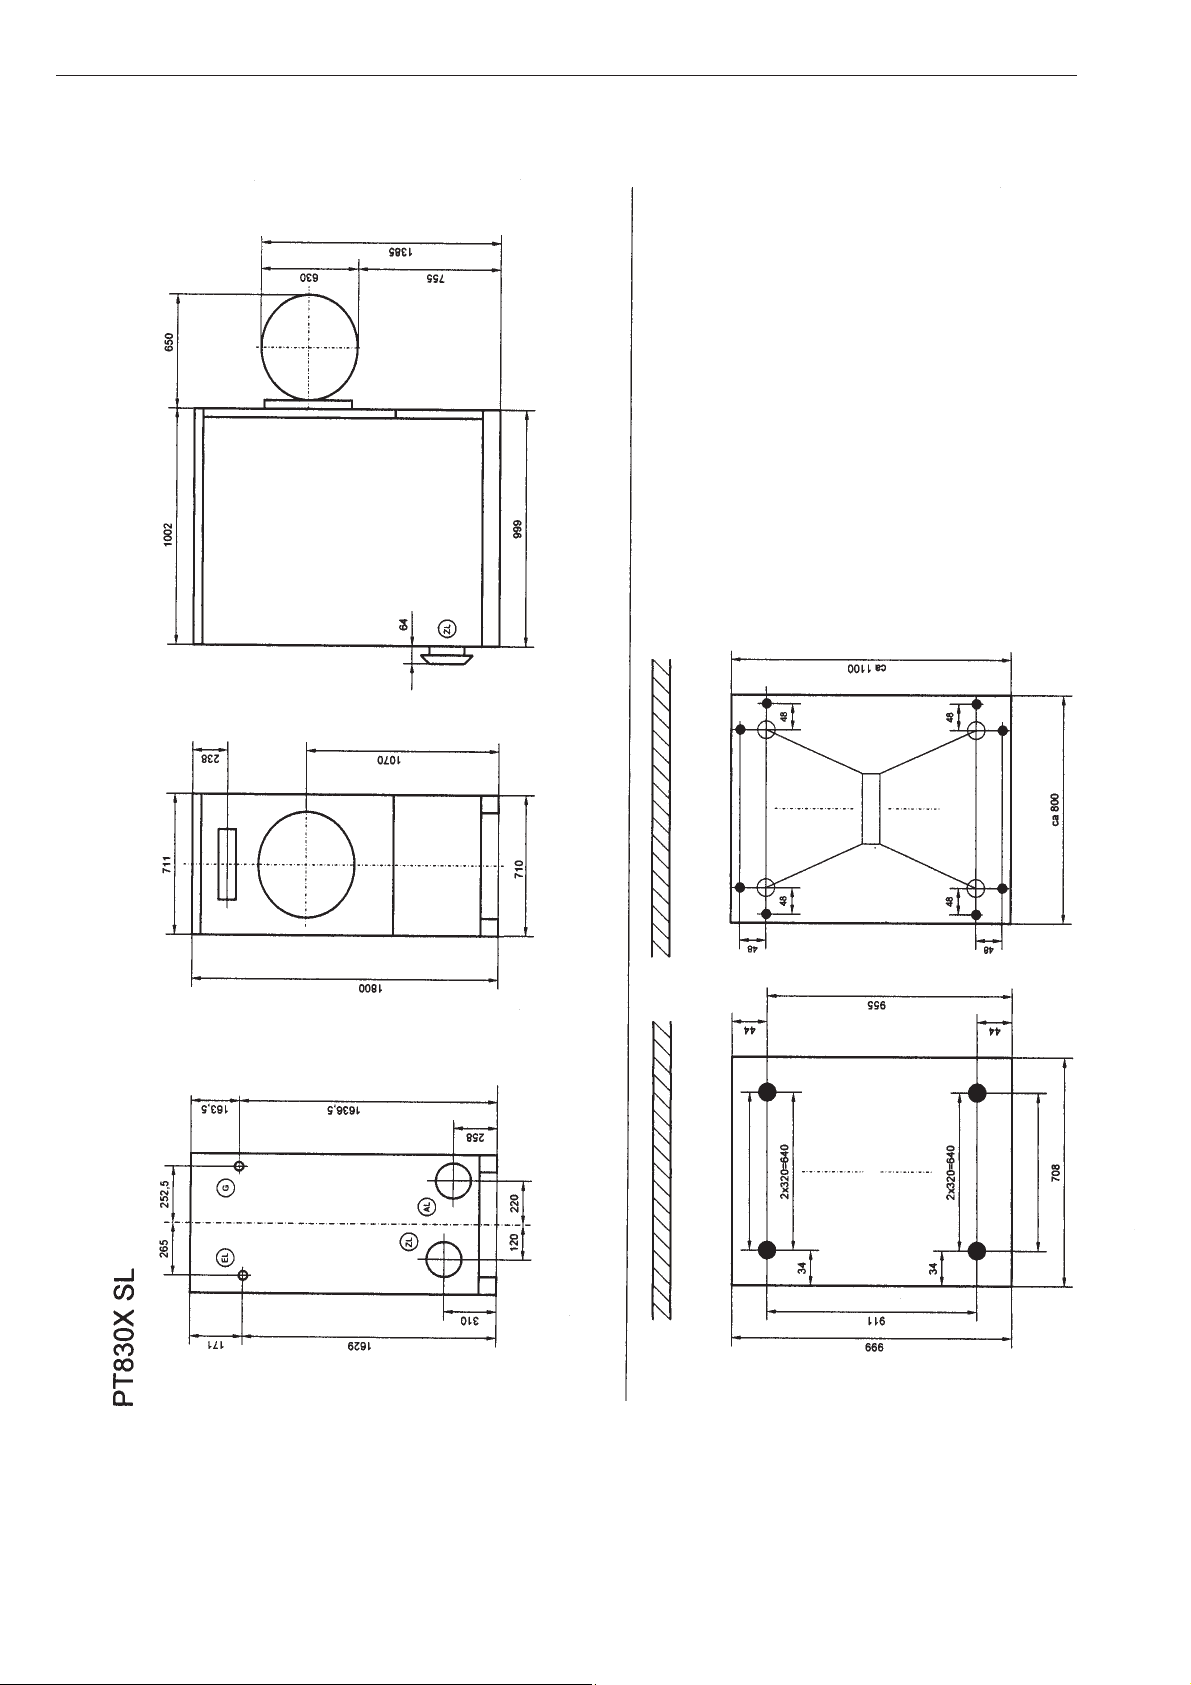
four feet supplied.
PT 830x
x 1800 mm
y 710 mm
z 1090 mm
16
Page 17
Installation and connection
Levelling the appliance
The dryer does not require a plinth. However, make
sure that any uneven areas of the floor are made
level.
The dryer must be perfectly level to ensure that it
functions correctly.
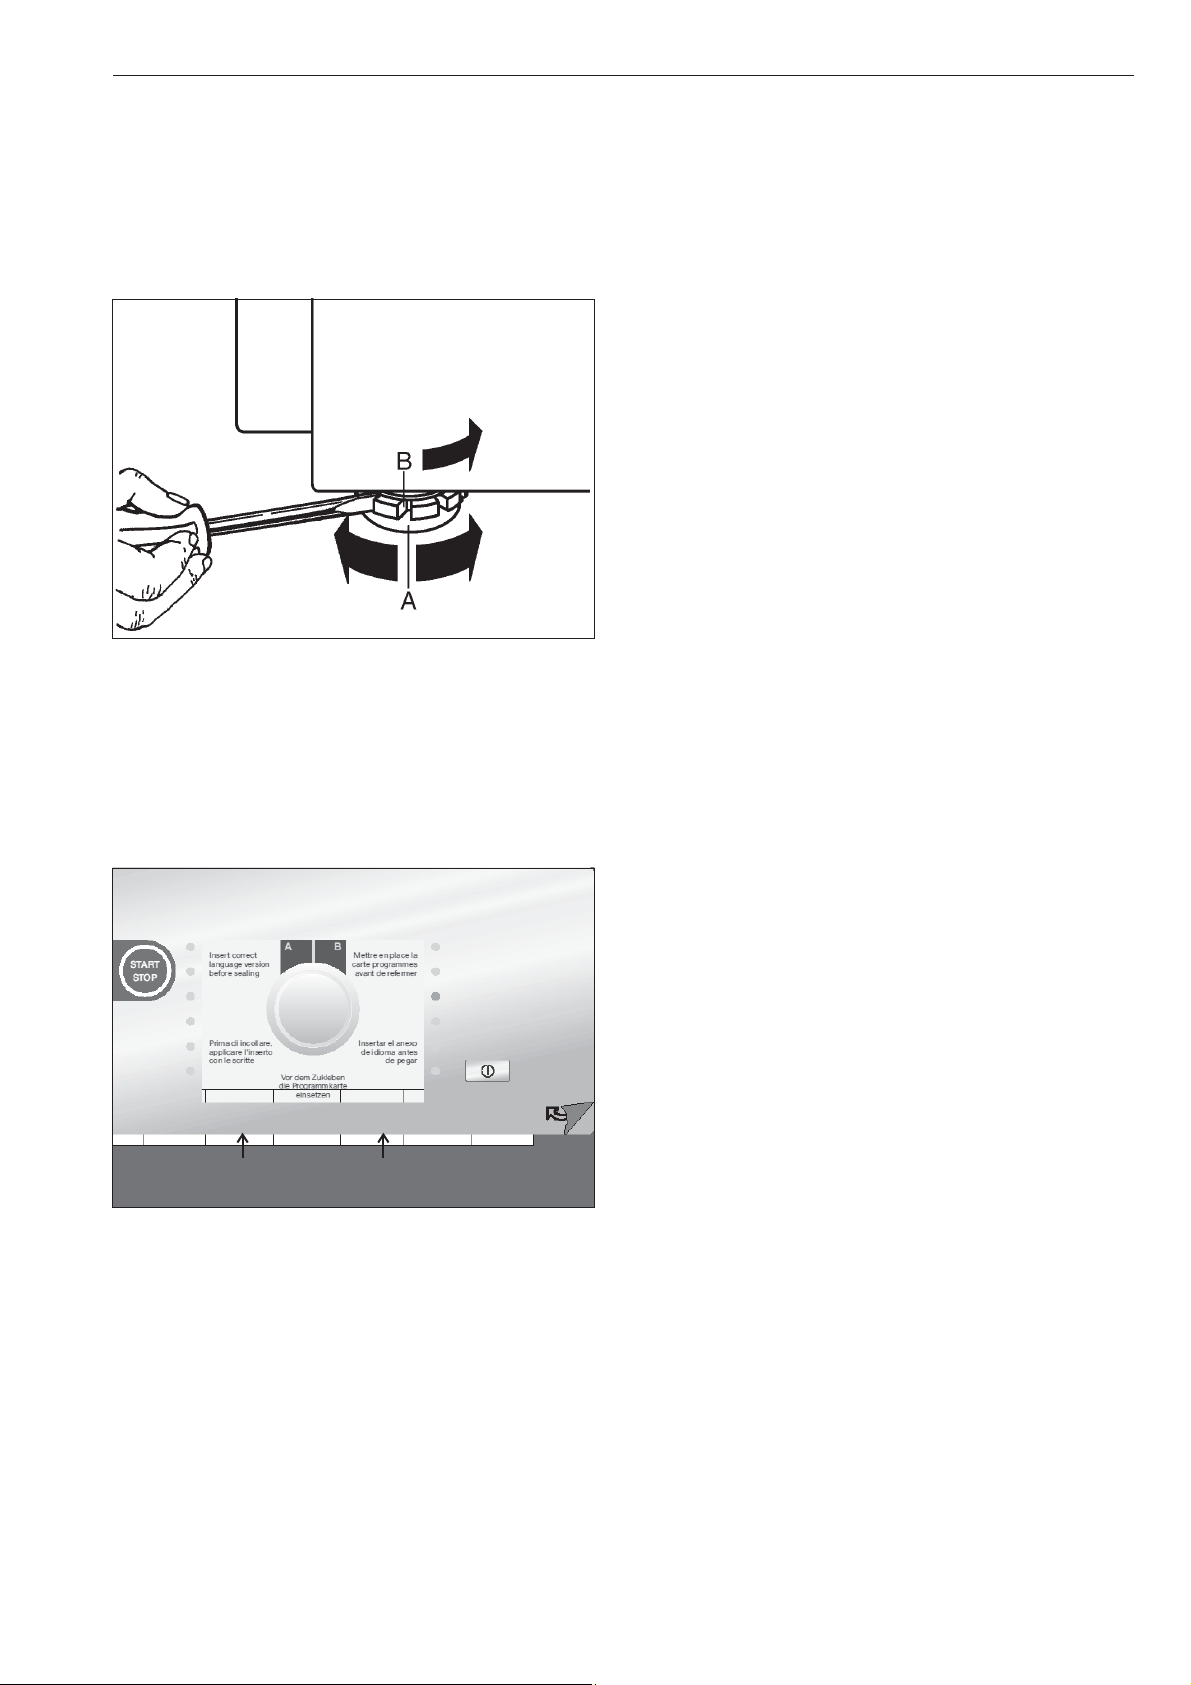
The screw feet A can be adjusted to align it.
After aligning the dryer correctly you need to use a
screwdriver to secure discs B to the floor plate.
Reducing the noise level
This dryer is fitted with an exhaust fan which can be
heard during operation.
If this noise disturbs you it is possible to fit a silencer
(available from Miele as an optional accessory) into
the dryer's exhaust duct (see Installation instructions).
Communication module XKM RS232
This dryer can be fitted with a communication module
which enables it to be linked to a PC via a serial
interface.
The slot for the communication module is located on
the rear of the dryer.
To fit the language insert (programme
selection)
Remove the protective cover on the control panel.
Carefully lift up the lower area of the control panel
cover underneath the programme rotary dial slightly.
Push in the language insert and align it.
Remove the dividers which are located underneath
and press the control panel cover down.
17
Page 18

Installation and connection
Electrical connection
The electrical components of this dryer comply with
IEC 335-1 and IEC 335-2-11.
All electrical work must be carried out by a suitably
qualified and competent person in strict accordance
with current local and national safety regulations.
For technical data see data plate or wiring diagram
supplied. The wiring diagram is supplied with the
dryer.
The dryer shall only be operated with the voltage,
frequency and fusing shown on the data plate.
Connection should be made via a suitable isolator in
accordance with national regulations, with an on-off
switch which is easily accessible for servicing and
maintenance work after the dryer has been installed.
An electrical safety test should easily be performed
after installation and after any servicing work.
When hard-wired a main power switch with all-pole
disconnection is to be installed. When switched off
there must be an all-pole contact gap of at least 3
mm in the mains connection switch, which should be
lockable in the neutral position.
Air inlet and exhaust connection
This dryer must only be used when it is connected to
a suitable ducting system. The installation site must
be adequately ventilated. See the installation
instructions supplied.
Repairs must only be carried out by a Miele
,
Service technician. In the event of a fault please
contact the Miele Service Department.
After setting up and connecting the appliance,
,
ensure that all outer casing parts are correctly
fitted back into position.
The mains connection cable may only be replaced by
an original Miele spare part or an appropriate cable
with wire end ferrules.
If the appliance is disconnected from the electricity
supply ensure adequate measures are taken to
ensure that the appliance cannot be reconnected to
the electricity supply until all work has been carried
out (lockable disconnector or monitoring of
connection site).
After the dryer has been connected to the electricity
supply check the rotation direction of the fan. It
should rotate clockwise. If it rotates counterclockwise,
2 phases on the incoming power supply need to be
exchanged.
Equipotential bonding
Equipotential bonding must be carried out if leak
current > 10mA.
18
Page 19

Model PT 8303 EL
Height in mm 1800
Width in mm 710
Depth in mm 1063
Depth with door open in mm 1716
Weight in kg 138.8
Drum volume in l 300
Max. capacity in kg (dry laundry) 15
Voltage See data plate
Connected load See data plate
Fuse rating See data plate
Test certificates awarded See data plate
Max. load bearing in operation in N 1582
Product safety standard IEC 335-1, IEC 335-2-11
Emission sound pressure level in dB (A), EN ISO 11204 < 70
Sound power level in dB (A), EN ISO 9614-2 < 80
Technical data
19
Page 20
Technical data
20
Page 21

21
Page 22
Please have the model and serial number
T
of your appliance available before
contacting Technical Service.
U.S.A.
Miele, Inc.
National Headquarters
9 Independence Way
Princeton, NJ 08540
Phone:
Fax:
www.mieleusa.com
Technical Service & Support
Nationwide
Phone:
Fax:
800-843-7231
609-419-9898
609-419-4298
800-999-1360
888-586-8056
echnicalService@mieleusa.com
Canada
Importer
Miele Limited
Headquarters and Miele Centre
161 Four Valley Drive
Vaughan, ON L4K 4V8
www.miele.ca
Customer Care Centre
Phone:
customercare@miele.ca
Germany
Manufacturer
Miele & Cie. KG
Carl-Miele-Straße 29
33332 Gütersloh
800-565-6435
905-532-2272
Alteration rights reserved/4814
M.-Nr. 07 985 561 / 00
Page 23
Mode d'emploi
Sèche-linge
PT 8303 SL
Lisez impérativement ce mode d'emploi avant
d'installer et de mettre en service cet appareil.
Vous vous protégerez ainsi et éviterez de détériorer votre appareil.
fr-CA
M.-Nr. 07 985 561
Page 24

2
Page 25

Table des matières
Prescriptions de sécurité et mises en garde .....................................................4
Votre contribution à la protection de l'environnement .............................................6
Description ................................................................................7
Description des appareils ....................................................................8
Séchage ...................................................................................9
Préparation du linge ..........................................................................9
Avant la mise en service......................................................................10
Mettre le sèche-linge en marche et charger le linge ................................................10
Sélectionner le programme ...................................................................10
Baisser la température .......................................................................11
Fin du programme ..........................................................................11
Après le séchage ...........................................................................11
Interruption du programme....................................................................11
Ajout/prélèvement de pièces de linge.........................................................11
Modification de la programmation ............................................................12
Modification de certains programmes de séchage par reprogrammation
(modification des options standard).............................................................12
Exemple de modification de programmation
PT 8303 Profitronic B Plus avec commande d'humidité résiduelle ...................................12
Fonctions de programmation client .............................................................13
Anomalies ................................................................................14
Messages d’erreurs .........................................................................14
Autres messages .........................................................................14
Nettoyage et entretien ......................................................................15
Filtre .....................................................................................15
Installation et raccordement .................................................................16
Calage ...................................................................................17
Mettre en place la signalétique en français .......................................................17
Module de communication XKM RS232 ..........................................................17
Branchement électrique ......................................................................18
Arrivée/évacuation d'air ......................................................................18
Caractéristiques techniques .................................................................19
3
Page 26

Prescriptions de sécurité et mises en garde
les textiles mal nettoyés ou souillés de graisse ou
–
d'huile. Nettoyer les textiles particulièrement sales
Explication des consignes de sécurité et
d'avertissement sur la machine
Veuillez lire le mode d'emploi.
Veuillez lire les instructions comme la no
tice d'installation.
-
(vêtements de travail par exemple) avec une les
sive spécialisée. Veuillez vous renseigner auprès
de votre revendeur de lessive ou de produit de
nettoyage.
Ces textiles critiques peuvent prendre feu. Il faut
donc retirer rapidement la charge lorsque le pro
gramme est terminé ou en cas d'interruption de l'ali
mentation électrique.
Il est conseillé d'installer un extincteur à proximité.
~
avant que le programme de séchage soit fini et sur
Attention, surfaces très chaudes.
Attention, tension jusqu'à 1000 V.
Mise à la terre
tout sans phase de refroidissement.
Le linge peut prendre feu et causer un incendie s'il
est rangé ou emballé encore chaud.
~
qu'aucun objet inflammable comme un briquet, des
allumettes, des bougies ou des articles cosmétiques
ne parviennent dans le sèche-linge.
~
public, l'exploitant doit garantir l'utilisation sans dan
ger de l'appareil.
-
-
-
Le linge ne doit pas être déchargé du sèche-linge
-
Videz toutes les poches des vêtements de sorte
Si le sèche-linge fonctionne dans un lieu ouvert au
-
Veuillez lire le mode d'emploi avant de mettre
votre sèche-linge en service. Vous vous protégerez ainsi et éviterez de détériorer votre
sèche-linge.
Si d'autres personnes sont formées à la manipulation du sèche-linge, il est impératif de mettre à leur
disposition ces prescriptions de sécurité et/ou de
leur expliquer.
Utilisation conforme du sèche-linge
Ce sèche-linge doit exclusivement être utilisé pour
~
le séchage de textiles lavés dans l'eau et déclarés
séchables en machine sur l'étiquette d'entretien.
Ne pas sécher les articles suivants au
~
sèche-linge en raison des risques d'incendie (sauf
les textiles autorisés dans les programmes spéciaux):
–
qui comportent de la mousse, du caoutchouc ou
des matières similaires,
–
qui sont traités aux détachants inflammables.
–
qui sont imprégnés de gel, laque pour cheveux,
dissolvant ou autres restes de même type.
–
qui comportent des traces d'huile, de graisse ou
d'autres restes de même type (linge de cuisine,
cosmétique).
Le machine doit être exclusivement utilisé en inté
~
rieur.
Sécurité électrique et technique
Ce sèche-linge ne doit être installé, mis en service
~
et entretenu que par le Service Miele.
La sécurité électrique de cet appareil n'est ga-
~
rantie que s'il est raccordé à un système de mise à la
terre homologué. Il est très important que cette condition de sécurité élémentaire soit remplie. En cas de
doute, faites vérifier l'installation par un professionnel.
Le fabricant ne peut être tenu pour responsable de
dégâts causés par une mise à la terre manquante ou
défectueuse à l'installation.
Le sèche-linge n'est débranché du secteur que
~
lorsque l'interrupteur principal ou le fusible (à prévoir
par l'utilisateur) est arrêté et la prise débranchée.
Les interventions techniques sur les machines
~
électriques doivent être exécutées exclusivement par
le Service Miele. Les réparations incorrectes peuvent
entraîner de graves dangers pour l'utilisateur.
Remplacer les pièces défectueuses uniquement
~
par des pièces détachées d'origine Miele, que nous
garantissons répondre totalement aux exigences de
sécurité que nous imposons à nos machines.
-
–
qui comportent des restes comme de la cire et des
produits chimiques (par exemple serpillères, fau
berts, torchons).
–
le linge ouatiné abîmé, coussin ou veste par
exemple.
4
-
Page 27

Prescriptions de sécurité et mises en garde
Ce sèche-linge ne doit pas être utilisé dans la
~
même pièce qu'une machine de nettoyage travaillant
aux solvants HCFC. La combustion des vapeurs gé
nérées entraîne la formation d'acide chlorhydrique
qui peut abîmer le linge et la machine. En cas de
montage dans des pièces séparées, aucun échange
d'air ne doit avoir lieu.
Le sèche-linge doit être alimenté en air frais
~
propre et non chargé en chlore, fluor ou autres va
peurs de solvants.
La prise d'air se trouve à l'arrière du sèche-linge.
~
Cette prise d'air ne doit en aucun cas être obturée. Il
ne faut donc jamais recouvrir le couvercle du
sèche-linge avec des couvertures ou des toiles.
Ne pas stocker ni utiliser d’essence, de pétrole ou
~
autre produit inflammable à proximité du sèche-linge.
Risque d'incendie et d'explosion !
Si la maintenance n'est pas effectuée à temps et
~
de façon professionnelle, baisse de rendement, pan
nes et risque d'incendie ne sont pas à exclure.
-
-
Utilisation de l'appareil
Le sèche-linge ne doit être utilisé que si un
~
conduit d'évacuation est raccordé et que l'aération
de la pièce est suffisante.
Les personnes qui ne sont pas en mesure d'utili-
~
ser ce sèche-linge en toute sécurité en raison de déficiences physiques, sensorielles ou mentales ne doivent pas l'utiliser sans la surveillance d'une personne
responsable.
Ne jamais permettre aux enfants de jouer sur ou à
~
proximité du sèche-linge ou même d'utiliser eux-mêmes le sèche-linge.
Fermez la porte après chaque séchage. Vous évi
~
terez ainsi que :
–
des enfants tentent de grimper dans le sèche-linge
ou y cachent des objets
–
des petits animaux montent dans le sèche-linge
Les machines présentant des dommages au ni
~
veau des éléments de commande ou de l'isolation
des câbles ne doivent pas être utilisées avant d'avoir
été réparées.
Ne pas abîmer, enlever ou désactiver les systè
~
mes de sécurité et les éléments de commande du
sèche-linge.
-
-
Les éléments de conduction de la vapeur ne doi
~
vent pas être touchés. Risque de brûlure.
S'assurer que le tambour est à l'arrêt avant de dé
~
charger le linge. Ne jamais mettre les mains dans un
tambour qui tourne encore.
Risque d'écrasement et de cisaillement au niveau
~
des charnières de la porte de chargement et de la
trappe de filtre. Veuillez utiliser les poignées prévues.
Le rayon d'ouverture complète de la porte ne doit
~
pas être bloqué par une porte ou tout autre obstacle.
Ne jamais faire fonctionner le sèche-linge sans le
~
filtre. Risque d'incendie !
Un filtre abîmé doit être remplacé immédiatement.
Dans le cas contraire, les peluches obstrueraient les
conduites d'air, le chauffage et l'évacuation.
Le fonctionnement optimal du sèche-linge ne pourrait
plus être garanti.
Les produits de désinfection et de nettoyage
-
~
contiennent souvent du chlore. Si de tels produits sè
chent sur des surfaces en acier inoxydable, le chlore
peut attaquer l’acier inoxydable et provoquer la for
mation de rouille. Pour protéger votre appareil contre
la corrosion, utilisez des produits non chlorés pour le
lavage/la désinfection ainsi que pour le nettoyage
des surfaces en acier inox. Demander confirmation
de l'innocuité de son produit au fabricant. Si un produit contenant du chlore est accidentellement répandu sur la surface en inox, rincer immédiatement avec
de l'eau puis sécher avec un tissu.
Ne pas utiliser de nettoyeur sous pression ni de jet
~
pour nettoyer la machine.
-
-
-
-
Utilisation d'accessoires
Les accessoires ne doivent être montés que s'ils
-
~
sont agréés expressément par Miele. Le montage
d'autres pièces exclut le bénéfice de la garantie.
Enlèvement de l'ancien appareil
En cas de mise au rebut de l'ancien sèche-linge,
~
détruire la serrure afin d'éviter que des enfants ne s'y
enferment au péril de leur vie.
Conservez ce mode d'emploi.
Le sèche-linge ne peut être utilisé que lorsque
~
toutes les pièces d'habillage externes sont montées
et qu'il n'y a pas de risque de contact avec des piè
ces conductrices, en mouvement ou chauffées.
Pendant le séchage, le hublot, le cadre de la
~
porte de chargement chauffent beaucoup, ainsi que
linge qui peut être brûlant s'il est retiré trop tôt.
-
5
Page 28

Votre contribution à la protection de l'environnement
Enlèvement de l'emballage
L'emballage protège votre machine des avaries de
transport. Les matériaux utilisés sont choisis en fonc
tion de critères écologiques de façon à en faciliter le
recyclage.
Le recyclage de l'emballage économise les matières
premières et réduit le volume des déchets à éliminer.
En principe, votre revendeur reprend l'emballage.
Tenez les matériaux d'emballage tels que films
,
et sacs en plastique hors de portée des enfants.
Risque de suffocation.
Enlèvement de l'ancien appareil
Les appareils électriques et électroniques contien
nent souvent encore des matériaux recyclables. Ils
contiennent également des matériaux nocifs, néces
saires au bon fonctionnement et à la sécurité de l'ap
pareil. Ces matériaux peuvent être dangereux pour
les hommes et l'environnement s'ils restent dans la
collecte de déchets ou s'ils sont mal manipulés. Ne
jetez par conséquent en aucun cas votre appareil
avec les déchets.
-
Conseils pour l'économie d'énergie
Essorez le linge en lave-linge avec la vitesse d'esso
-
-
-
rage maximale. Vous économiserez ainsi du temps et
de l'électricité au séchage.
Si le linge est rincé à l'eau chaude lors du dernier rin
çage en machine, l'humidité résiduelle réduite et la
chaleur résiduelle du linge permettent un temps de
traitement plus court et donc une économie
d'énergie.
Triez le linge :
- suivant les fibres/textiles,
- suivant le degré de séchage,
- suivant la taille et l'humidité résiduelle.
Utiliser la charge maximum. Il n'est pas rentable de
trop peu charger la machine ni de la surcharger car
cela altère le résultat de séchage et peut abîmer le
linge. La consommation d'énergie rapportée à la
quantité de linge sera ainsi optimisée.
Prévoyez une aération de la pièce suffisante.
-
-
Veuillez faire en sorte que votre ancien appareil soit
évacué conformément aux réglements locaux sur les
déchets.
Gardez l'ancien appareil hors de portée des enfants
jusqu'à son enlèvement, pour éviter tout accident. Le
mode d'emploi vous fournit des indications à ce sujet
sous la rubrique "Prescriptions de sécurité et mises
en garde".
6
Page 29

Description
a
b
c
d
e
h
f
g
a Panneau des commandes
b Porte de chargement
Pour ouvrir la porte, tirer sur la poignée.
c Trappe de filtre
Une clé est nécessaire pour ouvrir la trappe de filtre.
d 4 pieds à vis réglables
e Raccordement électrique
f Prise d'air
g Raccord d'évacuation
h Logement pour boîtier de communication (op
tion)
-
7
Page 30

Description des appareils
Panneau des commandes PT 8303 Profitronic B Plus avec commande d'humidité résiduelle
12
3456 7 8
1 Affichage digital "Humidité résiduelle" 2 Affichage "Déroulement de programme" 3 Touche "Délicat"
4 Diode anomalie "Evacuation" 5 Diode anomalie "Filtre" 6 Touche "START/STOP"
7 Sélecteur de programme" 8 Interrupteur "Marche/Arrêt"
Interrupteur "s "Marche-Arrêt"
Pour enclencher/arrêter la machine.
Touche K "Délicat"
Pour réduire la température de séchage (d'env. 20°C)
pour les textiles sensibles (par ex. en acrylique). La
diode correspondante s'allume.
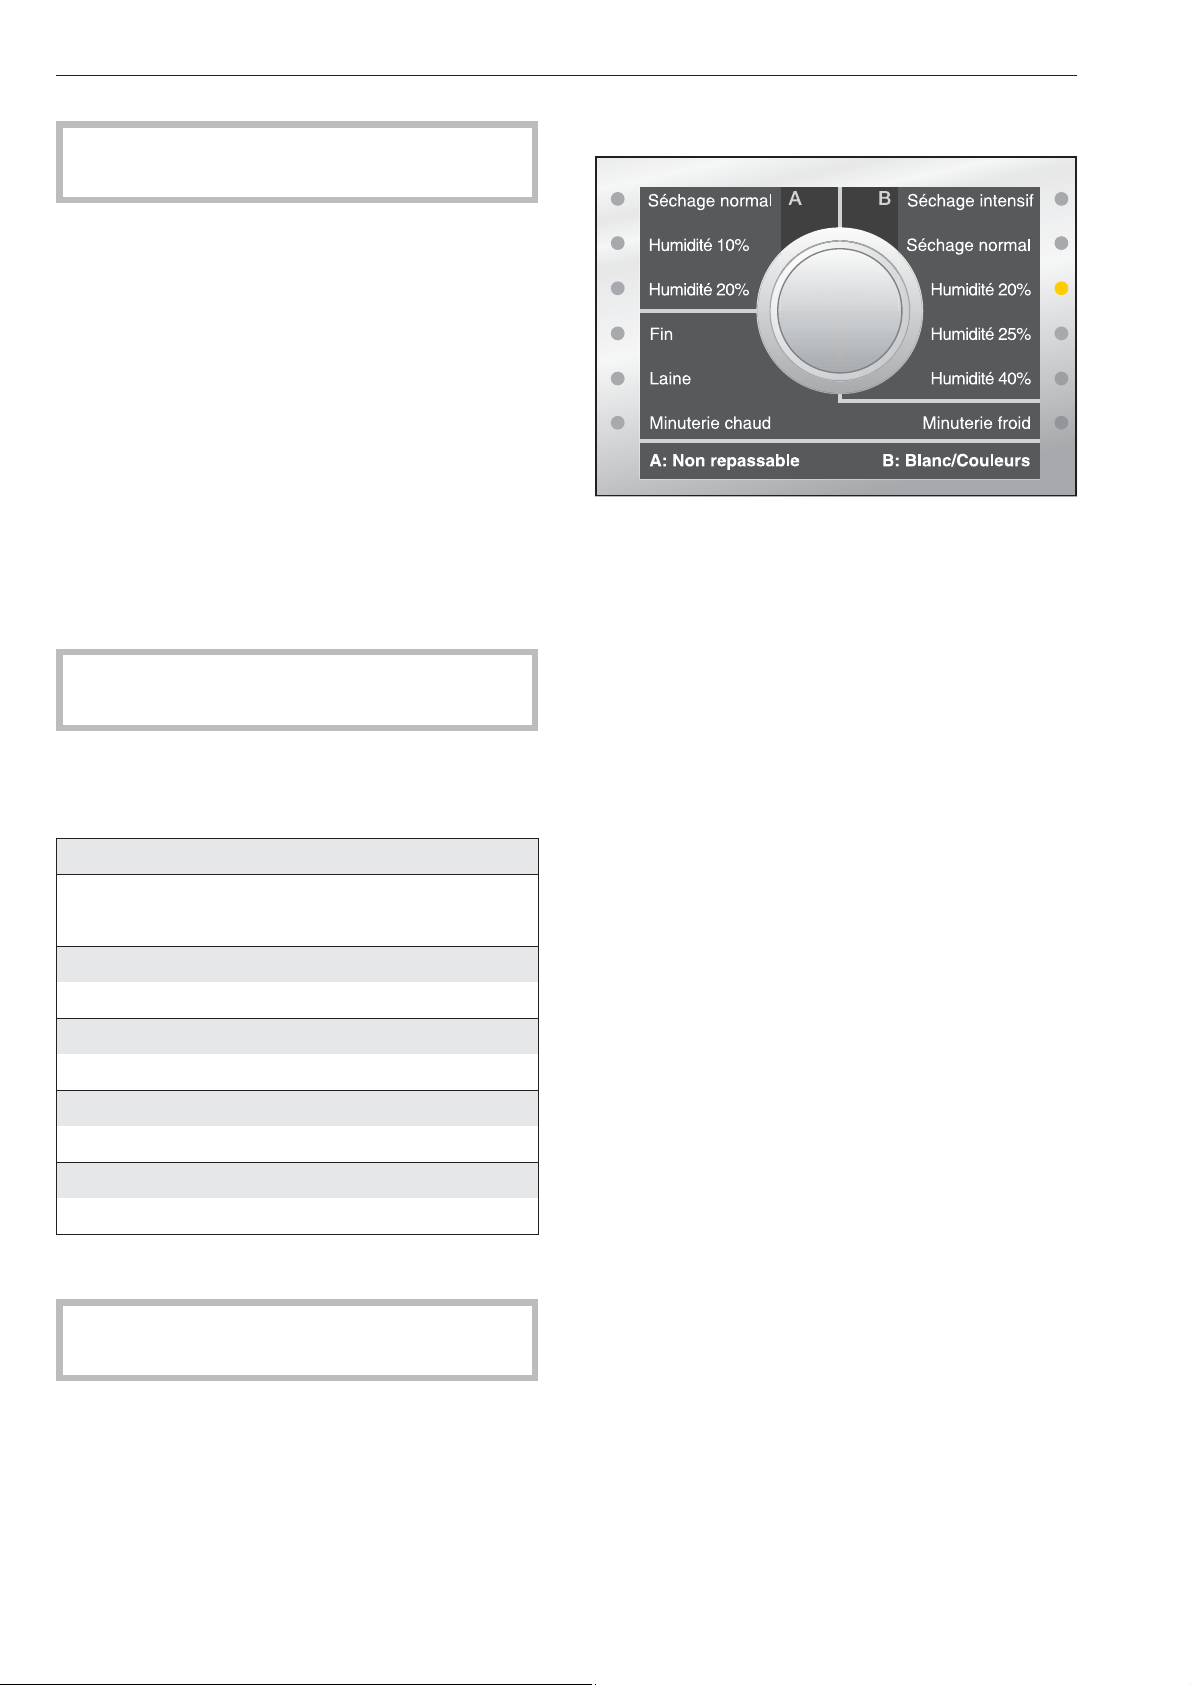
Sélecteur de programme
Le sélecteur de programme permet de choisir le pro
gramme de séchage.
A : Non repassable
Séchage normal
Humidité 10%
Humidité 20%
Fin Humidité 25%
Laine
Minuterie chaud Minuterie froid
Touche "START/STOP"
Pour démarrer ou arrêter le programme, appuyer sur
cette touche.
B : Blanc/Couleurs
Séchage intensif
Séchage normal
Humidité 20%
Humidité 40%
Affichage digital
Affiche l'humidité résiduelle choisie pour le programme en %.
Après le démarrage du programme, l'humidité résiduelle actuelle est affichée jusqu'à la fin du programme.
Les messages de défaut sont également affichés,
voir Elimination des anomalies.
Un h indique le délestage (en option).
-
Affichage de déroulement de programme
Indique les trois phases de déroulement du pro
gramme. Le champ correspondant s'allume en jaune
! Séchage
L Refroidissement
O Fin du programme / Infroissable
Diode d'anomalie 0 "Evacuation"
S'allume en cas d'anomalie au niveau de l'évacua
tion.
Diode d'anomalie W "Nettoyer le filtre"
-
-
S'allume lorsque le filtre doit être nettoyé.
8
Page 31

Séchage
Préparation du linge
Tous les textiles ne peuvent pas être séchés en
sèche-linge. Veuillez donc suivre les indications
sur l'étiquette d'entretien.
Signification des symboles :
q = séchage à température normale
r = séchage à faible température
s = ne pas sécher en machine.
Triez le linge suivant le type de fibre et de tissage.
Vous obtiendrez ainsi un résultat de séchage régulier
et éviterez d'abîmer les textiles.
Ne pas sécher les articles suivants au
,
sèche-linge en raison des risques d'incendie
(sauf les textiles autorisés dans les programmes
spéciaux):
-qui comportent de la mousse, du caoutchouc ou
des matières similaires
-qui sont traités aux détachants inflammables
-qui sont imprégnés de gel, laque pour cheveux,
dissolvant ou autres restes de même type
-qui comportent des traces d'huile, de graisse ou
d'autres restes de même type (linge de cuisine,
cosmétiques)
-qui comportent des restes comme de la cire et
des produits chimiques (par exemple serpillères,
fauberts, torchons).
-linge ouatiné abîmé, coussin ou veste par
exemple.
-textiles mal nettoyés ou souillés de graisse ou
d'huile. Nettoyer les textiles particulièrement sales
(vêtements de travail par exemple) avec une les
sive spécialisée. Veuillez vous renseigner auprès
de votre revendeur de lessive ou de produit de
nettoyage.
-
Conseils importants relatifs au séchage :
Les grandes pièces de métal (boucles, crochets,
oeillets, tirette de fermeture éclair, etc.) doivent être
enveloppées dans un tissu avant le séchage. Ceci
permet d'éviter d'abîmer le tambour (rayures, bos
ses).
Dans le cas des textiles avec fermeture éclair fermée,
les électrodes de détection sur les aubes risquent
d'être court-circuitées. Le processus de séchage
pourrait alors être arrêté trop tôt ou trop tard. Ne sé
chez ces textiles que fermeture éclair ouverte.
Les textiles en maille (par ex. t-shirts, sous-vête
ments) rétrécissent. Un séchage excessif peut les
faire rétrécir davantage. Il ne faut donc pas sélection
ner le programme "Blanc/couleurs intensif" pour ce
type de textiles.
Le linge amidonné peut être séché en machine. Sé
lectionner le programme dont l'humidité résiduelle est
appropriée pour le repassage avec un fer ou une re
passeuse.
Triez le linge suivant le degré de séchage souhaité. Il
n'est pas nécessaire de trier par taille.
Fermer les couettes et les oreillers afin que les petites
pièces de linge ne s'y glissent pas.
Utiliser la charge maximum. Il n'est pas rentable de
trop peu charger la machine. La surcharge altère le
résultat de séchage et peut abîmer le linge.
Si le linge est rincé à l'eau chaude lors du dernier rinçage en machine, l'humidité résiduelle réduite et la
chaleur résiduelle du linge permettent un temps de
traitement plus court et donc une économie
d'énergie.
-
-
-
-
-
-
Les textiles suivants ne doivent pas être séchés :
Les textiles en laine/laine mélangée ont tendance à
feutrer. Ils doivent impérativement être séchés en
programme "Laine".
Les textiles en pur lin peuvent devenir rugueux au
sèche-linge. Veuillez suivre les conseils du fabricant.
9
Page 32
Séchage
Ce sèche-linge ne doit être installé et mis en ser
vice que par le Service Miele.
Avant la mise en service
Avant de charger le sèche-linge, vous devez nettoyer
l'intérieur du tambour avec un tissu doux et sec.
Mettre le sèche-linge en marche et
charger le linge
Enclencher l'interrupteur principal (côté installa
^
tion).
Presser l'interrupteur "s "Marche-Arrêt"
^
Ouvrir la porte.
^
Charger le linge.
^
Défroissez le linge trié avant de le charger dans le
tambour.
-
-
Sélectionner le programme
Régler le programme souhaité avec le sélecteur ro
^
tatif "Sélection programme". La diode correspon
dante s'allume.
L'affichage indique l'humidité résiduelle choisie pour
le programme en %.
-
-
Ne pas oublier de boule doseuse ou d'autre objet
de même type dans le linge.
Capacité de linge (linge sec)
PT 8303
Contenance du tambour en litres
300
Blanc/Couleurs
12-15 kg
Synthétique
8,0 kg
Fin
3,0 kg
Laine
6,0 kg
Blanc/Couleurs
pour sécher les textiles coton/lin
- Séchage intensif 0 % d'humidité résiduelle + 10
min.
- Séchage normal 0 % d'humidité résiduelle
- Humidité 20 % 20 % d'humidité résiduelle
- Humidité 25 % 25 % d'humidité résiduelle
- Humidité 40 % 40 % d'humidité résiduelle
Non repassable
Pour sécher les textiles synthétiques/mélangés.
- Séchage normal 0 % humidité résiduelle
- Humidité 10 % 10 % humidité résiduelle
- Humidité 20 % 20 % humidité résiduelle
Fin 20 % humidité résiduelle
Pour sécher les fibres synthétiques, la rayonne.
Laine 5 minutes de temps de séchage
Pour sécher la laine et la laine mélangée lavable en
machine et résistante avec symbole Woolmark.
Minuterie chaud temps de séchage 20 minutes à
haute température
Minuterie froid temps de séchage 15 minutes pour
aérer les textiles.
Ne pas coincer de pièces de linge dans la porte
vous risqueriez de les abîmer.
^
fermer la porte.
10
Page 33

Séchage
Baisser la température
Presser la touche K "Délicat" pour les textiles déli
^
cats (par ex. en acrylique).
Presser la touche "START/STOP",
^
le programme de séchage commence.
L'affichage digital indique l'humidité actuelle jusqu'à
la fin du programme.
! Séchage
L Refroidissement
O Fin du programme / Infroissable
L'affichage "Déroulement de programme" indique le
déroulement du programme en trois phases, la phase
en cours est allumée en jaune.
-
Fin du programme
La fin du programme est indiquée par le retentisse
ment du signal sonore. " 0 " est affiché.
Ensuite, le refroidissement du linge est effectué.
! Séchage
L Refroidissement
-
Interruption du programme
Le programme est interrompu si :
- l'interrupteur s "Marche/Arrêt" est activé,
- la porte est ouverte,
- la trappe de filtre est ouverte.
Pour continuer le programme, réappuyer sur l'inter
rupteur s "Marche/Arrêt", fermer la porte ou la trappe
de filtre.
L'affichage indique l'humidité résiduelle de consigne
en clignotant et un refroidissement de sécurité est ef
fectué.
Appuyer sur la touche "START/STOP".
^
Le linge ne doit pas être déchargé du
,
sèche-linge avant que le programme de séchage
soit fini et surtout sans phase de refroidisse
ment.
Le linge très chaud peut s'enflammer et causer un
incendie s'il est rangé ou emballé encore chaud.
Ajout/prélèvement de pièces de linge
La porte de chargement peut être ouverte pendant le
séchage afin d'ajouter du linge ou d'en retirer.
-
-
-
O Fin du programme / Infroissable
Si le linge n'est pas retiré du tambour immédiatement
après la fin du programme, la fonction Infroissable
est activée.
Le tambour tourne à intervalle régulier afin d'éviter
que des plis se forment.
Après le séchage
Après la fin du programme
^
Ouvrir la porte.
Si la porte reste fermée, le sèche-linge se remet
brièvement en marche toutes les 30 minutes pour
des raisons de sécurité.
^
Retirer le linge.
Ne pas laisser de pièces de linge dans le tambour.
Si du linge reste dans l’appareil, il peut être en
dommagé au prochain séchage par surséchage.
-
,S'assurer que le tambour est à l'arrêt avant de
décharger le linge. Ne jamais mettre les mains
dans un tambour qui tourne encore.
Pour poursuivre le programme de séchage :
^
fermer la porte.
L'affichage digital indique l'humidité résiduelle de
consigne en clignotant.
Le ventilateur peut s'enclencher automatiquement si
la température à l'intérieur du sèche-linge est élevée.
^
Actionner la touche "START/STOP" pour poursuivre
le programme.
Si aucun autre programme de lavage n'est prévu :
^
fermer la porte.
^
Presser l'interrupteur "s "Marche-Arrêt" pour arrê
ter le sèche-linge.
^
Arrêter l'interrupteur principal (côté installation).
-
^
Contrôler et nettoyer le filtre à peluches le cas
échéant. Fermer la trappe de filtre, risque de se
prendre les pieds dedans.
11
Page 34

Modification de la programmation
Modification de certains programmes de
séchage par reprogrammation
(modification des options standard)
Certains programmes de séchage peuvent être modi
fiés et adaptés à des besoins particuliers ou à des
habitudes de travail.
Conditions :
Le sèche-linge est arrêté avec l'interrupteur
–
"Marche/Arrêt".
La porte est fermée.
–
Accès au mode de programmation :
Maintenir la touche "START/STOP" enfoncée et en
^
clencher le sèche-linge avec l'interrupteur
"Marche/Arrêt".
Maintenir la touche "START/STOP" jusqu'à ce que
^
l'anneau lumineux de la touche reste allumé sans
clignoter.
Relâcher la touche "START/STOP".
^
Exemple de modification de programmation
PT 8303 Profitronic B Plus avec commande
d'humidité résiduelle
-
-
P 2 Modifier le signal sonore de fin de programme
(voir fonctions de programmation client)
Tourner le sélecteur "Sélection programme" d'un
^
cran vers la droite.
La diode K "Délicat" clignote 2 x brièvement.
–
P et 1. clignotent alternativement dans l'affichage
–
digital.
Option de programmation 0 = désactivée - 1 =ac
tivée.
Pour modifier le chiffre de 1 à 0 appuyer sur
^
"START/STOP".
Pour enregistrer la programmation :
arrêter le sèche-linge avec l'interrupteur
^
"Marche/Arrêt".
-
– P et 1. clignotent alternativement dans l'affichage
digital.
La sélection des fonctions de programmation P1 à
P27 (voir fonctions de programmation client) s'effectue en tournant le sélecteur rotatif vers la droite.
La sélection des fonctions de programmationP1àP
27 (voir fonctions de programmation client) peut aussi s'effectuer en pressant la touche K "Délicat".
La sélection de l'option de programmation par
exemple 0 ou 1 s'effectue avec la touche
"START/STOP".
Pour vérifier dans quelle fonction de programma
tion on se trouve, il faut regarder la diode "Délicat"
sur les sèche-linge Profitronic B Plus. Un clignote
ment court indique une unité, un clignotement long
une dizaine.
Exemples : pour la fonction de programmation 5 la
diode clignote 5 fois brièvement. Pour la fonction
de programmation 10 la diode clignote 1 fois lon
guement. Pour la fonction de programmation 45 la
diode clignote quatre fois longuement et cinq fois
brièvement.
-
-
-
12
Page 35
Modification de la programmation
Fonctions de programmation client
N° Fonction de programmation Standard Option de programmation
P 1 Volume du signal sonore
0 = faible 1 = fort
1
P 2 Signal sonore fin de programme
P 3 Fonction mémoire
P 4 Bip d'activation des touches
P 5* Réglage de la résistivité
P 6 Ventilateur et chauffage pendant les pauses
P 7 BC et minuterie froid/chaud inversion activée (0 à 99 s)
P 8 BC et minuterie froid/chaud inversion désactivée (3 à 99 s)
P 9 Non repassable inversion activée (0 à 99 sec.)
P 10 Non repassable inversion désactivée (3 à 99 sec.)
P 11 Laine temps (1 à 99 min.)
P 12 Non repassable inversion activée (0 bis 99 sec.)
P 13 Laine inversion désactivée (3 à 99 sec.)
P 14 Fin inversion activée (0 bis 99 sec.)
P 15 Fin inversion désactivée (3 à 99 sec.)
1
1
0
0
1
60
3
60
3
5
20
10
27
3
0 = désactivé 1 = activé
0 = désactivé 1 = activé
0 = désactivé 1 = activé
0 = normal 1 = faible
0 = désactivé 1 = activé
0=0sec 99=99sec
3=3sec 99=99sec
0=0sec 99=99sec
3=3sec 99=99sec
1=1min 99=99min
0=0sec 99=99sec
3=3sec 99=99sec
0=0sec 99=99sec
3=3sec 99=99sec
P 16 Minuterie froid (1 à 99 min.)
P 17 Minuterie chaud (1 à 99 min.)
P 19 Humidité résiduelle pour programme 1 Blanc/Couleurs
Séchage intensif
P 20 Humidité résiduelle pour programme 2 Blanc/Couleurs
Séchage normal
P 21 Humidité résiduelle pour programme 3 Blanc/Couleurs
Humidité 20 %
P 22 Humidité résiduelle pour programme 4 Blanc/Couleurs
Humidité 25 %
P 23 Humidité résiduelle pour programme 5 Blanc/Couleurs
Humidité 40 %
P 24 Humidité résiduelle pour programme 9 Fin
Séchage normal
P 25 Humidité résiduelle pour programme 10 Non repassable
Humidité 20 %
P 26 Humidité résiduelle pour programme 11 Non repassable
Humidité 10 %
P 27 Humidité résiduelle pour programme 12 Non repassable
15
20
1
1
1
1
1
1
1
1
1
1=1min 99=99min
1=1min 99=99min
1=-2% 2=-4% 0=0%
1=0% 2=-2% 0=2%
1 = 20% 2 = 18% 0 = 22%
1 = 25% 2 = 23% 0 = 27%
1 = 40% 2 = 38% 0 = 42%
1 = 20% 2 = 18% 0 = 22%
1 = 20% 2 = 18% 0 = 22%
1=10% 2=8% 0=12%
1=0% 2=-2% 0=2%
13
Page 36

Anomalies
Messages d’erreurs
Affichage Cause Solution
Surpression dans le conduit d'évacua
N 0
N W
Impossible de démarrer le
sèche-linge
Autres messages
En cas de panne, veuillez contacter le Service Miele.
Veuillez préparer le modèle, le numéro de série (SN)
et la référence article (M.-Nr.).
Ces données sont indiquées sur la plaque signalétique :
tion
Défault d'étancheité dans le conduit
d'air.
Le filtre est obstrué Nettoyer le filtre.
La trappe de filtre n'est pas bien
fermée.
Circuit de délestage
Le sèche-linge continue à fonctionner
sans chauffage, le temps restant ne
change plus.
Contrôler le conduit d'évacuation.
-
Service Miele
Bien tourner la fermeture de trappe de filtre
au maximum dans le sens des aiguilles
d'une montre.
Dès que la déconnexion de délestage est
terminée, le programme est poursuivi.
Elle est soit en haut à l'intérieur de la porte, soit à l'arrière de l'appareil, en haut.
14
Page 37
Nettoyage et entretien
Filtre
Ne jamais faire fonctionner le sèche-linge sans
,
le filtre. Risque d'incendie !
Un filtre abîmé doit être remplacé immédiatement.
Dans le cas contraire, les peluches obstrueraient
les conduites d'air, le chauffage et l'évacuation.
Le fonctionnement optimal du sèche-linge ne pourrait
plus être garanti.
Les peluches viennent se fixer sur le filtre. Nettoyer
les filtres au moins une fois par jour et lorsque 0
est affiché.
En cas de forte présence de peluches, il peut être
nécessaire de nettoyer le filtre plusieurs fois par jour.
Ne pas enlever le filtre pour le nettoyer. Attention de
ne pas endommager le filtre.
Sèche-linge
Avant de commencer tout nettoyage ou entretien, le
sèche-linge doit être arrêté avec l'interrupteur princi
pal (côté installation).
Ne pas utiliser de nettoyeur sous pression ni
,
de jet pour nettoyer la machine.
Nettoyer la carrosserie, le bandeau de commande et
^
les pièces en plastique uniquement avec un produit
nettoyant doux ou un tissu lisse humide, puis sécher.
Après avoir séché des vêtements amidonnés, es
^
suyer l'intérieur du tambour avec un linge humide.
Ne jamais nettoyer le sèche-linge avec un produit
abrasif.
Vérifier le joint et la fermeture de la porte de charge
ment et de la trappe d'accès au filtre.
La prise d'air se trouve à l'arrière du sèche-linge.
Cette prise d'air ne doit en aucun cas être obturée. Il
ne faut donc jamais recouvrir le couvercle du
sèche-linge avec des couvertures ou des toiles.
-
-
-
^
Ouvrir la trappe d'accès au filtre
^
Enlever les peluches du filtre à la main (ne pas utili
ser d'objet pointu ou comportant une arête vive).
L'environnement du sèche-linge, en particulier celui
de la prise d'air, doit être débarrassé des peluches
afin que celles-ci ne soient pas aspirées. Les peluches aspirées se déposent dans le sèche-linge et
peuvent en perturber le fonctionnement.
Faites contrôler les dépôts de peluches par le Service Miele une fois par an et si nécessaire faites-les
nettoyer :
–
batterie de chauffe et conduit de chauffage (chauf
fage électrique)
–
tout l'intérieur du sèche-linge
–
les pales du ventilateur d'évacuation
-
,
Si la maintenance n'est pas effectuée à temps
et de façon professionnelle, baisse de rendement,
pannes et risque d'incendie ne sont pas à exclure.
-
15
Page 38
Installation et raccordement
Ce sèche-linge ne doit être installé et mis en ser
vice que par le Service Miele.
Afin de faciliter les interventions du service
-
après-vente, respecter les cotes minimales et la dis
tance par rapport au mur indiquées.
-
Il doit être installé en conformité avec les règles ap
plicables et ne doit être utilisé que dans une pièce
suffisamment aérée.
Veuillez lire les notices avant d'installer et d'utiliser
cet appareil.
N'installez pas votre sèche-linge dans une pièce ex
posée au gel.
Transporter le sèche-linge avec un chariot élévateur
jusqu'à son emplacement d'installation. Attention,
risque de basculement !
-
-
Enlever l'emballage de transport. Dévisser les vis
(Torx T20 et 30) de l'habillage en bois et enlever l'habillage en bois.
Soulever le sèche-linge avec le chariot élévateur et
monter les pieds fournis (x 4).
PT 830x
x 1800 mm
y 710 mm
z 1090 mm
16
Page 39

Installation et raccordement
Calage
Il n'est pas nécessaire de disposer le sèche-linge sur
un socle. Les inégalités du sol doivent être compen
sées.
Pour un bon fonctionnement, le sèche-linge doit être
installé parfaitement d'aplomb.
Régler l'aplomb du sèche-linge en ajustant les pieds
vissables A.
-
Réduction du niveau sonore
Le sèche-linge est équipé d'un ventilateur d'évacua
tion qui émet un certain bruit pendant le fonctionne
ment.
Pour réduire l'émission sonore, il est possible de
monter un silencieux sur le tuyau d'évacuation du
sèche-linge. (voir notice d'installation ; disponible
parmi les accessoires Miele)
Module de communication XKM RS232
Le module de communication permet le raccorde
ment d'un ordinateur à la machine par une interface
de série.
Le logement du boîtier de communication se trouve
sur le côté du lave-linge.
-
-
-
Après l'ajustage, les rondelles B doivent être serrées
à fond contre la tôle de fond.
Mettre en place la signalétique en français
Retirer le film de protection du panneau des com
mandes.
Soulever légèrement le bas du film de panneau des
commandes sous le sélecteur de programme.
Insérer la signalétique et l'ajuster.
Tirer la bande placée dessous et coller le film de
panneau des commandes en bas.
-
17
Page 40

Installation et raccordement
Branchement électrique
L'équipement électrique du sèche-linge correspond
aux normes IEC 335-1 et IEC 335-2-11.
Tous les travaux concernant le branchement élec
trique doivent être effectués par un électricien agréé.
Le branchement électrique doit être conforme aux
normes en vigueur.
Caractéristiques techniques, voir plaque signalétique
ou schéma électrique fourni. Le schéma électrique
est joint à l'appareil.
Le sêche-linge ne doit fonctionner qu'à la tension, à
la fréquence et avec les fusibles indiqués sur la
plaque signalétique.
-
Une fois la machine installée, il faut impérative
,
ment reposer toutes les pièces d'habillage exter
nes.
-
-
Branchement par prise de courant en fonction des ré
glementations nationales (la prise doit être accessible
après l'installation de l'appareil). Un contrôle de sé
curité électrique lors de la mise en service de l'appa
reil par exemple pourra ainsi être effectué sans pro
blème.
Pour le raccordement fixe, une déconnexion tous pô
les doit être présente côté installation. Ce dispositif
peut être constitué d'un interrupteur à ouverture de
contact de min. 3 mm. Il peut s'agir d'un disjoncteur
automatique, de fusibles ou de contacteurs.
En cas de remplacement du câble électrique, utiliser
une pièce de rechange Miele d'origine ou un câble
avec douille sertie sur l'extrémité des fils.
Si le lave-linge est débranché, le dispositif de sectionnement doit être verrouillable ou le point de sectionnement doit pouvoir être surveillé.
Une fois le raccordement effectué le sens de rotation
de la turbine du ventilateur doit être vérifié. Elle doit
tourner dans le sens des aiguilles d'une montre. Si
elle tourne dans le sens contraire des aiguilles d'une
montre, deux phases doivent être inversées sur la
prise réseau.
-
-
-
-
-
Liaison équipotentielle
Effectuer une liaison équipotentielle en cas de cou
rant de fuite >10 mA.
Arrivée/évacuation d'air
Le sèche-linge ne doit être utilisé que si un conduit
d'évacuation est raccordé et que l'aération de la
pièce est suffisante.
Voir le plan d'installation fourni.
,
Seuls des professionnels sont autorisés à ré
parer les détériorations. Adressez-vous immédia
tement à Service Miele.
18
-
-
-
Page 41

Caractéristiques techniques
Type PT 8303 EL
Hauteur en mm 1800
Largeur en mm 710
Profondeur en mm 1063
Profondeur porte ouverte en mm 1716
Poids en kg 138,8
Contenu du tambour en l 300
Capacité maxi en kg (linge sec) 15
Tension Voir plaque signalétique
Puissance de raccordement Voir plaque signalétique
Fusible Voir plaque signalétique
Labels de conformité Voir plaque signalétique
Charge au sol max. en fonctionnement en N 1582
Norme de sécurité produit IEC 335-1, IEC 335-2-11
Niveau de pression acoustique en dB (A), EN ISO 11204 < 70
Niveau de puissance acoustique en dB (A), EN ISO 9614-2 < 80
19
Page 42

Caractéristiques techniques
20
Page 43

21
Page 44

&DQDGD
,PSRUWHU
0LHOH/LPLWHG
3URIHVVLRQDO'LYLVLRQ
&OUR6ALLEY$RIVE
6AUGHAN/.,+6
0HONE
&AX
WWWMIELEPROFESSIONALCA
PROFESSIONAL MIELECA
0LHOH3URIHVVLRQDO7HFKQLFDO6HUYLFH
0HONE
&AX
SERVICEPROFESSIONAL MIELECA
*HUPDQ\
0DQXIDFWXUHU
-IELE#IE+'
#ARL-IELE3TRAE
'àTERSLOH
Sous réserve de modifications/4814
M.-Nr. 07 985 561 / 00
 Loading...