

Page 1
Operating and Installation instructions
Steam oven
DG 5070
DG 5080
DG 5088
To avoid the risk of accidents or
damage to the appliance it is
essential to read these
instructions before it is installed
and used for the first time.
en-GB
M.-Nr. 07 207 620
Page 2

Contents
Warning and Safety instructions .....................................5
Caring for the environment.........................................10
Guide to the appliance ............................................11
Front view........................................................11
Accessories supplied ..............................................12
Control panel .....................................................14
Description of the functions ........................................15
Sensors .........................................................15
Display ..........................................................16
Condensate tray ..................................................17
Water container ...................................................17
Temperature .....................................................17
Cooking duration (time) .............................................17
Noises ..........................................................17
Heating-up phase .................................................18
Cooking phase....................................................18
Steam reduction...................................................18
Keeping warm ....................................................18
Before using for the first time.......................................19
Setting up the appliance for using for the first time........................19
Cleaning for the first time............................................21
Setting the correct boiling point for water ...............................22
Functions .......................................................23
Brief operating instructions ........................................24
Preparing the appliance for use ......................................24
Selecting a function ................................................24
Setting the temperature .............................................24
Setting a cooking duration...........................................24
At the end of the duration ...........................................25
After use.........................................................25
2
Page 3

Contents
Operation .......................................................26
During operation ..................................................26
Interrupting operation ............................................26
Changing a programme ..........................................26
Saving settings .................................................27
Insufficient water................................................27
Automatic........................................................28
Menu cooking (cooking whole meals) ..................................29
User programmes .................................................30
Additional functions ..............................................32
Start time / Finish ..................................................32
Pre-heat .........................................................32
Minute minder time ................................................34
System lock ......................................................35
Settings.........................................................36
Language J ......................................................36
Time of day ......................................................36
Start ............................................................37
Steam reduction...................................................37
Keeping warm ....................................................37
Pre-heat .........................................................37
Recommended temperatures ........................................37
Water hardness ...................................................38
Display ..........................................................38
Volume ..........................................................38
Safety ...........................................................38
Units............................................................39
Showroom programme .............................................39
Factory default ....................................................39
Cleaning and care ................................................40
General notes ....................................................40
Appliance front ...................................................41
Oven interior .....................................................42
3
Page 4

Contents
Condensate tray, rack and cooking containers...........................42
Automatic door release .............................................42
Water container ...................................................43
Coupling seal ..................................................44
Descaling........................................................45
Removing and refitting the door ......................................47
Problem solving guide ............................................48
Optional accessories..............................................51
Cooking containers ................................................51
Cleaning and care products .........................................53
Safety instructions for installation...................................55
Appliance and building-in dimensions ...............................56
Installation in a tall unit..............................................56
Installation in a base unit ............................................57
Installation in a tall unit in combination with an oven.......................58
Installing the appliance ............................................59
Electrical connection..............................................60
After sales service, data plate ......................................62
4
Page 5

Warning and Safety instructions
This steam oven conforms to current
safety requirements. Inappropriate
use can, however, lead to personal
injury and damage to property.
To avoid the risk of accidents and
damage to the steam oven, please
read these instructions carefully
before installation and before using
it for the first time. They contain
important notes on the installation,
safety, operation and care of the
appliance.
Keep these instructions in a safe
place and ensure that new users are
familiar with the content. Pass them
on to any future owner.
Correct application
This steam oven is intended for
~
domestic use only, and must only be
used as described in these instructions.
Any other usage is at the owner's risk
and could be dangerous. The
manufacturer cannot be held liable for
damage resulting from incorrect or
improper use or operation.
This steam oven is not intended for
~
use by persons (including children)
with reduced physical, sensory or
mental capabilities, or lack of
experience and knowledge, unless they
are supervised while using it or have
been given instruction concerning its
use by a person responsible for their
safety.
5
Page 6

Warning and Safety instructions
Safety with children
Activate the safety lock to ensure
~
that children cannot switch on the
appliance inadvertently.
Keep children away from the steam
~
oven at all times. It is not a toy! To
avoid the risk of injury do not allow
them to play with it or to play with the
controls. Supervise children whilst you
are using it.
Older children may use the
~
appliance only when its operation has
been clearly explained to them and
they are able to use it safely,
recognising the dangers of incorrect
use.
Make sure that children do not
~
attempt to open the door when the
appliance is in operation. To safeguard
against burning, keep children well
away from the appliance at all times.
Do not allow children to lean against
~
the open oven door, nor to sit on it or
swing on it.
Packaging, e.g. cling film,
~
polystyrene and plastic wrappings,
must be kept out of the reach of babies
and young children. Danger of
suffocation. Dispose of or recycle all
packaging safely as soon as possible.
Technical safety
Before installation, check the steam
~
oven for visible signs of damage. Do
not install and use a damaged
appliance. A damaged appliance is
dangerous.
Before connecting the appliance to
~
the mains supply, ensure that the
connection data on the data plate
(voltage and connected load) match
the mains supply. Consult a qualified
electrician if in any doubt.
The electrical safety of this
~
appliance can only be guaranteed
when continuity is complete between it
and an effective earthing system which
complies with current local and national
safety regulations. It is most important
that this basic safety requirement is
present and regularly tested, and
where there is any doubt, the
household wiring system should be
inspected by a qualified electrician.
The manufacturer cannot be held liable
for the consequences of an inadequate
earthing system (e.g. electric shock).
6
Page 7

Warning and Safety instructions
This appliance is supplied with a
~
moulded plug ready for connection to a
switched socket. If you wish to connect
it to a double-pole fused spur
connection unit, or to an isolator switch
or if the appliance is supplied without a
plug, it must be installed by a suitably
qualified and competent person in strict
accordance with current local and
national safety regulations. The
manufacturer cannot be held liable for
damage caused by incorrect
installation or connection.
For safety reasons, this appliance
~
may only be used when it has been
built in. This is necessary to ensure that
all electrical components are shielded.
Never open the casing of the
~
appliance.
Tampering with electrical connections
or components and mechanical parts is
highly dangerous to the user and can
cause operational faults.
Installation, maintenance and
~
repairs may only be carried out by a
suitably qualified and competent
person in strict accordance with current
national and local safety regulations.
Repairs and other work by unqualified
persons could be dangerous. The
manufacturer cannot be held liable for
unauthorised work.
If the connection cable is damaged,
~
it must be replaced with a special
connection cable of type H 05 V V-F
(pvc insulated), available from the Miele
Spare Parts Department.
Faulty components must only be
~
replaced by genuine Miele original
spare parts. The manufacturer can only
guarantee the safety of the appliance
when Miele replacement parts are
used.
During installation, maintenance and
~
repair work, the appliance must be
disconnected from the mains electricity
supply. It is only completely isolated
from the electricity supply when:
the mains fuse is disconnected,
–
the screw-out fuse is removed (in
–
countries where this is applicable),
– it is switched off at the wall socket
and the plug is withdrawn from the
socket, or it is switched off at the
isolator.
While the appliance is under
~
guarantee, repairs should only be
undertaken by a service technician
authorised by the manufacturer.
Otherwise the guarantee is invalidated.
Do not connect the steam oven to
~
the mains electricity supply by a
multi-socket unit or an extension lead.
These do not guarantee the required
safety of the appliance (e.g. danger of
overheating).
In countries where there are areas
~
which may be subject to infestation by
cockroaches or other vermin, pay
particular attention to keeping the
appliance and its surroundings in a
clean condition at all times. Any
damage caused by cockroaches or
other vermin will not be covered by the
guarantee.
7
Page 8

Warning and Safety instructions
Correct use
For added protection, it is advisable
~
to use heat-resistant pot holders or
gloves when using the appliance. Do
not let them get damp or wet, as this
causes heat to transfer through the
material more quickly with the risk of
scalding or burning yourself.
When putting cooking containers or
~
the condensate tray into the oven or
taking them out, take care not to spill
the contents. Avoid contact with hot
steam, and do not touch the hot oven
interior walls. Danger of burning and
scalding.
If using plastic cooking containers,
~
make sure that they are heat- and
steam-resistant to 100 °C. Otherwise
they may melt, distort or break.
Do not use the appliance to heat up
~
food in sealed jars and tins. Pressure
will build up inside them and they can
explode causing damage to the
appliance, as well as the risk of injury
and scalding.
Do not leave cooked food in the
~
oven and do not use any cooking
containers which are susceptible to
corrosion as this could lead to
corrosion in the appliance.
The appliance is designed in such a
~
way that there will always be a little
residual water left in the water container
after use. If there is no residual water,
there is something wrong. Call the Ser
vice Department.
Do not immerse the water container
~
in water, or clean it in a dishwasher.
Connecting the water container into the
appliance when wet could cause an
electric shock.
For reasons of hygiene and to
~
prevent the build-up of moisture in the
appliance, the water container should
be emptied after each use.
Take care not to tip the water
~
container when taking it out of the
appliance. Hot water can scald.
-
Always ensure that food is
~
sufficiently cooked or reheated.
Some foods may contain
micro-organisms which are only
destroyed by thorough cooking at a
sufficiently high temperature for long
enough. Therefore, when cooking or
reheating food such as poultry, it is
particularly important that the food is
completely cooked through. If in doubt,
select a longer cooking or reheating
time.
8
Page 9

Warning and Safety instructions
When using an electric socket near
~
the steam oven, care should be taken
that the cable of the appliance cannot
get trapped by the steam oven door.
The insulation on the cable could
become damaged, giving rise to an
electric shock hazard.
Do not place heavy objects on the
~
open door. The door can support a
maximum weight of 8 kg.
If the appliance is not going to be
~
used for a longer period of time, e.g.
whilst on holiday, it should be
thoroughly cleaned and dried
beforehand to prevent the build-up of
odours etc. Make sure that the water
container is empty. Leave the door
open.
The manufacturer cannot be held
liable for damage caused by
non-compliance with these Warning
and Safety instructions.
9
Page 10
Caring for the environment
Disposal of the packing
material
The transport and protective packing
has been selected from materials which
are environmentally friendly for
disposal, and can normally be
recycled.
Ensure that any plastic wrappings,
bags, etc. are disposed of safely and
kept out of the reach of babies and
young children. Danger of suffocation.
Rather than just throwing these
materials away, please ensure they are
recycled.
Disposing of your old
appliance
Electrical and electronic appliances
often contain materials which, if
handled or disposed of incorrectly they
could be potentially hazardous to
human health and to the environment.
They are, however, essential for the
correct functioning of your appliance.
Please do not therefore dispose of it
with your household waste.
Please dispose of it at your local
community waste collection/recycling
centre or contact your dealer for
advice. Ensure that it presents no
danger to children while being stored
for disposal.
10
Page 11
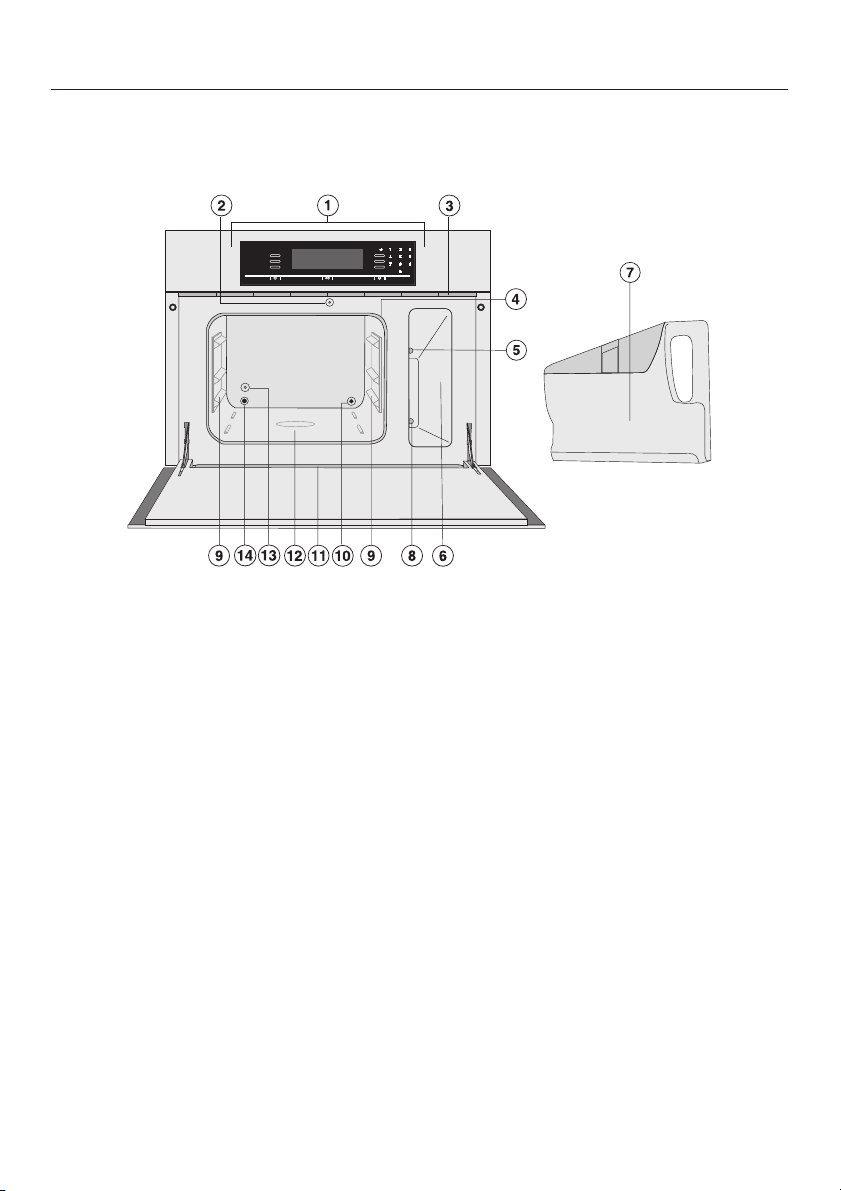
Front view
Guide to the appliance
a Control panel
b Automatic door release for reducing
steam
c Ventilation outlet
d Door seal
e Steam channel
f Compartment for water container
g Water container (with insert)
h Contact point for water container
i Shelf levels
j Steam inlet
k Drip channel in the oven
l Floor heater
m Temperature sensor
n Outlet for air from oven interior
11
Page 12
Guide to the appliance
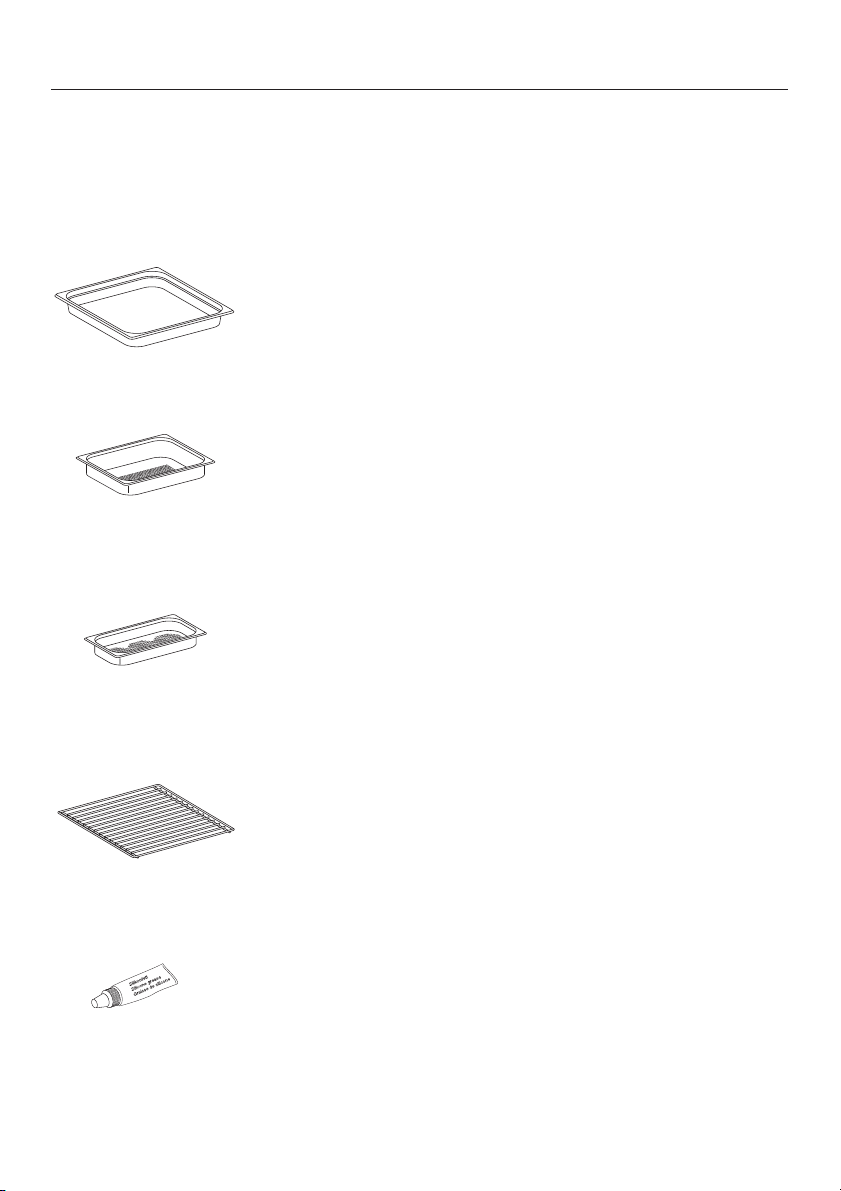
Accessories supplied
The accessories supplied with your appliance as well as a
range of optional ones are available to order from Miele (see
"Optional accessories").
Condensate tray
To catch excess moisture
Gastronorm size GN 2/3
325x350x40 mm (WxDxH)
DGGL 8
1 perforated cooking container
gross capacity 2.0 litres / useable capacity 1.7 litres
Gastronorm size GN 1/2
325x265x40 mm (WxDxH)
DGGL 1
2 perforated cooking containers
gross capacity 1.5 litres / useable capacity 0.9 litres
Gastronorm size GN 1/3
325x175x40 mm (WxDxH)
Rack
Silicone grease
12
For placing your own cooking containers on
For lubricating the coupling seal on the water container
Page 13

Descaling tablets
For descaling the water container.
Miele steam oven cookbook
A selection of the best recipes from the Miele test kitchen.
Guide to the appliance
13
Page 14
Guide to the appliance
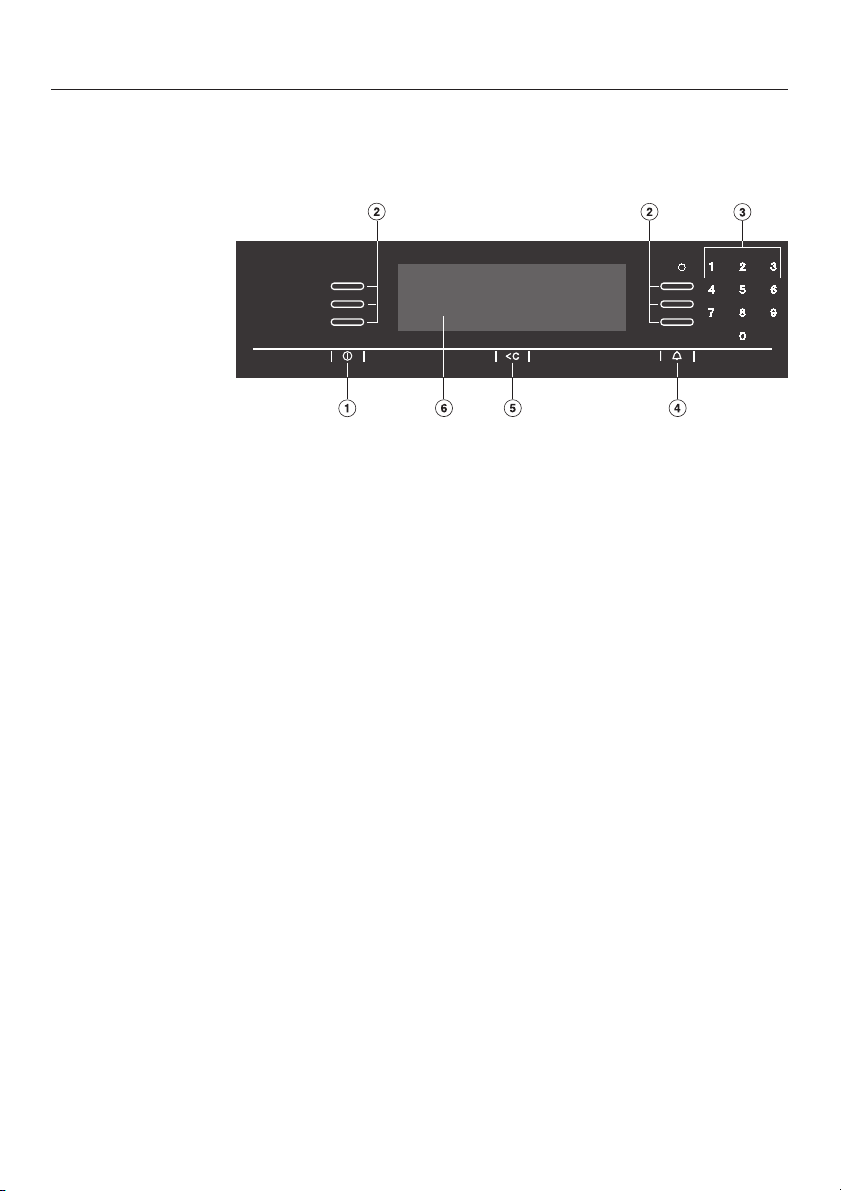
Control panel
a On/Off sensor
b Selector sensors
c Numerical keypad
d Minute minder
14
e "Clear"
f Display
Page 15

Sensors
Description of the functions
Lightly touch the sensors to operate the appliance. An
audible tone will sound each time a sensor is touched.
You can adjust the volume in the Settings menu (see
"Settings / Volume").
Sensor Function
s For switching the appliance on and off.
C For scrolling through the menus.
For selecting the option or value shown in the
display next to the sensor.
(The sensors light up when it is possible to make
a selection).
0,1, 2, ... For entering temperatures.
For entering times.
(The sensors light up when an entry is possible or
necessary).
< For reverting to the previous menu.
For deleting the previous entry.
l For activating and deactivating the minute
minder.
For selecting the minute minder time.
15
Page 16
Description of the functions
Display
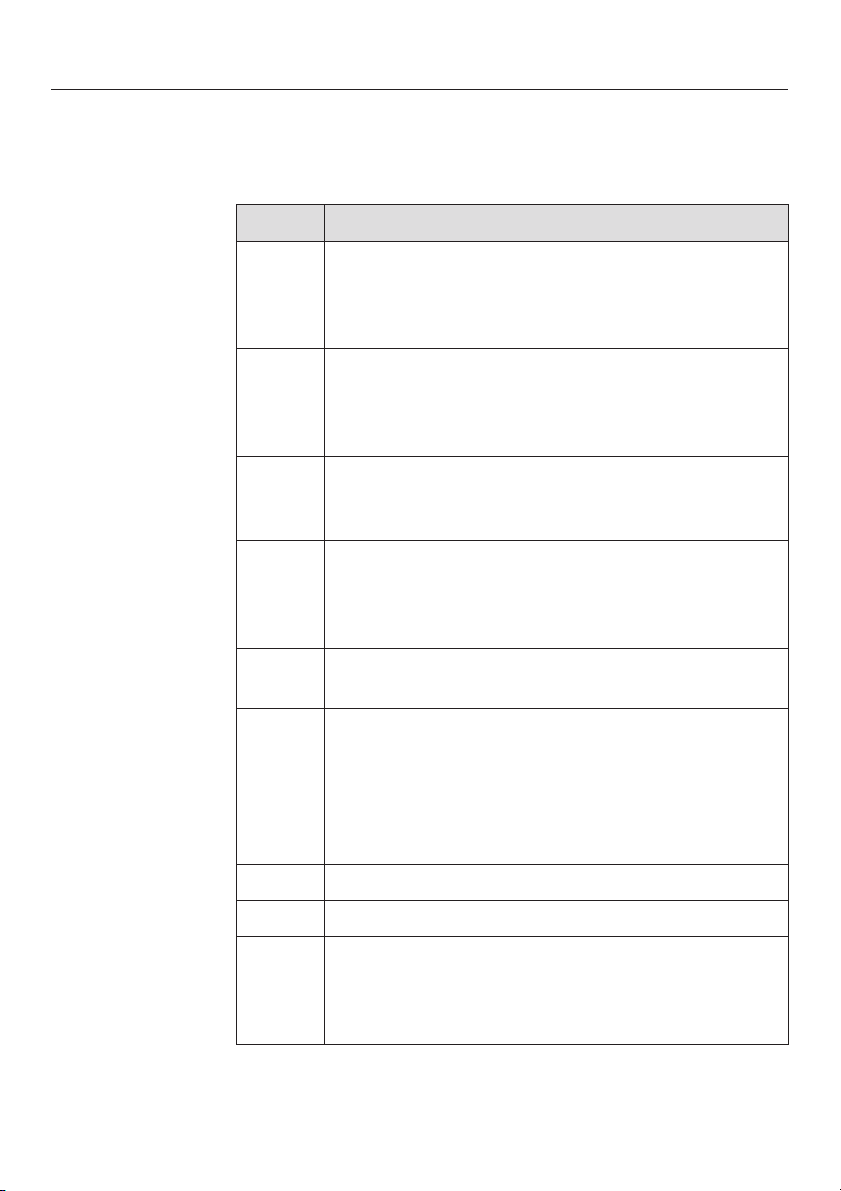
The following symbols will appear in the display in addition to
the text:
Symbol Meaning
ß Appears beside an option or a prompt, e.g.
"Continue" and is allocated to a sensor.
You select the option you want by pressing the
sensor beside the dot.
A maximum of 3 options can be shown in the
p
---- Adotted line will appear under the last option
+ / - For entering temperatures.
display.
These arrows indicate if more than three options
are available.
available. The beginning of the list will appear
under the dotted line.
For entering times.
(These only appear when an entry is possible or
necessary).
16
L A tick will appear beside the option which is
currently selected.
Water level in the water container:
<
=
?
full
half full
nearly empty.
R Start time
O Programme finished
System lock changed to "Permitted":
)
$
Off = operation possible
On = operation not possible.
Page 17

Condensate tray
Water container
Temperature
Description of the functions
When you are using perforated containers, place the
condensate tray on the floor of the appliance to collect any
drops of liquid and allow them to be removed easily.
The maximum water level is 1.2 litres, the minimum 0.75 litres.
The water level markers are located inside and outside the
container. On no account exceed the upper or maximum
level marker.
The maximum quantity of 1.2 litres of water is sufficient to run
a cooking programme at 100 °C for approx. 2 hours, and the
minimum quantity of 0.75 litres of water is sufficient to run a
cooking programme at 100 °C for approx. 30 minutes,
providing the door is not opened.
The water level in the water container is represented by a
symbol in the display.
Some of the functions are allocated with a recommended
temperature. You can alter the recommended temperature for
an individual cooking process or permanently (see "Settings /
Recommended temperature").
Cooking duration (time)
A duration of between 1 minute (-:-1) and 10 hours (10:00)
can be set.
If you are using the numerical keypad, you must enter the
duration in hours and minutes if it is more than 59 minutes.
Example: Duration of 80 minutes = 1:20.
Noises
You can hear the noise of the fan when the appliance is
operating.
Noises similar to those of a kettle can be heard when steam is
being generated.
17
Page 18

Description of the functions
Heating-up phase
During the heating-up phase the oven compartment is heated
to the set temperature. The display will show the temperature
of the cooking compartment as it rises.
The duration of the heating-up phase will depend on the
quantity and the temperature of the food. In general the
heating-up phase will last for approx. 7 minutes. The duration
will be longer if you are preparing frozen or refrigerated food.
Filling the water container with hot water will shorten the
heating-up time.
Cooking phase
The cooking phase begins when the set temperature is
reached. During the cooking phase the duration remaining
(time left) will be shown in the display.
Steam reduction
The steam oven is delivered with this function activated. It
reduces the amount of steam which escapes from the
appliance when the door is opened at the end of the cooking
duration. You can deactivate the steam reduction function
(see "Settings / Steam reduction").
Keeping warm
18
The steam oven is set at the factory so that if it is not switched
off at the end of a cooking programme, it will maintain a
temperature of 70°C for a maximum of 15 minutes to keep
food warm. You can deactivate the keeping warm function
(see "Settings / Keeping warm").
Please note that delicate food, especially fish, can continue
cooking whilst being kept warm.
Please refer to the "User instructions" booklet supplied with
your appliance for more information and tips on how to use
your steam oven.
Page 19

Before using for the first time
Setting up the appliance for using for the first time
The appliance will switch on automatically when it is
connected to the electricity supply.
A welcome screen will appear in the display and you will then
be requested to select some basic settings which are needed
to set up the appliance up for using for the first time.
Follow the instructions in the display.
Setting the language
The welcome screen will be replaced by the request to set a
language:
Touch one of the sensors next to the arrows until the
^
language you want appears in the display.
^ Touch the sensor to the left hand side of the language you
want.
A tick L will appear beside the language selected. If you
have chosen the wrong language by mistake you can follow
the flag symbol J to return to the Language sub-menu.
^ Confirm your selection by touching the sensor next to "OK"
(the lowest of the three sensors beside the display on the
right hand side).
Clock format
The request to select a Clock format will appear. The default
setting for the clock is 24 h.
^
Touch the sensor next to the clock format you want.
^
Touch the sensor next to "OK" to confirm your selection.
19
Page 20

Before using for the first time
Time of day
You will then be requested to enter the Time of day.
You can either use the sensors next to + and - or the
numerical keypad to enter the time.
Enter the time as 4 figures, e.g. 10 minutes past 9 o'clock in
the morning = 09:10.
Enter the hour and minutes and confirm with "OK".
^
Time of day display
You will then be asked if you want the display to always show
the time:
On = the display will always show the time of day
On for 60 seconds = the display will show the time for 60
seconds after the appliance is switched off
Do not display = the display will only show the time when the
appliance is switched on
^ Select the option you want.
After you have confirmed your selection with "OK", the display
will show messages to tell you that:
20
– your appliance is set up ready to take the Miele|home
system.
–
your appliance has been successfully set up to use it for
the first time.
^
Confirm with "OK".
Your steam oven is now ready for use.
Page 21

Please stick the extra data plate for the appliance supplied
with this documentation in the space provided in the "After
sales service" section of this booklet.
Cleaning for the first time
Remove any protective foil and adhesive labels.
Water container
Take the water container out of the appliance and remove the
insert (see "Cleaning and care / Water container"). Rinse the
water container and the insert thoroughly by hand using hot
water. Do not use any washing-up liquid or detergent.
Do not clean the water container or the insert in a
dishwasher. Do not immerse the water container in water.
Accessories / Oven interior
Take all accessories out of the oven. Wash them in a mild
solution of washing-up liquid and hot water or in the
dishwasher.
The interior of the steam oven has been treated at the factory
with a conditioning agent. To remove this, clean the oven
interior with a mild solution of washing-up liquid and hot water
and then dry thoroughly with a soft cloth.
Before using for the first time
21
Page 22

Before using for the first time
Setting the correct boiling point for water
The boiling point for water at a high altitude above sea level
will be lower than the boiling point for water at sea level. To
adjust the boiling point for the altitude in your area, fill the
water container with mains tap water (see "Brief operating
instructions / Preparing the appliance for use") and then run
the Steam cooking / Universal (100 °C) programme for 15
minutes. Proceed as described in "Brief operating
instructions".
This procedure sets the correct boiling point for water for the
altitude in your area and also flushes out the waterways.
Warning! A lot of steam will be emitted from the appliance.
If you move house, the appliance will need to be re-set for
the new altitude if this differs from the old one by more than
300 m. To do this, descale the appliance (see "Cleaning and
care / Descaling").
22
Page 23
Functions
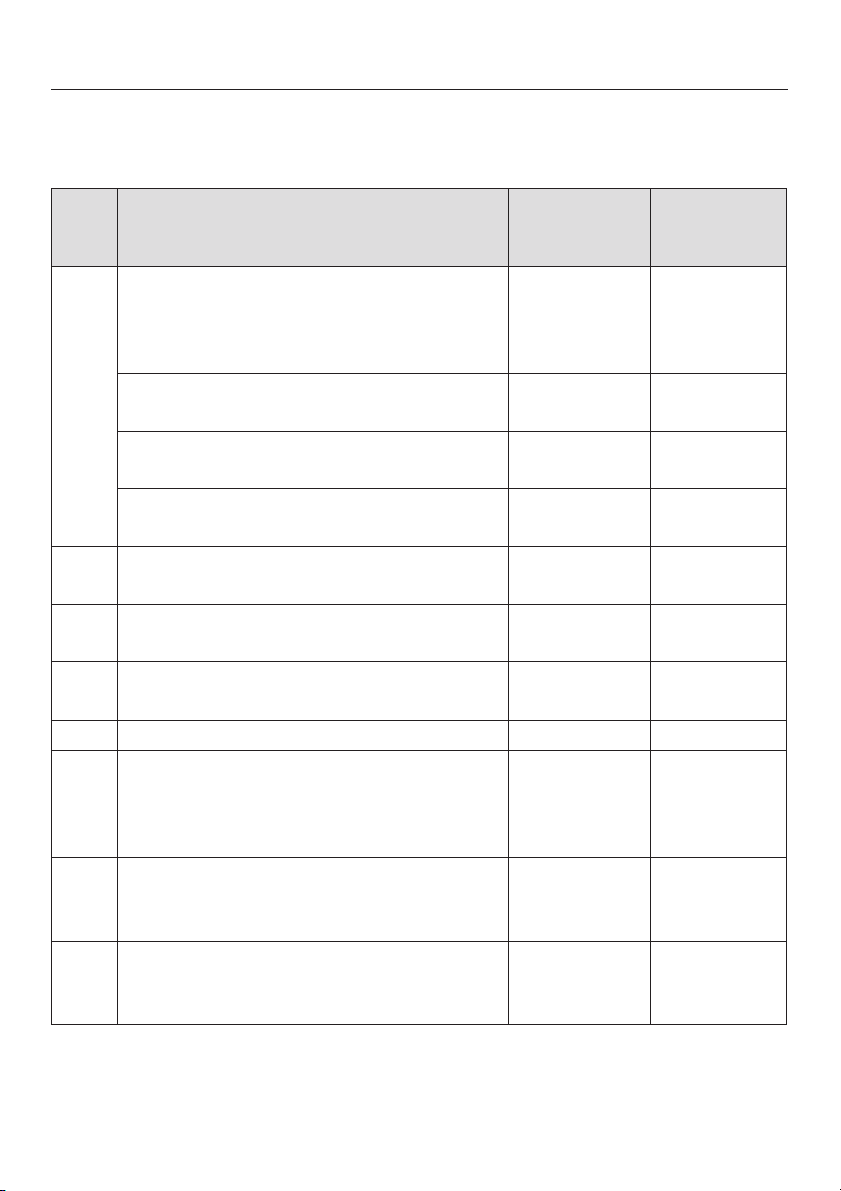
Please refer to the "User instructions" booklet supplied with your appliance for
more information on the following functions as well as tips on how to use your
steam oven.
Function / Menu Recommende
d
temperature
Steam cooking universal °C 100
2
Cook fish °C 85
Cook vegetables °C 100
Cook meat °C 100
Reheat °C 100
For cooking of all types of food,
bottling, extracting juice with steam,
menu cooking
(
) Defrost °C 60
F Descale --
For descaling the water container
c Automatic -
Menu cooking --
2
User programmes --
Settings --
Various types of food can be
cooked to be ready at the same
time
You can create and store cooking
processes
You can change the factory default
settings
°F 212
°F 185
°F 212
°F 212
°F 212
°F 140
Temperature
range
°C 40 - 100
°F 105 - 212
°C 75 - 100
°F 165 - 212
°C 90 - 100
°F 195 - 212
°C 90 - 100
°F 195 - 212
°C 80 - 100
°F 175 - 212
°C 50 - 60
°F 120 - 140
23
Page 24

Brief operating instructions
Preparing the appliance for use
Fill the water container with mains tap water up to at least
^
the "min" marker. You do not need to remove the insert.
Only use mains tap water. Never use distilled or mineral
water or other liquids.
Push the water container into the appliance until it
^
connects.
If the water container is not positioned correctly, the
appliance will not heat up and after a while F20 will appear in
the display (see "Problem solving guide").
Place the food in the oven.
^
Selecting a function
^ Switch on the appliance s.
^ If the function displayed is not the one you want, touch one
of the illuminated sensors next to the arrows in the display
until the function you want appears.
^ Touch the sensor beside the function to select it.
Setting the temperature
^
If you want to use the recommended temperature then
confirm with "OK". If you want to change the temperature,
enter the new temperature with either -/+ or the numerical
keypad. Confirm with "OK".
Setting a cooking duration
^
Enter the cooking duration you require with +/-or the
numercal keypad, e.g. 20 minutes.
^
Confirm your selection by touching "OK".
The appliance will start automatically after the duration has
been confirmed.
24
Page 25

At the end of the duration
At the end of the cooking duration an audible tone will sound
and "Steam reduction" and "Programme finished" will appear
in the display. The door will open slightly during steam
reduction.
Wait until "Steam reduction" goes out in the display before
opening the door and removing the food.
Switch off the appliance.
^
The fan will continue to run for a while after the oven has been
switched off. If you want to reduce the run-on time, you can
do so by removing the water container as soon as you have
switched the appliance off.
The keeping warm function will be activated if you do not
switch the oven off.
When putting cooking containers or the condensate tray
into the steam oven or taking them out, take care not to
spill the contents. Avoid contact with hot steam, and do
not touch the hot oven interior walls. Danger of burning
and scalding.
Brief operating instructions
After use
^
Remove the condensate tray and empty it.
^
Remove the water container by pushing upwards slightly
as you take it out of the appliance. Empty it.
^
After each use, clean and dry the whole appliance as
described in "Cleaning and care".
^
Leave the door open until the cooking compartment is
completely dry.
The appliance is designed in such a way that there will
always be a little residual water left in the water container
after use. If there is no residual water, there is something
wrong. Call the Service Department.
25
Page 26

Operation
During operation
Interrupting operation
Operation is interrupted as soon as the door is opened. The
heating will be switched off and the cooking duration
remaining stored in memory.
Operation will resume when the door is closed.
When the door is closed, the pressure has to equalise, which
can cause a whistling sound.
The oven will heat up again and the display will show the
temperature of the cooking compartment as it rises. Once the
set temperature has been reached, the display will change to
show the cooking duration remaining as it counts down.
Steam will escape when the door is opened. Step back
from the steam oven and wait until the steam has
dissipated.
When putting cooking containers or the condensate tray
into the oven or taking them out, take care not to spill the
contents. Avoid contact with hot steam, and do not touch
the hot oven interior walls. Danger of burning and
scalding.
Changing a programme
^
Select "Change".
^
Select the setting you wish to change, e.g. "Temperature"
and then enter the change.
^
Confirm with "OK".
26
Page 27

Saving settings
Insufficient water
Operation
You can save the settings for a cooking programme while it is
in progress, so that you can call it up again from the User
programmes menu at a later date.
Select "Change".
^
Touch one of the sensors next to the arrows until "Save as"
^
appears.
Select "Save as".
^
A summary will appear in the display.
Confirm with "Continue".
^
Follow the instructions given in "User programmes - Save".
^
If the steam oven runs out of water during operation, an
audible tone will sound and the display will prompt you to fill
the water container with fresh tap water.
^ Remove the water container and fill it with fresh tap water.
^ Push the water container into the appliance until it
connects.
^ Close the door.
Operation will continue.
27
Page 28

Operation
Automatic
The weight entry in the Automatic programmes refers to the
weight per piece. For example, you can cook just one piece
of salmon weighing 250 g or 10 pieces of salmon weighing
250 g at the same time.
Fill the water container with fresh tap water and push it into
^
the appliance.
Insert the condensate tray, if required, at the lowest level.
^
Place the food in the appliance.
^
Switch on the appliance s.
^
^ Select the programme you want.
^ Select the food you want.
Depending on the programme and the type of food
selected,the display will prompt you to enter the size and how
well done you want the food. The factory default setting is
medium (for how well done you want the food). It is best to
use the preset value to start with. If food is not cooked
sufficiently it can be put back in the oven and cooked some
more.
28
^
Enter the values you want and confirm with "Continue".
^
Start the cooking programme straight away or enter a start
time or end time (see "Start time / Finish").
Page 29

Menu cooking (cooking whole meals)
You can select up to three ingredients, e.g. fish, rice and
vegetables. The steam oven uses cooking duration for its
calculations so the food with the longest cooking duration
must be placed in the oven first.
Fill the water container with fresh tap water and push it into
^
the appliance.
Insert the condensate tray, if required, at the lowest level.
^
Switch on the appliance s.
^
Select "Menu cooking".
^
^ Select the food you want.
Depending on the type of food selected the display will
prompt you to enter the size and how well done you want the
food.
^ Select or enter the values you want and confirm with
"Continue".
Operation
^ Select "Add next ingredient".
^ Select the food you want and proceed in the same way as
with the first ingredient.
^
Repeat for the third food type.
After you have confirmed "Start menu cooking", the display
will show the food type and the shelf runner.
At the end of the heating-up phase, the display will show
when the next food type is to be placed in the oven. When the
time for the next food type to be placed in the oven is
reached, the display will show the food type and the shelf
runner. This process will be repeated for the third food type.
You can also use the steam oven to cook a menu / whole
meal using types of food which do not appear in the
display list. See "Menu cooking" in the User instructions
supplied with the appliance for more information on how to
do this.
29
Page 30

Operation
User programmes
You can save up to 25 cooking programmes under their own
individual names in the User programmes menu.
If you have not yet created any user programmes, the display
will only show the functions.
If user programmes have already been created and saved,
the following will appear:
Select
User programmes can be called up and started.
Create
You can create user programmes.
Change
Existing programmes will be shown in the display and can be
altered.
Delete
Existing programmes can be deleted.
Use in main menu
You can place up to three existing programmes in the main
menu. When doing this you can allocate the programme to a
specific position at the end of the Main menu.
Create
30
^
Select "User programmes".
^
Select "Create".
^
Select the function you want.
^
Enter the settings as normal and confirm with "Continue".
A summary will appear in the display.
^
Confirm with "Continue".
You can now save the cooking programme.
Page 31

Save
Operation
The programme can be saved under the pre-set name, e.g.
"Dish 1", under a name of your choice, e.g. "Minestrone" or a
combination of both, e.g. "Dish 1 Minestrone"
Use the sensors on the left and right hand side of the
alphabet to highlight the letters you want and confirm them
with "Select character". The appliance will enter the letters as
lower or upper case automatically. Complete the process with
"Confirm name".
31
Page 32

Additional functions
Start time / Finish
You can delay the start of a programme. The oven will then
switch on automatically.
With "Start time" you enter the time of day at which you want
the programme to start. With "Finish" you enter the time of day
at which you want the programme to end.
The difference between the Start time and Finish is the
cooking duration selected plus the heating-up time which the
steam oven calculates.
It is only possible to delay the start within 60 seconds after
making an entry. This function cannot be used if the
temperature in the oven is above 40°C, e.g. after a cooking
process.
Cooking results can be impaired if there is a long delay
between the food being placed in the oven and the start of
cooking.
Fresh food can change its colour and even deteriorate.
^ Select the function, temperature and duration in the normal
way.
Pre-heat
32
^ Then select "Start time" or "Finish" and enter the time you
want the cooking programme to begin or end at.
^
Confirm with "OK".
Your appliance has a pre-heating function. This heats the
oven interior to approx. 40°C. The heating-up time is then
shorter as the oven interior is pre-heated and therefore the
cooking process takes less time.
The appliance is delivered with the pre-heating function
deactivated. If you wish to use it you will need to alter the
setting (see "Settings / Pre-heat").
When the pre-heat function has been activated you can still
choose whether you want to use it for each programme.
Page 33

Using pre-heat
Additional functions
The water container must be filled with water for
pre-heating.
The pre-heating process will be cancelled if the door is
opened. You can start the process again by switching the
appliance off and back on again.
If the door is not opened within 30 minutes of the end of the
pre-heating process, the main menu will appear in the
display.
^ Switch on the appliance.
The main menu will appear in the display. Do not select a
function.
The display will change afer a few seconds and the
appliance will start heating up. When the heating up process
has finished "Programme finished" will appear in the display.
Not using pre-heat
^ Place the food in the oven.
The main menu will appear in the display.
^
Select the settings as normal.
^
Place the food in the oven.
^
Switch on the appliance.
Select the function and set the temperature and duration as
normal.
33
Page 34

Additional functions
Minute minder time
The minute minder can be used to time any activity in the
kitchen, e.g. boiling eggs.
You can also use the minute minder when a programme is
running, e.g. as a reminder to stir a dish or add seasoning
etc.
You can set a time for the minute minder of between 1
second (-:- -:-1 h:min:sec) and 9 hours 59 minutes 59
seconds (9:59:59).
A minute minder time of up to 10 minutes will be shown in
min:sec in the display, and a minute minder time of more than
10 minutes in h:min.
The minute minder time must be entered in minutes and
seconds or hours, minutes and seconds.
Example: 8 minutes = -:-8:00.
At the end of the minute minder time you will hear an audible
tone. Switch the minute minder time off by touching "<". If
you do not switch the minute minder off, the time will carry on
counting in seconds and the l symbol will flash in the
display. This will tell you how much time has passed since the
minute minder time elapsed.
Setting the minute minder time
^
Touch the l sensor.
^
Use the sensors next to +/- or the numerical keypad to
enter the minute minder time.
^
Confirm with "OK".
Changing the minute minder time
^
Touch the l sensor, enter the new time and confirm with
"OK".
Deleting the minute minder time
^
Touch the l sensor, touch < and confirm with "OK".
34
Page 35

System lock
The lock prevents the steam combi oven being switched on
unintentionally, by children for example.
The appliance is delivered with the lock deactivated (factory
default setting). Before this feature can be activated, you will
need to change the factory default setting to "Permitted" (this
only needs to be done once, see "Settings / Safety").
To activate the system lock
Select the ) symbol.
^
Select "On" and confirm with "OK".
^
To deactivate the system lock
^ Select the $ symbol.
^ Select "Off" and confirm with "OK".
Additional functions
35
Page 36

Settings
Language J
Time of day
Some of the standard steam oven settings (factory default
settings) have an alternative which you can select if required.
You can alter several settings one after the other.
Proceed as follows:
Switch on the appliance.
^
Select the Settings menu.
^
Select the setting you want to change.
^
A tick L will indicate which setting is currently selected.
If you do not make a selection in the sub-menu within approx.
5 seconds, the display will revert to the Settings menu.
You can set the display to show the language of your choice.
You do this via the Languages J sub-menu.
If you have selected the wrong language by mistake you can
follow the flag symbol J to return to the Language sub-menu.
36
Display: You can choose whether you want the time of day to
be displayed all the time when the appliance is switched off
or for it to go out after 60 seconds or not to be shown.
Clock format: The time of day can be set to appear either as
a 24 hour or 12 hour clock.
Set: Set the time of day
Page 37

Start
Steam reduction
Keeping warm
Pre-heat
Settings
The appliance has be set at the factory so that the
programme will start automatically a few seconds after the
last entry is made. You can alter this setting so that the
programme has to be started manually.
This function can be activated or deactivated. It is best to
deactivate it when you are cooking different types of food at
the same time, e.g. when cooking a whole meal and the
dishes need to be put into the steam combi oven at different
times.
Please note that when steam reduction is deactivated a lot of
steam will escape when you open the door and that the
keeping warm function cannot be used.
This function can be activated or deactivated.
This function can be activated or deactivated.
Recommended temperatures
If you frequently change a recommended temperature it may
be a good idea to change it permanently. You can change
the temperatures within the permitted range.
37
Page 38
Settings
Water hardness
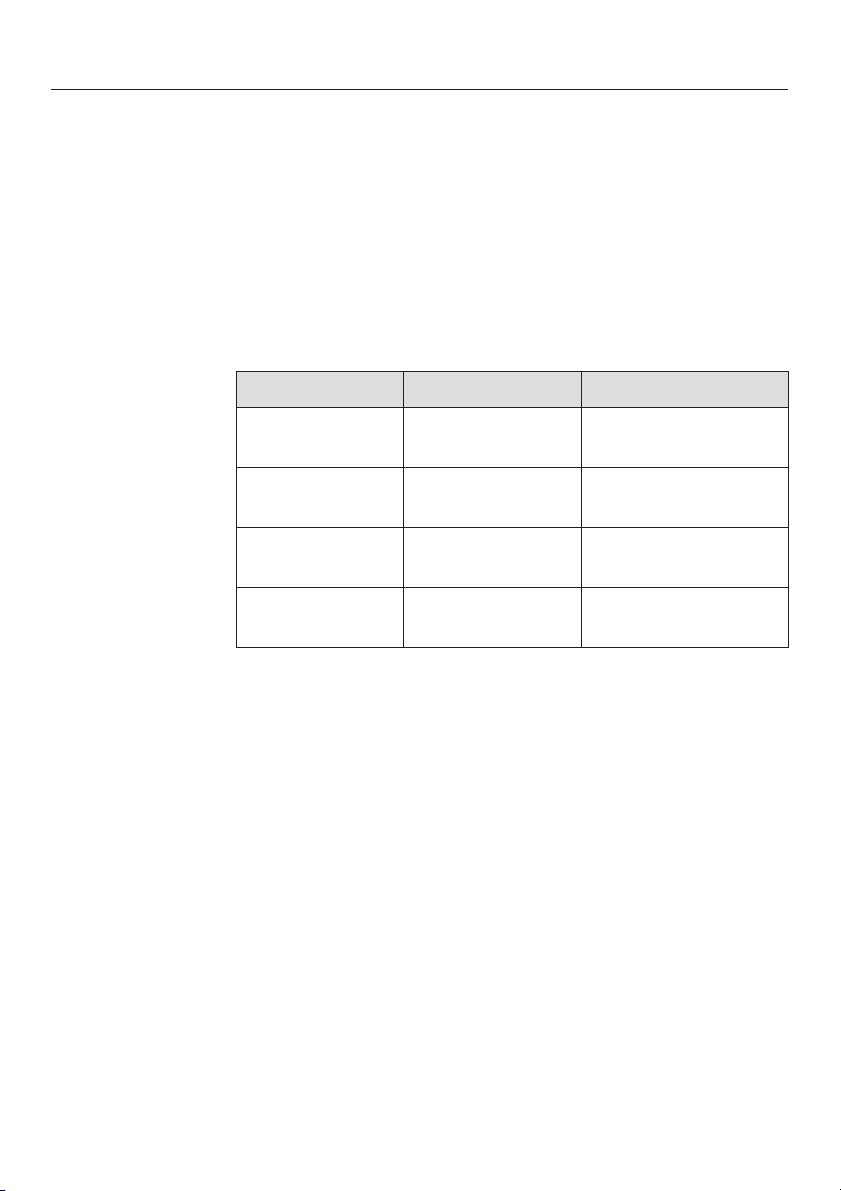
The steam oven is set at the factory to water hardness setting
IV (Very hard 4). You can set the steam oven for the water
hardness level in your area.
You can use the test strip supplied to check the water
hardness level, or your local water supplier will be able to
advise you on the water hardness of your area.
The water hardness is shown as settings I to IV equivalent to
the German scale 1 to >21 °dH (0.2 >3.8 mmol/l).
Hardness level Hardness range Setting
Display
Volume
Safety
I 1-7 °dH
(0.2-1.3 mmol/l)
II 8-14 °dH
(1.4-2.5 mmol/l)
III 15-21 °dH
(2.7-3.8 mmol/l)
IV >21 °dH (above
3.8 mmol/l)
The contrast and brightness can be adjusted.
The volume of the buzzer and also the keypad tone which
sounds each time a sensor is touched can be altered. The
keypad tone can also be switched off.
Once the setting under "System lock" has been changed to
"Permitted", you will be able to activate the system lock to
prevent the steam oven being switched on unintentionally, by
children for example.
Soft 1
Medium 2
Hard 3
Very hard 4
38
Page 39

Units
You can choose for the weight to be shown in kg or lbs, the
temperature in °C or °F and the depth / thickness in cm or
inches.
Showroom programme
This programme is for dealers who want to demonstrate the
appliance without the heater elements working. Do not
activate this setting for domestic use!
If you select and activate this option by mistake, you can
deactivate it as follows:
Demo programme
–
Select the "Off" option and follow the instructions in the
^
display.
– Continuous loop,
Demo mode
^ Touch one of the sensors next to the display and follow the
instructions in the display.
Settings
Factory default
All settings: any changes you have made to settings in the
"Settings" menu will be reset to the factory default setting.
Saved user programmes will be kept.
User programmes: all saved user programmes will be
deleted.
Main menu: the main menu will be reset to the factory default
setting.
Recommended temperatures: recommended temperatures
which have been changed will be reset to the factory default
settings.
39
Page 40

Cleaning and care
Miele offer a range of branded cleaning and conditioning
products. See “Optional accessories”.
General notes
Disconnect the appliance from the electricity supply and
allow it to cool down to a safe temperature before cleaning.
It should be cleaned after each use.
Make sure the appliance is completely dry before closing the
door.
Do not use a steam cleaning appliance to clean this
appliance. The steam could reach the electrical
components and cause a short circuit.
Do not use commercial cleaning agents. Only use agents
designed for domestic use.
Do not use cleaning agents or washing-up liquids
containing aliphatic hydrocarbons as these could cause
the seals to swell.
40
Page 41

Appliance front
Cleaning and care
Remove any soiling immediately.
If not, it might become impossible to remove and could
cause the surface to alter or discolour.
Clean the front using a damp Miele microfibre E-cloth or with
a clean sponge and a solution of hot water and washing-up
liquid. After cleaning dry with a soft cloth.
The external surfaces of this appliance are all susceptible
to scratching. Scratches on glass surfaces could even
cause a breakage.
Contact with unsuitable cleaning agents can alter or
discolour surfaces.
To avoid damaging your appliance, do not use:
– cleaning agents containing soda, alkalines, ammonia,
acids or chlorides,
– cleaning agents containing descaling agents,
– abrasive cleaning agents, e.g. powder cleaners and cream
cleaners,
–
solvent-based cleaning agents,
–
stainless steel cleaning agents,
–
dishwasher cleaner,
–
oven sprays,
–
glass cleaning agents,
–
hard, abrasive sponges and brushes, e.g. pot scourers,
–
sharp metal scrapers.
41
Page 42

Cleaning and care
Oven interior
Dry the oven interior, oven interior roof, door seal, drip
channel, inside of the door and the compartment for the water
container after each use. Use a sponge or absorbent cloth to
wipe off the condensate which has built up in the
compartment.
Remove grease deposits with a clean sponge and a solution
of hot water and washing-up liquid. Rinse with clean water
and then dry the oven interior with a soft cloth.
After prolonged use, the floor heater can become
discoloured by drops of liquid. This discolouration can be
removed easily with the Miele ceramic and stainless steel hob
cleaner (see "Optional accessories"). After cleaning, wipe the
surface with a damp cloth to remove any cleaning agent
residues.
Replace the door seal with a new one if it becomes porous or
brittle. Door seals can be ordered from the Miele Spare Parts
Department.
When fitting the new seal make sure that any join is at the
top.
Condensate tray, rack and cooking containers
Wash and dry the condensate tray, rack and cooking
containers after each use. They are all dishwasher safe.
Use a little vinegar to remove any bluish discolouration on the
cooking containers.
You could also use the Miele ceramic and stainless steel hob
cleaner (see "Optional accessories"). Rinse the containers
thoroughly with clean water to remove any residual cleaning
agent.
Automatic door release
Make sure that the door release does not get clogged with
food deposits. Remove soiling with a clean sponge and a
solution of hot water and washing-up liquid. Rinse with clean
water and then dry the oven interior with a soft cloth.
42
Page 43
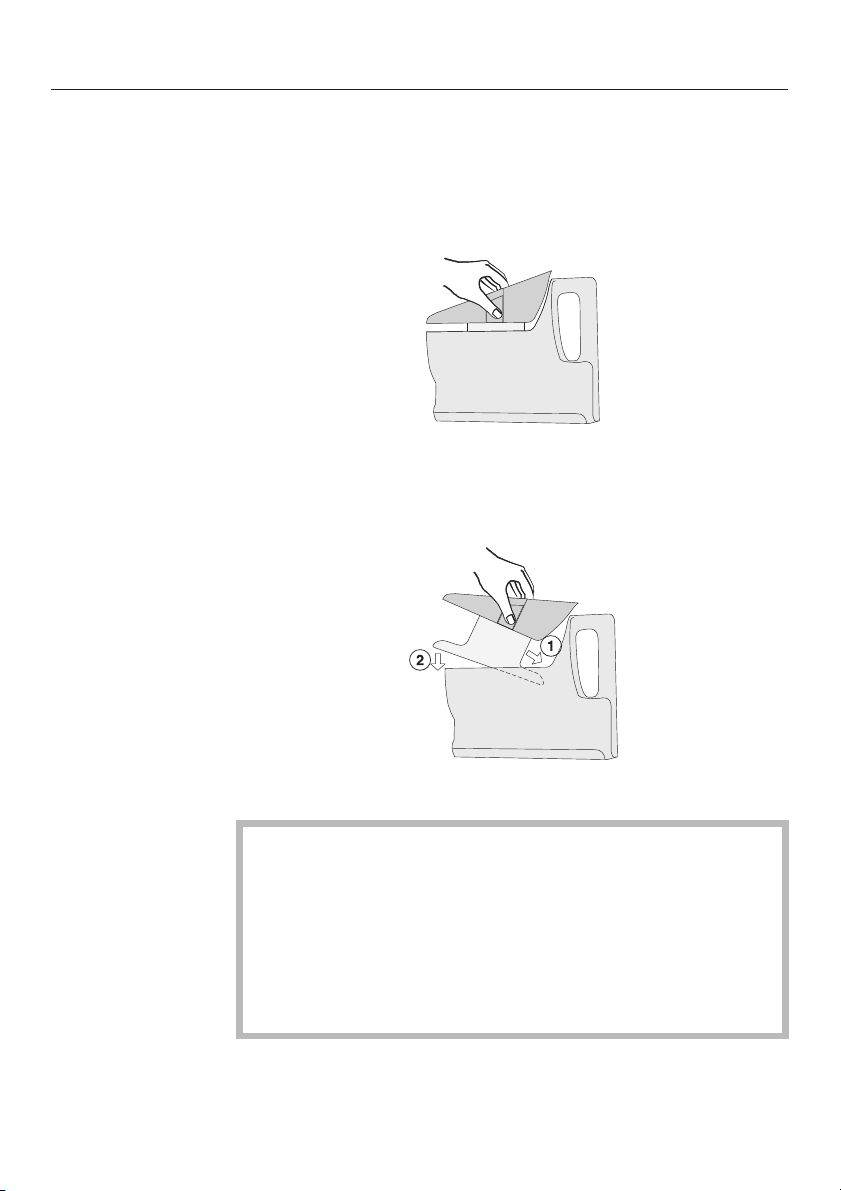
Water container
Cleaning and care
Remove, empty and dry the water container after each use.
Release the insert by pushing the catches on the sides in
^
towards each other and the pull it out of the container.
After cleaning, dry both parts of the insert thoroughly
^
before replacing it in the water container. When replacing
the insert, guide it in at an angle a and then push it
downwards b as illustrated.
Do not immerse the water container in water or clean it in a
dishwasher.
It is important to empty the water container after each use
for hygiene reasons, and also to prevent condensate
building up in the appliance.
Do not use scouring pads or hard brushes.
43
Page 44
Cleaning and care
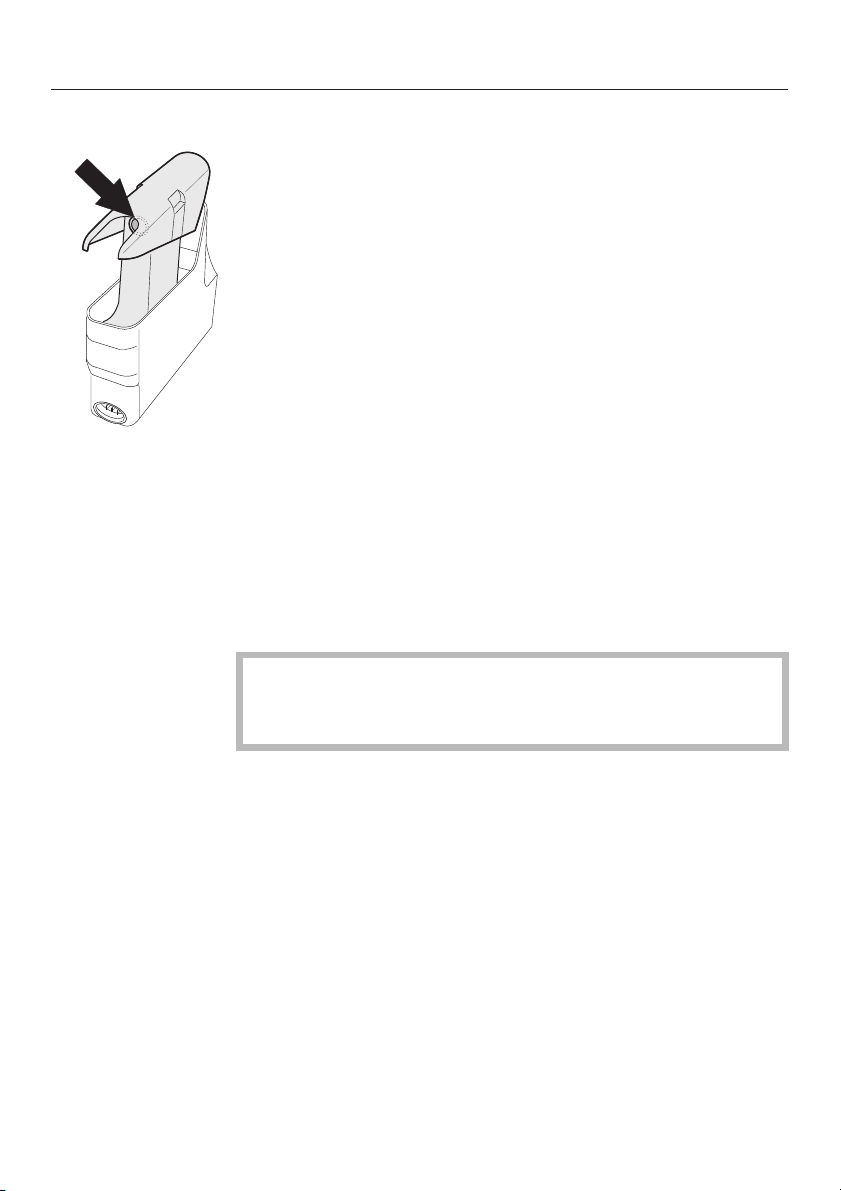
Coupling seal
If the water container becomes difficult to remove and
replace or the fault message F20 appears, rub a small
amount of the silicone grease supplied (see "Guide to the
appliance / Accessories supplied") into the inside of the
coupling seal. Do not take the seal out to lubricate it!
When handling silicone grease, please observe the following
safety measures:
Remove any silicone grease from your skin either by
–
wiping it off or by washing it off.
If the grease gets into the eyes, it must be rinsed out with
–
plenty of clean water.
– If it is swallowed, seek medical advice.
The coupling seal should be replaced with a new one if it
becomes brittle or porous or if an unusually large amount of
water collects on the floor of the water container
compartment.
Coupling seals can be ordered from the Miele Spare Parts
Department.
44
Only use the silicone grease supplied. On no account
must margarine or oil or any other domestic grease or fat
be used, as these can cause the seal to swell.
Page 45

Descaling
Cleaning and care
For optimum cleaning results we recommend that you use
Miele descaling tablets to descale your steam oven (see
"Optional accessories"). A proprietary citric acid based
descaling agent can also be used. Follow the manufacturer's
instructions on the packaging.
Ensure that the descaling agent does not come into
contact with the door handle or the metal control panel as
this could cause marks. However, should any descaling
agent get onto these surfaces, wipe it away immediately.
The water container will need descaling after a certain
number of operating hours. The display will alert you when
this needs to be done.
The appliance will lock out after you have run the tenth
programme.
However, we recommend that you descale the appliance
before it locks out.
^ Fill the water container with 1 litre of descaling solution.
Follow the instructions on the descaling agent packaging
carefully.
^ Push the water container into the appliance until it
connects.
^
Switch the appliance on and select "Descale".
^
Confirm with "Continue".
The descaling process will now begin. It is only possible to
cancel the descaling process during the first minute. After
that the process cannot be cancelled.
Do not switch the appliance off during the descaling
process. If if is switched off before the end of the process,
the whole process will have to be started from the
beginning again.
After 12 minutes, the appliance will prompt you to fill it with
fresh tap water.
45
Page 46

Cleaning and care
Remove the water container and empty it. Remove the
^
insert.
Rinse the water container and the insert thoroughly.
^
Replace the insert and fill the water container with 1 litre of
^
fresh tap water. Push the water container into the appliance
until it connects.
The descaling process will continue automatically when the
water container is pushed back into the appliance.
After descaling:
Switch off the appliance.
^
Open the door.
^
^ Remove the water container and empty it.
^ Dry the appliance thoroughly.
^ Make sure the appliance is completely dry before closing
the door.
46
Page 47
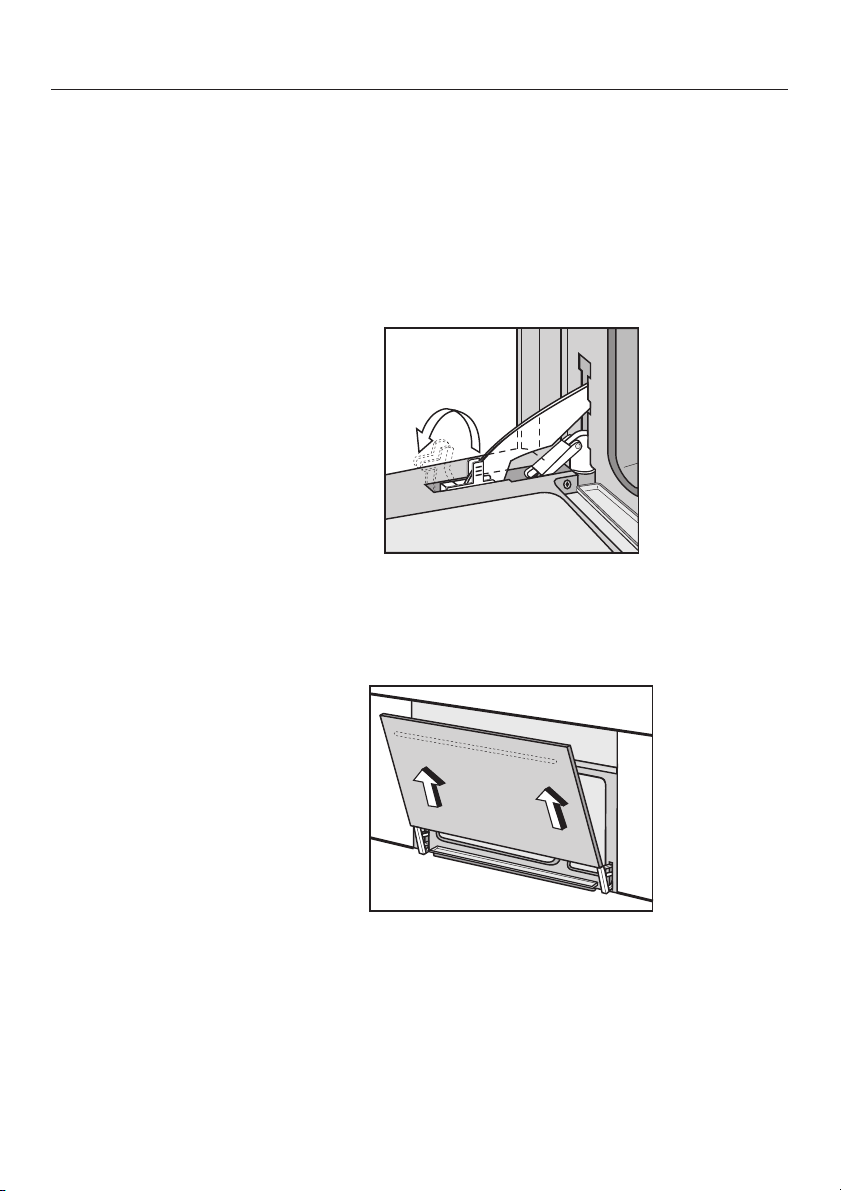
Removing and refitting the door
It is much easier to clean the steam oven interior if you
remove the door first.
To remove the door
Open the door fully.
^
Flip up the release levers in front of the door hinges.
^
^ Slowly close the door until the raised levers are touching
the frame.
Cleaning and care
To refit the door
^ Holding the door evenly with both hands, lift the door up
and off the hinges.
^
Fit the door on the hinges.
^
Open the door fully.
^
Then push the levers back down.
^
Close the door.
47
Page 48

Problem solving guide
Installation work and repairs to electrical appliances
,
must only be carried out by a suitably qualified and
competent person in strict accordance with current local
and national safety regulations (BS 7671 in the UK).
Repairs and other work by unqualified persons could be
dangerous. The manufacturer cannot be held liable for
unauthorised work.
What to do if ...
... you cannot switch the appliance on.
Check whether the mains fuse has tripped.
If this is not the case, then disconnect the appliance from the
electricity supply for approx. 1 minute. To do this:
– switch off at the socket and withdraw the plug, or
– switch off at the isolator, or
– disconnect the mains fuse.
48
Reset the trip switch in the mains fuse box, and switch the
appliance back on. If it still will not switch on, contact a
qualified electrician or the Miele Service Department.
... the appliance is in demo mode.
The appliance will not heat up if it is in demo mode. See
"Settings / Showroom programme".
... the fan can still be heard after the appliance has been
switched off.
The appliance is fitted with a fan which removes steam from
the oven.
The fan will continue to run for a while after the appliance has
been switched off.
Page 49

Problem solving guide
... the water container has become harder to put into the
appliance and take out again.
Lightly lubricate the coupling seal on the water container with
silicone grease, as described in "Cleaning and care /
Coupling seal".
... the heating-up phase lasts an unusually long time.
Check the bottom of the water container.
If a thick layer of limescale has built-up, check the water
hardness level that has been set. Set the correct water
hardness level for your water supply (see "Settings / Water
hardness"), and descale the appliance as described in
"Cleaning and care / Descaling".
If the water hardness level was in fact set correctly or the
problem occurs again, contact the Service Department.
... after moving house the appliance no longer switches
from the heating up phase to the cooking phase.
Altitude affects the boiling point of water. If you move house,
the appliance will need to be re-set for the new altitude if this
differs from the old one by more than 300 m. To do this,
descale the appliance (see "Cleaning and care / Descaling").
... during operation an unusually large amount of steam
escapes or steam escapes from parts of the steam oven
where it does not usually.
Check whether
–
the door is closed properly.
–
the door seal is fitted correctly. If necessary, press it in all
the way round the door to make sure it is fitted evenly.
–
the door seal is damaged, e.g. cracks can be seen. The
seal must be replaced with a new one.
If this does not solve the problem, call the Miele Service
Department.
49
Page 50

Problem solving guide
... a whistling sound is heard when the appliance is
switched on again.
When the door is closed, the pressure has to equalise, which
can cause a whistling sound. This is not a fault.
... F and a number appear in the display.
This combination indicates a fault.
F 20: The appliance does not heat up.
–
Check whether the water container has been pushed right
into the appliance so that it connects.
Switch the appliance off and then back on again.
A fault message will appear if the temperature of the oven
–
compartment has not risen by at least 2 °C within
5 minutes of the start of the heating up phase. This can
occur if, for example, a large quantity of frozen food is
being prepared.
– Lightly lubricate the coupling seal on the water container
with silicone grease, as described in "Cleaning and care /
Water container / Coupling seal".
50
If the appliance still will not start, switch it off and contact the
Miele Service Department.
–
Other fault messages:
Call the Service department.
Page 51
Miele offers a range of useful accessories as well as cleaning
and conditioning products for your appliance.
These can be ordered via the internet at
www.miele-shop.com
or from Miele (see back cover for contact details) or from your
Miele dealer.
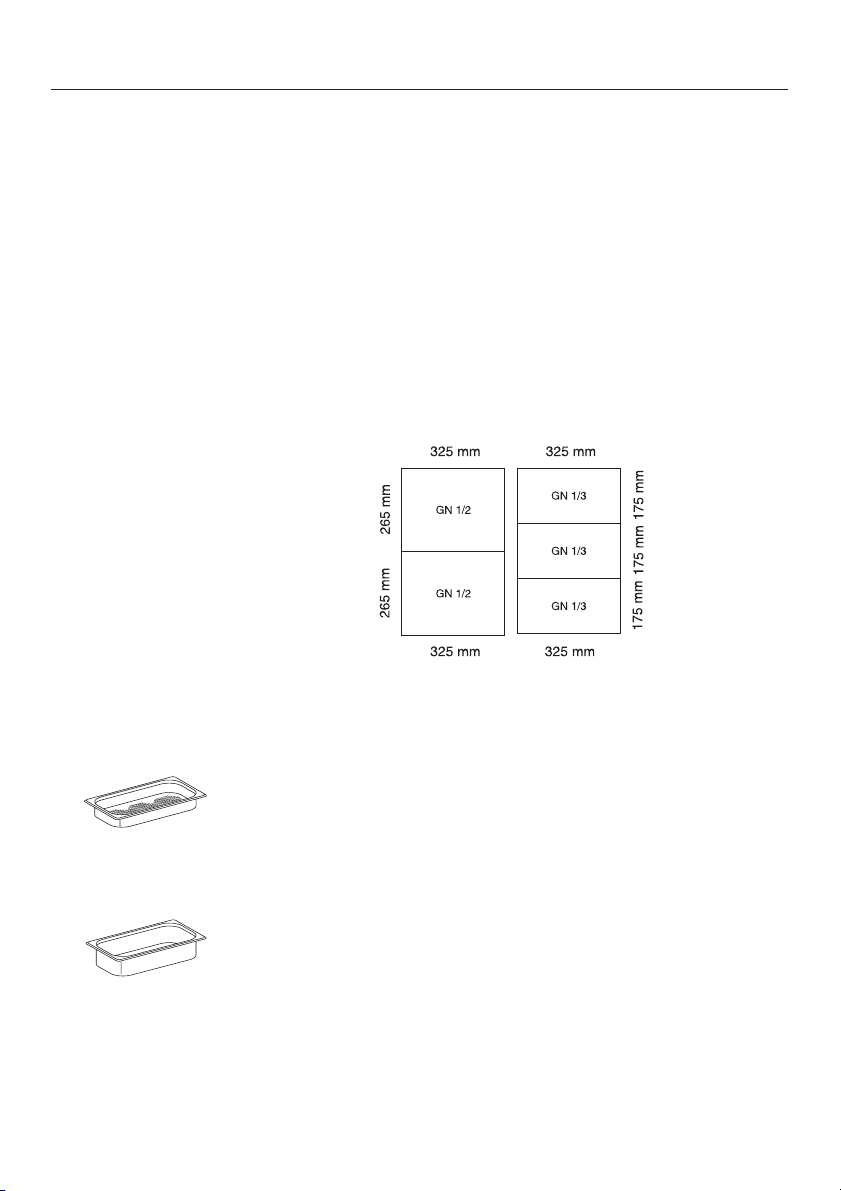
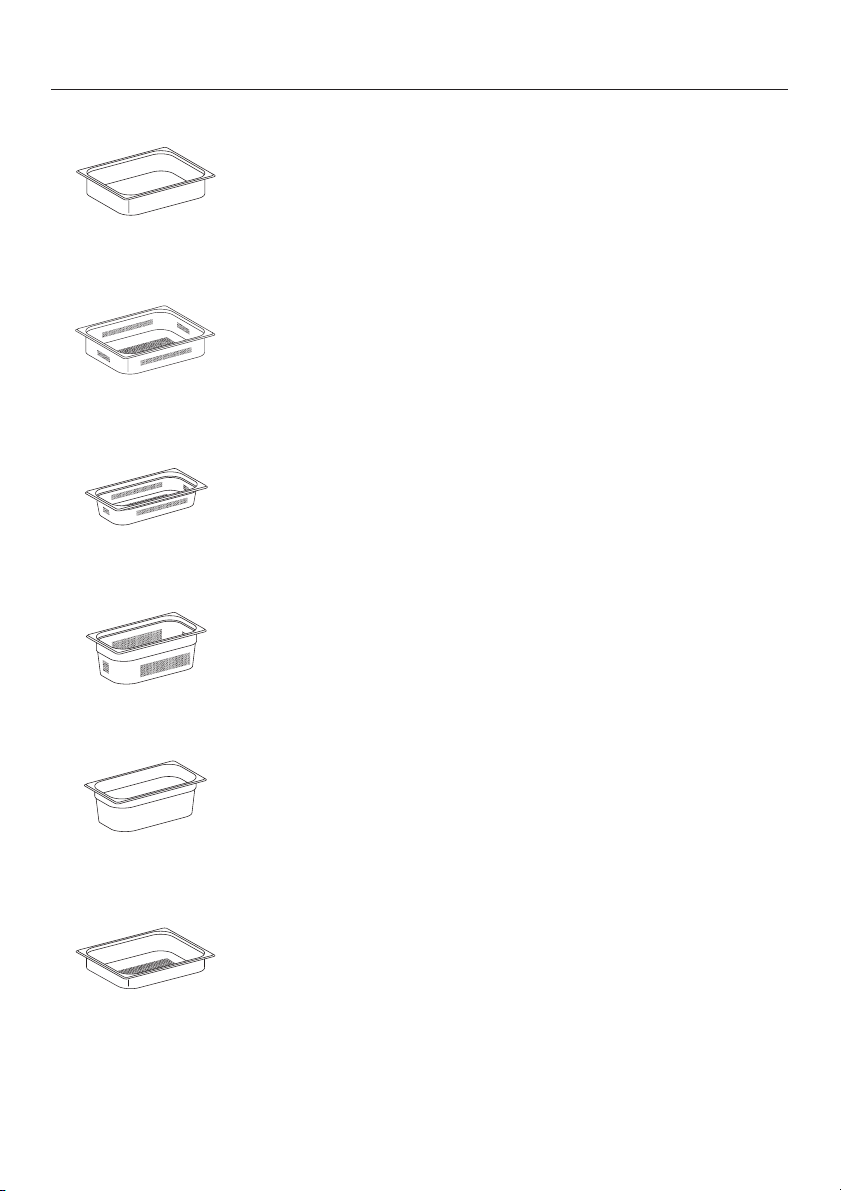
Cooking containers
Each stainless steel cooking container has a Gastro-Norm
(GN) size (Example GN 1/3). 1/3 or 1/2 is the width and depth
of the cooking containers as shown below.
Optional accessories
DGGL 1
DGG 2
Peforated cooking container, GN 1/3
Gross capacity 1.5 litres / Usable capacity 0.9 litres
325x175x40 mm (WxDxH)
Solid cooking container, GN 1/3
Gross capacity 2.5 litres / Usable capacity 2.0 litres
325x175x65 mm (WxDxH)
51
Page 52
Optional accessories
DGG 3
Solid cooking container, GN 1/2
Gross capacity 4.0 litres / Usable capacity 3.1 litres
325x265x65 mm (WxDxH)
DGGL 4
Perforated cooking container, GN 1/2
Gross capacity 4.0 litres / Usable capacity 3.1 litres
325x265x65 mm (WxDxH)
DGGL 5
Perforated cooking container, GN 1/3
Gross capacity 2.5 litres / Usable capacity 2.0 litres
325x175x65 mm (WxDxH)
DGGL 6
Perforated cooking container, GN 1/3
Gross capacity 4.0 litres / Usable capacity 2.8 litres
325x175x100 mm (WxDxH)
DGG 7
DGGL 8
52
Solid cooking container, GN 1/3
Gross capacity 4.0 litres / Usable capacity 2.8 litres
325x175x100 mm (WxDxH)
Perforated cooking container, GN 1/2
Gross capacity 2.0 litres / Usable capacity 1.7 litres
325x265x40 mm (WxDxH)
Page 53
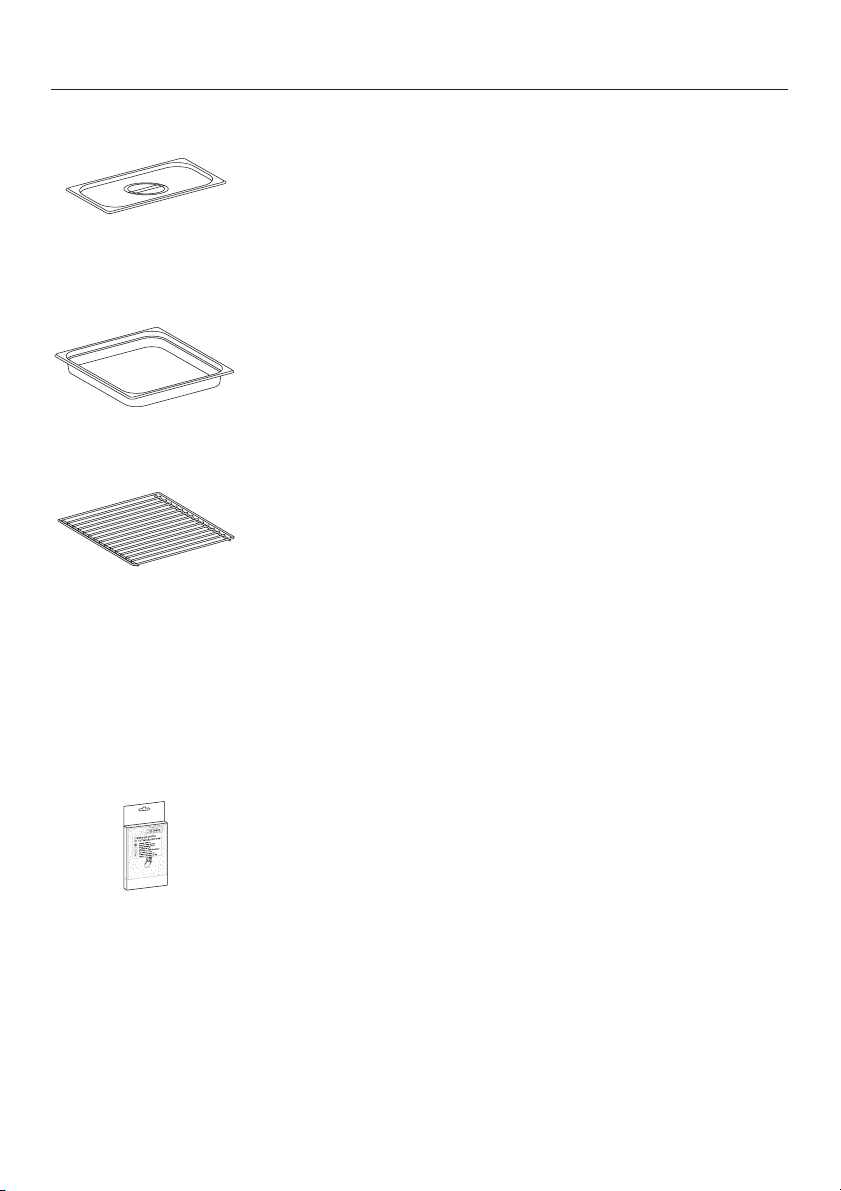
DGD
Condensate tray
Rack
Optional accessories
Lid for GN 1/3 cooking containers
To catch excess moisture, GN 2/3
325x350x40 mm (WxDxH)
For placing your own cooking containers on
Cleaning and care products
Miele descaling tablets
6 tablets
For descaling the water container.
53
Page 54
Optional accessories
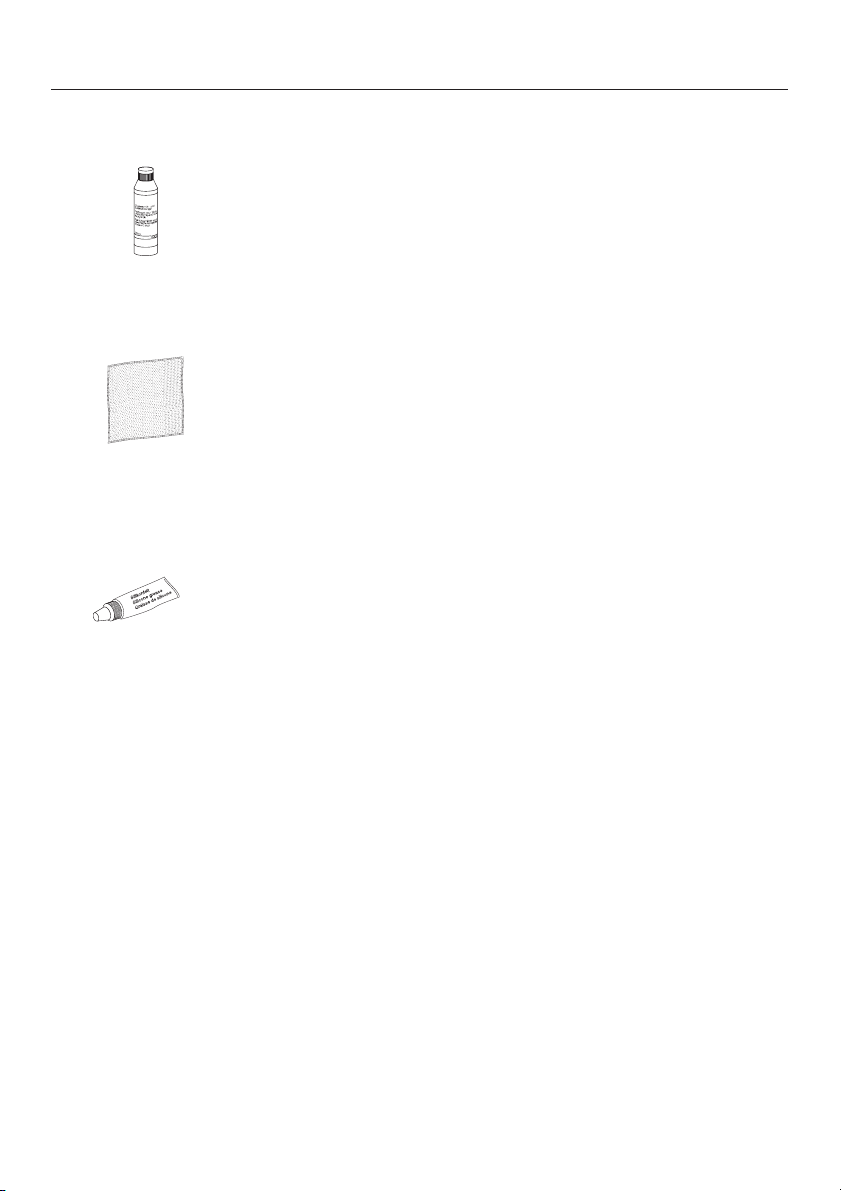
Ceramic and stainless steel hob cleaner
250 ml
Removes discolouration from the floor heater caused by
drops of liquid.
Removes discolouration from cooking containers.
E-Cloth (microfibre cloth)
Removes finger marks and light soiling.
Silicone grease
For lubricating the coupling seal.
Please read the relevant instructions in "Cleaning and care".
54
Page 55

Safety instructions for installation
Before connecting the appliance, make sure that the
~
connection data on the data plate (voltage and connected
load) match the mains electricity supply.
This data must correspond in order to avoid the risk of
damage to the appliance. Consult a qualified electrician if in
any doubt.
The socket and on-off switch should be easily accessible
~
after the appliance has been installed.
This appliance may only be used in mobile installations
~
such as ships, caravans, aircraft etc. if a risk assessment of
the installation has been carried out by a suitably qualified
engineer.
The appliance must be positioned so that you can see the
~
contents of a cooking container placed on the top runner.
Otherwise you may risk scalding or burning yourself with hot
water and food when taking containers out of the oven.
All dimensions in this instruction booklet are given in mm.
55
Page 56
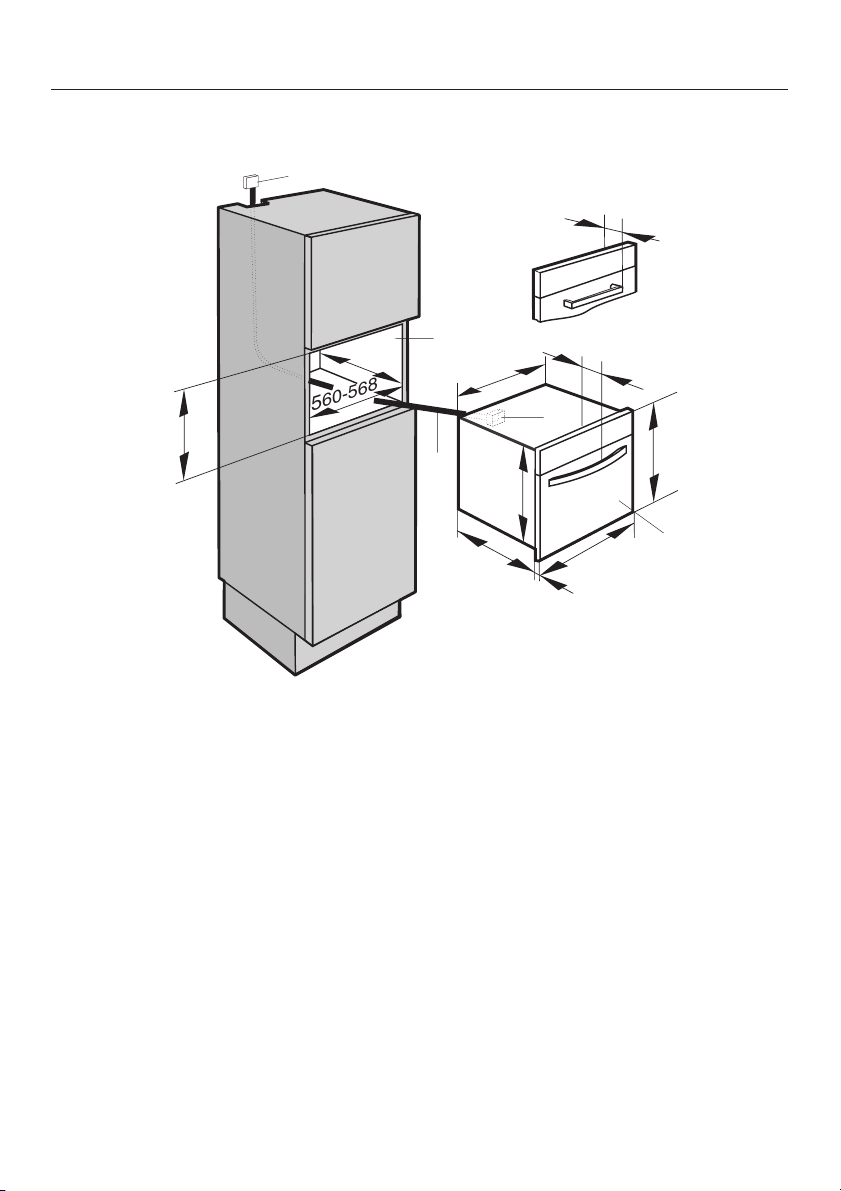
Appliance and building-in dimensions
0
Installation in a tall unit
d
70
b
549
e
444
448-452
60-568
5
500
* Appliances with glass front
** Appliances with metal front
a Steam oven
b Building-in recess
c Inlet for mains connection cable to the appliance
d Recommended position for electrical socket.
Important: Do not position behind the appliance!
c
446
22*/23**
75
455,5
a
595
e Mains connection cable
56
Page 57
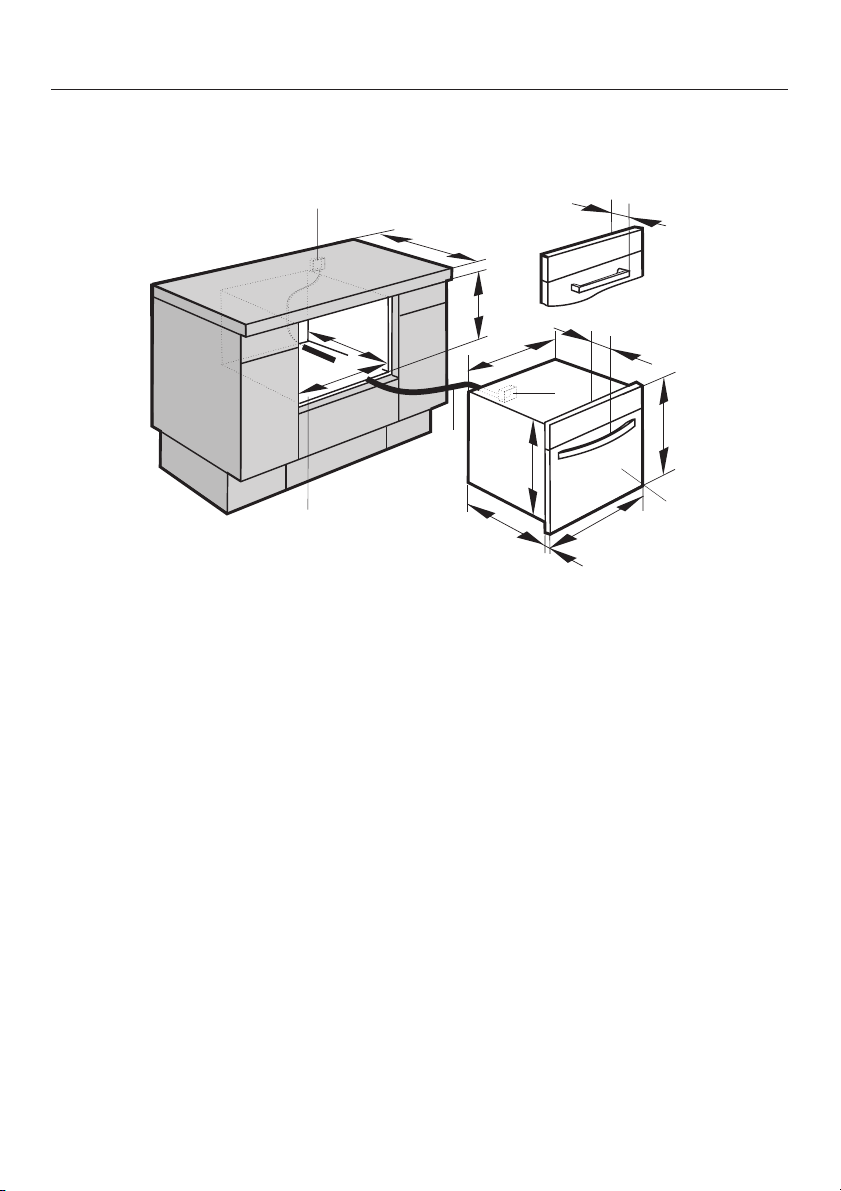
Appliance and building-in dimensions
Installation in a base unit
d
600
0
500
549
560-568
e
b
* Appliances with glass front
** Appliances with metal front
a Steam oven
b Building-in recess
c Inlet for mains connection cable to the appliance
444
460-465
c
446
22*/23**
70
75
455,5
a
595
d Recommended position for electrical socket.
Important: Do not position behind the appliance!
e Mains connection cable
N.B. Undercounter installation is not recommended if there are young children in
the home.
57
Page 58
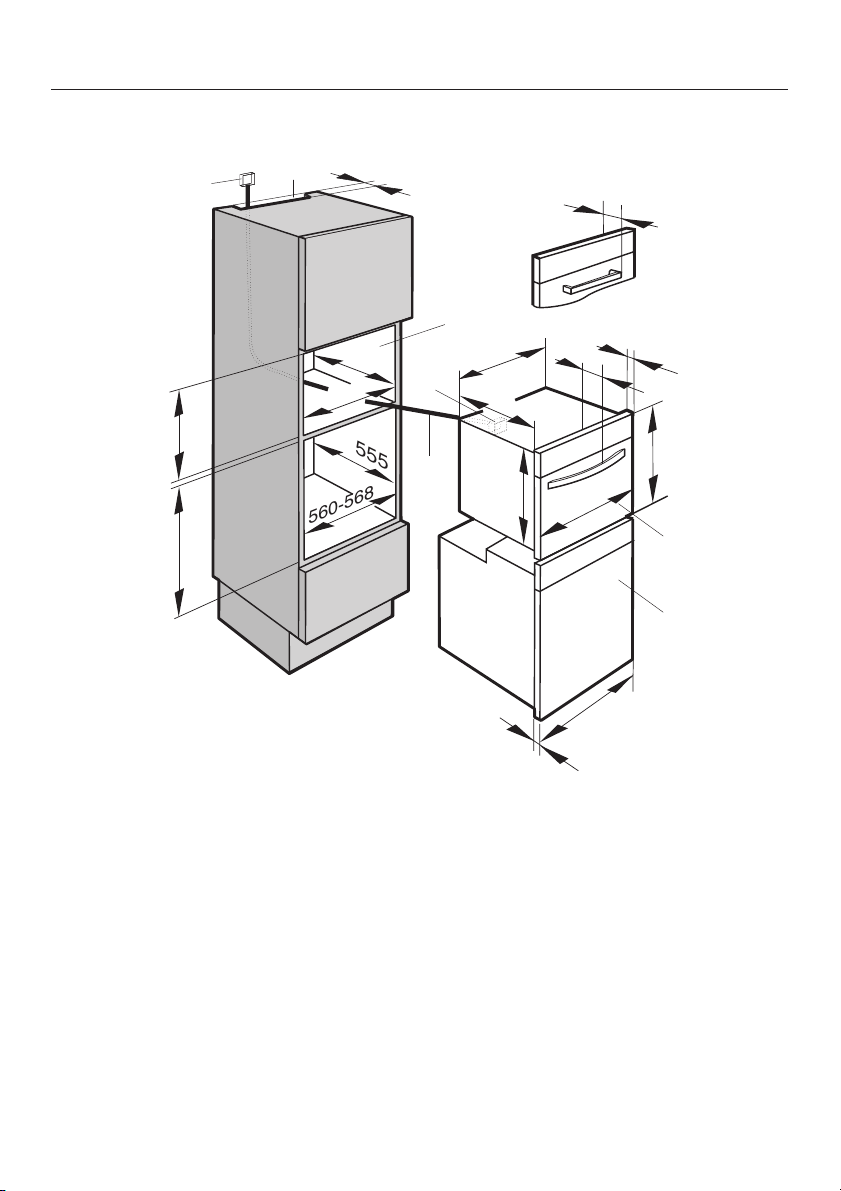
Appliance and building-in dimensions
Installation in a tall unit in combination with an oven
d
448-452
593-595
f
560-568
0
500
0
555
560-568
30
c
e
b
549
444
446
22*/23**
70
22*/23**
75
455,5
595
a
g
595
* Appliances with glass front
** Appliances with metal front
a Steam oven
b Building-in recess
c Inlet for mains connection cable to the appliance
d Recommended position for electrical socket.
Important: Do not position behind the appliance!
e Mains connection cable
f Vent cut-out for when appliance is installed in combination with a pyrolytic oven
g Oven
58
Page 59
Installing the appliance
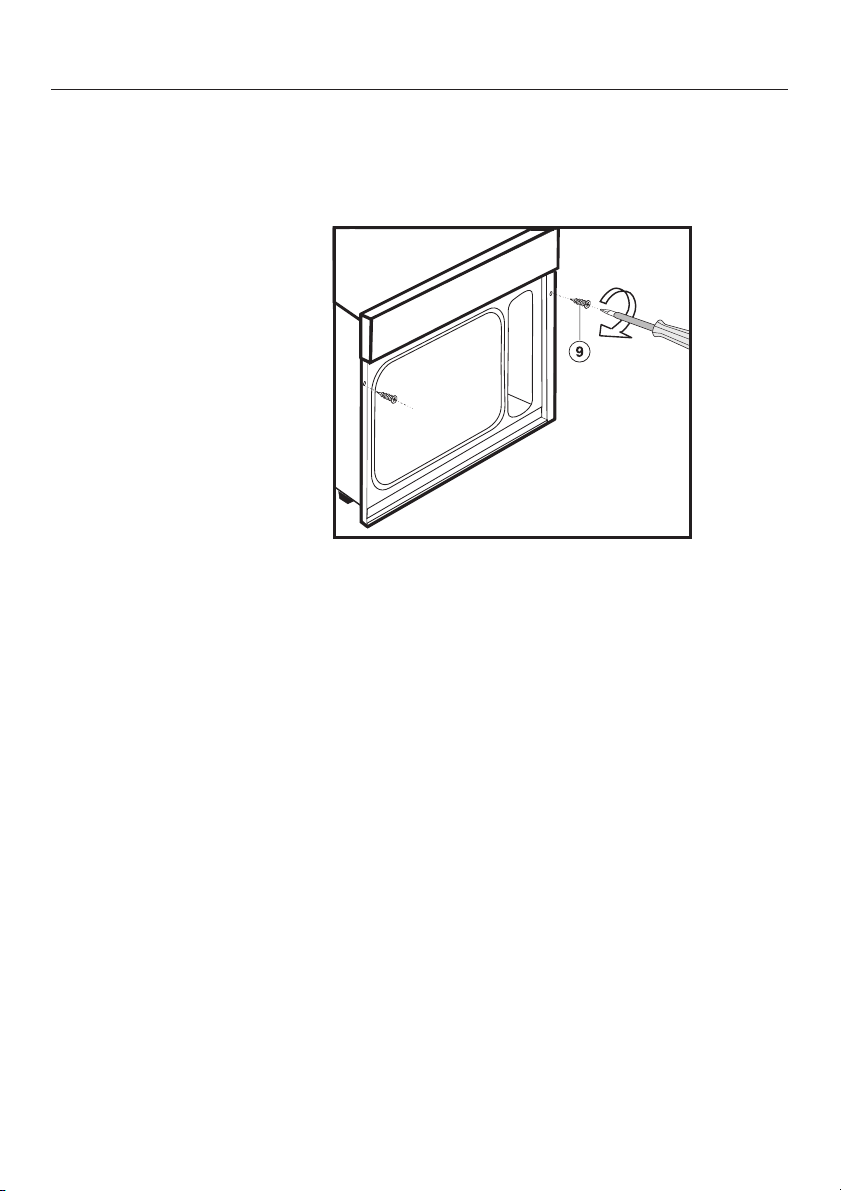
Push the appliance into the recess and align it.
^
Secure the appliance by screwing the two wood screws
^
3.5x25mmi (supplied) into the vertical trim on either
side of the appliance (see illustration).
59
Page 60

Electrical connection
All electrical work should be carried out by a suitably
qualified and competent person, in strict accordance with
current local and national safety regulations (BS 7671 in
the UK).
Installation, repairs and other work by unqualified persons
could be dangerous. The manufacturer cannot be held
liable for unauthorised work.
Ensure power is not supplied to the appliance until after
installation work has been carried out.
The appliance must only be operated when built-in. This is
to ensure that all electrical parts are shielded. Live parts
must not be exposed.
Do not connect the appliance to the mains electricity
supply via an extension lead. These do not guarantee the
required safety of the appliance.
Please ensure that the connection data quoted on the data
plate match the household mains supply.
60
This appliance is supplied with a cable and moulded plug for
connection to a suitable switched socket which should be
easily accessible after installation.
It can, if necessary, be connected to a suitable isolator or a
double pole fused spur connection unit which complies with
national and local safety regulations by a suitably qualified
electrician.
If the switch is not accessible after installation (depending on
country) an additional means of disconnection must be
provided for all poles.
For extra safety it is advisable to install a suitable residual
current device.
When switched off there must be an all-pole contact gap of
3 mm in the isolator switch (including switch, fuses and
relays).
Page 61

Important U.K.
This appliance is supplied for connection to a single phase
230-240 V 50 Hz supply with a 3-core cable.
The wires in the mains lead are coloured in accordance with
the following code:
Green/yellow = earth
Blue = neutral
Brown = live
WARNING: THIS APPLIANCE MUST BE
EARTHED
Non-rewireable plugs BS 1363
The fuse cover must be refitted when changing the fuse, and
if the fuse cover is lost, the plug must not be used until a
suitable replacement is obtained. The colour of the correct
replacement cover is that of the coloured insert in the base of
the plug, or the colour that is embossed in words on the base
of the plug (as applicable to the design of plug fitted).
Electrical connection
Important
Replacement fuses should be ASTA approved to BS 1362
and have the correct rating. Replacement fuses and fuse
covers may be purchased from your local electrical supplier.
The electrical safety of this appliance can only be guaranteed
when continuity is complete between the appliance and an
effective earthing system, which complies with local and
national regulations. It is most important that this basic safety
requirement is tested regularly and where there is any doubt
the household wiring should be inspected by a qualified
electrician. The manufacturer cannot be held liable for the
consequences of an inadequate earthing system such as
electric shock.
The manufacturer cannot be held liable for damage
caused by incorrect installation or connection.
61
Page 62

After sales service, data plate
In the event of any faults which you cannot remedy yourself, or if the appliance is
under guarantee, please contact:
Your Miele dealer, or
–
the Miele Customer Contact Centre (see back cover for address).
–
Please note that telephone calls may be monitored and recorded to improve
our service.
When contacting Miele, please quote the model and serial number of your
appliance, which are given on the data plate.
Space in which to stick the extra data plate supplied with the appliance. Ensure
that the model number is the same as the one on the front of these instructions.
62
Page 63

63
Page 64
Alteration rights reserved / 0508
M.-Nr. 07 207 620 / 01
 Loading...