

Page 1
Operating and installation
instructions
Rangehood
To prevent the risk of accidents or damage to the appliance, it is
essential to read these instructions before it is installed and used for
the first time.
en-AU, NZ M.-Nr. 12 039 300
Page 2

Contents
Warning and Safety instructions...................................................................... 4
Caring for the environment .............................................................................. 13
Guide to the rangehood .................................................................................... 14
Description of the functions............................................................................. 16
Before using for the first time .......................................................................... 17
Selecting extraction mode or recirculation mode................................................ 17
Setting up Miele@home ...................................................................................... 17
Connecting via the App.................................................................................. 18
Connecting via WPS ...................................................................................... 19
Signing out of Wi-Fi (reset to factory settings)............................................... 20
Setting up Con@ctivity ........................................................................................ 21
Con@ctivity via the home Wi-Fi network (Con@ctivity 3.0)............................ 22
Con@ctivity via a direct Wi-Fi connection (Con@ctivity 3.0) .......................... 22
Reattempting the connection......................................................................... 23
Operation (automatic mode) ............................................................................ 24
Cooking with Con@ctivity (automatic mode) ...................................................... 24
Cooking process ................................................................................................. 25
Leaving automatic mode temporarily.................................................................. 26
Returning to automatic mode......................................................................... 26
Operation (manual mode) ................................................................................. 27
Cooking without Con@ctivity (manual mode) ..................................................... 27
Switching the fan on............................................................................................ 27
Selecting a power level ....................................................................................... 27
Selecting the second Booster level................................................................ 27
Selecting the run-on time.................................................................................... 28
Switching the fan off ........................................................................................... 28
Dimming/Switching the cooktop lighting on/off.................................................. 28
Safety switch-off ................................................................................................. 28
Changing settings ............................................................................................. 29
Altering the grease filter operating hours counter ............................................... 29
Altering or deactivating the charcoal filter operating hours counter ................... 30
Deactivating Power management ....................................................................... 30
Buzzer for the sensors......................................................................................... 31
Energy saving tips ............................................................................................. 32
2
Page 3

Contents
Cleaning and care ............................................................................................. 33
Housing ............................................................................................................... 33
Important information for appliances with stainless steel surfaces ............... 33
Grease filters ....................................................................................................... 34
Change grease filters...................................................................................... 35
NoSmell active charcoal filters............................................................................ 36
Resetting the charcoal filter operating hours counter.................................... 36
Disposing of the charcoal filters..................................................................... 36
Reactivatable charcoal filters ......................................................................... 37
Service................................................................................................................ 38
Contact in case of fault ....................................................................................... 38
Position of the data plate .................................................................................... 38
Warranty .............................................................................................................. 38
Installation.......................................................................................................... 39
Before installation................................................................................................ 39
Installation recommendations ............................................................................. 39
Installation materials............................................................................................ 39
Installation materials for recirculation mode................................................... 40
Appliance dimensions ......................................................................................... 41
Safety distance (S) .............................................................................................. 43
Adjusting the vapour shield................................................................................. 44
Connection for air extraction............................................................................... 44
Non-return flap ............................................................................................... 45
Condensed water ........................................................................................... 45
Silencer........................................................................................................... 46
Electrical connection ........................................................................................... 47
Technical data.................................................................................................... 48
Optional accessory for recirculation mode ......................................................... 48
3
Page 4

Warning and Safety instructions
This rangehood complies with all relevant local and national safety
requirements. However, inappropriate use can lead to personal
injury and damage to property.
Read the operating and installation instructions carefully before
using the rangehood. They contain important information on the
safety, installation, use and maintenance of the appliance. This
prevents both personal injury and damage to the rangehood.
In accordance with standard IEC 60335-1, Miele expressly and
strongly advises that you read and follow the instructions in
“Installation” and in the “Warning and Safety instructions”.
Miele cannot be held liable for injury or damage caused by noncompliance with these instructions.
Keep these instructions in a safe place and pass them on to any
future owner.
Correct application
This rangehood is designed for domestic use and for use in similar
environments by guests in hotel or motel rooms, bed & breakfasts
and other typical living quarters. This does not include common/
shared facilities or commercial facilities within hotels, motels or bed
& breakfasts.
The appliance is not suitable for outdoor use.
It must only be used to extract vapours and remove odours from
cooking.
Any other usage is at the owner's risk. Miele cannot be held liable for
damage resulting from incorrect or improper use or operation.
The rangehood cannot be used to ventilate the room in which it is
installed in recirculation mode above a gas cooktop. Please seek the
advice of a qualified gas fitter for more information if necessary.
4
Page 5

Warning and Safety instructions
This appliance is not intended for use by persons (including
children) with reduced physical, sensory or mental capabilities, or
lack of experience and knowledge, unless they have been given
supervision or instruction concerning its use by a person responsible
for their safety, and are able to recognise the dangers of misuse.
Safety with children
Young children must not be allowed to use the rangehood.
Older children may only use the rangehood if its operation has
been clearly explained to them and they are able to use it safely.
They must be able to understand and recognise the possible
dangers caused by incorrect operation.
Cleaning work may only be carried out by older children under the
supervision of an adult.
Children should be supervised near the appliance. Ensure that
they do not play with the appliance.
The cooktop lighting is very intense.
Ensure, in particular, that babies/small children do not look directly
at the light.
Danger of suffocation! Children may be able to wrap themselves in
packing material or pull it over their heads with the risk of
suffocation. Keep children away from any packing material.
5
Page 6

Warning and Safety instructions
Technical safety
Repairs and other work by unqualified persons could be
dangerous. Installation, maintenance work and repairs to electrical
appliances must only be carried out by a Miele approved service
technician.
A damaged appliance can be dangerous. Check it for visible signs
of damage. Do not use a damaged appliance.
The electrical safety of this appliance can only be guaranteed
when continuity is complete between it and an effective earthing
system. It is most important that this basic safety requirement is
present and tested regularly and, where there is any doubt, the
household wiring system should be inspected by a qualified
electrician.
Temporary or permanent operation with a self-sufficient or non-
mains synchronous energy supply system (e.g. isolated networks,
back-up systems) is possible. A requirement for the operation is that
the energy supply system complies with all current local and national
requirements that apply to stand-alone, solar and/or battery
systems.
The protective measures provided in the installation and in this Miele
product must also be assured in their function and operation in
isolated operation or in non-mains synchronous operation, or
replaced with equivalent measures in the installation.
The connection data (voltage and frequency) on the data plate of
the rangehood must match the mains electricity supply in order to
avoid the risk of damage to the rangehood.
Compare this before connecting the appliance to the mains
electricity. If in doubt, consult a qualified electrician.
Do not connect the appliance to the mains electricity supply by a
multi-socket unit or an extension lead. Extension leads are a fire
hazard and do not guarantee the required safety of the appliance.
6
Page 7

Warning and Safety instructions
For safety reasons, this appliance may only be used after it has
been built in.
This rangehood must not be installed and operated in mobile
installations (e.g. on a ship).
Tampering with electrical connections or components and
mechanical parts is highly dangerous to the user and can cause
operational faults.
Only open the housing as described in the instructions given in the
installation sheet and in the “Cleaning and care” section of this
booklet. Under no circumstances should any other parts of the
housing be opened.
The manufacturer's warranty will be invalidated if the appliance is
not repaired by a Miele authorised service technician.
If the mains connection cable is damaged, it must only be
replaced by a Miele authorised service technician or suitably
qualified and competent electrician in order to avoid a hazard.
The lamps are a built-in component of the lighting. Replacement
lamps may only be installed by a Miele authorised technician.
During installation, maintenance and repair work, the appliance
must be disconnected from the mains electricity supply. It is only
completely isolated from the electricity supply when:
- the mains circuit breaker is switched off, or
- it is switched off at the wall socket and the plug is withdrawn from
the socket. Do not pull the mains connection cable but the mains
plug to disconnect your appliance from the mains electricity
supply.
7
Page 8
Warning and Safety instructions
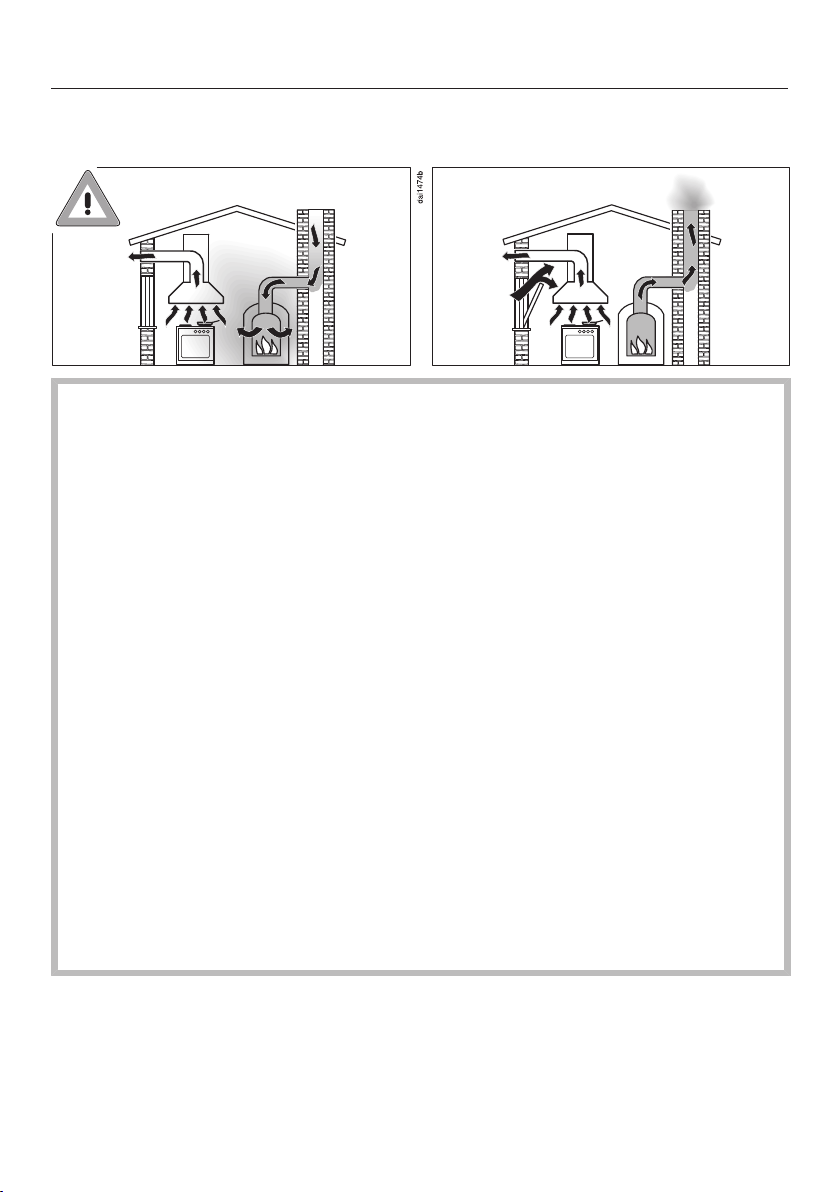
Using at the same time as other heating appliances that depend on the air from the room
Danger of toxic fumes!
Great care should be taken when using the rangehood in the same
room or the same area of the house as another heating appliance
that depends on the air from the room.
Such heating appliances draw in air from the room and duct
exhaust gases out through a chimney or extraction ducting. They
include gas, oil, wood and coal-fired boilers and heaters,
continuous flow or other water heaters, gas cooktops and ovens.
The rangehood draws in air from the kitchen and from
neighbouring rooms. This applies to the following modes of
operation:
- extraction mode
- recirculation mode with a recirculation box installed outside the
room.
If there is insufficient air, an underpressure will occur. The heating
appliance may be starved of oxygen. This impairs combustion.
Harmful gases could be drawn from the chimney or extraction
ducting back into the room.
This could have potentially fatal consequences. Risk of death!
8
Page 9

Warning and Safety instructions
In order to ensure safe operation and to prevent gases given off by
a heating appliance from being drawn back into the room, when
the rangehood and the heater are both operated simultaneously,
an underpressure in the room of 0.04mbar (4Pa) is the maximum
permissible.
Sufficient ventilation can be maintained by air inlets which cannot
be blocked, e.g. in windows, doors and outside wall vents. The
diameter of the inlet openings must enable sufficient ventilation. A
ventilation brick alone is not generally sufficient to ensure safe
ventilation.
The overall ventilation condition of the dwelling must be taken into
account. If in any doubt, the advice of a competent builder or, for
gas, a qualified gas fitter (registered with an official gas safety
body in accordance with national safety regulations) must be
sought.
If the rangehood is being operated in recirculation mode, whereby
the air is redirected into the room in which it is installed, the above
restrictions do not apply.
9
Page 10

Warning and Safety instructions
Correct use
Open flames are a fire hazard!
Never use an open flame under the rangehood. To avoid the danger
of fire, do not flambé or grill over an open flame. When switched on,
the rangehood could draw flames into the filter. Kitchen grease
deposits could ignite.
The rangehood can become damaged when exposed to excessive
heat.
- When using the rangehood over a gas cooktop, ensure that any
burners in use are always covered by a pan. Switch the cooking
zone off when a pan is removed, even for a short time.
- Select a pan which is suitable for the size of the burner.
- Regulate the flame so that it does not burn up the sides of the
pan.
- Avoid overheating the pan (e.g. when cooking with a wok).
Always switch the rangehood on when a cooking zone is in use,
otherwise condensation may collect in the rangehood, which could
cause corrosion.
Overheated oil and fat can ignite, causing fire damage to the
rangehood.
When cooking with oil or fat, chip pans and deep fat fryers etc., do
not leave the pans unattended. Similarly, never leave an open grill
unattended when grilling.
10
Page 11

Warning and Safety instructions
Do not use the rangehood without the filters in place. This way
you will avoid the risk of grease and dirt getting into the appliance
and hindering its smooth operation.
The rangehood can get very hot during cooking due to heat rising
from the cooktop.
Do not touch the housing or the grease filters until the rangehood
has cooled down.
Correct installation
To determine whether a rangehood may be operated above your
cooking appliance, please refer to the information provided by the
appliance’s manufacturer.
Safety regulations prohibit the fitting of a rangehood over solid
fuel stoves.
An insufficient safety distance between the stovetop and the
rangehood can result in damage to the rangehood.
The minimum safety distances between the top of the cooktop and
the bottom of the rangehood given in the “Installation” section of
these instructions must be observed, unless the cooktop
manufacturer states that a greater safety distance is required.
If more than one cooking appliance is fitted beneath the rangehood,
and they have different minimum safety distances to the rangehood,
select the greater distance.
The information provided in “Installation” must be observed when
installing the rangehood.
There may be a risk of injury due to protruding parts and sharp
edges.
Wear gloves that offer protection against cuts during assembly.
All ducting, pipework and fittings must be of non-flammable
material and comply with all relevant national and local building
regulations.
11
Page 12

Warning and Safety instructions
The appliance must not be connected to a chimney or vent flue
which is in current use for exhausting fumes from appliances burning
gas or other fuels. Neither should it be connected to ducting which
ventilates rooms with fireplaces.
If exhaust air is to be extracted into a chimney or ventilation duct
no longer used for other purposes, seek professional advice.
Cleaning and care
There is a risk of fire if cleaning is not carried out as described in
these operating instructions.
Do not use a steam cleaning appliance to clean this appliance.
The steam could reach electrical components and cause a short
circuit.
Accessories and spare parts
Use only genuine original Miele spare parts. If spare parts or
accessories from other manufacturers are used, the warranty will be
invalidated, and Miele cannot accept liability.
Faulty components must only be replaced by genuine Miele spare
parts. The manufacturer can only guarantee the safety of the
appliance when Miele replacement parts are used.
Miele will guarantee to supply functional spare parts for a
minimum of 10years and up to 15years following the
discontinuation of your appliance.
12
Page 13

Caring for the environment
Disposal of the packing material
The transport and protective packaging
has been selected from materials which
are environmentally friendly for
disposal, and can normally be recycled.
Recycling the packaging reduces the
use of raw materials in the
manufacturing process and also
reduces the amount of waste in landfill
sites. Ensure that any plastic
wrappings, bags etc. are disposed of
safely and kept out of the reach of
babies and young children. Danger of
suffocation.
Disposing of your old appliance
Electrical and electronic appliances
often contain valuable materials. They
also contain specific materials,
compounds and components, which
were essential for their correct function
and safety. These could be hazardous
to human health and to the environment
if disposed of with your domestic waste
or if handled incorrectly. Please do not,
therefore, dispose of your old appliance
with your household waste.
Please dispose of it at your local
community waste collection / recycling
centre for electrical and electronic
appliances. You are also responsible for
deleting any personal data that may be
stored on the appliance prior to
disposal. Please ensure that your old
appliance poses no risk to children
while being stored prior to disposal.
13
Page 14
Guide to the rangehood
14
Page 15

Guide to the rangehood
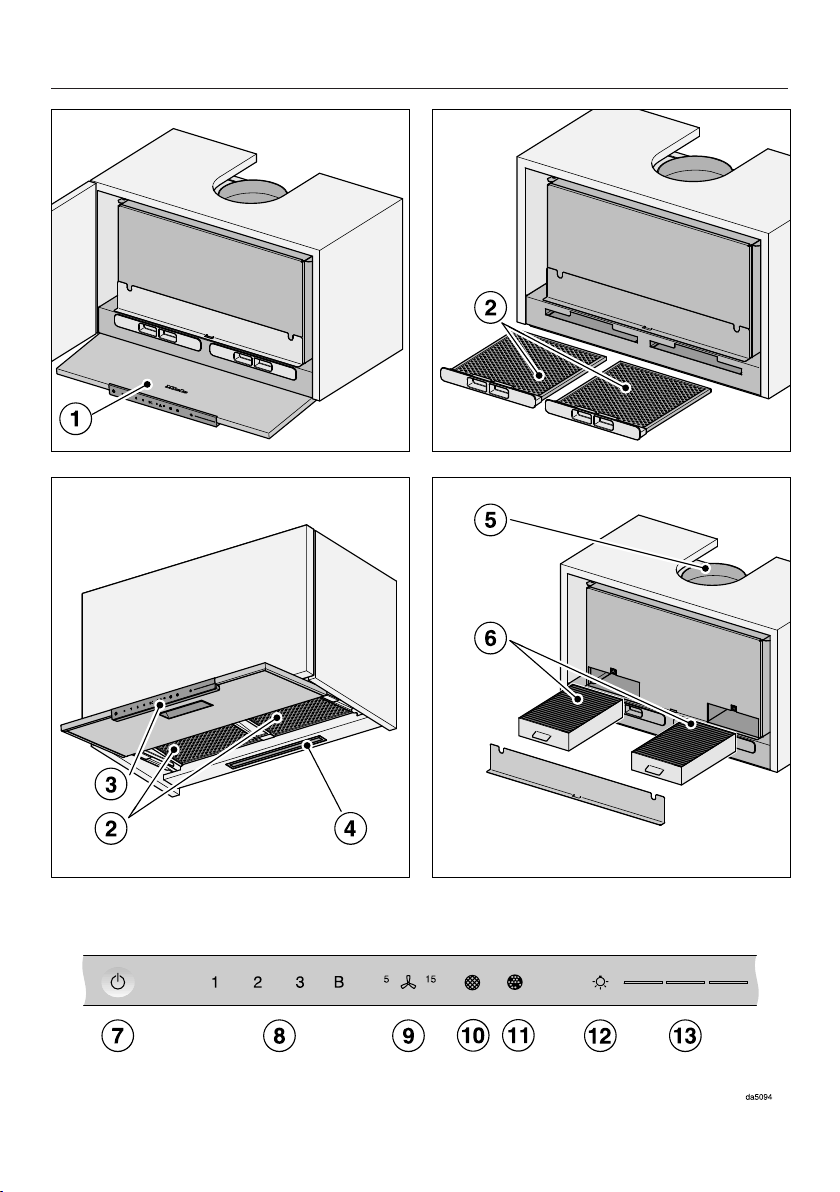
a
Pull-out deflector plate
b
Grease filter
c
Control panel
d
Cooktop lighting
e
Exhaust connection
f
Charcoal filter
Single-use or reactivatable charcoal filters
Optional accessory for recirculation mode
g
Sensor for switching the rangehood on and off
h
Sensors for switching the fan on and off and for setting the fan power level
i
Sensor for the run-on function
j
Sensor for the grease filter operating hours counter
k
Sensor for the charcoal filter operating hours counter
l
Sensor for switching the lighting on and off and for dimming the lighting
m
Sensors for selecting and displaying lighting levels
15
Page 16
Description of the functions
Depending on the model of the
rangehood, the following options are
available:
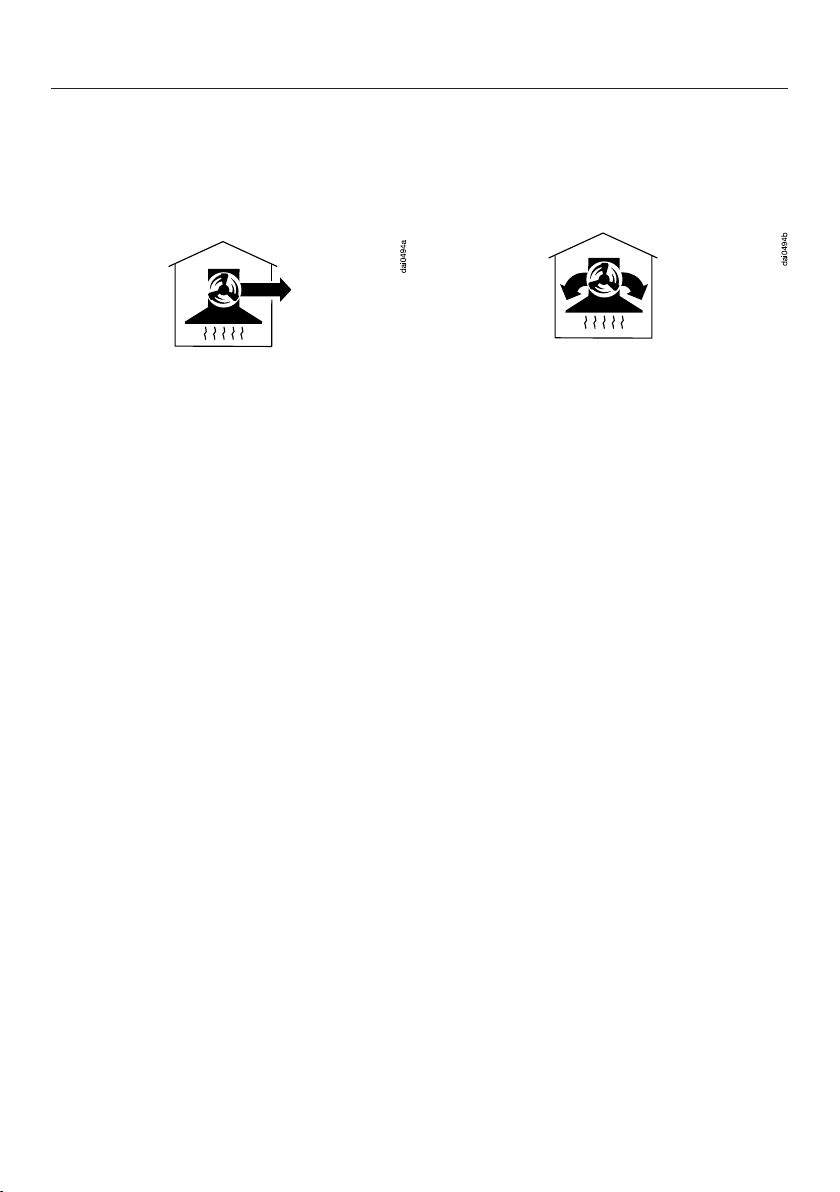
Air extraction mode
The air is drawn in and cleaned by the
grease filters and directed outside.
Recirculation mode
(available as an optional extra with a
conversion kit and charcoal filter: see
“Technical Data”)
The air is drawn in and cleaned first by
the grease filters and then by a charcoal
filter. The cleaned air is then
recirculated back into the kitchen.
16
Page 17

Before using for the first time
Selecting extraction mode or recirculation mode
The rangehood can be operated with
either extraction mode or recirculation
mode. The power of the fan is
adapted to suit the selected mode of
operation. The rangehood is set up at
the factory for recirculation mode. It
has to be reset for extraction mode.
To reset it for extraction mode, the
operating hours counter for the
charcoal filter(s) has to be deactivated.
Pull out the deflector plate.
Switch off the fan with the button 2
and the lighting with the button .
Press and hold the run-on option
control until the grease filter
and charcoal filtersymbols light
up.
Touch the charcoal filter symbol.
The charcoal filter symbol and one of
the fan power levels will flash.
Touch the B control.
Confirm your choice by touching the
charcoal filter sensor.
Setting up Miele@home
Prerequisites:
- a Wi-Fi network
- the Miele App
- a Miele user account. The user
account can be created via the
Miele App.
Your rangehood is equipped with an
integrated Wi-Fi module. Connect the
rangehood to your household Wi-Fi
network. You will then be able to
operate the rangehood via the Miele
App.
If your Miele cooktop is connected to a
home Wi-Fi network, you can control
the rangehood automatically via the
Con@ctivity function.
Before installing the rangehood in its
final location, ensure that the signal
of your Wi-Fi network is strong
enough.
You can connect to the Wi-Fi network
via the Miele@home App or via WPS.
All the indicator lights will go out.
Extraction mode has now been set.
If you do not confirm your selection
within 4minutes, the rangehood will
automatically revert to the previous
setting.
17
Page 18
Before using for the first time
Miele@home availability
The ability to use the Miele App
depends on the availability of the
Miele@home service in your country.
The Miele@home service is not
available in every country.
For information about availability,
please visit www.miele.com.
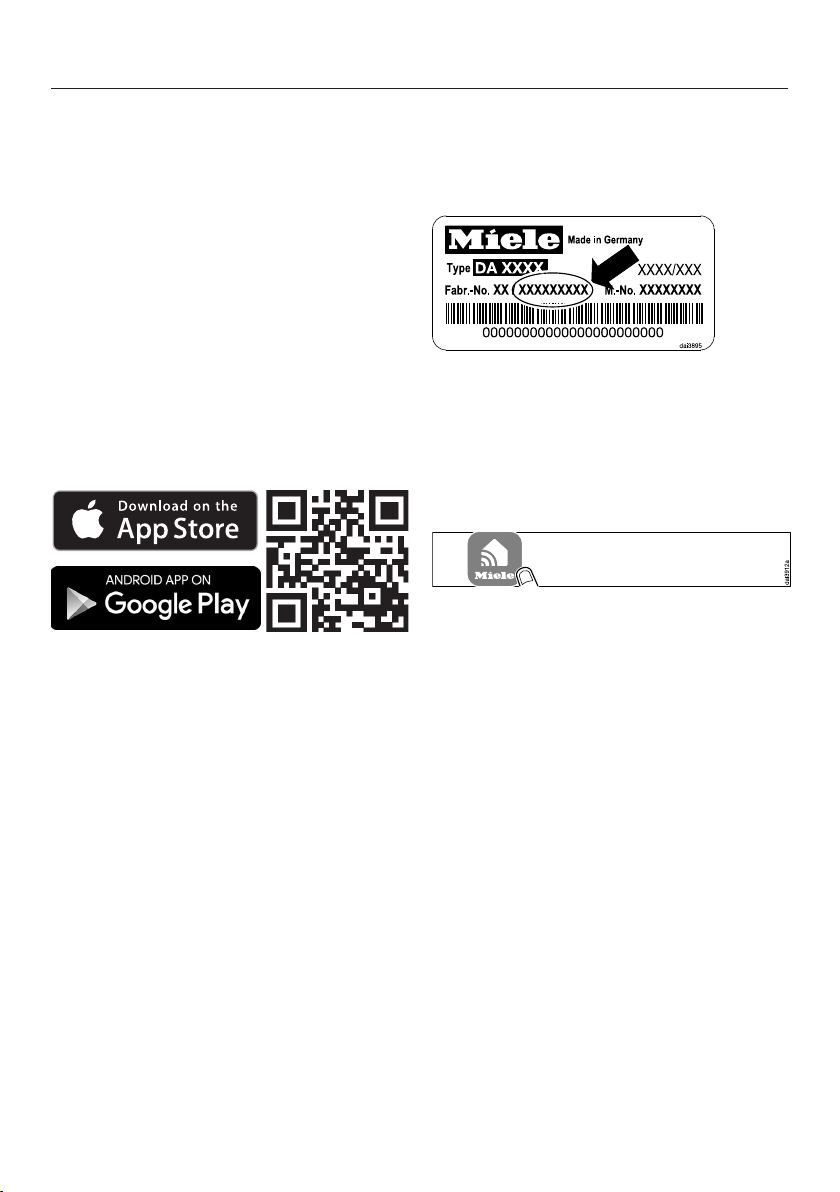
Miele App
You can download the Miele App from
the Apple App Store® or the Google
Play Store™ free of charge (only
functional in selected countries).
Connecting via the App
The Miele App can be used to connect
to your network.
To log in you will need:
1. Your Wi-Fi network password
2. Your rangehood password
The password for your rangehood
consists of the last nine digits of the
serial number, which can be found on
the appliance's data plate.
The data plate is visible after removing
the grease filters.
Start the appliance registration in the
App. Follow the login steps.
If requested to activate Wi-Fi on the
rangehood, proceed as follows:
Install the Miele App on your mobile
device.
18
Page 19
Before using for the first time
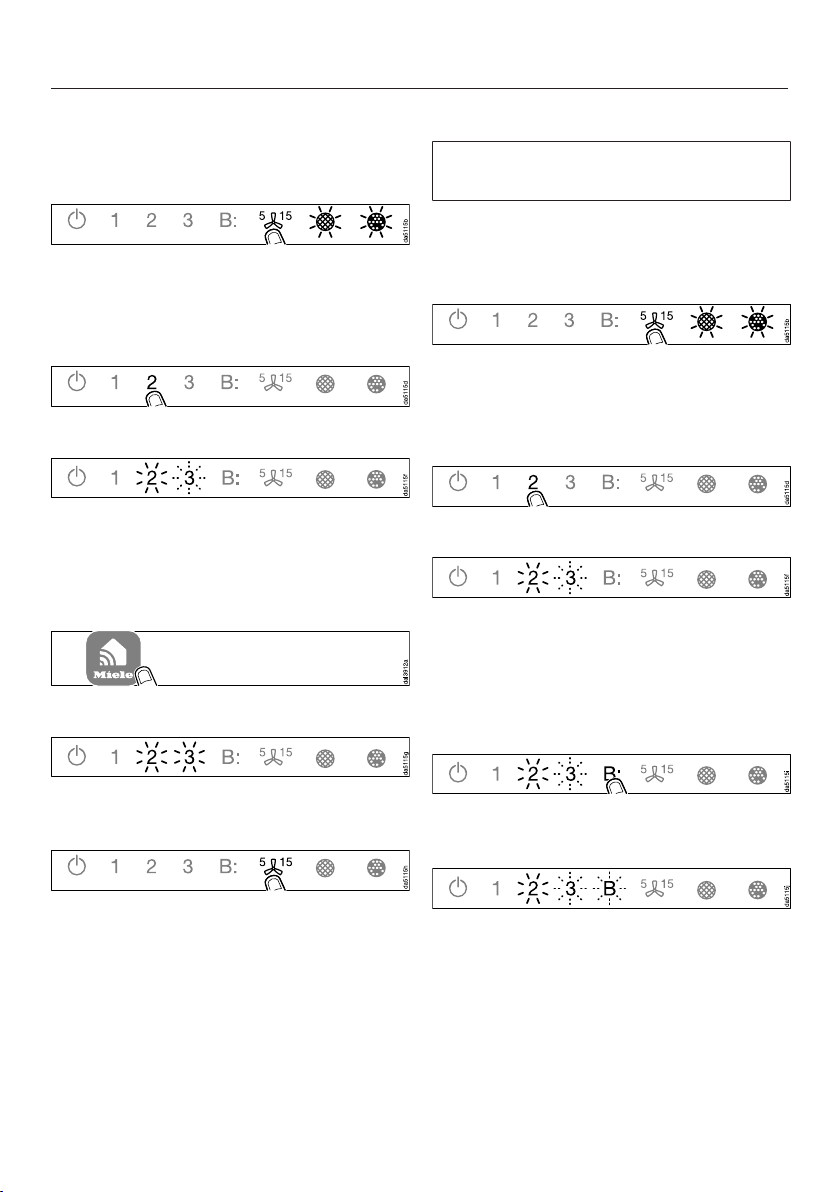
Touch the On/Off sensor.
All symbols light up with reduced
brightness.
Press and hold the run-on option
control until the grease filter
and charcoal filtersymbols light
up.
Touch the 2 control.
2 will light up constantly, 3 will flash on
and off.
The rangehood is ready for connection
during the next twominutes.
Follow the instructions in the App.
Connecting via WPS
Your Wi-Fi router must support WPS
(Wi-Fi Protected Setup).
Touch the On/Off sensor.
All symbols light up with reduced
brightness.
Press and hold the run-on option
control until the grease filter
and charcoal filtersymbols light
up.
Touch the 2 control.
2 will light up constantly, 3 will flash on
and off.
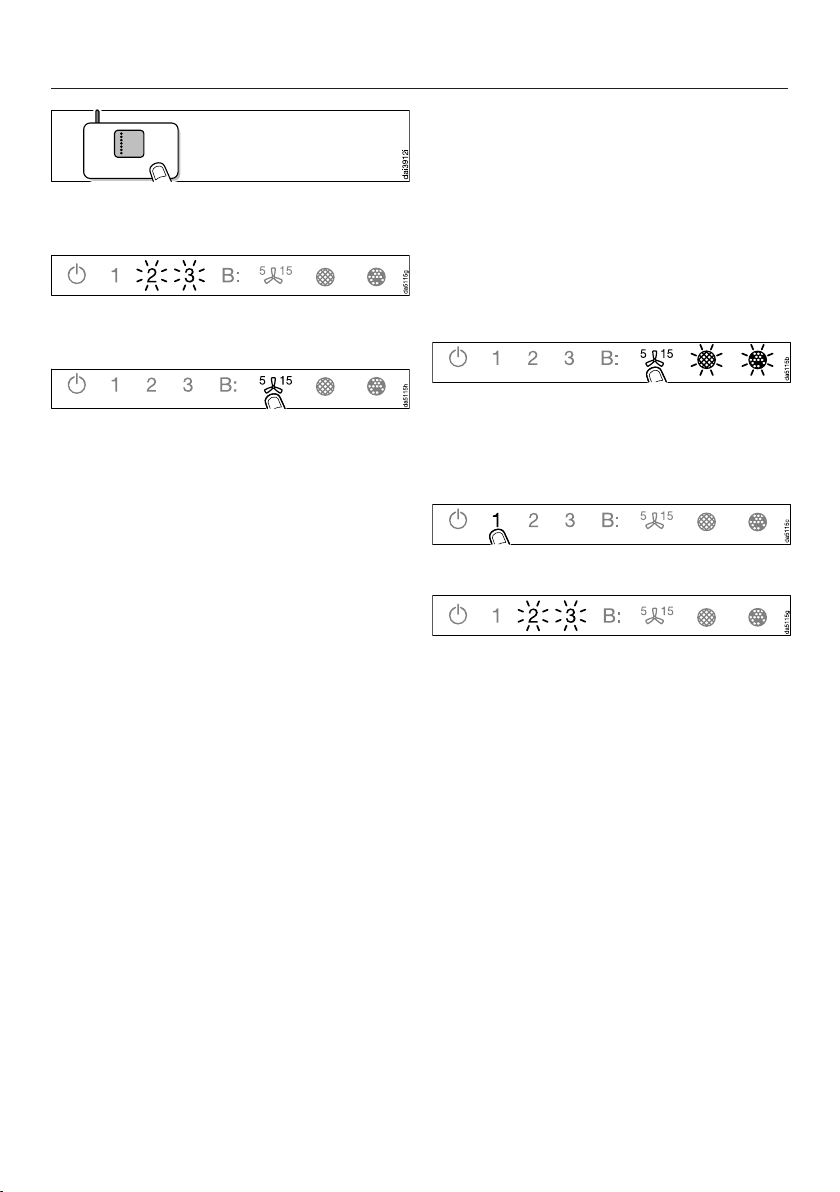
The Wi-Fi connection must be started
on the rangehood at the same time as
on the Wi-Fi router.
When successfully connected 2 and 3
will light up constantly.
Quit connection mode on the
rangehood by touching the run-on
control.
The rangehood can now be operated
via the App.
Press the B control on the rangehood
after a few seconds.
After a short while 2 will light up
constantly, and 3 and B will flash on
and off.
The rangehood is ready for connection
during the next two minutes.
19
Page 20
Before using for the first time
Start the WPS connection on your
Wi-Fi router.
When successfully connected 2 and 3
will light up constantly.
Quit connection mode on the
rangehood by touching the run-on
control.
The rangehood can now be operated
via the App.
If the connection fails, you have
probably not connected WPS on your
router quickly enough. Repeat the steps
above.
Useful tip: If your Wi-Fi router does not
support WPS, please connect via the
Miele App.
Signing out of Wi-Fi (reset to factory settings)
To set up a new Wi-Fi connection, the
existing Wi-Fi connection must first be
disconnected.
Touch the On/Off sensor.
All symbols light up with reduced
brightness.
Press and hold the run-on option
control until the grease filter
and charcoal filtersymbols light
up.
Touch the 1 control.
With an existing Wi-Fi connection 2 and
3 will light up constantly.
The rangehood is ready for
disconnection during the next two
minutes.
20
Page 21
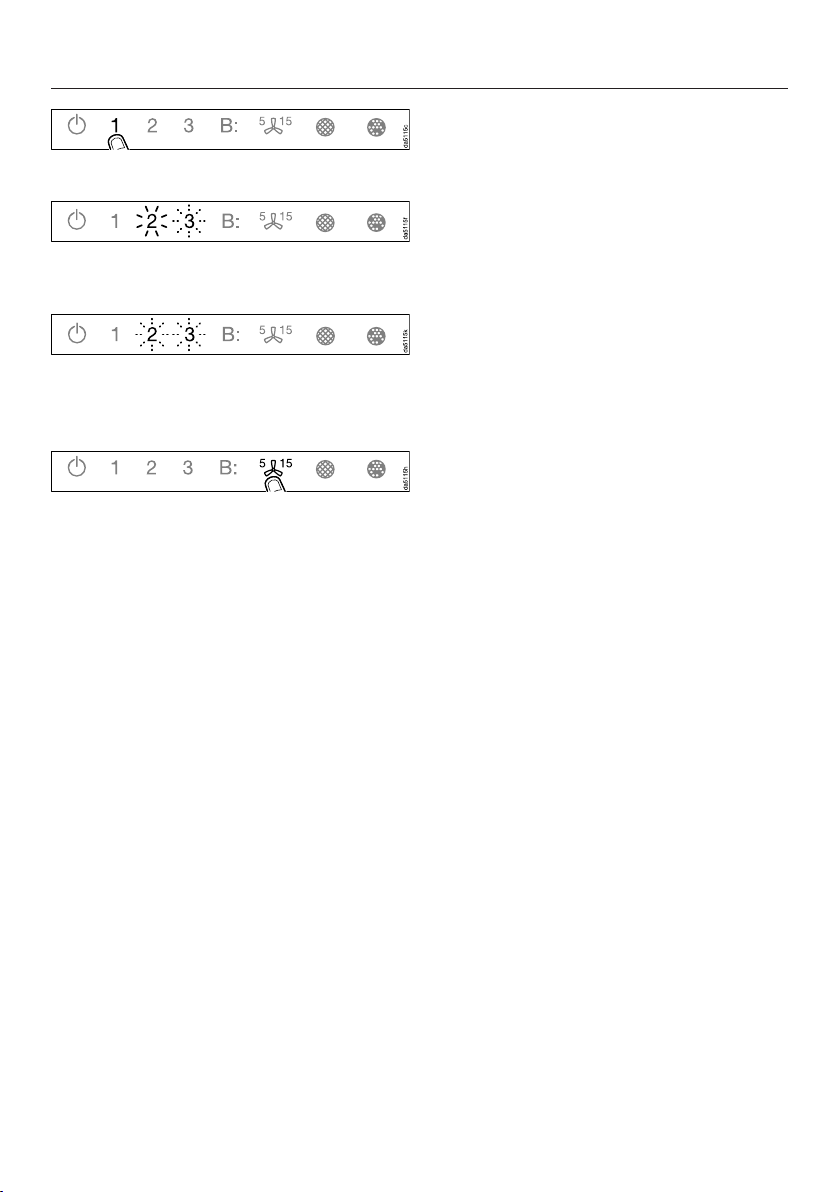
Touch the 1 control.
2 will light up constantly, 3 will flash on
and off.
After a few seconds 2 and 3 will flash
on and off. The connection has now
been disconnected.
Quit disconnection mode on the
rangehood by touching the run-on
control.
The Wi-Fi connection has been
disconnected. A new connection can
now be set up.
Before using for the first time
Setting up Con@ctivity
Con@ctivity is the direct communication
system between an electric Miele
cooktop and a Miele rangehood. It
enables the rangehood to operate
automatically depending on the
operational state of a Miele cooktop
with onset controls.
- When the cooktop is switched on,
the cooktop lighting on the
rangehood comes on independently
and, after a short time, the fan also
switches on.
- The rangehood selects the power
level automatically during cooking.
The power level selected by the
rangehood depends on the number
of cooking zones being used and
their power levels.
- After switching the cooktop off, the
fan and the cooktop lighting will
switch off automatically after a
specified period of time.
See “Operation” for detailed information
about this function.
21
Page 22
Before using for the first time
Con@ctivity via the home Wi-Fi network (Con@ctivity 3.0)
Prerequisites:
- Home Wi-Fi network
- Wi-Fi enabled Miele cooktop
Connect the rangehood and cooktop
to your home Wi-Fi network (see
"Setting up Miele@home").
The Con@ctivity function will be
activated automatically.
Con@ctivity via a direct Wi-Fi connection (Con@ctivity 3.0)
Prerequisite:
- Wi-Fi enabled Miele cooktop
If you do not have a home network, you
can establish a direct connection
between the cooktop and the
rangehood.
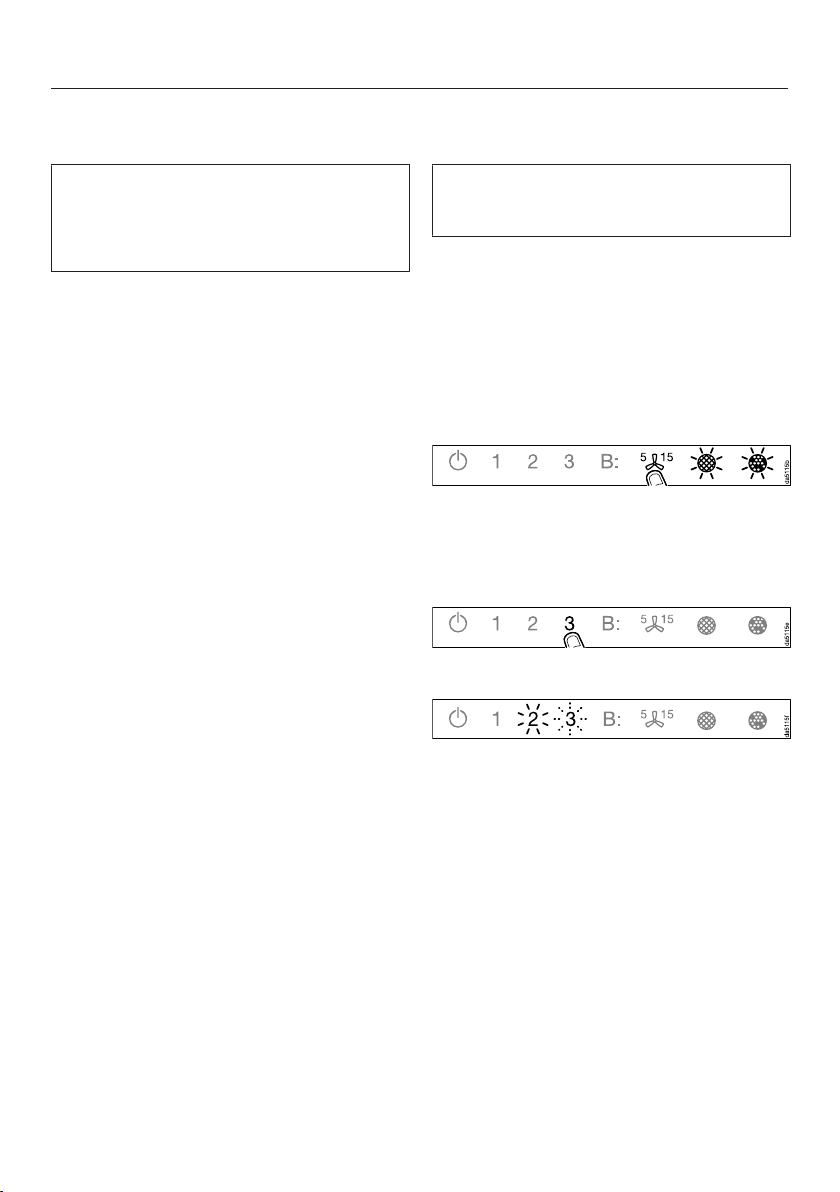
Touch the On/Off sensor.
All symbols light up with reduced
brightness.
Press and hold the run-on option
control until the grease filter
and charcoal filtersymbols light
up.
Touch the 3 control.
22
2 will light up constantly, 3 will flash on
and off.
The rangehood is ready for connection
during the next twominutes.
Page 23
Start the Wi-Fi connection on the
cooktop. For further details, see the
cooktop operating instructions.
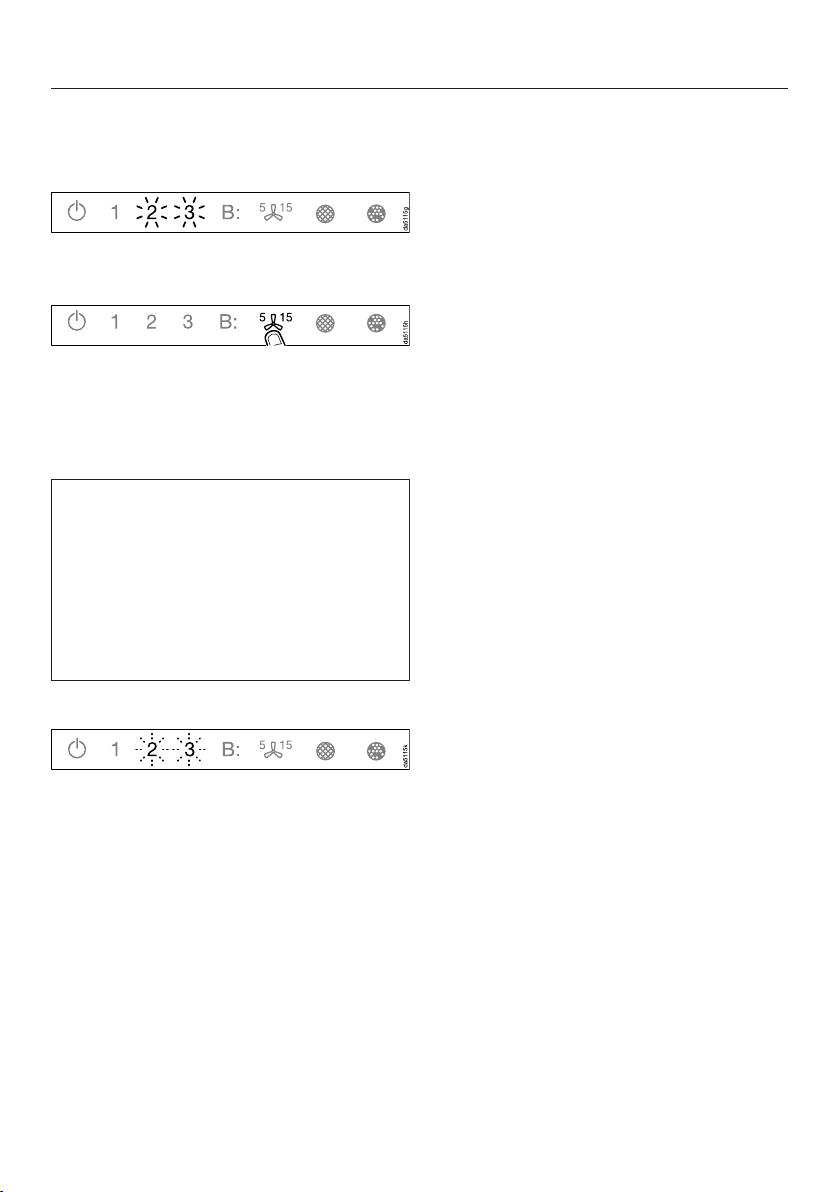
When successfully connected 2 and 3
will light up constantly.
Quit connection mode on the
rangehood by touching the run-on
control.
Con@ctivity has now been activated.
With a direct Wi-Fi connection, it is not
possible to connect the cooktop and
the rangehood to a home network.
Should this be required at a later date,
the direct Wi-Fi connection between
the cooktop and the rangehood must
be disconnected first (see "Signing out
of Wi-Fi").
Before using for the first time
Reattempting the connection
If it is not possible to connect, 2 and 3
flash or the rangehood cancels the
process.
Disconnect the connection to the
rangehood (see “Signing out of WiFi”) and to the cooktop.
Attempt to make the connection
again.
23
Page 24
Operation (automatic mode)
When Con@ctivity is active, the
rangehood always operates in
automatic mode (see “Before using for
the first time – Setting up
Con@ctivity”).
If you wish to manually operate the
rangehood, see “Operation (manual
mode) – Cooking without Con@ctivity”.
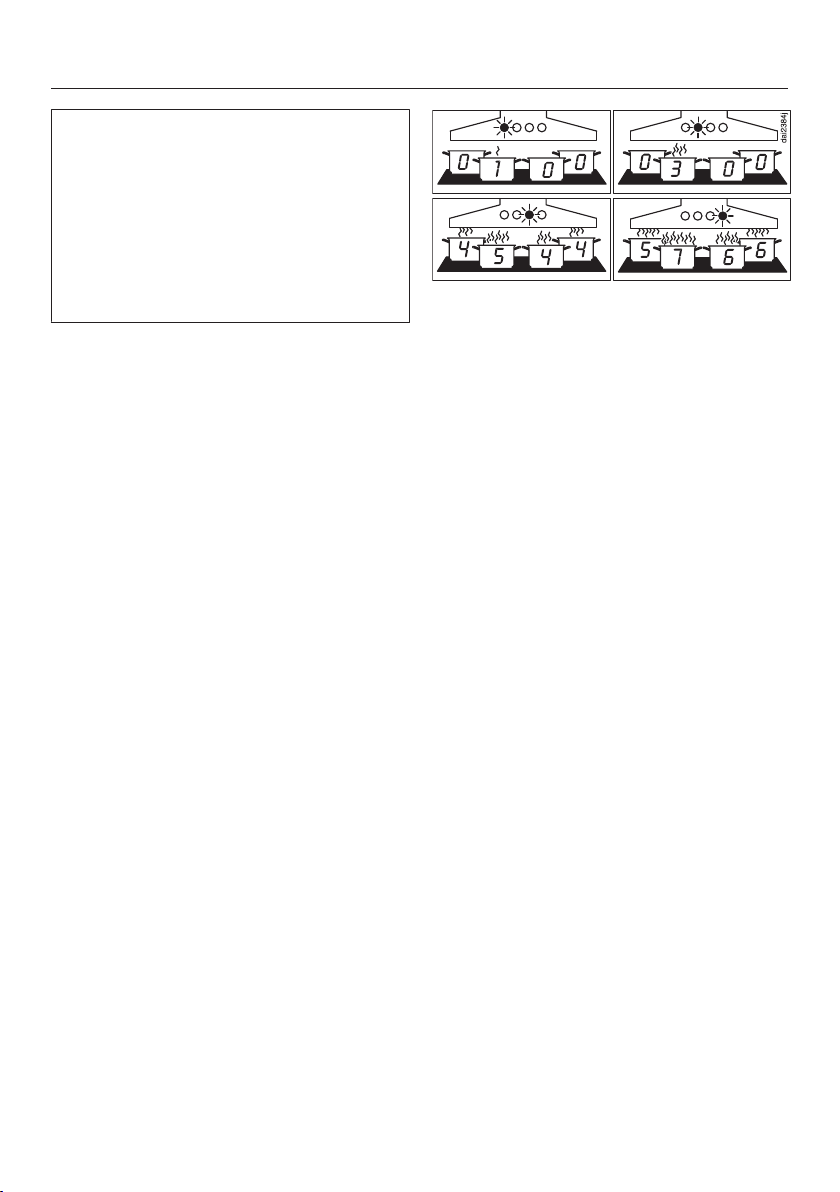
Examples for power levels 1 to B
Cooking with Con@ctivity (automatic mode)
Switch on a cooking zone at any
power level.
The rangehood lighting will come on.
Pull out the deflector plate.
The fan will come on at power level 2.
The rangehood selects the power level
automatically during cooking.
This is determined by the total output of
the cooktop, i.e. the number of cooking
zones in operation and the power levels
selected.
If you select a higher power level on
the cooktop or are using several
cooking zones, the rangehood will
switch to a higher power level.
When you reduce the power level on
the cooktop or the number of cooking
zones being used, the rangehood
power level will also be reduced.
Reaction time
The rangehood reacts with a slight
delay because altering the power level
on the cooktop does not immediately
result in a reduction or increase in
cooking vapours.
Because the cooktop transmits the
information to the rangehood at
intervals, this can also cause delays.
The reaction can vary from a few
seconds to a few minutes.
24
Page 25

Operation (automatic mode)
Cooking process
For example, you switch on a cooking
zone at the highest power level to
heat a pan for frying. After approx.
10seconds to 4minutes, you then
reduce the power level (60seconds
to 5minutes for a radiant cooktop).
The rangehood recognises a cooking
process.
The rangehood switches itself on and
when the cooktop power level has been
reduced, the rangehood switches to
power level 3 and remains at that level
for approx. 5 minutes.
After that the rangehood power level is
determined automatically by the
Con@ctivity function.
You can select another power level
manually before then.
Switching off
Switch off all cooking zones.
The rangehood fan will reduce its power
level in stages over the next few
minutes and will then switch itself off.
This helps to neutralise any lingering
vapours and odours in the air.
- From the Booster setting, the fan
switches immediately to level3.
- From level 3, it will switch to level 2
after approx. 1minute.
- From level 2, it will switch to level 1
after 2minutes.
- After 2minutes at Level 1, the fan
switches itself off.
- After another 30 seconds, the
cooktop lighting switches off.
The cooking process is then finished.
If the deflector plate remains pulled out,
the rangehood will be switched on
automatically the next time the cooktop
is switched on:
The fan switches on a few seconds
after the cooktop switches on, initially
at level 2, before immediately changing
to level 1. Operation then continues
automatically.
25
Page 26

Operation (automatic mode)
Leaving automatic mode temporarily
To leave automatic mode temporarily
during cooking:
Manually select a different power
level, or
Manually switch the rangehood off, or
Activate the run-on function on
the rangehood. The fan will switch
itself off after the selected run-on
time, and the lighting will remain on.
The rangehood functions are now
operated manually (see “Operation
(manual mode)”).
Returning to automatic mode
The rangehood returns to automatic
mode:
- if the rangehood has not been used
for approx. 5 minutes after selecting
a power level manually, or
You can also operate the rangehood
manually for a complete cooking
process.
To do so switch the rangehood fan on
before the cooktop.
If the rangehood fan and the cooktop
have been switched off for at least 30
seconds after cooking, automatic mode
will resume next time the cooktop is
switched on.
- if the manually selected power level
corresponds to the automatic one
again, or
- the rangehood fan and the cooktop
have been switched off for at least 30
seconds.
Automatic mode will resume next
time the cooktop is switched on.
26
Page 27
Operation (manual mode)
Cooking without Con@ctivity (manual mode)
The rangehood can be operated
manually if:
- the Con@ctivity function is not
activated.
- You have temporarily deactivated the
Con@ctivity function (see “Operation
(manual operation) – Leaving
automatic mode temporarily”).
Switching the fan on
Switch the fan on as soon as you start
cooking. This is to ensure that vapours
are captured right from the start.
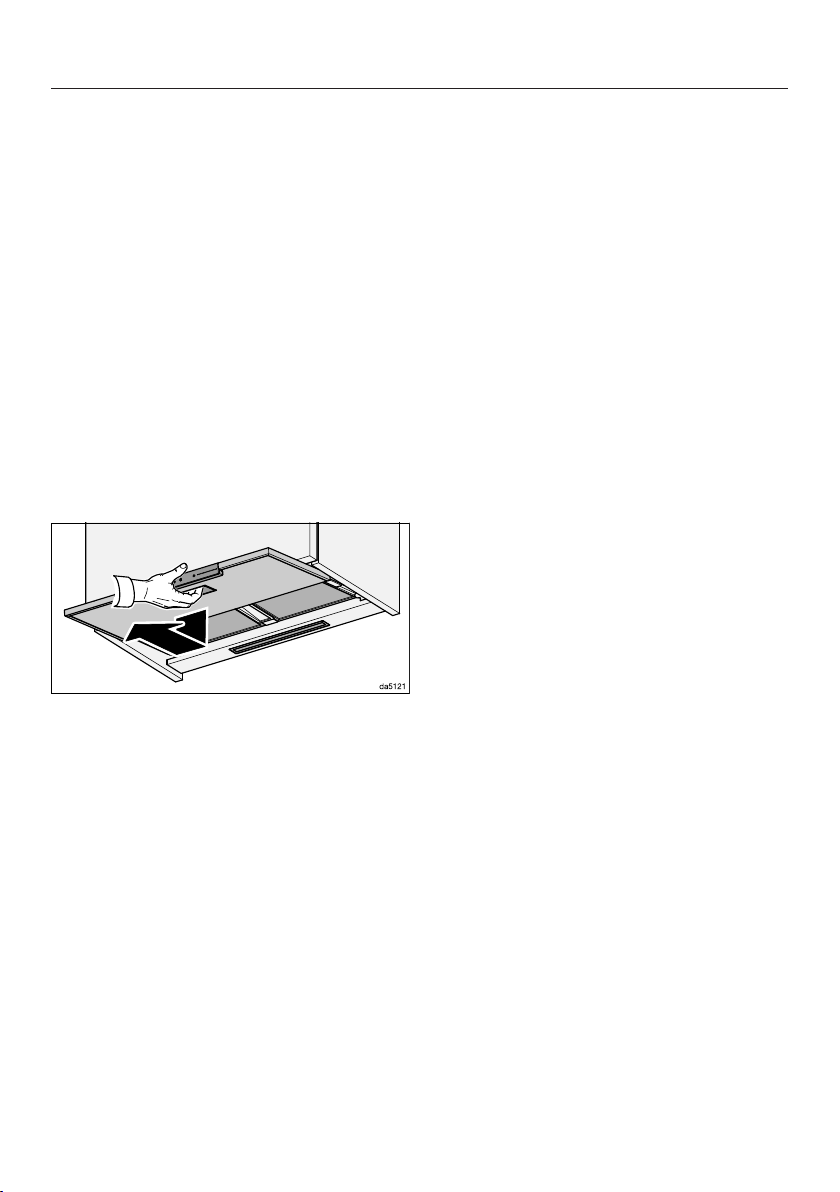
Pull out the deflector plate. To ensure
optimum extraction and a low noise
level, pull the canopy all the way out.
The fan will switch on at power level 2.
Selecting a power level
For light to heavy cooking vapours and
odours, select from power levels 1 to 3.
For short periods of cooking food with
intensive vapours and a strong aroma,
e.g. when searing meat, select Booster
settingB.
Select the power level required by
touching a control from 1 to B.
Selecting the second Booster level
When you select the Booster level,
the Bsymbol lights up. To increase
the power level further, touch B
again.
The Bsymbol lights up.
The second Booster level is activated.
The air throughput is increased for a
short time.
Switching back the Booster levels
If Power management is activated
(default setting), the first Booster level
Bautomatically switches back to
level3 after 5minutes.
The second Booster level B switches
back after 2minutes (even if Power
management is deactivated).
27
Page 28

Operation (manual mode)
Selecting the run-on time
It is advisable to run the fan for a few
minutes after cooking has finished. This
helps to remove any lingering vapours
and odours from the air.
It also reduces the risk of residues
accumulating in the rangehood and any
resultant odours.
The run-on function allows the fan to
continue to run for a pre-determined
time before switching itself off
automatically.
After you have finished cooking,
touch the run-on control with the
fan still switched on:
- Once: the fan will switch itself off
after 5minutes (5 lights up).
- Twice: The fan will switch itself off
after 15minutes ( 15 lights up).
- If you touch the run-on control
again, the fan will remain switched on
( will go out).
Switching the fan off
Touching the control for the active
power level again switches the fan
off.
Also, when you slide in the vapor
screen, the blower turns off.
Dimming/Switching the cooktop lighting on/off
You can switch the cooktop lighting
on by pulling the deflector plate out
and off by pushing it in.
When the deflector plate is pulled
out, you can switch the cooktop
lighting on and off with the lighting
control .
The lighting will switch on at maximum
brightness. All 3 bars next to the
lighting control light up.
To change the brightness, press and
hold the lighting control with the
lighting switched on. The brightness
will gradually dim until you release the
control.
To increase the brightness, press and
hold the lighting control again until
the desired level has been reached
and then release it.
Alternatively, you can select 3
brightness levels by touching the bars
next to the lighting control.
Safety switch-off
If Power management has been
deactivated, the fan and the cooktop
lighting will switch off automatically
after 12hours if they have been left on.
28
To switch back on, press the On/Off
control .
Page 29

Changing settings
All settings are made with the
rangehood switched off.
Pull out the deflector plate and switch
off the fan and the lighting.
Altering the grease filter operating hours counter
You can set the operating hours counter
to suit the type of cooking you do.
The factory setting is a cleaning interval
of 30hours.
- Select a shorter time of 20hours if
you fry a lot.
- If you only cook occasionally, we
recommend that you still select a
short time for the counter. This is to
prevent grease from hardening on the
filter and making cleaning more
difficult.
- Select a longer time of 40 or 50hours
if you use very little fat for cooking.
Touch the On/Off sensor.
All symbols light up with reduced
brightness.
Press and hold the run-on option
control until the grease filter
and charcoal filtersymbols light
up.
Touch the grease filter symbol.
The grease filter symbol and one of
the fan power level indicators will flash.
The fan power level indicators 1 to B
show the time set:
1............................................... 20 hours
2............................................... 30 hours
3............................................... 40 hours
B .............................................. 50 hours
Touch the relevant control to select
the duration required.
Confirm your choice by touching the
grease filter control . If you do not
confirm your selection within
4minutes, the rangehood will
automatically revert to the previous
setting.
29
Page 30

Changing settings
Altering or deactivating the charcoal filter operating hours counter
Charcoal filters are needed for
recirculation mode.
You can set the operating hours counter
to suit the type of cooking you do.
It has to be deactivated for extraction
mode.
It is set at the factory for 180hours of
use before the filters need replacing.
Touch the On/Off sensor.
All symbols light up with reduced
brightness.
Press and hold the run-on option
control until the grease filter
and charcoal filtersymbols light
up.
Touch the charcoal filter symbol.
The charcoal filter symbol and one of
the fan power levels will flash.
The fan power level indicators 1 to B
show the time set:
1............................................. 120 hours
2............................................. 180 hours
3............................................. 240 hours
B ......................................... deactivated
Touch the relevant control to select
the duration required.
Confirm your choice by touching the
charcoal filter sensor. If you do not
confirm your selection within
4minutes, the rangehood will
automatically revert to the previous
setting.
30
Deactivating Power management
Keep in mind that deactivating this
function may increase energy
consumption.
Activating/deactivating Power management
Touch the On/Off sensor.
All symbols light up with reduced
brightness.
Press and hold the run-on option
control.
After a few seconds, the grease filter
and charcoal filter symbols light up,
and after a further 5seconds the 1 fan
power level indicator lights up.
The deflector plate extends.
Then touch in turn
- the lighting control,
- the 1 control and then again
- the lighting control.
When Power management is activated,
the 1 and B indicators light up
constantly.
When it is deactivated, the 1 and B
indicators flash.
To deactivate Power management,
touch 1.
The 1 and B indicators will flash.
To activate, touchB.
The 1 and B indicators will light up
constantly.
Confirm the setting by pressing the
run-on control.
Page 31

All the indicator lights will go out.
If you do not confirm your selection of
setting within 4minutes, the rangehood
will revert to the previous setting.
Buzzer for the sensors
When a function is selected with the
sensors, a short buzzer will sound for
confirmation.
The buzzer can be switched off.
Touch the On/Off sensor.
All symbols light up with reduced
brightness.
Press and hold the run-on option
control until the grease filter
and charcoal filtersymbols light
up.
Touch the B control.
The buzzer is switched off.
Changing settings
If you want to switch the buzzer on
again, proceed in the same way.
Regardless of the previous setting, the
buzzer will be reactivated when power
is restored to the rangehood after it
has been disconnected from the
mains electricity supply or after a
power cut.
31
Page 32

Energy saving tips
This rangehood operates very efficiently
and economically. The following will
help you to save even more energy
when using it:
- Ensure that there is sufficient
ventilation in the kitchen when
cooking. In extraction mode, if there
is insufficient air flow the rangehood
cannot operate efficiently and this
causes increased operating noise
levels.
- Always cook with the lowest possible
setting. This produces fewer cooking
vapours, so you can use a lower
rangehood power level and therefore
benefit from reduced energy
consumption.
- Clean or change the filters at regular
intervals. Heavily soiled filters reduce
performance, increase the risk of fire
and are unhygienic.
- Use the Con@ctivity function. The
rangehood will switch on and off
automatically. The rangehood will
select the optimum power level for
the cooking you are doing, which
ensures low energy consumption.
- If you are operating the rangehood
manually, please note the following:
– Check the power level selected on
the rangehood. A low power level
is usually sufficient. Only use the
Booster setting when necessary.
– When a large volume of cooking
vapours are being produced,
switch to a high power level in
good time. This is more efficient
than operating the rangehood for
longer to try to capture cooking
vapours which have already been
distributed throughout the kitchen.
– Make sure that you switch the
rangehood off after use.
If cooking vapours and odours still
need to be removed from the
kitchen air after cooking, use the
run-on function. The fan will switch
off automatically after the selected
run-on time.
32
Page 33

Cleaning and care
Before carrying out any
maintenance or cleaning, the
rangehood must be disconnected
from the electricity supply (see
“Warning and Safety instructions”).
Housing
General
The surfaces and controls are
susceptible to scratches and
abrasion.
Please observe the following
cleaning instructions.
All external surfaces and controls can
be cleaned using warm water with a
small amount of washing-up liquid
applied with a well wrung-out soft
sponge or cloth.
After cleaning, wipe the surfaces dry
using a soft cloth.
Do not use:
Important information for appliances with stainless steel surfaces
Stainless steel surfaces can be cleaned
with a non-abrasive cleaning agent
designed specifically for use on
stainless steel.
To prevent the surfaces from quickly
becoming dirty again, we recommend
treating them with a stainless steel care
product (available from Miele).
Important for appliances with glass surfaces
Glass surfaces can be cleaned using
a proprietary non-abrasive cleaning
agent designed specifically for use on
glass.
- cleaning agents containing soda,
acids, chlorides or solvents,
- abrasive cleaning agents, e.g.
powder cleaners or cream cleaners
and abrasive sponges, as well as pot
scourers or sponges which have
been used previously with abrasive
cleaning agents. These will damage
the surface material.
33
Page 34
Cleaning and care
Grease filters
Fire hazard!
Oversaturated grease filters are a fire
hazard.
Clean the grease filters at regular
intervals.
The re-usable metal grease filters in the
appliance remove solid particles
(grease, dust, etc.) from the kitchen
vapours, preventing soiling of the
rangehood.
The grease filters must be cleaned at
regular intervals.
Heavily soiled grease filters hinder air
extraction and will lead to increased
levels of soiling in the rangehood and
in the kitchen.
Grease filter cleaning intervals
Accumulated grease solidifies over a
longer period of time and makes
cleaning more difficult. The grease
filters should therefore be cleaned every
3 to 4 weeks.
The operating hours control reminds
you to regularly clean the grease filters
by illuminating the grease filter symbol
.
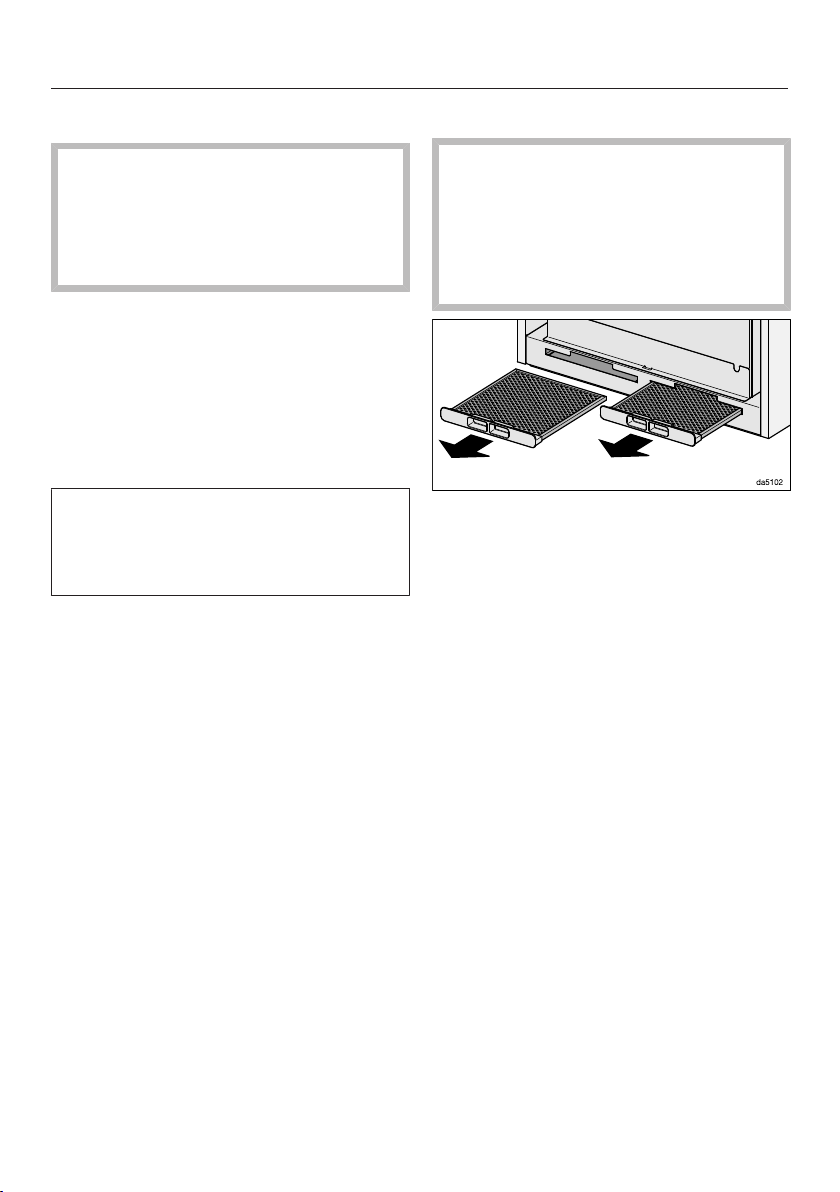
Removing the grease filter
When handling the grease filter,
be careful not to drop it.
This can result in damage to the filter
and the cooktop below.
Make sure you hold the filter securely
at all times when handling it.
Remove the grease filters from the
slots on the front of the housing.
Cleaning the grease filters by hand
Clean the filters with a soft nylon
brush in a mild solution of hot water
and a small amount of washing-up
liquid. Do not use undiluted washing
up liquid.
Unsuitable cleaning agents
Unsuitable cleaning agents can cause
damage to the surface of the filters if
used regularly.
Do not use:
- cleaning agents containing descaling
agents,
34
- powder cleaners or cream cleaners,
- aggressive all-purpose cleaning
agents or spray cleaners for grease,
- oven sprays.
Page 35

Cleaning and care
Cleaning the grease filters in the dishwasher
Place the grease filters upright or
slightly inclined in the lower basket.
Ensure the spray arm is not
obstructed.
Use a standard household
dishwasher detergent.
Select a dishwasher programme with
a wash temperature between 50°C
and 65°C.
Depending on the detergent used,
cleaning the filters in the dishwasher
may cause the inside filter surfaces to
become discoloured. This will not
affect the functioning of the grease
filters in any way.
After cleaning
After cleaning, leave the filters to dry
on an absorbent surface before
refitting them.
Change grease filters
Regular use and cleaning can cause the
filter surfaces to wear.
If you notice any damage, replace the
grease filters.
You can obtain grease filters from Miele
customer service (see end of these
operating instructions) or from your
Miele specialist dealer.
When removing the filters for
cleaning, also clean off any residues
of oil or fat from the now accessible
housing to prevent the risk of these
catching fire.
Refit the grease filters.
Resetting the grease filter operating hours counter
After cleaning, the operating hours
counter needs to be reset.
While the fan is switched on, press
the grease filter control for approx.
3seconds until only 1 is flashing.
The grease filter symbol goes out.
35
Page 36
Cleaning and care
NoSmell active charcoal filters
With recirculation mode, two charcoal
filters must be fitted in addition to the
grease filters. These are designed to
absorb cooking odours.
Charcoal filters are available to order via
the Miele online shop (see the end of
this booklet for contact details) or
directly from Miele.
The part number of the charcoal filter
required is listed under “Technical data”.
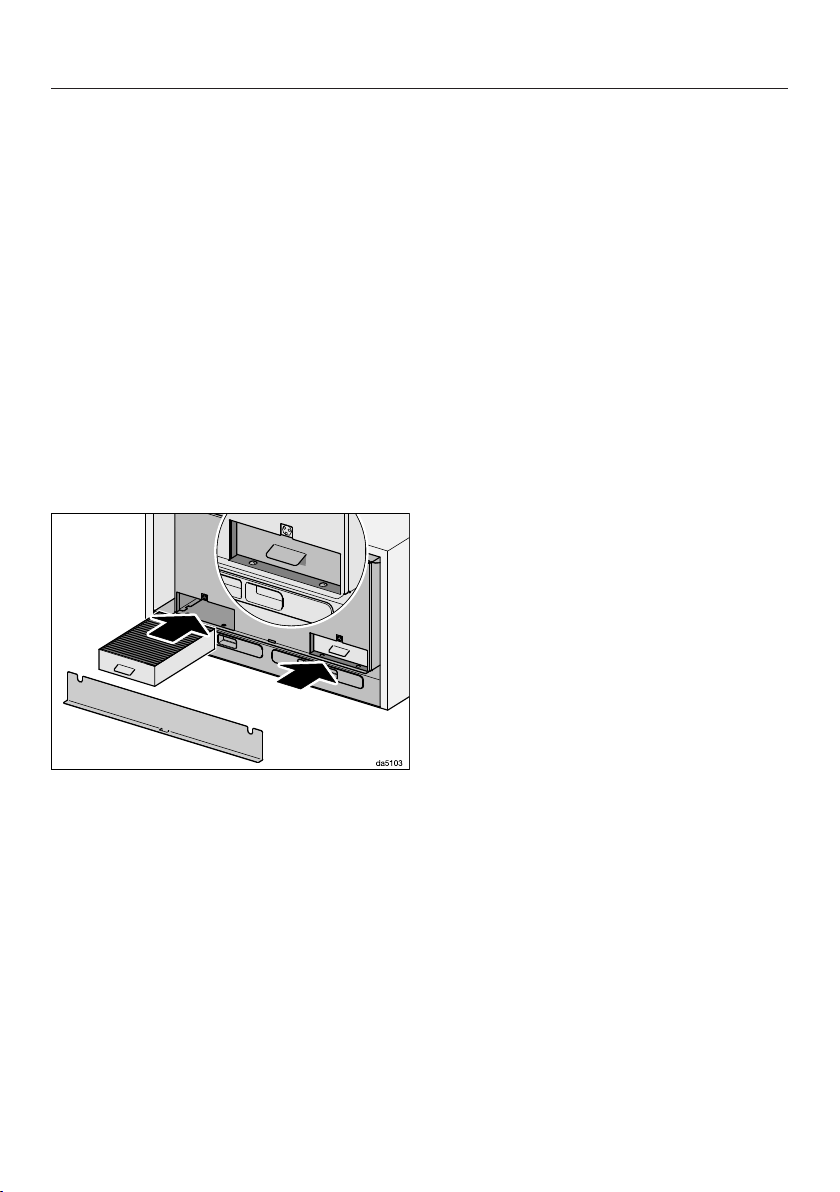
Fitting/Replacing the charcoal filters
The slots for the charcoal filters are
located above the grease filters.
The operating hours counter will remind
you to replace the charcoal filters by
lighting up the charcoal filter symbol .
Resetting the charcoal filter operating hours counter
After changing the charcoal filters, the
operating hours counter needs to be
reset.
Touch the charcoal filter control for
approx. 3 seconds with the
rangehood switched on until only the
indicator light for level 1 is flashing.
The charcoal filter symbol goes out.
Disposing of the charcoal filters
Used charcoal filters can be disposed
of with the normal household waste.
Take the lid off. It is held in place by
magnets.
Take the charcoal filters out of their
packaging.
Insert the charcoal filters in the slots
as far as they will go.
Refit the lid.
When to change the NoSmell active charcoal filters
Replace the charcoal filters when they
no longer absorb kitchen odours
effectively, or at least every 6months.
36
Page 37
Reactivatable charcoal filters
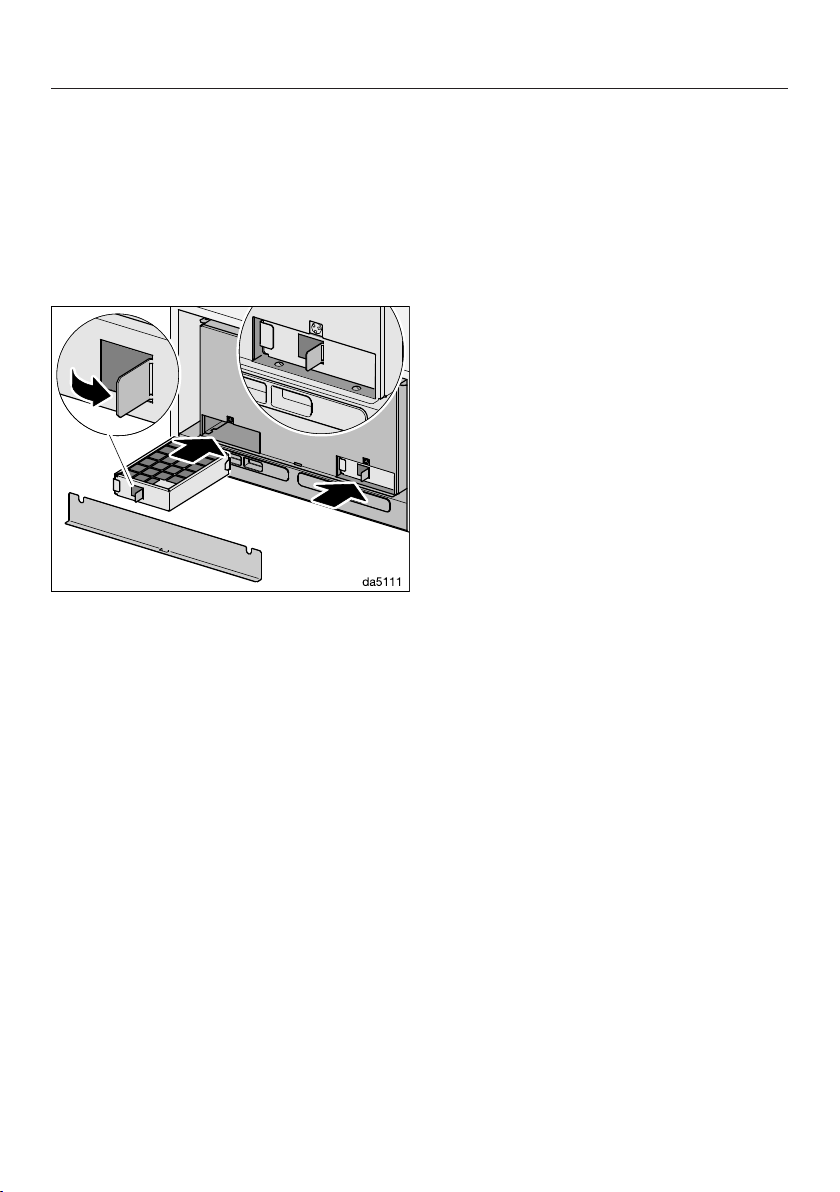
Reactivatable charcoal filters are
available for this rangehood. They can
be used several times after being
reactivated in the oven.
Please follow the operating instructions
supplied with the filter.
Bend out the tab, e.g. with a
screwdriver. The charcoal filter can
be pulled out at the tab for removal.
Cleaning and care
Insert the charcoal filters in the slots
as far as they will go.
Refit the lid.
37
Page 38

Service
Contact in case of fault
In the event of any faults which you
cannot remedy yourself, please contact
Miele.
You can book a Miele customer
service call-out online at
www.miele.com.au/service or
www.miele.co.nz/service.
Contact information for Miele can be
found at the end of this booklet.
Please quote the model and serial
number of your appliance when
contacting Miele. This information can
be found on the data plate.
Position of the data plate
The data plate is located on the casing
of the rangehood and is visible when
the cover for the charcoal filter slots is
removed.
Warranty
The manufacturer's warranty for this
appliance is 2years.
For further information, please refer to
your warranty booklet.
38
Page 39
*INSTALLATION*
Installation
Before installation
Before installation, it is important
to read the information given on the
following pages as well as the
“Warning and Safety instructions” at
the beginning of this booklet.
Installation recommendations
- To achieve optimum vapour
extraction, the rangehood must be
positioned centrally over the cooktop,
not to the side.
- The cooktop should be no wider than
the rangehood and, if possible, it
should be narrower, especially for
safety distances greater than
750mm.
- The installation area must be easily
accessible. The rangehood should be
easily accessible and easy to
dismantle in the event that service is
required. This should be taken into
consideration when planning the
position of cupboards, shelves,
ceilings or features in the vicinity of
the rangehood.
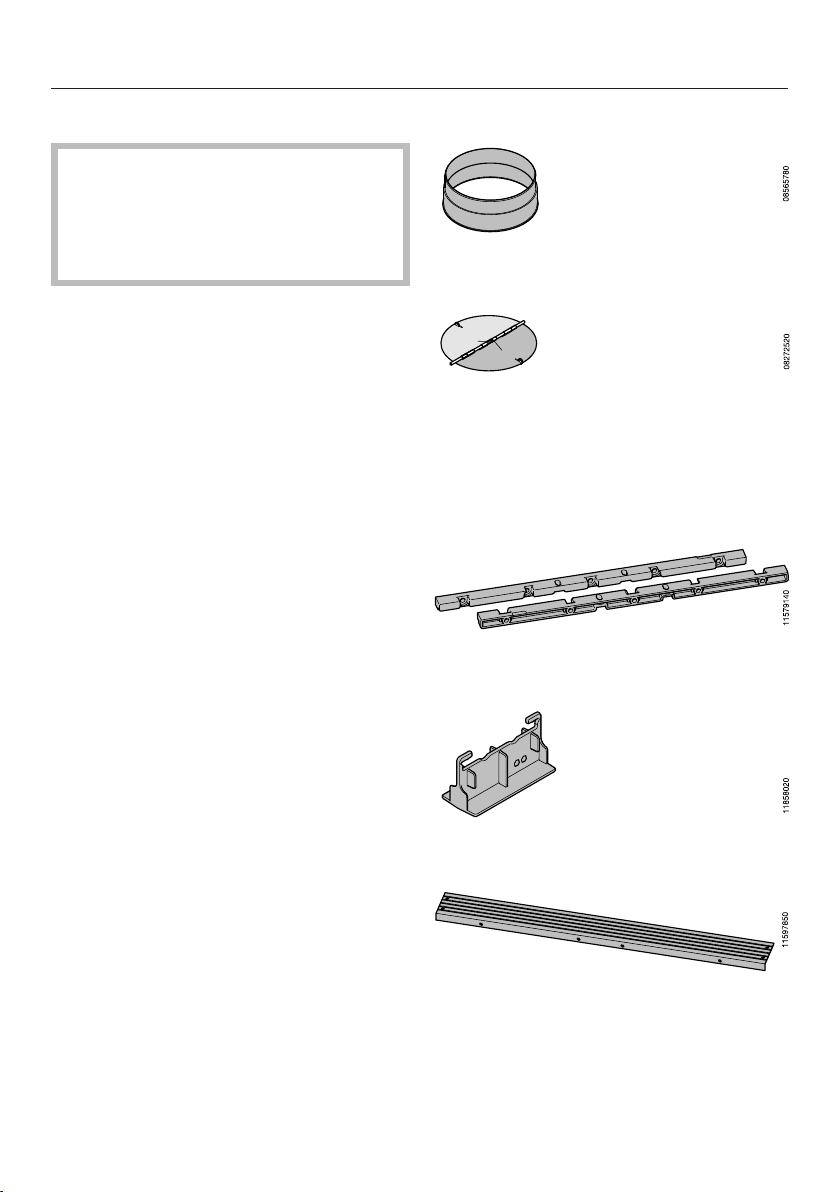
Installation materials
1 exhaust connection
for exhaust ducting 150mm.
1 non-return flap
for fitting into the exhaust connection
on the motor unit (not needed for
recirculation mode). Depending on
model, the non-return flap may already
be fitted.
2 mounting brackets
for mounting in the cabinet
1drilling template
1 spacer strip
for concealing the gap between the
rear of the appliance and the wall
39
Page 40
*INSTALLATION*
Montage
Installation
Montaje
Montaggio
Montering
Montagem
Asennus
Installation
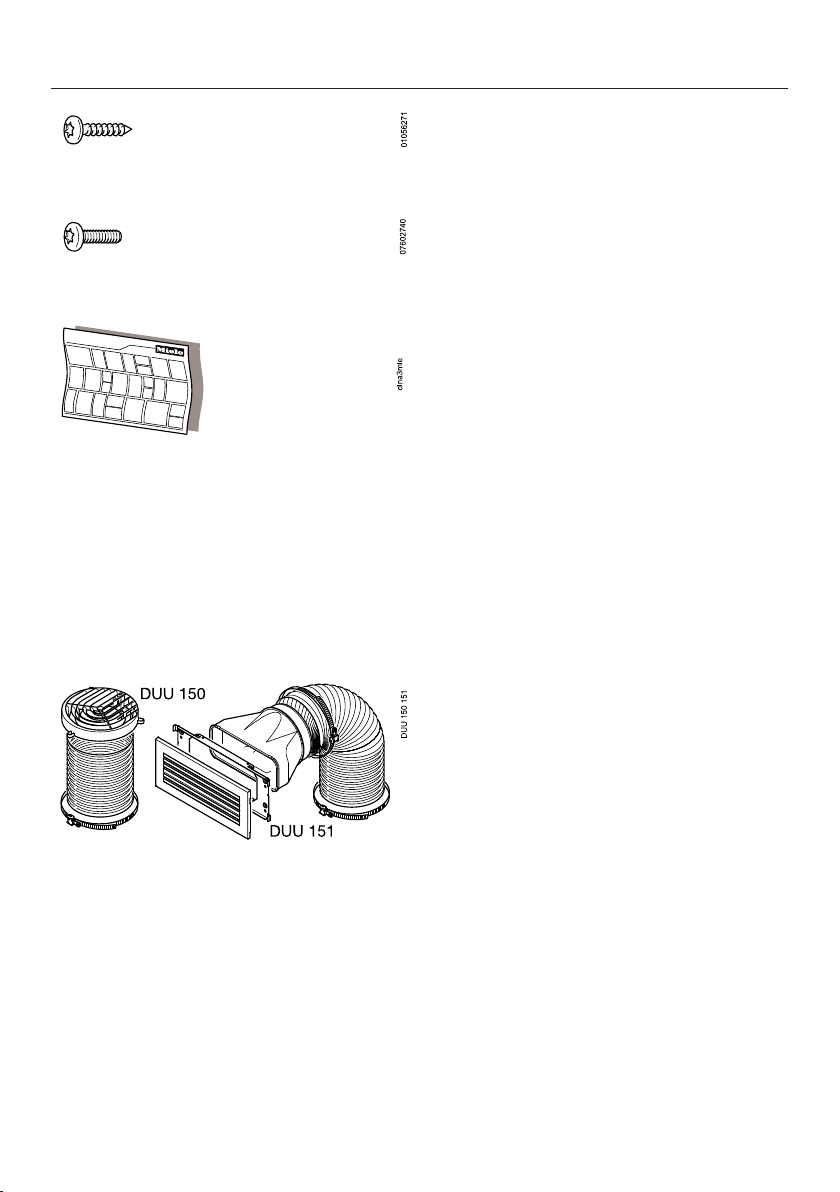
6 screws, 4x15mm
4 screws, M4 x 16 mm
Installation plan
See the installation plan for details on
the individual steps involved in the
installation of this appliance.
Installation materials for recirculation mode
You need the following optional
accessories for recirculation mode.
DUU15x installation kit
contains a directional unit socket, hose
and hose clips (DUU150 for the top of
the cabinet or DUU151 for the sides or
front of the cabinet)
40
Page 41
*INSTALLATION*
Appliance dimensions
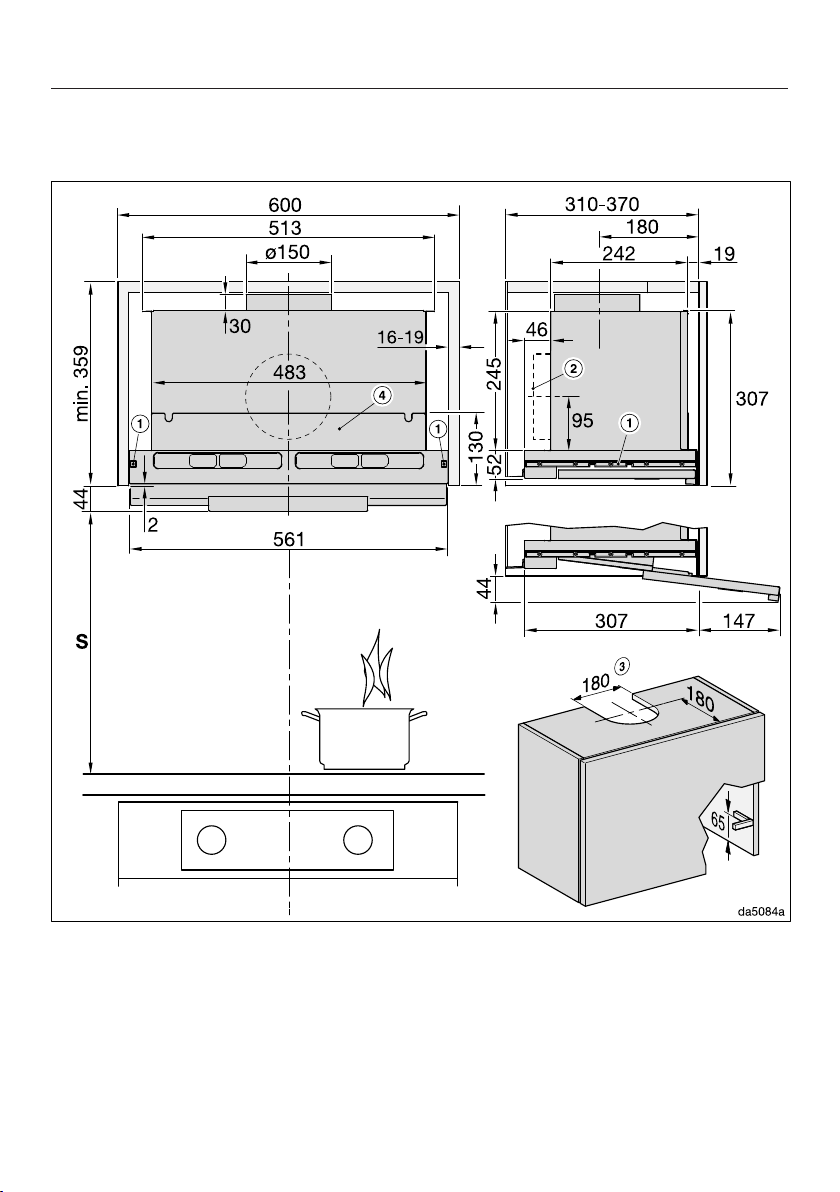
Diagram 1: DAS8630 in a 600mm wide cabinet.
Installation
The drawing is not to scale
41
Page 42
*INSTALLATION*
Installation
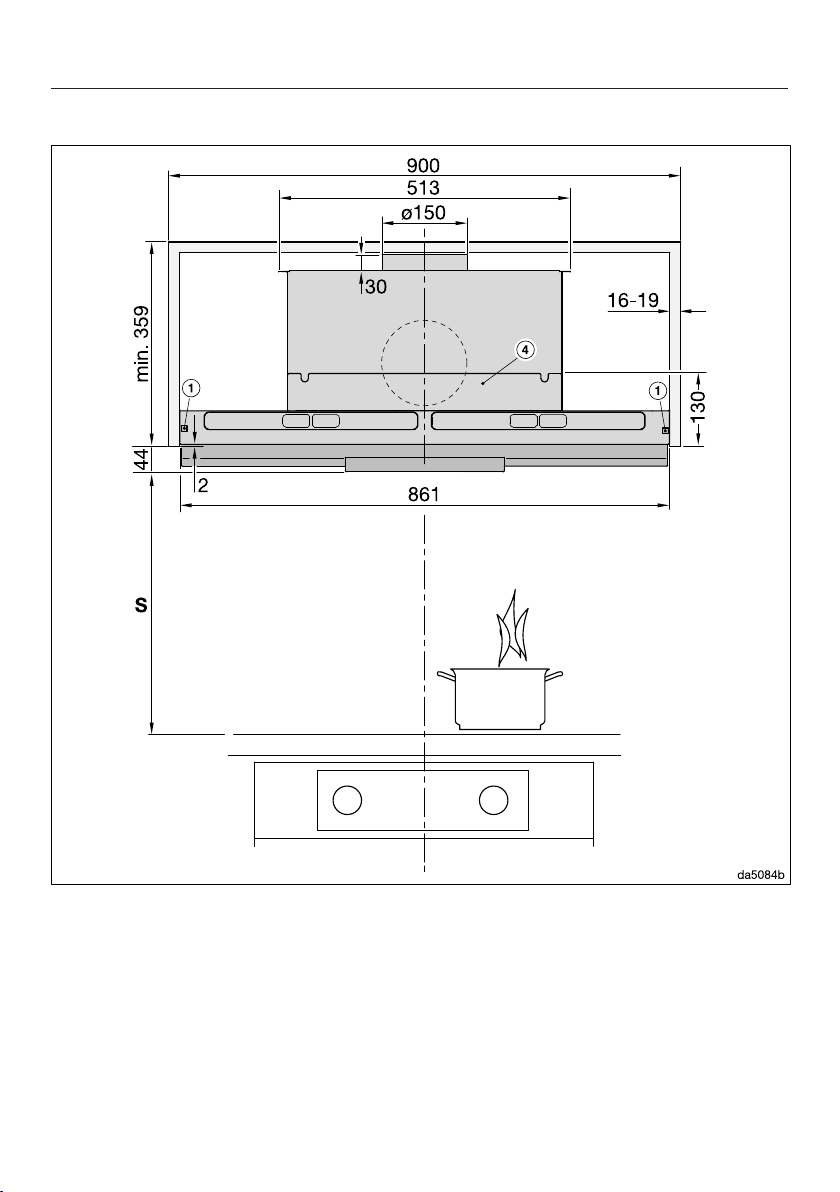
Diagram 2: DAS8930 in a 900mm wide cabinet.
The drawing is not to scale
See diagram 1 for side view
Footnotes for diagrams 1 to 2:
a
The mounting brackets are suitable for cabinets with wall thicknesses from 16
to 19mm.
b
The ducting can also be connected at the back.
c
Cut-out for extraction mode or for recirculation mode with conversion kit
DUU150
42
Page 43
*INSTALLATION*
d
The wall unit can be fitted with a partition after installation. Slots for the grease
filters, and with recirculation mode for the charcoal filters, must remain
accessible.
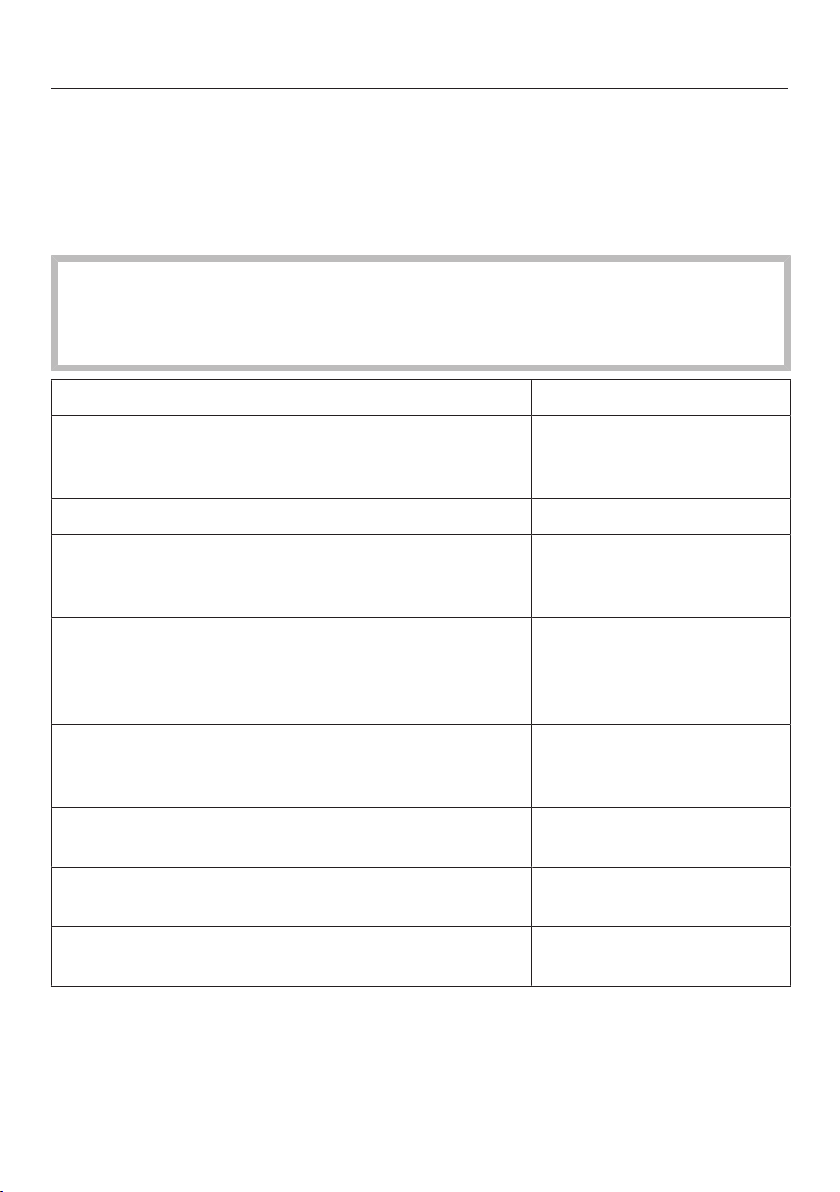
Safety distance (S)
The minimum distances between the cooking surface of a cooktop (pan
support(s) for gas models) and the bottom of the rangehood are as follows,
unless a greater distance is specified by the manufacturer of your cooking
appliance. See also “Warning and Safety instructions”.
Cooking appliance Minimum distance S
Electric cooktop 600mm (AU, NZ)
Electric grill, deep fat fryer (electric) 650mm
Installation
450mm
(HK, MY, SG, TH, TW)
Multi-burner gas cooktop with maximum 45.4MJ/h
total output, with no burner having a greater output
than 16.2MJ/h.
Multi-burner gas cooktop with total output greater
than 45.4MJ/h, but with a maximum of 77.8MJ/h,
with no burner having a greater output than
17.3MJ/h.
Multi-burner gas cooktop with total output greater
than 77.8MJ/h, with a single burner having a
greater output than 17.3MJ/h.
Single burner gas cooktop with a maximum output
of 21.6MJ/h.
Single burner gas cooktop with an output greater
than 21.6MJ/h, but with a maximum of 29.2MJ/h.
Single burner gas cooktop with an output greater
than 29.2MJ/h.
650mm
760mm
Not possible
650mm
760mm
Not possible
43
Page 44
*INSTALLATION*
Installation
Adjusting the vapour shield
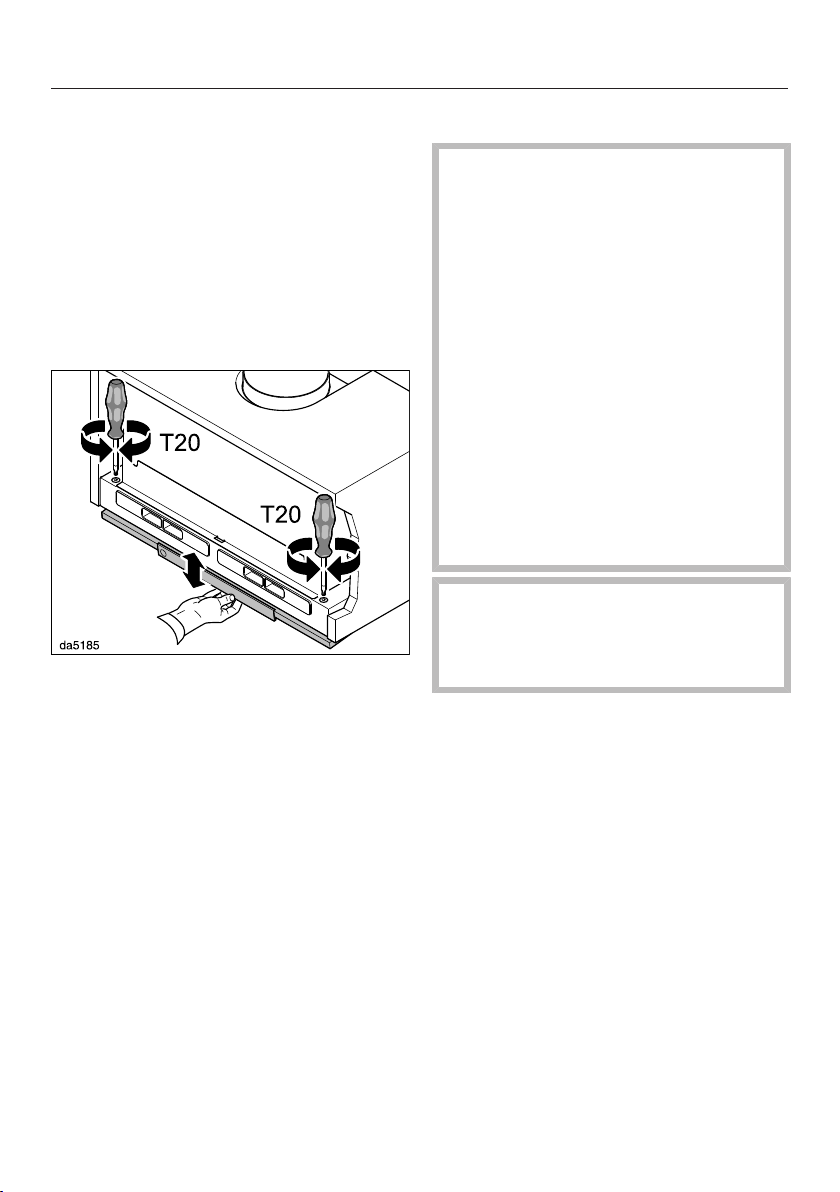
When retracted, the deflector plate is
held in place by magnets.
The retaining force of the magnets can
be adjusted. The magnets should be
adjusted such that the deflector plate is
held in place securely on the left and
right hand side and can be lowered
slightly. An angled key is supplied for
adjusting the magnets.
Adjust both sides equally. Turn in
stages by a half turn each time and
check the adjustment by lowering
and raising the deflector plate.
- Turning the adjusting screws
clockwise increases the magnetic
retaining force.
- Turning the adjusting screws anticlockwise reduces the magnetic
retaining force.
Connection for air extraction
Before installation, it is important
to read the information given on the
following pages as well as the
“Appliance dimensions” and the
“Warning and Safety instructions” at
the beginning of this booklet. This is
particularly crucial when using the
rangehood at the same time as a
heating appliance that relies on
oxygen from the same room, which
could result in the build-up of toxic
fumes.
The rangehood should be installed
according to local and national
building regulations. Seek approval
from the building inspector where
necessary.
Only use smooth pipes or flexible
ducting made from approved nonflammable materials for exhaust
ducting.
To achieve the most efficient air
extraction with the lowest noise levels,
please note the following:
- The diameter of the exhaust ducting
must not be smaller than the crosssection of the exhaust connection
(see "Appliance dimensions"). This is
particularly applicable when using flat
ducting.
- The exhaust ducting must be as
short and straight as possible.
44
- Only use wide radius bends.
- The exhaust ducting must not be
kinked or compressed.
- All connections must be strong and
airtight.
Page 45
*INSTALLATION*
Installation
- If the ducting has flaps, these must
be opened when the rangehood is
switched on.
Any constriction of the airflow will
reduce extraction performance and
increase operating noise.
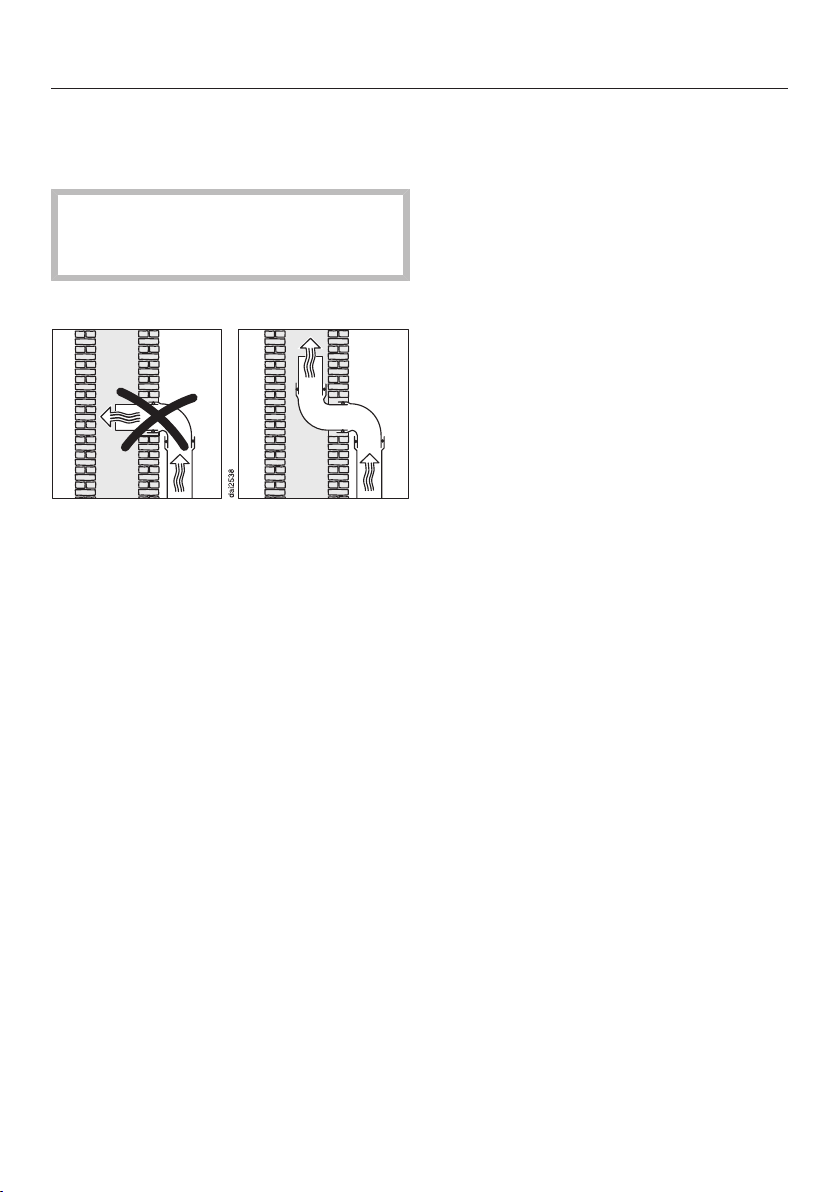
Vent flue
If the exhaust air is to be ducted into a
vent flue, the ducting must be directed
in the flow direction of the flue.
If the flue is used by several ventilation
units, the cross-section of the flue must
be large enough.
Non-return flap
Make sure you use a non-return flap
in the exhaust air system.
A non-return flap ensures that when the
rangehood is not in operation, the duct
is closed and no exchange of room and
outside air can take place.
If the exhaust air is ducted through an
outside wall, a Miele wall vent or a
Miele roof vent (available as an optional
accessory) is recommended. These are
fitted with an integrated non-return flap.
If the on-site exhaust air system does
not have a non-return flap, one is
supplied with the rangehood.
The non-return flap is fitted to the fan's
exhaust connection.
Condensed water
If the exhaust ducting is to run through
rooms, ceiling space etc., condensate
may form in the ducting due to
variations in temperature between the
different areas. To minimise temperature
variations, the exhaust ducting will need
to be suitably insulated.
Where ducting is horizontal, it must be
laid to slope away at at least 1 cm per
metre. The gradient ensures that
condensate cannot drain back into the
rangehood.
45
Page 46
*INSTALLATION*
Installation
In addition to insulating the exhaust
ducting, we recommend that a suitable
condensate trap is also installed to
collect and evaporate any condensate
which may occur.
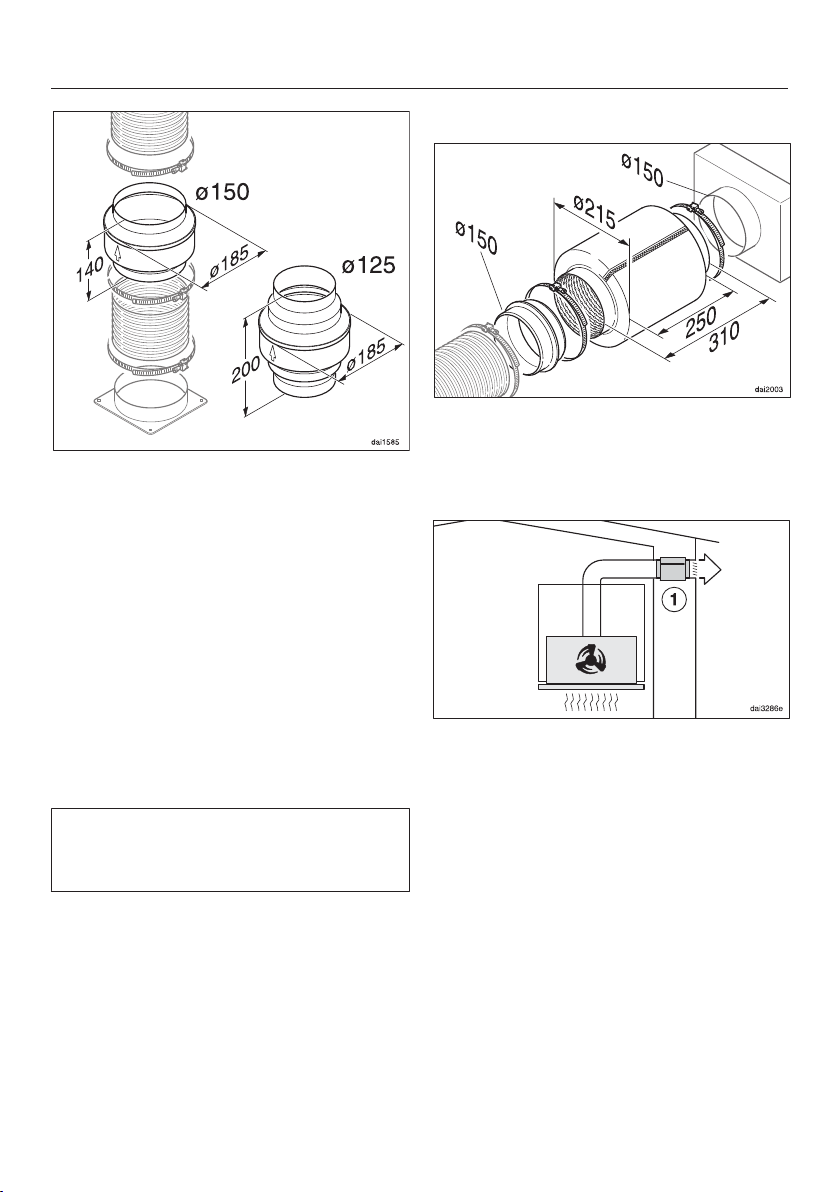
Silencer
To achieve even further reductions in
noise levels, a special silencer (optional
accessory) can be fitted in the ducting
system.
Condensate traps are available for
125mm or 150mm ducting.
When installing a condensate trap,
ensure that it is positioned vertically
and, if possible, directly above the
exhaust socket. The arrow on the
housing indicates the direction of
airflow.
Miele will not accept warranty claims
for any functional defects or damage
caused by inadequate ducting.
46
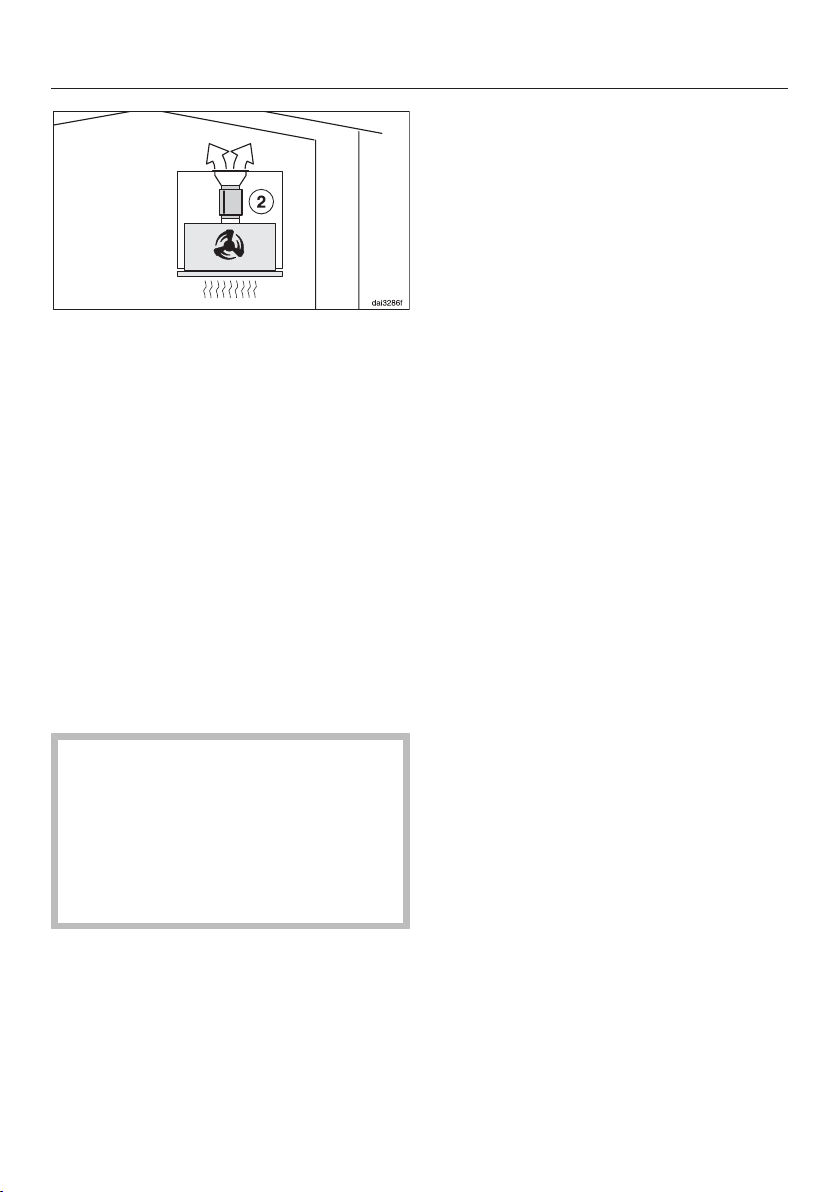
In extraction mode the silencer not only
reduces noise from the fan outside the
house, but also sounds from outside
which reach the kitchen via the vent
ducting (e.g. traffic noise). For this
reason, the silencer must be positioned
as close as possible to the ducting exit
.
Page 47
*INSTALLATION*
In recirculation mode the silencer needs
to be positioned between the exhaust
connection and the exhaust grille.
Please ensure there is adequate
installation space.
Installation
For safety reasons, we recommend
using a suitable residual current device
(RCD) in the relevant electrical
installation for connecting the
rangehood.
If the mains connection cable is
damaged, it must only be replaced with
a specific mains connection cable of
the same type (available from Miele).
For safety reasons, such replacement
may only be carried out by a suitably
qualified and competent electrician or a
Miele authorised service technician, in
order to avoid a hazard.
Electrical connection
The rangehood is supplied with a mains
connection cable with moulded plug
ready for connection to a suitable
earthed socket.
If the socket is not easily accessible or
if the appliance is to be hard-wired,
ensure that a suitable means of
disconnection is provided on the
installation side for each pole.
Risk of fire from overheating.
Connecting the rangehood to multisocket adapters or extension cables
can overload the cables.
For safety reasons, do not use an
extension cable or multi-socket
adapter.
All electrical work must be carried out
by a suitably qualified and competent
person in strict accordance with
national and local safety regulations.
The data plate indicates the nominal
power consumption and the connection
data. Compare this information with the
data of the on-site electrical
connection.
If in any doubt, consult a qualified
electrician.
Temporary or permanent operation with
a self-sufficient or non-mains
synchronous energy supply system
(e.g. isolated networks, back-up
systems) is possible. A requirement for
the operation is that the energy supply
system complies with all current local
and national requirements that apply to
stand-alone, solar and/or battery
systems. The protective measures
provided in the domestic installation
and in this Miele product must also be
assured in their function and operation
in isolated operation or in non-mains
synchronous operation, or replaced
with equivalent measures in the
installation.
47
Page 48
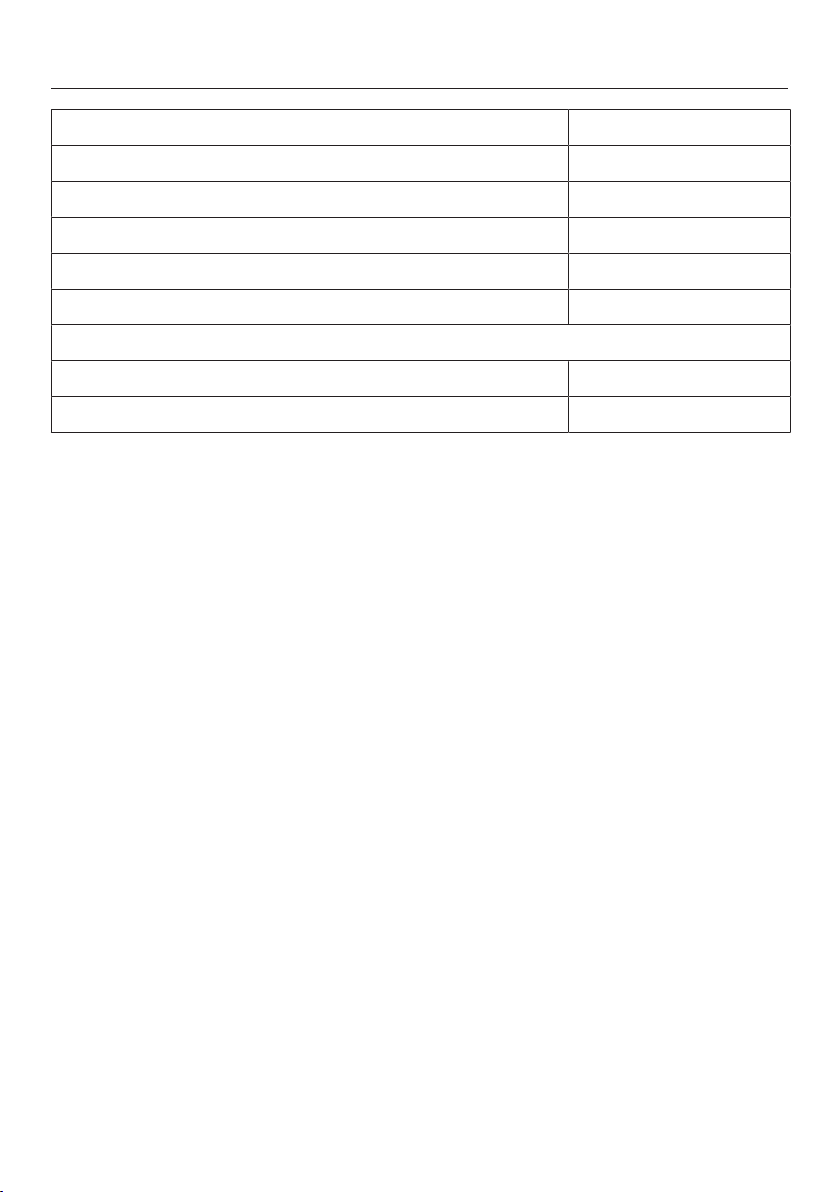
Technical data
Fan motor 290W
Cooktop lighting 3W
Total rated load 293W
Voltage, frequency AC 230 V, 50 Hz
Fuse rating 10A
Mains connection cable length 1.5 m
Weight
DAS8630 15kg
DAS8930 19kg
Optional accessory for recirculation mode
For recirculation operation, you need the DUU 150 or DUU 151 kit and the DKF 31-P
or DFK 31-R charcoal filters (reactivatable). The packs contain 2 charcoal filters.
48
Page 49

Page 50

Page 51

Miele Head Office Melbourne:
Level 4, 141 Camberwell Road
Hawthorn East, VIC 3123
Miele Experience Centre South Melbourne:
206-210 Coventry Street
South Melbourne, VIC 3205
Miele Experience Centre and Office Sydney:
3 Skyline Place
Frenchs Forest, NSW 2086
Miele Experience Centre and Office Brisbane:
Tenancy 4C, 63 Skyring Terrace
Newstead, QLD 4006
Miele Experience Centre and Office Perth:
83-85 Sir Donald Bradman Drive
Hilton, SA 5033
Miele Experience Centre and Office Adelaide:
Miele Australia Pty. Ltd. Miele New Zealand Limited
Miele Global Headquarters
Germany
Miele & Cie. KG
Carl-Miele-Straße 29
33332 Gütersloh
Federal Republic of Germany
IRD 98 463 631
ACN 005 635 398
ABN 96 005 635 398
Miele Experience Centre Gold Coast:
131 Ferry Road
Southport, QLD 4215
Miele Experience Centre
and Head Office Auckland:
8 College Hill
Freemans Bay, Auckland 1011
Miele Experience Centre
Wellington:
183 Featherston Street
Wellington 6011
0800 464 353 (0800 4 MIELE)
www.miele.co.nz
205-207 Stirling Highway
Claremont, WA 6010
1300 464 353 (1300 4 MIELE)
www.miele.com.au
Miele Experience Centre Doncaster:
1136/7 Doncaster Shopping Centre
619 Doncaster Rd, Doncaster, VIC 3108
Page 52

DAS 8630, DAS 8930
M.-Nr. 12 039 300 / 00en-AU, NZ
 Loading...