

Page 1

DARC 6
de Fernbedienung für Dunstabzugshauben
Gebrauchsanweisung
en Remote control for cooker hoods
Operating instructions
fr Télécommande pour hottes
Mode d'emploi
it Telecomando per cappe aspiranti
Istruzioni d'uso
es Mando a distancia para campanas extractoras
Instrucciones de manejo
nl Afstandsbediening voor afzuigkappen
Gebruiksaanwijzing
da Fjernbetjening til emhætter
Brugsanvisning
fi Liesituulettimien kaukosäädin
Käyttöohje
no Fjernkontroll for ventilatorer
Bruksanvisning
sv Fjärrkontroll för fläktar
Bruksanvisning
M.-Nr. 09 882 110
Page 2

de ........................................................................................................................ 3
en ........................................................................................................................ 9
fr ......................................................................................................................... 15
it .......................................................................................................................... 21
es ........................................................................................................................ 27
nl ......................................................................................................................... 33
da ........................................................................................................................ 39
fi .......................................................................................................................... 45
no ........................................................................................................................ 51
sv ........................................................................................................................ 57
2
Page 3

de - Inhalt
Sicherheitshinweise und Warnungen................................................................... 4
Übersicht und Funktion.........................................................................................
5
Verwendung der Fernbedienung.............................................................................. 5
Fernbedienung an-/abmelden...............................................................................
Zusatzbeleuchtung aktivier
Verfahrfunktion aktivier
en/deaktivieren........................................................ 7
en/deaktivieren ............................................................ 7
Reinigung und Pflege ............................................................................................
6
8
Reinigung der Fernbedienung.................................................................................. 8
Wechsel der Batterie................................................................................................ 8
3
Page 4

de - Sicherheitshinweise und Warnungen
Lesen Sie die Gebrauchs- und Montageanweisung der Dunstab‐
shaube aufmerksam durch, bevor Sie die Dunstabzugshaube
zug
in Betrieb nehmen. Sie enthält wichtige Hinweise für die Montage,
die Sicherheit, den Gebrauch und die Wartung. Dadurch schützen
Sie sich und vermeiden Schäden an der Dunstabzugshaube. Miele
kann nicht für Schäden verantwortlich gemacht werden, die infol‐
ge von Nichtbeachtung dieser Hinweise verursacht werden.
Bewahren Sie die Gebrauchs- und Montageanweisung auf, und
eben Sie sie an einen eventuellen Nachbesitzer weiter!
g
Diese F
zughaube zu verwenden.
Lassen Sie Kin
W
– Die Batterie nicht kurzschließen, nicht aufladen und nicht ins Feu‐
er werfen. Explosionsgefahr!
– Geben Sie eine gebrauchte Batterie bei einer Sammelstelle ab.
W
ernbedienung ist ausschließlich mit einer Miele Dunstab‐
der nicht mit der Fernbedienung spielen.
ichtig für den Umgang mit der Batterie der Fernbedienung:
erfen Sie die Batterie nicht in den Hausmüll.
4
Page 5

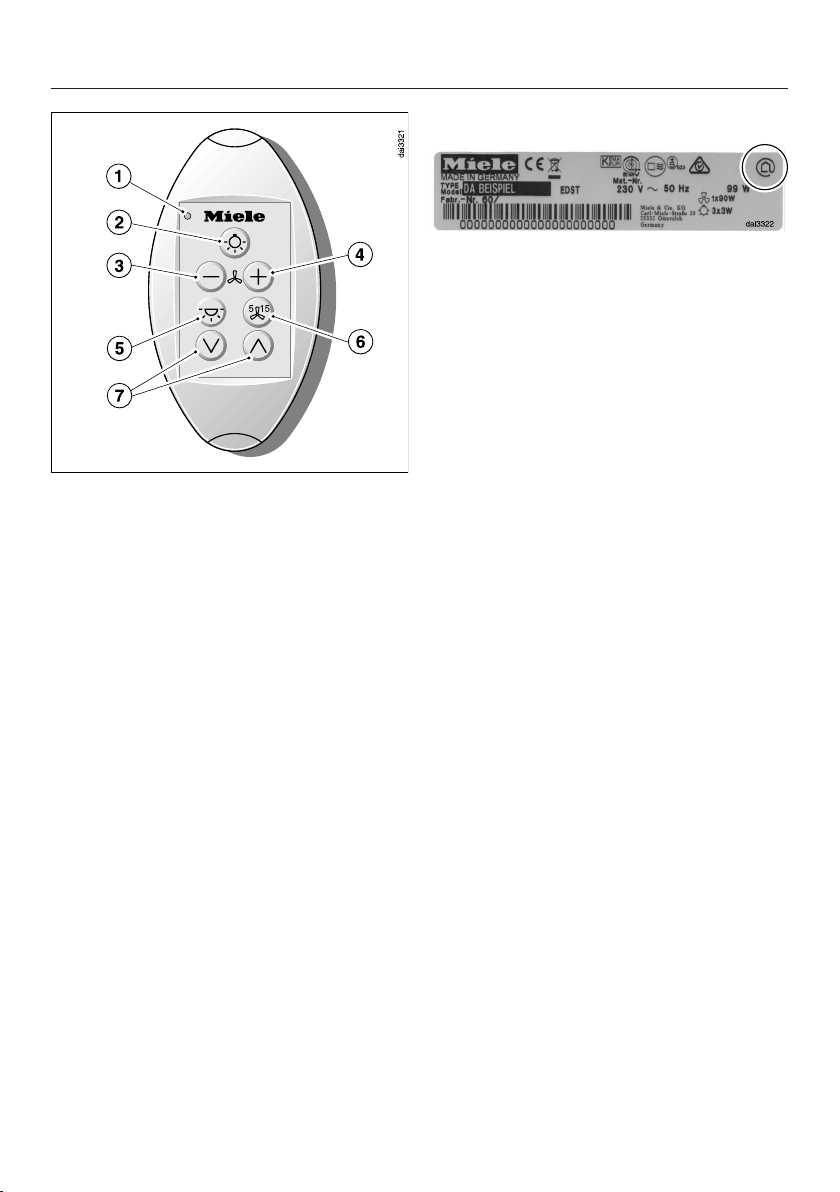
a
Kontrollleuchte
b
Taste für die Kochstellenbeleuch‐
tung
c
Taste zum Ausschalten des Geblä‐
ses und zur W
Gebläsestufe.
d
Taste zum Einschalten des Gebläses
und zur W
sestufe.
e
Ein/Aus-Taste für die Zusatzbeleuch‐
tung
(abhängig von der Ausstattung der
Dunstabzugshaube)
f
Taste für die Nachlauf-Funktion
g
Tasten zur Höhenverstellung des
W
rasenschirms
(abhängig von der Ausstattung der
Dunstabzugshaube)
ahl einer niedrigeren
ahl einer höheren Geblä‐
de - Übersicht und Funktion
Verwendung der Fernbedienung
Die Fernbedienung kann in Verbindung
mit einer Miele Dunstabzugshaube ver‐
wendet wer
schild das Miele@home-Symbol
trägt.
Die Hauptfunktionen können an der
Dunstabzug
dienung gewählt werden. Bei Wahl ei‐
ner Funktion auf der Fernbedienung
leuchtet kurz die Kontrollleuchte auf der
Fernbedienung.
Beachten Sie zur Beschreibung der
unktionen die Gebrauchsanweisung
F
der Dunstabzugshaube.
Programmierungen, z. B. des Betriebs‐
stundenzählers, sind nur am Bedienteil
der Dunstabzugshaube möglich.
Die maximale Reichweite der Fernbe‐
dienung beträgt ca. 10 m. Räumliche
Gegebenheiten können die Reichweite
verringern (z. B. Mobiliar, Wände).
Die Rückseite der Fernbedienung ist
magnetisch. Sie kann so an vielen me‐
talli
schen Untergründen fixiert werden.
den, die auf dem Typen‐
shaube und mit der Fernbe‐
5
Page 6

de - Fernbedienung an-/abmelden
Um die Fernbedienung nutzen zu kön‐
nen, muss sie ang
Das An- und Abmelden muss an der
Dunstabzugshaube und an der Fernbe‐
dienung gleichzeitig erfolgen. Rufen Sie
den An-/Abmeldemodus zunächst an
der Dunstabzugshaube, dann an der
Fernbedienung auf.
An-/Abmeldemodus an der Dunstab‐
zugshaube aufrufen
Drück
D
– die Taste "" (
– dann die Taste "" (Sensortaste IS)*,
– dann die Beleuchtungs-Taste .
Rufen Sie
An-/Abmeldemodus an der Fernbe‐
dienung aufrufen
D
Drück
en Sie die Nachlauf-Taste
515 ca. 10 Sekunden bis die An‐
zeige 1 der Gebläsestufenanzeige
leuchtet.
rücken Sie anschließend nachei‐
nander
Modus an der Fernbedienung auf.
rücken Sie beide Pfeiltasten
gleichzeitig ca. 5 Sekunden, bis die
LED der Fernbedienung blinkt.
en Sie die Beleuchtungstaste
.
emeldet werden.
Sensortaste 1)*,
direkt anschließend den
Anmelden starten
Drü
cken Sie im An-/Abmeldemodus
zuerst an der Dunstabzugshaube die
Taste "" (Sensortaste IS)* und dann
an der Fernbedienung die Taste "".
Die Suche nach einer Funkverbindung
tet. Die LED der Fernbedienung
star
blinkt gleichmäßig.
Nach ca. 30 Sekunden blinkt die LED
der Fernbedienung in kurzen Abständen
4-mal. Die Funkverbindung ist herge‐
stellt. Nach kurzer Zeit erlischt die LED.
Bestätigen Sie die Anmeldung an der
Dunstabzugshaube mit der NachlaufT
aste 515. Alle Kontrolllampen er‐
löschen.
Die Fernbedienung ist damit nutzbar.
Erfolgt Ihre Bestätigung nicht innerhalb
von 4 Min
folgt keine Aktivierung.
Anmelden abbrechen
Soll
sein, kann der Vorgang durch Drü‐
cken der Nachlauftaste 515 an der
Dunstabzugshaube und an der Fern‐
bedienung abgebrochen werden.
Die Anmeldung muss anschließend
wiederholt wer
abzugshaube und Fernbedienung zu‐
nächst abzumelden.
uten nach dem Einstellen, er‐
te die Anmeldung nicht möglich
den. Dazu sind Dunst‐
Abmelden
D
rücken Sie im An-/Abmeldemodus
an der Dunstabzugshaube die Taste
"" (Sensortaste 1)* und dann an der
Fernbedienung die Taste "".
Die LED der Fernbedienung blinkt
gleichmäßig.
6
Page 7
de - Fernbedienung an-/abmelden
Nach ca. 10 Sekunden blinkt die LED
der F
ernbedienung in größeren Abstän‐
den 2-mal. Die Fernbedienung ist abge‐
meldet. Nach kurzer Zeit erlischt die
LED.
Bestätigen Sie die Abmeldung an der
Dunstabzugshaube mit der NachlaufT
aste 515. Alle Kontrolllampen er‐
löschen.
Beachten Sie, dass mit der Trennung
der Funkverbindung auch eine vorhan‐
dene Con@ctivity 2.0-Funktion deakti‐
viert wird und wieder aktiviert werden
muss.
* bei Geräten mit Sensortasten
Zusatzbeleuchtung aktivier
deaktivieren
Verfügt Ihre Dunstabzugshaube neben
ochstellenbeleuchtung noch über
der K
eine zusätzliche Beleuchtung, z.B. einer
Glaskantenbeleuchtung, kann sie auch
mit der Fernbedienung ein- und ausge‐
schaltet werden.
Diese Funktion ist an der Fernbedie‐
nung zusätzlich zu aktivieren.
en/
Verfahrfunktion a
tivieren
Verfügt Ihre Dunstabzugshaube über ei‐
nen mot
senschirm, kann dieser auch mit der
Fernbedienung verfahren werden.
Diese Funktion ist an der Fernbedie‐
nung zusätzlich zu aktivieren.
Drüc
Drüc
Drüc
Die Programmierung wird automatisch
abgeschlossen.
orisch höhenverstellbaren Wra‐
ken Sie beide Pfeiltasten
gleichzeitig ca. 5 Sekunden, bis die
LED der Fernbedienung blinkt.
ken Sie die Taste für die Nach‐
lauf-Taste .
ken Sie zum Aktivieren die Taste
"", zum Deaktivieren die Taste "".
ktivieren/deak‐
Drüc
Drüc
Drüc
Die Programmierung wird automatisch
abgeschlossen.
ken Sie beide Pfeiltasten
gleichzeitig ca. 5 Sekunden, bis die
LED der Fernbedienung blinkt.
ken Sie die Taste für die Zusatz‐
beleuchtung .
ken Sie zum Aktivieren die Taste
"", zum Deaktivieren die Taste "".
7
Page 8
de - Reinigung und Pflege
Reinigung der Fernbedienung
Reinig
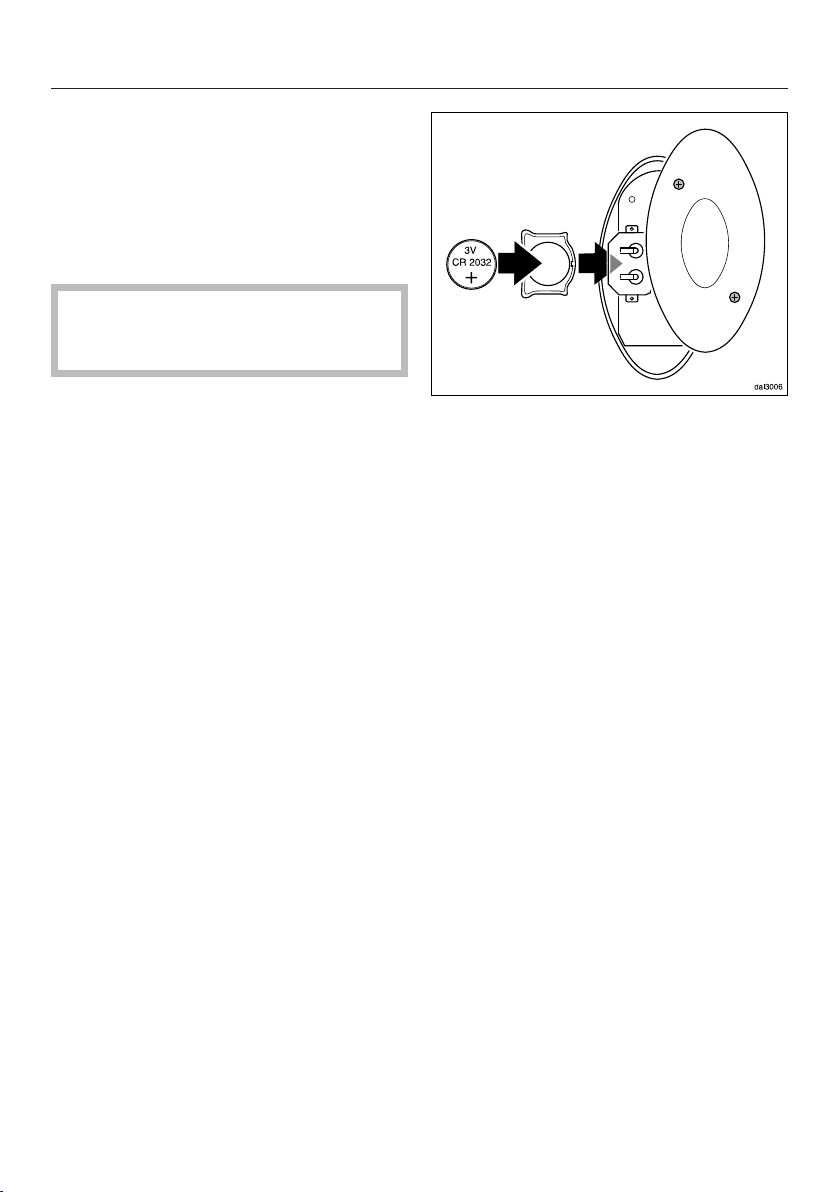
Wechsel der Batterie
Es darf nur die angegebene Batterie
ver
Es dürfen keine wiederaufladbaren
Batterien verwendet werden.
Die Fernbedienung verfügt über eine
Batt
Die Batterie muss gewechselt werden,
wenn sich die F
zugshaube nicht mehr mit der Fernbe‐
dienung wählen lassen. Bei Druck einer
Taste leuchtet die Kontrolllampe auf der
Fernbedienung nicht mehr oder nur
noch schwach.
Die Funktionen der Dunstabzugshaube
lassen sich aber auch weiterhin am Be‐
dienteil der Dunstabzugshaube wählen.
en Sie die Oberfläche nur mit
einem feuchtem Tuch. Verwenden Sie
nicht zu viel Wasser, um ein Eindrin‐
gen von Feuchtigkeit in das Gehäuse
zu vermeiden.
wendet werden.
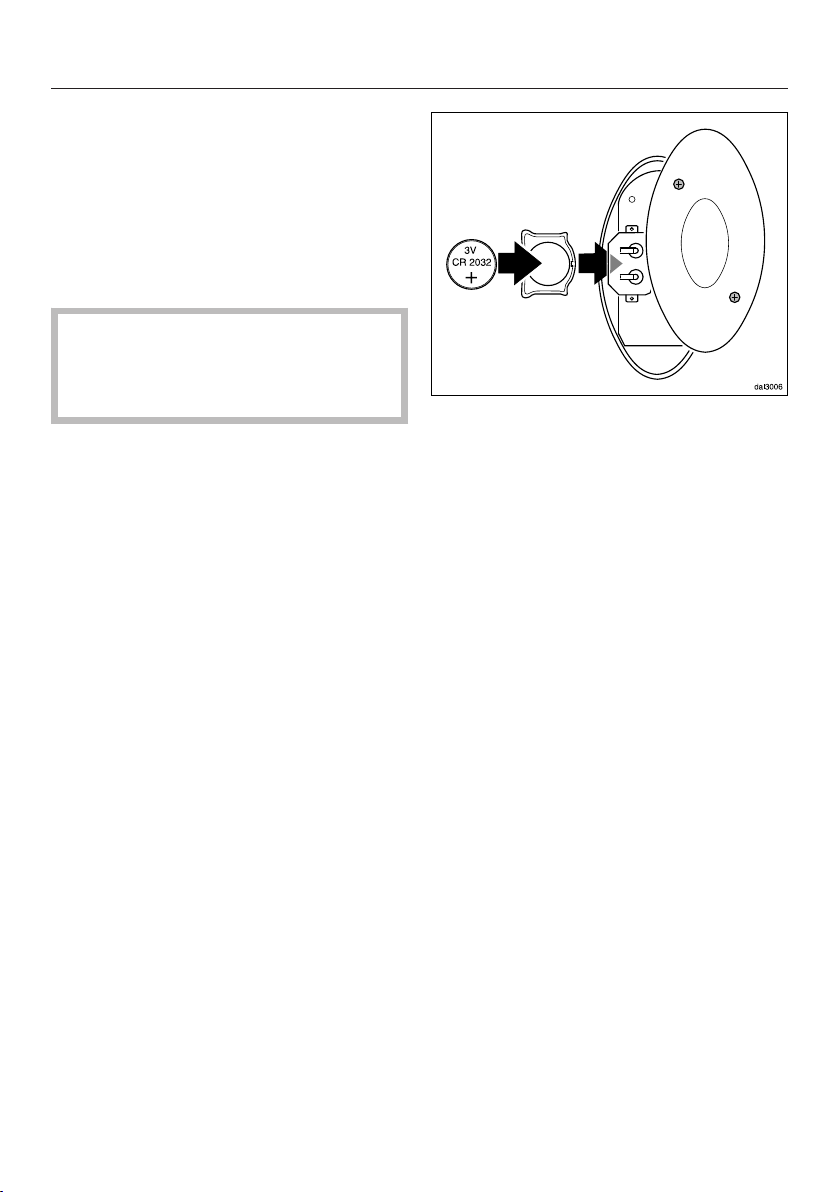
erie, Knopfzelle 3 V, CR 2032.
unktionen der Dunstab‐
L
ösen Sie mit einem Schraubendre‐
her die beiden Schrauben auf der
Rückseite und nehmen Sie den De‐
ckel ab.
Neh
men Sie die Batterie heraus und
legen Sie eine neue ein. Achten Sie
auf die richtige Polarität.
Den De
Geben Sie die gebr
bei einer Sammelstelle an Ihrem
Wohnort ab.
ckel wieder schließen.
auchte Batterie
8
Page 9

en - Contents
Warning and Safety instructions ........................................................................ 10
Overview and function.........................................................................................
11
Using the remote control ....................................................................................... 11
Signing on/off the remote control ......................................................................
To activate/deactivate feature lighting ..............................................................
To activate/deactivate the height adjustment function ...................................
Cleaning and care................................................................................................
12
13
13
14
Cleaning the remote control................................................................................... 14
Changing the battery ............................................................................................. 14
9
Page 10

en - Warning and Safety instructions
To avoid the risk of accidents and damage to the cooker hood,
please
using it for the first time. They contain important notes on its safe‐
ty, installation, use and maintenance. Miele cannot be held liable
for any damage caused by non-compliance with these instruc‐
tions.
Keep these instructions in a safe place and ensure that all users
ar
the appliance.
read the instructions for your cooker hood carefully before
e familiar with the contents. Pass them on to any future owner of
This r
Do not all
Imp
– Do not short circuit or recharge the battery, or throw it into a fire.
– Do not throw old batteries away with your general household
emote control is for use with Miele cooker hoods only.
ow children to play with the remote control.
ortant information on handling the remote control battery:
ger of explosion.
Dan
waste. Please dispose of them in a designated battery collection
and recycling system.
10
Page 11
en - Overview and function
Using the remote control
The remote control can be used with
any Miel
Miele@home symbol on the data
plate.
The main functions can be selected via
the coo
The indicator light on the remote control
unit will light up briefly when a function
is selected by remote control.
e cooker hood which has the
ker hood or by remote control.
a
LED light
b
Hob lighting control
c
Control for switching the fan off and
for selecting a lower power level
d
Control for switching the fan on and
for selecting a higher power level
e
On/Off control for feature lighting
(depending on cooker hood model)
f
Run-on option control
g
Controls for raising and lowering the
canopy
(depending on cooker hood model)
Please see the description of functions
in the oper
cooker hood.
Programming, e.g. of the operating
hours counter, can only be done from
the cooker hood controls.
The maximum operating range of the
r
emote control is approx. 10 m. Howev‐
er, this may be less depending on the
physical conditions present in the room
(e.g. furniture, walls).
The rear of the remote control unit is
magn
to various metal surfaces.
ating instructions for the
etic which allows it to be attached
11
Page 12

en - Signing on/off the remote control
The remote control must be signed on
so that it can be used.
Signing on and off must be done at the
same time on
remote control. Signing on/off mode
has to be accessed on the cooker hood
first, then on the remote control.
To access Signing on/off mode on
the cook
P
ress the run-on option control
515 for approx. 10 seconds until
the indicator for power level 1 lights
up.
Then pr
– the "" contr
– then the "" contr
– then the lighting control .
Then access the Signing on/off mode
on the
To access Signing on/off mode on
the r
emote control
P
ress both arrow controls at the
same time and hold for about 5 se‐
conds until the remote control LED
flashes.
P
ress the lighting control .
the cooker hood and the
er hood
ess in turn,
ol (1 sensor)*,
ol (IS sensor)*,
remote control immediately.
To start the signing on procedure
In Signi
control (IS sensor)* on the cooker
hood first and then the "" control
on the remote control.
The search for a signal will start. The re‐
mot
After approx. 30 seconds the remote
contr
at short intervals. The connection has
been established. The LED will go out
after a short while.
Co
hood run-on option control 515. All
indicator lights will go out.
The remote control can now be used.
If you do not confirm your selection
within 4 min
place.
To cancel the signing on procedure
If it is not possible t
cedure can be cancelled by pressing
the run-on option control 515 on
the cooker hood and on the remote
control.
The sig
be repeated. To do this the cooker
hood and the remote control must
first be signed off.
ng on/off mode press the ""
e control LED will flash steadily.
ol LED will flash on and off 4 times
nfirm signing on with the cooker
utes, activation will not take
o sign on the pro‐
ning on procedure must then
12
To sign off
In Signing
control (1 sensor)* on the cooker
hood and then the "" control on the
remote control.
The remote control LED will flash stead‐
ily
.
on/off mode press the ""
Page 13
en - Signing on/off the remote control
After approx. 10 seconds the remote
contr
ol LED will flash on and off twice
with a longer interval between the flash‐
es. The remote control has now been
signed off. The LED will go out after a
short while.
Co
nfirm the signing off procedure by
pressing the run-on option control
515 on the cooker hood. All indica‐
tors will go out.
Please bear in mind that disabling the
signal will also disable any Con@ctivi‐
ty 2.0 function
activated again.
* for appliances with sensor controls
To activate/deactivate feature light‐
ing
If your cooker hood has feature lighting
n addition to the hob lighting, e.g.
i
glass edge feature lighting, it can be
switched on and off using the remote
control.
This function must also be activated on
the remote control.
and this will have to be
To activate/deactivate the height ad‐
justment function
If your cooker hood has a motorised
height-adjustable canopy, this can be
adjust
ed using the remote control.
This function must also be activated on
the remote control.
P
ress both arrow controls at the
same time and hold for about 5 se‐
conds until the remote control LED
flashes.
P
ress the button for the run-on option
.
T
o activate press the "" control, to
deactivate press the "" control
Programming is completed automati‐
y.
call
P
ress both arrow controls at the
same time and hold for about 5 se‐
conds until the remote control LED
flashes.
P
ress the control for the feature ligh‐
ting .
T
o activate press the "" control, to
deactivate press the "" control
Programming is completed automati‐
call
y.
13
Page 14

en - Cleaning and care
Cleaning the remote control
Only cl
cloth. Do not use too much water to
avoid moisture penetrating the ca‐
sing.
Changing the battery
Use only the type of battery listed.
Do
The remote control requires one 3 V CR
2032
The battery must be changed if cooker
hood functions can no longer be selec‐
t
ed using the remote control or if the
LED light on the remote control does
not light up, or only lights up dimly
when a control is pressed.
Cooker hood functions can still be se‐
lected using the cooker hood controls.
ean the surface with a damp
not use rechargeable batteries.
battery.
Use a scr
screws on the back and remove the
cover.
Remo
with a new one, making sure the po‐
larity is correct.
Replace
Dispose
ly.
ewdriver to loosen the two
ve the old battery and replace
the cover.
of the old battery responsib‐
14
Page 15

fr - Table des matières
Consignes de sécurité et mises en garde ......................................................... 16
Aperçu et fonctions .............................................................................................
17
Utilisation de la télécommande.............................................................................. 17
Connecter/déconnecter la télécommande........................................................
Activer/désactiver l'éclairage supplémentaire ..................................................
Activer/désactiver la fonction de déplacement ..............................................
Nettoyage et entretien.........................................................................................
18
19
19
20
Nettoyage de la télécommande............................................................................. 20
Remplacement de la pile ....................................................................................... 20
15
Page 16

fr - Consignes de sécurité et mises en garde
Lisez attentivement cette notice d'utilisation et de montage avant
d'install
formations importantes sur le montage, la sécurité, l’utilisation et
l’entretien de votre appareil. Vous assurerez ainsi votre protection
et éviterez d'endommager votre appareil. Miele ne peut être tenu
pour responsable des dommages liés au non-respect des présen‐
tes consignes de sécurité.
Veuillez conserver ce document à disposition et le remettre au fu‐
tur pr
er et de mettre en service votre hotte. Elle contient des in‐
opriétaire en cas de cession de votre appareil !
Cett
hotte Miele.
Ne laisse
Consi
– Ne court-circuitez pas la pile, ne la rechargez pas et ne la jetez
– Jetez la pile usagée dans un point de collecte dédié au recyclage
e télécommande doit exclusivement être utilisée avec une
z pas les enfants jouer avec la télécommande.
gnes à respecter avec la pile de la télécommande :
pas au feu. Risque d'explosion !
des piles.
16
Page 17

a
Diode de contrôle
b
Touche éclairage de la table de cuis‐
son
c
Touche de désactivation du moteur
de ventilation et de diminution de la
puissance de ventilation.
d
Touche d'activation du moteur de
ventilation et d'augmentation de la
puissance de ventilation.
e
Touche Marche/Arrêt pour l'éclaira‐
ge supplémentai
(selon l'équipement de la hotte aspi‐
r
ante)
f
Touche Arrêt différé
g
Touches de réglage en hauteur du
déflect
eur
(selon l'équipement de la hotte aspi‐
r
ante)
re
fr - Aperçu et fonctions
Utilisation de la télécommande
La télécommande peut être utilisée sur
une ho
que signalétique affiche le symbole
Miele@home .
Vous pouvez sélectionner les principa‐
les foncti
la télécommande. Lorsque vous sélec‐
tionnez une fonction sur la télécom‐
mande, la diode de contrôle de la télé‐
commande s’allume brièvement.
Respectez les instructions du mode
d'emploi de la hott
nant les fonctions décrites.
Les programmations, par ex. le comp‐
teur d'heures de fonctionnement, ne
peuvent être effectuées que sur le ban‐
deau de commande de la hotte aspi‐
rante.
La portée maximale de la télécomman‐
de est d
de la pièce peuvent réduire la portée
(par ex. mobilier, murs).
Le dos de la télécommande est magné‐
tique. V
xer sur des supports métalliques.
tte aspirante Miele dont la pla‐
ons sur la hotte ou en utilisant
e aspirante concer‐
'env. 10 m. Les caractéristiques
ous pouvez ainsi aisément la fi‐
17
Page 18

fr - Connecter/déconnecter la télécommande
Pour pouvoir utiliser la télécommande,
cett
e dernière doit être connectée.
La connexion et la déconnexion sur la
hotte et la télécommande doivent avoir
lieu en même temps. Accédez d'abord
au mode de connexion et de déconne‐
xion sur la hotte, puis sur la télécom‐
mande.
Accéder au mode de connexion et de
déconne
Appuye
515 pendant env. 10 secondes,
jusqu'à ce que le 1 de l'affichage de
la vitesse s'allume.
App
sur :
– la touche ""
– puis la touche "" (touche sensitive
IS)*,
– et la touche Eclairage .
V
ment au mode via la télécommande.
xion sur la hotte
z sur la touche Arrêt différé
uyez ensuite successivement
(touche sensitive 1)*,
ous pouvez ensuite accéder directe‐
Démarrer la connexion
Appuye
nexion/déconnexion sur la hotte sur
la touche "" (touche sensitive IS)*
puis sur la télécommande sur la tou‐
che « ».
La recherche d'une liaison radio com‐
mence
clignote régulièrement.
Au bout de 30 s., la liaison radio est
établie lo
mande clignote 4 fois à intervalles
courts. Après un bref moment, la LED
s'éteint.
Co
te en effleurant la touche de poursui‐
te du fonctionnement 515. Tous les
voyants lumineux s'éteignent.
Vous pouvez maintenant utiliser la télé‐
commande.
Si votre validation n'a pas lieu dans les
4 minut
n'a pas lieu.
z tout d'abord en mode con‐
. La LED de la télécommande
rsque la LED de la télécom‐
nfirmez la déconnexion sur la hot‐
es suivant le réglage, l'activation
Accédez au mode de connexion et
de déconne
de
App
flèches pendant environ 5 se‐
condes jusqu'à ce que la LED de la
télécommande clignote.
Appuye
18
xion sur la télécomman‐
uyez simultanément sur les deux
z sur la touche d'éclairage .
Annuler la connexion
Si la co
processus peut être interrompu en
appuyant sur la touche Arrêt différé
515 sur la hotte et sur la télécom‐
mande.
Il faut r
xion. Pour cela, il faut d'abord décon‐
necter la hotte et la télécommande.
nnexion s'avère impossible, le
épéter le processus de conne‐
Page 19
fr - Connecter/déconnecter la télécommande
Déconnexion
Ap
puyez tout d'abord en mode con‐
nexion/déconnexion sur la hotte sur
la touche "" (touche sensitive 1)*
puis sur la télécommande sur la tou‐
che « ».
La LED de la télécommande clignote
r
égulièrement.
Si au bout de 10 secondes, la LED de
la télécommande clignote deux fois à
intervalles plus espacés, la télécom‐
mande est déconnectée. Après un bref
moment, la LED s'éteint.
Co
nfirmez la déconnexion de la hotte
en effleurant la touche de poursuite
du fonctionnement 515. Tous les
voyants lumineux s'éteignent.
N'oubliez pas que lorsque vous dés‐
ivez la liaison radio, la fonction
act
Con@ctivity 2.0 est également désac‐
tivée et doit être réactivée.
Appuye
supplémentaire .
Appuye
ver l'éclairage supplémentaire et sur
la touche "" pour le désactiver.
La programmation se termine automati‐
quement.
Activer/désactiver la fonction de dé‐
placement
Si votre hotte possède un déflecteur
mot
ge peut aussi s'effectuer à l'aide de la
télécommande.
Cette fonction supplémentaire doit être
activée sur la télécommande.
A
flèches pendant environ 5 se‐
condes, jusqu'à ce que la LED de la
télécommande clignote.
A
.
z sur la touche d'éclairage
z sur la touche "" pour acti‐
orisé réglable en hauteur, ce régla‐
ppuyez simultanément sur les deux
ppuyez sur la touche d'arrêt différé
* sur les appareils équipés de touches
sensitives
Activer/désactiver l'éclairage supplé‐
mentair
Si votre hotte dispose d'un éclairage
supplémentair
de la table de cuisson, par ex. d'un
éclairage du bandeau en verre, celui-ci
peut également être allumé et éteint
avec la télécommande.
Cette fonction doit être activée sur la
télécommande.
Appuye
e
e en plus de l'éclairage
z simultanément sur les deux
flèches pendant environ 5 se‐
condes, jusqu'à ce que la LED de la
télécommande clignote.
A
ppuyez sur la touche "" pour l'ac‐
tiver et sur la touche "" pour le dés‐
activer.
La programmation se termine automati‐
quement.
19
Page 20
fr - Nettoyage et entretien
Nettoyage de la télécommande
Ne
ttoyez la surface avec un chiffon
humide uniquement. N’utilisez pas
trop d’eau pour empêcher l'eau de
pénétrer dans le boîtier.
Remplacement de la pile
N'utilisez que la pile indiquée.
N'utili
sez pas de de pile rechargea‐
ble.
La télécommande fonctionne avec une
onde 3 V, CR 2032.
pile r
Dès que vous n'arrivez plus à utiliser les
fonctio
mande, cela signifie que vous devez en
changer la pile. Le cas échéant, l'éclai‐
rage de la diode de la télécommande
s'allume faiblement ou ne s'allume plus
du tout.
Vous pouvez toutefois continuer à utili‐
ser les fonctions de la hotte via le pan‐
neau de commande de cette dernière.
ns de la hotte via la télécom‐
Desserr
télécommande avec un tournevis
puis retirez le couvercle.
Sor
nouvelle. Veillez à bien respecter les
polarités.
Referme
Jet
collecte de votre commune.
ez les deux vis à l'arrière de la
tez la pile et remplacez-la par une
z le couvercle.
ez la pile usagée dans un point de
20
Page 21

it - Contenuto
Istruzioni per la sicurezza e avvertenze............................................................. 22
Panoramica e funzionamento.............................................................................
23
Utilizzo del telecomando........................................................................................ 23
Connettere/disconnettere il telecomando.........................................................
Attivare/disattivare l'illuminazione supplementare ...........................................
Attivare/disattivare la funzione di regolazione ................................................
Pulizia e manutenzione........................................................................................
24
25
25
26
Pulizia del telecomando......................................................................................... 26
Sostituire la batteria............................................................................................... 26
21
Page 22

it - Istruzioni per la sicurezza e avvertenze
Leggere attentamente le istruzioni d'uso e di montaggio prima di
ere in funzione la cappa aspirante. Contengono informazioni
mett
importanti su montaggio, sicurezza, uso e manutenzione. Osser‐
vandole si evitano pericoli per le persone e danni materiali alla
cappa aspirante. Miele non risponde dei danni causati dall'inos‐
servanza delle presenti istruzioni per la sicurezza e avvertenze.
Conservare le presenti istruzioni d'uso e di montaggio e conse‐
g
narle anche a eventuali altri utenti.
elecomando deve essere utilizzato esclusivamente con una
Il t
cappa aspirante Miele.
Non far gio
Imp
– non mettere in corto circuito le batterie, non ricaricarle e non get‐
– Consegnare le batterie usate negli idonei centri di raccolta. Non
ortante! Quando si maneggia la batteria del telecomando:
nel fuoco. Pericolo di esplosione!
tarle
gettare le batterie tra i normali rifiuti domestici.
care i bambini con il telecomando.
22
Page 23

it - Panoramica e funzionamento
Utilizzo del telecomando
Il telecomando può essere utilizzato
con un
cui targhetta dati appare il simbolo
Miele@home .
Le principali funzioni della cappa aspi‐
r
mando. Se si seleziona la funzione con
il telecomando, sul telecomando si ac‐
cende brevemente la spia di servizio.
a cappa aspirante Miele, sulla
ante si possono attivare con il teleco‐
a
Spia di servizio
b
Tasto illuminazione piano cottura
c
Tasto per spegnere la ventola e sele‐
are un livello più basso.
zion
d
Tasto per accendere la ventola e se‐
zionare un livello più alto.
le
e
Tasto On/Off per l'illuminazione sup‐
plementar
(in base alla dotazione della cappa
aspir
f
Tasto per il funzionamento supple‐
mentar
g
Tasti per la regolazione in altezza
dello schermo deviafumane
(in base alla dotazione della cappa
aspir
e
ante)
e
ante)
Per la descrizione delle funzioni si ri‐
manda alle istruzioni d'uso della cappa
aspir
ante.
Le programmazioni, p.es. del contatore
ore di funzionamento, possono essere
impostate solo sull'area comandi della
cappa aspirante.
Il raggio d'azione del telecomando è di
10 m cir
mando può venire ridotto da ostacoli,
ad es. pareti, mobili ecc.
La parte posteriore del telecomando è
magnetizzata. È quindi possibile fissarlo
su super
ca. Il funzionamento del teleco‐
fici metalliche.
23
Page 24

it - Connettere/disconnettere il telecomando
Per poter utilizzare il telecomando oc‐
corr
e effettuare la connessione.
La connessione e la disconnessione
devono essere effettuate contempora‐
neamente sulla cappa aspirante e sul
telecomando. Accedere dapprima sulla
cappa aspirante la modalità di connes‐
sione/disconnessione e poi sul teleco‐
mando.
Accedere alla modalità di connessio‐
ne/disconnessione sulla cappa aspi‐
r
ante
enere premuto il tasto del funziona‐
T
mento supplementare 515 per ca.
10 sec. finché s'illumina la spia 1 dei
livelli di aspirazione.
P
remere poi in successione
– il tasto "" (tasto sensore 1)*,
– il tasto "" (t
– quindi il tasto dell'illuminazione .
Acceder
modalità sul telecomando.
Accedere alla modalità connessione/
disconn
P
P
essione sul telecomando
remere contemporaneamente i sen‐
sori delle frecce per circa 5 se‐
condi, finché il LED del telecomando
inizia a lampeggiare.
remere il tasto dell'illuminazione .
asto sensore IS)*,
e quindi direttamente alla
Avviare la connessione
remere nella modalità connessione/
P
disconnessione dapprima sulla cap‐
pa aspirante il tasto "" (tasto senso‐
re IS)* e poi sul telecomando il tasto
"".
Inizia la ricerca della connessione radio.
Il LED d
modo uniforme.
Dopo ca. 30 secondi il LED sul teleco‐
mando lampeg
valli. La connessione radio è attiva. Po‐
co dopo il LED si spegne.
Co
Adesso è possibile utilizzare il teleco‐
mando.
Se non si conferma l'operazione entro 4
minuti dopo l'impostazione, non avvie‐
ne l'attivazione.
Interrompere la connessione
Qualo
Infine ripet
el telecomando lampeggia in
gia 4 volte a brevi inter‐
nfermare la connessione sulla
cappa aspirante con il tasto per il
funzionamento supplementare 515.
Tutte le spie si spengono.
ra la connessione non fosse
possibile, si può interrompere il pro‐
cedimento premendo il tasto di funzi‐
onamento supplementare 515 sulla
cappa aspirante e sul telecomando.
ere la procedura per attiva‐
re la connessione. A tale scopo è ne‐
cessario dapprima disconnettere la
cappa aspirante e il telecomando.
24
Disconnessione
P
remere in modalità connessione/
disconnessione sulla cappa aspirante
il tasto "" (tasto sensore 1)* e poi
sul telecomando il tasto "".
Page 25

it - Connettere/disconnettere il telecomando
Il LED del telecomando lampeggia in
modo uniforme.
Dopo ca. 10 secondi il LED del teleco‐
mando lampeg
valli, significa che il telecomando non è
più connesso. Dopo breve tempo il LED
si spegne.
Co
nfermare la disconnessione sulla
cappa aspirante con il tasto di funzio‐
namento supplementare 515. Tutte
le spie si spengono.
Disattivando la connessione radio si
disattiva anche un'eventuale funzione
Con@ctivity 2.0, che deve quindi es‐
ser
e riattivata.
* per apparecchi con tasti a sensore
Attivare/disattivare l'illuminazione
ementare
suppl
Se oltre all'illuminazione del piano cot‐
tur
a la cappa aspirante è dotata anche
di un'ulteriore luce, p.es. a bordo vetro,
anche quest'ultima può essere accesa
o spenta con il telecomando.
Questa funzione deve essere inoltre at‐
tivata sul telecomando.
gia 2 volte a lunghi inter‐
Attivare/disattivare la funzione di re‐
golazione
Se la cappa aspirante è dotata di uno
rmo deviafumane regolabile in al‐
sche
tezza tramite motorino è possibile spo‐
stare lo schermo con il telecomando.
Questa funzione deve essere attivata
sul telecomando.
P
remere contemporaneamente i sen‐
sori delle frecce per circa 5 se‐
condi, finché il LED del telecomando
inizia a lampeggiare.
P
remere il tasto per il funzionamento
supplementare della ventola .
P
er attivarla, premere il tasto "", per
disattivarla il tasto "".
La programmazione si conclude auto‐
maticame
nte.
P
remere contemporaneamente i sen‐
sori delle frecce per circa 5 se‐
condi, finché il LED del telecomando
inizia a lampeggiare.
P
remere il tasto per l'illuminazione
supplementare .
P
er attivarla, premere il tasto "", per
disattivarla il tasto "".
La programmazione si conclude auto‐
maticame
nte.
25
Page 26

it - Pulizia e manutenzione
Pulizia del telecomando
P
ulire la superficie solo con uno
straccio umido. Lo straccio non deve
essere troppo bagnato per evitare
che l'acqua penetri all'interno.
Sostituire la batteria
Si possono utilizzare solo le batterie
in
dicate.
Non si possono utilizzare batterie ri‐
caricabili.
Il telecomando funziona con una batte‐
ria da 3 V (CR 2032).
Sostituire le batterie quando non è più
possibile attivar
con il telecomando. Se si preme un ta‐
sto, la spia sul telecomando non si ac‐
cende o solo debolmente.
Le funzioni della cappa si possono co‐
munque attivare con i tasti sul pannello
della cappa.
e le funzioni della cappa
S
vitare con un cacciavite entrambe le
viti disposte sulla parte posteriore del
telecomando e rimuovere il coper‐
chio.
Estr
arre la batteria e sostituirla con
una nuova. Rispettare la polarità.
Rich
iudere il coperchio.
nsegnare la batteria usata negli
Co
idonei punti di raccolta.
26
Page 27

es - Contenido
Advertencias e indicaciones de seguridad........................................................ 28
Relación y Función...............................................................................................
29
Utilización del mando a distancia .......................................................................... 29
Registrar/desconectar el mando a distancia....................................................
Iluminación complementaria activación/desactivación
Función de proceso activación/desactivación
............................................... 31
.................................... 31
Limpieza y mantenimiento ..................................................................................
30
32
Limpieza del mando a distancia ............................................................................ 32
Sustitución de la pila.............................................................................................. 32
27
Page 28

es - Advertencias e indicaciones de seguridad
Lea atentamente las Instrucciones de manejo y montaje antes de
r la campana extractora en funcionamiento. En las instruccio‐
pone
nes encontrará indicaciones importantes para el montaje, seguri‐
dad, manejo y mantenimiento. De este modo se protegerá a Vd.
mismo y evitará daños en la campana extractora. Miele no se ha‐
ce responsable por los daños causados al ignorar estas indicacio‐
nes.
Conserve las presentes Instrucciones de manejo y de montaje y
trégueselas al nuevo propietario en caso de venta posterior del
en
aparato.
Utilic
extractora Miele.
e este mando a distancia exclusivamente con una campana
No deje jugar a los niños con el mando a distancia.
Imp
– No poner en cortocircuito, recargar la pila o tirarla al fuego. ¡Ries‐
– Deposite las pilas usadas en un punto de recogida. No tire las pi‐
ortante para el manejo de la pila del control a distancia:
go
de explosión!
las a la
basura doméstica.
28
Page 29

a
Piloto de control
b
Tecla para la iluminación del área de
cocción
c
Tecla para desconectar el ventilador
y par
a seleccionar un nivel de coc‐
ción inferior.
d
Tecla para conectar el ventilador y
par
a seleccionar un nivel de cocción
superior.
e
Tecla de conexión/desconexión para
la iluminación complementaria
(en función de la dotación de la
campana e
f
Tecla para la función de funciona‐
mient
g
Teclas para la regulación de altura
de la viser
(en función de la dotación de la
campana e
xtractora)
o posterior
a
xtractora)
es - Relación y Función
Utilización del mando a distancia
Se puede utilizar el mando a distancia
en combin
tractora Miele que tenga el Miele@ho‐
me-Symbol en la placa de caracte‐
rísticas.
Las funciones principales se pueden
selecc
con el mando a distancia. Al seleccio‐
nar una función con el mando a distan‐
cia se ilumina brevemente el piloto de
control en el mando.
Observe las instrucciones de manejo
de la campana e
cripción de las funciones.
Programaciones, p.ej. del contador de
horas de servicio, son posibles sólo en
la unidad de mando de la campana ex‐
tractora.
El alcance máximo del mando a distan‐
cia es de apr
dades de la estancia pueden reducir el
alcance (p. ej. mobiliario, paredes).
La parte posterior del mando a distan‐
cia es imantable, de modo que puede
fijarlo en muchas bases metálicas.
ación con una campana ex‐
ionar en la campana extractora y
xtractora para una des‐
ox. 10 m. Las particulari‐
29
Page 30

es - Registrar/desconectar el mando a distancia
Para poder utilizar el mando a distancia
ést
e tiene que estar registrado.
El registrar/desconectar debe realizarse
simultáneamente en la campana ex‐
tractora y en el mando a distancia. Acti‐
ve el modo registrar/desconectar pri‐
mero en la campana extractora, des‐
pués en el mando a distancia.
Activar el modo registrar/desconec‐
tar en la campana e
P
ulse la tecla de funcionamiento pos‐
terior 515 durante aprox. 10 segun‐
dos, hasta que la indicación del nivel
del extractor 1 se ilumine.
A continu
– la tecla "" (t
– después la tecla "" (
IS)*,
– y finalmente la tecla de la iluminación
.
A contin
modo en el mando a distancia.
ación, pulse sucesivamente
uación active directamente el
xtractora
ecla sensora 1)*,
tecla sensora
Iniciar el registro
En el modo r
pulse primero en la campana extra‐
ctora la tecla "" (tecla sensora IS)* y
después en el mando a distancia la
tecla "".
Se inicia la búsqueda de una conexión
inalámbrica. .El LED del mando a dis‐
tancia parpadea de forma uniforme.
La conexión inalámbrica se establece
cuando el LED del mando a distancia
parpadea en int
tras aprox. 30 segundos. Tras un breve
tiempo el LED se apaga.
Co
nfirme el registro de la campana
extractora con la tecla de funciona‐
miento posterior 515. Todos los pi‐
lotos de mando se apagan.
El mando a distancia ya se puede utili‐
.
zar
Si no realiza la confirmación en el plazo
de 4 minut
activación no se llevará a cabo.
egistrar/desconectar
ervalos cortos 4 veces
os después de los ajustes, la
Activar el modo registrar/desconec‐
tar en el mando a distancia
P
ulse ambas flechas de dirección
simultáneamente durante aprox.
5 segundos hasta que el LED del
mando a distancia parpadee.
P
ulse la tecla de iluminación .
30
Cancelar registro
En caso de no ser posible el r
el proceso puede ser interrumpido
pulsando la tecla de funcionamiento
posterior 515 en la campana extra‐
ctora o en el mando a distancia.
El p
roceso deberá repetirse. Para el‐
lo, primero hay que desconectar la
campana extractora y el mando a
distancia.
egistro,
Page 31

es - Registrar/desconectar el mando a distancia
Desconectar
En el m
pulse en la campana extractora la
tecla "" (tecla sensora 1)* y en el
mando a distancia la tecla "".
El LED del mando a distancia parpadea
de forma uniforme.
Después de aprox. 10 segundos, el
LED del mando a distancia parpadea
en int
mando a distancia está desconectado.
Transcurrido un tiempo corto, el LED se
apaga.
Co
pana extractora con la tecla de funci‐
onamiento posterior 515. Todos los
pilotos de mando se apagan.
Observe que con la desconexión de la
onexión inalámbrica también se de‐
c
sactiva una función Con@ctivity 2.0
existente y debe activarse de nuevo.
*en aparatos con teclas sensoras
odo registrar/desconectar
ervalos más largos 2 veces. El
nfirme la desconexión de la cam‐
P
ulsar la tecla para la iluminación
complementaria .
P
ara activar pulse la tecla "", para
desactivar pulse la tecla "".
La programación finaliza automática‐
e.
ment
Función de proceso activación/
desactivación
Sí su campana extractora dispone de
una viser
ésta también puede realizarse con el
mando a distancia.
Esta función tiene que activarse adicio‐
nalmente en el mando a distancia.
P
simultáneamente durante aprox.
5 segundos hasta que el LED del
mando a distancia parpadee.
P
posterior .
P
desactivar pulse la tecla "".
a de altura regulable a motor,
ulse ambas flechas de dirección
ulse la tecla para el funcionamiento
ara activar pulse la tecla "", para
Iluminación complementaria acti‐
vación/desactivación
Sí su campana extractora dispone de
u
na iluminación complementaria junto a
la iluminación del área de cocción, p.
ej. una iluminación de los cantos de vi‐
drio, ésta también puede conectarse y
desconectarse con el mando a distan‐
cia.
Esta función tiene que activarse adicio‐
nalmente en el mando a distancia.
P
ulse ambas flechas de dirección
simultáneamente durante aprox.
5 segundos hasta que el LED del
mando a distancia parpadee.
La programación finaliza automática‐
mente.
31
Page 32

es - Limpieza y mantenimiento
Limpieza del mando a distancia
Li
mpie la superficie únicamente con
un paño húmedo. No utilice demasia‐
da agua para evitar que penetre la
humedad en la carcasa.
Sustitución de la pila
Solo se puede utilizar la pila suminis‐
tr
ada.
No se puede utilizar ninguna pila re‐
cargable.
El control a distancia cuentea con una
pila, pila de b
Se debe cambiar la pila cuando ya no
se pueda seleccionar las funciones con
el mando a distancia. Cuando se pulsa
una t
ecla ya no se enciende el piloto de
control del mando a distancia o lo hace
de forma muy débil.
Sin embargo, es posible seguir selec‐
cionando las funciones de la campana
extractora en la unidad de manejo de la
campana extractora.
otón 3 V, CR 2032.
Afloj
e con un destornillador los dos
tornillos situados en la parte posterior
y retire la tapa.
Extr
aiga la pila y coloque una nueva.
Tenga en cuenta la polaridad correc‐
ta.
V
uelva a cerrar la tapa.
Deposi
de recogida de su lugar de residen‐
cia.
te la pila usada en un punto
32
Page 33

nl - Inhoud
Veiligheidsinstructies en waarschuwingen ....................................................... 34
Beschrijving van paneel en werking ..................................................................
35
Gebruik van de afstandsbediener.......................................................................... 35
Afstandsbediening aan-/afmelden .....................................................................
Extra verlichting
Verstelfunctie
activeren / deactiveren .......................................................... 37
activeren / deactiveren............................................................. 37
Reiniging en onderhoud ......................................................................................
36
38
Afstandsbediener reinigen ..................................................................................... 38
Batterij vervangen .................................................................................................. 38
33
Page 34

nl - Veiligheidsinstructies en waarschuwingen
Ondeskundig gebruik van deze afzuigkap kan persoonlijk letsel en
ade aan het apparaat veroorzaken. Lees de gebruiks- en mon‐
sch
tagehandleiding van dit apparaat daarom aandachtig door, voor‐
dat u het in gebruik neemt. In de handleiding vindt u belangrijke
instructies met betrekking tot de montage, de veiligheid, het ge‐
bruik en het onderhoud. Worden de instructies niet opgevolgd,
kan Miele niet aansprakelijk worden gesteld voor schade die daar‐
van het gevolg is.
Bewaar de gebruiks- en montagehandleiding en geef deze door
aa
n een eventuele volgende eigenaar.
De
ze afstandsbediener mag alleen in combinatie met een Miele-
afzuigkap worden gebruikt.
Laat kinder
Neem bij gebruik
gende instructies in acht.
– Sluit batterijen niet kort, laad ze niet opnieuw op en gooi ze niet in
het vuu
– Gooi batterijen na gebruik niet bij het gewone afval, maar lever ze
in
bij een inzamelpunt voor lege batterijen.
en niet met de afstandsbediener spelen.
van een afstandsbediener met batterij de vol‐
r om een explosie te voorkomen.
34
Page 35

nl - Beschrijving van paneel en werking
a
Controlelampje
b
Toets van de kookplaatverlichting
c
Toets voor het uitschakelen van de
ing en voor het kiezen van een
afzuig
lagere vermogensstand.
d
Toets voor het inschakelen van de
afzuig
ing en voor het kiezen van een
hogere vermogensstand.
e
Aan / Uit - toets van de extra verlich‐
ting
(afhankelijk van de specificaties van
de afzuigkap)
f
Toets van de uitlooptijdfunctie
g
Toetsen voor het verstellen van het
wasemscherm
(afhankelijk van de specificaties van
de afzuigkap)
Gebruik van de afstandsbediener
De afstandsbediener kan worden ge‐
bruikt in combinatie met een Miele-af‐
zuigkap met het Miele@home-symbool
. Zie typeplaatje.
De belangrijkste functies kunnen zowel
met de t
met de toetsen van de afstandsbedie‐
ner worden bediend. Wanneer u een
functie via de afstandsbediener kiest,
licht het controlelampje daar kort op.
De functies worden beschreven in de
gebruiksaanwijzing van de afzuigkap.
P
rogrammeringen zoals het instellen
van de urenteller zijn alleen via het be‐
dieningspaneel van de afzuigkap moge‐
lijk.
De maximale reikwijdte van de af‐
standsbediening
Door de omstandigheden in het vertrek,
bijv. door de aanwezigheid van meubi‐
lair en muren, kan de reikwijdte minder
zijn.
De afstandsbediener heeft een magne‐
tische ac
talen ondergrond kan worden vastge‐
maakt.
oetsen van de afzuigkap, als
bedraagt ca. 10 m.
hterkant, zodat hij op een me‐
35
Page 36

nl - Afstandsbediening aan-/afmelden
Om de afstandsbediening te kunnen
gebruik
den.
Het aan- en afmelden moet vlak achter
elkaar bij de afzuigkap en bij de af‐
standsbediener gebeuren. Roep eerst
de aan-/afmeldmodus bij de afzuigkap
en daarna bij de afstandsbediener op.
Aan-/Afmeldmodus bij de afzuigkap
o
Druk ca. 10 seconden op de 515
Druk ach
– de ""
– daarna op de ""
– en daarna op de t
Roe
Aan-/Afmeldmodus bij de afstands‐
bediener opr
Druk ca. 5 seconden lang op de bei‐
Druk op de t
en, moet u deze eerste aanmel‐
proepen
t
oets van de uitlooptijd, totdat stand
1 van het afzuigvermogen gaat bran‐
den.
ter elkaar op
toets (sensortoets 1)*,
toets (sensortoets
IS)*,
oets van de ver‐
lichting.
p direct daarna de modus bij de
afstandsbediener op.
oepen
de pijltoetsen , totdat de LED van
de afstandsbediener knippert.
oets van de verlich‐
ting.
Aanmelden starten
Druk in de aan-/afmeldmodus eerst
op de "" t
de afzuigkap en daarna op de ""
toets van de afstandsbediener.
Het apparaat zoekt naar een draadloze
verbinding. De LED van de afstandsbe‐
diener kni
Na ca. 30 seconden knippert de LED
van de afstandsbediener met korte tus‐
senpozen 4 keer. De draadloze verbin‐
ding is tot stand gekomen. Na korte tijd
gaat de LED uit.
Bevestig de aanmelding bij de afzuig‐
kap met de 515
looptijd. Nu gaan alle controlelampjes
uit.
De afstandsbediener is nu gebruiks‐
klaar
.
Wordt de activering niet binnen 4 minu‐
ten bevestigd, dan wordt er niet geacti‐
veerd.
Afmelden afbreken
Is het aanmelden niet mogelijk, dan
kunt u de pr
op de 515 toets aan de afzuigkap
en aan de afstandsbediener te druk‐
ken.
Daarna moe
meld. Daarvoor moeten afzuigkap en
afstandsbediener eerst worden afge‐
meld.
oets (sensortoets IS)* van
ppert gelijkmatig.
toets van de uit‐
ocedure afbreken door
t opnieuw worden aange‐
36
Afmelden
Druk in de aan-/afmeldmodus op de
"" t
oets (sensortoets 1)* van de af‐
zuigkap en daarna op de "" toets
van de afstandsbediener.
Page 37

nl - Afstandsbediening aan-/afmelden
De LED van de afstandsbediener knip‐
per
t gelijkmatig.
Na ca. 10 seconden knippert de LED
van de afstandsbed
tussenpozen 2 keer. De afstandsbedie‐
ning is afgemeld. Na korte tijd gaat de
LED uit.
Bevestig de afmelding bij de afzuig‐
kap met de 515
looptijd. Alle controlelampjes gaan
uit.
Houd er rekening mee, dat wanneer
raadloze verbinding wordt verbro‐
de d
ken, ook een eventueel aanwezige
Con@ctivity 2.0-functie wordt gedeac‐
tiveerd en dus opnieuw moet worden
geactiveerd.
* Bij apparaten met sensortoetsen
Extra verlichting ac
tiveren
Beschikt uw afzuigkap naast de kook‐
plaatverli
verlichting, bijv. een glasrandverlichting,
dan kan deze ook met de afstandsbe‐
diener worden in- en uitgeschakeld.
Deze functie moet met de afstandsbe‐
diener worden geactiveerd.
chting ook nog over een extra
iener met grotere
toets van de uit‐
tiveren / deac‐
Verstelfunctie active
veren
Beschikt uw afzuigkap over een moto‐
risch in
scherm, kan dit ook met de afstands‐
bediener worden versteld.
Deze functie moet met de afstandsbe‐
diener worden geactiveerd.
Druk ca. 5 seconden lang op de bei‐
Druk op de t
Druk om
De programmering wordt automatisch
afgesl
hoogte verstelbaar wasem‐
de pijlt
oetsen , totdat de LED van
de afstandsbediener knippert.
oets van de uitloop‐
tijd.
te activeren op de ""
toets, om te deactiveren op de ""
toets.
oten.
ren / deacti‐
Druk ca. 5 seconden lang op de bei‐
de pijlt
de afstandsbediener knippert.
Druk op de
verlichting.
Druk om
toets, om te deactiveren op de ""
toets.
De programmering wordt automatisch
afgesl
oetsen , totdat de LED van
- toets van de extra
te activeren op de ""
oten.
37
Page 38

nl - Reiniging en onderhoud
Afstandsbediener reinigen
Rei
nig het oppervlak alleen met een
vochtige doek. Gebruik niet te veel
water om te voorkomen dat vocht in
de ommanteling terechtkomt.
Batterij vervangen
Alleen de aangegeven batterij mag
wor
den gebruikt.
Gebruik van herlaadbare batterijen is
niet toegestaan.
De afstandsbediener beschikt over een
erij 3 V, CR 2032.
batt
De batterij moet worden vervangen
wanneer het u niet meer lukt om de
functies van de afzuigkap met de af‐
standsbediener in t
geval brandt het controlelampje op de
afstandsbediener niet meer of slechts
zwak.
U kunt de benodigde functies echter
ook via het bedieningspaneel van de af‐
zuigkap inschakelen.
e schakelen. In dat
Dr
aai de beide schroeven aan de
achterkant met een schroevendraaier
los en verwijder de afdekking.
Haa
l de batterij uit de afstandsbedie‐
ner en zet er een nieuwe in. Let daar‐
bij op de + en - pool.
Slui
t de afdekking weer.
ever de gebruikte batterij in bij een
L
inzamelpunt voor batterijen.
38
Page 39

da - Indhold
Råd om sikkerhed og advarsler.......................................................................... 40
Oversigt og funktion ............................................................................................
41
Anvendelse af fjernbetjeningen.............................................................................. 41
Fjernbetjening til-/afmeldes................................................................................
Ekstra lys
Hæve-/sænkefunktion
aktiveres/deaktiveres....................................................................... 43
aktiveres/deaktiveres................................................. 43
Rengøring og vedligeholdelse ............................................................................
42
44
Fjernbetjeningen rengøres ..................................................................................... 44
Batteriet udskiftes.................................................................................................. 44
39
Page 40

da - Råd om sikkerhed og advarsler
Læs venligst brugs- og monteringsanvisningen til emhætten grun‐
digt, inden emh
ninger om montering, sikkerhed, brug og vedligeholdelse. Derved
beskyttes personer, og skader på emhætten undgås. Miele kan ik‐
ke gøres ansvarlig for skader, der er opstået, fordi disse anvisnin‐
ger ikke er blevet fulgt.
Gem venligst brugs- og monteringsanvisningen, og giv den videre
til
en eventuel senere ejer.
ætten tages i brug. Den indeholder vigtige anvis‐
Denne f
Lad ikk
V
igtigt ved håndtering af batteriet til fjernbetjeningen:
– Batteriet må ikke kortsluttes, ikke genoplades og ikke kastes ind i
il
d. Risiko for eksplosion!
– Aflever det brugte batteri på et opsamlingssted. Smid det ikke ud
med husholdningsaffaldet.
jernbetjening kan kun anvendes til en Miele emhætte.
e børn lege med fjernbetjeningen.
40
Page 41

a
Kontrollampe
b
Tast til kogepladebelysning
c
Tast til frakobling af blæseren og til
valg af et laver
d
Tast til tilkobling af blæseren og til
valg af et høj
e
Tænd/sluk-tast til ekstra lys
(afhængig af emhættens udstyr)
f
Tast til efterudsugning
g
Taster til højdeindstilling af emskær‐
men
(afhængig af emhættens udstyr)
e blæsertrin.
ere blæsertrin.
da - Oversigt og funktion
Anvendelse af fjernbetjeningen
Fjernbetjeningen kan anvendes til en
e emhætte, der har Miele@home-
Miel
symbolet på typeskiltet.
Hovedfunktionerne kan vælges på em‐
hætten eller med fjernbetjeningen. Ved
valg af en funktion med fjernbetjenin‐
gen lyser kontrollampen på denne kort‐
varigt.
Vedrørende beskrivelsen af funktioner‐
ne henvises til brugsanvisningen til em‐
hætt
en.
Programmeringer, fx af driftstimetælle‐
ren, kan kun foretages på emhættens
betjeningspanel.
Fjernbetjeningens maksimale rækkevid‐
de er ca. 10 m. Rummæssige forhold
kan r
educere rækkevidden (fx møbler,
vægge).
Fjernbetjeningens bagside er magne‐
tisk, hvor
lang række metaloverflader.
ved den kan sættes fast på en
41
Page 42

da - Fjernbetjening til-/afmeldes
Fjernbetjeningen skal være tilmeldt, in‐
den den kan anvendes.
T
il- og afmelding skal foretages samti‐
digt på emhætten og på fjernbetjenin‐
gen. Aktiver først til-/afmeldingsmodus
på emhætten og derefter på fjernbetje‐
ningen.
Til-/afmeldingsmodus kaldes frem på
emhætt
T
T
– tasten "" (
– tasten "" (
– lystasten .
Kald umiddelbar
Til-/afmeldingsmodus kaldes frem på
f
jernbetjeningen
T
T
en
ryk på efterudsugningstasten 515
i ca. 10 sekunder, indtil blæsertrin 1
lyser.
ryk herefter en efter en på
sensortast 1)*,
sensortast IS)*,
t derefter modussen
frem på fjernbetjeningen.
ryk samtidigt på de to piletaster
i ca. 5 sekunder, indtil fjernbetjenin‐
gens kontrollampe blinker.
ryk på lystasten .
Tilmelding startes
T
ryk i til-/afmeldingsmodus først på
tasten "" (sensortast IS)* på em‐
hætten og derefter på tasten "" på
fjernbetjeningen.
Søgning efter radioforbindelse starter.
nbetjeningens kontrollampe blinker
Fjer
regelmæssigt.
Efter ca. 30 sekunder blinker fjernbetje‐
ningens kontrollampe 4 gange med kor‐
te intervaller. Radioforbindelsen er
etableret. Efter kort tid slukker kontrol‐
lampen.
Bekr
Fjernbetjeningen kan nu anvendes.
Hvis bekræftelsen ikke foretages inden
for 4 minutt
der ingen aktivering.
Tilmelding afbrydes
Hvis til
Her
æft tilmeldingen på emhætten
med efterudsugningstasten 515.
Alle kontrollamper slukker.
er efter indstillingen, sker
melding ikke er mulig, kan
processen afbrydes ved tryk på efte‐
rudsugningstasten 515 på emhæt‐
ten og på fjernbetjeningen.
efter skal tilmeldingen gentages.
Emhætten og fjernbetjeningen skal
da først afmeldes.
42
Afmelding
T
ryk i til-/afmeldingsmodus på tasten
"" (sensortast 1)* på emhætten og
derefter på tasten "" på fjernbetje‐
ningen.
Fjernbetjeningens kontrollampe blinker
samtidig.
Page 43

da - Fjernbetjening til-/afmeldes
Efter ca. 10 sekunder blinker fjernbetje‐
ning
ens kontrollampe 2 gange med
længere intervaller. Fjernbetjeningen er
afmeldt. Kontrollampen slukker efter
kort tid.
Bekr
Ekstra lys aktiver
Hvis emhætten ud over kogepladebe‐
lysnin
kantbelysning, kan dette også tændes
og slukkes med fjernbetjeningen.
Denne funktion skal også aktiveres på
fjernbetjeningen.
T
æft afmeldingen på emhætten
med efterudsugningstasten 515.
Alle kontrollamper slukker.
Bemærk: Ved afbrydelse af radiofor‐
bindelsen deaktiver
sterende Con@ctivity 2.0-funktion;
denne skal derfor aktiveres igen.
* på modeller med sensortaster
gen har et ekstra lys, fx en glas‐
ryk samtidigt på de to piletaster
i ca. 5 sekunder, indtil fjernbetjenin‐
gens kontrollampe blinker.
es også en eksi‐
es/deaktiveres
T
ryk samtidigt på de to piletaster
i ca. 5 sekunder, indtil fjernbetjenin‐
gens kontrollampe blinker.
T
ryk på tasten til efterudsugning .
T
ryk på tasten "" for aktivering og
på tasten "" for deaktivering.
Programmeringen afsluttes automatisk.
T
ryk på tasten til det ekstra lys .
T
ryk på tasten "" for aktivering og
på tasten "" for deaktivering.
Programmeringen afsluttes automatisk.
Hæve-/sænkefunktion
deaktiveres
Hvis emhætten har en emskærm, hvis
højde kan indstilles motorisk, kan den‐
ne også indstilles med fjernbetjeningen.
Denne funktion skal også aktiveres på
fjernbetjeningen.
aktiveres/
43
Page 44

da - Rengøring og vedligeholdelse
Fjernbetjeningen rengøres
Over
Batteriet udskiftes
fladen må kun rengøres med en
fugtig klud. Den må ikke være for
våd, da der ikke må trænge fugt ind i
fjernbetjeningshuset.
Der må kun anvendes den nævnte
type batt
Der må ikke anvendes genopladelige
batterier.
eri.
Fjernbetjeningen anvender et batteri,
knapcell
Batteriet skal udskiftes, når emhættens
funktio
med fjernbetjeningen. Når der trykkes
på en tast, lyser kontrollampen ikke
længere, eller den lyser kun svagt.
Emhættens funktioner kan dog stadig
vælges på emhættens betjeningspanel.
e 3 V, CR 2032.
ner ikke længere kan vælges
L
øsn de to skruer på bagsiden med
en skruetrækker, og tag dækslet af.
T
ag batteriet ud, og læg et nyt i. Sørg
for, at det vender rigtigt.
Luk dækslet igen.
Aflever det brugt
opsamlingssted.
e batteri på et lokalt
44
Page 45

fi - Sisältö
Tärkeitä turvallisuusohjeita ................................................................................. 46
Laitteen osat ja toiminnot ...................................................................................
47
Kaukosäätimen käyttö ........................................................................................... 47
Kaukosäätimen sisään-/uloskirjaaminen ..........................................................
Lisävalaistuksen kytk
Höyrynkeräyslipan siirtotoiminnon
eminen päälle/pois päältä .............................................. 49
ottaminen käyttöön/pois käytöstä........... 49
Puhdistus ja hoito ................................................................................................
48
50
Kaukosäätimen puhdistus ..................................................................................... 50
Pariston vaihto ....................................................................................................... 50
45
Page 46

fi - Tärkeitä turvallisuusohjeita
Lue liesituulettimen käyttö- ja asennusohje huolellisesti ennen kuin
at käyttää laitetta. Käyttöohje antaa sinulle tärkeitä tietoja lait‐
al
teen asennuksesta, turvallisuudesta, käytöstä ja huollosta. Näin
vältät mahdolliset vahingot ja liesituulettimesi rikkoontumisen.
Miele ei ole vastuussa sellaisista vahingoista, jotka aiheutuvat sii‐
tä, että tätä laitetta käytetään käyttöohjeiden vastaisesti.
Säilytä tämä käyttöohje! Jos luovutat liesituulettimen toiselle käyt‐
täj
älle, muista antaa käyttöohje sen mukana.
ätä kaukosäädintä voi käyttää ainoastaan Miele-liesituulettimien
T
kanssa.
Älä anna la
T
ärkeitä tietoja kaukosäätimen paristosta:
– Älä aseta paristoa oikosulkuun, älä yritä ladata sitä äläkä heitä si‐
tä avotu
– Vie käytetty paristo paristojen keräyspisteeseen. Älä hävitä sitä
talousjätteiden mukana.
sten leikkiä kaukosäätimellä.
leen. Räjähdysvaara!
46
Page 47

a
Merkkivalo
b
Valokytkin
c
Kytkin, jolla voit kytkeä puhaltimen
pois päältä tai vähen
d
Kytkin, jolla voit kytkeä puhaltimen
päälle ja
e
Lisävalaistuksen valokytkin
(liesituulettimen varustuksen mu‐
kaan)
f
Jälkikäynnin valitsin
g
Höyrynkeräyslipan korkeudensäätö‐
painikk
(liesituulettimen varustuksen mu‐
kaan)
lisätä imutehoa
eet
tää imutehoa
fi - Laitteen osat ja toiminnot
Kaukosäätimen käyttö
Kaukosäädintä voidaan käyttää vain
isten Miele-liesituulettimien kanssa,
sella
joiden arvokilvessä on Miele@homemerkintä .
Voit käyttää liesituulettimen perustoi‐
mint
oja sekä liesituulettimen käyttövalit‐
similla että kaukosäätimellä. Kun valit‐
set jonkin toiminnon kaukosäätimellä,
kaukosäätimen merkkivalo syttyy het‐
keksi.
Katso toimintojen tarkemmat kuvaukset
liesi
tuulettimen käyttöohjeesta.
Ohjelmoitavia toimintoja, esim. käyttö‐
tuntilaskureita voidaan käyttää vain lie‐
situulettimen omilla käyttövalitsimilla.
Kaukosäätimen suurin kantama on noin
10 m. Huon
lyhentää kantamaa (esim. suuret huo‐
nekalut, seinät).
Kaukosäätimen takapuolella on mag‐
neetti. Siksi se on helppo kiinnittää
useimpii
eistossa olevat esteet voivat
n metallisiin pintoihin.
47
Page 48

fi - Kaukosäätimen sisään-/uloskirjaaminen
Jotta voisit käyttää kaukosäädintä, se
on ensi
Sinun on tehtävä liesituulettimen ja kau‐
kosäätimen ulos- ja sisäänkirjaus sa‐
manaikaisesti. Aloita ensin kirjaaminen
liesituulettimesta, sitten kaukosäätimes‐
tä.
Kirjautumistoiminnon valinta liesituu‐
lettimesta
P
P
– painiketta "" (hipaisukytkin 1)*,
– sitten painiketta "" (hipaisukytkin
– ja sitten valokytkintä .
V
Kirjautumistoiminnon valinta kauko‐
säätimestä
P
P
n kirjattava järjestelmään.
aina jälkikäyntitoiminnon valitsinta
515 noin 10 sekunnin ajan, kunnes
imutehon 1 merkkivalo syttyy.
aina tämän jälkeen peräjälkeen
IS)*,
alitse heti tämän jälkeen kirjautumis‐
toiminto kaukosäätimestä.
aina molempia nuolipainikkeita
samanaikaisesti noin 5 sekuntia, kun‐
nes kaukosäätimen merkkivalo vilk‐
kuu.
aina valokytkintä .
Sisäänkirjaaminen
un kirjautumistoiminto on valittuna,
K
paina ensin liesituulettimen painiket‐
ta "" (hipaisukytkin IS)* ja sitten
kaukosäätimestä painiketta "".
Laitteet alkavat etsiä langatonta yhteyt‐
tä. Kauk
tasaisesti.
Noin 30 sekunnin kuluttua kaukosääti‐
men merkkivalo vilkkuu 4 kertaa lyhyin
aikavälein. Langaton yhteys on nyt luo‐
tu. Hetken kuluttua merkkivalo sammuu
kokonaan.
V
Nyt voit käyttää kaukosäädintä.
Jollet vahvista kirjautumisia neljän en‐
simmäisen minuutin aikana, kirjautumi‐
set peruuntuvat.
Kirjautumistoiminnon lopettaminen
Jos kirjautuminen ei onnistu, voit lo‐
T
osäätimen merkkivalo vilkkuu
ahvista liesituulettimen kirjautumi‐
nen painamalla jälkikäyntitoiminnon
valitsinta 515. Kaikki merkkivalot
sammuvat.
pettaa kirjau
malla jälkikäyntitoiminnon valitsinta
515 liesituulettimesta ja kaukosää‐
timestä.
ämän jälkeen kirjautumistoimet on
suoritettava uudelleen. Ensiksi sekä
liesituuletin että kaukosäädin on kir‐
jattava ulos järjestelmästä.
tumistoiminnon paina‐
48
Kirjautuminen ulos järjestelmästä
K
un kirjautumistoiminto on valittuna,
paina ensin liesituulettimesta paini‐
ketta "" (hipaisukytkin 1)* ja sitten
kaukosäätimen painiketta "".
Page 49

fi - Kaukosäätimen sisään-/uloskirjaaminen
Kaukosäätimen merkkivalo vilkkuu ta‐
saisesti.
Noin 10 sekunnin kuluttua kaukosääti‐
men merkkivalo vilkkuu jaksoittain kaksi
k
ertaa peräkkäin, kaukosäädin on kirjat‐
tu ulos järjestelmästä. Hetken kuluttua
merkkivalo sammuu kokonaan.
V
ahvista liesituulettimen uloskirjautu‐
minen painamalla jälkikäyntitoimin‐
non valitsinta 515. Kaikki merkkiva‐
lot sammuvat.
Huomaa, että kun katkaiset yhteyden
osäätimen ja liesituulettimen välil‐
kauk
tä, myös Con@ctivity 2.0-toiminto kyt‐
keytyy pois käytöstä ja se on otettava
uudelleen käyttöön.
* Laitteet, joita käytetään hipaisukytki‐
millä.
Lisävalaistuksen kytk
päälle/pois päältä
Jos liesituulettimessasi on tavallisen
eittotasovalaistuksen lisäksi lisävalais‐
k
tus, esimerksi valoreunus, voit myös
kytkeä sen päälle tai pois päältä kauko‐
säätimellä.
Tämä toiminto on otettava erikseen
käyttöön kaukosäätimestä.
eminen
Höyrynkeräyslipan siirtotoiminnon
ottamin
tä
Jos liesituulettimessasi on moottoroitu
höyrynkeräyslipan korkeudensäätö, voit
siirtää höyrynkeräyslippaa kaukosääti‐
mellä.
Tämä toiminto on otettava erikseen
käyttöön kaukosäätimestä.
P
aina molempia nuolipainikkeita
samanaikaisesti noin 5 sekuntia, kun‐
nes kaukosäätimen merkkivalo vilk‐
kuu.
P
aina jälkikäynnin valitsinta .
O
ta toiminto käyttöön painamalla pai‐
niketta "" ja pois käytöstä paina‐
malla painiketta "".
Ohjelmointi päättyy automaattisesti.
en käyttöön/pois käytös‐
P
aina molempia nuolipainikkeita
samanaikaisesti noin 5 sekuntia, kun‐
nes kaukosäätimen merkkivalo vilk‐
kuu.
P
aina lisävalaistuksen painiketta .
Ota t
Ohjelmointi päättyy automaattisesti.
oiminto käyttöön painamalla pai‐
niketta "" ja pois käytöstä paina‐
malla painiketta "".
49
Page 50

fi - Puhdistus ja hoito
Kaukosäätimen puhdistus
P
uhdista pinta pelkällä kostealla lii‐
nalla. Älä käytä liikaa vettä, jottei vet‐
tä pääse laitteen sisään.
Pariston vaihto
Käytä vain mainitun kaltaisia paristo‐
ja.
Älä missään tapauksessa käytä la‐
dattavia parist
Kaukosäätimen mukana toimitetaan yk‐
si nappiparist
Vaihda paristo uuteen, kun kaukosääti‐
mellä ei enää voi ohjata liesituulettimen
t
oimintoja. Kun painat jotain painiketta,
kaukosäätimen merkkivalo ei syty tai
palaa vain heikosti.
Voit kuitenkin käyttää liesituuletinta sen
omilla käyttövalitsimilla.
oja.
o 3 V, CR 2032.
Ruuva
P
Aseta kansi takaisin paikalleen.
V
a auki kaukosäätimen takapuo‐
lella olevat kaksi ruuvia ja irrota paris‐
tolokeron kansi.
oista vanha paristo ja aseta tilalle
uusi. Tarkista että navat tulevat oi‐
keinpäin.
ie vanha paristo paristojen kerä‐
yspisteeseen.
50
Page 51

no - Innhold
Sikkerhetsregler................................................................................................... 52
Oversikt og funksjon............................................................................................
53
Bruk av fjernkontrollen........................................................................................... 53
På-/avlogging av fjernkontrollen ........................................................................
Aktivering/deaktivering av tilleggsbelysningen ................................................
Aktivering/deaktivering av høydereguleringen ...............................................
Rengjøring og stell...............................................................................................
54
55
55
56
Rengjøring av fjernkontrollen ................................................................................. 56
Utskiftning av batteriet........................................................................................... 56
51
Page 52

no - Sikkerhetsregler
Les bruks- og monteringsanvisningen nøye før du begynner å bru‐
e ventilatoren. Den gir viktige råd om montering, sikkerhet, bruk
k
og vedlikehold. Du beskytter deg selv og unngår skader på venti‐
latoren. Miele kan ikke gjøres ansvarlig for skader som skyldes at
disse henvisningene ikke er fulgt.
Ta vare på bruks- og monteringsanvisningen og gi den videre til en
eventuell senere eier!
Denne f
fra Miele.
Barn må ikk
V
iktig for omgang med batteriet til fjernkontrollen:
– Ikke kortslutt batteriet, ikke lad det opp og ikke kast det inn i
flamme
– Kast det brukte batteriet på et offentlig innsamlingssystem. Ikke
kast det som husholdningsavfall.
jernkontrollen skal kun brukes sammen med en ventilator
e leke med fjernkontrollen.
r. Eksplosjonsfare!
52
Page 53

no - Oversikt og funksjon
Bruk av fjernkontrollen
Denne fjernkontrollen kan brukes sam‐
men med en Miele
merket med Miele@home-symbolet
på typeskiltet.
Hovedfunksjonene kan velges på venti‐
lat
oren og med fjernkontrollen. Ved valg
av en funksjon med fjernkontrollen, ly‐
ser kontrollampen en kort stund på
fjernkontrollen.
ventilator, som er
a
Kontrollampe
b
Tast for kokefeltbelysning
c
Tast for utkobling av viften og for å
et lavere effekttrinn.
velge
d
Tast for innkobling av viften og for å
et høyere effekttrinn.
velge
e
På/av-tast for tilleggsbelysning
(avhengig av ventilatorens utrust‐
ning)
f
Tast for etterløpfunksjon
g
Taster for høydejustering av damp‐
skjermen
(avhengig av ventilatorens utrust‐
ning)
Se ventilatorens bruksanvisning for be‐
skrivelse av funksjonene.
P
rogrammeringer, f.eks. av driftstime‐
telleren, er kun mulig på ventilatorens
betjeningsdel.
Maksimal rekkevidde for fjernkontrollen
er ca. 10 m. F
redusere rekkevidden (f.eks. inventar,
vegger).
Baksiden av fjernkontrollen er magnet‐
isk. Den kan dermed fest
metalliske steder.
orholdene i rommet kan
es på mange
53
Page 54

no - På-/avlogging av fjernkontrollen
For å kunne ta fjernkontrollen i bruk, må
den logges på.
P
å- og avloggingen må skje samtidig
på ventilatoren og på fjernkontrollen.
Velg først på-/avloggingsmodus på
ventilatoren og deretter på fjernkontrol‐
len.
Valg av på-/avloggingsmodus på
ventilat
Ho
T
– tasten "" (
– deretter tasten ""
– deretter tasten for belysningen .
V
Valg av på-/avloggingsmodus på
f
jernkontrollen
Ho
T
oren
ld tasten for etterløpfunksjonen
515 inne i ca. 10 sekunder, til indi‐
katoren 1 for viftetrinnene lyser.
rykk deretter følgende taster etter
hverandre:
sensortast 1)*,
(sensortast IS)*,
elg deretter omgående modusen på
fjernkontrollen.
ld de to piltastene inne samti‐
dig i ca. 5 sekunder, til LED-lampen
på fjernkontrollen blinker.
rykk tasten for belysningen .
Start av påloggingen
Når du befinner deg i på-/avloggings‐
modus, tr
ventilatoren (sensortast IS)* og deret‐
ter tasten "" på fjernkontrollen.
Søket etter radiosignalforbindelse star‐
er. LED-lampen på fjernkontrollen blin‐
t
ker jevnt.
Etter ca. 30 sekunder blinker LED-lam‐
pen på fjernkontrollen 4 ganger med ra‐
ske mellomrom. Radiosignalforbindel‐
sen er opprettet. Etter kort tid slokner
LED-lampen.
Bekr
med tasten for etterløpfunksjonen
515. Alle kontrollampene slokner.
Nå kan fjernkontrollen brukes.
Hvis du ikke bekrefter i løpet av 4 mi‐
nutt
er, skjer det ingen aktivering.
Avbryte påloggingen
Hvis
prosessen avbrytes ved å trykke tas‐
ten for etterløpfunksjonen 515 på
ventilatoren og på fjernkontrollen.
Der
må ventilatoren og fjernkontrollen
logges av først.
ykk først tasten "" på
eft påloggingen på ventilatoren
pålogging ikke er mulig, kan
etter må påloggingen gjentas. Da
54
Avlogging
Når du befinner deg i på-/avloggings‐
modus, tr
1)* på ventilatoren og deretter tasten
"" på fjernkontrollen.
LED-lampen på fjernkontrollen blinker
jevnt.
ykk tasten "" (sensortast
Page 55

no - På-/avlogging av fjernkontrollen
Etter ca. 10 sekunder blinker LED-lam‐
pen på f
lengre mellomrom. Fjernkontrollen er
logget av. Etter kort tid slokner LEDlampen.
Bekr
Vær oppmerksom på at en Con@ctivi‐
ty
atskillelse fra radiosignalforbindelsen,
og må aktiveres på nytt.
* for apparater med sensortaster
Aktivering/deaktivering av tilleggsbe‐
lysningen
Dersom ventilatoren har en ekstra be‐
lysni
f.eks. en glasskantbelysning, kan denne
også kobles inn og ut med fjernkontrol‐
len.
Denne funksjonen må aktiveres på
fjernkontrollen i tillegg.
jernkontrollen 2 ganger med
eft avloggingen på ventilatoren
med tasten for etterløpfunksjonen
515. Alle kontrollampene slokner.
2.0-funksjon også deaktiveres ved
ng i tillegg til kokefeltbelysningen,
Aktivering/deaktivering av høydere‐
guleringen
Dersom ventilatoren har en dampskjerm
med mo
denne også styres med fjernkontrollen.
Denne funksjonen må aktiveres på
fjernkontrollen i tillegg.
Hol
T
T
Programmeringen avsluttes automatisk.
torisert høyderegulering, kan
d de to piltastene inne samti‐
dig i ca. 5 sekunder, til LED-lampen
på fjernkontrollen blinker.
rykk tasten for etterløpfunksjonen
.
rykk tasten "" for å aktivere og
tasten "" for å deaktivere.
Ho
ld de to piltastene inne samti‐
dig i ca. 5 sekunder, til LED-lampen
på fjernkontrollen blinker.
T
rykk tasten for tilleggsbelysningen
.
T
rykk tasten "" for å aktivere og
tasten "" for å deaktivere.
Programmeringen avsluttes automatisk.
55
Page 56

no - Rengjøring og stell
Rengjøring av fjernkontrollen
Ren
gjør overflaten kun med en fuktig
klut. Ikke bruk for mye vann, det må
ikke komme fuktighet inn i kabinettet.
Utskiftning av batteriet
Bruk bare samme type batteri som
itt her.
ang
Ikke bruk oppladbare batterier.
Fjernkontrollen bruker et rundcellebat‐
t
eri 3 V, CR 2032.
Batteriet må skiftes, når ventilatorens
funksjoner ikke lenger kan velges med
fjernkontrollen. Ved trykking på en tast,
lyser ikke kontrollampen på fjernkon‐
trollen lenger eller den lyser kun svakt.
Ventilatorens funksjoner kan imidlertid
fortsatt velges på ventilatorens betjen‐
ingsdel.
L
øsne de to skruene på baksiden
med en skrutrekker og ta av dekselet.
T
a ut batteriet og legg inn et nytt.
Pass på riktig polaritet.
Lukk dekselet igjen.
Kast det b
lig innsamlingssystem.
rukte batteriet på et offent‐
56
Page 57

sv - Innehåll
Säkerhetsanvisningar och varningar ................................................................. 58
Översikt och funktion ..........................................................................................
59
Använda fjärrkontrollen.......................................................................................... 59
Logga in och ut fjärrkontrollen ...........................................................................
Aktivera eller avaktivera extrabelysningen ........................................................
Aktivera eller avaktivera motordrift av ångskärmen ........................................
Rengöring och skötsel.........................................................................................
60
61
61
62
Rengöra fjärrkontrollen........................................................................................... 62
Byta batteri............................................................................................................. 62
57
Page 58

sv - Säkerhetsanvisningar och varningar
Läs bruks- och monteringsanvisningen noga innan du börjar an‐
da fläkten. Det är viktigt att göra eftersom den innehåller infor‐
vän
mation om inbyggnad, säkerhet, användning och underhåll. I och
med det undviker du olyckor och skador på fläkten. Miele tar inget
ansvar för skador som orsakats av att säkerhetsanvisningarna och
varningarna inte har följts.
Spara bruks- och monteringsanvisningen och överlämna den vid
eve
ntuellt ägarbyte.
Fjärrk
Låt int
V
– Kortslut inte batteriet, ladda inte upp det och elda inte upp det.
– Lämna använda batterier i en batteriinsamling.
ontrollen ska bara användas med en fläkt från Miele.
e barn leka med fjärrkontrollen.
iktigt vid hantering av fjärrkontrollens batteri:
Explosionsrisk!
58
Page 59

a
Kontrollampa
b
Knapp för hällbelysning
c
Knapp för att koppla från fläkten och
för att välja ett lägr
d
Knapp för att koppla in fläkten och
för att välja ett hög
e
Knapp för Till/Från för extrabelys‐
ning.
(beroende på typ av utrustning på
fläkt
en)
f
Knapp för funktionen Fortsatt drift
g
Knappar för höjdjustering av ång‐
skärm
(beroende på typ av utrustning på
fläkt
en)
e effektläge.
re effektläge.
sv - Översikt och funktion
Använda fjärrkontrollen
Fjärrkontrollen kan användas med en
ån Miele som har symbolen
fläkt fr
Miele@home- på typskylten.
Du kan välja huvudfunktionerna på
fläkten och med hjälp av fjärrkontrollen.
När du väljer en funktion på fjärrkontrol‐
len så lyser kort kontrollampan på fjärr‐
kontrollen.
Beakta bruksanvisningen för att få reda
på hur funktion
Du kan bara göra programmeringar, till
exempel av drifttidsräknaren, på man‐
överpanelen till fläkten.
Fjärrkontrollens maximala räckvidd är
cirka 10
räckvidden (till exempel väggar).
Fjärrkontrollens baksida är magnetisk.
Du kan där
olika ytor av metall.
meter. Vissa saker kan minska
erna fungerar.
för sätta fast den på många
59
Page 60

sv - Logga in och ut fjärrkontrollen
För att kunna använda fjärrkontrollen
måst
e den vara inloggad.
Du måste logga in/ut samtidigt på fläkt‐
en och fjärrkontrollen. Välj först in/utloggningsläge på fläkten och sedan på
fjärrkontrollen.
Välj in/ut-loggningsläge på fläkten
T
ryck på knappen för Fortsatt drift 5
15 i ungefär 10 sekunder tills fläkt‐
effekt 1 lyser.
T
ryck sedan på:
– knappen - (t
– knappen + (t
– och till sist knappen för belysning .
Sedan välje
loggningsläge på fjärrkontrollen.
Välj in/ut-loggningsläge på fjärrkon‐
tr
ollen
T
ryck på båda pilknapparna
samtidigt i cirka 5 sekunder tills lam‐
pan på fjärrkontrollen blinkar.
T
ryck på lampknappen .
ouchknappen 1)*
ouchknappen IS)*
r du direkt efteråt in/ut-
Starta inloggning
När du är i in/ut-
cker du först på (touchknapp IS
på fläkten och sedan på knappen
på fjärrkontrollen.
Sökning efter en radioförbindelse star‐
. Lampan på fjärrkontrollen blinkar
tar
regelbundet.
Efter cirka 30 sekunder blinkar lampan
på fjärrkontrollen 4 gånger ganska
snabbt. Radioförbindelsen är upprättad.
Efter en liten stund slocknar lampan.
B
ekräfta inloggningen för fläkten med
knappen för fortsatt drift 515. Alla
kontrollampor slocknar.
Nu går det att använda fjärrkontrollen.
Om ingen bekräftelse görs inom fyra
er görs ingen aktivering.
minut
Avbryta inloggning
Om det
kan du avbryta processen på fläkten
och fjärrkontrollen genom att trycka
på knappen för eftergångstid 515.
Du måst
och för att kunna göra det måste du
först logga ut både fläkten och fjärr‐
kontrollen.
inte skulle gå att logga in så
e då upprepa inloggningen
loggningsläge try‐
60
Utloggning
T
ryck på in/ut-loggningsläget på fläk‐
ten (touchknapp 1* och sedan på
fjärrkontrollen på knappen .
Lampan på fjärrkontrollen blinkar regel‐
bundet.
Page 61

sv - Logga in och ut fjärrkontrollen
Efter cirka 10 sekunder blinkar lampan
på f
järrkontrollen två gånger. Fjärrkon‐
trollen är då utloggad och efter en liten
stund slocknar lampan.
Bekr
Aktivera eller avaktivera extrabelys‐
ningen
Om din fläkt förutom hällbelysningen
oc
pel belysning i glaskanten så kan också
den tändas och släckas med fjärrkon‐
trollen.
Du kan välja att aktivera den här funk‐
tionen på fjärrkontrollen.
äfta aktiveringen för fläkten med
knappen för fortsatt drift 515. Alla
kontrollampor slocknar.
Tänk på att när radioförbindelsen bryts
så avaktiver
funktionen och måste aktiveras på
nytt.
* på fläktar med touchknappar
kså har en extrabelysning, till exem‐
as också Con@ctivity 2.0-
Aktivera eller avaktivera motordrift
av ångskärmen
Om din fläkt har en motordriven höj‐
justerbar ångskärm så kan du styra
d
ångskärmen med fjärrkontrollen.
Du kan välja att aktivera den här funk‐
tionen på fjärrkontrollen.
T
ryck på båda pilknapparna
samtidigt i cirka 5 sekunder till lam‐
pan på fjärrkontrollen blinkar.
T
ryck på knappen på eftergångstid
.
F
ör att aktivera trycker du på knap‐
pen och för att avaktivera trycker
du på knappen .
Programmeringen avslutas automatiskt.
T
ryck på båda pilknapparna
samtidigt i cirka 5 sekunder till lam‐
pan på fjärrkontrollen blinkar.
T
ryck på knappen för extrabelsynin‐
gen .
F
ör att aktivera trycker du på knap‐
pen och för att avaktivera trycker
du på knappen .
Programmeringen avslutas automatiskt.
61
Page 62

sv - Rengöring och skötsel
Rengöra fjärrkontrollen
Ren
gör fjärrkontrollens yta endast
med en fuktig trasa. Använd inte för
mycket vatten för att undvika att det
kommer in vatten i den.
Byta batteri
Endast ett angivet knappbatteri får
användas.
Inga uppladdning
användas.
sbara batterier får
Fjärrkontrollen har ett batteri, ett knapp‐
eri 3 V, CR 2032.
batt
Batteriet måste bytas när det inte längre
går att välja
len. När du trycker på en knapp lyser
kontrollampan på fjärrkontrollen bara
svagt eller inte alls.
Även om fjärrkontrollen inte fungerar,
kan du välja funktionerna direkt på
fläktens manöverpanel.
funktioner med fjärrkontrol‐
F
ör att byta batteri i fjärrkontrollen
skruvar du ut de båda skruvarna på
baksidan och tar bort locket.
T
a ut det gamla batteriet och sätt i ett
nytt. Se till att polerna ligger rätt.
S
täng locket.
Lämn
a använda batterier i en batteri‐
insamling.
62
Page 63

Page 64

Germany:
Miele&Cie.KG
Carl-Miele-Straße29
33332Gütersloh
Tel.:0524189-0
Fax:0524189-2090
Internet:www.miele.de
E-Mail:info@miele.de
Änderungen vorbehalten/ M.-Nr. 09 882 110 / 00
 Loading...