


Operating and installation instructions
Ventilation System
DA 229-2
To prevent accidents and machine damage, read these instructions before installation or use.
V
M.-Nr. 05 603 730

Table of Contents
Warning and Safety instructions
Guide to the appliance
Functional description
Operation
Main power switch . . . . . . . . . . . . . . . . . . . . . . . . . . . . . . . . . . . . . . . . . . . . . . . . . . 9 Turning on the fan . . . . . . . . . . . . . . . . . . . . . . . . . . . . . . . . . . . . . . . . . . . . . . . . . . 9 Selecting the power level. . . . . . . . . . . . . . . . . . . . . . . . . . . . . . . . . . . . . . . . . . . . . 9 Delayed Shut Down . . . . . . . . . . . . . . . . . . . . . . . . . . . . . . . . . . . . . . . . . . . . . . . . . 9 Turning off the fan . . . . . . . . . . . . . . . . . . . . . . . . . . . . . . . . . . . . . . . . . . . . . . . . . 10 Turning the lighting on / off . . . . . . . . . . . . . . . . . . . . . . . . . . . . . . . . . . . . . . . . . . 10 Grease filter timer. . . . . . . . . . . . . . . . . . . . . . . . . . . . . . . . . . . . . . . . . . . . . . . . . . 11
Checking the grease filter timer . . . . . . . . . . . . . . . . . . . . . . . . . . . . . . . . . . . . 11 Reprogramming the grease filter timer . . . . . . . . . . . . . . . . . . . . . . . . . . . . . . 12
Cleaning and Care
Cleaning the casing. . . . . . . . . . . . . . . . . . . . . . . . . . . . . . . . . . . . . . . . . . . . . . . . 13 Grease filters . . . . . . . . . . . . . . . . . . . . . . . . . . . . . . . . . . . . . . . . . . . . . . . . . . . . . 14 Changing the light bulb . . . . . . . . . . . . . . . . . . . . . . . . . . . . . . . . . . . . . . . . . . . . . 16
After Sales Service
Installation instructions
2

Warning and Safety instructions
Read these Operating Instructions carefully before installing or using the Ventilation System.
This appliance is intended for residential use only. Use the appliance only for its intended purpose. The manufacturer cannot be held responsible for damages caused by improper use of the hood.
This appliance complies with current safety requirements. Improper use of the appliance can lead to personal injury and material damage.
Read all instructions before installing or using for the first time.
Keep these operating instructions in a safe place and pass them on to any future user.
SAVE THESE INSTRUCTIONS AND REVIEW THEM PERIODICALLY
CAUTION
For General Ventilating Use Only.
Do Not Use To Exhaust Hazardous
Or Explosive Materials And Vapors.
This appliance is designed to vent cooking smoke / odors only.
Be certain your appliance is properly installed and grounded by a
qualified technician.
To guarantee the electrical safety of this appliance, continuity must exist between the appliance and an effective grounding system. It is imperative that this basic safety requirement be met. If there is any doubt, have the electrical system of the house checked by a qualified electrician. The manufacturer cannot be held responsible for damages caused by the lack, or inadequacy of, an effective grounding system.
Before connecting the appliance to the power supply make sure that
the voltage and frequency listed on the data plate correspond with the household electrical supply. This data must correspond to prevent machine damage. Consult a qualified electrician if in doubt.
Installation work and repairs should only be performed by a qualified
technician in accordance with all applicable codes and standards. Repairs and other work by unqualified persons could be dangerous and the manufacturer will not be held responsible.
3

Warning and Safety instructions
This equipment is not designed for maritime use or for use in mobile
installations such as caravans or aircraft. However, under certain conditions it may be possible for an installation in these applications. Please contact the nearest Miele dealer or the Miele Technical Service Department with specific requirements.
Before servicing, disconnect the power supply by either removing the fuse, unplugging the unit or manu-
ally "tripping" the circuit breaker.
Before discarding an old appliance, unplug it from the power supply and remove the power cord and
any doors to prevent hazards.
Use
Do not allow children to play with or operate the appliance or its con-
trols. Supervise its use by the elderly or infirm.
Be careful when preparing a flambé beneath the hood.
Flames may be drawn up into the hood by the suction or grease filters may catch fire.
Never operate gas burners without pots.
Do not leave cooking surfaces unattended while in use. Overheated
food, oil and grease can catch fire.
Do not use the hood without the grease filters in place.
Clean the grease filters regularly. Dirty filters are a fire hazard.
Do not use a steam cleaner to clean the hood. Steam could pene-
trate electrical components and cause a short circuit.
In areas subject to infestation by cockroaches or other pest, keep
the appliance and its surroundings clean at all times. Any damage caused by cockroaches or other pest will not be covered under warranty.
Installation
When installing the hood, make sure that the following minimum
safety distances between Miele cooktops and the hood are maintained.
–22" (55 cm) above electric cooktops
–26" (65 cm) above gas cooktops
–26" (65 cm) above an open grill
For non-Miele cooking appliances maintain the safety distances recommended by the cooktop manufacturer in their installation and operating instructions.
If there is more than one appliance beneath the hood and they have different minimum safety distances always select the greater distance.
4

Warning and Safety instructions
Do not use an extension cord to connect the appliance to electricity.
Extension cords do not guarantee the required safety of the appliance, (e.g. danger of overheating).
Do not install this hood over cooktops burning solid fuel.
Any fittings, sealant, or materials used to install the ductwork must be made of approved non-flammable
materials.
Never connect an exhaust hood to an active chimney, dryer vent, vent flue, or room ventilating ductwork. Seek professional advice before connecting an exhaust hood vent to an existing, in-
active chimney or vent flue.
Make sure that the airflow in the room is sufficient for combustion
and exhausting of all non-electric heating appliances (water heaters, gas cooktops, gas ovens, etc.), otherwise backdrafts may occur. Follow the heating manufacturer’s guidelines and safety standards or those published by the National Fire Protection Association (NFPA), or the American Society for Heating, Refrigeration and Air Conditioning Engineers (ASHRAE). If in doubt, consult an experienced professional.
WARNING
TO REDUCE THE RISK OF INJURY TO PERSONS IN THE EVENT OF A RANGE TOP GREASE FIRE, OBSERVE THE FOLLOWING:
Smother flames with a close fitting lid, cookie sheet, or metal tray, then
turn off the burner.
Be careful to prevent burns.
If the flames do not go out immediately, evacuate and call the fire department.
Never pick up a flaming pan -
You may be burned.
Do not use water, including wet dishcloths or towels - a violent
steam explosion will result.
Use an extinguisher only if:
–You know you have a Class ABC extinguisher, and you already know how to operate it.
–The fire is small and contained in the area where it started.
–The fire department is being called.
–You can fight the fire with your back to an exit.
The manufacturer cannot be held liable for damage caused by non-com- pliance with these Warning and Safety instructions.
5

Guide to the appliance
6
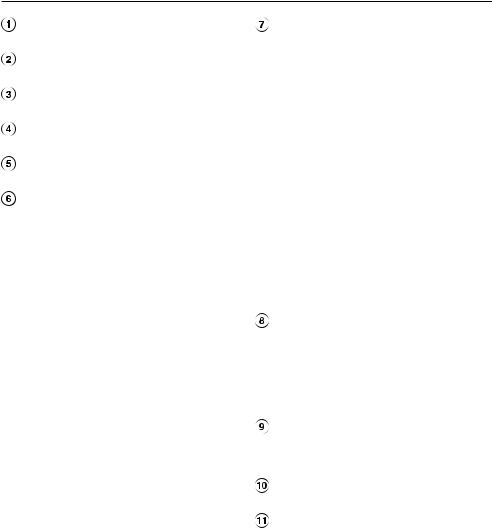
Guide to the appliance
Chimney extension
Chimney
Canopy
Overhead lighting
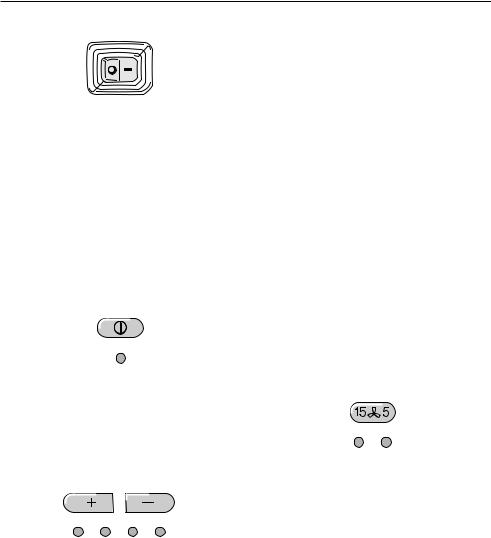
Main power switch
Grease filter
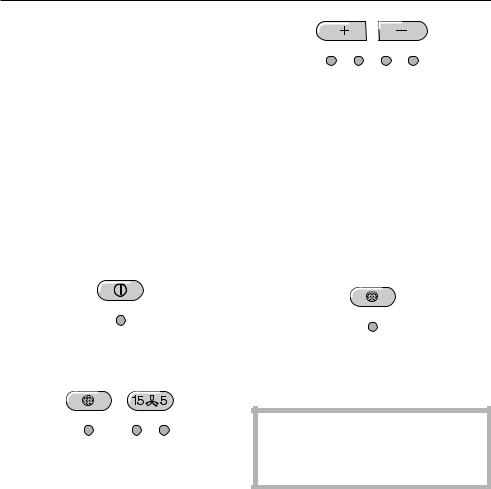
Grease filter button
The indicator below the grease filter button lights when the grease filters need to be cleaned.
This button is also used:
–to reset the grease filter timer after cleaning the grease filters (see "Cleaning and Care").
–to show how long the grease filter has been in use (see "Operation / Grease filter timer").
–to change the number of hours counted by the grease filter timer (see "Operation / Reprogramming the grease filter timer").
Delayed Shut Down
This button activates the Delayed Shut Down feature. The fan can be set to turn off automatically after either 5 or 15 minutes.
Fan power level buttons
Four fan speed selection.
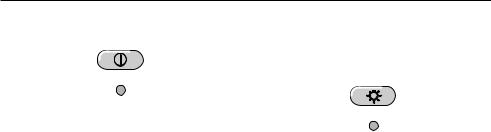
On/Off button
Light button
7

Functional description
The ventilation hood works by air extraction. The air is drawn in and cleaned by the grease filters and directed outside.
The hood comes equipped with a non-return flap. This flap automatically closes when the hood is turned off so that no exchange of outside air and room air can occur. When the hood is turned on, the air pressure of the exhaust fan automatically opens the flap blowing the inside air and cooking odors outside.
8
Operation
Main power switch |
Intensive setting |
|
Level "4" (yellow indicator) should be |
|
used for a short period when frying or |
|
cooking food with a strong aroma. |
Press the main power switch to "I". The fan and the lighting can now be operated.
If the appliance is not going to be used for a long period of time (e.g. while vacationing) turn the appliance off by pressing the main power switch to "0".
The next time it is turned on, the hood will operate at the level previously used.
Fan performance
The maximum air flow capacity is 625 cfm. Factors such as narrow duct diameter and bends will affect this value.
Level 1 operates at 40% capacity Level 2 operates at 60% capacity Level 3 operates at 80% capacity Level 4 operates at 100% capacity
Turning on the fan
^ Press the On/Off button.
The fan runs at power level "2". The On/Off indicator lights.
Selecting the power level
^Use the pmcontrols to select the desired power level.
p= increases the fan speed m= decreases the fan speed
Level "1" to "3" (green indicators) are usually sufficient for normal cooking.
Delayed Shut Down
If odors or smoke remain in the kitchen after cooking has been completed, the Delayed Shut Down feature can be selected to allow the hood to continue running for either 5 or 15 minutes.
^Press the Delayed Shut Down button while the fan is still running.
Press once = |
5 minute delay |
|
(left indicator lights) |
Press twice = |
15 minute delay |
|
(right indicator lights) |
To cancel the Delayed Shut Down feature press the button again.
9
Operation
Turning off the fan |
Turning the lighting on / off |
^Press the On/Off button to turn the fan off.
The indicator goes out.
Automatic Safety Shut Off
The fan will be turned off automatically 10 hours after the last button was activated. The lighting however, will remain on.
^Press the On/Off button to turn the fan back on.
The overhead lighting can be turned on and off independently of the fan.
^Press the light button to turn on the lighting.
The light button indicator illuminates.
^Press the light button again to turn off the lighting.
10
Operation
Grease filter timer
A timer monitors the hours of fan operation. The indicator for the grease filter will light after 30 hours of operation. The grease filters must then be cleaned.
After the grease filters have been cleaned and put in place, the grease filter timer must be reset.
^To do this, press the grease filter button for about 3 seconds.
The indicator will go out.
Checking the grease filter timer
To check the percentage of time already used:
^Press the On/Off button to turn the fan on.
^Press the grease filter button.
The number of flashing pmindicators show the percentage of programmed hours that have been used.
1 indicator = less than |
25 % |
2 indicators = less than |
50 % |
3 indicators = less than |
75 % |
4 indicators = less than 100 %
This information will remain stored in memory in the event of a power failure.
11
Operation
Reprogramming the grease filter timer
The grease filter timer is preset to 30 hours. This time can be lengthened or shortened to 20, 30, 40 or 50 hours.
–A time of 20 hours should be programmed in kitchens with frequent pan or deep frying.
–A time of 20 hours should also be programmed if the kitchen is only used occasionally. Otherwise grease which has accumulated over a long period of time will harden on the filters making cleaning more difficult.
^Press the On/Off button to turn off the fan.
^Press the Delayed Shut Down and grease filter buttons at the same time.
The indicator for the grease filter and one of the pmindicators will flash.
The lit pmindicator shows the programmed time:
1st indicator from the left |
= 20 hours |
|
2nd indicator from the left |
= 30 hours |
|
3rd indicator from the left |
= |
40 hours |
4th indicator from the left |
= |
50 hours. |
^Use the por mbutton to select the desired time.
^Store the selection by pressing the grease filter button.
If the procedure is not stored within 4 minutes of programming, the hood will automatically default to the "old" data.
12
 Loading...