

Page 1
Midmark Electric Column
Surgery Table Manual
V-Top & Flat-Top Surgery Tables
Table of Contents
Unpacking.......................... 2
Specifications ....................... 2
Installation ......................... 2
Flat-Top Parts Identification ............ 3
V-Top Parts Identification . . . . . . . . . . . . . . 4
Features/Operation................... 4
Troubleshooting ..................... 6
Care & Cleaning..................... 6
Accessories ........................ 7
Product Warranty .................... 8
User’s Guide
TP202 20-42-FO-00014 Rev A1 C2169
Rev. AA2 (1/22/19)
Page 2
Unpacking
Note
Save all packaging until certain you are satisfied with the product.
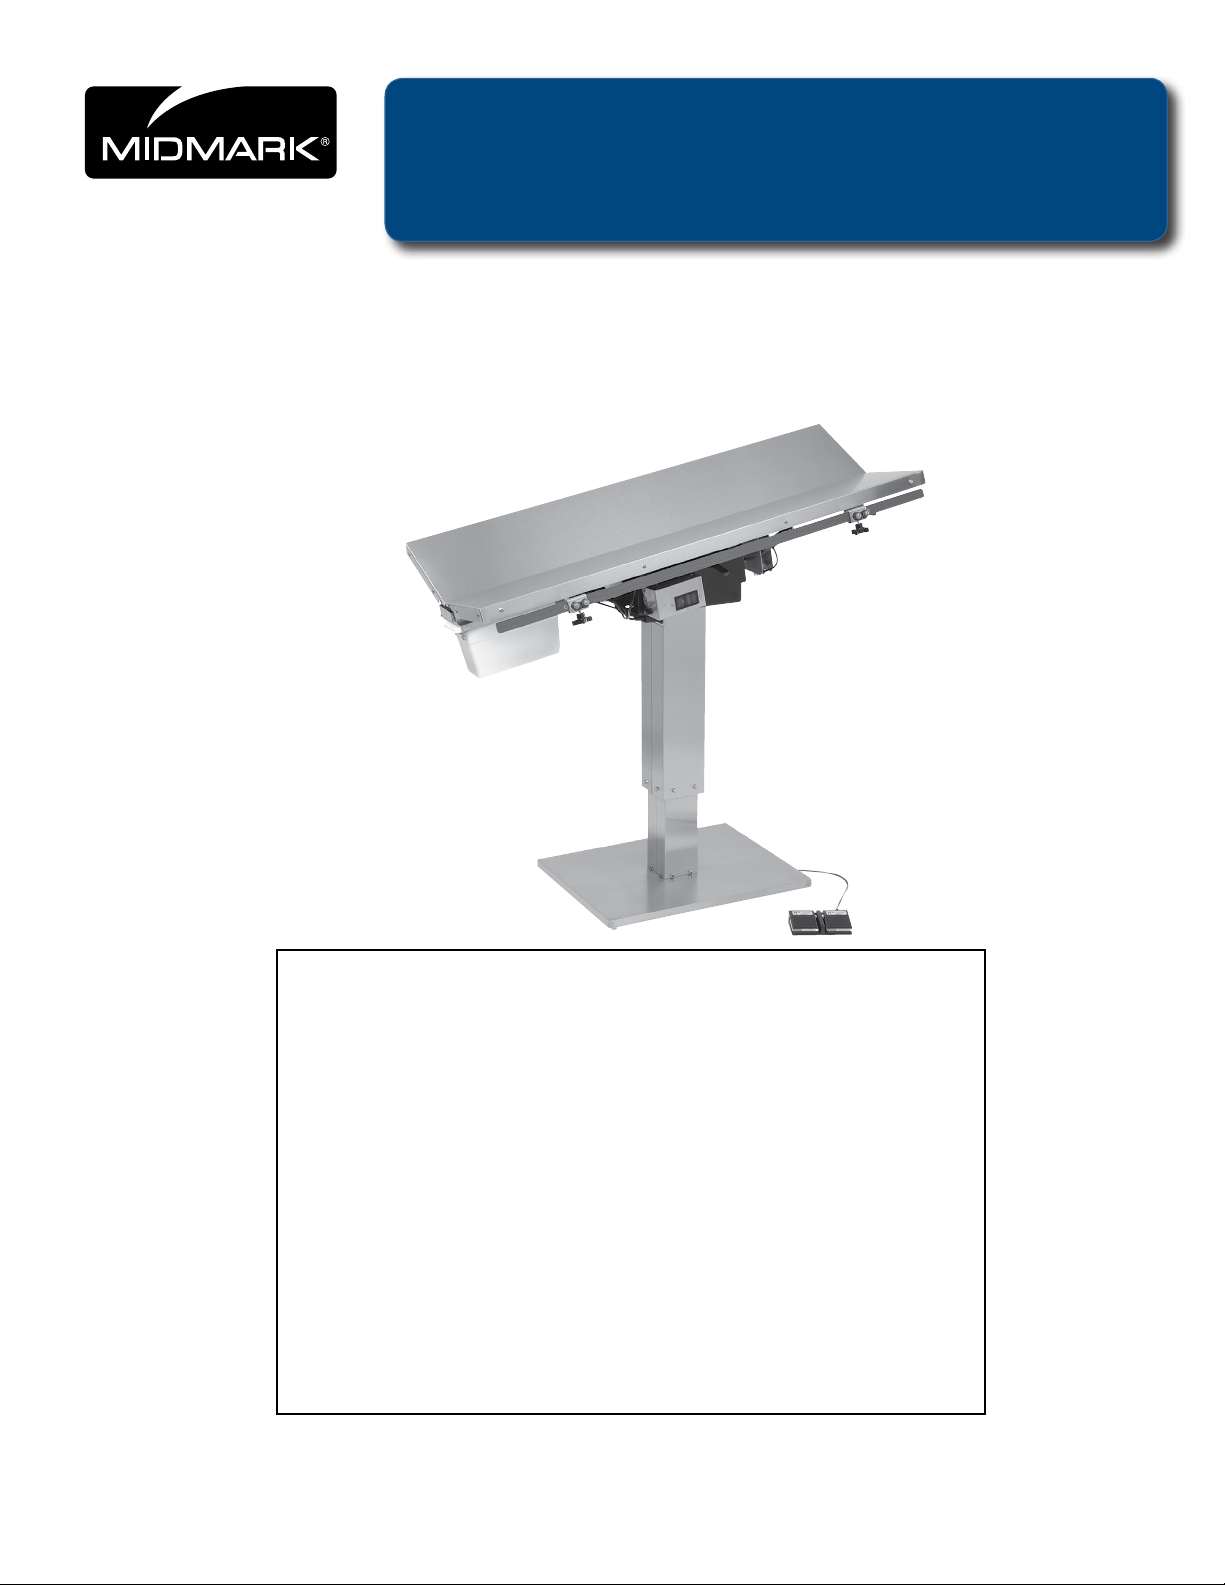
Thank you for purchasing The Midmark Electric Column Surgery Table!
Open packages carefully. Inspect the shipping carton and contents for any visible damage. This is important
in the event that any breakage has occurred during transit.
Specifications
V-Top Table with Electric Lift Column:
Height: Adjustable from 29 1/2" to 41 1/2"
Width: 20 1/4"
Length: 50" or 60"
Flat-Top Table with Electric Lift Column:
Height: Adjustable from 28 1/2" to 40 1/2"
Width: 22 1/8"
Length: 50" or 60"
Electrical: Operates on standard 110 VAC if ordered with either electric lift column or optional heated top.
Electric lift column will lift up to 300 lbs.
V-Top with Pedestal Base:
Height: 36"
Width: 20 1/4"
Length: 50" or 60"
Flat-Top with Pedestal Base:
Height: 36"
Width: 22 1/8"
Length: 50" or 60"
Installation
The Midmark Electric Column Surgery
sembled. Remove table from packaging and place in
position. Use a four-wheeled furniture cart to move table.
If a cart is not available, use care when lifting and carrying table.
V-Top Surgery Table:
1. When moving V-top surgery table, NEVER lift table
by V-panels! If table is equipped with the adjustable
column, lower table top to lowest position. The table
arrives in the lowest position. Refer to “Features/
Operation”, for adjusting instructions.
2. Remove drainage reservoir and drain trough from
table. Lift table by grasping polished stainless steel
support frame. Do NOT use the tie-down adjusting
rails as handles!
Table arrives pre-as-
Flat-Top Surgery Table:
1. If table is equipped with the electric lift column,
lower table top to lowest position. The table
arrives in the lowest position. Refer to
Operation” for adjusting instructions.
Lift table by picking up the table top. Do NOT use
the tie-down adjusting rails as handles!
2. Position table to allow plenty of space on all
sides. 50" V-top surgery tables should be placed
at least 50" from the wall nearest the uphill end,
and 60" V-top tables at least 60" away, to allow
easy drain trough removal for cleaning. Surgery
tables equipped with the electric lift column or
heated top option need to be within reach of a
standard power outlet.
3. After table is in position, snap non-skid rubber
pads over metal adjusting feet.
“Features/
The Midmark Electric Column Surgery
Table
4. Peel off the white plastic film covering the stain
less steel before using table. Refer to “Care and
Cleaning” for cleaning instructions.
5.
Please read all use and care instructions
using
2
The Midmark Electric Column Surgery
© Midmark Corporation 2017 TP202 20-42-FO-00014 Rev A1 C2169
before
Table.
Page 3
Cylinder Mounting Bracket
614-0030-00
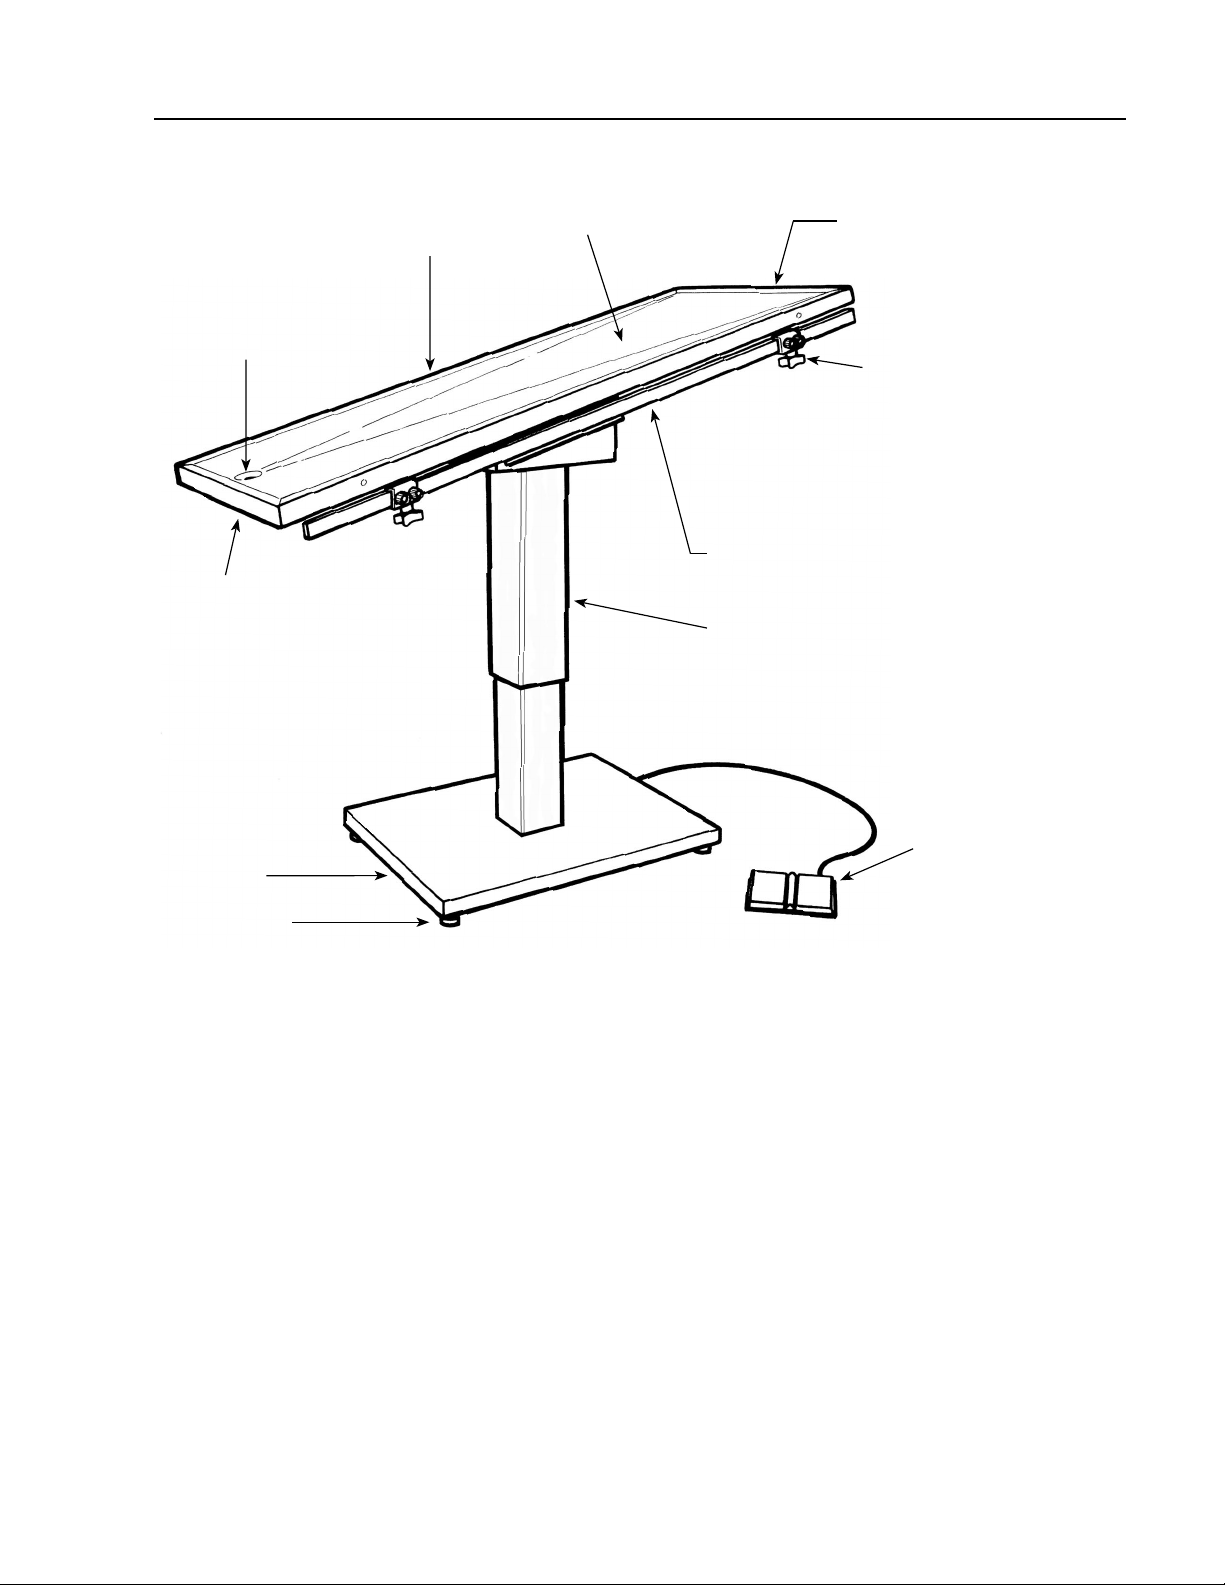
Flat-Top Parts Identification
Drain Hole
Drain Bucket Hook
(Under drain hole)
600-0013-00
Raised Anti-Drip Edges
Flat-Top Panel
Top Tilt Adjustment
Control Lever (Under edge)
50" To p 200-3041-30
60" To p 200-3071-30
Quick Release Tie-Down Cleats (4)
200-3041-06
Cam Cleat
827-0000-00
Tie-Down Rails (2)
629-0000-01
Rail Repair Kit
200-3041-08
Electric Lift Column
(Optional)
400-3041-20
Low Profile Base
with Stainless
Steel Cover
614-0197-01
Adjustable Feet
Cap/Pad 810-0000-00
Step-On Foot Control
(Only with electric lift
column)
400-3041-00
The Midmark Electric Column Surgery
Table
3
© Midmark Corporation 2017 TP202 20-42-FO-00014 Rev A1 C2169
Page 4

V-Top Parts Identification
Cylinder Mounting Bracket
614-0030-00
Drain Trough
50" Top 607-0395-00
60" Top 607-0395-01
Drainage Reservoir
805-0000-00
RH Support
619-0013-00
LH Support
619-0013-00
Reservoir Kit
200-3041-07
Quick Release Tie-Down Cleats (4)
200-3041-06
Cam Cleat
827-0000-00
Adjustable Feet
Cap/Pad 810-0000-00
Tie-Down Rails (2)
629-0000-01
Rail Repair Kit
200-3041-08
V-Top Panels
Top Tilt Adjustment
Control Lever (Under edge)
50" To p 200-3041-30
60" To p 200-3071-30
V-Panel Adjustment Control Lever
(One each side)
200-3041-31
On/Off Switch with
Adjustment Control Knob
for optional heated top
499-004-00
Electric Lift Column
(Optional)
400-3041-20
Step-On Foot Control
(Only with electric lift column)
400-3041-00
Low Profile Base with Stainless
Steel Cover
614-0197-01
Features/Operation
Tilt & V-top Angle Adjustment:
The Midmark Electric Column Surgery
designed for easy one-handed adjustment of table tilt
and V-top panel angles. Simply depress the desired
touch control lever while simultaneously adjusting the top
angle. Release the lever and the panel is locked solidly
in place.
Refer to the drawing on right for control lever locations.
Tables are
V-Panel Adjust Control Lever
Tilt Control Lever
(This Lever is located
in the same position
on Flat Top tables)
Step-On Foot Control
The Midmark Electric Column Surgery
Table
Electric Lift Column Adjustment:
Tables equipped with the electric lift column allow you to
adjust the height of the table top. Step on the foot control
to raise or lower table.
4
© Midmark Corporation 2017 TP202 20-42-FO-00014 Rev A1 C2169
Page 5

Features/Operation continued
Rails & Cleats:
Tie-down rails are mounted to the table edges for
easy access. Quick-release restraint cleats should
be at the same height as patient’s body. Cleats
may be moved to any position along the length of
the table by loosening the knob that clamps the
cleat to the rail.
Heated Top Option:
The optional heated top provides thermal support to
help prevent hypothermia during surgery. The heated
top should be between 10° and 15° above ambient room
temperature; however, all patients should be monitored
continuously to prevent any possible over-heating.
Heat
Adjustment
Slider
Quick-release restraint cleats allow one hand
operation. Tie-down straps slip easily into the
cleats to hold the patient securely in place. To
release, simply pull the tie-down strap in a downward, outward motion.
Rail
Cleat
Insert tie-down strap
between cleats
Knob
Rail Extensions:
All tables may be ordered with an optional
14" long rail extensions to accommodate larger animals. Each pair of extensions includes two quick-release restraint cleats.
pair of
ON/OFF
Push-Button
Heat control operating instructions:
1. Activate heat control by pushing the button to turn
green light off.
2. Adjust table top heat to desired temperature by
moving switch slider right to increase and left to
decrease. Allow 15 minutes for uniform table
top temperature.
3. Deactivate heat by pushing the button to turn
green light on.
4. The green light is a visual indication that heat is
OFF.
The Midmark Electric Column Surgery
Green
LED Light
Table
Restraint
Rail
Extensions
V-Top Drain Trough:
V-top surgery tables feature a removable drain
trough for easy cleaning. To remove the drain
trough, first lower the V-panels to the flat position.
The drain trough will slide out of the “uphill” end of
the table.
5
© Midmark Corporation 2017 TP202 20-42-FO-00014 Rev A1 C2169
Cleats
Page 6

Features/Operation continued
Flat-Top Drainage:
The flat-top surgery table drains into a stainless
steel bucket (not included). Refer to “Accessories”
for ordering information.
V-Top Drainage Reservoir:
V-top surgery tables feature a slide-out drainage
reservoir that catches waste fluids as they drain
from the drain trough. To remove the drainage
reservoir for cleaning, unhook the metal retainer
hook and slide the reservoir out.
Unhook drainage
reservoir retainer
The drain reservoir will
now slide out of the table
Troubleshooting
In the event that a problem occurs, a Midmark technician is ready to assist you. Call Midmark for assistance before attempting any repairs.
Care & Cleaning
The Midmark Electric Column Surgery
cleaned with any commercially available product recommended for use on stainless steel. Frequent
cleaning will prolong life and help maintain the natural luster of the stainless steel.
To prevent scratching, use a soft cloth to clean top. If
scrubbing is necessary, use a nylon or plastic type
scrubber. When cleaning, always rub in the direction
of the “grain” of the metal.
To remove minor scratches, we recommend using a
3M ScotchBrite® scouring pad rubbed lightly in the
direction of the “grain” of the metal.
Never use steel wool or steel brushes when clean-
ing your surgery table. Steel particles may become
embedded into the stainless steel and cause rust.
Table may be
Midmark Technical Support:
1-800-643-6275
Avoid use of chlorine bleach for cleaning
Chlorides, bromides, iodides and thiocyanates will
cause pitting, corrosion and discoloration of any
stainless steel. If using bleach, clean thoroughly with
water to completely remove bleach residue.
Avoid excessive moisture.
The Midmark Electric Column Surgery
electronic components that may be damaged by
excessive exposure to moisture. When cleaning or
mopping the floor, do not leave the table in standing
water. For thorough cleaning, remove the drainage
trough and reservoir and wash separately. Refer to
“Features/Operation” for removal instructions.
Table contains
The Midmark Electric Column Surgery
Table
6
© Midmark Corporation 2017 TP202 20-42-FO-00014 Rev A1 C2169
Page 7

Accessories
All tables may be ordered with an optional pair of 14"
long rail extensions to accommodate larger animals.
Each pair of extensions includes two quick-release tiedown cleats.
No. 200-3041-01 Rail Extension Set with Cleats
Casters may be ordered with any surgery table to provide easy mobility. Each set includes four locking casters. Locking casters lock and unlock easily with step-on
control. Casters will raise the height of the table 4".
No. 200-3041-05 Caster Set for Surgery Tables
For flat-top surgery tables, the 13 quart drip bucket easily handles large volumes of fluids. Stainless steel construction is extremely durable and easy to clean.
No. 200-3041-02 Large Drip Bucket, 13 qt.
For flat-top surgery tables, the 2 quart drip bucket is
available for smaller volumes of fluids. Durable stainless
steel construction is easy to clean.
No. 200-3041-03 Small Drip Bucket, 2 qt.
10" stainless steel table top extensions for V- top surgery
tables are available. Extensions may be added to each
end. Two extensions provide 20" of additional work surface length. For 50" table only.
No. 200-3041-10 V-Top Extension
10" stainless steel table top extensions for flat-top surgery tables are available. Extensions may be added to
each end. Two extensions provide 20" of additional work
surface length. For 50" table only.
The Midmark Electric Column Surgery
No. 200-3251-10 Flat-Top Extension
Table
7
© Midmark Corporation 2017 TP202 20-42-FO-00014 Rev A1 C2169
Page 8

Product Warranty
www.midmark.com
This product is warranted for 1 year from the date of delivery to the original purchaser only. If equipped with an electric column, the column is warranted for 2
years. Warranty is only applicable if customer complies with all instructions and
specifications furnished by Midmark relating to installation, care, and application.
Customer agrees that they will not modify, misapply, or misuse product in any
manner which deviates from the Midmark instructions. Any repairs, alterations, or
servicesprovidedbypartiesotherthanMidmarkoritsauthorizedrepresentatives
may void warranty. The buyer is responsible for all freight charges on returned
items.
Product Satisfaction Policy
In the event that the customer is not fully satisfied with the products purchased,
Midmark may, at its own discretion, arrange for the customer’s account to be credited
(excluding shipping charges) or replace the product. The customer must notify Midmark
of any claim of nonconformity or defect in writing within 30 days from the date of
receipt. The product must be returned to Midmark in its original packaging, undamaged
and showing no unusual wear within 20 days of the customer’s written notice.
To return an item, follow these simple instructions:
•CallMidmarkforcompleteinstructions(800-643-6275)
•AsalesrepresentativewillgiveyouaReturnAuthorizationNumber
•IfaRestockingFeeapplies,youwillbeinformedatthistime
•LabeltheboxeswiththisReturnAuthorizationNumber
(AllitemsmusthaveaReturnAuthorizationNumber)
•Returntheitems,postage/freightprepaid
If necessary, the Midmark sales representative will assist you with freight arrangements.
Note: Custom orders and/or custom colors may not be returned.
Midmark Corporation - Carthage Facilities
1000 Civil War Road
Area 5
Carthage, MO 64836
1-800-643-6275
 Loading...