

Page 1
VA113301
Quick Reference Guide
Matrx VMS®,, VMS® Plus,
and VMC™ Anesthesia Machines
Model Number:
Serial Number:
Dealer Information:
Purchase Date:
10578000 Rev DA1 3/20/18
This guide outlines basic operation and
maintenance of the Anesthesia Machine.
Additional information is available on
www.Midmark.com. If service is
required, contact your authorized Midmark
dealer.
Maintenance Kits
Calling for Service
If service is required, contact your Midmark dealer.
To contact Midmark directly:
8:00am until 5:00 PM Monday through Friday (EST)
Customer Service
1-800-Midmark (1-800-643-6275), Fax 1-877-725-6495
Technical Service
1-888-279-1260, Fax 1-716-662-8440
Registration
To register your product warranty, go to www.midmark.com
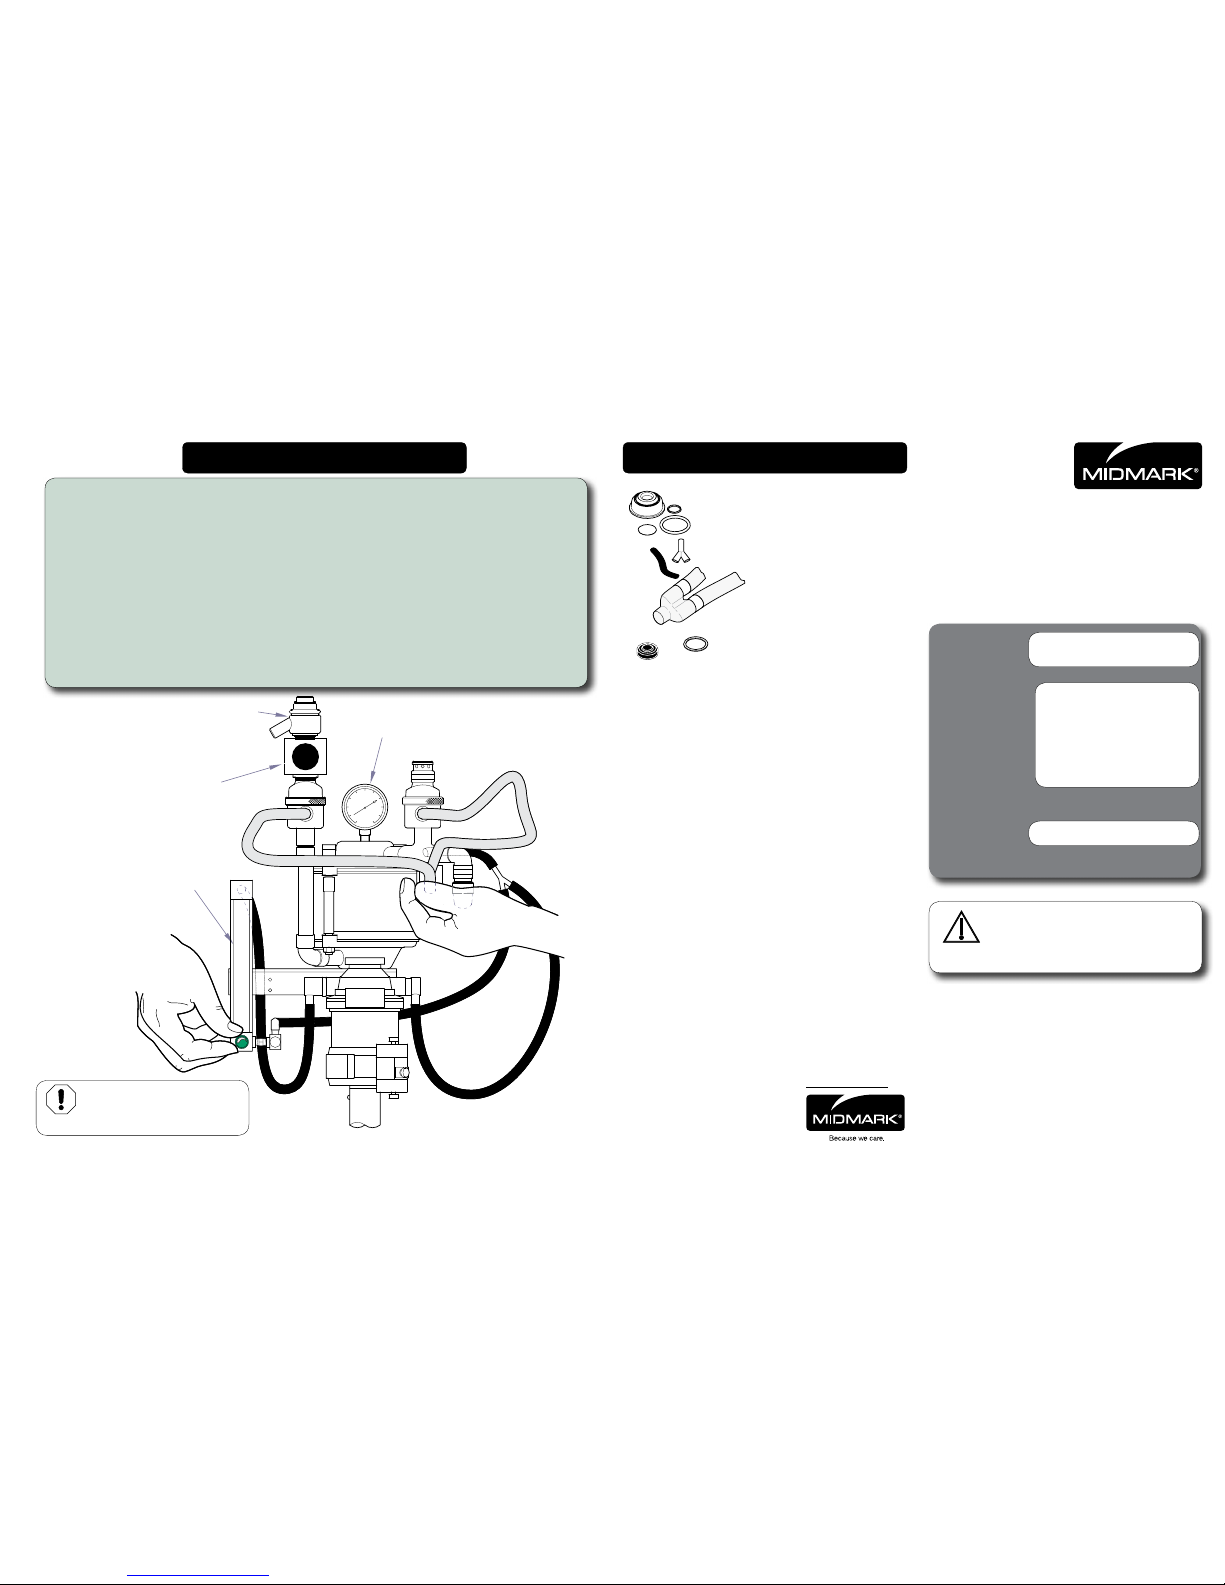
Leak Test Procedure
To perform leak test...
A) Close APL (Scavenging /Adjustable Pressure Limiting) valve by turning knob clockwise.
B) Place thumb over patient connection of breathing circuit Y.
C) Remove breathing bag and cover bag port opening. (Use palm of hand that is covering Y.)
D) With oxygen (50-55 PSI [3.4-3.8 Bar]) supplied to anesthesia machine, slowly open
flowmeter to register 30cm H20 on anesthesia machine pressure gauge.
E) Turn off flowmeter when pressure reaches 30cm H2O. (If pressure holds steady the system
is leak free but if pressure drops, proceed to step (F).)
F) Slowly open flowmeter until pressure stabilizes at 30cm. H2O setting. (This determines the
magnitude of the leak. If leak rate is greater than 300ml/min; proceed to step (G).)
G) Refer to page 2, “What if machine leaks?
H) Replace reservoir bag. Repeat step (B) and steps (D) through (F). This will determine the
integrity of breathing bag.
Flowmeter
APL Valve
(Scavenging /Adjustable
Pressure Limiting)
Pressure Gauge
VA113401
VMS® , VMS® Plus
and VMC™
Order #: 91303015
Includes:
•Disc(2)
•LargeO-ring(2)
•SmallO-ring(3)
•Dome(2)
•Tubing
•BreathingCircuit(1)
•UpperandLowerGaskets
•Diaphragm(VMS® only)
• Back Up Ring (VMS® only)
Equipment Alert
Do not activate the oxygen ush
during any part of this leak test.
1
Occlusion Valve
(VMS
®
only)
Sodasorb
®
Order #: 002-1761-00
Sodasorb® LF, Canister Pak, Case
Order #: 002-1762-00
Sodasorb® Standard, Canister Pak, Case
Order #: 002-1763-00
Sodasorb® LF, Pre-pak, Case
Order #: 002-1764-00
Sodasorb® Standard, Pre-pak, Case
Order #: 002-1765-00
Sodasorb® Standard, Bucket
© 2008 Midmark Corp. | 60 Vista Drive Versailles, OH 45380 USA | 1-800-643-6275 | 1-937-526-3662 |
Caution
Federal law restricts this device to sale
by or on the order of a licensed
veterinarian.
Page 2
VA113501
Equipment Alert
Never invert or tilt the vaporizer when
it contains anesthetic liquid. Never overtighten the
flowmeter needle valves, damage to the needle and
seat will eventually result.
CAUTION
Insure gas supplies are adequate and turned on. Verify vaporizer is filled to eliminate the possibility of anesthetic depletion during surgery.
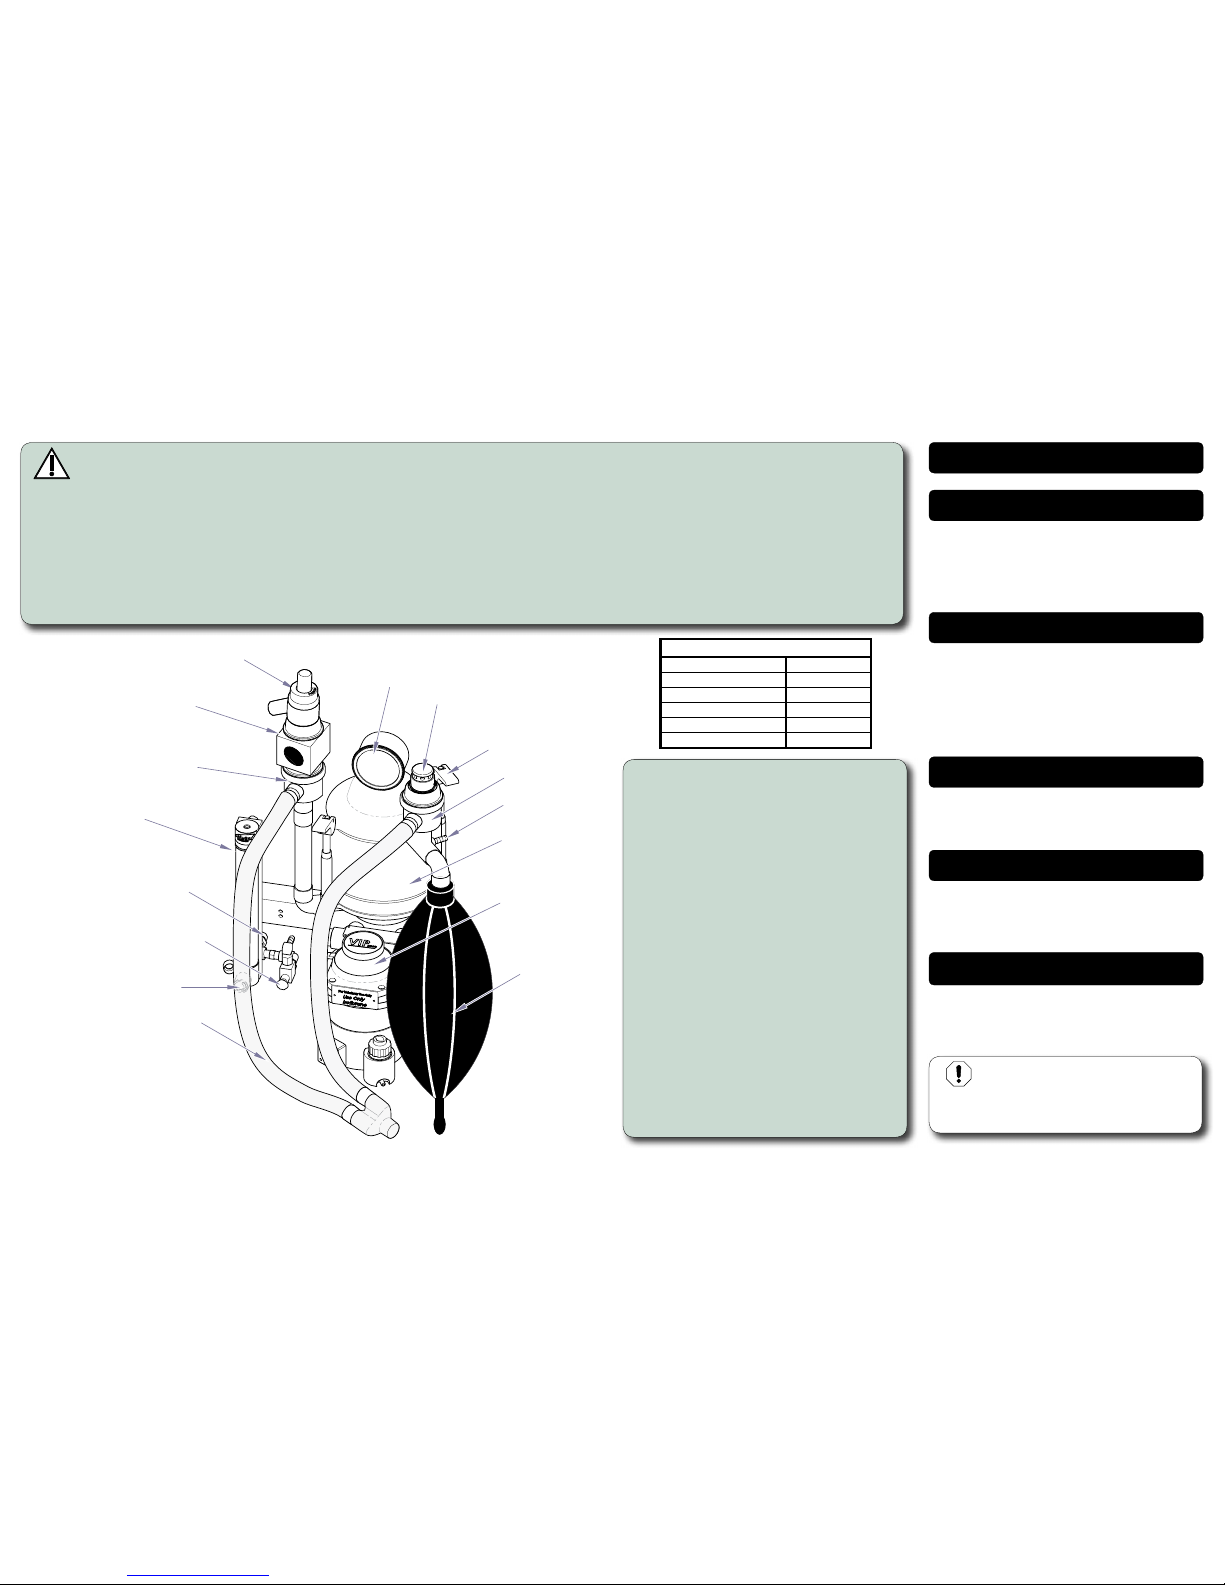
To Operate Anesthesia Machine...
A) Lift CO2 absorber canister lock levers. Slide clear canister free of absorber assembly. Fill canister with absorbent material, following directions on canister
label. Be sure canister and gasket mating surfaces are completely free of absorbent. Replace canister in absorber assembly. Simultaneously, close both
lock levers to secure canister.
B) Connect breathing bag and breathing circuit.
C) Connect a 50-55 PSI (3.4-3.8 Bar) oxygen supply line to the oxygen supply fitting on the back of the flowmeter.
D) Adjust flowmeter and vaporizer settings to meet physiologic needs of the patient.
E) During anesthesia, monitor the pressure gauge, inhalation and exhalation valves, and the breathing bag. Make necessary corrections in flow rate,
vaporizer setting, and Scavenging/Adjustable Pressure Limiting (APL) valve, to insure adequate depth of anesthesia and adequate ventilation of the patient.
Note: For guidelines on induction and anesthesia techniques, or particular species physiologic requirements, etc., please refer to a veterinary anesthesia textbook.
Maintenance Schedule
Flowmeter
Breathing Circuit
Flowmeter Adjustment Knob
Oxygen Supply Fitting
Inhalation Valve
Pressure Gauge
(Manometer)
Breathing Bag
Safety Valve
(Negative Pressure Relief)
Oxygen Flush
Fresh Gas
Connection
Absorber
Canister
Vaporizer
(Not Included)
Before Every Surgery
A. Inspect.
Check machine connections and rubber parts for
looseness, damage or wear. Replace as necessary.
B. Perform leak test.
What if Machine Leaks?
1) Breathing Bag - If leak occurs, replace.
2) Breathing Circuit - Install new breathing
circuit or obstruct inhalation / exhalation
openings to determine if leak originates from
breathing circuit.
3) Vaporizer Fittings - Verifyfittingsandtubing
are securely attached.
4) Canister Gaskets - Check for loose
absorbent grains between canister housing
gaskets.
5) Verify Canister is seated properly.
6) Safety Valves - Remove valve and obstruct
opening to determine if leak originates from
negative pressure relief valve. Check the o-ring
under valve for damage.
7) APL Valve - Remove valve and obstruct
opening to determine if leak originates from APL
valve. Check the o-ring under valve for damage.
8) Occlusion Valve - Remove valve and
obstruct opening to determine if leak originates
from the occlusion valve. Check the o-ring, diaphragm & back-up ring on valve for damage.
9) O-Rings under chrome retaining rings. Check
the o-rings for damage.
Daily
Weekly
Annually
A. Clean.
Remove breathing bag and breathing circuit. Wash
with warm water and mild soap, rinse well. Hang to
dry. Remove white disks from inhalation and
exhalation valves. Wipe with soft cloth, wipe out
valves and reassemble. Remove absorber canister,
wipe off gaskets, canister and absorber housings.
A. Service Vaporizer.
Service and calibrate vaporizer. Contact Dealer for
details.
A. Change Absorbent Material.
Follow manufacturer’s recommendations for proper
use of CO2 absorbents.
Every Two (2) Years
A. Replace Maintenance Components.
Replace components found in maintenance kit
91303015.
Patient Weight Bag Size
15 lbs or less (7kg) 500 ml
15-30 lbs (7-14 kg) 1 liter
30-60 lbs (14-27 kg) 2 liter
60-100 lbs (27-45 kg) 3 liter
100 + lbs (45 + kg) 5 liter
BREATHING BAG
Lock Levers (Typical)
APL Valve
(Scavenging /Adjustable
Pressure Limiting)
2
Exhalation Valve
Occlusion Valve
(VMS
TM
only)
© 2008 Midmark Corp. | 60 Vista Drive Versailles, OH 45380 USA | 1-800-643-6275 | 1-937-526-3662 |
 Loading...