

Page 1
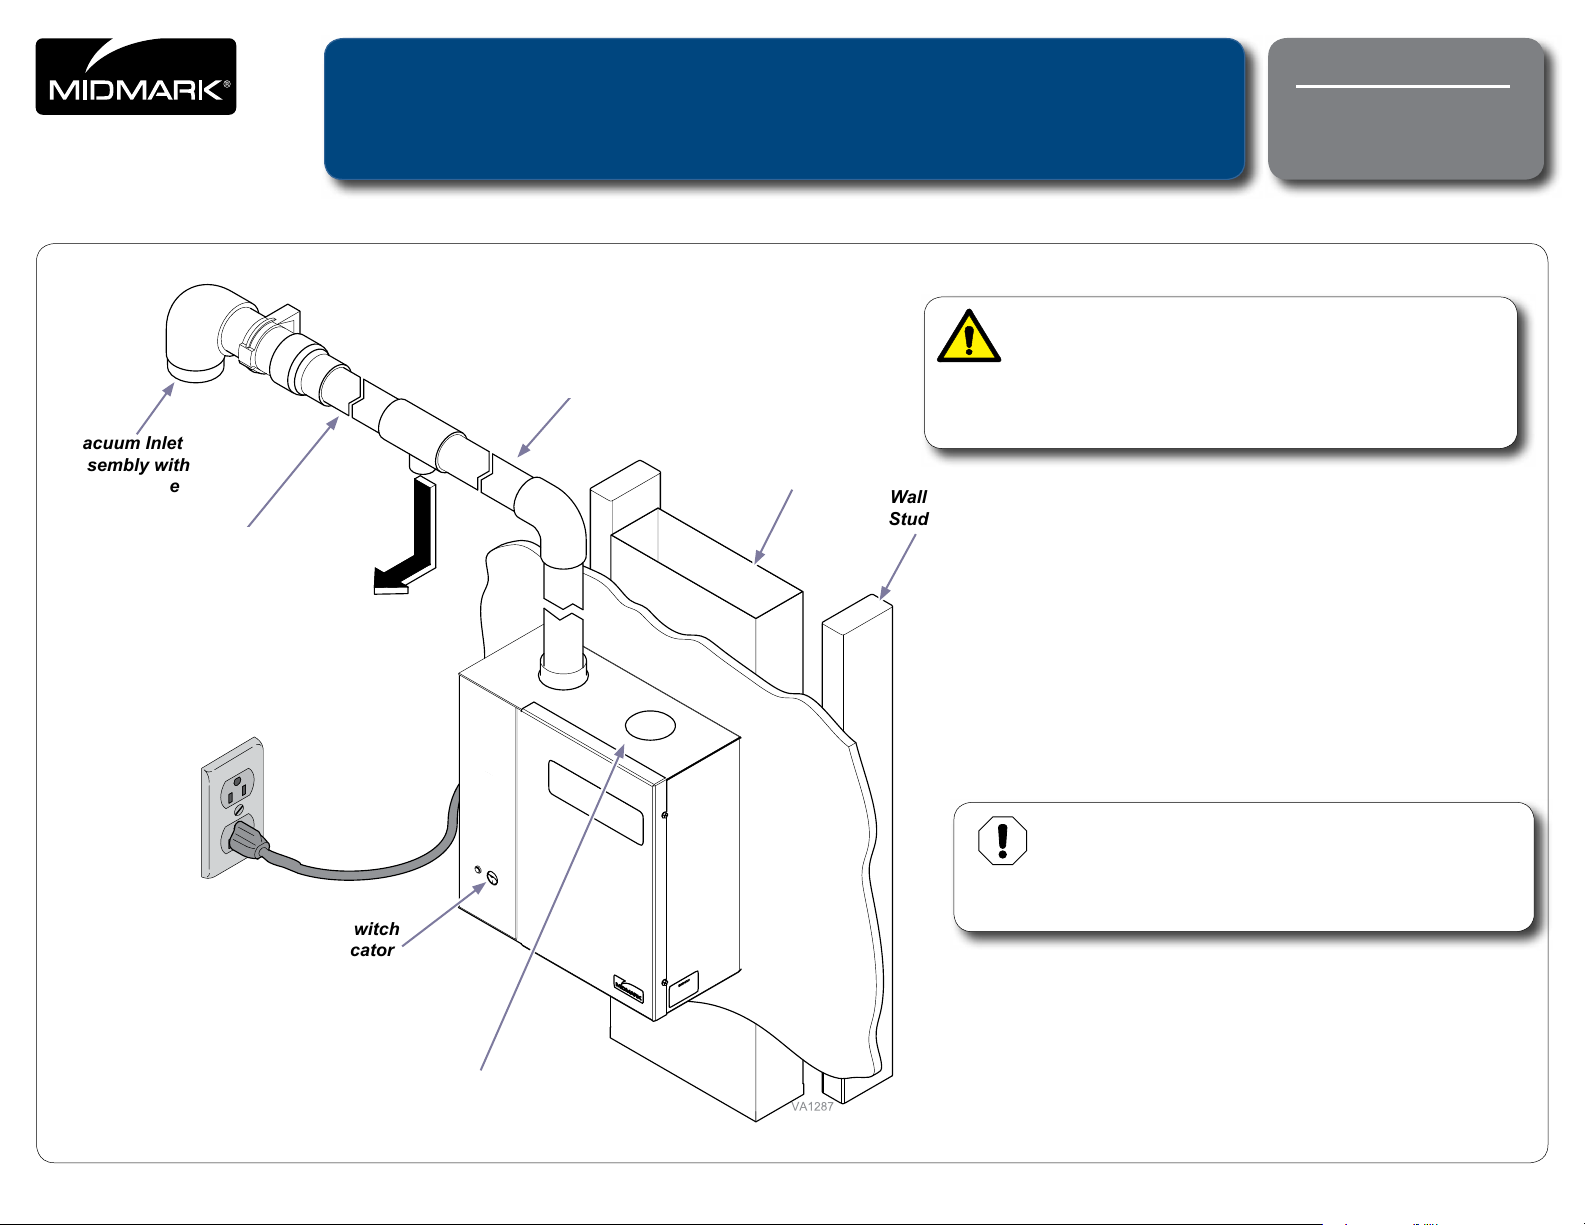
Vacuum Inlet
midmark.com
Assembly with
Safety Valve
Trunk Line
1-1/2” PVC
Matrx™ Central Scavenger
Waste Anesthetic Gas Disposal System Installation
To 19mm
Scavenging
Hose
Single Scavenger Hose
Connection Shown
Ducted Vent
Ducted Vent
Inside Wall Shown
Inside Wall
Applies to Models:
40162800
WARNING
Equipment is not suitable for use in the presence of a
flammable anesthetic mixture. Make certain that the
installation does not interfere with wiring, gas or water pipes
inside the walls when mounting the scavenger unit. A qualified
contractor may be required to perform these procedures.
Wall
Stud
115 VAC
Outlet
On/O Switch
and Indicator
Total of Five Inlet Holes
© 2011 Midmark Corp. | 60 Vista Drive Versailles, OH 45380 USA | 1-800-643-6275 | 1-937-526-3662 |
Equipment Alert
Trunk line Inlet holes are shown with plastic caps.
There are two more on back and one on bottom.
All unused trunk line Inlet holes must be capped. Vacuum Inlet
Assembly with Safety Valve must be installed facing downward.
1
Style G
10593000 Rev. FA2 (1/10/19)
Page 2
Important Information
Intended Use
Operation of all Midmark Waste Anesthetic Gas Disposal equipment is restricted to use in veterinary
procedures.
Safety Symbols
Disposal of Equipment
At the end of product life, the unit(s), accessories, and other consumable goods may become
contaminated from normal use. Consult local codes and ordinances for proper disposal of
equipment, and other consumable goods.
Transportation / Storage Conditions
Ambient Temperature Range: ................................................................. 32°F to 104°F (0°C to 40°C)
Relative Humidity....................................................................................10% to 90% (non condensing)
Atmospheric Pressure .............................................................500hPa to 1060hPa (0.49atm to 1.05atm)
Symbols
These symbols may appear on your equipment and/or in the manuals.
Proper Shipping Orientation
Maximum stacking height
(Do not stack)
Fragile
Consult User Guide
Do Not Tumble
WARNING
Indicates a potentially hazardous situation which
could result in serious injury if not avoided.
Caution
Indicates a potentially hazardous situation which may
result in minor or moderate injury if not avoided. It may
also be used to alert against unsafe practices
Equipment Alert
Indicates a potentially hazardous situation which could
result in equipment damage if not avoided.
Note
Ampliesaprocedure,practice,orcondition.
Keep Dry
Handle With Care
2
10593000
Page 3
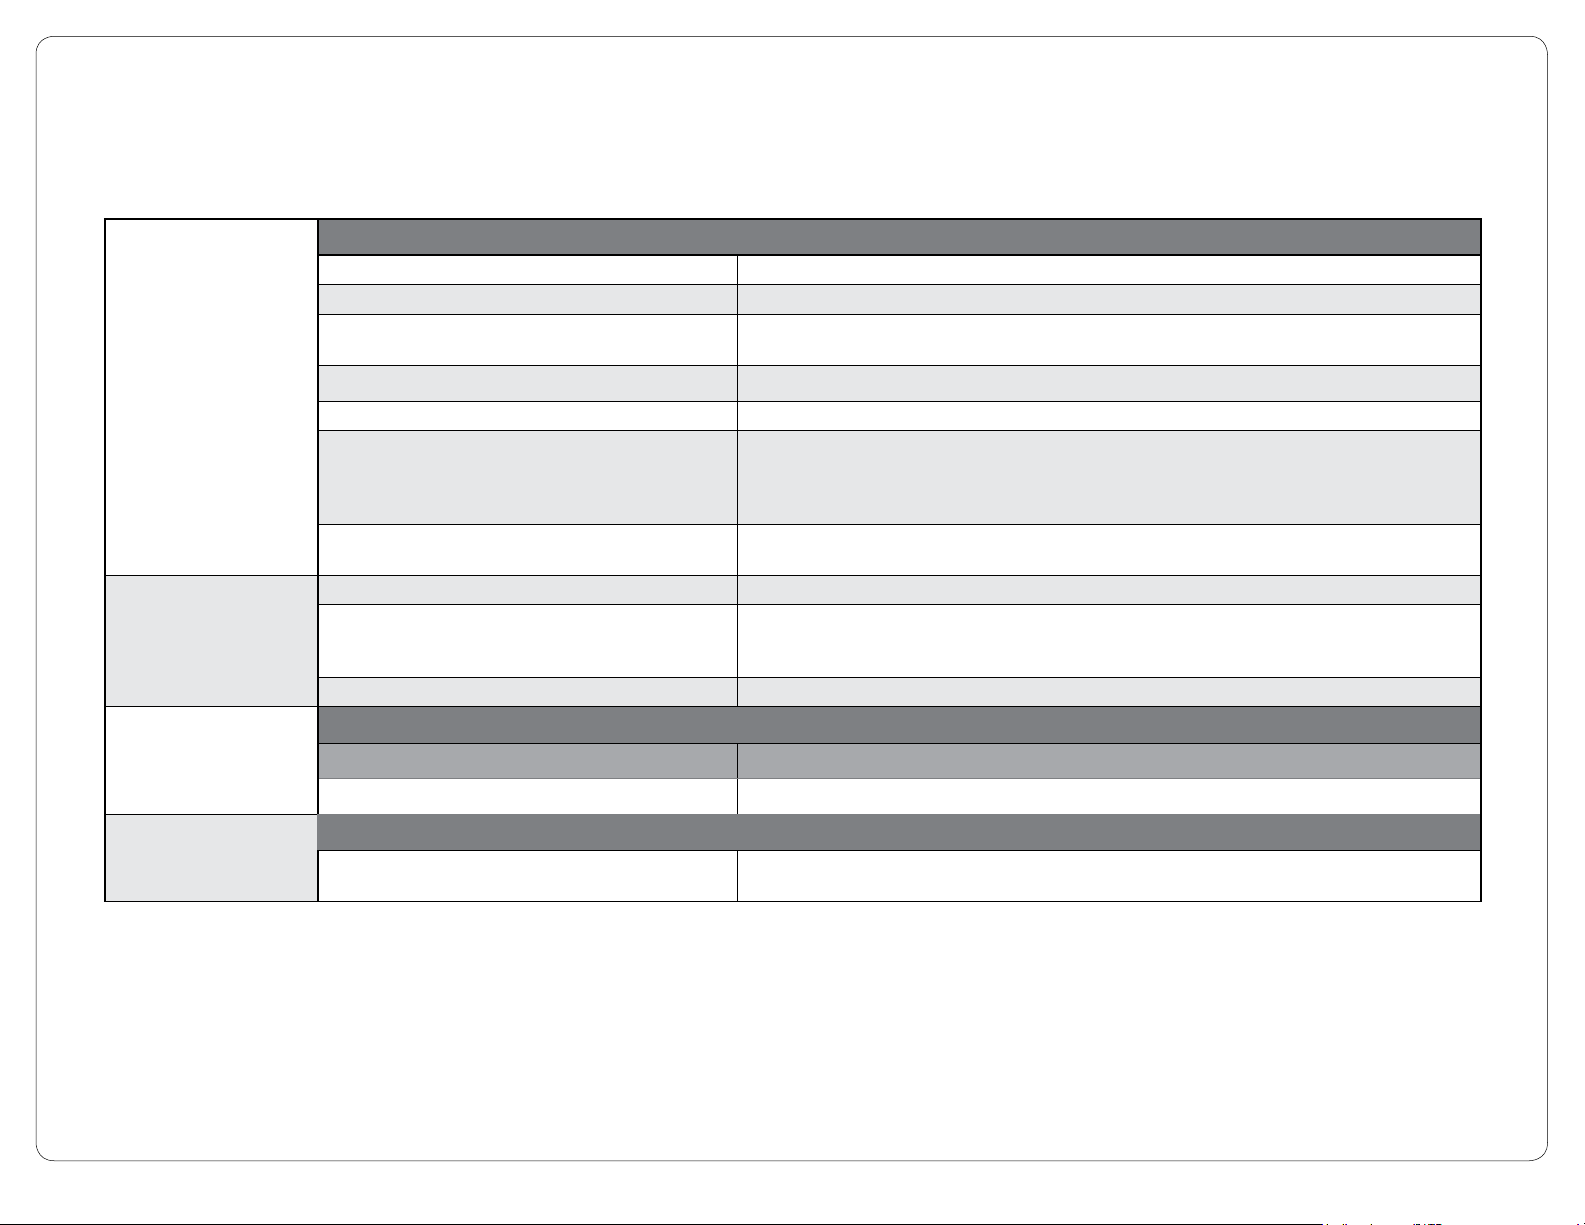
Central Scavenger Site Requirements
Trunk Line
Termination Vacuum Inlet Assembly with Room
Scavenger Connection
Plumbing
Maximum Length 100’ Pipe, 8 Elbows
Max Trunk Lines 3 Trunk Lines for Each Central Scavenger Unit
Mounting Options PVC can be mounted to Wall or Ceiling
Vent
Template Paper Template Provided
Type PVC Sch 40 Pipe
Size 1-1/2” (Installer Supplied)
Air Safety Valve Facing Downwards (included)
Secure PVC Pipe to Inlet Hole with O-ring and Lock Nut (included)
with up to 4 Scavenging Hose Connections
(Note: Only 3 Scavenging Hose Connections in Canada)
(40’ Scavenging Hose included)
(can be concealed inside wall or above ceiling)
Type Direct or Ducted
Size Maximum length for 3-1/4 x 10in. ducting is 40 feet with no more than one 90° bend.
Maximum length for 5 in. diameter round ducting is 30 feet with no more than one 90°
bend.
Electrical
Environmental
Boxes
Temperature
Equipment Room Ambient Temperature 32° to 104° F
Supply 115 VAC Outlet
Power Cord Length 6’
0° to 40° C
3
10593000
Page 4

Installation Kit Components
Installation Preparation...
Choose a location to install the Scavenger Unit within 6 feet of a 115 VAC outlet.
Note: Use the Cutout Template provided in the Installation Kit to mark the appropriate cutouts for the
required installation configuration (Direct Wall or Ducted Vent) and optional rear Trunk Inlet Line holes.
Cutout Template (1)
1-1/2” x 1 1/2” x 3/4” NPT
RDC Tee (4)
Auto-close
19 mm
Hose Fitting (4)
19 mm Male
Fitting x 3/4” NPT
for RDC Tees (4)
40 Ft. of
19mm Magenta
Scavenging
Hose
Male Adapter
1-1/2 in. PVC (1)
O-Ring (1)
Manometer with
Tubing and 1/4”
Adapter (1)
Lock Nut
Conduit
1-1/2 in. (1)
Flanged Lock
Nut (2)
19mm Adapter (4)
Vacuum Inlet
Assembly (1)
6 Foot Electrical
Power Cord (1)
Street Elbow
PVC 1-1/2 in. (4)
Includes Room Air
Safety Valve
Outside Vent
with screen (1)
19mm Female Fitting x 3/4” NPT (4)
4
10593000
Page 5

Central Scavenger Unit
Central Scavenger
Enclosure
Cover
Loosen
Screws
Round Gasket
Plastic caps on ve
Trunk Line Inlet holes
Fan
Remove Cover...
A) Loosen hex head screws on the side of the enclosure.
B) Pull right side of cover out from the screws via the slotted holes.
C) Pull the loose side of the cover free of the enclosure by pulling it
from under the fixed left panel.
Vacuum Level Sliding
Cover Adjustment
On/O Switch
VA1566
On LED Indicator (green)
5
10593000
Page 6

Vent Installation
Install direct wall or ducted vent.
Note: Use the paper template provided to properly locate the anchor and vent
holes on the wall surface before drilling and mounting the unit to the wall.
Direct Wall Vent Installation
Mount the scavenger unit to the wall.
Anchors
(installer supplied)
Scavenger Unit
Holes
Outside Vent
11 1/2"
Ducted Vent Installation
Use 3-1/4 x 10 in. rectangular duct installed thru an interior wall to
vent scavenger unit to the roof or an outside wall.
A) Secure scavenger unit to wall anchors.
B) Press scavenger unit thru wall and into duct.
C) Use four #8 screws and flat washers to draw together.
Note: Round, 5 in. diameter ducting could also be used to vent the scavenging unit thru the wall.
WARNING
Do not attach to HVAC ducting.
Anchors
(installer supplied)
Scavenger Unit
Holes Thru Wall
and Ducting for
Anchors
Wall Stud
Wall
Wall
#8 Screws & Washers
(installer supplied)
Wall Stud
Mount the vent to an outside wall and weatherproof as
necessary.
Trim vent duct length to keep vent flush with outside wall.
Vent aligns with
#8 Screws & Washers
(installer supplied)
Round
Gasket
hole in center of
Duct, centered
between studs
Cap unused
end of Duct
Mount the vent to an outside wall and weatherproof as necessary.
Trim vent duct length to keep vent flush with an outside wall.
Use a vent designed for roof applications if the vent terminates on a roof.
6
10593000
Page 7

Install trunk line in ceiling or wall (wall shown on next page).
Trunk Line In Room (Ceiling Drop Shown)
Clamp
(installer supplied)
Install Vacuum Inlet
Assembly with Room Air
Safety Valve Facing Down
1-1/2 in. PVC Pipe
Ceiling Plate
(installer supplied)
Trunk Line
19mm
Scavenging
Hose
Trunk Line
Inlet Holes
O-Ring
Lock Nut
19mm
Adapter
Auto Close
Fitting
19mm
Hose
Note
Example shows equipment room and one operatory set-up.
Scavenger is shipped with components for four scavenging hose
connections.
7
10593000
Page 8

Trunk Line In Walls (Wall Port Shown)
3/4” PVC Drop
Clamp
(installer supplied)
Wall Plate
(installer supplied)
Trunk Line
1 1/2” PVC Pipe
(installer supplied)
Trunk Line
Inlet hole
Use 1-1/2 in. Street
Elbow connection
to Trunk Line
Install Vacuum Inlet
Assembly with Room Air
Safety Valve Facing Down
Lock
Nut
O-Ring
19mm Female
Fitting x 3/4”
NPT
Auto Close
Fitting
19mm
Adapter
19mm
Scavenging
Hose
Elbow 3/4”
PVC x 3/4”
NPT
8
Note
Example shows equipment room and one operatory set-up.
Scavenger is shipped with components for four scavenging hose
connections.
10593000
Page 9

Testing the Vacuum Level
The maximum allowable negative pressure in the central scavenger system, immediately downstream of the
gas collecting assembly during normal administration of anesthesia, shall be tested at an excess gas flow rate
of zero and shall be 50 Pa (0.5 cm-H2O) or less.
Follow the instructions printed on the front of the manometer to test the vacuum level at every scavenging hose
throughout the entire central scavenger system. Repeat test with all scavenging hose connections open.
19mm Scavenging Hose
Use 1/4 in. Tubing with
Adapter to Connect
Manometer to 19mm
Scavenger Hose
9
Auto Close Fitting
19 mm Adapter
10593000
 Loading...