

Page 1

Fixed Mount VHF Marine Radio
Fixed Mount VHF Marine Radio
with DSC
with DSC
Owner’s Manual
Owner’s Manual
wwwwwwwwwwww....mmmmiiiiddddllllaaaannnnddddrrrraaaaddddiiiioooo....ccccoooomm
mm
Page 2

Model RG1 Owner’s Manual
Page 2 www.midlandradio.com
Table of Contents
Table of Contents
Welcome to the World of Midland Electronics
Major REGATTA 1 Features
FCC Licensing Information
- Station License
- International Station License
- Radio Call Sign
- Canadian Ship Station License
Warnings
Included with your REGATTA 1
Controls and Indicators
-Front Panel
-Back Panel
-LCD Indicators
Installation
Operation
Distress
Digital Selective Calling
GPS Input Connection Specification
USA Channel and Function Chart
International Channel and Function Chart
Canada Channel and Function Chart
Technical Specifications
Trouble Shooting
Care and Maintenance
Limited Warranty
Service and Technical Support
Other Midland Products
2
3
3
4
4
4
4
4
5
6
7
7
8
8
9-10
11-13
14
15
16
17
18
19
20
21
22
23
24
25
Page 3

Model RG1 Owner’s Manual
Page 3 www.midlandradio.com
Welcome to the World of Midland Electronics
Welcome to the World of Midland Electronics
Congratulations on your purchase of the Midland REGATTA 1 VHF Marine Radio. This
fixed mount radio gives you 2- way vessel to vessel and vessel to shore communication- for both safety and navigational purposes. With the REGATTA 1, you can call for
help, get information from other boaters and talk to lock or bridge tenders. In addition, in the USA you can access the NOAA weather broadcast with the 10 weather
channels and be alerted to severe weather emergencies with the weather alert feature. The REGATTA 1 is a quality piece of electronic equipment, skillfully constructed
with the finest components. This radio is designed for reliable and trouble-free performance for years to come. Enjoy!
Major REGATTA 1 Features:
Major REGATTA 1 Features:
• Submersible- meets JIS7 specifications
• All Marine Channels-US, International and Canada
• 10 NOAA Weather Channels
• NOAA Weather Alert
• DSC Digital Selective Calling – for security on the water and the ability to make
quick calls automatically.
• Channel Scan
• HI/LO Power Settings
• Last Channel Memory
• Tri-Watch
• Large, High Visibility Display
• PA Function
• Distress Button
• Instant Emergency Channel 16/9-for instant access to channel 16 (the universal
marine channel for emergency contact).
• Front Firing Speaker
• NMEA connection – use the interface cable supplied for easy connection from
transceiver to optional GPS system. Once connected, the display will show the
automatically updated coordinates (latitude and longitude) and time data.
• Connection to an external speaker (optional) – for listening to communications
further away from the transceiver.
In an effort to constantly improve product
quality, product characteristics are subject
to change without notice.
Page 4

Model RG1 Owner’s Manual
Page 4 www.midlandradio.com
Registration of your Marine
Transceiver
For using GMDSS and DSC functions, the operator
must have a GMDSS radio operator's certificate (SRC
or LRC) and apply for a ships MMSI number at the
local radio authority. Without MMSI number the
radio can only be used as conventional VHF marine
radio without DSC. Your distributor may program
your radio according to your needs.
FCC Licensing Information
FCC Licensing Information
The REGATTA 1 radio complies with the FCC (Federal Communication
Commission) requirements that regulate the Maritime Radio Service. This radio incorporates a VHF FM transceiver designed for use in the frequency range of 156.025 to
163.275 MHz. It requires 13.8 volts DC and has a switchable RF output power of one
(1) or 25 watts. The transceiver is capable of DSC (Digital Selective Calling) operation.
The radio operates on all currently allocated marine channels and is switchable for useaccording to U.S.A., International, or Canadian regulations.
Station License
An FCC ship station license is no longer required for any vessel traveling in U.S.A.
waters which uses a VHF marine radio, RADAR, or EPIRB (Emergency Position Indicating
Radio Beacon), and which is not required to carry radio equipment.
However, any vessel required to carry a marine radio on an international voyage, carrying a HF single side band radiotelephone, or carrying a marine satellite terminal must
obtain a station license. FCC license forms and applications for ship and land stations
can be downloaded through the Internet at www.fcc.gov/forms. Forms can also be
obtained by calling the FCC at 888-225-5322.
International Station License
If your vessel will be entering the sovereign waters of a country other than the
U.S.A. or Canada, you should contact that country’s communications regulatory authority for licensing information.
Radio Call Sign
Currently, the FCC does not require recreational boaters to have a license. The
United States Coast Guard recommends that the boat’s registration number and state of
registry (e.g., Illinois 1234 AB) be used as a call sign and be clearly visible on the vessel.
Canadian Ship Station License
You need a Radio Operator’s Certificate if your vessel is operated in Canadian
waters. Radio Operator training and certification is available from the Canadian Power
Squadron. Visit their website (http://www.cps-ecp.ca/english/newradiocard.html),
contact the nearest field office or write: Industry of Canada, Radio Regulatory
Branch, Attn: DOSP, 300 Slater Street, Ottawa, Ontario, Canada K1A 0C8.
Page 5

Model RG1 Owner’s Manual
Page 5 www.midlandradio.com
Warnings
Warnings
General
This device has been tested for compliance with Class D digital marine device
limits. These limits were created to allow for reasonable protection against damaging
interference. This device is to be used solely as an aid to navigation. Its settings may
be influenced by diverse factors, such as defects or malfunction of the device, environmental conditions or improper use. It is the user's responsibility to observe reasonable
prudence and judgement in navigation, and as such this device should not be considered a substitute for this reasonable prudence and judgement. Do not open the radio
for any reason! REGATTA 1's precision mechanics and electronics require expertise and
specialized equipment; for the same reason, the radio should under no circumstances
be realigned as it has already been calibrated for maximum performance. Unauthorized
opening of the transceiver will nullify the warranty.
Radio Frequency / Installation
Midland recommends following the requirements for prevention of radio frequency exposure. Unauthorized changes or modifications to this device may invalidate conformity to the FCC Regulations. All changes or modifications must be approved in writing by MIDLAND RADIO CORPORATION.
This VHF DSC transceiver generates and irradiates electromagnetic energy (EME) at
radio frequency (RF), and as such must be installed and placed in operating conditions
that are in conformity with the instructions contained in this manual and with current
regulations. Not following these instructions can cause personal injury and/or malfunction of the device.
•Do not use REGATTA 1 before connecting a suitable antenna that is in perfect
working condition - although REGATTA 1 is protected, this may seriously damage
the stages of transmission power.
•Do not use transmit before ensuring proper connection of the antenna. During
transmission, remain at a minimum distance of 3 feet from the antenna.
Environmental
•Pay attention to ambient conditions - although REGATTA 1 is designed to operate under the most severe conditions, it is important to avoid exposure to environments that are excessively humid or dusty, or to temperatures outside the
+5°F to +55°F range. Also avoid exposure to direct sunlight.
•Avoid jarring and excessive vibration - REGATTA 1 is built to resist mechanical
shock and vibration as long as these are within the norm for any electrical
device.
•Do not use this device in potentially explosive environments. A single spark may
cause an explosion.
Page 6
Model RG1 Owner’s Manual
Page 6 www.midlandradio.com
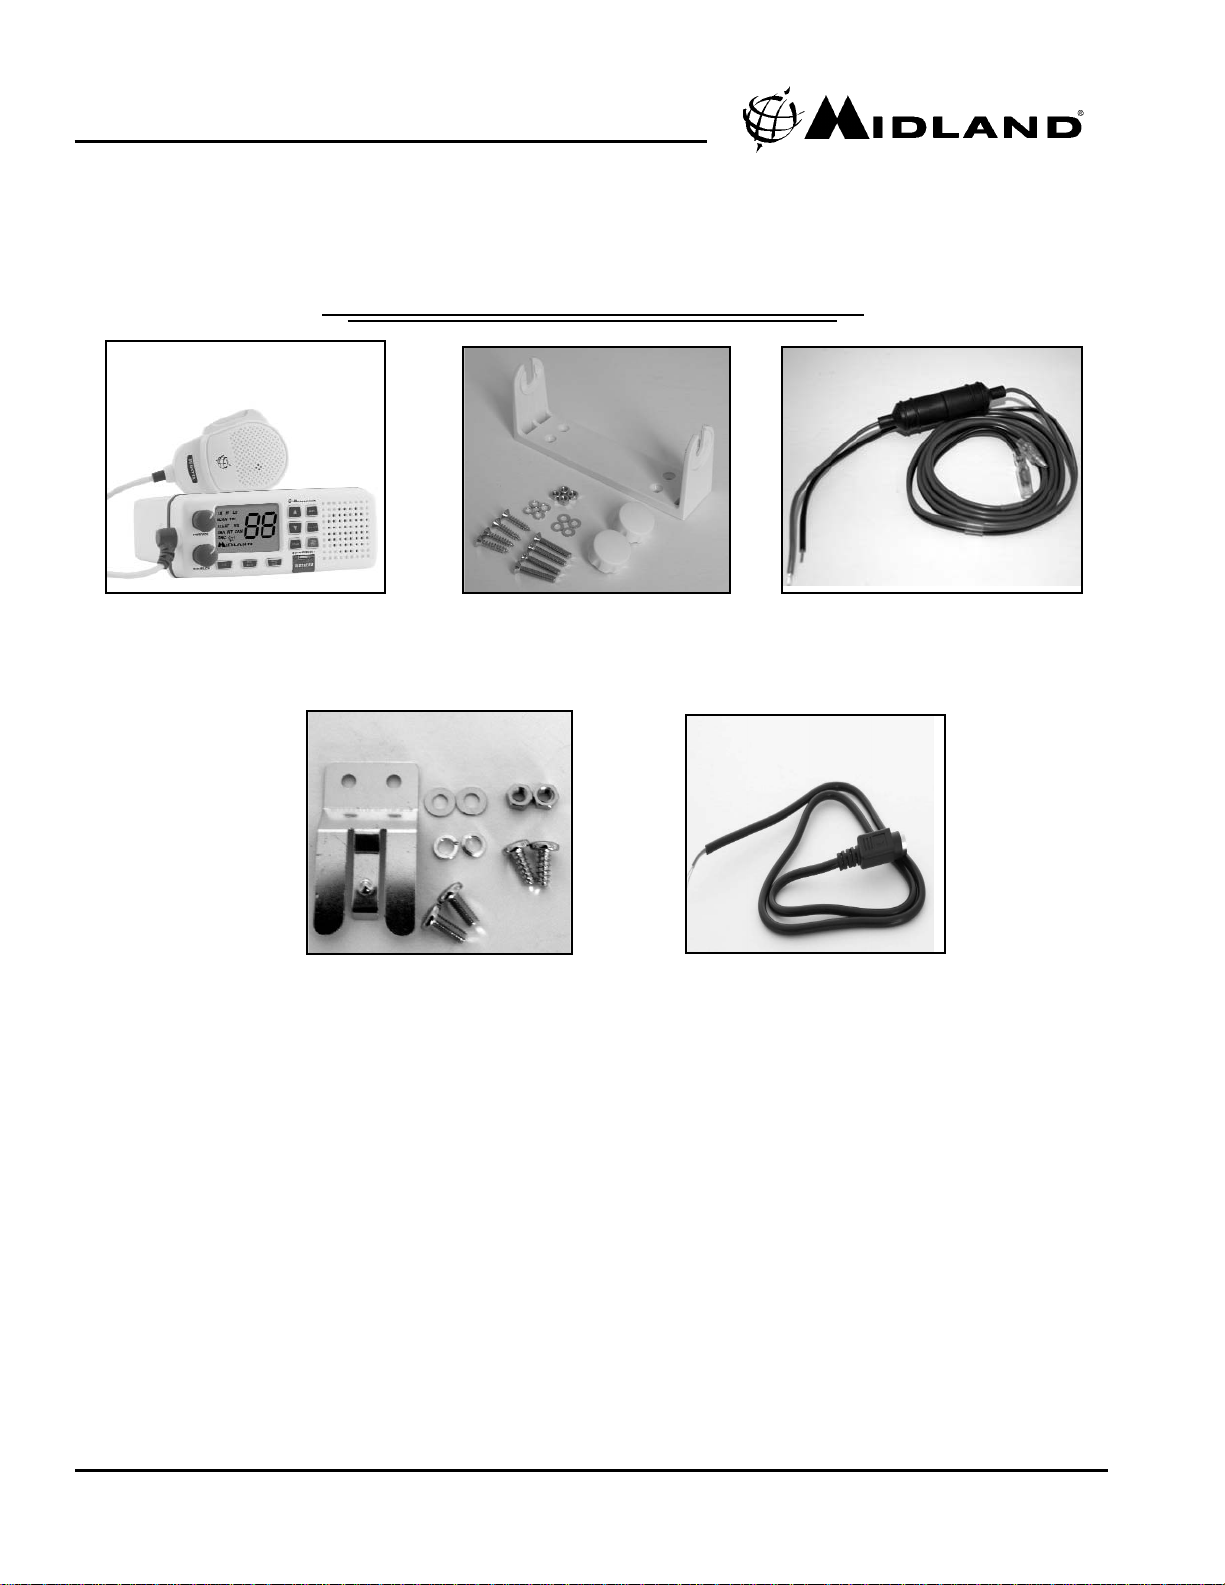
Included with your REGATTA 1
Included with your REGATTA 1
Transciever and Microphone Surface Mount Kit
Microphone Mounting Kit
GPS Interface Cable
DC Power Cord
Page 7
www.midlandradio.comPage 7
Model RG1 Owner’s Manual
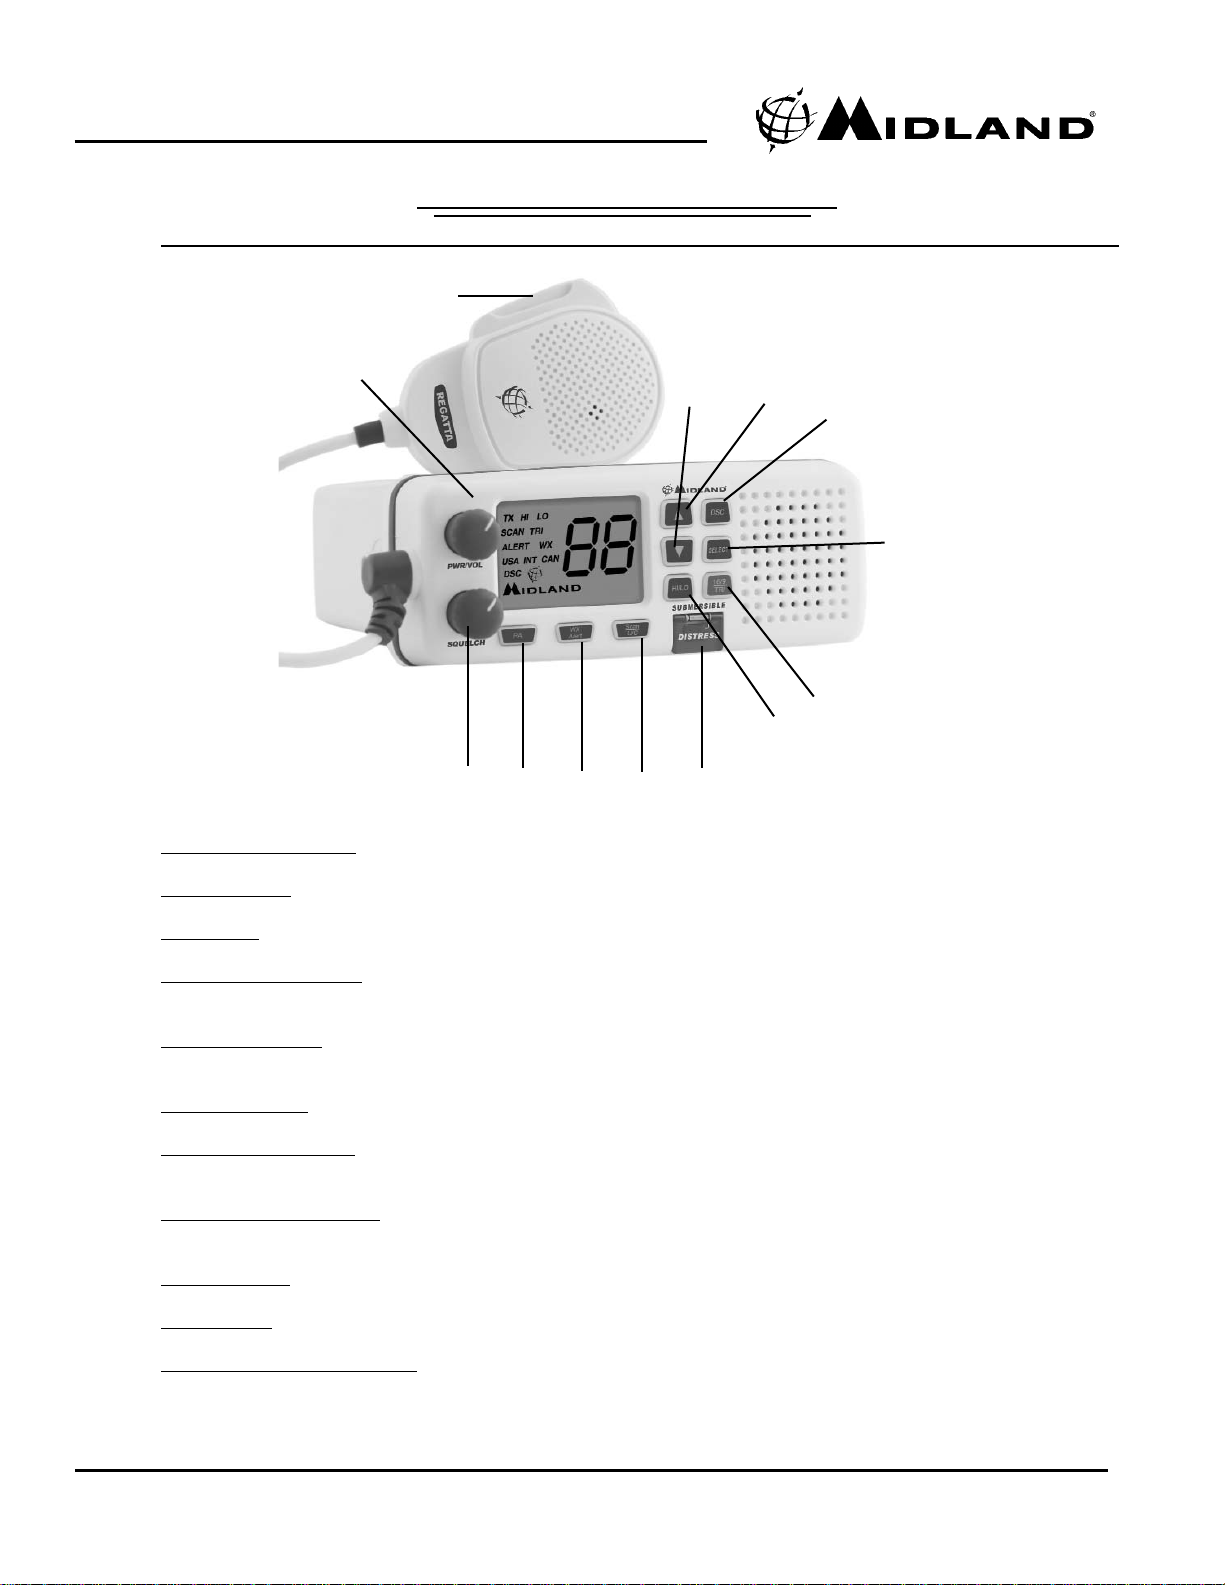
Controls and Indicators
Controls and Indicators
Squelch
Knob
PA
Button
Weather
Alert
Button
Scan/
UIC
Button
Distress
Button
HI/LO
Power
Button
16/9/
Tri -Watch
Button
Select
Button
DSC
Button
Channel
Up
Button
Power/
Volume
Knob
Channel
Down
Button
PTT
Button
Front Panel
Power/Volume Knob: (On/Off/Volume) - Turns the unit On or Off and adjusts the speaker volume.
Squelch Knob: Rotate this knob to eliminate background noise when a signal is not being received.
PA Button:
Press this key to enable the PA (Public Address) feature.
Weather Alert Button:
Press this key to listen to active NOAA Weather channels. Press and hold this key for 2 sec-
onds to place the radio into the Weather Alert mode.
Scan/UIC Button: Press this key once to activate channel scan mode. Press and hold for 2 seconds to change chan-
nel modes from USA to CANADIAN to INTERNATIONAL.
Distress Button:
Press this key to send a signal of distress in case of emergency.
HI/LO Power Button:
Press this key to change the transmit power to either High or Low. Default mode is high
power.
16/9/Tri-Watch Button: Press this key instantly to change to Channel 16, Channel 9 or current channel. Pressing
and holding this key for 2 seconds will activate the Triple Watch Feature.
Select Button:
In DSC mode, this key is used to makes selections.
DSC Button:
Press this button to enter DSC mode.
Channel Up/Down Buttons: These keys are used to arrow through the channels.
Page 8
Model RG1 Owner’s Manual
Page 8 www.midlandradio.com
Controls and Indicators cont...
Controls and Indicators cont...
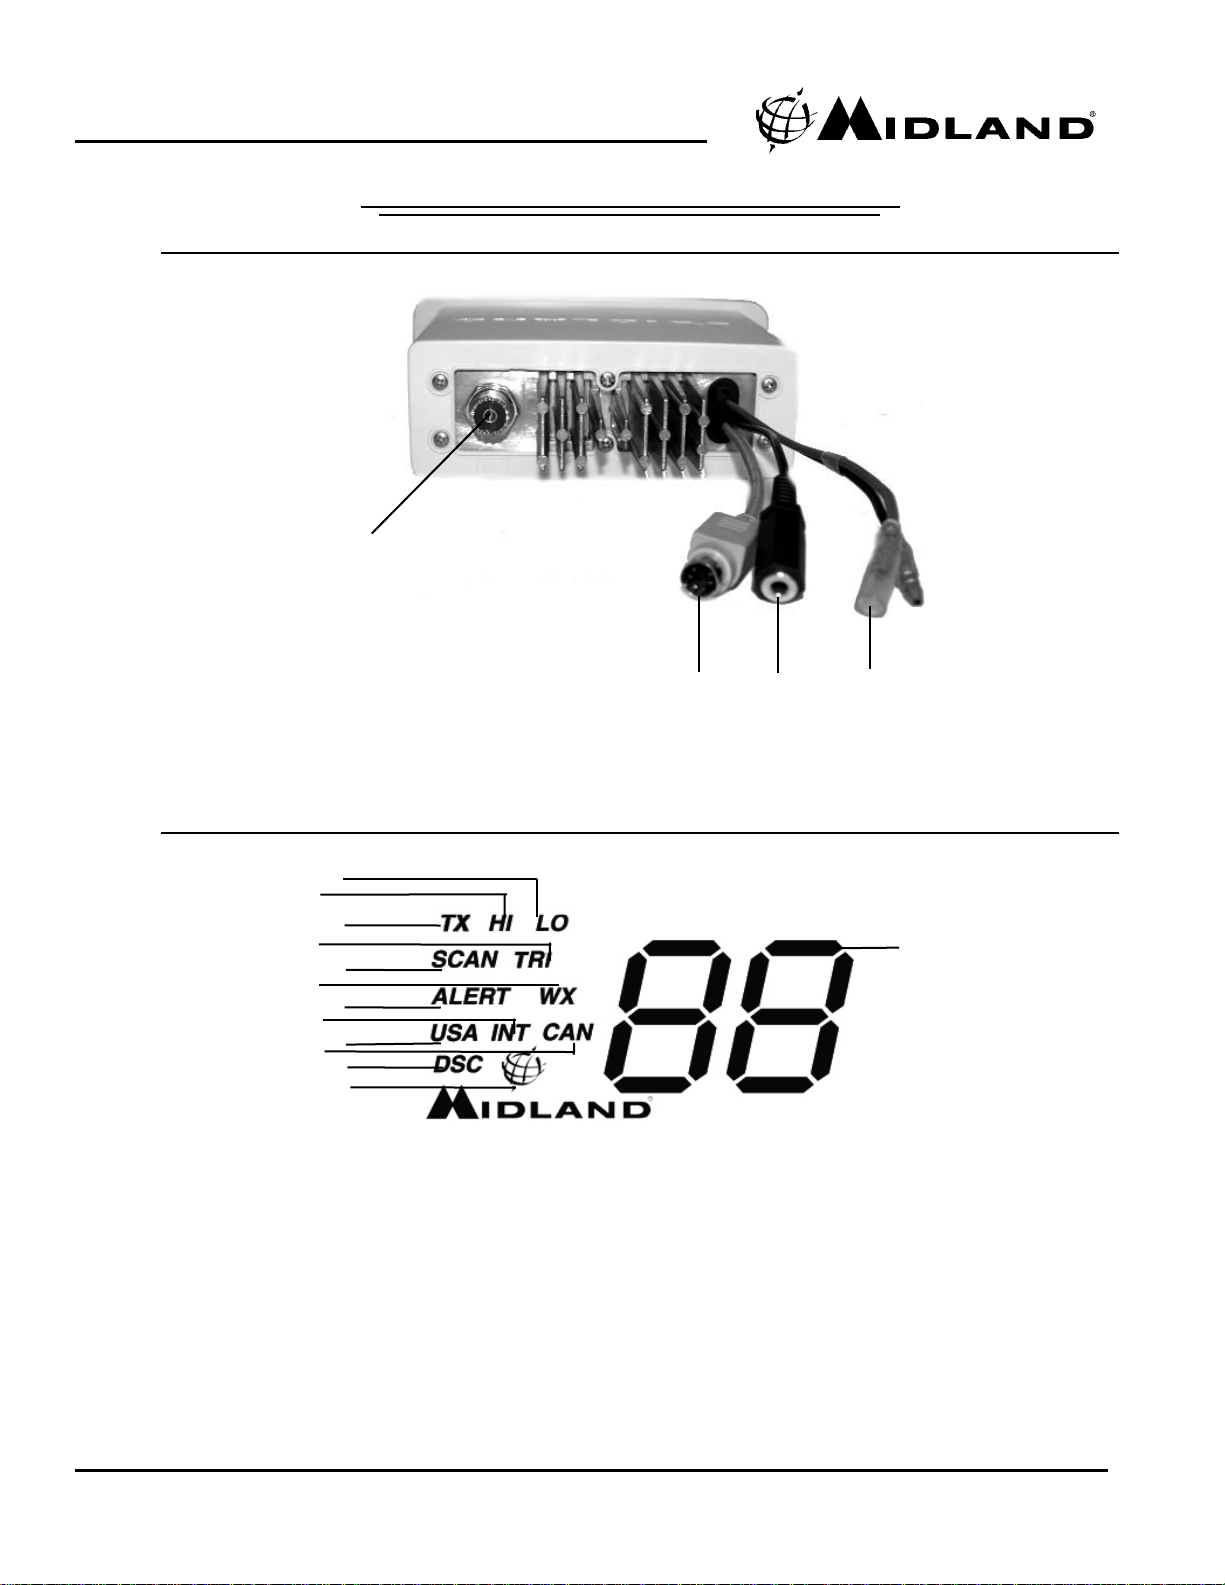
Back Panel
Antenna
Connector
NMEA /GPS
Accessory
Connector
External
Speaker/
PA
Connector
DC
Connectors
LCD Indicators
1. LO (Low)- Indicates transmit output is 1 Watt.
2. HI (High)- Indicates transmit output is 25 Watts.
3. TX (Transmit)- Indicates radio is transmitting.
4. TRI ( Triple Watch)- Indicates Triple Watch Mode is in effect.
5. SCAN- Indicates channel scan mode is in effect.
6. WX- Indicate Weather Channel Mode has been activated.
7. Alert- Indicates the weather alert mode is activated.
8. INT- Indicates International Channel Mode.
9. USA- Indicates US Channel Mode.
10. CAN - Indicates Canada Channel Mode.
11. DSC- Indicates the radio is in the DSC mode.
12. Globe- Indicates a GPS data receiver is receiving a signal.
13. Channel Display- Indicates Channel Number in use.
3
2
1
4
5
6
7
8
9
10
11
12
13
Page 9

Model RG1 Owner’s Manual
Page 9 www.midlandradio.com
Installation
Installation
The REGATTA 1 will only operate with a nominal 12 volt negative ground battery
system. It is important to carefully determine the most suitable location for your radio
on your vessel. Electrical, mechanical, and environmental considerations must all be
taken into account. You should select the optimum relationship among these considerations.
Features which should be considered are:
1. The universal mounting bracket may be installed on either the top or bottom
of a shelf, on a bulkhead, or for overhead mounting.
2. The accessory speaker wires can be used with an external speaker.
3. All connections are "plug-in" type for easy removal of the radio.
4. Front fire built-in speaker allows for convenient in-dash mounting.
Choosing a Location
Some important factors to consider in selecting the location for your REGATTA 1.
1. Select a location that is free from spray and splash.
2. Keep the battery leads as short as possible. Direct connection to the battery is
most desirable. If direct connection can not be made with the supplied power
lead, any extension should be made with #10 AWG wire. Long extensions
should use larger gauge wire.
3. Keep the antenna lead as short as possible. Long antenna leads can cause
substantial loss of performance for both receiving and transmitting.
4. Locate your antenna as high as possible and clear from metal objects. The reliable range of coverage is a direct function of the antenna height.
5. Select a location that allows free air flow around the heat sink on the rear of
the radio.
6. Select a location well away from the ship’s compass.
Engine Noise Suppression
Interference from the noise generated by the electrical systems of engines is
sometimes a problem with radios. The REGATTA 1 has been designed to be essentially
impervious to ignition noise and alternator noise. However, in some installations it may
be necessary to take measures to further reduce the effect of noise interference. All DC
battery wires, antenna lead, and accessory cables should be routed away from the
engine and engine compartment, and from power cabling carrying high currents.
Page 10

Model RG1 Owner’s Manual
Page 10 www.midlandradio.com
Antenna Considerations
A variety of antennas are available from a number of quality suppliers. It is recommended you draw upon the advice of your Midland dealer in determining a suitable
antenna for your vessel and range requirements.
In general, communication range is increased by using a high-gain antenna
placed as high as possible above the water line. Antennas should be located away from
metal objects. Antennas should not have excessively long coaxial feed cables.
Antenna Selection and Installation
REGATTA 1 has been designed to accommodate all of the popular marine VHF
antennas. However, the selection and the installation of the antenna is the responsibility
of the user or installer. The FCC has determined that excessive radiation poses a health
risk to people near radio transmitting antennas. Therefore, the antenna used
with this radio should be installed using the following guidelines to insure
a suitable distance between the antenna and persons close by. Small whip antennas (3
dB) or smaller should be installed keeping at least three feet separation distance
between the radiating element and people. Larger antennas (6 dB or 9 dB) should be
installed keeping at least a six foot separation distance. No person should touch the
antenna or come into the separation distance when the radio is transmitting.
Installing the REGATTA 1
After you have carefully considered the various factors affecting your choice of
location, position the radio (with the bracket, microphone, power cord, antenna and any
auxiliary cables installed) into the selected location to assure there is no interference
with the surrounding items.
Mark the location of the mounting bracket. Remove the
bracket from the radio and use it as a template to mark the holes
to be drilled for the mounting hardware. Drill the holes and mount
the bracket with hardware compatible with the material of the
mounting surface. Then attach the
radio to the mounting bracket
using the included knobs.
Connect the red wire of the supplied power cord to the positive (+) battery supply.
Connect the black wire of the power cord to the negative (–) battery supply. The power
cord is equipped with a fuse to protect the radio. Use only a six (7) ampere fast blow
fuse for replacement. Connect the power cord to the keyed connector on the power
"pigtail". Connect the antenna and all other auxiliary cables and accessories. Install the
radio in the mounting bracket and connect all cables and accessories to the appropriate
jacks and connectors.
Installation cont...
Installation cont...
Note: Do not use any other mounting
knobs than the ones enclosed.
Do not insert the knobs without
attaching the bracket.
Page 11

Model RG1 Owner’s Manual
Page 11 www.midlandradio.com
Operation
Operation
Power On/Off: Turn the unit On by rotating the PWR/VOL control clockwise.
Adjust the volume to a comfortable level. When you turn the unit On, you will hear a
beep, and the channel number will display on the LCD.
Note:
When you turn On the
radio for the first time after purchase, the channel 16 will appear on the LCD.
Last Channel Memory:
The REGATTA 1 memorizes the last channel selected before
you turn Off the radio. For example, if you turn Off the radio on CH 8, it will be on that
channel when turned back On.
Squelch:
Turn SQUELCH fully clockwise. This raises the “Squelch Gate” so high
that only very strong signals can get through.
Turn SQUELCH fully counterclockwise until you hear a hiss. This lowers the “Squelch
Gate” so that everything gets through - noise, weak signals,
and strong signals.
Turn SQUELCH back clockwise until the hiss stops. Now the
“Squelch Gate” allows only strong signals through.
Page 12

Model RG1 Owner’s Manual
Page 12 www.midlandradio.com
Coast Guard Channel 16/9 : To access Coast Guard Channel 16 or Channel 9 communications, press 16/9/TRI. You can access Coast Guard Channel 16 instantly while
tuned to another channel. Press 16/9/TRI again for Channel 9 Calling communications.
Press 16/9/TRI a third time to return to the channel selected prior to accessing Coast
Guard Channel 16/Channel 9 commnunications. The display will indicate the selected
channel.
Tri-Watch:
Tri-Watch monitors Channel 16, Channel 9, and the current Marine
Channel. To activate Tri-Watch, press and hold 16/9/TRI for 2 seconds. TRI appears on
the LCD, indicating Tri- Watch mode is in effect. If a signal is received on either Channel
16 or Channel 9, the radio remains on that channel until the signal ends. Press and hold
16/9/TRI for 2 seconds to cancel the Triple Watch mode.
Manual Tuning:
To manually select a channel, press the channel up or down button.
Communication channels are located on channel 01-28 and 60-88. Weather channels are
located on channels WX 0-9.
Weather Channels
: To select Weather Channels 0-9, press WX/ALERT. The radio will go
to the last selected Weather Channel. Press the channel up/down buttons to select a different Weather Channel. To exit from Weather Channel press WX/ALERT. The radio
returns to the previously selected Marine channel.
Weather Alert:
To activate Weather Alert mode, press the WX/ALERT button for 2 seconds. ALERT will display on the LCD. When the radio is in Alert mode, it scans weather
every 7 seconds. When an alert is received, the unit will switch to the current weather
channel and emit a loud siren noise. To turn off the siren, press the WX/ALERT button.
Transmitting:
The REGATTA 1 transmits on fifty-four marine frequencies and receives
on eighty marine frequencies. Channel 70 of the USA, International, and Canadian frequencies, and channel 15 of the USA frequencies, and WX CH – are for receiving only.
The radio transmits on channel 70 when sending DSC information. Your radio will not
transmit on these channels.
PA
Function: Press the PA button once to enter PA function. The LCD will display PA
instead of channel. You must have an external PA speaker connected in order for this to
work. To exit PA mode, press the PA button again.
Operation Cont...
Operation Cont...
Page 13

Model RG1 Owner’s Manual
Page 13 www.midlandradio.com
Setting Transmit (TX) Power
NOTE
NOTE
::It is important to remember to use the LO position in port or for
It is important to remember to use the LO position in port or for
short range communications.
short range communications.
1. When you turn the radio On for the first time, the unit is automatically set to transmit
at 25 watts (HI).
2. Press HI/LO to change the transmitter output to 1 watt (LO).
3. Press HI/LO again to change back to 25 watts (HI).
Note:
Each time the HI/LO is pressed a short tone sounds. CH13 is set as 1 watt (LO)
channel. On the LO power channels, you cannot set the transmit power to HI. LO power
channels are 13 and 67 for USA, and 13, 15, 17, and 20 for CAN.
Channel Scan:
Press the SCAN/UIC button to begin rapidly scanning channels for an
active channel. If a channel is active, the unit will lock on that channel. To begin scanning
again, press the SCAN/UIC button again. If no active channel is found, press the
SCAN/UIC button to end scan mode.
Channel Band Selection:
Press the SCAN/UIC button for 6 seconds to swicth the unit
to international band. Repeat again to switch to Canada band. Repeat a 3rd time to
return to US band.
User MMSI
Federal MMSI's are issued by the National Telecommunications and Information
Administration. Non-Federal MMSI's are issued by the Federal Communications
Commission (FCC). You will need to obtain a nine digit MMSI number and program it into
the REGATTA 1. The information obtained from the application is useful to the U.S. Coast
Guard to help in search and rescue operations. To obtain an MMSI number, visit one of
the following websites: http://wireless.fcc.gov/marine/fctsht14.html or
www.boatus.com/mmsi/
This portion of the SETUP menu will allow you to program an MMSI, (Maritime Mobile
Service Identity) for sending and receiving DSC calls.
Setting the MMSI:
When you first turn the unit on after purchasing, press the DSC button and it will enter MMSI setting mode. Using the up and down arrow, enter the nine
digit number.
Note: Only 2 digits at a time can display on the LCD while programming the
MMSI into the radio.
Press the SELECT button to confirm settings. After setting the MMSI
number, turn off the unit.
Please note:
You can only program your radio twice with an MMSI number. After
that, send your radio to Midland for factory service.
Operation Cont...
Operation Cont...
Page 14

Model RG1 Owner’s Manual
Page 14 www.midlandradio.com
Note:
You must set the user MMSI in order to send a Distress call. This feature will
allow you to transmit a Distress call.
1. In order to transmit a Distress call, press and hold DISTRESS for 5 seconds.
2. The Distress call is transmitted and it waits for about 210 - 270 seconds.
This is continued internally. After the Distress call has been sent, the Distress
alert will sound every other second, and it also "watches" for a transmission
between CH16 and CH70 until an acknowledgment signal is received from the
Coast Guard shore station. To cancel the Distress call, press 16/9/TRI.
3. If an acknowledgment is not received, the Distress call is repeated until an
acknowledgment is received from theCoast Guard shore station.
Note:
If the radio receives a Distress call, it will be displayed on the LCD display. An
emergency alert will sound. The name will be displayed if it is the name registered in the
directory. Otherwise, sender’s MMSI is displayed. Latitude, longitude, and time information will also be displayed if the GPS module is carried in the vessel that transmitted a
DSC Distress call.
Distress
Distress
Page 15

Model RG1 Owner’s Manual
Page 15 www.midlandradio.com
Digital Selective Calling is a process of establishing a radio call, it has been chosen by
the International Maritime Organization (IMO) as an international standard for establishing VHF, MF and HF radio calls. Digital Selective Calling has also been selected as part of
the Global Maritime Distress and Safety System (GMDSS).
This service will let you instantly send a Distress call with GPS position (when optional
GPS receiver is connected to the REGATTA 1) to the US Coast Guard and other vessels
within range of the transmission. DSC will also let you initiate or receive distress,
urgency, safety, position information and routine calls to or from another vessel outfitted
with a DSC transceiver.
Press the DSC Button to enter DSC Call Mode. DSC has 2 options as follows:
1. INDIVIDUAL
- Press the DSC button once. IN will be displayed on the LCD.
- Press Select to choose INDIVIDUAL MODE.
- You will then need to enter the MMSI number for the individual you would like
to call. Use the up/down arrows to choose the 1st digit. Press select to move to
the next digit. It will be blinking. Repeat this procedure until all 9 digits have
been programmed. When finished the unit will return to channel 16.
Note:
Only 2 digits at a time can display on the LCD while programming the
MMSI into the radio.
2. ALL SHIPS
- Press the DSC button once. Use the CH up/down buttons to toggle to ALL
SHIPS MODE. AL will be displayed on the LCD.
- Press Select to choose ALL SHIPS MODE. The radio will then have you choose
which type of ALL SHIPS message you would like to send: URGENCY (UR),
SAFETY (SA), or ROUTINE(RO).
Note:
ROUTINE calls tune to the previously selected channel.
- Use the CH up/down buttons to toggle to URGENCY or SAFETY. When chosen,
press select to transmit the ALL SHIPS DSC call.
When sending either an URGENCY or SAFETY message, all radios will automatically move to channel 70 until all of the data is received. After your selected
URGENCY or SAFETY ALL SHIPS call is transmitted, the radio will switch to
Channel 16. You should wait a few minutes before transmitting the ALL SHIPS call
information again.
DIGITAL SELECTIVE CALLING
DIGITAL SELECTIVE CALLING
Page 16

Model RG1 Owner’s Manual
Page 16 www.midlandradio.com
This section is useful when attaching an external GPS to the REGATTA 1 DSC radio.
Many GPS units have a setup menu to be able to configure the NMEA0183 serial data
output. This output can be used to supply information to other devices on the vessel
including auto pilots, chart plotters, etc.
To setup the GPS to be used with the REGATTA 1 DSC radio, the following items need
to be considered for proper operation:
1. Baud Rate – Set the Baud rate to 4800.
2. Data Bits – Set the Data Bits to 8.
3. Parity – Set the Parity to None.
4. Stop Bits – Set the Stop Bits to 1.
5. RMC, GLL, GGA, GNS, and ZDA Command – These commands are used by
the REGATTA 1 and includes the UTC Time, Latitude, and Longitude.The data amplitude : Over 3.0V Drive capability : Over 10mA
REGATTA1 GPS Input Connection Specification
REGATTA1 GPS Input Connection Specification
Page 17

Model RG1 Owner’s Manual
Page 17
www.midlandradio.com
VHF FM Marine Radio Telephone
VHF FM Marine Radio Telephone
Channel and Functions
Channel and Functions
(USA Channels)
(USA Channels)
Page 18

Model RG1 Owner’s Manual
Page 18 www.midlandradio.com
VHF FM Marine Radio Telephone
VHF FM Marine Radio Telephone
Channel and Functions
Channel and Functions
(International Channels)
(International Channels)
Page 19

Model RG1 Owner’s Manual
Page 19 www.midlandradio.com
VHF FM Marine Radio Telephone
VHF FM Marine Radio Telephone
Channel and Functions
Channel and Functions
(Canadian Channels)
(Canadian Channels)
Page 20

Model RG1 Owner’s Manual
Page 20 www.midlandradio.com
Technical Specifications
Technical Specifications
General
Channels.........................All 48 USA, 55 Canadian & 57 international marine channels
Frequency generation...................................................................... PLL synthesizer
Frequency range.....................................................TX from 156.025 to 157.425 MHz
RX from 156.050 to 162.550 MHz
Antenna Impedance.....................................................................................50 Ohm
Power supply................................................................................................12V DC
Operating temperature..............................................................from -20°C to +55°C
Size (HxLxW) .................................................................................70×160×170 mm
Weight (device only)...................................................................................1.305 Kg
Transmitter
Output power...............................................................High (HI): 25W/Low (LO):1W
Modulation Type..................................................................................................FM
Microphone.................................................................................. .....condenser type
Hum and noise attenuation...............................................................................34dB
Audio distortion...................................................................................................5%
Harmonics reduction......................................................................HI: 80dB/LO:60dB
Receiver
Sensitivity @ 20 dB Sinad...............................................................................<0.5 V
S/N ratio (20dB)...............................................................................................0,8 V
Squelch sensitivity...............................................................threshold -12dB V (EMF)
Adjacent channel rejection................................................................................70dB
Audio output power ..........................................................................>2W su 8 Ohm
Audio distortion.................................................................................................10%
Note: these values are average. Actual values may be subject to variation.
Page 21

Model RG1 Owner’s Manual
Page 21 www.midlandradio.com
Troubleshooting
Troubleshooting
Page 22

Model RG1 Owner’s Manual
Page 22 www.midlandradio.com
Care and Maintenance
Care and Maintenance
Your REGATTA 1 is a precision crafted piece of electronic equipment and you should
treat it accordingly. Due to the rugged design, very little maintenance is required.
However, a few precautions should be observed:
• If the antenna has been damaged, you should not transmit except in the case of an
emergency. A defective antenna may cause damage to your radio.
• You are responsible for continued FCC technical compliance of your radio.
• Never open the device (transceiver or microphone) as this may compromise the water
seal.
• If the device becomes dirty or dusty, do not use alcohol, solvents or abrasives to clean
it. Use only a soft cloth, slightly dampened with water. For more persistent cases, use
a mild detergent.
Page 23

Model RG1 Owner’s Manual
Page 23 www.midlandradio.com
Midland Radio will repair or replace, at its option without charge, your MODEL REGATTA
1 VHF Marine transceiver which fails due to a defect in material or workmanship within
FIVE years following the initial consumer purchase.
This warranty does not include the cost of labor for removal or re-installation of the
product in a vehicle or other mounting.
Performance of any obligation under this warranty may be obtained by returning the
warranted product, freight prepaid, along with a readable copy of the original dated
sales receipt, to:
Midland Radio Corporation
Warranty Service Department
5900 Parretta Drive
Kansas City, MO 64120
Note: The above warranty applies only to merchandise purchased in the United States
of America or any of the territories or possessions or from U.S. military exchange.
This warranty gives you specific legal rights, and you may also have other rights, which
vary from state to state.
Midland Radio Corporation
5900 Parretta Drive
Kansas City, MO 64120
Tel: (816) 241-8500
E-mail: mail@midlandradio.com
URL: www.midlandradio.com
Model REGATTA 1
Limited Warranty
Limited Warranty
Page 24

Model RG1 Owner’s Manual
Page 24 www.midlandradio.com
Service and Technical Support
Service and Technical Support
* If you have a problem which you believe requires service, please call
first and speak with a service technician. Many problems can be remedied over the phone without returning the unit for service.
For Technical Support Contact:
Midland Radio Corporation
5900 Parretta Drive
Kansas City, Missouri 64120
Phone: (816) 241-8500
Fax: (816) 241-5713
E-mail: mail@midlandradio.com
Website: www.midlandradio.com
If after talking with technical support you still feel your unit needs to be returned
for service, follow the below instructions:
1. Pack the unit in its original box and packing. Then pack the original box
in a suitable shipping carton. Caution: Improper packing may result in
damage during shipment.
2. Include the following:
a. full description of any problems
b. money order for $7.50 to cover shipping and handling (this may
not be required in some states)
c. daytime telephone number, name & address
3. For warranty service include a photocopy of the bill of sale from an
authorized dealer or other proof of purchase showing the date of sale.
4. You do not need to return accessory items (Fused DC power cord,
mounting hardware, Owners Guide) unless they might be directly related to the problem.
5. A flat rate of $45.00 will apply to repairs not covered by warranty or
units that are over five years old. Send only cashier’s check, money
order or Master Card or Visa card number.
Send to:
Midland Radio Corporation
5900 Parretta Drive
Kansas City, Missouri 64120
Page 25

Model RG1 Owner’s Manual
Page 25 www.midlandradio.com
Page 26

MIDLAND RADIO CORPORATION
MIDLAND RADIO CORPORATION
5900 Parretta Drive
Kansas City, MO 64120
Call 816.241.8500
visit us at http://www.midlandradio.com
Note: Features & Specifications are subject to change without notice. MIDLAND is not responsi-
ble for unintentional errors or omissions on its packaging.
 Loading...