

Page 1
M-Mini
” RICETRASMETTITORE VEICOLARE CB AM/FM
” AM/FM CB MOBILE TRANSCEIVER
” AM/FM CB MOBILFUNKGERÄT
” TRANSCEPTOR MÓVIL CB AM/FM
” EMETTEURRÉCEPTEUR MOBILE CB AM/FM
” RADIO CB AM/FM
” STATIE RADIO CB AM/FM
Page 2

ITALIANO
ENGLISH
DEUTSCH
ESPAÑOL
FRANÇAIS
POLSKI
ROMANA
Page 3

Sommario
DESCRIZIONE E COMANDI 3
INSTALLAZIONE 5
FUNZIONAMENTO 7
SPECIFICHE TECNICHE 10
M-Mini Manuale d’uso | 1
Page 4

M-MINI può essere utilizzata come stazione mobile in auto o con un alimentatore
CC come stazione base. Il ricetrasmettitore è conforme alle più recenti norme europee in materia di banda cittadina. Grazie alla possibilità di selezionare lo standard
CB, può essere utilizzato in tutta l’Europa. La selezione dello standard consentito nel
paese in cui il dispositivo viene utilizzato è descritta di seguito.
CARATTERISTICHE
• Ricetrasmettitore multistandard;
• Tasti UP/DOWN sul microfono
• Scansione canali;
• Display LCD con S/meter;
• Squelch automatico regolabile;
• Attenuatore ricezione (RF gain) regolabile;
• Canale emergenza 9/19;
• Presa due pin frontale per mic/spk esterni (compresi accessori bluetooth);
• Presa altoparlante esterno
2 | M-Mini Manuale d’uso
Page 5
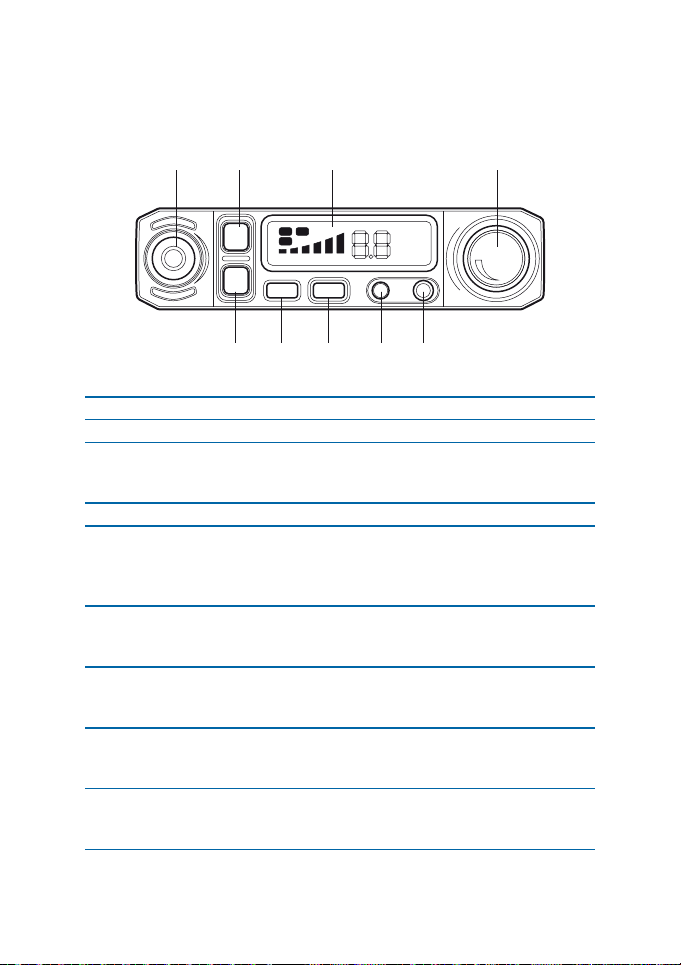
DESCRIZIONE E COMANDI
1 2 3 4
A/F
SQ
TXRXAQ
1 3 5 7 9 +30
RFG EMG
8.8
FM AM
M H
SC R
8 7 6 59
PRESSIONE CORTA PRESSIONE LUNGA
1. MICROFONO
2. TASTO A/F Permette la selezione
3. LCD Display
4. MANOPOLA DI
ACCENSIONE E
REGOLAZIONE
VOLUME
5.6.PRESA DUE PIN PER
ACCESSORI ESTERNI
(BLUETOOTH)
7. TASTO EMG
(EMERGENZA)
8. TASTO RFG Abilita/disabilita l’RF
9. TASTO SQ Permette di visualizzare
del modo di emissione
AM/FM
Commuta ripetutamente
tra canale 9/19/canale
in uso
GAIN e permette di
regolare il suo livello
e regolare il livello dello
squelch manuale
Attiva la funzione SCAN
Permette di visualizzare e
regolare il livello dell’ASQ
(automatic Squelch)
M-Mini Manuale d’uso | 3
Page 6
A/F
SQ
RFG EMG
8.8
TXRXAQ
1 3 5 7 9 +30
FM AM
M H
SC R
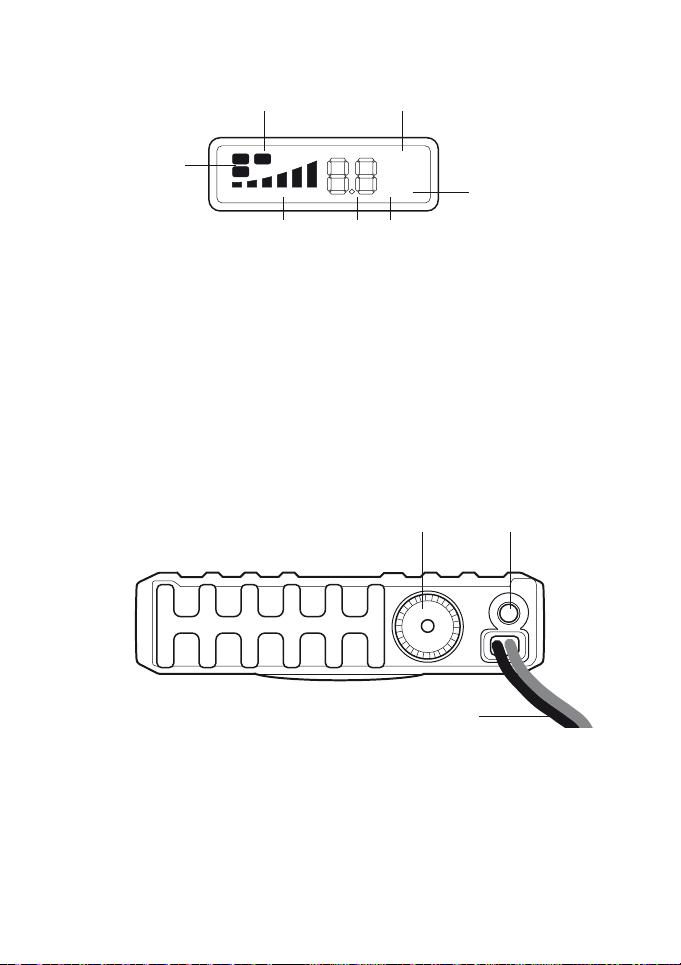
DISPLAY
8.8
FM AM
M H
SC R
ANT
EXT SP
15
12
13
TXRXAQ
1 3 5 7 9 +30
8.8
FM AM
M H
SC R
1011
14
16
10. Numero canale selezionato
11. Indicatore S-METER di intensità del segnale ricevuto e di potenza di segnale
trasmesso
12. AM/FM: indicatore del modo di emissione
13. RX/TX: indicatore ricezione (RX) e trasmissione (TX)
14. SC: indicatore funzione SCAN attivata
15. AQ: indicatore attivazione automatic squelch
16. R: Indicatore RFGAIN attivo
PANNELLO POSTERIORE
1819
EXT SP
ANT
17
17. Cavo di alimentazione
18. Speaker/altoparlante esterno
19. Connettore antenna
4 | M-Mini Manuale d’uso
Page 7
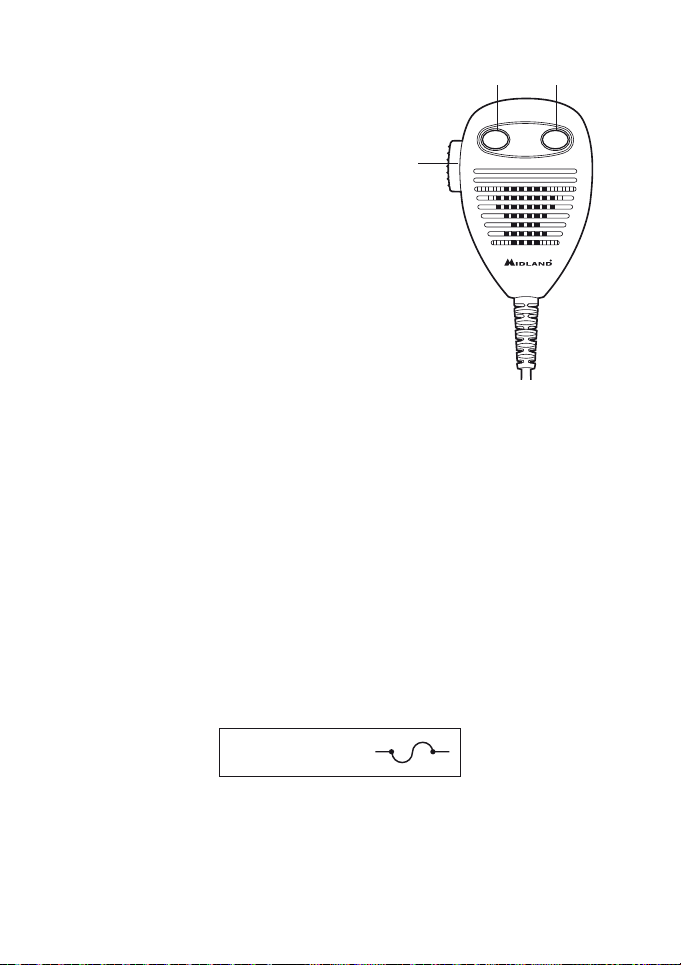
MICROFONO
A/F
SQ
RFG EMG
8.8
TXRXAQ
1 3 5 7 9 +30
FM AM
M H
SC R
ANT
EXT SP
8.8
TXRXAQ
1 3 5 7 9 +30
FM AM
M H
SC R
20. Tasto PTT
21. Tasto UP
22. Tasto Down
22 21
DOWN UP
20
INSTALLAZIONE
Selezionare il luogo di installazione in modo che il dispositivo non pregiudichi la sicurezza e non metta a rischio l’incolumità in caso di incidente. Accertarsi che il display
sia ben visibile ed i comandi siano facilmente accessibili.
ALIMENTAZIONE
Fusibile
Un fusibile nel cavo di alimentazione protegge da danni causati da difetti tecnici o
polarità errata. Se il fusibile si brucia, eliminare prima l’errore e poi sostituire il fusibile del cavo di alimentazione con uno similare di tipo F3A 250V. I parametri ed il
simbolo del fusibile sono indicati nella seguente etichetta:
F3A 250V +
Se il fusibile si brucia più volte provvedere all’individuazione del problema o inviare
la radio in assistenza.
M-Mini Manuale d’uso | 5
Page 8

Uso in un veicolo
Il filo rosso del cavo di alimentazione deve essere collegato al terminale positivo
(+12V), il filo nero al terminale negativo. Se possibile collegare la radio direttamente alla batteria del veicolo, questo è il punto con meno interferenze dell’impianto
elettrico dell’auto. Il dispositivo può essere collegato anche dietro l’interruttore di
accensione del veicolo. Tutte le impostazioni ed i settaggi del M-MINI sono salvate
in una memoria non volatile e pertanto allo spegnimento della radio non vengono
perse.
Funzionamento con alimentatore CA
Utilizzare la radio solo con un alimentatore per radio stabilizzato in grado di fornire
almeno 2A a 12 - 13,8V CC. Alimentatori con caratteristiche diverse e caricabatterie non sono adatti e possono causare danni. Collegare il cavo rosso al polo positivo
(+) e il cavo nero al polo negativo (-) dell’alimentatore.
COLLEGAMENTO DELL’ANTENNA
Collegare l’antenna CB alla presa ANT sul retro del MMINI. L’antenna deve essere sintonizzata sulla banda radio CB (27 MHz). Per controllare il regolare funzionamento dell’impianto di antenna utilizzare un misuratore SWR.
Per un buon funzionamento dell’impianto radio e per ottenere le massime prestazioni dal dispositivo il valore dell’ SWR deve essere il più basso possibile e non superare un valore di 2. Un SWR alto è indice di qualche difetto dell’impianto di antenna
(controllare la linea di trasmissione, accertarsi che non vi siano interruzioni o corti
nel cavo coassiale dell’’antenna). Non trasmettere mai senza un’antenna connessa!
Nota: L’antenna radio deve essere montata il più lontano possibile da altre antenne,
oggetti metallici e fonti di interferenze. Di solito le antenne CB devono essere installate nella parte più alta del veicolo e su superfici metalliche. Una superficie metallica
sucientemente grande è essenziale per il buon funzionamento dell’antenna. In caso
di installazioni su veicoli privi di una superficie metallica (fibra di vetro o deflettori in
plastica), è possibile utilizzare speciali antenne che non richiedono la presenza del piano
metallico di massa.
6 | M-Mini Manuale d’uso
Page 9

FUNZIONAMENTO
Accensione/spegnimento della radio
Ruotare la manopola VOL in senso orario per accendere la radio, LCD visualizza lo
standard CB seguito dal numero di canale.
Ruotare la manopola VOL in senso antiorario fino a quando non fa clic per spegnere
la radio.
Controllo volume
Ruotare in senso orario per aumentare il volume e in senso antiorario per ridurlo.
Selezione del canale
Premere ripetutamente i tasti UP o DOWN sul microfono per selezionare il canale
desiderato.
Tenere premuti i tasti UP o DOWN sul microfono per cambiare e selezionare rapidamente il canale desiderato.
Controllo livello squelch (28 livelli e spento)
Premere brevemente il tasto SQ, il display mostrerà per un attimo l’indicazione SQ
e successivamente il livello corrente di squelch;
0.F Squelch spento
0.1 Livello squelch più basso
2.8 Livello squelch più alto
Quando il display mostra il livello attuale, per cambiare il livello dello squelch premere brevemente i tasti UP o DOWN sul microfono; tenere premuti i tasti UP o
DOWN sul microfono per modificare rapidamente il livello di squelch.
Nota: Un livello di squelch alto richiede un segnale più forte per aprire l’audio in altoparlante ed ascoltare l’interlocutore.
Controllo squelch ASQ (9 livelli)
Tenere premuto il tasto SQ, fino a quando il display LCD visualizza l’indicazione AQ
(nella parte alta del display); l’LCD mostrerà inoltre per circa cinque secondi il livello
di ASQ corrente.
A.1 Livello ASQ più basso
A.9 Livello ASQ più alto
Quando il display mostra il livello di ASQ corrente è possibile modificare il livello
M-Mini Manuale d’uso | 7
Page 10

premendo brevemente i tasti UP o DOWN sul microfono. Tenere premuti i tasti
UP o DOWN sul microfono per modificare il livello di ASQ rapidamente.
Nota: Un livello di ASQ alto richiede un segnale più forte per aprire l’audio in altoparlante ed ascoltare l’interlocutore.
Tipo di modulazione
Premere brevemente il tasto A/F per commutare tra le modalità AM o FM.
Il display LCD visualizzerà la modalità selezionata.
Controllo guadagno RF (solo in modalità AM)
Premere brevemente il tasto RFG, il display mostra l’indicazione ‘R’ (in basso a destra) e per cinque secondi il livello dell’RF gain attuale lampeggiante.
Quando il display mostra il livello attuale dell’RF gain lampeggiante è possibile modificare il livello dell’RF gain (aumentare o diminuire il livello di attenuazione in ricezione) premendo brevemente i tasti UP o DOWN sul microfono.
Tenere premuto i tasti UP o DOWN sul microfono per modificare il livello dell’RF
gain rapidamente.
Nota: Il controllo RF GAIN è attivo solo in AM.
Quando la funzione RF è attiva, la vostra radio avrà la ricezione attenuata ed i segnali
di livello basso potrebbero non essere ricevuti.
Esempio: se il livello di RFG è settato a 24 significa che la radio riceve il segnale attenuato di 24 dB
Canale di emergenza
Premere brevemente il tasto EMG per selezionare il canale di emergenza CH9 (il
display mostra il canale 9 lampeggiante)
Premere nuovamente il tasto EMG per selezionare di emergenza CH19 (il display
mostra il canale 19 lampeggiante)
Premere brevemente per una terza volta il tasto EMG per ritornare all’ultimo canale
in uso.
Blocco tasti
Tenere premuto il tasto EMG per più di 2 secondi per bloccare i tasti, il display LCD
visualizza “LC” ad indicare il blocco tasti attivato.
Tenere premuto nuovamente il tasto EMG per più di due secondi per disattivare il
blocco tasti, il display LCD visualizza la scritta ‘OF’.
Nota: in modalità blocco tasti tutti i tasti sono disabilitati ad eccezione del tasto PTT.
Funzione scansione
Tenere premuto A/F per avviare la scansione dei canali, la dicitura “SC” comparirà
8 | M-Mini Manuale d’uso
Page 11

sul display in basso a destra del display. Premere i tasti UP o DOWN sul microfono
per modificare la direzione di scansione. Tenere premuto il tasto A/F o premere il
tasto PTT per arrestare ed uscire dalla funzione di scansione.
Modifica dello standard CB
Spegnere la radio; successivamente premere A/F ed accendere nuovamente la radio.
Il display visualizza la banda di frequenza in uso (fare riferimento alla tabella seguente); premere i tasti UP o DOWN del microfono per scegliere la banda di frequenza
desiderata. Spegnere e riaccendere nuovamente la radio. Il display visualizzerà brevemente la banda di frequenza selezionata.
TABELLA BANDE DI FREQUENZA
Sigla sul display Paese
I Italia 40 CH AM/FM 4 Watt
I2 Italia 34 CH AM/FM 4 Watt
D4 Germania 80 CH FM 4 Watt / 40 CH AM 4 Watt
EU Europa 40 CH FM 4 Watt / 40 CH AM 1 Watt
EC CEPT 40 CH FM 4 Watt
PL Polonia 40 CH AM/FM 4 Watt
UK Inghilterra 40 CH FM 4 Watt frequenze inglesi + EC 40 CH
IN Internazionale 27 CH AM/FM 4 Watt
ATTENZIONE! Lo standard sicuramente riconosciuto in tutti i paesi europei è 40CH
FM 4W (EC) - vedi tabella “Restrizioni all’uso”.
FM 4 Watt frequenze CEPT
Altoparlante esterno
E’ possibile collegare un altoparlante esterno (8 Ohm) alla presa mono da 3,5 mm
sul retro della radio. L’altoparlante interno della radio viene automaticamente escluso quando viene inserito lo spinotto dell’altoparlante esterno.
Ripristino impostazioni di fabbrica
Spegnere la radio; poi tenere premuto il tasto SQ ed accendere nuovamente la
radio; il display della radio mostrerà per un attimo l’indicazione “rt”.
Dopo questa operazione tutte le impostazioni della radio saranno ripristinate alle
impostazioni di fabbrica. Dopo il reset la radio sarà operativa in FM sul canale 9
della banda EU.
M-Mini Manuale d’uso | 9
Page 12

SPECIFICHE TECNICHE
Gamma di frequenza* ................................................................26.565-27.99125 mhz
Dimensioni .......................................................................................102 x 100 x 25 mm
Peso ........................................................................................................................ 450 gr
Tensione di alimentazione ......................................................................................13,2 V
Consumo ..............................................................................................................2 A max
Gamma di temperatura d’uso ...............................................................da -10 a +55 °C
Presa per l’antenna ..................................................................................UHF, SO-239
Errore di frequenza ....................................................................................< +/- 300 Hz
Potenza TX ..............................................................................................................4 Watt
Emissioni spurie ................................................................................ < 4 nW (-54 dBm)
Potenza canali adiacenti .....................................................................................< 20 µW
Deviazione FM ...................................................................................................... 1,9 kHz
Indice di modulazione AM ................................................................................ 85-90%
Sensibilità RX .......................................................................................... migliore di 1 μV
Scarto immagine ..................................................................................................... 70 dB
Scarto canale adiacente .........................................................................................60 dB
Uscita audio ...........................................................................1 Watt su carico di 8 Ohm
Risposta in frequenza .............................................................................300-3000 Hz
*considerando tutte le bande di frequenza europee approvate.
Le specifiche sono soggette a modifiche senza preavviso.
Un dispositivo di sezionamento adatto deve essere previsto nell’impianto elettrico.
Tale dispositivo deve disconnettere entrambi i poli simultaneamente.
10 | M-Mini Manuale d’uso
Page 13

Index
DESCRIPTIONS AND COMMANDS 3
INSTALLATION 5
OPERATION 7
SPECIFICATION 10
M-Mini Instruction Guide | 1
Page 14

M-MINI can be operated as a mobile station in a car or with a suitable DC power
supply as a base station. This device complies with the latest European CB standards. Due to its selectable CB standards it can be used throughout Europe. Please
select only a CB standard that is allowed in the country of use.
FEATURES:
• Multi-standard device
• Up/Down keys on the microphone
• Channel Scan
• LCD display, S-Meter
• ASQ Automatic squelch, adjustable
• RF Gain
• Emergency canne 9/19
• 2 pin socket for accessories (included Bluetooth accessories)
• Socket for external loudspeaker
2 | M-Mini Instruction Guide
Page 15

DESCRIPTIONS AND COMMANDS
1 2 3 4
A/F
SQ
TXRXAQ
1 3 5 7 9 +30
RFG EMG
8.8
FM AM
M H
SC R
8 7 6 59
SHORTLY PRESS LONG PRESS
1. SPEAKER
2. AM/FM SWITCH AM/FM selection enable SCAN function
3. LCD Display
4. POWER ON/OFF
VOLUME
5.6.2 PIN SOCKET FOR
ACCESSORIES
7. EMERGENCY KEY
XH9/CH19 KEYLOCK
8. RF GAIN enable/disable RF
9. SQUELCH CONTROL
SQ AND ASQ
Switch continually
amongst ch9/ch19/in
use channel
GAIN and control its
level
Display and control
manual squelch
Display and control
ASQ (automatic
Squelch)
M-Mini Instruction Guide | 3
Page 16

A/F
SQ
RFG EMG
8.8
TXRXAQ
1 3 5 7 9 +30
FM AM
M H
SC R
DISPLAY
8.8
FM AM
M H
SC R
ANT
EXT SP
15
12
13
TXRXAQ
1 3 5 7 9 +30
8.8
FM AM
M H
SC R
1011
14
10. Selected channel
11. Received signal strenght indicator and trasmission power signal
12. AM/FM mode
13. RX/TX: reception (RX) and trasmission (TX) indicator
14. SC: SCAN funcition activated
15. AQ: Automatic squelch activated
16. R: RFGAIN activated
BACK PANEL
16
1819
EXT SP
ANT
17
17. Power supply cable
18. External speacker
19. Antenna connector
4 | M-Mini Instruction Guide
Page 17

MICROPHONE
A/F
SQ
RFG EMG
8.8
TXRXAQ
1 3 5 7 9 +30
FM AM
M H
SC R
ANT
EXT SP
8.8
TXRXAQ
1 3 5 7 9 +30
FM AM
M H
SC R
20. PTT key: trasmission button
21. UP key
22. DOWN key
22 21
DOWN UP
20
INSTALLATION
Select the mounting location so that road safety is not aected by the device, or
additional risk of injury in an accident arises. Check that the display can be seen, and
the controls can easily accessed.
POWER SUPPLY
Fuse
A fuse in the power cable protects against damage caused by technical defects or
incorrect polarity. If this fuse is blown, first eliminate the error and then replace
the blown fuse for DC power Cord, use F3A 250V type.The parameters and the
symbol of the fuse are indicated in the following label.
F3A 250V +
If the fuse burns several times, please send the radio to our service.
M-Mini Instruction Guide | 5
Page 18

Car Operation
The red wire of the power cable must be connected to the positive terminal (+12 V),
the black wire to the negative terminal. If possible the radio should be connected
directly to the vehicle battery, because this is the point with the least interference
from the car’s electrical system. The device can also be connected behind the ignition switch. All settings of the M-MINI are stored in a nonvolatile memory.
Operation with AC Adapter
Operate your radio only at a stabilized radio power supply, which is capable to provide at least 2A at 12 -13.8V DC. Unregulated power supplies or battery chargers are
unsuitable and can cause damage. Connect the red lead to the positive (+) terminal
of the power supply, the black wire to the negative (-) terminal of the power supply.
ANTENNA CONNECTION
Connect the CB antenna to the ANT socket on the back of your M-MINI. The
antenna must be tuned to the CB radio band. For this use a SWR meter. For a
good radio range, the SWR should not exceed a value of 2. A high SWR also points
to defects in antenna, cable, or a short circuit in the antenna line. Never transmit
without connected antenna!
Note: The radio antenna is to be mounted from other antennas and interference sources
as much as possible. CB antennas must be mounted usually in the vehicule highest part
on a metal surfaces. A suciently large metal surface is essential for the function of the
antenna. For installation on a fiberglass cabs or plastic wind deflectors, special ground
less antennas can be used.
6 | M-Mini Instruction Guide
Page 19

OPERATION
Power On/O the radio
Turn VOL switch clockwise to power on the radio, the LCD displays the CB standard followed by the channel number.
Turn the VOL knob counterclockwise, until it clicks. The radio is powered o.
Volume control
Turn clockwise to increase volume and turn counterclockwise to decrease volume.
Channel Selection
Shortly press microphone UP or DOWN to change working channel.
Hold microphone UP or DOWN to change the working channel fast.
Squelch level control (28 level and o)
Shortly press SQ, until LCD shortly displays “SQ” and then displays current level
squelch;
0.F Squelch o
0.1 Lowest Squelch level
2.8 highest Squelch level
While display shows current level, press microphone UP or DOWN shortly to
change SQ level; hold microphone UP or DOWN to change the SQ level fast.
Hold SQ or wait for 3 seconds to store and exit.
Note: Higher SQ level require a stronger signal to open the speaker and hear the spokesman.
ASQ control (9 levels)
Hold SQ key, until LCD displays AQ, the ASQ function is turned on. The LCD will
display the ASQ level.
A.1 lowest ASQ level
A.9 highest ASQ level
Shortly press microphone UP or DOWN to change ASQ level, hold microphone
UP or DOWN to change the ASQ level fast fast. Hold SQ or wait for 3 seconds
to store and exit.
Note: Higher ASQ level require a stronger signal to open the speaker and hear the spokesman.
M-Mini Instruction Guide | 7
Page 20

Modulation Type
Shortly press A/F key to switch between AM /FM mode.
The LCD displays the selected mode.
RF Gain control
Shortly press RFG key, LCD displays R and the present RF gain level flashes.
Shortly press microphone UP or DOWN to change the level of attenuation.
Shortly press RFG key to exit RF gain level control.
Note: RFGain wonk only in AM mode
When RFG function is on, your radio attenuatly receives anche the low signal could
be not received.
If RFG level 6 is selected it means the attenuation is 6 dB.
Emergency Channel
Shortly press EMG key to choose CH9, the channel number flashes.
Shortly press EMG key again to choose CH19, the channel number flashes.
Shortly press EMG key third time to return to last normal channel.
Key Lock
Hold EMG key for over 2 seconds to lock the keys, LCD displays “LC”.
Hold EMG key for over 2 seconds again to unlock the keys, LCD displays OF.
Note: In lock mode, all keys except PTT are invalid.
Scan function
Hold A/F to start scan function, “SC” flashes in the LCD; press microphone UP or
DOWN to change scan direction during scan. Press A/F or PTT key to exit scan
function.
8 | M-Mini Instruction Guide
Page 21

Changing the CB-Standard
Switch o the radio, press A/F and then swich on your radio. Display shows the
current frequencies.
Press microphone UP or DOWN to choose wanted norms.
Power o and power on again.
FREQUENCY BAND CHART
Digits displayed Country
I Italy 40 CH AM/FM 4 Watt
I2 Italy 34 CH AM/FM 4 Watt
D4 Germany 80 CH FM 4 Watt / 40 CH AM 4 Watt
EU Europe 40 CH FM 4 Watt / 40 CH AM 1 Watt
EC CEPT 40 CH FM 4 Watt
PL Poland 40 CH AM/FM 4 Watt
UK England 40 CH FM 4 Watt English frequencies + EC 40
IN International 27 CH AM/FM 4 Watt
Note: The frequency band allowed all over Europe is 40 CH FM 4W (EC).
CH FM 4 Watt CEPT frequencies
External Speaker
An external speaker (8 Ohm) can be connected to the 3.5mm mono socket on
the back of the radio. The built-in speaker automatically turns o when a plug is
inserted into this jack.
Restore factory default
Switch o the radio, hold SQ key and then powering the radio on, until the LCD
displays “RT”.
All channel and function setting will resume factory default after above operation.
M-Mini Instruction Guide | 9
Page 22

SPECIFICATION
Frequency band* ................................................................................ 26.565-27.99125
Dimensions ..................................................................................... 102 x 100 x 25 mm³
Weight .................................................................................................................... 450 gr
Supply Voltage ........................................................................................................13,2 V
Current Consumption .........................................................................................2 A max
Operating Temperature Range ............................................................. -20 to +50 °C
Antenna Socket .......................................................................................UHF, SO-239
Frequency Error .........................................................................................< +/- 300 Hz
TX Power .................................................................................................................4 Watt
Spurious Transmissions ....................................................................< 4 nW (-54 dBm)
Adjacent Channel Power ...................................................................................< 20 μW
FM Deviation ........................................................................................................ 1.9 kHz
AM Modulation Index ....................................................................................... 85-90%
RX Sensitivity better than ........................................................................................ 1 μV
Image Rejection .......................................................................................................70dB
Adjacent Channel Rejection ..................................................................................60dB
Audio Output .................................................................................... 1 Watt into 8 Ohm
Frequency Response ...............................................................................300-3000Hz
*covering all approved EU frequency band
Specifications are subject to change without notice.
A redily accessibile disconnect device shell be incorporated in the installation wiring.
The disconnect device shall disconnect both poles simultaneously.
10 | M-Mini Instruction Guide
Page 23

BEDIENUNGSELEMENTE 3
INSTALLATION 5
BEDIENUNG 7
TECHNISCHE DATEN 10
M-Mini Bedienungsanleitung | 1
Page 24

Das M-MINI kann als Mobilstation im Auto oder mit einer geeigneten DC-Stromversorgung als Basisstation betrieben werden. Dieses Gerät entspricht den neuesten europäischen CB-Normen. Durch seine auswählbaren CB-Standards kann
er europaweit eingesetzt werden. Bitte wählen Sie nur CB-Standards aus, die im
Einsatzland auch erlaubt sind.
FEATURES:
• Multi-Standard Gerät
• Kanal auf/ab Tasten am Mikrofon
• Kanalsuchlauf
• LCD Display, S-Meter
• Automatische Rauschsperre (ASQ) einstellbar
• RF Gain
• Kanal 9/19 Taste
• 2-Pin Buchse für Zubehör (inklusive Bluetooth Zubehör)
• Anschluss für externen Lautsprecher
2 | M-Mini Bedienungsanleitung
Page 25

BEDIENUNGSELEMENTE
1 2 3 4
A/F
SQ
TXRXAQ
1 3 5 7 9 +30
RFG EMG
8.8
FM AM
M H
SC R
8 7 6 59
Kurzer Druck Langer Druck
1. Lautsprecher
2. AM/FM Taste AM/FM Umschaltung Suchlauf (SCAN)
3. LCD Display
4. Ein/Aus Lautstärke
5.6.2-Pin Buchse für
Zubehör
7. EMG-Taste Schaltet zwischen
8. RF Gain RF Gain an/aus und
9. Rauschsperre SQ und
ASQ
K9, K19 und dem
Arbeitskanal
Einstellung der Stufe
Anzeige und Einstellung
der manuellen
Rauschsperre
Anzeige und Einstellung
der automatischen
Rauschsperre
M-Mini Bedienungsanleitung | 3
Page 26

A/F
SQ
RFG EMG
8.8
TXRXAQ
1 3 5 7 9 +30
FM AM
M H
SC R
DISPLAY
8.8
FM AM
M H
SC R
ANT
EXT SP
15
12
13
TXRXAQ
1 3 5 7 9 +30
8.8
1011
10. Gewählter Kanal
11. S-Meter und Anzeige der Sendeleistung
12. AM/FM Modulation
13. RX/TX Anzeige : Empfangen (RX) und Senden (TX)
14. SC: SCAN Suchlauft aktiviert
15. AQ: Automatische Rauschsperre aktiviert
16. R: RFGAIN aktiviert
RÜCKSEITE
FM AM
M H
SC R
14
16
1819
EXT SP
ANT
17
17. 12V DC Anschlusskabel
18. Buchse für externen Lautsprecher
19. Antennen-Buchse
4 | M-Mini Bedienungsanleitung
Page 27

MIKROFON
A/F
SQ
RFG EMG
8.8
TXRXAQ
1 3 5 7 9 +30
FM AM
M H
SC R
ANT
EXT SP
8.8
TXRXAQ
1 3 5 7 9 +30
FM AM
M H
SC R
22 21
20. PTT: Sendetaste
21. UP: Aufwärts-Taste
22. DOWN: Abwärts-Taste
INSTALLATION
20
DOWN UP
Wählen Sie den Montageort so aus, dass durch das Gerät nicht die Verkehrssicherheit beeinträchtigt wird oder ein zusätzliches Verletzungsrisiko bei einem Unfall
entsteht. Überprüfen Sie, ob das Display gut sichtbar ist und die Bedienelemente
leicht zugänglich sind.
STROMVERSORGUNG
Sicherung
Eine Sicherung in der DC-Zuleitung schützt vor Schäden durch technische Defekte oder falsche Polarität. Wenn diese Sicherung durchgebrannt ist, beseitigen Sie zuerst den Fehler und ersetzen Sie dann die durchgebrannte Sicherung.
Verwenden Sie den Typ F3A 250V. Die Parameter und das Symbol der Sicherung
sind wie folgend.
F3A 250V +
Sollte die Sicherung mehrmals durchbrennen, senden Sie bitte das Gerät an unseren Service.
M-Mini Bedienungsanleitung | 5
Page 28

Fahrzeugbetrieb
Der rote Ader der DC-Zuleitung muss mit dem Pluspol (+12 V) verbunden werden,
die schwarze Ader mit dem Minuspol. Wenn möglich sollte das Funkgerät direkt an
die Fahrzeugbatterie angeschlossen werden, da dies der Punkt mit den geringsten
Störungen durch die elektrische Anlage des Fahrzeugs ist. Das Gerät kann auch
hinter dem Zündschalter angeschlossen werden. Alle Einstellungen des M-MINI
werden nichtflüchtig gespeichert.
Betrieb mit Netzteil
Betreiben Sie das Gerät nur an einem stabilisierten Funknetzteil, welches mindestens 2 A bei 12 -13,8 V DC liefert. Unstabilisierte Netzteile oder Batterieladegeräte sind ungeeignet und können zu Schäden führen. Verbinden Sie die rote
Ader mit dem Pluspol (+) des Netzteils, die schwarze Ader mit dem negativen (-)
Anschluss des Netzteils.
ANSCHLUSS DER ANTENNE
Schließen Sie die CB-Antenne an die ANT-Buchse auf der Rückseite des M-MINI
an. Die Antenne muss auf das CB-Band abgestimmt sein. Verwenden Sie hierzu
ein SWR-Messgerät. Für eine gute Reichweite sollte das SWR den Wert 2 nicht
überschreiten. Ein hohes SWR weist auf Defekte in Antenne, Kabel oder einen
Kurzschluss in der Antennenleitung hin. Senden Sie niemals ohne angeschlossene
Antenne!
Hinweis: Die Funkantenne sollte so weit entfernt wie möglich von anderen Antennen
und Störquellen montiert werden. CB-Antennen sollten möglichst auf dem Dach des
Fahrzeugs montiert werden. Für die Funktion der Antenne ist eine ausreichend große
Metalloberfläche erforderlich. Zur Montage auf GFK-Auauten oder auf KunststoWindabweisern sind spezielle massefreie Antennen verfügbar.
6 | M-Mini Bedienungsanleitung
Page 29

BEDIENUNG
Ein- / Ausschalten des Geräts
Zum Einschalten des Geräts den VOL-Knopf im Uhrzeigersinn drehen. Das Display
zeigt kurz den CB-Standard an, gefolgt von der Kanalnummer.
Den VOL-Knopf gegen den Uhrzeigersinn drehen, bis es klickt. Das Gerät ist
ausgeschaltet.
Lautstärke
VOL-Knopf im Uhrzeigersinn drehen, um die Lautstärke zu erhöhen und gegen den
Uhrzeigersinn drehen, um die Lautstärke zu verringern.
Kanalwahl
UP- oder DOWN-Taste am Mikrofon kurz drücken, um den Arbeitskanal zu we-
chseln. UP- oder DOWN-Taste gedrückt halten, um den Arbeitskanal schnell zu
ändern.
Rauschsperren-Pegel (28 Stufen und Aus)
Die SQ-Taste kurz drücken. Das Display zeigt kurz „SQ“ und dann die aktuelle Ein-
stellung der Rauschsperre.
0.F Rauschsperre aus
0.1 Niedrigster Rauschsperren-Pegel
2.8 Höchster Rauschsperren-Pegel
Während das Display den aktuellen Pegel anzeigt, kurz die UP- oder DOWN-Taste
am Mikrofon drücken, um den Rauschsperren-Pegel zu ändern. Die UP- oder
DOWN-Taste gedrückt halten, um den Rauschsperren-Pegel schnell zu ändern.
Zum Speichern und Beenden die SQ-Taste erneut drücken oder 3 Sekunden war-
ten.
Hinweis: Höhere Rauschsperren-Einstellungen erfordern ein stärkeres Signal, um den
Lautsprecher zu önen und die Gegenstation zu hören.
ASQ Einstellung (9 Stufen)
Die SQ-Taste gedrückt halten, bis das Display „AQ“ anzeigt. Die ASQ-Funktion ist
eingeschaltet und das Display zeigt den ASQ-Pegel.
A.1 Niedrigster ASQ-Pegel
A.9 Höchster ASQ-Pegel
Die UP- oder DOWN-Taste am Mikrofon drücken, um den ASQ-Pegel zu ändern.
M-Mini Bedienungsanleitung | 7
Page 30

Die UP- oder DOWN-Taste gedrückt halten, um den ASQ-Pegel schnell zu ändern. Zum Speichern und Beenden die SQ-Taste erneut drücken oder 3 Sekunden
warten.
Hinweis: Höhere ASQ-Einstellungen erfordern ein stärkeres Signal, um den Lautsprecher zu önen und die Gegenstation zu hören.
Modulationsart
Kurz die A/F-Taste drücken, um zwischen dem AM- und FM-Modus zu wechseln.
Das Display zeigt den ausgewählten Modus an.
RF Gain Einstellung
Kurz die RFG-Taste drücken. Das Display zeigt R und der Wert der aktuellen
Abschwächung blinkt. Die UP- oder DOWN-Taste am Mikrofon drücken, um den
Wert der Abschwächung zu ändern.
Zum Verlassen der RF Gain Einstellung, kurz die RFG-Taste drücken.
Hinweis: RF Gain arbeitet nur im AM-Modus
Ist die RFG-Funktion eingeschaltet, empfängt das Gerät weniger empfindlich und
schwache Signale können nicht empfangen werden.
Wenn der RFG-Pegel 6 gewählt wird, bedeutet dies, dass die Dämpfung 6 dB beträgt.
Kanal 9/19
Ein kurzer Druck der EMG-Taste schaltet auf Kanal 9, die Kanalnummer blinkt.
Ein weiterer Druck der EMG-Taste schaltet auf Kanal 19, die Kanalnummer blinkt.
Der nächste Druck der EMG-Taste schaltet zurück auf den zuletzt benutzten Ar-
beitskanal.
Tastensperre
Die EMG-Taste für mehr als 2 Sekunden gedrückt halten, um die Tasten zu sperren.
Das Display zeigt „LC“.
Um die Tasten zu entsperren, die EMG-Taste erneut für mehr als 2 Sekunden ge-
drückt halten. Das Display zeigt „OF“.
Hinweis: Bei eingeschalteter Tastensperre sind alle Tasten außer PTT inaktiv.
Kanalsuchlauf
Um den Suchlauf zu starten, die A/F-Taste gedrückt halten. „SC“ blinkt im Display.
Am Mikrofon die UP- oder DOWN-Taste drücken, um die Richtung während des
Suchlaufs zu ändern. Zur Beendigung des Suchlaufs die A/F- oder PTT-Taste drü-
cken.
8 | M-Mini Bedienungsanleitung
Page 31

Wechsel des CB-Standards
Gerät ausschalten, mit gedrückter A/F-Taste wieder einschalten. Das Display zeigt
den aktuellen CB-Standard. Den gewünschten CB-Standard mit der UP- oder
DOWN-Taste am Mikrofon wählen.
Gerät ausschalten und wieder einschalten.
FREQUENZBAND-TABELLE
Anzeige Land
I Italien 40 K AM/FM 4Watt
I2 Italien 34 K AM/FM 4Watt
D4 Deutschland 80 K FM 4Watt / 40 K AM 4Watt
EU Europa 40 CH K 4Watt / 40 K AM 1Watt
EC CEPT 40 K FM 4Watt
PL Polen 40 K AM/FM 4W
UK England 40 KH FM 4 Watt Englische Frequenzen + EC 40 K FM
4Watt CEPT Frequenzen
IN International 27 CH AM/FM 4 Watt
Hinweis: Das Frequenzband EC (40 K FM 4W) ist überall in Europa erlaubt.
Externer Lautsprecher
Ein externer Lautsprecher (8 Ohm) kann an die 3,5 mm Klinkenbuchse auf der
Rückseite des Funkgeräts angeschlossen werden. Der eingebaute Lautsprecher
wird ausgeschaltet, wenn ein Stecker in diese Buchse gesteckt wird.
Werkseinstellungen wiederherstellen
Gerät ausschalten und bei gedrückter SQ-Taste wieder einschalten, bis das Display
„RT“ anzeigt.
Alle Kanal- und Funktionseinstellungen werden hierdurch wieder auf die Werkseinstellung zurückgesetzt.
M-Mini Bedienungsanleitung | 9
Page 32

TECHNISCHE DATEN
Frequenzbereich* ...............................................................................26,565-27,99125
Abmessungen .................................................................................. 102 x 100 x 25 mm
Gewicht ..................................................................................................................450 gr
Betriebsspannung .................................................................................................. 13,2 V
Stromaufnahme ..................................................................................................2 A max
Betriebstemperatur ................................................................................ -20 to +50 °C
Antennenbuchse .....................................................................................UHF, SO-239
Frequenzabweichung ................................................................................ < +/- 300 Hz
Sendeleistung ........................................................................................................ 4 Watt
Unerwünschte Aussendungen ........................................................< 4 nW (-54 dBm)
Nachbarkanalleistung........................................................................................< 20 μW
FM Hub .................................................................................................................1,9 kHz
AM Modulationsgrad ........................................................................................85-90%
Empfangsempfindlichkeit besser als .......................................................................1 μV
Spiegelfrequenz-Unterdrückung .......................................................................... 70dB
Nachbarkanal-Unterdrückung ..............................................................................60dB
Audio Ausgangsleistung .....................................................................1 Watt an 8 Ohm
Frequenzgang .......................................................................................... 300-3000Hz
* Alle in Europa zulässigen CB-Frequenzbänder.
Technische Änderungen ohne Vorankündigung vorbehalten.
Eine leicht zugängliche Trennvorrichtung muss in die Versorgungsleitung eingebaut werden. Die
Trennvorrichtung muss beide Pole gleichzeitig trennen.
10 | M-Mini Bedienungsanleitung
Page 33

• INFORMAZIONE AGLI UTENTI: Ai sensi dell’art. 13 del decreto legislativo 25 luglio
2005, n.151 “Attuazione delle Direttive 2002/95/CE, 2002/96/CE e 2003/108/
CE, relative alla riduzione dell’uso di sostanze pericolose nelle apparecchiature elettriche ed elettroniche, nonché allo smaltimento dei rifiuti”. Il simbolo del cassonetto barrato riportato sull’apparecchiatura indica che il prodotto alla fine della propria vita utile
deve essere raccolto separatamente dagli altri rifiuti. L’utente dovrà, pertanto, conferire
l’apparecchiatura giunta a fine vita agli idonei centri di raccolta dierenziata dei rifiuti
elettronici ed elettrotecnici, oppure riconsegnarla al rivenditore al momento dell’acquisto di una nuova apparecchiatura di tipo equivalente, in ragione di uno a uno. L’adeguata
raccolta dierenziata per l’avvio successivo dell’apparecchiatura dismessa al riciclaggio,
al trattamento e allo smaltimento ambientalmente compatibile contribuisce ad evitare
possibili eetti negativi sull’ambiente e sulla salute e favorisce il riciclo dei materiali di cui
è composta l’apparecchiatura. Lo smaltimento abusivo del prodotto da parte dell’utente
comporta l’applicazione delle sanzioni amministrative di cui al dlgs. n.22/1997 (articolo
50 e seguenti del dlgs. n.22/1997).
• All articles displaying this symbol on the body, packaging or instruction manual of
same, must not be thrown away into normal disposal bins but brought to specialised
waste disposal centres. Here, the various materials will be divided by characteristics and
recycles, thus making an important contribution to environmental protection.
• Alle Artikel, die auf der Verpackung oder der Gebrauchanweisung dieses Symbol tragen, dürfen nicht in den normalen Mülltonnen entsorgt werden, sondern müssen an
gesonderten Sammelstellen abgegeben werden. Dort werden die Materialien entsprechend ihrer Eigenschaften getrennt und, um einen Beitrag zum Umweltschutz zu liefern, wiederverwertet.
• Todos los artículos que exhiban este símbolo en el cuerpo del producto, en el embalaje o en el manual de instrucciones del mismo, no deben ser desechados junto a los
residuos urbanos normales sino que deben ser depositados en los centros de recogida
especializados. En estos centros, los materiales se dividirán en base a sus características
y serán reciclados, para así poder contribuir de manera importante a la protección y
conservación del medio ambiente.
• Tous les articles présentant ce symbole sur le corps, l’emballage ou le manuel d’utilisation de celui-ci ne doivent pas être jetés dans des poubelles normales mais être amenés
dans des centres de traitement spécialisés. Là, les diérents matériaux seront séparés
par caractéristiques et recyclés, permettant ainsi de contribuer à la protection de l’environnement.
• Zużyte towary oznaczone tym znakiem mogą stanowić zagrożenie dla środowiska naturalnego, dlatego nie należy ich wyrzucać tylko oddać sprzedawcy, który przekaże je do
przedsiębiorstwa zajmującego się utylizacja odpadów.
• Toate produsele care au aplicat acest simbol pe ambalaj sau in manualul de utilizare, nu
trebuie să fie aruncate in coşurile de gunoi, ci duse in centrele de colectare a deşeurilor
electrice si electronice. Aici, diversele materialele vor fi impărţite in funcţie de caracteristici si reciclate, aducându-se astfel o contribuţie importantă la protectia mediului.
 Loading...