

Page 1
M-30
” RICETRASMETTITORE VEICOLARE CB AM/FM
” AM/FM CB MOBILE TRANSCEIVER
” AM/FM CB MOBILFUNKGERÄT
” TRANSCEPTOR MÓVIL CB AM/FM
” EMETTEURRÉCEPTEUR MOBILE CB AM/FM
” RADIO CB AM/FM
” STATIE RADIO CB AM/FM
Page 2

ITALIANO
ENGLISH
DEUTSCH
ESPAÑOL
FRANÇAIS
POLSKI
ROMANA
Page 3

Sommario
Contenuto 1
Precauzioni 1
Caratteristiche principali 2
Descrizione dell’installazione della radio 3
Installazione della radio 3
Connessione all’alimentazione 3
Installazione del microfono 4
Installazione della antenna 4
Utilizzo di un altoparlante esterno 4
Descrizione display e parti della radio 5
Display 6
Pannello posteriore 7
Microfono 7
Operazioni principali 8
Accensione e spegnimento 8
Regolazione del volume 8
Selezione del canale 8
Selezione della modalità operativa (AM/FM) 9
M-30 Manuale d’uso
Page 4

Regolazione dello Squelch 9
Attivazione dello squelch automatico 9
Selezione della modalità di visualizzazione (frequenza o numero
canale) 9
Ricezione 9
Trasmissione 10
Selezione della banda d’uso 10
Blocco tastiera 11
Impostazioni da menu 12
Accesso e navigazione del menu 12
Elenco delle funzioni di menu 14
Canali di memoria 16
Memorizzare un canale 16
Richiamare un canale 16
Cancellare un canale 16
Scansione 16
Aggiungere un canale alla lista canali da scansionare 17
Togliere un canale alla lista canali da scansionare 17
Modificare il tempo di permanenza su un canale attivo durante la
scansione 17
Abilitazione della funzione Dual Watch 17
Attivazione del Noise Blanker 18
Abilitazione dell’attenuatore di segnale (RF-Gain) 18
Abilitazione Roger Beep 18
Abilitazione dell’equalizzatore audio 18
Canale di emergenza 19
Taratura strumento lettura SWR (ROS) 19
Altre funzioni 19
Impostazione del canale prioritario 19
Attivazione/disattivazione dei suoni di tastiera 19
Impostazione del Time Out Timer 20
Impostazione del livello della retroilluminazione 20
Attivazione dell’accensione automatica 20
Impostazione dei gruppi menu 20
Reset delle impostazioni 21
Soluzione dei problemi 22
Specifiche tecniche 23
M-30 Manuale d’uso M-30 Manuale d’uso
Page 5

Contenuto
• 1 ricetrasmettitore M-30 con cavo di alimentazione;
• 1 microfono da palmo;
• 1 staa di fissaggio;
• 1 sacchetto contenente le viti per il fissaggio della staa e per il fissaggio della
radio alla staa;
• 1 fusibile di protezione;
• 1 supporto per microfono;
Se l’elenco non coincide con ciò che trovate nell’imballo, contattate il vostro rivenditore Midland.
Precauzioni
Il vostro ricetrasmettitore è stato progettato per darvi anni di prestazioni sicure ed
adabili. Come per tutte le apparecchiature elettriche, esistono alcune precauzioni
alle quali consigliamo di attenervi.
• Non cercate di aprire la radio. Potreste danneggiarla e invalidare la garanzia.
• Non esponete l’apparato ad eccessive temperature e non lasciatelo in ambienti
polverosi.
• Non bagnate l’apparato. L’umidità può corrodere i circuiti elettrici.
• Se dalla radio esce fumo, spegnetela immediatamente.
• Non trasmettete senza antenna.
• Non utilizzate alcol solventi o abrasivi per pulire l’apparecchio. Utilizzate solo un
panno morbido e pulito leggermente inumidito con acqua.
M-30 Manuale d’uso | 1
Page 6

Caratteristiche principali
• CB Multifunzione con 6 tasti programmabili
• Ampio display TFT a colori
• Alimentazione 12V-24V
• Corpo radio in lega di metallo per una migliore dissipazione del calore
• Tasti programmabili
• Visualizzazione nel display del numero del canale o del numero del canale
+ frequenza.
• AM/FM multi banda
• Squelch Digitale automatico regolabile su più livelli
• Rosmetro e S-Meter
• Attenuatore di RF
• Funzione scansione
• Dual Watch
• Roger Beep personalizzabile
• Canali Emergenza 9/19 e canale prioritario
• Noise Blanker
• Equalizzatore Audio
• Protezione contro l’inversione di polarità
• 8 canali di memoria personalizzabili
• Time Out Timer
• Retroilluminazione Regolabile
• Accensione Automatica
• Blocco tastiera
• Microfono con connettore RJ45 con tasti Up/Down/Canale prioritario
• Programmabile da software (mediante programmatore PRG-30 cod. C1318,
opzionale)
Descrizione dell’installazione della radio
Installazione della radio
• Ricercate e localizzate, sul mezzo mobile, la posizione per installare l’apparato.
Utilizzate la staa di supporto in dotazione per il fissaggio. Tale posizionamento
deve essere fatto in modo da non creare intralcio a chi guida, ma deve anche
essere facilmente accessibile, adeguatamente areato e protetto dalla luce diretta del sole.
• Installate la staa di fissaggio nel veicolo usando le viti autofilettanti e le rondelle
piatte fornite in dotazione.
• Posizionate la radio nella staa, inserite le apposite viti e stringetele saldamente.
Controllare che le viti siano ben serrate, in considerazione delle notevoli vibrazioni create dall’autoveicolo.
Connessione all’alimentazione
• Prima di procedere in questa operazione, controllare che il ricetrasmettitore sia
spento.
• Sul retro della radio esce un cavetto di alimentazione bicolore con un portafusibile inserito sul cavo rosso. Il cavo può essere collegato direttamente alla
batteria. Oppure se necessario può essere inserito all’interno di una spina accendisigari (non in dotazione).
• Nel collegamento, è molto importante rispettare la polarità, anche se l’apparato
è protetto contro l’inversione accidentale. Di norma si identifica il polo positivo
con il colore rosso o con il segno “+”, e il polo negativo con il colore nero o con
il segno “-”.
• Gli stessi segni (o colori) identificativi li troveremo sulla batteria (accumulatore
od altro) e nella scatola dei fusibili dell’automobile.
• La batteria del veicolo deve avere una tensione nominale di 12V o 24V. Assicuratevi che la batteria del veicolo sia in grado di fornire una suciente corrente
alla radio durante il suo funzionamento.
• Stendete il cavo di alimentazione nel veicolo fino a raggiungere la batteria. Cercate di percorrere il tratto più breve possibile.
• Collegate i cavi alla batteria assicurandovi di aver rispettato le polarità.
• Si raccomanda di collegare in modo corretto e stabile i terminali del cavetto alla
batteria.
ATTENZIONE: Per l’ottimizzazione delle prestazioni si consiglia l’installazione dell’apparecchiatura in luoghi che possano consentire un suciente riciclo d’aria.
2 | M-30 Manuale d’uso M-30 Manuale d’uso | 3
Page 7
Sostituzione del fusibile
M
O
D
R
F
G
C
H
S
Q
L
S
FM
CE
CH–31
0 2 4 6 8
0 3 5 7 9 30
P
S
MAX
MAX
12.5
Se un fusibile si è bruciato, determinarne la causa prima della sua sostituzione. Se
necessario rivolgersi ad un centro assistenza.
Il fusibile posto sul cavetto sulla parte posteriore della radio è da 5A
5A 250V FUSE
IN-LINE FUSE HOLDER
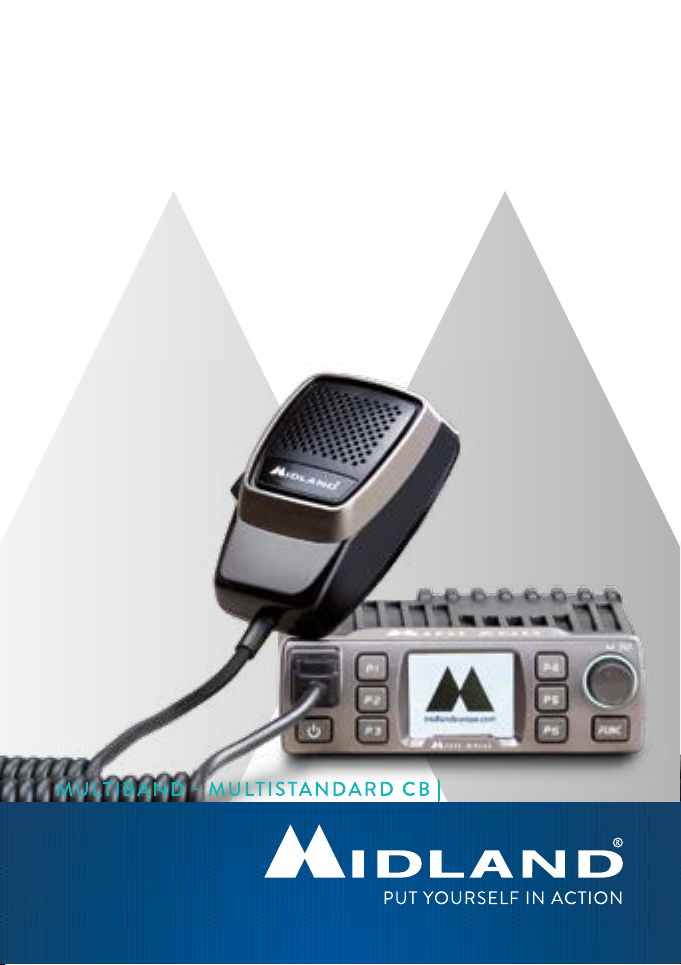
Descrizione display e parti della radio
9 2 5 10
11
P1
P2
Installazione del microfono
Collegare il microfono al frontalino della radio inserendo il connettore nell’apposita
presa. Assicuratevi di coprire il connettore con il cappuccio antipolvere.
Se lo desiderate potete fissare sul veicolo il supporto per appendere il microfono
durante la guida.
Installazione della antenna
Informazioni utili:
Installare l’antenna nella parte più alta del veicolo
• Maggiore è la lunghezza dell’antenna e migliore sarà il suo rendimento
• Se possibile, installare l’antenna al centro della superficie metallica scelta
• Tenere il cavo dell’antenna lontano da fonti di disturbi elettrici
• Evitate di danneggiare il cavo
Attenzione: Non usare mai la radio senza aver installato un’antenna appropriata per
non correre il rischio di danneggiare il trasmettitore; per la stessa ragione controllare
periodicamente la taratura dell’antenna.
Utilizzo di un altoparlante esterno
Se desiderate usare la radio con un altoparlante esterno assicuratevi che l'impedenza sia di 4 Ω o 8 Ω. Il connettore dell’altoparlante deve essere di tipo jack 3,5
mm mono.
1. Tasto accensione / spegnimento. Tenere premuto per accendere o spegnere
2. Tasto programmabile P1
3. Tasto programmabile P2
4. Tasto programmabile P3
5. Tasto programmabile P4
6. Tasto programmabile P5
7. Tasto programmabile P6
8. Tasto FUNC: tasto funzione. Utilizzando questo tasto si attivano le funzioni
9. Connettore microfonico per collegare il microfono o il cavo di programma-
10. Selettore principale: premere brevemente per spostarsi di 10 canali avanti.
11. Display grafico multicolore.
4 | M-30 Manuale d’uso M-30 Manuale d’uso | 5
1 7 6 83 4
l’apparato. Premere brevemente per disattivare/attivare l’altoparlante
secondarie dei tasti sul frontale della radio. Tenere premuto per entrare nel
menu.
zione (opzionale).
La pressione lunga permette di bloccare/sbloccare la tastiera. Il selettore prin-
cipale permette di navigare il menu. All’interno del menu ruotare il selettore
principale per cambiare la voce del menu, premere brevemente per confer-
mare la scelta.
P3
midlandeurope.com
P4
P5
P6
FUNC
Page 8
Display
M
O
D
R
F
G
E
M
G
C
H
S
Q
L
S
C
A
S
FM
CE
CH–31
0 2 4 6 8
0 3 5 7 9 30
P
S
MAX
MAX
VOL
RFG
SQL
HIC
35
of
10
of
12.5
P1
P2
P3
P4
P5
P6
FUNC
M
O
D
R
F
G
E
M
G
C
H
S
Q
L
S
C
A
S
FM
CE
CH–31
0 2 4 6 8
0 3 5 7 9 30
P
S
MAX
MAX
VOL
RFG
SQL
HIC
35
of
10
of
midlandeurope.com
M
O
D
R
F
C
H
S
Q
S
FM
CE
0 2 4 6 8
0 3 5 7 9 30
P
S
MAX
MAX
12.5
12.5
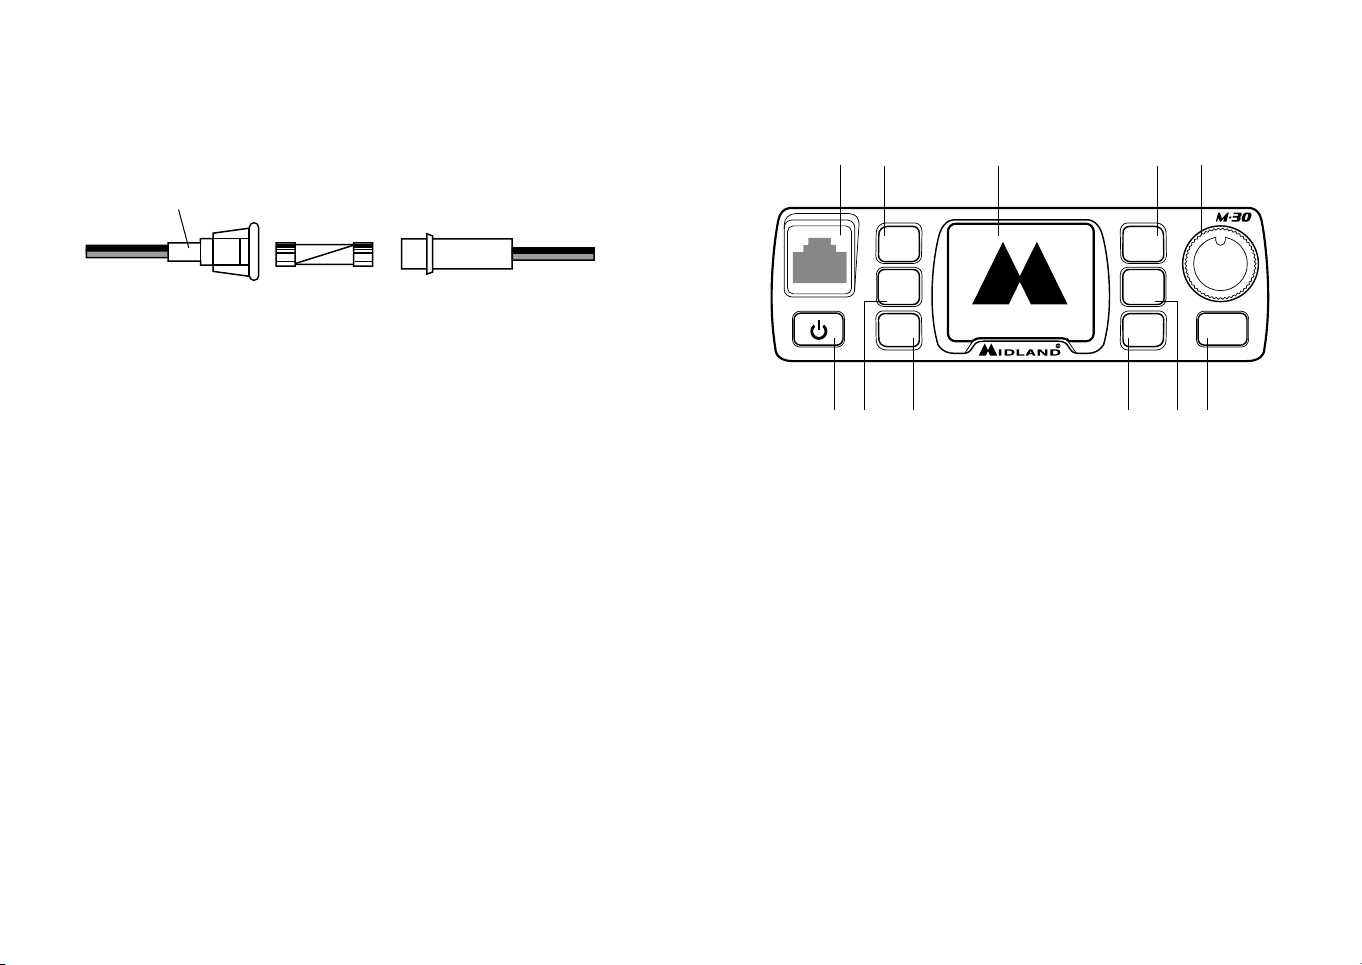
A. Barra indicatore potenza trasmessa
B. Barra indicatore livello di segnale ricevuto o livello di SWR (ROS) (se in tra-
C. Tipo di modulazione (AM/FM)
D. Funzioni associate ai tasti P1-P6
E. S:Indicatore di canale inserito nella lista dei canali scansionabili, oppure T: in-
F. Canale o frequenza in uso
G. Riquadro contenente i principali parametri della radio
RX:
H. Nome banda in uso
I. Valore della tensione di alimentazione
6 | M-30 Manuale d’uso M-30 Manuale d’uso | 7
0 2 4 6 8
M
P
D
E
F
smissione)
dicatore di trasmissione attiva.
VOL, livello volume
SQL, livello di squelch
RFG, livello dell’attenuatore
HIC, Livello dell’equalizzatore
O
D
R
G
M
G
S
S
F
CH–31
E
VOL
RFG
A B C
MAX
0 3 5 7 9 30
FM
35
SQL
of
HIC
MAX
12.5
CE
10
of
G
TX:
PWR, livello di potenza
RB, tipo di roger beep
SPL, split (funzione attiva solo per
la versione amatoriale)
TOT, valore del Time Out Timer
C
H
S
Q
L
S
C
A
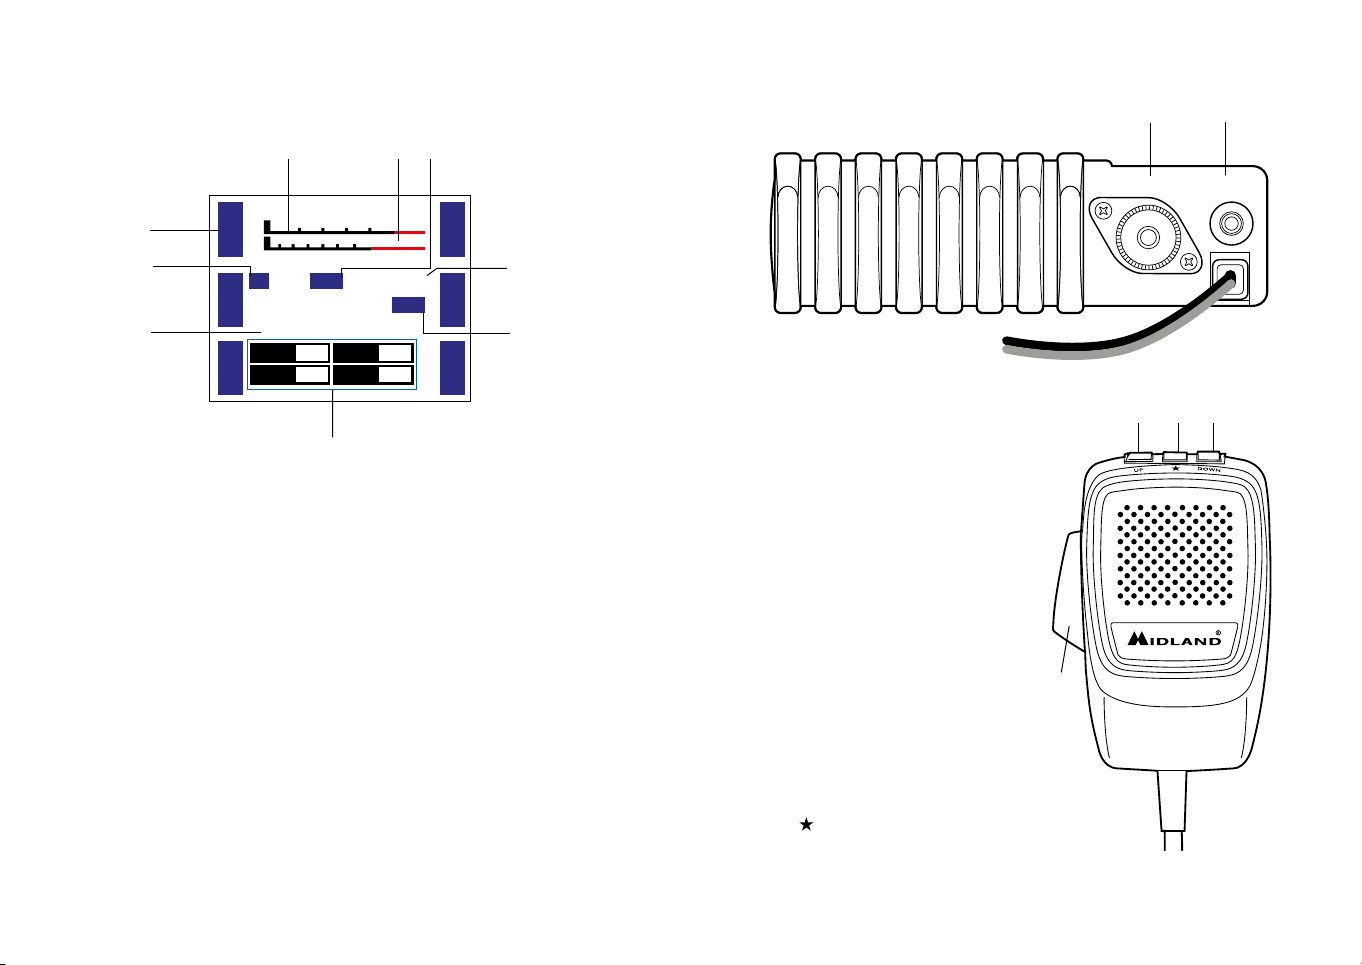
Pannello posteriore
12 13
ANT EXT SP
I
H
2
12. ANT: connettore d’antenna.
È previsto il connettore d’antenna SO239
13. EXT SPK: presa altoparlante esterno.
1
3 2
Microfono
1. PTT: premere per trasmettere.
2. UP/DOWN: premete per au-
mentare/ridurre il volume o per
scorrere le varie impostazioni.
3. : premere per posizionarsi sul
canale prioritario.
Page 9

Operazioni principali
Questa radio ha 6 pulsanti personalizzabili indicati con P1-P2-P3-P4-P5-P6.
Ogni pulsante può essere associato fino a 3 funzioni contemporaneamente suddivise in 3 gruppi menu.
Per impostazione predefinita sono attivi 2 gruppi menu.
Si può attivare il terzo gruppo menu mediante programmatore PRG30 (opzionale).
I 2 gruppi menu sono così impostati:
Menu 1:
P1 MOD P4 CH
P2 RFG P5 SQL
P3 EMG P6 SCA
Le funzioni associate ai tasti P1-P2-P3 compaiono nella parte sinistra del display,
mentre le funzioni associate ai tasti P4-P5-P6 compaiono nella parte destra del
display.
È possibile modificare le funzioni assegnate ai tasti da menu, oppure da software
(opzionale).
Per cambiare gruppo menu premere il tasto FUNC.
Accensione e spegnimento
Premete il pulsante per 1 secondo per accendere la radio. Premete il pulsante
per 2 secondi per spegnere la radio.
Regolazione del volume
Ruotate il selettore principale in senso orario per aumentare il volume, in senso
antiorario per diminuirlo.
Selezione del canale
Premete il tasto P4 del menu 1 o quello che avete associato alla funzione CH, ruotate quindi il selettore principale in senso orario per selezionare il canale successivo,
in senso antiorario per selezionare quello precedente.
Nota: È possibile regolare il volume anche tramite i tasti UP e DOWN del microfono.
Nota: È possibile spostarsi velocemente di 10 canali in avanti premendo brevemente il
selettore principale.
Menu 2:
P1 DW P4 DIM
P2 DSP P5 NB
P3 HIC P6 MEM
Selezione della modalità operativa (AM/FM)
Per cambiare modalità operativa premere il tasto P1 del menu 1 o quello che avete
associato alla funzione MOD. Nella parte inferiore del display comparirà la modalità
selezionata.
Per confermare premere il selettore principale o attendere 10 secondi.
Regolazione dello Squelch
La funzione dello Squelch consiste nel silenziare l’altoparlante in assenza di segnali.
Più alto è il livello di Squelch selezionato, più i segnali ricevuti devono essere forti
per poterli sentire. L’impostazione appropriata di Squelch dipende dalle condizioni di
rumore di radiofrequenza nell’ambiente.
Per regolare lo Squelch premere il tasto P5 del menu 1 o quello che avete associato
alla funzione SQL, selezionare il valore di squelch desiderato ruotando il selettore
principale. È possibile scegliere 28 livelli: il livello più sensibile è il livello 1 mentre il
livello meno sensibile è il livello 28.
Per confermare premere il selettore principale o attendere 10 secondi.
Attivazione dello squelch automatico
Per attivare lo squelch automatico tenere premuto il pulsante associato alla funzione
SQL. Regolare il livello desiderato ruotando il selettore principale.
È possibile scegliere 9 livelli: il livello più sensibile è il livello 1 mentre il livello meno
sensibile è il livello 9. Confermare la scelta premendo il selettore principale. Una
volta abilitato lo squelch automatico la funzione SQL nel display diventerà ASQ.
Selezione della modalità di visualizzazione (frequenza o numero
canale)
M-30 permette di visualizzare la frequenza (in MHz) o il numero del canale.
Per cambiare la modalità di visualizzazione premere il tasto P2 del menu 2 o quello
associato alla funzione DSP.
Per confermare premere il selettore principale o attendere 10 secondi.
Ricezione
Quando la radio è Accesa, è immediatamente in grado di ricevere sul canale impostato i segnali provenienti dall’antenna. L’intensità del segnale ricevuto è visualizzata
sull’apposita barra verde nella parte alta del display.
Assicurarsi di aver impostato la modalità di funzionamento desiderata tra AM e FM.
Nota: per silenziare rapidamente lo speaker premere brevemente il pulsante
parte bassa del display comparirà la scritta Audio: MT. Premere nuovamente il pulsante
per riabilitare l’audio. Sul display comparirà la scritta AUDIO: Esc.
. Nella
8 | M-30 Manuale d’uso M-30 Manuale d’uso | 9
Page 10

Trasmissione
Prima di trasmettere sulla frequenza o sul canale impostato verificare con attenzione che la frequenza o il canale siano liberi.
Premere il PTT e parlare con un tono di voce normale.
Alla pressione del PTT sul display comparirà la lettera T e l’intensità della potenza
in uscita sarà visibile su una barra preceduta dalla lettera P. Rilasciare il PTT per
ricevere.
Selezione della banda d’uso
Midland M-30 è un CB multi standard che può essere utilizzato in diversi paesi.
A seconda del paese di utilizzo potete selezionare la banda corretta.
Di seguito si riporta una tabella contenente la bande di funzionamento memorizzate
nella radio:
Sigla sul display Paese
EU Europa /Italia 40CH AM/FM 4W
CE 40CH FM 4W
UK
PL Polonia 40CH AM/FM 4W
I2 Italia 34 CH AM/FM 4W
DE
IN 27CH AM/FM 4W
HF Russia 400CH AM/FM 4/8/15W
HF Polonia (Russia -5KHz) 400CH AM/FM 4/8/15W
HAM
Inghilterra 40CH FM 4 Watt frequenze inglesi + EC
40CH FM 4Watt frequenze CEPT
Germania 80CH FM 4W /
40CH AM 4W
Solo per mercato extra EU
Amatoriale 340CH AM/FM 4/8/15W. Per operare su
questa banda è necessaria una licenza amatoriale
4. Ora selezionate la banda di vostro interesse ruotando il selettore principale;
5. Confermate la volta scelta tenendo premuto 5 secondi il selettore principale.
Nota: La selezione della banda UK permette comunque di passare velocemente alla banda CE. Premere il tasto P1 del menu 1 o quello associato alla funzione MOD per passare
dalla banda UK alla banda CE.
Nota: Lo standard sicuramente riconosciuto in tutti i paesi europei è la banda CE
(40 Ch FM 4W). Vedi tabelle restrizioni all’uso incluse nella confezione.
Blocco tastiera
Tenete premuta la manopola principale per 2 secondi per bloccare la tastiera. Sul
display comparirà la scritta Key Lock nella parte bassa. Il blocco tasti sarà esteso
anche ai tasti del microfono (PTT escluso).
Tenete premuto il selettore principale per 2 secondi per sbloccare la tastiera.
Per selezionare la banda desiderata seguite questa procedura:
1. Spegnete la radio;
2. Accendete la radio tenendo premuto il tasto il tasto FUNC;
3. Rilasciate il tasto FUNC non appena compare questa schermata:
CB FREQ
SelectBand:
CE BAND
10 | M-30 Manuale d’uso M-30 Manuale d’uso | 11
Page 11

Impostazioni da menu
Tramite menu è possibile personalizzare le varie funzioni della radio e dei canali.
Con il tasto FUNC e con la manopola principale è possibile navigare il menu e cambiare i parametri. La manopola principale infatti oltre a fungere da selettore è anche
un pulsante per entrare nei menu e confermare i settaggi della radio.
Accesso e navigazione del menu
1. Premere per 2 secondi FUNC del frontale della radio;
2. Ruotate la manopola principale per selezionare la voce del menu desiderata;
3. Premete il selettore principale sul frontale della radio, per entrare nelle opzioni
relative alla voce del menu scelta;
4. Ruotate la manopola principale o usate le frecce del microfono per selezionare
il parametro desiderato;
5. Confermate e salvate la scelta premendo il selettore principale. Successiva-
mente la radio si posizionerà sulla voce del menu appena modificata.
6. Premete il pulsante P3 sul frontale della radio per tornare indietro di un livello
nel MENU.
7. Premete nuovamente P3 per uscire da tutti i menu o attendere 5 secondi per
riportare la radio in stand-by.
MENU:
• FUNC MENU (usato per cambiare le impostazioni generali della radio)
1. BEEP
2. TOT DIM
3. VOL
4. SQL
5. ASQ
6. RFG
7. DSP
• PUD MENU (usato per cambiare con un unico settaggio le impostazioni di tutti
i canali della banda in uso)
1. A/FM
2. NB
3. HIC
4. ROG
• CHAN MENU (usato per modificare le impostazioni del canale in uso)
1. PD
2. SCAN
3. A/FM*
4. NB*
5. HIC*
• DTMF MENU (usato per cambiare le impostazioni dei codici DTMF)
1. DTMF
2. SND-T
3. FIR-T
4. PRE-T
* queste voci compaiono solo se PD è su “OFF”.
** KEY MENU permette di impostare le opzioni richiamabili dai pulsanti P1-P6
del frontale della radio.
8. KEY
9. SCM
10. SCRT
11. AOP
12. SWR
13. RST
5. BUSY
6. BOT
7. EOT
8. CALL
6. ROG*
7. BUSY*
8. BOT*
9. EOT*
10. CALL*
5. DELAY
6. D-FUN
7. DISP
8. KEY MENU**
12 | M-30 Manuale d’uso M-30 Manuale d’uso | 13
Page 12

Elenco delle funzioni di menu
Display Menu N. Funzione Valori Selezionabili
FUNC MENU
BEEP 1 Abilitazione dei toni di tastiera ON, OFF
TOT 2 Time Out Timer
DIM 3
VOL 4 Impostazione del volume dello speaker 1,2,3,…,56
SQL 5 Selezione del livello di squelch OFF,1,2,…,28
ASQ 6
RFG 7
DSP 8
KEYs 9
SCM 10 Selezione del metodo di scansione SQ, TI
SCRT 11
AOP 12 Accensione automatica ON, OFF
SWR 13 SWR test per antenna ---
RST 14 Ripristino impostazioni di fabbrica OPT, ALL
A/FM 1 Selezione della modalità operativa AM, FM
NB 2 Abilitazione del Noise Blanker OFF, ON
HIC 3 Abilitazione del filtro audio OFF, ON
ROG 4 Abilitazione del roger beep OFF, 1, 2, 3, 4, 5
BUSY 5
BOT*** 6
EOT*** 7
CALL*** 8
Selezione del livello di retroilluminazione del
display e dei tasti
Selezione della sensibilità dello squelch
automatico
Selezione del livello di attenuazione del
segnale in ingresso.
Selezione della modalità di visualizzazione
informazioni canale
Selezione dei gruppi menu accessibili da
display
Selezione del tempo di permanenza su un
canale occupato durante la scansione
PUD MENU
Abilitazione del blocco trasmissione su
canale occupato
Abilitazione dei toni DTMF alla pressione
del PTT
Abilitazione dei toni DTMF al rilascio del
PTT
Scelta del tipo di tono da inviare con il
comando CALL
OFF, 1, 2, …, … ,
30 min.
1, 2, 3
1,2,3,…,9
OFF,3,6,9,…
,30,AU
CH,FRQ
1/2/3, 1/2, 2/3, 1/3
5S, 10S, 15S, …,
30S
OFF, ON
CHAN MENU
PD 1
SCAN 2
Quando PD è impostato su ON le successive funzioni sono disabilitate
A/FM 3 Selezione della modalità operativa AM, FM
NB 4 Abilitazione del Noise Blanker OFF, ON
HIC 5 Abilitazione del filtro audio OFF, ON
ROG 6 Abilitazione del roger beep OFF, 1, 2, 3, 4, 5
BUSY 7
BOT*** 8
EOT*** 9
CALL*** 10
DTMF 1
SND-T 2
FIR-T 3
PRE-T 4
DELAY 5
D-FUN 6
DISP 7
In questo menu è possibile impostare le funzioni associate ai tasti P1-P6
Nota: L’elenco delle opzioni può variare se si sono modificate le impostazioni tramite
programmatore (opzionale).
***: Le funzioni DTMF non sono disponibili su M-30.
Abilitazione dei settaggi separati per i singoli
canali
Aggiunta o cancellazione del canale
corrente alla lista di canali da scansionare
Abilitazione del blocco trasmissione su
canale occupato
Abilitazione dei toni DTMF alla pressione
del PTT
Abilitazione dei toni DTMF al rilascio del
PTT
Scelta del tipo di tono da inviare con il
comando CAL
DTMF MENU***
Selezione del codice DTMF richiamabile dal
comando CALL
Settaggio del tempo di invio del codice
DTMF
Settaggio del tempo di invio del primo
numero che compone il codice DTMF
Settaggio del tempo di pre- emissione del
codice DTMF
Settaggio del tempo di post-emissione del
comando DTMF
Settaggio modalità invio lettera D nei codici
DTMF
Abilitazione della visualizzazione sul display
del codice DTMF inviato
KEY MENU
OFF, ON
ADD, DEL
OFF, ON
1,2,3, …,16
10ms, …, 500ms
0ms, …, 1000ms
100ms, …,
2500ms
0ms, …, 1000ms
D, 1S, 2S, .., 16S
OFF, ON
14 | M-30 Manuale d’uso M-30 Manuale d’uso | 15
Page 13

Canali di memoria
M-30 permette di memorizzare fino a 8 canali. I canali consentono di memorizzare
le frequenze e i relativi dati di uso frequente. In questo modo, non sarà necessario
riprogrammare continuamente gli stessi dati, ma sarà possibile richiamare rapidamente i canali desiderati.
Memorizzare un canale
1. Posizionarsi sul canale che si vuole memorizzare,
2. Impostare i parametri di funzionamento desiderati (AM/FM, HIC, RB, NB).
3. Tenete premuto il tasto P6 del menu 2 o quello associato alla funzione MEM
per 2 secondi, sul display comparirà il numero del canale.
4. Se il canale lampeggia significa che il canale di memoria è vuoto. Se il canale
non lampeggia significa che il canale è già occupato. È comunque possibile
sovrascrivere le informazioni memorizzate nel canale occupato.
5. Selezionare il numero di canale su cui si vogliono memorizzare (o sovrascrivere) le impostazioni ruotando la manopola principale.
6. Per memorizzare il canale, premete 2 secondi P6 nel menu 2 o il tasto che
avete associato alla funzione MEM oppure premere FUNC sul microfono per
cancellare la memorizzazione.
Richiamare un canale
1. Premere P6 nel menu 2 o il tasto associato alla funzione MEM per accedere
alle memorie della radio.
2. Ruotare la manopola principale per selezionare il canale di memoria desiderato.
Cancellare un canale
1. Premere il tasto associato alla funzione MEM per accedere alle memorie della
radio.
2. Posizionarsi sul canale che si desidera cancellare.
3. Tenete premuto il tasto associato alla funzione MEM per 2 secondi.
Scansione
M-30 ore 2 tipi di scansione:
• TI: una volta attivata la scansione si ferma per qualche secondo sul segnale rice-
vuto per poi proseguire la scansione sui canali successivi.
• SQ: una volta attivata la scansione si ferma sul segnale ricevuto. La scansione
riprenderà solo se il segnale ricevuto dovesse scomparire.
1. Per selezionare il tipo di scansione desiderato, entrate nel menu della radio e
seguite il seguente percorso: MENUFUNC MENU SCM
2. Selezionate la voce desiderata.
3. Per avviare la scansione premere P6 nel menu 1 o il tasto associato alla funzione SCA
4. Per invertire la direzione della scansione ruotare la manopola principale.
5. Per fermare la scansione premere un qualsiasi tasto sul frontale della radio
oppure premere il PTT.
Aggiungere un canale alla lista canali da scansionare
1. Posizionarsi su un canale che non è nella lista dei canali da scansionare.
2. Per aggiungere il canale alla lista dei canali da scansionare tenere premuto per
2 secondi il tasto associato alla funzione SCA
3. Il display mostrerà SKP: ADD nella parte inferiore e la lettera S comparirà immediatamente sopra al nome del canale (o frequenza).
Rimuovere un canale dalla lista canali da scansionare
1. Posizionarsi su un canale che è nella lista dei canali da scansionare.
2. Per eliminare il canale dalla lista dei canali da scansionare tenere premuto per
2 secondi il tasto associato alla funzione SCA
3. Il display mostrerà SKP: DEL nella parte inferiore e la lettera S sopra al nome
del canale (o frequenza) scomparirà.
Modificare il tempo di permanenza su un canale attivo durante la
scansione
È possibile personalizzare il tempo di attesa su un canale attivo durante la scansione
in modalità TI. È possibile scegliere tra un minimo di 5s ad un massimo di 30s di
attesa.
1. Entrate nel menu della radio:
MENUFUNC MENUSCRT
2. Premete la manopola principale per entrare nelle opzioni relative alla voce del
menu scelta.
3. Ruotate la manopola principale per selezionare il valore desiderato.
4. Confermate e salvate la scelta premendo il selettore principale.
Abilitazione della funzione Dual Watch
M-30 ore la possibilità di monitorare due canali contemporaneamente.
1. Posizionarsi sul primo canale da monitorare e premere P1 nel menu 2 o il tasto
associato alla funzione DW.
2. Ora posizionarsi sul secondo canale da monitorare e premere nuovamente il
tasto associato alla funzione DW.
3. La funzione Dual Watch è attiva. Alla ricezione di un segnale la radio interromperà il monitoraggio sui due canali, che riprenderà non appena il segnale
non sarà più presente.
16 | M-30 Manuale d’uso M-30 Manuale d’uso | 17
Page 14

Attivazione del Noise Blanker
Il Noise Blanker permette di rimuovere o attenuare i disturbi e le interferenze impulsive che arrivano sull’antenna (come ad esempio i disturbi dovuti al circuito di
ignizione delle automobili).
1. Per attivare il Noise Blanker premere P5 nel menu 2 o il pulsante assegnato
alla funzione NB.
2. Sul display comparirà NB: OFF oppure NB: ON a seconda che si accenda o si
spenga il Noise Blanker.
3. Premere il selettore principale per confermare la scelta.
Abilitazione dell’attenuatore di segnale (RF-Gain)
In presenza di segnali molto forti può essere utile inserire l’attenuatore.
1. Per attivare l’attenuatore premere P2 nel menu 1 o il pulsante assegnato alla
funzione RFG. Ad ogni pressione del pulsante RFG è possibile aumentare di
un livello l’attenuatore. È possibile scegliere tra i seguenti livelli: OFF, 3, 6, 9,
12, 15, 18, 21, 24, 27, 30, AU.
2. Premere il selettore principale per confermare la scelta.
Abilitazione Roger Beep
Quando la funzione Roger Beep è attiva la radio emetterà una nota audio a fine
trasmissione.
M-30 ha 5 note audio preimpostate che possono essere modificate a piacere tramite il software di programmazione (opzionale).
1. Per attivare il Roger Beep entrare nel menu e seguite questa procedura:
MENU FUNC MENU ROG.
2. È possibile scegliere tra le seguenti opzioni: OFF, 1, 2, 3, 4, 5.
3. Premere il selettore principale per confermare la scelta.
Abilitazione dell’equalizzatore audio
M-30 ha la possibilità di enfatizzare le note basse al fine di migliorare l’audio da
ascoltare, specialmente per lunghi periodi.
1. Per attivare l’equalizzatore premere P3 nel menu 2 o il pulsante assegnato alla
funzione HIC.
HIC: OFF. l’equalizzatore audio sarà regolato sul livello standard
HIC: ON. l’equalizzatore audio sarà regolato in modo da enfatizzare le basse
frequenze.
2. Premere il selettore principale per confermare la scelta.
Canale di emergenza
M-30 permette di passare velocemente ai canali di emergenza standard: canale 9
e canale 19.
1. Per passare ai canali di emergenza premere il pulsante assegnato alla funzione
EMG.
2. Ad ogni pressione del pulsante EMG è possibile cambiare i canali di emergenza
e l’ultimo canale in uso.
3. Premere il selettore principale per confermare la scelta.
Taratura strumento lettura SWR (ROS)
Tramite questo menu è possibile tarare il rosmetro dell’M-30 in modo tale che il
display, durante la fase di trasmissione, indichi il corretto valore del SWR (ROS) in
antenna. M-30 è già tarato in fabbrica sulla frequenza centrale di lavoro. Se necessario è possibile eseguire nuovamente una taratura (è richiesto un carico fittizio da
50 Ohm, non fornito in dotazione).
1. Entrate nel menu della radio e seguite questo percorso:
MENUFUNC MENUSWR
2. Premete la manopola principale per avviare la taratura.
3. Assicuratevi che alla radio sia collegato un carico fittizio da 50 Ohm e preme-
te il selettore principale per confermare.
Altre funzioni
Impostazione del canale prioritario
1. Sintonizzarsi sul canale che si vuole impostare come prioritario.
2. Tenete premuto per 3 secondi il tasto sul microfono per memorizzare il
canale come prioritario.
3. È possibile richiamare in seguito il canale prioritario premendo brevemente il
tasto su microfono.
Attivazione/disattivazione dei suoni di tastiera
1. Entrate nel menu della radio e seguite questo percorso:
MENUFUNC MENUBEEP
2. Premete la manopola principale per entrare nelle opzioni relative alla voce del
menu scelta
3. Ruotate la manopola principale per selezionare ON (beep di tastiera attivi) o
OFF (beep di tastiera disattivi).
4. Confermate e salvate la scelta premendo il selettore principale.
18 | M-30 Manuale d’uso M-30 Manuale d’uso | 19
Page 15

Impostazione del Time Out Timer
Il time out timer (TOT) è un timer di fine trasmissione che limita la durata di ogni
trasmissione.
Il timeout prestabilito limita il tempo di trasmissione da un minimo di 1 minuti a un
massimo di 30 minuti. M-30 genera un allarme acustico all’interruzione della trasmissione.
Questa funzione è utile per evitare danni da surriscaldamento. Non è consigliabile
disattivare il time out timer.
1. Entrare nel menu della radio e seguire questa procedura:
MENUFUNC MENUTOT
2. Impostare il valore desiderato e confermare premendo il selettore principale.
Impostazione del livello della retroilluminazione
1. Entrare nel menu della radio e seguire questa procedura:
MENUFUNC MENUDIM
2. Impostare il valore desiderato e confermare premendo il selettore principale.
3. È possibile regolare la retroilluminazione del display su tre livelli, il livello 1 è il
meno luminoso e il livello 3 è il più luminoso.
Attivazione dell’accensione automatica
È possibile impostare M-30 anché si accenda automaticamente quando è alimentato dalla tensione batteria.
1. Entrare nel menu della radio e seguire questa procedura:
MENUUTILITIES FUNC MENUAOP
2. Impostare il valore desiderato e confermare premendo il selettore principale.
Impostazione dei gruppi menu
M-30 ha 3 gruppi menu. È possibile usarli tutti e 3 o abilitarne solo alcuni.
1. Entrare nel menu della radio e seguire questo percorso:
MENUUTILITIES FUNC MENUKEYS
2. Scegliere tra le seguenti opzioni:
1/2/3, per abilitare tutti e tre i gruppi menu,
1/2, per abilitare il gruppo 1 e 2,
2/3, per abilitare il gruppo 2 e 3,
1/3, per abilitare il gruppo 1 e 3.
3. Impostare il valore desiderato e confermare premendo il selettore principale.
Reset delle impostazioni
1. Entrare nel menu della radio e seguire questa procedura:
MENUFUNC MENURST
2. Scegliere tra le seguenti opzioni:
OPT, per eseguire il reset delle sole impostazioni. Non esegue il reset delle
memorie,
ALL, per eseguire il reset di tutte le impostazioni e delle memorie.
3. Impostare il valore desiderato e confermare premendo il selettore principale.
20 | M-30 Manuale d’uso M-30 Manuale d’uso | 21
Page 16

Soluzione dei problemi
Specifiche tecniche
Problema Soluzione
La radio non si accende Cavo di alimentazione scollegato o interrotto. Verifi-
care lo stato del cavo di alimentazione.
Fusibile interrotto. Verificare lo stato dei fusibili della
radio e della vettura.
La tastiera non funziona É attiva la funzione di Blocco tastiera
Canali vedi tabella bande
Gamma di frequenza**** 26.565-27.99125 MHz FM (RX/TX)
26.965-27.405 MHz AM (RX/TX)
Alimentazione 12/24V
Consumo .2A
Temperatura di funzionamento -10°C a + 55°C
Presa di Antenna UHF, SO239
Potenza d’uscita 4W
Modulazione A3E (AM), F3E (FM),
Deviazione max di frequenza (FM) ≤ 1,9KHz
Modulazione max di ampiezza (AM) 85%
Emissione spurie < -54dBm
Potenza canale adiacente < 20 uW
Stabilità di frequenza ±5.0 ppm
Sensibilità di ricezione @12dB SINAD < 1uV
Potenza d’uscita audio ≥ 3W (8 Ohm)
Reiezione Canale Adiacente migliore di 60 dB
Risposta in frequenza 300-3000Hz
Dimensioni 120x38x160 (LxAxP)
Peso (microfono incluso) 820g
**** considerando tutte le bande di frequenza europee approvate
Le specifiche sono soggette a modifiche senza preavviso.
22 | M-30 Manuale d’uso M-30 Manuale d’uso | 23
Page 17

Index
What’s in the box 1
Cautions 1
Main features 2
Installing the radio 3
Installation 3
Power supply 3
Replacing fuses 4
Connecting the microphone 4
Installing an antenna 4
External speakers 4
Controls and display description 5
Display 6
Rear panel 7
Microphone 7
Main operations 8
Turning on and o 8
Volume adjustment 8
Channel selection 8
Selecting the operating mode (AM/FM) 8
Squelch adjustment 9
Activating the automatic squelch 9
Selecting the mode displayed (frequency or channel number) 9
M-30 Instruction Guide
Page 18

Receiving 9
Transmitting 9
Selecting the band in use 10
Menu settings 12
Going through the menu 12
List of the menu functions 14
Storing a channel 16
Recall a channel 16
Delete a channel 16
Scan function 17
Adding a channel to the scan list 17
Deleting a channel from the scan list 17
Scan resume time 17
Dual Watch function 18
Noise Blanker activation 18
RF-Gain 18
Roger Beep 18
Voice enhancer 19
Emergency channels 19
SWR adjustment 19
Menu of the radio 20
Reset 20
Troubleshooting 21
Technical specifications 22
Other functions 19
Setting the priority channel 19
Enabling/disabling the keypad tones 19
Time Out Timer 20
Setting the level of the display backlight 20
Automatic turning on 20
M-30 Instruction Guide M-30 Instruction Guide
Page 19

What’s in the box
• M-30 transceiver with power supply cord;
• 1 microphone;
• 1 mounting bracket;
• 1 polybag including screws to mount the bracket and to fix the radio to the bracket;
• 1 protection fuse;
• 1 microphone holder;
If any item is missing, please contact your Midland dealer.
Cautions
M-30 is an electronic product of exact design and should be treated with care. The
suggestions here below will help you to fulfill any warranty obligations and to enjoy
this product for many years.
• Do not attempt to open the radio for any reason! The radio’s precision mechanics and electronics require experience and specialized equipment; for the same
reason, the radio should under no circumstances be realigned as it has been
calibrated for maximum performance. Unauthorized opening of the transceiver
will void the warranty.
• Do not store the Radio under the sunshine or in hot areas. High temperatures
can shorten the life of electronic devices, and warp or melt certain plastics.
• Do not store the radio in dusty and dirty areas.
• Keep the Radio dry. Rainwater or damp will corrode electronic circuits.
• If it appears that the Radio diuses peculiar smell or smoke, please shut o its
power immediately.
• Do not transmit without antenna.
• Do not attempt to configure the transceiver while driving; it is very dangerous.
M-30 Instruction Guide | 1
Page 20

Main features
• Multi-function CB with 6 programmable channels
• Wide graphic TFT display
• Power supply 12V-24V
• Metal chassis
• Programmable controls
• Channel number or channel number+frequency band displayed
• AM/FM multi-band radio
• Digital automatic squelch adjustable in dierent levels
• S-Meter/SWR-Meter
• RF-gain
• Scan
• Dual Watch
• Customizable Roger Beep
• Emergency channels 9/19 and priority channel
• Noise Blanker
• Voice enhancer
• Protection against polarity inversion
• 8 memory channels customizable
• Time Out Timer
• Adjustable backlight
• Automatic turning on
• Keypad lock
• Microphone with RJ45 connector and Up/Down/Priority Channel controls
• Software programmable (through the optional programming kit PRG-30 cod.
C1318)
Installing the radio
Installation
• Safety and convenience are the primary considerations for mounting any piece
of mobile equipment. All controls must be readily available to the operator without interfering with the movements necessary for safe operation of the vehicle. To install the transceiver select a location that will minimize danger to your
passengers and yourself while the vehicle is in motion; the location should be
well-ventilated and shielded from direct sunlight.
• Install the mounting bracket in the vehicle using the supplied self-tapping
screws and flat washers.
• Install the bracket into the vehicle using the supplied self-tapping screws and
washers.
Power supply
• Be sure the transceiver is o.
• On the rear of the radio you will see a bi-color power supply cable with a fuse
holder on the red cable.
• This cable is supplied with a connector suitable for the connection to the radio
and vehicle’s battery.
• In the direct-voltage power supply, it is very important to observe the polarity
even if the unit is protected against the accidental inversion.
• Red = positive pole (+)
• Black = negative pole (-)
• The same colors are present on the battery and in the fuse box of the car. Correctly connect the cable terminal to the battery.
• The battery of vehicle must have a nominal capacity of 12 or 24V.
• Be sure the battery of the vehicle is able to supply enough power to the radio.
• Connect the DC power cable to the regulated DC power supply and ensure
that the polarities are correct.
ATTENTION: To obtain best performances we recommend installing the radio in a position with a good air circulation.
2 | M-30 Instruction Guide M-30 Instruction Guide | 3
Page 21

Replacing fuses
M
O
D
R
F
G
C
H
S
Q
L
S
FM
CE
CH–31
0 2 4 6 8
0 3 5 7 9 30
P
S
MAX
MAX
12.5
If the fuse blows, try to find a cause before replacing it. If necessary, contact a
service center for assistance.
The fuse on the rear of the radio has a current rating of 5A
5A 250V FUSE
IN-LINE FUSE HOLDER
Controls and display description
9 2 5 10
11
P1
P2
Connecting the microphone
Plug-in the supplied microphone to the proper connector on the front panel of
the radio.
The microphone can be hung up thanks to the holder supplied in the packaging.
Installing an antenna
• Place the antenna as high as possible
• The longer is the antenna, the better will be the performance
• If possible, mount the antenna in the centre of the surface
• Keep the antenna cable away from noise sources, such as the ignition switch,
gauges, etc
• Make sure you have a solid metal-to-metal ground connection
• Prevent cable damage during antenna installation
Attention: To prevent damage, never operate your radio without connecting a proper
antenna. A periodical control of the cable and of the S.W.R. is recommended.
External speakers
If you use external speakers, the impedance must be 4 Ω or 8 Ω. The external
speaker jack accepts a 3.5mm mono plug.
1. Power ON/OFF control. Keep pressed to turn on and o the transceiver.
2. P1 programmable key
3. P2 programmable key
4. P3 programmable key
5. P4 programmable key
6. P5 programmable key
7. P6 programmable key
8. FUNC: function button. With this control you activate the secondary fun-
9. Mike connector: plug-in the microphone or the optional programming cable.
10. Main knob: shortly push to skip 10 channels forwards, while if you keep it
11. Graphic multicolor display
4 | M-30 Instruction Guide M-30 Instruction Guide | 5
1 7 6 83 4
Shortly press to enable/disable the speaker.
ctions of the programmable keys on the front panel of the radio. Keep it pressed to enter the menu.
pressed the keypad is locked/unlocked. The main knob allows to look through
the menu options and to change the settings. Shortly press to confirm your
selection.
P3
midlandeurope.com
P4
P5
P6
FUNC
Page 22

Display
M
O
D
R
F
G
E
M
G
C
H
S
Q
L
S
C
A
S
FM
CE
CH–31
0 2 4 6 8
0 3 5 7 9 30
P
S
MAX
MAX
VOL
RFG
SQL
HIC
35
of
10
of
12.5
P1
P2
P3
P4
P5
P6
FUNC
M
O
D
R
F
G
E
M
G
C
H
S
Q
L
S
C
A
S
FM
CE
CH–31
0 2 4 6 8
0 3 5 7 9 30
P
S
MAX
MAX
VOL
RFG
SQL
HIC
35
of
10
of
midlandeurope.com
M
O
D
R
F
C
H
S
Q
S
FM
CE
0 2 4 6 8
0 3 5 7 9 30
P
S
MAX
MAX
12.5
12.5
A. Output power indicator
B. Received signal strength indicator or SWR level (in tx mode)
C. AM or FM modulation
D. Functions enabled with programmable controls P1-P6
E. S: Indicator of a channel included in the scan list. T: appears when the radio
F. Channel or frequency in use
G. Here are located the main parameters of the radio :
H. Name of the band in use
I. Power supply value
6 | M-30 Instruction Guide M-30 Instruction Guide | 7
M
P
D
E
F
is in tx mode.
RX: VOL, volume level
SQL, squelch level
RFG, RF-Gain
HIC, Voice enhancer
O
D
R
G
M
G
S
S
F
E
VOL
RFG
A B C
0 2 4 6 8
0 3 5 7 9 30
FM
CH–31
35
SQL
of
HIC
G
TOT, Time Out Timer setting
MAX
C
H
MAX
12.5
S
Q
CE
L
10
of
TX: PWR, output power level
RB, roger beep type
SPL, split (function enabled
S
C
A
only in the amateur version)
I
H
Rear panel
12. ANT: antenna connector, SO239 type.
13. EXT SPK: external speaker jack.
Microphone
1. PTT: push to transmit
2. UP/DOWN: press to increase/
decrease the volume or to look
through the options and settings.
3. press to select the priority
channel.
12 13
ANT EXT SP
2
3 2
1
Page 23

Main operations
M-30 is equipped with 6 programmable buttons: P1-P2-P3-P4-P5-P6. They can
be customised upon your needs; every button can be associated up to 3 functions
in 3 dierent menu at the same time.
By default the menu are 2; a third one can be activated through the optional programming kit PRG30.
Menu 1:
P1 MOD P4 CH
P2 RFG P5 SQL
P3 EMG P6 SCA
The functions associated to controls P1-P2-P3 will appear on the left side of the
display, while those activated with controls P4-P5-P6 will be displayed on the right.
It is possible to change the functions associated to the P buttons through the menu
or the optional programming software.
To change the menu press FUNC.
Turning on and o
Press the control for 1 second to switch on the radio; press it for 2 seconds to
switch it o.
Volume adjustment
Rotate the main knob clockwise to increase the volume, counter-clockwise to reduce it.
Channel selection
Press the button P4 of menu 1 or the one assigned to the channel function CH.
Then rotate the main knob clockwise to select the next channel, counter-clockwise
to select the previous one.
Note: the volume can also be adjusted with the UP/DOWN controls on the microphone.
Note: to skip 10 channels forwards shortly press the main knob.
Selecting the operating mode (AM/FM)
To change the operating mode press P1 of menu 1 or the key assigned to the MOD
function. The indicator will appear in the lower part of the display.
To confirm your selection press the main knob or wait for 10 seconds.
Menu 2:
P1 DW P4 DIM
P2 DSP P5 NB
P3 HIC P6 MEM
Squelch adjustment
Squelch is used to mute the speaker when no signals are present. The squelch level
must be adjusted according to the background noise. With the squelch level set
correctly, you will hear sound only while actually receiving a signal. The higher the
squelch level selected, the stronger must be the signals in order to hear them.
To adjust the squelch press P5 of menu 1 or the control associated to the SQL
function, select the desired level by rotating the main knob.
You can choose amongst 28 dierent levels: the most sensitive is level 1, while the
least sensitive is level 28.
To confirm your selection press the main knob or wait for 10 seconds.
Activating the automatic squelch
To activate the automatic squelch keep pressed the control associated to the SQL
function. Rotate the main knob to select the desired level. There are 9 levels available: the most sensitive is level 1, while level 9 is the least sensitive. Push the main
knob for confirmation.
Once the automatic squelch is activated, the indicator SQL on the display will be
replaced by ASQ.
Selecting the mode displayed (frequency or channel number)
M-30 is able to display either the frequency or the channel number.
To change this mode, press P2 in menu 2 or the key that you associated to DSP
function.
To confirm press the main knob or wait for 10 seconds.
Receiving
The received signal strength is shown with the green bar in the upper part of the
display.
Make sure you set the desired modulation (AM or FM).
Note: To rapidly mute the speaker press
Audio: MT will appear. Push
AUDIO: Esc.
. In the lower part of the display the indication
again to enable the audio again. The display will show
Transmitting
Before transmitting, be sure that the channel is not busy in that moment.
Press PTT and speak towards the microphone.
While transmitting, the display will show T and the output power will be indicated by
the bar in the upper part of the display.
Release to receive.
8 | M-30 Instruction Guide M-30 Instruction Guide | 9
Page 24

Selecting the band in use
Midland M-30 is a multi-standard CB that can be used in many countries. Depending on the country where you are, you have to select the proper and allowed band.
Here below the chart showing the frequency bands included in M-30:
Band displayed Country
EU Europe /Italy 40CH AM/FM 4W
CE 40CH FM 4W
UK
PL Poland 40CH AM/FM 4W
I2 Italy 34 CH AM/FM 4W
DE
IN 27CH AM/FM 4W
HF Russia 400CH AM/FM 4/8/15W
HF Poland (Russia -5KHz) 400CH AM/FM 4/8/15W
HAM
To select the desired frequency band, follow this procedure:
1. Switch o the radio;
2. Turn it on while keeping pressed FUNC;
3. Release FUNC as soon as the display shows:
England 40CH FM 4 Watt English frequencies + EC
40CH FM 4Watt CEPT frequencies
Germany 80CH FM 4W /
40CH AM 4W
FOR EXTRA EU MARKET ONLY
Amateur 340CH AM/FM 4/8/15W. The use of this band
is allowed with amateur licence only
CB FREQ
SelectBand:
CE BAND
Keypad lock
To lock the keypad keep pressed the main knob for 2 seconds. The display will show
Key Lock. When this function is activated all controls are locked on the radio and on
the mike except PTT.
To unlock the keypad keep pressed the main knob for 2 seconds again.
4. Now select the desired band by rotating the main knob.
5. For confirmation keep it pressed for 5 seconds.
Note 1: if the UK band is selected, you can switch directly to the CE band: just press P1
of menu 1 or the key associated to the MOD function.
Note 2: the frequency band allowed all over Europe is CE (40 Ch FM 4W). See the
Restrictions on the use chart included in the package.
10 | M-30 Instruction Guide M-30 Instruction Guide | 11
Page 25

Menu settings
With the menu it is possible to customize the functions of the radio and the channels.
With FUNC and the main knob it is possible to go through the menu and change
the parameters. The main knob in fact is not only a selector but also a control to
enter the menu and confirm the settings.
Going through the menu
1. Press the FUNC key for 2 seconds;
2. Rotate the knob to select the desired function;
3. Press the knob again to enter the options of the selected function;
4. Select the desired parameter by rotating the knob or using the UP/DOWN
controls of the microphone;
5. Push the knob for confirmation.
6. Press the P3 control on the front panel of the radio to go back to the previous
menu.
7. Push P3 again to exit all menu or wait for 5 seconds to return to stand-by
condition.
MENU:
• FUNC MENU (to change the general settings of the radio)
1. BEEP
2. TOT
3. DIM
4. VOL
5. SQL
6. ASQ
7. RFG
• PUD MENU (to change all channels' parameters of the band in use with only
one setting)
1. A/FM
2. NB
3. HIC
4. ROG
• CHAN MENU (to change the settings of the channel in use)
1. PD
2. SCAN
3. A/FM*
4. NB*
5. HIC*
• DTMF MENU (to change the settings of DTMF codes)
1. DTMF
2. SND-T
3. FIR-T
4. PRE-T
* these options are possible only if PD is set on “OFF”.
** KEY MENU allows to set the options or functions on P1-P6 keys.
8. DSP
9. KEY
10. SCM
11. SCRT
12. AOP
13. SWR
14. RST
5. BUSY
6. BOT
7. EOT
8. CALL
6. ROG*
7. BUSY*
8. BOT*
9. EOT*
10. CALL*
5. DELAY
6. D-FUN
7. DISP
8. KEY MENU**
12 | M-30 Instruction Guide M-30 Instruction Guide | 13
Page 26

List of the menu functions
Display Menu N. Function Options
FUNC MENU
BEEP 1 Keypad tone ON, OFF
TOT 2 Time Out Timer
DIM 3
VOL 4 Setting of the speaker volume 1,2,3,…,56
SQL 5 Squelch level selection OFF,1,2,…,28
ASQ 6
RFG 7 Selection of RF-Gain level
DSP 8 Mode displayed (channel or frequency) CH,FRQ
KEYs 9 Selection of the menu enabled
SCM 10 Type of scan SQ, TI
SCRT 11 Scan resume time
AOP 12 Automatic turning on ON, OFF
SWR 13 SWR test for antenna ---
RST 14 Reset OPT, ALL
A/FM 1 Operating mode AM, FM
NB 2 Noise Blanker OFF, ON
HIC 3 Voice enhancer OFF, ON
ROG 4 Roger beep
BUSY 5 Busy channel lockout selection OFF, ON
BOT*** 6
EOT*** 7
CALL*** 8 Selection of the call tone type
Selection of the display and controls
backlight level
Selection of the automatic squelch
sensitivity
PUD MENU
Activation of DTMF tones while pressing
PTT
Activation of DTMF tones while relea-
sing PTT
OFF, 1, 2, …, … ,
30 min.
1, 2, 3
1,2,3,…,9
OFF,3,6,9,…
,30,AU
1/2/3, 1/2, 2/3,
1/3
5S, 10S, 15S, …,
30S
OFF, 1, 2, 3,
4, 5
CHAN MENU
PD 1 Enabling the separate channel settings OFF, ON
SCAN 2
When the PD function is activated, the following features are disabled:
A/FM 3 Selection of the operative mode AM, FM
NB 4 Noise Blanker activation OFF, ON
HIC 5 Voice enhancer OFF, ON
ROG 6 Roger beep
BUSY 7 Busy channel lockout selection OFF, ON
BOT*** 8
EOT*** 9
CALL*** 10 Selection of the call tone type
DTMF 1
SND-T 2 Setting the tx time of the DTMF code
FIR-T 3
PRE-T 4 Pre-loading DTMF time setting
DELAY 5 Delay time setting
D-FUN 6 D-letter sending mode D, 1S, 2S, .., 16S
DISP 7 DTMF code sent displayed OFF, ON
In this menu it is possible to set the functions assigned to P1-P6 controls
Note: the list of the options can change in case some settings have been modified through the optional programming software.
***: The DTMF functions are not available on M-30.
Adding or deleting the channel in use
from the scan list
Activation of DTMF tones while pressing
PTT
Activation of DTMF tones while relea-
sing PTT
DTMF MENU***
Selection of the DTMF code associated
to CALL key
Setting the tx time of the first digit of
the DTMF code
KEY MENU
ADD, DEL
OFF, 1, 2, 3,
4, 5
1,2,3, …,16
10ms, …,
500ms
0ms, …,
1000ms
100ms, …,
2500ms
0ms, …,
1000ms
14 | M-30 Instruction Guide M-30 Instruction Guide | 15
Page 27

Memory channels
M-30 allows you to store up to 8 channels.
The channels let you store the frequency and data. So that you don’t have to
re-program the same data repeatedly and you can immediately tune on the desired
channels.
Storing a channel
1. Select the channel you want to store.
2. Set all desired parameters to the channel (AM/FM, HIC, RB, NB).
3. Keep pressed for 2 seconds P6 in menu 2 or the key associated to MEM
function, the channel number will appear on the display.
4. If the channel blinks it means that it is not stored. While if it doesn’t, it is already stored. It is possible however to overwrite the memory information on the
busy channel.
5. Select the channel number to store (or overwrite) by turning the main knob.
6. To delete the memory, press for 2 seconds P6 in menu 2 or the control associated to MEM function, or FUNC on the mike.
Recall a channel
Press P6 in menu 2 or the key associated to MEM function to enter the memory
channels.
Rotate the main knob to select the desired memory channel.
Delete a channel
Press P6 in menu 2 or the key associated to MEM function to enter the memory
channels.
Select the channel to delete.
Keep pressed for 2 seconds P6 in menu 2 or the key associated to MEM function.
Scan function
M-30 has 2 types of scan:
• TI: everytime a signal is detected, the radio will stop scanning for a few secon-
ds, then it will start scanning again on the other frequencies even though the
signal is still present.
• SQ: whenever a signal is detected, the radio will stop scanning and will resume
only after the signal disappears.
1. To select the desired type of scan, enter the radio menu and follow these
steps: MENUFUNC MENU SCM
2. Select the desired option.
3. To start scanning press P6 in menu 1 or the control associated to the SCA
function.
4. To invert the scan direction rotate the main knob.
5. To stop scanning press any key on the front panel or PTT.
Adding a channel to the scan list
1. Select the channel you want to add to the list.
2. Keep pressed for 2 seconds P6 in menu 1 or the control associated to the
SCA function.
3. The display will show SKP: ADD in the lower part and letter S will appear above
the channel (or frequency).
Deleting a channel from the scan list
1. Select the channel you want to delete from the scan list.
2. Keep pressed for 2 seconds P6 in menu 1 or the control associated to the
SCA function.
3. The display will show SKP: DEL in the lower part and letter S will disappear.
Scan resume time
In TI scan mode it is possible to change the scan resume time.
It goes from a minumum of 5s up to 30s.
1. Enter the radio menu della radio and follow this procedure: MENUFUNC
MENUSCRT
2. Press the main knob to enter the options
3. Rotate the knob to select the desired time
4. Confirm by pushing the knob.
16 | M-30 Instruction Guide M-30 Instruction Guide | 17
Page 28

Dual Watch function
M-30 allows to monitor two channels at the same time.
1. Select the first channel to monitor and then press P1 in menu 2 or the key
associated to DW function.
2. Now select the second channel to monitor and press again P1 in menu 2 or the
key associated to DW function.
3. The dual watch function is active.
4. When a signal is detected, the radio will stop monitoring on the two channels
and will resume after the signal is no longer heard.
Noise Blanker activation
The Noise Blanker feature allows to reduce noises and interferences, for example
the most well known is the car ignition noise.
1. To enable the Noise Blanker press P5 in menu 2 or the button assigned to
NB function.
2. The display will show NB: OFF or NB: ON depending on the Noise Blanker
activation or deactivation.
3. Confirm your selection by pushing the main knob.
RF-Gain
In case of very strong signals, it is possible to enable the RF-Gain.
1. To enable the RF-Gain press P2 in menu 1 or the button assigned to RFG function. Everytime this button is pushed the gain level will increase. The following
levels are available: OFF, 3, 6, 9, 12, 15, 18, 21, 24, 27, 30, AU.
2. Confirm by pushing the main knob.
Roger Beep
When this function is enabled, the radio will emit an audio tone everytime the
transmission is finished.
You can choose amongst 5 dierent audio tones that can be modified through the
optional programming software.
1. To activate the Roger Beep enter into the menu and follow this procedure:
MENUFUNC MENUROG
2. It is possible to choose amongst the following options: OFF, 1, 2, 3, 4, 5.
3. Press the main knob to confirm the selection.
Voice enhancer
This feature allows to enhance the voice tones and so to improve the audio, which
will be more comfortable to listen to, especially for a long time.
1. To activate it press P3 in menu 2 or the control associated to HIC function.
HIC: OFF. The voice enhancer will be adjusted to the standard level
HIC: ON. The audio will be adjusted to enhance the low tones
2. Press the main knob to confirm the selection.
Emergency channels
M-30 allows to immediately select the emergency channels 9 and 19.
1. Press P3 in menu 1 or the key assigned to EMG function. Everytime this but-
ton is pressed you will select the emergency channels or return to the latest
channel in use.
2. Press the main knob as confirmation.
SWR adjustment
This feature allows to adjust the SWR meter on M-30 so that while transmitting
the display will indicate the correct SWR value. M-30 is adjusted by default on the
central frequency.
It is also possible to make a new adjustment (in this case it is required a 50 Ohm
dummy load, optional).
1. Enter the radio menu and proceed with the following steps: MENUFUNC
MENUSWR
2. Press the main knob to start the adjustment.
3. Be sure that M-30 is connected to a 50 Ohm dummy load and confirm by
pushing the main knob.
Other functions
Setting the priority channel
1. Select the channel you want to set as priority.
2. Keep pressed for 3 seconds the button on the microphone to make this
setting.
3. So now to select the priority channel press on the mike.
Enabling/disabling the keypad tones
1. Enter the radio menu and follow these steps: MENUFUNC MENUBEEP
2. Press the main knob to look through the options
3. Rotate the knob to select ON (keypad beeps enabled) or OFF (disabled).
4. Press the main knob to confirm your selection.
18 | M-30 Instruction Guide M-30 Instruction Guide | 19
Page 29

Time Out Timer
The time out timer (TOT) automatically switches the radio in reception mode if
you talk for too long, after a pre-set time that can change from 1 minute up to 30
minutes.
Before stopping the transmission, M-30 emits an acoustic alarm to warn you.
This function is also useful to prevent an overheating of the equipment.
We suggest you keeping the TOT enabled.
TOT can be adjusted also from the radio menu:
1. Access the radio menu and follow this procedure: MENUFUNC
MENUTOT
2. Set the desired time and confirm by pushing the main knob.
Setting the level of the display backlight
1. Enter the radio menu and follow this procedure: MENUFUNC
MENUDIM
2. Set the desired level and confirm by pushing the main knob.
3. The levels available are 3: 1 is the least bright, while 3 is the brightest.
Automatic turning on
You can set the automatic turning on of the radio when the vehicle is switched on.
1. Enter the radio menu and follow this path: MENUUTILITIES FUNC
MENUAOP
2. Set the desired option and push the knob for confirmation.
Menu of the radio
M-30 is supplied with 3 menu; it is possible to use all of them or enable only some.
Enter the radio menu and follow these steps:
1. MENUUTILITIES FUNC MENUKEYS
2. Choose amongst the following options:
1/2/3, to enable all menu,
1/2, to enable menu 1 and 2,
2/3, to enable menu 2 and 3,
1/3, to enable 1 and 3.
3. Select the desired option and confirm by pushing the main knob.
Reset
1. Enter the radio menu and follow this path: MENUFUNC MENURST
2. Select one of these options:
OPT, to make a reset of the settings only; it won’t reset the memories.
ALL, to make a complete reset: settings and memories.
3. Select the desired setting and confirm by pushing the knob.
Troubleshooting
PROBLEM SOLUTION
The radio does not turn on Power supply cable disconnected or defective.
Check its status.
Fuse broken. Check the status of the fuses in
the radio and in your vehicle.
The keyboard does not work The Keypad lock is activated
20 | M-30 Instruction Guide M-30 Instruction Guide | 21
Page 30

Technical specifications
Channels see frequency band chart
Frequency band**** 26.565-27.99125 MHz FM (RX/TX)
26.965-27.405 MHz AM (RX/TX)
Power supply 12/24V
Current consumption 2A
Operating temperature -10°C to + 55°C
Antenna connector UHF, SO239
Output power 4W
Modulation A3E (AM), F3E (FM),
Max frequency deviation (FM) ≤ 1,9KHz
Spurious emissions < -54dBm
Adjacent channel power < 20 uW
Frequency stability ±5.0 ppm
Rx sensitivity @12dB SINAD < 1uV
Audio output power ≥ 3W (8 Ohm)
Adjacent channel rejection better than 60 dB
Frequency response 300-3000Hz
Dimensions 120x38x160 (LxHxD)
Weight (mike included) 820g
**** covering all approved EU frequency bands
Specifications are subject to change without notice.
22 | M-30 Instruction Guide M-30 Instruction Guide | 23
Page 31

Inhalt
Lieferumfang 1
Vorsicht 1
Haupteigenschaften 2
Installation des Funkgeräts 3
Installation 3
Stromversorgung 3
Das Mikrofon anschließen 4
Installation der Antenne 4
Externer Lautsprecher 4
Bedienelemente und Displaybeschreibung 5
Anzeige 6
Rückseite 7
Mikrofon 7
Hauptfunktionen 8
Ein- und Ausschalten 8
Lautstärkeregelung 8
Kanalwahl 8
Auswahl der Betriebsart (AM/FM) 8
Rauschsperre anpassen 9
Die automatische Rauschsperre aktivieren 9
Angezeigte Betriebsart auswählen
(Frequenz oder Kanalnummer) 9
M-30 Bedienungsanleitung
Page 32

Senden 10
Verwendetes Band auswählen 10
Tastatursperre 11
Menüeinstellungen 11
Im Menü blättern 11
Liste der Menüfunktionen 13
Speicherbare Kanäle 15
Einen Kanal speichern 15
Einen Kanal abrufen 15
Einen Kanal löschen 15
Einen Kanal zur Suchliste hinzufügen 16
Einen Kanal aus der Suchliste löschen 16
Wiederaufnahmezeit der Suche 16
Zweikanalüberwachung 17
Aktivierung des Störaustasters 17
RF-Gain 17
Roger-Piepton 17
Sprachfilter 18
Notruanäle 18
SWR-Anpassung 18
Funkgerätemenü 20
Zurücksetzen 20
Problembehebung 21
Technische Daten 22
Weitere Funktionen 19
Prioritätkanal einstellen 19
Die Tastentöne aktivieren/deaktivieren 19
Timeout-Timer 19
Stufe der Hintergrundbeleuchtung einstellen 19
Automatisches Einschalten 20
M-30 Bedienungsanleitung M-30 Bedienungsanleitung
Page 33

Lieferumfang
• M-30 Transceiver mit Stromversorgungskabel
• 1 Mikrofon
• 1 Halterung
• 1 Polybeutel inkl. Schrauben, um die Halterung zu montieren und das Funkgerät
an der Halterung zu fixieren
• 1 Schutzsicherung
• 1 Mikrofonhalter
Falls ein Einzelteil fehlen sollte, kontaktieren Sie bitte Ihren Midland-Händler.
Vorsicht
Das M-30 ist ein elektronisches, hochgenaues Produkt und muss mit Sorgfalt
behandelt werden. Die nachstehenden Hinweise helfen Ihnen, die Gewährleistungspflichten zu erfüllen, damit Sie dieses Produkt viele Jahre genießen können.
• Önen Sie das Funkgerät unter keinen Umständen! Der Präzisionsmecha-
nismus des Funkgeräts und die Elektronik erfordern Erfahrung und spezielle
Ausrüstung. Aus dem gleichen Grund darf das Funkgerät unter keinen Umständen neu abgeglichen werden, da es für maximale Leistung kalibriert wurde.
Durch unbefugtes Önen des Sendeempfängers erlischt die Garantie.
• Platzieren Sie das Gerät nicht an einem Ort mit direkter Sonneneinstrahlung
oder an heißen Orten. Hohe Temperaturen verkürzen die Lebensdauer elektronischer Geräte und können zur Verformung und Verschmelzung von Kunststoteilen führen.
• Lagern Sie das Funkgerät nicht in staubiger und schmutziger Umgebung.
• Halten Sie das Funkgerät trocken. Regen oder Feuchtigkeit führen zu Korrosion
der elektronischen Schaltkreise.
• Sollte das Funkgerät einen eigenartigen Geruch oder Rauch abgeben, so schal-
ten Sie es sofort aus.
• Senden Sie nicht ohne das eine Antenne angeschlossen ist.
• Versuchen Sie nicht, den Transceiver während der Fahrt zu konfigurieren, das
ist sehr gefährlich.
M-30 Bedienungsanleitung | 1
Page 34

Haupteigenschaften
• Breites grafisches LCD-Display
• Stromversorgung 12 V-24 V
• Metallgehäuse
• Programmierbare Tasten
• Kanalnummer oder Kanal und Frequenzband werden angezeigt
• AM/FM Multiband-Funkgerät
• Digitale automatische Rauschsperre, einstellbar auf verschiedene Stufen
• S-Meter/SWR-Meter
• RF-Gain
• Suchlauunktion
• Zweikanalüberwachung
• Anpassbarer Roger-Piepton
• Notruanäle 9/19 und Prioritätkanal
• Störaustaster
• Sprachfilter
• Schutz gegen Polaritätsumkehrung
• 8 anpassbare Kanalspeicher
• Timeout-Timer
• Einstellbare Hintergrundbeleuchtung
• Automatisches Einschalten
• Tastatursperre
• Mikrofon mit RJ45-Stecker und Bedienelementen für Aufwärts/Abwärts/Pri-
oritätkanal
• Software-programmierbar (über optionales Programmierkit PRG-30 cod.
C1318)
Installation des Funkgeräts
Installation
• Sicherheit und Komfort sind die wichtigsten Punkte für die Montage aller mobilen Geräte. Alle Bedienelemente müssen mühelos für den Fahrer erreichbar
sein, ohne die Bewegungsfreiheit für den sicheren Betrieb des Fahrzeugs zu
behindern. Wählen Sie für die Installation des Transceivers einen Ort, an dem
während der Fahrt geringe Gefahr für Ihre Beifahrer und für Sie selbst besteht.
Der Ort sollte gut belüftet und vor direkter Sonneneinstrahlung geschützt sein.
• Installieren Sie die Halterung bzw. den Haltebügel mit den mitgelieferten selbstschneidenden Schrauben und den flachen Unterlegscheiben im Fahrzeug.
Stromversorgung
• Vergewissern Sie sich, dass das der Transceiver ausgeschaltet ist.
• Auf der Rückseite des Funkgeräts finden Sie ein zweifarbiges Stromversorgungskabel mit einem Sicherungshalter an der roten Leitung.
• Dieses Kabel hat einen Stecker für den Anschluss an das Funkgerät und die
Batterie des Fahrzeugs.
• Bei der direkten Spannungsversorgung ist es sehr wichtig die Polarität zu
beachten, auch wenn das Gerät gegen die versehentliche Verpolung geschützt
ist.
• Rot = Pluspol (+)
• Schwarz = Minuspol (-)
• Die gleichen Farben finden Sie an der Batterie und im Sicherungskasten des
Fahrzeugs. Schließen Sie das Kabel direkt an der Batterie an.
• Die Batterie des Fahrzeugs muss eine Nennspannung von 12 V bzw. 24 V haben.
ACHTUNG: Wir empfehlen für optimale Leistungen die Installation des Funkgeräts an
einem Ort mit guter Luftzirkulation.
2 | M-30 Bedienungsanleitung M-30 Bedienungsanleitung | 3
Page 35

Sicherung auswechseln
M
O
D
R
F
G
C
H
S
Q
L
S
FM
CE
CH–31
0 2 4 6 8
0 3 5 7 9 30
P
S
MAX
MAX
12.5
Wenn die Sicherung durchgebrannt ist, versuchen Sie zuerst die Ursache zu finden,
bevor Sie die Sicherung durch eine neue ersetzen. Falls erforderlich, wenden Sie
sich an ein Kundendienstcenter.
Die Sicherung auf der Rückseite des Funkgeräts hat einen Nennstrom von 5 A.
5 A/250 V SICHERUNG
LEITUNGSINTERNER SICHERUNGSHALTER
Bedienelemente und Displaybeschreibung
9 2 5 10
P1
11
P4
P2
Das Mikrofon anschließen
Schließen Sie das mitgelieferte Mikrofon an dem Mikrofonanschluss des Funkgeräts
an. Das Mikrofon kann an dem in der Verpackung mitgelieferten Halter aufgehängt
werden.
Installation der Antenne
• Positionieren Sie die Antenne so hoch wie möglich
• Desto länger die Antenne ist, desto besser ist die Leistung.
• Falls möglich, montieren Sie die Antenne mittig auf der zu montierenden Oberfläche
• Halten Sie das Antennenkabel fern von Störquellen, wie der Zündung, Anzeigen
usw.
• Achten Sie auf eine gute Masseverbindung mit Metallkontakt
• Vermeiden Sie während der Installation eine Beschädigung des Antennenkabels
Achtung: Um Schäden zu vermeiden, nehmen Sie Ihr Funkgerät niemals ohne Anschluss
einer geeigneten Antenne in Betrieb. Eine regelmäßige Kontrolle des Kabels und der
Stehwellen ist ratsam.
1. Ein-/Ausschalter. Zum Ein- und Ausschalten des Senders/Empfängers be-
2. Programmierbare Taste P1
3. Programmierbare Taste P2
4. Programmierbare Taste P3
5. Programmierbare Taste P4
6. Programmierbare Taste P5
7. Programmierbare Taste P6
8. FUNC: Funktionstaste. Mit dieser Taste aktivieren Sie die sekundären
Externer Lautsprecher
Wenn Sie einen externen Lautsprecher verwenden, muss seine Impedanz 4 Ω oder
8 Ω betragen. In die externe Lautsprecherbuchse passt ein 3,5-mm-Mono-Klinkenstecker.
9. Mikrofonanschluss: Schließen Sie das Mikrofon oder das optionale Program-
10. Drehknopf: Kurz drücken, um 10 Kanäle vorwärts zu springen. Halten Sie ihn
11. Grafisches, mehrfarbiges Display
4 | M-30 Bedienungsanleitung M-30 Bedienungsanleitung | 5
1 7 6 83 4
drückt halten. Kurz drücken, um die Lautsprecher zu aktivieren bzw. zu deaktivieren.
Funktionen der programmierbaren Tasten auf der Frontplatte des Funkgeräts.
Halten Sie sie gedrückt, um das Menü aufzurufen.
mierkabel an.
gedrückt, um das Tastenfeld zu sperren bzw. zu entriegeln. Mit dem Drehknopf
können Sie durch die Menüoptionen blättern oder und die Einstellungen ändern. Kurz drücken, um Ihre Auswahl zu bestätigen.
P3
midlandeurope.com
P5
P6
FUNC
Page 36

Anzeige
M
O
D
R
F
G
E
M
G
C
H
S
Q
L
S
C
A
S
FM
CE
CH–31
0 2 4 6 8
0 3 5 7 9 30
P
S
MAX
MAX
VOL
RFG
SQL
HIC
35
of
10
of
12.5
P1
P2
P3
P4
P5
P6
FUNC
M
O
D
R
F
G
E
M
G
C
H
S
Q
L
S
C
A
S
FM
CE
CH–31
0 2 4 6 8
0 3 5 7 9 30
P
S
MAX
MAX
VOL
RFG
SQL
HIC
35
of
10
of
midlandeurope.com
M
O
D
R
F
C
H
S
Q
S
FM
CE
0 2 4 6 8
0 3 5 7 9 30
P
S
MAX
MAX
12.5
12.5
D
Rückseite
12 13
A B C
ANT EXT SP
12.5
10
of
MAX
MAX
CE
C
H
I
S
Q
L
S
C
A
H
12. ANT: Antennenanschluss, Typ SO239.
13. EXT SPK: Buchse für externen Lautsprecher.
2
3 2
0 2 4 6 8
M
P
O
D
S
E
F
0 3 5 7 9 30
S
R
F
G
CH–31
E
M
G
VOL
RFG
35
of
FM
SQL
HIC
A. Anzeige der Ausgangsleistung
B. Anzeige der Empfangs-Signalstärke oder der Stehwellen (im Sendemodus)
C. AM- oder FM-Modulation.
D. Funktionen, die mit den programmierbaren Tasten P1 - P6 aktiviert wurden
E. S: Anzeige eines Kanals, der in der Suchliste enthalten ist. T: Wird angezeigt,
F. Verwendeter Kanal oder verwendete Frequenz
G. Hier finden Sie die wichtigsten Parameter des Funkgeräts:
H. Name des verwendeten Frequenzbands
I. Spannungswert
6 | M-30 Bedienungsanleitung M-30 Bedienungsanleitung | 7
G
wenn das Funkgerät im Sendemodus ist.
RX: TX:
VOL: Lautstärkepegel PWR: Ausgangsleistung
SQL: Rauschsperrestufe RB: Typ des Roger-Pieptons
RFG: RF-Gain SPL: Split (die Funktion ist nur in der
HIC: Sprachverbesserer TOT: Timeout-Timer-Einstellung
Amateurversion aktiviert)
Mikrofon
1. PTT: Zum Senden drücken.
2. UP/DOWN: Erhöhen/Verringern der
Lautstärke oder durch die Optionen
und Einstellungen blättern.
3.
Auswahl des Prioritätkanals.
1
Page 37

Hauptfunktionen
Das M-30 ist mit 6 programmierbaren Tasten ausgestattet: P1-P2-P3-P4-P5P6. Sie können insgesamt 3 unterschiedliche Tastenbelegungen speichern.
Standardmäßig sind 2 Tastenbelegungen vorhanden. Eine dritte Tastenbelegung
kann mit dem optionalen Programmierkit PRG30 aktiviert werden.
Tastenbelegung 1:
P1 MOD P4 CH
P2 RFG P5 SQL
P3 EMG P6 SCA
Die Funktionen, die den Tasten P1-P2-P3 zugeordnet sind, werden auf der linken
Seite des Displays angezeigt, während die Tasten P4-P5-P6 auf der rechten Seite
angezeigt werden. Es ist möglich, die den P-Tasten zugeordneten Funktionen mit
dem Menü oder der optionalen Programmiersoftware zu ändern.
Drücken Sie die Taste FUNC zum Wechsel der Tastenbelegung.
Ein- und Ausschalten
Halten Sie die Taste für 1 Sekunde gedrückt, um das Funkgerät einzuschalten.
Halten Sie sie für 2 Sekunden gedrückt, um es auszuschalten.
Lautstärkeregelung
Drehen Sie den Drehknopf zum Erhöhen der Lautstärke im Uhrzeigersinn und zum
Verringern der Lautstärke gegen den Uhrzeigersinn.
Kanalwahl
Drücken Sie die Taste P4 in Tastenbelegung 1 oder diejenige, die der Kanalfunktion
CH zugeordnet ist. Drehen Sie dann den Drehknopf im Uhrzeigersinn, um den
nächsten Kanal oder drehen Sie ihn gegen den Uhrzeigersinn, um den vorigen Kanal
auszuwählen.
Hinweis: Die Lautstärke kann auch mit den Tasten UP/DOWN am Mikrofon eingestellt
werden.
Hinweis: Drücken Sie kurz den Drehknopf, um 10 Kanäle vorwärts zu springen.
Auswahl der Betriebsart (AM/FM)
Drücken Sie zum Ändern der Betriebsart die Taste P1 in Tastenbelegung 1 oder
diejenige, die der Funktion MOD zugeordnet ist. Die Anzeige erscheint im unteren
Bereich des Displays.
Drücken Sie zum Bestätigen Ihrer Auswahl den Drehknopf oder warten Sie 10
Sekunden.
Tastenbelegung 2:
P1 DW P4 DIM
P2 DSP P5 NB
P3 HIC P6 MEM
Rauschsperre anpassen
Die Rauschsperre schaltet den Lautsprecher stumm, wenn kein Signal vorhanden
ist. Die Rauschsperre muss so eingestellt werden, dass das Rauschen im Lautsprecher gerade eben nicht mehr zu hören ist. Bei richtig eingestellter Rauschsperre
hören Sie nur etwas, während Sie tatsächlich ein Signal empfangen. Je höher der
Rauschsperrepegel eingestellt wird, desto stärker müssen die Signale sein, um sie
zu hören.
Drücken Sie zum Anpassen der Rauschsperre die Taste P5 in Tastenbelegung 1 oder
diejenige, die der Funktion SQL zugeordnet ist. Wählen Sie den gewünschten Wert
durch Drehen des Drehknopfs.
Sie können zwischen 28 unterschiedlichen Stufen wählen: Die empfindlichste Stufe
ist 1, während die am wenigsten empfindliche Stufe 28 ist.
Drücken Sie zum Bestätigen Ihrer Auswahl den Drehknopf oder warten Sie 10
Sekunden.
Die automatische Rauschsperre aktivieren
Halten Sie zum Aktivieren der automatischen Rauschsperre die Taste gedrückt, die
der Funktion SQL zugeordnet ist. Drehen Sie den Drehknopf, um die gewünschte
Stufe auszuwählen. Es stehen 9 Stufen zur Verfügung: Die empfindlichste Stufe ist
1, während die am wenigsten empfindliche Stufe 9 ist. Drücken Sie den Drehknopf
zum Bestätigen.
Sobald die automatische Rauschsperre aktiviert ist, wechselt die Anzeige SQL auf
dem Display zu ASQ.
Angezeigte Betriebsart auswählen (Frequenz oder Kanalnummer)
Das M-30 kann entweder die Frequenz oder die Kanalnummer anzeigen.
Drücken Sie zum Ändern dieser Betriebsart die Taste P2 in Tastenbelegung 2 oder
diejenige, die der Funktion DSP zugeordnet ist.
Drücken Sie zum Bestätigen den Drehknopf oder warten Sie 10 Sekunden.
Empfang
Die Empfangssignalstärke wird mit dem grünen Balken im oberen Teil des Displays
angezeigt.
Stellen Sie sicher, dass Sie die gewünschte MODulation (AM oder FM) eingestellt
haben.
Hinweis: Drücken Sie zum schnellen Stummschalten des Lautsprecher die Taste
unteren Teil des Displays wird Audio angezeigt: MT erscheint. Drücken Sie erneut
den Ton wieder zu aktivieren. Das Display zeigt AUDIO an: Esc.
. Im
, um
8 | M-30 Bedienungsanleitung M-30 Bedienungsanleitung | 9
Page 38

Senden
Achten Sie vor dem Senden darauf, dass der Kanal in diesem Moment nicht belegt
ist.
Drücken Sie die Taste PTT und sprechen Sie in das Mikrofon.
Während des Sendens wird auf dem Display T und die Ausgangsleistung mit dem
Balken im oberen Teil des Displays angezeigt.
Lassen Sie die Taste zum Empfangen los.
Verwendetes Band auswählen
Das Midland M-30 ist ein Multistandard-CB-Funkgerät, das in vielen Ländern
verwendet werden kann. Je nach dem Land, in dem Sie sich befinden, müssen Sie
das richtige und erlaubte Frequenzband wählen. Im Folgenden finden Sie die Tabelle
mit den Frequenzbändern des M-30:
Bandanzeige Land
EU Europa/Italien: 40 Kanäle, AM/FM, 4 W
CE 40 Kanäle, FM, 4 W
UK England: 40 Kanäle, FM, 4 Watt, englische Frequenzen
und EU: 40 Kanäle, FM, 4 Watt, CEPT-Frequenzen
PL Polen: 40 Kanäle, AM/FM, 4 W
I2 Italien: 34 Kanäle, AM/FM, 4 W
DE Deutschland: 80 Kanäle, FM 4 W/AM 40 Kanäle, 4 W
IN 27 Kanäle, AM/FM, 4 W
FÜR MÄRKTE AUSSERHALB DER EU
HF Russland: 400 Kanäle, AM/FM, 4/8/15 W
HF Polen (Russland -5 KHz): 400 Kanäle, AM/FM, 4/8/15
W
HAM Amateur: 340 Kanäle, AM/FM, 4/8/15 W. Die Verwen-
dung dieses Frequenzbands ist nur mit Amateurlizenz
erlaubt
Befolgen Sie zum Auswählen des gewünschten Frequenzbands dieses Verfahren:
1. Schalten Sie das Funkgerät aus.
2. Schalten Sie es bei gedrückter Taste FUNC ein.
3. Lassen Sie die Taste FUNC los, sobald auf dem Display folgendes angezeigt
wird:
4. Wählen Sie nun das gewünschte Band durch Drehen des Drehknopfs.
5. Halten Sie ihn zur Bestätigung für 5 Sekunden gedrückt.
Hinweis 1: Wenn das britische Band ausgewählt wurde, können Sie direkt zum CE-Band
wechseln: Drücken Sie einfach die Taste P1 in Tastenbelegung 1 oder diejenige Taste, die
der Funktion MOD zugeordnet ist.
Hinweis 2: Das Frequenzband CE (40 Kanäle, FM, 4 W) ist in ganz Europa erlaubt. Die
Beschränkungen finden Sie auf der Karte in der Verpackung.
Tastatursperre
Halten Sie zum Sperren der Tasten den Drehknopf für 2 Sekunden gedrückt. Im
Display wird Key Lock angezeigt. Wenn diese Funktion aktiviert wurde, sind alle Bedienelemente des Funkgeräts und auf dem Mikrofon gesperrt außer PTT.
Halten Sie zum Entsperren der Tasten den Drehknopf erneut 2 Sekunden lang gedrückt.
Menüeinstellungen
Mit dem Menü ist es möglich, die Funktionen des Funkgeräts und die Kanäle anzupassen.
Mit FUNC und dem Drehknopf können durch das Menü blättern und die Para-
meter ändern. Der Drehknopf ist in der Tat nicht nur eine Auswahl, sondern auch
ein Steuerelement, um das Menü aufzurufen und die Einstellungen zu bestätigen.
Im Menü blättern
1. Halten Sie die Taste FUNC für 2 Sekunden gedrückt.
2. Wählen Sie mit dem Drehknopf die gewünschte Funktion.
3. Drücken Sie den Drehknopf erneut, die Optionen der ausgewählten Funktion
aufzurufen.
4. Wählen Sie den gewünschten Parameter durch Drehen des Drehknopfs oder
mit den Tasten UP/DOWN am Mikrofon.
5. Drücken Sie den Drehknopf zum Bestätigen.
6. Drücken Sie die Taste P3 auf der Frontplatte des Funkgeräts, um zum vorigen
Menü zurückzukehren.
7. Drücken Sie erneut P3, um alle Menüs zu verlassen oder warten Sie 5 Sekunden, um zum Standby-Zustand zurückzukehren.
10 | M-30 Bedienungsanleitung M-30 Bedienungsanleitung | 11
Page 39

MENU:
• FUNC MENU (Zum Ändern der allgemeinen Einstellungen des Funkgeräts)
1. BEEP
2. TOT
3. DIM
4. VOL
5. SQL
6. ASQ
7. RFG
8. DSP
9. KEY
10. SCM
11. SCRT
12. AOP
13. SWR
14. RST
• PUD MENU (Zum Ändern der Parameter aller Kanäle des verwendeten Fre-
quenzbands mit nur einer Einstellung)
1. A/FM
2. NB
3. HIC
4. ROG
5. BUSY
6. BOT
7. EOT
8. CALL
• CHAN MENU (Zum Ändern der Einstellungen des verwendeten Kanals)
1. PD
2. SCAN
3. A/FM*
4. NB*
5. HIC*
6. ROG*
7. BUSY*
8. BOT*
9. EOT*
10. CALL*
• DTMF MENU
1. DTMF
2. SND-T
3. FIR-T
4. PRE-T
5. DELAY
6. D-FUN
7. DISP
8. KEY MENU**
* Diese Optionen sind nur dann verfügbar, wenn PD auf „OFF“ eingestellt ist.
** Mit KEY MENU können die Optionen oder Funktionen der Tasten P1 bis P6
eingestellt werden.
Liste der Menüfunktionen
Anzeige
BEEP 1 Tastenton ON, OFF
TOT 2 Timeout-Timer
DIM 3
VOL 4
SQL 5 Auswahl der Rauschsperrenstufe OFF,1,2,…,28
ASQ 6
RFG 7 Auswahl des RF-Gain-Pegels
DSP 8
KEYs 9 Auswahl des aktivierten Menüs
SCM 10 Suchtyp SQ, TI
SCRT 11 Wiederaufnahmezeit der Suche
AOP 12 Automatisches Einschalten ON, OFF
SWR 13 Stehwellentest für die Antenne ---
RST 14 Zurücksetzen OPT, ALL
A/FM 1 BetriebsMODus AM, FM
NB 2 Störaustaster OFF, ON
HIC 3 Sprachverstärker OFF, ON
ROG 4 Roger-Piepton
BUSY 5
BOT*** 6
Menü-Nr.
Funktion Optionen
FUNC MENU
Auswahl des Displays und Steuerung
der Hintergrundbeleuchtung
Einstellen der Lautsprecherlautstär
ke
Auswahl der Empfindlichkeit der
automatischen Rauschsperre
Angezeigte Betriebsart (Kanal oder
Frequenz)
PUD MENU
Auswahl der Sperre für besetzte
Kanäle
Aktivierung von DTMF-Tönen wäh
rend des Drückens von PT
OFF, 1, 2, …, …,
-
1/2/3, 1/2, 2/3,
5S, 10S, 15S, …,
-
30 min.
1, 2, 3
1,2,3,…,56
1,2,3,…,9
OFF,3,6,9,…
,30,AU
CH, FRQ
1/3
30S
OFF, 1, 2, 3,
4, 5
OFF, ON
12 | M-30 Bedienungsanleitung M-30 Bedienungsanleitung | 13
Page 40

EOT*** 7
CALL*** 8 Auswahl des Ruftontyps
PD 1
-
SENDER
SUCHE
Wenn die PD-Funktion aktiviert wurde, sind folgende Funktionen deaktiviert:
A/FM 3 Auswahl der Betriebsart AM, FM
NB 4 Aktivierung des Störaustasters OFF, ON
HIC 5 Sprachverstärker OFF, ON
ROG 6 Roger-Piepton
BUSY 7
BOT*** 8
EOT*** 9
CALL*** 10 Auswahl des Ruftontyps
DTMF 1
SND-T 2
FIR-T 3
PRE-T 4
VERZÖGE
-
RUNG
D-FUN 6 D-Buchstabe SendeMODus
Aktivierung von DTMF-Tönen wäh-
rend des Loslassens von PTT
CHAN MENU
Aktivieren der separaten Kanalein
Hinzufügen oder Löschen des Kanals
2
Auswahl der Sperre für besetzte
Aktivierung von DTMF-Tönen wäh
Aktivierung von DTMF-Tönen wäh
Auswahl des DTMF-Codes, welcher
Einstellung der Sendedauer des
Einstellung der Sendedauer der
ersten Zier des DTMF-Codes
Vorladen der des DTMF-Dauerein
5 Verzögerungszeiteinstellung
stellungen
aus der Suchliste
Kanäle
rend des Drückens von PT
rend des Loslassens von PTT
DTMF MENU***
der Taste CALL zugeordnet ist
DTMF-Codes
stellung
-
-
-
-
OFF, ON
ADD, DEL
OFF, 1, 2, 3,
4, 5
OFF, ON
1,2,3, …,16
10ms, …,
500ms
0ms, …,
1000ms
100ms, …,
2500ms
0ms, …,
1000ms
D, 1S, 2S, …,
16S
DISP 7
In diesem Menü können Sie die Funktionen einstellen, die den Taste P1 bis P6
Anzeige des gesendeten DTMF-
Codes
KEY MENU
zugeordnet wurden
OFF, ON
Hinweis: Die Liste der Optionen kann sich bei einigen Einstellungen ändern, die mit der
optionalen Programmiersoftware geändert wurden.
***: Die DTMF-Funktionen sind beim M-30 nicht verfügbar.
Speicherbare Kanäle
Das M-30 kann bis zu 8 Kanäle speichern.
Sie können die Frequenz und die Daten der Kanäle speichern. Dadurch müssen Sie
dieselben Daten immer nicht wieder erneut programmieren und Sie können sofort
die gewünschten Kanäle einstellen.
Einen Kanal speichern
1. Wählen Sie den Kanal, den Sie speichern möchten.
2. Stellen Sie alle gewünschten Parameter des Kanals ein (AM/FM, HIC, RB,
NB).
3. Halten Sie die Taste P6 in Tastenbelegung 2 für 2 Sekunden gedrückt oder
diejenige Taste, die der Funktion MEM zugeordnet wurde. Die Kanalnummer
wird auf dem Display angezeigt.
4. Wenn der Kanal blinkt, bedeutet dies, dass er noch nicht gespeichert wurde.
Andernfalls wurde er bereits gespeichert. Es ist allerdings möglich, die Speicherinformationen des aktiven Kanals zu überschreiben.
5. Wählen Sie durch Drehen des Drehknopfs die zu speichernde (oder überschreibende) Kanalnummer.
6. Halten Sie die Taste P6 in Tastenbelegung 2 oder diejenige, die der Funktion
MEM zugeordnet wurde oder FUNC am Mikrofon für 2 Sekunden gedrückt,
um den Inhalt des Speichers zu löschen.
Einen Kanal abrufen
Drücken Sie die Taste P6 in Tastenbelegung 2 oder diejenige, die der Funktion
MEM zugeordnet wurde, um die Speicherkanäle aufzurufen.
Drehen Sie den Drehknopf, um den gewünschten Speicherkanal auszuwählen.
Einen Kanal löschen
Drücken Sie die Taste P6 in Tastenbelegung 2 oder diejenige, die der Funktion
MEM zugeordnet wurde, um die Speicherkanäle aufzurufen.
Wählen Sie den zu löschenden Kanal.
14 | M-30 Bedienungsanleitung M-30 Bedienungsanleitung | 15
Page 41

Halten Sie die Taste P6 in Tastenbelegung 2 für 2 Sekunden gedrückt oder diejenige
Taste, die der Funktion MEM zugeordnet wurde.
Scan-Funktion
Das M-30 verfügt über 2 Sucharten:
• TI: Jedes Mal, wenn ein Signal erkannt wird, hält das Funkgerät den Suchvor-
gang für ein paar Sekunden an. Anschließend startet der Suchvorgang erneut
bei anderen Frequenzen, obwohl das Signal noch vorhanden ist.
• SQ: Wenn ein Signal erkannt wird, hält das Funkgerät den Suchvorgang an und
setzt ihn erst fort, nachdem das Signal verschwindet.
1. Wählen Sie die gewünschte Art des Suchvorgangs, rufen Sie das Funkgeräte-
menü auf und führen Sie die folgenden Schritte aus: MENUFUNC MENU
SCM
2. Wählen Sie die gewünschte Option.
3. Drücken Sie zum Starten des Suchvorgangs die Taste P6 in Tastenbelegung 1
oder diejenige, die der Funktion SCA zugeordnet wurde.
4. Zum Umkehren der Suchrichtung drehen Sie den Drehknopf.
5. Drücken Sie zum Beenden der Suche eine beliebige Taste auf der Frontplatte
oder PTT.
Einen Kanal zur Suchliste hinzufügen
1. Wählen Sie den Kanal, den Sie zur Liste hinzufügen möchten.
2. Halten Sie die Taste P6 in Tastenbelegung 1 für 2 Sekunden gedrückt oder
diejenige Taste, die der Funktion SCA zugeordnet wurde.
3. Das Display zeigt SKP an. Im unteren Bereich werden ADD und der Buchstabe S über dem Kanal (oder der Frequenz) angezeigt.
Einen Kanal aus der Suchliste löschen
1. Wählen Sie den Kanal, den Sie aus der Suchliste löschen möchten.
2. Halten Sie die Taste P6 in Tastenbelegung 1 für 2 Sekunden gedrückt oder
diejenige Taste, die der Funktion SCA zugeordnet wurde.
3. Das Display zeigt SKP an. Im unteren Bereich wird DEL angezeigt und der
Buchstabe S verschwindet.
Wiederaufnahmezeit der Suche
Im TI-Suchmodus ist es möglich, die Wiederaufnahmedauer der Suche zu ändern.
Diesmal geht sie von einem Minimum von 5 Sek. bis 30 Sek.
1. Rufen Sie das Funkgerätemenü auf und befolgen Sie dieses Verfahren:
MENUFUNC MENUSCRT
2. Rufen Sie mit dem Drehknopf die Optionen auf.
3. Wählen Sie mit dem Drehknopf die gewünschte Zeit.
4. Drücken Sie den Drehknopf zum Bestätigen.
Zweikanalüberwachung
Das M-30 kann zwei Kanäle gleichzeitig überwachen.
1. Wählen Sie den ersten zu überwachenden Kanal und drücken Sie dann die
Taste P1 in Tastenbelegung 2 oder diejenige Taste, der die Funktion DW zugeordnet ist.
2. Wählen Sie jetzt den zweiten zu überwachenden Kanal und drücken Sie erneut
die Taste P1 in Tastenbelegung 2 oder diejenige Taste, der die Funktion DW
zugeordnet ist.
3. Die Zweikanalüberwachung ist aktiv.
4. Wenn ein Signal erkannt wurde, beendet das Funkgerät die Überwachung beider Kanäle und sie wird wiederaufgenommen, nachdem das Signal nicht mehr
zu hören ist.
Aktivierung des Störaustasters
Die Störaustaster-Funktion kann Rauschen und Störungen reduzieren, beispielsweise ist die bekannteste die Zündung des Autos.
1. Drücken Sie zum Aktivieren des Störaustasters Taste P5 in Tastenbelegung 2
oder diejenige, die der Funktion NB zugeordnet wurde.
2. Das Display zeigt NB: OFF oder NB: ON abhängig von der Aktivierung oder
Deaktivierung des Störaustasters an.
3. Bestätigen Sie Ihre Auswahl durch Drücken des Drehknopfs.
RF-Gain
Bei sehr starke Signalen ist es möglich, einen Empfangsabschwächer (RF-Gain)
zu aktivieren.
1. Drücken Sie zum Aktivieren von RF-Gain die Taste P2 in Tastenbelegung 1
oder diejenige, die der Funktion RFG zugeordnet wurde. Jedes Mal, wenn diese Taste gedrückt wurde, wird die Verstärkung reduziert. Folgende Stufen sind
verfügbar: OFF, 3, 6, 9, 12, 15, 18, 21, 24, 27, 30, AU.
2. Drücken Sie den Drehknopf zum Bestätigen.
Roger-Piepton
Wenn diese Funktion aktiviert wurde, sendet das Funkgerät jedes Mal einen Signalton, wenn die Übertragung beendet ist.
Sie können zwischen 5 verschiedenen Tönen wählen, die über die optionale Programmiersoftware geändert werden können.
1. Um den Roger-Piepton zu aktivieren, rufen Sie das Menü auf und befolgen
Sie dieses Verfahren: MENUFUNC MENUROG
2. Sie können aus den folgenden Optionen wählen: OFF, 1, 2, 3, 4, 5.
3. Drücken Sie den Drehknopf zum Bestätigen der Auswahl.
16 | M-30 Bedienungsanleitung M-30 Bedienungsanleitung | 17
Page 42

Sprachfilter
Mit dieser Funktion können Sie die Sprachqualität erhöhen und so die Audioausgabe verbessern, damit sie besser verständlich ist, insbesondere bei längerem Zuhören.
1. Drücken Sie zum Aktivieren die Taste P3 in Tastenbelegung 2 oder diejenige,
die der Funktion HIC zugeordnet wurde.
HIC: OFF. Der Sprachverbesserer wird auf die Standardstufe eingestellt.
HIC: ON. Die Audiowiedergabe wird angepasst, um die tiefen Töne zu ver-
bessern
2. Drücken Sie den Drehknopf zum Bestätigen der Auswahl.
Notruanäle
Das M-30 erlaubt die sofortige Auswahl der Notruanäle 9 und 19.
1. Drücken Sie Taste P3 in Tastenbelegung 1 oder diejenige, die der Funktion
EMG zugeordnet wurde. Jedes Mal, wenn Sie diese Taste drücken, wählen
Sie die Notruanäle aus oder kehren zum zuletzt verwendeten Kanal zurück.
2. Drücken Sie den Drehknopf zum Bestätigen.
SWR-Anpassung
Mit dieser Funktion können das Stehwellen-Meter am M-30 so einstellen, dass
das Display während der Übertragung den korrekten Stehwellenwert anzeigt. Das
M-30 ist standardmäßig auf die mittlere Frequenz eingestellt.
Es ist auch möglich, eine neue Einstellung vorzunehmen (In diesem Fall ist ein 50
Ohm Dummy-Lastwiderstand erforderlich, optional).
1. Rufen Sie das Funkgerätemenü auf und führen Sie die folgenden Schritte
durch: MENUFUNC MENUSWR
2. Drücken Sie den Drehknopf zum Starten der Anpassung.
3. Stellen Sie sicher, dass das M-30 an einen 50 Ohm Dummy-Lastwiderstand
angeschlossen ist und bestätigen Sie durch Drücken des Drehknopfs.
Weitere Funktionen
Prioritätkanal einstellen
1. Wählen Sie den Kanal, den Sie als Prioritätkanal einstellen möchten.
2. Halten Sie die Taste am Mikrofon für 3 Sekunden gedrückt, um diese Einstellung vorzunehmen.
3. Jetzt drücken Sie die Taste am Mikrofon, um den Prioritätkanal auszuwählen.
Die Tastentöne aktivieren/deaktivieren
1. Rufen Sie das Funkgerätemenü auf und führen Sie die folgenden Schritte aus:
MENUFUNC MENUBEEP
2. Blättern Sie mit dem Drehknopf durch die Optionen.
3. Wählen Sie mit dem Drehknopf die Option ON (Tastentöne aktiviert) oder
OFF (deaktiviert).
4. Drücken Sie den Drehknopf zum Bestätigen der Auswahl.
Timeout-Timer
Der Timeout-Timer (TOT) schaltet das Funkgerät automatisch in den Empfangsmodus, wenn Sie zu lange sprechen. Die voreingestellte Dauer auf 1 Minute bis zu
30 Minuten geändert werden.
Vor dem Beenden der Übertragung sendet das M-30 ein akustisches Signal als
Warnung.
Diese Funktion ist auch nützlich, um das Überhitzen des Geräts zu vermeiden.
Wir raten Ihnen, TOT zu aktivieren.
TOT kann auch im Funkgerätemenü eingestellt werden:
1. Rufen Sie das Funkgerätemenü auf und führen Sie die folgenden Schritte aus:
MENUFUNC MENUTOT
2. Stellen Sie die gewünschte Dauer ein und bestätigen Sie durch Drücken des
Drehknopfs.
Stufe der Hintergrundbeleuchtung einstellen
1. Rufen Sie das Funkgerätemenü auf und führen Sie die folgenden Schritte aus:
MENUFUNC MENUDIM
2. Stellen Sie die gewünschte Stufe ein und bestätigen Sie durch Drücken des
Drehknopfs.
3. Es sind 3 Stufen verfügbar: 1 ist die dunkelste und 3 ist die hellste Stufe.
18 | M-30 Bedienungsanleitung M-30 Bedienungsanleitung | 19
Page 43

Automatisches Einschalten
Sie können das automatische Einschalten des Funkgeräts einstellen, wenn das
Fahrzeug gestartet wird.
1. Rufen Sie das Funkgerätemenü auf und folgen Sie die diesem Pfad:
MENUUTILITIES FUNC MENUAOP
2. Stellen Sie die gewünschte Option ein und bestätigen Sie durch Drücken des
Drehknopfs.
Funkgerätemenü
Das M-30 hat 3 Tastenbelegungen. Es ist möglich, alle zu verwenden oder nur einige.
1. Rufen Sie das Funkgerätemenü auf und führen Sie die folgenden Schritte aus:
1. MENUUTILITIES FUNC MENUKEYS
2. Wählen Sie aus den folgenden Optionen:
1/2/3, um alle Tastenbelegungen zu aktivieren,
1/2, um Tastenbelegung 1 und 2 zu aktivieren,
2/3, um Tastenbelegung 2 und 3 zu aktivieren,
1/3, um Tastenbelegung 1 und 3 zu aktivieren.
3. Wählen Sie die gewünschte Option aus und bestätigen Sie durch Drücken
des Drehknopfs.
Zurücksetzen
1. Rufen Sie das Funkgerätemenü auf und folgen Sie die diesem Pfad:
MENUFUNC MENURST
2. Wählen Sie eine der folgenden Optionen:
OPT: Nur die Einstellungen zurücksetzen. Der Speicher wird nicht zurückge-
setzt.
ALL: Vollständig zurücksetzen: Einstellungen und Speicher.
3. Wählen Sie die gewünschte Einstellung und bestätigen Sie durch Drücken des
Drehknopfs.
Problembehebung
PROBLEM LÖSUNGSVORSCHLAG
Das Funkgerät schaltet sich nicht
ein
Die Tasten funktionieren nicht. Die Tastensperre ist aktiviert.
Das Stromversorgungskabel wurde nicht
angeschlossen oder ist defekt. Überprüfen Sie
seinen Zustand.
Sicherung durchgebrannt. Überprüfen Sie den
Zustand der Sicherungen im Funkgerät und in
Ihrem Fahrzeug.
20 | M-30 Bedienungsanleitung M-30 Bedienungsanleitung | 21
Page 44

Technische Daten
Kanäle Siehe Frequenzbandtabelle
Frequenzband**** 26,565-27,99125 MHz FM (Senden/Empfangen)
26,965-27,405 MHz AM (Senden/Empfangen)
Stromversorgung 12/24 V
Stromaufnahme 2 A
Betriebstemperatur -10 °C bis +55 °C
Antennenanschluss UHF, SO239
Ausgangsleistung 4 W
MODulation A3E (AM), F3E (FM),
Max. Frequenzabweichung
(FM)
Nebenwellen-Aussendungen < -54 dBm
Nachbarkanalleistung < 20 µW
Frequenzstabilität ±5,0 ppm
Sende-Empfindlichkeit bei 12
dB SINAD
Audio-Ausgangsleistung ≥ 3 W (8 Ohm)
Nachbarkanalunterdrückung besser als 60 dB
Frequenzgang 300 bis 3000 Hz
Abmessungen 120 x 38 x 160 (L x H x T)
Gewicht (einschließlich
Mikrofon)
≤ 1,9 KHz
< 1 µV
820 g
**** Deckt alle genehmigten EU-Frequenzbänder ab
Änderungen der technischen Daten vorbehalten.
22 | M-30 Bedienungsanleitung M-30 Bedienungsanleitung | 23
Page 45

Índice
La caja incluye 1
Mantenimiento 1
Características principales 2
Instalación de la radio 3
Instalación 3
Alimentación 3
Reemplazar fusibles 4
Conectar el micrófono 4
Instalación de la antena 4
Altavoces externos 4
Descripción de los controles y el display 5
Display 6
Panel trasero 7
Micrófono 7
Operaciones principales 8
Encendido y apagado 8
Ajuste del volumen 8
Selección de canal 8
Seleccionar el modo operativo (AM/FM) 9
Ajuste del Squelch 9
Activar el Squelch automático 9
Seleccionar el modo mostrado (frecuencia o número de canal) 9
M-30 Manuale d’uso
Page 46

Recepción 9
Transmisión 10
Seleccionar la banda en uso 10
Bloqueo del teclado 11
Ajustar del nivel de la retroiluminación del display 19
Encendido automático 19
Menú de la radio 19
Reset 19
Ajustes del menú 11
Explorar el menú 11
Lista de funciones del menú 13
Canales de memoria 15
Guardar un canal 15
Rellamar a un canal 15
Borrar un canal 15
Función Scan 15
Añadir un canal a la lista de escaneado 16
Eliminar un canal de la lista de escaneado 16
Tiempo de reanudación del escaneado 16
Función Dual Watch 16
Activación Supresión de Ruidos 17
Ganancia de RF 17
Roger Beep 17
Potenciador de voz 17
Canales de emergencia 17
Ajuste de SWR 18
Otras funciones 18
Ajustar el canal prioritario 18
Activar/desactivar los tonos de teclado 18
Time Out Timer 18
Solución de problemas 20
Especificaciones técnicas 21
M-30 Manuale d’uso M-30 Manuale d’uso
Page 47

La caja incluye
• Transceptor M-30 con cable de alimentación;
• 1 micrófono;
• 1 soporte de montaje;
• 1 bolsa con tornillos para montar el soporte y fijar la radio;
• 1 fusible de protección;
• 1 soporte de micrófono.
Si falta algún elemento, por favor, contacte con su proveedor Midland.
Mantenimiento
M-30 es un producto electrónico de diseño preciso y debe tratarse con cuidado.
Las siguientes sugerencias le ayudarán a cumplir con cualquier obligación de garantía y a disfrutar de este producto durante muchos años.
• ¡No intente abrir la radio por ninguna razón! La mecánica de precisión y la
electrónica de la radio requieren experiencia y equipo especializado; Por la
misma razón, la radio no debe en ningún caso ser reajustada ya que ya ha sido
calibrada para un máximo rendimiento. La apertura no autorizada del transceptor
anulará la garantía.
• No almacene la radio bajo el sol o en áreas calientes. Las altas temperaturas
pueden acortar la vida útil de los dispositivos electrónicos y deformar o derretir
ciertos plásticos.
• No guarde la radio en lugares polvorientos o sucios.
• Mantenga la radio seca. El agua de lluvia o la humedad corroerán los circuitos
electrónicos.
• Si parece que la radio difunde un olor peculiar o humo, apáguela inmediatamente y quite el cargador o la batería de la radio.
• No transmita sin antena.
• No intente configurar el transceptor mientras conduce; es muy peligroso.
M-30 Manual de Instrucciones | 1
Page 48

Características principales
• Amplio display gráfico TFT
• Alimentación 12V-24V
• Chasis de metal
• Controles programables
• Visualización de número de canal o número de canal+frecuencia
• Radio multibanda AM/FM
• Squelch digital automático ajustable en diferentes niveles
• S-Meter/SWR-Meter
• Ganancia de RF
• Función Scan
• Función Dual Watch
• Roger Beep personalizable
• Canales de emergencia 9/19 y canal prioritario
• Supresor de ruido
• Potenciador de voz
• Protección contra inversión de polaridad
• 8 canales de memoria personalizables
• Time Out Timer
• Retroiluminación ajustable
• Encendido automático
• Bloqueo de teclado
• Micrófono con conector RJ45 y controles ARRIBA/ABAJO/Canal Prioritario
• Software programable (mediante el kit de programación opcional PRG-30 cód.
C1318)
Instalación de la radio
Instalación
• Seguridad y comodidad son las consideraciones principales para el montaje de
cualquier pieza de equipo móvil. Todos los controles deben estar fácilmente accesibles para el operador sin interferir con los movimientos necesarios para la
conducción segura del vehículo. Para instalar el transceptor seleccione un lugar
que minimice el peligro para sus pasajeros y usted mismo mientras el vehículo
está en movimiento; la ubicación debe estar bien ventilada y protegida de la luz
solar directa.
• Instale el soporte de montaje en el vehículo utilizando los tornillos autorroscantes suministrados y las arandelas planas.
• Instale el soporte en el vehículo utilizando los tornillos autorroscantes suministrados y las arandelas.
Alimentación
• Asegúrese de que el transceptor está apagado.
• En la parte trasera de la radio, verá un cable de alimentación bicolor con un
portafusibles en el cable rojo.
• Este cable se suministra con un conector adecuado para la conexión a la radio
y la batería del vehículo.
• En la fuente de alimentación de tensión continua, es muy importante observar la
polaridad incluso si la unidad está protegida contra la inversión accidental.
• Rojo = polo positivo (+)
• Negro = polo negativo (-)
• Encontrará los mismos colores en la batería y en la caja de fusibles del coche.
Conecte correctamente el terminal del cable a la batería.
• La batería del vehículo debe tener una capacidad nominal de 12 o 24V.
• Asegúrese de que la batería del vehículo es capaz de suministrar suficiente potencia a la radio.
• Conecte el cable de alimentación de CC a la fuente de alimentación de CC
regulada y asegúrese de que las polaridades son correctas.
Atención: para obtener las mejores prestaciones se recomienda instalar la radio en una
posición con buena circulación de aire.
2 | M-30 Manual de Instrucciones M-30 Manual de Instrucciones | 3
Page 49

Reemplazar fusibles
M
O
D
R
F
G
C
H
S
Q
L
S
FM
CE
CH–31
0 2 4 6 8
0 3 5 7 9 30
P
S
MAX
MAX
12.5
Si el fusible se funde intente encontrar la causa antes de reemplazarlo. Si es necesario, contacte con un servicio técnico.
El fusible de la parte trasera de la radio tiene una corriente nominal de 5V.
FUSIBLE 5A 250V
SOPORTE DE FUSIBLE EN LÍNEA
Descripción de los controles y el display
9 2 5 10
11
Conectar el micrófono
Conecte el micrófono suministrado al conector apropiado en el panel frontal de la
radio.
El micrófono puede colgarse gracias al soporte suministrado en el embalaje.
P1
P2
midlandeurope.com
P3
P4
P5
P6
FUNC
Instalación de la antena
Coloque la antena lo más alta posible
• Cuanto más larga sea la antena, mejor será el rendimiento
• Si es posible, monte la antena en el centro de la superficie
• Mantenga el cable de la antena alejado de las fuentes de ruido, como el interruptor de encendido, los indicadores, etc.
• Asegúrese de tener una conexión sólida de metal a metal
• Evite daños en el cable durante la instalación de la antena
Atención: Para evitar daños, nunca utilice la radio sin conectar una antena adecuada. Se
recomienda un control periódico del cable y del S.W.R.
Altavoces externos
Si usa altavoces externos, la impedancia debe ser 4Ω u 8 Ω. El jack de altavoz
externo acepta un conector 3,5mm mono.
1. Botón de encendido/apagado. Mantenga pulsado para encender y apagar el
2. Botón programable P1
3. Botón programable P2
4. Botón programable P3
5. Botón programable P4
6. Botón programable P5
7. Botón programable P6
8. FUNC: tecla función. Con este botón se activan las funciones secundarias
9. Conector del micrófono: conecte el micrófono o el cable de programación
10. Mando principal: presione brevemente para avanzar 10 canales hacia delante,
11. Display gráfico multicolor
4 | M-30 Manual de Instrucciones M-30 Manual de Instrucciones | 5
1 7 6 83 4
transceptor. Pulse brevemente para activar o desactivar el altavoz.
de las teclas programables en el panel frontal de la radio. Manténgalo pulsado
para entrar al menú.
opcional.
o manténgalo pulsado para bloquear/desbloquear el teclado. El mando prin-
cipal permite ver las opciones del menú y cambiar la configuración. Presione
brevemente para confirmar la selección.
Page 50

Display
M
O
D
R
F
G
E
M
G
C
H
S
Q
L
S
C
A
S
FM
CE
CH–31
0 2 4 6 8
0 3 5 7 9 30
P
S
MAX
MAX
VOL
RFG
SQL
HIC
35
of
10
of
12.5
P1
P2
P3
P4
P5
P6
FUNC
M
O
D
R
F
G
E
M
G
C
H
S
Q
L
S
C
A
S
FM
CE
CH–31
0 2 4 6 8
0 3 5 7 9 30
P
S
MAX
MAX
VOL
RFG
SQL
HIC
35
of
10
of
midlandeurope.com
M
O
D
R
F
C
H
S
Q
S
FM
CE
0 2 4 6 8
0 3 5 7 9 30
P
S
MAX
MAX
12.5
12.5
Panel trasero
12 13
A B C
ANT EXT SP
12.5
10
of
MAX
MAX
CE
C
H
I
S
Q
L
S
C
A
H
2
3 2
0 2 4 6 8
M
P
D
E
F
O
D
S
0 3 5 7 9 30
S
R
F
G
CH–31
E
M
G
VOL
RFG
35
of
FM
SQL
HIC
A. Indicador de potencia de salida
B. Indicador de intensidad de señal recibida o nivel SWR (en modo tx)
C. Modulación AM o FM.
D. Funciones habilitadas con los controles programables P1-P6
E. S: indicador de un canal incluido en la lista de escaneado. T: aparece cuando
F. Canal o frecuencia en uso
G. Aquí se encuentran los principales parámetros de la radio:
H. Nombre de la banda en uso
I. Valor de la fuente de alimentación
6 | M-30 Manual de Instrucciones M-30 Manual de Instrucciones | 7
la radio está en modo tx.
RX: VOL, nivel de volumen
SQL, nivel de squelch
RFG, Ganancia de RF
HIC, potenciador de voz
G
TX: PWR, nivel de potencia de
salida
RB, tipo de Roger Beep
SPL, split (función habilitada
solo en la versión amateur)
TOT, configuración del Time
Out Timer
12. ANT: conector de la antena, tipo SO239
13. EXT SPK: jack para altavoz externo
Micrófono
1. PTT: pulse para transmitir
2. ARRIBA/ABAJO: pulse para subir/
bajar el volumen o para ver las opciones
del menú.
3. pulse para seleccionar el canal
prioritario.
1
Page 51

Operaciones principales
M-30 está equipada con 6 botones programables: P1 - P2 - P3 - P4 - P5 - P6.
Pueden ser personalizados según sus necesidades; cada botón puede ser asociado a
hasta 3 funciones en 3 menús diferentes a la vez.
Por defecto hay 2 menús; un tercer menú puede ser activado mediante el kit de
programación opcional PRG30.
Menú 1:
P1 MOD P4 CH
P2 RFG P5 SQL
P3 EMG P6 SCA
Las funciones asociadas a los botones P1 - P2 - P3 aparecerán en el lado izquierdo
del display, mientras que las activadas con los botones P4 - P5 - P6 serán mostradas
en el lado derecho.
Es posible cambiar las funciones asociadas a los botones P a través del menú o del
software de programación opcional.
Para cambiar el menú pulse FUNC.
Encendido y apagado
Pulse el botón durante 1 segundo para encender la radio; púlselo durante 2 segundos para apagarla.
Ajuste del volumen
Rote el mando principal en sentido horario para aumentar el volumen, y en sentido
antihorario para reducirlo.
Selección de canal
Pulse el botón P4 del menú 1 o el asignado a la función canal CH.
Después rote el mando principal en sentido horario para seleccionar el siguiente
canal, o en sentido antihorario para seleccionar el previo.
Nota: el volumen también puede ajustarse con los botones ARRIBA/ABAJO del micrófono.
Nota: para saltar 10 canales adelante, pulse brevemente el mando principal.
Menú 2:
P1 DW P4 DIM
P2 DSP P5 NB
P3 HIC P6 MEM
Seleccionar el modo operativo (AM/FM)
Para cambiar el modo operativa pulse P1 en el menú 1 o la tecla asignada a la función
MOD. El indicador aparecerá en la parte inferior del display.
Para confirmar su selección pulse el mando principal o espere 10 segundos.
Ajuste del Squelch
El Squelch se usa para silenciar el altavoz cuando no hay ninguna señal presente. El
nivel del Squelch debe ser regulado según el ruido de fondo. Con el nivel de Squelch
correctamente ajustado, oirá sonido únicamente cuando reciba una señal. Cuanto
más alto sea el nivel de Squelch seleccionado, más fuerte deberá ser la señal para
poder oírla.
Para ajustar el Squelch pulse P5 en el menú 1 o la tecla asociada a la función SQL;
seleccione el nivel deseado rotando el mando principal.
Puede escoger entre 28 niveles diferentes: el más sensible es el 1, y el menos sensible es el 28.
Para confirmar su selección presione el mando principal o espere 10 segundos.
Activar el Squelch automático
Para activar el Squelch automático mantenga pulsado el botón asociado a la función SQL. Rote el mando principal para seleccionar el nivel deseado. Hay 9 niveles
disponibles: el más sensible es el 1, y el menos sensible es el 9. Pulse el mando prin-
cipal para confirmar.
Una vez activado el Squelch automático, el indicador SQL del display será reemplazado por ASQ.
Seleccionar el modo mostrado (frecuencia o número de canal)
M-30 puede mostrar tanto la frecuencia como el número de canal.
Para cambiar este modo pulse P2 en el menú 2 o el botón asociado a la función
DSP.
Para confirmar pulse el mando principal o espere 10 segundos.
Recepción
La fuerza de la señal recibida se muestra con la barra verde en la parte superior del
display.
Asegúrese de que estableció la modulación deseada (AM/FM).
Nota: para silenciar rápidamente el altavoz presione . En la parte inferior del display
aparecerá el indicador Audio: MT. Pulse
display mostrará Audio: Esc.
de nuevo para activar el audio otra vez. El
8 | M-30 Manual de Instrucciones M-30 Manual de Instrucciones | 9
Page 52

Transmisión
Antes de transmitir, asegúrese de que el canal no está ocupado.
Pulse PTT y hable hacia el micrófono.
Durante la transmisión, el display mostrará T y la potencia de salida se indicará mediante la barra en la parte superior del display.
Suelte para recibir.
Seleccionar la banda en uso
Midland M-30 es una CB multiestándar que puede usarse en varios países. En función del país donde se encuentre, debe seleccionar la banda correcta y permitida.
La siguiente tabla muestra las bandas de frecuencia incluidas en M-30.
Banda mostrada País
EU Europa /Italia 40CH AM/FM 4W
CE 40CH FM 4W
UK
PL Polonia 40CH AM/FM 4W
I2 Italia 34 CH AM / FM 4W
DE Alemania 80CH FM 4W / 40CH AM 4W
IN 27 CH AM / FM 4W
Para seleccionar la banda de frecuencias siga este procedimiento:
1. Apague la radio;
2. Enciéndala mientras mantiene pulsado FUNC;
3. Suelte FUNC en cuanto el display muestre:
Inglaterra 40CH FM 4 Watt Frecuencias inglesas + EC
40CH FM 4Watt CEPT frecuencias
CB FREQ
SelectBand:
CE BAND
Bloqueo del teclado
Para bloquear el teclado mantenga presionado el mando principal durante 2 segundos. El display mostrará Key Lock. Cuando esta función es activada todos los
controles se bloquean en la radio y el micrófono, excepto el PTT.
Para desbloquear el teclado mantenga presionado el mando principal durante 2
segundos.
Ajustes del menú
A través del menú puede personalizar las funciones de la radio y los canales.
Con FUNC y el mando principal es posible navegar por el menú y cambiar los parámetros. El mando principal no es solo un selector, también es un mando para entrar
en el menú y confirmar los ajustes.
Explorar el menú
1. Pulse FUNC durante 2 segundos;
2. Rote en mando para seleccionar la función deseada;
3. Pulse el mando de nuevo para entrar a las opciones de la función seleccionada;
4. Seleccione el parámetro deseado rotando el mando usando los botones AR-
RIBA/ABAJO del micrófono;
5. Pulse el mando para confirmar;
6. Pulse el botón P3 en el panel frontal de la radio para volver al menú anterior;
7. Pulse P3 de nuevo para salir de todos los menús o espere 5 segundos para
volver al modo stand-by.
4. Ahora seleccione la banda deseada rotando el mando principal.
5. Para confirmar manténgalo presionado durante 5 segundos.
Nota 1: si la banda UK está seleccionada, puede cambiar directamente a la banda CE:
solo pulse P1 en el menú 1 o el botón asociado a la función MOD.
Nota 2: la banda de frecuencia permitida en toda Europa es CE (40 Ch FM 4W). Vea
la tabla de Restricciones al uso incluida en el embalaje.
10 | M-30 Manual de Instrucciones M-30 Manual de Instrucciones | 11
Page 53

MENÚ:
• FUNC MENU (para cambiar los parámetros generales de la radio)
1. BEEP
2. TOT DIM
3. VOL
4. SQL
5. ASQ
6. RFG
7. DSP
• PUD MENU (para cambiar los ajustes de todos los canales de la banda en uso
con solo un ajuste)
1. A/FM
2. NB
3. HIC
4. ROG
• CHAN MENU (para cambiar los ajustes del canal en uso)
1. PD
2. SCAN
3. A/FM*
4. NB*
5. HIC*
• DTMF MENU (para cambiar los ajustes de los códigos DTMF)
1. DTMF
2. SND-T
3. FIR-T
4. PRE-T
* Estas opciones solo son posibles si PD está ajustado en "OFF"
** KEY MENU permite ajustar las opciones o funciones en los botones P1 - P6.
8. KEY
9. SCM
10. SCRT
11. AOP
12. SWR
13. RST
5. BUSY
6. BOT
7. EOT
8. CALL
6. ROG*
7. BUSY*
8. BOT*
9. EOT*
10. CALL*
5. DELAY
6. D-FUN
7. DISP
8. KEY MENU**
Lista de funciones del menú
Display Nº Menú Función Opciones
Menú FUNC
BEEP 1 Tono teclado ON, OFF
TOT 2 Time Out Timer
DIM 3
VOL 4 Ajustar el volumen del altavoz 1,2,3,…,56
SQL 5 Selección nivel Squelch OFF,1,2,…,28
ASQ 6 Selección sensibilidad Squelch automático 1,2,3,…,9
RFG 7 Selección nivel Ganancia RF
DSP 8 Modo mostrado (canal o frecuencia) CH,FRQ
KEYs 9 Selección del menú activado
SCM 10 Tipo de scan SQ, TI
SCRT 11 Tiempo reanudación Scan
AOP 12 Encendido automático ON, OFF
SWR 13 Test SWR para antena ---
RST 14 Reset OPT, ALL
A/FM 1 Modo operativo AM, FM
NB 2 Supresor de ruido OFF, ON
HIC 3 Potenciador de voz OFF, ON
ROG 4 Roger beep OFF, 1, 2, 3, 4, 5
BUSY 5 Selección bloqueo canal ocupado OFF, ON
BOT*** 6
EOT*** 7
CALL*** 8 Selección del tipo de call tone
PD 1 Activar ajustes canal separado OFF, ON
Selección del display y nivel retroilumi-
nación
Menú PUD
Activación de los tonos DTMF mientras se
pulsa PTT
Activación de los tonos DTMF mientras se
suelta PTT
Menú CHAN
OFF, 1, 2, …, … ,
30 min.
1, 2, 3
OFF,3,6,9,…
,30,AU
1/2/3, 1/2, 2/3,
1/3
5S, 10S, 15S, …,
30S
12 | M-30 Manual de Instrucciones M-30 Manual de Instrucciones | 13
Page 54

SCAN 2
Cuando la función PD está activa, las siguientes funciones están desactivadas:
A/FM 3 Selección del modo operativo AM, FM
NB 4 Activación Supresión de ruido OFF, ON
HIC 5 Potenciador de voz OFF, ON
ROG 6 Roger beep OFF, 1, 2, 3, 4, 5
BUSY 7 Bloqueo canal ocupado OFF, ON
BOT*** 8 Activación de tonos DTMF pulsando PTT
EOT*** 9 Activación de tonos DTMF soltando PTT
CALL*** 10 Selección del tipo de tono de llamada
DTMF 1
SND-T 2 Ajustar el tiempo de tx del código DTMF 10ms, …, 500ms
FIR-T 3
PRE-T 4 Precargar el ajuste del tiempo de DTMF
DELAY 5 Ajuste del tiempo de retardo 0ms, …, 1000ms
D-FUN 6 Modo de envío D-letter D, 1S, 2S, .., 16S
DISP 7 Código DTMF enviado mostrado OFF, ON
En este menú es posible configurar las funciones asignadas a los botones P1-P6
Nota: la lista de las opciones puede cambiar en caso de que algunos ajustes se hayan
modificado mediante el software de programación opcional.
*** Las funciones DTMF no están disponibles en M-30.
Añadir o eliminar canal en uso de la lista de
escaneado
Menú DTMF***
Selección del código DTMF asociado al
botón CALL
Ajustar el tiempo de tx del primer dígito del
código DTMF
Menú KEY
ADD, DEL
1,2,3, …,16
0ms, …, 1000ms
100ms, …,
2500ms
Canales de memoria
M-30 permite almacenar hasta 8 canales.
Los canales permiten almacenar la frecuencia y los datos. Así, no será necesario
reprogramar los mismos datos repetidamente y podrá sintonizar inmediatamente
los canales deseados.
Guardar un canal
1. Seleccione el canal que desea guardar.
2. Ajuste los parámetros deseados al canal (AM/FM, HIC, RB, NB).
3. Presione P6 durante 2 segundos en el menú 2 o en el botón asociado a la
función MEM. El número de canal aparecerá en el display.
4. Si el canal parpadea significa que no ha sido guardado. Si no parpadea, está
ya almacenado. De todas formas, es posible sobrescribir la información de la
memoria en el canal ocupado.
5. Seleccione el número de canal a guardar (o sobrescribir) girando el mando
principal.
6. Presione P6 (o el botón asociado a la función MEM) durante 2 segundos en el
menú 2, o FUNC en el micrófono para borrar la memoria.
Rellamar a un canal
1. Presione P6 (o el botón asociado a la función MEM) en el menú 2 para entrar
en la memoria de canales.
2. Gire el mando principal para seleccionar el canal memorizado deseado.
Borrar un canal
1. Presione P6 (o el botón asociado a la función MEM) en el menú 2 para entrar
en la memoria de canales.
2. Seleccione el canal a borrar.
3. Mantenga pulsado durante 2 segundos P6 o el botón asociado a la función
MEM en el menú 2.
Función Scan
M-30 tiene 2 tipos de escaneado:
• TI: cada vez que se detecte una señal, la radio detendrá el escaneado durante
unos segundos. Después reanudará el escaneado en las demás frecuencias incluso si la señal sigue presente.
• SQ: cuando una señal es detectada, la radio detendrá el escaneado y lo reanu-
dará únicamente cuando la señal desaparezca.
1. Para seleccionar el tipo de escaneado deseado, entre el menú de la radio y siga
estos pasos: MENUFUNC MENU SCM
2. Seleccione la opción deseada.
14 | M-30 Manual de Instrucciones M-30 Manual de Instrucciones | 15
Page 55

3. Para empezar a escanear pulse P6 en el menú 1, o el botón asociado a la función SCA.
4. Para invertir la dirección del escaneado gire el mando principal.
5. Para detener el escaneado pulse cualquier tecla en el panel frontal o PTT.
Añadir un canal a la lista de escaneado
1. Seleccione el canal que desea añadir a la lista.
2. Mantenga pulsado durante 2 segundos P6 en el menú 1, o el botón asociado
a la función SCA.
3. El display mostrará SKP:ADD en la parte inferior y la letra S aparecerá encima
del canal (o frecuencia).
Eliminar un canal de la lista de escaneado
1. Seleccione el canal que desea eliminar de la lista.
2. Mantenga pulsado durante 2 segundos P6 en el menú 1, o el botón asociado
a la función SCA.
3. El display mostrará SKP:DEL en la parte inferior y la letra S desaparecerá.
Tiempo de reanudación del escaneado
En modo de escaneado TI se puede cambiar el tiempo de reanudación del escaneado.
1. Este tiempo va desde un mínimo de 5 segundos hasta 30 segundos.
2. Entre al menú de la radio y siga este procedimiento: MENUFUNC
MENUSCRT
3. Pulse el mando principal para entrar a las opciones.
4. Gire el mando para seleccionar el tiempo deseado.
5. Confirme pulsando el mando.
Función Dual Watch
M-30 permite monitorear dos canales al mismo tiempo.
1. Seleccione el primer canal a monitorear y después presione P1 en el menú 2 o
la tecla asociada a la función DW.
2. Ahora seleccione el segundo canal a monitorear y presione de nuevo P1 en el
menú 2 o la tecla asociada a la función DW.
3. La función Dual Watch está activa.
4. Cuando se detecte una señal, la radio dejará de monitorear en los dos canales
y empezará de nuevo una vez ya no se detecte la señal.
Activación Supresión de Ruidos
La función Noise Blanker (supresor de ruidos) permite reducir ruidos e interferencias, por ejemplo, el más conocido es el ruido de encendido del automóvil.
1. Para activar Noise Blanker, presione P5 en el menú 2 o el botón asignado a
la función NB.
2. La pantalla mostrará NB: OFF o NB: ON dependiendo de la activación o desactivación del Noise Blanker.
3. Confirme su selección pulsando el mando principal.
Ganancia de RF
En el caso de señales muy fuertes, es posible habilitar la Ganancia de RF.
1. Para habilitar la Ganancia de RF, presione P2 en el menú 1 o el botón asignado a la función RFG. Cada vez que se pulsa este botón, el nivel de ganancia
aumentará. Los siguientes niveles están disponibles: OFF, 3, 6, 9, 12, 15, 18,
21, 24, 27, 30, AU.
2. Confirme pulsando el mando principal.
Roger Beep
Cuando esta función está habilitada, la radio emitirá un tono de audio cada vez que
finalice la transmisión.
Puede elegir entre 5 tonos de audio diferentes que se pueden modificar a través del
software de programación opcional.
1. Para activar el Roger Beep, entre al menú y siga este procedimiento: MENU
FUNC MENU ROG
2. Es posible elegir entre las siguientes opciones: OFF, 1, 2, 3, 4, 5.
3. Confirme pulsando el mando principal.
Potenciador de voz
Esta función permite potenciar los tonos de voz y así mejorar el audio, que será más
cómodo de escuchar, especialmente en comunicaciones largas.
1. Para activarlo, presione P3 en el menú 2 o el botón asociado a la función HIC.
HIC: OFF. El potenciador de voz se ajustará al nivel estándar.
HIC: ON. El audio se ajustará para potenciar los tonos bajos.
2. Pulse el mando principal para confirmar la selección.
Canales de emergencia
M-30 permite seleccionar inmediatamente los canales de emergencia 9 y 19.
1. Presione P3 en el menú 1 o la tecla asignada a la función EMG. Cada vez que
se presiona este botón, seleccionará los canales de emergencia o volverá al
último canal en uso.
2. Pulse el mando principal para confirmar.
16 | M-30 Manual de Instrucciones M-30 Manual de Instrucciones | 17
Page 56

Ajuste de SWR
Esta característica permite ajustar el medidor SWR en M-30 de modo que mientras se transmite la pantalla indique el valor correcto de SWR. M-30 está ajustada
por defecto en la frecuencia central.
También es posible hacer un nuevo ajuste (en este caso se requiere una carga simulada de 50 Ohm, opcional).
1. Entre al menú de la radio y proceda con los siguientes pasos: MENUFUNC
MENUSWR
2. Pulse el mando principal para comenzar el ajuste.
3. Asegúrese de que M-30 esté conectada a una carga simulada de 50 Ohm y
confirme pulsando el mando principal.
Otras funciones
Ajustar el canal prioritario
1. Seleccione el canal que quiera establecer como prioritario.
2. Mantenga pulsado durante 3 segundos el botón en el micrófono para establecerlo.
3. Ahora, para seleccionar el canal prioritario, pulse en el micrófono.
Activar/desactivar los tonos de teclado
1. Entre al menú de la radio y siga estos pasos: MENUFUNC MENUBEEP
2. Pulse el mando principal para ver las opciones
3. Gire el mando para seleccionar ON (el teclado emite pitidos) u OFF (deshabilitado).
4. Pulse el mando principal para confirmar su selección.
Time Out Timer
El Time Out Timer (TOT) cambia automáticamente la radio a modo recepción si
habla demasiado tiempo, después de un tiempo preestablecido que puede cambiar
de 1 minuto a hasta 30 minutos.
Antes de detener la transmisión, M-30 emite una alarma acústica para avisarle.
Esta función también es útil para evitar un sobrecalentamiento del equipo.
Le sugerimos que mantenga el TOT habilitado.
TOT se puede ajustar también desde el menú de la radio:
1. Acceda al menú de la radio y siga este procedimiento: MENUFUNC
MENUTOT
2. Establezca la hora deseada y confirme pulsando el mando principal.
Ajustar del nivel de la retroiluminación del display
1. Entre al menú de la radio y siga este procedimiento: MENUFUNC
MENUDIM
2. Establezca el nivel deseado y confirme pulsando el mando principal.
3. Los niveles disponibles son 3: 1 es el menos brillante y 3 es el más brillante.
Encendido automático
Puede configurar el encendido automático de la radio cuando el vehículo está encendido.
1. Entre al menú de la radio y siga esta ruta: MENUUTILITIES FUNC
MENUAOP
2. Ajuste la opción deseada y pulse el mando principal para confirmación.
Menú de la radio
M-30 se suministra con 3 menús; es posible usarlos todos o habilitar solo algunos.
1. Entre al menú de la radio y siga estos pasos:
MENUUTILITIES FUNC MENUKEYS
2. Elija entre las siguientes opciones:
1/2/3, para habilitar todos los menús,
1/2, para habilitar los menús 1 y 2,
2/3, para habilitar los menús 2 y 3,
1/3, para habilitar los menús 1 y 3.
3. Seleccione la opción deseada y confirme pulsando el mando principal.
Reset
1. Entre al menú de la radio y siga este camino: MENUFUNC MENURST
2. Seleccione una de estas opciones:
OPT, para resetear solo la configuración; no reseteará las memorias.
ALL, para hacer un reinicio completo: configuraciones y memorias.
3. Seleccione la configuración deseada y confirme pulsando el mando principal.
18 | M-30 Manual de Instrucciones M-30 Manual de Instrucciones | 19
Page 57

Solución de problemas
Problema Solución
La radio no se enciende Cable de alimentación desconectado o defectuoso.
Verifique su estado.
Fusible roto. Verifique el estado de los fusibles en la
radio y en su vehículo.
El teclado no funciona El bloqueo de teclado está activo.
Especificaciones técnicas
Canales ver tabla de bandas de frecuencia
Banda de frecuencia **** 26.565-27.99125 MHz FM (RX / TX)
26.965-27.405 MHz AM (RX / TX)
Fuente de alimentación 12 / 24V
Consumo de corriente 2A
Temperatura operativa -10 ° C a + 55 ° C
Conector de antena UHF, SO239
Potencia de salida 4W
Modulación A3E (AM), F3E (FM)
Desviación de frecuencia máxima (FM) ≤ 1,9 KHz
Emisiones espurias <-54dBm
Potencia del canal adyacente <20 uW
Estabilidad de frecuencia ± 5.0 ppm
Sensibilidad Rx @ 12dB SINAD <1uV
Potencia de salida de audio ≥ 3W (8 Ohm)
Rechazo de canal adyacente mejor que 60 dB
Respuesta de frecuencia 300-3000Hz
Dimensiones 120x38x160 (LxHxD)
Peso (micrófono incluido) 820g
**** que cubre todas las bandas de frecuencia de la UE aprobadas.
Las especificaciones están sujetas a cambios sin previo aviso.
20 | M-30 Manual de Instrucciones M-30 Manual de Instrucciones | 21
Page 58

22 | M-30 Manual de Instrucciones M-30 Manual de Instrucciones | 23
Page 59

Spis treści
Zawartość opakowania 1
Ostrzeżenia 1
Podstawowe funkcje i cechy 2
Instalacja radia 3
Montaż 3
Zasilanie 3
Wymiana bezpiecznika 4
Podłączenie mikrofonu 4
Instalacja anteny 4
Głośnik zewnętrzny 4
Elementy sterowania i wyświetlacz 5
Wyświetlacz 6
Panel tylny 7
Mikrofon 7
Podstawowa obsługa 8
Włączanie/wyłączanie 8
Regulacja siły głosu 8
Zmiana kanałów 8
Wybór rodzaju modulacji (AM/FM) 8
Regulacja blokady szumów 9
Aktywacja automatycznej blokady szumów 9
Wybieranie trybu pracy wyświetlacza (częstotliwość lub kanał) 9
Odbiór 9
M-30 Instrukcja obsługi
Page 60

Wybór standardu pracy radia 10
Blokada przycisków 11
Menu radia 19
Reset 20
Menu ustawień 11
Poruszanie się po menu 11
Lista funkcji menu 13
Pamięć kanałów 15
Zapamiętywanie kanału 15
Wywoływanie zapamiętanego kanału 15
Kasowanie zapamiętanego kanału 15
Skaner 15
Dodawanie kanału do listy skanowania 16
Usuwanie kanału z listy skanowania 16
Czas wznowienia skanowania 16
Jednoczesny nasłuch 2 kanałów (Dual Watch) 16
Aktywacja filtra Noise Blanker 17
Regulacja czułości odbiornika 17
Roger Beep dźwięk końca transmisji 17
Wzmacniacz głosu 17
Kanały szybkiego dostępu 18
Regulacja SWR 18
Pozostałe funkcje 18
Wybór kanału priorytetowego 18
Dźwięk potwierdzenia użycia przycisku 18
Ograniczenie czasu nadawania (TOT) 19
Regulacja podświetlenia wyświetlacza 19
Automatyczne włączanie 19
Rozwiązywanie problemów 20
Dane techniczne 21
M-30 Instrukcja obsługi M-30 Instrukcja obsługi
Page 61

Zawartość opakowania
• Radiotelefon M-30 z kablem zasilającym
• 1 mikrofon
• 1 element mocujący
• 1 woreczek foliowy ze śrubami do przykręcenia radia w uchwycie i uchwytu do
podłoża
• 1 bezpiecznik
• 1 uchwyt mikrofonu
Jeżeli czegoś brakuje skontaktuj się ze sprzedawcą Midlanda.
Ostrzeżenia
M-30 jest zaawansowanym urządzeniem elektronicznym i powinien być traktowany
z należytą uwagą. Poniższe uwagi pozwolą spełnić wymagania ochrony gwarancyjnej
i pozwolą cieszyć się produktem przez długie lata.
• Nigdy nie próbuj otwierać obudowy. Radio to skomplikowane i precyzyjne
urządzenie poddane starannej regulacji optymalizującej parametry. Nieautoryzowane otwarcie obudowy, a tym bardziej próby zmiany parametrów pracy
powodują utratę gwarancji.
• Nie wystawiaj radia zbyt długo na bezpośrednie działanie słońca i nie zostawiaj w
gorących miejscach
• Nadmiar ciepła skraca żywotność elementów elektronicznych, a niektóre elementy z plastiku mogą się odkształcić lub stopić
• Nie umieszczaj radia w bardzo zapylonych i brudnych miejscach.
• Radio zawsze powinno być suche. Woda i wilgoć powodują korozję obwodów
elektrycznych.
• Jeżeli radio zacznie wydzielać jakiś zapach lub dym natychmiast odłącz je od zasilania.
• Nigdy nie nadawaj bez poprawnie podłączonej, sprawnej anteny.
• Nie zmieniaj ustawień radia podczas prowadzenia samochodu, bo to rozprasza
twoją uwagę.
M-30 Instrukcja obsługi | 1
Page 62

Podstawowe funkcje i cechy
• Szeroki wyświetlacz graficzny TFT
• Zasilanie 12 – 24V
• Metalowa obudowa
• Programowane przyciski
• Wyświetlanie numeru kanału lub numeru kanału z częstotliwością
• Modulacja AM i FM
• Cyfrowa automatyczna blokada szumów z możliwością regulacji
• Wskaźnik mocy sygnału i wartości SWR
• Regulowana czułość odbiornika RF gain
• Skaner
• Jednoczesny nasłuch 2 kanałów
• Regulowany Roger Beep
• Szybki dostęp do kanałów 9/19 i priorytetowego
• Redukcja zakłóceń Noise Blanker
• Wzmacniacz głosu
• Zabezpieczenie przed odwróceniem polaryzacji zasilania
• 8 miejsc na zapamiętanie kanałów
• Ograniczenie czasu nadawania
• Regulowane podświetlenie
• Automatyczne włączanie
• Blokada przycisków
• Mikrofon ze złączem RJ45, przyciskami Góra/Dół i kanał priorytetowy
• Możliwość programowania przed opcjonalny programator PRG-30 kod C1318
Instalacja radia
Montaż
• Przy instalacji radia w samochodzie należy kierować zarówno komfortem obsługi jak
i względami bezpieczeństwa. Elementy sterowania radia powinny być łatwo
dostępne i nie ograniczać ruchów niezbędnych do kierowania pojazdem. Miejsce
mocowania powinno być dobrze wentylowane, osłonięte od bezpośredniego padania promieni słonecznych, a radio nie może stanowić zagrożenia dla kierowcy i
pasażerów gdy pojazd jest w ruchu.
• Przykręć element mocujący za pomocą dostarczonych wkrętów i podkładek.
• Przykręć radio do elementu mocującego używając dostarczonych śrub i
podkładek.
Zasilanie
• Upewnij się, że radio jest wyłączone.
• Z tyłu radia znajdują się przewody zasilające w dwóch kolorach. Oprawką
bezpiecznika znajduje się na przewodzie czerwonym.
• Ten przewód wyposażony jest w konektor odpowiedni do połączenia radia z akumulatorem samochodu.
• Przy zasilaniu prądem stałym niezwykle istotna jest właściwa polaryzacja, mimo
że radio ma zabezpieczenie przed skutkami odwrotnego podłączenia.
• Czerwony = biegun dodatni (+)
• Czarny = biegun ujemny (-)
• Te same kolory znajdują się na akumulatorze i skrzynkach bezpiecznikowych.
Podłączaj kable zgonie
• z kolorami.
• Akumulator pojazdu powinien mieć nominalne napięcie 12 lub 24V.
• Upewnij się, ze akumulator ma wystarczającą ilość prądu do zasilenia radia.
• Podłącz kable do stabilizowanego źródła prądu stałego, upewniając się, że zachowujesz właściwą polaryzację.
UWAGA: Dla uzyskania najlepszych efektów zalecamy instalację radia w dobrze
wentylowanym miejscu.
2 | M-30 Instrukcja obsługi M-30 Instrukcja obsługi | 3
Page 63

Wymiana bezpiecznika
M
O
D
R
F
G
C
H
S
Q
L
S
FM
CE
CH–31
0 2 4 6 8
0 3 5 7 9 30
P
S
MAX
MAX
12.5
Przed wymianą bezpiecznika koniecznie ustal przyczynę jego przepalenia. Jeśli zachodzi taka potrzeba udaj się do serwisu.
Bezpiecznik użyty w radiu ma wartość prądową 5A.
BEZPIECZNIK 5A 250V
OPRAWA BEZPIECZNIKA NA PRZEWODZIE
Elementy sterowania i wyświetlacz
9 2 5 10
11
Podłączenie mikrofonu
Podłącz mikrofon do gniazda znajdującego się na przednim panelu.
Mikrofon można zawiesić w pobliżu radia korzystając z dołączonego wieszaka.
P1
P2
midlandeurope.com
P3
P4
P5
P6
FUNC
Instalacja anteny
Umieść antenę najwyżej jak to możliwe.
Im dłuższa antena tym większy zasięg łączności.
• Umieść antenę na środku powierzchni, którą wybrałeś na miejsce montażu.
• Prowadź kabel antenowy z dala od źródeł zakłóceń takich jak elementy zapłonu,
czujniki itp.
• Upewnij się, ze antena ma połączenie z metalowymi częściami auta.
• Uważaj, żeby nie uszkodzić kabla antenowego podczas instalacji.
Uwaga: Nigdy nie nadawaj, bez prawidłowo zamontowanej i zestrojonej anteny. Okresowo przeprowadzaj kontrolę SWR i stanu kabla.
Głośnik zewnętrzny
Impedancja opcjonalnego, zewnętrznego głośnika powinna zawierać się w przedziale
4 do 8 Ω. Wtyk w jaki ma być zaopatrzony to jack 3,5 mm mono.
1. Włącznik On/O. Naciśnij i przytrzymaj , żeby włączyć/wyłączyć radio.
2. P1 Przycisk programowany
3. P2 Przycisk programowany
4. P3 Przycisk programowany
5. P4 Przycisk programowany
6. P5 Przycisk programowany
7. P6 Przycisk programowany
8. FUNC: Przycisk funkcyjny. Aktywuje drugą funkcję przycisków programo-
9. Gniazdo mikrofonu: tu podłącza się mikrofon lub opcjonalny kabel do pro-
10. Pokrętło główne: krótkie wciśnięcie zmienia kanały co 10 w górę, a wciśniecie
11. Kolorowy wyświetlacz graficzny
4 | M-30 Instrukcja obsługi M-30 Instrukcja obsługi | 5
1 7 6 83 4
Krótkie naciśnięcie włącza/wyłącza głośnik.
wanych. Wciśnięcie i przytrzymanie otwiera menu.
gramowania.
i przytrzymanie blokuje/odblokowuje przyciski. Pokrętło pozwala na poruszanie
po menu i zmianę ustawień. Krótkie naciśnięcie potwierdza wtedy dokonany
wybór.
Page 64

Wyświetlacz
M
O
D
R
F
G
E
M
G
C
H
S
Q
L
S
C
A
S
FM
CE
CH–31
0 2 4 6 8
0 3 5 7 9 30
P
S
MAX
MAX
VOL
RFG
SQL
HIC
35
of
10
of
12.5
P1
P2
P3
P4
P5
P6
FUNC
M
O
D
R
F
G
E
M
G
C
H
S
Q
L
S
C
A
S
FM
CE
CH–31
0 2 4 6 8
0 3 5 7 9 30
P
S
MAX
MAX
VOL
RFG
SQL
HIC
35
of
10
of
midlandeurope.com
M
O
D
R
F
C
H
S
Q
S
FM
CE
0 2 4 6 8
0 3 5 7 9 30
P
S
MAX
MAX
12.5
12.5
A. Wskaźnik mocy nadawanej
B. Wskaźnik mocy sygnału przychodzącego lub poziom SWR (przy nadawaniu)
C. Modulacja AM lub FM
D. Funkcje dostępne z przycisków programowanych P1-P6
E. S:Wskaźnik kanału dodanego do listy skanowania. T: sygnalizuje trwające na-
F. Używany aktualnie kanał lub częstotliwość
G. Informacje o najważniejszych, aktualnych parametrach radia
RX:
VOL poziom głośności
SQL poziom blokady szumów
RFG poziom czułości odbiornika
HIC Wzmacniacz głosu
H. Nazwa aktualnie używanego standardu
I. Wartość napięcia zasilania
6 | M-30 Instrukcja obsługi M-30 Instrukcja obsługi | 7
D
dawanie.
Panel tylny
12 13
A B C
ANT EXT SP
0 2 4 6 8
M
P
O
D
S
E
F
0 3 5 7 9 30
S
R
F
G
CH–31
E
M
G
VOL
RFG
35
of
FM
SQL
HIC
G
MAX
C
H
MAX
12.5
S
Q
CE
L
10
of
TX:
PWR poziom mocy
RB typ dźwięku końca transmisji
SPL odstęp (funkcja tylko dla
wersji amatorskiej)
TOT ograniczenie czasu nadawania
S
C
A
I
H
12. ANT: Gniazdo antenowe typu SO239
13. EXTSPK: Gniazdo głośnika zewnętrznego
Mikrofon
1. PTT: Wciśnij i trzymaj wciśnięty
podczas nadawania
2. Góra/Dół: zwiększanie/zmniejszanie
siły głosu i poruszanie się po
opcjach menu
3. wywołanie kanału priorytetowego
2
3 2
1
Page 65

Podstawowa obsługa
M-30 posiada sześć programowanych przycisków na przednim panelu P1-P2-P3P4-P5-P6. Mogą sterować różnymi funkcjami zależnie od potrzeb użytkownika.
Każdemu z przycisków można przypisać jednocześnie 3 funkcje w 3 różnych menu.
Domyślnym jest menu 2. Menu 3 może być aktywowane tylko przez opcjonalny
programator PRG-30.
Menu 1:
P1 MOD P4 CH
P2 RFG P5 SQL
P3 EMG P6 SCA
Funkcje przypisane do przycisków P1-P2-P3 widać po lewej stronie wyświetlacza,
podczas gdy te przypisane do P4-P5-P6 pojawiają się po prawej. Istnieje możliwość
zmiany funkcji przypisanych poszczególnym przyciskom z poziomu menu lub przez
opcjonalny programator.
Chcąc zmienić menu naciśnij przycisk FUNC
Włączanie/wyłączanie
Wciśnij i przytrzymaj przez 1 sek. przycisk , aby włączyć radio, a przez 2 sek., żeby
wyłączyć.
Regulacja siły głosu
Do regulacji głośności służy pokrętło główne. Obracane zgodnie z ruchem
wskazówek zegara zwiększa głośność, a w przeciwną – zmniejsza.
Zmiana kanałów
Wciśnij przycisk P4 z menu 1 lub inny, któremu została przypisana funkcja CH. Potem pokrętłem głównym możesz zmieniać kanały.
Pamiętaj: Głośność można również regulować przyciskami umieszczonymi w górnej
części mikrofonu.
Pamiętaj: Można szybko przerzucać kanały co 10 przyciskając pokrętło główne.
Wybór rodzaju modulacji (AM/FM)
Zmiana modulacji odbywa się przez naciśnięcie przycisku P1 z menu 1 lub innego,
któremu została przypisana funkcja MOD. Symbol wybranego rodzaju emisji pojawi
się w dolnej części wyświetlacza.
Dla potwierdzenia wyboru wciśnij pokrętło główne lub poczekaj 10 sek.
Menu 2:
P1 DW P4 DIM
P2 DSP P5 NB
P3 HIC P6 MEM
Regulacja blokady szumów
Blokada szumów ma za zadanie tłumić hałasy dochodzące z głośnika podczas braku
jakiejkolwiek, zrozumiałej transmisji. Właściwie ustawiony poziom blokady powinien
być tylko nieznacznie wyższy od poziomu szumów tła. Im wyższy poziom blokady
tym coraz to silniejsze sygnały będą mogły go otworzyć. Odlegli korespondenci
przestaną być słyszalni.
Wciśnij przycisk P5 z menu 1 lub inny, któremu została przypisana funkcja SQL.
Poziom wybierz obracając pokrętłem głównym. Do wyboru jest 28 stopni czułości,
gdzie najczulszy jest poziom1.
Dla potwierdzenia wyboru wciśnij pokrętło główne lub poczekaj 10 sek.
Aktywacja automatycznej blokady szumów
Do aktywacji automatycznej blokady szumów służy ten sam przycisk co do obsługi
blokady manualnej czyli P5 z menu 1 lub inny, któremu została przypisana funkcja
SQL. Tym razem jednak należy go wcisnąć i dłużej przytrzymać. Potem obracając
pokrętłem głównym można wybrać jeden z 9 dostępnych poziomów, pamiętając że
1 jest najczulszy, a 9 najmniej czuły. potwierdzenia wyboru wciśnij pokrętło główne
lub poczekaj 10 sek.
Gdy automatyczna blokada szumów jest aktywna napis SQL na wyświetlaczu zostaje
zastąpiony przez ASQ.
Wybieranie trybu pracy wyświetlacza (częstotliwość lub kanał)
M-30 potrafi wyświetlać numer aktualnie używanego kanału lub numer kanału razem
z częstotliwością. Zmiana sposobu wyświetlania odbywa się przez naciśnięcie
przycisku P2 z menu 2 lub inny, któremu została przypisana funkcja DSP. Dla
potwierdzenia wyboru wciśnij pokrętło główne lub poczekaj 10 sek.
Odbiór
Siła sygnału przychodzącego obrazowana jest przez zielone segmenty wyświetlane w
górnej części wyświetlacza. Upewnij się, że wybrałeś właściwy rodzaj modulacji (AM
lub FM), zgodny z emisją twoich korespondentów.
Pamiętaj: możesz wyciszyć głośnik wciskając krótko
pojawi się komunikat Audio: MT. Ponowne, krótkie wciśnięcie uruchamia głośnik, co
potwierdza komunikat Audio: ESC na wyświetlaczu.
.W dolnej części wyświetlacza
8 | M-30 Instrukcja obsługi M-30 Instrukcja obsługi | 9
Page 66

Nadawanie
Przed rozpoczęciem nadawania upewnij się, że kanał, który wybrałeś nie jest obecnie
zajęty przez innych rozmówców.
Wciśnij i trzymaj wciśnięty przycisk PTT mówiąc do mikrofonu. Przez cały czas nadawania wyświetlacz pokazuje literę T i moc sygnału wychodzącego.
Zwolnieniem przycisku PTT przełącza radio w tryb odbioru.
5. Teraz wybierz właściwy standard obracając pokrętłem głównym
6. Dla zatwierdzenia wyboru wciśnij i przytrzymaj pokrętło główne przez 5 sek.
Uwaga 1: Pracując w standardzie UK możesz szybko zmienić standard na CE wciskając
przycisk P1 z menu 1 lub inny przycisk, który ma przypisaną funkcję MOD.
Uwaga 2: Standard dopuszczony do używania w całej Europie to CE (40CH FM 4W).
Patrz tabela ograniczeń.
Wybór standardu pracy radia
Midland M-30 to multistandardowy radiotelefon CB, którego można legalnie
używać w wielu krajach. Należy wybrać odpowiedni standard zależnie od państwa, na
którego terytorium przebywasz.
Poniższa tabela zawiera wszystkie standardy jakimi dysponuje M-30.
Wyświetlany symbol Państwo
EU Europa/Włochy 40CH AM/FM 4W
CE 40CH FM 4W
UK
PL Polska 40CH AM/FM 4W
I2 Włochy 34CH AM/FM 4W
DE Niemcy 80CH FM 4W/40CH AM 4W
IN 27CH AM/FM 4W
HF Rosja 400CH AM/FM 4/8/15W
HF Polska (Rosja-5kHz) AM/FM 4/8/15W
HAM
Procedura zmiany standardu wygląda następująco:
1. Wyłącz radio
2. Włącz radio trzymając wciśnięty przycisk FUNC
3. Zwolnij FUNC gdy wyświetlacz pokaże
4.
Anglia 40CH FM 4W angielskie częstotliwości + EC
Wersje na rynki pozaeuropejskie
40CH 4W częstotliwości CEPT
Amatorskie 340CH AM/FM 4/8/15W Potrzebna
SelectBand:
SelectBand:
licencja Krótkofalarska
CB FREQ
CB FREQ
CE BAND
CE BAND
Blokada przycisków
Blokadę przycisków włącza się wciskając i przytrzymując przez 2 sek. pokrętło
główne. Na wyświetlaczu pojawi się informacja Key Lock. Przy włączonej blokadzie
wszystkie przyciski oprócz PTT pozostają nieaktywne.
Blokadę wyłącza się jeszcze raz wciskając i przytrzymując przez 2 sek. pokrętło
główne.
Menu ustawień
Używając menu można indywidualnie dopasować funkcjonowanie radia i kanałów do
własnych potrzeb.
Używając przycisku FUNC i pokrętła głównego można poruszać się po menu i
zmieniać ustawienia.
Pokrętło główne odpowiada nie tylko za poruszanie się po menu, ale również za
zatwierdzanie wyboru i samo otwieranie menu.
Poruszanie się po menu
1. Wciśnij i przytrzymaj przez 2 sek. przycisk FUNC.
2. Obróć pokrętło, żeby wybrać funkcję.
3. Wciśnij pokrętło, żeby wejść w opcje wybranej funkcji.
4. Wybierz właściwy parametr obracając pokrętłem lub używając przycisków
Góra/Dół w mikrofonie.
5. Wciśnij pokrętło, żeby zatwierdzić wybór.
6. Wciśnij przycisk P3 aby powrócić do poprzedniego ekranu wyboru.
7. Wciśnij jeszcze raz P3, żeby opuścić MENU lub poczekaj 5 sek.
10 | M-30 Instrukcja obsługi M-30 Instrukcja obsługi | 11
Page 67

MENU:
• FUNC MENU (do zmiany podstawowych ustawień radia)
1. BEEP
2. TOT DIM
3. VOL
4. SQL
5. ASQ
6. RFG
7. DSP
• PUD MENU (do zmiany parametrów wszystkich kanałów używanego standardu
jedną operacją)
1. A/FM
2. NB
3. HIC
4. ROG
• CHAN MENU (do zmiany statusu obecnie używanego kanału)
1. PD
2. SCAN
3. A/FM*
4. NB*
5. HIC*
• DTMF MENU (do zmiany ustawień kodu DTMF)
1. DTMF
2. SND-T
3. FIR-T
4. PRE-T
* ta opcja jest dostępna tylko gdy PD jest w ustawieniu „OFF”
** KEY MENU pozwala przypisać opcje lub funkcje przyciskom P1-P6
8. KEY
9. SCM
10. SCRT
11. AOP
12. SWR
13. RST
5. BUSY
6. BOT
7. EOT
8. CALL
6. ROG*
7. BUSY*
8. BOT*
9. EOT*
10. CALL*
5. DELAY
6. D-FUN
7. DISP
8. KEY MENU**
Lista funkcji menu
Wyświetlacz Menu Funkcja Opcje
FUNC MENU
BEEP 1 Dźwięk potwierdzający użycie przycisków ON, OFF
TOT 2 Ograniczenie czasu nadawania
DIM 3 Podświetlenie wyświetlacza i przycisków 1, 2, 3
VOL 4 Głośność odsłuchu 1,2,3,…,56
SQL 5 Poziom blokady szumów OFF,1,2,…,28
ASQ 6 Czułość automatycznej blokady szumów 1,2,3,…,9
RFG 7 Czułość odbiornika
DSP 8
KEYs 9 Wybór menu 1/2/3, 1/2, 2/3, 1/3
SCM 10 Typ skanowania SQ, TI
SCRT 11 Czas wznowienia skanowania
AOP 12 Automatyczne włączenie ON, OFF
SWR 13 Test SWR anteny ---
RST 14 Reset OPT, ALL
A/FM 1 Modulacja AM, FM
NB 2 Filtr Noise Blanker OFF, ON
HIC 3 Wzmacniacz głosu OFF, ON
ROG 4 Roger Beep dźwięk końca transmisji OFF, 1, 2, 3, 4, 5
BUSY 5 Blokowanie nadawania na zajętym kanale OFF, ON
BOT*** 6 Aktywacja DTMF przy wciskaniu PTT
EOT*** 7 Aktywacja DTMF przy zwalnianiu PTT
CALL*** 8 Wybór dźwięku przywołania CALL
PD 1 Ustawianie oddzielnego kanału OFF, ON
SCAN 2
Kiedy funkcja PD jest aktywna następujące ustawienia pozostają nieaktywne
A/FM 3 Modulacja AM, FM
Sposób wyświetlania (kanały lub
częstotliwość)
PUD MENU
CHAN MENU
Dodawanie, usuwanie kanału z listy
skanowania
OFF, 1, 2, …, … ,
30 min.
OFF,3,6,9,…
,30,AU
CH,FRQ
5S, 10S, 15S, …,
30S
ADD, DEL
12 | M-30 Instrukcja obsługi M-30 Instrukcja obsługi | 13
Page 68

NB 4 Filtr Noise Blanker OFF, ON
HIC 5 Wzmacniacz głosu OFF, ON
ROG 6 Roger Beep dźwięk końca transmisji OFF, 1, 2, 3, 4, 5
BUSY 7 Blokowanie nadawania na zajętym kanale OFF, ON
BOT*** 8 Aktywacja DTMF przy wciskaniu PTT
EOT*** 9 Aktywacja DTMF przy zwalnianiu PTT
CALL*** 10 Wybór dźwięku przywołania CALL
DTMF MENU***
DTMF 1
SND-T 2 Ustawianie czasu nadawania kodu DTMF 10ms, …, 500ms
FIR-T 3
PRE-T 4 Ładowanie wstępne ustawień czasu DTMF
DELAY 5 Ustawienie czasu opóźnienia 0ms, …, 1000ms
D-FUN 6 Tryb wysyłania litery D D, 1S, 2S, .., 16S
DISP 7
W tym menu można zmieniać funkcje przypisane do przycisków P1-P6
Uwaga: lista opcji może się zmieniać, gdyż przez opcjonalne oprogramowanie dopu-
szczalne jest wprowadzanie modyfikacji na tym poziomie.
*** Funkcje DTMF nie są domyślnie dostępne w M-30
"Wybór kodu DTMF przypisanego do"
"przycisku CALL"
"Ustawianie czasu nadawania pierwszej
cyfry" "kodu DTMF"
"Wyświetlanie wysyłanego kodu DTMF"
"KEY MENU"
KEY MENU
1,2,3, …,16
0ms, …, 1000ms
100ms, …,
2500ms
OFF, ON
Pamięć kanałów
M-30 potrafi zapamiętać do 8 kanałów.
Adresy pamięci pozwalają zachować częstotliwość i ustawienia przypisane do danego
kanału
i wywoływać je szybko jednym przyciśnięciem.
Zapamiętywanie kanału
1. Wybierz kanał, który chcesz zapamiętać.
2. Ustaw wszystkie parametry kanału (AM/FM, HIC, RB, NB).
3. Wciśnij i przytrzymaj przez 2 sek. przycisk P6 z menu 2 lub inny, któremu
przypisano funkcję MEM. Na wyświetlaczu pojawi się numer adresu pamięci.
4. Jeśli numer miga oznacza, że nie został jeszcze zapisany. Jeśli jest wyświetlany
ciągle to jest już zajęty, choć istnieje możliwość zapisanie tam nowych informacji, które automatycznie skasują stare.
5. Pokrętłem głównym wybierz numer adresu pamięci.
6. Wciśnij i przytrzymaj przez 2 sek. przycisk P6 z menu 2 lub inny, któremu
przypisano funkcję MEM lub FUNC w mikrofonie, aby skasować kanał.
Wywoływanie zapamiętanego kanału
Wciśnij przycisk P6 z menu 2 lub inny, któremu przypisano funkcję MEM. Pokrętłem
głównym wybierz numer adresu pamięci.
Kasowanie zapamiętanego kanału
1. Wciśnij przycisk P6 z menu 2 lub inny, któremu przypisano funkcję MEM.
2. Wybierz pokrętłem głównym jeden z zapamiętanych kanałów (adresów
pamięci) do skasowania. Wciśnij i przytrzymaj przez 2 sek. przycisk P6 z menu
2 lub inny, któremu przypisano funkcję MEM.
Skaner
Midland M-30 posiada 2 tryby skanowania
• TI: radio skanując wszystkie kanały zatrzyma się na kilka sekund po wykryciu
sygnału mocniejszego niż poziom blokady szumów i wznowi skanowanie, mimo
że sygnał będzie cały czas obecny.
• SQ: radio skanując wszystkie kanały zatrzyma się na kilka sekund po wykryciu
sygnału mocniejszego niż poziom blokady szumów i wznowi skanowanie tylko
wtedy jeśli ten sygnał zaniknie.
1. Wybór sposobu skanowania odbywa się przez menu radia według następującego
schematu MENUFUNC MENU SCM.
2. Wybierz jedną z 2 opcji.
3. Skanowanie uruchamia się przyciskiem P6 menu jeden lub innym z przypisaną
funkcja SCA.
14 | M-30 Instrukcja obsługi M-30 Instrukcja obsługi | 15
Page 69

4. Pokrętłem głównym można zmienić kierunek skanowania.
5. Skanowanie zatrzymuje się wciskając dowolny przycisk na przednim panelu lub
PTT.
Dodawanie kanału do listy skanowania
1. Wybierz kanał, który chcesz dodać do listy skanowania.
2. Wciśnij i przytrzymaj przez 2 sek. przyciski P6 menu jeden lub inny z przypisaną
funkcja SCA.
3. Wyświetlacz w dolnej części pokaże SKP:ADD i litera S pojawi się nad numerem kanału lub częstotliwością.
Usuwanie kanału z listy skanowania
1. Wybierz kanał, który chcesz usunąć z listy skanowania.
2. Wciśnij i przytrzymaj przez 2 sek. przyciski P6 menu jeden lub inny z przypisaną
funkcja SCA.
3. Wyświetlacz w dolnej części pokaże SKP:DEL i litera S nad numerem kanału
lub częstotliwością zniknie.
Czas wznowienia skanowania
W trybie skanera TI możliwa jest zmiana czasu, po którym radio wznawia skanowanie, chwilowo zawieszone wykryciem sygnału wyrastającego ponad blokadę szumów.
Można wybrać czas z przedziału 5 – 30 sek.
1. Przeprowadź następującą procedurę MENUFUNC MENUSCRT
2. Naciśnij pokrętło główne, aby uzyskać dostęp do opcji.
3. Obracając pokrętłem głównym wybierz wartość najlepiej odpowiadającą twoim
potrzebom.
4. Potwierdź wybór wciskając pokrętło główne
Jednoczesny nasłuch 2 kanałów (Dual Watch)
Midland M-30 daje możliwość słuchania 2 kanałów jednocześnie.
1. Wybierz pierwszy kanał, który chcesz monitorować, a następnie wciśnij
przycisk P1 z menu 2, ewentualnie inny przycisk z przypisaną funkcją DW.
2. Teraz wybierz drugi kanał, który chcesz monitorować, a następnie wciśnij przycisk P1
z menu2, ewentualnie inny przycisk z przypisaną funkcją DW.
3. Funkcja jednoczesnego nasłuchu 2 kanałów została włączona.
4. Radio bez przerwy szybko przełącza się między 2 kanałami oczekując na sygnał
powyżej blokady szumów. Jeśli go usłyszy to zatrzymuje się na tym kanale do
czasu jego wygaśnięcia.
Aktywacja filtra Noise Blanker
Noise Blanker tłumi zakłócenia pochodzące od pobliskich urządzeń elektrycznych
takich jak np. aparat zapłonowy.
1. Włączanie/wyłączanie odbywa się przez naciśnięcie przycisku P5 z menu 2,
ewentualnie innego z przypisaną funkcją NB.
2. Wyświetlacz pokaże, zależnie od obecnego stanu NB: OFF (wyłączony) lub
NB: ON (włączony).
3. Potwierdź wybór wciskając pokrętło główne.
Regulacja czułości odbiornika
W przypadku konieczności odbierania silnych sygnałów z dalszych odległości możliwe
jest obniżenie czułości odbiornika przez powiększanie tłumienia wejścia sygnału.
1. Regulacja czułości zaczyna się od wciśnięcia przycisku P2 z menu 2 lub innego z przypisaną funkcją RFG. Za każdym przyciśnięciem zmienia się poziom
tłumienia w następującej kolejności: OFF,3,6,9,12,15,18,21,24,27,30,AU.
2. Potwierdź wybór przyciśnięciem pokrętła głównego.
Roger Beep dźwięk końca transmisji
Ta funkcja pozwala wysłać krótki dźwięk podczas zwalniania przycisku nadawania,
sygnalizujący słuchaczom, że skończyłeś mówić. Możesz wybrać jeden z pięciu
krótkich sygnałów akustycznych, które dodatkowo mogą być modyfikowane przez
opcjonalny programator.
1. Włączenie Roger Beep wymaga przeprowadzenia następującej procedury:
MENU FUNC MENU ROG.
2. Obracając pokrętłem głównym wybierasz spośród opcji OFF,1,2,3,4,5.
3. Wciśnij pokrętło główne dla potwierdzenia wyboru.
Wzmacniacz głosu
Ta funkcja pozwala selektywnie wzmocnić częstotliwości akustyczne właściwe dla
ludzkiego głosu, co poprawia zrozumiałość transmisji i komfort odsłuchu podczas
długich sesji łączności.
1. Sterowanie funkcją odbywa się przez wciśnięcie przycisku P3 z menu 2 lub inny
z przypisaną funkcją HIC.
HIC: OFF wzmacniacz głosu w pozycji standardowej.
HIC: ON audio ustawione na wzmacnianie niskich tonów.
2. Wciśnij pokrętło główne dla potwierdzenia wyboru.
16 | M-30 Instrukcja obsługi M-30 Instrukcja obsługi | 17
Page 70

Kanały szybkiego dostępu
M-30 oferuje szybki dostęp do kanałów uznanych za ratunkowy - 9 i drogowy - 19.
1. Wciśnij przycisk P3 z menu 1, ewentualnie inny przycisk z przypisaną funkcją
EMG.
1. Za każdym przyciśnięciem cyklicznie wybierasz kanały szybkiego dostępu i
ostatnio używany kanał.
2. Wciśnij pokrętło główne dla potwierdzenia
Regulacja SWR
Funkcja pozwala na regulację miernika współczynnika fali stojącej SWR tak, aby
wskazywał poprawną wartość podczas nadawania.
M-30 jest wyregulowany domyślnie na środek pasma pracy. Możliwa jest nowa regulacja
z wykorzystaniem opcjonalnego, sztucznego obciążenia 50 Ohm podłączonego do
gniazda antenowego.
1. Otwórz menu stosując następującą procedurę MENUFUNC MENUSWR.
2. Wciśnij pokrętło główne, żeby rozpocząć regulację.
3. Upewnij się, że M-30 jest podłączony do obciążenia 50 Ohm, ustaw jeden i
potwierdź wciskając pokrętło główne.
Pozostałe funkcje
Wybór kanału priorytetowego
1. Wybierz kanał, który będziesz traktował jako priorytetowy.
2. Wciśnij i przytrzymaj przez 3 sek. przycisk w mikrofonie.
3. Teraz wywołanie kanału priorytetowego wymaga krótkiego wciśnięcia przycisku
.
Dźwięk potwierdzenia użycia przycisku
1. Otwórz menu przeprowadzając następującą procedurę MENUFUNC
MENUBEEP.
2. Wciśnij pokrętło główne, aby uzyskać dostęp do opcji
3. Obracając pokrętłem głównym wybierz ON (włączone) lub OFF (wyłączone).
4. Wciśnij pokrętło główne dla potwierdzenia wyboru.
Ograniczenie czasu nadawania (TOT)
Ograniczenie czasu nadawania automatycznie przełącza radio w tryb odbioru po
przekroczeniu zadanego czasu transmisji. Limity wybierane są z przedziału 1 do 30
minut.
Przed wyłączeniem nadawania radio wyda ostrzegawczy dźwięk.
Ta funkcja zapobiega przegrzaniu urządzenia dlatego sugerujemy, żeby była uruchomiona.
Funkcję można regulować również z menu radia.
1. Otwórz menu radia przeprowadzając następującą procedurę MENUFUNC
MENUTOT.
2. Pokrętłem głównym wybierz czas i wciśnij je dla potwierdzenia wyboru.
Regulacja podświetlenia wyświetlacza
1. Otwórz menu i przeprowadź następującą procedurę MENUFUNC
MENUDIM.
2. Pokrętłem głównym wybierz właściwy poziom i wciśnij je dla potwierdzenia.
3. Dostępne są trzy poziomy. 1 najciemniejszy a 3 najjaśniejszy.
Automatyczne włączanie
Możesz wybrać opcję automatycznego włączania radia zaraz po uruchomieniu samochodu.
1. Otwórz menu i przeprowadź następującą procedurę MENUUTILITIES
FUNC MENUAOP
2. Pokrętłem głównym wybierz właściwą opcję i wciśnij je dla potwierdzenia.
Menu radia
M-30 posiada aż 3 menu. Można używać je wszystkie lub tylko niektóre.
1. Otwórz menu i przeprowadź następującą procedurę MENUUTILITIES
FUNC MENUKEYS.
2. Wybierz jedną z następujących opcji:
1/2/3 dla używania wszystkich
1/2 dla używania menu 1 i 2
2/3 dla używania menu 2 i 3
1/3 dla używania menu 1 i 3
3. Pokrętłem głównym wybierz właściwą opcję i wciśnij je dla potwierdzenia.
18 | M-30 Instrukcja obsługi M-30 Instrukcja obsługi | 19
Page 71

Reset
1. Otwórz menu i przeprowadź następującą procedurę MENUFUNC
MENURST.
2. Wybierz opcję:
OPT przeprowadza reset ustawień bez kasowania pamięci.
ALL przeprowadza kompletny reset urządzenia tj. ustawień i pamięci.
3. Wybierz opcję i potwierdź wciskając pokrętło główne.
Rozwiązywanie problemów
Problem Rozwiązanie
Radio nie włącza się Kable zasilające rozłączone lub uszkodzone. Sprawdź
ich stan
Spalony bezpiecznik. Sprawdź stan bezpiecznika w
radiu
Przyciski nie działają Włączona blokada przycisków
Dane techniczne
Kanały patrz tabela kanałów
Zakresy częstotliwości**** 26.565 – 27.99125 MHz FM (RX/TX)
26.965 – 27.405 MHZ AM (RX/TX)
Zasilanie 12/24 V
Pobór prądu 2A
Zakres temperatur pracy 10°C do +55°C
Złącze antenowe UHF, SO239
Moc wyjściowa 4W
Modulacja A3E (AM), F3E (FM)
Maksymalna dewiacja (FM) ≤1,9 kHz
Emisje niepożądane < -54 dBm
Tłumienie mocy międzykanałowej < 20 µW
Stabilność częstotliwości ±5,0 ppm
Czułość @12 dB SINAD < 1µV
Moc wyjściowa audio
≥3W (8 Ohm)
Tłumienie międzykanałowe lepsze niż 60 dB
Pasmo przenoszenia 300-3000Hz
Wymiary 120x38x160x (DxWxS)
Waga (z mikrofonem) 820g
****pokrywa wszystkie legalne standardy w Europie
Producent zastrzega możliwość wprowadzenia zmian
20 | M-30 Instrukcja obsługi M-30 Instrukcja obsługi | 21
Page 72

22 | M-30 Instrukcja obsługi
Page 73

Index
Continutul pachetului 1
Atentionari 1
Caracteristici principale 2
Instalarea statiei 3
Instalarea 3
Alimentarea 3
Inlocuirea sigurantei 4
Conectarea microfonului 4
Instalarea antenei 4
Difuzor extern 4
Descriere taste si ecran 5
Ecran 6
Panoul posterior 7
Microfon 7
Operatiuni principale 8
Pornirea si oprirea statiei 8
Reglare volum 8
M-30 Instruction Guide
Page 74

Selectare canal 8
Selectarea modului de operare (AM/FM) 8
Reglare Squelch 9
Activarea squelch-ului automat 9
Selectare mod de afisare (frecventa sau numar canal) 9
Receptia 9
Emisia 9
Selectarea benzii in uz 10
Blocare taste 11
Navigarea prin meniu 12
Lista functii meniu 14
Memorie canale 16
Salvarea unui canal 16
Reapelarea unui canal 16
Stergerea unui canal 16
Adaugarea unui canal in lista de scanare 17
Stergerea unui canal din lista de scanare 17
Timp reluare scanare 17
Functia Dual Watch 18
Activare Noise Blanker 18
RF-Gain 18
Roger Beep 18
Potentiator de voce 19
Canalele de urgenta 19
Reglare SWR 19
Alte functii 20
Setarea canalului prioritar 20
Activare/dezactivare tonuri taste 20
Time Out Timer 20
Setarea intensitatii ecranului 20
Pornirea automata 20
Meniul statiei 20
Reset 21
Probleme si solutii 21
Specificatii tehnice 22
M-30 Instruction Guide M-30 Instruction Guide
Page 75

Continutul pachetului
• Statie M-30 cu cablu de alimentare;
• 1 microfon;
• 1 suport de montaj;
• 1 punguta cu suruburi pentru montarea suportului si fixarea radioului pe suport;
• 1 siguranta;
• 1 suport microfon;
Daca lipseste vreo componenta, contactati distribuitorul Midland.
Atentionari
M-30 este un produs electronic cu design precis si trebuie tratat cu grija.
Sugestiile de mai jos va vor ajuta sa indepliniti obligatiile prevazute in certificatul de
garantie si sa va bucurati de acest produs multi ani.
• Nu incercati sa desfaceti statia pentru nici un motiv! Manipularea partilor elec-
tronice si mecanice ale statiei necesita experienta si echipament specializat; din
acelasi motiv, statia nu trebuie sub nici o forma reconfigurata intrucat a fost
calibrata pentru obtinerea performantelor maxime. Deschiderea neautorizata a
statiei va duce la pierderea garantiei.
• Nu depozitati statia in bataia directa a soarelui sau in zone foarte calde.
• Temperaturile ridicate pot scurta viata componentelor electronice si pot topi sau
deforma anumite componente din plastic.
• Nu depozitati statia in zone cu praf sau murdare.
• Pastrati statia uscata. Umiditatea poate cauza coroziuni componentelor elec-
tronice.
• Daca observati ca statia scoate fum sau un anumit miros, opriti-o imediat.
• Nu emiteti fara antena.
• Pentru siguranta Dvs. nu incercati sa configurati statia in timp ce conduceti.
M-30 Manual de utilizare | 1
Page 76

Caracteristici principale
• Ecran TFT mare
• Alimentare 12V-24V
• Carcasa din metal
• Functii programabile
• Afisare numar canal sau numar canal + frecventa
• Statie multi-banda AM/FM
• Squelch automat digital reglabil pe mai multe nivele
• S-Meter/SWR-Meter
• RF-gain
• Scan
• Dual Watch
• Roger Beep personalizabil
• Canale de urgenta 9/19 si canal prioritar
• Noise Blanker
• Potentiator de voce
• Protectie impotriva polaritatii inversate
• Memorare 8 canale personalizabile
• Time Out Timer
• Lumina de fundal pentru ecran reglabila
• Pornire automata
• Blocare taste
• Microfon cu conector RJ45 si butoane pentru Sus/Jos/Canal prioritar
• Software pentru programare (optional kit-ul de programare PRG-30 cod.
C1318)
Instalarea statiei
Instalarea
• Siguranta si comoditatea sunt principalele aspecte care trebuie luate in considerare cand se instaleaza statia. Toate tastele statiei trebuie sa fie accesibile pentru
utilizator fara sa afecteze miscarile libere ale conducatorului auto si conducerea in siguranta a vehiculului. Instalati statia intr-un loc care sa reduca la maxim
punerea in pericol a pasagerilor; locatia trebuie sa fie bine ventilata si ferita de
bataia directa a soarelui.
• Instalati suportul de motaj folosind suruburile si accesoriile incluse.
Alimentarea
• Asigurati-va ca statia este inchisa.
• Pe panoul din spate al statiei puteti vedea un cablu de alimentare in doua culori
cu o siguranta pe cablul rosu.
• Acest cablu este dotat cu un conector care va permite alimentarea statiei la
bateria vehiculului.
• Cand alimentati statia, fiti atenti la polaritate, chiar daca statia este prevazuta
cu protectie impotriva polaritatii inversate.
Rosu = pol pozitiv (+)
Negru = pol negativ (-)
• Aceleasi culori sunt prezente si pe baterie si in cutia cu sigurante a masinii.
• Conectati in mod corect cablul la baterie.
• Bateria vehiculului trebuie sa aiba o capacitate nominala de 12 sau 24V.
• Asigurati-va ca bateria vehiculului poate oferi suficienta putere statiei.
• Conectati cablul de alimentare DC la sursa de alimentare CC si asigurati-va ca
polaritatile sunt corecte.
ATENTIE: Pentru a obtine performante maxime, va recomandam sa instalati statia intro zona bine ventilata.
2 | M-30 Manual de utilizare M-30 Manual de utilizare | 3
Page 77

Inlocuirea sigurantei
M
O
D
R
F
G
C
H
S
Q
L
S
FM
CE
CH–31
0 2 4 6 8
0 3 5 7 9 30
P
S
MAX
MAX
12.5
Daca se arde siguranta, inainte de a o inlocui, incercati sa aflati cauza. Daca este
necesar, contactati un centru service autorizat.
Siguranta de pe spatele statiei are 5A
SIGURANTA 5A 250V
SUPORT SIGURANTA
Descriere taste si ecran
9 2 5 10
11
Conectarea microfonului
Conectati microfonul in conectorul dedicat de pe panoul frontal al statiei.
Microfonul poate fi fixat in suportul inclus in pachet.
P1
P2
midlandeurope.com
P3
P4
P5
P6
FUNC
Instalarea antenei
• Amplasati antena cat mai sus posibil.
• Cu cat este mai lunga antena, cu atat veti obtine performante mai ridicate
• Daca este posibil, instalati antena in mijlocul suprafetei
• Feriti cablul antenei de zone cu interferente, cum ar fi comutatorul de
• aprindere etc.
• Montati antena pe un suport plan metalic (cupola de metal a autoturismului)
• Evitati deteriorarea cablului in timpul instalarii antenei.
Atentionare: Pentru a preveni defectiuni, nu folositi niciodata statia fara antena. Recomandam verificarea periodica a cablului si a S.W.R.-ului.
Difuzor extern
Daca folositi un difuzor extern, impedanta trebuie sa fie 4 Ω sau8 Ω. Portul jack
pentru conectarea unui difuzor extern este de 3.5mm.
1. Tasta ON/OFF. Tineti apasat pentru a deschide/inchide statia. Apasati scurt
2. P1 tasta programabila
3. P2 tasta programabila
4. P3 tasta programabila
5. P4 tasta programabila
6. P5 tasta programabila
7. P6 tasta programabila
8. FUNC: tasta functii. Cu aceasta tasta activati functia secundara a tastelor
9. Conector microfon: conectati microfonul sau cablul de programare optional.
10. Buton principal: Apasati scurt pentru a sari peste 10 canale inainte, iar daca
11. Ecran multicolor
4 | M-30 Manual de utilizare M-30 Manual de utilizare | 5
1 7 6 83 4
pentru a activa/dezactiva difuzorul.
programabile de pe panoul frontal. Tineti apasat pentru a intra in meniu.
tineti apasat, blocati sau deblocati tastele.Butonul principal va permite si sa
navigati prin meniu si sa schimbati setarile. Apasati scurt pentru a confirma
setarile.
Page 78

Ecran
M
O
D
R
F
G
E
M
G
C
H
S
Q
L
S
C
A
S
FM
CE
CH–31
0 2 4 6 8
0 3 5 7 9 30
P
S
MAX
MAX
VOL
RFG
SQL
HIC
35
of
10
of
12.5
P1
P2
P3
P4
P5
P6
FUNC
M
O
D
R
F
G
E
M
G
C
H
S
Q
L
S
C
A
S
FM
CE
CH–31
0 2 4 6 8
0 3 5 7 9 30
P
S
MAX
MAX
VOL
RFG
SQL
HIC
35
of
10
of
midlandeurope.com
M
O
D
R
F
C
H
S
Q
S
FM
CE
0 2 4 6 8
0 3 5 7 9 30
P
S
MAX
MAX
12.5
12.5
Panoul posterior
12 13
A B C
ANT EXT SP
12.5
10
of
MAX
MAX
CE
C
H
I
S
Q
L
S
C
A
H
2
3 2
0 2 4 6 8
M
P
D
E
F
O
D
S
0 3 5 7 9 30
S
R
F
G
CH–31
E
M
G
VOL
RFG
35
of
FM
SQL
HIC
A. Indicator nivel putere
B. Indicator putere semnal receptionat sau nivel SWR (in modul tx)
C. AM sau FM
D. Functiile activate cu tastele programabile P1-P6
E. S: Indicatorul unui canal inclus in lista de scanare. T: apare cand statia este in
F. Canalul sau frecventa in uz
G. Aici sunt afisati principalii parametri ai statiei:
H. Numele benzii in uz
I. Valoarea sursei de alimentare
6 | M-30 Manual de utilizare M-30 Manual de utilizare | 7
modul tx
RX: VOL, nivel volum
SQL, nivel squelch
RFG, RF-Gain
HIC, Potentiator de voce
G
TX: PWR, nivel putere
RB, roger beep
SPL, split (functie disponibila
TOT, setari Time Out Timer
doar in versiunea pentru amatori)
12. ANT: conector antena, tip SO239 .
13. EXT SPK: jack difuzor extern.
Microfon
1. PTT: apasati pentru a emite
2. SUS/JOS: apasati pentru a regla volu-
mul sau pentru a naviga printre optiuni
si setari.
3.
apasati pentru a seta canalul prioritar
1
Page 79

Operatiuni principale
M-30 are 6 taste programabile: P1-P2-P3-P4-P5-P6 ce pot fi personalizate in
functie de nevoi; pe fiecare buton pot fi asociate maxim 3 functii din 3 meniuri
diferite simultan.
In mod implicit sunt 2 meniuri; al treilea meniu poate fi activat prin programare cu
ajutorul kit-ului optional PRG30.
Meniu 1:
P1 MOD P4 CH
P2 RFG P5 SQL
P3 EMG P6 SCA
Functiile asociate tastelor P1-P2-P3 vor aparea in partea stanga a ecranului, in
timp ce functiile acosiate tastelor P4-P5-P6 vor aparea in partea dreapta. Se pot
schimba functiile asociate tastelor P prin meniu sau cu ajutorul kit-ului optional de
programare.
Pentru a schimba meniul apasati FUNC.
Pornirea si oprirea statiei
Apasati tasta timp de o secunda pentru a porni statia; apasati timp de 2 secunde
pentru a opri statia.
Reglare volum
Rotiti butonul principal in sensul acelor de ceasornic pentru a mari volumul, si in
sens invers acelor de ceasornic pentru a reduce volumul.
Selectare canal
Apasati tasta P4 din meniul 1 sau cea asociata functiei canalului CH. Apoi rotiti
butonul principal in sensul acelor de ceasornic pentru a selecta urmatorul canal, si
in sens invers acelor de ceasornic pentru a selecta canalul anterior.
Nota: volumul poate fi reglat si din butoanele SUS/JOS de pe microfon.
Nota: pentru a trece rapid peste 10 canale apasati butonul principal .
Selectarea modului de operare (AM/FM)
Pentru a schimba modul de operare apasati P1 din meniul 1 sau tasta asociata
functiei MOD. Indicatorul va aparea in partea de jos a ecranului.
Pentru a confirma selectia apasati butonul principal sau asteptati 10 secunde.
Meniu 2:
P1 DW P4 DIM
P2 DSP P5 NB
P3 HIC P6 MEM
Reglare Squelch
Functia Squelch este folosita pentru a dezactiva difuzorul cand nu sunt prezente
semnale. Nivelul squelch-ului poate fi reglat in functie de zgomotul de fundal. Cu un
nivel al squelch-ului setat corent, veti auzi sunete doar cand receptionati un semnal.
Cu cat este mai mare nivelul squelch-ului, cu atat trebuie sa fie mai puternice semnalele pentru a le putea auzi.
Pentru a seta squelch-ul apasati P5 din meniul 1 sau tasta asociata functiei SQL,
selectati nivelul dorit rotind butonul principal . Puteti alege din 28 de nivele diferite:
nivelul cu sensibilitatea cea mai mare este nivelul 1, in timp ce canalul cel mai putin
sensibil este 28. Pentru a confirma selectia apasati butonul principal sau asteptati
10 secunde.
Activarea squelch-ului automat
Pentru a activa squelch-ul automat tineti apasata tasta asociata functiei SQL. Rotiti
butonul principal pentru a selecta nivelul dorit. Sunt 9 nivele disponibile: cel mai
sensibil este nivelul 1, in timp ce nivelul 9 este cel mai putin sensibil. Apasati butonul
principal pentru confirmare.
Odata ce squelch-ul automat este activat, indicatorul SQL de pe ecran va fi inlocuit
de ASQ.
Selectare mod de afisare (frecventa sau numar canal)
M-30 poate afisa frecventa sau numarul canalului.
Pentru a schimba modul de afisare, apasati P2 in meniul 2 sau tasta asociata functiei
DSP.
Pentru a confirma apasati butonul principal sau asteptati 10 secunde.
Receptia
Puterea semnalului receptionat este indicata prin bara verde in partea de sus a ecranului.
Asigurati-va ca ati selectat modulatia dorita (AM sau FM)
Nota: Pentru a dezactiva difuzorul apasati scurt . In partea de jos a ecranului va aparea
Audio: MT. Apasati din nou pentru a activa difuzorul. Pe ecran va aparea AUDIO: Esc.
Emisia
Inainte de a emite, asigurati-va ca nu este canalul ocupat in acel moment. Apasati
PTT si vorbiti orientat catre microfon.
In timp ce emiteti, pe ecran va aparea T iar puterea de emisie va fi afisata pe ecran
printr-o bara.
Eliberati butonul PTT pentru a receptiona.
8 | M-30 Manual de utilizare M-30 Manual de utilizare | 9
Page 80

Selectarea benzii in uz
Mildand M-30 este o statie CB multi-banda ce poate fi folosita in multe tari. In
functie de tara unde va aflati, trebuie sa selectati banda corespunzatoare. In tabelul
de mai jos sunt prezentate frecventele incluse in M-30:
Banda afisata Tara
EU Europa /Italia 40CH AM/FM 4W
CE 40CH FM 4W
UK Anglia 40CH FM 4 Watt frecvente engleze + EC
40CH FM 4Watt frecventeCEPT
PL Polonia 40CH AM/FM 4W
I2 Italia 34 CH AM/FM 4W
DE Germania 80CH FM 4W / 40CH AM 4W
IN 27CH AM/FM 4W
DOAR PENTRU TARILE DIN AFARA EU
HF Rusia 400CH AM/FM 4/8/15W
HF Polonia (Rusia -5KHz) 400CH AM/FM 4/8/15W
HAM Amatori 340CH AM/FM 4/8/15W. Folosirea acestei benzi
este permisa doar cu licenta.
Pentru a alege banda dorita, urmati pocedura:
1. Inchideti statia;
2. Deschideti statia din nou in timp ce tineti apasat FUNC;
3. Eliberati FUNC cand pe ecran apare:
CB FREQ
SelectBand:
CE BAND
Blocare taste
Pentru a bloca tastele tineti apasat timp de 2 secunde butonul principal . Pe ecran
va aparea Key Lock. Cand aceasta functie este activa, toate tastele de pe statie si
microfon sunt dezactivate cu exceptia tastei PTT.
Pentru a debloca tastele, apasati din nou timp de 2 secunde butonul principal .
4. Acum selectati banda dorita rotind butonul principal .
5. Pentru a confirma tineti apasat butonul principal imp de 5 secunde.
Nota 1: daca este selectata banda UK, puteti trece direct pe banda CE: doar apasati P1
din meniul 1 sau tasta asociata functiei MOD.
Nota 2: frecventa permisa peste tot in Europa este CE (40 Ch FM 4W).
10 | M-30 Manual de utilizare M-30 Manual de utilizare | 11
Page 81

Setari meniu
Prin meniu puteti personaliza functiile statiei si canalele.
Cu FUNC si butonul principal puteti naviga prin meniu selectand parametrii
doriti. Cu butonul principal puteti nu doar selecta o optiune, puteti intra in
meniu si confirma o setare.
Navigarea prin meniu
1. Apasati tasta FUNC pentru 2 secunde;
2. Rotati butonul pentru a selecta o optiune;
3. Apasati butonul din nou pentru a accesa optiunile functiei selectate;
4. Selectati parametrul dorit rotind butonul sau folosind tastele SUS/JOS de pe
microfon;
5. Apasati butonul pentru a confirma.
6. Apasati P3 de pe panoul frontal pentru a va intoarce la meniul anterior.
7. Apasati din nou P3 pentru a iesi din meniu sau asteptati 5 secunde pentru a va
intoarce la modul stand-by.
MENIU:
• FUNC MENU (pentru a schimba setarile generale ale statiei)
1. BEEP
2. TOT
3. DIM
4. VOL
5. SQL
6. ASQ
7. RFG
• PUD MENU (pentru a schimba parametrii tuturor canalelor de pe banda in uz
doar cu o setare)
1. A/FM
2. NB
3. HIC
4. ROG
• CHAN MENU (pentru a schimba setarile canalului in uz)
1. PD
2. SCAN
3. A/FM*
4. NB*
5. HIC*
• DTMF MENU (pentru a schimba setarile codurilor DTMF)
1. DTMF
2. SND-T
3. FIR-T
4. PRE-T
* aceste optiuni sunt disponibile doar daca PD este setat pe “OFF”.
** KEY MENU permite setarea optiunilor sau functiilor tastelor P1-P6.
8. DSP
9. KEY
10. SCM
11. SCRT
12. AOP
13. SWR
14. RST
5. BUSY
6. BOT
7. EOT
8. CALL
6. ROG*
7. BUSY*
8. BOT*
9. EOT*
10. CALL*
5. DELAY
6. D-FUN
7. DISP
8. KEY MENU**
12 | M-30 Manual de utilizare M-30 Manual de utilizare | 13
Page 82

Lista functii meniu
Ecran Meniu N. Functie
FUNC MENU
BEEP 1
TOT 2
DIM 3
VOL 4
SQL 5
ASQ 6
RFG 7
DSP 8
KEYs 9
SCM 10
SCRT 11
AOP 12
SWR 13
RST 14
A/FM 1
NB 2
HIC 3
ROG 4
BUSY 5
BOT*** 6
EOT*** 7
CALL*** 8
Selectare nivel lumina de fundal a
Selectare sensibilitate squelch automat
Mod afisare (canal sau frecventa)
Selectie BCL (Busy channel lockout)
Activare tonuri DTMF in timp ce
Activare tonuri DTMF in timp ce
Sunet taste
Time Out Timer OFF, 1, 2, …, … ,
ecranului
Setare nivel volum
Selectare nivel Squelch
Selectie nivel RF-Gain OFF,3,6,9,…
Selectie meniu activa 1/2/3, 1/2, 2/3,
Tipul de scanare
Timp reluare scanare 5S, 10S, 15S, …,
Pornire automata
Test SWR pentru antena
PUD MENU
Mod operare
Noise Blanker
Potentiator de voce
Roger beep OFF, 1, 2, 3,
apasati PTT
eliberati PTT
Selectare ton de apel
Reset
CHAN MENU
Optiune
ON, OFF
30 min.
1, 2, 3
1,2,3,…,56
OFF,1,2,…,28
1,2,3,…,9
,30,AU
CH,FRQ
1/3
SQ, TI
30S
ON, OFF
---
OPT, ALL
AM, FM
OFF, ON
OFF, ON
4, 5
OFF, ON
PD 1 Activare setari pe fiecare canal separat OFF, ON
SCAN 2
Cand functia PD este activata, urmatoarele functii sunt dezactivate:
A/FM 3 Selectie mod operare AM, FM
NB 4 Activare Noise Blanker OFF, ON
HIC 5 Potentiator de voce OFF, ON
ROG 6 Roger beep
BUSY 7 Selectie BCL (Busy channel lockout) OFF, ON
BOT*** 8
EOT*** 9
CALL*** 10 Selectare ton de apel
DTMF 1
SND-T 2 Setare timp emisie pentru DTMF
FIR-T 3 Setarea timpului de emisie
PRE-T 4 Incarcare setari timp DTMF
DELAY 5 Setari timp intarziere
D-FUN 6 Mod trimitere D-letter D, 1S, 2S, .., 16S
DISP 7 Afisare cod DTMF trimis OFF, ON
In acest meniu se pot seta functiile alocate tastelor P1-P6
Nota: Lista optiunilor se poate schimba in cazul in care unele setari au fost modificate
prin software-ul de programare optional.
*** Functiile DTMF nu sunt disponibile pentru M-30.
Adaugare sau stergere canal in uz din
lista de scanare
Activare tonuri DTMF in timp ce se
tine apasat PTT
Activare tonuri DTMF in timp ce se
elibereaza PTT
DTMF MENU***
Selectare cod DTMF asociat cu tasta
CALL
KEY MENU
ADD, DEL
OFF, 1, 2, 3,
4, 5
1,2,3, …,16
10ms, …,
500ms
0ms, …,
1000ms
100ms, …,
2500ms
0ms, …,
1000ms
14 | M-30 Manual de utilizare M-30 Manual de utilizare | 15
Page 83

Memorie canale
M-30 poate salva pana la 8 canale.
Vor fi salvate frecventa si setarile pentru fiecare canal memorat. Astfel, nu
trebuie sa reprogramati de fiecare data canalul dorit.
Salvarea unui canal
1. Selectati canalul pe care doriti sa-l salvati.
2. Setati toti parametrii pentru canalul respectiv (AM/FM, HIC, RB, NB).
3. Tineti apasat pentru 2 secunde P6 in meniul 2 sau tasta asociata functiei
MEM, numarul canalului va aparea pe ecran.
4. Daca numarul canalului clipeste, canalul nu este salvat. Daca nu clipeste, canalul este deja salvat. Este totusi posibil a suprascrieti informatiile memorate
pe o pozitie ocupata.
5. Selectati numarul canalului pe care doriti sa-l salvati (sau sa-l suprascrieti)
rotind butonul principal .
6. Apasati pentru 2 secunde P6 in meniul 2 sau tasta asociata functiei MEM,
7. sau FUNC de pe microfon pentru a sterge memoria.
Reapelarea unui canal
Apasati P6 in meniul 2 sau tasta asociata functiei MEM pentru a accesa canalele
memorate.
Rotiti butonul principal pentru a selecta canalul dorit.
Stergerea unui canal
Apasati P6 in meniul 2 sau tasta asociata functiei MEM pentru a accesa canalele
memorate.
Selectati canalul pe care doriti sa-l stergeti.
Tineti apasat pentru 2 secunde P6 in meniul 2 sau tasta asociata functiei MEM.
Functia Scanare
M-30 are 2 tipuri de scanare:
• TI: De fiecare data cand este detectat un semnal, statia va opri scanarea timp
de cateva secunde, apoi va reporni scanarea pe celelalte frecvente chiar daca
semnalul este inca prezent
• SQ: daca este detectat un semnal, statia va opri scanarea si va reporni scanarea
doar dupa ce semnalul va disparea.
1. Pentru a selecta tipul dorit de scanare, intrati in meniul statiei si urmati calea:
MENUFUNC MENU SCM
2. Selectati optiunea dorita.
3. Pentru a porni scanarea apasati P6 in meniul 1 sau tasta asociata functiei
SCAN.
4. Pentru a inversa sensul de scanare, rotiti butonul principal .
5. Pentru a opri scanarea apasati orice tasta pe statie sau tasta PTT.
Adaugarea unui canal in lista de scanare
1. Selectati canalul pe care doriti sa-l adaugati in lista.
2. Apasati pentru 2 secunde tasta P6 in meniul 1 sau tasta asociata functiei
3. SCA.
4. Pe ecran va aparea SKP: ADD in partea de jos sau litera S va aparea deasupra
5. canalului (sau frecventei).
Stergerea unui canal din lista de scanare
1. Selectati canalul pe care doriti sa-l stergeti din lista.
2. Apasati pentru 2 secunde tasta P6 in meniul 1 sau tasta asociata functiei SCA.
3. Pe ecran va aparea SKP: DEL in partea de jos si litera S va disparea de pe ecran.
Timp reluare scanare
In modul de scanare TI se poate schimba modul de reluare scanare. Acest timp este
cuprins intre 5s si 30s.
1. Intrati in meniu si urmati calea: MENUFUNC MENUSCRT
2. Apasati butonul principal pentru a accesa optiunile
3. Rotiti butonul pentru a selecta timpul dorit
4. Confirmati apasand butonul.
16 | M-30 Manual de utilizare M-30 Manual de utilizare | 17
Page 84

Functia Dual Watch
M-30 permite monitorizarea a doua canale simultan.
1. Selectati primul canal pe care doriti sa-l monitorizati apoi apasati P1 in meniul
2 sau tasta asociata functiei DW.
2. Apoi selectati al doilea canal pe care doriti sa-l monitorizati si apasati P1 in
meniul 2 sau tasta asociata functiei DW.
3. Functia dual watch este activa.
4. Cand este detectat un semnal, statia sa opri monitorizarea pe cele 2 canale si
5. va relua dupa ce semnalul nu va mai fi auzit.
Activare Noise Blanker
Functia Noise Blanker permite reducerea zgomotelor si a interferentelor, cum ar
fi de exemplu zgomotul cauzat de pornirea masinii.
1. Pentru a activa Noise Blanker apasati P5 in meniul 2 sau tasta asociata functiei
NB .
2. Pe ecran va aparea NB: OFF sau NB: ON
3. Confirmati selectia apasand butonul principal .
RF-Gain
In cazul in care sunt sunt prezente semnale foarte puternice, puteti activa RF-Gain.
1. Pentru a activa RF-Gain apasati P2 in meniul 1 sau tasta asociata functiei
RFG.
2. De fiecare data cand se va apasa tasta, nivelul RF-GAIN va creste. Sunt disponibile urmatoarele nivele: OFF, 3, 6, 9, 12, 15, 18, 21, 24, 27, 30, AU.
3. Confirmati selectia apasand butonul principal .
Roger Beep
Cand functia este activa, statia va emite un sunet la finalul emisiei.
Puteti alege din 5 tonuri diferite care pot fi modificate prin software-ul de
programare optional.
1. Pentru a activa Roger Beep intrati in meniu si urmati calea: MENU FUNC
MENUROG
2. Puteti alege dintre urmatoarele optiuni: OFF, 1, 2, 3, 4, 5.
3. Confirmati selectia apasand butonul principal .
Potentiator de voce
Aceasta functie permite imbunatatirea tonurilor vocale, care vor deveni astfel mai
usor de inteles si ascultat.
1. Pentru a activa aceasta functie, apasati P3 in meniul 2 sau tasta asociata fun-
ctiei HIC
HIC: OFF. Functia va fi reglata la nivelul standard
HIC: ON. Audio va fi reglat pentru a imbunatati tonurile joase
2. Confirmati selectia apasand butonul principal .
Canalele de urgenta
M-30 permite selectarea imediata a canalelor 9 si 19.
1. Apasati P3 in meniul 1 sau tasta asociata functiei EMG. De fiecare data se
va apasa acest buton veti selecta canalele de urgenta sau va veti intoarce la
ultimul canal folosit
2. Confirmati apasand butonul principal .
Reglare SWR
Aceasta functie permite reglarea SWR metrului pe M-30 astfel incat in timp ce
emiteti ecranul va afisa valoarea corecta a SWR-ului. M-30 este reglat in mod
implicit pe frecventa centrala.
Se poate face de asemenea o setare noua (in acest caz este necesara o sarcina
fictiva de 50Ohm, optional)
1. Intrati in meniu si urmati calea: MENUFUNC MENUSWR
2. Apasati butonul principal pentru a seta.
3. Asigurati-va ca M-30 este conectat la o sarcina fictiva de 50 Ohm.
4. Confirmati apasand butonul principal .
18 | M-30 Manual de utilizare M-30 Manual de utilizare | 19
Page 85

Alte functii
Setarea canalului prioritar
1. Selectati canalul pe care doriti sa-l setati ca prioritar.
2. Tineti apasat timp de 3 secunde tasta
asta setare.
3. Apasati din nou tasta
pentru a seta canalul prioritar.
Activare/dezactivare tonuri taste
1. Intrati in meniu si urmati calea: MENUFUNC MENUBEEP
2. Apasati butonul principal pentru a naviga printre optiuni
3. Rotiti butonul pentru a selecta ON (ton taste activ) sau OFF (inactiv).
4. Confirmati selectia apasand butonul principal .
Time Out Timer
Functia Time out timer (TOT) trece automat statia pe modul receptie daca vorbiti
timp prea indelungat, in functie de timpul presetat care poate fi intre 1 minut si 30
minute.
Inainte de a opri emisia, M-30 scoate un sunet de avertizare. Aceasta functie este
utila pentru a proteja echipamentul de supraincalzire.
Va recomandam sa tineti activata functia TOT.
TOT poate fi reglat si din meniul statiei:
1. Accesati meniul si urmati calea: MENUFUNC MENUTOT
2. Setati timpul dorit si confirmati apasand butonul principal
Setarea intensitatii ecranului
• Accesati meniul si urmati calea: MENUFUNC MENUDIM
3. Setati nivelul dorit si confirmati apasand butonul principal .
4. Sunt 3 nivele disponibile: 1 este cel mai putin luminos, 3 este cel mai luminos.
Pornirea automata
Puteti porni statia automat cand porneste masina.
1. Accesati meniul si urmati calea:
MENUUTILITIES FUNC MENU AOP
2. Setati optiunea dorita si confirmati apasand butonul principal .
Meniul statiei
M-30 are 3 meniuri; le puteti folosi pe toate sau puteti activa doar cele dorite.
Accesati meniul si urmati pasii:
1. MENUUTILITIES FUNC MENUKEYS
2. Alegeti din optiunile:
de pe microfon pentru a activa ace-
1/2/3, pentru a activa toate meniurile,
1/2, pentru a activa meniul 1 si 2,
2/3, pentru a activa meniul 2 si 3,
1/3, pentru a activa meniul 1 si 3.
3. Setati optiunea dorita si confirmati apasand butonul principal .
Reset
1. Accesati meniul si urmati calea: MENUFUNC MENURST
2. Alegeti din optiunile:
OPT, pentru a reseta doar optiunile; nu va reseta memoriile.
ALL, pentru a face un reset complet: setari si memorii.
3. Setati optiunea dorita si confirmati apasand butonul principal .
Probleme si solutii
PROBLEMA SOLUTIE
Statia nu se aprinde Cablul de alimentare este deconectat sau de-
fect. Verificati cablul.
Siguranta arsa. Verificati starea sigurantelor
statiei si a autovehiculului
Tastele nu merg Functia Blocare taste este activa
20 | M-30 Manual de utilizare M-30 Manual de utilizare | 21
Page 86

Specificatii tehnice
Cana le vezi tabel frecvente
Banda frecvente**** 26.565-27.99125 MHz FM (RX/TX)
26.965-27.405 MHz AM (RX/TX)
Alimentare 12/24V
Consum curent 2A
Temperatura de lucru -10°C ~ + 55°C
Conector antena UHF, SO239
Putere de emisie 4W
Modulatie A3E (AM), F3E (FM)
Deviatie de frecventa max. (FM) ≤ 1,9KHz
Emisii parazite < -54dBm
Putere canal adiacent < 20 uW
Stabilitate frecventa ±5.0 ppm
Sensibilitate Rx@12dB SINAD < 1uV
Putere audio ≥ 3W (8 Ohm)
Respingere canal adiacent mai bine de 60 dB
Raspuns frecventa 300-3000Hz
Dimensiuni 120x38x160 (LxHxD)
Greutate (microfon inclus) 820g
**** acoperind toate benzile de frecventa aprobate ale UE
Specificatiile pot fi modificate fara notificare.
22 | M-30 Manual de utilizare
Page 87

• INFORMAZIONE AGLI UTENTI: Ai sensi dell’art. 13 del decreto legislativo 25 luglio
2005, n.151 “Attuazione delle Direttive 2002/95/CE, 2002/96/CE e 2003/108/
CE, relative alla riduzione dell’uso di sostanze pericolose nelle apparecchiature elettri
che ed elettroniche, nonché allo smaltimento dei rifiuti”. Il simbolo del cassonetto barrato riportato sull’apparecchiatura indica che il prodotto alla fine della propria vita utile
deve essere raccolto separatamente dagli altri rifiuti. L’utente dovrà, pertanto, conferire
l’apparecchiatura giunta a fine vita agli idonei centri di raccolta dierenziata dei rifiuti
elettronici ed elettrotecnici, oppure riconsegnarla al rivenditore al momento dell’acqui
sto di una nuova apparecchiatura di tipo equivalente, in ragione di uno a uno. L’adeguata
raccolta dierenziata per l’avvio successivo dell’apparecchiatura dismessa al riciclaggio,
al trattamento e allo smaltimento ambientalmente compatibile contribuisce ad evitare
possibili eetti negativi sull’ambiente e sulla salute e favorisce il riciclo dei materiali di cui
è composta l’apparecchiatura. Lo smaltimento abusivo del prodotto da parte dell’utente
comporta l’applicazione delle sanzioni amministrative di cui al dlgs. n.22/1997 (articolo
50 e seguenti del dlgs. n.22/1997).
• All articles displaying this symbol on the body, packaging or instruction manual of
same, must not be thrown away into normal disposal bins but brought to specialised
waste disposal centres. Here, the various materials will be divided by characteristics and
recycles, thus making an important contribution to environmental protection.
• Alle Artikel, die auf der Verpackung oder der Gebrauchanweisung dieses Symbol tra
gen, dürfen nicht in den normalen Mülltonnen entsorgt werden, sondern müssen an
gesonderten Sammelstellen abgegeben werden. Dort werden die Materialien entspre
chend ihrer Eigenschaften getrennt und, um einen Beitrag zum Umweltschutz zu liefern, wiederverwertet.
• Todos los artículos que exhiban este símbolo en el cuerpo del producto, en el emba
laje o en el manual de instrucciones del mismo, no deben ser desechados junto a los
residuos urbanos normales sino que deben ser depositados en los centros de recogida
especializados. En estos centros, los materiales se dividirán en base a sus características
y serán reciclados, para así poder contribuir de manera importante a la protección y
conservación del medio ambiente.
• Tous les articles présentant ce symbole sur le corps, l’emballage ou le manuel d’utilisa
tion de celui-ci ne doivent pas être jetés dans des poubelles normales mais être amenés
dans des centres de traitement spécialisés. Là, les diérents matériaux seront séparés
par caractéristiques et recyclés, permettant ainsi de contribuer à la protection de l’en
vironnement.
• Zużyte towary oznaczone tym znakiem mogą stanowić zagrożenie dla środowiska natu
ralnego, dlatego nie należy ich wyrzucać tylko oddać sprzedawcy, który przekaże je do
przedsiębiorstwa zajmującego się utylizacja odpadów.
• Toate produsele care au aplicat acest simbol pe ambalaj sau in manualul de utilizare, nu
trebuie să fie aruncate in coşurile de gunoi, ci duse in centrele de colectare a deşeurilor
electrice si electronice. Aici, diversele materialele vor fi impărţite in funcţie de caracte
ristici si reciclate, aducându-se astfel o contribuţie importantă la protectia mediului.
-
-
-
-
-
-
-
-
-
Page 88

Compliant
Prodotto o importato da: CTE INTERNATIONAL s.r.l.
Via. R.Sevardi 7 - 42124 Reggio Emilia Italia www.midlandeurope.com
L’utilizzo dell’apparato può essere soggetto a restrizioni nazionali.
Prima dell’uso leggere attentamente le istruzioni.
Produced or imported by: CTE INTERNATIONAL s.r.l.
Via. R.Sevardi 7 - 42124 Reggio Emilia Italy
Imported by: ALANNEVADA UK
Unit 1 Fitzherbert Spur Farlington Portsmouth Hants. P06 1TT - United Kingdom
www.nevada.co.uk
The use of this transceiver can be subject to national restrictions.
Read the instructions carefully before installation and use.
Importé par: ALAN FRANCE S. A.R.L .
5, Rue Ferrié, Zac les Portes du Vexin - 95300 Ennery - France - www.alan-midland.fr
L’appareil peut être sujet à des restrictions nationales. Avant l’utilisation, lire les instructions.
Importado por: MIDLAND IBERIA, S.A.
C/Cobalt, 48 - 08940 Cornellá de Llobregat España - w ww.midland.es
El uso de este equipo puede estar sujeto a la obtención de la correspondiente autorización administrativa. Antes de utilizar, lea atentamente el manual de uso.
Vertrieb durch: ALAN ELECTRONICS GmbH
Daimlerstraße 1K - D-63303 Dreieich Deutschland - www.alan-electronics.de
Die Benutzung dieses Funkgerätes ist von den landesspezifischen Bestimmungen abhängig.
Vor Benutzung Bedienungsanleitung beachten.
Impor towane przez: AL AN TELEKOMUNIKACJA SP. z o.o.
Jawczyce, Poznańska 64 - 05-850 Ożarów Maz. Polska - www.alan.pl
Używanie tego radiotelefonu może podlegać pewnym ograniczeniom.
Przed instalacją i pierwszym użyciem przeczytaj uważnie instrukcję.
 Loading...