

Page 1
User’s Guide
Model M-222P
General Mobile Radio Service Radio
Featuring:
• 22 Channels
• 38 CTCSS codes
• VOX
Page 2

Index
Introduction 1
FCC Licensing Information 1
Control Buttons and Indicators 2
LCD Display 3
Installing Batteries 4
Operation 5
Use and Care 11
Frequency and CTCSS Charts 12
Technical Specifications 13
Warranty Information Back Cover
This radio complies with Part 15 of the FCC rules. Operation is subject to the
condition that this device does not cause harmful interference.
To maintain compliance with the FCC’s RF exposure guidelines, this transmitter and
its antenna must maintain a separation distance of at least two inches from your body.
To transmit, hold the radio with the antenna pointed up and away from your face,
with the radio at least two inches from your face. Speak in a normal voice into the
microphone.
Introduction
Your M-222P represents the state-of-the art in high-tech engineering. Designed
for General Mobile Radio Service operation, this compact package is big in
performance. It is a quality piece of electronic equipment, skillfully constructed
with the finest components. The circuitry is all solid-state and mounted on
rugged printed circuit boards. Your M-222P is designed for many years of
reliable, trouble-free performance.
FCC Licensing Information
Your M-222P operates on General Mobile Radio Service (GMRS) frequencies and is
subject to the Rules and Regulations of the Federal Communications Co-mission (FCC).
The FCC requires that all operators using General Mobile Radio Service (GMRS)
frequencies obtain a radio license before operating their equipment for business,
personal or recreational use. A GMRS license held by an individual may be shared by
immediate family members. To obtain the application forms, call the FCC forms hotline
at 1-800-418-3676 or go to http://www.fcc.gov. Please request forms 605
include all necessary forms and instructions.
For questions concerning licensing, please contact the FCC at 1-888-CALL-FCC (1-888225-5322), or go to http://www.fcc.gov.
and 159 which
Page 3
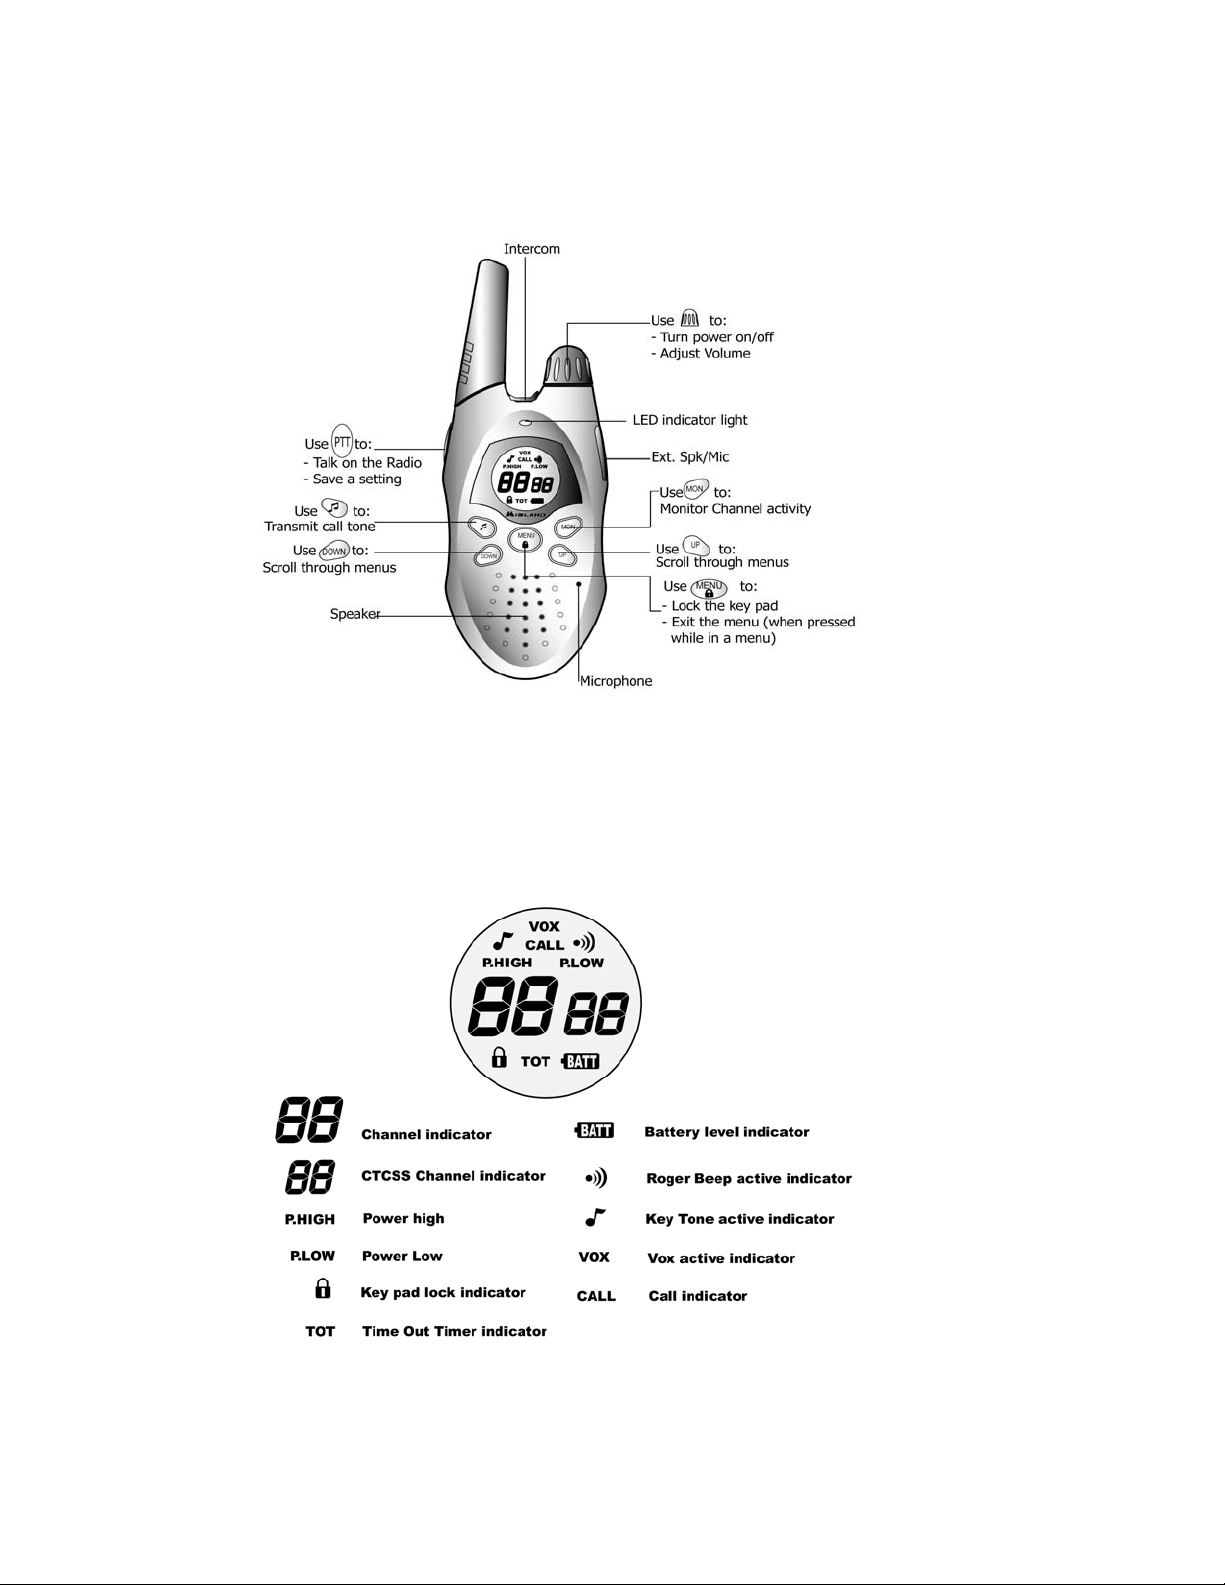
Control Buttons & Indicators
LCD Display
Page 4
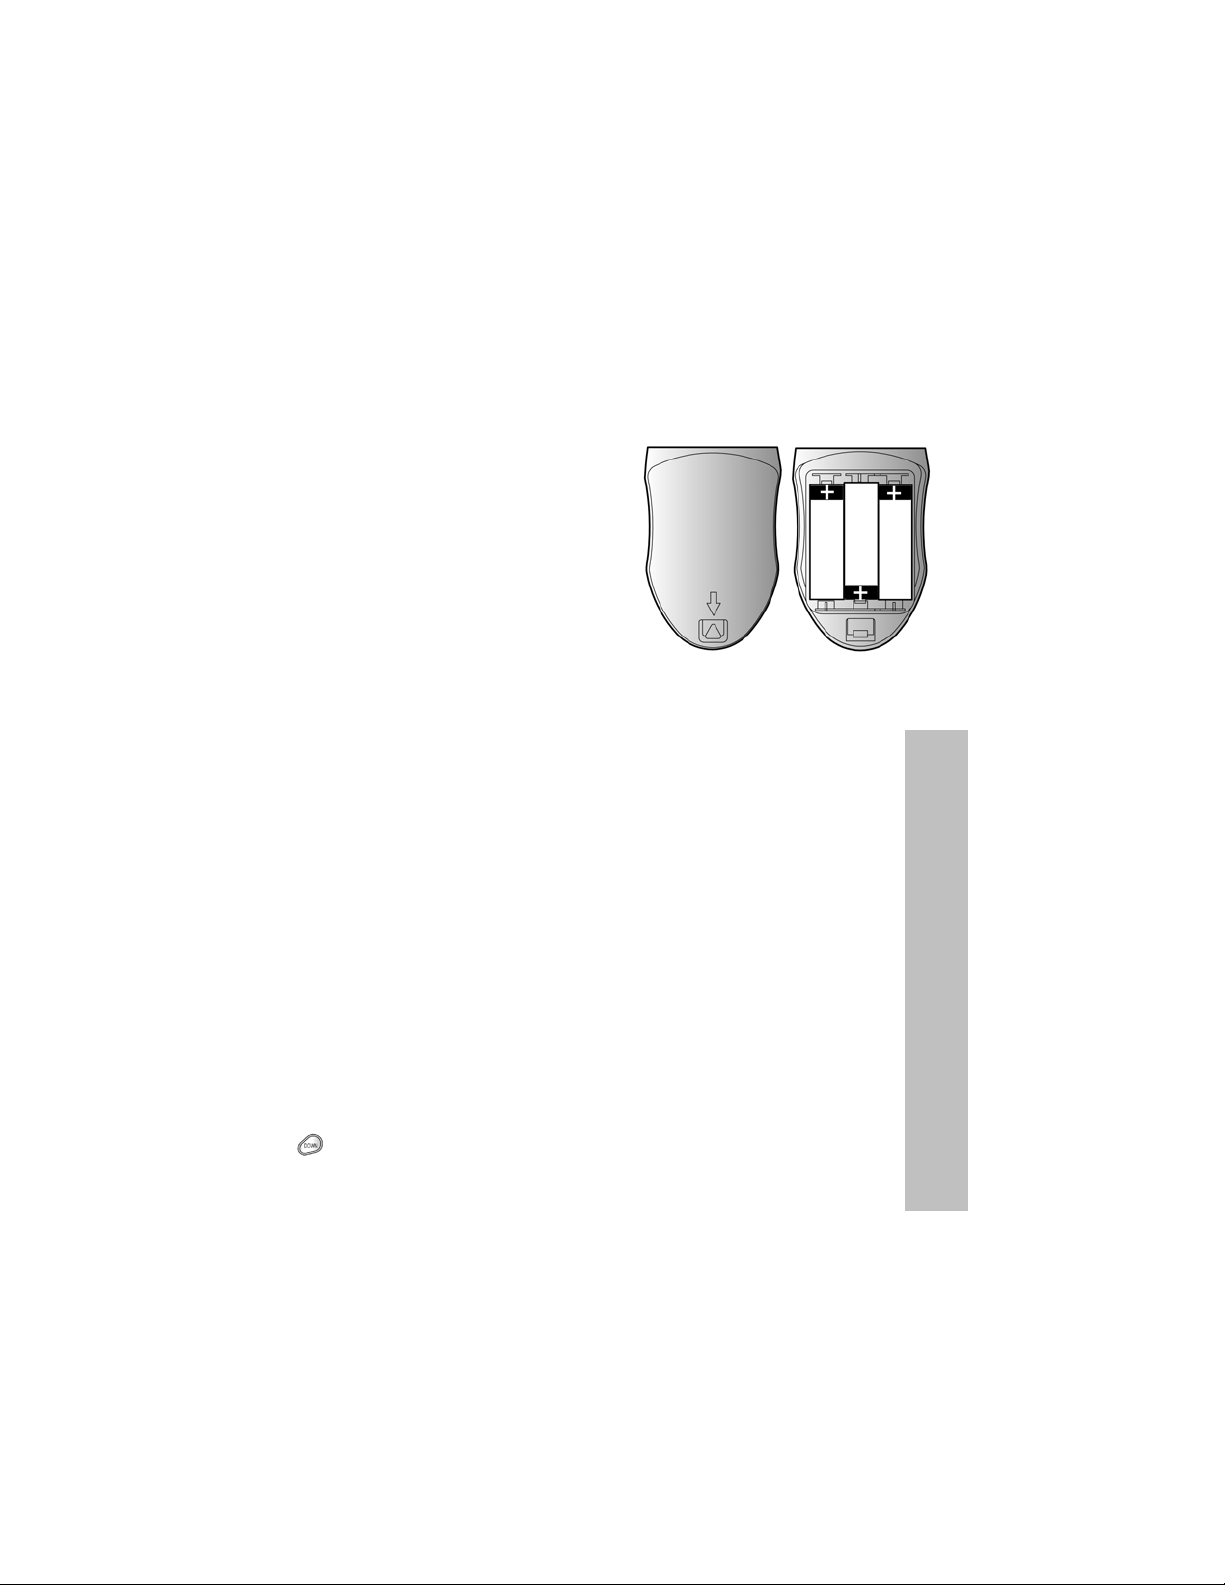
Installing Batteries
Your M-222P radio operates with 3 AA Alkaline batteries. The belt clip should be removed to
ease battery installation or removal. To install or remove batteries:
1. With back of radio facing you, gently press the triangular battery latch toward the top of the
radio.
2. Lift up on the bottom edge of the battery cover and lift the cover off.
3. Insert 3 AA batteries observing the polarity as shown.
4. Insert the two alignment tabs on the top edge of the cover into their slots and press down on
the bottom of the cover to secure.
Note: Batteries are not included.
Operation
Power On/Off: Turn the knob on the top of the radio clockwise to turn the radio on.
Turn the knob fully counterclockwise to turn the radio off.
Volume: Rotate the knob clockwise to increase the volume and counterclockwise to
decrease the volume.
Talking and Listening: To communicate, all radios in your group must be set the same
channel and CTCSS code.
• For maximum clarity, hold the radio 2 to 3 inches from your mouth.
• Press and hold the PTT button and speak in a normal voice into the microphone. The
LED indicator light glows continuously when transmitting.
• To receive messages, release the PTT button.
Disabling Button Beeps: A feedback beep is normally sounded each time a
front panel button on the radio is pressed. To turn this feature on or off, press
and hold the button while turning the radio on. The ♪ icon will be on when
beeps are enabled.
5
Page 5
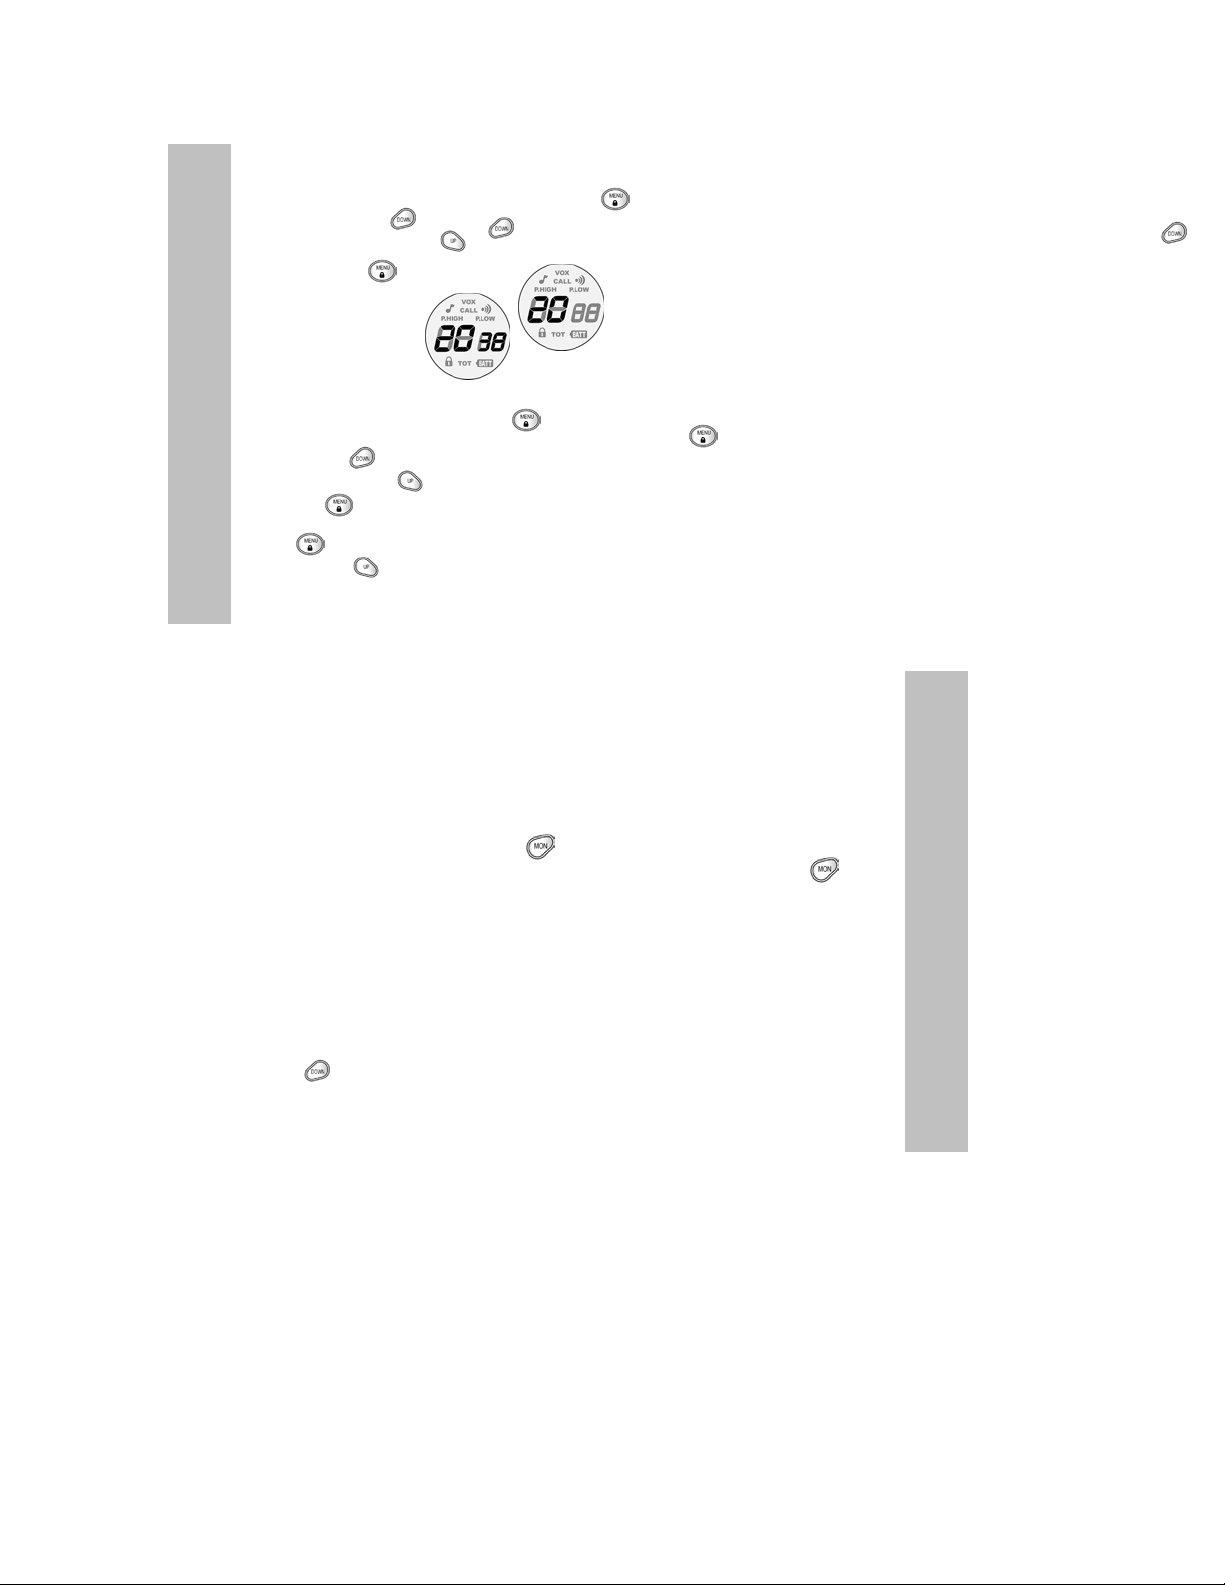
Channel selection: Your M-222P has 22 channels available. To change channels:
• With the radio on, repeatedly press until the current channel selection
flashes.
• Use the or buttons to change the channel.
• Press or the PTT button to save the new channel and exit the menus.
CTCSS selection: Your M-222P has 38 CTCSS codes available. The selected CTCSS
code may be different for each channel. To select a CTCSS code for the current channel:
• With the desired channel selected, repeatedly press until the current CTCSS code
number flashes.
• Use the or buttons to change the CTCSS code number.
• Press or the PTT button to save the new CTCSS code and exit the menus.
Note
Selecting a CTCSS code of 0 will disable the CTCSS feature. Selecting a CTCSS
:
code may keep you from hearing unwanted radio traffic or interference.
6
CTCSS selection will not eliminate any interference while transmitting or make
your conversation private. To communicate between two M-222P radios, both the
channel and CTCSS code selections must be the same. To communicate with other
models and brands of radios the actual radio frequency and CTCSS frequency must be
matched. The frequency charts at the back of this book are included to help with this
selection. In general, the first fourteen channel selections may be used to communicate
with most FRS radios.
Monitor button: Pressing and holding the button lets you hear white noise so you
can adjust the volume level of the radio level when not receiving a signal. The should
be used to check activity on current channel before transmitting.
Time out Timer: The Time-out Timer feature helps extend battery life by preventing
accidental continuous transmission. If the PTT button is pressed continuously for 60
seconds, the radio will emit a warning tone and will stop transmitting.
Power Selection: Your M-222P has two transmit power levels. To select the power level
on channels 1-7 and 15-22:
• Press until the
P.HIGH
• Press or to select between high and low power levels.
• Press the PTT button to save and exit.
Note: On channels 8-14 no power level selection is possible.
or
P.LOW
icon flashes.
7
Page 6

Keypad Lock: To avoid accidentally changing radio operation, press for 3 seconds.
The icon will be appearing. When the is on the menu functions and and
buttons are disabled. When locked, you will be able to turn the radio off and on, increase
or decrease volume, monitor, transmit and send a call tone. To unlock, press for 3
seconds.
Call Tone: Your M-222P has 10 different call tones available. To select the call tone:
CALL
• With the radio on, repeatedly press until
appears. The current call
tone setting will begin to flash.
• Press or to change the call tone. The new call tone will be heard
over the speaker.
• Press or the PTT button to save the new call tone and exit the menus.
Note: Setting the call tone to 0 disables the call tone function.
Roger Beep Tone: Whenever you release the PTT button, a “Roger Beep” tone may be
transmitted to let your friends know you are finished talking. To enable the Roger Beep,
turn the radio off. Press and hold as you turn your radio on. The icon will appear
in the upper right position of the display. Repeat the same steps to turn off the Roger
Beep.
8
VOX: VOX (voice operated transmit) operation allows you to transmit without using the
PTT button when using a headset. To enable VOX operation:
• Open the SPK/MIC cover on right side of the radio.
• Insert the headset plug(s) into the SPK/MIC jacks.
• Set the VOX switch on headset to VOX position.
• Turn on the radio. The
Note: The VOX level must be set properly and to a level other than zero for correct
VOX operation.
VOX
icon will appear.
VOX Level setup: Your M-222P has three selectable VOX levels. The VOX level
should be adjusted so that your voice causes the radio to transmit, but environmental
noise does not. To set the VOX level:
VOX
• With the radio on, repeatedly press until
appears. The current VOX
setting will begin to flash.
• Press or to change the VOX level.
• Press or the PTT button to save the new VOX level and exit the menus.
Note: Selecting level 0 will disable VOX operation without regard to the VOX switch
setting on the headset.
9
Page 7
External Speaker/Microphone Jack: Your M-222P can be used with an optional
external speaker/microphone or headset, freeing your hands for other tasks. To use an
optional speaker/microphone or headset:
• Open the SPK/MIC cover on right side of the radio.
• Insert the plug(s) into the SPK/MIC jacks.
Intercom: Your M-222P can be used with optional accessories that allow the radio to
operate as an intercom system.
• Open the INT cover on top of the radio.
• Insert the appropriate plug into the INT jack.
Belt clip: Your M-222P comes with a belt clip. To install the belt clip:
• Slide the clip down into the slots on the back of the radio until the latching
mechanism clicks.
To remove the belt clip:
• Pull outward on the latching tab while gently sliding the belt clip toward the top
of the radio.
10
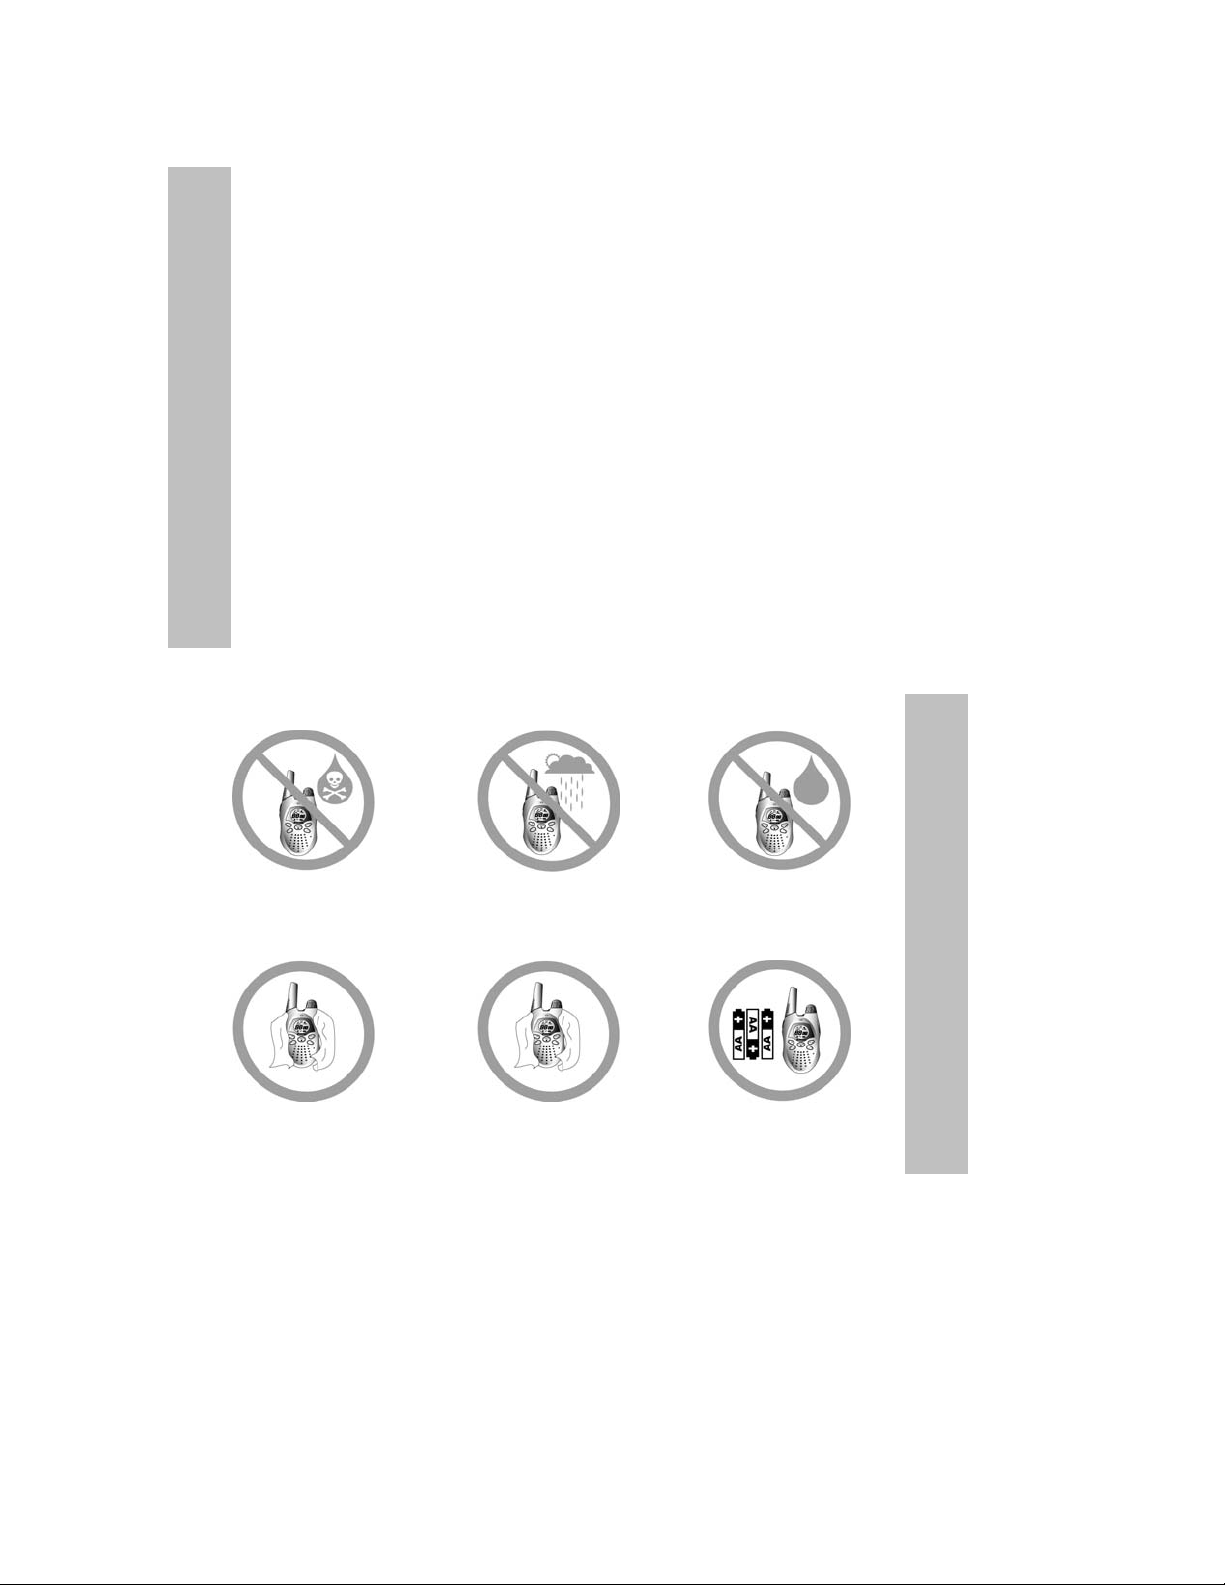
Use and Care
Do not use alcohol or
cleaning solutions to clean
the radio.
Do use a soft damp cloth
to clean the radio.
Do not immerse the radio
in water.
Do dry the radio with a
dry lint free cloth should it
get wet.
Do not use the radio until
completely dry.
Do turn off the radio and
remove the batteries when
storing.
11
Page 8

12
Channel Frequency Chart
Channel Number Channel Frequency Channel Number Channel Frequency
1 462.5625 12 467.6625
2 462.5875 13 467.6875
3 462.6125 14 467.7125
4 462.6375 15 462.5500
5 462.6625 16 462.5750
6 462.6875 17 462.6000
7 462.7125 18 462.6250
8 467.5625 19 462.6500
9 467.5875 20 462.6750
10 467.6125 21 462.7000
11 467.6375 22 462.7250
(MHz) (MHz)
CTCSS Code Chart
Code Freq Code Freq Code Freq Code Freq Code Freq
1 67.0 9 91.5 17 118.8 25 156.7 33 210.7
2 71.9 10 94.8 18 123.0 26 162.2 34 218.1
3 74.4 11 97.4 19 127.3 27 167.9 36 225.7
4 77.0 12 100.0 20 131.8 28 173.8 36 233.6
5 79.7 13 103.5 21 136.5 29 179.9 37 241.8
6 82.5 14 107.2 22 141.3 30 186.2 38 250.3
7 85.4 15 110.9 23 146.2 31 192.8
8 88.5 16 114.8 24 151.4 32 203.5
(Hz) (Hz) (Hz) (Hz) (Hz)
Technical Specifications
General
Frequency Range 462.5500-467.7125 MHz
Channels 22
CTCSS Codes 38
Antenna Impedance 50 Ohm
Speaker Impedance 8 Ohm
Power Supply 3 AA Alkaline(4.5 VDC)
Modulation Type FM
Intermediate frequencies 1
Receiver
Sensitivity (for 12 dB Sinad) 0.22uV
Audio out put power (@ 10%THD) 150mW @ 8ohm
Audio distortion (@ 500 mVrms) 5 % @ 1kHz
Signal/Noise ratio 40 dB
Image Rejection 50 dB
Adjacent channel selectivity 50 dB
Current drain (standby) 65 mA
Transmitter
Modulation FM 1.8 KHz-2.3 KHz Max
Signal/Noise ratio 30 dB
Current drain (max) 1000mA
st
IF = 21.7 MHz 2nd IF = 450 KHz
Page 9

LIMITED WARRANTY
Midland Radio Corporation will repair or replace, at its option without charge, any Midland FRS/GMRS
transceiver which fails due to a defect in material or workmanship within One Year following the initial
consumer purchase. This warranty does not apply to water damage, battery leak damage or abuse.
This warranty does not include any carrying cases, earphones, or antennas, which may be a part of or included with the
warranted product, or the cost of labor for removal or re-installation of the product in a vehicle or other mounting.
Performance of any obligation under thi s warranty may be obtained by returning the warranted product , freight prepaid,
along with proof of purchase date, to:
This warranty gives you specific legal rights, and you may al so have other rights, which vary, from state to state.
Note: The above warranty applies only to merchandise purchased in the United States of America or any of the
territories or possessions thereof, or from a U.S. Military exchange.
Midland Radi o Cor poration
1120 Clay St.
N. Kansas City, MO 64116
Tel: (816) 241-8500
E-mail: mail@midlandradio.com
URL: www.midlandradio.com Printed in Thailand
Midland Radi o Cor poration
Warranty Service Department
1120 Clay Street
North Kansas City, Missouri 64116.
 Loading...