

Page 1
Midland
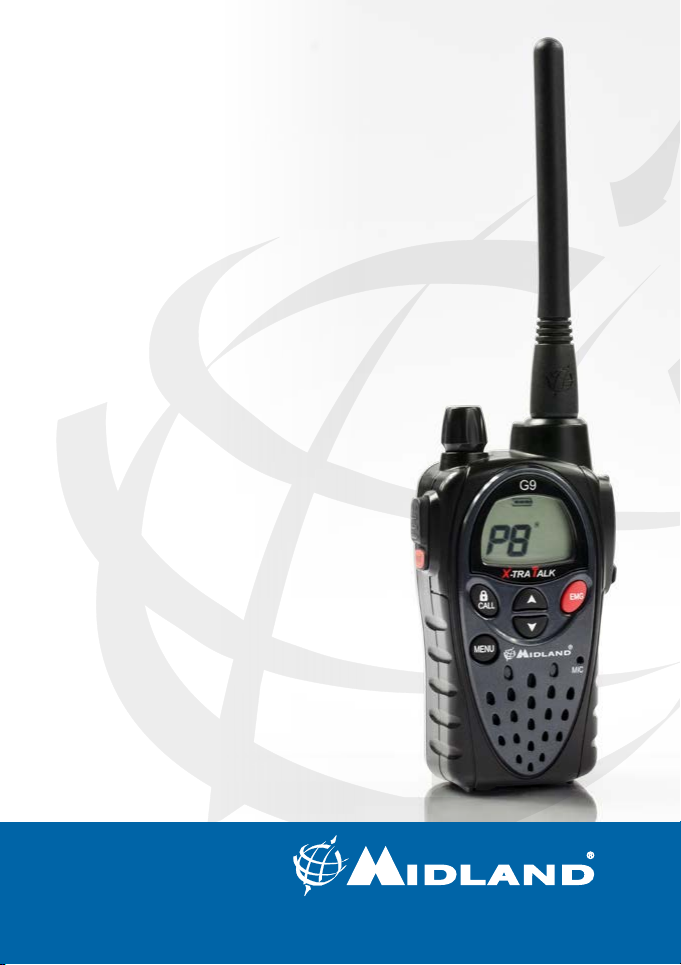
G9/G9E Plus
” Manuale d’uso
PMR446+LPD/PMR446 |
Page 2

Sommario
Dotazione 4
Copertura/portata 5
Batterie e vano batteria 5
Avvertenze 5
Caratteristiche 6
Caratteristiche principali 7
Versioni: 7
Descrizione delle parti 8
Display 8
Descrizione dell’apparato radio 10
Funzioni 12
Accensione/spegnimento 12
Selezione della Banda PMR466 o LDP 12
Selezione di un canale 12
Visualizzare il canale/tono dei canali pre-registrati 12
Trasmissione e ricezione 13
Funzione TOT 13
Regolazione VOLUME 13
Tasto “CALL” 13
Tasto “Emergenza” 13
Page 3

Blocco tastiera 14
Funzione MON (Monitor)/Squelch 14
Scansione di tutti i canali 14
Selezione di un canale 15
Impostazione toni CTCSS/DCS 15
Funzione Alta - Bassa potenza 17
Funzione Vibra-CALL 18
Funzione CALL 18
Funzione ROGER BEEP 19
Beep Tastiera 19
Funzione chiamata Emergenza 19
Cambio canale di emergenza 20
Funzione DUAL WATCH 21
Illuminazione del display 22
Risparmio energia 22
Ricarica delle batterie 23
Specifiche tecniche 24
Manuale d’uso Midland G9/G9E Plus | 3
Page 4

Grazie per aver scelto i prodotti Midland! L’apparato Midland G9 Plus è
un ricetrasmettitore che può essere utilizzato senza licenza, in quasi tutta
Europa.
Come previsto da dl 259 del 01/08/2003, successive integrazioni e da nota 101C
del PNF, gli apparati PMR446 sono soggetti ad una dichiarazione d’utilizzo e ad
un contributo annuo. Per ottenere la modulistica e le modalità di ottenimento
dell’autorizzazione generale contattate l’Ispettorato Territoriale nel vostro capoluogo di regione o visitate il sito web del Ministero delle Comunicazioni (www.
urpcomunicazioni.it oppure www.urpcomunicazioni.it/ispettorati).
L’utilizzo dell’apparato è consentito solamente dopo aver inviato la pratica
all’Ispettorato Territoriale. Raccomandiamo di conservare una copia di tale
pratica.
L’apparato Midland G9 Plus grazie all’utilizzo delle tecnologie più avanzate nel campo della radiocomunicazione ed alla sua robusta struttura
meccanica è decisamente la soluzione più affidabile ed ideale per la
gestione professionale di team di lavoro, per la comunicazione con più
persone all’interno di cantieri, di edifici e nelle manifestazioni sportive.
Midland G9 Plus è disponibile in due modelli:
• versione BiBanda (PMR446/LPD)
• versione E solo banda PMR446
Questo manuale comprende entrambe le versioni, segnalando quali
sono le funzionalità specifiche per ciascuna versione.
Dotazione
• N° 1 apparato Midland G9 Plus
• N° 1 caricatore da tavolo singolo
• N° 1 adattatore da muro
• N° 4 batterie ricaricabili AA da 1800mAh NiMH
• N° 1 clip da cintura
4 | Manuale d’uso Midland G9/G9E Plus
Page 5

Copertura/portata
Le prestazioni dei ricetrasmettitori dipendono dalle condizioni ambientali ed atmosferiche. Fattori ambientali quali alture, edifici, alberi, fogliame possono diminuire la copertura.
Le prestazioni ottimali si ottengono in campo aperto mentre la portata
si potrà ridurre, per esempio all’interno di un’automobile o di un edificio.
Tipicamente la copertura in città, in presenza di edifici è di 1 o 2 Km.
In campo aperto, ma con presenza di alberi, case, fogliame, la copertura
è di 4-6 Km. In campo aperto, a vista e senza nessun tipo d’interferenza,
come per esempio in montagna, la copertura può essere anche superiore
ai 12 Km.
Batterie e vano batteria
E’ possibile utilizzare le batterie ricaricabili fornite con l’apparato, oppure 4 batterie AA alcaline. Per aprire il vano batteria, spingere la linguetta
verso il basso, e rimuovere il coperchio sollevandolo. Dopo aver inserito
il pacco batteria o le batterie richiudere il vano batteria e riportate la linguetta nella posizione di chiusura.
Attenzione: nel caso si utilizzi le batterie ricaricabili è opportuno porre le radio in ricarica prima dell’utilizzo.
Avvertenze
• BATTERIE - Osservate tutte le precauzioni sull’utilizzo delle batterie
descritte nel cap “Ricarica delle batterie”.
• NON APRITE LA RADIO PER NESSUN MOTIVO, la meccanica ed elettronica di precisione di cui é composto l’apparato richiede esperienza e
strumentazione; per lo stesso motivo non va assolutamente riallineata la radio, che é già stata tarata in fabbrica per le massime prestazioni.
L’apertura del ricetrasmettitore da parte di personale non autorizzato
farà decadere automaticamente la garanzia.
• Non utilizzate alcool, solventi o abrasivi per pulire l’apparecchio. Utilizzate solo un panno morbido e pulito leggermente inumidito con
acqua. Nei casi più tenaci utilizzate un blando detergente.
Manuale d’uso Midland G9/G9E Plus | 5
Page 6

Caratteristiche
• Nuova funzionalità Side Tone: silenziatore del fruscio a fine trasmis-
sione
• Funzionalità “doppio PTT per alta o bassa potenza”: Midland G9 Plus
è dotata di PTT doppio, grazie al quale è possibile scegliere se trasmettere in alta o bassa potenza. Grazie a questa caratteristica è possibile utilizzare l’alta potenza in trasmissione solo quando è veramente
necessario, ottimizzando così il consumo delle batterie.
• Funzionalità “Chiamata d’emergenza”. Midland G9 Plus introduce
una nuova funzione “innovativa ed importante”: il canale dedicato alle
emergenze. Normalmente la comunicazione via radio avviene tra due
o più utenti che sono in quel momento sintonizzati sullo stesso canale, per cui non è possibile comunicare con persone che sono su canali
differenti o trasmettere su più canali contemporaneamente.
• Funzione “Emergenza” è possibile invece controllare costantemente
il canale dedicato alle emergenze; in questo modo coloro che sono in
possesso di un Midland G9 Plus potranno comunicare normalmente
sul canale impostato ed allo stesso tempo ricevere o trasmette eventuali comunicazioni d’EMERGENZA sul canale dedicato per questo
scopo. É sufficiente tenere premuto il tasto EMG per 3 secondi ed
un segnale di emergenza verrà inviato a tutte le radio in portata, che
verranno sintonizzate automaticamente sul canale “EC” (Emergency
Channel) anche se si trovavano su un altro canale.
• Funzionalità “controllo portata”: con la semplice pressione di un ta-
sto potete verificare se ci sono radio in portata.
• Funzionalità “Vox TalkBack”: Se la radio dovesse trasmettere costan-
temente in VOX, la trasmissione viene automaticamente interrotta
dopo 20” per dare la possibilità di parlare anche ad altri utenti sintonizzati su quel canale.
6 | Manuale d’uso Midland G9/G9E Plus
Page 7

Caratteristiche principali
• Potenza: 500mW (PMR446); 10mW (LPD)
• Temperatura operativa: da -20° a +55° C
• Side Tone
• 38 toni CTCSS/104 codici DCS
• Doppio PTT: alta/bassa potenza
• Chiamata d’emergenza
• Controllo Portata
• VOX regolabile su 3 livelli, con “TalkBack”
• VibraCALL
• Blocco tastiera
• Auto power save: risparmio automatico batterie
• Indicatore di batteria scarica
• Dual Watch
• CALL con 5 melodie
• SCAN
• Monitor
• Out of Range
• Roger beep: tono di fine chiamata
• Alta/Bassa potenza
• Display LCD retroilluminato
• Alimentazione tramite 4 batterie AA NiMH (o con pacco batteria da
800mAh)
• Presa accessori 2 Pin
Versioni:
• G9 Plus Dual band (PMR446/LPD):
24 canali PMR446 (8+16 pre-registrati)/69 canali LPD
• G9E Plus (solo PMR446):
24 canali PMR446 (8+16 pre-registrati)
Manuale d’uso Midland G9/G9E Plus | 7
Page 8
Descrizione delle parti
Display
6
4
7
5
8
3
2
1
14
11
9
10
12
13
8 | Manuale d’uso Midland G9/G9E Plus
Page 9
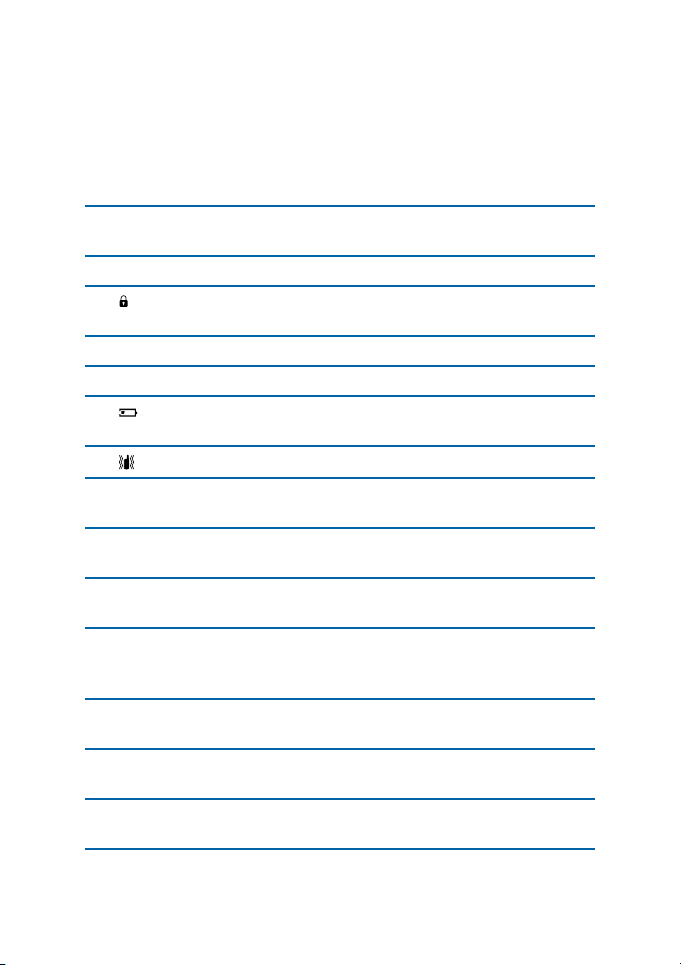
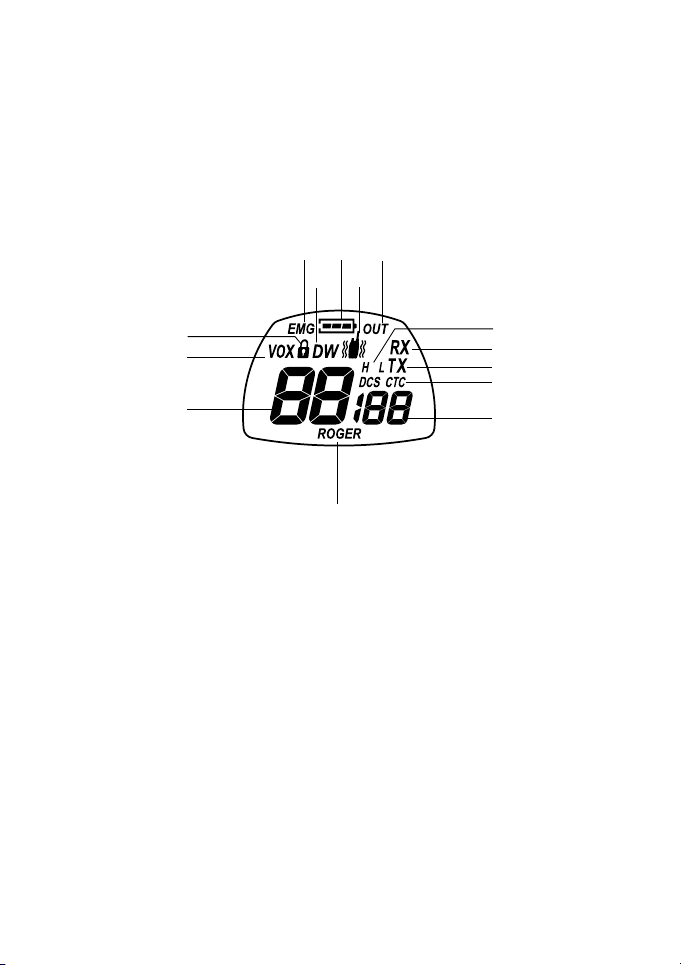
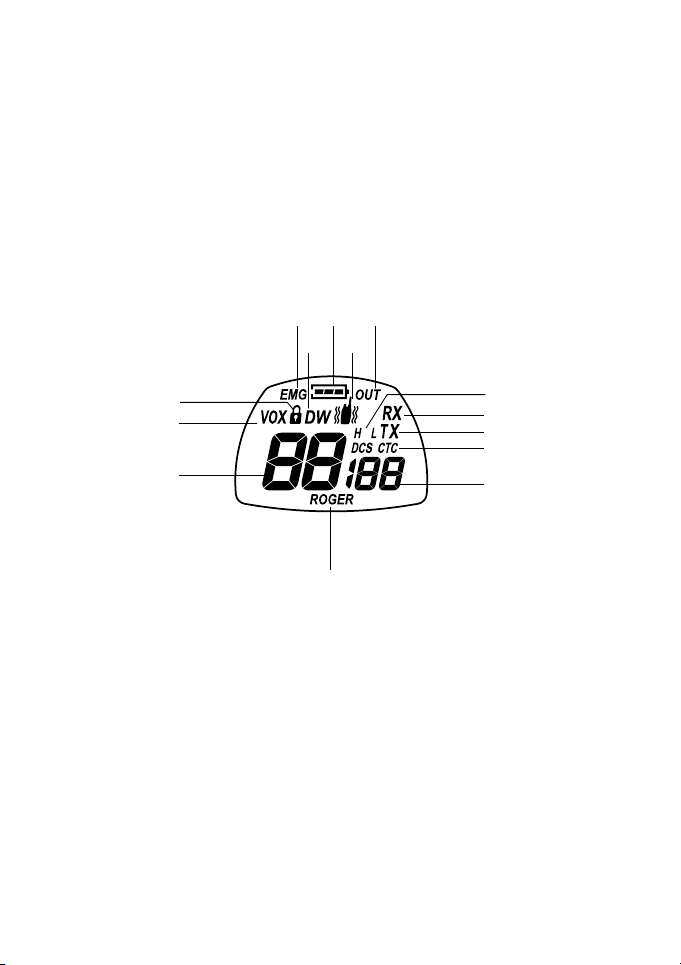
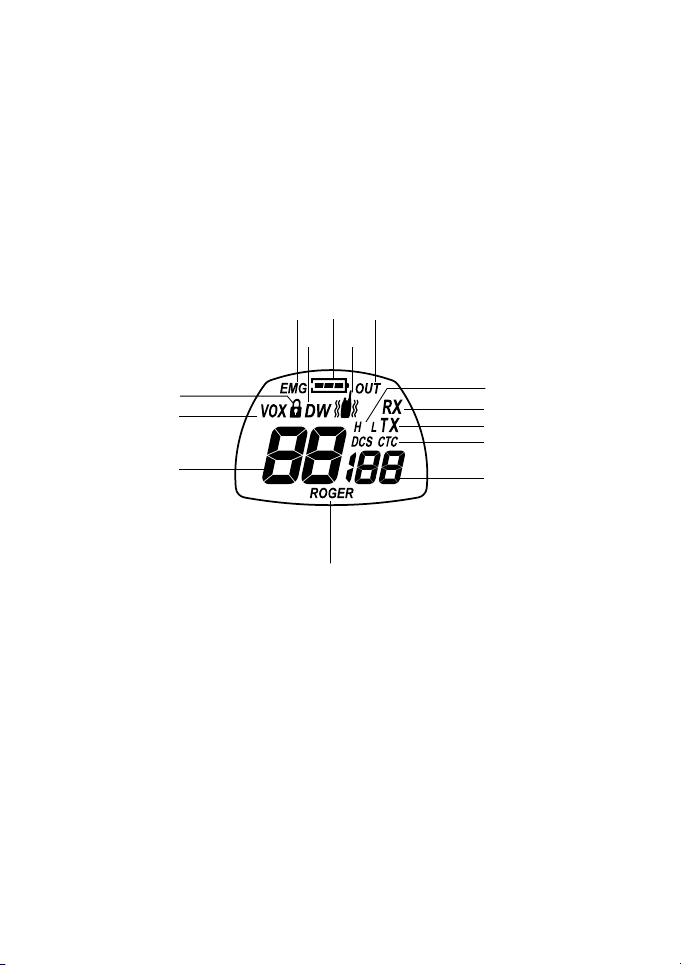
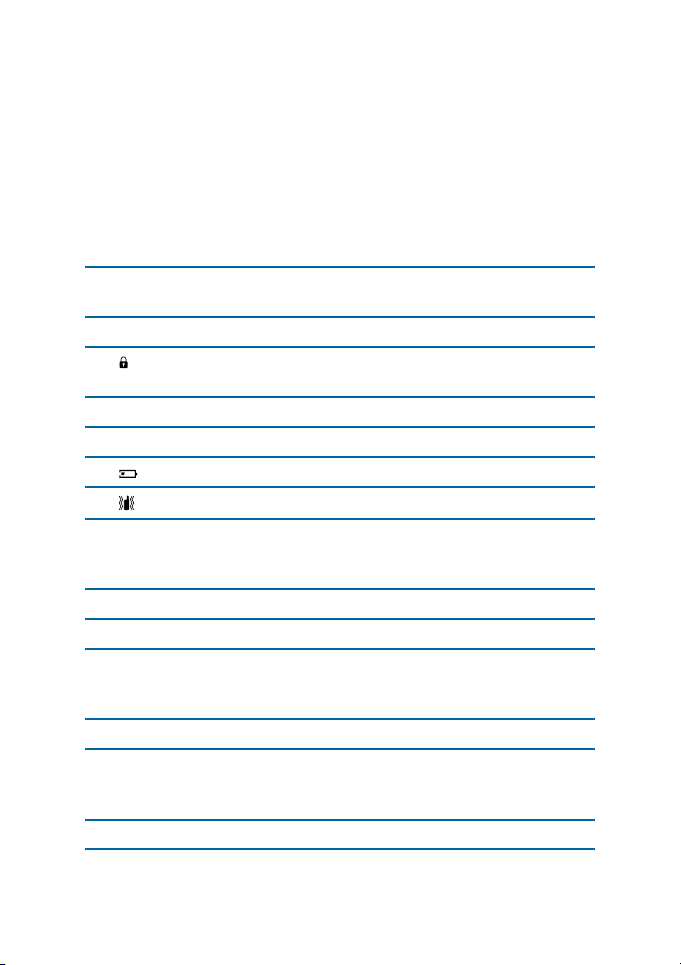
Il vostro ricetrasmettitore utilizza un display LCD (a cristalli liquidi) per informarvi costantemente del suo stato operativo. I simboli ed i parametri
che possono apparire di volta in volta sono i seguenti:
1. CANALE Queste due grandi cifre indicano il numero del
canale selezionato
2. VOX Indica l’attivazione della funzione VOX
3.
4. EMG Compare quando la funzione Emergenza è attiva
5. DW Compare quando la funzione Dual Watch è attiva
6.
7.
8. OUT Indica il superamento della distanza massima di
9. RX Appare sul display, quando il ricetrasmettitore è
10. TX Compare durante la trasmissione (pulsante PTT
11. H(High)/L(Low) Indica la selezione della bassa o dell’alta potenza
12. CTCSS/DCS Queste due icone indicano il tipo di tono sub
13. Toni CTCSS/DCS Queste tre piccole cifre indicano il codice dei toni
14. ROGER Compare, quando la funzione Roger Beep è
Il simbolo del lucchetto indica il blocco della
tastiera attivo
Il simbolo della batteria indica lo stato di carica
del pacco batteria o delle batterie AAA
Indica la funzione VibraCALL attiva
ricezione Out of Range
in ricezione
premuto)
di trasmissione. La potenza di trasmissione del
PTT grande segue questa selezione
audio selezionato
CTCSS/DCS selezionati (1-38 / 1-104)
attiva
Manuale d’uso Midland G9/G9E Plus | 9
Page 10
Descrizione dell’apparato radio
19
20
18
17
CALL
EMG
21
22
23
16
MENU
24
15
10 | Manuale d’uso Midland G9/G9E Plus
Page 11

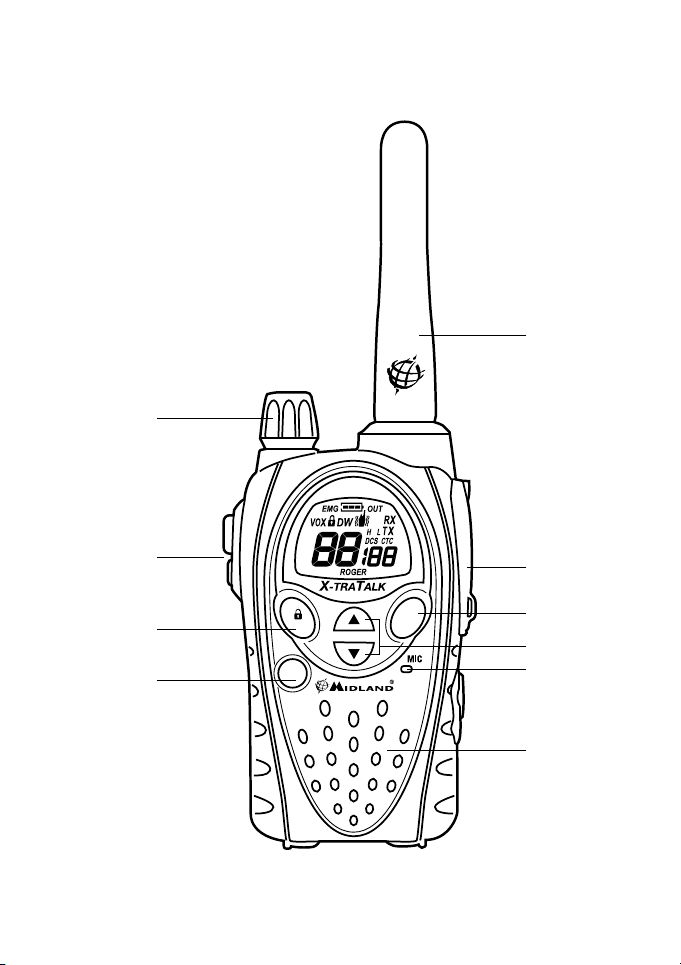
Fate riferimento all’immagine nella pagina precedente per identificare
tutte le principali parti dell’apparato:
15. Altoparlante
integrato
16. Pulsante MENU La pressione di questo pulsante permette di
17.
Pulsante CALL/
18. Pulsante PTT (premere per parlare). Sono disponibili 2 pulsanti
19. Manopola
VOLUME
20. ANTENNA Serve a ricevere e trasmettere i segnali radio.
21. Presa Accessori (sotto la protezione) Consente il collegamento
22. Pulsante EMG Consente l’immediata attivazione delle funzioni
23. Pulsanti ▲▼ Servono per scorrere le varie impostazioni
24. Microfono
integrato
In questo punto si trova l’altoparlante per la
ricezione audio.
entrare nel MENU di configurazione della radio.
Serve ad inviare un segnale di chiamata sul
canale in uso, oppure tenendolo premuto
per circa 5 secondi per attivare il blocco della
tastiera.
PTT, uno grande e uno più piccolo identificato
con la parola “boost” in rosso. La pressione del
PTT grande porta l’apparato in trasmissione in
bassa oppure alta potenza (in base alla selezione
fatta a MENU: H oppure L), mentre la pressione
del PTT piccolo (boost) trasmette sempre in alta
potenza.
Accende /spegne l’apparecchio e regola il
VOLUME audio di ricezione.
a dispositivi esterni quali: cuffie, microfoni,
caricatori, ecc (2 pin).
d’EMERGENZA e Controllo Portata.
all’interno del MENU
In questo punto si trova il microfono per la
trasmissione
Manuale d’uso Midland G9/G9E Plus | 11
Page 12

Funzioni
Accensione/spegnimento
Per accendere il ricetrasmettitore, ruotare la manopola VOLUME in senso
orario sino a sentire uno scatto meccanico.
Per spegnere il ricetrasmettitore, ruotare la manopola in senso antiorario.
Selezione della Banda PMR466 o LDP
(solo per la versione BiBanda)
Midland G9 Plus versione BiBanda è un apparato inizialmente configurato sulla banda PMR446.
• Per passare alla banda LPD, è sufficiente tenere premuto a lungo il
tasto MENU finchè il display mostra il canale 1. Per tornare alla banda
PMR446 tenete premuto il tasto MENU finchè il display mostra “P1”.
Questa procedura disabilita la funzione “EMG” (Emergenza) quindi se
cambiate banda ricordatevi di riattivare dal MENU la funzione Emergenza (vedi capitolo “Funzione chiamata Emergenza”).
Selezione di un canale
Premere il tasto MENU, sul Display inizierà a lampeggiare il n° del canale.
Selezionare il canale desiderato utilizzando i tasti ▼▲. Premere PTT per
confermare, oppure attendere 5 secondi.
In base al modello si può scegliere tra i seguenti canali:
• versione BiBanda: PMR446 da P1 a P8 e da 9p a 24p (pre-registrati) /
LPD da 1 a 69.
• versione E solo PMR446: da P1 a P8 e da 9p a 24p (pre-registrati)
Il canale P8 è stato dedicato di Default alla funzione “Emergenza” quindi
consigliamo di non utilizzarlo per non interferire con questa funzionalità.
Visualizzare il canale/tono dei canali pre-registrati
Per visualizzare momentaneamente il canale PMR446 e il subtono utilizzato nei canali pre-registrati, è sufficiente posizionarsi sul canale voluto
(da 9p a 24p) e tenere premuta ▼ per 3 sec.
12 | Manuale d’uso Midland G9/G9E Plus
Page 13

Trasmissione e ricezione
Per trasmettere tenere premuto indifferentemente uno dei due pulsanti PTT. Attendere una frazione di secondo e parlare con tono normale a
circa 5 cm di distanza in direzione del microfono del ricetrasmettitore; il
display visualizzerà TX.
Rilasciare il tasto PTT al termine della conversazione.
Quando l’apparecchio é in ricezione (pulsante PTT rilasciato) riceverete
automaticamente qualsiasi comunicazione. Il display visualizzerà RX.
Per default sia il tasto grande del PTT che quello piccolo, trasmettono in
Alta potenza, essendo da menu configurata come Alta potenza (H – High).
Se si utilizza un accessorio esterno, il PTT presente sull’accessorio segue la
stessa funzionalità del PTT grande.
Funzione TOT
Questa funzione, evita il prolungarsi delle trasmissioni. La radio infatti
blocca temporaneamente la trasmissione se utilizzata oltre un tempo
massimo predeterminato. Quando si raggiunge il tempo predefinito nel
timer, l’apparecchio commuta in ricezione.
Regolazione VOLUME
Ruotare la manopola VOLUME fino ad ottenere il livello desiderato.
Tasto “CALL”
Premendo il tasto CALL verrà inviato un segnale sonoro di avviso chiamata a tutti gli utenti sullo stesso canale. Sono disponibili diverse suonerie
selezionabili tramite MENU.
Tasto “Emergenza”
Quando la funzione emergenza è attiva, (EMG lampeggiante sul display)
tenendo premuto il tasto EMG per 3 secondi si invia la chiamata di emergenza agli altri G9 Plus.
La funzione Emergenza è già attivata di default.
Premendo due volte il tasto EMG viene inviata una richiesta di risposta a
tutte le radio in portata (funzione Controllo Portata)
Manuale d’uso Midland G9/G9E Plus | 13
Page 14

Blocco tastiera
1. Mantenere premuto il tasto CALL/
2. Il simbolo che appare sul display
3. Solo i tasti PTT, EMG e CALL/
4. Per la disattivazione, tenere premuto nuovamente il tasto CALL/
per circa 5 secondi.
per circa 5 secondi.
indica la sua attivazione.
rimangono attivi.
Funzione MON (Monitor)/Squelch
La funzione Monitor consente di escludere temporaneamente lo squelch
automatico per ricevere eventuali segnali estremamente deboli che altrimenti non sarebbero stati ricevuti.
Per attivare la funzione Monitor, tenere premuto per circa 2 secondi contemporaneamente entrambi i pulsanti ▲▼.
Per disattivare questa funzione premere nuovamente per circa 2 secondi
entrambi i tasti ▲▼, (oppure spegnere e riaccendere la radio).
Questa funzione può essere attivata solo se la funzione “Emergenza” non
è attiva.
Con la funzione MON attiva, è normale che la radio abbia sempre un costante rumore di fondo.
Scansione di tutti i canali
SCAN esegue la scansione di tutti i canali e in presenza di un segnale in
ricezione si arresta.
La scansione riprende dopo cinque secondi dal cessare del segnale.
Questa funzione è utile per controllare quali canali sono liberi.
Per eseguire la scansione dei canali, premere per 2 sec il pulsante ▲:
Midland G9 Plus inizia ad eseguire la scansione dei canali.
Per fermare la scansione, premete il tasto PTT, il vostro ricetrasmettitore
tornerà sul canale in uso al momento in cui è stata fatta partire la scansione.
Questa funzione può essere attivata solo se la funzione “Emergenza” non
è attiva.
14 | Manuale d’uso Midland G9/G9E Plus
Page 15

Tasto Funzione “MENU”
Le seguenti funzioni si selezionano premendo il tasto “MENU”:
• Selezione canale
• Impostazione toni CTCSS
• Impostazione toni DCS
• Impostazione Alta/Bassa potenza (solo sulla banda PMR446)
• Funzione VOX
• Funzione VibraCALL
• Impostazione suonerie
• Roger Beep
• Beep tastiera
• Canale Emergenza
• Funzione Dual Watch
• Out of Range
Selezione di un canale
1. Premere il tasto MENU, sul Display inizierà a lampeggiare il n° del
canale.
2. Selezionare il canale desiderato utilizzando i tasti ▲▼.
3. Premere PTT per confermare, oppure attendere 5 secondi.
In base al modello si può scegliere tra i seguenti canali:
• versione BiBanda: PMR446 da P1 a P8 e da 9p a 24p (pre-registrati) /
LPD da 1 a 69.
• versione E solo PMR446: da P1 a P8 e da 9p a 24p (pre-registrati)
Il canale P8 è stato dedicato alla funzione “Emergenza” quindi consigliamo di non utilizzarlo per non interferire con questa funzionalità.
Impostazione toni CTCSS/DCS
I toni CTCSS e DCS sono dei codici che possono essere aggiunti ai canali
per crearne uno personale. Per ogni canale si possono aggiungere fino a
38 codici CTCSS e 104 codici DCS diversi.
L’implementazione di questi codici può essere fatta sui seguenti canali:
• Versione BiBanda: solo sugli 8 canali principali PMR446 (da P1 a P8)
e sui 69 LPD.
• Versione E solo PMR446: solo sugli 8 canali principali PMR446 (da P1
a P8)
Manuale d’uso Midland G9/G9E Plus | 15
Page 16

• Per entrambe le versioni, i canali pre-registrati da 9p a 24p non possono essere modificati.
Procedimento per l’attivazione dei 38 toni CTCSS:
1. Accendere l’apparato.
2. Selezionare il canale desiderato premendo il pulsante MENU e i tasti
▲▼.
3. Premere nuovamente il tasto MENU sino a visualizzare sul display la
scritta CTC e il codice del tono lampeggiante a destra (“of”=nessun
codice - condizione di default).
4. Selezionare il tono CTCSS desiderato premendo i tasti ▲▼.
5. Per confermare l’impostazione, premere il tasto PTT oppure atten-
dere circa 5 secondi.
Procedimento per la disattivazione del tono CTCSS:
Per non utilizzare i toni CTCSS:
1. Selezionare il canale desiderato
2. Premere il tasto MENU sino a visualizzare sul display il codice del
tono CTCSS lampeggiante a destra;
3. Selezionare “of” tramite i tasti ▲▼.
Procedimento per l’attivazione dei 104 toni DCS:
1. Accendere l’apparato.
2. Selezionare il canale desiderato, premendo il pulsante MENU e i tasti
▲▼.
3. Premere nuovamente il tasto MENU sino a visualizzare sul display la
scritta DCS e il codice del tono lampeggiante a destra (“of”=nessun
codice - condizione di default).
4. Selezionare il tono DCS desiderato premendo i tasti ▲▼.
5. Per confermare l’impostazione, premere il tasto PTT oppure atten-
dere circa 5 secondi.
Di fabbrica, il canale P8 con tono DCS 50 (P850) è riservato alla funzione
Emergenza (canale EC). Consigliamo quindi di non utilizzarlo!!!
16 | Manuale d’uso Midland G9/G9E Plus
Page 17

Procedimento per la disattivazione del tono DCS:
Per non utilizzare i toni DCS:
1. Selezionare il canale desiderato
2. Premere il tasto MENU finchè il display mostra il canale desiderato,
ed il codice del tono DCS lampeggia a destra;Selezionare “of ” tramite
i tasti ▲▼.
Funzione Alta - Bassa potenza
(solo banda PMR446)
Per selezionare la potenza, premere il pulsante MENU sino a visualizzare
sul display, Pr, utilizzando i tasti ▲▼ selezionare L (low) per la bassa potenza H (high) per l’alta potenza.
Premere PTT per confermare, oppure attendere 5 secondi.
Con le batterie completamente cariche, l’alta potenza é di 500 mW (ERP),
mentre quella bassa é di 10mW (ERP).
Sui Canali LPD (solo versione G9 Plus Bibanda) la potenza è sempre di
10mW (ERP).
La selezione dell’alta o bassa potenza da MENU modifica anche la modalità con cui il doppio PTT funziona.
• Canali PMR446: Se dal MENU è selezionata la voce “Alta potenza”
(H-High), il PTT grande ed il PTT piccolo trasmettono entrambi alla
massima potenza. Se invece dal MENU è selezionata la voce “Bassa
potenza” (L-Low), il PTT grande trasmette a bassa potenza ed il PTT
piccolo trasmette alla massima potenza.
• Canali LPD: quando si utilizzano i canali LPD (solo per versione G9
Plus Bibanda) la funzione Alta-Bassa potenza non è disponibile, quindi i due PTT trasmetteranno sempre alla massima potenza.
ATTENZIONE: Per ottimizzare il consumo delle batterie, e quindi utilizzare l’alta potenza solo quando veramente serve (utilizzando il pulsante PTT “boost”), è
necessario configurare la potenza di trasmissione da menu in Bassa (L-Low). Per
default la configurazione da menu è sempre Alta (H-High), quindi ricordatevi di
cambiare questo parametro.
Manuale d’uso Midland G9/G9E Plus | 17
Page 18

Funzione VOX
Questa funzione permette di attivare la comunicazione senza premere il
tasto PTT. E’ sufficiente parlare e la comunicazione viene attivata.
La sensibilità è regolabile su 3 livelli e attivabile con o senza accessori.
Il quarto livello disponibile attiva la funzione Vox con TalkBack.
Nel caso in cui uno dei due apparati trasmette ininterrottamente per più
di 20 secondi, Vox TalkBack ne interrompe la trasmissione per dieci secondi, liberando il canale e concedendo così all’altro utente la possibilità
di parlare.
Per attivare questa funzione, premere il pulsante MENU, sino a che apparirà sul display VOX, utilizzando i tasti ▲▼ selezionare la sensibilità:
• Of: Disattivato;
• 1: Alta
• 2: Media
• 3: Bassa
• 4: Talk Back (con sensibilità Alta)
Premere PTT per confermare, oppure attendere 5 secondi
Per disattivare la funzione VOX seguire le indicazioni sopra riportate selezionando la voce oF.
Funzione Vibra-CALL
Midland G9 Plus è dotato del dispositivo “Vibra-CALL”, ovvero la possibilità di attivare la vibrazione al momento della ricezione del “Tono di
chiamata”. Per attivare questa funzione premere il tasto MENU, sino a visualizzare sul display
funzione (on: Attiva oF:Disattiva);
Confermare premendo il tasto PTT oppure attendere 5 secondi.
; premendo i tasti ▲▼si può inibire o attivare la
Funzione CALL
Midland G9 Plus ha la possibilità di inviare 5 diversi toni di chiamata.
Per farlo occorre premere il tasto CALL/
I toni possono essere selezionati nel seguente modo:
1. Premere il tasto MENU, sino a visualizzare sul display “CA” con il nu-
mero del tono attivo.
2. Premendo i tasti ▲▼si possono ascoltare/selezionare le 5 melodie
pre-impostate;
3. Confermare premendo PTT oppure attendere 5 secondi.
18 | Manuale d’uso Midland G9/G9E Plus
.
Page 19

Funzione ROGER BEEP
(Tonalità di conferma fine conversazione)
Al rilascio del tasto PTT, quindi alla fine di ogni trasmissione, viene emessa una tonalità, che indica al vostro interlocutore che può iniziare a parlare.
Nel Midland G9 Plus questa funzione è disattivata di default.
1. Premere il tasto MENU, sino a visualizzare sul display “rb of”;
2. Con i tasti ▲▼ selezionare “on” e sul Display comparirà “rb on”;
3. Premere il tasto PTT oppure attendere 5 secondi per confermare la
programmazione.
Per disattivarlo ripetere la procedura indicata selezionando “rb of”
Beep Tastiera
Questa funzione, se attiva, genera un beep audio ogni volta che si preme
un tasto.
Nel caso si desideri escludere il beep audio, è possibile farlo operando nel
seguente modo:
1. Premere il tasto MENU, sino a visualizzare sul display “bP on”.
2. Premendo i tasti ▲▼ fare in modo che il display mostri “bP of”.
3. Confermare premendo il tasto PTT oppure attendere 5 secondi.
In questo modo tutte le volte che si preme un tasto non si sentirà alcun
suono.
Per riattivarla ripetere la procedura indicata selezionando “bP on”
Funzione chiamata Emergenza
Questa funzione utilizza un canale dedicato alle chiamate d’emergenza e
permette di parlare a tutti i G9 Plus in portata, anche se su canali diversi.
Tenendo premuto il tasto EMG, in automatico la radio si sposta dal canale
in uso a quello dedicato all’emergenza, identificato con “EC” e contemporaneamente viene inviato un tono audio.
Tutte le radio in portata con la funzione Emergenza attiva, verranno automaticamente spostate sul canale “EC”. Ora tutti possono parlare sullo
stesso canale.
Quando la radio si trova sul canale d’emergenza (EC sul display) non è
possibile utilizzare le funzionalità del MENU. Solo i tasti PTT e CALL sono
attivi.
Manuale d’uso Midland G9/G9E Plus | 19
Page 20

Le radio torneranno sul canale in uso dopo un minuto dall’invio dell’ultima trasmissione. È possibile ritornare immediatamente al canale in uso
premendo il tasto EMG. In questa condizione è possibile utilizzare tutte
le funzioni del MENU.
Attivazione - Disattivazione
All’accensione dell’apparato la funzione EMERGENZA è attiva per default,
è sempre possibile disattivarla/attivarla operando nel seguente modo:
Premere il tasto MENU sino a visualizzare sul display EC on.
Con i tasti ▲▼ selezionare EC of. Confermare premendo il tasto PTT oppure attendere 5 secondi.
Quando la funzione emergenza è attiva (EMG lampeggiante sul display)
le seguenti funzioni non sono utilizzabili: Scan, Monitor, Dual Watch, Out
of Range.
Cambio canale di emergenza
Per default il canale d’emergenza preimpostato è il P8 DCS 50; è però
possibile scegliere un qualunque altro canale in base alle proprie esigenze.
Ricordatevi di cambiare il canale anche sulle altre radio!!
Con la funzione emergenza attiva (EMG lampeggiante sul display)
1. Premere il tasto MENU sino a visualizzare sul display EC on.
2. Premere ancora MENU (sul display compare of) e con i tasti ▲▼ se-
lezionare il canale desiderato.
3. Premere il tasto PTT oppure attendere 5 secondi per conferma.
Per impostare nuovamente il canale di emergenza di default (P8 DCS 50)
con la funzione Emergenza attiva (EMG lampeggiante sul display):
1. Premere il tasto MENU sino a visualizzare sul display EC on.
2. Premere ancora MENU e selezionare of
3. Premere il tasto PTT oppure attendere 5 secondi per conferma.
Se decidete di dedicare un altro canale qualunque alla funzione Emergenza, ricordatevi di non utilizzarlo anche per la normale comunicazione. Questo per evitare interferenze con la funzione Emergenza.
20 | Manuale d’uso Midland G9/G9E Plus
Page 21

Funzione Controllo portata
Questa funzione permette di verificare manualmente in ogni momento
se esiste almeno un’altra radio raggiungibile in portata.
Premendo due volte il tasto EMG viene inviata una richiesta di risposta,
sul canale in quel momento in uso, a tutte le radio in portata.
Se almeno una radio risponde, viene generato un tono audio sulla propria radio.
Se nemmeno una radio risponde (quindi nessuna radio in portata), non
viene generato alcun tono audio.
Questa funzione può essere utilizzata solo se la funzione “Out of Range”
non è attiva.
Funzione DUAL WATCH
Questa funzione permette di monitorare costantemente in ricezione un
secondo canale oltre a quello in uso.
Attivazione - Disattivazione
1. Premere il tasto MENU ripetutamente sino a visualizzare sul display
DW of.
2. Con i tasti ▲▼ selezionare il secondo canale che si desidera moni-
torare.
3. Premere il tasto PTT oppure attendere 5 secondi per conferma. Il di-
splay mostrerà alternativamente il canale in uso e il secondo canale
selezionato.
Per interrompere il Dual Watch, è sufficiente premere il tasto MENU.
Quando la radio riceverà un segnale su uno dei due canali monitorati, la
funzione “Dual Watch” viene momentaneamente sospesa, permettendo
la trasmissione e la ricezione sul canale in quel momento in uso.
Dopo 5 secondi, se non viene effettuata nessuna attività di trasmissione
o ricezione, la funzione Dual Watch riprende.
Questa funzione può essere attivata solo se la funzione “Emergenza” non
è attiva.
Manuale d’uso Midland G9/G9E Plus | 21
Page 22

Funzione Out-of-Range
Grazie a questa funzione è possibile verificare se una coppia di apparati
rimane sempre in portata. Dal momento in cui due radio vengono accoppiate, automaticamente si trasmettono a vicenda un codice di controllo
ogni 30 secondi.
Non appena questa trasmissione si interrompe ed uno dei due apparati
non riceve il codice di controllo per più di 2 volte consecutive, l’icona OUT
inizierà a lampeggiare sul display e la radio emetterà un suono di avviso.
Questa funzione può essere attivata solo se la funzione “Emergenza” non
è attiva.
Attivazione - Disattivazione
Attivare su entrambe le radio la funzione Out of Range:
1. premere il tasto MENU sino a visualizzare sul display “OUT” e “Or of”,
selezionare quindi con ▲▼ “Or on” (attivato)
2. Spegnere entrambe le radio
3. Riaccendere entrambe le radio contemporaneamente
Per disattivare la funzione premere il tasto MENU sino a visualizzare sul
display “OUT” e “Or on”, selezionare quindi con ▲▼ “Or of” (disattivato).
Confermare le impostazioni con il pulsante PTT o attendere 5 secondi.
Illuminazione del display
Se l’illuminazione ambientale non é sufficiente per leggere bene il display, premendo il pulsante EMG una volta (brevemente), così da illuminarlo per circa 5 secondi.
Tutte le volte che viene usato il pulsante MENU, il display si illumina automaticamente.
Risparmio energia
La funzione di risparmio automatico di energia consente di ridurre i consumi fino al 50%; se la radio non riceve alcun segnale per più di 7 secondi
la funzione viene attivata automaticamente.
Quando le batterie sono scariche, apparirà sul Display l’icona
sostituire le batterie al più presto o provvedere alla loro ricarica.
Questa funzionalità è attiva solo quando la funzione “EMG” è disattiva.
22 | Manuale d’uso Midland G9/G9E Plus
: occorre
Page 23

Ricarica delle batterie
1. Inserite la spina del cavo di ricarica in una presa di alimentazione di
rete CA e l’altra estremità nella presa della vaschetta di ricarica. Sono
necessarie 12/14 ore per una carica completa.
2. Inserite il ricetrasmettitore nella vaschetta in modo che si innesti sal-
damente al suo interno. Il led rosso di ricarica presente sulla parte
frontale della vaschetta si accende.
3. Al termine della carica, estraete il ricetrasmettitore dalla vaschetta e
scollegate la spina del cavo di ricarica dalla presa di alimentazione
di rete CA.
Non sovraccaricate le batterie! Quando le batterie sono completamente
cariche, il processo di carica non si blocca automaticamente. Non dimenticate quindi di staccare al più presto il ricetrasmettitore dal caricabatteria non appena é trascorso il tempo necessario, diversamente potreste
danneggiare le batterie e/o il ricetrasmettitore.
Non cercate di caricare batterie alcaline o comunque batterie non ricaricabili. Accertatevi che nel vano batterie dell’apparecchio, con il caricabatterie collegato, siano inserite esclusivamente batterie ricaricabili NI-MH o
il pacco batteria fornito in dotazione! Le batterie alcaline non sono ricaricabili. Batterie non idonee possono perdere liquido, esplodere o anche
bruciare e causare gravi danni!
L’utilizzo di un caricabatterie non originale puó causare danni al vostro
apparecchio o causare esplosioni e lesioni personali.
Non gettate mai le batterie nel fuoco, né avvicinatele a sorgenti di calore:
possono causare esplosioni e lesioni personali. Smaltite le batterie esclusivamente seguendo le normative locali.
Non mescolate assieme batterie vecchie e nuove e/o di tipo diverso e/o
utilizzate in modo diverso.
Manuale d’uso Midland G9/G9E Plus | 23
Page 24

Specifiche tecniche
Canali G9 PLUS 8+16 preprogrammati (PMR446)
+ 1~69 (LPD)
G9E PLUS 8+16 preprogrammati (PMR446)
Generazione delle frequenze sintetizzatore PLL
Copertura di frequenza 446.00625 ÷ 446.09375MHz (PMR446)
433.075 - 434.775MHz (LPD)
Passo Canalizzazione 12.5 KHz (PMR446); 25 KHz (LPD)
Alimentazione 6+/- 10% VCC
Temperatura operativa da -20° a +55°
Dimensioni (senza antenna) 58 (L)x 110 (A)x32(P) mm
Peso (senza batterie) 114gr
Ciclo di funzionamento TX 5%, RX 5%, stand-by 90%
Trasmettitore
Potenza di uscita 10 o 500 mW (Selezionabile)
Tipo di modulazione FM
Reiezione Spurie rispetta le normative ETSI
Ricevitore
Sensibilità a 12dB Sinad 0,35μV
Reiezione canali adiacenti 70dB
Potenza di uscita audio 300mW a 10% THD
Frequenze intermedie 1°:21,4 MHz ; 2°:450 KHz
Presa per microfono esterno e
ricarica
Presa per altoparlante esterno jack mono 3.5 mm
jack stereo 2,5 mm
24 | Manuale d’uso Midland G9/G9E Plus
Page 25

Le specifiche sono soggette a modifica senza preavviso.
Noi, CTE International dichiariamo che il prodotto MIDLAND G9/G9E Plus
è conforme ai requisiti essenziali e alle disposizioni della Direttiva del
Consiglio 99/05/CE.
ATTENZIONE: L’adattatore di alimentazione è il dispositivo di disconnessione dell’apparato; la base di carica della corrente deve restare vicino
all’apparato e facilmente accessibile.
Manuale d’uso Midland G9/G9E Plus | 25
Page 26

Prodotto o importato da:
CTE INTERNATIONAL s.r.l.
Via. R.Sevardi 7- 42124 Reggio Emilia Italia
www.cte.it - www.midlandeurope.com
L’uso di questo apparato può essere soggetto a restrizioni nazionali (per l’uso in Italia in
modalità PMR446, è richiesta una dichiarazione di possesso come da D.L. 259 del 01/08/03
art. 99 comma 3; All. 25 art. 36 e successivi aggiornamenti) . Prima dell ’uso leggere
attentamente le istruzioni. Se il prodotto contiene batterie: non gettare nel fuoco, non
disperdere nell’ambiente dopo l’uso, usare gli appositi contenitori per la raccolta.
Produced or imported by:
CTE INTERNATIONAL s.r.l.
Via. R.Sevardi 7 42124 Mancasale Reggio Emilia Italy
Imported by:
ALAN - NEVADA UK
Unit 1 Fitzherbert Spur Farlington Portsmouth Hants.
P06 1TT - United Kingdom
www.nevada.co.uk
The use of this transceiver can be subject to national restrictions. Read the instructions
carefully before installation and use. If the product contains batteries: do not throw the
battery into fire. To disperse after use, throw into the appropriate containers.
Importado por:
ALAN COMMUNICATIONS, SA
C/Cobalt, 48 - 08940 Cornellà de Llobregat (Barcelona - España)
Tel: +34 902 384878 Fax: +34 933 779155
www.midland.es
El uso de este equipo puede estar sujeto a la obtención de la correspondiente autorización administrativa. Lea atentamente las instrucciones antes de usar el equipo. si el
producto contiene pilas o baterías no las tire al fuego ni las disperse en el ambiente
después de su uso, utilice los contenedores apropiados para su reciclaje.
Vertrieb durch:
ALAN ELECTRONICS GmbH
Daimlerstraße 1K - D-63303 Dreieich Deutschland
www.alan-electronics.de
Die Benutzung dieses Handfunkgerätes ist von den landesspezifischen Bestimmungen
abhängig. Vor Benutzung Bedienungsanleitung beachten. Bei Verwendung von Batterien beachten Sie bitte die Umweltbestimmungen. Batterien niemals ins offene Feuer
werfen, und nur in dafür vorgesehene Sammelbehälter entsorgen.
WWW.MIDLANDEUROPE.COM |
Page 27
Midland
G9/G9E Plus
” Instruction guide
PMR446+LPD/PMR446 |
Page 28

Index
Content 4
Coverage/range 4
Batteries and battery compartment 5
Warnings 5
Features 6
Main characteristics 7
Versions 7
Description of the controls and functions 8
Display 8
Radio 10
Operations 12
Turning on/off 12
Selecting the PMR466 or LDP band 12
Channel selection 12
Displaying the channel/sub audio tone 12
Transmission and reception 13
Transmitting TOT Setting 13
VOLUME adjustment 13
“CALL” 13
“Emergency” 13
Page 29

MON (Monitor) function / Squelch 14
Scanning all the channels 14
“MENU” key 14
Channel selection 15
CTCSS/DCS tone setting 15
Hi/low power selection (only in PMR446 band) 16
VOX function 17
Vibra-Call function 18
CALL feature 18
ROGER BEEP (End transmission tone) 18
Keypad Beep 18
Emergency Call function 19
Activating / Deactiving the Emergency feature 19
Changing the emergency channel 19
Manual Out of range function 20
Dual Watch 20
Automatic Out-of-Range 21
Display illumination 21
Power save 21
Battery recharge 22
Technical specifications 23
Midland G9/G9E Plus instruction guide | 3
Page 30

Thanks for choosing Midland! Midland G9 Plus is a portable transceiver
that is free use in almost all European countries.
Combining the latest technology in radio communication along with a sturdy mechanical frame, the Midland G9 Plus makes the ideal and effective
solution for the professionals who need to stay in touch with colleagues in
construction sites and buildings.
Midland G9 Plus is available in two versions:
• Dual Band (PMR446/LPD)
• E version (PMR446 only)
This manual is referred to both models and you will find highlighted the
differences between the two versions.
Content
N° 1 Midland G9 Plus
N° 1 Single desktop charger
N° 1 Wall adaptor
N° 4 1800 mAh AA NiMH rechargeable batteries
N° 1 Belt clip
Coverage/range
The maximum range depends on terrain condition and is obtained during use in an open space.
The only limitation to maximum possible range are environmental factors such as blockage caused by trees, buildings, or other obstructions.
Inside a car or a metallic constructions, the range can be reduced. Normally the coverage in the city, with buildings or other obstructions is
about 1 or 2 Km. In open space but with obstructions like trees, leaves
or houses the maximum possible range is about 4-6 Km. In open space,
without obstructions and in sight, like for example in mountain, the coverage can be more than 12 Km.
4 | Midland G9/G9E Plus instruction guide
Page 31

Batteries and battery compartment
The transceiver accepts the supplied rechargeable batteries or 4 AA alkaline batteries. To open the battery compartment: with the back of the
radio facing you, unhook the battery holder in the lower part of the radio
and gently slide the cover. Insert the battery observing the polarity and
place the cover again.
Attention: the batteries must be recharged before the first use.
Warnings
• BATTERIES - Strictly follow all the warnings on the batteries stated at
chapter “Battery recharge”.
• Do not open the radio for any reason! The radio’s precision mechanics and electronics require experience and specialized equipment;
for the same reason, the radio should under no circumstances be realigned as it has already been calibrated for maximum performance.
Unauthorized opening of the transceiver will void the warranty.
• Do not use detergents, alcohol, solvents, or abrasives to clean the
equipment. Just use a soft, clean cloth. If the radio is very dirty, slightly
dampen the cloth with a mixture of water and a neutral soap.
Midland G9/G9E Plus instruction guide | 5
Page 32

Features
• New function ‘Side Tone’: End transmission noise muffler
• “Dual PTT” feature for high or low output power. Midland G9 Plus is
equipped with a Dual PTT key. Thanks to this brand new feature, it is
possible to use the high power only when it is really necessary, enabling in this way a high reduction of the battery consumption.
• “Emergency CALL” feature. Midland G9 Plus introduces an innovati-
ve and important feature: the channel dedicated to the emergencies.
Radio communications usually happen between two or more users
which are tuned on the same channel: it’s not possible to transmit
or receive to/from different channels. But thanks to the “Emergency”
function, you can also keep a check on the Emergency channel: all
users having a Midland G9 Plus can communicate on the tuned channel and at the same time can receive/transmit Emergency messages
on the dedicated channel. Simply keep pressed the EMG button for 3
seconds and an emergency CALL will be sent to all the G9 Plus within
the range: they will be automatically tuned on the “EC” channel (Emergency Channel).
• “Manual Out of range” feature: just press twice the EMG button and
you will verify whether there are some radios within the range of your
equipment.
• “Vox TalkBack” feature: if one radio is continuously transmitting in
VOX, the Vox TB will automatically stop the transmission after 20” to
allow the transmission to the other users as well.
6 | Midland G9/G9E Plus instruction guide
Page 33

Main characteristics
• Power: 500mW (PMR446); 10mW (LPD)
• Operating temperature: from -20° to +55° C
• Side Tone
• 38 CTCSS tones/104 DCS codes
• Dual PTT key: high/low output power
• Emergency CALL
• Out of range control
• VOX adjustable in 3 levels and with “TalkBack”
• VibraCALL
• Keypad lock
• Auto power save: automatic current economy circuit
• Low battery indicator
• Dual Watch
• CALL with 5 selectable melodies
• SCAN
• Monitor
• Out of Range
• Roger beep
• High/Low power
• LCD Display with backlight
• Power supply: 4 AA NiMH rechargeable batteries (or an optional 800
mAh NiMH battery pack)
• 2pin accessory plug
Versions
• G9 Plus Dual band (PMR446/LPD)
24 PMR446 channels (8+16 pre-set)/69 LPD channels
• G9E Plus (PMR446 only)
24 PMR446 channels (8+16 pre-set)
Midland G9/G9E Plus instruction guide | 7
Page 34
Description of the controls and functions
Display
8
6
4
7
5
3
2
1
14
8 | Midland G9/G9E Plus instruction guide
11
9
10
12
13
Page 35
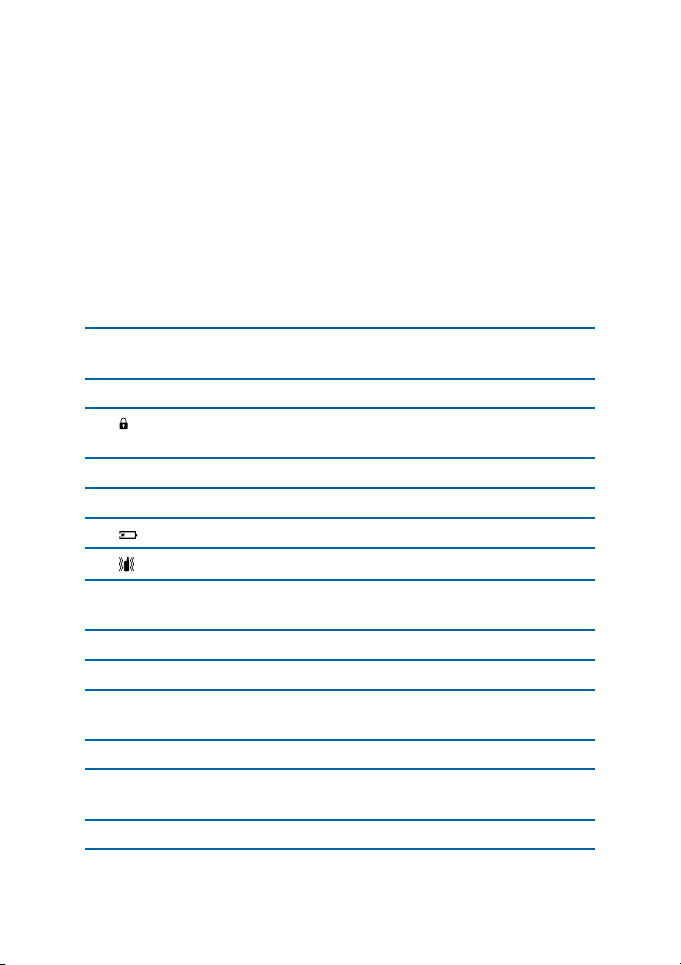
Your Midland G9 Plus keeps you constantly updated about its operational status through a Liquid Crystal Display (LCD). The symbols and their
corresponding parameters that may appear, according to the operational
status of the device, are described as follows:
1. CHANNEL These two large digits indicate the selected
channel
2. VOX VOX function activated
3.
4. EMG Emergency function activated
5. DW Dual Watch activated
6.
7.
8. OUT Indicates if the Automatic Out of Range function
9. RX Reception mode
10. TX Indicates the transmission (PTT pressed)
11. H(High) / L(Low) High or low power selection. The output power
12. CTCSS/DCS Indicate the type of sub audio tone selected
13. CTCSS/DCS tone These three small digits indicate the code of the
14. ROGER Roger Beep activated
This symbol appears when the keypad lock is
activated
Indicates the battery status
Vibra-Call function activated
looses contact with the other radios
of the big PTT depends on your selection
CTCSS/DCS tones selected (1-38 / 1-104)
Midland G9/G9E Plus instruction guide | 9
Page 36
Radio
19
20
18
17
CALL
EMG
21
22
23
16
MENU
24
15
10 | Midland G9/G9E Plus instruction guide
Page 37

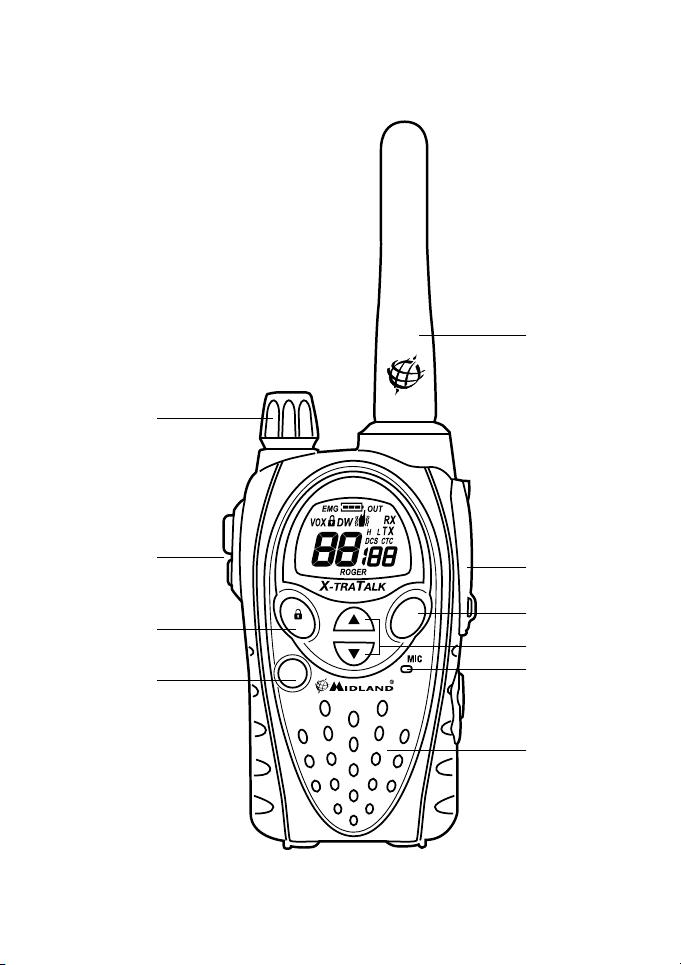
Refer to this picture to identify the various parts of the device
15. Built-in speaker Here is where the speaker is housed.
16. MENU button Press this button to enter the radio’s MENU.
17.
CALL/
button
18. PTT (push to talk) The PTT key has a dual function, as it is compo-
19. VOLUME knob On/off and VOLUME adjustment.
20. ANTENNA Receives and transmits radio signals.
21. Accessory socket (under protective cover) To connect to external
22. EMG button To activate the Emergency and the Manual Out
23. ▲▼ buttons To change the setting within the MENU
24. Built-in
microphone
To send a CALL on the selected channel. If you
keep it pressed for about 5 seconds, the keypad
lock is activated.
sed by 2 parts: the larger and bigger side of the
PTT key, allows the transceiver to send with high
or low power (depending on the setting of the
MENU); while the small PTT (Boost) allows the
transceiver to transmit always with high power.
audio devices such as microphones, chargers,
etc. (2pin type)
of range functions.
Here is where sound is picked up by the microphone.
Midland G9/G9E Plus instruction guide | 11
Page 38

Operations
Turning on/off
To turn on the transceiver, turn the VOLUME knob clockwise until you
hear it clicks. To turn off the transceiver, turn the knob counter-clockwise.
Selecting the PMR466 or LDP band
(only for the dual band version)
Midland G9 Plus (Dual band) is pre-set at factory on the PMR446 band.
To switch to the LPD band, keep pressed the MENU button until the LPD
shows channel ‘1’.
To return to the PMR446 band, keep pressed the MENU button again,
until the LCD shows ‘P1’.
This procedure disables the “EMG” function; therefore if you change the
frequency band, remember to activate the Emergency function again
(see paragraph “Emergency function”).
Channel selection
Press the MENU button. The number of the channel will start flashing on
the display.
Press the scroll buttons ▲▼ till you select the desired channel.
Press the PTT button to confirm, or wait for 5 seconds.
According to the version you bought, you can choose amongst the following channels:
• Dual band version: PMR446 from P1 to P8 and from 9p to 24p (preset) / LPD from 1 to 69.
• E version (PMR446 only): from P1 to P8 and from 9p to 24p (pre-set)
Channel P8 has been set at factory for the “Emergency” function; we suggest that you do not use it for general communications!
Displaying the channel/sub audio tone
To momentarily display the PMR446 channel and the subadio tone used
in the pre-set channels, go to the desired channel (from 9p to 24p) and
keep pressed the ▼ for 3 seconds.
12 | Midland G9/G9E Plus instruction guide
Page 39

Transmission and reception
To transmit keep the PTT button firmly pressed (it is not important what
part of it). Wait for a fraction of a second then speak normally in the direction of the microphone and hold the device at a distance of about 5 cm;
TX will appear on the display.
When you have finished, release the PTT.
When the radio is in reception mode (PTT released) you will automatically receive any communication. RX will be displayed.
By default the output power set is “H-high”, so independently on which
PTT key you press (small or big)the sending will be with high power.
If you use an external microphone, the PTT on it will follow the same PTT
setting of the radio.
Transmitting TOT Setting
The TOT function is used to prevent a too long transmission. This function
temporarily blocks transmissions if the radio has been used beyond the
maximum time permitted. Once reached the preset timer, the radio will
be forced in reception mode.
VOLUME adjustment
Rotate the VOLUME knob till you reach the desired level.
“CALL”
Push the CALL button and you will send an audio signal to the users tuned on the same channel; you can choose amongst different CALL tones.
“Emergency”
When the Emergency function is enabled (EMG blinks on the display)
keep pressed EMG for 3 seconds and you send an emergency CALL to
the other G9 Plus within your range.
The Emergency function is activated by default.
Midland G9/G9E Plus instruction guide | 13
Page 40

Keypad lock
Keep pressed CALL/
confirmation. Only PTT, EMG and CALL/
function, keep pressed again CALL/
for about 5 seconds. and
remain active. To disable this
for 5 seconds approx.
will be displayed as
MON (Monitor) function / Squelch
The Monitor button is for temporarily excluding (opening) the squelch,
in order to listen to signals that are too weak to keep the squelch permanently opened.
To activate the monitor function, keep pressed for about 2 seconds both
▲▼ at the same time. Follow the same procedure to deactivate the function, or switch off and on the radio.
When MON is active, you will probably hear a constant background noise.
You can activate the Monitor feature only if the “Emergency” function is
disabled.
Scanning all the channels
Midland G9 Plus can automatically search for signals throughout the
bands by scanning the channels in rapid sequence. This function is useful
to find out any active channel.
When a signal is detected, the scanning pauses on that channel for 5 seconds.
Press ▲ for 2 seconds: the scanning will start.
To stop it, push PTT: the Midland G9 Plus will go back to the channel
from which the scanning originally started.
You can activate the scanning feature only if the “Emergency” function
is disabled.
“MENU” key
The following features can be selected by using the “MENU” button:
› Channel selection
› CTCSS tone setting
› DCS tone setting
› High/low power selection (only in the PMR446 band)
› VOX
› VibraCALL function
14 | Midland G9/G9E Plus instruction guide
Page 41

› Call melodies
› Roger Beep
› Keypad Beep
› Emergency channel
› Dual Watch function
› Out of Range
Channel selection
1. Press the MENU button. The number of the channel will start
flashing on the display.
2. Press the scroll buttons ▲▼ till you select the desired channel.
3. Press the PTT button to confirm, or wait for 5 seconds.
According to the version you bought, you can choose amongst the following channels:
• Dual band version: PMR446 from P1 to P8 and from 9p to 24p (preset) / LPD from 1 to 69.
• E version (PMR446 only): from P1 to P8 and from 9p to 24p (pre-set)
Channel P8 has been set at factory for the “Emergency” function; we suggest that you do not use it for general communications!
CTCSS/DCS tone setting
CTCSS and DCS tones are similar to access codes and enable the radio
to communicate only with the users that are tuned on the same channel
and have set the same code. For each channel, you can set up to 38 CTCSS
and 104 DCS tones.
These tones can be set on the following channels:
• Dual band version: only on the 8 main PMR446 channels (from P1 to
P8) and on the 69 LPD channels.
• E version (PMR446 only): only on the 8 main PMR446 channels (from
P1 to P8)
For both, the pre-set channels from 9p to 24p cannot be modified.
Activating the CTCSS tones:
1. Turn on the unit.
2. Select the desired channel by pushing the MENU button and the
▲▼ channels.
3. Press the MENU button till the display shows CTC and the CTCSS
Midland G9/G9E Plus instruction guide | 15
Page 42

tone blinks on the right (“of”= no code – default condition).
4. Select the desired CTCSS tone by pushing ▲▼.
5. To confirm the setting, push PTT or wait for 5 seconds.
Deactivating the CTCSS tones:
If you don’t want to use the CTCSS tones, follow these steps:
1. Select the desired channel
2. Press the MENU key till the display shows the CTCSS tone blinking
on the left;
3. Select “of” by means of ▲▼.
Activating the DCS codes:
1. Turn on the unit.
2. Select the desired channel by pressing MENU and ▲▼ keys.
3. Push the MENU button again till the display shows DCS and the tone
code blinks on the right (“of”=no code – default condition).
4. Select the desired DCS code by pushing ▲▼.
5. To confirm the setting, press the PTT or wait for 5 seconds.
Channel P8 with DCS tone 50 (P850) has been set at factory for the “Emergency” function; do not use it for general communications!!
Deactivating the DCS codes:
1. Select the desired channel.
2. Press the MENU key till the display shows the channel in use and the
DCS code blinks on the right.
3. Select “of” by pushing ▲▼.
Hi/low power selection (only in PMR446 band)
1. To select the power level, press the MENU button till the display
shows Pr.
2. Use ▲▼ to select L (low power) or H (high power).
3. To confirm your selection, push PTT or wait for 5 seconds.
When the batteries are fully charged, the high power is 500 mW (ERP),
while the low is 10mW (ERP).
If your radio has to operate within a short range, you can select the low
power and therefore extend the battery life.
On LPD channels (only for G9 Plus Dual band version) the output power
16 | Midland G9/G9E Plus instruction guide
Page 43

is always 10 mW (ERP).
• PMR446 channels: The selection of high or low power influences the
use of the PTT key. If you choose “H” (high power), by pressing the
PTT key, regardless of what part of it, the transceiver transmit with
high power. If you choose “L” (low power), by pressing the big PTT, the
transceiver will transmit with low power; while by pressing the small
PTT it will transmit with high power.
• LPD channels: the high/low output power selection is not available
on LPD channels; so the two PTT transmit always with high power
(note for G9 Plus Dualband version).
WARNING: to optimize the battery consumption, it is necessary to set the
Output power of the menu as “L-low”. In this way, pressing the Boost PTT,
you send with high power only when you really need. As by default the
Output power is “H-high”; so it is really recommended to change this parameter to “L-low”.
VOX function
Midland G9 Plus enables hands free conversations through the VOX function: just speak in the direction of the microphone and the communication will be automatically activated.
The VOX sensitivity can be adjusted in 3 different levels.
You can enable the VOX function with or without accessories.
The fourth level activated is the Vox TalkBack: if one radio is continuously
transmitting in VOX, the Vox TB will automatically stop the transmission
after 20 seconds to allow the transmission to the other users as well.
To activate the VOX function press the MENU button till VOX appears on
the display.
Use ▲▼ to select the sensitivity levels:
• Of: Off;
• 1: High
• 2: Middle
• 3: Low
• 4: Talk Back (with high sensitivity)
To confirm your selection, press PTT or wait for 5 seconds.
To disable the VOX function, follow the procedure here above indicated
and select oF.
Midland G9/G9E Plus instruction guide | 17
Page 44

Vibra-Call function
Midland G9 Plus is equipped with the “Vibra-Call” feature, which provides a silent alert for incoming calls.
1. To activate this feature, press the MENU button until the display
shows
2. Use the ▲▼ buttons to disable or enable this feature (on: enables,
oF:disables).
3. Push PTT [11] to confirm or wait for 5 seconds.
.
CALL feature
Midland G9 Plus can send 5 different CALL tones. To send this audio signal to other users, press the CALL/
To select the CALL tones:
1. Press MENU, until the display shows “CA” and the active tone code.
2. By pushing ▲▼ you will hear the 5 pre-set melodies.
3. Confirm by pressing PTT or wait for 5 seconds.
key.
ROGER BEEP (End transmission tone)
When the PTT button is released, the radio will beep to confirm to other
users that your transmission has finished.
In the Midland G9 Plus this function is factory disabled.
To activate it:
1. Press the MENU button until the display shows “rb of”;
2. Using the scroll buttons ▲▼ select “on” and “rb on” will be displa-
yed;
3. To confirm the roger beep activation, press PTT or wait for 5 secon-
ds.
Keypad Beep
Everytime a button is pressed, you will hear a beep.
To disable the beeps, follow this procedure:
1. Press MENU, till the display shows “bP on”.
2. Push ▲▼ till “bP of” is displayed.
3. Confirm your selection by pushing PTT or wait for 5 seconds.
In this way, all beeps and tones are disabled.
To enable the keypad beep, repeat this procedure and select “bP on”
18 | Midland G9/G9E Plus instruction guide
Page 45

Emergency Call function
The Midland G9 Plus dedicates a channel to the Emergency Calls: all the
G9 Plus operating within your range, even if tuned on different channels,
can receive/transmit Emergency messages on that channel.
If you keep pressed the EMG button, the communications automatically
switch to the emergency channel (“EC” on the display). An audio signal
will be sent and all the G9 Plus operating within the range will automatically go to the Emergency channel (“EC”).
If you have disabled this function, you won’t receive/transmit any Emergency Call.
When the radio is operating on the Emergency channel (EC displayed), all
the buttons except PTT and CALL are disabled.
The G9 Plus will return to the channel in use after one minute from the
last transmission.
To return immediately, push EMG. Now you can use all the MENU functions.
Activating / Deactiving the Emergency feature
When you switch on the unit, the Emergency function is activated, but
you can disable and enable it again:
1. Press MENU till the display shows EC on.
2. Select EC of by using ▲▼ .
3. Confirm your selection by pushing PTT or wait for 5 seconds.
When the Emergency function is activated (EMG blinking on the display)
the following functions cannot be used: Scan, Monitor, Dual Watch, Out
of Range.
Changing the emergency channel
The emergency channel originally preset is P8 DCS 50; but you can change it according to your needs.
Important: be sure that the Emergency function is active! (EMG blinking).
If you decide to change the channel dedicated to the Emergency function,
do not forget to make the same change to all the radios!
1. Press the MENU button until the display shows EC on.
2. Push MENU again (of displayed) and select the desired channel by
means of ▲▼.
Midland G9/G9E Plus instruction guide | 19
Page 46

3. To confirm press PTT or wait for 5 seconds.
Important: be sure that the Emergency function is active! (EMG blinking).
If you decide to change the channel dedicated to the Emergency function,
do not forget to make the same change to all the radios!
To set again the original Emergency channel (P8 DCS 50)
1. Press the MENU button until the display shows EC on.
2. Push MENU again and select of
3. To confirm press PTT or wait for 5 seconds.
If you dedicate any of the standard channels to the Emergency function,
remember to use it only for this purpose, otherwise you will cause interferences.
Manual Out of range function
This function allows you to know if there are any radios within your range.
By pushing EMG twice, you will send a request of acknowledge to the
other G9 Plus operating within your range and tuned on the same channel. If any radio replies, it means that it’s within your range and you will
receive an audio tone for confirmation.
This function can be used only if the “Automatic Out of Range” feature is
not active.
Dual Watch
The Dual Watch allows you to monitor constantly two channels of your
choice at the same time.
Enabling - Disabling
1. Press the MENU button until the display shows DW of.
2. Select the second channel to monitor by pushing ▲▼.
3. To confirm your selection, press PTT or wait for 5 seconds.
4. The display will alternately show the channel in use and the second
channel to monitor.
5. To stop the function, simply press MENU.
When the transceiver detects a transmission on one of the two channels,
the Dual Watch temporarily pauses, remains tuned for 5 seconds on the
corresponding channel, giving the user a chance to respond to a CALL.
20 | Midland G9/G9E Plus instruction guide
Page 47

After this pause, the Dual Watch starts again.
This function can be activated only if the “Emergency” feature is disabled.
Automatic Out-of-Range
By setting this mode a pair of G9 Plus is transmitting every 30 seconds a
data control code. As soon as the contact between both units is getting
lost and one radio doesn’t receive this data control code twice consecutively, the icon OUT starts flashing in the display and you will hear a beep
tone.
This function can be activated only if the “Emergency” feature is disabled.
Activating – Deactivating
1. Press MENU till the display shows “OUT” and “Or of”, select “Or on”
(activated) with the ▲▼ buttons.
2. Switch off both radios.
3. Turn them on at the same time.
To disable this function:
1. Push MENU till “OUT” and “Or on” are displayed;
2. Select “Or of” (disabled) with the ▲▼ buttons.
3. Confirm your selection by pushing PTT or wait for 5 seconds.
Display illumination
If there is insufficient light to read the display, press briefly EMG and the
display illumination will activate for about 5 seconds. Every time the
MENU is pressed, the display will automatically light up.
Power save
The battery power saving feature enables a reduction in the consumption
of up to 50%; power saving comes on automatically when the transceiver
does not receive any signal for more than 7 seconds. When the batteries
are discharged, the icon
or recharge the battery pack.
The power save is active only if the Emergency function is disabled.
Midland G9/G9E Plus instruction guide | 21
appears on the display: replace the batteries
Page 48

Battery recharge
Connect the socket of the wall adaptor to a mains power socket and insert the jack of the wall adaptor into the desktop charger plug. It takes
12/14 hours to fully recharge.
Place your transceiver into the cradle of the desktop charger. The red led
of the charger will light up.
When charging is complete take the transceiver out of the cradle and
detach the socket of the wall adaptor from the mains.
Do not overcharge the batteries! When these are fully charged the charging process does not stop automatiCALLy. Do not forget therefore, to remove the transceiver from the charger as soon as the batteries are charged, otherwise the radio and batteries may be damaged.
Do not try to charge alkaline batteries or non rechargeable batteries.
Make sure that when you charge the radio, only rechargeable NI-MH
batteries or the supplied battery pack should be contained in the battery
compartment! Alkaline batteries are not rechargeable! Batteries which
are not suitable to be recharged may leak, explode or even burn and cause damage!
Using a different battery charger other than the one specified can cause
damage to your device or may even cause explosions and personal injuries.
Do not throw batteries into fire or place them near heat as this may cause
explosions or personal injuries. Dispose of the batteries according to the
procedures set out by local regulations.
Do not mix old and new batteries or batteries of different types or batteries which have been used in different manners.
22 | Midland G9/G9E Plus instruction guide
Page 49

Technical specifications
Channels G9 PLUS 8+16 preprogrammed (PMR446) + 1~69
(LPD)
G9E PLUS 8+16 preprogrammed (PMR446)
Frequency range 446.00625 ÷ 446.09375MHz (PMR446)
433.075 ÷ 434.775MHz (LPD)
Channel spacing 12.5 KHz (PMR446); 25 KHz (LPD)
Power supply 6+/- 10% Vdc
Temperature from -20° to +55°C
Dimensions (w/o batteries) 58 (L)x 110 (H)x32 (D) mm
Weight (w/o batteries) 114gr
Duty cycle TX 5%, RX 5%, stand-by 90%
Transmitter
Output power 10 or 500 mW (Selectable)
Modulation FM
Spurious rejection within European legal terms
Receiver
Sensitivity @ 12dB Sinad 0,35μV
Adjacent channel rejection 70dB
Audio output power 300mW @ 10% THD
Intermediate frequencies 1st :21,4 MHz ; 2nd:450 KHz
Jack for ext.mike and recharge stereo 2,5 mm
Jack for ext. speaker mono 3.5 mm
Midland G9/G9E Plus instruction guide | 23
Page 50

Specifications are subject to change without notice.
Hereby, CTE International declares that this G9 Plus is in compliance with
the essential requirements and other relevant provisions of Directive
1999/5/EC.
WARNING: Direct plug-in ac/dc power supply must be used for disconnecting the transceiver from the mains; the desktop charger must be positioned close to the unit and easily accessible.
24 | Midland G9/G9E Plus instruction guide
Page 51

Midland G9/G9E Plus instruction guide | 25
Page 52

Prodotto o importato da:
CTE INTERNATIONAL s.r.l.
Via. R.Sevardi 7- 42124 Reggio Emilia Italia
www.cte.it - www.midlandeurope.com
L’uso di questo apparato può essere soggetto a restrizioni nazionali (per l’uso in Italia in
modalità PMR446, è richiesta una dichiarazione di possesso come da D.L. 259 del 01/08/03
art. 99 comma 3; All. 25 art. 36 e successivi aggiornamenti) . Prima dell ’uso leggere
attentamente le istruzioni. Se il prodotto contiene batterie: non gettare nel fuoco, non
disperdere nell’ambiente dopo l’uso, usare gli appositi contenitori per la raccolta.
Produced or imported by:
CTE INTERNATIONAL s.r.l.
Via. R.Sevardi 7 42124 Mancasale Reggio Emilia Italy
Imported by:
ALAN - NEVADA UK
Unit 1 Fitzherbert Spur Farlington Portsmouth Hants.
P06 1TT - United Kingdom
www.nevada.co.uk
The use of this transceiver can be subject to national restrictions. Read the instructions
carefully before installation and use. If the product contains batteries: do not throw the
battery into fire. To disperse after use, throw into the appropriate containers.
Importado por:
ALAN COMMUNICATIONS, SA
C/Cobalt, 48 - 08940 Cornellà de Llobregat (Barcelona - España)
Tel: +34 902 384878 Fax: +34 933 779155
www.midland.es
El uso de este equipo puede estar sujeto a la obtención de la correspondiente autorización administrativa. Lea atentamente las instrucciones antes de usar el equipo. si el
producto contiene pilas o baterías no las tire al fuego ni las disperse en el ambiente
después de su uso, utilice los contenedores apropiados para su reciclaje.
Vertrieb durch:
ALAN ELECTRONICS GmbH
Daimlerstraße 1K - D-63303 Dreieich Deutschland
www.alan-electronics.de
Die Benutzung dieses Handfunkgerätes ist von den landesspezifischen Bestimmungen
abhängig. Vor Benutzung Bedienungsanleitung beachten. Bei Verwendung von Batterien beachten Sie bitte die Umweltbestimmungen. Batterien niemals ins offene Feuer
werfen, und nur in dafür vorgesehene Sammelbehälter entsorgen.
WWW.MIDLANDEUROPE.COM |
Page 53
Midland
G9/G9E Plus
” Bedienungsanleitung
PMR446+LPD/PMR446 |
Page 54

Inhaltsverzeichnis
Inhalt 2
Reichweite 3
Batterien und Batteriefach 3
Warnhinweise 3
Eigenschaften 4
Die wichtigsten Eigenschaften 5
Versionen: 5
Beschreibung der Bedienungen und Funktionen 6
Anzeige 6
Funkgerät 8
Inbetriebnahme 10
An-/Ausschalten 10
PMR466 oder LDP Band auswählen 10
Auswahl der Kanäle 10
Anzeigen der Kanal/Subtöne 11
Übermittlung und Empfang 11
Senden TOT-Einstellung 11
Lautstärkeregelung 11
“CALL” 11
“Notruf“ 12
Tastatursperre 12
MON (Monitor) Funktion/ Squelch (Rauschsperre) 12
Page 55

Alle Kanäle absuchen 12
„MENÜ“ Taste 13
Auswahl der Kanäle 13
CTCSS/DCS Toneinstellung 13
CTCSS-Töne deaktivieren: 14
Hohe/niedrige Leistungsauswahl 15
VOX-Funktion 16
Vibrationsalarm 16
CALL-Funktion 16
ROGER Piepton (Ton für Übertragungsende) 17
Tastatur-Piepton 17
Notruf 17
Notrufkanal wechseln 18
Den ursprünglichen Notrufkanal (P8 DCS 50) einstellen 18
Manuelle Reichweitenkontrolle 19
Dual Watch (2-Kanalüberwachung) 19
Automatische Reichweitenkontrolle 20
Displayhelligkeit 20
Stromsparfunktion 20
Batterie aufladen 21
Technische Daten 22
Midland G9/G9E Plus Bedienungsanleitung | 1
Page 56

Vielen Dank, dass Sie sich für Midland entschieden haben! Das tragbare Midland G9 Plus Funkgerät kann in fast allen europäischen Ländern
kostenfrei eingesetzt werden. Weitere Informationen finden Sie auf der
Karte „Nutzungseinschränkungen“
Das Midland G9 Plus ist eine Kombination neuester Funktechnologie zusammen mit einem stabilen, mechanischen Gehäuse und ist die ideale und
effektive Lösung für Profis, die in Kontakt mit ihren Kollegen bleiben müssen
(Baustellen, Gebäude, Hotel, Messen, Show-Business). Sein robustes Gehäuse, die Bedienerfreundlichkeit und das einfache Design machen es ideal für
die Benutzung in allen Bereichen.
Midland G9 Plus ist in zwei Ausführungen verfügbar:
• Dual Band (PMR446/LPD)
• E Version (nur PMR446)
Dieses Handbuch bezieht sich auf beide Modelle; die Unterschiede
zwischen beiden Versionen sind hervorgehoben.
Inhalt
N° 1 Midland G9 Plus
N° 1 Einzel-Tischladegerät
N° 1 Netzadapter
N.° 4 x 1800 mAh aufladbare NiMH Akkus
N° 1 Gürtelklemme
2 | Midland G9/G9E Plus Bedienungsanleitung
Page 57

Reichweite
Die maximale Reichweite ist abhängig von der Geländeform und wird im
freien Gelände erreicht.
Die maximale Reichweite kann durch Umgebungsfaktoren, wie Behinderung durch Bäume, Gebäude oder andere Blockierungen eingeschränkt
sein. Innerhalb eines Autos oder einer Metallkonstruktion, kann der
Empfang reduziert sein. Die Reichweite in der Stadt, zwischen Gebäuden
oder anderen Hindernissen, ist ca.1 bis 2 km. Die maximale Reichweite im
Freien mit Hindernissen, wie Bäume, Blätter oder Häuser ist ca. 4-6 km. Im
freien Gelände ohne Hindernisse und Sichtweite, z.B.in Bergen, kann der
Empfang mehr als 12 km
Batterien und Batteriefach
Das Gerät akzeptiert die mitgelieferten aufladbaren Akkus oder wahlweise 4 Stück AA Alkaline Batterien. Öffnen des Batteriefachs: lösen Sie den
Batteriehalter am unteren Teil der Rückseite des Funkgerätes und öffnen
Sie die Abdeckung durch leichtes Schieben. Setzen Sie, unter Berücksichtigung der richtigen Polarität, die Batterie ein und schließen die Abdeckung.
Achtung: der mitgelieferte Aufladbare Akku muss vor Gebrauch geladen
werden.
Warnhinweise
• BATTERIEN - Halten Sie sich streng an alle Warnhinweise für Batterien
im Kapitel „Batterie aufladen“.
• Das Funkgerät darf auf keinen Fall geöffnet werden! Die präzise Mechanik und Elektronik des Funkgerätes erfordern Erfahrung und spezielle Geräte. Aus diesem Grund und da es bereits auf maximale Leistung kalibriert ist, darf das Funkgerät nicht neu eingestellt werden.
Bei nicht genehmigtem Öffnen des Funkgerätes erlischt die Garantie.
• Kein Reinigungsmittel, Alkohol, Lösungsmittel oder Schleifmittel zur
Reinigung verwenden. Benutzen Sie nur ein weiches sauberes Tuch.
Bei starker Verschmutzung des Funkgerätes befeuchten Sie das Tuch
mit Wasser und neutraler Seife.
Midland G9/G9E Plus Bedienungsanleitung | 3
Page 58

Eigenschaften
• Neue Eigenschaft ‘Rauschunterdrückung für Übertragungsende’
• „Dual PTT“ Sendetaste für Senden mit hoher oder niedriger Leistung.
Das Midland G9 Plus hat eine doppelte Sendetaste (PTT) . Mit dieser
neuen Funktion ist es möglich, bei jedem Senden die Sendeleistung
(hoch oder niedrig) zu wählen, die nötig ist, um die Sprechverbindung
herzustellen. Damit kann erheblich an Batteriestrom eingespart werden.
• „Notruf“ Eigenschaft. Midland G9 Plus enthält eine neue und wichtige Eigenschaft: ein Kanal, der für Notfälle zugewiesen ist. Ein Funkverkehr kommt gewöhnlich zwischen zwei oder mehreren Personen zustande, die denselben Kanal eingestellt haben: es ist nicht möglich,
zwischen verschiedenen Kanälen zu empfangen oder senden. Mit der
„Notruf“-Funktion können Sie auch den Notrufkanal kontrollieren.
Alle Benutzer eines Midland G9 Plus können auf dem eingestellten
Kanal kommunizieren und gleichzeitig Notruf-Meldungen auf dem
zugewiesenen Kanal empfangen/senden. Durch drücken der EMG Taste für 3 Sekunden wird ein Notruf an alle, in Reichweite befindlichen
G9 Geräte, gesendet: sie werden automatisch auf den „EC“-Kanal (Notrufkanal) eingestellt.
• „Manuelle Reichweitenabfrage Eigenschaft“: durch zweimaliges
Drücken der EMG-Taste erhalten Sie eine Bestätigung der in Reichweite befindlichen Geräte.
• „Vox Rückruf Eigenschaft“: wenn ein Funkgerät ständig im VOX
Modus sendet, wird der Vox Rückruf automatisch nach 20 Sekunden
gestoppt, um anderen Benutzern eine Übertragung zu ermöglichen.
4 | Midland G9/G9E Plus Bedienungsanleitung
Page 59

Die wichtigsten Eigenschaften
• Leistung: 500mW (PMR446); 10mW (LPD)
• Betriebstemperatur: Von -20° bis +55°C
• Rauschunterdrückung für Übertragungsende
• 38 CTCSS und 104 DCS Kodierungstöne
• Doppel-Sendetaste für Hohe oder Niedrige Sendeleistung
• Notruf
• Reichweitenkontrolle
• VOX einstellbar in 3 Stufen mit „Rückruf“
• Vibrationsalarm
• Tastatursperre
• Autom. Stromsparfunktion: autom. ökonomischer Stromkreis
• Anzeige bei schwacher Batterie
• Dual Watch (2-Kanalüberwachung)
• CALL (Anrufsignalisierung) mit 5 auswählbaren Melodien
• SCAN (Suchlauf)
• Monitor
• Ausser Reichweite
• Roger Piepton
• Hohe/Niedrige Leistung
• LCD Anzeige mit Hintergrundbeleuchtung
• Stromversorgung: 4 AA aufladbare NiMH Akkus (oder ein optionales
800 mAh NiMH Akkupack)
• 2-poliger Anschlussstecker
Versionen:
• G9 Plus Dual Band (PMR446/LPD)
24 PMR446 Kanäle(8+16 voreingestellt)/69 LPD Kanäle
• G9E Plus (nur PMR446)
24 PMR446 Kanäle(8+16 voreingestellt)
Midland G9/G9E Plus Bedienungsanleitung | 5
Page 60
Beschreibung der Bedienungen und Funktionen
Anzeige
8
6
4
7
5
3
2
1
14
6 | Midland G9/G9E Plus Bedienungsanleitung
11
9
10
12
13
Page 61
Ihr Midland G9 Plus informiert Sie über das Liquid Crystal Display (LCD)
ständig über den aktuellen Betriebsstatus. Im Folgenden werden die
Symbole mit ihren entsprechenden Parameter für den Betriebsstatus des
Gerätes erklärt:
1. KANAL Diese zwei grossen Ziffern zeigen den
ausgewählten Kanal an
2. VOX VOX Funktion aktiviert
3.
4. EMG Notruffunktion ativiert
5. DW Dual Watch aktiviert
6.
7.
8. OUT Erscheint, wenn die autom. Reichweitenkon-
9. RX Empfangsmodus
10. TX Zeigt eine Übermittlung an (PTT gedrückt)
11. H(Hoch) / L(Niedrig) Hohe oder niedrige Leistung ausgewählt. Die
12. CTCSS/DCS Zeigt den ausgewählten Typ der Subtöne an
13. CTCSS/DCS Diese drei kleinen Ziffern zeigen den
14. ROGER Roger Piepton aktiviert
Dieses Symbol erscheint bei aktivierter Tastensperre
Zeigt den Batteriestatus an
Vibrationsalarm aktiviert
trolle den Kontakt zu anderen Funkgeräten
verliert
Ausgangsleistung bei dem grossen PTT Tastenteil hängt von Ihrer Vorauswahl ab
ausgewählten Code der CTCSS/DCS Töne an
(1-38 / 1-104)
Midland G9/G9E Plus Bedienungsanleitung | 7
Page 62
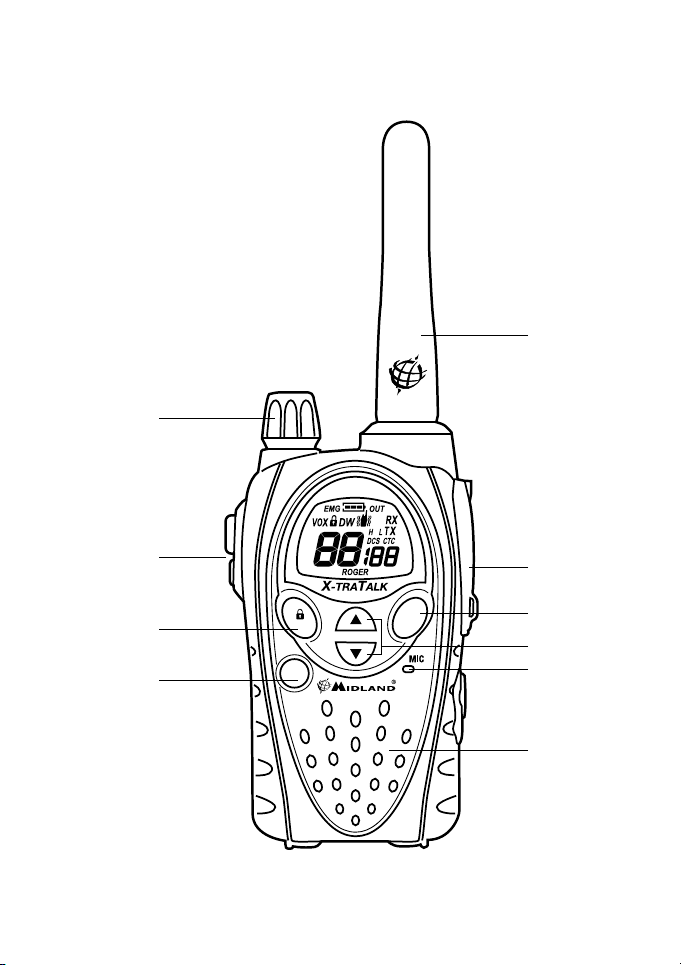
Funkgerät
19
20
18
17
CALL
EMG
21
22
23
16
MENU
24
15
8 | Midland G9/G9E Plus Bedienungsanleitung
Page 63

In dieser Abbildung sind die einzelnen Teile des Gerätes dargestellt:
15. Eingebauter
Lautsprecher
16. MENÜ Taste Drücken Sie dieser Taste, um das MENÜ des
17.
CALL/
Taste
18. PTT (push to talk) Die Sendetaste PTT hat eine Doppelfunktion
19. LAUTSTÄRKE
Drehknopf
20. ANTENNE Empfängt und sendet Funksignale.
21. Zubehöranschluss (unter Schutzabdeckung) Zum Anschluss
22. EMG-Taste Zum aktivieren des Notrufs und der manuel-
23. ▲▼ Tasten Ändern der Einstellungen im MENÜ
24. Eingebautes
Mikrofon
Hier ist der Lautsprecher eingebaut.
Funkgerätes aufzurufen.
Eine Anrufsignalisierung auf dem
ausgewählten Kanal senden. Wenn Sie diese
Taste ca. 5 Sekunden drücken, wird die
Tastensperre aktiviert.
und ist 2-teilig. Drückt man den grösseren
Hauptteil der Sendetaste, dann sendet das
Gerät mit der vorher im Menü voreingestellten Leistung (entweder hoch oder niedrig),
drückt man die schmalere (Boost PTT) Taste,
dann sendet man immer mit höchstmöglicher Leistung.
An-/Ausschalter des Gerätes und Einstellen
der LAUTSTÄRKE für den Empfang.
externer Audiogeräte, z.B. Mikrofon, Ladegerät usw. (2-polig)
len Reichweitenkontrolle.
Hier ist das Mikrofon eingebaut.
Midland G9/G9E Plus Bedienungsanleitung | 9
Page 64

Inbetriebnahme
An-/Ausschalten
Zum Anschalten des Funkgerätes drehen Sie den LAUTSTÄRKE-
Drehknopf im Uhrzeigersinn bis es höbar klickt. Um das Funkgerät auszuschalten, Drehknopf im Gegenuhrzeigersinn drehen.
PMR466 oder LDP Band auswählen
(nur in der Dual-Band Ausführung)
Midland G9 Plus (Dual-Band) ist werksseitig auf das PMR466 Band voreingestellt
Zum Wechsel in das LPD Band drücken Sie die MENÜ Taste bis das LCD
den Kanal ‘1’ zeigt.
Um in das PMR446 Band zurückzukehren drücken Sie die MENÜ-Taste bis
das LCD den Kanal ‘P1’ zeigt.
Dieses Vorgehen deaktiviert die “EMG” Funktion; aktivieren Sie deshalb
nach dem Wechsel des Frequenzbandes die Notruffunktion wieder (siehe
Abschnitt „Notruffunktion“).
Auswahl der Kanäle
Drücken Sie die MENÜ-Taste. Die Nummer des Kanals auf dem Display
fängt an zu blinken.
Drücken Sie die Taste ▲▼ bis der gewünschte Kanal erscheint. Zur Bestätigung drücken Sie die PTT-Taste, oder warten 5 Sekunden.
Je nach gekaufter Ausführung können Sie zwischen folgenden Kanälen
wählen:
• Dual-Band Ausführung: PMR446 von P1 bis P8 und von 9p bis 24p
(voreingestellt) / LPD von 1 bis 69.
• E Ausführung(nur PMR446): von P1 bis P8 und von 9p bis 24p (voreingestellt)
Kanal P8 wurde Werksseitig auf die Notruffunktion voreingestellt; wir
empfehlen Ihnen diesen Kanal nicht für allgemeine Kommunikation zu
nutzen!
10 | Midland G9/G9E Plus Bedienungsanleitung
Page 65

Anzeigen der Kanal/Subtöne
Um den PMR446 Kanal und die benutzten Subtöne der voreingestellten
Kanäle anzuzeigen, wählen Sie den gewünschten Kanal (von 9p bis 24p)
und pressen ▼ für 3 Sekunden.
Übermittlung und Empfang
Zum Senden die betreffende PTT Taste fest drücken. Warten Sie einen
Moment und sprechen dann mit normaler Stimme in Richtung Mikrofon
mit einem Abstand von ca. 5 cm vom Gerät. Das Gerätedisplay zeigt TX
an.
Wenn Sie fertig sind lassen Sie die PTT-Taste.
Wenn das Gerät im Empfangsmodus ist (PTT nicht gedrückt) können Gespräche automatisch empfangen werden. RX wird angezeigt.
Werkseinstellung ist „Hohe Leistung“ , so ist die Sendeleistung in dieser
Einstellung zunächst bei beiden PTT-Tasten die gleiche (hohe) Einstellung.
Bei externem Mikrofon gibt es dann auch nur die voreingestellte Leistung
entsprechend dem Menüpunkt.
Senden TOT-Einstellung
Der Time Out Timer wird verwendet, um eine zu lange Ubertragung zu
verhindern. Diese Funktion blockiert vorubergehend die Ubertragungen,
wenn das Funkgerat uber die maximal erlaubte Zeit benutzt wird.
Beim Erreichen des voreingestellten Timers wird das Funkgerat in den
Empfangsmodus gezwungen.
Lautstärkeregelung
Drehen Sie den LAUTSTÄRKE-Drehknopf bis zum gewünschten Lautstär-
kepegel.
“CALL”
Beim Drücken der CALL Taste senden Sie ein Tonsignal an die Benutzer
des gleichen Kanals. Sie können aus verschiedenen Ruftönen auswählen.
Midland G9/G9E Plus Bedienungsanleitung | 11
Page 66

“Notruf“
Wenn die Notruffunktion aktiviert ist (EMG blinkt auf dem Display) können Sie einen Notruf an andere G9 innerhalb Ihrer Reichweite senden,
durch drücken von EMG für 3 Sekunden .
Die Funktion Notruffunktion ist standardmäßig aktiviert.
Tastatursperre
Drücken Sie CALL/
gung auf dem Display. Nur PTT, EMG und CALL/
Funktion zu deaktivieren drücken Sie wieder CALL/
für ca. 5 Sekunden und
erscheint als Bestäti-
bleibt aktiv. Um diese
für ca. 5 Sekunden.
MON (Monitor) Funktion/ Squelch (Rauschsperre)
Die Monitortaste deaktiviert (öffnet) vorübergehend die Rauschsperre,
damit auch schwache Signale empfangen werden können.
Um die Monitorfunktion zu aktivieren müssen Sie die Tasten ▲▼ glei-
chzeitig für 2 Sekunden drücken. Mit der gleiche Vorgehensweise oder
durch aus- und einschalten des Gerätes deaktivieren Sie diese Funktion.
Wenn MON aktiv ist hören Sie ständig ein Hintergrundrauschen.
Sie können die Monitorfunktion nur aktivieren, wenn die „Notruf-
funktion“ deaktiviert ist.
Alle Kanäle absuchen
Midland G9 Plus kann durch scannen der Kanäle in schneller Folge automatisch nach Signalen in den Bändern suchen. Mit dieser Funktion können Sie nach aktiven Kanälen suchen.
Wenn ein Signal gefunden wird stoppt der Suchlauf auf diesem Kanal für
5 Sekunden.
Drücken Sie ▲ für 2 Sekunden: der Suchlauf startet. Drücken Sie PTT um
den Suchlauf zu stoppen: das Midland G9 Plus geht zu dem Kanal, bei
dem der Suchlauf gestartet wurde.
Sie können den Suchlauf nur aktivieren, wenn die „Notruffunktion“ deaktiviert ist.
12 | Midland G9/G9E Plus Bedienungsanleitung
Page 67

„MENÜ“ Taste
Folgende Eigenschaften können über die „MENÜ“ Taste ausgewählt wer-
den:
• Auswahl der Kanäle
• CTCSS Toneinstellung
• DCS Toneinstellung
• Hohe/niedrige Leistungsauswahl (nur im PMR446 Band)
• VOX
• Vibrationsalarm
• Rufmelodien
• Roger Piepton
• Tastatur-Piepton
• Notrufkanal
• Dual Watch (2-Kanalüberwachung)
• Reichweitenkontrolle
Auswahl der Kanäle
Drücken Sie die MENÜ-Taste. Die Nummer des Kanals auf dem Display
fängt an zu blinken.
Drücken Sie die Taste ▲▼ bis der gewünschte Kanal erscheint. Zur Bestätigung drücken Sie die PTT-Taste, oder warten 5 Sekunden.
Je nach gekaufter Ausführung können Sie zwischen folgenden Kanälen
wählen:
• Dual-Band Ausführung: PMR446 von P1 bis P8 und von 9p bis 24p
(voreingestellt) / LPD von 1 bis 69.
• E Ausführung(nur PMR446): von P1 bis P8 und von 9p bis 24p (voreingestellt)
Kanal P8 wurde Werksseitig auf die Notruffunktion voreingestellt; wir
empfehlen Ihnen diesen Kanal nicht für allgemeine Kommunikation zu
nutzen!
CTCSS/DCS Toneinstellung
CTCSS und DCS Töne sind ähnlich den Zugangscodes und ermöglichen
Funkkommunikation nur mit Benutzer, die den gleichen Kanal und Code
eingestellt haben. Für jeden Kanal können Sie bis zu 38 CTCSS und 104
Midland G9/G9E Plus Bedienungsanleitung | 13
Page 68

DCS Töne einstellen. Diese Töne können Sie auf folgende Kanäle einstellen:
• Dual-Band Ausführung: nur auf den 8 PMR446 Hauptkanälen (von P1
bis P8) und den 69 LPD Kanälen.
• E Ausführung(nur PMR446): nur auf den 8 PMR446 Hauptkanälen
(von P1 bis P8)
In beiden Fällen können die voreingestellten Kanäle 9p bis 24p nicht
verändert werden.
CTCSS-Töne aktivieren:
1. Gerät einschalten.
2. Gewünschten Kanal auswählen durch drücken der MENÜ-Taste und
der ▲▼ Tasten.
3. Drücken Sie die MENÜ-Taste bis das Display CTC anzeigt und der
CTCSS Ton rechts blinkt („of“= kein Code - Standardzustand).
4. Durch drücken von ▲▼ den gewünschten CTCSS-Ton auswählen.
5. Zur Bestätigung drücken Sie PTT oder warten 5 Sekunden.
CTCSS-Töne deaktivieren:
So deaktivieren Sie CTCSS-Töne:
1. Wählen Sie den gewünschten Kanal
2. Drücken Sie die MENÜ-Taste bis auf dem Display auf der linken Seite
CTCSS-Ton blinkt;
3. Wählen Sie „of“ durch die Tasten ▲▼ .
DCS-Codes aktivieren:
1. Gerät einschalten.
2. Gewünschten Kanal auswählen durch drücken der MENÜ-Taste und
der ▲▼ Tasten.
3. Drücken Sie die MENÜ-Taste bis das Display DCS anzeigt und der
Ton-Code rechts blinkt („of“= kein Code - Standardzustand).
4. Durch drücken von ▲▼ den gewünschten DCS-Code auswählen.
5. Zur Bestätigung der Einstellung drücken Sie PTT oder warten 5
Sekunden.
Werksseitig ist der Kanal P8 mit DCS-Ton 50 (P850) für die Notruffunktion
eingestellt; benutzen Sie diesen nicht zur allgemeinen Kommunikation!!
14 | Midland G9/G9E Plus Bedienungsanleitung
Page 69

DCS-Codes deaktivieren:
Wählen Sie den gewünschten Kanal
1. Drücken Sie die MENÜ-Taste bis auf dem Display auf der rechten
Seite DCS-Code blinkt.
2. Wählen Sie „Aus“ durch die Tasten ▲▼.
Hohe/niedrige Leistungsauswahl
(nur im PMR446 Band)
Um den Leistungspegel auszuwählen, drücken Sie die MENÜ-Taste, bis
auf dem Display Pr erscheint. Mit den Tasten ▲▼ wählen Sie L (niedrige
Leistung) oder H (hohe Leistung). Zur Bestätigung drücken Sie PTT oder
warten 5 Sekunden.
Bei einer vollständig geladenen Batterie ist die hohe Leistung 500 mW
(ERP) und bei niedriger Leistung 10 mW (ERP).
Wenn Sie Ihr Funkgerät für kurze Reichweite verwenden, können Sie niedrige Leistung wählen und somit Ihre Batterie schonen.
Auf LPD Kanälen (diese gibt es nur bei der G9 Dual Band Version) ist die
Ausgangsleistung immer automatisch entsprechend den gesetzlichen
Höchstwert von 10 mW (ERP).
• PMR446 Kanäle: Funktion der doppelten PTT Taste nach Einstellung (High oder Low) im Menü. Haben Sie dort “H” (hohe Leistung)
gewählt, dann erzielt jede der beiden Tasten die hohe Sendeleistung.
Haben Sie “L” (low (niedrige) Leistung) gewählt, dann sendet Ihr Gerät
beim Drücken der grossen Taste mit kleiner und beim Drücken des
kleineren Tastenteils (Boost PTT) mit hoher Leistung.
• LPD Kanäle: hier gibt es keine High/Low Leistungseinstellung im
Menü, daher führt ein Tastendruck auf jeder der beiden Tasten zur
gleichen Leistung von 10 mW (nur bei der Dual Band Version).
WARNUNG: zum Optimieren des Stromverbrauchs ist es empfehlenswert,
die Sendeleistung im Menü auf „ L-low” einzustellen. In diesem Fall
bekommen Sie die hohe Leistung beim Drücken der Boost PTT-Taste, also
nur dann, wenn Sie die hohe Leistung wirklich brauchen. Sie sollten diese
Einstellung immer dann ändern, wenn Sie energiesparend senden wollen
(werksseitig ist „H-high“ eingestellt).
Midland G9/G9E Plus Bedienungsanleitung | 15
Page 70

VOX-Funktion
Midland G9 Plus bietet über die VOX-Funktion eine Freisprechmöglichkeit: Sie müssen nur in Richtung des Mikrofons sprechen und die Kommunikation wird automatisch gestartet.
Die VOX-Empfindlichkeit kann in 3 Stufen eingestellt werden. Die VOXFunktion können Sie unabhängig vom Zubehör aktivieren.
Die vierte aktivierte Stufe ist der Vox Rückruf: wenn ein Funkgerät ständig im VOX Modus sendet, wird der Vox TB (Rückruf) automatisch nach
20 Sekunden gestoppt, um anderen Benutzern eine Übertragung zu
ermöglichen.
Um die VOX-Funktion auszuwählen, drücken Sie die MENÜ-Taste, bis auf
dem Display VOX erscheint.
Benutzen Sie ▲▼ , um die Empfindlichkeitsstufe einzustellen:
• Of: Aus;
• 1: Hoch
• 2: Mittel
• 3: Niedrig
• 4: Rückruf (mit hoher Empfindlichkeit)
Zur Bestätigung drücken Sie PTT oder warten 5 Sekunden.
Um die VOX-Funktion auszuschalten verfahren Sie nach der oben beschriebenen Weise und wählen Sie oF.
Vibrationsalarm
Midland G9 Plus ist mit „Vibrationsalarm“ ausgestattet und ermöglicht
einen stillen Alarm für eingehende Rufe.
Zum Aktivieren dieser Funktion drücken Sie die MENÜ-Taste, bis auf dem
Display
aktivieren oder deaktivieren (on: aktiv, oF:inaktiv);
Zur Bestätigung drücken Sie PTT oder warten 5 Sekunden.
erscheint; mit den ▲▼ -Tasten können Sie diese Funktion
CALL-Funktion
Midland G9 Plus kann 5 verschiedene Ruftöne senden. Um dieses Signal
an andere Benutzer zu senden drücken Sie die CALL/
CALL-Töne auswählen:
1. Drücken Sie die MENÜ-Taste, bis auf dem Display “CA” und der akti-
ve Tone-Code angezeigt wird.
2. Durch Drücken von ▲▼ können Sie die 5 voreingestellten Melo-
16 | Midland G9/G9E Plus Bedienungsanleitung
-Taste.
Page 71

dien anhören.
3. Zur Bestätigung drücken Sie PTT oder warten 5 Sekunden.
ROGER Piepton (Ton für Übertragungsende)
Wenn die PTT-Taste losgelassen wird sendet das Funkgerät dem Ge-
sprächspartner ein Bestätigungs-Piepton, der anzeigt, dass die Übertragung beendet ist.
Beim Midland G9 Plus ist diese Funktion werksseitig deaktiviert.
Diese Funktion aktivieren:
1. Drücken Sie die MENÜ-Taste, bis auf dem Display “rb of” erscheint;
2. Wählen Sie mit den Tasten ▲▼ “on” und “rb on” wird angezeigt;
3. Zum Bestätigen der Aktivierung des Roger Pieptons drücken Sie PTT
oder warten Sie 5 Sekunden.
Tastatur-Piepton
Bei jedem Tastendruck ertönt ein Piepton.
Deaktivieren des Pieptons:
1. Drücken Sie die MENÜ-Taste, bis auf dem Display “bP on” erscheint.
2. Drücken Sie ▲▼ , bis „bP of“ angezeigt wird.
3. Zur Bestätigung drücken Sie PTT oder warten 5 Sekunden.
4. Dadurch werden alle Pieptöne deaktiviert.
5. Zum aktivieren der Pieptöne wiederholen diesen Vorgang und
wählen „bP on“
Notruf
Das Midland G9 Plus bestimmt einen Kanal für Notrufe: alle G9 Plus, die
in Reichweite in Betrieb sind, können Notrufe empfangen/senden; selbst
wenn sie auf unterschiedliche Kanäle eingestellt sind.
Wenn Sie die EMG-Taste gedrückt halten wechselt die Kommunikation
automatisch in den Notrufkanal („EC“ auf dem Display) Ein Audiosignal
wird gesendet und alle G9 in Reichweite wechseln automatisch auf den
Notrufkanal („EC“).
Wenn Sie diese Funktion deaktiviert haben, können Sie keine Notrufe
empfangen/senden.
Wenn das Funkgerät auf dem Notrufkanal arbeitet (EC ist angezeigt), sind
alle Tasten außer PTT und CALL deaktiviert.
Midland G9/G9E Plus Bedienungsanleitung | 17
Page 72

Das G9 Plus wechselt eine Minute nach der letzten Übermittlung zurück
auf den benutzten Kanal.
Um sofort zurückzukehren, drücken Sie EMG. Jetzt können Sie alle
MENÜ-Funktionen nutzen.
Aktivieren/deaktivieren der Notruffunktion
Beim Anschalten des Gerätes ist die Notruffunktion aktiviert, kann aber
deaktiviert und wieder aktiviert werden:
1. Drücken Sie die MENÜ-Taste, bis auf dem Display EC on
2. Wählen Sie „EC“ mit den Tasten ▲▼ . Zur Bestätigung drücken Sie
PTT oder warten 5 Sekunden.
Wenn die Notruffunktion aktiviert ist (EMG blinkt auf dem Display) können folgende Funktionen nicht benutzt werden: Suchlauf, Monitor, Dual
Watch, Reichweitenkontrolle.
Notrufkanal wechseln
Der Notrufkanal ist Standardmässig P8 DCS 50; Sie können ihn aber nach
Ihren Bedürfnissen ändern.
Wichtig: vergewissern Sie sich, dass die Notruffunktion aktiv ist! (EMG
blinkt). Sollten Sie den zugewiesenen Kanal für die Notruffunktion wechseln, müssen Sie die gleiche Änderung bei allen Funkgeräten vornehmen!
1. Drücken Sie die MENÜ-Taste, bis auf dem Display “EC on” erscheint.
2. Drücken Sie erneut MENÜ (of wird angezeigt) und wählen Sie mit
▲▼ den gewünschten Kanal.
3. Zur Bestätigung drücken Sie PTT oder warten 5 Sekunden.
Wichtig: vergewissern Sie sich, dass die Notruffunktion aktiv ist! (EMG
blinkt).
Sollten Sie den zugewiesenen Kanal für die Notruffunktion wechseln,
müssen Sie die gleiche Änderung bei allen Funkgeräten vornehmen!
Den ursprünglichen Notrufkanal (P8 DCS 50) einstellen
1. Drücken Sie die MENÜ-Taste, bis auf dem Display “EC on” erscheint.
2. Drücken Sie erneut MENÜ und wählen „of“
18 | Midland G9/G9E Plus Bedienungsanleitung
Page 73

3. Zur Bestätigung drücken Sie PTT oder warten 5 Sekunden.
Wenn Sie einen der Standardkanäle für die Notruffunktion zuweisen,
dürfen Sie ihn nur für diesen Zweck benutzen, da dies sonst zu Störungen
führt.
Manuelle Reichweitenkontrolle
Mit dieser Funktion können Sie herausfinden, ob andere Funkgeräte in
Ihrer Reichweite sind.
Durch zweimaliges Drücken der Taste EMG wird eine Anfrage zu anderen
G9 Geäten ausgesendet, die in Ihrer Reichweite in Betrieb sind und automatisch auf den gleichen Kanal geschalten.
Wenn ein Funkgerät antwortet ist es in Ihrer Reichweite und Sie bekommen einen Bestätigungston.
Diese Funktion kann nur benutzt werden, wenn die „autom. Reichweitenkontrolle“ nicht aktiv ist.
Dual Watch (2-Kanalüberwachung)
Mit der Dual Watch Funktion können Sie ständig zwei Kanäle Ihrer Wahl
zur selben Zeit überwachen.
Aktivieren - Deaktivieren
1. Drücken Sie die MENÜ-Taste, bis auf dem Display “DW of” erscheint.
2. Wählen Sie den zweiten Kanal zur Überwachung durch Drücken von
▲▼ .
3. Zur Bestätigung drücken Sie PTT oder warten 5 Sekunden. Auf dem
Display wird wechselweise der benutzte Kanal und der überwachte
Kanal angezeigt.
4. Drücken Sie zum Beenden dieser Funktion MENÜ.
Wenn das Funkgerät eine Übermittlung auf einem der beiden Kanäle
erkennt, wird Dual Watch angehalten und bleibt 5 Sekunden auf dem
entsprechenden Kanal, damit der Benutzer auf den Ruf antworten kann.
Nach dieser Pause startet Dual Watch wieder.
Sie können diese Funktion nur aktivieren, wenn die „Notruffunktion“ deaktiviert ist.
Midland G9/G9E Plus Bedienungsanleitung | 19
Page 74

Automatische Reichweitenkontrolle
Wenn dieser Modus eingestellt ist, senden zwei G9 Geräte alle 30 Sekunden einen Datenkontrollcode. Sobald die Verbindung zwischen den
Geräten abbricht und ein Funkgerät diesen Datenkontrollcode zweimal
hintereinander nicht empfängt, fängt das Symbol OUT auf dem Display
an zu blinken und Sie hören ein Piepton.
Sie können diese Funktion nur aktivieren, wenn die „Notruffunktion“ deaktiviert ist.
Aktivieren – Deaktivieren
1. Drücken Sie die MENU-Taste, bis auf dem Display “OUT” und “Or
of”angezeigt wird; wählen Sie “Or on” (aktiviert) mit den ▲▼ Tasten.
2. Schalten Sie beide Funkgeräte aus.
3. Schalten Sie die Geräte zeitgleich ein.
Zum deaktivieren drücken Sie die MENU-Taste, bis auf dem Display “OUT”
und “Or on”angezeigt wird; wählen Sie “Or of” (deaktiviert) mit den ▲▼
Tasten.
Zur Bestätigung drücken Sie PTT oder warten 5 Sekunden.
Displayhelligkeit
Bei schwachen Lichtverhältnissen drücken Sie kurz auf EMG und aktivieren dadurch die Displaybeleuchtung für ca. 5 Sekunden. Jedesmal,
wenn die MENÜ-Taste gedrückt wird, wird automatisch die Displaybe-
leuchtung aktiviert.
Stromsparfunktion
Die Stromsparfunktion der Batterie reduziert den Verbrauch um ca. 50%.
Die Stromsparfunktion wird automatisch aktiviert, wenn das Funkgerät
länger als 7 Sekunden kein Signal empfängt. Wenn die Batterien schwach
sind, erscheint das Symbol
oder laden den Akku.
Sie können die Stromsparfunktion nur aktivieren, wenn die „Notruffunktion“ deaktiviert ist.
auf dem Display: ersetzen Sie die Batteien
20 | Midland G9/G9E Plus Bedienungsanleitung
Page 75

Batterie aufladen
1. Verbinden Sie den Netzadapter mit der Wandsteckdose und verbin-
den den Netzadapter mit der Tischladestation. Die Ladezeit beträgt
12/14 Stunden bis zur vollständigen Aufladung.
2. Stellen Sie Ihr Funkgerät in die Ladestation. Das rote Licht an der
Ladestation beginnt zu leuchten.
3. Wenn der Ladevorgang beendet ist entfernen Sie das Funkgerät
aus der Ladeschale und entfernen den Netzadapter von der Wandsteckdose.
Batterien nicht überladen! Nach der vollständigen Aufladung stoppt der
Ladevorgang nicht automatisch. Achten Sie deshalb darauf, dass das
Funkgerät aus der Ladeschale genommen wird, sobald die Batterien
geladen sind; andernfalls können das Funkgerät und die Batterien beschädigt werden.
Laden Sie niemals Alkaline (Nickeleisen) Batterien oder nichtaufladbare
Batterien. Achten Sie beim Laden des Funkgerätes, dass nur aufladbare
NI-MH Batterien oder der mitgelieferte Akku in das Batteriefach eingelegt
werden. Alkaline (Nickeleisen) Batterien sind nicht aufladbar! Batterien,
die nicht aufladbar sind können auslaufen, explodieren oder brennen
und Schaden verursachen!
Bei der Verwendung von Ladegeräten, die nicht für dieses Funkgerät vorgesehen sind, kann das Gerät beschädigt werden oder Explosionen und
Verletzungen verursacht werden.
Batterien nicht ins Feuer werfen und nicht neben heiße Gegenstände
stellen; dies kann zu Explosionen und Verletzungen führen. Entsorgen Sie
Batterien entsprechend den lokalen Bestimmungen.
Mischen Sie alte Batterien nicht mit neuen Batterien oder Batterien unterschiedlichen Typs oder Batterien, die unterschiedlich benutzt wurden
Midland G9/G9E Plus Bedienungsanleitung | 21
Page 76

Technische Daten
Kanäle G9 PLUS 8+ 16 vorprogrammiert (PMR 446) +
1-69 (LPD)
G9E PLUS 8+ 16 vorprogrammiert (PMR 446)
Frequenzbereiche 446.00625-446.09375 MHz
(PMR446)
.433.075- 434.775 MHz (LPD)
Kanalabstand 12.5 kHz (PMR446) bzw. 25 kHz (LPD)
Frequenzerzeugung CPU gesteuertes PLL System
Stromversorgung 4.8 bis max. 6 VDC
Arbeitstemperaturbereich von -20° to +50°C
Abmessungen 110x58x32 mm (Höhe x Breite x
Tiefe)
Gewicht (ohne Batterien) ca. 114 g
Duty Cycle (Betriebsperioden TX 5 %, RX 5 %, StandBy 90 %
Sender
Sendeleistung (gemessen als
Strahlungsleistung über Antenne)
Modulation FM, 8k50F3E, 16K0F3E
Störstrahlungsunterdrückung nach EN Norm EN 300 296-2
Empfänger
Empfindlichkeit für 12dB SINAD 0,35μV
Nachbarkanalunterdrückung 70dB
10mW oder 500 mW (schaltbar bei
PMR 446)
22 | Midland G9/G9E Plus Bedienungsanleitung
Page 77

Audio Ausgangsleistung 300mW bei10% Klirrfaktor
Zwischenfrequenzen 1.ZF:21,4 MHz ; 2.ZF:450 KHz
Mikrofon und Ladeanschluss 2.5 mm stereo
externer
Lautsprecher/ Höreranschluss
Abweichungen von den Technischen Daten im Zuge der Weiterentwicklung bleiben vorbehalten.
Hiermit erklärt CTE International das dieses G9 PLUS den grundlegenden
Anforderungen und anderen relevanten Bestimmungen der Richtlinie
1999/5/EG entspricht.
WARNUNG: Um im Bedarfsfall die Funkanlage sicher vom Stromnetz
trennen zu können, ziehen Sie bitte - falls notwendig- den Stecker des
Ladeadapters hinaus. Das Ladegerät muss sich in der Nähe der Funkanlage befinden und jederzeit leicht zugänglich sein.
3.5mm mono
Midland G9/G9E Plus Bedienungsanleitung | 23
Page 78

Prodotto o importato da:
CTE INTERNATIONAL s.r.l.
Via. R.Sevardi 7- 42124 Reggio Emilia Italia
www.cte.it - www.midlandeurope.com
L’uso di questo apparato può essere soggetto a restrizioni nazionali (per l’uso in Italia in
modalità PMR446, è richiesta una dichiarazione di possesso come da D.L. 259 del 01/08/03
art. 99 comma 3; All. 25 art. 36 e successivi aggiornamenti) . Prima dell ’uso leggere
attentamente le istruzioni. Se il prodotto contiene batterie: non gettare nel fuoco, non
disperdere nell’ambiente dopo l’uso, usare gli appositi contenitori per la raccolta.
Produced or imported by:
CTE INTERNATIONAL s.r.l.
Via. R.Sevardi 7 42124 Mancasale Reggio Emilia Italy
Imported by:
ALAN - NEVADA UK
Unit 1 Fitzherbert Spur Farlington Portsmouth Hants.
P06 1TT - United Kingdom
www.nevada.co.uk
The use of this transceiver can be subject to national restrictions. Read the instructions
carefully before installation and use. If the product contains batteries: do not throw the
battery into fire. To disperse after use, throw into the appropriate containers.
Importado por:
ALAN COMMUNICATIONS, SA
C/Cobalt, 48 - 08940 Cornellà de Llobregat (Barcelona - España)
Tel: +34 902 384878 Fax: +34 933 779155
www.midland.es
El uso de este equipo puede estar sujeto a la obtención de la correspondiente autorización administrativa. Lea atentamente las instrucciones antes de usar el equipo. si el
producto contiene pilas o baterías no las tire al fuego ni las disperse en el ambiente
después de su uso, utilice los contenedores apropiados para su reciclaje.
Vertrieb durch:
ALAN ELECTRONICS GmbH
Daimlerstraße 1K - D-63303 Dreieich Deutschland
www.alan-electronics.de
Die Benutzung dieses Handfunkgerätes ist von den landesspezifischen Bestimmungen
abhängig. Vor Benutzung Bedienungsanleitung beachten. Bei Verwendung von Batterien beachten Sie bitte die Umweltbestimmungen. Batterien niemals ins offene Feuer
werfen, und nur in dafür vorgesehene Sammelbehälter entsorgen.
WWW.MIDLANDEUROPE.COM |
Page 79
Midland
G9/G9E Plus
” Manual de instrucciones
PMR446+LPD/PMR446 |
Page 80

Tabla de contenidos
Contenido 2
Rango de cobertura 3
Las baterías y su comportamiento 3
Advertencias 3
Características 4
Principales características 5
Versiones: 5
Descripción de los controles y sus funciones 6
Display 6
Radio 8
Operativa 10
Encendido/apagado 10
Selección de bandas pmr446 o LPD 10
Selección del canal 10
Visualizar el canal/subtono 10
Transmisión y recepción 11
Ajuste de temporizador TOT 11
Ajuste del VOLUMEN 11
“CALL” 11
“Emergencia” 11
Bloqueo del teclado 12
Page 81

Función Monitor (MON) / Squelch 12
Exploración de canales 12
Tecla “MENU” 12
Selección de canal 13
Ajuste de subtonos CTCSS/DCS 13
Seleccione la potencia Hi/low 14
Función VOX control 15
Función Vibra-CALL (vibración) 16
Función CALL 16
ROGER BEEP (Tono fin de transmisión) 16
Tonos del teclado 16
Función llamada de Emergencia 17
Activación / Desactivación de la función Emergencia 17
Cambio del canal de emergencia 17
Función Out of range Manual (fuera de cobertura) 18
DUAL WATCH (Doble escucha) 18
Automatic Out-of-Range 19
Iluminación del display 19
Power save (Ahorro de batería) 19
Recarga de baterías 20
Especificaciones técnicas 21
Manual de instrucciones Midland G9/G9E Plus | 1
Page 82

¡Gracias por haber escogido nuestra marca! El Midland G9 Plus es un transceptor portátil de libre uso en España y en la práctica totalidad de países
europeos. Para una mayor información al respecto, diríjase a la tabla de “Restricciones al uso” que acompaña a este manual.
Combinando la última tecnología en radiocomunicación junto con un
chasis robusto, el Midland G9 Plus es la solución ideal y efectiva para
los profesionales que tienen que estar en contacto con sus colegas en
obras, edificios, hoteles, ferias, etc. Su robustez, facilidad de uso y práctico manejo le convierten en la radio ideal para cualquier actividad.
Midland G9 Plus está disponible en dos versiones:
• Doble banda (pmr446/LPD)
• Versión E (pmr446)
En este manual nos referimos a ambas versiones y encontrará resaltadas
las diferencias entre ellas.
Contenido
• 1 radio Midland G9 Plus
• 1 Cargador de sobremesa individual
• 1 Adaptador de corriente
• 4 baterías recargables tipo AA NiMH de 1.800 mAh
• 1 Clip de cinturón
2 | Manual de instrucciones Midland G9/G9E Plus
Page 83

Rango de cobertura
El máximo alcance depende del terreno y se obtiene cuando se utiliza en
espacios abiertos.
Las limitaciones a este máximo alcance son debidas habitualmente a
factores ambientales como árboles, edificios u otras estructuras que se
interpongan entre los aparatos a comunicar. En el interior de un coche
o en construcciones de estructura metálica, el alcance también se verá
reducido. Normalmente, el alcance en ciudad, con edificios y otros obstáculos es aproximadamente de 1 -2 Km. En espacios abiertos con obstáculos como árboles, casas, etc., el alcance puede ser de hasta 4-6 Km.
Y en espacios abiertos, sin obstáculos y con alcance visual, por ejemplo
entre dos montañas, el alcance puede ser superior a los 12 Km.
Las baterías y su comportamiento
La radio puede funcionar con baterías recargables (en dotación) o con 4
pilas alcalinas tipo AA. Para abrir el compartimiento de las baterías, coloque la radio con la parte trasera hacia usted, desbloquee la tapa en la parte inferior de la radio deslícela suavemente. Inserte las baterías teniendo
en cuenta la polaridad y vuelva a colocar la tapa.
Atención: las baterías recargables deben cargarse antes de sus primer
uso.
Advertencias
• BATERÍAS - Siga estrictamente todas las indicaciones y advertencias
referidas en el capítulo “Recarga de baterías”.
• NO ABRA LA RADIO BAJO NINGÚN CONCEPTO- la mecánica y la electrónica de precisión que forman el equipo exige experiencia e instrumentación; por el mismo motivo, la radio no debe ser nunca reajustada ya que viene programada de fábrica con el fin de obtener las
máximas prestaciones. La apertura de la radio por parte de personal
no autorizado anulará automáticamente la garantía.
• No utilice alcohol, disolventes o abrasivos para limpiar el equipo. Utilice sólo un paño suave y limpio ligeramente humedecido con agua. En
los casos más resistentes use un detergente suave.
Manual de instrucciones Midland G9/G9E Plus | 3
Page 84

Características
• Nueva function ‘Silenciador ruido conmutación’
• PTT “Dual” para cambio rápido de alta a baja potencia. Midland G9
Plus incorpora un nuevo PTT “Dual”. Gracias a esta función, podrá usar
el equipo en potencia alta sólo cuando lo necesite, sin necesidad de
ir al menú, consiguiendo así un gran ahorro de baterías y una óptima
funcionalidad
• Función “Llamada de Emergencia”. Midland G9 Plus introduce una
nueva e importante función: un canal dedicado a emergencias. Las
radiocomunicaciones se realizan generalmente entre dos o más usuarios que utilizan el mismo canal: no es posible transmitir o recibir en
otros canales diferentes. Pero gracias a la función “Emergencia”, puede estar monitorizando el canal de emergencia: todos los usuarios
de un Midland G9 Plus pueden comunicarse en el canal sintonizado
y, al mismo tiempo, recibir/transmitir mensajes de emergencia en el
canal dedicado a tal efecto. Simplemente manteniendo pulsada la
tecla EMG durante 3 segundos, se envía una llamada de emergencia
a todos los G9 que estén dentro del rango de cobertura; automáticamente pasaran a sintonizarse en el canal de de emergencia (canal EC).
• Función “Fuera de cobertura Manual”: simplemente pulsando dos
veces la tecla EMG comprobará si hay alguna radio en el rango de alcance de su radio.
• Función “Vox TalkBack”: si una de las radios está costantemente
transmitiendo en VOX, la función Vox TB detendrá la transmisión
después de 20 segundos para permitir también la transmisión a los
demás usuarios.
4 | Manual de instrucciones Midland G9/G9E Plus
Page 85

Principales características
• Potencia: 500mW (PMR446); 10mW (LPD)
• Rango de temperaturas: de -20° a +55° C
• Silenciador ruido conmutación
• 38 subtonos CTCSS/104 códigos DCS
• Doble tecla PTT: para alta o baja potencia
• Llamada de Emergencia
• Control fuera de cobertura (Out of range)
• VOX ajustable a 3 niveles y “TalkBack”
• VibraCALL (vibración)
• Bloqueo de teclado
• Ahorro de baterías: circuito automático de ahorro de baterías
• Indicador de batería baja
• Dual Watch (Doble escucha)
• CALL con 5 melodías seleccionables
• SCANER
• Monitor
• Fuera de cobertura
• Roger beep
• Potencia alta/baja
• Display LCD con retroiluminación
• Alimentación mediante 4 baterías AA NiMH (opcionalmente, con pack
baterías NiMH 800 mAh)
• Conector de accesorio de 2pin
Versiones:
• G9 Plus Dual (pmr446/LPD)
24 canales pmr446 channels (8+16 preajustados)/69 canales LPD
• G9E Plus (pmr446)
24 canales pmr446 (8+16 preajustados)
Manual de instrucciones Midland G9/G9E Plus | 5
Page 86
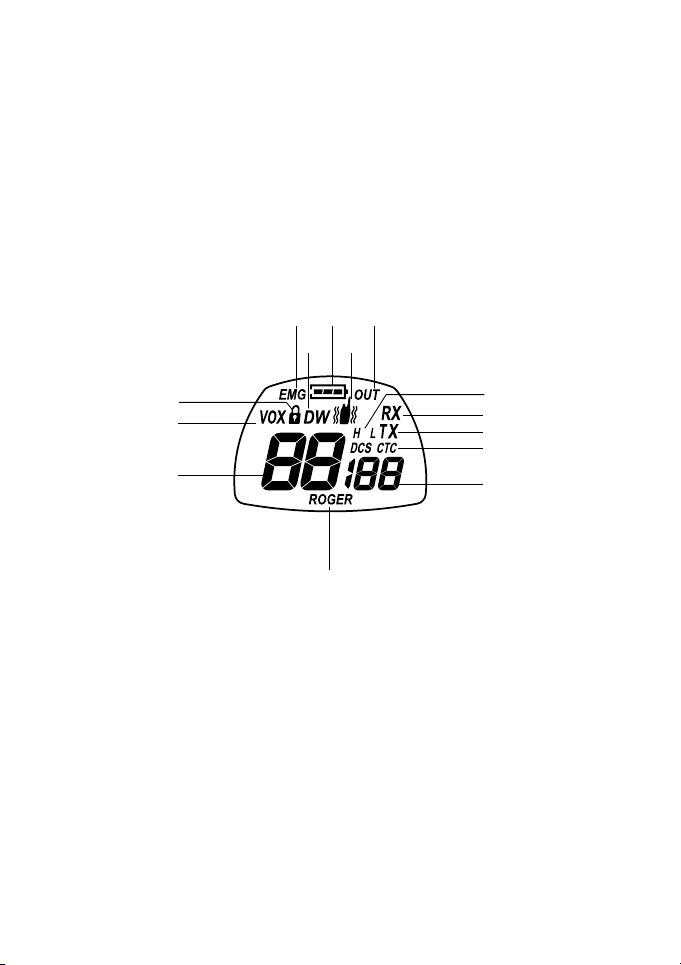
Descripción de los controles y sus funciones
Display
8
6
4
7
5
3
2
1
14
6 | Manual de instrucciones Midland G9/G9E Plus
11
9
10
12
13
Page 87
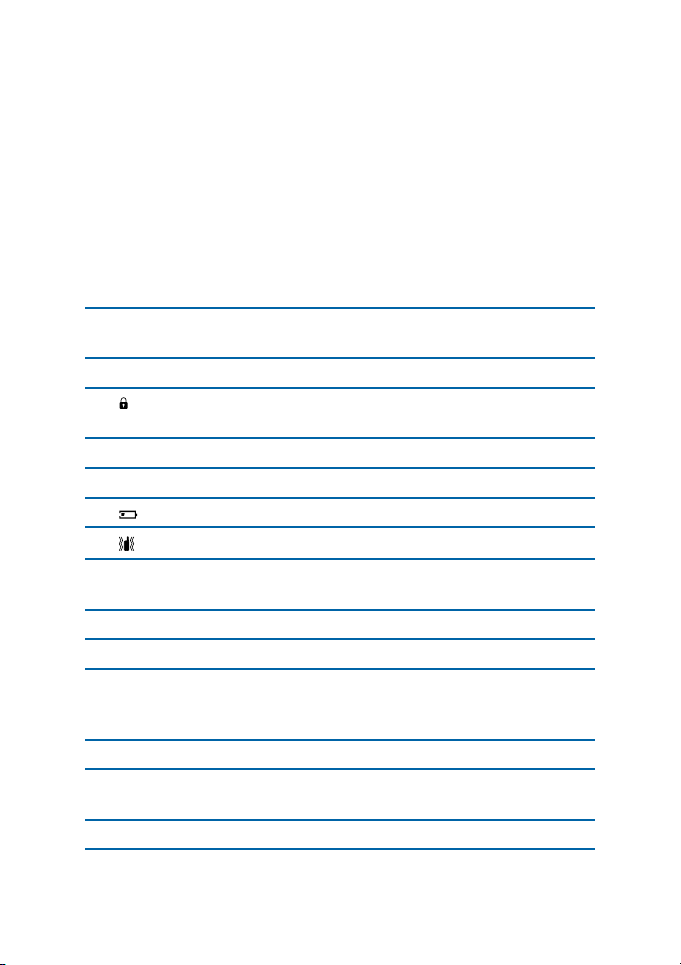
Su Midland G9 Plus utiliza un display LCD (de cristal líquido) que le informa continuamente de su estado operativo.
Los símbolos y los parámetros que pueden aparecer son los siguientes:
1. CANAL Estos dos dígitos grandes indican el canal
seleccionado
2. VOX La activación de la función VOX
3.
4. EMG Función emergencia activada
5. DW Función Dual Watch (doble escucha) activada
6.
7.
8. OUT Indica si la Función Fuera de Cobertura au-
9. RX Está en modo recepción
10. TX Indica que está en transmisión (PTT pulsado)
11. H(High) / L(Low) Selección de potencia alta o baja. La potencia
12. CTCSS/DCS Indica el tipo de subtono seleccionado
13. CTCSS/DCS Estos tres pequeños dígitos indican el código
14. ROGER Roger Beep activado
El símbolo del candado indica que se ha activado el bloqueo del teclado
Indica el estado de las baterías
Función Vibra-CALL (vibración) activada
tomática pierde contacto con otras radios
de transmisión del PTT grande sigue esta
selección
CTCSS/DCS seleccionado (1-38 / 1-104)
Manual de instrucciones Midland G9/G9E Plus | 7
Page 88
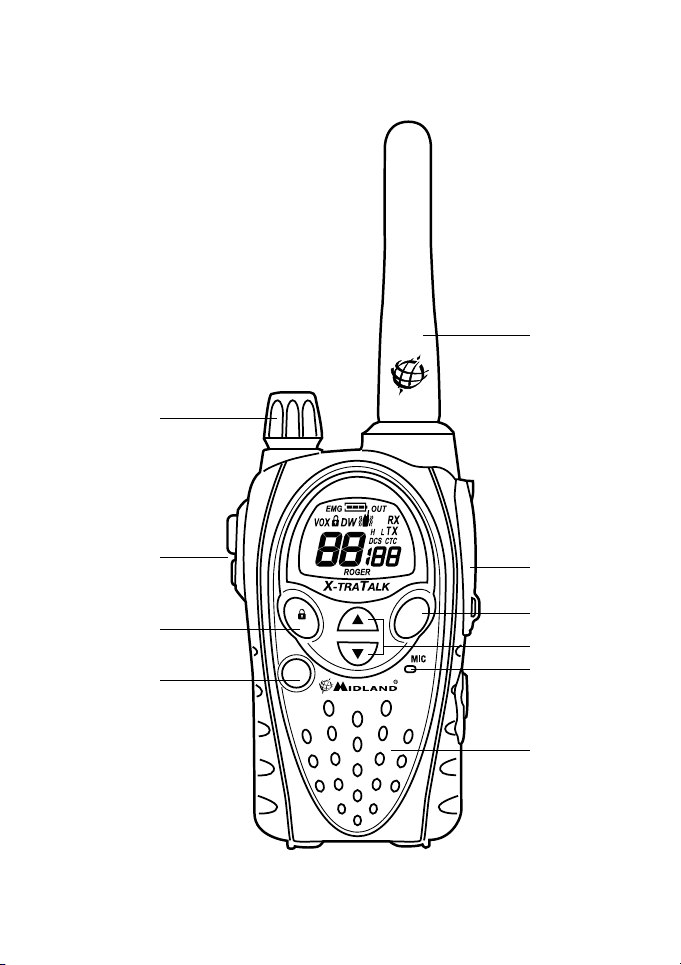
Radio
20
19
18
17
CALL
EMG
21
22
23
16
MENU
24
15
8 | Manual de instrucciones Midland G9/G9E Plus
Page 89

Remítase a las siguientes imágenes para localizar y familiarizarse
con las diferentes partes del equipo:
15. Micrófono integrado Aquí se encuentra el micrófono para la
transmisión
16. Tecla MENU Pulsando esta tecla se activa la opción MENU
17.
Tecla CALL/
18. PTT
(pulsar para hablar)
19. Mando VOLUMEN Enciende/apaga el equipo y regula el VOLU-
20. ANTENA Sirve para recibir y transmitir las señales de
21. Toma MIC/CHG
(bajo la protección)
22. Tecla EMG Activa las funciones de Emergencia y Fuera
23. Teclas ▲▼ sirven cambiar las opciones del MENU
24. MICRÓFONO
integrado
para enviar una llamada en el canal seleccionado. Si la mantiene pulsada durante 5
segundos, se activa el bloqueo del teclado
La tecla PTT tiene dos características al estar
compuesta por dos partes: pulsando en la
parte grande del PTT, la potencia de salida
dependerá de la selección hecha en el menú
(H o L); mientras que al presionar el PTT
pequeño (Boost), transmitirá siempre en alta
potencia
MEn de audio en recepción
radio
Permite la conexión de dispositivos de audio
externos (auriculares, micrófonos, cargadores, etc.). (Conector de 2 pin)
de cobertura manual
Aquí se encuentra el micrófono para la
transmisión
Manual de instrucciones Midland G9/G9E Plus | 9
Page 90

Operativa
Encendido/apagado
Para encender el transceptor, gire el mando VOLUMEN en el sentido de
las agujas del reloj hasta oír un clic mecánico. Para apagar el transceptor,
gire el mando en el sentido contrario a las agujas del reloj hasta oír nuevamente el clic mecánico.
Selección de bandas pmr446 o LPD
(solamente para la versión Dual)
Midland G9 Plus (Dual) esta ajustado de fábrica en la banda pmr446.
• Para seleccionar la banda LPD, mantenga pulsada la tecla MENU hasta
que el display muestre canal ‘1’
• Para volver a pmr446 mantenga pulsada la tecla MENU hasta que el
display muestre ‘P1’.
Este proceso desactiva la función “EMG”; por lo tanto, si cambia la banda
de trabajo, recuerde activar de nuevo la función Emergencia (vea párrafo “Función Emergencia”).
Selección del canal
Pulse la tecla MENU. En el display parpadea el número del canal.
Pulse las teclas ▼▲ para pasar hacia arriba o abajo los canales hasta que
encuentre el canal deseado.
Pulse PTT para confirmar o espere 5 segundos.
Dependiendo de la versión adquirida, puede seleccionar entre los siguientes canales:
• versión Dual: PMR446 de P1 a P8 y de 9p a 24p (preajustado) / LPD
de 1 a 69.
• version E (PMR446): de P1 a P8 y de 9p a 24p (preajustado)
¡El canal P8 ha sido ajustado de fábrica para la función “Emergencia”; le
sugerimos que no lo utilice para comunicaciones habituales!
Visualizar el canal/subtono
Para mostrar momentáneamente el canal y el subtono preajustados en la
10 | Manual de instrucciones Midland G9/G9E Plus
Page 91

banda pmr446, vaya al canal deseado (del 9p al 24p) y mantenga pulsada
la tecla ▼ durante 3 segundos.
Transmisión y recepción
Para transmitir, mantenga firmemente pulsado el PTT (no importa que
parte de él).
Espere una fracción de segundo y hable normalmente en dirección al micrófono, manteniendo la radio a una distancia de unos 5 cm; en el display
aparece TX.
Cuando haya terminado de hablar, suelte el PTT.
Cuando la radio está en recepción, recibirá automáticamente cualquier
comunicación. En el display aparece RX.
Por defecto, tanto el PTT grande como el pequeño, transmiten en alta
potencia.
Si utiliza un accesorio audio externo, el PTT de éste sigue la misma funcionalidad del PTT grande del equipo.
Ajuste de temporizador TOT
Esta funcion se utiliza para prevenir una transmision demasiado larga. Si
la radio esta transmitiendo mas tiempo del permitido, la radio bloquea la
transmision y pasa a modo de recepcion.
Ajuste del VOLUMEN
Gire el mando de VOLUMEN hasta alcanzar el nivel deseado.
“CALL”
Pulse la tecla CALL para enviar una señal de caudio a los usuarios que
estén en su mismo canal; puede seleccionar diferentes tonos de llamada.
“Emergencia”
Cuando la función Emergencia está activada (EMG parpadea en el display) mantenga pulsada la tecla EMG durante 3 segundos y enviará una
llamada de emergencia a los G9 que estén en su radio de cobertura.
La función Emergencia está activada por defecto.
Manual de instrucciones Midland G9/G9E Plus | 11
Page 92

Bloqueo del teclado
Mantenga pulsada la tecla CALL/
se confirmará con
necen activas. Para deshabilitar esta función, vuelva a mantener pulsada
CALL/
durante 5 segundos aproximadamente.
en el display. Solo el PTT, EMG y CALL/
durante unos 5 segundos y el bloqueo
perma-
Función Monitor (MON) / Squelch
La tecla Monitor se utiliza para excluir temporalmente el squelch, para
poder recibir señales demasiado débiles que no pasarían el filtro del
squelch. Para activar esta función, mantenga pulsadas durante 2 segundos las teclas ▲▼al mismo tiempo. Realice el mismo proceso para desactivar la función, o apague la radio y vuelva a encenderla.
Cuando MON está activo, probablemente escuchará un ruido de fondo
constante.
Solo puede activar la función MON si la función “Emergencia” está desactivada.
Exploración de canales
Midland G9 Plus puede buscar automaticamente señales realizando una
exploración rápida de todas las bandas.
Esta función es útil para encontrar canales activos.
Cuando se detecta una señal, la exploración se detiene en ese canal durante 5 segundos. Para continuar, pulse ▲ durante 2 segundos.
Para detener la exploración definitivamente, pulse PTT y la radio volverá
al canal desde el que se comenzó la exploración.
Solo puede activar la función exploración, si la función “Emergencia”
está desactivada.
Tecla “MENU”
Mediante la tecla “MENU” se pueden seleccionar las siguientes funciones
• Selección de canal
• Ajuste de subtonos CTCSS
• Ajuste de código DCS
• Selección de potencia alta/baja (solo en banda pmr446)
• VOX
12 | Manual de instrucciones Midland G9/G9E Plus
Page 93

• Función VibraCALL
• Selección de melodías CALL
• Roger Beep
• Sonido del teclado
• Canal de Emergencia
• Función doble escucha (Dual Watch)
• Fuera de cobertura (Out of Range)
Selección de canal
Pulse la tecla MENU. En el display parpadea el número de canal.
Pulse las teclas ▼▲ para pasar hacia arriba o abajo los canales hasta que
encuentre el canal deseado.
Pulse PTT para confirmar o espere 5 segundos.
Dependiendo de la versión que haya comprado, puede elegir entre los
siguientes canales:
• versión Dual: PMR446 de P1 a P8 y de 9p a 24p (pre-ajustado) / LPD
de 1 a 69.
• versión E (solo PMR446 ):de P1 a P8 y de 9p a 24p (pre-ajustado)
¡El canal P8 ha sido ajustado de fábrica para la función “Emergencia”; le
sugerimos que no lo utilice para comunicaciones habituales!
Ajuste de subtonos CTCSS/DCS
Los subtonos CTCSS y DCS son códigos de acceso que permiten a la radio
comunicarse solamente con otras radios que estén en el mismo canal y
con el mismo subtono.
Se pueden ajustar 38 subtonos CTCSS y 104 códigos DCS. Estos tonos se
pueden ajustar en los siguientes canales:
• Versión Doble Banda: solo en los 8 canales principales de la banda
pmr446 (de P1 a P8) y en los 69 canales LPD.
• Versión E (solo pmr446): solo en los 8 canales principales de la banda
pmr446 (de P1 a P8).
Para los dos modelos, los canales pre-ajustados de 9p a 24p no se pueden
modificar
Activación de los subtonos CTCSS:
Encienda la radio.
1. Seleccione el canal deseado mediante las teclas MENU y ▲▼.
Manual de instrucciones Midland G9/G9E Plus | 13
Page 94

2. Pulse la tecla MENU hasta que el display muestre CTC y el subtono
parpadee en la parte derecha (“of”= sin código – ajuste por defecto).
3. Seleccione el subtono deseado mediante las teclas ▲▼.
4. Para confirmar el ajuste, pulse PTT ó espere durante 5 segundos.
Desactivación de los subtonos CTCSS:
Si no desea utilizar subtonos, siga los siguientes pasos:
1. Seleccione el canal deseado
2. Pulse la tecla MENU hasta que el display muestre el subtono parpa-
deando en la parte derecha.
3. Seleccione “of” mediante las teclas ▲▼.
Activación de los códigos DCS:
1. Encienda la radio.
2. Seleccione el canal deseado mediante las teclas MENU y ▲▼
3. Pulse la tecla MENU hasta que el display muestre DCS y el código
parpadee en la parte derecha (“of”=sin código – ajuste por defecto).
4. Seleccione el código deseado mediante las teclas ▲▼.
5. Para confirmar el ajuste, pulse PTT ó espere 5 segundos.
¡El canal P8 con el código 50 DCS (P850) ha sido ajustado en fábrica como
canal de “Emergencia”; no lo utilice para comunicaciones habituales!
Desactivación de los códigos DCS:
Si no desea utilizar códigos DCS, siga los siguientes pasos:
1. Seleccione el canal deseado.
2. Pulse la tecla MENU hasta que el display muestre el código parpade-
ando en la parte derecha.
3. Seleccione “of” mediante las teclas ▲▼.
Seleccione la potencia Hi/low
(solo en banda pmr446)
Para seleccionar el nivel de potencia, pulse la tecla MENU hasta que el
display muestre Pr. Utilice las teclas ▲▼para seleccionar L (potencia
baja) o H (potencia alta). Para confirmar la selección, pulse PTT ó espere
5 segundos.
Cuando las baterías están totalmente cargadas, la potencia alta es 500
mW (ERP), mientras que la baja es 10mW (ERP).
14 | Manual de instrucciones Midland G9/G9E Plus
Page 95

En los canales LPD (solo versión G9 Bibanda), la potencia es siempre de
10mW (ERP).
• Canales PRM446: La selección de alta o baja potencia afecta al uso de
la tecla PTT: Si escoge “H” (alta potencia), pulsando el PTT, no importa
que parte, el equipo transmitirá en alta potencia. Si escoge “L” (baja
potencia), pulsando la parte grande del PTT, el equipo transmitirá
en baja potencia; mientras que pulsando la parte pequeña del PTT,
transmitirá en potencia alta.
• Canales LPD: cuando se usan canales LPD (sólo para versión G9 Bibanda) la función Alta-Baja potencia no está disponible, por lo tanto, los
dos pulsadores PTT transmiten siempre a la misma potencia (10mW).
ATENCIÓN: para optimizar el consumo de la batería y, por lo tanto, usar
sólo la potencia Alta cuando es realmente necesario (pulsando el PTT
“Boost”), deberá configurar la potencia de transmisión de menú en Baja
(L-Low). Por defecto, la configuración de menú es siempre Alta (H-High),
recuerde cambiar este parámetro.
Función VOX control
Midland G9 Plus permite conversaciones con manos libres a través de la
función VOX: solo tiene que hablar en dirección al micrófono y la comunicación se activará automáticamente.
La sensibilidad del VOX se puede ajustar en 3 niveles diferentes y se puede utilizar con o sin accesorio de audio.
El cuarto nivel es la función Vox TalkBack: si la radio esta transmitiendo
continuamente en VOX, la función Vox TB detendrá la transmisión tras 20
segundos para permitir transmitir a otros usuarios.
Para activar la función VOX pulse la tecla MENU hasta que en el display
aparezca VOX .
Utilice las teclas ▲▼para seleccionar los distintos niveles de sensibilidad:
• Of: Desactivado;
• 1: Alto
• 2: Medio
• 3: Bajo
• 4: Talk Back (con alta sensibilidad)
Para confirmar la selección, pulse PTT ó espere 5 segundos.
Para desactivar la función, siga el procedimiento descrito y seleccione oF.
Manual de instrucciones Midland G9/G9E Plus | 15
Page 96

Función Vibra-CALL (vibración)
Midland G9 Plus está equipado con la función “Vibra-CALL”, con la que
podemos recibir una señal de llamada silenciosa.
Para activar esta función, pulse la tecla MENU hasta que en el display aparezca
; utilice las teclas ▼▲ para activar o desactivar esta función(on:
activada, oF:desactivada);
Pulse PTT para confirmar o espere 5 segundos.
Función CALL
Midland G9 Plus puede enviar 5 tonos de llamada diferentes.
Para enviar esta señal de audio a otros usuarios pulse la tecla CALL/
Para seleccionar los diferentes tonos:
1. Pulse la tecla MENU, hasta que en el display aparezca “CA” y el códi-
go del tono activo.
2. Mediante las teclas ▲▼escuchará 5 melodías disponibles.
3. Confirme la selección pulsando PTT ó espere 5 segundos.
.
ROGER BEEP (Tono fin de transmisión)
Al soltar la tecla PTT al final de cada transmisión, la radio emite un tono
que indica a su interlocutor que la transmisión ha finalizado y puede empezar a hablar. Esta función está desactivada de fábrica.
Para activarla:
1. Pulse la tecla MENU hasta que el display muestres “rb of”.
2. Mediante las teclas ▼▲ seleccione “on” y el display mostrará “rb on”.
3. Para confirmar la selección, pulse PTT o espere 5 segundos.
Tonos del teclado
Cada vez que pulsa una tecla, se escucha un pitido.
Para desactivar este pitido siga este proceso:
1. Pulse la tecla MENU, hasta que el display muestre “bP on”.
2. Pulse las teclas ▲▼hata que en el display aparezca “bP of”
3. Confirme su selección pulsando PTT o esperando segundos.
De esta manera, todos los pitidos están desactivados
Para activar la función, repita el proceso y seleccione “bP on”
16 | Manual de instrucciones Midland G9/G9E Plus
Page 97

Función llamada de Emergencia
Midland G9 Plus dedica un canal a llamadas de emergencia: todos los G9
que operen a su alcance, incluso si están en otro canal, pueden recibir y
emitir llamadas de emergencia en ese canal.
Si mantiene pulsada la tecla EMG, la comunicación pasa automáticamente al canal de emergencia (“EC” en el display).
Se envía una señal de audio y todos los G9 que estén en su radio de cobertura, pasarán automáticamente al canal de emergencia (“EC”).
Si usted ha desactivado esta función, no recibirá ni podrá transmitir una
señal de emergencia.
Cuando la radio está operando en el canal de emergencia (EC en el display), todas las teclas excepto PTT y CALL están desactivadas.
La radio vuelve al canal de uso habitual después de un minuto desde la última transmisión. Para volver inmediatamente, pulse EMG. Ahora podrá
usar todas las funciones y teclas.
Activación / Desactivación de la función Emergencia
Cuando enciende la radio, la función de emergencia está activada, pero
puede activarla o desactivarla a su preferencia:,
1. Pulse la tecla MENU hasta que el display muestre EC on.
2. Seleccione EC of mediante las teclas ▲▼.
3. Confirme la seleccioón mediante PTT ó espere 5 segundos.
Cuando la función Emergencia está activada ( en el display parpadea
EMG) no se pueden usar las siguientes funciones: Scan, Monitor, Doble
escucha, Out of Range (fuera de cobertura).
Cambio del canal de emergencia
El canal de emergencia está preajustado de fábrica en P8 DCS 50; pero se
puede cambiar en función de sus necesidades.
¡Importante: asegúrese de que la función Emergencia está activada!(EMG
parpadea). Si decide cambiar el canal dedicado a la función de Emergencia, no olvide realizar el cambio en todas las radios!
1. Pulse la tecla MENU hasta que el display muestre EC on.
2. Pulse la tecla MENU de nuevo (of en el display) y seleccione el canal
Manual de instrucciones Midland G9/G9E Plus | 17
Page 98

deseado mediante ▲▼.
3. Para confirmar la selección, pulse PTT o espere 5 segundos.
Para volver a seleccionar el canal original (P8 DCS 50)
1. Pulse la tecla MENU hasta que el display muestre EC on.
2. Pulse la tecla MENU de nuevo y seleccione of
3. Para confirmar la selección, pulse PTT o espere 5 segundos
¡Si dedica uno de los canales estándar como canal de Emergencia, recuerde utilizarlo solamente para esta función, de lo contrario causará interferencias!
Función Out of range Manual (fuera de cobertura)
Esta función le permite saber si hay alguna radio en su radio de cobertura.
Pulsando dos veces la tecla EMG, enviará una petición de reconocimiento
a otros G9 que estén en su rango de cobertura y en el mismo canal.
Si responde alguna radio recibirá un tono de confirmación. Si no hay ninguna radio en cobertura, no se escuchará ningún tono.
¡Esta función solo se puede utilizar si el “Automatic Out of Range” no está
activo!
DUAL WATCH (Doble escucha)
Esta función le permite escuchar contestamente dos canales de su elección al mismo tiempo.
Activación - Desactivación
1. Pulse la tecla MENU hasta que el display muestre DW of.
2. Seleccione el segundo canal a escuchar mediante las teclas ▲▼.
3. Para confirmar su selección, pulse PTT o espere 5 segundos. El di-
splay mostrará alternativamente el canal en uso y el segundo canal
seleccionado.
4. Para detener esta función, simplemente pulse la tecla MENU.
Cuando la radio detecta una transmisión en uno de los dos canales, la Doble escucha se detiene temporalmente, se mantiene durante 5 segundos
en el canal activo, para dar opción a contestar.
Después de esta pausa, la doble escucha se reanuda de nuevo
¡Esta función solo se puede activar si la función “Emergencia” está desactivada!
18 | Manual de instrucciones Midland G9/G9E Plus
Page 99

Automatic Out-of-Range
(Fuera de cobertura automático)
Seleccionando esta función, una pareja de G9 transmites un código de
control cada 30 segundos.
En cuanto el contacto entre las dos radios se está perdiendo y una de las
radios no recibe el código de control dos veces consecutivas, el icono
OUT parpadea en el display y se escuchará un tono de advertencia.
¡Esta función solo se puede activar si la función “Emergencia” está desac-
tivada!
Activación – Desactivación
1. Pulse la tecla MENU hasta que en el display aparezca “OUT” y “ Or of”,
seccione “Or on” (activado) mediante las teclas ▲▼.
2. Apague las dos radios.
3. Enciéndalas al mismo tiempo.
4. Para desactivar la función, pulse, MENU hasta que el display muestre
“OUT” y “Or on” ; seleccione “Or of” (desactivado) mediante las teclas
▲▼.
5. Confirme su selección pulsando PTT ó esperando 5 segundos
Iluminación del display
En caso de que no haya suficiente luz para leer el display, pulse brevemente la tecla EMG y la iluminación del display se activará durante 5 segundos.
Cada vez que pulse MENU, el display se iluminarà automáticamente.
Power save (Ahorro de batería)
La función de ahorro de batería permite una reducción del consumo de
batería de hasta el 50%; la función se activa automáticamente cuando la
radio no recibe ninguna señal en 7 segundos.
Cuando las baterías están descargadas, el icono
con lo que tendrá que cambiarlas o cargarlas.
¡Esta función solo se activa si la función “Emergencia” está desactivada!
Manual de instrucciones Midland G9/G9E Plus | 19
aparece en el display
Page 100

Recarga de baterías
Conecte el adaptador en una toma de corriente e inserte el jack en el
cargador de sobremesa.
Coloque la radio en la bañera del cargador. El diodo del cargador se ilumina.
La recarga dura alrededor de 12/14 horas.
Cuando se complete la carga, retire la radio del cargador y desenchufe el
adaptador de la toma de corriente.
¡No sobrecargue las pilas! Cuando las pilas están completamente cargadas, el proceso no se detiene automáticamente. Por lo tanto, no olvide
desconectar el transceptor del cargador en cuanto haya transcurrido el
tiempo necesario, de lo contrario la radio y las baterías podrían dañarse.
¡No intente recargar pilas alcalinas o cualquier pila no recargable!
¡Asegúrese de que en el porta pilas del equipo, con el cargador conectado,
se encuentren exclusivamente pilas recargables NI-MH o el pack suministrado! Es muy peligroso intentar recargar pilas de otro tipo (por ejemplo
alcalinas o de manganeso). Las baterías que no son recargables, pueden
sulfatarse, explotar e incluso arder y causar daños!
¡El uso de un cargador no original puede causar daños al equipo o causar
explosiones y lesiones personales!
¡No tire nunca las pilas al fuego, ni las acerque a fuentes de calor: pueden causar explosiones y lesiones personales! Deseche las pilas siguiendo
exclusivamente la normativa medioambiental vigente!
¡No mezcle baterías nuevas y viejas o baterías de distinto tipo o capacidad o que hayan sido utilizadas para otros usos!
20 | Manual de instrucciones Midland G9/G9E Plus
 Loading...