

Page 1
Midland G9
”
Manuale d`uso
”
User manual
”
Dedienungsanleitung
”
Manual de instrucciones
”
Manuel d`utilisation
”
Manual de instruções
”
Οδηγίες χρήσης
”
Руководство пользователя
Page 2

Con la presente, CTE International dichiara che l’apparato è conforme ai requisiti essenziali della
direttiva RTTE 1999/5/CE; la dichiarazione di conformità è consultabile sul sito internet
www.midlandredio.eu
CTE International herewith declares that the product complies with the essential requirements of
EC Directive 99/05/EC; the declaration of conformity of the device can be consulted onto
www.midlandradio.eu
Par la prèsente CTE International dèclare que l’appareil est conforme aux exigences essentielles
de la directive R&TTE 1999/5/CE ; la dèclaration de conformitè est consultable sur le site internet
www.midlandredio.eu
www.midlandradio.eu
Настоящим CTE International заявляет, что данный продукт соответствует требованиям
директивы ЕС 99/05/EC; с декларацией соответствия вы можете ознакомиться на сайте
www.midlandradio.eu
www.midlandradio.eu
www.midlandradio.eu
Page 3

1
ITALIANO
Grazie per aver scelto i prodotti Midland! L’apparato Midland G9 è un ricetrasmettitore che può essere utilizzato
senza licenza, in quasi tutta Europa.
Come previsto da dl 259 del 01/08/2003 e da nota 101C del PNF, gli apparati PMR446 sono soggetti ad una
dichiarazione d’utilizzo e ad un contributo annuo. Per ottenere la modulistica e le modalità di ottenimento
dell’autorizzazione generale contattate l’Ispettorato Territoriale nel vostro capoluogo di regione o visitate il sito web del
Ministero delle Comunicazioni (www.urpcomunicazioni.it oppure www.urpcomunicazioni.it/ispettorati).
L’utilizzo dell’apparato è consentito solamente dopo aver inviato la pratica all’Ispettorato Territoriale.
Raccomandiamo di conservare una copia di tale pratica.
L’apparato Midland G9 grazie all’utilizzo delle tecnologie più avanzate nel campo della radiocomunicazione
ed alla sua robusta struttura meccanica è decisamente la soluzione più afdabile ed ideale per la gestione
professionale di team di lavoro, per la comunicazione con più persone all’interno di cantieri, di edici e nelle
manifestazioni sportive.
Midland G9 è disponibile in due modelli:
versione BiBanda (PMR446/LPD) ›
versione E solo banda PMR446 ›
Questo manuale comprende entrambe le versioni, segnalando quali sono le funzionalità speciche per
ciascuna versione.
Dotazione
N° 1 apparato Midland G9 ›
N° 1 caricatore da tavolo singolo ›
N° 1 adattatore da muro ›
N° 4 batterie ricaricabili AA da 1800mAh NiMH ›
N° 1 clip da cintura ›
Copertura/portata
Le prestazioni dei ricetrasmettitori dipendono dalle condizioni ambientali ed atmosferiche. Fattori ambientali quali
alture, edici, alberi, fogliame possono diminuire la copertura.
Le prestazioni ottimali si ottengono in campo aperto mentre la portata si potrà ridurre, per esempio all’interno di
un’automobile o di un edicio. Tipicamente la copertura in città, in presenza di edici è di 1 o 2 Km. In campo
aperto, ma con presenza di alberi, case, fogliame, la copertura è di 4-6 Km. In campo aperto, a vista e senza
nessun tipo d’interferenza, come per esempio in montagna, la copertura può essere anche superiore ai 12 Km.
Batterie e vano batteria
E’ possibile utilizzare le batterie ricaricabili fornite con l’apparato, oppure 4 batterie AA alcaline. Per aprire il vano
batteria, spingere la linguetta verso il basso, e rimuovere il coperchio sollevandolo. Dopo aver inserito il pacco
batteria o le batterie richiudere il vano batteria e riportate la linguetta nella posizione di chiusura.
Attenzione, nel caso si utilizzi le batterie ricaricabili è opportuno porre le radio in ricarica prima
dell’utilizzo.
Avvertenze
BATTERIE › - Osservate tutte le precauzioni sull’utilizzo delle batterie descritte nel cap “Ricarica delle
batterie”.
NON APRITE LA RADIO PER NESSUN MOTIVO › , la meccanica ed elettronica di precisione di cui é composto
l’apparato richiede esperienza e strumentazione; per lo stesso motivo non va assolutamente riallineata la
radio, che é già stata tarata in fabbrica per le massime prestazioni. L’apertura del ricetrasmettitore da parte di
personale non autorizzato farà decadere automaticamente la garanzia.
Non utilizzate alcool, solventi o abrasivi per pulire l’apparecchio. › Utilizzate solo un panno morbido e pulito
leggermente inumidito con acqua. Nei casi più tenaci utilizzate un blando detergente.
MIDLAND G9
Page 4

CARATTERISTICHE
Nuova funzionalità “doppio PTT per alta o bassa potenza” › : Midland G9 introduce il PTT doppio, grazie al
quale è possibile scegliere se trasmettere in alta o bassa potenza. Grazie a questa caratteristica è possibile
utilizzare l’alta potenza in trasmissione solo quando è veramente necessario, ottimizzando così il consumo
delle batterie.
Nuova funzionalità “Chiamata d’emergenza”. Midland G9 › introduce una nuova funzione “innovativa
ed importante”: il canale dedicato alle emergenze. Normalmente la comunicazione via radio avviene
tra due o più utenti che sono in quel momento sintonizzati sullo stesso canale, per cui non è possibile
comunicare con persone che sono su canali differenti o trasmettere su più canali contemporaneamente.
Grazie alla nuova funzione “Emergenza” è possibile invece controllare costantemente il canale dedicato alle
emergenze; in questo modo coloro che sono in possesso di un Midland G9 potranno comunicare normalmente
sul canale impostato ed allo stesso tempo ricevere o trasmette eventuali comunicazioni d’EMERGENZA sul
canale dedicato per questo scopo. É sufciente tenere premuto il tasto EMG per 3 secondi ed un segnale
di emergenza verrà inviato a tutte le radio in portata, che verranno sintonizzate automaticamente sul canale
“EC” (Emergency Channel) anche se si trovavano su un altro canale.
Nuova funzionalità “controllo portata”: › con la semplice pressione di un tasto potete vericare se ci sono
radio in portata.
Nuova funzionalità “Vox TalkBack”: › Se la radio dovesse trasmettere costantemente in VOX, la trasmissione
viene automaticamente interrotta dopo 20” per dare la possibilità di parlare anche ad altri utenti sintonizzati
su quel canale.
Caratteristiche principali
Potenza: 500mW (PMR446); 10mW (LPD) ›
Temperatura operativa: da -20° a +55° C ›
38 toni CTCSS/104 codici DCS ›
Doppio PTT: alta/bassa potenza ›
Chiamata d’emergenza ›
Controllo Portata ›
VOX regolabile su 3 livelli, con “TalkBack” ›
VibraCALL ›
Blocco tastiera ›
Auto power save: risparmio automatico batterie ›
Indicatore di batteria scarica ›
Dual Watch ›
CALL con 5 melodie ›
SCAN ›
Monitor ›
Out of Range ›
Roger beep: tono di ne chiamata ›
Alta/Bassa potenza ›
Display LCD retroilluminato ›
Alimentazione tramite 4 batterie AA NiMH (o con pacco batteria da 800mAh) ›
Presa accessori 2 Pin ›
Versioni:
G9 Dual band (PMR446/LPD) ›
24 canali PMR446 (8+16 pre-registrati)/69 canali LPD
G9E (solo PMR446) ›
24 canali PMR446 (8+16 pre-registrati)
2
Page 5

3
ITALIANO
DESCRIZIONE DELLE PARTI
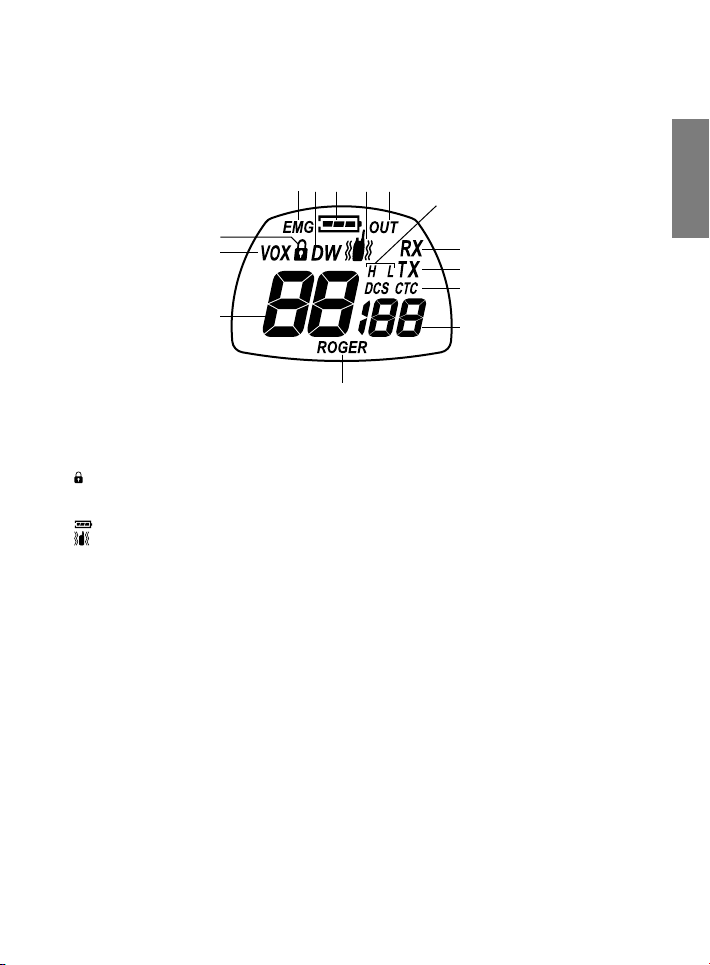
Display
Il vostro ricetrasmettitore utilizza un display LCD (a cristalli liquidi) per informarvi costantemente del suo stato
operativo. I simboli ed i parametri che possono apparire di volta in volta sono i seguenti:
1. CANALE Queste due grandi cifre indicano il numero del canale selezionato
2. VOX Indica l’attivazione della funzione VOX;
3.
Il simbolo del lucchetto indica il blocco della tastiera attivo.
4. EMG Compare quando la funzione Emergenza è attiva.
5. DW Compare quando la funzione Dual Watch è attiva.
6.
Il simbolo della batteria indica lo stato di carica del pacco batteria o delle
batterie AAA.
7.
Indica la funzione VibraCALL attiva.
8. OUT Indica il superamento della distanza massima di ricezione Out of Range.
9. RX Appare sul display, quando il ricetrasmettitore è in ricezione.
10. TX Compare durante la trasmissione (pulsante PTT premuto);
11. H(High)/L(Low) Indica la selezione della bassa o dell’alta potenza di trasmissione.
La potenza di trasmissione del PTT grande segue questa selezione.
12. CTCSS/DCS Queste due icone indicano il tipo di tono sub audio selezionato.
13. Toni CTCSS/DCS Queste tre piccole cifre indicano il codice dei toni CTCSS/DCS selezionati
(1-38 / 1-104)
14. ROGER Compare, quando la funzione Roger Beep è attiva.
1
2
3
4 5 6 8
7
10
9
11
12
13
14
Page 6
CALL
MENU
EMG
1
2
5
3
4 6 8 7
11
9
10
12
13
14
15
24
23
22
21
20
19
18
17
16
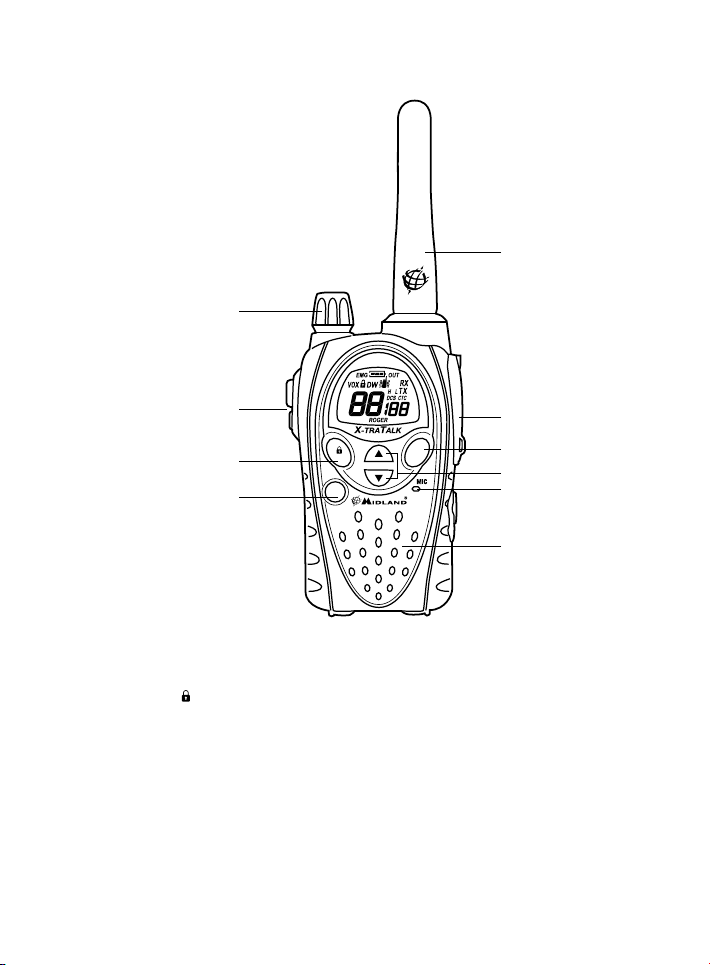
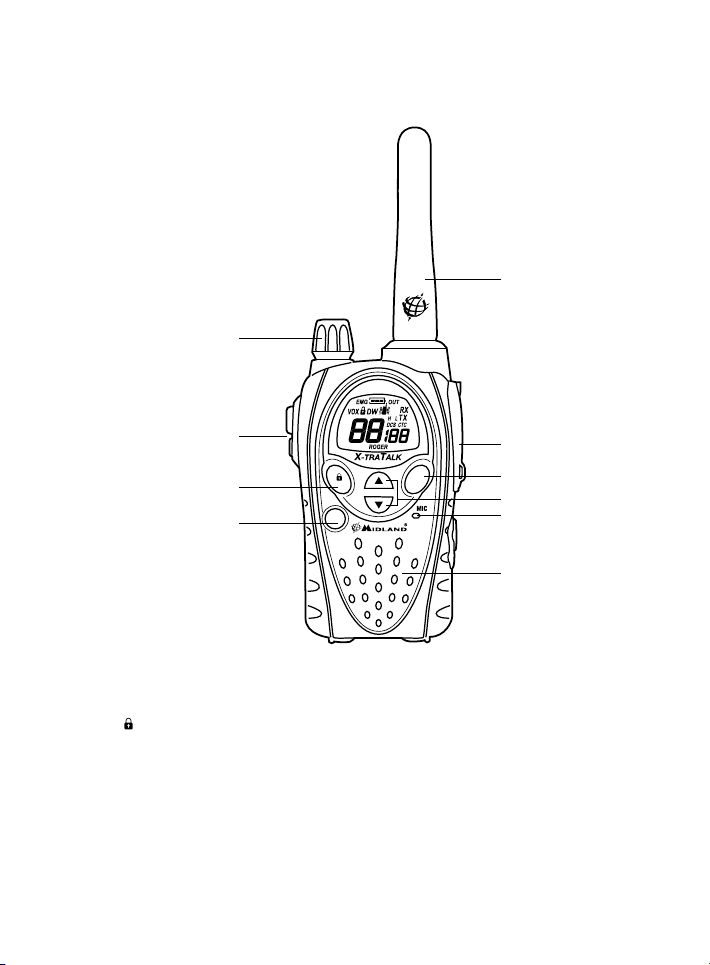
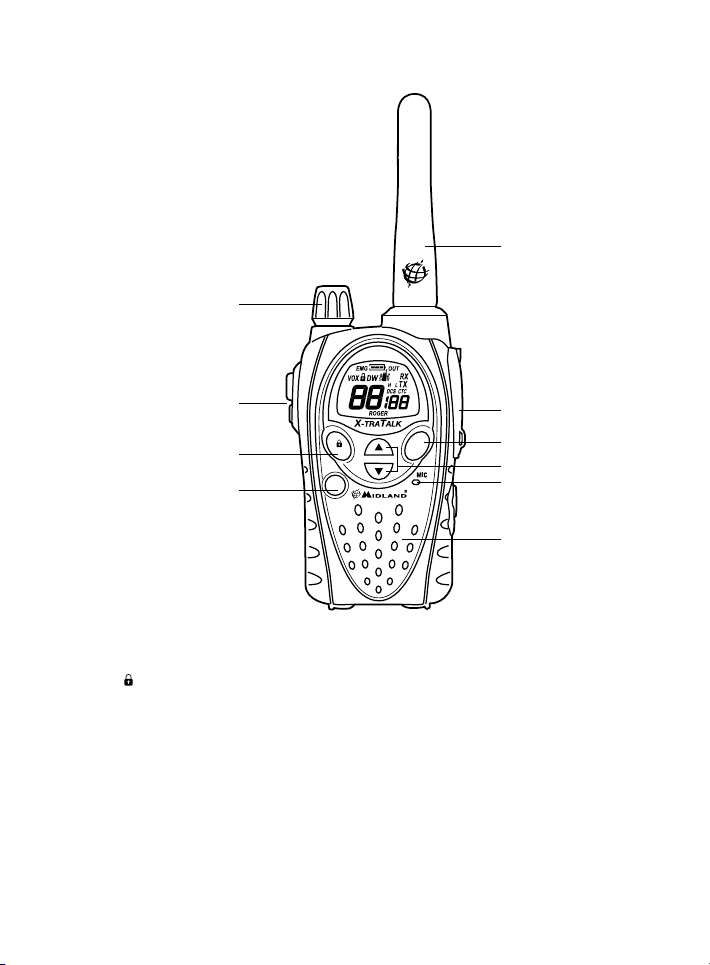
Descrizione dell’apparato radio
Fate riferimento all’immagine nella pagina seguente per identicare tutte le principali parti dell’apparato:
15. Altoparlante integrato In questo punto si trova l’altoparlante per la ricezione audio.
16. Pulsante MENU La pressione di questo pulsante permette di entrare nel MENU di
17. Pulsante CALL/
18. Pulsante PTT (premere per parlare). Sono disponibili 2 pulsanti PTT, uno grande e uno
19. Manopola VOLUME Accende /spegne l’apparecchio e regola il VOLUME audio di ricezione.
20. ANTENNA Serve a ricevere e trasmettere i segnali radio.
21. Presa Accessori (sotto la protezione) Consente il collegamento a dispositivi esterni quali: cufe,
22. Pulsante EMG Consente l’immediata attivazione delle funzioni d’EMERGENZA e Controllo
23. Pulsanti ▲▼ Servono per scorrere le varie impostazioni all’interno del MENU
24. Microfono integrato In questo punto si trova il microfono per la trasmissione
congurazione della radio.
Serve ad inviare un segnale di chiamata sul canale in uso, oppure tenendolo
premuto per circa 5 secondi per attivare il blocco della tastiera.
più piccolo identicato con la parola “boost” in rosso. La pressione del PTT
grande porta l’apparato in trasmissione in bassa oppure alta potenza (in base
alla selezione fatta a menu: H oppure L), mentre la pressione del PTT piccolo
(boost) trasmette sempre in alta potenza.
microfoni, caricatori, ecc (2 pin).
Portata.
4
Page 7

5
ITALIANO
Accensione/spegnimento
Per accendere il ricetrasmettitore, ruotare la manopola VOLUME in senso orario sino a sentire uno scatto
meccanico.
Per spegnere il ricetrasmettitore, ruotare la manopola in senso antiorario.
Selezione della Banda PMR466 o LDP (solo per la versione BiBanda)
Midland G9 versione BiBanda è un apparato inizialmente congurato sulla banda PMR446.
Per passare alla banda LPD, è sufciente tenere premuto a lungo il tasto MENU nchè il display mostra il canale
1. Per tornare alla banda PMR446 tenete premuto il tasto MENU nchè il display mostra “P1”.
! Questa procedura disabilita la funzione “
EMG” (Emergenza) quindi se cambiate banda ricordatevi di
riattivare dal MENU la funzione Emergenza (vedi capitolo “Funzione chiamata Emergenza”).
Selezione di un canale
Premere il tasto MENU, sul Display inizierà a lampeggiare il n° del canale. Selezionare il canale desiderato
utilizzando i tasti ▲▼. Premere PTT per confermare, oppure attendere 5 secondi.
In base al modello si può scegliere tra i seguenti canali:
versione BiBanda: › PMR446 da P1 a P8 e da 9p a 24p (pre-registrati) / LPD da 1 a 69.
versione E solo PMR446: › da P1 a P8 e da 9p a 24p (pre-registrati)
! Il canale P8 è stato dedicato di Default alla funzione “Emergenza” quindi consigliamo di non utilizzarlo
per non interferire con questa funzionalità.
Visualizzare il canale/tono dei canali pre-registrati
Per visualizzare momentaneamente il canale PMR446 e il subtono utilizzato nei canali pre-registrati, è sufciente
posizionarsi sul canale voluto (da 9p a 24p) e tenere premuta la freccia giù per 3 sec.
Trasmissione e ricezione
Per trasmettere tenere premuto indifferentemente uno dei due pulsanti PTT. Attendere una frazione di secondo
e parlare con tono normale a circa 5 cm di distanza in direzione del microfono del ricetrasmettitore; il display
visualizzerà TX
Rilasciare il tasto PTT al termine della conversazione.
Quando l’apparecchio é in ricezione (pulsante PTT rilasciato) riceverete automaticamente qualsiasi comunicazione.
Il display visualizzerà RX.
! Per default sia il tasto grande del PTT che quello piccolo, trasmettono in Alta potenza, essendo da
menu congurata come Alta potenza (H – High).
! Se si utilizza un accessorio esterno, il PTT presente sull’accessorio segue la stessa funzionalità del
PTT grande.
Regolazione VOLUME
Ruotare la manopola VOLUME no ad ottenere il livello desiderato.
Tasto “CALL”
Premendo il tasto CALL verrà inviato un segnale sonoro di avviso chiamata a tutti gli utenti sullo stesso canale.
Sono disponibili diverse suonerie selezionabili tramite MENU.
Tasto “Emergenza”
Quando la funzione emergenza è attiva, (EMG lampeggiante sul display) tenendo premuto il tasto EMG per 3
secondi si invia la chiamata di emergenza agli altri G9.
La funzione Emergenza è già attivata di default.
Premendo due volte il tasto
EMG viene inviata una richiesta di risposta a tutte le radio in portata (funzione
Controllo Portata)
Blocco tastiera
Mantenere premuto il tasto CALL/
per circa 5 secondi. Il simbolo che appare sul display
indica la sua
attivazione. Solo i tasti PTT,
EMG e CALL/
rimangono attivi. Per la disattivazione, tenere premuto nuovamente
il tasto CALL/
per circa 5 secondi.
Page 8

Funzione MON (Monitor)/Squelch
La funzione Monitor consente di escludere temporaneamente lo squelch automatico per ricevere eventuali
segnali estremamente deboli che altrimenti non sarebbero stati ricevuti.
Per attivare la funzione Monitor, tenere premuto per circa 2 secondi contemporanea-mente entrambi i pulsanti
▲▼. Per disattivare questa funzione premere nuovamente per circa 2 secondi entrambi i tasto ▲▼, (oppure
spegnere e riaccendere la radio).
! Questa funzione può essere attivata solo se la funzione “Emergenza” non è attiva.
! Con la funzione MON attiva, è normale che la radio abbia sempre un costante rumore di fondo.
Scansione di tutti i canali
SCAN esegue la scansione di tutti i canali e in presenza di un segnale in ricezione si arresta. La scansione
riprende dopo cinque secondi dal cessare del segnale. Questa funzione è utile per controllare quali canali sono
liberi.
Per eseguire la scansione dei canali, premere per 2 sec il pulsante ▲: Midland G9 inizia ad eseguire la scansione
dei canali. Per fermare la scansione, premete il tasto PTT, il vostro ricetrasmettitore tornerà sul canale in uso al
momento in cui è stata fatta partire la scansione.
! Questa funzione può essere attivata solo se la funzione “Emergenza” non è attiva.
Tasto Funzione “MENU”
Le seguenti funzioni si selezionano premendo il tasto “MENU”:
Selezione canale ›
Impostazione toni CTCSS ›
Impostazione toni DCS ›
Impostazione Alta/Bassa potenza (solo sulla banda PMR446) ›
Funzione VOX ›
Funzione Vibra › CALL
Impostazione suonerie ›
Roger Beep ›
Beep tastiera ›
Canale Emergenza ›
Funzione Dual Watch ›
Out of Range ›
Selezione di un canale
Premere il tasto MENU, sul Display inizierà a lampeggiare il n° del canale. Selezionare il canale desiderato
utilizzando i tasti ▲▼. Premere PTT per confermare, oppure attendere 5 secondi.
In base al modello si può scegliere tra i seguenti canali:
versione BiBanda: › PMR446 da P1 a P8 e da 9p a 24p (pre-registrati) / LPD da 1 a 69.
versione E solo PMR446 › : da P1 a P8 e da 9p a 24p (pre-registrati)
! Il canale P8 è stato dedicato alla funzione “Emergenza” quindi consigliamo di non utilizzarlo per non
interferire con questa funzionalità.
Impostazione toni CTCSS/DCS
I toni CTCSS e DCS sono dei codici che possono essere aggiunti ai canali per crearne uno personale. Per ogni
canale si possono aggiungere no a 38 codici CTCSS e 104 codici DCS diversi. L’implementazione di questi
codici può essere fatta sui seguenti canali:
Versione BiBanda: solo sugli 8 canali principali PMR446 (da P1 a P8) e sui 69 LPD.
Versione E solo PMR446: solo sugli 8 canali principali PMR446 (da P1 a P8)
Per entrambe le versioni, i canali pre-registrati da 9p a 24p non possono essere modicati.
Procedimento per l’attivazione dei 38 toni CTCSS:
Accendere l’apparato. ›
Selezionare il canale desiderato premendo il pulsante › MENU e i tasti ▲▼.
Premere nuovamente il tasto › MENU sino a visualizzare sul display la scritta CTC e il codice del tono lampeggiante a destra (“of”=nessun codice - condizione di default).
Selezionare il tono CTCSS desiderato premendo i tasti ▲▼. ›
Per confermare l’impostazione, premere il tasto PTT oppure attendere circa 5 secondi.
6
Page 9

7
ITALIANO
Procedimento per la disattivazione del tono CTCSS:
Per non utilizzare i toni CTCSS:
Selezionare il canale desiderato ›
Premere il tasto › MENU sino a visualizzare sul display il codice del tono CTCSS lampeggiante a destra;
Selezionare “ › of” tramite i tasti ▲▼.
Procedimento per l’attivazione dei 104 toni DCS:
Accendere l’apparato. ›
Selezionare il canale desiderato, premendo il pulsante › MENU e i tasti ▲▼.
Premere nuovamente il tasto › MENU sino a visualizzare sul display la scritta DCS e il codice del tono lampeggiante a destra (“of”=nessun codice - condizione di default).
Selezionare il tono DCS desiderato premendo i tasti ▲▼. ›
Per confermare l’impostazione, premere il tasto PTT oppure attendere circa 5 secondi.
! Di fabbrica, il canale P8 con tono DCS 50 (P850) è riservato alla funzione Emergenza (canale EC).
Consigliamo quindi di non utilizzarlo!!!
Procedimento per la disattivazione del tono DCS:
Per non utilizzare i toni DCS:
Selezionare il canale desiderato ›
Premere il tasto › MENU nchè il display mostra il canale desiderato, ed il codice del tono DCS lampeggia a
destra;Selezionare “of” tramite i tasti ▲▼.
Funzione Alta - Bassa potenza (solo banda PMR446)
Per selezionare la potenza, premere il pulsante MENU sino a visualizzare sul display, Pr, utilizzando i tasti ▲▼
selezionare L (low) per la bassa potenza H (high) per l’alta potenza. Premere PTT per confermare, oppure
attendere 5 secondi.
Con le batterie completamente cariche, l’alta potenza é di 500 mW (ERP), mentre quella bassa é di 10mW
(ERP).
Sui Canali LPD (solo versione G9 Bibanda) la potenza è sempre di 10mW (ERP).
La selezione dell’alta o bassa potenza da menu modica anche la modalità con cui il doppio PTT funziona.
Canali PMR446: Se dal Menu è selezionata la voce “Alta potenza” (H-High), il PTT grande ed il PTT piccolo
trasmettono entrambi alla massima potenza. Se invece dal menu è selezionata la voce “Bassa potenza”
(L-Low), il PTT grande trasmette a bassa potenza ed il PTT piccolo trasmette alla massima potenza.
Canali LPD: quando si utilizzano i canali LPD (solo per versione G9 Bibanda) la funzione Alta-Bassa potenza non
è disponibile, quindi i due PTT trasmetteranno sempre alla massima potenza.
! ATTENZIONE: Per ottimizzare il consumo delle batterie, e quindi utilizzare l’alta
potenza solo quando veramente serve (utilizzando il pulsante PTT “boost”), è
necessario congurare la potenza di trasmissione da menu in Bassa (L-Low).
Per default la congurazione da menu è sempre Alta (H-High), quindi ricordatevi di cambiare questo
parametro.
Funzione VOX
Questa funzione permette di attivare la comunicazione senza premere il tasto PTT.
E’ sufciente parlare e la comunicazione viene attivata.
La sensibilità è regolabile su 3 livelli e attivabile con o senza accessori. Il quarto livello disponibile attiva la
funzione Vox con TalkBack.
Nel caso in cui uno dei due apparati trasmette ininterrottamente per più di 20 secondi, Vox TalkBack ne interrompe
la trasmissione per dieci secondi, liberando il canale e concedendo così all’altro utente la possibilità di parlare.
Per attivare questa funzione, premere il pulsante MENU, sino a che apparirà sul display VOX, utilizzando i tasti
▲▼ selezionare la sensibilità:
Of: Disattivato; ›
1: Alta ›
2: Media ›
3: Bassa ›
4: Talk Back › (con sensibilità Alta)
premere PTT per confermare, oppure attendere 5 secondi
Per disattivare la funzione VOX seguire le indicazioni sopra riportate selezionando la voce oF.
Page 10

Funzione Vibra-CALL
Midland G9 è dotato del dispositivo “Vibra-CALL”, ovvero la possibilità di attivare la vibrazione al momento della
ricezione del “TONO DI CHIAMATA”
Per attivare questa funzione premere il tasto MENU, sino a visualizzare sul display
può inibire o attivare la funzione (on: Attiva oF:Disattiva);
Confermare premendo il tasto PTT oppure attendere 5 secondi.
; premendo i tasti ▲▼si
Funzione CALL
Midland G9 ha la possibilità di inviare 5 diversi toni di chiamata. Per farlo occorre premere il tasto CALL/
I toni possono essere selezionati nel seguente modo:
premere il tasto › MENU, sino a visualizzare sul display “CA” con il numero del tono attivo.
Premendo i tasti ▲▼si possono ascoltare/selezionare le 5 melodie pre-impostate; ›
Confermare premendo › PTT oppure attendere 5 secondi.
Funzione ROGER BEEP (Tonalità di conferma ne conversazione)
Al rilascio del tasto PTT, quindi alla ne di ogni trasmissione, viene emessa una tonalità, che indica al vostro
interlocutore che può iniziare a parlare.
Nel Midland G9 questa funzione è disattivata di default.
Premere il tasto MENU, sino a visualizzare sul display “rb of”;
Con i tasti ▲▼ selezionare “on” e sul Display comparirà “rb on”;
Premere il tasto PTT oppure attendere 5 secondi per confermare la programmazione.
Per disattivarlo ripetere la procedura indicata selezionando “rb of”
Beep Tastiera
Questa funzione, se attiva, genera un beep audio ogni volta che si preme un tasto.
Nel caso si desideri escludere il beep audio, è possibile farlo operando nel seguente modo:
Premere il tasto › MENU, sino a visualizzare sul display “bP on”.
Premendo i tasti ▲▼ fare in modo che il display mostri “ › bP of”.
Confermare premendo il tasto › PTT oppure attendere 5 secondi.
In questo modo tutte le volte che si preme un tasto non si sentirà alcun suono.
Per riattivarla ripetere la procedura indicata selezionando “bP on”
Funzione chiamata Emergenza
Questa funzione utilizza un canale dedicato alle chiamate d’emergenza e permette di parlare a tutti i G9 in portata,
anche se su canali diversi.
Tenendo premuto il tasto
identicato con “EC” e contemporaneamente viene inviato un tono audio. Tutte le radio in portata con la funzione
Emergenza attiva, verranno automaticamente spostate sul canale “EC”. Ora tutti possono parlare sullo stesso
canale.
! Quando la radio si trova sul canale d’emergenza (EC sul display) non è possibile utilizzare le
funzionalità del MENU. Solo i tasti PTT e CALL sono attivi.
Le radio torneranno sul canale in uso dopo un minuto dall’invio dell’ultima trasmissione. È possibile ritornare
immediatamente al canale in uso premendo il tasto
funzioni del MENU.
Attivazione - Disattivazione
All’accensione dell’apparato la funzione EMERGENZA è attiva per default, è sempre possibile disattivarla/
attivarla operando nel seguente modo:
Premere il tasto › MENU sino a visualizzare sul display EC on.
Con i tasti ▲▼ selezionare › EC of. Confermare premendo il tasto PTT oppure attendere 5 secondi.
! Quando la funzione emergenza è attiva (
utilizzabili: Scan, Monitor, Dual Watch, Out of Range.
Cambio canale di emergenza
Per default il canale d’emergenza preimpostato è il P8 DCS 50; è però possibile scegliere un qualunque altro
canale in base alle proprie esigenze.
Ricordatevi di cambiare il canale anche sulle altre radio!!
EMG, in automatico la radio si sposta dal canale in uso a quello dedicato all’emergenza,
EMG. In questa condizione è possibile utilizzare tutte le
EMG lampeggiante sul display) le seguenti funzioni non sono
8
.
Page 11

9
ITALIANO
Con la funzione emergenza attiva (EMG lampeggiante sul display)
Premere il tasto › MENU sino a visualizzare sul display EC on.
Premere ancora › MENU (sul display compare of) e con i tasti ▲▼ selezionare il canale desiderato
Premere il tasto › PTT oppure attendere 5 secondi per conferma.
Per impostare nuovamente il canale di emergenza di default (P8 DCS 50) con la funzione Emergenza attiva (EMG
lampeggiante sul display):
Premere il tasto › MENU sino a visualizzare sul display EC on.
Premere ancora › MENU e selezionare of
Premere il tasto › PTT oppure attendere 5 secondi per conferma.
! Se decidete di dedicare un altro canale qualunque alla funzione Emergenza, ricordatevi di non utilizzarlo
anche per la normale comunicazione. Questo per evitare interferenze con la funzione Emergenza.
Funzione Controllo portata
Questa funzione permette di vericare manualmente in ogni momento se esiste almeno un’altra radio raggiungibile
in portata.
Premendo due volte il tasto
EMG viene inviata una richiesta di risposta, sul canale in quel momento in uso, a
tutte le radio in portata.
Se almeno una radio risponde, viene generato un tono audio sulla propria radio. Se nemmeno una radio risponde
(quindi nessuna radio in portata), non viene generato alcun tono audio.
! Questa funzione può essere utilizzata solo se la funzione “Out of Range” non è attiva.
Funzione DUAL WATCH
Questa funzione permette di monitorare costantemente in ricezione un secondo canale oltre a quello in uso.
Attivazione - Disattivazione
Premere il tasto › MENU ripetutamente sino a visualizzare sul display DW of.
Con i tasti ▲▼ selezionare il secondo canale che si desidera monitorare. ›
Premere il tasto › PTT oppure attendere 5 secondi per conferma. Il display mostrerà alternativamente il canale
in uso e il secondo canale selezionato.
Per interrompere il Dual Watch, è sufciente premere il tasto MENU.
Quando la radio riceverà un segnale su uno dei due canali monitorati, la funzione “Dual Watch” viene
momentaneamente sospesa, permettendo la trasmissione e la ricezione sul canale in quel momento in uso. Dopo
5 secondi, se non viene effettuata nessuna attività di trasmissione o ricezione, la funzione Dual Watch riprende.
! Questa funzione può essere attivata solo se la funzione “Emergenza” non è attiva.
Funzione Out-of-Range
Grazie a questa funzione è possibile vericare se una coppia di apparati rimane sempre in portata. Dal momento
in cui due radio vengono accoppiate, automaticamente si trasmettono a vicenda un codice di controllo ogni 30
secondi. Non appena questa trasmissione si interrompe ed uno dei due apparati non riceve il codice di controllo
per più di 2 volte consecutive, l’icona OUT inizierà a lampeggiare sul display e la radio emetterà un suono di
avviso.
! Questa funzione può essere attivata solo se la funzione “Emergenza” non è attiva.
Attivazione - Disattivazione
Attivare su entrambe le radio la funzione Out of Range:
premere il tasto › MENU sino a visualizzare sul display “OUT” e “Or of”, selezionare quindi con ▲▼ “Or on”
(attivato)
Spegnere entrambe le radio ›
Riaccendere entrambe le radio contemporaneamente ›
Per disattivare la funzione premere il tasto MENU sino a visualizzare sul display “OUT” e “Or on”, selezionare
quindi con ▲▼ “Or of” (disattivato).
Confermare le impostazioni con il pulsante PTT o attendere 5 secondi.
Illuminazione del display
Se l’illuminazione ambientale non é sufciente per leggere bene il display, premendo il pulsante EMG una volta
(brevemente), così da illuminarlo per circa 5 secondi. Tutte le volte che viene usato il pulsante MENU, il display
si illumina automaticamente.
Page 12

Risparmio energia
La funzione di risparmio automatico di energia consente di ridurre i consumi no al 50%; se la radio non riceve
alcun segnale per più di 7 secondi la funzione viene attivata automaticamente.Quando le batterie sono scariche,
apparirà sul Display l’icona
! Questa funzionalità è attiva solo quando la funzione “
Ricarica delle batterie
1) Inserite la spina del cavo di ricarica in una presa di alimentazione di rete CA e l’altra estremità nella presa della
vaschetta di ricarica. Sono necessarie 12/14 ore per una carica completa.
2) Inserite il ricetrasmettitore nella vaschetta in modo che si innesti saldamente al suo interno. Il led rosso di
ricarica presente sulla parte frontale della vaschetta si accende.
3) Al termine della carica, estraete il ricetrasmettitore dalla vaschetta e scollegate la spina del cavo di ricarica
dalla presa di alimentazione di rete CA.
! Non sovraccaricate le batterie! Quando le batterie sono completamente cariche, il processo di carica
non si blocca automaticamente. Non dimenticate quindi di staccare al più presto il ricetrasmettitore
dal caricabatteria non appena é trascorso il tempo necessario, diversamente potreste danneggiare le
batterie e/o il ricetrasmettitore.
! Non cercate di caricare batterie alcaline o comunque batterie non ricaricabili. Accertatevi che nel
vano batterie dell’apparecchio, con il caricabatterie collegato, siano inserite esclusivamente batterie
ricaricabili NI-MH o il pacco batteria fornito in dotazione! Le batterie alcaline non sono ricaricabili.
Batterie non idonee possono perdere liquido, esplodere o anche bruciare e causare gravi danni!
! L’utilizzo di un caricabatterie non originale puó causare danni al vostro apparecchio o causare
esplosioni e lesioni personali.
! Non gettate mai le batterie nel fuoco, né avvicinatele a sorgenti di calore: possono causare esplosioni
e lesioni personali. Smaltite le batterie esclusivamente seguendo le normative locali.
! Non mescolate assieme batterie vecchie e nuove e/o di tipo diverso e/o utilizzate in modo diverso.
: occorre sostituire le batterie al più presto o provvedere alla loro ricarica.
EMG” è disattiva.
GARANZIA
- Il consumatore è titolare di diritti secondo la legislazione nazionale applicabile disciplinante la vendita dei beni
di consumo e la garanzia lascia impregiudicati tali diritti ;
- La durata della garanzia è di mesi 24 a decorrere dalla data di acquisto o dalla data della ricevuta rilasciata
dal rivenditore ; per farla valere l’utente deve presentare lo scontrino d’acquisto assieme al box dell’apparato
acquistato ;
- La garanzia copre l’apparecchio nella totalità delle sue parti esclusi i TRANSISTORS nali e comprende sia
il materiale che la manodopera necessaria per le riparazioni ;
- La garanzia non copre i difetti causati dall’uso o collegamento del Prodotto con accessori o/e software non
prodotti o forniti dal Produttore o da un uso del prodotto diverso da quello per cui il prodotto medesimo è stato
realizzato. Essa non è valida in caso di apertura, modica o riparazione da parte di soggetti diversi dai centri
autorizzati o in caso di riparazioni effettuate con ricambi non autorizzati.
- Nulla sarà dovuto all’acquirente per il tempo durante il quale l’apparecchio sarà rimasto inattivo né egli potrà
pretendere risarcimenti o indennizzi per spese sostenute come pure per danni diretti o indiretti derivanti
dall’uso dell’apparecchio.
Con la presente, CTE International dichiara che l’apparato è conforme ai requisiti essenziali della direttiva RTTE
1999/5/CE; la dichiarazione di conformità è consultabile sul sito internet www.midlandredio.eu
10
Page 13

11
ENGLISH
Thanks for choosing Midland! Midland G9 is a portable transceiver that is free use in almost all European
countries.
Combining the latest technology in radio communication along with a sturdy mechanical frame, the Midland
G9 makes the ideal and effective solution for the professionals who need to stay in touch with colleagues in
construction sites and buildings.
Midland G9 is available in two versions:
Dual Band (PMR446/LPD) ›
E version (PMR446 only) ›
This manual is referred to both models and you will nd highlighted the differences between the two versions.
Content
N° 1 › Midland G9
N° 1 Single desktop charger ›
N° 1 Wall adaptor ›
N° 4 1800 mAh AA NiMH rechargeable batteries ›
N° 1 Belt clip ›
Coverage/range
The maximum range depends on terrain condition and is obtained during use in an open space.
The only limitation to maximum possible range are environmental factors such as blockage caused by trees,
buildings, or other obstructions. Inside a car or a metallic constructions, the range can be reduced. Normally the
coverage in the city, with buildings or other obstructions is about 1 or 2 Km. In open space but with obstructions
like trees, leaves or houses the maximum possible range is about 4-6 Km. In open space, without obstructions
and in sight, like for example in mountain, the coverage can be more than 12 Km.
Batteries and battery compartment
The transceiver accepts the supplied rechargeable batteries or 4 AA alkaline batteries. To open the battery
compartment: with the back of the radio facing you, unhook the battery holder in the lower part of the radio and
gently slide the cover. Insert the battery observing the polarity and place the cover again.
Attention: the batteries must be recharged before the rst use.
Warnings
BATTERIES › - Strictly follow all the warnings on the batteries stated at chapter “Battery recharge”.
DO NOT OPEN THE RADIO FOR ANY REASON › ! The radio’s precision mechanics and electronics require
experience and specialized equipment; for the same reason, the radio should under no circumstances be realigned as it has already been calibrated for maximum performance. Unauthorized opening of the transceiver
will void the warranty.
Do not use detergents, alcohol, solvents, or abrasives to clean the equipment. › Just use a soft, clean
cloth. If the radio is very dirty, slightly dampen the cloth with a mixture of water and a neutral soap.
MIDLAND G9
Page 14

FEATURES
New “Dual PTT” feature for high or low output power. Midland G9 › is equipped with a Dual PTT key. Than-
ks to this brand new feature, it is possible to use the high power only when it is really necessary, enabling in
this way a high reduction of the battery consumption.
New “Emergency CALL” feature. Midland G9 › introduces an innovative and important feature: the channel
dedicated to the emergencies. Radio communications usually happen between two or more users which
are tuned on the same channel: it’s not possible to transmit or receive to/from different channels. But thanks
to the “Emergency” function, you can also keep a check on the Emergency channel: all users having a
Midland G9 can communicate on the tuned channel and at the same time can receive/transmit Emergency
messages on the dedicated channel. Simply keep pressed the EMG button for 3 seconds and an emergency
CALL will be sent to all the G9 within the range: they will be automatically tuned on the “EC” channel (Emergency Channel).
New “Manual Out of range” feature: › just press twice the EMG button and you will verify whether there are
some radios within the range of your equipment.
New “Vox TalkBack” feature: › if one radio is continuously transmitting in VOX, the Vox TB will automatically
stop the transmission after 20” to allow the transmission to the other users as well.
Main characteristics
Power: 500mW (PMR446); 10mW (LPD) ›
Operating temperature: from -20° to +55° C ›
38 CTCSS tones/104 DCS codes ›
Dual PTT key: high/low output power ›
Emergency CALL ›
Out of range control ›
VOX adjustable in 3 levels and with “TalkBack” ›
VibraCALL ›
Keypad lock ›
Auto power save: automatic current economy circuit ›
Low battery indicator ›
Dual Watch ›
CALL with 5 selectable melodies ›
SCAN ›
Monitor ›
Out of Range ›
Roger beep ›
High/Low power ›
LCD Display with backlight ›
Power supply: 4 AA NiMH rechargeable batteries (or an optional 800 mAh NiMH battery pack) ›
2pin accessory plug ›
Versions:
G9 Dual band (PMR446/LPD) ›
24 PMR446 channels (8+16 pre-set)/69 LPD channels
G9E (PMR446 only) ›
24 PMR446 channels (8+16 pre-set)
12
Page 15
13
ENGLISH
DESCRIPTION OF THE CONTROLS AND FUNCTIONS
Display
Your Midland G9 keeps you constantly updated about its operational status through a Liquid Crystal Display
(LCD). The symbols and their corresponding parameters that may appear, according to the operational status of
the device, are described as follows:
1. CHANNEL These two large digits indicate the selected channel
2. VOX VOX function activated
3.
This symbol appears when the keypad lock is activated
4. EMG Emergency function activated
5. DW Dual Watch activated
6.
Indicates the battery status
7.
Vibra-CALL function activated
8. OUT Indicates if the Automatic Out of Range function looses contact with the other
radios.
9. RX Reception mode
10. TX Indicates the transmission(PTT pressed);
11. H(High) / L(Low) High or low power selection.
The output power of the big PTT depends on your selection.
12. CTCSS/DCS Indicate the type of sub audio tone selected.
13. CTCSS/DCS tone These three small digits indicate the code of the CTCSS/DCS tones
selected (1-38 / 1-104)
14. ROGER Roger Beep activated.
1
2
3
4 5 6 8
7
10
9
11
12
13
14
Page 16
CALL
MENU
EMG
1
2
5
3
4 6 8 7
11
9
10
12
13
14
15
24
23
22
21
20
19
18
17
16
Radio
Refer to this picture to identify the various parts of the device:
15. Built-in speaker Here is where the speaker is housed.
16. MENU button Press this button to enter the radio’s MENU.
17. CALL/
18. PTT (push to talk) The PTT key has a dual function, as it is composed by 2 parts: the larger and bigger
19. VOLUME knob On/off switch for the device and adjusts VOLUME of reception.
20. ANTENNA Receives and transmits radio signals.
21. Accessory socket (under protective cover) To connect to external audio devices such as microphones,
22.
23. ▲▼ buttons To change the setting within the MENU
24. Built-in microphone Here is where sound is picked up by the microphone.
button To send a CALL on the selected channel. If you keep it pressed for about 5 seconds,
the keypad lock is activated.
side of the PTT key, allowes the transceiver to send with high or low power (depending
on the setting of the menu); while the small PTT (Boost) allows the transceiver to
transmit always with high power.
chargers, etc. (2pin type)
EMG button To activate the Emergency and the Manual Out of range functions.
14
Page 17

15
ENGLISH
Turning on/off
To turn on the transceiver, turn the VOLUME knob clockwise until you hear it clicks.
To turn off the transceiver, turn the knob counter-clockwise.
Selecting the PMR466 or LDP band (only for the dual band version)
Midland G9 (Dual band) is pre-set at factory on the PMR446 band.
To switch to the LPD band, keep pressed the MENU button until the LPD shows channel ‘1’.
To return to the PMR446 band, keep pressed the MENU button again, until the LCD shows ‘P1’.
! This procedure disables the “
EMG” function; therefore if you change the frequency band, remember
to activate the Emergency function again (see paragraph “Emergency function”).
Channel selection
Press the MENU button. The number of the channel will start ashing on the display.
Press the scroll buttons ▼▲ till you select the desired channel. Press the PTT button to conrm, or wait for 5
seconds.
According to the version you bought, you can choose amongst the following channels:
Dual band version: › PMR446 from P1 to P8 and from 9p to 24p (pre-set) / LPD from 1 to 69.
E version › (PMR446 only): from P1 to P8 and from 9p to 24p (pre-set)
! Channel P8 has been set at factory for the “Emergency” function; we suggest that you do not use it for
general communications!
Displaying the channel/sub audio tone
To momentarily display the PMR446 channel and the subadio tone used in the pre-set channels, go to the desired
channel (from 9p to 24p) and keep pressed the ▼ for 3 seconds.
Transmission and reception
To transmit keep the PTT button rmly pressed (it is not important what part of it). Wait for a fraction of a second
then speak normally in the direction of the microphone and hold the device at a distance of about 5 cm; TX will
appear on the display.
When you have nished, release the PTT.
When the radio is in reception mode (PTT released) you will automatically receive any communication. RX will
be displayed.
! By default the output power set is “H-high”, so independently on which PTT key you press (small or
big)the sending will be with high power.
! If you use an external microphone, the PTT on it will follow the same PTT setting of the radio.
VOLUME adjustment
Rotate the VOLUME knob till you reach the desired level.
“CALL”
Push the CALL button and you will send an audio signal to the users tuned on the same channel; you can choose
amongst different CALL tones.
“Emergency”
When the Emergency function is enabled (EMG blinks on the display) keep pressed EMG for 3 seconds and you
send an emergency CALL to the other G9 within your range.
The Emergency function is activated by default.
Keypad lock
Keep pressed CALL/
for about 5 seconds. and
will be displayed as conrmation. Only PTT, EMG and CALL/
remain active. To disable this function, keep pressed again CALL/
for 5 seconds approx.
MON (Monitor) function / Squelch
The Monitor button is for temporarily excluding (opening) the squelch, in order to listen to signals that are too weak
to keep the squelch permanently opened.
Page 18

To activate the monitor function, keep pressed for about 2 seconds both ▲▼ at the same time. Follow the same
procedure to deactivate the function, or switch off and on the radio.
! When MON is active, you will probably hear a constant background noise.
! You can activate the Monitor feature only if the “Emergency” function is disabled.
Scanning all the channels
Midland G9 can automatically search for signals throughout the bands by scanning the channels in rapid
sequence. This function is useful to nd out any active channel.
When a signal is detected, the scanning pauses on that channel for 5 seconds.
Press ▲ for 2 seconds: the scanning will start. To stop it, push PTT: the Midland G9 will go back to the channel
from which the scanning originally started.
! You can activate the scanning feature only if the “Emergency” function is disabled.
“MENU” key
The following features can be selected by using the “MENU” button:
Channel selection ›
CTCSS tone setting ›
DCS tone setting ›
High/low power selection (only in the PMR446 band) ›
VOX ›
Vibra › CALL function
CALL › melodies
Roger Beep ›
Keypad Beep ›
Emergency channel ›
Dual Watch function ›
Out of Range ›
Channel selection
Press the MENU button. The number of the channel will start ashing on the display.
Press the scroll buttons ▼▲ till you select the desired channel. Press the PTT button to conrm, or wait for 5
seconds.
According to the version you bought, you can choose amongst the following channels:
Dual band version: › PMR446 from P1 to P8 and from 9p to 24p (pre-set) / LPD from 1 to 69.
E version › (PMR446 only): from P1 to P8 and from 9p to 24p (pre-set)
! Channel P8 has been set at factory for the “Emergency” function; we suggest that you do not use it for
general communications!
CTCSS/DCS tone setting
CTCSS and DCS tones are similar to access codes and enable the radio to communicate only with the users that
are tuned on the same channel and have set the same code. For each channel, you can set up to 38 CTCSS
and 104 DCS tones.
These tones can be set on the following channels:
Dual band version: › only on the 8 main PMR446 channels (from P1 to P8) and on the 69 LPD channels.
E version › (PMR446 only): only on the 8 main PMR446 channels (from P1 to P8)
For both, the pre-set channels from 9p to 24p cannot be modied.
Activating the CTCSS tones:
Turn on the unit. ›
Select the desired channel by pushing the › MENU button and the ▲▼ channels.
Press the › MENU button till the display shows CTC and the CTCSS tone blinks on the right (“of”= no code –
default condition).
Select the desired CTCSS tone by pushing ▲▼. ›
To conrm the setting, push › PTT or wait for 5 seconds.
Deactivating the CTCSS tones:
If you don’t want to use the CTCSS tones, follow these steps:
Select the desired channel ›
16
Page 19

17
ENGLISH
Press the › MENU key till the display shows the CTCSS tone blinking on the left;
Select “ › of” by means of ▲▼.
Activating the DCS codes:
Turn on the unit. ›
Select the desired channel by pressing › MENU and ▲▼ keys.
Push the › MENU button again till the display shows DCS and the tone code blinks on the right (“of”=no code
– default condition).
Select the desired DCS code by pushing ▲▼. ›
To conrm the setting, press the › PTT or wait for 5 seconds.
! Channel P8 with DCS tone 50 (P850) has been set at factory for the “Emergency” function; do not use
it for general communications!!
Deactivating the DCS codes:
Select the desired channel. ›
Press the › MENU key till the display shows the channel in use and the DCS code blinks on the right.
Select “ › of” by pushing ▲▼.
Hi/low power selection (only in PMR446 band)
To select the power level, press the MENU button till the display shows Pr. Use ▲▼ to select L (low power) or H
(high power). To conrm your selection, push PTT or wait for 5 seconds.
When the batteries are fully charged, the high power is 500 mW (ERP), while the low is 10mW (ERP).
If your radio has to operate within a short range, you can select the low power and therefore extend the battery
life.
On LPD channels (only for G9 Dual band version) the output power is always 10 mW (ERP).
PMR446 channels: The selection of high or low power inuences the use of the PTT key.
If you choose “H” (high power), by pressing the PTT key, regardless of what part of it, the transceiver transmit
with high power.
If you choose “L” (low power), by pressing the big PTT, the transceiver will transmit with low power; while by
pressing the small PTT it will transmit with high power.
LPD channels: the high/low output power selection is not available on LPD channels; so the two PTT transmit
always with high power (note for G9 Dualband version).
! WARNING: to optimize the battery consumption, it is necessary to set the Output power of the menu
as “L-low”. In this way, pressing the Boost PTT, you send with high power only when you really need.
As by default the Output power is “H-high”; so it is really recommended to change this parameter to
“L-low”.
VOX function
Midland G9 enables hands free conversations through the VOX function: just speak in the direction of the
microphone and the communication will be automatically activated.
The VOX sensitivity can be adjusted in 3 different levels. You can enable the VOX function with or without
accessories.
The fourth level activated is the Vox TalkBack: if one radio is continuously transmitting in VOX, the VOX TB will
automatically stop the transmission after 20 seconds to allow the transmission to the other users as well.
To activate the VOX function press the MENU button till VOX appears on the display.
Use ▲▼ to select the sensitivity levels:
Of: Off; ›
1: High ›
2: Middle ›
3: Low ›
4: Talk Back › (with high sensitivity)
To conrm your selection, press PTT or wait for 5 seconds.
To disable the VOX function, follow the procedure here above indicated and select oF.
Page 20

Vibra-CALL function
Midland G9 is equipped with the “Vibra-CALL” feature, which provides a silent alert for incoming CALLs.
To activate this feature, press the MENU button until the display shows
enable this feature (on: enables, oF:disables);
Push PTT [11] to conrm or wait for 5 seconds.
CALL feature
Midland G9 can send 5 different CALL tones. To send this audio signal to other users, press the CALL/
To select the CALL tones:
Press MENU, until the display shows “CA” and the active tone code.
By pushing ▲▼ you will hear the 5 pre-set melodies.
Conrm by pressing PTT or wait for 5 seconds.
ROGER BEEP (End transmission tone)
When the PTT button is released, the radio will beep to conrm to other users that your transmission has
nished.
In the Midland G9 this function is factory disabled.
To activate it:
Press the MENU button until the display shows “rb of”; using the scroll buttons ▼▲ select “on” and “rb on” will
be displayed; to conrm the roger beep activation, press PTT or wait for 5 seconds.
Keypad Beep
Everytime a button is pressed, you will hear a beep.
To disable the beeps, follow this procedure:
Press › MENU, till the display shows “bP on”.
Push ▲▼ till “ › bP of” is displayed.
Conrm your selection by pushing › PTT or wait for 5 seconds.
In this way, all beeps and tones are disabled.
To enable the keypad beep, repeat this procedure and select “bP on”
Emergency CALL function
The Midland G9 dedicates a channel to the Emergency calls: all the G9 operating within your range, even if tuned
on different channels, can receive/transmit Emergency messages on that channel.
If you keep pressed the EMG button, the communications automatically switch to the emergency channel (“EC”
on the display). An audio signal will be sent and all the G9 operating within the range will automatically go to the
Emergency channel (“EC”).
If you have disabled this function, you won’t receive/transmit any Emergency CALL.
! When the radio is operating on the Emergency channel (EC displayed), all the buttons except PTT and
CALL are disabled.
The G9 will return to the channel in use after one minute from the last transmission.
To return immediately, push EMG. Now you can use all the MENU functions.
Activating / Deactiving the Emergency feature
When you switch on the unit, the Emergency function is activated, but you can disable and enable it again:
Press MENU till the display shows EC on.
Select EC of by using ▲▼ . Conrm your selection by pushing PTT or wait for 5 seconds.
! When the Emergency function is activated (EMG blinking on the display) the following functions
cannot be used: Scan, Monitor, Dual Watch, Out of Range.
Changing the emergency channel
The emergency channel originally preset is P8 DCS 50; but you can change it according to your needs.
! Important: be sure that the Emergency function is active! (EMG blinking). If you decide to change
the channel dedicated to the Emergency function, do not forget to make the same change to all the
radios!
Press the MENU button until the display shows EC on.
Push MENU again (of displayed) and select the desired channel by means of ▲▼. To conrm press PTT or wait
; use the ▼▲ buttons to disable or
key.
18
Page 21

19
ENGLISH
for 5 seconds.
! Important: be sure that the Emergency function is active! (EMG blinking).
If you decide to change the channel dedicated to the Emergency function, do not forget to make the
same change to all the radios!
To set again the original Emergency channel (P8 DCS 50)
Press the MENU button until the display shows EC on.
Push MENU again and select of
To conrm press PTT or wait for 5 seconds.
! If you dedicate any of the standard channels to the Emergency function, remember to use it only for
this purpose, otherwise you will cause interferences.
Manual Out of range function
This function allows you to know if there are any radios within your range.
By pushing
EMG twice, you will send a request of acknowledge to the other G9 operating within your range and
tuned on the same channel.
If any radio replies, it means that it’s within your range and you will receive an audio tone for conrmation.
! This function can be used only if the “Automatic Out of Range” feature is not active.
DUAL WATCH
The Dual Watch allows you to monitor constantly two channels of your choice at the same time.
Enabling - Disabling
Press the MENU button until the display shows DW of.
Select the second channel to monitor by pushing ▲▼.
To conrm your selection, press PTT or wait for 5 seconds. The display will alternately show the channel in use
and the second channel to monitor.
To stop the function, simply press MENU.
When the transceiver detects a transmission on one of the two channels, the Dual Watch temporarily pauses,
remains tuned for 5 seconds on the corresponding channel, giving the user a chance to respond to a CALL. After
this pause, the Dual Watch starts again.
! This function can be activated only if the “Emergency” feature is disabled.
Automatic Out-of-Range
By setting this mode a pair of G9 is transmitting every 30 seconds a data control code. As soon as the contact
between both units is getting lost and one radio doesn’t receive this data control code twice consecutively, the icon
OUT starts ashing in the display and you will hear a beep tone.
! This function can be activated only if the “Emergency” feature is disabled.
Activating – Deactivating
Press MENU till the display shows “OUT” and “Or of”, select “Or on” (activated) with the ▲▼ buttons.
Switch off both radios.
Turn them on at the same time.
To disable this function, push MENU till “OUT” and “Or on” are displayed; select “Or of” (disabled) with the ▲▼
buttons.
Conrm your selection by pushing PTT or wait for 5 seconds.
Display illumination
If there is insufcient light to read the display, press briey EMG and the display illumination will activate for about
5 seconds. Every time the MENU is pressed, the display will automatically light up.
Power save
The battery power saving feature enables a reduction in the consumption of up to 50%; power saving comes on
automatically when the transceiver does not receive any signal for more than 7 seconds. When the batteries are
discharged, the icon
appears on the display: replace the batteries or recharge the battery pack.
! The power save is active only if the Emergency function is disabled.
Page 22

Battery recharge
Connect the socket of the wall adaptor to a mains power socket and insert the jack of the wall adaptor into the
desktop charger plug. It takes 12/14 hours to fully recharge.
Place your transceiver into the cradle of the desktop charger. The red led of the charger will light up.
When charging is complete take the transceiver out of the cradle and detach the socket of the wall adaptor from
the mains.
! Do not overcharge the batteries! When these are fully charged the charging process does not stop
automatically. Do not forget therefore, to remove the transceiver from the charger as soon as the
batteries are charged, otherwise the radio and batteries may be damaged.
! Do not try to charge alkaline batteries or non rechargeable batteries. Make sure that when you charge
the radio, only rechargeable NI-MH batteries or the supplied battery pack should be contained in the
battery compartment! Alkaline batteries are not rechargeable! Batteries which are not suitable to be
recharged may leak, explode or even burn and cause damage!
! Using a different battery charger other than the one specied can cause damage to your device or may
even cause explosions and personal injuries.
! Do not throw batteries into re or place them near heat as this may cause explosions or personal
injuries. Dispose of the batteries according to the procedures set out by local regulations.
! Do not mix old and new batteries or batteries of different types or batteries which have been used in
different manners.
WARRANTy
This product is covered by European warranty rulings and should be returned to the place where purchased for
repair or replacement if not repairable. In the event it that it is returned to us by your supplier then we will either
repair or replace within 15 working days from receipt.
CTE International herewith declares that the product complies with the essential requirements of EC Directive
99/05/EC; the declaration of conformity of the device can be consulted onto www.midlandradio.eu
20
Page 23

21
DEUTSCH
Vielen Dank, dass Sie sich für Midland entschieden haben! Das tragbare Midland G9 Funkgerät kann in fast
allen europäischen Ländern kostenfrei eingesetzt werden. Weitere Informationen nden Sie auf der Karte
"Nutzungseinschränkungen"
Das Midland G9 ist eine Kombination neuester Funktechnologie zusammen mit einem stabilen, mechanischen
Gehäuse und ist die ideale und effektive Lösung für Pros, die in Kontakt mit ihren Kollegen bleiben müssen
(Baustellen, Gebäude, Hotel, Messen, Show-Business). Sein robustes Gehäuse, die Bedienerfreundlichkeit und
das einfache Design machen es ideal für die Benutzung in allen Bereichen.
Midland G9 ist in zwei Ausführungen verfügbar:
Dual Band (PMR446/LPD) ›
E Version (nur PMR446) ›
Dieses Handbuch bezieht sich auf beide Modelle; die Unterschiede zwischen beiden Versionen sind
hervorgehoben.
Inhalt
N° 1 Midland G9 ›
N° 1 Einzel-Tischladegerät ›
N° 1 Netzadapter ›
N.° 4 x 1800 mAh auadbare NiMH Akkus ›
N° 1 Gürtelklemme ›
Reichweite
Die maximale Reichweite ist abhängig von der Geländeform und wird im freien Gelände erreicht.
Die maximale Reichweite kann durch Umgebungsfaktoren, wie Behinderung durch Bäume, Gebäude oder andere
Blockierungen eingeschränkt sein. Innerhalb eines Autos oder einer Metallkonstruktion, kann der Empfang
reduziert sein. Die Reichweite in der Stadt, zwischen Gebäuden oder anderen Hindernissen, ist ca.1 bis 2 km.
Die maximale Reichweite im Freien mit Hindernissen, wie Bäume, Blätter oder Häuser ist ca. 4-6 km. Im freien
Gelände ohne Hindernisse und Sichtweite, z.B.in Bergen, kann der Empfang mehr als 12 km
Batterien und Batteriefach
Das Gerät akzeptiert die mitgelieferten auadbaren Akkus oder wahlweise 4 Stück AA Alkaline Batterien. Öffnen
des Batteriefachs: lösen Sie den Batteriehalter am unteren Teil der Rückseite des Funkgerätes und öffnen Sie die
Abdeckung durch leichtes Schieben. Setzen Sie, unter Berücksichtigung der richtigen Polarität, die Batterie ein
und schließen die Abdeckung.
Achtung: der mitgelieferte Auadbare Akku muss vor Gebrauch geladen werden.
Warnhinweise
BATTERIEN - Halten Sie sich streng an alle Warnhinweise für Batterien im Kapitel "Batterie auaden". ›
DAS FUNKGERÄT DARF AUF KEINEN FALL GEÖFFNET WERDEN › ! Die präzise Mechanik und Elektronik
des Funkgerätes erfordern Erfahrung und spezielle Geräte. Aus diesem Grund und da es bereits auf maximale
Leistung kalibriert ist, darf das Funkgerät nicht neu eingestellt werden. Bei nicht genehmigtem Öffnen des
Funkgerätes erlischt die Garantie.
Kein Reinigungsmittel, Alkohol, Lösungsmittel oder Schleifmittel zur Reinigung verwenden. Benutzen Sie nur ›
ein weiches sauberes Tuch. Bei starker Verschmutzung des Funkgerätes befeuchten Sie das Tuch mit Wasser
und neutraler Seife.
MIDLAND G9
Page 24

Eigenschaften
Neue „Dual PTT“ Sendetaste für Senden › mit hoher oder niedriger Leistung. Das Midland G9 hat eine
doppelte Sendetaste (PTT) . Mit dieser neuen Funktion ist es möglich, bei jedem Senden die Sendeleistung
(hoch oder niedrig) zu wählen, die nötig ist, um die Sprechverbindung herzustellen. Damit kann erheblich an
Batteriestrom eingespart werden.
Neue Eigenschaft "Notruf". › Midland G9 enthält eine neue und wichtige Eigenschaft: ein Kanal, der für Not-
fälle zugewiesen ist. Ein Funkverkehr kommt gewöhnlich zwischen zwei oder mehreren Personen zustande,
die denselben Kanal eingestellt haben: es ist nicht möglich, zwischen verschiedenen Kanälen zu empfangen
oder senden. Mit der "Notruf"-Funktion können Sie auch den Notrufkanal kontrollieren. Alle Benutzer eines
Midland G9 können auf dem eingestellten Kanal kommunizieren und gleichzeitig Notruf-Meldungen auf dem
zugewiesenen Kanal empfangen/senden. Durch drücken der EMG Taste für 3 Sekunden wird ein Notruf an
alle, in Reichweite bendlichen G9 Geräte, gesendet: sie werden automatisch auf den "EC"-Kanal (Notrufkanal) eingestellt.
Neue Eigenschaft "Manuelle Reichweitenabfrage" › : durch zweimaliges Drücken der EMG-Taste erhalten
Sie eine Bestätigung der in Reichweite bendlichen Geräte.
Neue Eigenschaft "Vox Rückruf" › : wenn ein Funkgerät ständig im VOX Modus sendet, wird der Vox Rückruf
automatisch nach 20 Sekunden gestoppt, um anderen Benutzern eine Übertragung zu ermöglichen.
Die wichtigsten Eigenschaften
Leistung: 500mW (PMR446); 10mW (LPD) ›
Betriebstemperatur: Von -20° bis +55°C ›
38 CTCSS und 104 DCS Kodierungstöne ›
Doppel-Sendetaste für Hohe oder Niedrige Sendeleistung ›
Notruf ›
Reichweitenkontrolle ›
VOX einstellbar in 3 Stufen mit "Rückruf" ›
Vibrationsalarm ›
Tastatursperre ›
Autom. Stromsparfunktion: autom. ökonomischer Stromkreis ›
Anzeige bei schwacher Batterie ›
Dual Watch (2-Kanalüberwachung) ›
CALL › (Anrufsignalisierung) mit 5 auswählbaren Melodien
SCAN (Suchlauf) ›
Monitor ›
Ausser Reichweite ›
Roger Piepton ›
Hohe/Niedrige Leistung ›
LCD Anzeige mit Hintergrundbeleuchtung ›
Stromversorgung: 4 AA auadbare NiMH Akkus (oder ein optionales 800 mAh NiMH Akkupack) ›
2-poliger Anschlussstecker ›
Versionen:
G9 Dual Band (PMR446/LPD) ›
24 PMR446 Kanäle(8+16 voreingestellt)/69 LPD Kanäle
G9E (nur PMR446) ›
24 PMR446 Kanäle(8+16 voreingestellt)
22
Page 25

23
DEUTSCH
BESCHREIBUNG DER BEDIENUNGEN UND FUNKTIONEN
Anzeige
Ihr Midland G9 informiert Sie über das Liquid Crystal Display (LCD) ständig über den aktuellen Betriebsstatus. Im
Folgenden werden die Symbole mit ihren entsprechenden Parameter für den Betriebsstatus des Gerätes erklärt:
1. KANAL Diese zwei grossen Ziffern zeigen den ausgewählten Kanal an
2. VOX VOX Funktion aktiviert
3.
Dieses Symbol erscheint bei aktivierter Tastensperre
4. EMG Notruffunktion ativiert
5. DW Dual Watch aktiviert
6.
Zeigt den Batteriestatus an
7.
Vibrationsalarm aktiviert
8. OUT Erscheint, wenn die autom. Reichweitenkontrolle den Kontakt zu
anderen Funkgeräten verliert.
9. RX Empfangsmodus
10. TX Zeigt eine Übermittlung an (PTT gedrückt);
11. H(Hoch) / L(Niedrig) Hohe oder niedrige Leistung ausgewählt. Die Ausgangsleistung bei
dem grossen PTT Tastenteil hängt von Ihrer Vorauswahl ab.
12. CTCSS/DCS Zeigt den ausgewählten Typ der Subtöne an.
13. CTCSS/DCS Diese drei kleinen Ziffern zeigen den ausgewählten Code der CTCSS/
DCS Töne an (1-38 / 1-104)
14. ROGER Roger Piepton aktiviert.
1
2
3
4 5 6 8
7
10
9
11
12
13
14
Page 26
CALL
MENU
EMG
1
2
5
3
4 6 8 7
11
9
10
12
13
14
15
24
23
22
21
20
19
18
17
16
Funkgerät
In dieser Abbildung sind die einzelnen Teile des Gerätes dargestellt:
15. Eingebauter Lautsprecher Hier ist der Lautsprecher eingebaut.
16. MENÜ Taste Drücken Sie dieser Taste, um das MENÜ des Funkgerätes
17. CALL/
18. PTT (push to talk) Die Sendetaste PTT hat eine Doppelfunktion und ist 2-teilig. Drückt
Taste Eine Anrufsignalisierung auf dem ausgewählten Kanal senden. Wenn
19. LAUTSTÄRKE Drehknopf An-/Ausschalter des Gerätes und Einstellen der LAUTSTÄRKE für den
20. ANTENNE Empfängt und sendet Funksignale.
21. Zubehöranschluss (unter Schutzabdeckung) Zum Anschluss externer Audiogeräte, z.B.
22.
23. ▲▼ Tasten Ändern der Einstellungen im MENÜ
24. Eingebautes Mikrofon Hier ist das Mikrofon eingebaut.
EMG-Taste Zum aktivieren des Notrufs und der manuellen Reichweitenkontrolle.
aufzurufen.
Sie diese Taste ca. 5 Sekunden drücken, wird die Tastensperre
aktiviert.
man den grösseren Hauptteil der Sendetaste, dann sendet das Gerät
mit der vorher im Menü voreingestellten Leistung (entweder hoch oder
niedrig), drückt man die schmalere (Boost PTT) Taste, dann sendet
man immer mit höchstmöglicher Leistung.
Empfang.
Mikrofon, Ladegerät usw. (2-polig)
24
Page 27

25
DEUTSCH
An-/Ausschalten
Zum Anschalten des Funkgerätes drehen Sie den LAUTSTÄRKE-Drehknopf im Uhrzeigersinn bis es höbar klickt.
Um das Funkgerät auszuschalten, Drehknopf im Gegenuhrzeigersinn drehen.
PMR466 oder LDP Band auswählen (nur in der Dual-Band Ausführung)
Midland G9 (Dual-Band) ist werksseitig auf das PMR466 Band voreingestellt
Zum Wechsel in das LPD Band drücken Sie die MENÜ Taste bis das LCD den Kanal ‘1’ zeigt.
Um in das PMR446 Band zurückzukehren drücken Sie die MENÜ-Taste bis das LCD den Kanal ‘P1’ zeigt.
! Dieses Vorgehen deaktiviert die “
EMG” Funktion; aktivieren Sie deshalb nach dem Wechsel des
Frequenzbandes die Notruffunktion wieder (siehe Abschnitt "Notruffunktion").
Auswahl der Kanäle
Drücken Sie die MENÜ-Taste. Die Nummer des Kanals auf dem Display fängt an zu blinken.
Drücken Sie die Taste ▼▲ bis der gewünschte Kanal erscheint. Zur Bestätigung drücken Sie die PTT-Taste,
oder warten 5 Sekunden.
Je nach gekaufter Ausführung können Sie zwischen folgenden Kanälen wählen:
Dual-Band Ausführung: PMR446 von P1 bis P8 und von 9p bis 24p (voreingestellt) / LPD von 1 bis 69. ›
E Ausführung(nur PMR446): von P1 bis P8 und von 9p bis 24p (voreingestellt) ›
! Kanal P8 wurde Werksseitig auf die Notruffunktion voreingestellt; wir empfehlen Ihnen diesen Kanal
nicht für allgemeine Kommunikation zu nutzen!
Anzeigen der Kanal/Subtöne
Um den PMR446 Kanal und die benutzten Subtöne der voreingestellten Kanäle anzuzeigen, wählen Sie den
gewünschten Kanal (von 9p bis 24p) und pressen ▼ für 3 Sekunden.
Übermittlung und Empfang
Zum Senden die betreffende PTT Taste fest drücken. Warten Sie einen Moment und sprechen dann mit normaler
Stimme in Richtung Mikrofon mit einem Abstand von ca. 5 cm vom Gerät. Das Gerätedisplay zeigt TX an.
Wenn Sie fertig sind lassen Sie die PTT-Taste.
Wenn das Gerät im Empfangsmodus ist (PTT nicht gedrückt) können Gespräche automatisch empfangen
werden. RX wird angezeigt.
! Werkseinstellung ist „Hohe Leistung“ , so ist die Sendeleistung in dieser Einstellung zunächst bei
beiden PTT-Tasten die gleiche (hohe) Einstellung.
! Bei externem Mikrofon gibt es dann auch nur die voreingestellte Leistung entsprechend dem
Menüpunkt.
Lautstärkeregelung
Drehen Sie den LAUTSTÄRKE-Drehknopf bis zum gewünschten Lautstärkepegel.
“CALL”
Beim Drücken der CALL Taste senden Sie ein Tonsignal an die Benutzer des gleichen Kanals. Sie können aus
verschiedenen Ruftönen auswählen.
"Notruf"
Wenn die Notruffunktion aktiviert ist (EMG blinkt auf dem Display) können Sie einen Notruf an andere G9
innerhalb Ihrer Reichweite senden, durch drücken von
EMG für 3 Sekunden .
Die Funktion Notruffunktion ist standardmäßig aktiviert.
Tastatursperre
Drücken Sie CALL/
für ca. 5 Sekunden und
erscheint als Bestätigung auf dem Display. Nur PTT, EMG und
CALL/
bleibt aktiv. Um diese Funktion zu deaktivieren drücken Sie wieder CALL/
für ca. 5 Sekunden.
MON (Monitor) Funktion/ Squelch (Rauschsperre)
Die Monitortaste deaktiviert (öffnet) vorübergehend die Rauschsperre, damit auch schwache Signale empfangen
werden können.
Page 28

Um die Monitorfunktion zu aktivieren müssen Sie die Tasten ▲▼ gleichzeitig für 2 Sekunden drücken. Mit der
gleiche Vorgehensweise oder durch aus- und einschalten des Gerätes deaktivieren Sie diese Funktion.
! Wenn MON aktiv ist hören Sie ständig ein Hintergrundrauschen.
! Sie können die Monitorfunktion nur aktivieren, wenn die "Notruffunktion" deaktiviert ist.
Alle Kanäle absuchen
Midland G9 kann durch scannen der Kanäle in schneller Folge automatisch nach Signalen in den Bändern
suchen. Mit dieser Funktion können Sie nach aktiven Kanälen suchen.
Wenn ein Signal gefunden wird stoppt der Suchlauf auf diesem Kanal für 5 Sekunden.
Drücken Sie ▲ für 2 Sekunden: der Suchlauf startet. Drücken Sie PTT um den Suchlauf zu stoppen: das Midland
G9 geht zu dem Kanal, bei dem der Suchlauf gestartet wurde.
! Sie können den Suchlauf nur aktivieren, wenn die "Notruffunktion" deaktiviert ist.
"MENÜ" Taste
Folgende Eigenschaften können über die "MENÜ" Taste ausgewählt werden:
Auswahl der Kanäle ›
CTCSS Toneinstellung ›
DCS Toneinstellung ›
Hohe/niedrige Leistungsauswahl (nur im PMR446 Band) ›
VOX ›
Vibrationsalarm ›
Rufmelodien ›
Roger Piepton ›
Tastatur-Piepton ›
Notrufkanal ›
Dual Watch (2-Kanalüberwachung) ›
Reichweitenkontrolle ›
Auswahl der Kanäle
Drücken Sie die MENÜ-Taste. Die Nummer des Kanals auf dem Display fängt an zu blinken.
Drücken Sie die Taste ▼▲ bis der gewünschte Kanal erscheint. Zur Bestätigung drücken Sie die PTT-Taste,
oder warten 5 Sekunden.
Je nach gekaufter Ausführung können Sie zwischen folgenden Kanälen wählen:
Dual-Band Ausführung: PMR446 von P1 bis P8 und von 9p bis 24p (voreingestellt) / LPD von 1 bis 69. ›
E Ausführung(nur PMR446): von P1 bis P8 und von 9p bis 24p (voreingestellt) ›
! Kanal P8 wurde Werksseitig auf die Notruffunktion voreingestellt; wir empfehlen Ihnen diesen Kanal
nicht für allgemeine Kommunikation zu nutzen!
CTCSS/DCS Toneinstellung
CTCSS und DCS Töne sind ähnlich den Zugangscodes und ermöglichen Funkkommunikation nur mit Benutzer,
die den gleichen Kanal und Code eingestellt haben. Für jeden Kanal können Sie bis zu 38 CTCSS und 104 DCS
Töne einstellen.
Diese Töne können Sie auf folgende Kanäle einstellen:
Dual-Band Ausführung: nur auf den 8 PMR446 Hauptkanälen (von P1 bis P8) und den 69 LPD Kanälen. ›
E Ausführung(nur PMR446): nur auf den 8 PMR446 Hauptkanälen (von P1 bis P8) ›
In beiden Fällen können die voreingestellten Kanäle 9p bis 24p nicht verändert werden.
CTCSS-Töne aktivieren:
Gerät einschalten. ›
Gewünschten Kanal auswählen durch drücken der MENÜ-Taste und der ▲▼ Tasten. ›
Drücken Sie die MENÜ-Taste bis das Display CTC anzeigt und der CTCSS Ton rechts blinkt ("of"= kein Code ›
- Standardzustand).
Durch drücken von ▲▼ den gewünschten CTCSS-Ton auswählen. ›
Zur Bestätigung drücken Sie › PTT oder warten 5 Sekunden.-
CTCSS-Töne deaktivieren:
So deaktivieren Sie CTCSS-Töne:
Wählen Sie den gewünschten Kanal ›
26
Page 29

27
DEUTSCH
Drücken Sie die MENÜ-Taste bis auf dem Display auf der linken Seite CTCSS-Ton blinkt; ›
Wählen Sie "of" durch die Tasten ▲▼. ›
DCS-Codes aktivieren:
Gerät einschalten. ›
Gewünschten Kanal auswählen durch drücken der MENÜ-Taste und der ▲▼ Tasten. ›
Drücken Sie die MENÜ-Taste bis das Display DCS anzeigt und der Ton-Code rechts blinkt ("of"= kein Code ›
- Standardzustand).
Durch drücken von ▲▼ den gewünschten DCS-Code auswählen. ›
Zur Bestätigung der Einstellung drücken Sie › PTT oder warten 5 Sekunden.
! Werksseitig ist der Kanal P8 mit DCS-Ton 50 (P850) für die Notruffunktion eingestellt; benutzen Sie
diesen nicht zur allgemeinen Kommunikation!!
DCS-Codes deaktivieren:
Wählen Sie den gewünschten Kanal ›
Drücken Sie die MENÜ-Taste bis auf dem Display auf der rechten Seite DCS-Code blinkt. ›
Wählen Sie "Aus" durch die Tasten ▲▼. ›
Hohe/niedrige Leistungsauswahl (nur im PMR446 Band)
Um den Leistungspegel auszuwählen, drücken Sie die MENÜ-Taste, bis auf dem Display Pr erscheint. Mit den
Tasten ▲▼ wählen Sie L (niedrige Leistung) oder H (hohe Leistung).Zur Bestätigung drücken Sie PTT oder
warten 5 Sekunden.
Bei einer vollständig geladenen Batterie ist die hohe Leistung 500 mW (ERP) und bei niedriger Leistung 10 mW
(ERP).
Wenn Sie Ihr Funkgerät für kurze Reichweite verwenden, können Sie niedrige Leistung wählen und somit Ihre
Batterie schonen.
Auf LPD Kanälen (diese gibt es nur bei der G9 Dual Band Version) ist die Ausgangsleistung immer automatisch
entsprechend den gesetzlichen Höchstwert von 10 mW (ERP).
PMR446 Kanäle: Funktion der doppelten PTT Taste nach Einstellung (High oder Low) im Menü.
Haben Sie dort “H” (hohe Leistung) gewählt, dann erzielt jede der beiden Tasten die hohe Sendeleistung.
Haben Sie “L” (low (niedrige) Leistung) gewählt, dann sendet Ihr Gerät beim Drücken der grossen Taste mit
kleiner und beim Drücken des kleineren Tastenteils (Boost PTT) mit hoher Leistung.
LPD Kanäle: hier gibt es keine High/Low Leistungseinstellung im Menü, daher führt ein Tastendruck auf jeder der
beiden Tasten zur gleichen Leistung von 10 mW (nur bei der Dual Band Version).
! WARNUNG: zum Optimieren des Stromverbrauchs ist es empfehlenswert, die Sendeleistung im Menü
auf „ L-low” einzustellen. In diesem Fall bekommen Sie die hohe Leistung beim Drücken der Boost
PTT-Taste, also nur dann, wenn Sie die hohe Leistung wirklich brauchen. Sie sollten diese Einstellung
immer dann ändern, wenn Sie energiesparend senden wollen (werksseitig ist „H-high“ eingestellt).
VOX-Funktion
Midland G9 bietet über die VOX-Funktion eine Freisprechmöglichkeit: Sie müssen nur in Richtung des Mikrofons
sprechen und die Kommunikation wird automatisch gestartet.
Die VOX-Empndlichkeit kann in 3 Stufen eingestellt werden. Die VOX-Funktion können Sie unabhängig vom
Zubehör aktivieren.
Die vierte aktivierte Stufe ist der Vox Rückruf: wenn ein Funkgerät ständig im VOX Modus sendet, wird der
VOX TB (Rückruf) automatisch nach 20 Sekunden gestoppt, um anderen Benutzern eine Übertragung zu
ermöglichen.
Um die VOX-Funktion auszuwählen, drücken Sie die MENÜ-Taste, bis auf dem Display VOX erscheint.
Benutzen Sie ▲▼, um die Empndlichkeitsstufe einzustellen:
Of: Aus; ›
1: Hoch ›
2: Mittel ›
3: Niedrig ›
4: Rückruf (mit hoher Empndlichkeit) ›
Zur Bestätigung drücken Sie PTT oder warten 5 Sekunden.
Um die VOX-Funktion auszuschalten verfahren Sie nach der oben beschriebenen Weise und wählen Sie oF.
Page 30

Vibrationsalarm
Midland G9 ist mit "Vibrationsalarm" ausgestattet und ermöglicht einen stillen Alarm für eingehende Rufe.
Zum Aktivieren dieser Funktion drücken Sie die MENÜ-Taste, bis auf dem Display
▲▼-Tasten können Sie diese Funktion aktivieren oder deaktivieren (on: aktiv, oF:inaktiv);
Zur Bestätigung drücken Sie PTT [11] oder warten 5 Sekunden.
CALL-Funktion
Midland G9 kann 5 verschiedene Ruftöne senden. Um dieses Signal an andere Benutzer zu senden drücken
Sie die CALL/
CALL-Töne auswählen:
Drücken Sie die MENÜ-Taste, bis auf dem Display “CA” und der aktive Tone-Code angezeigt wird.
Durch Drücken von ▲▼ können Sie die 5 voreingestellten Melodien anhören.
Zur Bestätigung drücken Sie PTT oder warten 5 Sekunden.
ROGER Piepton (Ton für Übertragungsende)
Wenn die PTT-Taste losgelassen wird sendet das Funkgerät dem Gesprächspartner ein Bestätigungs-Piepton,
der anzeigt, dass die Übertragung beendet ist.
Beim Midland G9 ist diese Funktion werksseitig deaktiviert.
Diese Funktion aktivieren:
Drücken Sie die MENÜ-Taste, bis auf dem Display “rb of” erscheint; wählen Sie mit den Tasten ▼▲ “on” und
“rb on” wird angezeigt; zum Bestätigen der Aktivierung des Roger Pieptons drücken Sie PTT oder warten Sie 5
Sekunden.
Tastatur-Piepton
Bei jedem Tastendruck ertönt ein Piepton.
Deaktivieren des Pieptons:
Drücken Sie die MENÜ-Taste, bis auf dem Display “bP on” erscheint. ›
Drücken Sie ▲▼, bis "bP of" angezeigt wird. ›
Zur Bestätigung drücken Sie › PTT oder warten 5 Sekunden.
Dadurch werden alle Pieptöne deaktiviert.
Zum aktivieren der Pieptöne wiederholen diesen Vorgang und wählen "bP on"
Notruf
Das Midland G9 bestimmt einen Kanal für Notrufe: alle G9, die in Reichweite in Betrieb sind, können Notrufe
empfangen/senden; selbst wenn sie auf unterschiedliche Kanäle eingestellt sind.
Wenn Sie die
dem Display) Ein Audiosignal wird gesendet und alle G9 in Reichweite wechseln automatisch auf den Notrufkanal
("EC").
Wenn Sie diese Funktion deaktiviert haben, können Sie keine Notrufe empfangen/senden.
! Wenn das Funkgerät auf dem Notrufkanal arbeitet (EC ist angezeigt), sind alle Tasten außer PTT und
CALL deaktiviert.
Das G9 wechselt eine Minute nach der letzten Übermittlung zurück auf den benutzten Kanal.
Um sofort zurückzukehren, drücken Sie
Aktivieren/deaktivieren der Notruffunktion
Beim Anschalten des Gerätes ist die Notruffunktion aktiviert, kann aber deaktiviert und wieder aktiviert werden:
Drücken Sie die MENÜ-Taste, bis auf dem Display EC on
Wählen Sie "EC" mit den Tasten ▲▼. Zur Bestätigung drücken Sie PTT oder warten 5 Sekunden.
! Wenn die Notruffunktion aktiviert ist (EMG blinkt auf dem Display) können folgende Funktionen nicht
benutzt werden: Suchlauf, Monitor, Dual Watch, Reichweitenkontrolle.
Notrufkanal wechseln
Der Notrufkanal ist Standardmässig P8 DCS 50; Sie können ihn aber nach Ihren Bedürfnissen ändern.
! Wichtig: vergewissern Sie sich, dass die Notruffunktion aktiv ist! (EMG blinkt). Sollten Sie den
zugewiesenen Kanal für die Notruffunktion wechseln, müssen Sie die gleiche Änderung bei allen
Funkgeräten vornehmen!
-Taste.
EMG-Taste gedrückt halten wechselt die Kommunikation automatisch in den Notrufkanal ("EC" auf
EMG. Jetzt können Sie alle MENÜ-Funktionen nutzen.
erscheint; mit den
28
Page 31

29
DEUTSCH
Drücken Sie die MENÜ-Taste, bis auf dem Display “EC on” erscheint.
Drücken Sie erneut MENÜ (of wird angezeigt) und wählen Sie mit ▲▼ den gewünschten Kanal. Zur Bestätigung
drücken Sie PTT oder warten 5 Sekunden.
! Wichtig: vergewissern Sie sich, dass die Notruffunktion aktiv ist! (EMG blinkt).
Sollten Sie den zugewiesenen Kanal für die Notruffunktion wechseln, müssen Sie die gleiche Änderung
bei allen Funkgeräten vornehmen!
Den ursprünglichen Notrufkanal (P8 DCS 50) einstellen
Drücken Sie die MENÜ-Taste, bis auf dem Display “EC on” erscheint.
Drücken Sie erneut MENÜ und wählen "of"
Zur Bestätigung drücken Sie PTT oder warten 5 Sekunden.
! Wenn Sie einen der Standardkanäle für die Notruffunktion zuweisen, dürfen Sie ihn nur für diesen
Zweck benutzen, da dies sonst zu Störungen führt.
Manuelle Reichweitenkontrolle
Mit dieser Funktion können Sie herausnden, ob andere Funkgeräte in Ihrer Reichweite sind.
Durch zweimaliges Drücken der Taste
EMG wird eine Anfrage zu anderen G9 Geäten ausgesendet, die in Ihrer
Reichweite in Betrieb sind und automatisch auf den gleichen Kanal geschalten.
Wenn ein Funkgerät antwortet ist es in Ihrer Reichweite und Sie bekommen einen Bestätigungston.
! Diese Funktion kann nur benutzt werden, wenn die "autom. Reichweitenkontrolle" nicht aktiv ist.
Dual Watch (2-Kanalüberwachung)
Mit der Dual Watch Funktion können Sie ständig zwei Kanäle Ihrer Wahl zur selben Zeit überwachen.
Aktivieren - Deaktivieren
Drücken Sie die MENÜ-Taste, bis auf dem Display “DW of” erscheint.
Wählen Sie den zweiten Kanal zur Überwachung durch Drücken von ▲▼.
Zur Bestätigung drücken Sie PTT oder warten 5 Sekunden. Auf dem Display wird wechselweise der benutzte
Kanal und der überwachte Kanal angezeigt.
Drücken Sie zum Beenden dieser Funktion Menü.
Wenn das Funkgerät eine Übermittlung auf einem der beiden Kanäle erkennt, wird Dual Watch angehalten und
bleibt 5 Sekunden auf dem entsprechenden Kanal, damit der Benutzer auf den Ruf antworten kann. Nach dieser
Pause startet Dual Watch wieder.
! Sie können diese Funktion nur aktivieren, wenn die "Notruffunktion" deaktiviert ist.
Automatische Reichweitenkontrolle
Wenn dieser Modus eingestellt ist, senden zwei G9 Geräte alle 30 Sekunden einen Datenkontrollcode. Sobald die
Verbindung zwischen den Geräten abbricht und ein Funkgerät diesen Datenkontrollcode zweimal hintereinander
nicht empfängt, fängt das Symbol OUT auf dem Display an zu blinken und Sie hören ein Piepton.
! Sie können diese Funktion nur aktivieren, wenn die "Notruffunktion" deaktiviert ist.
Aktivieren – Deaktivieren
Drücken Sie die MENU-Taste, bis auf dem Display “OUT” und “Or of”angezeigt wird; wählen Sie “Or on” (aktiviert)
mit den ▲▼ Tasten.
Schalten Sie beide Funkgeräte aus.
Schalten Sie die Geräte zeitgleich ein.
Zum deaktivieren drücken Sie die MENU-Taste, bis auf dem Display “OUT” und “Or on”angezeigt wird; wählen
Sie “Or of” (deaktiviert) mit den ▲▼ Tasten.
Zur Bestätigung drücken Sie PTT oder warten 5 Sekunden.
Displayhelligkeit
Bei schwachen Lichtverhältnissen drücken Sie kurz auf EMG und aktivieren dadurch die Displaybeleuchtung
für ca. 5 Sekunden. Jedesmal, wenn die MENÜ-Taste gedrückt wird, wird automatisch die Displaybeleuchtung
aktiviert.
Page 32

30
Stromsparfunktion
Die Stromsparfunktion der Batterie reduziert den Verbrauch um ca. 50%. Die Stromsparfunktion wird automatisch
aktiviert, wenn das Funkgerät länger als 7 Sekunden kein Signal empfängt. Wenn die Batterien schwach sind,
erscheint das Symbol
auf dem Display: ersetzen Sie die Batteien oder laden den Akku.
! Sie können die Stromsparfunktion nur aktivieren, wenn die "Notruffunktion" deaktiviert ist.
Batterie auaden
Verbinden Sie den Netzadapter mit der Wandsteckdose und verbinden den Netzadapter mit der Tischladestation.
Die Ladezeit beträgt 12/14 Stunden bis zur vollständigen Auadung.
Stellen Sie Ihr Funkgerät in die Ladestation. Das rote Licht an der Ladestation beginnt zu leuchten.
Wenn der Ladevorgang beendet ist entfernen Sie das Funkgerät aus der Ladeschale und entfernen den
Netzadapter von der Wandsteckdose.
! Batterien nicht überladen! Nach der vollständigen Auadung stoppt der Ladevorgang nicht
automatisch. Achten Sie deshalb darauf, dass das Funkgerät aus der Ladeschale genommen wird,
sobald die Batterien geladen sind; andernfalls können das Funkgerät und die Batterien beschädigt
werden.
! Laden Sie niemals Alkaline (Nickeleisen) Batterien oder nichtauadbare Batterien. Achten Sie beim
Laden des Funkgerätes, dass nur auadbare NI-MH Batterien oder der mitgelieferte Akku in das
Batteriefach eingelegt werden. Alkaline (Nickeleisen) Batterien sind nicht auadbar! Batterien, die
nicht auadbar sind können auslaufen, explodieren oder brennen und Schaden verursachen!
! Bei der Verwendung von Ladegeräten, die nicht für dieses Funkgerät vorgesehen sind, kann das Gerät
beschädigt werden oder Explosionen und Verletzungen verursacht werden.
! Batterien nicht ins Feuer werfen und nicht neben heiße Gegenstände stellen; dies kann zu Explosionen
und Verletzungen führen. Entsorgen Sie Batterien entsprechend den lokalen Bestimmungen.
! Mischen Sie alte Batterien nicht mit neuen Batterien oder Batterien unterschiedlichen Typs oder
Batterien, die unterschiedlich benutzt wurden
Page 33

31
DEUTSCH
GEWÄHRLEISTUNG
Durch die Gewährleistung (von 2 Jahren nach EU Gewährleistungsrecht) werden andere Verbraucherrechte
unter der nationalen Gesetzgebung nicht berührt..
Innerhalb der Gewährleistungsfrist ist ausschließlich Ihr Fachhändler, bei dem Sie das Produkt erworben
haben, dafür verantwortlich, dass ein defektes Produkt entweder instandgesetzt oder ausgetauscht wird. Der
Fachhändler kann dazu ggf. den Hersteller bzw. einen autorisierten Servicepartner einbeziehen. In Fällen, wo
ausdrücklich eine zusätzliche Herstellergarantie gewährt wird, kann der Kunde sich auch direkt an den Her-
steller oder seinem autorisierten Servicepartner wenden. Zusätzliche Garantieleistungen sind freiwillige zeitlich
beschränkte Zusatzleistungen von Alan Electronics GmbH für in Deutschland verkaufte Geräte und gelten nur,
wenn die zusätzliche Herstellergarantie in der Bedienungsanleitung, zusätzlichen Gerätepapieren oder im
Kaufbeleg ausdrücklich erwähnt ist.
Gewährleistungsfristen
Die Gewährleistungsfrist beginnt mit dem Zeitpunkt des Verkaufs an den ersten Endverbraucher. Unsere Produkte können aus verschiedenen Teilen bestehen, für die unterschiedliche Fristen gelten können:
- 24 Monate für das elektronische Gerät mit Ausnahme der im folgenden genannten Teile
- 6 Monate für Teile mit beschränkter Lebensdauer wie: auadbare Batterien (Akkus), Ladegeräte, Headsets,
Antennen.
Wie mache ich Gewährleistungsansprüche geltend?
Im Falle eines Defekts wenden Sie sich an Ihren Fachhändler, bei dem Sie das Gerät erworben haben, bzw. an
die mit dem Händler vereinbarte Serviceanschrift. Im Falle einer zusätzlichen Herstellergarantie können Sie Ihr
Gerät auch direkt an den autorisierten Servicepartner senden. Senden Sie bitte folgendes ein::
- das beanstandete Gerät (möglichst mit Zubehör) und Fehlerangaben
- einen gültigen Kaufbeleg (z.B. der Kassenzettel, aus dem das Kaufdatum, sowie Name + Anschrift der
Verkaufsstelle hervorgehen muss).
Was deckt die Gewährleistung nicht ab?
Die Gewährleistung gilt nicht für:
- Normale Abnutzungserscheinungen durch den Gebrauch des Geräts
- Defekte oder Beschädigungen, die durch grobe Behandlung entstanden sind (z.B. durch scharfe Gegenstände,
durch Fallenlassen oder übermäßige Krafteinwirkung)
- Defekte oder Beschädigungen durch nicht bestimmungsgemäße Verwendung des Geräts, einschließlich
Schäden oder bei Haftungsfällen, die durch Benutzung entgegen den Angaben in der Bedienungsanleitung
entstanden sind.
- Defekte, die durch andere Faktoren oder Tätigkeiten außerhalb des Einussbereichs des Herstellers
hervorgerufen wurden.
Die Gewährleistung deckt auch keine Defekte oder Folgeschäden ab, die durch missbräuchliche Nutzung des
Produktes, zusätzliche Software oder Zubehörteile von Fremdherstellern, die nicht vom Hersteller geliefert
oder als geeignet deklariert wurden, oder durch die Benutzung des Gerätes für andere als den vorbestimmten
Verwendungszwecke hervorgerufen wurden.
Die Gewährleistung kann abgelehnt werden, wenn das Produkt geöffnet, modiziert oder durch andere als vom
Hersteller autorisierte Personen repariert wurde, nach einem Reparaturversuch unter Verwendung von unge-
eigneten Ersatzteilen. Keine Gewährleistung erfolgt grundsätzlich, wenn Seriennummer und/oder Typenschild
geändert oder entfernt wurden und die Herkunft des Gerätes dadurch nicht zu klären ist., oder wenn das Gerät
extremen thermischen oder Umweltbedingungen ausgesetzt wurde , wie Korrosion, Oxidation, Verschmutzung
mit Speiseresten, Einsatz von Flüssigkeiten oder chemischen Stoffen.
Page 34

32
Page 35

33
ESPAÑOL
¡Gracias por haber escogido nuestra marca! El Midland G9 es un transceptor portátil de libre uso en España
y en la práctica totalidad de países europeos. Para una mayor información al respecto, diríjase a la tabla de
“Restricciones al uso” que acompaña a este manual.
Combinando la última tecnología en radiocomunicación junto con un chasis robusto, el Midland G9 es la solución
ideal y efectiva para los profesionales que tienen que estar en contacto con sus colegas en obras, edicios,
hoteles, ferias, etc. Su robustez, facilidad de uso y práctico manejo le convierten en la radio ideal para cualquier
actividad.
Midland G9 está disponible en dos versiones:
› Doble banda (pmr446/LPD)
› Versión E (pmr446)
En este manual nos referimos a ambas versiones y encontrará resaltadas las diferencias entre ellas.
Contenido
1 radio Midland G9 ›
1 Cargador de sobremesa individual ›
1 Adaptador de corriente ›
4 baterías recargables tipo AA NiMH de 1.800 mAh ›
1 Clip de cinturón ›
Rango de cobertura
El máximo alcance depende del terreno y se obtiene cuando se utiliza en espacios abiertos.
Las limitaciones a este máximo alcance son debidas habitualmente a factores ambientales como árboles,
edicios u otras estructuras que se interpongan entre los aparatos a comunicar. En el interior de un coche o en
construcciones de estructura metálica, el alcance también se verá reducido. Normalmente, el alcance en ciudad,
con edicios y otros obstáculos es aproximadamente de 1 -2 Km. En espacios abiertos con obstáculos como
árboles, casas, etc., el alcance puede ser de hasta 4-6 Km. Y en espacios abiertos, sin obstáculos y con alcance
visual, por ejemplo entre dos montañas, el alcance puede ser superior a los 12 Km.
Las baterías y su comportamiento
La radio puede funcionar con baterías recargables (en dotación) o con 4 pilas alcalinas tipo AA. Para abrir el
compartimiento de las baterías, coloque la radio con la parte trasera hacia usted, desbloquee la tapa en la parte
inferior de la radio deslícela suavemente. Inserte las baterías teniendo en cuenta la polaridad y vuelva a colocar
la tapa.
Atención: las baterías recargables deben cargarse antes de sus primer uso.
Advertencias
BATERÍAS › - Siga estrictamente todas las indicaciones y advertencias referidas en el capítulo “Recarga de
baterías”.
NO ABRA LA RADIO BAJO NINGÚN CONCEPTO- › la mecánica y la electrónica de precisión que forman el
equipo exige experiencia e instrumentación; por el mismo motivo, la radio no debe ser nunca reajustada ya
que viene programada de fábrica con el n de obtener las máximas prestaciones. La apertura de la radio por
parte de personal no autorizado anulará automáticamente la garantía.
No utilice alcohol, disolventes o abrasivos para limpiar el equipo. › Utilice sólo un paño suave y limpio
ligeramente humedecido con agua. En los casos más resistentes use un detergente suave.
MIDLAND G9
Page 36

34
CARACTERÍSTICAS
Nuevo PTT “Dual” para cambio rápido de alta a baja potencia. Midland G9 › incorpora un nuevo PTT
“Dual”. Gracias a esta función, podrá usar el equipo en potencia alta sólo cuando lo necesite, sin necesidad
de ir al menú, consiguiendo así un gran ahorro de baterías y una óptima funcionalidad
Nueva función “Llamada de Emergencia”. Midland G9 › introduce una nueva e importante función: un canal
dedicado a emergencias. Las radiocomunicaciones se realizan generalmente entre dos o más usuarios que
utilizan el mismo canal: no es posible transmitir o recibir en otros canales diferentes. Pero gracias a la función “Emergencia”, puede estar monitorizando el canal de emergencia: todos los usuarios de un Midland
G9 pueden comunicarse en el canal sintonizado y, al mismo tiempo, recibir/transmitir mensajes de emergen-
cia en el canal dedicado a tal efecto. Simplemente manteniendo pulsada la tecla EMG durante 3 segundos, se
envía una llamada de emergencia a todos los G9 que estén dentro del rango de cobertura; automáticamente
pasaran a sintonizarse en el canal de de emergencia (canal EC).
Nueva función “Fuera de cobertura Manual”: › simplemente pulsando dos veces la tecla EMG comprobará
si hay alguna radio en el rango de alcance de su radio.
Nueva función “Vox TalkBack”: › si una de las radios está constantemente transmitiendo en VOX, la función Vox
TB detendrá la transmisión después de 20 segundos para permitir también la transmisión a los demás usuarios.
Principales características
Potencia: 500mW (PMR446); 10mW (LPD) ›
Rango de temperaturas: de -20° a +55° C ›
38 subtonos CTCSS/104 códigos DCS ›
Doble tecla PTT: para alta o baja potencia ›
Llamada de Emergencia ›
Control fuera de cobertura (Out of range) ›
VOX ajustable a 3 niveles y “TalkBack” ›
VibraCALL (vibración) ›
Bloqueo de teclado ›
Ahorro de baterías: circuito automático de ahorro de baterías ›
Indicador de batería baja ›
Dual Watch (Doble escucha) ›
CALL con 5 melodías seleccionables ›
SCANER ›
Monitor ›
Fuera de cobertura ›
Roger beep ›
Potencia alta/baja ›
Display LCD con retroiluminación ›
Alimentación mediante 4 baterías AA NiMH (opcionalmente, con pack baterías NiMH 800 mAh) ›
Conector de accesorio de 2pin ›
Versiones:
G9 Dual (pmr446/LPD) › sólo países autorizados
24 canales pmr446 channels (8+16 preajustados)/69 canales LPD
G9E (pmr446) válida para España ›
24 canales pmr446 (8+16 preajustados)
Page 37

35
ESPAÑOL
DESCRIPCIÓN DE LOS CONTROLES Y SUS FUNCIONES
Display
Su Midland G9 utiliza un display LCD (de cristal líquido) que le informa continuamente de su estado operativo.
Los símbolos y los parámetros que pueden aparecer son los siguientes:
1. CANAL Estos dos dígitos grandes indican el canal seleccionado
2. VOX La activación de la función VOX.
3.
El símbolo del candado indica que se ha activado el bloqueo del teclado
4.
EMG Función emergencia activada.
5. DW Función Dual Watch (doble escucha) activada.
6.
Indica el estado de las baterías.
7.
Función Vibra-CALL (vibración) activada.
8. OUT Indica si la Función Fuera de Cobertura automática pierde contacto con otras radios
9. RX Está en modo recepción.
10. TX Indica que está en transmisión (PTT pulsado).
11. H(High) / L(Low) Selección de potencia alta o baja. La potencia de transmisión del PTT grande sigue
esta selección.
12. CTCSS/DCS Indica el tipo de subtono seleccionado.
13. CTCSS/DCS Estos tres pequeños dígitos indican el código
CTCSS/DCS seleccionado (1-38 / 1-104)
14. ROGER Roger Beep activado.
1
2
3
4 5 6 8
7
10
9
11
12
13
14
Page 38

36
Radio
Remítase a las siguientes imágenes para localizar y familiarizarse
con las diferentes partes del equipo:
15. Micrófono Integrado Aquí se encuentra el micrófono para la transmisión.
16. Tecla MENU Pulsando esta tecla se activa la opción MENU.
17. Tecla CALL/
para enviar una llamada en el canal seleccionado. Si la mantiene
pulsada durante 5 segundos, se activa el bloqueo del teclado..
18. PTT (pulsar para hablar) La tecla PTT tiene dos características al estar compuesta por dos partes:
pulsando en la parte grande del PTT, la potencia de salida dependerá
de la selección hecha en el menú (H o L); mientras que al presionar el
PTT pequeño (Boost), transmitirá siempre en alta potencia.
19. Mando VOLUMEN Enciende/apaga el equipo y regula el VOLUMEn de audio en recepción.
20. ANTENA Sirve para recibir y transmitir las señales de radio
21. Toma MIC/CHG
(bajo la protección) Permite la conexión de dispositivos de audio externos (auriculares,
micrófonos, cargadores, etc.). (Conector de 2 pin)
22. Tecla
EMG Activa las funciones de Emergencia y Fuera de cobertura manual
23. Teclas ▲▼ sirven cambiar las opciones del MENU
24. MICRÓFONO Integrado Aquí se encuentra el micrófono para la transmisión
CALL
MENU
EMG
1
2
5
3
4 6 8 7
11
9
10
12
13
14
15
24
23
22
21
20
19
18
17
16
Page 39

37
ESPAÑOL
Encendido/apagado
Para encender el transceptor, gire el mando VOLUMEN en el sentido de las agujas del reloj hasta oír un clic
mecánico. Para apagar el transceptor, gire el mando en el sentido contrario a las agujas del reloj hasta oír
nuevamente el clic mecánico.
Selección de bandas pmr446 o LPD (solamente para la versión Dual)
Midland G9 (Dual) esta ajustado de fábrica en la banda pmr446.
Para seleccionar la banda LPD, mantenga pulsada la tecla MENU hasta que el display muestre canal ‘1’
Para volver a pmr446 mantenga pulsada la tecla MENU hasta que el display muestre ‘P1’.
! Este proceso desactiva la función “EMG”; por lo tanto, si cambia la banda de trabajo, recuerde activar
de nuevo la función Emergencia (vea párrafo “Función Emergencia”).
Selección del canal
Pulse la tecla MENU. En el display parpadea el número del canal. Pulse las teclas ▼▲ para pasar hacia arriba o
abajo los canales hasta que encuentre el canal deseado. Pulse PTT para conrmar o espere 5 segundos.
Dependiendo de la versión adquirida, puede seleccionar entre los siguientes canales: ›
versión Dual: PMR446 de P1 a P8 y de 9p a 24p (preajustado) / LPD de 1 a 69.
version E › (PMR446): de P1 a P8 y de 9p a 24p (preajustado)
! El canal P8 ha sido ajustado de fábrica para la función “Emergencia”; le sugerimos que no lo utilice
para comunicaciones habituales!
Visualizar el canal/subtono
Para mostrar momentáneamente el canal y el subtono preajustados en la banda pmr446, vaya al canal deseado
(del 9p al 24p) y mantenga pulsada la tecla ▼ durante 3 segundos.
Transmisión y recepción
Para transmitir, mantenga rmemente pulsado el PTT (no importa que parte de él). Espere una fracción de
segundo y hable normalmente en dirección al micrófono, manteniendo la radio a una distancia de unos 5 cm; en
el display aparece TX.
Cuando haya terminado de hablar, suelte el PTT.
Cuando la radio está en recepción, recibirá automáticamente cualquier comunicación. En el display aparece
RX.
! Por defecto, tanto el PTT grande como el pequeño, transmiten en alta potencia.
! Si utiliza un accesorio audio externo, el PTT de éste sigue la misma funcionalidad del PTT grande del
equipo.
Ajuste del VOLUMEN
Gire el mando de VOLUMEN hasta alcanzar el nivel deseado.
“CALL”
Pulse la tecla CALL para enviar una señal de caudio a los usuarios que estén en su mismo canal; puede
seleccionar diferentes tonos de llamada.
“Emergencia”
Cuando la función Emergencia está activada (EMG parpadea en el display) mantenga pulsada la tecla EMG
durante 3 segundos y enviará una llamada de emergencia a los G9 que estén en su radio de cobertura.
La función Emergencia está activada por defecto.
Bloqueo del teclado
Mantenga pulsada la tecla CALL/
durante unos 5 segundos y el bloqueo se conrmará con
en el display.
Solo el PTT,
EMG y CALL/
permanecen activas. Para deshabilitar esta función, vuelva a mantener pulsada
CALL/
durante 5 segundos aproximadamente.
Función Monitor (MON) / Squelch
La tecla Monitor se utiliza para excluir temporalmente el squelch, para poder recibir señales demasiado débiles
Page 40

38
que no pasarían el ltro del squelch. Para activar esta función, mantenga pulsadas durante 2 segundos las
teclas ▲▼ al mismo tiempo. Realice el mismo proceso para desactivar la función, o apague la radio y vuelva a
encenderla.
! Cuando MON está activo, probablemente escuchará un ruido de fondo constante.
! Solo puede activar la función MON si la función “Emergencia” está desactivada.
Exploración de canales
Midland G9 puede buscar automaticamente señales realizando una exploración rápida de todas las bandas.
Esta función es útil para encontrar canales activos. Cuando se detecta una señal, la exploración se detiene
en ese canal durante 5 segundos. Para continuar, pulse ▲ durante 2 segundos. Para detener la exploración
denitivamente, pulse PTT y la radio volverá al canal desde el que se comenzó la exploración.
! Solo puede activar la función exploración, si la función “Emergencia” está desactivada.
Tecla “MENU”
Mediante la tecla “MENU” se pueden seleccionar las siguientes funciones
Selección de canal ›
Ajuste de subtonos CTCSS ›
Ajuste de código DCS ›
Selección de potencia alta/baja (solo en banda pmr446) ›
VOX ›
Función Vibra › CALL
Selección de melodías › CALL
Roger Beep ›
Sonido del teclado ›
Canal de Emergencia ›
Función doble escucha (Dual Watch) ›
Fuera de cobertura (Out of Range) ›
Selección de canal
Pulse la tecla MENU. En el display parpadea el número de canal. Pulse las teclas ▼▲ para pasar hacia arriba o
abajo los canales hasta que encuentre el canal deseado. Pulse PTT para conrmar o espere 5 segundos.
Dependiendo de la versión que haya comprado, puede elegir entre los siguientes canales: ›
versión Dual: › PMR446 de P1 a P8 y de 9p a 24p (pre-ajustado) / LPD de 1 a 69.
versión E › (solo PMR446 ):de P1 a P8 y de 9p a 24p (pre-ajustado)
! El canal P8 ha sido ajustado de fábrica para la función “Emergencia”; le sugerimos que no lo utilice
para comunicaciones habituales!
Ajuste de subtonos CTCSS/DCS
Los subtonos CTCSS y DCS son códigos de acceso que permiten a la radio comunicarse solamente con otras
radios que estén en el mismo canal y con el mismo subtono. Se pueden ajustar 38 subtonos CTCSS y 104
códigos DCS. Estos tonos se pueden ajustar en los siguientes canales:
Versión Doble Banda: solo en los 8 canales principales de la banda pmr446 (de P1 a P8) y en los 69 canales
LPD.
Versión E › (solo pmr446): solo en los 8 canales principales de la banda pmr446 (de P1 a P8).
Para los dos modelos, los canales pre-ajustados de 9p a 24p no se pueden modicar ›
. ›
Activación de los subtonos CTCSS:
Encienda la radio. ›
Seleccione el canal deseado mediante las teclas › MENU y ▲▼.
Pulse la tecla › MENU hasta que el display muestre CTC y el subtono parpadee en la parte derecha (“of”= sin
código – ajuste por defecto).
Seleccione el subtono deseado mediante las teclas ▲▼. ›
Para conrmar el ajuste, pulse › PTT ó espere durante 5 segundos.
Desactivación de los subtonos CTCSS:
Si no desea utilizar subtonos, siga los siguientes pasos:
Seleccione el canal deseado ›
Page 41

39
ESPAÑOL
Pulse la tecla › MENUhasta que el display muestre el subtono parpadeando en la parte derecha.
Seleccione “ › of” mediante las teclas ▲▼.
Activación de los códigos DCS:
Encienda la radio. ›
Seleccione el canal deseado mediante las teclas › MENU y ▲▼
Pulse la tecla › MENU hasta que el display muestre DCS y el código parpadee en la parte derecha (“of”=sin
código – ajuste por defecto).
Seleccione el código deseado mediante las teclas ▲▼. ›
Para conrmar el ajuste, pulse › PTT ó espere 5 segundos.
! El canal P8 con el código 50 DCS (P850) ha sido ajustado en fábrica como canal de “Emergencia”; no
lo utilice para comunicaciones habituales!
Desactivación de los códigos DCS:
Si no desea utilizar códigos DCS, siga los siguientes pasos:
Seleccione el canal deseado. ›
Pulse la tecla › MENU hasta que el display muestre el código parpadeando en la parte derecha.
Seleccione “ › of” mediante las teclas ▲▼.
Seleccione la potencia Hi/low (solo en banda pmr446)
Para seleccionar el nivel de potencia, pulse la tecla MENU hasta que el display muestre Pr. Utilice las teclas
▲▼ para seleccionar L (potencia baja) o H (potencia alta). Para conrmar la selección, pulse PTT ó espere 5
segundos.
Cuando las baterías están totalmente cargadas, la potencia alta es 500 mW (ERP), mientras que la baja es
10mW (ERP).
En los canales LPD (solo versión G9 Bibanda), la potencia es siempre de 10mW (ERP).
Canales PRM446: La selección de alta o baja potencia afecta al uso de la tecla PTT:
Si escoge “H” (alta potencia), pulsando el PTT, no importa que parte, el equipo transmitirá en alta potencia.
Si escoge “L” (baja potencia), pulsando la parte grande del PTT, el equipo transmitirá en baja potencia; mientras
que pulsando la parte pequeña del PTT, transmitirá en potencia alta.
Canales LPD: cuando se usan canales LPD (sólo para versión G9 Bibanda) la función Alta-Baja potencia no está
disponible, por lo tanto, los dos pulsadores PTT transmiten siempre a la misma potencia (10mW).
! ATENCIÓN: para optimizar el consumo de la batería y, por lo tanto, usar sólo la potencia Alta cuando
es realmente necesario (pulsando el PTT “Boost”), deberá congurar la potencia de transmisión de
menú en Baja (L-Low). Por defecto, la conguración de menú es siempre Alta (H-High), recuerde
cambiar este parámetro
Función VOX control
Midland G9 permite conversaciones con manos libres a través de la función VOX: solo tiene que hablar en
dirección al micrófono y la comunicación se activará automáticamente. La sensibilidad del VOX se puede
ajustar en 3 niveles diferentes y se puede utilizar con o sin accesorio de audio. El cuarto nivel es la función Vox
TalkBack: si la radio esta transmitiendo continuamente en VOX, la función VOX TB detendrá la transmisión tras
20 segundos para permitir transmitir a otros usuarios.
Para activar la función VOX pulse la tecla MENU hasta que en el display aparezca VOX .
Utilice las teclas ▲▼ para seleccionar los distintos niveles de sensibilidad:
Of: Desactivado; ›
1: Alto ›
2: Medio ›
3: Bajo ›
4: Talk Back › (con alta sensibilidad)
Para conrmar la selección, pulse PTT ó espere 5 segundos.
Para desactivar la función, siga el procedimiento descrito y seleccione oF.
Función Vibra-CALL (vibración)
Midland G9 está equipado con la función “Vibra-CALL”, con la que podemos recibir una señal de llamada
silenciosa.
Page 42

40
Para activar esta función, pulse la tecla MENU hasta que en el display aparezca
; utilice las teclas ▼▲ para
activar o desactivar esta función(on: activada, oF:desactivada);
Pulse PTT [11] para conrmar o espere 5 segundos.
Función CALL
Midland G9 puede enviar 5 tonos de llamada diferentes. Para enviar esta señal de audio a otros usuarios pulse
la tecla CALL/
key.
Para seleccionar los diferentes tonos:
Pulse la tecla MENU, hasta que en el display aparezca “CA” y el código del tono activo.
Mediante las teclas ▲▼ escuchará 5 melodías disponibles.
Conrme la selección pulsando PTT ó espere 5 segundos.
ROGER BEEP (Tono n de transmisión)
Al soltar la tecla PTT al nal de cada transmisión, la radio emite un tono que indica a su interlocutor que la
transmisión ha nalizado y puede empezar a hablar. Esta función está desactivada de fábrica..
Para activarla:
Pulse la tecla MENU hasta que el display muestres “rb of”; mediante las teclas ▼▲ seleccione “on” y el display
mostrará “rb on” para conrmar la selección, pulse PTT o espere 5 segundos.
Tonos del teclado
Cada vez que pulsa una tecla, se escucha un pitido.
Para desactivar este pitido siga este proceso:
Pulse la tecla › MENU, hasta que el display muestre “bP on”.
Pulse las teclas ▲▼ hata que en el display aparezca “ › bP of”
Conrme su selección pulsando › PTT o esperando segundos.
De esta manera, todos los pitidos están desactivados
Para activar la función, repita el proceso y seleccione “bP on”
Función llamada de Emergencia
Midland G9 dedica un canal a llamadas de emergencia: todos los G9 que operen a su alcance, incluso si están
en otro canal, pueden recibir y emitir llamadas de emergencia en ese canal.
Si mantiene pulsada la tecla EMG, la comunicación pasa automáticamente al canal de emergencia (“EC” en el
display). Se envía una señal de audio y todos los G9 que estén en su radio de cobertura, pasarán automáticamente
al canal de emergencia (“EC”).
Si usted ha desactivado esta función, no recibirá ni podrá transmitir una señal de emergencia.
! Cuando la radio está operando en el canal de emergencia (EC en el display), todas las teclas excepto
PTT y CALL están desactivadas.
La radio vuelve al canal de uso habitual después de un minuto desde la última transmisión. Para volver
inmediatamente, pulse EMG. Ahora podrá usar todas las funciones y teclas.
Activación / Desactivación de la función Emergencia
Cuando enciende la radio, la función de emergencia está activada, pero puede activarla o desactivarla a su
preferencia:,
Pulse la tecla MENU hasta que el display muestre EC on.
Seleccione EC of mediante las teclas ▲▼ . Conrme la seleccioón mediante PTT ó espere 5 segundos.
! Cuando la función Emergencia está activada ( en el display parpadea EMG) no se pueden usar las
siguientes funciones: Scan, Monitor, Doble escucha, Out of Range (fuera de cobertura).
Cambio del canal de emergencia
El canal de emergencia está preajustado de fábrica en P8 DCS 50; pero se puede cambiar en función de sus
necesidades.
! Importante: asegúrese de que la función Emergencia está activada!(EMG parpadea). Si decide cambiar
el canal dedicado a la función de Emergencia, no olvide realizar el cambio en todas las radios!
Pulse la tecla MENU hasta que el display muestre EC on.
Pulse la tecla MENU de nuevo (of en el display) y seleccione el canal deseado mediante ▲▼.Para conrmar la
selección, pulse PTT o espere 5 segundos
Para conrmar la selección, pulse PTT o espere 5 segundos.
Para volver a seleccionar el canal original (P8 DCS 50)
Page 43

41
ESPAÑOL
Pulse la tecla MENU hasta que el display muestre EC on.
Pulse la tecla MENU de nuevo y seleccione of
Para conrmar la selección, pulse PTT o espere 5 segundos
! Si dedica uno de los canales estándar como canal de Emergencia, recuerde utilizarlo solamente para
esta función, de lo contrario causará interferencias!.
Función Out of range Manual (fuera de cobertura)
Esta función le permite saber si hay alguna radio en su radio de cobertura.
Pulsando dos veces la tecla EMG, enviará una petición de reconocimiento a otros G9 que estén en su rango de
cobertura y en el mismo canal. Si responde alguna radio recibirá un tono de conrmación. Si no hay ninguna radio
en cobertura, no se escuchará ningún tono.
¡Esta función solo se puede utilizar si el “Automatic Out of Range” no está activo!
DUAL WATCH (Doble escucha)
Esta función le permite escuchar contestamente dos canales de su elección al mismo tiempo.
Activación - Desactivación
Pulse la tecla MENU hasta que el display muestre DW of.
Seleccione el segundo canal a escuchar mediante las teclas ▲▼.
Para conrmar su selección, pulse PTT o espere 5 segundos. El display mostrará alternativamente el canal en
uso y el segundo canal seleccionado.
Para detener esta función, simplemente pulse la tecla MENU.
Cuando la radio detecta una transmisión en uno de los dos canales, la Doble escucha se detiene temporalmente,
se mantiene durante 5 segundos en el canal activo, para dar opción a contestar. Después de esta pausa, la doble
escucha se reanuda de nuevo
! Esta función solo se puede activar si la función “Emergencia” está desactivada!
Automatic Out-of-Range (Fuera de cobertura automático)
Seleccionando esta función, una pareja de G9 transmites un código de control cada 30 segundos. En cuanto
el contacto entre las dos radios se está perdiendo y una de las radios no recibe el código de control dos veces
consecutivas, el icono OUT parpadea en el display y se escuchará un tono de advertencia.
¡Esta función solo se puede activar si la función “Emergencia” está desactivada!
Activación – Desactivación
Pulse la tecla MENU hasta que en el display aparezca “OUT” y “Or of”, seccione “Or on” (activado) mediante
las teclas ▲▼ .
Apague las dos radios.
Enciéndalas al mismo tiempo.
Para desactivar la función, pulse, MENU hasta que el display muestre “OUT” y “Or on” ; seleccione “Or of”
(desactivado) mediante las teclas ▲▼.
Conrme su selección pulsando PTT ó esperando 5 segundos
Iluminación del display
En caso de que no haya suciente luz para leer el display, pulse brevemente la tecla EMG y la iluminación del
display se activará durante 5 segundos. Cada vez que pulse MENU, el display se iluminarà automáticamente.
Power save (Ahorro de batería)
La función de ahorro de batería permite una reducción del consumo de batería de hasta el 50%; la función se
activa automáticamente cuando la radio no recibe ninguna señal en 7 segundos. Cuando las baterías están
descargadas, el icono
aparece en el display con lo que tendrá que cambiarlas o cargarlas.
! Esta función solo se activa si la función “Emergencia” está desactivada!.
Recarga de baterías
Conecte el adaptador en una toma de corriente e inserte el jack en el cargador de sobremesa.
Coloque la radio en la bañera del cargador. El diodo del cargador se ilumina.
La recarga dura alrededor de 12/14 horas.
Cuando se complete la carga, retire la radio del cargador y desenchufe el adaptador de la toma de corriente.
Page 44

42
! No sobrecargue las pilas! Cuando las pilas están completamente cargadas, el proceso no se detiene
automáticamente. Por lo tanto, no olvide desconectar el transceptor del cargador en cuanto haya
transcurrido el tiempo necesario, de lo contrario la radio y las baterías podrían dañarse.
! No intente recargar pilas alcalinas o cualquier pila no recargable! ¡Asegúrese de que en el porta pilas
del equipo, con el cargador conectado, se encuentren exclusivamente pilas recargables NI-MH o el
pack suministrado! Es muy peligroso intentar recargar pilas de otro tipo (por ejemplo alcalinas o
de manganeso). Las baterías que no son recargables, pueden sulfatarse, explotar e incluso arder y
causar daños!
! El uso de un cargador no original puede causar daños al equipo o causar explosiones y lesiones
personales!
! No tire nunca las pilas al fuego, ni las acerque a fuentes de calor: pueden causar explosiones y lesiones
personales! Deseche las pilas siguiendo exclusivamente la normativa medioambiental vigente.
! No mezcle baterías nuevas y viejas o baterías de distinto tipo o capacidad o que hayan sido utilizadas
para otros usos!
Garantía Limitada de ALAN COMMUNICATIONS
Esta garantía no limita los derechos del usuario reconocidos en la normativa estatal aplicable en materia de
venta de bienes de consumo.
Durante el periodo de garantía, ALAN COMMUNICATIONS, reparará en un periodo razonable de tiempo los
defectos en materiales, diseño y fabricación, libre de cargos de reparación.
Esta garantía limitada solamente es válida en el país donde se ha adquirido el producto.
Periodo de garantía
El periodo de garantía comienza en el momento de la compra por parte del primer usuario nal. El producto
consta de diferentes partes que pueden tener diferentes periodos de garantía. La presente garantía es válida
por un periodo de:
• 24 meses para el transceptor
• 6 meses para los siguientes accesorios: batería, cargador de batería, antena y el resto de accesorios
Para mayor información sobre este y otros asuntos relativos al servicio de garantía, diríjase a nuestra página
web www.alan.es
Como acceder al servicio de Garantía
En caso de que el producto tenga un defecto, póngase en contacto con su Distribuidor o siga las instrucciones
que guran en la página web www.alan.es.
Cualquier reclamación por el producto afectado, debe de comunicarse dentro de un tiempo razonable desde
que se apreció el defecto y, en ningún caso, después de que expire el periodo de garantía.
Para tener acceso a esta garantía, es necesario enviar al servicio técnico:
• El producto afectado (equipo o accesorio) con una nota explicativa de la anomalía detectada
• La factura original de compra, con el nombre y la dirección del distribuidor y la fecha y el lugar de compra
Lo que NO cubre la Garantía
Esta Garantía Limitada no cubre:
• El deterioro del producto debido a su uso habitual
• Los defectos causados por un uso indebido (defectos causados por objetos alados, deformaciones,
presiones, caídas, etc.)
• Defectos o daños causados por un uso contrario al indicado en el presente manual.
• Defectos causados por otros factores o actos que se escapan del control del fabricante.
Esta garantía limitada no cubre defectos o daños causados al producto por un uso, o conexión con cualquier
producto, accesorio, software y/o servicios no fabricados o suministrados por el fabricante o por el uso del
producto para cualquier otra función diferente de la que ha sido fabricado.
La garantía tampoco cubre los defectos causados en las baterías por cortocircuitos de sus contactos, si los
sellos o las células están rotos o si muestra evidencia de que la batería se ha usado en otro equipo diferente
para el que ha sido fabricada.
Esta garantía limitada no será válida si el producto ha sido abierto, modicado o reparado por cualquier otro
que no sea un servicio autorizado por ALAN Communications, si se repara usando piezas no autorizadas o si el
número de serie del producto ha sido retirado, borrado, alterado o son ilegibles de alguna manera, quedando a
la única discreción de ALAN COMMUNICATIONS.
Esta garantía limitada no será válida si el producto se ha expuesto a humedad, a condiciones ambientales o
de temperatura extrema, corrosión, oxidación, derrames de comida o líquidos o a la inuencia de productos
químicos.
Page 45

43
FRANÇAIS
Merci d’avoir choisi Midland! Le Midland G9 est une radio portative qui est libre d’utilisation à travers toute
l’Europe. Pour plus d’information, reportez vous au chapitre « Restriction d’utilisation ».
Combinant les dernières technologies en matière de radio et de communication ainsi qu’un solide boîtier, le
Midland G9 est la solution idéale et efcace pour les professionnels qui ont besoin de rester en contact avec
leurs collègues (chantiers de construction, des bâtiments, des hôtels, des foires commerciales. Son boîtier
robuste, la facilité d’utilisation et la simplicité de sa conception en font un produit idéal pour l’utilisation dans
toutes les activités.
Le Midland G9 est disponible en deux versions:
Bi Bande (PMR446/LPD) ›
E version (PMR446 uniquement) ›
Ce manuel fait référence au deux model et met en évidence les différence entre chaque model.
Contenue
N° 1 › Midland G9
N° 1 Socle de bureau simple ›
N° 1 Adaptateur secteur ›
N° 4 Batteries rechargeable AA 1800 mAh NiMH ›
N° 1 Clip ceinture ›
Couverture/portée
La portée maximale dépend du terrain et est obtenue La couverture maximale dépend du terrain et s’obtient
pendant une utilisant en champ libre.
La seul limitation de la couverture maximal sont des facteurs environnementaux, tel que des arbres, des
immeubles et autres constructions. De même dans une voiture ou une construction métallique la portée peut
être réduite. Normalement la couverture en ville avec des immeubles ou autre obstacles est de environ 1 à 2
Km. Dans grand espace mais avec des arbres, des feuilles ou des maisons la portée est d’environ 4 à 6 Km.
Dans uns espace sans obstacle et à vue, par exemple en montagne, la couverture peut allez jusqu’a 10 Km.
Batteries and battery compartment
La radio accept les batteries rechargeable fournit ou 4 piles alcalines AA.
Pour ouvrir le compartiment des batteries, tournez la radio face avant vers le bas et ouvrez le verrouillage du
couvercle qui se trouve en bas du poste et faite le glisser.
Attention: Les batteries fournies doivent être rechargé avant la première utilisation.
Mise en gardes
BATTERIES › – Lisez attentivement toutes les mise en gardes décrites au chapitre “Rechargement des bat-
teries”.
Ne pas ouvrir la radio quelqu’en soit la raison! › La mécanique et l’électronique de précision qu’est la radio
requièrent une expérience et des équipements spécialisés. Pour les même raison la radio ne doit en aucun
cas être réglé car elle l’a déjà été pour un maximum de performance. Une ouverture non autorisé entraîne
l’annulation de la garantie.
Ne pas utiliser de détergent, d’alcool, de solvant, ou d’abrasifs pour nettoyer la radio. › Utilisé unique-
ment une chiffon doux et propre. Si la radio est très sale, humidiez légèrement avec un mélange d’eau et
de savon neutre.
MIDLAND G9
Page 46

44
OPTIONS
Nouvelle option “Double PTT” › pour une puissance d’émission haute ou basse. Le Midland G9 est doté
d’une double touche PTT. Grace à cette toute nouvelle fonction il est possible d’émettre en puissance haute
uniquement quand cela est nécessaire, permettant ainsi une réduction de la consommation batterie.
Nouvelle option “Emergency CALL”. Midland G9 › inaugure une importante et innovante option: le canal
dédié aux urgences. Les communications radio se produisent généralement entre deux ou plus d’utilisateurs
qui sont sur le même canal: il n’est pas possible de transmettre ou recevoir de / vers différents canaux. Mais
grâce à la « fonction d’urgence », vous pouvez également surveillez le canal d’urgence. Tous les utilisateurs
possédant un Midland G9 peuvent communiquer sur un canal choisi et en même temps recevoir/émettre sur
le canal dédié d’urgence. Gardez simplement la touche EMG appuyé pendant 3 secondes et un appel d’ur-
gence sera envoyé à tous le G9 à portées, qui basculerons automatiquement sur le canal EC » (Emergency
Channel).
Nouvelle option “Out of range manuel” › : appuyez deux fois sur la touche EMG ce qui permet de vérier si
des radios sont à portées de la votre.
Nouvelle option “Vox TalkBack” › : si une radio émet en permanence en mode VOX, le VOX TB lui interrompt
automatiquement l’émission toutes les 20 secondes pour permettre aux autres démettre à leur tours.
Caractéristiques principales
Puissance: 500mW (PMR446); 10mW (LPD) ›
Température de fonctionnement: de -20° à +55° C ›
38 tonalités CTCSS /104 codes DCS ›
Double PTT pour haute ou baisse puissance ›
Appel d’Urgence ›
Control Out of range ›
VOX ajustable sur 3 niveaux et avec “TalkBack” ›
Vibreur ›
Verrouillage clavier ›
Économie d’énergie automatique ›
Indicateur de batterie faible ›
Double veille ›
Appel avec 5 mélodies sélectionnable ›
SCAN ›
Moniteur ›
Out of Range ›
Roger beep ›
Puissance Haute/basse ›
Afcheur LCD rétro éclairé ›
Alimentation: 4 batteries rechargeable AA NiMH (ou en option un pack batterie 800 mAh) ›
Prise accessoire deux broches ›
Versions:
G9 Bi bande (PMR446/LPD) ›
24 canaux PMR446 (8+16 préprogrammé)/69 canaux LPD
G9E (PMR446 seuls) ›
24 canaux PMR446 (8+16 préprogrammé)
Page 47

45
FRANÇAIS
DESCRIPTION DES CONTROLS ET FONCTIONS
Afcheur
Votre Midland G9 vous grade constamment informé sur sont états à travers l’afcheur à cristaux liquides (LCD).
Les symboles et leurs paramètres correspondant qui apparaissent en fonction des statues de l’appareil, ont
décrit ci-dessous :
1. CANAL Ces deux grands chiffres indiquent
le canal en cours d’utilisation.
2. VOX Fonction VOX active
3.
Ce symbole apparaît quand le clavier est verrouillé
4. EMG La fonction d’urgence à été activé
5. DW La fonction double veille est active
6.
Donne l’état des batteries
7.
Fonction vibreur active
8. OUT indique que la fonction automatique Out of Range à perdue le contact avec les
autres radio.
9. RX en mode réception
10. TX Indique que la radio émet (PTT appuyé);
11. H(High) / L(Low) Puissance sélectionné. La puissance d’émission de la grande touche PTT dépend
de votre sélection.
12. CTCSS/DCS Indique le type de tonalité sélectionné.
13. CTCSS/DCS ton Ces trois petits chiffres indiquent le code de tonalité en cours d’utilisation. (CTCSS
1-38 /DCS 1-104)
14. ROGER Roger Beep actif.
1
2
3
4 5 6 8
7
10
9
11
12
13
14
Page 48

46
Radio
Reportez vous à l’image pour identier les différentes partie de la radio:
15. Haut-parleur intégré C’est ici que ce trouve le Haut-parleur.
16. Bouton MENU Appuyez sur ce bouton pour entrez dans le MENU de la radio.
17. Bouton CALL Pour envoyer un appel sur le canal sélectionné.
Si vous restez appuyé pendant 5 secondes, le clavier se verrouille.
18. PTT (push to talk) La touche PTT à une double fonction, dès lors qu’il est composé de
2 parties: appuyez sur la plus grande et la plus large des touches, la
puissance d’émission utilisé dépendra de la puissance sélectionné dans
le menu des options (H ou L) ; alors qu’en appuyant sur la plus petit
(Boost) la radio émettra toujours en puissance Haute.
19. Bouton de VOLUME Interrupteur ON/OFF et réglage du VOLUME de réception.
20. ANTENNE Reçoit et émet les signaux radio.
21. Prise accessoire (sous couvercle de protection) Pour connecter des accessoire tel que
microphone, chargeur, etc. (Type 2 broches)
22. Bouton EMG Pour activer la fonction d’urgence et la fonction « Out of range » manuel.
23. Boutons ▲/▼ Pour changer les options dans le MENU
24. Microphone interne Zone ou vous devez parler et ou se trouve le micro.
CALL
MENU
EMG
1
2
5
3
4 6 8 7
11
9
10
12
13
14
15
24
23
22
21
20
19
18
17
16
Page 49

47
FRANÇAIS
Allumez/éteindre
Pour allumer votre portatif, tourner le bouton VOLUME dans le sens horaire de façon à entendre un click. Pour
éteindre la radio, tourner le bouton dans le sens inverse jusqu’à entendre un nouveau.
Choisir le mode PMR466 ou LDP
(Seulement pour la version Bi bande)
Le Midland G9 (Bi bande) est par défaut en mode PMR446.
Pour basculer en mode LPD, gardez le bouton MENU appuyez jusqu’à ce que l’afcheur indique le canal ‘1’.
Pour basculer en mode PMR446, gardez le bouton MENU appuyez jusqu’à ce que l’afcheur indique le canal
‘P1’.
! Cette procédure désactive la fonction “EMG”; cependant si vous changez de bande de fréquence,
rappelez vous qu’il faut réactiver la fonction D’urgence (Voir le paragraphe “Fonction d’Urgence”).
Sélection d’un canal
Pressez une fois le bouton MENU. Le numéro du canal clignote à l’écran.
Pressez les boutons pour monter ou descendre les canaux an de sélectionner le canal de votre choix.
Pressez le PTT pour conrmer, ou attendez 5 secondes.
En fonction de la version que vous possédez, vous pouvez choisir les canaux suivants :
Version Bi bande : › PMR446 de P1 à P8 et de 9p à 24p (préprogrammé) / LPD de 1 à 69.
Version E › (PMR446 seulement): de P1 à P8 et de 9p à 24p (préprogrammé)
! Le canal P8 à été choisi comme canal “D’urgence” par défaut, nous vous recommandons de ne pas
l’utiliser pour des communications générales!
Afcher le canal et la tonalité CTCSS/DCS
Pour afcher temporairement le canal PMR446 et la tonalité utilise sur les canaux préprogrammés, sélectionnez
un canal (de 9p à 24p) et appuyez pendant 3 secondes la touche ▼.
Émission and reception
Pour émettre maintenez la touche PTT appuyez (peut importe la partie). Attendez une fraction de secondes
avant de parler normalement en direction du microphone et garder la radio à environ une distance de 5 cm. TX
apparaît sur l’afcheur.
Quand vous avez ni de parler, relâchez la touche PTT. Quand la radio est en mode réception (PTT relâché)
vous recevez automatiquement n’importe quel communication, RX apparaît alors sur l’afcheur.
! Par défaut la puissance est congure sur “H-Haute”, donc indépendamment des touches PTT (petite
ou grande) l’émission sera en puissance haute.
! Si vous utilisez un microphone extérieur, il fonctionnera suivant la conguration de la radio.
Réglage du VOLUME
Tournez le bouton VOLUME jusqu’a atteindre le niveau voulu.
Fonction “CALL”
Appuyez sur le bouton CALL et vous envoyez un appel sonore à tous les utilisateurs à l’écoute sur le canal,
vous pouvez choisir entre différentes tonalités.
Fonction “Emergency”
Quand le fonction d’urgence est activé (EMG clignote sur l’afcheur) gardez la touche EMG appuyez pendant 3
seconds et vous envoyez à tous les G9 à portée l’appel d’Urgence. La fonction d’Urgence est active par défaut.
Verrouillage clavier
Maintenez enfoncé CALL/
5 secondes environ et s’éclaire sur l’afcheur en guise de conrmation. Seules
les touches PTT, EMG et CALL/
restent actives. Pour inhiber la fonction, maintenez à nouveau 5 secondes
CALL/
[12].
Page 50

48
Fonction MON (Moniteur) / Squelch
La fonction moniteur désactive temporairement (ouvre) le Squelch, de façon à pouvoir entendre les signaux trop
faible pour pouvoir ouvrir en permanence le Squelch. Pour activer le moniteur, appuyez en même temps sur les
deux touches ▲▼. Suivez la même procédure pour la désactiver, ou éteignez la radio.
! Quand le MON est actif, vous entendrez probablement un bruit de fond constant.
! Vous pouvez activer la fonction moniteur seulement si la fonction “d’Urgence” est désactivé.
Scanner tous les canaux
Le Midland G9 peut automatiquement rechercher des signaux sur la bande de fréquence en scannent tous les
canaux en séquence rapide. Cette fonction est utile pour trouver un canal actif. Quand un signal est détecté, le
scanning fait une pause de 5 secondes sur ce canal. Appuyez pendant 2 secondes sur la touche ▲ : le scan
démarre. Pour l’arrêter, appuyez sur la touche PTT: le Midland G9 retourne sur le canal ou le scan a débuté.
! Vous ne pouvez activer la fonction SCAN que si la fonction “d’Urgence” est inactive.
Touche “MENU”
Les fonctions suivantes peuvent être sélectionné par le bouton “MENU” :
Sélection du canal ›
Code de tonalité CTCSS ›
Code de tonalité DCS ›
Sélection de la puissance Haut/basse (Seulement en mode PMR446) ›
VOX ›
Vibreur ›
Mélodies d’appel ›
Roger Beep ›
Beep touche ›
Canal d’Urgence ›
Double veille ›
Out of Range ›
›
Sélection du canal
Appuyez une fois sur le bouton MENU. Le numéro du canal clignote à l’écran.
Appuyez sur les boutons pour monter ou descendre les canaux PMR puis les canaux LPD an de sélectionner
le canal de votre choix.
Appuyez sur PTT pour conrmer, ou attendez 5 secondes.
En fonction de la version que vous possédez, vous pouvez choisir les canaux suivants :
Version Bi bande : › PMR446 de P1 à P8 et de 9p à 24p (préprogrammé) / LPD de 1 à 69.
Version E › (PMR446 seulement): de P1 à P8 et de 9p à 24p (préprogrammé)
! Le canal P8 à été choisi comme canal “D’urgence” par défaut, nous vous recommandons de ne pas
l’utiliser pour des communications générales!
Tonalité CTCSS/DCS
Les tonalités CTCSS et DCS peuvent être compare à des codes d’accès et permettes à la radio de
communiquer seulement avec les utilisateurs qui sont sur le même canal et avec le même code. Pour chaque
canal vous pouvez congurer 38 codes CTCSS et 104 codes DCS. Ces codes peuvent être conguré sur les
canaux suivants :
Version Bi bande: › uniquement sur les 8 canaux principaux PMR446 (de P1 à P8) et sur les 69 canaux LPD.
Version E › (PMR446 uniquement): on uniquement sur les 8 canaux principaux PMR446 (de P1 à P8)
Pour les deux version les canaux préprogrammés 9p à 24p ne peuvent pas être modié.
Activer les codes CTCSS:
Allumez la radio. ›
Sélectionnez le canal désirez en appuyant sur la touche › MENU et puis sur ▲▼.
Appuyez sur la touche › MENU jusqu’a ce que CTC s’afche et que le code CTCSS clignote à sa droite (“of”=
pas de code – état par défaut).
Sélectionnez la tonalité CTCSS à l’aide des touches ▲▼. ›
Pour conrmer votre sélection appuyez sur › PTT ou attendez 5 secondes.
Page 51

49
FRANÇAIS
Désactiver les codes CTCSS:
Si vous ne voulez pas utiliser de tonalité CTCSS, suivez ces étapes:
Sélectionnez le canal. ›
Appuyez sur la touche › MENU jusqu’a ce que CTC s’afche et que le code CTCSS clignote à sa droite.
Sélectionnez “ › of” à l’aide des touches ▲▼.
Activez les codes DCS:
Allumez la radio. ›
Sélectionnez le canal désirez en appuyant sur la touche › MENU et puis sur ▲▼.
Appuyez sur la touche › MENU jusqu’a ce que DCS s’afche et que le code DCS clignote à sa droite (“of”= pas
de code – état par défaut).
Sélectionnez la tonalité DCS à l’aide des touches ▲▼. ›
Pour conrmer votre sélection appuyez sur › PTT ou attendez 5 secondes.
! Le canal P8 avec le codes DCS 50 (P8 50)à été paramétrer d’usine pour la fonction “d’Urgence”; ne
l’utilisez pas pour des communication générale!!
Désactiver les codes DCS:
Sélectionnez le canal. ›
Appuyez sur la touche › MENU jusqu’a ce que DCS s’afche et que le code DCS clignote à sa droite.
Sélectionnez “ › of” à l’aide des touches ▲▼.
Sélection de la puissance Haute/Basse (Seulement en PMR446)
Pour sélectionner le niveau de puissance, appuyez sur la touche MENU jusqu’a ce que l’afcheur indique Pr.
Utilisez les touches ▲▼ pour sélectionner L (puissance basse) ou H (puissance haute). Pour conrmer votre
sélection appuyez sur PTT ou attendez 5 secondes.
Quand les batteries sont totalement chargées la puissance haute est de 500 mW (PAR), alors quand puissance
basse elle est de 10mW (PAR). Si vous deviez communiquer sur une courte distance vous pouvez choisir la
puissance basse pour économiser les batteries.
Sur les canaux LPD (Seulement pour le G9 version Bi-bande) la puissance de sortie est toujours de 10mW
(PAR).
Canaux PMR446: La sélection de puissance haute ou basse inuence le fonctionnement de la touche PTT.
Si vous avez choisie « H » (Puissance Haute), si vous appuyez sur la touche PTT quelque soit sa taille, la radio
émet toujours en puissance haute.
Si vous avez choisie « L » (Puissance Basse), si vous appuyez sur la petite Touche PTT la radio émet en
puissance basse, alors que si vous appuyez sur la petite touche la radio émet en puissance Haute.
Canaux LPD: La sélection de puissance Haute/Basse n’est pas disponible sur les canaux LPD. Donc quelque
soit le PTT utilisez la radio émet toujours en puissance Haute. (Pour le Version G9 Bi-Bande).
La fonction VOX
Le Midland G9 permet une communication en mains-libres à l’aide de la fonction VOX. Parlez simplement
en direction du microphone et la communication s’établie alors automatiquement. La sensibilité du VOX est
réglable sur 3 niveaux. Vous pouvez activer la fonction VOX avec ou sans accessoires.
Le quatrième niveau activable est la fonction TalkBack, si une radio émet en permanence en VOX, la
fonction VOX TB va automatiquement interrompre l’émission après 20 secondes an de permettre aux autres
utilisateurs de répondre.
Pour activer la fonction VOX appuyez sur la touche MENU jusqu’à ce que VOX apparaisse à l’écran.
Utilisez les touches ▲▼ pour choisir le niveau de sensibilité:
Of: Off ›
1: Haute ›
2: Moyenne ›
3: Basse ›
4: Talk Back (avec une sensibilité haute) ›
Pour conrmer votre sélection appuyez sur PTT ou attendez 5 secondes.
Pour désactiver la fonction VOX, suivez les meme étapes que précédementmais sélecionnez le niveau oF.
Page 52

50
Fonction Vibreur
Le Midland G9 est équipé d’un vibreur, qui permet d’avoir un appel silencieux plutôt que sonore.
Pour activer cette fonction, appuyez sur la touche MENU jusqu’à ce que
soit afché.
Utilisez les touches ▼▲ pour activez ou désactiver cet fonction (on: actif, oF:inactif).
Pour conrmer votre sélection appuyez sur PTT ou attendez 5 secondes.
Fonction CALL
Le Midland G9 peut envoyer 5 différentes tonalités d’appel. Pour envoyer ce signal, presser la touche CALL/
.
Pour sélectionner les tonalités d’appel:
Pour activer cet fonction, appuyez sur la touche › MENU jusqu’à ce que “CA” s’afche.
En pressant ▼▲ vous entendrez 5 mélodies préprogrammées. ›
Pour conrmer votre sélection appuyez sur › PTT ou attendez 5 secondes.
ROGER BEEP (Tonalité de n de transmission)
A chaque n de transmission (PTT [11] relâché), le Midland G9 émet un bip audio indiquant au correspondant
qu’il peut émettre à son tour.
Cette fonction est inhibée par défaut.
Pour activer cette fonction, appuyez sur la touche MENU jusqu’à ce que “ rb oF” s’afche.
Utilisez les boutons pour sélectionner “on” et “rb on” s’afche;
Pour conrmer votre sélection appuyez sur PTT ou attendez 5 secondes.
Beep touches
A chaque fois que appuyez sur une touche vous attendez un beep.
Pour désactiver le bip d’appui touches, suivez la procédure :
Appuyez sur la touche › MENU jusqu’a afcher“bP on”.
Utilisez les boutons ▲▼ pour afcher “ › bP of”.
Pour conrmer votre sélection appuyez sur › PTT ou attendez 5 secondes.
A présent, vous n’entendrez plus de bip à chaque appui touche.
Fonction d’appel d’urgence
Le Midland G9 possède un canal dédié aux appels d’urgence. Tous les G9 fonctionnant dans un environnement
proche et se même sur un autre canal, peuvent recevoir et émettre sur ce canal. Si vous gardez la touche EMG
appuyé, la communication bascule automatiquement sur le canal d’urgence (“EC” sur l’afcheur). Un signal
audio est alors transmit et tous les G9 à portée bascule automatiquement sur le canal d’urgence (“EC”). Si vous
avez désactivé cette fonction vous ne recevrez, ni enverrez aucun appel d’urgence.
! Quand la radio fonctionne sur le canal d’urgence (EC sur l’afcheur), toutes les touches excepté le PTT
et CALL sont bloquées.
Le G9 retourne sur le canal précédemment utilise après une minute environ. Pour revenir immédiatement,
appuyé sur la Touche EMG. Maintenant, vous pouvez utiliser toutes les fonctions du MENU.
Activé/Désactivé la fonction d’urgence
Quand vous allumez la radio, la fonction d’urgence est active, mais vous pouvez l’activer ou la désactiver à
nouveau :
Appuyez sur la touche MENU jusqu’a afcher EC on.
Sélectionnez EC of en appuyant sur ▲▼ . Pour conrmer votre sélection appuyez sur PTT ou attendez 5
secondes.
! Quand la fonction d’urgence est active (EMG clignote sur l’afcheur), les fonctions suivante ne
peuvent plus être utilisées : Scan, Moniteur, Double veille, Out of Range.
Modier le canal d’urgence
Le canal d’urgence par défaut est P8 DCS 50, mais vous pouvez le modier en fonction de vos besoins.
Appuyez sur la touche MENU jusqu’a afcher EC on.
Appuyez a nouveau sur MENU (of est afché) puis sélectionnez le canal voulue à l’aide des touches ▲▼.
Pour conrmer votre sélection appuyez sur PTT ou attendez 5 secondes.
! Important: Assurez vous que la fonction d’urgence soit active! (EMG clignote).Si décidez de modier
le canal dédié aux urgences, n’oubliez pas de faire la modication sur toutes les radios!
Page 53

51
FRANÇAIS
Pour réactiver canal d’urgence par défaut est P8 DCS 50.
Appuyez sur la touche MENU jusqu’a afcher EC on.
Appuyez a nouveau sur MENU et choisissez of.
Pour conrmer votre sélection appuyez sur PTT ou attendez 5 secondes.
! Si vous affectez un canal standard pour les appels d’urgences, rappelez vous de ne l’utiliser que dans
ce cas si, sinon vous risquez de causer des interférences.
Fonction Out of range manuel
Cette fonction permet de vérier si des radios son à portées de la votre.
Appuyez sur la touche EMG deux fois et vous enverrez un signal à les autres G9 dans votre portée et dans
votre même canal.
Si des radios répondent, sont dans votre porté et vous recevrez un signal de conrmation.tone for conrmation.
! Cette fonction ne peut être utilise que si la fonction “Out of Range automatique” est inactive.
Double veille
Cette option vous permet de surveiller deux canaux de votre choix. C’est utile si vous voulez garder le contact
avec deux autres personnes.
Activation:
Allumez la radio. ›
Sélectionnez avec les touches le premier canal que vous voulez surveiller. ›
Appuyez sur la touche › MENU jusqu’a afcher DW of.
Sélectionnez le second canal à surveiller à l’aide des touches. ›
Pour conrmer votre sélection appuyez sur › PTT ou attendez 5 secondes.
Maintenant la radio commence à scanner les deux canaux jusqu’a la réception d’un signal sur l’un des canaux.
Le scan reprend au bout de 30 secondes lorsque le signal disparaît.
! Cette fonction peut être activé seulement si la fonction “D’urgence” est désactivé.
Out-of-Range Automatique
Le G9 est équipé de la fonction “out of range”. En choisissant ce mode une paire de G9 transmet toutes les 30
secondes des données de control. Dès que le contact est interrompu ou que l’une des radios ne reçoit pas les
données de control de fois de suite, l’icône OUT clignote sur l’afcheur et un Beep retenti.
! Cette fonction peut être activé seulement si la fonction “D’urgence” est désactivé.
Activer – Désactiver
Appuyez sur la touche › MENU jusqu’a afcher “OUT” et “Or of”, sélectionnez “Or on” (activer) à l’aide des
touches ▲▼.
Éteignez les deux radios. ›
Allumez les deux radios en même temps. ›
Appuyez sur la touche › MENU jusqu’a afcher “OUT” et “Or on”, sélectionnez “Or of” (désactivé) à l’aide des
touches ▲▼.
Pour conrmer votre sélection appuyez sur › PTT ou attendez 5 secondes.
Éclairage de l’afcheur
S’il n’y a pas assez de lumière pour lire correctement l’afcheur, appuyez un court instant sur EMG et l’afcheur
s’éclaire alors pour une durée de 5 secondes. A chaque appuie sur cette touche l’afcheur s’illumine.
Économie d’énergie
L’économie d’énergie batterie permet une réduction jusqu’à 50%, L’économie s’active automatiquement quand
la radio ne reçoit pas de signal plus de 7 secondes. Quand les batteries sont déchargées l’icône
s’afche à
l’écran, remplacez les batteries ou rechargez les.
! L’économie d’énergie n’est active que si la fonction d’urgence est désactivée.
Rechargement des batteries
Connecter l’adaptateur secteur, puis connecter la jack au support de bureau. Placer votre radio dans le socle du
chargeur de bureau. La LED rouge du chargeur s’allume.
Un rechargement complet nécessite 12/14 heures.
Quand la charge est complète retirez la radio du chargeur et débrancher l’adaptateur secteur.
Page 54

52
! Ne surchargez pas les batteries! Quand la charge est complète le chargeur ne s’arrête pas
automatiquement. N’oubliez pas malgré tous de retirer la radio du chargeur aussi tôt que les batteries
sont chargées, sinon la radio ou les batteries peuvent être endommagées.
! N’essayez pas de recharger des piles alcalines ou des batteries non rechargeable.
Assurez vous que lorsque vous rechargez la radio, les batteries sont de type NiMH ou que le pack
fournit soit en place de le compartiment batteries !
Les piles alcalines ne sont pas rechargeables ! Les batteries qui ne sont pas prévue pour être
rechargées peuvent couler, exploser ou même brûler et causer des dégâts !
! Utiliser un autre chargeur que celui prévue peut causer des dommages à la radio ou provoqué une
explosion et des dommages corporels.
! Ne jeter pas les batteries dans le feu ou près d’une source de chaleur, car elles peuvent exploser et
causer des dommages corporels. Éliminez les batteries en respectant les lois en vigueurs.
! Ne mélangez pas d’anciennes batteries avec des nouvelles ou d’un type différents ou qui a été utilisé
d’une manière différente.
Garantie
La garantie ne limite pas les droits (légaux) de l’utilisation dans le cadre des lois national applicable relative à la
vente de produits de consommation.
Pendant la période de garantie, le fabricant ou un revendeur habilité remédie au défaut en réparant ou remplacement le produit, dans la limite de cette garantie.
Cette garantie limité est valable uniquement dans le pays ou à été acheté le produit.
Période de garantie
La période de garantie débute lors de l’achat initial par du premier client nal. Le produit est constitué d’une
multitude d’éléments et ces éléments sont couverts par différente périodes de garanties :
- 24 mois pour l’appareil lui même
- 6 mois pour les éléments suivants : batterie, chargeurs, oreillettes, antennes.
Comment bénécier de la garantie
Dans le cas d’un produit défectueux, merci de retourner le matériel à un réparateur agrée ou au fabricant direc-
tement. Pour bénécier de cette garantie il est nécessaire de retourner au service autorisé :
- Le produit défectueux (ou accessoires)
- La facture originale, qui indique clairement le nom et l’adresse du vendeur, la date et le lieu de l’achat.
Ce que la garantie de ne couvre pas
La garantie ne couvre pas:
- L’usure normale du produit
- Les défauts causés par une manipulation brutale (défauts cause par un objet coupant, par torsion, compression
ou chute …)
- Les défauts ou dommage causés par une mauvaise manipulation du produit, y compris les utilisations contraire
aux recommandations du fabricant.
- Les défauts causés par d’autres facteurs/faits en dehors des control raisonnables du fabricant.
La garantie ne couvre pas les défauts ou les dommages causés au produit par un mauvais usage avec, ou une
connexion à un quelconque produit, logiciel accessoire et / ou services non produits ou fournis par le fabricant
ou par l’utilisation du produit pour un usage autre que pour l’usage prévu du produit.
La garantie n’est pas applicable si le produit a été ouvert, modié ou réparé par quelqu’un d’autre que le
revendeur autorisé, si il est réparé avec des pièces de rechange non autorisées ou si le numéro de série a été
supprimé, effacé, abîmé, altéré ou n’est plus lisible.
La garantie n’est pas applicable si le produit a été exposé à l’humidité, à l’humidité ou à des conditions thermiques extrême ou aux intempéries ou à la corrosion, à l’oxydation, au contact d’aliments ou de liquides ou à
l’action de produits chimiques.
Page 55

53
PORTOGUÊS
Obrigado por escolher a Midland! O Midland G9 é um emissor-receptor portátil de utilização livre em quase todos
os países europeus. Para informações adicionais, sugerimos que consulte a tabela “Restrições de utilização”.
Combinando a mais recente tecnologia em comunicação rádio em conjunto com uma armação mecânica
resistente, o Midland G9 é a solução ideal e ecaz para os prossionais que necessitam de se manter em
contacto com colegas em estaleiros de construção, edifícios, hotéis, feiras comerciais o exposições. A sua
armação robusta, a facilidade de utilização e o desenho simples signicam que é ideal para usar em qualquer
actividade.
O Midland G9 encontra-se disponível em duas versões:
Banda dupla (PMR446/LPD) ›
Versão E (apenas PMR446) Este manual faz referência a ambos os modelos e as diferenças entre as duas ›
versões estarão realçadas.
Conteúdo
N.° 1 Midland G9 ›
N.° 1 Carregador de secretária único ›
N.° 1 Adaptador de parede ›
N.° 4 pilhas recarregáveis AA NiMH de 1800 mAh ›
N.° 1 Prendedor para o cinto ›
Cobertura/alcance
O alcance máximo depende das condições do terreno e é obtido durante utilização num espaço aberto.
A única limitação em relação ao alcance máximo possível deve-se a factores ambientais como, por exemplo,
bloqueios provocados por árvores, edifícios, ou outros obstáculos. No interior de um automóvel ou de uma
construção metálica, o alcance poderá ser mais reduzido. Normalmente, a cobertura na cidade, com edifícios ou
outras obstruções é de cerca de 1 ou 2 Km. Num espaço aberto mas com obstáculos, tais como árvores, folhas
ou casas, o alcance máximo possível é de cerca de 4-6 Km. Num espaço aberto, sem obstáculos e à vista como,
por exemplo, em montanha, a cobertura pode ser de mais de 12 Km.
Pilhas e compartimento das pilhas
O emissor-receptor pode utilizar das baterias recarregáveis fornecidas ou 4 pilhas alcalinas tipo AA. Para abrir
o compartimento das pilhas: com a parte de trás do rádio virada para si, desprenda o suporte das pilhas na
parte inferior do rádio e deslize suavemente a tampa. Introduza as pilhas fazendo corresponder as respectivas
polaridades e volte a colocar a tampa.
Atenção: das baterias recarregáveis fornecidas tem de ser recarregado antes da primeira utilização.
Avisos
PILHAS - Cumpra rigorosamente todos os avisos sobre as pilhas descritos no capítulo “Recarregar as ›
pilhas”.
Não abra o rádio por qualquer motivo! Os elementos mecânicos e electrónicos de precisão do rádio exigem ›
experiência e equipamento especializado; pelo mesmo motivo, o rádio não deve, sob circunstância alguma,
ser realinhado uma vez que já foi calibrado para um desempenho máximo. A abertura não autorizada do
emissor-receptor irá invalidar a garantia.
Não utilize detergentes, álcool, solventes ou produtos abrasivos para limpar o equipamento. Utilize apenas ›
um pano macio e limpo. Se o rádio estiver muito sujo, utilize um pano ligeiramente humedecido com uma
mistura de água e de sabonete neutro.
MIDLAND G9
Page 56

54
CARACTERÍSTICAS
Nova função “Dual PTT” para potência de saída alta ou baixa › . O Midland G9 possui uma tecla Dual PTT.
Com esta nova função, é possível utilizar a potência alta somente se realmente necessário, permitindo desta
forma uma alta redução no consumo de pilhas.
Nova característica “Chamada de emergência”. › Midland G9 apresenta uma importante e inovadora
característica: o canal dedicado às emergências. As comunicações rádio geralmente realizam-se entre dois
ou mais utilizadores que estão sintonizados no mesmo canal: não é possível transmitir ou receber de/para
canais diferentes. Mas graças à função de “emergência”, também pode manter o canal de emergência sob
supervisão: todos os utilizadores com um Midland G9 podem comunicar no canal sintonizado e ao mesmo
tempo podem receber/transmitir mensagens de emergência no canal dedicado. Basta manter pressionado
o botão EMG durante 3 segundos e uma chamada de emergência será enviada para todos os G9 no seu
alcance: estes serão automaticamente sintonizados para o canal “EC” (canal de emergência).
Nova característica “Fora de alcance manual”: › basta pressionar duas vezes o botão EMG e irá vericar se
existem rádios no âmbito do alcance do seu equipamento.
Nova característica “Vox TalkBack”: › se um rádio estiver a transmitir continuamente em VOX, a funcio-
nalidade Vox TB irá parar automaticamente a transmissão ao m de 20 segundos para permitir também a
transmissão para os outros utilizadores.
Características principais
Alimentação: 500mW (PMR446); 10mW (LPD) ›
Temperatura de funcionamento: de -20° a +55° C38 tons CTCSS/104 tons DCS ›
Duplo PTT para potência alta e baixa ›
Chamada de emergência ›
Controlo de fora de alcance ›
VOX ajustável em 3 níveis e com “TalkBack” ›
VibraCALL ›
Bloqueio de teclado ›
Poupança de energia automática: circuito de economia de corrente automático ›
Indicador de pilhas fracas ›
Vigilância dupla ›
CALL com 5 melodias seleccionáveis ›
VARRIMENTO ›
Monitorização ›
Fora de alcance ›
Aviso de m de transmissão (Roger beep) ›
Potência alta/baixa ›
Visor LCD com luz de fundo ›
Alimentação: 4 pilhas recarregáveis AA NiMH (ou uma bateria opcional tipo NiMH de 800 mAh) ›
Ficha de acessórios de 2 pinos ›
Versões:
G9 banda dupla (PMR446/LPD) ›
24 canais PMR446 (8+16 pré-programados)/69 canais LPD
G9E (apenas PMR446) ›
24 canais PMR446 (8+16 pré-programados)
Page 57

55
PORTOGUÊS
DESCRIÇÃO DOS CONTROLOS
E FUNÇÕES
Visor
O seu Midland G9 mantém-no constantemente actualizado sobre o seu estado operacional através de um visor
de cristais líquidos (LCD). Os símbolos e os seus parâmetros correspondentes que possam ser apresentados,
em conformidade com o estado operacional do aparelho, são descritos da seguinte forma:
1. CANAL Estes dois dígitos grandes indicam o canal seleccionado
2. VOX Função VOX activada
3.
Este símbolo é visualizado quando o bloqueio do teclado está activado
4. EMG Função de emergência activada
5. DW Dupla vigilância activada
6.
Indica o estado da bateria
7.
Função Vibra-CALL activada
8. OUT Indica se a função de fora de alcance automática perde contacto com os
outros rádios.
9. RX Modo de recepção
10. TX Indica a transmissão (PTT pressionado);
11. H (alto)/L (baixo) Selecção de potência alta ou baixa. A potência de saída da parte maior da
tecla PTT depende da sua seleção.
12. CTCSS/DCS Indica o tipo de tom sub-áudio seleccionado.
13. CTCSS/DCS Estes três dígitos pequenos indicam o código dos tons CTCSS/DCS
seleccionados (1-38/1-104)
14. ROGER Aviso de m de transmissão activado.
1
2
3
4 5 6 8
7
10
9
11
12
13
14
Page 58

56
Rádio
Consulte esta imagem para identicar as várias peças do dispositivo:
15. Altifalante integrado Aqui é onde está instalado o altifalante.
16. Botão MENU Pressione este botão para entrar no MENU do rádio.
17. Botão CALL/
Para enviar uma chamada no canal seleccionado. Se mantiver pressionado
durante cerca de 5 segundos, o bloqueio do teclado é activado.
18. PTT (“push to talk”) A tecla PTT possui duas funções, pois é feita de 2 partes: pressione o
lado maior da tecla PTT para utilizar a potência de saída de acordo com
a selecionada através das congurações do menu (H ou L, alta ou baixa);
enquanto que a parte menor da tecla PTT (Boost) permite que o aparelho
transmita sempre na potência alta.
19. Botão rotativo de VOLUME Interruptor de ligado/desligado do dispositivo
e regulador do VOLUME da recepção.
20. ANTENA Recebe e transmite sinais de rádio.
21. Tomada de acessórios (sobre cobertura protectora) Para ligar dispositivos de áudio externos como,
por exemplo, microfones, carregadores, etc. (2 pinos)
22.
Botão EMG Para activar as funções de Emergência e de Fora de alcance manual.
23. Botões ▲▼ Para alterar a denição no interior do MENU
24. Microfone integrado É aqui que o som é captado pelo microfone.
CALL
MENU
EMG
1
2
5
3
4 6 8 7
11
9
10
12
13
14
15
24
23
22
21
20
19
18
17
16
Page 59

57
PORTOGUÊS
Ligar/Desligar
Para ligar o emissor-receptor, rode o botão rotativo de VOLUME no sentido dos ponteiros do relógio até escutar
este emitir um “clique”.
Para desligar o emissor-receptor, rode o botão rotativo no sentido contrário aos ponteiros do relógio.
Seleccionar a banda PMR466 ou LDP (apenas para a versão de banda dupla)
Midland G9 (banda dupla) é pré-programado de fábrica na banda PMR446.
Para mudar para a banda LPD, mantenha pressionado o botão MENU até o LPD apresentar o canal “1”.
Para regressar à banda PMR446, mantenha pressionado o botão MENU novamente, até o LCD apresentar o
canal “P1”.
! Este procedimento desactiva a função“
EMG”; como tal, se mudar a banda de frequência, lembre-se
de activar a função de emergência novamente (ver parágrafo “Função de emergência”).
Selecção de canal
Pressione o botão MENU. O número do canal irá começar a piscar no visor.
Pressione os botões de deslocação ▼▲ até seleccionar o canal pretendido. Pressione o botão PTT para
conrmar, ou aguarde durante 5 segundos.
Consoante a versão que adquiriu, pode escolher entre os seguintes canais: ›
Versão de banda dupla: PMR446 de P1 a P8 e de 9p a 24p (pré-programados)/LPD de 1 a 69. ›
Versão E (apenas PMR446): de P1 a P8 e de 9p a 24p (pré-programados) ›
! O canal 8 foi programado de fábrica para a função de “Emergência”; sugerimos que não o utilize para
comunicações gerais!
Visualizar o canal/tom sub-áudio
Para visualizar temporariamente o canal PMR446 e o tom sub-áudio utilizado nos canais pré-programados,
avance para o canal pretendido (de 9p a 24p) e mantenha pressionado o botão ▼ durante 3 segundos.
Transmissão e recepção
Para transmitir, mantenha a tecla PTT pressionada com rmeza (independente de que parte da tecla estiver
pressionada). Aguarde por uma fracção de um segundo e, de seguida, fale normalmente na direcção do
microfone e segure o dispositivo a uma distância de cerca de 5 cm; TX será visualizado no visor.
Quando terminar, liberte o botão PTT.
Quando o rádio está no modo de recepção (PTT não pressionado) irá receber automaticamente qualquer
comunicação. RX será visualizado no visor.
! A potência de saída padrão é “H-alta”, portanto não importa que parte da tecla for pressionada (a
pequena ou a grande), pois a transmissão será sempre na potência alta.
! Se um microfone externo estiver sendo utilizado, a função PTT seguirá a mesma conguração da
função PTT do rádio.
Regulação do VOLUME
Rode o botão rotativo VOLUME até alcançar o nível pretendido.
“CALL”
Pressione o botão CALL (chamada) e irá enviar um sinal de áudio para os utilizadores sintonizados no mesmo
canal; pode escolher entre os diferentes tons de chamada.
“Emergência”
Quando a função de Emergência está activada (EMG pisca no visor) mantenha pressionado EMG durante 3
segundos e irá enviar uma chamada de emergência para os outros aparelhos G9 no seu alcance.
A função de Emergência está activada por predenição.
Bloqueio de teclado
Mantenha pressionado CALL/
durante cerca de 5 segundos e
será visualizado como conrmação. Apenas
PTT,
EMG e CALL/
permanecem activos. Para desactivar esta função, mantenha pressionado novamente
CALL/
durante cerca de 5 segundos.
Page 60

58
Função MON (monitorização)/Ruído de fundo (squelch)
O botão de monitorização destina-se a excluir temporariamente (abrir) a restrição ao ruído de fundo (squelch),
com vista a escutar sinais que são demasiado fracos para manter a função constantemente aberta.
Para activar a função de monitorização, mantenha pressionados os botões ▲▼ durante 2 segundos ao mesmo
tempo. Siga o mesmo procedimento para desactivar a função, ou desligue e volte a ligar o rádio.
! Quando a função MON (monitorização) está activa, irá provavelmente escutar um ruído de fundo
constante.
! Só pode activar a função de monitorização se a função “Emergência” estiver desactivada.
Varrimento de todos os canais
Midland G9 pode procurar automaticamente sinais ao longo das bandas através do varrimento de canais em
sequência rápida. Esta função é útil para encontrar canais activos.
Quando é detectado um sinal, o varrimento é colocado em pausa nesse canal durante 5 segundos. Pressione ▲
durante 2 segundos: o varrimento irá começar. Para parar, pressione PTT: o Midland G9 irá regressar ao canal
a partir do qual o varrimento teve originalmente início.
! Só pode activar a função de varrimento se a função “Emergência” estiver desactivada.
Tecla “MENU”
Pode seleccionar as funções seguintes através da utilização do botão “MENU”:
Selecção de canal ›
Denição de tom CTCSS ›
Denição de tom DCS ›
Selecção de potência alta/baixa (apenas na banda PMR446) ›
VOX ›
Função Vibra › CALL
Melodias de chamada ›
Aviso de nal de transmissão ›
Bloqueio do teclado ›
Canal de emergência ›
Função de vigilância dupla ›
Fora de alcance ›
Selecção de canal
Pressione o botão MENU. O número do canal irá começar a piscar no visor.
Pressione os botões de deslocação ▼▲ até seleccionar o canal pretendido. Pressione o botão PTT para
conrmar, ou aguarde durante 5 segundos.
Consoante a versão que adquiriu, pode escolher entre os seguintes canais: ›
Versão de banda dupla: PMR446 de P1 a P8 e de 9p a 24p (pré-programados)/LPD de 1 a 69. ›
Versão E (apenas PMR446): de P1 a P8 e de 9p a 24p (pré-programados) ›
! O canal 8 foi programado de fábrica para a função de “Emergência”; sugerimos que não o utilize para
comunicações gerais!
Denição de tom CTCSS/DCS
Os tons CTCSS e DCS são idênticos a códigos de acesso e permitem ao rádio comunicar com apenas os
utilizadores que estão sintonizados no mesmo canal e que tenham denido o mesmo código. Para cada canal,
pode denir até 38 tons CTCSS e 104 tons DCS.
Estes tons podem ser denidos nos seguintes canais: ›
Versão de banda dupla: apenas nos 8 canais PMR446 principais (de P1 a P8) e nos 69 canais LPD. ›
Versão E (apenas PMR446): apenas nos 8 canais PMR446 principais (de P1 a P8) ›
Para ambos, os canais pré-programados de 9p a 24p não podem ser modicados.
Activar os tons CTCSS:
Ligue a unidade. ›
Seleccione o canal pretendido pressionando o botão › MENU e os canais ▲▼.
Pressione o botão › MENU até o visor apresentar CTC e o tom CTCSS pisca à direita (“of” = nenhum código
– condição predenida).
Seleccione o tom CTCSS pretendido pressionando ▲▼. ›
Para conrmar a denição, pressione › PTT ou aguarde 5 segundos.
Page 61

59
PORTOGUÊS
Desactivar os tons CTCSS:
Se não pretender utilizar os tons CTCSS, siga estes passos:
Seleccione o canal pretendido. ›
Pressione a tecla › MENU até o visor apresentar o tom CTCSS a piscar à esquerda;
Seleccione “of” através da utilização dos botões ▲▼. ›
Activação dos códigos DCS:
Ligue a unidade. ›
Seleccione o canal pretendido pressionando as teclas › MENU e ▲▼.
Pressione o botão › MENU novamente até o visor apresentar DCS e o código de tom piscar à direita (“of” =
nenhum código – condição predenida).
Seleccione o tom DCS pretendido pressionando ▲▼. ›
Para conrmar a denição, pressione › PTT ou aguarde 5 segundos.
! O canal P8 com tom DCS 50 (P850) foi programado de fábrica para a função de “Emergência”; não o
utilize para comunicações gerais!!
Desactivação dos códigos DCS: ›
Seleccione o canal pretendido. ›
Pressione a tecla › MENU até o visor apresentar o canal a ser usado e o código DCS piscar à direita.
Seleccione “of” pressionando ▲▼. ›
Selecção de potência alta/baixa (apenas na banda PMR446)
Para seleccionar o nível de potência, pressione o botão MENU até o visor apresentar a indicação Pr. Utilize os
botões ▲▼ para seleccionar L (baixa potência) ou H (alta potência). Para conrmar a sua selecção, pressione
PTT ou aguarde 5 segundos.
Quando as pilhas estão completamente carregadas, a potência alta é de 500 mW (ERP), ao passo que a potência
baixa é de 10mW (ERP). Se o seu rádio tiver de operar num alcance curto, pode seleccionar a baixa potência e
deste modo prolongar a duração das pilhas.
Nos canais LPD (somente para a versão G9 Dualband), a potência de saída é sempre de 10 mW (ERP).
Canais PMR446: a seleção de potência alta ou baixa inuencia o uso da tecla PTT.
Se “H” (potência alta) for selecionada, ao se pressionar qualquer parte da tecla PTT, o aparelho transmitirá na
potência alta.
Se “L” (potência baixa) for selecionada, ao se pressionar a parte grande da tecla PTT, o aparelho transmitirá na
potência baixa; se a parte menor da tecla PTT for pressionada, o aparelho transmitirá na potência alta.
Canais LPD: a seleção de potência alta ou baixa não funciona nos canais LPD; portanto, as duas partes da tecla
PTT transmitirão na potência alta (para a versão G9 Dualband).
! AVISO: para otimizar o consumo de bateria, é necessário selecionar a opção “L-baixa” para a potência
de saída. Desta forma, quando a tecla Boost PTT for pressionada, o aparelho transmitirá na potência
alta somente quando necessário. Como a potência de saída padrão é “H-alta”, é recomendável alterar
este parâmetro.
Função VOX
Midland G9 permite conversações mãos-livres através da função VOX: basta falar na direcção do microfone e a
comunicação será activada automaticamente.
A sensibilidade VOX pode ser ajustada em 3 níveis diferentes. Pode activar a função VOX com ou sem
acessórios. O quarto nível activado é a função Vox TalkBack: se um rádio estiver a transmitir continuamente em
VOX, a funcionalidade VOX TB irá parar automaticamente a transmissão ao m de 20 segundos para permitir a
transmissão também para os outros utilizadores.
Para activar a função VOX pressione o botão MENU até a indicação VOX surgir no visor.
Utilize os botões ▲▼ para seleccionar os níveis de sensibilidade: ›
Of: Desligado; ›
1: Alto ›
2: Médio ›
3: Baixo ›
4: Talk Back (com sensibilidade alta) ›
Para conrmar a sua selecção, pressione PTT ou aguarde 5 segundos.
Para desactivar a função VOX, siga o procedimento descrito anteriormente e seleccione oF.
Page 62

60
Função Vibra-CALL
Midland G9 está equipado com a função “Vibra-CALL”, a qual oferece um alerta silencioso para chamadas
recebidas.
Para activar esta funcionalidade, pressione o botão MENU até o visor apresentar
; utilize os botões ▼▲ para
desactivar ou activar esta funcionalidade (on: activa, oF: desactiva);
Pressione PTT [11] para conrmar ou aguarde durante 5 segundos.
Função CALL
Midland G9 pode enviar 5 tons de chamada diferentes. Para enviar este sinal de áudio para outros utilizadores,
pressione a tecla CALL/
.
Para seleccionar os tons de chamada:
Pressione › MENU, até o visor apresentar a indicação “CA” e o código de tom activo.
Se pressionar ▲▼ irá escutar as 5 melodias pré-programadas. ›
Conrme pressionando › PTT ou aguarde 5 segundos.
ROGER BEEP (tom de nal de transmissão)
Quando o botão PTT é libertado, o rádio emite um sinal sonoro para conrmar aos outros utilizadores que a sua
transmissão terminou.
No Midland G9 esta função vem desactivada de fábrica.
Para a activar:
Pressione o botão MENU até o visor apresentar “rb of”; utilizando os botões de deslocação ▼▲ seleccione
“on” e “rb on” será visualizado; para conrmar a activação do aviso de nal de transmissão, pressione PTT ou
aguarde durante 5 segundos.
Bloqueio do teclado
Cada vez que pressionar um botão, irá escutar um sinal sonoro.
Para desactivar os sinais sonoros, siga este procedimento: ›
Pressione o botão › MENU, até o visor apresentar “bP on”.
Pressione ▲▼ até ser visualizado “bP of”. ›
Conrme a sua selecção pressionando › PTT ou aguarde 5 segundos.
Deste modo, todos os sinais sonoros e tons são desactivados.
Para activar o sinal sonoro do teclado, repita este procedimento e seleccione “bP on”
Função de chamada de emergência
O Midland G9 dedica uma canal para as chamadas de emergência: todos os aparelhos G9 a funcionar no seu
alcance, mesmo que sintonizados em canais diferentes, podem receber/transmitir mensagens de emergência
nesse canal.
Se mantiver pressionado o botão EMG, as comunicações mudam automaticamente para o canal de emergência
(“EC” no visor). Será enviado um sinal de áudio e todos os aparelhos G9 a operar nesse alcance serão
automaticamente colocados no canal de emergência (“EC”).
Se desactivou esta função, não irá receber/transmitir nenhuma chamada de emergência.
! Quando o rádio estiver a funcionar no canal de emergência (EC visualizado), todos os botões com
excepção de PTT e CALL estarão desactivados.
O G9 irá regressar ao canal em utilização um minuto depois da última transmissão.
Para regressar imediatamente, pressione EMG. Agora pode utilizar todas as funções de MENU.
Activar/desactivar a função de emergência
Quando liga o aparelho, a função de emergência é activada, mas pode desactivá-la e voltar a ligá-la
novamente:
Pressione o botão MENU até o visor apresentar a indicação EC on.
Seleccione EC of utilizando os botões ▲▼. Conrme a sua selecção pressionando PTT ou aguarde 5
segundos.
! Quando a função de emergência é activada (EMG a piscar no visor) as funções indicadas a seguir não
podem ser utilizadas: varrimento, monitorização, vigilância dupla, fora de alcance.
Alterar o canal de emergência
O canal de emergência originalmente predenido é o P8 DCS 50; mas pode alterá-lo em conformidade com as
suas necessidades.
Page 63

61
PORTOGUÊS
! Importante: certique-se de que a função de emergência está activa! (EMG a piscar). Se decidir alterar
o canal dedicado à função de emergência, não se esqueça de realizar a mesma alteração em todos os
rádios!
Pressione o botão MENU até o visor apresentar a indicação EC on.
Pressione o botão MENU novamente (of é visualizado) e seleccione o canal pretendido utilizando os botões ▲▼.
Para conrmar, pressione o botão PTT ou aguarde 5 segundos.
! Importante: certique-se de que a função de emergência está activa! (EMG a piscar).
Se decidir alterar o canal dedicado à função de emergência, não se esqueça de realizar a mesma
alteração em todos os rádios!
Para denir novamente o canal de emergência original (P8 DCS 50) pressione o botão MENU até ser visualizada
no visor a indicação EC on.
Pressione o botão MENU novamente e seleccione of.
Para conrmar, pressione PTT ou aguarde durante 5 segundos.
! Se dedicar algum dos canais padrão para a função de emergência, lembre-se de o utilizar apenas para
esse propósito, caso contrário irá provocar interferências.
Função Fora de alcance manual
Esta função permite-lhe saber se existem rádios no âmbito do alcance do seu aparelho.
Pressionando
EMG duas vezes, irá enviar um pedido de reconhecimento para outros aparelhos G9 a operar no
âmbito do seu alcance e sintonizados no mesmo canal.
Se algum rádio responder, isto signica que se encontra no seu alcance e irá receber um tom de áudio de
conrmação.
! Esta função só pode ser utilizada se a função “Fora de alcance automático” não estiver activa.
VIGILÂNCIA DUPLA
A vigilância dupla permite-lhe monitorizar constantemente dois canais à sua escolha ao mesmo tempo.
Activar - Desactivar
Pressione o botão › MENU até o visor apresentar a indicação DW of.
Seleccione o segundo canal a monitorizar pressionando os botões ▲▼. ›
Para conrmar a sua selecção, pressione › PTT ou aguarde 5 segundos. O visor irá mostrar de forma alternada
o canal em utilização e o segundo canal a ser monitorizado.
Para parar a função, basta pressionar o botão MENU.
Quando o emissor-receptor detecta uma transmissão num dos dois canais, a vigilância dupla é colocada
temporariamente em pausa, permanece sintonizada durante 5 segundos no canal correspondente, dando
ao utilizador a oportunidade de responder a uma chamada. Após esta pausa, a vigilância dupla é novamente
reiniciada.
! Esta função só pode ser activada se a função “Emergência” estiver desactivada.
Fora de alcance automático
Ao denir este modo um conjunto de 2 aparelhos G9 realiza uma transmissão a cada 30 segundos de um código
de controlo de dados. Assim que o contacto entre os dois aparelhos estiver a perder-se e que um rádio não
receba este código de controlo de dados duas vezes consecutivas, o ícone OUT começa a piscar e irá escutar
um sinal sonoro.
! Esta função só pode ser activada se a função “Emergência” estiver desactivada.
Activar – Desactivar
Pressione o botão MENU até o visor apresentar “OUT” e “Or of”, seleccione “Or on” (activado) com os botões
▲▼.
Desligue os dois rádios.
Ligue-os ao mesmo tempo.
Para desactivar esta função, pressione o botão MENU até “OUT” e “Or on” serem visualizados; seleccione “Or
of” (desactivado) com os botões ▲▼.
Conrme a sua selecção pressionando PTT ou aguarde 5 segundos.
Page 64

62
Iluminação do visor
Se não existir luz suciente para ler o visor, pressione brevemente o botão EMG e a iluminação do visor irá
ligar-se durante cerca de 5 segundos. Cada vez que o botão MENU é pressionado, o visor irá acender-se
automaticamente.
Poupança de energia
A função de poupança de energia das pilhas permite uma redução no consumo de até 50%; a poupança de
energia activa-se automaticamente quando o emissor-receptor não recebe qualquer sinal durante mais de 7
segundos. Quando as pilhas estão descarregadas, o ícone
é visualizado no visor: substitua as pilhas ou
recarregue o conjunto de pilhas.
! A poupança de energia apenas é activada se a função de emergência estiver desactivada.
Recarregar as pilhas
Ligue a tomada do adaptador de parede à alimentação eléctrica e introduza a cha do adaptador de parede na
tomada do carregador de secretária.
Coloque o seu emissor-receptor no suporte do carregador de secretária. O LED vermelho do carregador irá
acender-se. Demora 12/14 horas a carregar completamente.
Quando o carregamento estiver concluído retire o emissor-receptor do suporte e desligue a tomada do adaptador
de parede da alimentação eléctrica.
! Não sobrecarregue as pilhas! Quando estas estiverem completamente carregadas o processo de
carregamento não pára automaticamente. Não se esqueça portanto, de remover o emissor-receptor
do carregador assim que as pilhas estiverem carregadas, caso contrário o rádio e as pilhas poderão
ser danicados.
! Não tente carregar pilhas alcalinas ou pilhas não recarregáveis. Certique-se de que quando
carrega o rádio, apenas são utilizadas pilhas recarregáveis NI-MH ou o conjunto de pilhas fornecido
no compartimento das pilhas! As pilhas alcalinas não são recarregáveis! As pilhas que não são
adequadas para serem recarregadas podem ter fugas, explodir ou mesmo arder e provocar danos!
! Utilizar um carregador de pilhas diferente do especicado pode provocar danos ao seu aparelho ou
pode mesmo provocar explosões e ferimentos pessoais.
! Não atire pilhas para o lume nem as coloque próximas de calor uma vez que isto pode provocar
explosões ou ferimentos pessoais. Elimine as pilhas em conformidade com os procedimentos
denidos pelas suas normas locais.
! Não misture pilhas novas e velhas ou pilhas de tipos diferentes ou mesmo pilhas que tenham sido
utilizadas de formas diferentes.
Page 65

63
PORTOGUÊS
GARANTIA
A garantia não limita os direitos de estatuto do usuário sob as leis nacionais aplicáveis referentes à venda de
bens de consumo.
Durante o período de garantia, o fabricante ou o agente de serviço autorizado irá, de acordo com esta Garantia
Limitada, consertar defeitos através de reparos ou substituição do produto.
A Garantia Limitada é válida e tem vigor somente no país em que o produto for adquirido.
Período de garantia
O período de garantia inicia-se quando o produto é comprado pelo primeiro usuário. O produto pode possuir
várias peças diferentes e estas peças são cobertas por períodos diferentes de garantia:
- 24 meses para o aparelho
- 6 meses para as seguintes peças: baterias, carregadores, fones de ouvido e antenas.
Como obter o serviço de garantia
Caso o produto apresente defeitos, leve-o a um agente de serviço autorizado ou ao próprio fabricante. Para
utilizar esta garantia, é preciso levar ao agente de serviço autorizado:
- O produto afetado (ou acessórios)
- Recibo original de compra, na qual devem estar indicados com clareza o nome e o endereço do revendedor
e a data e o local da compra.
O que a garantia não cobre
A garantia não cobre:
- Desgastes normais do produto
- Defeitos causados por manuseio inadequado (defeitos causados por objetos aados, ou se o aparelho for
entortado, comprimido ou derrubado, etc.)
- Defeitos ou danos causados por um uso incorreto do produto, incluindo usos contrários às instruções
fornecidas pelo fabricante
- Defeitos causados por outros fatores ou ações além do controle do fabricante.
A garantia não cobre defeitos ou danos causados ao produto por uma má utilização com, ou conectado a, qualquer outro produto, software e/ou serviços não produzidos ou fornecidos pelo fabricante, ou mesmo por um uso
do produto para qualquer outro m diferente do especicado.
A garantia é anulada se o produto for aberto, modicado ou consertado por alguém que não seja um agente de
serviço autorizado; se for consertado utilizando-se peças não autorizadas ou se o número de série for removido,
apagado, coberto, alterado ou se estiver ilegível.
A garantia é anulada se o produto for exposto a umidades altas ou condições extremas de temperatura ou clima,
ou mesmo a corrosões, oxidação, derramamento de comidas ou líquidos ou contato com produtos químicos.
Page 66

64
Page 67

65
ΕΛΛΗΝΙΚΑ
MIDLAND G9
Ευχαριστούμε που επιλέξατε τη Midland! Ο Midland G9 είναι ένας φορητός πομποδέκτης licence free σχεδόν σε
όλες τις ευρωπαϊκές χώρες. Για περισσότερες πληροφορίες, προτείνουμε να δείτε το διάγραμμα των “περιορισμών
στη χρήση”.
Συνδυάζοντας την τελευταία λέξη της τεχνολογίας μέσα σε ένα ανθεκτικό πλαίσιο, ο Midland G9 είναι η ιδανική
και αποτελεσματική λύση τόσο για τους επαγγελματίες που θέλουν να μείνουν σε επαφή με τους συνεργάτες
τους (μοτοσικλετιστές, κατασκευαστικές / οικοδομικές εταιρείες, τουριστικά συγκροτήματα / ξενοδοχεία, αθλητικές
εκδηλώσεις, συναυλίες). Η ανθεκτική κατασκευή, η ευκολία στη χρήση και ο απλός σχεδιασμός, καθιστούν την
συσκευή ιδανική για οποιαδήποτε δραστηριότητα.
Ο Midland G9 είναι διαθέσιμος σε δύο εκδόσεις:
Dual Band (PMR446/LPD) ›
Έκδοση Ε (PMR446 μόνο) ›
Αυτό το εγχειρίδιο αναφέρεται και στα δύο μοντέλα και θα βρείτε τονισμένες τις διαφορές μεταξύ των
δύο εκδόσεων.
Περιεχόμενα συσκευασίας
1 Midland G9 ›
1 μονός επιτραπέζιος φορτιστής ›
1 αντάπτορας τοίχου ›
4 επαναφορτιζόμενες μπαταρίες 1800mAh NiMH ›
1 κλίπ ζώνης ›
Κάλυψη / Εμβέλεια
Η μέγιστη εμβέλεια επιτυγχάνεται όταν χρησιμοποιείται σε ανοιχτό χώρο. Ο μόνος περιορισμός στην εμβέλεια
τίθεται από παράγοντες όπως η διαμόρφωση του εδάφους, συστάδες δένδρων, κτίρια, ή άλλα εμπόδια. Μέσα σε
αυτοκίνητα ή μεταλλικές κατασκευές η εμβέλεια μειώνεται. Φυσιολογικά η κάλυψη στην πόλη, με κτήρια ή άλλα
εμπόδια είναι περίπου 1 με 2 χλμ. Σε ανοιχτό χώρο αλλά με εμπόδια όπως δέντρα, φυλλωσιές ή σπίτια το μέγιστο
δυνατό εύρος είναι περίπου 4-6 χλμ. Σε ανοιχτό χώρο, για περιοχές χωρίς εμπόδια και μέσα στο οπτικό σας
πεδίο, όπως παραδείγματος χάριν στο βουνό, η κάλυψη μπορεί να είναι περισσότερη από 12 χλμ.
Οι μπαταρίες και η θήκη μπαταριών
Ο πομποδέκτης αποδέχεται τις παρεχόμενες επαναφορτιζόμενες μπαταρίες ή 4 αλκαλικές μπαταρίες AA. Για
να ανοίξετε το χώρο των μπαταριών: κοιτώντας τη πλάτη του πομποδέκτη , απαγκιστρώστε το κλείστρο της
μπαταρίας στο κάτω μέρος του πομποδέκτη και γλιστρήστε απαλά το κάλυμμα προς τα έξω Εισάγετε την μπαταρία
προσέχοντας την πολικότητα και τοποθετήστε το κάλυμμα πάλι στη θέση του.
Προσοχή: τις παρεχόμενες επαναφορτιζόμενες μπαταρίες πρέπει να επαναφορτιστεί πριν από την πρώτη
χρήση.
Προειδοποιήσεις
ΜΠΑΤΑΡΙΕΣ › - Ακολουθήστε αυστηρά όλες τις οδηγίες και τις προειδοποιήσεις που αφορούν τις μπαταρίες
όπως αυτές εμφανίζονται στo κεφάλαιο “επαναφόρτιση μπαταριών”
Μην ανοίγετε τη συσκευή για κανένα λόγο! › Τα μεγάλης ακρίβειας μηχανικά και ηλεκτρονικά μέρη της
απαιτούν εμπειρία και ειδικό εξοπλισμό. Για τον ίδιο λόγο, δεν πρέπει να προσπαθήσετε να συντονίσετε
εσωτερικά τη συσκευή αφού έχει ήδη συντονιστεί για να έχει τη βέλτιστη απόδοση. Κάθε επέμβαση μη
αρμοδίου, θέτει τον πομποδέκτη εκτός εγγύησης.
Μην χρησιμοποιείτε απορρυπαντικά, οινόπνευμα ή στιλβωτικά για να καθαρίσετε τη συσκευή. ›
Χρησιμοποιείτε μόνο ένα απαλό καθαρό πανί. Αν ο πομποδέκτης σας είναι πολύ λερωμένος βρέξτε ελαφρώς
το πανί σε διάλυμα ουδέτερου σαπουνιού.
Page 68

66
ΧΑΡΑΚΤΗΡΙΣΤΙΚΑ
Νέο “Dual PTT” χαρακτηριστικό για την υψηλή ή χαμηλή ισχύ εξόδου. › Το Midland G9 είναι εξοπλισμένο
με ένα διπλό πλήκτρο PTT. Χάρη σε αυτό το ολοκαίνουργιο χαρακτηριστικό, είναι δυνατό να χρησιμοποιηθεί
η υψηλή ισχύ μόνο όταν είναι πραγματικά απαραίτητο, επιτρέποντας με αυτόν τον τρόπο υψηλή μείωση της
κατανάλωσης της μπαταρίας.
Νέα λειτουργία “επείγουσα κλήση”. › O Midland G9 εισάγει ένα καινοτόμο και σημαντικό χαρακτηριστικό: το
κανάλι που είναι μόνο για επείγουσες καταστάσεις. Οι ραδιοεπικοινωνίες συμβαίνουν συνήθως μεταξύ δύο ή
περισσότερων χρηστών που είναι συντονισμένοι στο ίδιο κανάλι: δεν είναι δυνατό να γίνει εκπομπή ή λήψη
σε / από διαφορετικά κανάλια. Αλλά χάρη στη λειτουργία “επείγουσας κλήσης”, μπορείτε να ελέγχετε το κανάλι
έκτακτης ανάγκης: όλοι οι χρήστες που έχουν ένα Midland G9 μπορούν να επικοινωνήσουν στο κανάλι που
είναι συντονισμένοι και μπορούν συγχρόνως να λαμβάνουν / εκπέμπουν μηνύματα έκτακτης ανάγκης στο κατ’
εξοχήν γι αυτό κανάλι. Απλά κρατήστε πιεσμένο το κουμπί EMG για 3 δευτερόλεπτα και μια κλήση έκτακτης
ανάγκης θα σταλεί σε όλα τα G9 που είναι σε εμβέλεια: θα συντονιστούν αυτόματα στο κανάλι “EC” (κανάλι
έκτακτης ανάγκης).
Νέα λειτουργία “Χειροκίνητος έλεγχος out of range(εκτός εμβέλειας)” › : απλά πιέστε δύο φορές το κουμπί
EMG και θα ελέγξετε εάν υπάρχουν μερικοί πομποδέκτες μέσα στην εμβέλεια της συσκευής σας.
Νέα λειτουργία “Vox TalkBack”: › εάν ένας πομποδέκτης μεταδίδει συνεχώς σε VOX, η λειτουργία Vox TB θα
σταματήσει αυτόματα την εκπομπή μετά από 20” για να επιτρέψει την εκπομπή και στους άλλους χρήστες.
Κύρια χαρακτηριστικά
Ισχύς : 500 mW (PMR446); 10mW (LPD) ›
Θερμοκρασία λειτουργίας : από -20° έως +55° C ›
38 CTCSS /104 DCS ›
“Dual PTT” για την υψηλή ή χαμηλή ισχύ εξόδου ›
Λειτουργία επείγουσας κλήσης ›
Έλεγχος εκτός εμβέλειας (out of range) ›
Ρυθμιζόμενο VOX σε 3 επίπεδα με λειτουργία “TalkBack” ›
Λειτουργία δόνησης Vibra › CALL
Κλείδωμα πλήκτρων ›
Λειτουργία εξοικονόμησης ρεύματος:αυτόματο κύκλωμα εξοικονόμησης μπαταρίας ›
Ένδειξη χαμηλής στάθμης μπαταρίας ›
Λειτουργία Dual Watch ›
Λειτουργία › CALL με 5 επιλέξιμες μελωδίες
Σάρωση (SCAN) ›
Λειτουργία Monitor ›
Λειτουργία ελέγχου “ εκτός εμβέλειας ” (out of range) ›
Roger beep ›
Επιλογή υψηλής / χαμηλής ισχύος (hi / low) ›
LCD οθόνη με φωτισμό ›
Παροχή ισχύος: 4 ΑΑ NiMH επαναφορτιζόμενες μπαταρίες (ή προαιρετικό πακ μπαταριών 800mAh) ›
Υποδοχή αξεσουάρ 2 pin ›
Εκδόσεις
G9 Dual Band (PMR446/LPD) ›
24 PMR446 Κανάλια (8 + 16 αποθηκευμένα) / 69 LPD Κανάλια
G9E (PMR446 μόνο) ›
24 PMR446 Κανάλια (8 + 16 αποθηκευμένα)
Page 69

67
ΕΛΛΗΝΙΚΑ
ΠΕΡΙΓΡΑΦΗ ΜΕΡΩΝ ΣΥΣΚΕΥΗΣ ΚΑΙ ΛΕΙΤΟΥΡΓΙΩΝ
Οθόνη
Οι λειτουργίες και η τρέχουσα κατάσταση του πομποδέκτη, εμφανίζονται διαρκώς στην οθόνη (LCD). Τα σύμβολα
και οι αντίστοιχες παράμετροι δίνουν λεπτομερείς πληροφορίες οι οποίες αναφέρονται αναλυτικά παρακάτω:
1. ΚΑΝΑΛΙ Τα δύο μεγάλα ψηφία δείχνουν το επιλεγμένο κανάλι
2. VOX Ενεργοποίηση της λειτουργίας VOX.
3.
Εμφανίζεται όταν τα πλήκτρα είναι κλειδωμένα
4. EMG Ενεργοποίηση της λειτουργίας έκτακτης ανάγκης
5. DW Ενεργοποίηση της λειτουργίας Dual Watch
6.
Δείχνει τη στάθμη της μπαταρίας
7.
Είναι ενεργοποιημένη η λειτουργία δόνησης.VibraCALL
8. OUT Δείχνει εάν η λειτουργία αυτόματου ελέγχου out of range (εκτός εμβέλειας)
έχει χάσει επαφή με τους άλλους πομποδέκτες
9. RX εμφανίζεται όταν ο πομποδέκτης λαμβάνει σήμα
10. TX εμφανίζεται κατά τη διάρκεια της εκπομπής (πατημένο PTT).
11. H (High) / L(Low) επιλεγμένη η υψηλή / χαμηλή ισχύς αντίστοιχα. Η ισχύς εξόδου του μεγάλου
ΡΤΤ εξαρτάται από την επιλογή σας.
12. CTCSS / DCS Δείχνει το τύπο του υποτόνου που έχει επιλεχθεί
13. CTCSS / DCS τα 3 μικρά ψηφία δείχνουν τον επιλεγμένο υπότονο CTCSS/DCS (1 – 38/
1-104)
14. ROGER Ενεργοποίηση Roger Beep
1
2
3
4 5 6 8
7
10
9
11
12
13
14
Page 70

68
Πομποδέκτης
Στην εικόνα φαίνονται τα διάφορα μέρη της συσκευής:
15. Ενσωματωμένο μεγάφωνο
16. Πλήκτρο MENU Για εμφάνιση του MENU επιλογών του πομποδέκτη
17. Πλήκτρο CALL/
για αποστολή κλήσης στο επιλεγμένο κανάλι. Κρατήστε το πατημένο για 5
sec προκειμένου να κλειδώσετε τα πλήκτρα.
18. Πλήκτρο PTT (push to talk) Το πλήκτρο PTT έχει διπλή λειτουργία, καθώς αποτελείται από 2 μέρη:
πατώντας το μεγαλύτερο και μεγαλύτερο μέρος των βασικών PTT, θα
μπορέσει η πομποδέκτης να εκπέμψει με χαμηλή ισχύ, ενώ πατώντας το
μικρό μέρος του (που ονομάζεται Boost) θα εκπέμπει με μεγάλη ισχύ.
19. Κουμπί VOLUME Ενεργοποίηση/ απενεργοποίηση της συσκευής και ρύθμιση της έντασης φωνής
20. ΚΕΡΑΙΑ
21. Υποδοχή μικρομεγαφώνου SPK/MIC (προστατεύεται από λαστιχένιο κάλυμμα) Για τη σύνδεση
εξωτερικών αξεσουάρ ήχου (κεφαλοακουστικά, μικρόφωνα κλπ) και για τη
φόρτιση των μπαταριών (2 pin)
22. Πλήκτρο EMG Για ενεργοποίηση της λειτουργίας επείγουσας κατάστασης και της λειτουργίας
χειροκίνητου ελέγχου out of range (εκτός εμβέλειας)
23. Πλήκτρα ▲▼ Για αλλαγή των ρυθμίσεων του MENU
24. Ενσωματωμένο μικρόφωνο
CALL
MENU
EMG
1
2
5
3
4 6 8 7
11
9
10
12
13
14
15
24
23
22
21
20
19
18
17
16
Page 71

69
ΕΛΛΗΝΙΚΑ
Ενεργοποίηση/ απενεργοποίηση (on/off)
Για να ενεργοποιήσετε τον πομποδέκτη περιστρέψτε το κουμπί VOLUME δεξιόστροφα μέχρι να
ακούσετε ένα κλικ. Για να απενεργοποιήσετε τον πομποδέκτη, περιστρέψτε αριστερόστροφα το ίδιο κουμπί
ώσπου να ακουστεί κλικ και να σβήσει η οθόνη.
Επιλέγοντας τη μπάντα PMR466 ή LDP (μόνο για την έκδοση Dual Band)
Ο Midland G9 (Dual Band) έχει ως προεπιλεγμένη από το εργοστάσιο τη μπάντα PMR446.
Για να γυρίσετε στη μπάντα LPD, κρατήστε πιεσμένο το πλήκτρο MENU έως ότου η LCD οθόνη να εμφανίζει
κανάλι “1”.
Για να επιστρέψετε στη μπάντα PMR446, κρατήστε πιεσμένο το πλήκτρο MENU πάλι, έως ότου η LCD οθόνη
να εμφανίσει “P1”.
! Αυτή η διαδικασία απενεργοποιεί τη λειτουργία “EMG” · επομένως όταν αλλάζετε τη ζώνη συχνότητας,
θυμηθείτε να ενεργοποιείτε τη λειτουργία έκτακτης ανάγκης πάλι (δείτε την παράγραφο «Λειτουργία
έκτακτης ανάγκης»).
Επιλογή καναλιού
Πιέστε το πλήκτρο MENU. Ο αριθμός του καναλιού θα αρχίσει να αναβοσβήνει στην οθόνη. Πιέστε τα πλήκτρα
κύλισης ▼▲ μέχρις ότου επιλέξετε το επιθυμητό κανάλι. Πιέστε το πλήκτρο PTT για να επιβεβαιώσετε την επιλογή
, ή περιμένετε 5 δευτερόλεπτα.
Σύμφωνα με την έκδοση που αγοράσατε, μπορείτε να επιλέξετε μεταξύ των ακόλουθων καναλιών:
Έκδοση Dual Band: › PMR446: από P1 έως P8 και από 9p έως 24p (αποθηκευμένα)/ LPD: από 1 έως 69.
Έκδοση Ε (PMR446 μόνο): › από P1 P8 και από 9p 24p (αποθηκευμένα)
! Το κανάλι P8 έχει προκαθοριστεί από το εργοστάσιο για τη λειτουργία «έκτακτης ανάγκης» ·προτείνουμε
να μην το χρησιμοποιείτε για τις γενικές επικοινωνίες!
Εμφάνιση καναλιού / υποτόνου
Για να εμφανιστεί στιγμιαία το κανάλι PMR446 και ο υπότονος που χρησιμοποιείται στα αποθηκευμένα κανάλια,
πηγαίνετε στο επιθυμητό κανάλι (από 9p έως 24p) και κρατήστε πιεσμένο το ▼ για 3 δευτερόλεπτα.
Εκπομπή και λήψη
Για τη μετάδοση κρατήστε το κουμπί PTT σταθερά πατημένο (δεν έχει σημασία ποιο τμήμα του). Περιμένετε για
κλάσματα του δευτερολέπτου, κατόπιν μιλήστε κανονικά στο μικρόφωνο κρατώντας τη συσκευή σε μια απόσταση
περίπου 5 εκατ. Στην οθόνη θα εμφανιστεί η ένδειξη TX
Όταν τελειώσετε, απελευθερώστε το PTT.
Όταν ο πομποδέκτης είναι σε κατάσταση λήψης (πλήκτρο PTT απελευθερωμένο) θα λάβετε αυτόματα οποιαδήποτε
επικοινωνία. Στην οθόνη θα εμφανιστεί η ένδειξη RX .
! Ως προεπιλογή η ισχύς εξόδου είναι ρυθμισμένη στο “H- Υψηλή”, ώστε ανεξάρτητα με το ποιο ΡΤΤ
πλήκτρο κρατάτε πατημένο (μεγάλο ή μικρό) η αποστολή να πραγματοποιείται με μεγάλη ισχύ.
! Αν χρησιμοποιείτε εξωτερικό μικρόφωνο, το ΡΤΤ πάνω του θα ακολουθήσει την ίδια ΡΤΤ αποστολή
του πομποδέκτη.
Ρύθμιση της έντασης
Περιστρέψτε το κουμπί VOLUME μέχρις ότου φθάσετε στο επιθυμητό επίπεδο.
Λειτουργία CALL
Πιέστε το πλήκτρο CALL και θα εκπέμψετε ένα σήμα στους χρήστες που είναι συντονισμένοι στο ίδιο κανάλι·
μπορείτε να επιλέξετε μεταξύ διαφορετικών τόνων κλήσης.
“Λειτουργία έκτακτης ανάγκης”
Όταν είναι ενεργοποιημένη η λειτουργία έκτακτης ανάγκης (η ένδειξη EMG αναβοσβήνει στην οθόνη), κρατήστε
το EMG πατημένο για 3 δευτερόλεπτα και έτσι στέλνετε μια κλήση έκτακτης ανάγκης στα άλλα G9 μέσα στην
εμβέλεια σας. Η λειτουργία έκτακτης ανάγκης είναι ενεργοποιημένη εξ ορισμού.
Κλείδωμα πλήκτρων
Κρατήστε πατημένο το πλήκτρο CALL/
για 5 δευτερόλεπτα και το εικονίδιο θα εμφανιστεί στην οθόνη. Μόνο τα
πλήκτρα PTT EMG και CALL/
παραμένουν ενεργά. Επαναλάβετε για να τα ξεκλειδώσετε.
Page 72

70
Λειτουργία MON (Monitor) / Squelch
Πατώντας το πλήκτρο Monitor μπορείτε να παρακάμψετε προσωρινά το squelch και έτσι να λάβετε ακόμα και τα
πιο ασθενή σήματα.
Προκειμένου να ενεργοποιήσετε τη λειτουργία Monitor, κρατήστε πατημένα και τα δύο πλήκτρα ▲▼ για 2
δευτερόλεπτα περίπου.
Επαναλάβετε για να απενεργοποιήσετε τη λειτουργία, ή απενεργοποιήστε τον πομποδέκτη.
! Όταν η λειτουργία MON είναι ενεργή, θα ακούτε πιθανώς έναν σταθερό θόρυβο από παράσιτα.
! Μπορείτε να ενεργοποιήσετε τη λειτουργία monitor μόνο εάν η λειτουργία “έκτακτης ανάγκης” είναι
απενεργοποιημένη.
Σάρωση όλων των διαύλων
Με τον Midland G9 μπορείτε να σαρώσετε τις μπάντες PMR/LPD αναζητώντας σήματα. Όταν ανιχνευτεί κάποιο
σήμα, η σάρωση σταματά προσωρινά στο κανάλι αυτό για 5 δευτερόλεπτα.
Πιέστε το πλήκτρο ▲ για 2 δευτερόλεπτα: η σάρωση θα αρχίσει. Για να σταματήσει, πιέστε το PTT: ο Midland G9
θα επιστρέψει στο κανάλι από το οποίο άρχισε η σάρωση.
! Μπορείτε να ενεργοποιήσετε τη λειτουργία σάρωσης μόνο εάν η λειτουργία «έκτακτης ανάγκης» είναι
απενεργοποιημένη.
Το πλήκτρο “MENU”
Τα ακόλουθα χαρακτηριστικά μπορούν να επιλεγούν με τη χρήση του πλήκτρου “MENU”:
Επιλογή καναλιού ›
Ρύθμιση CTCSS υποτόνων ›
Ρύθμιση DCS υποτόνων ›
Επιλογή υψηλή / χαμηλή ισχύς αντίστοιχα (μόνο στη μπάντα PMR446) ›
VOX ›
Λειτουργία δόνησης Vibra › CALL
Μελωδίες κλήσης ›
Roger Beep ›
Τόνοι πλήκτρων ›
Κανάλι επείγουσας ανάγκης ›
Λειτουργία Dual Watch ›
Λειτουργία Out of range (εκτός εμβέλειας) ›
Επιλογή καναλιού
Πατήστε το πλήκτρο MENU. Ο αριθμός του καναλιού θα αρχίσει να αναβοσβήνει στην οθόνη. Πιέστε τα πλήκτρα
κύλισης ▼▲ μέχρις ότου επιλέξετε το επιθυμητό κανάλι. Πιέστε το πλήκτρο PTT για να επιβεβαιώσετε την επιλογή
, ή περιμένετε 5 δευτερόλεπτα.
Σύμφωνα με την έκδοση που αγοράσατε, μπορείτε να επιλέξετε μεταξύ των ακόλουθων καναλιών:
Έκδοση Dual Band: › PMR446: από P1 έως P8 και από 9p έως 24p (αποθηκευμένα)/ LPD: από 1 έως 69.
Έκδοση Ε (PMR446 μόνο): › από P1 έως P8 και από 9p έως 24p (αποθηκευμένα)
! Το κανάλι P8 έχει προκαθοριστεί από το εργοστάσιο για τη λειτουργία «έκτακτης ανάγκης» ·προτείνουμε
να μην το χρησιμοποιείτε για τις γενικές επικοινωνίες!
Ρύθμιση CTCSS/DCS υποτόνων
Οι CTCSS και DCS υπότονοι είναι παρόμοιοι με κωδικούς πρόσβασης και επιτρέπουν στον πομποδέκτη να
επικοινωνήσει μόνο με τους χρήστες που είναι συντονισμένοι στο ίδιο κανάλι και έχουν θέσει τον ίδιο κωδικό. Για
κάθε κανάλι, μπορείτε να προγραμματίσετε 38 CTCSS και 104 DCS υπότονους.
Αυτοί οι υπότονοι μπορούν να προγραμματιστούν στα ακόλουθα κανάλια:
Έκδοση Dual Band: › μόνο στα 8 κύρια κανάλια PMR446 (από P1 έως P8) και στα 69 κανάλια LPD.
Έκδοση Ε (PMR446 μόνο): › μόνο στα 8 κύρια κανάλια PMR446 (από P1 έως P8).
Και για τις δύο, τα αποθηκευμένα κανάλια από 9p έως 24p δεν μπορούν να τροποποιηθούν.
Ενεργοποίηση των τόνων CTCSS:
Ενεργοποιήστε τη συσκευή.
Επιλέξτε το επιθυμητό κανάλι πατώντας το πλήκτρο MENU και τα πλήκτρα▲▼.
Πιέστε το πλήκτρο MENU μέχρις ότου η οθόνη εμφανίσει την ένδειξη CTC και αναβοσβήνει ο CTCSS υπότονος
στα δεξιά (“of” = κανένας κωδικός – προκαθορισμένη κατάσταση).
Επιλέξτε τον επιθυμητό υπότονο CTCSS πατώντας τα πλήκτρα▲▼.
Για να επιβεβαιώσετε την επιλογή, πατήστε το πλήκτρο PTT ή περιμένετε 5 δευτερόλεπτα.
Page 73

71
ΕΛΛΗΝΙΚΑ
Απενεργοποίηση των τόνων CTCSS:
Εάν δεν θέλετε να χρησιμοποιήσετε τους υπότονους CTCSS, ακολουθήστε αυτά τα βήματα:
Επιλέξτε το επιθυμητό κανάλι
Πατήστε το κουμπί MENU μέχρις ότου αναβοσβήνει στην οθόνη ο υπότονος CTCSS στα αριστερά·
Επιλέξτε “of” μέσω των πλήκτρων ▲▼.
Ενεργοποίηση των υπότονων DCS:
Ενεργοποιήστε τη συσκευή.
Επιλέξτε το επιθυμητό κανάλι πατώντας το πλήκτρο MENU και τα πλήκτρα ▲▼.
Πατήστε το πλήκτρο MENU πάλι μέχρι η οθόνη να εμφανίσει την ένδειξη DCS και αναβοσβήνει ο κωδικός του
υπότονου στα δεξιά (“of” = κανένας κωδικός – προκαθορισμένη κατάσταση).
Επιλέξτε τον επιθυμητό κωδικό DCS πατώντας τα πλήκτρα ▲▼.
Για να επιβεβαιώσετε τη ρύθμιση, πιέστε το PTT ή περιμένετε 5 δευτερόλεπτα.
! Το κανάλι P8 με υπότονο DCS50 (P850) έχει προκαθοριστεί από το εργοστάσιο για τη λειτουργία
«έκτακτης ανάγκης»·μην το χρησιμοποιείτε για γενικές επικοινωνίες!!
Απενεργοποίηση των υποτόνων DCS:
Επιλέξτε το επιθυμητό κανάλι.
Πατήστε το κουμπί MENU μέχρις ότου εμφανιστεί στην οθόνη το κανάλι σε χρήση και αναβοσβήνει στην οθόνη
ο υπότονος DCS στα δεξιά.
Επιλέξτε “of” μέσω των πλήκτρων ▲▼.
Επιλογή υψηλής / χαμηλής ισχύος (μόνο στη μπάντα PMR446)
Για να επιλέξετε το επίπεδο ισχύος, πιέστε το κουμπί MENU μέχρις ότου εμφανιστεί στην οθόνη η ένδειξη Pr.
Χρησιμοποιήστε τα πλήκτρα▲▼ για να επιλέξετε L (χαμηλή ισχύ) ή Η (υψηλή ισχύ). Για να επιβεβαιώσετε την
επιλογή σας, πιέστε το PTT ή περιμένετε 5 δευτερόλεπτα.
Όταν οι μπαταρίες είναι φορτισμένες πλήρως, η υψηλή ισχύς είναι 500 MW (ERP), ενώ η χαμηλή είναι 10mW
(ERP).
Εάν ο πομποδέκτης σας πρέπει να λειτουργήσει μέσα σε περιορισμένη εμβέλεια, μπορείτε να επιλέξετε την
χαμηλή ισχύ και συνεπώς να επεκτείνετε τη ζωή των μπαταριών.
Στα LPD κανάλια (μόνο στην έκδοση Dual band του G9) η ισχύς εξόδου είναι πάντα 10mW (ERP).
Κανάλια PMR446: Η επιλογή της υψηλής ή χαμηλής ισχύος επηρεάζει τη χρήση του πλήκτρου PTT.
Εάν επιλέξετε “H” (υψηλής ισχύος), πατώντας το πλήκτρο PTT, ανεξάρτητα από το ποιό τμήμα της, ο πομποδέκτης
εκπέμπει με μεγάλη δύναμη.
Εάν επιλέξετε “L” (χαμηλής ισχύος), πατώντας το μεγάλο PTT, ο πομποδέκτης θα εκπέμπει με χαμηλή ισχύ, ενώ
πατώντας το μικρό PTT θα εκπέμπει με μεγάλη δύναμη.
Κανάλια LPD: η επιλογή υψηλής/χαμηλής ισχύος εξόδου δεν είναι διαθέσιμη στα κανάλια LPD ώστε τα δύο ΡΤΤ
να εκπέμπουν πάντα με υψηλή ισχύ. (Σημειώστε ότι αφορά την έκδοση G9 Dual band).
! ΠΡΟΣΟΧΗ: για να βελτιστοποιήσετε την κατανάλωση της μπαταρίας, είναι απαραίτητο να ρυθμίσετε
την ισχύ Εξόδου των ρυθμίσεων μενού ως “L-χαμηλή”. Με τον τρόπο αυτό, πιέζοντας το Boost PTT,
μπορείτε να στείλετε με υψηλή ισχύ μόνο όταν πραγματικά το χρειάζεστε. Ως προεπιλογή η ισχύς
εξόδου είναι ρυθμισμένη στο “H-Υψηλή“, συνιστάται η αλλαγή αυτής της παραμέτρου.
Λειτουργία VOX
Με το Midland G9 μπορείτε να πραγματοποιείτε handsfree επικοινωνίες με τη βοήθεια της λειτουργίας VOX:
απλά μιλήστε στο μικρόφωνο και η επικοινωνία θα είναι άμεση.
Η ευαισθησία VOX μπορεί να ρυθμιστεί σε 3 διαφορετικά επίπεδα. Μπορείτε να ενεργοποιήσετε τη λειτουργία
VOX με ή χωρίς αξεσουάρ.
Το τέταρτο επίπεδο που ενεργοποιείται είναι το VOX TalkBack: αν ένας πομποδέκτης εκπέμπει συνεχώς σε VOX,
η λειτουργία VOX TB θα σταματήσει αυτόματα την εκπομπή μετά από 20 δευτερόλεπτα για να επιτρέψει και στους
άλλους χρήστες να εκπέμψουν.
Για να ενεργοποιήσετε την λειτουργία VOX, πιέστε το πλήκτρο MENU μέχρις ότου στην οθόνη εμφανιστεί η
ένδειξη VOX
Με την βοήθεια των πλήκτρων ▲▼ επιλέξτε:
Of: απενεργοποίηση ›
1: 1° επίπεδο (υψηλή ευαισθησία) ›
2: 2° επίπεδο (μεσαία ευαισθησία) ›
Page 74

72
3: 3° επίπεδο (χαμηλή ευαισθησία) ›
4: Talk Back (με υψηλή ευαισθησία) ›
Πιέστε το πλήκτρο PTT για να επιβεβαιώσετε την επιλογή σας ή περιμένετε για 5 δευτερόλεπτα.
Για να απενεργοποιήσετε τη λειτουργία VOX, κατά τη διαδικασία, επιλέξτε o F.
Λειτουργία Vibra-CALL
Η συσκευή Midland G9 είναι εξοπλισμένη με το χαρακτηριστικό Vibra-CALL για να σας ειδοποιεί αθόρυβα για
τις λαμβανόμενες κλήσεις.
Για να ενεργοποιήσετε το χαρακτηριστικό αυτό, πιέστε το πλήκτρο MENU μέχρι στην οθόνη να εμφανιστεί το
εικονίδιο
μέσω των πλήκτρων ▲▼ ενεργοποιήστε / απενεργοποιήστε τη δόνηση (on: ενεργοποίηση, oF:
απενεργοποίηση).
Πιέστε το πλήκτρο PTT για να επιβεβαιώσετε ή περιμένετε για 5 δευτερόλεπτα.
Λειτουργία CALL
Ο πομποδέκτης Midland G9 μπορεί να στείλει 5 διαφορετικούς τόνους κλήσης. Για να στείλετε ένα ηχητικό σήμα
κλήσης σε άλλους χρήστες, πιέστε το πλήκτρο CALL/
.
Για να επιλέξετε τον τόνο κλήσης:
Πιέστε το πλήκτρο MENU έως ότου εμφανιστεί στην οθόνη η ένδειξη “CA” και τον ενεργό ήχο κλήσης.
Μέσω των πλήκτρων ▲▼ ακούστε και επιλέξτε μια από τις 5 διαθέσιμες μελωδίες.
Πιέστε το πλήκτρο PTT για να επιβεβαιώσετε την επιλογή σας ή περιμένετε για 5 δευτερόλεπτα.
ROGER BEEP (Τόνος επιβεβαίωσης ολοκλήρωσης εκπομπής)
Κάθε φορά που ολοκληρώνετε την εκπομπή (απελευθερώνετε το πλήκτρο PTT ), η συσκευή σας εκπέμπει ένα
τόνο για να ενημερώσει τον συνομιλητή σας ότι είναι πλέον ελεύθερος να μιλήσει εκείνος.
Η λειτουργία αυτή είναι εργοστασιακά απενεργοποιημένη.
Για να την ενεργοποιήσετε:
Πιέστε το πλήκτρο MENU έως ότου εμφανιστεί στην οθόνη η ένδειξη “rb oF” · μέσω των πλήκτρων ▲▼ επιλέξτε
“on” και στην οθόνη θα εμφανιστεί η ένδειξη “rb on” · Πιέστε το πλήκτρο PTT για επιβεβαίωση ή περιμένετε 5
δευτερόλεπτα.
Τόνοι πλήκτρων
Κάθε φορά που πατάτε κάποιο πλήκτρο ακούγεται ένας τόνος επιβεβαίωσης.
Για να απενεργοποιήσετε τους τόνους των πλήκτρων, ακολουθήστε τα παρακάτω βήματα:
Πιέστε το πλήκτρο MENU , έως ότου εμφανιστεί η ένδειξη “bP on”.
Πιέστε τα πλήκτρα ▲▼ έως ότου εμφανιστεί η ένδειξη “bP of”.
Πιέστε το πλήκτρο PTT για να επιβεβαιώσετε την επιλογή σας ή περιμένετε για 5 δευτερόλεπτα.
Τώρα δεν θα ακούτε τόνο επιβεβαίωσης κάθε φορά που πατάτε κάποιο πλήκτρο.
Για να ενεργοποιήσετε ξανά τους τόνους πλήκτρων, επαναλάβετε τη διαδικασία και επιλέξτε “bP on”.
Λειτουργία επείγουσας κλήσης
Ο Midland G9 διαθέτει ένα κανάλι κατεξοχήν για κλήσεις έκτακτης ανάγκης: όλες οι συσκευές G9 που λειτουργούν
μέσα στην εμβέλειά σας, ακόμα κι αν είναι συντονισμένες σε διαφορετικά κανάλια, μπορούν να λάβουν /
εκπέμψουν μηνύματα
έκτακτης ανάγκης σε αυτό το κανάλι.
Εάν κρατάτε πιεσμένο το κουμπί EMG, οι επικοινωνίες μεταπηδούν αυτόματα στο κανάλι έκτακτης ανάγκης
(ένδειξη “EC” στην οθόνη). Ένα ακουστικό σήμα θα σταλεί και όλες οι συσκευές G9 που λειτουργούν μέσα σε
εμβέλεια θα μεταφερθούν αυτόματα στο κανάλι έκτακτης ανάγκης (“EC”).
Εάν έχετε απενεργοποιήσει αυτή τη λειτουργία, δεν θα λαμβάνετε / εκπέμπετε οποιαδήποτε κλήση έκτακτης
ανάγκης.
! Όταν ο πομποδέκτης λειτουργεί στο κανάλι έκτακτης ανάγκης (ένδειξη “EC” στην οθόνη), όλα τα
πλήκτρα εκτός από το PTT και το πλήκτρο CALL είναι απενεργοποιημένα.
Η συσκευή θα επιστρέψει στο κανάλι σε χρήση μετά από ένα λεπτό από την τελευταία εκπομπή.
Για να επιστρέψετε αμέσως, πιέστε το πλήκτρο EMG. Τώρα μπορείτε να χρησιμοποιήσετε όλες τις επιλογές του
MENU.
Ενεργοποίηση / απενεργοποίηση λειτουργίας έκτακτης ανάγκης
Όταν ενεργοποιείτε τη συσκευή, η λειτουργία έκτακτης ανάγκης ενεργοποιείται, αλλά μπορείτε να την
Page 75

73
ΕΛΛΗΝΙΚΑ
απενεργοποιήσετε και να την ενεργοποιήσετε πάλι:
Πιέστε το πλήκτρο MENU μέχρις ότου εμφανιστεί στην οθόνη η ένδειξη EC on.
Επιλέξτε EC Of χρησιμοποιώντας τα πλήκτρα ▲▼. Επιβεβαιώστε την επιλογή σας πιέζοντας το PTT ή περιμένετε
5 δευτερόλεπτα.
! Όταν η λειτουργία έκτακτης ανάγκης ενεργοποιείται ( η ένδειξη EMG αναβοσβήνει στην οθόνη) οι
ακόλουθες λειτουργίες δεν μπορούν να χρησιμοποιηθούν: Σάρωση, Monitor, Dual Watch,Out of
range.
Αλλαγή του καναλιού έκτακτης ανάγκης
Το προκαθορισμένο κανάλι έκτακτης ανάγκης αρχικά είναι το P8 DCS 50 αλλά μπορείτε να το αλλάξετε σύμφωνα
με τις ανάγκες σας.
! Σημαντικό: Βεβαιωθείτε ότι η λειτουργία έκτακτης ανάγκης είναι ενεργή! (η ένδειξη EMG θα
αναβοσβήνει). Εάν αποφασίσετε να αλλάξετε το κανάλι που είναι κατεξοχήν προγραμματισμένο για τη
λειτουργία έκτακτης ανάγκης, μην ξεχάστε να κάνετε την ίδια αλλαγή σε όλες τις συσκευές!
Πιέστε το πλήκτρο MENU έως ότου εμφανιστεί στην οθόνη η ένδειξη EC on.
Πιέστε το πλήκτρο MENU ξανά (θα εμφανίζεται η ένδειξη of) και επιλέξτε το επιθυμητό κανάλι με τη βοήθεια των
πλήκτρων ▲▼. Για επιβεβαίωση πιέστε το πλήκτρο PTT ή περιμένετε 5 δευτερόλεπτα.
! Σημαντικό: Βεβαιωθείτε ότι η λειτουργία έκτακτης ανάγκης είναι ενεργή! (η ένδειξη EMG θα
αναβοσβήνει). Εάν αποφασίσετε να αλλάξετε το κανάλι που είναι κατεξοχήν προγραμματισμένο για τη
λειτουργία έκτακτης ανάγκης, μην ξεχάστε να κάνετε την ίδια αλλαγή σε όλες τις συσκευές!
Για να επαναφέρετε το αρχικό κανάλι έκτακτης ανάγκης (P8 DCS 50)
Πιέστε το πλήκτρο MENU μέχρι στην οθόνη να εμφανιστεί η ένδειξη EC on.
Για επιβεβαίωση πιέστε το πλήκτρο PTT ή περιμένετε 5 δευτερόλεπτα.
! Εάν καθορίσετε οποιοδήποτε από τα standard κανάλια για τη λειτουργία έκτακτης ανάγκης, θυμηθείτε
να το χρησιμοποιείτε μόνο για αυτόν το λόγο, διαφορετικά θα προκαλέσετε σύγχυση και παρεμβολές.
Λειτουργία χειροκίνητου ελέγχου out of range (εκτός εμβέλειας)
Αυτή η λειτουργία επιτρέπει σε σας να γνωρίζετε εάν υπάρχουν άλλοι πομποδέκτες στην εμβέλειά σας.
Πατώντας το πλήκτρο EMG δύο φορές, θα στείλετε ένα αίτημα αναγνώρισης στις άλλες συσκευές G9 που
βρίσκονται μέσα στη εμβέλειά σας και είναι συντονισμένες στο ίδιο κανάλι.
Εάν οποιοσδήποτε πομποδέκτης απαντήσει, σημαίνει ότι είναι μέσα στη εμβέλειά σας και θα λάβετε έναν
ακουστικό τόνο για επιβεβαίωση.
! Αυτή η λειτουργία μπορεί να χρησιμοποιηθεί μόνο εάν η λειτουργία αυτόματου ελέγχου out of range
δεν είναι ενεργή.
Λειτουργία Dual Watch
H Λειτουργία Dual Watch επιτρέπει σε σας να ακούτε συνεχώς δύο κανάλια της επιλογής σας ταυτόχρονα.
Ενεργοποίηση / απενεργοποίηση
Πιέστε το πλήκτρο MENU έως ότου στην οθόνη εμφανιστεί η ένδειξη DW of.
Επιλέξτε το δεύτερο κανάλι που θα ακούτε πιέζοντας τα πλήκτρα ▲▼.
Για να επιβεβαιώσετε την επιλογή σας, πιέστε το PTT ή περιμένετε 5 δευτερόλεπτα. Η οθόνη θα εμφανίσει
διαδοχικά το κανάλι σε χρήση και δεύτερο κανάλι που ακούτε.
Για να σταματήσετε τη λειτουργία, πιέστε απλά το πλήκτρο MENU.
Όταν ο πομποδέκτης ανιχνεύει μια εκπομπή σε ένα από τα δύο κανάλια, η λειτουργία Dual Watch διακόπτεται
προσωρινά, παραμένει συντονισμένη για 5 δευτερόλεπτα στο αντίστοιχο κανάλι, δίνοντας στο χρήστη μια
πιθανότητα να απαντήσει σε μια κλήση. Μετά από αυτήν την μικρή διακοπή, η λειτουργία ξεκινά πάλι.
! Αυτή η λειτουργία μπορεί να ενεργοποιηθεί μόνο εάν η λειτουργία “έκτακτης ανάγκης” είναι
απενεργοποιημένη.
Λειτουργία αυτόματου ελέγχου out of range (εκτός εμβέλειας)
Ενεργοποιώντας αυτή τη λειτουργία, ένα ζευγάρι G9 εκπέμπει κάθε 30 δευτερόλεπτα έναν κωδικό ελέγχου
δεδομένων.
Μόλις η επαφή μεταξύ των δύο συσκευών χαθεί και ένας πομποδέκτης δεν λάβει αυτόν τον κωδικό ελέγχου
δεδομένων δύο φορές στη σειρά, το εικονίδιο OUT αρχίζει να αναβοσβήνει στην οθόνη και θα ακούσετε ένα
μπίπ.
! Αυτή η λειτουργία μπορεί να ενεργοποιηθεί μόνο εάν η λειτουργία “έκτακτης ανάγκης” είναι
απενεργοποιημένη.
Page 76

74
Ενεργοποίηση - Απενεργοποίηση
Πιέστε το πλήκτρο MENU μέχρι στην οθόνη να εμφανιστούν οι ενδείξεις ‘’OUT” και “Or of”· Επιλέξτε ”Or on”
(λειτουργία ενεργοποιημένη) με τα πλήκτρα ▲▼.
Απενεργοποιήστε και τους δύο πομποδέκτες και ενεργοποιήστε τους ταυτοχρόνως.
Για να απενεργοποιήσετε αυτή τη λειτουργία πιέστε το πλήκτρο MENU μέχρι στην οθόνη να εμφανιστούν οι
ενδείξεις ‘’OUT” και “Or on”· Επιλέξτε ”Or of” (λειτουργία απενεργοποιημένη) με τα πλήκτρα ▲▼.
Επιβεβαιώστε την επιλογή σας πιέζοντας το πλήκτρο PTT ή περιμένετε 5 δευτερόλεπτα.
Φωτισμός οθόνης
Αν ο φωτισμός δεν επαρκεί για να διαβάσετε τις ενδείξεις της οθόνης, μπορείτε να πιέσετε το πλήκτρο EMG για
σύντομο χρονικό διάστημα για να ενεργοποιήσετε το φωτισμό της για 5 δευτερόλεπτα περίπου. Κάθε φορά που
πιέζεται το πλήκτρο MENU, η οθόνη αυτόματα θα φωτίζεται.
Εξοικονόμηση Ισχύος
Η λειτουργία αυτή έχει ως αποτέλεσμα την αύξηση της αυτονομίας του πομποδέκτη μειώνοντας την κατανάλωση
μέχρι και 50%. Ο πομποδέκτης τίθεται αυτόματα σε κατάσταση εξοικονόμησης ισχύος όταν δεν λάβει κανένα σήμα
για πάνω από 7 δευτερόλεπτα. Όταν οι μπαταρίες είναι εξασθενημένες, στην οθόνη εμφανίζεται το εικονίδιο
:
αντικαταστήστε τις μπαταρίες ή φορτίστε το pack μπαταριών.
Φόρτιση του pack μπαταριών
Συνδέστε την υποδοχή του αντάπτορα τοίχου στην πρίζα και εισάγετε το βύσμα του αντάπτορα τοίχου στην
υποδοχή της επιτραπέζιας βάσης φόρτισης. Η πλήρης φόρτιση διαρκεί 12/14 ώρες.
Τοποθετήστε τον πομποδέκτη στη βάση του επιτραπέζιου φορτιστή. Η κόκκινη λυχνία φόρτισης θα ανάψει.
Όταν η φόρτιση είναι πλήρης απομακρύνετε τον πομποδέκτη από τη βάση φόρτισης και τον φορτιστή από την
πρίζα.
! Μην υπερφορτίζετε τις μπαταρίες! Η φόρτιση δεν σταματάει αυτόματα όταν οι μπαταρίες φορτιστούν
πλήρως. Επομένως, μην ξεχνάτε να απομακρύνετε τον πομποδέκτη από τον φορτιστή μόλις φορτιστούν
οι μπαταρίες.
! Μην προσπαθήσετε να φορτίσετε μη επαναφορτιζόμενες μπαταρίες. Πριν ξεκινήσετε τη φόρτιση
βεβαιωθείτε ότι ο πομποδέκτης σας περιέχει επαναφορτιζόμενες μπαταρίες NI-MH και μόνο! Είναι
πολύ επικίνδυνο να προσπαθήσετε να φορτίσετε άλλου τύπου μπαταρίες (για παράδειγμα αλκαλικές
ή μπαταρίες μαγγανίου). Αν οι μπαταρίες δεν είναι κατάλληλες για φόρτιση μπορεί να παρουσιάσουν
διαρροές, να εκραγούν ή και να αναφλεχθούν!
! Η χρήση ενός φορτιστή διαφορετικού από τον ενδεδειγμένο μπορεί να προκαλέσει ζημιά στη συσκευή
ή ακόμα και να θέσει σε κίνδυνο τη σωματική ακεραιότητα του χρήστη.
! Μην πετάτε τις μπαταρίες στη φωτιά ή μην τις τοποθετείτε κοντά σε πηγές θερμότητας διότι μπορεί να
εκραγούν και να προκαλέσουν ακόμα και τραυματισμό. Απαλλαγείτε από τις παλιές μπαταρίες, με τις
διαδικασίες που επιβάλλει η νομοθεσία.
! Μην αναμειγνύετε παλιές και καινούριες μπαταρίες ή μπαταρίες διαφορετικών τύπων ή μπαταρίες που
έχουν χρησιμοποιηθεί με διαφορετικούς τρόπους.
Page 77

75
ΕΛΛΗΝΙΚΑ
Εγγύηση
Η εγγύηση δεν περιορίζει τα δικαιώματα (υποχρεωτικά) του χρήστη που απορρέουν από την ισχύουσα Εθνική
νομοθεσία σχετικά με την πώληση των καταναλωτικών προϊόντων.
Κατά τη διάρκεια της περιόδου εγγύησης, ο κατασκευαστής ή το εξουσιοδοτημένο service των πελατών, σύμφωνα
με την παρούσα Περιορισμένη Εγγύηση, έχει την υποχρέωση να επιδιορθώσει τα ελαττωματικά τμήματα ή να
αντικαταστήσει το προϊόν.
Η παρούσα Περιορισμένη Εγγύηση έχει ισχύ και μπορεί να εκτελεστεί μόνο στη χώρα όπου ο χρήστης έχει
αγοράσει το προϊόν.
Περίοδος Εγγύησης
Η περίοδος εγγύησης ξεκινά κατά τη στιγμή της αρχικής αγοράς του προϊόντος από τον πρώτο τελικό χρήστη.
Το προϊόν μπορεί να αποτελείται από πολλά διαφορετικά μέρη και αυτά τα μέρη καλύπτονται από διαφορετικές
περιόδους εγγύησης:
- 24 μήνες για τη συσκευή
- 6 μήνες για τα παρακάτω μέρη: μπαταρία, φορτιστές, κεφαλακουστικά, κεραίες,…
Τι δεν καλύπτει η εγγύηση
Η εγγύηση δεν καλύπτει:
- Κανονική φθορά του προϊόντος .
- Ελαττώματα που προκαλούνται από την εντατική χρήση της συσκευής (ελαττώματα που προκαλούνται από
αιχμηρά αντικείμενα, από την κάμψη, συμπίεση ή ρίψη ...).
- Ελαττώματα ή ζημιά που προκαλείται από κακή χρήση του προϊόντος, συμπεριλαμβανομένης της χρήσης που
είναι αντίθετη προς τις οδηγίες που παρέχονται από τον κατασκευαστή .
- Ελαττώματα που προκαλούνται από άλλους παράγοντες / πράξεις πέραν του εύλογου ελέγχου του
κατασκευαστή.
Η εγγύηση δεν καλύπτει ελαττώματα ή ζημίες που προκαλούνται στο Προϊόν από κατάχρηση ή σύνδεση με
οποιοδήποτε προϊόν, εξάρτημα λογισμικού και / ή υπηρεσίες που δεν παράγονται ή παρέχονται από τον
κατασκευαστή ή από κάθε άλλη χρήση του προϊόντος εκτός από την προβλεπόμενη χρήση του.
Η εγγύηση δεν είναι εκτελεστεί, αν το προϊόν έχει ανοιχτεί, τροποποιηθεί ή επισκευαστεί από οποιονδήποτε άλλο
πέρα από το εξουσιοδοτημένο κέντρο υπηρεσιών, αν έχει επισκευαστεί χρησιμοποιώντας μη εξουσιοδοτημένα
ανταλλακτικά ή αν ο serial αριθμός έχει αφαιρεθεί, σβηστεί, παραμορφωθεί, αλλοιωθεί ή είναι δυσανάγνωστος.
Η εγγύηση δεν μπορεί να εκτελεστεί, αν το προϊόν έχει εκτεθεί σε σταγονίδια νερού, υγρασία ή σε ακραίες θερμικές
ή περιβαλλοντικές συνθήκες ή σε διάβρωση, οξείδωση, έκχυση των τροφίμων ή υγρών ή την επιρροή από χημικά
προϊόντα.
Page 78

76
Page 79

Midland G9
Руководство пользователя
Спасибо Вам за то, что Вы выбрали продукт марки Midland!
Midland G9 – портативная радиостанция, которой Вы можете свободно пользоваться практически
во всех странах Европы.
Объединив в себе самые последние технологии в области радиокоммуникации, обладая при этом прочным
корпусом, MIDLAND G9 представляет собой идеальное решение для профессионалов, которым необходимо
постоянно быть на связи со своими коллегами.
Midland G9 доступна в двух версиях:
PMR446 / LPD ›
Версия E (PMR446) ›
Данное руководство пользователя разработано для обеих версий радиостанции.
Комплектация
2 рации › Midland G9 версии PMR446/LPD
2 клипсы для ношения на ремне ›
Настольное зарядное устройство ›
Сетевой адаптер ›
8 аккумуляторных батареек 1800 мА / ч ›
Зона покрытия
Максимальный радиус действия радиостанции определяется физическими особенностями местности
и достигается при использовании радиостанции на открытом пространстве. Однако имеются факторы
окружающей среды, ограничивающие максимально возможный радиус действия, такие как наличие деревьев,
зданий или других преград. Внутри автомобиля или металлической конструкции радиус действия радиостанции
существенно уменьшается. Обычно радиус действия в городе со зданиями и иными преградами составляет
до 2 км. На местности с преградами в виде деревьев, листвы или домов максимально возможный радиус
действия составляет порядка 4 – 6 км. На открытом пространстве или, например, в горах, зона покрытия
может быть больше 12 км.
Аккумулятор и отсек для аккумулятора
Радиостанция работает от 4‑х поставляемых в комплекте аккумуляторов типа АА или от 4‑х щелочных
батареек типа АА. Для того чтобы вставить батарейки / акк умуляторы в аккумуляторный отсек, необходимо
перевернуть радиостанцию передней панелью вниз, снять клипсу, затем освободить фиксатор в нижней части
радиостанции и снять крышку аккумуляторного отсека. Соблюдая полярность, вставьте батарейки / аккумуляторы
в отсек. Установите и зафиксируйте крышку аккумуляторного отсека.
Внимание: перед первым использованием радиостанции необходимо зарядить аккумуляторы. Время
первой зарядки составит 14 – 16 часов.
Предупреждения
Аккумуляторы: ›строго следуйте всем инструкциям по использованию аккумуляторов, описанным
в разделе «Зарядка аккумулятора».
Не вскрывайте радиостанцию! › Вмешиваться в точное устройство прибора может только опытный
профессионал со специализированным оборудованием. По этой же причине не следует менять
заводские настройки, так как они уже оптимизированы для наиболее эффективной эксплуатации рации.
Несанкционированное вскрытие прибора лишает вас права на гарантийное обслуживание.
Не используйте растворители, спиртосодержащие, абразивные и моющие средства для чистки ›
прибора. Протирайте радиостанцию чистым, мягким кусочком ткани. При сильном загрязнении слегка
смочите ткань в смеси воды и нейтрального мыла.
77
РУССКИЙ
Page 80

ВОЗМОЖНОСТИ РАДИОСТАНЦИИ
Новые возможности:
Рация Midland G9 оснащена ›двумя кнопками PTT для оперативного выбора высокого (high) или низкого
(low) уровня мощности передачи. Выбор оптимальной мощности при заданных условиях позволяет
эффективно расходовать заряд батареи.
«Экстренный вызов». ›Midland G9 обладает передовой и важной возможностью: каналом, настроенным
на прием / передачу экстренных сообщений. Радиосвязь обычно осуществляется между двумя
или более пользователями, радиостанции которых настроены на один канал. В данном случае
невозможно передавать / получать сообщения пользователям с других каналов. Но благодаря функции
«Экстренный вызов» вы можете наряду с передачей / приемом сообщений в рамках канала, выбранного
пользователями вашей группы, получать / передавать экстренные сообщения по экстренному каналу.
Для этого необходимо нажать и удерживать в течение 3‑х секунд кнопку EMG, после чего радиостанция
передаст экстренный сигнал всем радиостанциям G9, находящимся в радиусе действия вашей
радиостанции. В результате чего они автоматически настроятся на «Экстренный канал» (см. раздел
«Функция «Экстренный вызов»).
«Manual Out of range» › . Нажав два раза кнопку EMG, вы сможете проверить есть ли радиостанции
в радиусе действия вашей радиостанции (см. раздел «Функция «Manual Out of range»).
«Vox TalkBack». ›Если радиостанция непрерывно осуществляет передачу сообщения в режиме VOX, то
функция «Vox TalkBack» автоматически остановит передачу сигнала через 20 сек. с момента ее начала.
В результате другие пользователи, радиостанции которых настроены на этот же канал, будут иметь
возможность ответить на сообщение (см. раздел «Функция «VOX-голосовое управление»).
Характеристики:
Мощность: 500 мВт (PMR446); 10 мВт (LPD) ›
Рабочая температура: от – 10 ›
38 CTCSS тонов / 104 DCS кода ›
2 кнопки PTT для оперативного выбора уровня мощности: high / low ›
Экстренный вызов ›
Out of range – контроль выхода из зоны действия ›
VOX с 3 уровнями чувствительности и функция «Vox TalkBack» ›
Вибровызов ›
Блокировка клавиатуры ›
Автоматический режим экономии заряда батареи ›
Индикатор низкой зарядки аккумулятора ›
Dual Watch ›
Звонок (5 мелодий на выбор) ›
SCAN (Сканирование) ›
Roger beep (сигнал окончания передачи) ›
Высокая / низкая мощность ›
Режим мониторинга выбранного канала ›
LCD дисплей с подсветкой ›
Питание: 4 аккумулятора типа АА 1800 мА / ч или 4 батарейки типа АА ›
Разъем для аксессуаров – двухштырьковый ›
Версии:
G9 – PMR446 / LPD › – 24 PMR446 канала (8 + 16 предварительно настроенных) / 69 LPD каналов
G9E (PMR446) › – 24 PMR446 канала (8 + 16 предварительно настроенных)
°
C до + 55 °C
78
Page 81

ЭЛЕМЕНТЫ УПРАВЛЕНИЯ РАДИОСТАНЦИИ
1
2
3
4 5 6 8
7
10
9
11
12
13
14
ДИСПЛЕЙ
LCD дисплей радиостанции MIDLAND G9 позволяет вам непрерывно получать информацию о текущих
настройках радиостанции.
Символы и соответствующие им параметры, которые появляются на дисплее, соответствуют рабочему
состоянию радиостанции и отображаются следующим образом:
На дисплее отображается:
1.
в рабочем режиме две большие цифры отображают номер выбранного канала
2. VOX вк лючен режим VOX
3. вк лючена блокировка клавиатуры
4. EMG функция «Экстренный вызов» активирована
5. DW включен режим Dual Watch
6. индикатор уровня разряда аккумулятора / батареи
7. включен режим Vibra‑CALL (вибровызов)
8.
OUT символ оповещает о том, что радиостанция вышла из радиуса действия других
9. RX режим приема
10. TX режим передачи сообщения (кнопка PTT нажата)
11. H(High) / L(Low) высокий / низкий уровень мощности
12. CTCSS / DCS тип выбранного sub тона
13. в рабочем режиме цифрами отображается значение выбранного тона CTCSS/
14. ROGER Функция Roger Beep активирована
в режиме MENU – сокращенное обозначение пункта меню
радиостанций вашей группы (опция «автоматический out of range»)
кода DCS (1 – 38 / 1 – 104);
в режиме MENU – значение параметров меню
79
РУССКИЙ
Page 82

КОРПУС РАДИОСТАНЦИИ
Обратите Ваше внимание на графическое изображение радиостанции, дающее наглядное представление
об элементах ее управления, для того, чтобы идентифицировать их.
Встроенный динамик15.
Кнопка MENU16. – нажимайте на кнопку для выбора пункта меню радиостанции.
17. Кнопка CALL /
секунд приведет к блокировке клавиатуры.
18.
Кнопки PTT (нажми и говори) – радиостанция Midland G9 оснащена двумя кнопками PT T. Кнопка
большего размера позволяет осуществлять передачу либо на высоком уровне мощности передачи,
либо на низком (в зависимости от параметра пункта меню Pr=H / L); в то время как кнопк а меньшего
размера (оранжевая) позволяет осуществлять передачу только на высоком уровне мощности.
! Подтверждение выбранных настроек радиостанции осуществляется кнопкой PTT большего
размера.
VOLUME19. позволяет включать / выключать радиостанцию и настраивать уровень громкости.
Антенна20.
21.
Двухштырьковое гнездо предназначено для внешних аудио‑аксессуаров: микрофона, наушников
и зарядного устройства; закрыто защитной крышкой.
Кнопка EMG22. – кнопка активации функции «Экстренный вызов» и «Manual Out of range».
Кнопки23. ▲▼ – позволяют менять настройки в режиме меню.
Встроенный микрофон24.
– нажмите кнопку для посылки вызывного сигнала; удержание кнопки в течение 5‑ти
80
Page 83

УПРАВЛЕНИЕ И ФУНКЦИИ
Включение / выключение радиостанции
Для включения радиостанции поверните ручку громкости по часовой стрелке до щелчка.
Для выключения радиостанции поверните ручку громкости против часовой стрелки до щелчка.
При первом включении после замены элементов питания радиостанция включается по умолчанию со следующими
настройками: диапазон PMR, канал Р1, мощность H, функция «Экстренный вызов» включена.
Выбор диапазона PMR446 или LPD (только для версии PMR446 / LPD)
Изначально радиостанция Midland G9 версии PMR446 / LPD настроена на работу в диапазоне PMR446.
Для переключения LPD / PMR диапазонов удерживайте нажатой кнопку MENU до появления на дисплее
радиостанции номера канала соответствующего диапазона.
Переключение с одного диапазона на другой отключает функцию «Экстренный вызов». Поэтому
!
не забудьте снова активировать функцию «Экстренный вызов» после переключения с одного
диапазона на другой.
Выбор канала
Нажмите кнопку MENU. Номер канала начнет мигать на дисплее. Используйте кнопки ▲▼ для выбора
нужного канала. Для подтверждения выбора нажмите кнопку PTT или подождите 5 секунд.
В зависимости от версии вашей радиостанции вы можете выбрать один из следующих каналов:
Версия › PMR446 / LPD: PMR446 с P1 по P8 и с 9p по 24p (предварительно настроенные) / LPD с 1 по 69.
Версия Е › (PMR446): с P1 по P8 и с 9p по 24p (предварительно настроенные).
Канал Р8 с тоном DCS 50 (Р850) установлен производителем в качестве «Экстренного канала»;
!
не используйте его для обычного общения.
Отображение на дисплее номера PMR канала и sub аудио тона
Для отображения на дисплее номера предварительно настроенного канала PMR446 и sub аудио тона перейдите
на интересующий вас канал (с 9р по 24р), затем нажмите и удерживайте кнопку ▼ более 3‑х секунд.
Передача и прием сигнала
Для передачи сигнала нажмите и удерживайте кнопку PTT, подождите секунду и говорите в микрофон,
держа радиостанцию примерно в 5 см ото рта. На дисплее появится значок TX.
Закончив передачу, отпустите кнопку PTT. Радиостанция перейдет в режим ожидания.
Когда радиостанция находится в режиме приема (на дисплее отображается значок RX), вы принимаете
сигналы на выбранном канале.
Если в радиостанции настроен высокий (H-High) уровень мощности передачи (смотрите !
индикацию), то вне зависимости от того, к акую из двух кнопок PTT вы будете нажимать,
передача будет осуществляться на высоком уровне мощности.
Настройка громкости
Поворачивая ручку громкости, вы можете настроить уровень громкости во время приема сигнала.
«CALL»
Нажав кнопку CALL, вы отправите вызывной сигнал пользователям, радиостанции которых настроены
на выбранный вами канал; вы можете выбрать один из вариантов вызывного сигнала (см. п. меню «Вызывной
сигнал CALL»).
«Экстренный вызов»
При включенной функции «Экстренный вызов» (на экране мигает значок EMG), нажмите и удерживайте
в течение 3‑х секунд кнопку EMG. В результате ваша радиостанция передаст на экстренном канале
экстренный вызов всем радиостанциям G9, находящимся в радиусе действия вашей радиостанции
(см. п. меню Функция «Экстренный вызов»).
Блокировкка клавиатуры
Нажмите кнопку CALL / и удерживайте ее около 5 секунд, на дисплее появится значок , указывающий
на блокировку клавиатуры.
Кнопки PTT, EMG и CALL / останутся активными. Чтобы снять блокировку клавиатуры, повторите
процедуру.
81
РУССКИЙ
Page 84

Режим «Мониторинг»
Этот режим временно отключает подавитель фоновых шумов (squelch), чтобы вы могли слышать все сигналы
на выбранном канале, в том числе очень слабые. Чтобы включить режим мониторинга, одновременно
нажмите кнопки ▲▼ и удерживайте их в течение 3 секунд. Чтобы выключить режим повторите процедуру
или выключите, а затем включите радиостанцию.
Когда режим мониторинга включен вы будете слышать постоянный фоновый шум. !
Вы можете включить режим мониторинга только, когда выключена функция «Экстренного !
вызова».
Сканирование каналов
Радиостанция Midland G9 дает возможность сканировать каналы по всему диапазону, проверяя их на наличие
сигнала. При обнаружении сигнала ск анирование останавливается на активном канале. Кнопк ами ▲▼
(нажать и удерживать 1 сек.) вы можете продолжить сканирование или сменить направление сканирования.
Сканирование автоматически возобновится через 3 секунды после завершения активности на канале.
Для включения режима сканирования нажмите и удерживайте в течение 2 – х секунд кнопку ▲. Для прекращения
процесса сканирования нажмите на кнопку PTT, в результате радиостанция вернется на канал, с которого
началось сканирование.
Вы можете включить режим «Сканирование каналов» только в том случае, если выключена !
функция «Экстренный вызов».
Кнопка MENU
Нажимая на кнопку MENU, вы можете выбрать следующие пункты:
Выбор канала ›
Установка CTCSS тона ›
Установка DCS кода ›
Выбор высокой / низкой мощности (в диапазоне PMR446) ›
VOX (голосовое управление) ›
Вибровызов ›
Вызывной сигнал CALL ›
Сигнал окончания передачи Roger Beep ›
Звуковое сопровождение нажатия клавиш ›
Экстренный вызов ›
Dual Watch – сканирование двух каналов ›
Out of Range – выход из зоны действия ›
Установка CTCSS тонов и DCS кодов
CTCSS тоны и DCS коды обеспечивают возможность общения только с теми пользователями, чьи
радиостанции настроены на тот же канал и тон / код. Вы можете установить 1 из 38 CTCSS тонов или 1 из
104 DCS кодов для следующих каналов:
версия PMR446 / LPD: только для каналов с P1 по P8 (PMR446) и для 69‑ти каналов LPD. ›
версия PMR446 : только для каналов с P1 по P8. ›
Для предварительно настроенных каналов с 9p по 24p тоны не могут быть изменены.
Установленный CTCSS тон или DCS код используется как в режиме передачи, так и в режиме приема.
Установка CTCSS тонов:
Выберите канал, для которого вы хотите установить CTCSS тон. ›
Нажимайте кнопку ›MENU до тех пор, пока на дисплее не отобразиться мигающий значок «CTC». Кнопками
▲▼ выберите один из 38 CTCSS тонов («oF» – код не установлен). Для подтверждения выбора нажмите
кнопку PTT или подождите 5 секунд.
Установка DCS кодов
Выберите канал, для которого вы хотите установить DCS код. ›
Нажимайте кнопку ›MENU до тех пор, пока на дисплее не отобразится мигающий значок DCS. Кнопками
▲▼ выберите 1 из 104 DCS кодов («oF» – код не установлен). Для подтверждения выбора нажмите
кнопку PTT или подождите 5 секунд.
По умолчанию канал Р8 с кодом DCS 50 (Р850) установлен производителем в качестве
!
«Экстренного канала»; не используйте его для обычного общения. При этом имеется
возможность изменить «экстренный» канал (см. п. «Функция «Экстренный вызов»).
82
Page 85

Выбор мощности передачи для диапазона PM446
Для выбора уровня мощности передачи нажимайте кнопку MENU до тех пор, пока на дисплее не появится
значок «Pr» и справа мигающий значок текущего значения параметра. С помощью кнопок ▲▼ выберите
значение «L» («низкий уровень») или значение «H» («высокий уровень»). Для подтверждения выбора
нажмите кнопку PTT или подождите 5 секунд.
При полном заряде аккумулятора высокий уровень мощности = 500 мВт, низкий = 10 мВт.
Основное потребление энергии осуществляется в режиме передачи. Чтобы экономно расходовать заряд
аккумуляторов / батареек, вы можете выбрать низкий уровень мощности при передаче сигнала на короткое
расстояние.
Для диапазона LPD (радиостанция версии PMR446/LPD) уровень мощности всегда равен 10 мВт.
Использование кнопок PTT для каналов PMR446 зависит от выбора высокого или низкого уровня мощности
передачи. Если установлен высокий уровень передачи «H», то не имеет значения, какую из двух кнопок
PTT нажимать, радиостанция будет работать на высоком уровне мощности.
Если установлен низкий уровень передачи «L», то нажимая на кнопку PTT большего размера, радиостанция
будет осуществлять передачу на низком (L) уровне мощности; при нажатии на кнопку PTT меньшего размера,
радиостанция будет осуществлять передачу на высоком уровне мощности.
Для оптимального потребления энергии необходимо в меню радиостанции установить низкий
!
уровень мощности передачи. Таким образом, нажимая кнопку PTT меньшего размера, вы будете
осуществлять передачу на высоком уровне мощности только, когда в этом есть необходимость.
По умолчанию установлен высокий уровень мощности передачи, поэтому мы настоятельно
рекомендуем Вам изменить данную настройку.
Каналы LPD: выбор высокого / низкого уровней мощности передачи на данном диапазоне невозможен,
поэтому не имеет значения, на какую из двух кнопок PTT нажимать для осуществления передачи. Передача
будет осуществляться с уровнем мощности = 10 мВт.
Функция VOX – Голосовое управление
При включенной функции VOX вы можете осуществлять передачу, не используя кнопку PTT: передатчик будет
активироваться автоматически, когда вы начнете говорить в микрофон. VOX имеет 3 уровня чувствительности.
Вы можете включать функцию VOX, как используя аксессуары, так и без них.
При выборе 4‑го уровня VOX активируется режим Vox TalkBack: если радиостанция непрерывно осуществляет
передачу, функция Vox TalkBack автоматически прервет передачу через 20 секунд (радиостанция перейдет
на 10 сек. в режим приема), что обеспечит возможность осуществлять передачу другим пользователям.
Чтобы включить функцию VOX, нажимайте кнопку MENU до тех пор, пока на дисплее не появится мигающий
значок «VOX». Кнопками ▲▼ выберите одно из следующих значений:
1 – высокая чувствительность; ›
2 – средняя чувствительность; ›
3 – низкая чувствительность; ›
4 – Vox TalkBack с выс оким уровнем чувствительности. ›
Для подтверждения нажмите кнопку PTT или подождите 5 секунд.
Чтобы выключить функцию VOX, повторите действия и выберите значение «OFF» («Выключено»).
83
РУССКИЙ
Page 86

Вибровызов
Радиостанция Midland G9 оснащена режимом вибровызова, который обеспечивает бесшумное предупреждение
о входящих сигналах.
Чтобы включить / выключить режим вибровызова, нажимайте кнопку MENU до тех пор, пока на дисплее
не появится мигающий значок . Кнопками ▲▼ выберите «on» – «Вкл.», «oF» – «Выкл.». Для подтверждения
нажмите кнопку PTT или подождите 5 секунд.
Вызывной сигнал «CALL»
MIDLAND G9 может передавать вызывной сигнал 5‑ти вариантов. Чтобы передать вызывной сигнал другим
пользователям, нажмите кнопку CALL / .
Чтобы выбрать вызывной сигнал, нажимайте кнопку MENU до тех пор, пока на дисплее не появится значок
«CА» со значением текущего варианта сигнала. Кнопк ами ▲▼ выберите 1 из 5 вариантов. Если вк лючен
режим звукового сопровождения нажатия клавиш, то выбор варианта сопровождается его прослушиванием.
Для отключения вызывного сигнала выберите значение «OF». Для подтверждения вашего выбора нажмите
кнопку PTT или подождите 5 секунд.
Roger beep – Сигнал окончания передачи
Радиостанция имеет режим, при котором, когда вы заканчиваете передачу и отпускаете кнопку PTT,
радиостанция передает сигнал, сообщающий собеседнику, что вы закончили сеанс передачи.
Чтобы включить / выключить функцию ROGER BEEP, нажимайте кнопку MENU до тех пор, пока на дисплее
не появится значок «rb oF» и надпись ROGER. Кнопками ▲▼ выберите значение «on» («Вкл.») или «oF»
(«Выкл.»). Для подтверждения нажмите кнопку PTT или подождите 5 секунд.
Звуковой сигнал при нажатии клавиш
Если данная функция активирована, то каждый раз при нажатии кнопок вы будете слышать звуковой сигнал.
Для его отключения нажимайте кнопку MENU до тех пор, пока на дисплее не появится значок «bP Оn»
(«Сигнал включен»). Кнопками ▲▼ выберите значение «OF» («Сигнал выключен»). Для подтверждения
нажмите кнопку PTT или подождите 5 секунд.
Теперь нажатие кнопок не будет сопровождаться звуковым сигналом.
Для активации данной функции повторите процедуру, выбрав значение «bP Оn».
Функция «Экстренный вызов»
«Экстренный вызов» позволяет получать / передавать сигналы по экстренному каналу, даже если радиостанции
G9, находящиеся в радиусе действия вашей радиостанции, осуществляют прием / передачу на разных
каналах.
Для передачи сигнала по экстренному каналу нажмите и удерживайте кнопку EM G. На дисплее отобразится
значение «EC». В результате ваша радиостанция передаст аудио сигнал на все радиостанции G9,
находящиеся в радиусе действия вашей радиостанции, и они автоматически переключатся на экстренный
канал («EC»).
Если вы отключите данную функцию, то ваша радиостанция не будет принимать / передавать сигналы
экстренного вызова.
Когда радиостанция осуществляет прием / передачу сообщений на экстренном канале все !
кнопки за исключением PTT и CALL не активны.
Радиостанция вернется на первоначальный канал через минуту с момента последней передачи сигнала
по экстренному каналу. Чтобы немедленно вернуться на первоначальный канал, нажмите кнопку EM G. После
этого вы можете использовать все функции радиостанции.
Чтобы включить / выключить функцию «Экстренный вызов» необходимо нажимать кнопку MENU до тех
пор, пока на дисплее не появится значок «EC on» («Вкл.») / «EC of» («Выкл.»). Кнопками ▲▼ выберите
нужное значение. Для подтверждения нажмите кнопку PTT или подождите 5 секунд.
Когда функция «Экстренного вызова» включена (на дисплее мигает значок EMG) следующие !
функции не могут быть использованы: Scan, Monitor, Dual Watch, Out of Range!!!
Изменение канала «Экстренного вызова»
Экстренный к анал по умолчанию – P8 DCS 50, но вы можете изменить его в соответствии с вашими
потребностями.
Удостоверьтесь, что функция «Экстренного вызова» включена (на дисплее мигает значок !
EMG).
84
Page 87

Если вы решите изменить номер канала, предназначенного для экстренного вызова», не забудьте изменить
его на всех радиостанциях, с которыми будет осуществляться прием / передача сигналов.
Для изменения канала нажимайте кнопку MENU до тех пор, пока на дисплее не появится значок EC on
(«Вкл.»). Нажмите кнопку MENU еще раз. На дисплее появится значение O F . Кнопками ▲▼ выберите
канал, к оторый вы хотите установить в качестве «Экстренного канала». Вы также можете установить
CTCSS тон или DCS код для экстренного канала. Для этого еще раз нажмите кнопку MENU и следуйте
процедуре, описанной в пункте «Установка CTCSS тонов или DCS кодов». Для подтверждения нажмите
кнопку PTT или подождите 5 секунд.
Чтобы установить в качестве «Экстренного канала» первоначально настроенный канал (P8 DCS 50),
необходимо нажимать кнопку MENU до тех пор, пока на дисплее не появится значок EC on («Вкл.»). Затем
нажать кнопку MENU еще раз. На дисплее появится текущее значение экстренного канала, кнопками ▲▼
установить «OF». Для подтверждения нажмите кнопку PTT или подождите 5 секунд.
Не используйте «Экстренный канал» для обычного общения. !
Функция Manual out of range – Ручной режим контроля зоны действия
Данная функция позволяет определить наличие других радиостанций в пределах радиуса действия вашей
радиостанции.
Двойным нажатием на кнопку EMG вы отправите определенный сигнал радиостанциям, находящимся
в пределах радиуса действия вашей радиостанции и настроенным на тот же канал.
Если какая‑либо радиостанция ответит, это означает, что она находится в радиусе действия вашей
радиостанции, и вы получите звуковой сигнал подтверждения.
Эта функция может быть использована, только если не активирована функция «Automatic !
Out of Range».
Функция Automatic out of range – Автоматический режим контроля зоны действия
При включении этой функции пара радиостанций G9 начинает обмениваться друг с другом сигналами
каждые 30 секунд. Как только сообщение между радиостанциями прекращается и одна из радиостанций
не получает сигнал 2 раза подряд, на дисплее начинает мигать значение «OUT», и радиостанция издает
каждые 30 секунд сигнал (beep tone) до тех пор, пока не получит ответа.
Эта функция может быть использована, только если не активирована функция «Экстренного
!
вызова».
Для включения Automatic out of range необходимо нажимать кнопку MENU до тех пор, пока на дисплее
не появится значок OUT. Кнопками ▲▼ выберите значение «Or on» («Вкл.»). Эту процедуру необходимо
выполнить на обеих радиостанциях.
Затем выключите обе радиостанции и включите их одновременно.
Для выключения Automatic out of range необходимо нажимать кнопку MENU до тех пор, пок а на дисплее
не появится значок OUT и «Or on» («Вкл.»). С помощью кнопок ▲▼ выберите «Or of» («Выкл.»).
Для подтверждения нажмите кнопку PTT или подождите 5 секунд.
Функция Dual Watch (сканирование по двум каналам)
Эта функция позволяет одновременно контролировать два канала в режиме приема.
Для включения этой функции необходимо нажимать кнопку MENU до тех пор, пока на дисплее не появится
значок DW of. С помощью кнопок ▲▼ выберите второй канал, который вы хотите контролировать.
Для подтверждения нажмите кнопку PTT или подождите 5 секунд. На дисплее будут попеременно отображаться
2 канала, выбранные для контроля.
Когда радиостанция обнаруживает передачу сигнала на одном из «прослушиваемых» каналов, она временно
отключает сканирование, оставаясь на этом канале, позволяя пользователю ответить на сообщение. После
прекращения активности на этом канале функция Dual Watch автоматически активируется снова.
Эта функция может быть использована, только если не активирована функция «Экстренного
!
вызова».
Чтобы отключить функцию Dual Watch, нажмите кнопку MENU.
Подсветка дисплея
Если подсветка дисплея недостаточна для идентификации значков на дисплее, нажмите слегка кнопку EMG,
и подсветка дисплея активируется на 5 секунд. Каждый раз при нажатии кнопки MENU, будет включаться
подсветка дисплея.
85
РУССКИЙ
Page 88

Режим экономии энергии
Функция экономии энергии позволяет сократить потребление заряда аккумулятора в режиме ожидания.
Режим экономии энергии включается автоматически, если радиостанция не производит никаких действий
больше 7 секунд. Когда заряд аккумулятора заканчивается, на дисплее появляется значок
случае надо заменить батарейки или зарядить аккумуляторы.
Если функция «Экстренного вызова» включена, то режим экономии энергии не работает! !
Зарядка аккумулятора
Для осуществления зарядки: вставьте штекер адаптера в гнездо настольного зарядного устройства
и подсоедините сетевой адаптер к переменному напряжению 220 В.
Поместите радиостанцию в паз настольного зарядного устройства. На корпусе зарядного устройства загорится
красный индикатор. Для полной зарядки аккумулятора необходимо 12 / 14 часов. По завершении зарядки
выньте радиостанции из зарядного устройства и отсоедините зарядное устройство от сети.
Не превышайте время зарядки аккумуляторов! Даже когда они полностью заряжены, процесс
!
зарядки не прекращается автоматически. Поэтому не забудьте отсоединить радиостанцию
от зарядного устройства, как только закончится время зарядки.
Не пытайтесь заряжать щелочные батарейки! Перед тем как заряжать аккумуляторы,
!
убедитесь, что в радиостанции находятся только перезаряжаемые NI-MH аккумуляторы.
Попытка зарядить другие типы батареек (например, щелочные или марганцевые) может
быть опасной. Батарейки могут протечь, взорваться, повре див радиостанцию и создав
опасность для вашего здоровья!
Используйте только зарядное устройство, специально предназначенное для зарядки этой !
радиостанции. Применение другого зарядного устройства может привести к повреждению
радиостанции, вызвать короткое замыкание, пожар, то есть представлять опасность
для вашего здоровья.
Берегите аккумуляторы от огня и высоких температур, это может вызвать взрыв
!
и представлять опасность для вашего здоровья. Отслужившие свой срок аккумуляторы
и батарейки выбрасывайте согласно местным правилам утилизации подобных
предметов.
Не используйте одновременно новые и старые аккумуляторы / батарейки, или
!
аккумуляторы / батарейки различных типов.
ПРАВИЛА ЭКСПЛУАТАЦИИ и УХОДА:
Не пользуйтесь содержащими алкоголь жидкостями и чистящими средствами для очистки !
радиостанции.
Не погружайте радиостанцию в воду. !
Протирайте радиостанцию мягким влажным кусочком ткани. !
Если радиостанция намокла, высушите ее сухой непушистой тканью. Если радиостанция попала
!
в воду, то вытащите батарейки/аккумуляторы и просушите радиостанцию (не используйте
огонь для сушки радиостанции!).
На время длительного хранения выключите радиостанцию и удалите из нее аккумулятор/ !
батарейки.
Если вы думаете, что радиостанция нуждается в ремонте, сначала позвоните специалисту сервисной
службы. Возможно, вашу проблему можно устранить с помощью консультации по телефону, и вам
не придется отдавать радиостанцию в ремонт.
Внимание! Не вскрывайте радиостанцию самостоятельно!
Несанкционированное вскрытие радиостанции лишит вас гарантии на устройство!
: в этом
86
Page 89

ТЕХНИЧЕСКИЕ ХАРАКТЕРИСТИКИ
Общие
Каналы . . . . . . . . . . . . . . . . . . . . . . . . . . . . . . . . . . . . . . . . . . . . . . . . . . 8 PMR446 + 16 запрограммированных
1~69 LPD
Диапазон частот . . . . . . . . . . . . . . . . . . . . . . . . . . . . . . . . . . . . . . . . . . . . . 446,00625 ÷ 446,09375 МГц (PMR)
433,075 ÷ 434,775 МГц (LPD)
Шаг сетки частот . . . . . . . . . . . . . . . . . . . . . . . . . . . . . . . . . . . . . . . . . . . . . . . . . . 12,5 КГц (PMR); 25 КГц (LPD)
Напряжение питания . . . . . . . . . . . . . . . . . . . . . . . . . . . . . . . . . . . . . . . . . . . . . . . . . . . . . . . . . . . 6 +/–10 % Vdc
Рабочие температуры . . . . . . . . . . . . . . . . . . . . . . . . . . . . . . . . . . . . . . . . . . . . . . . . . . . . . . . . от –10 до +55 °C
Габариты (без аккумуляторов) (Ш × В × Г) . . . . . . . . . . . . . . . . . . . . . . . . . . . . . . . . . . . . . . . 58 × 110 × 32 мм
Вес (без аккумуляторов) . . . . . . . . . . . . . . . . . . . . . . . . . . . . . . . . . . . . . . . . . . . . . . . . . . . . . . . . . . . . . . . . 114 г
Рабочий цикл (1 час) . . . . . . . . . . . . . . . . . . . . . . . . . . . . . . . . . . . . . . . . . . . . . . .TX 5 %, RX 5 %, stand‑by 90 %
Передатчик
Выходная мощность . . . . . . . . . . . . . . . . . . . . . . . . . . . . . . . . . . . . . . . . . . . . . . . . . . . . . . . . . . . . . 0,5 Вт ‑PMR
10 мВт ‑LPD
Модуляция . . . . . . . . . . . . . . . . . . . . . . . . . . . . . . . . . . . . . . . . . . . . . . . . . . . . . . . . . . . . . . . . . . . . . . . . . . . . FM
Радиоприёмник
Чувствительность при 12 дБ Sinad . . . . . . . . . . . . . . . . . . . . . . . . . . . . . . . . . . . . . . . . . . . . . . . . . . . . . . 0,35 μV
Избирательность по соседнему каналу . . . . . . . . . . . . . . . . . . . . . . . . . . . . . . . . . . . . . . . . . . . . . . . . . . 70 дБ
Выходная аудио мощность . . . . . . . . . . . . . . . . . . . . . . . . . . . . . . . . . . . . . . . . . . . . . . . . 300 мВт @ 10 % THD
Промежуточные частоты . . . . . . . . . . . . . . . . . . . . . . . . . . . . . . . . . . . . . . . . . . . . . . . . 1:21,4 МГц ; 2:450 КГц
Разъем для микрофона и зарядного устройства . . . . . . . . . . . . . . . . . . . . . . . . . . . . . . . . . . . . стерео 2,5 мм
Разъем для внешнего динамика . . . . . . . . . . . . . . . . . . . . . . . . . . . . . . . . . . . . . . . . . . . . . . . . . . . моно 3,5 мм
87
РУССКИЙ
Page 90

88
Page 91

DCS
N° CODE N° CODE N° CODE N° CODE N° CODE
1 023 22 131 43 251 64 371 85 532
2 025 23 132 44 252 65 4 11 86 546
3 026 24 134 45 255 66 412 87 565
4 031 25 143 46 261 67 413 88 606
5 032 26 145 47 263 68 423 89 612
6 036 27 152 48 265 69 431 90 624
7 043 28 155 49 266 70 432 91 627
8 047 29 156 50 271 71 445 92 631
9 051 30 162 51 274 72 446 93 632
10 053 31 165 52 306 73 452 94 654
11 054 32 172 53 3 11 74 454 95 662
12 065 33 174 54 315 75 455 96 664
13 071 34 205 55 325 76 462 97 703
14 072 35 212 56 331 77 464 98 712
15 073 36 223 57 332 78 465 99 723
16 074 37 225 58 343 79 466 100 731
17 114 38 226 59 346 80 503 101 732
18 115 39 243 60 351 81 506 102 734
19 116 40 244 61 356 82 516 103 743
20 122 41 245 62 364 83 523 104 754
21 125 42 246 63 365 84 526
CTCSS
N° FREQ. (Hz) N° FREQ. (Hz) N° FREQ.(Hz)
01 67.0 14 107.2 27 167.9
02 71.9 15 110.9 28 173.8
03 74.4 16 114.8 29 179.9
04 77.0 17 118.8 30 186.2
05 79.7 18 123.0 31 192.8
06 82.5 19 127.3 32 203.5
07 85.4 20 131.8 33 210.7
08 88.5 21 136.5 34 218.1
09 91.5 22 141.3 35 225.7
10 94.8 23 146.2 36 233.6
11 97.4 24 151.4 37 241.8
12 100.0 25 156.7 38 250.3
13 103.5 26 162.2
Page 92

Page 93

• INFORMAZIONE AGLI UTENTI
Ai sensi dell’art. 13 del decreto legislativo 25 luglio
2005, n.151 “Attuazione delle Direttive 2002/95/
CE, 2002/96/CE e 2003/108/CE, relative alla
riduzione dell’uso di sostanze pericolose nelle
apparecchiature elettriche ed elettroniche, nonché
allo smaltimento dei rifiuti”.
• Il simbolo del cassonetto barrato riportato
sull’apparecchiatura indica che il prodotto alla
ne della propria vita utile deve essere raccolto
separatamente dagli altri riuti. L’utente dovrà,
pertanto, conferire l’apparecchiatura giunta a ne
vita agli idonei centri di raccolta differenziata dei riuti
elettronici ed elettrotecnici, oppure riconsegnarla al
rivenditore al momento dell’acquisto di una nuova
apparecchiatura di tipo equivalente, in ragione di
uno a uno. L’adeguata raccolta differenziata per
l’avvio successivo dell’apparecchiatura dismessa
al riciclaggio, al trattamento e allo smaltimento
ambientalmente compatibile contribuisce ad
evitare possibili effetti negativi sull’ambiente e
sulla salute e favorisce il riciclo dei materiali di
cui è composta l’apparecchiatura. Lo smaltimento
abusivo del prodotto da parte dell’utente comporta
l’applicazione delle sanzioni amministrative di cui
al dlgs. n.22/1997 (articolo 50 e seguenti del dlgs.
n.22/1997).
• All articles displaying this symbol on the body,
packaging or instruction manual of same, must
not be thrown away into normal disposal bins but
brought to specialised waste disposal centres.
Here, the various materials will be divided
by characteristics and recycles, thus making
an important contribution to environmental
protection.
• Alle Artikel, die auf der Verpackung oder der
Gebrauchanweisung dieses Symbol tragen, dürfen
nicht in den normalen Mülltonnen entsorgt werden,
sondern müssen an gesonderten Sammelstellen
abgegeben werden. Dort werden die Materialien
entsprechend ihrer Eigenschaften getrennt und,
um einen Beitrag zum Umweltschutz zu liefern,
wiederverwertet.
• Todos los artículos que exhiban este símbolo en
el cuerpo del producto, en el embalaje o en el
manual de instrucciones del mismo, no deben
ser desechados junto a los residuos urbanos
normales sino que deben ser depositados en
los centros de recogida especializados. En estos
centros, los materiales se dividirán en base a sus
características y serán reciclados, para así poder
contribuir de manera importante a la protección y
conservación del medio ambiente.
• Tous les articles présentant ce symbole sur le corps,
l'emballage ou le manuel d'utilisation de celuici ne doivent pas être jetés dans des poubelles
normales mais être amenés dans des centres de
traitement spécialisés. Là, les différents matériaux
seront séparés par caractéristiques et recyclés,
permettant ainsi de contribuer à la protection de
l'environnement.
• Todos os artigos que apresentem este símbolo no
seu corpo, embalagem ou manual de instruções,
não devem ser eliminados juntamente com o lixo
normal mas sim conduzidos para contentores
de eliminação de resíduos especializados.
Aqui, os diversos materiais serão divididos por
características e reciclados, realizando assim
uma importante contribuição para a protecção
ambiental.
•
Όλα τα προϊόντα στα οποία εμφανίζεται το ακόλουθο
σύμβολο στο σώμα, τη συσκευασία ή το εγχειρίδιο
χρήσης τους, δεν πρέπει να εναποθέτονται στους
κοινούς κάδους απορριμάτων αλλά να προσκομίζονται
στα ειδικά κέντρα αποκομιδής. Εκεί, τα διάφορα
υλικά θα πρέπει να διαχωρίζονται ανάλογα με τα
χαρακτηριστικά και τα ανακυκλούμενα υκλικά,
συμμετέχοντας έτσι ουσιαστικά στην προστασία του
περιβάλλοντος.
• Zużyte towary oznaczone tym znakiem mogą
stanowić zagrożenie dla środowiska naturalnego,
dlatego nie należy ich wyrzucać tylko oddać sprzedawcy, który przekaże je do przedsiębiorstwa
zajmującego się utylizacja odpadów.
• Alle artikels die dit symbool weergeven op de
behuizing, verpakking of instructiehandleiding
ervan, mogen niet weggegooid worden in normale
vuilnisemmers maar moeten naar speciale
afvalverwerkingscentra gebracht worden. Hier
worden de verschillende materialen verdeeld
volgens eigenschappen en recyclage waardoor
een belangrijke bijdrage aan de milieubescherming
wordt geleverd.
• Alla artiklar som är märkta med denna symbol
eller som har den på sitt emballage eller sin
bruksanvisning får inte kastas som vanligt
hushållsavfall, utan måste lämnas in för lämplig
återvinning. Då delas de olika materialen upp och
återanvänds, vilket innebär ett viktigt bidrag för
skydd av miljön.
• Kaikki tuotteet, joissa on tämä merkintä tuotteessa
Не бросайте аккумулятор в огонь. Утилизируйте
itsessään, sen pakkauksessa tai käyttöoppaassa,
аккумуляторы в специально предназначенные
tulee hävittää ainoastaan tarkoitukseen
для этого контейнеры.
varatuissa kierrätyskeskuksissa. Siellä eri
materiaalit erotellaan ominaisuuksiensa ja
kierrätystapansa mukaan, millä on tärkeä merkitys
ympäristönsuojelussa.
Page 94

Prodotto o importato da:
CTE INTERNATIONAL s.r.l.
Via. R.Sevardi 7- 42124 Reggio Emilia Italia
L’uso di questo prodotto può essere soggetto a restrizioni nazionali (per l’uso in Italia in modalità PMR446,
è richiesta l’autorizzazione generale (come da D.L. 259 del 01/08/03 art. 99 comma 3; All. 25 art. 36). Prima
dell’uso leggere attentamente le istruzioni. Se il prodotto contiene batterie: non gettare nel fuoco, non
disperdere nell’ambiente dopo l’uso, usare gli appositi contenitori per la raccolta.
Produced or imported by:
CTE INTERNATIONAL s.r.l.
Via. R.Sevardi 7 42124 Mancasale Reggio Emilia Italy
Imported by:
ALAN UK
Unit 2, Callenders, Paddington Drive, Churchward Park, Swindon, Wiltshire, SN5 7YW - UK
The use of this transceiver can be subject to national restrictions. Read the instructions carefully before
installation and use. if the product contains batteries: do not throw the battery into re.
To disperse after use, throw into the appropriate containers.
Importado por:
ALAN COMMUNICATIONS, SA
C/Cobalt, 48 - 08940 Cornellà de Llobregat Barcelona España
Tel: +34 902 384878 Fax: +34 933 779155 Web site: www.midland.es
El uso de este transceptor puede estar sujeto a restricciones nacionales. Lea atentamente las instrucciones
antes de usar el equipo. si el producto contiene pilas o baterías no las tire al fuego ni las disperse en el
ambiente después de su uso, utilice los contenedores apropiados para su reciclaje.
Vertrieb durch:
ALAN ELECTRONICS GmbH
Daimlerstraße 1K - D-63303 Dreieich Deutschland
Die Benutzung dieses Handfunkgerätes ist von den landesspezischen Bestimmungen abhängig.
Vor Benutzung Bedienungsanleitung beachten. Bei Verwendung von Batterien beachten Sie bitte die
Umweltbestimmungen. Batterien niemals ins offene Feuer werfen, und nur in dafür vorgesehene
Sammelbehälter entsorgen.
Импортер в России
ЗАО «АЛАН-СВЯЗЬ»
Интернет‑сайт: www.midland.ru
105187, г. Москва, Фортунатовская, 31А, стр. 2
Использование данной радиостанции может быть объектом национальных ограничений.
Вни матель но п роч ита йт е рук ов одс тво п ользо ват еля , пре жд е ч ем уста на вли ват ь акк умуля тор ы
и пользоваться радиостанцией.
www.midlandradio.eu |
 Loading...