

Page 1

Midland G8
RICETRASMETTITORE BIBANDA
Grazie per aver scelto i prodotti Midland! L’apparato Midland G8 è un ricetrasmettitore
che può essere utilizzato senza licenza, in quasi tutta Europa. Per ulteriori informazioni,
consultate la tabella “Restrizioni all’uso”.
Come previsto da dl 259 del 01/08/2003 e da nota 101C del PNF, gli apparati PMR446
sono soggetti ad una dichiarazione d’utilizzo e ad un contributo annuo. Per ottenere la
modulistica e le modalità di ottenimento dell’autorizzazione generale contattate l’Ispettorato
Territoriale nel vostro capoluogo di regione o visitate il sito web del Ministero delle
Comunicazioni (www.urpcomunicazioni.it oppure www.urpcomunicazioni.it/ispettorati).
L’utilizzo dell’apparato è consentito solamente dopo aver inviato la pratica all’Ispettorato
Territoriale. Raccomandiamo di conservare una copia di tale pratica.
L’apparato Midland G8 grazie all’utilizzo delle tecnologie più avanzate nel campo
della radiocomunicazione ed alla sua robusta struttura meccanica è decisamente la
soluzione più affidabile ed ideale per la gestione professionale di team di lavoro, per
la comunicazione con più persone all’interno di cantieri, di edifici, nelle manifestazioni
sportive, spettacoli, fiere ed alberghi o semplicemente è la soluzione ideale per il
tempo libero (escursioni in montagna, in moto, in bicicletta, ecc).
Midland G8 è disponibile in due modelli:
versione BiBanda (PMR446/LPD) ›
versione E solo banda PMR446 ›
Questo manuale comprende entrambe le versioni, segnalando quali sono le
funzionalità specifiche per ciascuna versione.
Dotazione della confezione singola
N° 1 Apparato › Midland G8
N° 1 Caricatore da tavolo singolo ›
N° 1 Adattatore da muro ›
N° 1 Pacco Batterie ›
N° 1 Clip da cintura ›
Copertura/portata
Le prestazioni dei ricetrasmettitori dipendono dalle condizioni ambientali ed
atmosferiche. Fattori ambientali quali alture, edifici, alberi, fogliame possono diminuire
la copertura.
Le prestazioni ottimali si ottengono in campo aperto mentre la portata si potrà ridurre,
per esempio all’interno di un’automobile o di un edificio. Tipicamente la copertura in
città, in presenza di edifici è di 1 o 2 Km. In campo aperto, ma con presenza di alberi,
case, fogliame, la copertura è di 4-6 Km. In campo aperto, a vista e senza nessun
tipo d’interferenza, come per esempio in montagna, la copertura può essere anche
superiore ai 12 Km.
Batterie e vano batteria
E’ possibile utilizzare il pacco batteria ricaricabile fornito con l’apparato, oppure 4
batterie AAA alcaline o ricaricabili. Per aprire il vano batteria, spingere la linguetta
verso il basso, e rimuovere il coperchio sollevandolo. Dopo aver inserito il pacco
batteria o le batterie richiudere il vano batteria e riportate la linguetta nella posizione
di chiusura.
Attenzione, nel caso si utilizzi il pacco batteria ricaricabile è opportuno porre le
radio in ricarica prima dell’utilizzo.
Avvertenze
BATTERIE › - Osservate tutte le precauzioni sull’utilizzo delle batterie descritte nel
cap “Ricarica delle batterie”.
NON APRITE LA RADIO PER NESSUN MOTIVO › , la meccanica ed elettronica di
precisione di cui é composto l’apparato richiede esperienza e strumentazione; per
lo stesso motivo non va assolutamente riallineata la radio, che é già stata tarata
in fabbrica per le massime prestazioni. L’apertura del ricetrasmettitore da parte di
personale non autorizzato farà decadere automaticamente la garanzia.
Non utilizzate alcool, solventi o abrasivi per pulire l’apparecchio. › Utilizzate
solo un panno morbido e pulito leggermente inumidito con acqua. Nei casi più
tenaci utilizzate un blando detergente.
CARATTERISTICHE
Nuova funzionalità “Chiamata d’emergenza” ›
Midland G8 › introduce una nuova funzione “innovativa ed importante”: il canale
dedicato alle emergenze. Normalmente la comunicazione via radio avviene
tra due o più utenti che sono in quel momento sintonizzati sullo stesso canale,
per cui non è possibile comunicare con persone che sono su canali differenti o
trasmettere su più canali contemporaneamente.
Grazie alla nuova funzione “Emergenza” è possibile invece controllare
costantemente il canale dedicato alle emergenze; in questo modo coloro che
sono in possesso di un Midland G8 potranno comunicare normalmente sul canale
impostato ed allo stesso tempo ricevere o trasmette eventuali comunicazioni
d’EMERGENZA sul canale dedicato per questo scopo.
É sufficiente tenere premuto il tasto EMG per 3 secondi ed un segnale di emergenza
verrà inviato a tutte le radio in portata, che verranno sintonizzate automaticamente
sul canale “EC” (Emergency Channel) anche se si trovavano su un altro canale.
Nuova funzionalità “controllo portata”: › con la semplice pressione di un tasto
1
Page 2

potete verificare se ci sono radio in portata.
Nuova funzionalità “Vox TalkBack”: › Se la radio dovesse trasmettere
costantemente in VOX, la trasmissione viene automaticamente interrotta dopo 20”
per dare la possibilità di parlare anche ad altri utenti sintonizzati su quel canale.
Potenza: 500mW (PMR446); 10mW (LPD) ›
Temperatura operativa: da -20° a +55° C ›
38 toni CTCSS/104 codici DCS ›
Water proof: IPX5 ›
Chiamata d’emergenza ›
Controllo Portata ›
VOX regolabile su 3 livelli, con “TalkBack” ›
INTERCOM moto ›
Vibra › CALL
Blocco tastiera ›
Auto power save: risparmio automatico batterie ›
Indicatore di batteria scarica ›
Dual Watch ›
CALL › con 5 melodie
SCAN ›
Monitor ›
Out of Range ›
Roger beep: tono di fine chiamata ›
Alta/Bassa potenza ›
Display LCD retroilluminato ›
Alimentazione tramite pacco batteria NiMH 800mAh da 4,8V o con 4 batterie AAA ›
Presa accessori 2 Pin ›
Peso: 112gr (senza batterie) ›
Dimensioni: 59x98x32mm ›
Autonomia (in banda PMR446): oltre 12 ore con pacco batteria da 800mAh ›
Versioni:
G8 Dual band (PMR446/LPD) ›
24 canali PMR446 (8+16 pre-registrati)/69 canali LPD
G8E (solo PMR446) ›
24 canali PMR446 (8+16 pre-registrati)
DESCRIZIONE DELLE PARTI
Display
Il vostro ricetrasmettitore utilizza
un display LCD (a cristalli liquidi)
per informarvi costantemente del
suo stato operativo. I simboli ed i
parametri che possono apparire di
volta in volta sono i seguenti:
3
2
5
1
1. CANALE Queste due grandi cifre indicano il numero del canale
selezionato
2. VOX Indica l’attivazione della funzione VOX;
3.
4. EMG Compare quando la funzione Emergenza è attiva.
5. DW Compare quando la funzione Dual Watch è attiva.
6.
7.
8. OUT Indica il superamento della distanza massima di ricezione
9. RX Appare sul display, quando il ricetrasmettitore è in ricezione.
10. TX Compare durante la trasmissione (pulsante PTT premuto);
11. H(High)/L(Low) Indica la selezione della bassa o dell’alta potenza di
12. CTCSS/DCS Queste due icone indicano il tipo di tono sub audio
13. Toni CTCSS/DCS Queste tre piccole cifre indicano il codice dei toni CTCSS/
14. ROGER Compare, quando la funzione Roger Beep è attiva.
Il simbolo del lucchetto indica il blocco della tastiera attivo.
Il simbolo della batteria indica lo stato di carica del pacco
batteria o delle batterie AAA.
Indica la funzione VibraCALL attiva.
Out of Range.
trasmissione.
selezionato.
DCS selezionati (1-38 / 1-104)
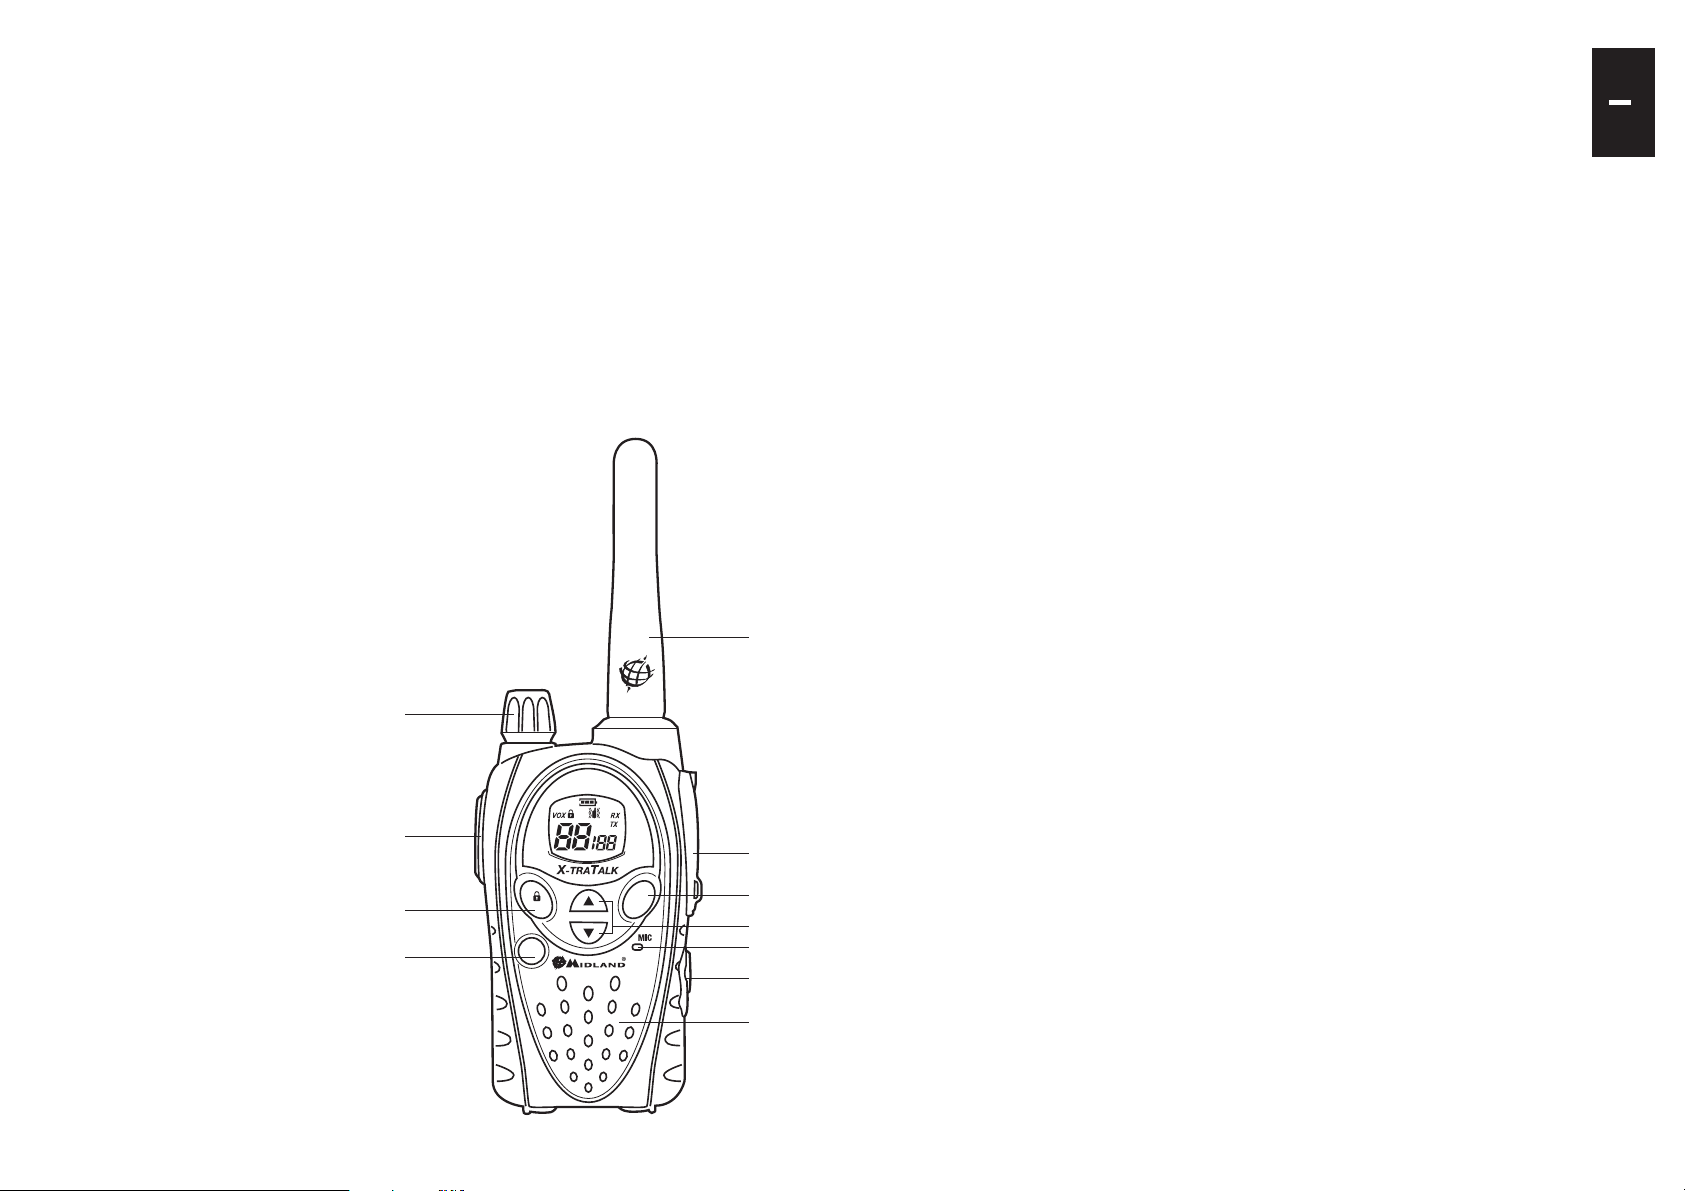
Descrizione dell’apparato radio
Fate riferimento all’immagine nella pagina seguente per identificare tutte le principali
parti dell’apparato:
4687
11
9
10
12
13
14
15. Altoparlante integrato In questo punto si trova l’altoparlante per la ricezione
audio.
16. Pulsante MENU La pressione di questo pulsante permette di entrare nel
MENU di configurazione della radio.
17. Pulsante CALL/
Serve ad inviare un segnale di chiamata sul canale in
2
Page 3
uso, oppure tenendolo premuto per circa 5 secondi per
attivare il blocco della tastiera.
18. Pulsante PTT (premere per parlare) La pressione di questo pulsante,
porta l’apparecchio in trasmissione.
19. Manopola VOLUME Accende /spegne l’apparecchio e regola il VOLUME
audio di ricezione.
20. ANTENNA Serve a ricevere e trasmettere i segnali radio.
21. Presa Accessori (sotto la protezione) Consente il collegamento a
dispositivi esterni quali: cuffie, microfoni, caricatori, ecc
(2 pin).
22. Pulsante EMG Consente l’immediata attivazione delle funzioni
d’EMERGENZA e Controllo Portata.
23. Pulsanti ▲▼ Servono per scorrere le varie impostazioni all’interno del
MENU
24. Microfono integrato In questo punto si trova il microfono per la trasmissione
25. Presa Intercom Consente il collegamento di accessori cuffia/microfono
per la comunicazione intercom
20
19
Accensione/spegnimento
Per accendere il ricetrasmettitore, ruotare la manopola VOLUME in senso orario sino
a sentire uno scatto meccanico.
Per spegnere il ricetrasmettitore, ruotare la manopola in senso antiorario.
Selezione della Banda PMR466 o LDP (solo per la versione BiBanda)
Midland G8 versione BiBanda è un apparato inizialmente configurato sulla banda
PMR446.
Per passare alla banda LPD, è sufficiente tenere premuto a lungo il tasto MENU finchè
il display mostra il canale 1. Per tornare alla banda PMR446 tenete premuto il tasto
MENU finchè il display mostra “P1”.
! Questa procedura disabilita la funzione “EMG” (Emergenza) quindi se
cambiate banda ricordatevi di riattivare dal MENU la funzione Emergenza
(vedi capitolo “Funzione chiamata Emergenza”).
Selezione di un canale
Premere il tasto MENU, sul Display inizierà a lampeggiare il n° del canale. Selezionare
il canale desiderato utilizzando i tasti ▲▼. Premere PTT per confermare, oppure
attendere 5 secondi.
In base al modello si può scegliere tra i seguenti canali:
versione BiBanda: › PMR446 da P1 a P8 e da 9p a 24p (pre-registrati) / LPD da
1 a 69.
versione E solo PMR446: › da P1 a P8 e da 9p a 24p (pre-registrati)
! il canale P8 è stato dedicato di Default alla funzione “Emergenza” quindi
consigliamo di non utilizzarlo per non interferire con questa funzionalità.
Visualizzare il canale/tono dei canali pre-registrati
Per visualizzare momentaneamente il canale PMR446 e il subtono utilizzato nei
canali pre-registrati, è sufficiente posizionarsi sul canale voluto (da 9p a 24p) e tenere
premuta la freccia giù per 3 sec.
18
17
16
MENU
Trasmissione e ricezione
EMG OUT
DW
H L
DCS CTC
ROGER
CALL
EMG
21
22
23
24
25
15
Per trasmettere tenere premuto il pulsante PTT. Attendere una frazione di secondo
e parlare con tono normale a circa 5 cm di distanza in direzione del microfono del
ricetrasmettitore; il display visualizzerà TX
Rilasciare il tasto PTT al termine della conversazione.
Quando l’apparecchio é in ricezione (pulsante PTT rilasciato) riceverete
automaticamente qualsiasi comunicazione. Il display visualizzerà RX.
Regolazione VOLUME
Ruotare la manopola VOLUME fino ad ottenere il livello desiderato.
Tasto “CALL”
Premendo il tasto CALL verrà inviato un segnale sonoro di avviso chiamata a tutti
gli utenti sullo stesso canale. Sono disponibili diverse suonerie selezionabili tramite
MENU.
3
Page 4

Tasto “Emergenza”
Quando la funzione emergenza è attiva, (EMG lampeggiante sul display) tenendo
premuto il tasto EMG per 3 secondi si invia la chiamata di emergenza agli altri G8.
La funzione Emergenza è già attivata di default.
Premendo due volte il tasto EMG viene inviata una richiesta di risposta a tutte le radio
in portata (funzione Controllo Portata)
Blocco tastiera
Mantenere premuto il tasto CALL/ per circa 5 secondi. Il simbolo che appare sul
display
attivi. Per la disattivazione, tenere premuto nuovamente il tasto CALL/
secondi.
indica la sua attivazione. Solo i tasti PTT, EMG e CALL/ rimangono
per circa 5
Funzione MON (Monitor)/Squelch
La funzione Monitor consente di escludere temporaneamente lo squelch automatico
per ricevere eventuali segnali estremamente deboli che altrimenti non sarebbero stati
ricevuti.
Per attivare la funzione Monitor, tenere premuto per circa 2 secondi contemporaneamente entrambi i pulsanti ▲▼. Per disattivare questa funzione premere nuovamente
per circa 2 secondi entrambi i tasto ▲▼, (oppure spegnere e riaccendere la radio).
! Questa funzione può essere attivata solo se la funzione “Emergenza” non è
attiva.
! Con la funzione MON attiva, è normale che la radio abbia sempre un costante
rumore di fondo.
Scansione di tutti i canali
SCAN esegue la scansione di tutti i canali e in presenza di un segnale in ricezione si
arresta. La scansione riprende dopo cinque secondi dal cessare del segnale. Questa
funzione è utile per controllare quali canali sono liberi.
Per eseguire la scansione dei canali, premere per 2 sec il pulsante ▼: Midland G8
inizia ad eseguire la scansione dei canali. Per fermare la scansione, premete il tasto
PTT, il vostro ricetrasmettitore tornerà sul canale in uso al momento in cui è stata fatta
partire la scansione.
! Questa funzione può essere attivata solo se la funzione “Emergenza” non è
attiva.
Tasto Funzione “MENU”
Le seguenti funzioni si selezionano premendo il tasto “MENU”:
Selezione canale ›
Impostazione toni CTCSS ›
Impostazione toni DCS ›
Impostazione Alta/Bassa potenza (solo sulla banda PMR446) ›
Funzione VOX ›
Funzione Vibra › CALL
Impostazione suonerie ›
Roger Beep ›
4
Beep tastiera ›
Canale Emergenza ›
Funzione Dual Watch ›
Out of Range ›
Selezione di un canale
Premere il tasto MENU, sul Display inizierà a lampeggiare il n° del canale. Selezionare
il canale desiderato utilizzando i tasti ▲▼. Premere PTT per confermare, oppure
attendere 5 secondi.
In base al modello si può scegliere tra i seguenti canali:
versione BiBanda: › PMR446 da P1 a P8 e da 9p a 24p (pre-registrati) / LPD da
1 a 69.
versione E solo PMR446 › : da P1 a P8 e da 9p a 24p (pre-registrati)
! Il canale P8 è stato dedicata alla funzione “Emergenza” quindi consigliamo di
non utilizzarlo per non interferire con questa funzionalità.
Impostazione toni CTCSS/DCS
I toni CTCSS e DCS sono dei codici che possono essere aggiunti ai canali per crearne
uno personale. Per ogni canale si possono aggiungere fino a 38 codici CTCSS e 104
codici DCS diversi. L’implementazione di questi codici può essere fatta sui seguenti
canali:
Versione BiBanda: solo sugli 8 canali principali PMR446 (da P1 a P8) e sui 69 LPD.
Versione E solo PMR446: solo sugli 8 canali principali PMR446 (da P1 a P8)
Per entrambe le versioni, i canali pre-registrati da 9p a 24p non possono essere
modificati.
Procedimento per l’attivazione dei 38 toni CTCSS:
Accendere l’apparato. ›
Selezionare il canale desiderato premendo il pulsante › MENU e i tasti ▲▼.
Premere nuovamente il tasto › MENU sino a visualizzare sul display la scritta CTC
e il codice del tono lampeggiante a destra (“of”=nessun codice - condizione di default).
Selezionare il tono CTCSS desiderato premendo i tasti ▲▼. ›
Per confermare l’impostazione, premere il tasto PTT oppure attendere circa 5
secondi.
Procedimento per la disattivazione del tono CTCSS:
Per non utilizzare i toni CTCSS:
Selezionare il canale desiderato ›
Premere il tasto › MENU sino a visualizzare sul display il codice del tono CTCSS
lampeggiante a destra;
Selezionare “ › of” tramite i tasti ▲▼.
Procedimento per l’attivazione dei 104 toni DCS:
Accendere l’apparato. ›
Selezionare il canale desiderato, premendo il pulsante › MENU e i tasti ▲▼.
Premere nuovamente il tasto › MENU sino a visualizzare sul display la scritta DCS
e il codice del tono lampeggiante a destra (“of”=nessun codice - condizione di default).
Page 5

Selezionare il tono DCS desiderato premendo i tasti ▲▼. ›
Per confermare l’impostazione, premere il tasto PTT oppure attendere circa 5
secondi.
! Di fabbrica, il canale P8 con tono DCS 50 (P850) è riservato alla funzione
Emergenza (canale EC). Consigliamo quindi di non utilizzarlo!!!
Procedimento per la disattivazione del tono DCS:
Per non utilizzare i toni DCS:
Selezionare il canale desiderato ›
Premere il tasto › MENU finchè il display mostra il canale desiderato, ed il codice del
tono DCS lampeggia a destra;
Selezionare “ › of” tramite i tasti ▲▼.
Funzione Alta - Bassa potenza (solo banda PMR446)
Per selezionare la potenza, premere il pulsante MENU sino a visualizzare sul display,
Pr, utilizzando i tasti ▲▼ selezionare L (low) per la bassa potenza H (high) per l’alta
potenza. Premere PTT per confermare, oppure attendere 5 secondi.
Con le batterie completamente cariche, l’alta potenza é di 500 mW (ERP), mentre
quella bassa é di 10mW (ERP).
Grazie a questa funzione, se non dovete coprire grandi distanze, potete selezionare la
modalità “Bassa potenza” e aumentare notevolmente la durata della batteria.
Funzione VOX
Questa funzione permette di attivare la comunicazione senza premere il tasto PTT.
E’ sufficiente parlare e la comunicazione viene attivata.
La sensibilità è regolabile su 3 livelli e attivabile con o senza accessori. Il quarto livello
disponibile attiva la funzione Vox con TalkBack.
Nel caso in cui uno dei due apparati trasmette ininterrottamente per più di 20 secondi,
Vox TalkBack ne interrompe la trasmissione per dieci secondi, liberando il canale e
concedendo così all’altro utente la possibilità di parlare.
Per attivare questa funzione, premere il pulsante MENU, sino a che apparirà sul
display VOX, utilizzando i tasti ▲▼ selezionare la sensibilità:
Of: Disattivato; ›
1: Alta ›
2: Media ›
3: Bassa ›
4: Talk Back › (con sensibilità Alta)
premere PTT per confermare, oppure attendere 5 secondi
Per disattivare la funzione VOX seguire le indicazioni sopra riportate selezionando la
voce oF.
Funzione Vibra-CALL
Midland G8 è dotato del dispositivo “Vibra-CALL”, ovvero la possibilità di attivare la
vibrazione al momento della ricezione del “TONO DI CHIAMATA”
Per attivare questa funzione premere il tasto MENU, sino a visualizzare sul display
premendo i tasti ▲▼si può inibire o attivare la funzione (on: Attiva oF:Disattiva);
Confermare premendo il tasto PTT oppure attendere 5 secondi.
;
Funzione CALL
Midland G8 ha la possibilità di inviare 5 diversi toni di chiamata. Per farlo occorre
premere il tasto CALL/
I toni possono essere selezionati nel seguente modo:
premere il tasto › MENU, sino a visualizzare sul display “CA” con il numero del tono
attivo.
Premendo i tasti ▲▼si possono ascoltare/selezionare le 5 melodie pre-impostate; ›
Confermare premendo › PTT oppure attendere 5 secondi.
.
Funzione ROGER BEEP (Tonalità di conferma fine conversazione)
Al rilascio del tasto PTT, quindi alla fine di ogni trasmissione, viene emessa una
tonalità, che indica al vostro interlocutore che può iniziare a parlare.
Nel Midland G8 questa funzione è disattivata di default.
Premere il tasto MENU, sino a visualizzare sul display “rb of”;
Con i tasti ▲▼ selezionare “on” e sul Display comparirà “rb on”;
Premere il tasto PTT oppure attendere 5 secondi per confermare la programmazione.
Per disattivarlo ripetere la procedura indicata selezionando “rb of”
Beep Tastiera
Questa funzione, se attiva, genera un beep audio ogni volta che si preme un tasto.
Nel caso si desideri escludere il beep audio, è possibile farlo operando nel seguente
modo:
Premere il tasto › MENU, sino a visualizzare sul display “bP on”.
Premendo i tasti ▲▼ fare in modo che il display mostri “ › bP of”.
Confermare premendo il tasto › PTT oppure attendere 5 secondi.
In questo modo tutte le volte che si preme un tasto non si sentirà alcun suono.
Per riattivarla ripetere la procedura indicata selezionando “bP on”
Funzione chiamata Emergenza
Questa funzione utilizza un canale dedicato alle chiamate d’emergenza e permette di
parlare a tutti i G8 in portata, anche se su canali diversi.
Tenendo premuto il tasto EMG, in automatico la radio si sposta dal canale in uso
a quello dedicato all’emergenza, identificato con “EC” e contemporaneamente viene
inviato un tono audio. Tutte le radio in portata con la funzione Emergenza attiva,
verranno automaticamente spostate sul canale “EC”. Ora tutti possono parlare sullo
stesso canale.
! Quando la radio si trova sul canale d’emergenza (EC sul display) non è
possibile utilizzare le funzionalità del MENU. Solo i tasti PTT e CALL sono
attivi.
Le radio torneranno sul canale in uso dopo un minuto dall’invio dell’ultima trasmissione.
È possibile ritornare immediatamente al canale in uso premendo il tasto EMG. In
questa condizione è possibile utilizzare tutte le funzioni del MENU.
Attivazione - Disattivazione
All’accensione dell’apparato la funzione EMERGENZA è attiva per default, è sempre
5
Page 6

possibile disattivarla/attivarla operando nel seguente modo:
Premere il tasto › MENU sino a visualizzare sul display EC on.
Con i tasti ▲▼ selezionare › EC of. Confermare premendo il tasto PTT oppure attendere 5 secondi.
! Quando la funzione emergenza è attiva (EMG lampeggiante sul display) le
seguenti funzioni non sono utilizzabili: Scan, Monitor, Dual Watch, Out of
Range.
Cambio canale di emergenza
Per default il canale d’emergenza preimpostato è il P8 DCS 50; è però possibile
scegliere un qualunque altro canale in base alle proprie esigenze.
Ricordatevi di cambiare il canale anche sulle altre radio!!
Con la funzione emergenza attiva (EMG lampeggiante sul display)
Premere il tasto › MENU sino a visualizzare sul display EC on.
Premere ancora › MENU (sul display compare of) e con i tasti ▲▼ selezionare il
canale desiderato
Premere il tasto › PTT oppure attendere 5 secondi per conferma.
Per impostare nuovamente il canale di emergenza di default (P8 DCS 50) con la
funzione Emergenza attiva (EMG lampeggiante sul display):
Premere il tasto › MENU sino a visualizzare sul display EC on.
Premere ancora › MENU e selezionare of
Premere il tasto › PTT oppure attendere 5 secondi per conferma.
! Se decidete di dedicare un altro canale qualunque alla funzione Emergenza,
ricordatevi di non utilizzarlo anche per la normale comunicazione. Questo per
evitare interferenze con la funzione Emergenza.
Quando la radio riceverà un segnale su uno dei due canali monitorati, la funzione
“Dual Watch” viene momentaneamente sospesa, permettendo la trasmissione e la
ricezione sul canale in quel momento in uso. Dopo 5 secondi, se non viene effettuata
nessuna attività di trasmissione o ricezione, la funzione Dual Watch riprende.
! Questa funzione può essere attivata solo se la funzione “Emergenza” non è
attiva.
Funzione Out-of-Range
Grazie a questa funzione è possibile verificare se una coppia di apparati rimane sempre
in portata. Dal momento in cui due radio vengono accoppiate, automaticamente si
trasmettono a vicenda un codice di controllo ogni 30 secondi. Non appena questa
trasmissione si interrompe ed uno dei due apparati non riceve il codice di controllo
per più di 2 volte consecutive, l’icona OUT inizierà a lampeggiare sul display e la radio
emetterà un suono di avviso.
! Questa funzione può essere attivata solo se la funzione “Emergenza” non è
attiva.
Attivazione - Disattivazione
Attivare su entrambe le radio la funzione Out of Range:
premere il tasto › MENU sino a visualizzare sul display “OUT” e “Or of”, selezionare
quindi con ▲▼ “Or on” (attivato)
Spegnere entrambe le radio ›
Riaccendere entrambe le radio contemporaneamente ›
Per disattivare la funzione premere il tasto MENU sino a visualizzare sul display “OUT”
e “Or on”, selezionare quindi con ▲▼ “Or of” (disattivato).
Confermare le impostazioni con il pulsante PTT o attendere 5 secondi.
Funzione Controllo portata
Questa funzione permette di verificare manualmente in ogni momento se esiste
almeno un’altra radio raggiungibile in portata.
Premendo due volte il tasto EMG viene inviata una richiesta di risposta, sul canale in
quel momento in uso, a tutte le radio in portata.
Se almeno una radio risponde, viene generato un tono audio sulla propria radio. Se
nemmeno una radio risponde (quindi nessuna radio in portata), non viene generato
alcun tono audio.
! Questa funzione può essere utilizzata solo se la funzione “Out of Range” non
è attiva.
Funzione DUAL WATCH
Questa funzione permette di monitorare costantemente in ricezione un secondo
canale oltre a quello in uso.
Attivazione - Disattivazione
Premere il tasto › MENU ripetutamente sino a visualizzare sul display DW of.
Con i tasti ▲▼ selezionare il secondo canale che si desidera monitorare. ›
Premere il tasto › PTT oppure attendere 5 secondi per conferma. Il display mostrerà
alternativamente il canale in uso e il secondo canale selezionato.
Per interrompere il Dual Watch, è sufficiente premere il tasto MENU.
6
Illuminazione del display
Se l’illuminazione ambientale non é sufficiente per leggere bene il display, premendo il
pulsante EMG una volta (brevemente), così da illuminarlo per circa 5 secondi. Tutte le
volte che viene usato il pulsante MENU, il display si illumina automaticamente.
Risparmio energia
La funzione di risparmio automatico di energia consente di ridurre i consumi fino al
50%; se la radio non riceve alcun segnale per più di 7 secondi la funzione viene attivata
automaticamente.Quando le batterie sono scariche, apparirà sul Display l’icona
occorre sostituire le batterie al più presto o provvedere alla loro ricarica.
! Questa funzionalità è attiva solo quando la funzione “EMG” è disattiva.
Ricarica delle batterie
Il pacco batterie in dotazione é del tipo Ni-MH 800mAh da 4.8V e deve essere
caricato quando è inserito nel ricetrasmettitore; sono necessarie 8 ore per una carica
completa.
Per caricare il pacco batterie:
1) Inserite la spina del cavo di ricarica in una presa di alimentazione di rete CA e l’altra
estremità nella presa della vaschetta di ricarica.
2) Inserite il ricetrasmettitore nella vaschetta in modo che si innesti saldamente al
:
Page 7

suo interno. Il led rosso di ricarica presente sulla parte frontale della vaschetta si
accende.
3) Al termine della carica, estraete il ricetrasmettitore dalla vaschetta e scollegate la
spina del cavo di ricarica dalla presa di alimentazione di rete CA.
! Non sovraccaricate le batterie! Quando le batterie sono completamente
cariche, il processo di carica non si blocca automaticamente. Non dimenticate
quindi di staccare al più presto il ricetrasmettitore dal caricabatteria non
appena é trascorso il tempo necessario, diversamente potreste danneggiare
le batterie e/o il ricetrasmettitore.
! Non cercate di caricare batterie alcaline o comunque batterie non ricaricabili.
Accertatevi che nel vano batterie dell’apparecchio, con il caricabatterie
collegato, siano inserite esclusivamente batterie ricaricabili NI-MH o il pacco
batteria fornito in dotazione! Le batterie alcaline non sono ricaricabili. Batterie
non idonee possono perdere liquido, esplodere o anche bruciare e causare
gravi danni!
! L’utilizzo di un caricabatterie non originale puó causare danni al vostro
apparecchio o causare esplosioni e lesioni personali.
! Non gettate mai le batterie nel fuoco, né avvicinatele a sorgenti di calore:
possono causare esplosioni e lesioni personali. Smaltite le batterie
esclusivamente seguendo le normative locali.
! Non mescolate assieme batterie vecchie e nuove e/o di tipo diverso e/o
utilizzate in modo diverso.
7
Page 8

8
Page 9

Midland G8
USER’S MANUAL
Thanks for choosing Midland! The Midland G8 is a portable transceiver that is free use
in almost all European countries. For further information, we suggest you look at the
“Restrictions on the use” chart.
Combing the latest technology in radio communication along with a sturdy mechanical
frame, the Midland G8 makes the ideal and effective solution for the professionals who
need to stay in touch with colleagues (construction sites, buildings, hotels, trade fairs,
shows) or with leisure users that just want to keep up with friends and family. Its robust
frame, ease of use and simple design mean that it is ideal for use in any activity.
Midland G8 is available in two versions:
Dual Band (PMR446/LPD) ›
E version (PMR446 only) ›
This manual is referred to both models and you will find highlighted the differences
between the two versions.
Content
N° 1 › Midland G8
N° 1 Single desktop charger ›
N° 1 Wall adaptor ›
N° 1 Battery pack ›
N° 1 Belt clip ›
Coverage/range
The maximum range depends on terrain condition and is obtained during use in an
open space.
The only limitation to maximum possible range are environmental factors such as
blockage caused by trees, buildings, or other obstructions. Inside a car or a metallic
constructions, the range can be reduced. Normally the coverage in the city, with
buildings or other obstructions is about 1 or 2 Km. In open space but with obstructions
like trees, leaves or houses the maximum possible range is about 4-6 Km. In open
space, without obstructions and in sight, like for example in mountain, the coverage
can be more than 12 Km.
Batteries and battery compartment
The transceiver accepts the supplied rechargeable battery pack or 4AAA alkaline/
rechargeable batteries. To open the battery compartment: with the back of the radio
facing you, unhook the battery holder in the lower part of the radio and gently slide the
cover. Insert the battery observing the polarity and place the cover again.
Attention: the supplied battery pack must be recharged before the first use.
Warnings
BATTERIES › - Strictly follow all the warnings on the batteries stated at chapter “Bat-
tery recharge”.
DO NOT OPEN THE RADIO FOR ANY REASON › ! The radio’s precision mechanics
and electronics require experience and specialized equipment; for the same reason, the radio should under no circumstances be realigned as it has already been
calibrated for maximum performance. Unauthorized opening of the transceiver will
void the warranty.
Do not use detergents, alcohol, solvents, or abrasives to clean the equip- ›
ment. Just use a soft, clean cloth. If the radio is very dirty, slightly dampen the cloth
with a mixture of water and a neutral soap.
FEATURES
New feature “Emergency CALL” ›
Midland G8 › introduces an innovative and important feature: the channel dedicated
to the emergencies. Radio communications usually happen between two or more
users which are tuned on the same channel: it’s not possible to transmit or receive
to/from different channels. But thanks to the “Emergency” function, you can also
keep a check on the Emergency channel: all users having a Midland G8 can com-
municate on the tuned channel and at the same time can receive/transmit Emergency messages on the dedicated channel. Simply keep pressed the EMG button
for 3 seconds and an emergency CALL will be sent to all the G8 within the range:
they will be automatiCALLy tuned on the “EC” channel (Emergency Channel).
New feature “Manual Out of range”: › just press twice the EMG button and you will
verify whether there are some radios within the range of your equipment.
New feature “Vox TalkBack”: › if one radio is continuously transmitting in VOX, the
Vox TB will automatiCALLy stop the transmission after 20” to allow the transmission
to the other users as well.
9
Page 10

Power: 500mW (PMR446); 10mW (LPD) ›
Operating temperature: from -20° to +55° C ›
38 CTCSS tones/104 DCS codes ›
Waterproof: IPX5 ›
Emergency › CALL
Out of range control ›
VOX adjustable in 3 levels and with “TalkBack” ›
INTERCOM ›
Vibra › CALL
Keypad lock ›
Auto power save: automatic current economy circuit ›
Low battery indicator ›
Dual Watch ›
CALL › with 5 selectable melodies
SCAN ›
Monitor ›
Out of Range ›
Roger beep ›
High/Low power ›
LCD Display with backlight ›
Power supply: NiMH battery pack 800mAh 4,8V or 4 AAA batteries ›
2pin accessory plug ›
Weight: 112gr (w/o batteries) ›
Dimensions: 59x98x32mm ›
Battery life (in PMR446 band): more than 12 hours with 800mAh battery pack ›
Versions:
G8 Dual band (PMR446/LPD) ›
24 PMR446 channels (8+16 pre-set)/69 LPD channels
G8E (PMR446 only) ›
24 PMR446 channels (8+16 pre-set)
DESCRIPTION OF THE CONTROLS
AND FUNCTIONS
4687
Display
Your Midland G8 keeps you
constantly updated about its
operational status through a Liquid
Crystal Display (LCD). The symbols
and their corresponding parameters
that may appear, according to the
operational status of the device,
are described as follows:
1. CHANNEL These two large digits indicate the selected channel
2. VOX VOX function activated
3.
4. EMG Emergency function activated
5. DW Dual Watch activated
6.
7.
8. OUT Indicates if the Automatic Out of Range function looses
9. RX Reception mode
10. TX Indicates the transmission(PTT pressed);
11. H(High) / L(Low) High or low power selection.
12. CTCSS/DCS Indicate the type of sub audio tone selected.
13. CTCSS/DCS These three small digits indicate the code of the CTCSS/DCS
14. ROGER Roger Beep activated.
This symbol appears when the keypad lock is activated
Indicates the battery status
Vibra-CALL function activated
contact with the other radios.
tones selected (1-38 / 1-104)
3
2
5
11
9
10
12
1
13
14
10
Page 11
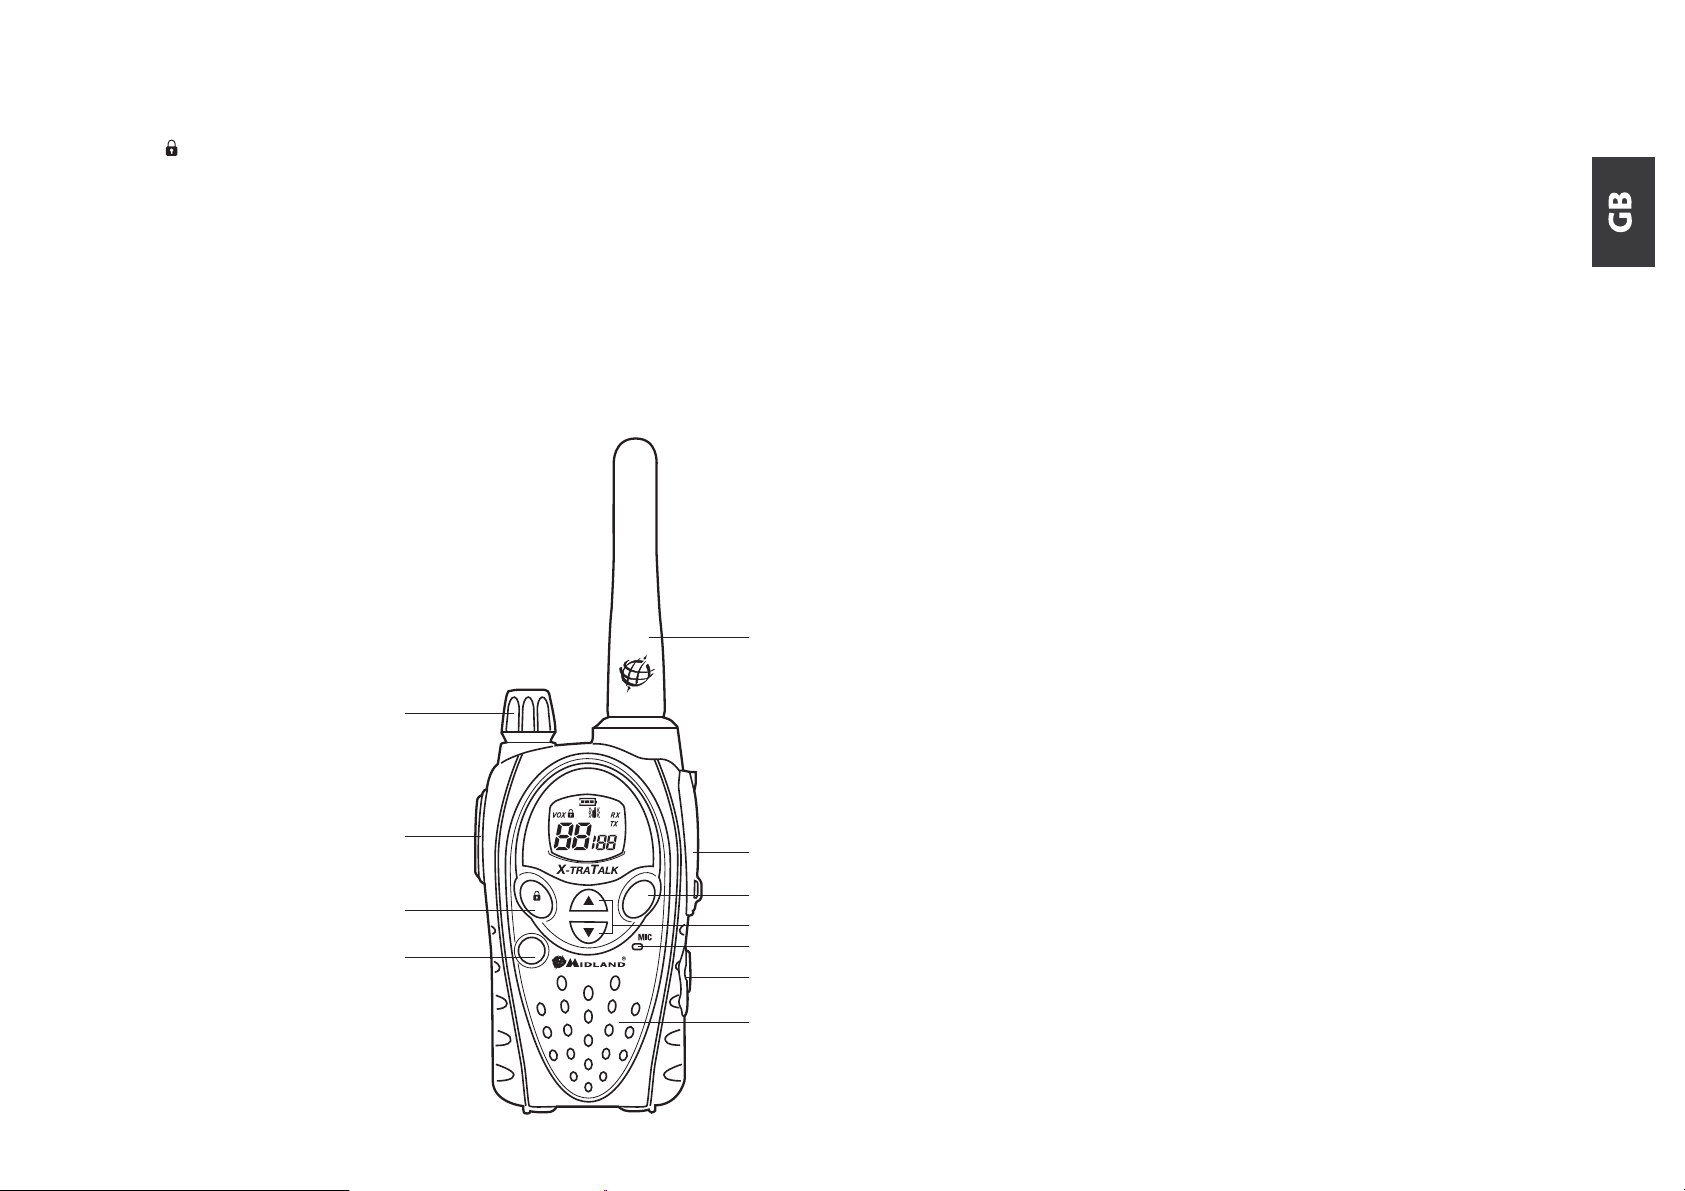
Radio
Refer to this picture to identify the various parts of the device:
15. Built-in speaker Here is where the speaker is housed.
16. MENU button Press this button to enter the radio’s MENU.
17. CALL/
18. PTT (push to talk) Push this button to transmit.
19. VOLUME knob On/off switch for the device and adjusts VOLUME of reception.
20. ANTENNA Receives and transmits radio signals.
21. Accessory socket (under protective cover) To connect to external audio devices
22. EMG button To activate the Emergency and the Manual Out of range
23. ▲▼ buttons To change the setting within the MENU
24. Built-in microphone Here is where sound is picked up by the microphone.
25. Intercom plug To connect to headset/mike accessories suitable for intercom
button To send a CALL on the selected channel. If you keep it
pressed for about 5 seconds, the keypad lock is activated.
such as microphones, chargers, etc. (2pin type)
functions.
communications.
20
Turning on/off
To turn on the transceiver, turn the VOLUME knob clockwise until you hear it clicks.
To turn off the transceiver, turn the knob counter-clockwise.
Selecting the PMR466 or LDP band (only for the dual band version)
Midland G8 (Dual band) is pre-set at factory on the PMR446 band.
To switch to the LPD band, keep pressed the MENU button until the LPD shows
channel ‘1’.
To return to the PMR446 band, keep pressed the MENU button again, until the LCD
shows ‘P1’.
! This procedure disables the “EMG” function; therefore if you change the
frequency band, remember to activate the Emergency function again (see
paragraph “Emergency function”).
Channel selection
Press the MENU button. The number of the channel will start flashing on the display.
Press the scroll buttons ▼▲ till you select the desired channel. Press the PTT button
to confirm, or wait for 5 seconds.
According to the version you bought, you can choose amongst the following
channels:
Dual band version: › PMR446 from P1 to P8 and from 9p to 24p (pre-set) / LPD
from 1 to 69.
E version › (PMR446 only): from P1 to P8 and from 9p to 24p (pre-set)
! Channel P8 has been set at factory for the “Emergency” function; we suggest
that you do not use it for general communications!
19
18
17
16
MENU
Displaying the channel/sub audio tone
To momentarily display the PMR446 channel and the subadio tone used in the pre-set
channels, go to the desired channel (from 9p to 24p) and keep pressed the ▼ for 3
seconds.
EMG OUT
DW
H L
DCS CTC
ROGER
CALL
EMG
21
22
23
24
25
15
Transmission and reception
To transmit keep the PTT button firmly pressed. Wait for a fraction of a second then
speak normally in the direction of the microphone and hold the device at a distance of
about 5 cm; TX will appear on the display.
When you have finished, release the PTT.
When the radio is in reception mode (PTT released) you will automatiCALLy receive
any communication. RX will be displayed.
VOLUME adjustment
Rotate the VOLUME knob till you reach the desired level.
“CALL”
Push the CALL button and you will send an audio signal to the users tuned on the
same channel; you can choose amongst different CALL tones.
11
Page 12

“Emergency”
When the Emergency function is enabled (EMG blinks on the display) keep pressed
EMG for 3 seconds and you send an emergency CALL to the other G8 within your
range.
The Emergency function is activated by default.
Keypad lock
Keep pressed CALL/ for about 5 seconds. and will be displayed as confirmation.
Only PTT, EMG and CALL/
again CALL/
for 5 seconds approx.
remain active. To disable this function, keep pressed
Channel selection
Press the MENU button. The number of the channel will start flashing on the display.
Press the scroll buttons ▼▲ till you select the desired channel. Press the PTT button
to confirm, or wait for 5 seconds.
According to the version you bought, you can choose amongst the following
channels:
Dual band version: › PMR446 from P1 to P8 and from 9p to 24p (pre-set) / LPD
from 1 to 69.
E version › (PMR446 only): from P1 to P8 and from 9p to 24p (pre-set)
! Channel P8 has been set at factory for the “Emergency” function; we suggest
that you do not use it for general communications!
MON (Monitor) function / Squelch
The Monitor button is for temporarily excluding (opening) the squelch, in order to listen
to signals that are too weak to keep the squelch permanently opened.
To activate the monitor function, keep pressed for about 2 seconds both ▲▼ at the
same time. Follow the same procedure to deactivate the function, or switch off and
on the radio.
! When MON is active, you will probably hear a constant background noise.
! You can activate the Monitor feature only if the “Emergency” function is
disabled.
Scanning all the channels
Midland G8 can automatiCALLy search for signals throughout the bands by scanning
the channels in rapid sequence. This function is useful to find out any active channel.
When a signal is detected, the scanning pauses on that channel for 5 seconds.
Press ▼ for 2 seconds: the scanning will start. To stop it, push PTT: the Midland G8
will go back to the channel from which the scanning originally started.
! You can activate the scanning feature only if the “Emergency” function is
disabled.
“MENU” key
The following features can be selected by using the “MENU” button:
Channel selection ›
CTCSS tone setting ›
DCS tone setting ›
High/low power selection (only in the PMR446 band) ›
VOX ›
Vibra › CALL function
CALL › melodies
Roger Beep ›
Keypad Beep ›
Emergency channel ›
Dual Watch function ›
Out of Range ›
12
CTCSS/DCS tone setting
CTCSS and DCS tones are similar to access codes and enable the radio to
communicate only with the users that are tuned on the same channel and have set the
same code. For each channel, you can set up to 38 CTCSS and 104 DCS tones.
These tones can be set on the following channels:
Dual band version: › only on the 8 main PMR446 channels (from P1 to P8) and on
the 69 LPD channels.
E version › (PMR446 only): only on the 8 main PMR446 channels (from P1 to P8)
For both, the pre-set channels from 9p to 24p cannot be modified.
Activating the CTCSS tones:
Turn on the unit. ›
Select the desired channel by pushing the › MENU button and the ▲▼ channels.
Press the › MENU button till the display shows CTC and the CTCSS tone blinks on
the right (“of”= no code – default condition).
Select the desired CTCSS tone by pushing ▲▼. ›
To confirm the setting, push › PTT or wait for 5 seconds.
Deactivating the CTCSS tones:
If you don’t want to use the CTCSS tones, follow these steps:
Select the desired channel ›
Press the › MENU key till the display shows the CTCSS tone blinking on the left;
Select “ › of” by means of ▲▼.
Activating the DCS codes:
Turn on the unit. ›
Select the desired channel by pressing › MENU and ▲▼ keys.
Push the › MENU button again till the display shows DCS and the tone code blinks
on the right (“of”=no code – default condition).
Select the desired DCS code by pushing ▲▼. ›
To confirm the setting, press the › PTT or wait for 5 seconds.
! Channel P8 with DCS tone 50 (P850) has been set at factory for the
“Emergency” function; do not use it for general communications!!
Page 13

Deactivating the DCS codes:
Select the desired channel. ›
Press the › MENU key till the display shows the channel in use and the DCS code
blinks on the right.
Select “ › of” by pushing ▲▼.
Hi/low power selection (only in PMR446 band)
To select the power level, press the MENU button till the display shows Pr. Use ▲▼
to select L (low power) or H (high power). To confirm your selection, push PTT or wait
for 5 seconds.
When the batteries are fully charged, the high power is 500 mW (ERP), while the low
is 10mW (ERP).
If your radio has to operate within a short range, you can select the low power and
therefore extend the battery life.
VOX function
Midland G8 enables hands free conversations through the VOX function: just speak
in the direction of the microphone and the communication will be automatiCALLy
activated.
The VOX sensitivity can be adjusted in 3 different levels. You can enable the VOX
function with or without accessories.
The fourth level activated is the Vox TalkBack: if one radio is continuously transmitting
in VOX, the VOX TB will automatiCALLy stop the transmission after 20 seconds to
allow the transmission to the other users as well.
To activate the VOX function press the MENU button till VOX appears on the display.
Use ▲▼ to select the sensitivity levels:
Of: Off; ›
1: High ›
2: Middle ›
3: Low ›
4: Talk Back › (with high sensitivity)
To confirm your selection, press PTT or wait for 5 seconds.
To disable the VOX function, follow the procedure here above indicated and select
oF.
Vibra-CALL function
Midland G8 is equipped with the “Vibra-CALL” feature, which provides a silent alert
for incoming CALLs.
To activate this feature, press the MENU button until the display shows
▼▲ buttons to disable or enable this feature (on: enables, oF:disables);
Push PTT [11] to confirm or wait for 5 seconds.
; use the
CALL feature
Midland G8 can send 5 different CALL tones. To send this audio signal to other users,
press the CALL/
key.
To select the CALL tones:
Press MENU, until the display shows “CA” and the active tone code.
By pushing ▲▼ you will hear the 5 pre-set melodies.
Confirm by pressing PTT or wait for 5 seconds.
ROGER BEEP (End transmission tone)
When the PTT button is released, the radio will beep to confirm to other users that your
transmission has finished.
In the Midland G8 this function is factory disabled.
To activate it:
Press the MENU button until the display shows “rb of”; using the scroll buttons ▼▲
select “on” and “rb on” will be displayed; to confirm the roger beep activation, press
PTT or wait for 5 seconds.
Keypad Beep
Everytime a button is pressed, you will hear a beep.
To disable the beeps, follow this procedure:
Press › MENU, till the display shows “bP on”.
Push ▲▼ till “ › bP of” is displayed.
Confirm your selection by pushing › PTT or wait for 5 seconds.
In this way, all beeps and tones are disabled.
To enable the keypad beep, repeat this procedure and select “bP on”
Emergency CALL function
The Midland G8 dedicates a channel to the Emergency CALLs: all the G8 operating
within your range, even if tuned on different channels, can receive/transmit Emergency
messages on that channel.
If you keep pressed the EMG button, the communications automatiCALLy switch to
the emergency channel (“EC” on the display). An audio signal will be sent and all
the G8 operating within the range will automatiCALLy go to the Emergency channel
(“EC”).
If you have disabled this function, you won’t receive/transmit any Emergency CALL.
! When the radio is operating on the Emergency channel (EC displayed), all the
buttons except PTT and CALL are disabled.
The G8 will return to the channel in use after one minute from the last transmission.
To return immediately, push EMG. Now you can use all the MENU functions.
Activating / Deactiving the Emergency feature
When you switch on the unit, the Emergency function is activated, but you can disable
and enable it again:
Press MENU till the display shows EC on.
Select EC of by using ▲▼ . Confirm your selection by pushing PTT or wait for 5
seconds.
! When the Emergency function is activated (EMG blinking on the display)
the following functions cannot be used: Scan, Monitor, Dual Watch, Out of
13
Page 14

Range.
Changing the emergency channel
The emergency channel originally preset is P8 DCS 50; but you can change it
according to your needs.
! Important: be sure that the Emergency function is active! (EMG blinking). If
you decide to change the channel dedicated to the Emergency function, do
not forget to make the same change to all the radios!
Press the MENU button until the display shows EC on.
Push MENU again (of displayed) and select the desired channel by means of ▲▼. To
confirm press PTT or wait for 5 seconds.
! Important: be sure that the Emergency function is active! (EMG blinking).
If you decide to change the channel dedicated to the Emergency function, do
not forget to make the same change to all the radios!
To set again the original Emergency channel (P8 DCS 50)
Press the MENU button until the display shows EC on.
Push MENU again and select of
To confirm press PTT or wait for 5 seconds.
! If you dedicate any of the standard channels to the Emergency function,
remember to use it only for this purpose, otherwise you will cause
interferences.
again.
! This function can be activated only if the “Emergency” feature is disabled.
Automatic Out-of-Range
By setting this mode a pair of G8 is transmitting every 30 seconds a data control code.
As soon as the contact between both units is getting lost and one radio doesn’t receive
this data control code twice consecutively, the icon OUT starts flashing in the display
and you will hear a beep tone.
! This function can be activated only if the “Emergency” feature is disabled.
Activating – Deactivating
Press MENU till the display shows “OUT” and “Or of”, select “Or on” (activated) with
the ▲▼ buttons.
Switch off both radios.
Turn them on at the same time.
To disable this function, push MENU till “OUT” and “Or on” are displayed; select “Or
of” (disabled) with the ▲▼ buttons.
Confirm your selection by pushing PTT or wait for 5 seconds.
Display illumination
If there is insufficient light to read the display, press briefly EMG and the display
illumination will activate for about 5 seconds. Every time the MENU is pressed, the
display will automatiCALLy light up.
Manual Out of range function
This function allows you to know if there are any radios within your range.
By pushing EMG twice, you will send a request of acknowledge to the other G8
operating within your range and tuned on the same channel.
If any radio replies, it means that it’s within your range and you will receive an audio
tone for confirmation.
! This function can be used only if the “Automatic Out of Range” feature is not
active.
DUAL WATCH
The Dual Watch allows you to monitor constantly two channels of your choice at the
same time.
Enabling - Disabling
Press the MENU button until the display shows DW of.
Select the second channel to monitor by pushing ▲▼.
To confirm your selection, press PTT or wait for 5 seconds. The display will alternately
show the channel in use and the second channel to monitor.
To stop the function, simply press MENU.
When the transceiver detects a transmission on one of the two channels, the Dual
Watch temporarily pauses, remains tuned for 5 seconds on the corresponding channel,
giving the user a chance to respond to a CALL. After this pause, the Dual Watch starts
14
Power save
The battery power saving feature enables a reduction in the consumption of up to
50%; power saving comes on automatiCALLy when the transceiver does not receive
any signal for more than 7 seconds. When the batteries are discharged, the icon
appears on the display: replace the batteries or recharge the battery pack.
! The power save is active only if the Emergency function is disabled.
Battery recharge
The supplied battery pack is NiMH type 4.8V 800mAh and must be recharged only
when it’s inserted in the radio; it takes 8 hours to fully recharge.
To recharge the battery pack:
Connect the socket of the wall adaptor to a mains power socket and insert the jack of
the wall adaptor into the desktop charger plug.
Place your transceiver into the cradle of the desktop charger. The red led of the
charger will light up.
When charging is complete take the transceiver out of the cradle and detach the
socket of the wall adaptor from the mains.
! Do not overcharge the batteries! When these are fully charged the charging
process does not stop automatiCALLy. Do not forget therefore, to remove the
transceiver from the charger as soon as the batteries are charged, otherwise
the radio and batteries may be damaged.
Page 15

! Do not try to charge alkaline batteries or non rechargeable batteries. Make
sure that when you charge the radio, only rechargeable NI-MH batteries or
the supplied battery pack should be contained in the battery compartment!
Alkaline batteries are not rechargeable! Batteries which are not suitable to be
recharged may leak, explode or even burn and cause damage!
! Using a different battery charger other than the one specified can cause
damage to your device or may even cause explosions and personal injuries.
! Do not throw batteries into fire or place them near heat as this may cause
explosions or personal injuries. Dispose of the batteries according to the
procedures set out by local regulations.
! Do not mix old and new batteries or batteries of different types or batteries
which have been used in different manners.
15
Page 16

16
Page 17

Midland G8
BENUTZERHANDBUCH
Vielen Dank, dass Sie sich für Midland entschieden haben! Das tragbare Midland
G8 Funkgerät kann in fast allen europäischen Ländern kostenfrei eingesetzt werden.
Weitere Informationen finden Sie auf der Karte "Nutzungseinschränkungen"
Das Midland G8 ist eine Kombination neuester Funktechnologie zusammen mit einem
stabilen, mechanischen Gehäuse und ist die ideale und effektive Lösung für Profis, die
in Kontakt mit ihren Kollegen bleiben müssen (Baustellen, Gebäude, Hotel, Messen,
Show-Business) oder für Freizeitbenutzer, die mit Freunden und der Familie in Kontakt
bleiben wollen. Sein robustes Gehäuse, die Bedienerfreundlichkeit und das einfache
Design machen es ideal für die Benutzung in allen Bereichen.
Midland G8 ist in zwei Ausführungen verfügbar:
Dual Band (PMR446/LPD) ›
E Version (nur PMR446) ›
Dieses Handbuch bezieht sich auf beide Modelle; die Unterschiede zwischen beiden
Versionen sind hervorgehoben.
Inhalt
N° 1 Midland G8 ›
N° 1 Einzel-Tischladegerät ›
N° 1 Netzadapter ›
N° 1 Akku ›
N° 1 Gürtelklemme ›
Reichweite
Die maximale Reichweite ist abhängig von der Geländeform und wird im freien
Gelände erreicht.
Die maximale Reichweite kann durch Umgebungsfaktoren, wie Behinderung durch
Bäume, Gebäude oder andere Blockierungen eingeschränkt sein. Innerhalb eines
Autos oder einer Metallkonstruktion, kann der Empfang reduziert sein. Die Reichweite
in der Stadt, zwischen Gebäuden oder anderen Hindernissen, ist ca.1 bis 2 km. Die
maximale Reichweite im Freien mit Hindernissen, wie Bäume, Blätter oder Häuser ist
ca. 4-6 km. Im freien Gelände ohne Hindernisse und Sichtweite, z.B.in Bergen, kann
der Empfang mehr als 12 km
Batterien und Batteriefach
Das Funkgerät arbeitet mit den mitgelieferten Akkus oder 4 AAA Alkaline/aufladbaren
Batterien. Öffnen des Batteriefachs: lösen Sie den Batteriehalter am unteren Teil der
Rückseite des Funkgerätes und öffnen Sie die Abdeckung durch leichtes Schieben.
Setzen Sie, unter Berücksichtigung der richtigen Polarität, die Batterie ein und
schließen die Abdeckung.
Achtung: der mitgelieferte Akku muss vor Gebrauch geladen werden.
Warnhinweise
BATTERIEN - Halten Sie sich streng an alle Warnhinweise für Batterien im Kapitel ›
"Batterie aufladen".
DAS FUNKGERÄT DARF AUF KEINEN FALL GEÖFFNET WERDEN › ! Die präzise
Mechanik und Elektronik des Funkgerätes erfordern Erfahrung und spezielle Geräte. Aus diesem Grund und da es bereits auf maximale Leistung kalibriert ist, darf
das Funkgerät nicht neu eingestellt werden. Bei nicht genehmigtem Öffnen des
Funkgerätes erlischt die Garantie.
Kein Reinigungsmittel, Alkohol, Lösungsmittel oder Schleifmittel zur Reinigung ver- ›
wenden. Benutzen Sie nur ein weiches sauberes Tuch. Bei starker Verschmutzung
des Funkgerätes befeuchten Sie das Tuch mit Wasser und neutraler Seife.
Eigenschaften
Neue Eigenschaft "Notruf" ›
Midland G8 enthält eine neue und wichtige Eigenschaft: ein Kanal, der für › Notfälle
zugewiesen ist. Ein Funkverkehr kommt gewöhnlich zwischen zwei oder mehreren
Personen zustande, die denselben Kanal eingestellt haben: es ist nicht möglich,
zwischen verschiedenen Kanälen zu empfangen oder senden. Mit der "Notruf"Funktion können Sie auch den Notrufkanal kontrollieren. Alle Benutzer eines Midland G8 können auf dem eingestellten Kanal kommunizieren und gleichzeitig Notruf-Meldungen auf dem zugewiesenen Kanal empfangen/senden. Durch drücken
der EMG Taste für 3 Sekunden wird ein Notruf an alle, in Reichweite befindlichen
G8 Geräte, gesendet: sie werden automatisch auf den "EC"-Kanal (Notrufkanal)
eingestellt.
Neue Eigenschaft "Manuelle Reichweitenabfrage": durch zweimaliges Drücken der ›
EMG-Taste erhalten Sie eine Bestätigung der in Reichweite befindlichen Geräte.
Neue Eigenschaft "Vox Rückruf": wenn ein Funkgerät ständig im VOX Modus sen- ›
det, wird der Vox Rückruf automatisch nach 20 Sekunden gestoppt, um anderen
Benutzern eine Übertragung zu ermöglichen.
17
Page 18

Leistung: 500mW (PMR446); 10mW (LPD) ›
Betriebstemperatur: Von -20° bis +55°C ›
38 CTCSS und 104 DCS Kodierungstöne ›
Spritzwassergeschützt: IPX5 ›
Notruf ›
Reichweitenkontrolle ›
VOX einstellbar in 3 Stufen mit "Rückruf" ›
INTERCOM ›
Vibrationsalarm ›
Tastatursperre ›
Autom. Stromsparfunktion: autom. ökonomischer Stromkreis ›
Anzeige bei schwacher Batterie ›
Dual Watch (2-Kanalüberwachung) ›
CALL › (Anrufsignalisierung) mit 5 auswählbaren Melodien
SCAN (Suchlauf) ›
Monitor ›
Ausser Reichweite ›
Roger Piepton ›
Hohe/Niedrige Leistung ›
LCD Anzeige mit Hintergrundbeleuchtung ›
Stromversorgung: NiMH Akku 800mAh 4,8V oder 4 AAA Batterien ›
2-poliger Anschlussstecker ›
Gewicht: 112gr (ohne Batterien) ›
Abmessungen: 59x98x32mm ›
Akkuleistung (im PMR446 Band): mehr als 12 Stunden mit 800mAh Akku ›
Versionen:
G8 Dual Band (PMR446/LPD) ›
24 PMR446 Kanäle(8+16 voreingestellt)/69 LPD Kanäle
G8E (nur PMR446) ›
24 PMR446 Kanäle(8+16 voreingestellt)
BESCHREIBUNG DER BEDIENUNGEN
UND FUNKTIONEN
Anzeige
Ihr Midland G8 informiert Sie
über das Liquid Crystal Display
(LCD) ständig über den aktuellen
Betriebsstatus. Im Folgenden
werden die Symbole mit ihren
entsprechenden Parameter für den
Betriebsstatus des Gerätes erklärt:
1. KANAL Diese zwei grossen Ziffern zeigen den
2. VOX VOX Funktion aktiviert
3.
4. EMG Notruffunktion ativiert
5. DW Dual Watch aktiviert
6.
7.
8. OUT Erscheint, wenn die autom. Reichweitenkontrolle
9. RX Empfangsmodus
10. TX Zeigt eine Übermittlung an (PTT gedrückt);
11. H(Hoch) / L(Niedrig) Hohe oder niedrige Leistung ausgewählt.
12. CTCSS/DCS Zeigt den ausgewählten Typ der Subtöne an.
13. CTCSS/DCS Diese drei kleinen Ziffern zeigen den ausgewählten
14. ROGER Roger Piepton aktiviert.
Dieses Symbol erscheint bei aktivierter
Zeigt den Batteriestatus an
Vibrationsalarm aktiviert
3
2
5
1
ausgewählten Kanal an
Tastensperre
den Kontakt zu anderen Funkgeräten verliert.
Code der CTCSS/DCS Töne an (1-38 / 1-104)
4687
11
9
10
12
13
14
18
Funkgerät
In dieser Abbildung sind die einzelnen Teile des Gerätes dargestellt:
15. Eingebauter Lautsprecher Hier ist der Lautsprecher eingebaut.
16. MENÜ Taste Drücken Sie dieser Taste, um das MENÜ des
Funkgerätes aufzurufen.
17. CALL/
18. PTT (push to talk) Drücken Sie diese Taste, um zu senden.
Taste Eine Anrufsignalisierung auf dem ausgewählten
Kanal senden. Wenn Sie diese Taste ca. 5
Sekunden drücken, wird die Tastensperre
aktiviert.
Page 19
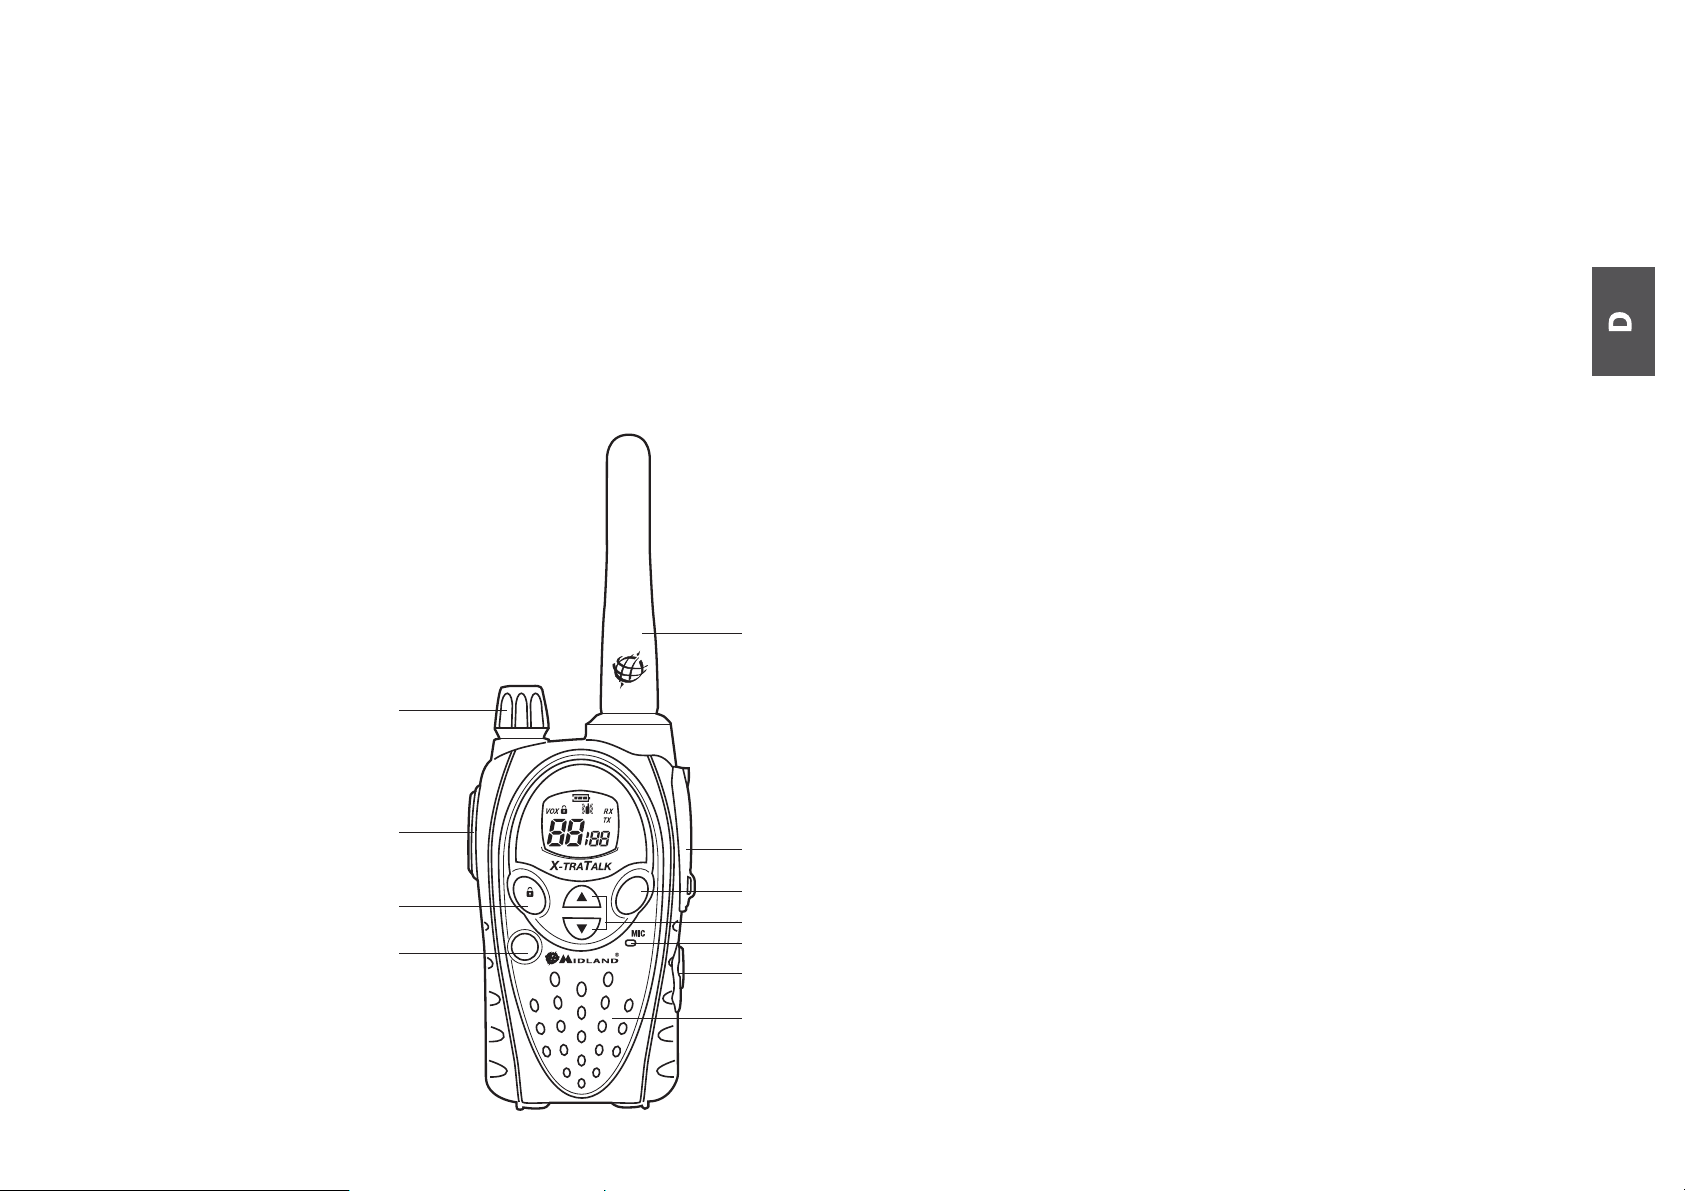
19. LAUTSTÄRKE Drehknopf An-/Ausschalter des Gerätes und Einstellen der
LAUTSTÄRKE für den Empfang.
20. ANTENNE Empfängt und sendet Funksignale.
21. Zubehöranschluss (unter Schutzabdeckung) Zum Anschluss
externer Audiogeräte, z.B. Mikrofon, Ladegerät
usw. (2-polig)
22. EMG-Taste Zum aktivieren des Notrufs und der manuellen
Reichweitenkontrolle.
23. ▲▼ Tasten Ändern der Einstellungen im MENÜ
24. Eingebautes Mikrofon Hier ist das Mikrofon eingebaut.
25. Intercom Stecker Zum Anschluss von passendem Zubehör für
Intercom-Gespräche, z.B. Headset/Mikrofon.
20
19
An-/Ausschalten
Zum Anschalten des Funkgerätes drehen Sie den LAUTSTÄRKE-Drehknopf im
Uhrzeigersinn bis es höbar klickt.
Um das Funkgerät auszuschalten, Drehknopf im Gegenuhrzeigersinn drehen.
PMR466 oder LDP Band auswählen (nur in der Dual-Band
Ausführung)
Midland G8 (Dual-Band) ist werksseitig auf das PMR466 Band voreingestellt
Zum Wechsel in das LPD Band drücken Sie die MENÜ Taste bis das LCD den Kanal
‘1’ zeigt.
Um in das PMR446 Band zurückzukehren drücken Sie die MENÜ-Taste bis das LCD
den Kanal ‘P1’ zeigt.
! Dieses Vorgehen deaktiviert die “EMG” Funktion; aktivieren Sie deshalb nach
dem Wechsel des Frequenzbandes die Notruffunktion wieder (siehe Abschnitt
"Notruffunktion").
Auswahl der Kanäle
Drücken Sie die MENÜ-Taste. Die Nummer des Kanals auf dem Display fängt an zu
blinken.
Drücken Sie die Taste ▼▲ bis der gewünschte Kanal erscheint. Zur Bestätigung
drücken Sie die PTT-Taste, oder warten 5 Sekunden.
Je nach gekaufter Ausführung können Sie zwischen folgenden Kanälen wählen:
Dual-Band Ausführung: PMR446 von P1 bis P8 und von 9p bis 24p (voreingestellt) ›
/ LPD von 1 bis 69.
E Ausführung(nur PMR446): von P1 bis P8 und von 9p bis 24p (voreingestellt) ›
! Kanal P8 wurde Werksseitig auf die Notruffunktion voreingestellt; wir
empfehlen Ihnen diesen Kanal nicht für allgemeine Kommunikation zu
nutzen!
18
17
16
MENU
Anzeigen der Kanal/Subtöne
Um den PMR446 Kanal und die benutzten Subtöne der voreingestellten Kanäle
EMG OUT
DW
H L
DCS CTC
ROGER
21
anzuzeigen, wählen Sie den gewünschten Kanal (von 9p bis 24p) und pressen ▼ für
3 Sekunden.
Übermittlung und Empfang
CALL
EMG
22
23
24
25
15
Zum Senden muss die PTT Taste fest gedrückt werden. Warten Sie einen Moment und
sprechen dann mit normaler Stimme in Richtung Mikrofon mit einem Abstand von ca.
5 cm vom Gerät. Das Gerätedisplay zeigt TX an.
Wenn Sie fertig sind lassen Sie die PTT-Taste.
Wenn das Gerät im Empfangsmodus ist (PTT nicht gedrückt) können Gespräche
automatisch empfangen werden. RX wird angezeigt.
Lautstärkeregelung
Drehen Sie den LAUTSTÄRKE-Drehknopf bis zum gewünschten Lautstärkepegel.
19
Page 20

“CALL”
Beim Drücken der CALL Taste senden Sie ein Tonsignal an die Benutzer des gleichen
Kanals. Sie können aus verschiedenen Ruftönen auswählen.
"Notruf"
Wenn die Notruffunktion aktiviert ist (EMG blinkt auf dem Display) können Sie einen
Notruf an andere G8 innerhalb Ihrer Reichweite senden, durch drücken von EMG für
3 Sekunden .
Die Funktion Notruffunktion ist standardmäßig aktiviert.
Tastatursperre
Drücken Sie CALL/ für ca. 5 Sekunden und erscheint als Bestätigung auf dem
Display. Nur PTT, EMG und CALL/
drücken Sie wieder CALL/
für ca. 5 Sekunden.
bleibt aktiv. Um diese Funktion zu deaktivieren
MON (Monitor) Funktion/ Squelch (Rauschsperre)
Die Monitortaste deaktiviert (öffnet) vorübergehend die Rauschsperre, damit auch
schwache Signale empfangen werden können.
Um die Monitorfunktion zu aktivieren müssen Sie die Tasten ▲▼ gleichzeitig für 2
Sekunden drücken. Mit der gleiche Vorgehensweise oder durch aus- und einschalten
des Gerätes deaktivieren Sie diese Funktion.
! Wenn MON aktiv ist hören Sie ständig ein Hintergrundrauschen.
! Sie können die Monitorfunktion nur aktivieren, wenn die "Notruffunktion"
deaktiviert ist.
Alle Kanäle absuchen
Midland G8 kann durch scannen der Kanäle in schneller Folge automatisch nach
Signalen in den Bändern suchen. Mit dieser Funktion können Sie nach aktiven
Kanälen suchen.
Wenn ein Signal gefunden wird stoppt der Suchlauf auf diesem Kanal für 5
Sekunden.
Drücken Sie ▼ für 2 Sekunden: der Suchlauf startet. Drücken Sie PTT um den
Suchlauf zu stoppen: das Midland G8 geht zu dem Kanal, bei dem der Suchlauf
gestartet wurde.
! Sie können den Suchlauf nur aktivieren, wenn die "Notruffunktion" deaktiviert
ist.
"MENÜ" Taste
Folgende Eigenschaften können über die "MENÜ" Taste ausgewählt werden:
Auswahl der Kanäle ›
CTCSS Toneinstellung ›
DCS Toneinstellung ›
Hohe/niedrige Leistungsauswahl (nur im PMR446 Band) ›
VOX ›
20
Vibrationsalarm ›
Rufmelodien ›
Roger Piepton ›
Tastatur-Piepton ›
Notrufkanal ›
Dual Watch (2-Kanalüberwachung) ›
Reichweitenkontrolle ›
Auswahl der Kanäle
Drücken Sie die MENÜ-Taste. Die Nummer des Kanals auf dem Display fängt an zu
blinken.
Drücken Sie die Taste ▼▲ bis der gewünschte Kanal erscheint. Zur Bestätigung
drücken Sie die PTT-Taste, oder warten 5 Sekunden.
Je nach gekaufter Ausführung können Sie zwischen folgenden Kanälen wählen:
Dual-Band Ausführung: PMR446 von P1 bis P8 und von 9p bis 24p (voreingestellt) ›
/ LPD von 1 bis 69.
E Ausführung(nur PMR446): von P1 bis P8 und von 9p bis 24p (voreingestellt) ›
! Kanal P8 wurde Werksseitig auf die Notruffunktion voreingestellt; wir empfehlen
Ihnen diesen Kanal nicht für allgemeine Kommunikation zu nutzen!
CTCSS/DCS Toneinstellung
CTCSS und DCS Töne sind ähnlich den Zugangscodes und ermöglichen
Funkkommunikation nur mit Benutzer, die den gleichen Kanal und Code eingestellt
haben. Für jeden Kanal können Sie bis zu 38 CTCSS und 104 DCS Töne einstellen.
Diese Töne können Sie auf folgende Kanäle einstellen:
Dual-Band Ausführung: nur auf den 8 PMR446 Hauptkanälen (von P1 bis P8) und ›
den 69 LPD Kanälen.
E Ausführung(nur PMR446): nur auf den 8 PMR446 Hauptkanälen (von P1 bis P8) ›
In beiden Fällen können die voreingestellten Kanäle 9p bis 24p nicht verändert
werden.
CTCSS-Töne aktivieren:
Gerät einschalten. ›
Gewünschten Kanal auswählen durch drücken der MENÜ-Taste und der ▲▼ Ta- ›
sten.
Drücken Sie die MENÜ-Taste bis das Display CTC anzeigt und der CTCSS Ton ›
rechts blinkt ("of"= kein Code - Standardzustand).
Durch drücken von ▲▼ den gewünschten CTCSS-Ton auswählen. ›
Zur Bestätigung drücken Sie › PTT oder warten 5 Sekunden.-
CTCSS-Töne deaktivieren:
So deaktivieren Sie CTCSS-Töne:
Wählen Sie den gewünschten Kanal ›
Drücken Sie die MENÜ-Taste bis auf dem Display auf der linken Seite CTCSS-Ton ›
blinkt;
Wählen Sie "of" durch die Tasten ▲▼. ›
Page 21

DCS-Codes aktivieren:
Gerät einschalten. ›
Gewünschten Kanal auswählen durch drücken der MENÜ-Taste und der ▲▼ Ta- ›
sten.
Drücken Sie die MENÜ-Taste bis das Display DCS anzeigt und der Ton-Code rechts ›
blinkt ("of"= kein Code - Standardzustand).
Durch drücken von ▲▼ den gewünschten DCS-Code auswählen. ›
Zur Bestätigung der Einstellung drücken Sie › PTT oder warten 5 Sekunden.
! Werksseitig ist der Kanal P8 mit DCS-Ton 50 (P850) für die Notruffunktion
eingestellt; benutzen Sie diesen nicht zur allgemeinen Kommunikation!!
Weise und wählen Sie oF.
Vibrationsalarm
Midland G8 ist mit "Vibrationsalarm" ausgestattet und ermöglicht einen stillen Alarm
für eingehende Rufe.
Zum Aktivieren dieser Funktion drücken Sie die MENÜ-Taste, bis auf dem Display
erscheint; mit den ▲▼-Tasten können Sie diese Funktion aktivieren oder deaktivieren
(on: aktiv, oF:inaktiv);
Zur Bestätigung drücken Sie PTT [11] oder warten 5 Sekunden.
DCS-Codes deaktivieren:
Wählen Sie den gewünschten Kanal ›
Drücken Sie die MENÜ-Taste bis auf dem Display auf der rechten Seite DCS-Code ›
blinkt.
Wählen Sie "Aus" durch die Tasten ▲▼. ›
Hohe/niedrige Leistungsauswahl (nur im PMR446 Band)
Um den Leistungspegel auszuwählen, drücken Sie die MENÜ-Taste, bis auf dem
Display Pr erscheint. Mit den Tasten ▲▼ wählen Sie L (niedrige Leistung) oder H
(hohe Leistung).Zur Bestätigung drücken Sie PTT oder warten 5 Sekunden.
Bei einer vollständig geladenen Batterie ist die hohe Leistung 500 mW (ERP) und bei
niedriger Leistung 10 mW (ERP).
Wenn Sie Ihr Funkgerät für kurze Reichweite verwenden, können Sie niedrige Leistung
wählen und somit Ihre Batterie schonen.
VOX-Funktion
Midland G8 bietet über die VOX-Funktion eine Freisprechmöglichkeit: Sie müssen
nur in Richtung des Mikrofons sprechen und die Kommunikation wird automatisch
gestartet.
Die VOX-Empfindlichkeit kann in 3 Stufen eingestellt werden. Die VOX-Funktion
können Sie unabhängig vom Zubehör aktivieren.
Die vierte aktivierte Stufe ist der Vox Rückruf: wenn ein Funkgerät ständig im VOX
Modus sendet, wird der VOX TB (Rückruf) automatisch nach 20 Sekunden gestoppt,
um anderen Benutzern eine Übertragung zu ermöglichen.
Um die VOX-Funktion auszuwählen, drücken Sie die MENÜ-Taste, bis auf dem
Display VOX erscheint.
Benutzen Sie ▲▼, um die Empfindlichkeitsstufe einzustellen:
Of: Aus; ›
1: Hoch ›
2: Mittel ›
3: Niedrig ›
4: Rückruf (mit hoher Empfindlichkeit) ›
Zur Bestätigung drücken Sie PTT oder warten 5 Sekunden.
Um die VOX-Funktion auszuschalten verfahren Sie nach der oben beschriebenen
CALL-Funktion
Midland G8 kann 5 verschiedene Ruftöne senden. Um dieses Signal an andere
Benutzer zu senden drücken Sie die CALL/
CALL-Töne auswählen:
Drücken Sie die MENÜ-Taste, bis auf dem Display “CA” und der aktive Tone-Code
angezeigt wird.
Durch Drücken von ▲▼ können Sie die 5 voreingestellten Melodien anhören.
Zur Bestätigung drücken Sie PTT oder warten 5 Sekunden.
-Taste.
ROGER Piepton (Ton für Übertragungsende)
Wenn die PTT-Taste losgelassen wird sendet das Funkgerät dem Gesprächspartner
ein Bestätigungs-Piepton, der anzeigt, dass die Übertragung beendet ist.
Beim Midland G8 ist diese Funktion werksseitig deaktiviert.
Diese Funktion aktivieren:
Drücken Sie die MENÜ-Taste, bis auf dem Display “rb of” erscheint; wählen Sie mit
den Tasten ▼▲ “on” und “rb on” wird angezeigt; zum Bestätigen der Aktivierung des
Roger Pieptons drücken Sie PTT oder warten Sie 5 Sekunden.
Tastatur-Piepton
Bei jedem Tastendruck ertönt ein Piepton.
Deaktivieren des Pieptons:
Drücken Sie die MENÜ-Taste, bis auf dem Display “bP on” erscheint. ›
Drücken Sie ▲▼, bis "bP of" angezeigt wird. ›
Zur Bestätigung drücken Sie › PTT oder warten 5 Sekunden.
Dadurch werden alle Pieptöne deaktiviert.
Zum aktivieren der Pieptöne wiederholen diesen Vorgang und wählen "bP on"
Notruf
Das Midland G8 bestimmt einen Kanal für Notrufe: alle G8, die in Reichweite in
Betrieb sind, können Notrufe empfangen/senden; selbst wenn sie auf unterschiedliche
Kanäle eingestellt sind.
Wenn Sie die EMG-Taste gedrückt halten wechselt die Kommunikation automatisch in
den Notrufkanal ("EC" auf dem Display) Ein Audiosignal wird gesendet und alle G8 in
Reichweite wechseln automatisch auf den Notrufkanal ("EC").
21
Page 22

Wenn Sie diese Funktion deaktiviert haben, können Sie keine Notrufe empfangen/
senden.
! Wenn das Funkgerät auf dem Notrufkanal arbeitet (EC ist angezeigt), sind alle
Tasten außer PTT und CALL deaktiviert.
Das G8 wechselt eine Minute nach der letzten Übermittlung zurück auf den benutzten
Kanal.
Um sofort zurückzukehren, drücken Sie EMG. Jetzt können Sie alle MENÜ-Funktionen
nutzen.
Aktivieren/deaktivieren der Notruffunktion
Beim Anschalten des Gerätes ist die Notruffunktion aktiviert, kann aber deaktiviert und
wieder aktiviert werden:
Drücken Sie die MENÜ-Taste, bis auf dem Display EC on
Wählen Sie "EC" mit den Tasten ▲▼. Zur Bestätigung drücken Sie PTT oder warten
5 Sekunden.
! Wenn die Notruffunktion aktiviert ist (EMG blinkt auf dem Display) können
folgende Funktionen nicht benutzt werden: Suchlauf, Monitor, Dual Watch,
Reichweitenkontrolle.
Notrufkanal wechseln
Der Notrufkanal ist Standardmässig P8 DCS 50; Sie können ihn aber nach Ihren
Bedürfnissen ändern.
! Wichtig: vergewissern Sie sich, dass die Notruffunktion aktiv ist! (EMG blinkt).
Sollten Sie den zugewiesenen Kanal für die Notruffunktion wechseln, müssen
Sie die gleiche Änderung bei allen Funkgeräten vornehmen!
Drücken Sie die MENÜ-Taste, bis auf dem Display “EC on” erscheint.
Drücken Sie erneut MENÜ (of wird angezeigt) und wählen Sie mit ▲▼ den
gewünschten Kanal. Zur Bestätigung drücken Sie PTT oder warten 5 Sekunden.
! Wichtig: vergewissern Sie sich, dass die Notruffunktion aktiv ist! (EMG
blinkt).
Sollten Sie den zugewiesenen Kanal für die Notruffunktion wechseln, müssen
Sie die gleiche Änderung bei allen Funkgeräten vornehmen!
Den ursprünglichen Notrufkanal (P8 DCS 50) einstellen
Drücken Sie die MENÜ-Taste, bis auf dem Display “EC on” erscheint.
Drücken Sie erneut MENÜ und wählen "of"
Zur Bestätigung drücken Sie PTT oder warten 5 Sekunden.
! Wenn Sie einen der Standardkanäle für die Notruffunktion zuweisen, dürfen
Sie ihn nur für diesen Zweck benutzen, da dies sonst zu Störungen führt.
Kanal geschalten.
Wenn ein Funkgerät antwortet ist es in Ihrer Reichweite und Sie bekommen einen
Bestätigungston.
! Diese Funktion kann nur benutzt werden, wenn die "autom.
Reichweitenkontrolle" nicht aktiv ist.
Dual Watch (2-Kanalüberwachung)
Mit der Dual Watch Funktion können Sie ständig zwei Kanäle Ihrer Wahl zur selben
Zeit überwachen.
Aktivieren - Deaktivieren
Drücken Sie die MENÜ-Taste, bis auf dem Display “DW of” erscheint.
Wählen Sie den zweiten Kanal zur Überwachung durch Drücken von ▲▼.
Zur Bestätigung drücken Sie PTT oder warten 5 Sekunden. Auf dem Display wird
wechselweise der benutzte Kanal und der überwachte Kanal angezeigt.
Drücken Sie zum Beenden dieser Funktion Menü.
Wenn das Funkgerät eine Übermittlung auf einem der beiden Kanäle erkennt, wird
Dual Watch angehalten und bleibt 5 Sekunden auf dem entsprechenden Kanal, damit
der Benutzer auf den Ruf antworten kann. Nach dieser Pause startet Dual Watch
wieder.
! Sie können diese Funktion nur aktivieren, wenn die "Notruffunktion"
deaktiviert ist.
Automatische Reichweitenkontrolle
Wenn dieser Modus eingestellt ist, senden zwei G8 Geräte alle 30 Sekunden einen
Datenkontrollcode. Sobald die Verbindung zwischen den Geräten abbricht und ein
Funkgerät diesen Datenkontrollcode zweimal hintereinander nicht empfängt, fängt das
Symbol OUT auf dem Display an zu blinken und Sie hören ein Piepton.
! Sie können diese Funktion nur aktivieren, wenn die "Notruffunktion"
deaktiviert ist.
Aktivieren – Deaktivieren
Drücken Sie die MENU-Taste, bis auf dem Display “OUT” und “Or of”angezeigt wird;
wählen Sie “Or on” (aktiviert) mit den ▲▼ Tasten.
Schalten Sie beide Funkgeräte aus.
Schalten Sie die Geräte zeitgleich ein.
Zum deaktivieren drücken Sie die MENU-Taste, bis auf dem Display “OUT” und “Or
on”angezeigt wird; wählen Sie “Or of” (deaktiviert) mit den ▲▼ Tasten.
Zur Bestätigung drücken Sie PTT oder warten 5 Sekunden.
Manuelle Reichweitenkontrolle
Mit dieser Funktion können Sie herausfinden, ob andere Funkgeräte in Ihrer Reichweite
sind.
Durch zweimaliges Drücken der Taste EMG wird eine Anfrage zu anderen G8 Geäten
ausgesendet, die in Ihrer Reichweite in Betrieb sind und automatisch auf den gleichen
22
Displayhelligkeit
Bei schwachen Lichtverhältnissen drücken Sie kurz auf EMG und aktivieren dadurch
die Displaybeleuchtung für ca. 5 Sekunden. Jedesmal, wenn die MENÜ-Taste gedrückt
wird, wird automatisch die Displaybeleuchtung aktiviert.
Page 23

Stromsparfunktion
Die Stromsparfunktion der Batterie reduziert den Verbrauch um ca. 50%. Die
Stromsparfunktion wird automatisch aktiviert, wenn das Funkgerät länger als 7
Sekunden kein Signal empfängt. Wenn die Batterien schwach sind, erscheint das
Symbol
! Sie können die Stromsparfunktion nur aktivieren, wenn die "Notruffunktion"
deaktiviert ist.
auf dem Display: ersetzen Sie die Batteien oder laden den Akku.
Batterie aufladen
Der mitgelieferte Akku ist ein NiMH 4.8V 800mAh und darf nur im Funkgerät geladen
werden; Die Ladezeit beträgt 8 Stunden bis zur vollständigen Aufladung.
Aufladen des Akkus:
Verbinden Sie den Netzadapter mit der Wandsteckdose und verbinden den Netzadapter
mit der Tischladestation.
Stellen Sie Ihr Funkgerät in die Ladestation. Das rote Licht an der Ladestation beginnt
zu leuchten.
Wenn der Ladevorgang beendet ist entfernen Sie das Funkgerät aus der Ladeschale
und entfernen den Netzadapter von der Wandsteckdose.
! Batterien nicht überladen! Nach der vollständigen Aufladung stoppt der
Ladevorgang nicht automatisch. Achten Sie deshalb darauf, dass das
Funkgerät aus der Ladeschale genommen wird, sobald die Batterien geladen
sind; andernfalls können das Funkgerät und die Batterien beschädigt
werden.
! Laden Sie niemals Alkaline (Nickeleisen) Batterien oder nichtaufladbare
Batterien. Achten Sie beim Laden des Funkgerätes, dass nur aufladbare
NI-MH Batterien oder der mitgelieferte Akku in das Batteriefach eingelegt
werden. Alkaline (Nickeleisen) Batterien sind nicht aufladbar! Batterien,
die nicht aufladbar sind können auslaufen, explodieren oder brennen und
Schaden verursachen!
! Bei der Verwendung von Ladegeräten, die nicht für dieses Funkgerät
vorgesehen sind, kann das Gerät beschädigt werden oder Explosionen und
Verletzungen verursacht werden.
! Batterien nicht ins Feuer werfen und nicht neben heiße Gegenstände stellen;
dies kann zu Explosionen und Verletzungen führen. Entsorgen Sie Batterien
entsprechend den lokalen Bestimmungen.
! Mischen Sie alte Batterien nicht mit neuen Batterien oder Batterien
unterschiedlichen Typs oder Batterien, die unterschiedlich benutzt wurden
23
Page 24

24
Page 25

Midland G8
USER’S MANUAL
¡Gracias por haber escogido nuestra marca! El Midland G8 es un transceptor portátil
de libre uso en España y en la práctica totalidad de países europeos. Para una mayor
información al respecto, diríjase a la tabla de “Restricciones al uso” que acompaña
a este manual.
Combinando la última tecnología en radiocomunicación junto con un chasis robusto, el
Midland G8 es la solución ideal y efectiva para los profesionales que tienen que estar
en contacto con sus colegas (obras, edificios, hoteles, ferias, etc.) o para usuarios que
quieren hablar con sus amigos y familiares en los ratos de ocio. Su robustez, facilidad
de uso y práctico manejo le convierten en la radio ideal para cualquier actividad.
Midland G8 está disponible en dos versiones:
›› Doble banda (pmr446/LPD)
›› Versión E (pmr446)
En este manual nos referimos a ambas versiones y encontrará resaltadas las
diferencias entre ellas.
Contenido
›› 1 radio Midland G8 ›
›› 1 Cargador de sobremesa individual ›
›› 1 Adaptador de corriente ›
›› 1 Pack de baterías ›
›› 1 Clip de cinturón ›
Rango de cobertura
El máximo alcance depende del terreno y se obtiene cuando se utiliza en espacios
abiertos.
Las limitaciones a este máximo alcance son debidas habitualmente a factores
ambientales como árboles, edificios u otras estructuras que se interpongan entre los
aparatos a comunicar. En el interior de un coche o en construcciones de estructura
metálica, el alcance también se verá reducido. Normalmente, el alcance en ciudad,
con edificios y otros obstáculos es aproximadamente de 1 -2 Km. En espacios abiertos
con obstáculos como árboles, casas, etc., el alcance puede ser de hasta 4-6 Km.
Y en espacios abiertos, sin obstáculos y con alcance visual, por ejemplo entre dos
montañas, el alcance puede ser superior a los 12 Km.
.
Las baterías y su comportamiento
La radio puede funcionar con el pack de baterías suministrado o con 4 pilas alcalinas
o baterías recargables tipo AAA. Para abrir el compartimiento de las baterías, coloque
la radio con la parte trasera hacia usted, desbloquee la tapa en la parte inferior de la
radio deslícela suavemente. Inserte las baterías teniendo en cuenta la polaridad y
vuelva a colocar la tapa.
Atención: el pack de baterías suministrado debe cargarse antes de su primer
uso.
Advertencias
BATERÍAS › - Siga estrictamente todas las indicaciones y advertencias referidas en
el capítulo “Recarga de baterías”.
NO ABRA LA RADIO BAJO NINGÚN CONCEPTO- › la mecánica y la electrónica
de precisión que forman el equipo exige experiencia e instrumentación; por el mismo motivo, la radio no debe ser nunca reajustada ya que viene programada de
fábrica con el fin de obtener las máximas prestaciones. La apertura de la radio por
parte de personal no autorizado anulará automáticamente la garantía.
No utilice alcohol, disolventes o abrasivos para limpiar el equipo. › Utilice sólo
un paño suave y limpio ligeramente humedecido con agua. En los casos más resistentes use un detergente suave.
CARACTERÍSTICAS
NUEVA FUNCIÓN “Llamada de Emergencia” ›
Midland G8 › introduce una nueva e importante función: un canal dedicado a
emergencias. Las radiocomunicaciones se realizan generalmente entre dos o
más usuarios que utilizan el mismo canal: no es posible transmitir o recibir en otros
canales diferentes. Pero gracias a la función “Emergencia”, puede estar monitorizando el canal de emergencia: todos los usuarios de un Midland G8 pueden
comunicarse en el canal sintonizado y, al mismo tiempo, recibir/
transmitir mensajes de emergencia en el canal dedicado a tal efecto. Simplemente ›
manteniendo pulsada la tecla EMG durante 3 segundos, se envía una llamada de
emergencia a todos los G8 que estén dentro del rango de cobertura; automáticamente pasaran a sintonizarse en el canal de de emergencia (canal EC).
Nueva función “Fuera de cobertura Manual”: › simplemente pulsando dos veces
la tecla EMG comprobará si hay alguna radio en el rango de alcance de su radio.
Nueva función “Vox TalkBack”: › si una de las radios está constantemente
transmitiendo en VOX, la función Vox TB detendrá la transmisión después
25
Page 26

de 20 segundos para permitir también la transmisión a los demás usuarios.
Potencia: 500mW (PMR446); 10mW (LPD)
Rango de temperaturas: de -20° a +55° C ›
38 subtonos CTCSS/104 códigos DCS ›
Impermeabilidad: IPX5 ›
Llamada de Emergencia ›
Control fuera de cobertura (Out of range) ›
VOX ajustable a 3 niveles y “TalkBack” ›
INTERCOMUNICADOR ›
Vibra › CALL (vibración)
Bloqueo de teclado ›
Ahorro de baterías: circuito automático de ahorro de baterías ›
Indicador de batería baja ›
Dual Watch (Doble escucha) ›
CALL › con 5 melodías seleccionables
SCANER ›
Monitor ›
Fuera de cobertura ›
Roger beep ›
Potencia alta/baja ›
Display LCD con retroiluminación ›
Alimentación: pack de baterías de NiMh de 4,8V/ 800mAh ó 4 baterías AAA ›
Conector de accesorio de 2pin ›
Peso: 112gr (sin baterías) ›
Dimensiones: 59x98x32mm ›
Duración de la baterías (en pmr446):más de 12 horas con el pack de 800mAh ›
Versiones:
G8 Dual (pmr446/LPD) sólo países autorizados ›
24 canales pmr446 channels (8+16 preajustados)/69 canales LPD
G8E (pmr446) válida para España
24 canales pmr446 (8+16 preajustados)
DESCRIPCIÓN DE LOS CONTROLES Y SUS
FUNCIONES
4687
Display
Su Midland G8 utiliza un display LCD
(de cristal líquido) que le informa
continuamente de su estado operativo.
Los símbolos y los parámetros que
pueden aparecer son los siguientes:
1. CANAL Estos dos dígitos grandes indican el canal seleccionado
2. VOX La activación de la función VOX.
3.
4. EMG Función emergencia activada.
5. DW Función Dual Watch (doble escucha) activada.
6.
7.
8. OUT Indica si la Función Fuera de Cobertura automática pierde
9. RX Está en modo recepción.
10. TX Indica que está en transmisión (PTT pulsado).;
11. H(High) / L(Low) Selección de potencia alta o baja.
12. CTCSS/DCS Indica el tipo de subtono seleccionado.
13. CTCSS/DCS Estos tres pequeños dígitos indican el código CTCSS/DCS
14. ROGER Roger Beep activado.
El símbolo del candado indica que se ha activado el bloqueo
del teclado
Indica el estado de las baterías.
Función Vibra-CALL (vibración) activada.
contacto con otras radios
seleccionado (1-38 / 1-104)
3
2
5
11
9
10
12
1
13
14
26
Page 27

Radio
Remítase a las siguientes imágenes para localizar y familiarizarse con las diferentes partes del
equipo:
15. Micrófono Integrado Aquí se encuentra el micrófono para la transmisión.
16. Tecla MENU Pulsando esta tecla se activa la opción MENU.
17. Tecla CALL/
18. PTT (pulsar para hablar) Pulsando esta tecla se activa la transmisión del equipo.
19. Mando VOLUMEN Enciende/apaga el equipo y regula el VOLUMEn de audio en
20. ANTENA Sirve para recibir y transmitir las señales de radio
21. Toma MIC/CHG (bajo la protección) Permite la conexión de dispositivos de audio externos
22. Tecla EMG Activa las funciones de Emergencia y Fuera de cobertura manual
23. Teclas ▲▼ sirven cambiar las opciones del MENU
24. MICRÓFONO Integrado Aquí se encuentra el micrófono para la transmisión
25. Conector Intercomunicador Para conectar los accesorios necesarios para actuar como
para enviar una llamada en el canal seleccionado. Si la mantiene
pulsada durante 5 segundos, se activa el bloqueo del teclado..
recepción.
(auriculares, micrófonos, cargadores, etc.). (Conector de 2 pin)
intercomunicador
20
19
Encendido/apagado
Para encender el transceptor, gire el mando VOLUMEN en el sentido de las agujas
del reloj hasta oír un clic mecánico. Para apagar el transceptor, gire el mando en el
sentido contrario a las agujas del reloj hasta oír nuevamente el clic mecánico.
Selección de bandas pmr446 o LPD (solamente para la versión Dual)
Midland G8 (Dual) esta ajustado de fábrica en la banda pmr446.
Para seleccionar la banda LPD, mantenga pulsada la tecla MENU hasta que el
display muestre canal ‘1’
Para volver a pmr446 mantenga pulsada la tecla MENU hasta que el display muestre
‘P1’.
! Este proceso desactiva la función “EMG”; por lo tanto, si cambia la banda
de trabajo, recuerde activar de nuevo la función Emergencia (vea párrafo
“Función Emergencia”).
Selección del canal
Pulse la tecla MENU. En el display parpadea el número del canal. Pulse las teclas ▼▲
para pasar hacia arriba o abajo los canales hasta que encuentre el canal deseado.
Pulse PTT para confirmar o espere 5 segundos.
Dependiendo de la versión adquirida, puede seleccionar entre los siguientes canales: ›
versión Dual: PMR446 de P1 a P8 y de 9p a 24p (preajustado) / LPD de 1 a 69.
version E › (PMR446): de P1 a P8 y de 9p a 24p (preajustado)
! El canal P8 ha sido ajustado de fábrica para la función “Emergencia”; le
sugerimos que no lo utilice para comunicaciones habituales!
Visualizar el canal/subtono
Para mostrar momentáneamente el canal y el subtono preajustados en la banda
pmr446, vaya al canal deseado (del 9p al 24p) y mantenga pulsada la tecla ▼ durante
3 segundos.
18
17
16
MENU
Transmisión y recepción
EMG OUT
DW
H L
DCS CTC
ROGER
CALL
EMG
21
22
23
24
25
15
Para transmitir, mantenga pulsada la tecla PTT. Espere una fracción de segundo y
hable normalmente en dirección al micrófono, manteniendo la radio a una distancia
de unos 5 cm; en el display aparece TX.
Cuando haya terminado de hablar, suelte el PTT.
Cuando la radio está en recepción, recibirá automáticamente cualquier comunicación.
En el display aparece RX.
Ajuste del VOLUMEn
Gire el mando de VOLUMEN hasta alcanzar el nivel deseado.
“CALL”
Pulse la tecla CALL para enviar una señal de caudio a los usuarios que estén en su
mismo canal; puede seleccionar diferentes tonos de llamada.
“Emergencia”
27
Page 28

Cuando la función Emergencia está activada (EMG parpadea en el display) mantenga
pulsada la tecla EMG durante 3 segundos y enviará una llamada de emergencia a los
G8 que estén en su radio de cobertura.
La función Emergencia está activada por defecto.
Bloqueo del teclado
Mantenga pulsada la tecla CALL/ durante unos 5 segundos y el bloqueo se
confirmará con
Para deshabilitar esta función, vuelva a mantener pulsada CALL/
segundos aproximadamente.
en el display. Solo el PTT, EMG y CALL/ permanecen activas.
durante 5
Función Monitor (MON) / Squelch
La tecla Monitor se utiliza para excluir temporalmente el squelch, para poder recibir
señales demasiado débiles que no pasarían el filtro del squelch. Para activar esta
función, mantenga pulsadas durante 2 segundos las teclas ▲▼ al mismo tiempo.
Realice el mismo proceso para desactivar la función, o apague la radio y vuelva a
encenderla.
! Cuando MON está activo, probablemente escuchará un ruido de fondo
constante.
! Solo puede activar la función MON si la función “Emergencia” está
desactivada.
Exploración de canales
Midland G8 puede buscar automaticamente señales realizando una exploración rápida
de todas las bandas. Esta función es útil para encontrar canales activos. Cuando se
detecta una señal, la exploración se detiene en ese canal durante 5 segundos. Para
continuar, pulse ▼ durante 2 segundos. Para detener la exploración definitivamente,
pulse PTT y la radio volverá al canal desde el que se comenzó la exploración.
! Solo puede activar la función exploración, si la función “Emergencia” está
desactivada.
Tecla “MENU”
Mediante la tecla “MENU” se pueden seleccionar las siguientes funciones
Selección de canal ›
Ajuste de subtonos CTCSS ›
Ajuste de código DCS ›
Selección de potencia alta/baja (solo en banda pmr446) ›
VOX ›
Función Vibra › CALL
Selección de melodías › CALL
Roger Beep ›
Sonido del teclado ›
Canal de Emergencia ›
Función doble escucha (Dual Watch) ›
Fuera de cobertura (Out of Range) ›
Selección de canal
Pulse la tecla MENU. En el display parpadea el número de canal. Pulse las teclas ▼▲
28
para pasar hacia arriba o abajo los canales hasta que encuentre el canal deseado.
Pulse PTT para confirmar o espere 5 segundos.
Dependiendo de la versión que haya comprado, puede elegir entre los siguientes ›
canales:
versión Dual: › PMR446 de P1 a P8 y de 9p a 24p (pre-ajustado) / LPD de 1 a 69.
versión E › (solo PMR446 ):de P1 a P8 y de 9p a 24p (pre-ajustado)
! El canal P8 ha sido ajustado de fábrica para la función “Emergencia”; le
sugerimos que no lo utilice para comunicaciones habituales!
Ajuste de subtonos CTCSS/DCS
Los subtonos CTCSS y DCS son códigos de acceso que permiten a la radio
comunicarse solamente con otras radios que estén en el mismo canal y con el mismo
subtono. Se pueden ajustar 38 subtonos CTCSS y 104 códigos DCS. Estos tonos se
pueden ajustar en los siguientes canales:
Versión Doble Banda: solo en los 8 canales principales de la banda pmr446 (de
P1 a P8) y en los 69 canales LPD.
Versión E › (solo pmr446): solo en los 8 canales principales de la banda pmr446
(de P1 a P8).
Para los dos modelos, los canales pre-ajustados de 9p a 24p no se pueden mo- ›
dificar
. ›
Activación de los subtonos CTCSS:
Encienda la radio. ›
Seleccione el canal deseado mediante las teclas › MENU y ▲▼.
Pulse la tecla › MENU hasta que el display muestre CTC y el subtono parpadee en
la parte derecha (“of”= sin código – ajuste por defecto).
Seleccione el subtono deseado mediante las teclas ▲▼. ›
Para confirmar el ajuste, pulse › PTT ó espere durante 5 segundos.
Desactivación de los subtonos CTCSS:
Si no desea utilizar subtonos, siga los siguientes pasos:
Seleccione el canal deseado ›
Pulse la tecla › MENUhasta que el display muestre el subtono parpadeando en la
parte derecha.
Seleccione “ › of” mediante las teclas ▲▼.
Activación de los códigos DCS:
Encienda la radio. ›
Seleccione el canal deseado mediante las teclas › MENU y ▲▼
Pulse la tecla › MENU hasta que el display muestre DCS y el código parpadee en la
parte derecha (“of”=sin código – ajuste por defecto).
Seleccione el código deseado mediante las teclas ▲▼. ›
Para confirmar el ajuste, pulse › PTT ó espere 5 segundos.
! El canal P8 con el código 50 DCS (P850) ha sido ajustado en fábrica como
canal de “Emergencia”; no lo utilice para comunicaciones habituales!
Desactivación de los códigos DCS:
Page 29

Si no desea utilizar códigos DCS, siga los siguientes pasos:
Seleccione el canal deseado. ›
Pulse la tecla › MENU hasta que el display muestre el código parpadeando en la
parte derecha.
Seleccione “ › of” mediante las teclas ▲▼.
Seleccione la potencia Hi/low (solo en banda pmr446)
Para seleccionar el nivel de potencia, pulse la tecla MENU hasta que el display
muestre Pr. Utilice las teclas ▲▼ para seleccionar L (potencia baja) o H (potencia
alta). Para confirmar la selección, pulse PTT ó espere 5 segundos.
Cuando las baterías están totalmente cargadas, la potencia alta es 500 mW (ERP),
mientras que la baja es 10mW (ERP).
Función VOX control
Midland G8 permite conversaciones con manos libres a través de la función VOX:
solo tiene que hablar en dirección al micrófono y la comunicación se activará
automáticamente. La sensibilidad del VOX se puede ajustar en 3 niveles diferentes
y se puede utilizar con o sin accesorio de audio. El cuarto nivel es la función Vox
TalkBack: si la radio esta transmitiendo continuamente en VOX, la función VOX TB
detendrá la transmisión tras 20 segundos para permitir transmitir a otros usuarios.
Para activar la función VOX pulse la tecla MENU hasta que en el display aparezca
VOX .
Utilice las teclas ▲▼ para seleccionar los distintos niveles de sensibilidad:
Of: Desactivado; ›
1: Alto ›
2: Medio ›
3: Bajo ›
4: Talk Back › (con alta sensibilidad)
Para confirmar la selección, pulse PTT ó espere 5 segundos.
Para desactivar la función, siga el procedimiento descrito y seleccione oF.
Función Vibra-CALL (vibración)
Midland G8 está equipado con la función “Vibra-CALL”, con la que podemos recibir
una señal de llamada silenciosa.
Para activar esta función, pulse la tecla MENU hasta que en el display aparezca
; utilice las teclas ▼▲ para activar o desactivar esta función(on: activada,
oF:desactivada);
Pulse PTT [11] para confirmar o espere 5 segundos.
Función CALL
Midland G8 puede enviar 5 tonos de llamada diferentes. Para enviar esta señal de
audio a otros usuarios pulse la tecla CALL/
Para seleccionar los diferentes tonos:
Pulse la tecla MENU, hasta que en el display aparezca “CA” y el código del tono
activo.
Mediante las teclas ▲▼ escuchará 5 melodías disponibles.
key.
Confirme la selección pulsando PTT ó espere 5 segundos.
ROGER BEEP (Tono fin de transmisión)
Al soltar la tecla PTT al final de cada transmisión, la radio emite un tono que indica
a su interlocutor que la transmisión ha finalizado y puede empezar a hablar. Esta
función está desactivada de fábrica..
Para activarla:
Pulse la tecla MENU hasta que el display muestres “rb of”; mediante las teclas ▼▲
seleccione “on” y el display mostrará “rb on” para confirmar la selección, pulse PTT
o espere 5 segundos.
Tonos del teclado
Cada vez que pulsa una tecla, se escucha un pitido.
Para desactivar este pitido siga este proceso:
Pulse la tecla › MENU, hasta que el display muestre “bP on”.
Pulse las teclas ▲▼ hata que en el display aparezca “ › bP of”
Confirme su selección pulsando › PTT o esperando segundos.
De esta manera, todos los pitidos están desactivados
Para activar la función, repita el proceso y seleccione “bP on”
Función llamada de Emergencia
Midland G8 dedica un canal a llamadas de emergencia: todos los G8 que operen a su
alcance, incluso si están en otro canal, pueden recibir y emitir llamadas de emergencia
en ese canal.
Si mantiene pulsada la tecla EMG, la comunicación pasa automáticamente al canal
de emergencia (“EC” en el display). Se envía una señal de audio y todos los G8 que
estén en su radio de cobertura, pasarán automáticamente al canal de emergencia
(“EC”).
Si usted ha desactivado esta función, no recibirá ni podrá transmitir una señal de
emergencia.
! Cuando la radio está operando en el canal de emergencia (EC en el display),
todas las teclas excepto PTT y CALL están desactivadas.
La radio vuelve al canal de uso habitual después de un minuto desde la última
transmisión. Para volver inmediatamente, pulse EMG. Ahora podrá usar todas las
funciones y teclas.
Activación / Desactivación de la función Emergencia
Cuando enciende la radio, la función de emergencia está activada, pero puede
activarla o desactivarla a su preferencia:,
Pulse la tecla MENU hasta que el display muestre EC on.
Seleccione EC of mediante las teclas ▲▼ . Confirme la seleccioón mediante PTT ó
espere 5 segundos.
! Cuando la función Emergencia está activada ( en el display parpadea EMG)
no se pueden usar las siguientes funciones: Scan, Monitor, Doble escucha,
Out of Range (fuera de cobertura).
Cambio del canal de emergencia
29
Page 30

El canal de emergencia está preajustado de fábrica en P8 DCS 50; pero se puede
cambiar en función de sus necesidades.
! Importante: asegúrese de que la función Emergencia está activada!(EMG
parpadea). Si decide cambiar el canal dedicado a la función de Emergencia,
no olvide realizar el cambio en todas las radios!
Pulse la tecla MENU hasta que el display muestre EC on.
Pulse la tecla MENU de nuevo (of en el display) y seleccione el canal deseado
mediante ▲▼.Para confirmar la selección, pulse PTT o espere 5 segundos
Para confirmar la selección, pulse PTT o espere 5 segundos.
Para volver a seleccionar el canal original (P8 DCS 50)
Pulse la tecla MENU hasta que el display muestre EC on.
Pulse la tecla MENU de nuevo y seleccione of
Para confirmar la selección, pulse PTT o espere 5 segundos
! Si dedica uno de los canales estándar como canal de Emergencia, recuerde
utilizarlo solamente para esta función, de lo contrario causará interferencias!.
Función Out of range Manual (fuera de cobertura)
Esta función le permite saber si hay alguna radio en su radio de cobertura.
Pulsando dos veces la tecla EMG, enviará una petición de reconocimiento a otros
G8 que estén en su rango de cobertura y en el mismo canal. Si responde alguna
radio recibirá un tono de confirmación. Si no hay ninguna radio en cobertura, no se
escuchará ningún tono.
¡Esta función solo se puede utilizar si el “Automatic Out of Range” no está
activo!
DUAL WATCH (Doble escucha)
Esta función le permite escuchar contestamente dos canales de su elección al mismo
tiempo.
Activación - Desactivación
Pulse la tecla MENU hasta que el display muestre DW of.
Seleccione el segundo canal a escuchar mediante las teclas ▲▼.
Para confirmar su selección, pulse PTT o espere 5 segundos. El display mostrará
alternativamente el canal en uso y el segundo canal seleccionado.
Para detener esta función, simplemente pulse la tecla MENU.
de las radios no recibe el código de control dos veces consecutivas, el icono OUT
parpadea en el display y se escuchará un tono de advertencia.
¡Esta función solo se puede activar si la función “Emergencia” está
desactivada!
Activación – Desactivación
Pulse la tecla MENU hasta que en el display aparezca “OUT” y “Or of”, seccione “Or
on” (activado) mediante las teclas ▲▼ .
Apague las dos radios.
Enciéndalas al mismo tiempo.
Para desactivar la función, pulse, MENU hasta que el display muestre “OUT” y “Or
on” ; seleccione “Or of” (desactivado) mediante las teclas ▲▼.
Confirme su selección pulsando PTT ó esperando 5 segundos
Iluminación del display display
En caso de que no haya suficiente luz para leer el display, pulse brevemente la tecla
EMG y la iluminación del display se activará durante 5 segundos. Cada vez que pulse
MENU, el display se iluminarà automáticamente.
Power save (Ahorro de batería)
La función de ahorro de batería permite una reducción del consumo de batería de
hasta el 50%; la función se activa automáticamente cuando la radio no recibe ninguna
señal en 7 segundos. Cuando las baterías están descargadas, el icono
en el display con lo que tendrá que cambiarlas o cargarlas.
! Esta función solo se activa si la función “Emergencia” está desactivada!.
aparece
Recarga de baterías
El pack de baterías suministrado es de NiMH, de 4.8V - 800mAh y se debe cargar
solamente cuando está insertado en la radio. La recarga dura alrededor de 8 horas.
Para recargar el pack de baterías:
Conecte el adaptador en una toma de corriente e inserte el jack en el cargador de
sobremesa.
Coloque la radio en la bañera del cargador. El diodo del cargador se ilumina.
Cuando se complete la carga, retire la radio del cargador y desenchufe el adaptador
de la toma de corriente.
Cuando la radio detecta una transmisión en uno de los dos canales, la Doble escucha
se detiene temporalmente, se mantiene durante 5 segundos en el canal activo, para
dar opción a contestar. Después de esta pausa, la doble escucha se reanuda de
nuevo
! Esta función solo se puede activar si la función “Emergencia” está
desactivada!
Automatic Out-of-Range (Fuera de cobertura automático)
Seleccionando esta función, una pareja de G8 transmites un código de control cada
30 segundos. En cuanto el contacto entre las dos radios se está perdiendo y una
30
! No sobrecargue las pilas! Cuando las pilas están completamente cargadas, el
proceso no se detiene automáticamente. Por lo tanto, no olvide desconectar
el transceptor del cargador en cuanto haya transcurrido el tiempo necesario,
de lo contrario la radio y las baterías podrían dañarse.
! No intente recargar pilas alcalinas o cualquier pila no recargable! ¡Asegúrese
de que en el porta pilas del equipo, con el cargador conectado, se encuentren
exclusivamente pilas recargables NI-MH o el pack suministrado! Es muy
peligroso intentar recargar pilas de otro tipo (por ejemplo alcalinas o de
manganeso). Las baterías que no son recargables, pueden sulfatarse,
Page 31

explotar e incluso arder y causar daños!
! El uso de un cargador no original puede causar daños al equipo o causar
explosiones y lesiones personales!
! No tire nunca las pilas al fuego, ni las acerque a fuentes de calor: pueden
causar explosiones y lesiones personales! Deseche las pilas siguiendo
exclusivamente la normativa medioambiental vigente.
! No mezcle baterías nuevas y viejas o baterías de distinto tipo o capacidad o
que hayan sido utilizadas para otros usos!
31
Page 32

32
Page 33

Midland G8
MANUEL UTILISATEUR
Merci d’avoir choisi Midland! Le Midland G8 est une radio portative qui est libre
d’utilisation à travers toute l’Europe. Pour plus d’information, reportez vous au
chapitre « Restriction d’utilisation ».
Combinant les dernières technologies en matière de radio et de communication
ainsi qu’un solide boîtier, le Midland G8 est la solution idéale et efficace pour les
professionnels qui ont besoin de rester en contact avec leurs collègues (chantiers de
construction, des bâtiments, des hôtels, des foires commerciales, spectacles) ou en
loisirs avec des utilisateurs qui veulent juste rester en contact avec leurs amis et leur
famille. Son boîtier robuste, la facilité d’utilisation et la simplicité de sa conception en
font un produit idéal pour l’utilisation dans toutes les activités.
Le Midland G8 est disponible en deux versions:
Bi Bande (PMR446/LPD) ›
E version (PMR446 uniquement) ›
Ce manuel fait référence au deux model et met en évidence les différence entre
chaque model.
Contenue
N° 1 › Midland G8
N° 1 Socle de bureau simple ›
N° 1 Adaptateur secteur ›
N° 1 Pack batterie ›
N° 1 Clip ceinture ›
Couverture/portée
La portée maximale dépend du terrain et est obtenue dans une utilisation en espace
ouvert.
La seul limitation de portée peuvent être du au conditions environnemental tel que
des arbres, des immeubles ou d’autre obstacles.
Dans une voiture ou une construction métallique la portée peut être réduite
également.
Batteries and battery compartment
Le G8 peut fonctionner avec le pack batterie fournit ou 4 batteries AAA rechargeable
ou non.
Pour ouvrir le compartiment des batteries, tournez la radio face avant vers le bas et
ouvrez le verrouillage du couvercle qui se trouve en bas du poste et faite le glisser.
Attention: Le pack batterie fournit doit être recharge avant la première
utilisation.
Mise en gardes
BATTERIES › – Lisez attentivement toutes les mise en gardes décrites au chapitre
“Rechargement des batteries”.
Ne pas ouvrir la radio quelqu’en soit la raison! › La mécanique et l’électronique
de précision qu’est la radio requièrent une expérience et des équipements spécialisés. Pour les même raison la radio ne doit en aucun cas être réglé car elle l’a
déjà été pour un maximum de performance. Une ouverture non autorisé entraîne
l’annulation de la garantie.
Ne pas utiliser de détergent, d’alcool, de solvant, ou d’abrasifs pour nettoyer ›
la radio. Utilisé uniquement une chiffon doux et propre. Si la radio est très sale,
humidifiez légèrement avec un mélange d’eau et de savon neutre.
OPTIONS
Nouvelle option “Emergency CALL” ›
Midland G8 › inaugure une importante et innovante option: le canal dédié aux ur-
gences. Les communications radio se produisent généralement entre deux ou plus
d’utilisateurs qui sont sur le même canal: il n’est pas possible de transmettre ou
recevoir de / vers différents canaux. Mais grâce à la « fonction d’urgence », vous
pouvez également surveillez le canal d’urgence. Tous les utilisateurs possédant un
Midland G8 peuvent communiquer sur un canal choisi et en même temps recevoir/
émettre sur le canal dédié d’urgence. Gardez simplement la touche EMG appuyé
pendant 3 secondes et un appel d’urgence sera envoyé à tous le G8 à portées, qui
basculerons automatiquement sur le canal EC » (Emergency Channel).
Nouvelle option “Out of range manuel” › : appuyez deux fois sur la touche EMG ce
qui permet de vérifier si des radios sont à portées de la votre.
Nouvelle option “Vox TalkBack” › : si une radio émet en permanence en mode
VOX, le VOX TB lui interrompt automatiquement l’émission toutes les 20 secondes
pour permettre aux autres démettre à leur tours.
33
Page 34

Puissance: 500mW (PMR446); 10mW (LPD) ›
Température de fonctionnement: de -20° à +55° C ›
38 tonalités CTCSS /104 codes DCS ›
Waterproof: IPX5 ›
Appel d’Urgence ›
Control Out of range ›
VOX ajustable sur 3 niveaux et avec “TalkBack” ›
INTERCOM ›
Vibreur ›
Verrouillage clavier ›
Économie d’énergie automatique ›
Indicateur de batterie faible ›
Double veille ›
Appel avec 5 mélodies sélectionnable ›
SCAN ›
Moniteur ›
Out of Range ›
Roger beep ›
Puissance Haute/basse ›
Afficheur LCD rétro éclairé ›
Alimentation: Pack batterie NiMH 800mAh 4,8V ou 4 piles/batteries AAA ›
Prise accessoire deux broches ›
Poids: 112gr (sans batteries) ›
Dimensions: 59x98x32mm ›
Autonomie batterie (en PMR446): supérieur à 12 avec un pack batterie de ›
800mAh
Versions:
G8 Bi bande (PMR446/LPD) ›
24 canaux PMR446 (8+16 préprogrammé)/69 canaux LPD
G8E (PMR446 seuls) ›
24 canaux PMR446 (8+16 préprogrammé)
DESCRIPTION DES CONTROLS ET FONCTIONS
Afficheur
Votre Midland G8 vous grade
constamment informé sur sont
états à travers l’afficheur à
cristaux liquides (LCD). Les
symboles et leurs paramètres
correspondant qui apparaissent
en fonction des statues de
l’appareil, ont décrit ci-dessous :
1. CANAL Ces deux grands chiffres indiquent le canal en cours
d’utilisation.
2. VOX Fonction VOX active
3.
4. EMG La fonction d’urgence à été activé
5. DW La fonction double veille est active
6.
7.
8. OUT indique que la fonction automatique Out of Range à perdue le
9. RX en mode réception
10. TX Indique que la radio émet (PTT appuyé);
11. H(High) / L(Low) Puissance sélectionné.
12. CTCSS/DCS Indique le type de tonalité sélectionné.
13. CTCSS/DCS Ces trois petits chiffres indiquent le code de tonalité en cours
14. ROGER Roger Beep actif.
Ce symbole apparaît quand le clavier est verrouillé
Donne l’état des batteries
Fonction vibreur active
contact avec les autres radio.
d’utilisation. (CTCSS 1-38 /DCS 1-104)
3
2
5
1
4687
11
9
10
12
13
14
34
Radio
Reportez vous à l’image pour identifier les différentes partie de la radio:
15. Haut-parleur intégré C’est ici que ce trouve le Haut-parleur.
16. Bouton MENU Appuyez sur ce bouton pour entrez dans le MENU de
la radio.
17. Bouton CALL Pour envoyer un appel sur le canal sélectionné. Si
vous restez appuyé pendant 5 secondes, le clavier se
verrouille.
18. PTT (push to talk) Appuyez sur cet touché pour émettre.
19. Bouton de VOLUME Interrupteur ON/OFF et réglage du VOLUME de
réception.
20. ANTENNE Reçoit et émet les signaux radio.
Page 35

21. Prise accessoire (sous couvercle de protection) Pour connecter des
accessoire tel que microphone, chargeur, etc. (Type 2
broches)
22. Bouton EMG Pour activer la fonction d’urgence et la fonction « Out
of range » manuel.
23. Boutons ▲/▼ Pour changer les options dans le MENU
24. Microphone interne Zone ou vous devez parler et ou se trouve le micro.
25. Prise Intercom Pour connecter le kit micro/oreillette utilise pour la
communication de l’Intercom.
20
19
EMG OUT
DW
H L
18
17
CALL
ROGER
DCS CTC
21
EMG
22
23
16
MENU
24
25
15
Allumez/éteindre
Pour allumer votre portatif, tourner le bouton VOLUME dans le sens horaire de façon
à entendre un click. Pour éteindre la radio, tourner le bouton dans le sens inverse
jusqu’à entendre un nouveau.
Choisir le mode PMR466 ou LDP
(Seulement pour la version Bi bande)
Le Midland G8 (Bi bande) est par défaut en mode PMR446.
Pour basculer en mode LPD, gardez le bouton MENU appuyez jusqu’à ce que
l’afficheur indique le canal ‘1’.
Pour basculer en mode PMR446, gardez le bouton MENU appuyez jusqu’à ce que
l’afficheur indique le canal ‘P1’.
! Cette procédure désactive la fonction “EMG”; cependant si vous changez de
bande de fréquence, rappelez vous qu’il faut réactiver la fonction D’urgence
(Voir le paragraphe “Fonction d’Urgence”).
Sélection d’un canal
Pressez une fois le bouton MENU. Le numéro du canal clignote à l’écran.
Pressez les boutons pour monter ou descendre les canaux afin de sélectionner le
canal de votre choix. Pressez le PTT pour confirmer, ou attendez 5 secondes.
En fonction de la version que vous possédez, vous pouvez choisir les canaux
suivants :
Version Bi bande : › PMR446 de P1 à P8 et de 9p à 24p (préprogrammé) / LPD
de 1 à 69.
Version E › (PMR446 seulement): de P1 à P8 et de 9p à 24p (préprogrammé)
! Le canal P8 à été choisi comme canal “D’urgence” par défaut, nous vous
recommandons de ne pas l’utiliser pour des communications générales!
Afficher le canal et la tonalité CTCSS/DCS
Pour afficher temporairement le canal PMR446 et la tonalité utilise sur les canaux
préprogrammés, sélectionnez un canal (de 9p à 24p) et appuyez pendant 3
secondes la touche ▼.
Émission and reception
Pour émettre appuyez ferment sur la touche PTT. Attendez une fraction de secondes
avant de parler normalement en direction du microphone et garder la radio à environ
une distance de 5 cm. TX apparaît sur l’afficheur.
Quand vous avez fini de parler, relâchez la touche PTT. Quand la radio est en
mode réception (PTT relâché) vous recevez automatiquement n’importe quel
communication, RX apparaît alors sur l’afficheur.
Réglage du VOLUME
Tournez le bouton VOLUME jusqu’a atteindre le niveau voulu.
35
Page 36

Fonction “CALL”
Appuyez sur le bouton CALL et vous envoyez un appel sonore à tous les utilisateurs
à l’écoute sur le canal, vous pouvez choisir entre différentes tonalités.
Fonction “Emergency”
Quand le fonction d’urgence est activé (EMG clignote sur l’afficheur) gardez la
touche EMG appuyez pendant 3 seconds et vous envoyez à tous les G8 à portée
l’appel d’Urgence. La fonction d’Urgence est active par défaut.
Verrouillage clavier
Maintenez enfoncé CALL/ 5 secondes environ et s’éclaire sur l’afficheur en guise
de confirmation. Seules les touches PTT, EMG et CALL/
inhiber la fonction, maintenez à nouveau 5 secondes CALL/
restent actives. Pour
[12].
Fonction MON (Moniteur) / Squelch
La fonction moniteur désactive temporairement (ouvre) le Squelch, de façon à
pouvoir entendre les signaux trop faible pour pouvoir ouvrir en permanence le
Squelch. Pour activer le moniteur, appuyez en même temps sur les deux touches
▲▼. Suivez la même procédure pour la désactiver, ou éteignez la radio.
! Quand le MON est actif, vous entendrez probablement un bruit de fond
constant.
! Vous pouvez activer la fonction moniteur seulement si la fonction “d’Urgence”
est désactivé.
Scanner tous les canaux
Le Midland G8 peut automatiquement rechercher des signaux sur la bande de
fréquence en scannent tous les canaux en séquence rapide. Cette fonction est utile
pour trouver un canal actif. Quand un signal est détecté, le scanning fait une pause
de 5 secondes sur ce canal. Appuyez pendant 2 secondes sur la touche ▼ : le scan
démarre. Pour l’arrêter, appuyez sur la touche PTT: le Midland G8 retourne sur le
canal ou le scan a débuté.
! Vous ne pouvez activer la fonction SCAN que si la fonction “d’Urgence” est
inactive.
Touche “MENU”
Les fonctions suivantes peuvent être sélectionné par le bouton “MENU” :
Sélection du canal ›
Code de tonalité CTCSS ›
Code de tonalité DCS ›
Sélection de la puissance Haut/basse (Seulement en mode PMR446) ›
VOX ›
Vibreur ›
Mélodies d’appel ›
Roger Beep ›
Beep touche ›
Canal d’Urgence ›
Double veille ›
Out of Range ›
Sélection du canal
Appuyez une fois sur le bouton MENU. Le numéro du canal clignote à l’écran.
Appuyez sur les boutons pour monter ou descendre les canaux PMR puis les
canaux LPD afin de sélectionner le canal de votre choix.
Appuyez sur PTT pour confirmer, ou attendez 5 secondes.
En fonction de la version que vous possédez, vous pouvez choisir les canaux
suivants :
Version Bi bande : › PMR446 de P1 à P8 et de 9p à 24p (préprogrammé) / LPD
de 1 à 69.
Version E › (PMR446 seulement): de P1 à P8 et de 9p à 24p (préprogrammé)
! Le canal P8 à été choisi comme canal “D’urgence” par défaut, nous vous
recommandons de ne pas l’utiliser pour des communications générales!
Tonalité CTCSS/DCS
Les tonalités CTCSS et DCS peuvent être compare à des codes d’accès et
permettes à la radio de communiquer seulement avec les utilisateurs qui sont sur le
même canal et avec le même code. Pour chaque canal vous pouvez configurer 38
codes CTCSS et 104 codes DCS. Ces codes peuvent être configuré sur les canaux
suivants :
Version Bi bande: › uniquement sur les 8 canaux principaux PMR446 (de P1 à P8)
et sur les 69 canaux LPD.
Version E › (PMR446 uniquement): on uniquement sur les 8 canaux principaux
PMR446 (de P1 à P8)
Pour les deux version les canaux préprogrammés 9p à 24p ne peuvent pas être
modifié.
Activer les codes CTCSS:
Allumez la radio. ›
Sélectionnez le canal désirez en appuyant sur la touche › MENU et puis sur ▲▼.
Appuyez sur la touche › MENU jusqu’a ce que CTC s’affiche et que le code CTCSS
clignote à sa droite (“of”= pas de code – état par défaut).
Sélectionnez la tonalité CTCSS à l’aide des touches ▲▼. ›
Pour confirmer votre sélection appuyez sur › PTT ou attendez 5 secondes.
Désactiver les codes CTCSS:
Si vous ne voulez pas utiliser de tonalité CTCSS, suivez ces étapes:
36
Page 37

Sélectionnez le canal. ›
Appuyez sur la touche › MENU jusqu’a ce que CTC s’affiche et que le code CTCSS
clignote à sa droite.
Sélectionnez “ › of” à l’aide des touches ▲▼.
Activez les codes DCS:
Allumez la radio. ›
Sélectionnez le canal désirez en appuyant sur la touche › MENU et puis sur ▲▼.
Appuyez sur la touche › MENU jusqu’a ce que DCS s’affiche et que le code DCS
clignote à sa droite (“of”= pas de code – état par défaut).
Sélectionnez la tonalité DCS à l’aide des touches ▲▼. ›
Pour confirmer votre sélection appuyez sur › PTT ou attendez 5 secondes.
! Le canal P8 avec le codes DCS 50 (P8 50)à été paramétrer d’usine pour la
fonction “d’Urgence”; ne l’utilisez pas pour des communication générale!!
Désactiver les codes DCS:
Sélectionnez le canal. ›
Appuyez sur la touche › MENU jusqu’a ce que DCS s’affiche et que le code DCS
clignote à sa droite.
Sélectionnez “ › of” à l’aide des touches ▲▼.
Sélection de la puissance Haute/Basse (Seulement en PMR446)
Pour sélectionner le niveau de puissance, appuyez sur la touche MENU jusqu’a ce
que l’afficheur indique Pr. Utilisez les touches ▲▼ pour sélectionner L (puissance
basse) ou H (puissance haute). Pour confirmer votre sélection appuyez sur PTT ou
attendez 5 secondes.
Quand les batteries sont totalement chargées la puissance haute est de 500 mW
(PAR), alors quand puissance basse elle est de 10mW (PAR). Si vous deviez
communiquer sur une courte distance vous pouvez choisir la puissance basse pour
économiser les batteries.
La fonction VOX
Le Midland G8 permet une communication en mains-libres à l’aide de la fonction
VOX. Parlez simplement en direction du microphone et la communication s’établie
alors automatiquement. La sensibilité du VOX est réglable sur 3 niveaux. Vous
pouvez activer la fonction VOX avec ou sans accessoires.
Le quatrième niveau activable est la fonction TalkBack, si une radio émet en
permanence en VOX, la fonction VOX TB va automatiquement interrompre
l’émission après 20 secondes afin de permettre aux autres utilisateurs de répondre.
Pour activer la fonction VOX appuyez sur la touche MENU jusqu’à ce que VOX
apparaisse à l’écran.
Utilisez les touches ▲▼ pour choisir le niveau de sensibilité:
Of: Off ›
1: Haute ›
2: Moyenne ›
3: Basse ›
4: Talk Back (avec une sensibilité haute) ›
Pour confirmer votre sélection appuyez sur PTT ou attendez 5 secondes.
Pour désactiver la fonction VOX, suivez les meme étapes que précédementmais
sélecionnez le niveau oF.
Fonction Vibreur
Le Midland G8 est équipé d’un vibreur, qui permet d’avoir un appel silencieux plutôt
que sonore.
Pour activer cette fonction, appuyez sur la touche MENU jusqu’à ce que
affiché.
Utilisez les touches ▼▲ pour activez ou désactiver cet fonction (on: actif, oF:inactif).
Pour confirmer votre sélection appuyez sur PTT ou attendez 5 secondes.
soit
Fonction CALL
Le Midland G8 peut envoyer 5 différentes tonalités d’appel. Pour envoyer ce signal,
presser la touche CALL/
Pour sélectionner les tonalités d’appel:
Pour activer cet fonction, appuyez sur la touche › MENU jusqu’à ce que “CA” s’af-
fiche.
En pressant ▼▲ vous entendrez 5 mélodies préprogrammées. ›
Pour confirmer votre sélection appuyez sur › PTT ou attendez 5 secondes.
.
ROGER BEEP (Tonalité de fin de transmission)
A chaque fin de transmission (PTT [11] relâché), le Midland G8 émet un bip audio
indiquant au correspondant qu’il peut émettre à son tour.
Cette fonction est inhibée par défaut.
Pour activer cette fonction, appuyez sur la touche MENU jusqu’à ce que “ rb oF”
s’affiche.
Utilisez les boutons pour sélectionner “on” et “rb on” s’affiche;
Pour confirmer votre sélection appuyez sur PTT ou attendez 5 secondes.
Beep touches
A chaque fois que appuyez sur une touche vous attendez un beep.
Pour désactiver le bip d’appui touches, suivez la procédure :
Appuyez sur la touche › MENU jusqu’a afficher“bP on”.
Utilisez les boutons pour afficher “ › bP of”.
Pour confirmer votre sélection appuyez sur › PTT ou attendez 5 secondes.
A présent, vous n’entendrez plus de bip à chaque appui touche.
Fonction d’appel d’urgence
Le Midland G8 possède un canal dédié aux appels d’urgence. Tous les G8
fonctionnant dans un environnement proche et se même sur un autre canal,
37
Page 38

peuvent recevoir et émettre sur ce canal. Si vous gardez la touche EMG appuyé,
la communication bascule automatiquement sur le canal d’urgence (“EC” sur
l’afficheur). Un signal audio est alors transmit et tous les G8 à portée bascule
automatiquement sur le canal d’urgence (“EC”). Si vous avez désactivé cette fonction
vous ne recevrez, ni enverrez aucun appel d’urgence.
! Quand la radio fonctionne sur le canal d’urgence (EC sur l’afficheur), toutes
les touches excepté le PTT et CALL sont bloquées.
Le G8 retourne sur le canal précédemment utilise après une minute environ. Pour
revenir immédiatement, appuyé sur la Touche EMG. Maintenant, vous pouvez utiliser
toutes les fonctions du MENU.
Activé/Désactivé la fonction d’urgence
Quand vous allumez la radio, la fonction d’urgence est active, mais vous pouvez
l’activer ou la désactiver à nouveau :
Appuyez sur la touche MENU jusqu’a afficher EC on.
Sélectionnez EC of en appuyant sur ▲▼ . Pour confirmer votre sélection appuyez
sur PTT ou attendez 5 secondes.
! Quand la fonction d’urgence est active (EMG clignote sur l’afficheur), les
fonctions suivante ne peuvent plus être utilisées : Scan, Moniteur, Double
veille, Out of Range.
Modifier le canal d’urgence
Le canal d’urgence par défaut est P8 DCS 50, mais vous pouvez le modifier en
fonction de vos besoins.
Appuyez sur la touche MENU jusqu’a afficher EC on.
Appuyez a nouveau sur MENU (of est affiché) puis sélectionnez le canal voulue à
l’aide des touches ▲▼.
Pour confirmer votre sélection appuyez sur PTT ou attendez 5 secondes.
! Important: Assurez vous que la fonction d’urgence soit active! (EMG clignote).
Si décidez de modifier le canal dédié aux urgences, n’oubliez pas de faire la
modification sur toutes les radios!
Pour réactiver canal d’urgence par défaut est P8 DCS 50.
Appuyez sur la touche MENU jusqu’a afficher EC on.
Appuyez a nouveau sur MENU et choisissez of.
Pour confirmer votre sélection appuyez sur
! Si vous affectez un canal standard pour les appels d’urgences, rappelez
vous de ne l’utiliser que dans ce cas si, sinon vous risquez de causer des
interférences.
PTT ou attendez 5 secondes.
Fonction Out of range manuel
This function allows you to know if there are any radios within your range.
By pushing EMG twice, you will send a request of acknowledge to the other G8
operating within your range and tuned on the same channel.
If any radio replies, it means that it’s within your range and you will receive an audio
tone for confirmation.
38
! Cette fonction ne peut être utilise que si la fonction “Out of Range
automatique” est inactive.
Double veille
Cette option vous permet de surveiller deux canaux de votre choix. C’est utile si vous
voulez garder le contact avec deux autres personnes.
Activation:
Allumez la radio. ›
Sélectionnez avec les touches le premier canal que vous voulez surveiller. ›
Appuyez sur la touche › MENU jusqu’a afficher DW of.
Sélectionnez le second canal à surveiller à l’aide des touches. ›
Pour confirmer votre sélection appuyez sur › PTT ou attendez 5 secondes.
Maintenant la radio commence à scanner les deux canaux jusqu’a la réception d’un
signal sur l’un des canaux. Le scan reprend au bout de 30 secondes lorsque le
signal disparaît.
! Cette fonction peut être activé seulement si la fonction “D’urgence” est
désactivé.
Out-of-Range Automatique
Le G8 est équipé de la fonction “out of range”. En choisissant ce mode une paire de
G8 transmet toutes les 30 secondes des données de control. Dès que le contact est
interrompu ou que l’une des radios ne reçoit pas les données de control de fois de
suite, l’icône OUT clignote sur l’afficheur et un Beep retenti.
! Cette fonction peut être activé seulement si la fonction “D’urgence” est désactivé.
Activer – Désactiver
Appuyez sur la touche › MENU jusqu’a afficher “OUT” et “Or of”, sélectionnez “Or
on” (activer) à l’aide des touches ▲▼.
Éteignez les deux radios. ›
Allumez les deux radios en même temps. ›
Appuyez sur la touche › MENU jusqu’a afficher “OUT” et “Or on”, sélectionnez “Or
of” (désactivé) à l’aide des touches ▲▼.
Pour confirmer votre sélection appuyez sur › PTT ou attendez 5 secondes.
Éclairage de l’afficheur
S’il n’y a pas assez de lumière pour lire correctement l’afficheur, appuyez un court
instant sur EMG et l’afficheur s’éclaire alors pour une durée de 5 secondes. A chaque
appuie sur cette touche l’afficheur s’illumine.
Économie d’énergie
L’économie d’énergie batterie permet une réduction jusqu’à 50%, L’économie s’active
automatiquement quand la radio ne reçoit pas de signal plus de 7 secondes. Quand
les batteries sont déchargées l’icône
ou rechargez les.
! L’économie d’énergie n’est active que si la fonction d’urgence est
désactivée.
s’affiche à l’écran, remplacez les batteries
Page 39

Rechargement des batteries
Le pack batterie fournit est de type NiMH de 4.8V 800mAh et ne doit être rechargé
que lorsqu’il est insérer dans la radio, un rechargement complet nécessite 8 heures.
Pour recharger le pack batterie:
Connecter l’adaptateur secteur, puis connecter la jack au support de bureau.
Placer votre radio dans le socle du chargeur de bureau. La LED rouge du chargeur
s’allume.
Quand la charge est complète retirez la radio du chargeur et débrancher l’adaptateur
secteur.
! Ne surchargez pas les batteries! Quand la charge est complète le chargeur ne
s’arrête pas automatiquement. N’oubliez pas malgré tous de retirer la radio
du chargeur aussi tôt que les batteries sont chargées, sinon la radio ou les
batteries peuvent être endommagées.
! N’essayez pas de recharger des piles alcalines ou des batteries non
rechargeable.
Assurez vous que lorsque vous rechargez la radio, les batteries sont de type
NiMH ou que le pack fournit soit en place de le compartiment batteries !
Les piles alcalines ne sont pas rechargeables ! Les batteries qui ne sont pas
prévue pour être rechargées peuvent couler, exploser ou même brûler et
causer des dégâts !
! Utiliser un autre chargeur que celui prévue peut causer des dommages à la
radio ou provoqué une explosion et des dommages corporels.
! Ne jeter pas les batteries dans le feu ou près d’une source de chaleur, car
elles peuvent exploser et causer des dommages corporels. Éliminez les
batteries en respectant les lois en vigueurs.
! Ne mélangez pas d’anciennes batteries avec des nouvelles ou d’un type
différents ou qui a été utilisé d’une manière différente.
39
Page 40

40
Page 41

Midland G8
MANUAL DO UTILIZADOR
Obrigado por escolher a Midland! O Midland G8 é um emissor-receptor portátil de
utilização livre em quase todos os países europeus. Para informações adicionais,
sugerimos que consulte a tabela “Restrições de utilização”.
Combinando a mais recente tecnologia em comunicação rádio em conjunto com
uma armação mecânica resistente, o Midland G8 é a solução ideal e eficaz para os
profissionais que necessitam de se manter em contacto com colegas (estaleiros de
construção, edifícios, hotéis, feiras comerciais, exposições) ou junto de utilizadores
de lazer que apenas pretendem manter-se em contacto com amigos e família. A sua
armação robusta, a facilidade de utilização e o desenho simples significam que é ideal
para usar em qualquer actividade.
O Midland G8 encontra-se disponível em duas versões:
Banda dupla (PMR446/LPD) ›
Versão E (apenas PMR446) Este manual faz referência a ambos os modelos e as ›
diferenças entre as duas versões estarão realçadas.
Conteúdo
N.° 1 Midland G8 ›
N.° 1 Carregador de secretária único ›
N.° 1 Adaptador de parede ›
N.° 1 Conjunto de pilhas ›
N.° 1 Prendedor para o cinto ›
Cobertura/alcance
O alcance máximo depende das condições do terreno e é obtido durante utilização
num espaço aberto.
A única limitação em relação ao alcance máximo possível deve-se a factores
ambientais como, por exemplo, bloqueios provocados por árvores, edifícios, ou outros
obstáculos. No interior de um automóvel ou de uma construção metálica, o alcance
poderá ser mais reduzido. Normalmente, a cobertura na cidade, com edifícios ou
outras obstruções é de cerca de 1 ou 2 Km. Num espaço aberto mas com obstáculos,
tais como árvores, folhas ou casas, o alcance máximo possível é de cerca de 4-6 Km.
Num espaço aberto, sem obstáculos e à vista como, por exemplo, em montanha, a
cobertura pode ser de mais de 12 Km.
Pilhas e compartimento das pilhas
O emissor-receptor pode utilizar o conjunto de pilhas recarregáveis fornecido ou 4
pilhas recarregáveis/alcalinas tipo AAA. Para abrir o compartimento das pilhas: com a
parte de trás do rádio virada para si, desprenda o suporte das pilhas na parte inferior
do rádio e deslize suavemente a tampa. Introduza as pilhas fazendo corresponder as
respectivas polaridades e volte a colocar a tampa.
Atenção: o conjunto de pilhas fornecido tem de ser recarregado antes da
primeira utilização.
Avisos
PILHAS - Cumpra rigorosamente todos os avisos sobre as pilhas descritos no ›
capítulo “Recarregar as pilhas”.
Não abra o rádio por qualquer motivo! Os elementos mecânicos e electrónicos de ›
precisão do rádio exigem experiência e equipamento especializado; pelo mesmo
motivo, o rádio não deve, sob circunstância alguma, ser realinhado uma vez que já
foi calibrado para um desempenho máximo. A abertura não autorizada do emissorreceptor irá invalidar a garantia.
Não utilize detergentes, álcool, solventes ou produtos abrasivos para limpar o ›
equipamento. Utilize apenas um pano macio e limpo. Se o rádio estiver muito sujo,
utilize um pano ligeiramente humedecido com uma mistura de água e de sabonete
neutro.
CARACTERÍSTICAS
Nova característica “Chamada de emergência” ›
Midland G8 apresenta uma importante e inovadora característica: o canal dedicado ›
às emergências. As comunicações rádio geralmente realizam-se entre dois ou mais
utilizadores que estão sintonizados no mesmo canal: não é possível transmitir ou
receber de/para canais diferentes. Mas graças à função de “emergência”, também
pode manter o canal de emergência sob supervisão: todos os utilizadores com um
Midland G8 podem comunicar no canal sintonizado e ao mesmo tempo podem
receber/transmitir mensagens de emergência no canal dedicado. Basta manter
pressionado o botão EMG durante 3 segundos e uma chamada de emergência
será enviada para todos os G8 no seu alcance: estes serão automaticamente
sintonizados para o canal “EC” (canal de emergência).
Nova característica “Fora de alcance manual”: basta pressionar duas vezes o botão ›
EMG e irá verificar se existem rádios no âmbito do alcance do seu equipamento.
Nova característica “Vox TalkBack”: se um rádio estiver a transmitir continuamente ›
em VOX, a funcionalidade Vox TB irá parar automaticamente a transmissão ao fim
41
Page 42

de 20 segundos para permitir também a transmissão para os outros utilizadores.
Alimentação: 500mW (PMR446); 10mW (LPD) ›
Temperatura de funcionamento: de -20° a +55° C38 tons CTCSS/104 tons DCS ›
À prova de água: IPX5 ›
Chamada de emergência ›
Controlo de fora de alcance ›
VOX ajustável em 3 níveis e com “TalkBack” ›
INTERCOMUNICADOR ›
Vibra › CALL
Bloqueio de teclado ›
Poupança de energia automática: circuito de economia de corrente automático ›
Indicador de pilhas fracas ›
Vigilância dupla ›
CALL › com 5 melodias seleccionáveis
VARRIMENTO ›
Monitorização ›
Fora de alcance ›
Aviso de fim de transmissão (Roger beep) ›
Potência alta/baixa ›
Visor LCD com luz de fundo ›
Fonte de alimentação: Conjunto de pilhas NiMH 800mAh 4,8V ou 4 pilhas tipo ›
AAA
Ficha de acessórios de 2 pinos ›
Peso: 112 g (sem pilhas) ›
Dimensões: 59 x 98 x 32 mm ›
Duração das pilhas (em banda PMR446): mais de 12 horas com conjunto de pilhas ›
800mAh
Versões:
G8 banda dupla (PMR446/LPD) ›
24 canais PMR446 (8+16 pré-programados)/69 canais LPD
G8E (apenas PMR446) ›
24 canais PMR446 (8+16 pré-programados)
E FUNÇÕES
Visor
O seu Midland G8 mantémno constantemente actualizado
sobre o seu estado operacional
através de um visor de cristais
líquidos (LCD). Os símbolos e os
seus parâmetros correspondentes
que possam ser apresentados,
em conformidade com o estado
operacional do aparelho, são
descritos da seguinte forma:
1. CANAL Estes dois dígitos grandes indicam o canal seleccionado
2. VOX Função VOX activada
3.
4. EMG Função de emergência activada
5. DW Dupla vigilância activada
6.
7.
8. OUT Indica se a função de fora de alcance automática perde
9. RX Modo de recepção
10. TX Indica a transmissão (PTT pressionado);
11. H (alto)/L (baixo) Selecção de potência alta ou baixa.
12. CTCSS/DCS Indica o tipo de tom sub-áudio seleccionado.
13. CTCSS/DCS Estes três dígitos pequenos indicam o código dos tons
14. ROGER Aviso de fim de transmissão activado.
Este símbolo é visualizado quando o bloqueio do teclado
está activado
Indica o estado da bateria
Função Vibra-CALL activada
contacto com os outros rádios.
CTCSS/DCS seleccionados (1-38/1-104)
3
2
5
1
4687
11
9
10
12
13
14
DESCRIÇÃO DOS CONTROLOS
42
Rádio
Consulte esta imagem para identificar as várias peças do dispositivo:
15. Altifalante integrado Aqui é onde está instalado o altifalante.
16. Botão MENU Pressione este botão para entrar no MENU do
rádio.
17. Botão CALL/
18. PTT (“push to talk”) Pressione este botão para transmitir.
19. Botão rotativo de VOLUME Interruptor de ligado/desligado do dispositivo e
Para enviar uma chamada no canal seleccionado.
Se mantiver pressionado durante cerca de 5
segundos, o bloqueio do teclado é activado.
regulador do VOLUME da recepção.
Page 43

20. ANTENA Recebe e transmite sinais de rádio.
21. Tomada de acessórios (sobre cobertura protectora) Para ligar dispositivos
de áudio externos como, por exemplo, microfones,
carregadores, etc. (2 pinos)
22. Botão EMG Para activar as funções de Emergência e de Fora
de alcance manual.
23. Botões ▲▼ Para alterar a definição no interior do MENU
24. Microfone integrado É aqui que o som é captado pelo microfone.
25. Ficha de intercomunicador Para ligar a acessórios de auscultador/
microfone adequados para comunicações de
intercomunicador.
20
Ligar/Desligar
Para ligar o emissor-receptor, rode o botão rotativo de VOLUME no sentido dos
ponteiros do relógio até escutar este emitir um “clique”.
Para desligar o emissor-receptor, rode o botão rotativo no sentido contrário aos
ponteiros do relógio.
Seleccionar a banda PMR466 ou LDP (apenas para a versão de
banda dupla)
Midland G8 (banda dupla) é pré-programado de fábrica na banda PMR446.
Para mudar para a banda LPD, mantenha pressionado o botão MENU até o LPD
apresentar o canal “1”.
Para regressar à banda PMR446, mantenha pressionado o botão MENU novamente,
até o LCD apresentar o canal “P1”.
! Este procedimento desactiva a função“EMG”; como tal, se mudar a banda
de frequência, lembre-se de activar a função de emergência novamente (ver
parágrafo “Função de emergência”).
Selecção de canal
Pressione o botão MENU. O número do canal irá começar a piscar no visor.
Pressione os botões de deslocação ▼▲ até seleccionar o canal pretendido. Pressione
o botão PTT para confirmar, ou aguarde durante 5 segundos.
Consoante a versão que adquiriu, pode escolher entre os seguintes canais: ›
Versão de banda dupla: PMR446 de P1 a P8 e de 9p a 24p (pré-programados)/ ›
LPD de 1 a 69.
Versão E (apenas PMR446): de P1 a P8 e de 9p a 24p (pré-programados) ›
! O canal 8 foi programado de fábrica para a função de “Emergência”;
sugerimos que não o utilize para comunicações gerais!
19
18
17
16
MENU
Visualizar o canal/tom sub-áudio
Para visualizar temporariamente o canal PMR446 e o tom sub-áudio utilizado nos
canais pré-programados, avance para o canal pretendido (de 9p a 24p) e mantenha
EMG OUT
DW
H L
DCS CTC
ROGER
CALL
EMG
21
22
23
24
25
15
pressionado o botão ▼ durante 3 segundos.
Transmissão e recepção
Para transmitir mantenha o botão PTT pressionado com firmeza. Aguarde por uma
fracção de um segundo e, de seguida, fale normalmente na direcção do microfone e
segure o dispositivo a uma distância de cerca de 5 cm; TX será visualizado no visor.
Quando terminar, liberte o botão PTT.
Quando o rádio está no modo de recepção (PTT não pressionado) irá receber
automaticamente qualquer comunicação. RX será visualizado no visor.
Regulação do VOLUME
Rode o botão rotativo VOLUME até alcançar o nível pretendido.
43
Page 44

“CALL”
Pressione o botão CALL (chamada) e irá enviar um sinal de áudio para os utilizadores
sintonizados no mesmo canal; pode escolher entre os diferentes tons de chamada.
“Emergência”
Quando a função de Emergência está activada (EMG pisca no visor) mantenha
pressionado EMG durante 3 segundos e irá enviar uma chamada de emergência para
os outros aparelhos G8 no seu alcance.
A função de Emergência está activada por predefinição.
Selecção de potência alta/baixa (apenas na banda PMR446) ›
VOX ›
Função Vibra › CALL
Melodias de chamada ›
Aviso de final de transmissão ›
Bloqueio do teclado ›
Canal de emergência ›
Função de vigilância dupla ›
Fora de alcance ›
Bloqueio de teclado
Mantenha pressionado CALL/ durante cerca de 5 segundos e será visualizado
como confirmação. Apenas PTT, EMG e CALL/
desactivar esta função, mantenha pressionado novamente CALL/
5 segundos.
permanecem activos. Para
durante cerca de
Função MON (monitorização)/Ruído de fundo (squelch)
O botão de monitorização destina-se a excluir temporariamente (abrir) a restrição ao
ruído de fundo (squelch), com vista a escutar sinais que são demasiado fracos para
manter a função constantemente aberta.
Para activar a função de monitorização, mantenha pressionados os botões ▲▼
durante 2 segundos ao mesmo tempo. Siga o mesmo procedimento para desactivar a
função, ou desligue e volte a ligar o rádio.
! Quando a função MON (monitorização) está activa, irá provavelmente escutar
um ruído de fundo constante.
! Só pode activar a função de monitorização se a função “Emergência” estiver
desactivada.
Varrimento de todos os canais
Midland G8 pode procurar automaticamente sinais ao longo das bandas através do
varrimento de canais em sequência rápida. Esta função é útil para encontrar canais
activos.
Quando é detectado um sinal, o varrimento é colocado em pausa nesse canal durante
5 segundos. Pressione ▼ durante 2 segundos: o varrimento irá começar. Para parar,
pressione PTT: o Midland G8 irá regressar ao canal a partir do qual o varrimento teve
originalmente início.
! Só pode activar a função de varrimento se a função “Emergência” estiver
desactivada.
Tecla “MENU”
Pode seleccionar as funções seguintes através da utilização do botão “MENU”:
Selecção de canal ›
Definição de tom CTCSS ›
Definição de tom DCS ›
Selecção de canal
Pressione o botão MENU. O número do canal irá começar a piscar no visor.
Pressione os botões de deslocação ▼▲ até seleccionar o canal pretendido. Pressione
o botão PTT para confirmar, ou aguarde durante 5 segundos.
Consoante a versão que adquiriu, pode escolher entre os seguintes canais: ›
Versão de banda dupla: PMR446 de P1 a P8 e de 9p a 24p (pré-programados)/ ›
LPD de 1 a 69.
Versão E (apenas PMR446): de P1 a P8 e de 9p a 24p (pré-programados) ›
! O canal 8 foi programado de fábrica para a função de “Emergência”;
sugerimos que não o utilize para comunicações gerais!
Definição de tom CTCSS/DCS
Os tons CTCSS e DCS são idênticos a códigos de acesso e permitem ao rádio
comunicar com apenas os utilizadores que estão sintonizados no mesmo canal e que
tenham definido o mesmo código. Para cada canal, pode definir até 38 tons CTCSS
e 104 tons DCS.
Estes tons podem ser definidos nos seguintes canais: ›
Versão de banda dupla: apenas nos 8 canais PMR446 principais (de P1 a P8) e ›
nos 69 canais LPD.
Versão E (apenas PMR446): apenas nos 8 canais PMR446 principais (de P1 a P8) ›
Para ambos, os canais pré-programados de 9p a 24p não podem ser modificados.
Activar os tons CTCSS:
Ligue a unidade. ›
Seleccione o canal pretendido pressionando o botão › MENU e os canais ▲▼.
Pressione o botão › MENU até o visor apresentar CTC e o tom CTCSS pisca à direita
(“of” = nenhum código – condição predefinida).
Seleccione o tom CTCSS pretendido pressionando ▲▼. ›
Para confirmar a definição, pressione › PTT ou aguarde 5 segundos.
Desactivar os tons CTCSS:
Se não pretender utilizar os tons CTCSS, siga estes passos:
Seleccione o canal pretendido. ›
Pressione a tecla › MENU até o visor apresentar o tom CTCSS a piscar à esquerda;
Seleccione “of” através da utilização dos botões ▲▼. ›
Activação dos códigos DCS:
Ligue a unidade. ›
44
Page 45

Seleccione o canal pretendido pressionando as teclas › MENU e ▲▼.
Pressione o botão › MENU novamente até o visor apresentar DCS e o código de tom
piscar à direita (“of” = nenhum código – condição predefinida).
Seleccione o tom DCS pretendido pressionando ▲▼. ›
Para confirmar a definição, pressione › PTT ou aguarde 5 segundos.
! O canal P8 com tom DCS 50 (P850) foi programado de fábrica para a função
de “Emergência”; não o utilize para comunicações gerais!!
Desactivação dos códigos DCS: ›
Seleccione o canal pretendido. ›
Pressione a tecla › MENU até o visor apresentar o canal a ser usado e o código DCS
piscar à direita.
Seleccione “of” pressionando ▲▼. ›
Para activar esta funcionalidade, pressione o botão MENU até o visor apresentar
utilize os botões ▼▲ para desactivar ou activar esta funcionalidade (on: activa, oF:
desactiva);
Pressione PTT [11] para confirmar ou aguarde durante 5 segundos.
Função CALL
Midland G8 pode enviar 5 tons de chamada diferentes. Para enviar este sinal de
áudio para outros utilizadores, pressione a tecla CALL/
Para seleccionar os tons de chamada:
Pressione › MENU, até o visor apresentar a indicação “CA” e o código de tom ac-
tivo.
Se pressionar ▲▼ irá escutar as 5 melodias pré-programadas. ›
Confirme pressionando › PTT ou aguarde 5 segundos.
.
;
Selecção de potência alta/baixa (apenas na banda PMR446)
Para seleccionar o nível de potência, pressione o botão MENU até o visor apresentar
a indicação Pr. Utilize os botões ▲▼ para seleccionar L (baixa potência) ou H (alta
potência). Para confirmar a sua selecção, pressione PTT ou aguarde 5 segundos.
Quando as pilhas estão completamente carregadas, a potência alta é de 500 mW
(ERP), ao passo que a potência baixa é de 10mW (ERP). Se o seu rádio tiver de
operar num alcance curto, pode seleccionar a baixa potência e deste modo prolongar
a duração das pilhas.
Função VOX
Midland G8 permite conversações mãos-livres através da função VOX: basta falar na
direcção do microfone e a comunicação será activada automaticamente.
A sensibilidade VOX pode ser ajustada em 3 níveis diferentes. Pode activar a função
VOX com ou sem acessórios. O quarto nível activado é a função Vox TalkBack: se um
rádio estiver a transmitir continuamente em VOX, a funcionalidade VOX TB irá parar
automaticamente a transmissão ao fim de 20 segundos para permitir a transmissão
também para os outros utilizadores.
Para activar a função VOX pressione o botão MENU até a indicação VOX surgir no
visor.
Utilize os botões ▲▼ para seleccionar os níveis de sensibilidade: ›
Of: Desligado; ›
1: Alto ›
2: Médio ›
3: Baixo ›
4: Talk Back (com sensibilidade alta) ›
Para confirmar a sua selecção, pressione PTT ou aguarde 5 segundos.
Para desactivar a função VOX, siga o procedimento descrito anteriormente e
seleccione oF.
Função Vibra-CALL
Midland G8 está equipado com a função “Vibra-CALL”, a qual oferece um alerta
silencioso para chamadas recebidas.
ROGER BEEP (tom de final de transmissão)
Quando o botão PTT é libertado, o rádio emite um sinal sonoro para confirmar aos
outros utilizadores que a sua transmissão terminou.
No Midland G8 esta função vem desactivada de fábrica.
Para a activar:
Pressione o botão MENU até o visor apresentar “rb of”; utilizando os botões de
deslocação ▼▲ seleccione “on” e “rb on” será visualizado; para confirmar a activação
do aviso de final de transmissão, pressione PTT ou aguarde durante 5 segundos.
Bloqueio do teclado
Cada vez que pressionar um botão, irá escutar um sinal sonoro.
Para desactivar os sinais sonoros, siga este procedimento: ›
Pressione o botão › MENU, até o visor apresentar “bP on”.
Pressione ▲▼ até ser visualizado “bP of”. ›
Confirme a sua selecção pressionando › PTT ou aguarde 5 segundos.
Deste modo, todos os sinais sonoros e tons são desactivados.
Para activar o sinal sonoro do teclado, repita este procedimento e seleccione “bP on”
Função de chamada de emergência
O Midland G8 dedica uma canal para as chamadas de emergência: todos os aparelhos
G8 a funcionar no seu alcance, mesmo que sintonizados em canais diferentes, podem
receber/transmitir mensagens de emergência nesse canal.
Se mantiver pressionado o botão EMG, as comunicações mudam automaticamente
para o canal de emergência (“EC” no visor). Será enviado um sinal de áudio e todos
os aparelhos G8 a operar nesse alcance serão automaticamente colocados no canal
de emergência (“EC”).
Se desactivou esta função, não irá receber/transmitir nenhuma chamada de
emergência.
! Quando o rádio estiver a funcionar no canal de emergência (EC visualizado),
todos os botões com excepção de PTT e CALL estarão desactivados.
45
Page 46

O G8 irá regressar ao canal em utilização um minuto depois da última transmissão.
Para regressar imediatamente, pressione EMG. Agora pode utilizar todas as funções
de MENU.
Activar/desactivar a função de emergência
Quando liga o aparelho, a função de emergência é activada, mas pode desactivá-la e
voltar a ligá-la novamente:
Pressione o botão MENU até o visor apresentar a indicação EC on.
Seleccione EC of utilizando os botões ▲▼. Confirme a sua selecção pressionando
PTT ou aguarde 5 segundos.
! Quando a função de emergência é activada (EMG a piscar no visor) as funções
indicadas a seguir não podem ser utilizadas: varrimento, monitorização,
vigilância dupla, fora de alcance.
Alterar o canal de emergência
O canal de emergência originalmente predefinido é o P8 DCS 50; mas pode alterá-lo
em conformidade com as suas necessidades.
! Importante: certifique-se de que a função de emergência está activa! (EMG a
piscar). Se decidir alterar o canal dedicado à função de emergência, não se
esqueça de realizar a mesma alteração em todos os rádios!
Pressione o botão MENU até o visor apresentar a indicação EC on.
Pressione o botão MENU novamente (of é visualizado) e seleccione o canal
pretendido utilizando os botões ▲▼. Para confirmar, pressione o botão PTT ou
aguarde 5 segundos.
! Importante: certifique-se de que a função de emergência está activa! (EMG a
piscar).
Se decidir alterar o canal dedicado à função de emergência, não se esqueça
de realizar a mesma alteração em todos os rádios!
Para definir novamente o canal de emergência original (P8 DCS 50) pressione o botão
MENU até ser visualizada no visor a indicação EC on.
Pressione o botão MENU novamente e seleccione of.
Para confirmar, pressione PTT ou aguarde durante 5 segundos.
! Se dedicar algum dos canais padrão para a função de emergência, lembre-
se de o utilizar apenas para esse propósito, caso contrário irá provocar
interferências.
Função Fora de alcance manual
Esta função permite-lhe saber se existem rádios no âmbito do alcance do seu
aparelho.
Pressionando EMG duas vezes, irá enviar um pedido de reconhecimento para outros
aparelhos G8 a operar no âmbito do seu alcance e sintonizados no mesmo canal.
Se algum rádio responder, isto significa que se encontra no seu alcance e irá receber
um tom de áudio de confirmação.
! Esta função só pode ser utilizada se a função “Fora de alcance automático”
não estiver activa.
46
VIGILÂNCIA DUPLA
A vigilância dupla permite-lhe monitorizar constantemente dois canais à sua escolha
ao mesmo tempo.
Activar - Desactivar
Pressione o botão › MENU até o visor apresentar a indicação DW of.
Seleccione o segundo canal a monitorizar pressionando os botões ▲▼. ›
Para confirmar a sua selecção, pressione › PTT ou aguarde 5 segundos. O visor
irá mostrar de forma alternada o canal em utilização e o segundo canal a ser monitorizado.
Para parar a função, basta pressionar o botão MENU.
Quando o emissor-receptor detecta uma transmissão num dos dois canais, a vigilância
dupla é colocada temporariamente em pausa, permanece sintonizada durante 5
segundos no canal correspondente, dando ao utilizador a oportunidade de responder
a uma chamada. Após esta pausa, a vigilância dupla é novamente reiniciada.
! Esta função só pode ser activada se a função “Emergência” estiver
desactivada.
Fora de alcance automático
Ao definir este modo um conjunto de 2 aparelhos G8 realiza uma transmissão a cada
30 segundos de um código de controlo de dados. Assim que o contacto entre os dois
aparelhos estiver a perder-se e que um rádio não receba este código de controlo de
dados duas vezes consecutivas, o ícone OUT começa a piscar e irá escutar um sinal
sonoro.
! Esta função só pode ser activada se a função “Emergência” estiver
desactivada.
Activar – Desactivar
Pressione o botão MENU até o visor apresentar “OUT” e “Or of”, seleccione “Or on”
(activado) com os botões ▲▼.
Desligue os dois rádios.
Ligue-os ao mesmo tempo.
Para desactivar esta função, pressione o botão MENU até “OUT” e “Or on” serem
visualizados; seleccione “Or of” (desactivado) com os botões ▲▼.
Confirme a sua selecção pressionando PTT ou aguarde 5 segundos.
Iluminação do visor
Se não existir luz suficiente para ler o visor, pressione brevemente o botão EMG e a
iluminação do visor irá ligar-se durante cerca de 5 segundos. Cada vez que o botão
MENU é pressionado, o visor irá acender-se automaticamente.
Poupança de energia
A função de poupança de energia das pilhas permite uma redução no consumo de até
50%; a poupança de energia activa-se automaticamente quando o emissor-receptor
não recebe qualquer sinal durante mais de 7 segundos. Quando as pilhas estão
descarregadas, o ícone
o conjunto de pilhas.
é visualizado no visor: substitua as pilhas ou recarregue
Page 47

! A poupança de energia apenas é activada se a função de emergência estiver
desactivada.
Recarregar as pilhas
O conjunto de pilhas fornecido é do tipo NiMH 4,8V 800mAh e tem de ser recarregado
apenas quando for introduzido no rádio; demora 8 horas a carregar completamente.
Para recarregar o conjunto de pilhas:
Ligue a tomada do adaptador de parede à alimentação eléctrica e introduza a ficha do
adaptador de parede na tomada do carregador de secretária.
Coloque o seu emissor-receptor no suporte do carregador de secretária. O LED
vermelho do carregador irá acender-se. Quando o carregamento estiver concluído
retire o emissor-receptor do suporte e desligue a tomada do adaptador de parede da
alimentação eléctrica.
! Não sobrecarregue as pilhas! Quando estas estiverem completamente
carregadas o processo de carregamento não pára automaticamente. Não se
esqueça portanto, de remover o emissor-receptor do carregador assim que
as pilhas estiverem carregadas, caso contrário o rádio e as pilhas poderão
ser danificados.
! Não tente carregar pilhas alcalinas ou pilhas não recarregáveis. Certifique-se
de que quando carrega o rádio, apenas são utilizadas pilhas recarregáveis NIMH ou o conjunto de pilhas fornecido no compartimento das pilhas! As pilhas
alcalinas não são recarregáveis! As pilhas que não são adequadas para
serem recarregadas podem ter fugas, explodir ou mesmo arder e provocar
danos!
! Utilizar um carregador de pilhas diferente do especificado pode provocar
danos ao seu aparelho ou pode mesmo provocar explosões e ferimentos
pessoais.
! Não atire pilhas para o lume nem as coloque próximas de calor uma vez que
isto pode provocar explosões ou ferimentos pessoais. Elimine as pilhas em
conformidade com os procedimentos definidos pelas suas normas locais.
! Não misture pilhas novas e velhas ou pilhas de tipos diferentes ou mesmo
pilhas que tenham sido utilizadas de formas diferentes.
47
Page 48

48
Page 49

Midland G8
ΕΓΧΕΙΡΙΔΙΟ ΧΡΗΣΗΣ
Ευχαριστούμε που επιλέξατε τη Midland! Ο Midland G8 είναι ένας φορητός
πομποδέκτης licence free σχεδόν σε όλες τις ευρωπαϊκές χώρες. Για περισσότερες
πληροφορίες, προτείνουμε να δείτε το διάγραμμα των “περιορισμών στη χρήση”.
Συνδυάζοντας την τελευταία λέξη της τεχνολογίας μέσα σε ένα ανθεκτικό πλαίσιο, ο
Midland G8 είναι η ιδανική και αποτελεσματική λύση τόσο για τους επαγγελματίες
που θέλουν να μείνουν σε επαφή με τους συνεργάτες τους (μοτοσικλετιστές,
κατασκευαστικές / οικοδομικές εταιρείες, τουριστικά συγκροτήματα / ξενοδοχεία,
αθλητικές εκδηλώσεις, συναυλίες), όσο και για τους απλούς χρήστες που θέλουν
να βρίσκονται σε επικοινωνία με τους φίλους και την οικογένειά τους. Η ανθεκτική
κατασκευή, η ευκολία στη χρήση και ο απλός σχεδιασμός,
ιδανική για οποιαδήποτε δραστηριότητα.
Ο Midland G8 είναι διαθέσιμος σε δύο εκδόσεις:
Dual Band (PMR446/LPD) ›
Έκδοση Ε (PMR446 μόνο) ›
Αυτό το εγχειρίδιο αναφέρεται και στα δύο μοντέλα και θα βρείτε τονισμένες τις
διαφορές μεταξύ των δύο εκδόσεων.
Περιεχόμενα συσκευασίας
1 Midland G8
1 μονός επιτραπέζιος φορτιστής
1 αντάπτορας τοίχου
1 pack μπαταριών
1 κλίπ ζώνης
Κάλυψη / Εμβέλεια
Η
μέγιστη εμβέλεια επιτυγχάνεται όταν χρησιμοποιείται σε ανοιχτό χώρο. Ο μόνος
περιορισμός στην εμβέλεια τίθεται από παράγοντες όπως η διαμόρφωση του εδάφους,
συστάδες δένδρων, κτίρια, ή άλλα εμπόδια. Μέσα σε αυτοκίνητα ή μεταλλικές
κατασκευές η εμβέλεια μειώνεται. Φυσιολογικά η κάλυψη στην πόλη, με κτήρια ή άλλα
εμπόδια είναι περίπου 1 με 2 χλμ. Σε
φυλλωσιές ή σπίτια το μέγιστο δυνατό εύρος είναι περίπου 4-6 χλμ. Σε ανοιχτό χώρο,
για περιοχές χωρίς εμπόδια και μέσα στο οπτικό σας πεδίο, όπως παραδείγματος
χάριν στο βουνό, η κάλυψη μπορεί να είναι περισσότερη από 12 χλμ.
ανοιχτό χώρο αλλά με εμπόδια όπως δέντρα,
καθιστούν την συσκευή
Οι μπαταρίες και η θήκη μπαταριών
Ο πομποδέκτης
αλκαλικές ή επαναφορτιζόμενες μπαταρίες. Για να ανοίξετε το χώρο των μπαταριών:
κοιτώντας τη πλάτη του πομποδέκτη , απαγκιστρώστε το κλείστρο της μπαταρίας στο
κάτω μέρος του πομποδέκτη και γλιστρήστε απαλά το κάλυμμα προς τα έξω Εισάγετε
την μπαταρία προσέχοντας την πολικότητα και τοποθετήστε το κάλυμμα
του.
Προσοχή: το παρεχόμενο pack μπαταριών πρέπει να επαναφορτιστεί πριν από
την πρώτη χρήση.
Προειδοποιήσεις
ΜΠΑΤΑΡΙΕΣ › - Ακολουθήστε αυστηρά όλες τις οδηγίες και τις προειδοποιήσεις που
αφορούν τις μπαταρίες όπως αυτές εμφανίζονται στo κεφάλαιο “επαναφόρτιση
μπαταριών”
Μην ανοίγετε τη συσκευή για κανένα λόγο! › Τα μεγάλης ακρίβειας μηχανικά και
ηλεκτρονικά
δεν πρέπει να προσπαθήσετε να συντονίσετε εσωτερικά τη συσκευή αφού έχει ήδη
συντονιστεί για να έχει τη βέλτιστη απόδοση. Κάθε επέμβαση μη αρμοδίου, θέτει
τον πομποδέκτη εκτός εγγύησης.
Μην χρησιμοποιείτε απορρυπαντικά, οινόπνευμα ή στιλβωτικά για να ›
καθαρίσετε τη
ο πομποδέκτης σας είναι πολύ λερωμένος βρέξτε ελαφρώς το πανί σε διάλυμα
ουδέτερου σαπουνιού.
›
›
δέχεται το παρεχόμενο επαναφορτιζόμενο pack μπαταριών ή 4 AAA
πάλι στη θέση
μέρη της απαιτούν εμπειρία και ειδικό εξοπλισμό. Για τον ίδιο λόγο,
συσκευή. Χρησιμοποιείτε μόνο ένα απαλό καθαρό πανί. Αν
ΧΑΡΑΚΤΗΡΙΣΤΙΚΑ
Νέα λειτουργία “επείγουσα κλήση” ›
O › Midland G8 εισάγει ένα καινοτόμο και σημαντικό χαρακτηριστικό: το κανάλι που
είναι μόνο για επείγουσες καταστάσεις. Οι ραδιοεπικοινωνίες συμβαίνουν συνήθως
μεταξύ δύο ή περισσότερων χρηστών που είναι συντονισμένοι στο ίδιο κανάλι: δεν
είναι δυνατό να γίνει εκπομπή ή λήψη σε / από διαφορετικά κανάλια. Αλλά χάρη
λειτουργία “επείγουσας κλήσης”, μπορείτε να ελέγχετε το κανάλι έκτακτης ανάγκης:
όλοι οι χρήστες που έχουν ένα Midland G8 μπορούν να επικοινωνήσουν στο κανάλι
που είναι συντονισμένοι και μπορούν συγχρόνως να λαμβάνουν / εκπέμπουν
μηνύματα έκτακτης ανάγκης στο κατ’ εξοχήν γι αυτό κανάλι. Απλά κρατήστε
πιεσμένο το κουμπί EMG για 3 δευτερόλεπτα και μια
σταλεί σε όλα τα G8 που είναι σε εμβέλεια: θα συντονιστούν αυτόματα στο κανάλι
“EC” (κανάλι έκτακτης ανάγκης).
Νέα λειτουργία “Χειροκίνητος έλεγχος out of range(εκτός εμβέλειας)” › :
απλά πιέστε δύο φορές το κουμπί EMG και θα ελέγξετε εάν υπάρχουν μερικοί
κλήση έκτακτης ανάγκης θα
στη
49
Page 50

πομποδέκτες μέσα στην εμβέλεια της συσκευής σας.
Νέα λειτουργία “Vox TalkBack”: › εάν ένας πομποδέκτης μεταδίδει συνεχώς σε
VOX, η λειτουργία Vox TB θα σταματήσει αυτόματα την εκπομπή μετά από 20” για
να επιτρέψει την εκπομπή και στους άλλους χρήστες.
Ισχύς : 500 mW (PMR446); 10mW (LPD) ›
Θερμοκρασία λειτουργίας : από -20° έως +55° C ›
38 CTCSS /104 DCS ›
Πρότυπο στεγανότητας: IPX5 ›
Λειτουργία επείγουσας κλήσης ›
Έλεγχος
Ρυθμιζόμενο VOX σε 3 επίπεδα με λειτουργία “TalkBack” ›
INTERCOM ›
Λειτουργία δόνησης Vibra › CALL
Κλείδωμα πλήκτρων ›
Λειτουργία εξοικονόμησης ρεύματος:αυτόματο κύκλωμα εξοικονόμησης μπαταρίας ›
Ένδειξη χαμηλής στάθμης μπαταρίας ›
Λειτουργία Dual Watch ›
Λειτουργία › CALL με 5 επιλέξιμες μελωδίες
Σάρωση (SCAN) ›
Λειτουργία Monitor ›
Λειτουργία ελέγχου “ εκτός εμβέλειας ” (out of range) ›
Roger beep ›
Επιλογή υψηλής / χαμηλής ισχύος (hi / low)
›
LCD οθόνη με φωτισμό ›
Τροφοδοσία: pack μπαταριών NiMH 800mAh 4,8V ή 4 AAA μπαταρίες ›
Υποδοχή αξεσουάρ 2 pin ›
Βάρος: 112 gr (χωρίς μπαταρίες) ›
Διαστάσεις: 59x98x32mm ›
Διάρκεια μπαταρίας (στη μπάντα PMR446 ): πάνω από 12 ώρες με pack μπαταριών ›
800mAh
Εκδόσεις
G8 Dual Band (PMR446/LPD) ›
24 PMR446 Κανάλια (8 + 16 αποθηκευμένα) / 69 LPD Κανάλια
G8E (PMR446 μόνο) ›
24 PMR446 Κανάλια (8 + 16 αποθηκευμένα)
εκτός εμβέλειας (out of range) ›
50
ΠΕΡΙΓΡΑΦΗ ΜΕΡΩΝ ΣΥΣΚΕΥΗΣ ΚΑΙ ΛΕΙΤΟΥΡΓΙΩΝ
Οθόνη
Οι λειτουργίες και η τρέχουσα
κατάσταση του πομποδέκτη,
εμφανίζονται διαρκώς στην
οθόνη (LCD). Τα σύμβολα και οι
αντίστοιχες παράμετροι δίνουν
λεπτομερείς πληροφορίες οι
οποίες αναφέρονται αναλυτικά
παρακάτω:
3
2
5
1
1. ΚΑΝΑΛΙ Τα δύο μεγάλα ψηφία δείχνουν το επιλεγμένο κανάλι
2. VOX Ενεργοποίηση της λειτουργίας VOX.
3.
4. EMG Ενεργοποίηση της λειτουργίας έκτακτης ανάγκης
5. DW Ενεργοποίηση της λειτουργίας Dual Watch
6.
7.
8. OUT Δείχνει εάν η λειτουργία αυτόματου ελέγχου out of range (εκτός
9. RX εμφανίζεται όταν ο πομποδέκτης λαμβάνει σήμα
10. TX εμφανίζεται κατά τη διάρκεια της εκπομπής (πατημένο PTT).
11. H (High) / L(Low) επιλεγμένη η υψηλή / χαμηλή ισχύς αντίστοιχα.
12. CTCSS / DCS Δείχνει το
13. CTCSS / DCS τα 3 μικρά ψηφία δείχνουν τον επιλεγμένο υπότονο CTCSS/
14. ROGER Ενεργοποίηση Roger Beep
Εμφανίζεται όταν τα πλήκτρα είναι κλειδωμένα
Δείχνει τη στάθμη της μπαταρίας
Είναι ενεργοποιημένη η λειτουργία δόνησης.VibraCALL
εμβέλειας) έχει χάσει επαφή με τους άλλους πομποδέκτες
τύπο του υποτόνου που έχει επιλεχθεί
DCS (1 – 38/ 1-104)
Πομποδέκτης
Στην εικόνα φαίνονται τα διάφορα μέρη της συσκευής:
15. Ενσωματωμένο μεγάφωνο
16. Πλήκτρο MENU Για εμφάνιση του MENU επιλογών του
πομποδέκτη
17. Πλήκτρο CALL/
18. Πλήκτρο PTT (push to talk) Κρατήστε το πατημένο για να
19. Κουμπί VOLUME Ενεργοποίηση/ απενεργοποίηση της συσκευής και
20. ΚΕΡΑΙΑ
για αποστολή κλήσης στο επιλεγμένο κανάλι.
Κρατήστε το πατημένο για 5 sec προκειμένου να
κλειδώσετε τα πλήκτρα.
εκπέμψετε.
ρύθμιση της έντασης φωνής
4687
11
9
10
12
13
14
Page 51

21. Υποδοχή μικρομεγαφώνου SPK/MIC (προστατεύεται από λαστιχένιο
κάλυμμα) Για τη σύνδεση εξωτερικών αξεσουάρ
ήχου (κεφαλοακουστικά, μικρόφωνα κλπ) και για
τη φόρτιση των μπαταριών (2 pin)
22. Πλήκτρο EMG Για ενεργοποίηση της λειτουργίας επείγουσας
κατάστασης και της λειτουργίας χειροκίνητου
ελέγχου out of range (εκτός εμβέλειας)
23. Πλήκτρα ▲▼ Για αλλαγή των ρυθμίσεων του MENU
24. Ενσωματωμένο μικρόφωνο
25. Υποδοχή intercom Για σύνδεση
για επικοινωνίες intercom μηχανής
με ακουστικά / μικρόφωνα κατάλληλα
Ενεργοποίηση/ απενεργοποίηση (on/off)
Για να ενεργοποιήσετε τον πομποδέκτη περιστρέψτε το κουμπί VOLUME δεξιόστροφα
μέχρι να
ακούσετε ένα κλικ. Για να απενεργοποιήσετε τον πομποδέκτη, περιστρέψτε
αριστερόστροφα το ίδιο κουμπί ώσπου να ακουστεί κλικ και να σβήσει η οθόνη.
Επιλέγοντας τη μπάντα PMR466 ή LDP (μόνο για την έκδοση Dual Band)
Ο Midland G8 (Dual Band) έχει ως προεπιλεγμένη από το εργοστάσιο τη μπάντα
PMR446.
Για να γυρίσετε στη μπάντα LPD, κρατήστε πιεσμένο το πλήκτρο MENU έως ότου η
LCD οθόνη να εμφανίζει κανάλι “1”.
Για να επιστρέψετε στη μπάντα PMR446, κρατήστε πιεσμένο το πλήκτρο MENU πάλι,
έως ότου η LCD οθόνη να εμφανίσει “P1”.
! Αυτή η διαδικασία απενεργοποιεί τη
αλλάζετε τη ζώ ν η συχνότητας, θυμηθείτε να ενεργοποιείτε τη λειτουργία
έκτακτης ανάγκης πάλι (δείτε την παράγραφο «Λειτουργία έκτακτης
ανάγκης»).
λειτουργία “EMG” · επομένως όταν
Επιλογή καναλιού
Πιέστε το πλήκτρο MENU. Ο αριθμός του καναλιού θα αρχίσει να αναβοσβήνει
στην οθόνη. Πιέστε τα πλήκτρα κύλισης ▼▲ μέχρις ότου επιλέξετε το επιθυμητό
κανάλι. Πιέστε το πλήκτρο PTT για να επιβεβαιώσετε την επιλογή , ή περιμένετε 5
δευτερόλεπτα.
Σύμφωνα με την έκδοση που αγοράσατε, μπορείτε να επιλέξετε μεταξύ των ακόλουθων
καναλιών:
Έκδοση
LPD: από 1 έως 69.
Έκδοση Ε (PMR446 μόνο): › από P1 P8 και από 9p 24p (αποθηκευμένα)
! Το κανάλι P8 έχει προκαθοριστεί από το εργοστάσιο για τη λειτουργία
«έκτακτης ανάγκης» ·προτείνουμε να μην το χρησιμοποιείτε για τις γενικές
επικοινωνίες!
Dual Band: › PMR446: από P1 έως P8 και από 9p έως 24p (αποθηκευμένα)/
Εμφάνιση καναλιού / υποτόνου
Για να εμφανιστεί στιγμιαία το κανάλι PMR446 και ο υπότονος που χρησιμοποιείται
στα αποθηκευμένα κανάλια, πηγαίνετε στο επιθυμητό κανάλι (από 9p έως 24p) και
κρατήστε πιεσμένο το ▼ για 3 δευτερόλεπτα.
Εκπομπή και λήψη
Για να εκπέμψετε, κρατήστε το πλήκτρο PTT πατημένο. Περιμένετε για κλάσματα του
δευτερολέπτου, κατόπιν μιλήστε κανονικά στο μικρόφωνο κρατώντας τη συσκευή σε
μια απόσταση περίπου 5 εκατ. Στην οθόνη θα εμφανιστεί η ένδειξη TX
Όταν τελειώσετε, απελευθερώστε το PTT.
Όταν ο πομποδέκτης είναι σε κατάσταση λήψης (πλήκτρο PTT απελευθερωμένο) θα
λάβετε αυτόματα
οποιαδήποτε επικοινωνία. Στην οθόνη θα εμφανιστεί η ένδειξη RX .
Ρύθμιση της έντασης
Περιστρέψτε το κουμπί VOLUME μέχρις ότου φθάσετε στο επιθυμητό επίπεδο.
Λειτουργία CALL
Πιέστε το πλήκτρο CALL και θα εκπέμψετε ένα σήμα στους χρήστες που είναι
συντονισμένοι στο ίδιο κανάλι· μπορείτε να επιλέξετε μεταξύ διαφορετικών τόνων
κλήσης.
“Λειτουργία έκτακτης ανάγκης”
Όταν είναι ενεργοποιημένη η λειτουργία έκτακτης ανάγκης ( η ένδειξη EMG αναβοσβήνει
στην οθόνη), κρατήστε το EMG πατημένο για 3 δευτερόλεπτα και έτσι στέλνετε μια
κλήση έκτακτης ανάγκης στα άλλα G8 μέσα στην εμβέλεια σας.
Η λειτουργία έκτακτης ανάγκης είναι ενεργοποιημένη εξ ορισμού.
Κλείδωμα πλήκτρων
Κρατήστε πατημένο το πλήκτρο CALL/ για 5 δευτερόλεπτα και το εικονίδιο θα
εμφανιστεί στην οθόνη. Μόνο τα πλήκτρα PTT EMG και CALL/
Επαναλάβετε για να τα ξεκλειδώσετε.
παραμένουν ενεργά.
Λειτουργία MON (Monitor) / Squelch
Πατώντας το πλήκτρο Monitor μπορείτε να παρακάμψετε προσωρινά το squelch και
έτσι να λάβετε ακόμα και τα πιο ασθενή σήματα.
Προκειμένου να ενεργοποιήσετε τη λειτουργία Monitor, κρατήστε πατημένα και τα δύο
πλήκτρα ▲▼ για 2 δευτερόλεπτα περίπου.
Επαναλάβετε για να απενεργοποιήσετε τη λειτουργία, ή απενεργοποιήστε τον
πομποδέκτη.
! Όταν η λειτουργία MON είναι ενεργή, θα ακούτε
θόρυβο από παράσιτα.
! Μπορείτε να ενεργοποιήσετε τη λειτουργία monitor μόνο εάν η λειτουργία
“έκτακτης ανάγκης” είναι απενεργοποιημένη.
πιθανώς έναν σταθερό
Σάρωση όλων των διαύλων
Με τον Midland G8 μπορείτε να σαρώσετε τις μπάντες PMR/LPD αναζητώντας
σήματα. Όταν ανιχνευτεί κάποιο σήμα, η σάρωση σταματά προσωρινά στο κανάλι
51
Page 52

αυτό για 5 δευτερόλεπτα.
Πιέστε το πλήκτρο ▼ για 2 δευτερόλεπτα: η σάρωση θα αρχίσει. Για να σταματήσει,
πιέστε το PTT: ο Midland G8 θα επιστρέψει στο κανάλι από το οποίο άρχισε η
σάρωση.
! Μπορείτε να ενεργοποιήσετε τη λειτουργία σάρωσης μόνο εάν η λειτουργία «έκτακτης
ανάγκης» είναι απενεργοποιημένη.
Το πλήκτρο “MENU”
Τα ακόλουθα χαρακτηριστικά μπορούν να επιλεγούν με τη χρήση του πλήκτρου
“MENU”:
Επιλογή καναλιού ›
Ρύθμιση CTCSS υποτόνων ›
Ρύθμιση DCS υποτόνων ›
Επιλογή υψηλή / χαμηλή ισχύς αντίστοιχα (μόνο στη μπάντα PMR446) ›
VOX ›
Λειτουργία δόνησης Vibra › CALL
Μελωδίες κλήσης ›
Roger Beep ›
Τόνοι πλήκτρων ›
Κανάλι επείγουσας ανάγκης ›
Λειτουργία Dual Watch ›
Λειτουργία Out of range (εκτός εμβέλειας) ›
Επιλογή καναλιού
Πατήστε το πλήκτρο MENU. Ο αριθμός του καναλιού θα αρχίσει να αναβοσβήνει
στην οθόνη. Πιέστε τα πλήκτρα κύλισης ▼▲ μέχρις ότου επιλέξετε το επιθυμητό
κανάλι. Πιέστε το πλήκτρο PTT για να επιβεβαιώσετε την επιλογή , ή περιμένετε 5
δευτερόλεπτα.
Σύμφωνα με την έκδοση που αγοράσατε, μπορείτε να επιλέξετε μεταξύ των ακόλουθων
καναλιών:
Έκδοση
LPD: από 1 έως 69.
Έκδοση Ε (PMR446 μόνο): › από P1 έως P8 και από 9p έως 24p (αποθηκευμένα)
! Το κανάλι P8 έχει προκαθοριστεί από το εργοστάσιο για τη λειτουργία
«έκτακτης ανάγκης» ·προτείνουμε να μην το χρησιμοποιείτε για τις γενικές
επικοινωνίες!
Dual Band: › PMR446: από P1 έως P8 και από 9p έως 24p (αποθηκευμένα)/
Ρύθμιση CTCSS/DCS υποτόνων
Οι CTCSS και DCS υπότονοι είναι παρόμοιοι με κωδικούς πρόσβασης και επιτρέπουν
στον πομποδέκτη να επικοινωνήσει μόνο με τους χρήστες που είναι συντονισμένοι
στο ίδιο κανάλι και έχουν θέσει τον ίδιο κωδικό. Για κάθε κανάλι, μπορείτε να
προγραμματίσετε 38 CTCSS και 104 DCS υπότονους.
Αυτοί οι υπότονοι μπορούν να προγραμματιστούν στα ακόλουθα κανάλια:
Έκδοση Dual Band: › μόνο
69 κανάλια LPD.
Έκδοση Ε (PMR446 μόνο): › μόνο στα 8 κύρια κανάλια PMR446 (από P1 έως P8).
στα 8 κύρια κανάλια PMR446 (από P1 έως P8) και στα
52
Και για τις δύο, τα αποθηκευμένα κανάλια από 9p έως 24p δεν μπορούν να
τροποποιηθούν.
Ενεργοποίηση των τόνων CTCSS:
Ενεργοποιήστε τη συσκευή.
Επιλέξτε το επιθυμητό κανάλι πατώντας το πλήκτρο MENU και τα πλήκτρα▲▼.
Πιέστε το
αναβοσβήνει ο CTCSS υπότονος στα δεξιά ( “of” = κανένας κωδικός – προκαθορισμένη
κατάσταση).
Επιλέξτε τον επιθυμητό υπότονο CTCSS πατώντας τα πλήκτρα▲▼.
Για να επιβεβαιώσετε την επιλογή, πατήστε το πλήκτρο PTT ή περιμένετε 5
δευτερόλεπτα.
Απενεργοποίηση των τόνων CTCSS:
Εάν δεν θέλετε να χρησιμοποιήσετε τους υπότονους CTCSS, ακολουθήστε
βήματα:
Επιλέξτε το επιθυμητό κανάλι
Πατήστε το κουμπί MENU μέχρις ότου αναβοσβήνει στην οθόνη ο υπότονος CTCSS
στα αριστερά·
Επιλέξτε “of” μέσω των πλήκτρων ▲▼.
Ενεργοποίηση των υπότονων DCS:
Ενεργοποιήστε τη συσκευή.
Επιλέξτε το επιθυμητό κανάλι πατώντας το πλήκτρο MENU και τα πλήκτρα ▲▼.
Πατήστε το πλήκτρο MENU πάλι μέχρι η
και αναβοσβήνει ο κωδικός του υπότονου στα δεξιά (“of” = κανένας κωδικός –
προκαθορισμένη κατάσταση).
Επιλέξτε τον επιθυμητό κωδικό DCS πατώντας τα πλήκτρα ▲▼.
Για να επιβεβαιώσετε τη ρύθμιση, πιέστε το PTT ή περιμένετε 5 δευτερόλεπτα.
! Το κανάλι P8 με υπότονο DCS50 (P850) έχει προκαθοριστεί από το εργοστάσιο
για τη λειτουργία «έκτακτης
επικοινωνίες!!
Απενεργοποίηση των υποτόνων DCS:
Επιλέξτε το επιθυμητό κανάλι.
Πατήστε το κουμπί MENU μέχρις ότου εμφανιστεί στην οθόνη το κανάλι σε χρήση και
αναβοσβήνει στην οθόνη ο υπότονος DCS στα δεξιά.
Επιλέξτε “of” μέσω των πλήκτρων ▲▼.
πλήκτρο MENU μέχρις ότου η οθόνη εμφανίσει την ένδειξη CTC και
αυτά τα
οθόνη να εμφανίσει την ένδειξη DCS
ανάγκης»·μην το χρησιμοποιείτε για γενικές
Επιλογή υψηλής / χαμηλής ισχύος (μόνο στη μπάντα PMR446)
Για να επιλέξετε το επίπεδο ισχύος, πιέστε το κουμπί MENU μέχρις ότου εμφανιστεί
στην οθόνη η ένδειξη Pr. Χρησιμοποιήστε τα πλήκτρα▲▼ για να επιλέξετε L (χαμηλή
ισχύ) ή Η (υψηλή ισχύ). Για να επιβεβαιώσετε την επιλογή σας, πιέστε το PTT ή
περιμένετε 5 δευτερόλεπτα.
Όταν οι μπαταρίες είναι φορτισμένες πλήρως, η υψηλή
η χαμηλή είναι 10mW (ERP).
ισχύς είναι 500 MW (ERP), ενώ
Page 53

Εάν ο πομποδέκτης σας πρέπει να λειτουργήσει μέσα σε περιορισμένη εμβέλεια,
μπορείτε να επιλέξετε την χαμηλή ισχύ και συνεπώς να επεκτείνετε τη ζωή των
μπαταριών.
Λειτουργία VOX
Με το Midland G8 μπορείτε να πραγματοποιείτε handsfree επικοινωνίες με τη βοήθεια
της λειτουργίας VOX: απλά μιλήστε στο μικρόφωνο και η επικοινωνία θα είναι άμεση.
Η ευαισθησία VOX μπορεί να ρυθμιστεί σε 3 διαφορετικά επίπεδα. Μπορείτε να
ενεργοποιήσετε τη λειτουργία VOX με ή χωρίς αξεσουάρ.
Το τέταρτο επίπεδο που ενεργοποιείται είναι το VOX TalkBack: αν
εκπέμπει συνεχώς σε VOX, η λειτουργία VOX TB θα σταματήσει αυτόματα την
εκπομπή μετά από 20 δευτερόλεπτα για να επιτρέψει και στους άλλους χρήστες να
εκπέμψουν.
Για να ενεργοποιήσετε την λειτουργία VOX, πιέστε το πλήκτρο MENU μέχρις ότου στην
οθόνη εμφανιστεί η ένδειξη VOX
Με την βοήθεια των πλήκτρων ▲▼ επιλέξτε
Of: απενεργοποίηση ›
1: 1° επίπεδο (υψηλή ευαισθησία) ›
2: 2° επίπεδο (μεσαία ευαισθησία) ›
3: 3° επίπεδο (χαμηλή ευαισθησία) ›
4: Talk Back (με υψηλή ευαισθησία) ›
Πιέστε το πλήκτρο PTT για να επιβεβαιώσετε την επιλογή σας ή περιμένετε για 5
δευτερόλεπτα.
Για να απενεργοποιήσετε τη λειτουργία VOX, κατά τη διαδικασία, επιλέξτε oF.
:
ένας πομποδέκτης
Λειτουργία Vibra-CALL
Η συσκευή Midland G8 είναι εξοπλισμένη με το χαρακτηριστικό Vibra-CALL για να
σας ειδοποιεί αθόρυβα για τις λαμβανόμενες κλήσεις.
Για να ενεργοποιήσετε το χαρακτηριστικό αυτό, πιέστε το πλήκτρο MENU μέχρι
στην οθόνη να εμφανιστεί το εικονίδιο
απενεργοποιήστε τη δόνηση (on: ενεργοποίηση, oF: απενεργοποίηση).
Πιέστε το πλήκτρο PTT για να επιβεβαιώσετε ή περιμένετε για 5 δευτερόλεπτα.
μέσω των πλήκτρων ▲▼ ενεργοποιήστε /
Λειτουργία CALL
Ο πομποδέκτης Midland G8 μπορεί να στείλει 5 διαφορετικούς τόνους κλήσης. Για να
στείλετε ένα ηχητικό σήμα κλήσης σε άλλους χρήστες, πιέστε το πλήκτρο CALL/
Για να επιλέξετε τον τόνο κλήσης:
Πιέστε το πλήκτρο MENU έως ότου εμφανιστεί στην οθόνη η ένδειξη “CA” και τον
ενεργό ήχο κλήσης.
Μέσω των πλήκτρων ▲▼ ακούστε και επιλέξτε μια από τις 5 διαθέσιμες μελωδίες.
Πιέστε το πλήκτρο PTT για να επιβεβαιώσετε την επιλογή σας ή περιμένετε για 5
δευτερόλεπτα.
.
ROGER BEEP (Τόν ος επιβεβαίωσης ολοκλήρωσης εκπομπής)
Κάθε φορά που ολοκληρώνετε την εκπομπή (απελευθερώνετε το πλήκτρο PTT ), η
συσκευή σας εκπέμπει ένα τόνο για να ενημερώσει τον συνομιλητή σας ότι είναι πλέον
ελεύθερος να μιλήσει εκείνος.
Η λειτουργία αυτή είναι εργοστασιακά απενεργοποιημένη.
Για να την ενεργοποιήσετε:
Πιέστε το πλήκτρο MENU έως ότου εμφανιστεί στην οθόνη η ένδειξη “rb oF”
των πλήκτρων ▲▼ επιλέξτε “on” και στην οθόνη θα εμφανιστεί η ένδειξη “rb on” ·
Πιέστε το πλήκτρο PTT για επιβεβαίωση ή περιμένετε 5 δευτερόλεπτα.
· μέσω
Τόνοι πλήκτρων
Κάθε φορά που πατάτε κάποιο πλήκτρο ακούγεται ένας τόνος επιβεβαίωσης.
Για να απενεργοποιήσετε τους τόνους των πλήκτρων, ακολουθήστε τα παρακάτω
βήματα:
Πιέστε το πλήκτρο MENU , έως ότου εμφανιστεί η ένδειξη “bP on”.
Πιέστε τα πλήκτρα ▲▼ έως ότου εμφανιστεί η ένδειξη “bP of”.
Πιέστε το πλήκτρο PTT για να επιβεβαιώσετε την επιλογή σας
δευτερόλεπτα.
Τώρα δεν θα ακούτε τόνο επιβεβαίωσης κάθε φορά που πατάτε κάποιο πλήκτρο.
Για να ενεργοποιήσετε ξανά τους τόνους πλήκτρων, επαναλάβετε τη διαδικασία και
επιλέξτε “bP on”.
ή περιμένετε για 5
Λειτουργία επείγουσας κλήσης
Ο Midland G8 διαθέτει ένα κανάλι κατεξοχήν για κλήσεις έκτακτης ανάγκης: όλες οι
συσκευές G8 που λειτουργούν μέσα στην εμβέλειά σας, ακόμα κι αν είναι συντονισμένες
σε διαφορετικά κανάλια, μπορούν να λάβουν / εκπέμψουν μηνύματα
έκτακτης ανάγκης σε αυτό το κανάλι.
Εάν κρατάτε πιεσμένο το κουμπί EMG, οι επικοινωνίες μεταπηδούν αυτόματα στο
κανάλι έκτακτης
και όλες οι συσκευές G8 που λειτουργούν μέσα σε εμβέλεια θα μεταφερθούν αυτόματα
στο κανάλι έκτακτης ανάγκης (“EC”).
Εάν έχετε απενεργοποιήσει αυτή τη λειτουργία, δεν θα λαμβάνετε / εκπέμπετε
οποιαδήποτε κλήση έκτακτης ανάγκης.
! Όταν ο πομποδέκτης λειτουργεί στο κανάλι έκτακτης ανάγκης (ένδειξη
στην οθόνη), όλα τα πλήκτρα εκτός από το PTT και το πλήκτρο CALL είναι
απενεργοποιημένα.
Η συσκευή θα επιστρέψει στο κανάλι σε χρήση μετά από ένα λεπτό από την τελευταία
εκπομπή.
Για να επιστρέψετε αμέσως, πιέστε το πλήκτρο EMG. Τώρα μπορείτε να
χρησιμοποιήσετε όλες τις επιλογές του MENU.
ανάγκης (ένδειξη “EC” στην οθόνη). Ένα ακουστικό σήμα θα σταλεί
“EC”
Ενεργοποίηση / απενεργοποίηση λειτουργίας έκτακτης ανάγκης
Όταν ενεργοποιείτε τη συσκευή, η λειτουργία έκτακτης ανάγκης ενεργοποιείται, αλλά
μπορείτε να την απενεργοποιήσετε και να την ενεργοποιήσετε πάλι:
Πιέστε το πλήκτρο MENU μέχρις ότου εμφανιστεί στην οθόνη η ένδειξη EC on.
Επιλέξτε EC Of χρησιμοποιώντας τα πλήκτρα ▲▼. Επιβεβαιώστε την επιλογή σας
πιέζοντας το PTT ή περιμένετε 5 δευτερόλεπτα.
! Όταν η λειτουργία έκτακτης ανάγκης
αναβοσβήνει στην οθόνη) οι ακόλουθες λειτουργίες δεν μπορούν να
ενεργοποιείται ( η ένδειξη EMG
53
Page 54

χρησιμοποιηθούν: Σάρωση, Monitor, Dual Watch,Out of range.
Αλλαγή του καναλιού έκτακτης ανάγκης
Το προκαθορισμένο κανάλι έκτακτης ανάγκης αρχικά είναι το P8 DCS 50 αλλά
μπορείτε να το αλλάξετε σύμφωνα με τις ανάγκες σας.
! Σημαντικό: Βεβαιωθείτε ότι η λειτουργία έκτακτης ανάγκης είναι ενεργή! (η
ένδειξη EMG θα αναβοσβήνει). Εάν αποφασίσετε να αλλάξετε το κανάλι που
είναι κατεξοχήν προγραμματισμένο για τη λειτουργία έκτακτης ανάγκης, μην
ξεχάστε να
Πιέστε το πλήκτρο MENU έως ότου εμφανιστεί στην οθόνη η ένδειξη EC on.
Πιέστε το πλήκτρο MENU ξανά (θα εμφανίζεται η ένδειξη of) και επιλέξτε το επιθυμητό
κανάλι με τη βοήθεια των πλήκτρων ▲▼. Για επιβεβαίωση πιέστε το πλήκτρο PTT ή
περιμένετε 5 δευτερόλεπτα.
! Σημαντικό
ένδειξη EMG θα αναβοσβήνει). Εάν αποφασίσετε να αλλάξετε το κανάλι που
είναι κατεξοχήν προγραμματισμένο για τη λειτουργία έκτακτης ανάγκης, μην
ξεχάστε να κάνετε την ίδια αλλαγή σε όλες τις συσκευές!
Για να επαναφέρετε το αρχικό κανάλι έκτακτης ανάγκης (P8 DCS 50)
Πιέστε το πλήκτρο
Για επιβεβαίωση πιέστε το πλήκτρο PTT ή περιμένετε 5 δευτερόλεπτα.
! Εάν καθορίσετε οποιοδήποτε από τα standard κανάλια για τη λειτουργία
έκτακτης ανάγκης, θυμηθείτε να το χρησιμοποιείτε μόνο για αυτόν το λόγο,
διαφορετικά θα προκαλέσετε σύγχυση και παρεμβολές.
κάνετε την ίδια αλλαγή σε όλες τις συσκευές!
: Βεβαιωθείτε ότι η λειτουργία έκτακτης ανάγκης είναι ενεργή! (η
MENU μέχρι στην οθόνη να εμφανιστεί η ένδειξη EC on.
Λειτουργία χειροκίνητου ελέγχου out of range (εκτός εμβέλειας)
Αυτή η λειτουργία επιτρέπει σε σας να γνωρίζετε εάν υπάρχουν άλλοι πομποδέκτες
στην εμβέλειά σας.
Πατώντας το πλήκτρο EMG δύο φορές, θα στείλετε ένα αίτημα αναγνώρισης στις
άλλες συσκευές G8 που βρίσκονται μέσα στη εμβέλειά σας και είναι συντονισμένες
στο ίδιο κανάλι.
Εάν οποιοσδήποτε πομποδέκτης απαντήσει, σημαίνει ότι είναι μέσα στη εμβέλειά
και θα λάβετε έναν ακουστικό τόνο για επιβεβαίωση.
! Αυτή η λειτουργία μπορεί να χρησιμοποιηθεί μόνο εάν η λειτουργία αυτόματου
ελέγχου out of range δεν είναι ενεργή.
σας
Λειτουργία Dual Watch
H Λειτουργία Dual Watch επιτρέπει σε σας να ακούτε συνεχώς δύο κανάλια της
επιλογής σας ταυτόχρονα.
Ενεργοποίηση / απενεργοποίηση
Πιέστε το πλήκτρο MENU έως ότου στην οθόνη εμφανιστεί η ένδειξη DW of.
Επιλέξτε το δεύτερο κανάλι που θα ακούτε πιέζοντας τα πλήκτρα ▲▼.
Για να επιβεβαιώσετε την επιλογή σας, πιέστε το PTT ή περιμένετε 5 δευτερόλεπτα.
οθόνη θα εμφανίσει διαδοχικά το κανάλι σε χρήση και δεύτερο κανάλι που ακούτε.
Για να σταματήσετε τη λειτουργία, πιέστε απλά το πλήκτρο MENU.
Η
54
Όταν ο πομποδέκτης ανιχνεύει μια εκπομπή σε ένα από τα δύο κανάλια, η λειτουργία
Dual Watch διακόπτεται προσωρινά, παραμένει συντονισμένη για 5 δευτερόλεπτα στο
αντίστοιχο κανάλι, δίνοντας στο χρήστη
Μετά από αυτήν την μικρή διακοπή, η λειτουργία ξεκινά πάλι.
! Αυτή η λειτουργία μπορεί να ενεργοποιηθεί μόνο εάν η λειτουργία “έκτακτης
ανάγκης” είναι απενεργοποιημένη.
μια πιθανότητα να απαντήσει σε μια κλήση.
Λειτουργία αυτόματου ελέγχου out of range (εκτός εμβέλειας)
Ενεργοποιώντας αυτή τη λειτουργία, ένα ζευγάρι G8 εκπέμπει κάθε 30 δευτερόλεπτα
έναν κωδικό ελέγχου δεδομένων.
Μόλις η επαφή μεταξύ των δύο συσκευών χαθεί και ένας πομποδέκτης δεν λάβει
αυτόν τον κωδικό ελέγχου δεδομένων δύο φορές στη σειρά, το εικονίδιο OUT αρχίζει
να αναβοσβήνει στην οθόνη και θα ακούσετε ένα μπίπ.
! Αυτή η
ανάγκης” είναι απενεργοποιημένη.
Ενεργοποίηση - Απενεργοποίηση
Πιέστε το πλήκτρο MENU μέχρι στην οθόνη να εμφανιστούν οι ενδείξεις ‘’OUT” και
“Or of”· Επιλέξτε ”Or on” (λειτουργία ενεργοποιημένη) με τα πλήκτρα ▲▼.
Απενεργοποιήστε και τους δύο πομποδέκτες και ενεργοποιήστε τους ταυτοχρόνως.
Για να απενεργοποιήσετε αυτή τη λειτουργία
οθόνη να εμφανιστούν οι ενδείξεις ‘’OUT” και “Or on”· Επιλέξτε ”Or of” (λειτουργία
απενεργοποιημένη) με τα πλήκτρα ▲▼.
Επιβεβαιώστε την επιλογή σας πιέζοντας το πλήκτρο PTT ή περιμένετε 5
δευτερόλεπτα.
λειτουργία μπορεί να ενεργοποιηθεί μόνο εάν η λειτουργία “έκτακτης
πιέστε το πλήκτρο MENU μέχρι στην
Φωτισμός οθόνης
Αν ο φωτισμός δεν επαρκεί για να διαβάσετε τις ενδείξεις της οθόνης, μπορείτε να
πιέσετε το πλήκτρο EMG για σύντομο χρονικό διάστημα για να ενεργοποιήσετε το
φωτισμό της για 5 δευτερόλεπτα περίπου. Κάθε φορά που πιέζεται το πλήκτρο MENU,
η οθόνη αυτόματα θα φωτίζεται.
Εξοικονόμηση Ισχύος
Η λειτουργία αυτή έχει ως αποτέλεσμα την αύξηση της αυτονομίας του πομποδέκτη
μειώνοντας την κατανάλωση μέχρι και 50%. Ο πομποδέκτης τίθεται αυτόματα σε
κατάσταση εξοικονόμησης ισχύος όταν δεν λάβει κανένα σήμα για πάνω από 7
δευτερόλεπτα. Όταν οι μπαταρίες είναι εξασθενημένες, στην οθόνη εμφανίζεται το
εικονίδιο
: αντικαταστήστε τις μπαταρίες ή φορτίστε το pack μπαταριών.
Φόρτιση του pack μπαταριών
Το pack μπαταριών της συσκευασίας είναι 4,8 V NiMH 800 mAh και πρέπει να
επαναφορτίζεται χωρίς να αφαιρείται
από τον πομποδέκτη. Η πλήρης φόρτιση διαρκεί 8 ώρες.
Για να επαναφορτίσετε το pack μπαταριών:
Συνδέστε την υποδοχή του αντάπτορα τοίχου στην πρίζα και εισάγετε το βύσμα του
αντάπτορα τοίχου στην υποδοχή της επιτραπέζιας βάσης φόρτισης.
Τοποθετήστε τον πομποδέκτη στη βάση
του επιτραπέζιου φορτιστή. Η κόκκινη λυχνία
Page 55

φόρτισης θα ανάψει.
Όταν η φόρτιση είναι πλήρης απομακρύνετε τον πομποδέκτη από τη βάση φόρτισης
και τον φορτιστή από την πρίζα.
! Μην υπερφορτίζετε τις μπαταρίες! Η φόρτιση δεν σταματάει αυτόματα όταν οι
μπαταρίες φορτιστούν πλήρως. Επομένως, μην ξεχνάτε να απομακρύνετε τον
πομποδέκτη από τον φορτιστή μόλις φορτιστούν οι μπαταρίες.
! Μην
! Η χρήση ενός φορτιστή διαφορετικού από τον ενδεδειγμένο μπορεί να
! Μην πετάτε τις μπαταρίες στη φωτιά ή μην τις τοποθετείτε κοντά σε πηγές
! Μην αναμειγνύετε παλιές και καινούριες μπαταρίες ή μπαταρίες διαφορετικών
προσπαθήσετε να φορτίσετε μη επαναφορτιζόμενες μπαταρίες.
Πριν ξεκινήσετε τη φόρτιση βεβαιωθείτε ότι ο πομποδέκτης σας περιέχει
επαναφορτιζόμενες μπαταρίες NI-MH και μόνο! Είναι πολύ επικίνδυνο
να προσπαθήσετε να φορτίσετε άλλου τύπου μπαταρίες (για παράδειγμα
αλκαλικές ή μπαταρίες μαγγανίου). Αν οι μπαταρίες δεν είναι κατάλληλες
για φόρτιση μπορεί να παρουσιάσουν διαρροές, να εκραγούν ή και να
αναφλεχθούν!
προκαλέσει ζημιά στη συσκευή ή ακόμα και να θέσει σε κίνδυνο τη σωματική
ακεραιότητα του χρήστη.
θερμότητας διότι μπορεί να εκραγούν και να
τραυματισμό. Απαλλαγείτε από τις παλιές μπαταρίες, με τις διαδικασίες που
επιβάλλει η νομοθεσία.
τύπων ή μπαταρίες που έχουν χρησιμοποιηθεί με διαφορετικούς τρόπους.
προκαλέσουν ακόμα και
55
Page 56

56
Page 57

Midland G8
GEBRUIKERSHANDLEIDING
Bedankt voor uw keuze voor Midland! De Midland G8 is een draagbare zendontvanger
die in bijna alle Europese landen vrij mag worden gebruikt. Voor meer informatie,
raadpleeg onze tabel "Gebruiksbeperkingen".
Door de laatste technologie op het vlak van radiocommunicatie te combineren met een
stevig mechanisch frame, biedt de Midland G8 de ideale en doeltreffende oplossing
voor de professionals die in contact moeten blijven met collega's (constructieplaatsen,
gebouwen, hotels, handelsbeurzen, shows) of met vrijeijdsgebruikers die in contact
willen blijven met vrienden en familie. Zijn stevig frame, gebruiksgemak en eenvoudig
design betekenen dat het toestel ideaal is voor gebruik bij elke activiteit.
De Midland G8 is beschikbaar in twee versies:
Dubbele Band (PMR446/LPD) ›
E-versie (enkel PMR446) ›
Deze handleiding is van toepassing voor beide modellen en de verschillen tussen de
twee versies worden aangegeven.
Inhoud
Nr 1 Midland G8 ›
Nr 1 Eén desktoplader ›
N° 1 Muuradapter ›
Nr 1 Batterij ›
Nr 1 Riemclip ›
Dekking/bereik
Het maximum bereik hangt af van de terreinconditie en wordt verkregen bij gebruik in
een open ruimte.
De enige beperkingen voor het maximum mogelijk bereik zijn milieufactoren zoals het
blokkeren door bomen, gebouwen of andere obstructies. Binnenin een auto of een
metalen constructie kan het bereik gereduceerd zijn. Normaal bedraagt de dekking
in de stad, met gebouwen en andere obstructies, ongeveer 1 of 2 Km. In een open
ruimte maar met obstructies zoals bomen, bladeren of huizen, is het maximum bereik
ongeveer 4--6 Km. In een open ruimte zonder obstructies en in zicht, bijvoorbeeld in
de bergen, kan de dekking meer dan 12 Km bedragen.
Batterijen en batterijvak
De zendontvanger accepteert de bijgeleverde herlaadbare batterij of 4AAA alkaline/
herlaadbare batterijen. Om het batterijvak te openen: met de achterkant van de radio
naar u gericht, maak de batterijhouder los in het onderste gedeelte van de radio en
schuif het deksel zachtjes open. Plaats de batterij en hou rekening met de polariteit en
plaats het deksel terug op zijn plaats.
Opgepast: de bijgeleverde batterij moet voor het eerste gebruik worden
opgeladen.
Waarschuwingen
BATTERIJEN - Volg nauwgezet alle waarschuwingen inzake de batterijen die ›
vermeld staan in het hoofdstuk "Batterij herladen".
OPEN DE RADIO NIET VOOR WELKE REDEN OOK › ! De precisiemechanica
en -elektronica van de radio vereisen ervaring en gespecialiseerde apparatuur;
voor dezelfde reden mag de radio onder geen enkele omstandigheden opnieuw
gealigneerd worden, gezien deze al gekalibreerd werd voor maximale prestaties.
De ongeoorloofde opening van de zendontvanger zal de garantie doen vervallen.
Gebruik geen detergenten, alcohol, oplosmiddelen of schuurmiddelen om de ›
apparatuur te reinigen. Gebruik enkel een zachte, propere doek. Indien de radio
zeer vuil is, bevochtig de doek lichtjes met een mengsel van water en een neutrale
zeep.
FUNCTIES
Nieuwe functie "Noodoproep" ›
Midland G8 introduceert een vernieuwende en belangrijke functie: het kanaal ›
gewijd aan noodgevallen. Radiocommunicatie treedt gewoonlijk op tussen twee of
meer gebruikers die ingesteld zijn op hetzelfde kanaal: het is niet mogelijk om uit te
zenden of te ontvangen naar/van andere kanalen. Maar dankzij de "Noodfunctie",
kunt u ook het Noodkanaal in het oog houden: alle gebruikers met een Midland
G8 kunnen communiceren op het ingestelde kanaal en tegelijkertijd Noodberichten
ontvangen/zenden op het speciale kanaal. Houd de EMG-knop ingedrukt gedurende
3 seconden en er zal een noodoproep worden uitgezonden naar alle G8-toestellen
binnen bereik: deze zullen automatische ingesteld staan op het "EC" (Emergency
Channel - Noodkanaal).
Nieuwe functie "Manueel buiten bereik":druk enkel tweemaal op de › EMG knop en u
kunt verifiëren of er radio's binnen het bereik van uw apparatuur zijn.
Nieuwe functie “Vox TalkBack”: indien één radio voortdurend uitzendt in VOX, ›
zal de Vox TB de uitzending automatisch stoppen na 20" om het zenden naar de
andere gebruikers ook toe te laten.
57
Page 58

Vermogen: 500mW (PMR446); 10mW (LPD) ›
Bedrijfstemperatuur: van -20° tot +55° C ›
38 CTCSS tonen/104 DCS codes ›
Waterbestendig: IPX5 ›
Noodoproep ›
Buiten bereik controleren ›
VOX instelbaar op 3 niveaus en met “TalkBack” ›
INTERCOM ›
Vibra › CALL
Toetsenblokvergrendeling ›
Automatische energiebesparing: automatisch stroombesparingscircuit ›
Indicator batterij bijna leeg ›
Dubbele bewaking ›
OPROEP met 5 selecteerbare melodieën ›
SCAN ›
Monitor ›
Buiten bereik ›
Roger-pieptoon ›
Hoog/Laag vermogen ›
LCD-scherm met backlight ›
Vermogen: NiMH batterij 800mAh 4,8V of 4 AAA batterijen ›
2-pins accessoireplug ›
Gewicht: 112gr (zonder batterijen) ›
Afmetingen: 59x98x32mm ›
Batterijlevensduur (in PMR446 band): meer dan 12 uur met batterij van 800mAh ›
Versies:
G8 Dubbele band (PMR446/LPD) ›
24 PMR446 kanalen (8+16 vooringesteld)/69 LPD kanalen
G8E (alleen PMR446) ›
24 PMR446 kanalen (8+16 vooringesteld)
BESCHRIJVING VAN DE BEDIENINGEN
EN FUNCTIES
4687
Scherm
Uw Midland G8 houdt u
voortdurend op de hoogte over zijn
werkingsstatus via een Liquid Crystal
Display (LCD). De symbolen en hun
overeenkomstige parameters die
kunnen verschijnen, afhankelijk van
de werkingsstatus van het apparaat,
zijn als volgt beschreven:
1. KANAAL Deze twee grote cijfers geven het geselecteerde
2. VOX VOX-functie geactiveerd
Dit symbool verschijnt wanneer de
3.
4. EMG Noodgevalfunctie geactiveerd
5. DW Dubbele bewaking geactiveerd
6.
7.
8. OUT Geeft aan dat de automatische buiten bereik-functie
9. RX Ontvangstmodus
10. TX Geeft de transmissie aan(PTT ingedrukt);
11. H(Hoog) / L(Laag) Selectie hoog of laag vermogen.
12. CTCSS/DCS Geeft het type aan van de geselecteerde
13. CTCSS/DCS Deze drie kleine cijfers geven de code van de
14. ROGER Roger-pieptoon geactiveerd.
Geeft de batterijstatus aan
Vibra-CALL functie geactiveerd
3
2
5
11
9
10
12
1
13
14
kanaal aan
toetsenblokvergrendeling geactiveerd is
contact verliest met de andere radio's.
subaudiotoon.
CTCSS/DCS tonen aan geselecteerd (1-38 / 1-104)
58
Radio
Kijk naar deze afbeelding om de verschillende delen van het apparaat te
identificeren:
15. Ingebouwde luidspreker Hier bevindt zich de behuizing van de luidspreker.
16. MENU-knop Druk op deze knop om het MENU van de radio te
openen.
17. CALL/
knop Om een oproep naar het geselecteerde
kanaal te zenden. Indien u deze gedurende
ongeveer 5 seconden ingedrukt houdt, is de
toetsenblokvergrendeling geactiveerd.
Page 59

18. PTT (push to talk) Druk op deze knop om uit te zenden.
19. VOLUME-knop Aan/Uit-schakelaar voor het testen en past het
VOLUME van de ontvangst aan
20. ANTENNE Ontvangt en zendt radiosignalen.
21. Accessoire-aansluiting (onder beschermend deksel) Om externe
audiotoestellen zoals microfoons, laders, enz. aan
te sluiten. (2-pins type)
22. EMG knop Om de functies Noodgeval en Handmatig buiten
bereik te activeren.
23. ▲▼ knoppen Om de instelling in het MENU
24. Ingebouwde microfoon Hier wordt het geluid opgenomen door de
microfoon.
25. Intercom plug Om de headset/microfoonaccessoires aan te sluiten
die geschikt zijn voor intercom communicaties.
20
19
In/Uit-schakelen
Om de zendontvanger in te schakelen, draai de VOLUME knop met de klok mee tot
u deze hoort klikken.
Om de zendontvanger uit te schakelen, draai de knop tegen de klok in.
Selectie van de PMR466 of LDP band (enkel voor de versie met
dubbele band)
Midland G8 (Dubbele band) is vooringesteld in de fabriek op de PMR446 band.
Om over te schakelen op de LPD band, houd de knop MENU ingedrukt tot de LPD
‘1’ toont.
Om terug te schakelen naar de PMR466 band, houd de knop MENU opnieuw ingedrukt
tot de LCD ‘1’ toont.
! Deze procedure schakelt de functie “EMG” uit; als u daarom de frequentieband
wijzigt, vergeet dan niet om de Noodfunctie opnieuw te activeren (zie paragraaf
“Noodfunctie”).
Kanaalselectie
Druk op de knop MENU. Het nummer van het kanaal begint te knipperen op het
scherm.
Druk op de schuifknoppen ▼▲ tot u het gewenste kanaal selecteert. Druk op de knop
PTT om te bevestigen of wacht 5 seconden.
Afhankelijk van de versie die u kocht, kunt u uit de volgende kanalen kiezen:
Dubbele band versie: PMR446 van P1 tot P8 en van 9p tot 24p (vooringesteld) / ›
LPD van 1 tot 69.
E-versie (enkel PMR446): van P1 tot P8 en van 9p tot 24p (vooringesteld) ›
! Kanaal P8 werd in de fabriek ingesteld voor de “Noodfunctie”; we bevelen
aan dat u dit niet gebruikt voor algemene communicaties!
18
17
16
MENU
Weergeven van de kanaal/subaudiotoon
EMG OUT
DW
H L
DCS CTC
ROGER
CALL
EMG
21
22
23
24
25
15
Om kort het PMR446 kanaal en de subaudiotoon gebruikt in de vooringestelde kanalen
weer te geven, ga naar het gewenste kanaal (van 9p tot 24p) en houd ▼ gedurende
3 seconden ingedrukt.
Transmissie en ontvangst
Om te zenden, houd de knop PTTstevig ingedrukt. Wacht een fractie van een
seconden en spreek dan normaal in de richting van de microfoon en houd het toestel
op een afstand van ongeveer 5 cm, TX verschijnt op het scherm.
Wanneer u klaar bent, laat de toets PTTlos.
Wanneer de radio in de modus ontvangst is (PTT losgelaten), zult u automatisch een
communicatie ontvangen. RX wordt weergegeven..
VOLUMEREGELING
Roteer de VOLUMEKNOP tot het gewenste niveau
59
Page 60

“CALL”
Duw de CALL-knop in en u zult een audiosignaal zenden naar de gebruikers die
ingesteld zijn op hetzelfde kanaal, u kunt kiezen uit verschillende beltonen.
"Noodgeval"
Wanneer de Noodfunctie ingeschakeld is (EMG knippert op het scherm), houd EMG 3
seconden ingedrukt en u zendt een noodoproep naar de andere G8-toestellen binnen
uw bereik.
De Noodfunctie is standaard geactiveerd.
Toetsenblokvergrendeling
Houd CALL/ 5 seconden ingedrukt en wordt weergegeven ter bevestiging. Enkel
PTT, EMG en CALL/
5 seconden ingedrukt.
blijven actief. Om deze functie uit te schakelen, houd CALL/
MON (Monitor) functie / Ruisonderdrukker
De knop Monitor dient om tijdelijk de ruisonderdrukking te openen, ten einde te
luisteren naar signalen die te zwak zijn om de ruisonderdrukking permanent open te
houden.
Om de monitorfunctie te activeren, houd tegelijkertijd ▲▼ ongeveer 2 seconden
ingedrukt. Volg dezelfde procedure om de functie te deactiveren of de radio uit- en
aan te schakelen.
! Wanneer MON actief is, zult u waarschijnlijk een constant achtergrondgeluid
horen.
! U kunt de functie Monitor enkel activeren als de “Noodfunctie” uitgeschakeld is.
Scannen van alle kanalen
Midland G8 kan automatisch zoeken naar signalen doorheen de banden door de
kanelen snel achter elkaar te scannen. Deze functie is nuttig om een actief kanaal te
vinden.
Wanneer een signaal gedetecteerd wordt, pauzeert het scannen gedurende 5
seconden bij dat kanaal.
Druk gedurende 2 seconden op ▼: het scannen begint. Om het te stoppen, druk
op PTT: de Midland G8 zal terugkeren naar het kanaal van waarop het scannen
aanvankelijk begon.
! U kunt de functie scannen enkel activeren als de “Noodfunctie” uitgeschakeld is.
Toets "MENU"
De volgende functies kunnen worden geselecteerd door op de knop “MENU ” te
drukken:
Kanaalselectie ›
CTCSS tonen instellen ›
DCS tonen instellen ›
Selectie Hoog/laag verbruik (enkel in de band PMR446) ›
VOX ›
60
Functie Vibra › CALL
Belmelodieën ›
Roger-pieptoon ›
Toetsenblok-pieptoon ›
Noodkanaal ›
Functie Dubbele bewaking ›
Buiten bereik ›
Kanaalselectie
Druk op de knop MENU. Het nummer van het kanaal begint te knipperen op het
scherm.
Druk op de schuifknoppen ▼▲ tot u het gewenste kanaal selecteert. Druk op de knop
PTT om te bevestigen of wacht 5 seconden.
Afhankelijk van de versie die u kocht, kunt u uit de volgende kanalen kiezen:
Dubbele band versie: PMR446 van P1 tot P8 en van 9p tot 24p (vooringesteld) / ›
LPD van 1 tot 69.
E-versie (enkel PMR446): van P1 tot P8 en van 9p tot 24p (vooringesteld) ›
! Kanaal P8 werd in de fabriek ingesteld voor de “Noodfunctie”; we bevelen
aan dat u dit niet gebruikt voor algemene communicaties!
CTCSS/DCS tonen instellen
CTCSS en DCS tonen gelijken op toegangscodes en maken het de radio mogelijk om
enkel te communiceren met de gebruikers die ingesteld zijn op hetzelfde kanaal en
dezelfde code hebben ingesteld. Voor elk kanaal kunt u tot 38 CTCSS en 104 DCS
tonen instellen.
Deze tonen kunnen worden ingesteld op de volgende kanalen:
Dubbele band versie: enkel op de 8 hoofd PMR446 kanalen (van P1 tot P8) en op ›
de 69 LPD kanalen.
E-versie (enkel PMR446): enkel op de 8 hoofd PMR446 kanalen (van P1 tot P8) ›
Voor beide kunnen de vooringestelde kanalen van 9p tot 24p niet worden gewijzigd.
Activeren van de CTCSS tonen:
Schakel het toestel in. ›
Selecteer het gewenste kanaal door te drukken op de toets › MENU en de ▲▼
kanalen.
Druk op de knop › MENU tot het scherm CTC weergeeft en de CTCSS toon knippert
aan de rechterkant (“of”= nr code – standaardconditie).
Selecteer de gewenste CTCSS toon door te drukken op ▲▼. ›
Om de instelling te bevestigen, druk op › PTT of wacht 5 seconden.
Deactiveren van de CTCSS tonen:
Indien u de CTCSS tonen niet wilt gebruiken, volg deze stappen:
Selecteer het gewenste kanaal. ›
Druk op de toets › MENU tot het scherm de CTCSS toon die knippert aan de
linkerkant weergeeft;
Selecteer “of” via ▲▼. ›
Page 61

Activeren van de DCS codes:
Schakel het toestel in. ›
Selecteer het gewenste kanaal door te drukken op › MENU en de toetsen ▲▼.
Druk op de toets › MENU tot DCS op het scherm staat en de tooncode knippert aan
de rechterkant (“van”=nr code – standaardconditie).
Selecteer de gewenste DCS code door te drukken op ▲▼. ›
Om de instelling te bevestigen, druk op › PTT of wacht 5 seconden.
! Kanaal P8 met DCS toon 50 (P850) werd in de fabriek ingesteld voor de
“Noodfunctie”; gebruik deze niet voor algemene communicaties!
Deactiveren van de DCS codes:
Selecteer het gewenste kanaal. ›
Druk op de toets › MENU tot het scherm het gebruikte kanaal toont en de DCS code
knippert aan de rechterkant.
Selecteer “of” via ▲▼. ›
Vibra-CALL functie
Midland G8 is uitgerust met de “Vibra-CALL” functie, die een stille waarschuwing
geeft voor inkomende oproepen.
Om deze functie te activeren, druk op de knop MENU tot het scherm
weergeeft; gebruik de knoppen ▼▲ om deze functie te deactiveren (on: activeert,
oF:deactiveert);
Druk op PTT [11] om te bevestigen of wacht 5 seconden.
Functie CALL
Midland G8 kan 5 verschillende beltonen uitzenden. Om dit audiosignaal naar andere
gebruikers te zenden, druk op de toets CALL/
Om beltonen te selecteren:
Druk op MENU, tot het scherm “CA” weergeeft en de actieve tooncode.
Door te drukken op ▲▼ hoort u de 5 vooringestelde melodieën.
Bevestig door te drukken op PTT of wacht 5 seconden.
.
Selectie Hoog/laag verbruik (enkel in de band PMR446)
Om het energieniveau te selecteren, druk op de knop MENU tot het scherm Pr
weergeeft. Gebruik ▲▼ om L (laag vermogen) of H (hoog vermogen) te selecteren.
Om de selectie te bevestigen, druk op PTT of wacht 5 seconden.
Wanneer de batterijen volledig opgeladen zijn, bedraagt hoog vermogen 500 mW
(ERP), terwijl laag vermogen 10 mW (ERP) is.
Indien uw radio binnen een kort bereik moet werken, kunt u het laag vermogen
selecteren en zo de batterijlevensduur verlengen.
VOX functie
Midland G8 maakt een handenvrije conversatie mogelijk via de VOX functie: spreek in
de richting van de microfoon en de communicatie wordt automatisch geactiveerd.
De VOX gevoeligheid kan op 3 niveaus worden ingesteld. U kunt de VOX functie
inschakelen met of zonder accessoires.
Het vierde geactiveerde niveau is de Vox TalkBalk: indien één radio voortdurend
uitzendt in VOX, zal de VOX TB de uitzending automatisch stoppen na 20" om het
zenden naar de andere gebruikers ook toe te laten.
Om de VOX functie te activeren druk op de knop MENU tot VOX op het scherm
verschijnt.
Gebruik ▲▼ om de gevoeligheidsniveaus te selecteren:
Of: Off; ›
1: Hoog ›
2: Medium ›
3: Laag ›
4: Talk Back (met hoge gevoeligheid) ›
Om de selectie te bevestigen, druk op PTT of wacht 5 seconden.
Om de VOX functie uit te schakelen, volg de bovenstaande procedure en selecteer
oF.
ROGER-pieptoon (toon voor einde transmissie)
Wanneer de knop PTT wordt losgelaten, piept de radio om aan andere gebruikers te
bevestigen dat uw transmissie beëindigd is.
In de Midland G8 is deze functie in de fabriek uitgeschakeld.
Om deze te activeren:
Druk op de knop MENU tot het scherm “rb of”; toont met behulp van de toetsen ▼▲
selecteer “on” en “rb on” wordt weergegeven; om de activatie van de roger-pieptoon
te bevestigen, druk op PTT of wacht 5 seconden.
Toetsenblok-pieptoon
Telkens dat een knop wordt ingedrukt, hoort u een pieptoon.
Om deze pieptoon te deactiveren, volg deze procedure:
Druk op › MENU, tot het scherm “bP on” toont.
Druk op ▲▼ tot “bP of” wordt weergegeven. ›
Om de selectie te bevestigen, druk op › PTT of wacht 5 seconden.
Op deze manier worden alle pieptonen en tonen uitgeschakeld.
Om de toetsenblokpieptoon in te schakelen, herhaal deze procedure en selecteer "bP
on "
Functie Noodoproep
De Midland G8 heeft een speciaal kanaal voor noodoproepen: alle G8-toestellen die
zich binnen uw bereik bevinden, zelfs indien afgesteld op andere kanalen, kunnen
noodberichten ontvangen/doorzenden op dat kanaal.
Indien de knop EMG ingedrukt wordt gehouden, schakelt de communicatie automatisch
over op het noodkanaal (“EC” op het scherm). Een audiosignaal zal worden
uitgezonden en alle G8-toestellen binnen bereik zullen automatisch overschakelen
naar het Noodkanaal ("EC").
Indien u deze functie hebt uitgeschakeld, zult u geen Noodoproep ontvangen/
uitzenden.
61
Page 62

! Wanneer de radio op het noodkanaal werkt (EC weergegeven), zijn alle
knoppen behalve PRR en CALL uitgeschakeld.
De G8 zal terugkeren naar het kanaal in gebruik na één minuut na de laatste
transmissie.
Om onmiddellijk terug te keren, druk op EMG. Nu kunt u alle MENU functies
gebruiken.
Activeren/Deactiveren van de Noodfunctie
Wanneer u het toestel inschakelt, is de Noodfunctie geactiveerd, maar u kunt deze
uitschakelen en terug inschakelen.
Druk op MENU tot het scherm EC on
Selecteer EC of via ▲▼ . Om de selectie te bevestigen, druk op PTT of wacht 5
seconden.
! Wanneer de Noodfunctie geactiveerd is (EMG knippert op het scherm) kunnen
de volgende functies niet worden gebruikt: Scannen, Monitor, Dubbele
bewaking, Buiten bereik.
Wijzigen van het noodkanaal
Het noodkanaal is vooringesteld op P8 DCS 50 maar afhankelijk van uw behoeften
kunt u dit wijzigen.
! Belangrijk: zorg ervoor de dat Noodfunctie actief is! (EMG knippert). Indien
u beslist om het kanaal voor de Noodfunctie te wijzigen, vergeet dan niet om
dezelfde wijziging naar alle radio's uit te voeren.
Druk op MENU, tot het scherm EC on toont.
Druk opnieuw op MENU (van weergegeven) en selecteer het gewenste kanaal via
▲▼. Bevestig door te drukken op PTT of wacht 5 seconden.
! Belangrijk: zorg ervoor dat de Noodfunctie actief is! (EMG knippert).
Indien u beslist om het kanaal voor de Noodfunctie te wijzigen, vergeet dan
niet om dezelfde wijziging naar alle radio's uit te voeren.
Om het originele Noodkanaal opnieuw in te stellen (P8 DCS 50)
Druk op MENU, tot het scherm EC on toont.
Druk opnieuw op MENU en selecteer
Bevestig door te drukken op PTT of wacht 5 seconden.
! Indien u één van de standaard kanalen instelt op de Noodfunctie, vergeet niet om
dit enkel voor dit doeleind te gebruiken, anders zal er interferentie optreden.
Manuele buiten bereik functie
Via deze functie kunt u nagaan of er radio's binnen uw bereik zijn.
Door tweemaal te drukken op EMG, zendt u een verzoek tot ontvangstbevestiging
naar de andere G8-toestellen binnen uw bereik en ingesteld op hetzelfde kanaal.
Indien een radio antwoordt, betekent dit dat deze binnen uw bereik is en zult u een
audiotoon ter bevestiging ontvangen.
! Deze functie kan enkel worden gebruikt indien de functie “Automatisch buiten
bereik” niet actief is.
62
DUBBELE BEWAKING
De Dubbele bewaking laat u toe om constant twee kanalen naar keuze tegelijkertijd
te bewaken.
Inschakelen - Uitschakelen
Druk op MENU, tot het scherm DW of toont.
Selecteer het tweede kanaal ter bewaking via ▲▼.
Om de selectie te bevestigen, druk op PTT of wacht 5 seconden. Het scherm zal
afwisselend het kanaal in gebruik en het tweede kanaal ter bewaking tonen.
Om de functie te stoppen, druk op MENU.
Wanneer de zendontvanger een transmissie op één van de twee kanalen detecteert,
pauzeert de dubbele bewaking tijdelijk, blijft gedurende 5 seconden ingesteld op het
overeenkomstige kanaal zodat een gebruiker de gelegenheid heeft om een oproep te
beantwoorden. Na deze pauze herstart de dubbele bewaking.
! U kunt de functie enkel activeren als de functie “Noodgeval” uitgeschakeld is.
Automatisch buiten bereik
Door deze modus in te stellen, kan een paar G8-toestellen elke 30 seconden een
gegevenscontrolecode uitzenden. Zodra het contact tussen de beide eenheden
verloren is en één radio deze gegevenscontrolecode tweemaal achter elkaar niet
ontvangt, begint het pictogram OUT op het scherm te knipperen en hoort u een
pieptoon.
! U kunt de functie enkel activeren als de functie “Noodgeval” uitgeschakeld
is.
Activeren – Deactiveren
Druk op MENU tot het scherm “OUT” en “Or of” weergeeft, selecteer “Or on”
(geactiveerd) met de knoppen ▲▼.
Schakel de beide radio's uit.
Schakel ze tegelijkertijd terug in.
Om deze functie uit te schakelen, duw op MENU tot “OUT” en “Or on” worden
weergegeven; selecteer “Or of” (uitgeschakeld) met de knoppen ▲▼.
Om de selectie te bevestigen, druk op PTT of wacht 5 seconden.
Schermverlichting
Indien er onvoldoende licht is om het scherm te lezen, druk kort op EMG en de
schermverlichting zal gedurende 5 seconden geactiveerd worden. Telkens dat MENU
wordt ingedrukt, zal het scherm automatisch verlicht worden.
Energiebesparen
De functie voor het besparen van de batterijkracht maakt een reductie mogelijk van
tot 50% van het energieverbruik en wordt automatisch ingeschakeld wanneer de
zendontvanger gedurende meer dan 7 seconden geen signaal meer heeft ontvangen.
Wanneer de batterijen ontladen zijn, verschijnt het pictogram
vervang de batterijen of herlaad de batterij.
! De energiebesparing is enkel actief wanneer de Noodfunctie uitgeschakeld is..
op het scherm
Page 63

Batterij herladen
De bijgeleverde batterij is van het type NiMH 4.8V 800mAh en mag enkel worden
herladen wanneer geplaatst in de radio; het duurt 8 uur om de batterij volledig terug
op te laden.
Om de batterij te herladen:
Steek de stekker van de wandadapter in het stopcontact en plaats de jack van de
wandadapter in de plug van de desktoplader.
Plaats de zendontvanger in de houder van de desktoplader. Het rode lampje van de
lader begint te branden.
Wanneer het laden voltooid is, neem de zendontvanger uit de houder en vewijder de
stekker van de wandadapter uit het stopcontact.
! Overlaad de batterijen niet! Wanneer ze volledig opgeladen zijn, stopt het
laadproces niet automatisch. Vergeet daarom niet om de zendontvanger uit
de lader te halen zodra de batterij herladen zijn, anders kunnen de radio en de
batterijen beschadigd worden.
! Probeer geen alkaline batterijen of niet-herlaadbare batterijen te laden. Zorg
ervoor dat wanneer u de radio oplaadt, het batterijvak enkel herlaadbare NIMH
of de bijgeleverde batterij bevat. Alkaline batterijen zijn niet herlaadbaar!
Batterijen die niet geschikt zijn voor herlading kunnen lekken, exploderen of
branden en schade veroorzaken!
! Het gebruik van een andere batterijlader dan deze aangegeven kan schade aan
uw toestel veroorzaken of zelfs explosies en persoonlijk letsel veroorzaken.
! Gooi geen batterijen in een vuur en plaats ze niet nabij hitte gezien dit
explosies of persoonlijk letsel kan veroorzaken.. Gooi de batterijen weg
volgens de procedures van de plaatselijke overheden.
! Meng geen oude en nieuwe batterijen of verschillende types batterijen die op
verschillende manieren gebruikt werden.
63
 Loading...