

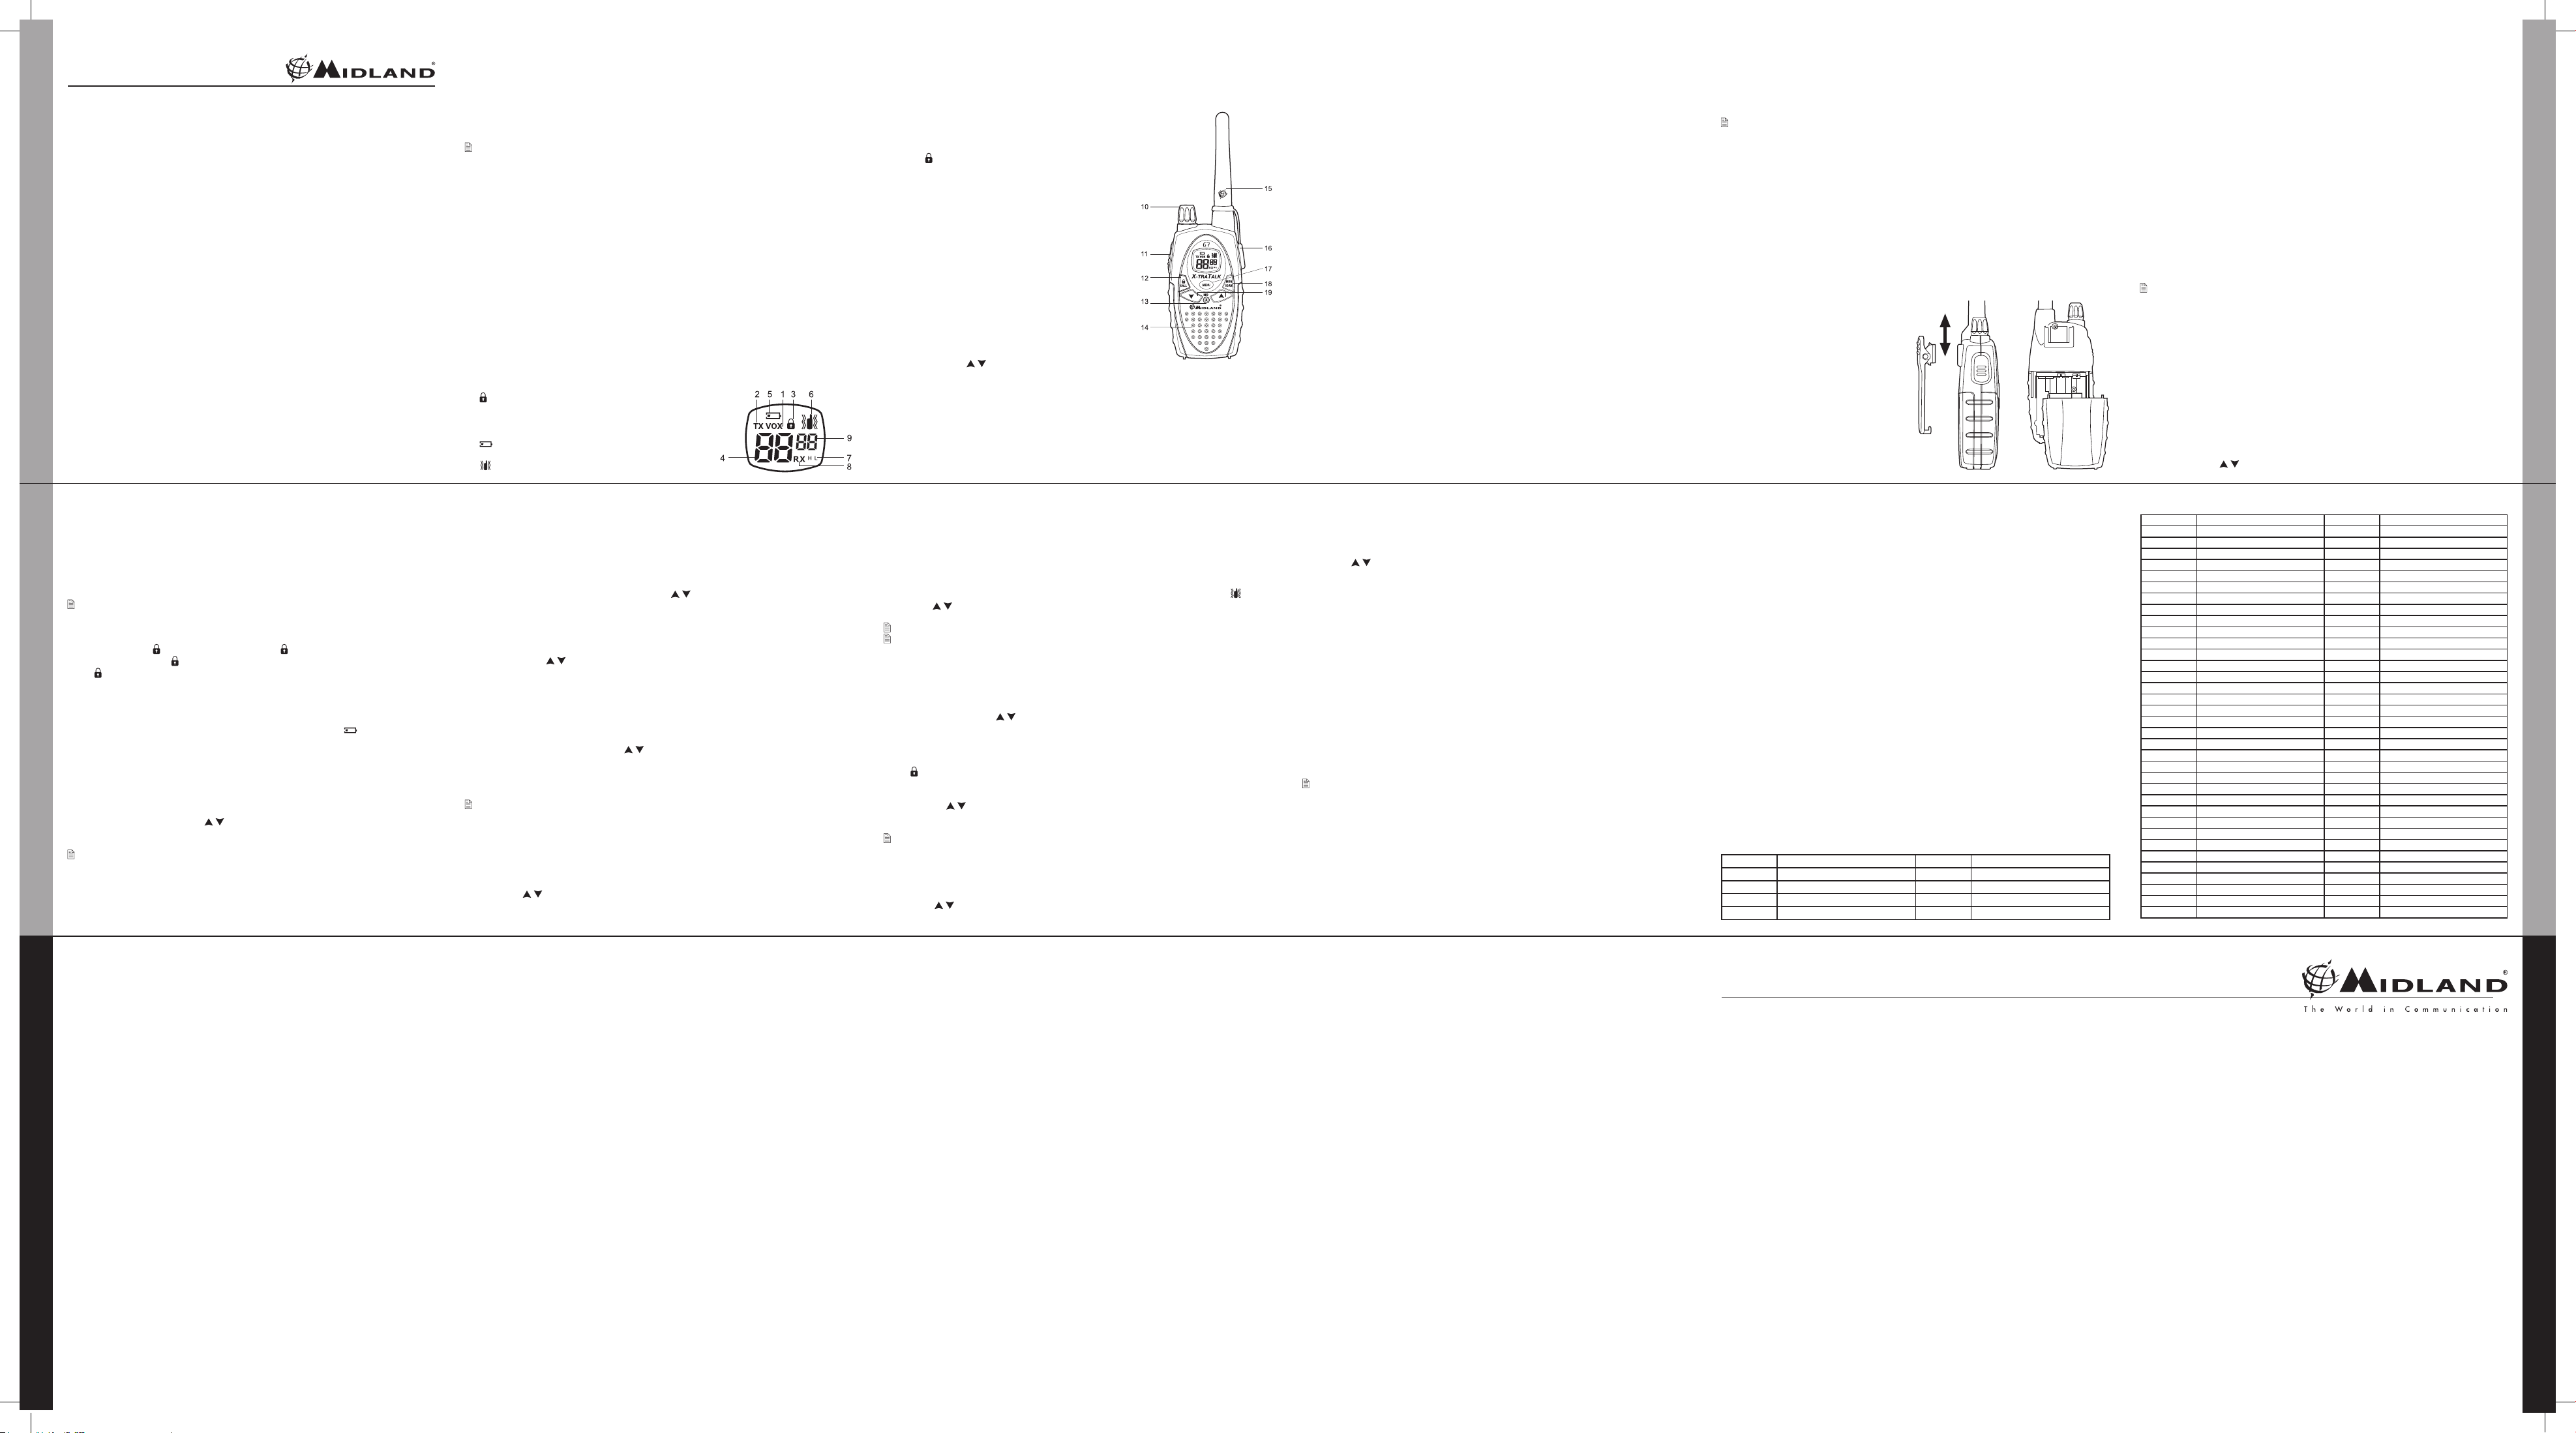
7. H (High) / L(Low) - shows the high or low power selection (PMR band).
8.
RX - (busy channel): appears on the display when the transceiver is receiving a signal.
9.
CTCSS tones - these 2 small digits indicate the selected CTCSS tone (1 - 38).
3.2 Radio
Refer to this picture to identify the various parts of the device:
10. VOLUME knob - On/off switch for the device and adjusts
volume of reception.
11. PTT button (push to talk) - Press this button to transmit.
12.
CALL/ button - to send a call on the selected channel.
If you keep it pressed for about 5 seconds, the keypad
lock is activated.
13.
Built-in MICROPHONE - Here is where sound is picked
up by the microphone.
14.
Built-in SPEAKER - Here is where the speaker is
housed.
15.
ANTENNA - Receives and transmits radio signals.
16.
SPK/MIC socket (under protective cover) - To connect
to external audio devices (headphones, microphone etc.)
and to the battery charger.
17. MENU button - Press this button to display the device’s
menu.
18.
MONITOR/SCAN button- Press this button once to
activate SCAN (scanning of channels). Keep the same
button pressed for about 2 seconds to activate MON
function. This function temporarily cuts off Squelch (for
weak signals).
19.
Scroll buttons / - Press these buttons to change
setting within the MENU.
4. PREPARING THE TRANSCEIVER
Make sure the following items are supplied in the package before you start using your
transceiver:
2 transceivers; double desktop charger; wall adaptor; 2 battery packs, 800m A/h NiMH; belt clip;
operational manual.
If any of the above is missing or damaged contact your supplier immediately.
4.1 Battery pack recharge
The supplied battery pack is 6V NiMH type and must be recharged without taking it out of the
transceiver; it takes 12 -14 hours to fully recharge.
To recharge the battery pack:
1. Connect the socket of the wall adaptor to a mains power socket and insert the jack of the wall
adaptor into the desktop charger plug.
2. Place your transceiver into the cradle of the desktop charger.
3. When charging is complete take the transceiver out of the cradle and detach the socket of the
wall adaptor from the mains.
! Do not overcharge the batteries! When these are fully charged the charging process
does not stop automatically. Do not forget therefore, to remove the transceiver from the
charger as soon as the batteries are charged.
! Do not try to charge alkaline batteries or non rechargeable batteries. Make sure that
when you charge the radio, only rechargeable NI-MH batteries should be contained
in the battery compartment! It is very dangerous attempting to recharge other types
of batteries (for example alkaline or manganese batteries). Batteries which are not
suitable to be recharged may leak, explode or even burn and cause damage!
! Using a different battery charger other than the one specied can cause damage to
your device or may even cause explosions and personal injuries.
! Do not throw batteries into re or place them near heat as this may cause explosions
or personal injuries. Dispose of the batteries according to procedures set out by local
regulations.
! Do not mix old and new batteries or batteries of different types or batteries which have
been used in different manners.
4.2 Memory effect of rechargeable batteries
Rechargeable NiMH (Nickel-Metal-Hydrate) batteries are affected by what is known as the
“memory effect”. This phenomenon is associated with a drastic reduction of battery autonomy
and is triggered if the batteries are regularly charged before being fully discharged and/or are not
completely recharged. To avoid the memory effect:
• When possible, recharge the batteries only when they are completely discharged (until the
device turns itself off during normal use)
• Do not disconnect the battery charger before the time indicated for a full battery charge.
• Discharge and recharge your batteries completely at least twice a month. In any case, the best
solution for avoiding the memory effect is to use in turn two battery sets: one in use, and the
other as a spare set. The memory effect can be easily eliminated by completely discharging/
charging the batteries 3 or 4 times.
The memory effect should not be confused with the normal battery life, which is 300-400
cycles of charge/discharge on average. It is completely normal for operating duty to decrease
when the batteries have reached the end of their life; at this point, you will need to substitute
the batteries.
4.3 Installing and removing the belt clip
With the belt clip you can easily attach the transceiver to your belt. The clip however, must be
removed in order to install or change the batteries. To remove the belt clip follow the indication of
picture 1. To x the clip back to the device slot it in the guides at the back of the transceiver until
it clicks into place.
4.4 Installing/removing the battery pack
4.4.a Removal
1) Remove the belt clip as explained in
paragraph 4.3;
2) Open the battery compartment as shown
in picture 2;
3) Remove the battery pack;
4) Replace the battery cover and x the belt
clip.
4.4.b Installation
1) Remove the belt clip as explained in
paragraph 4.3;
2) Insert the battery pack into the battery
compartment;
3) Replace the battery cover and x the belt
clip.
Midland G7
Two-colour and dual band PMR/LPD transceiver
1. INTRODUCTION
Combing the latest technology in radio communication along with a sturdy mechanical frame,
the MIDLAND G7 makes the ideal and effective solution for both the professionals who need
to stay in touch with colleagues (construction sites, buildings, hotels, trade fairs, shows) or
with leisure users that just want to keep up with friends and family. Its robust frame, ease
of use and simple design mean that it is ideal for use in any activity. The MIDLAND G7 is
extremely practical and operates on both PMR446 and LPD bands (please see chart in user
guide for restrictions on use).
The MIDLAND G7 incorporates all the functions that you would expect to see on the latest
and most advanced two way radio transceivers and guarantees reliability and maximum
efciency. Other key features include an LCD backlit display, a Vibrating call alert feature for
use in high-noise areas and an auto power save function which reduces battery consumption
by up to 50%. All of the features on this outstanding radio are easily accessible thanks to the
centrally mounted controls.
Coverage (referred to PMR frequency band)
The maximum range is obtained during use in an open space.
The only limitation to maximum possible range are environmental factors such as blockage
caused by trees, buildings, or other obstructions. Inside a car or a metallic constructions, the
range can be reduced.
channels to higher ones or vice versa) and therefore to skip communications which are of
no interest.
Press briey the button MON/SCAN [18] to start scanning.
If you want to stop it, press again MON/SCAN [18]. Your transceiver will go back to the
channel from which the scanning originally started.
5.6 Display backlight
If there is insufcient light to read the display you can press the MENU [17] button to switch
the display back light on for about 5 seconds.
Switching the backlight on the display adds an additional drain on the batteries. Try to
make a moderate use of this.
5.7 Keypad lock
Keep pressed CALL/ [12] for about 5 seconds and [3] will be displayed as conrmation.
Only PTT [11] and CALL/ [12] remain active. To disable this function, keep pressed again
CALL/ [12] for 5 seconds approx.
5.8 Power Save
The battery power saving feature enables a reduction in the consumption of up to 50%;
power saving comes on automatically when the transceiver does not receive any signal for
more than 7 seconds. When the batteries are discharged, the icon [5] appears on the
display: replace the batteries or recharge the battery pack.
6.MENU button
6.1 Channel selection
Press once the MENU [17] button. The number of the channel [4] will start ashing on the
display. Press the scroll buttons / [19] to scroll up or down the PMR and then LPD
channels till you select the desired channel. Press the PTT [11] button to conrm, or wait
for 5 seconds.
Refer to the table of frequencies of Chapter 9.
6.2 CTCSS tones selection
MIDLAND G7 can receive in two modes:
a)
Open trafc: in this case you will hear any communication transmitted on the selected
channel;
b)
Group mode CTCSS: CTCSS tones are access keys that allow you to receive only
messages coming from parties using the same channel and code. The speaker will remain
muted until the correct CTCSS tone is received.
To activate 1 of 38 different CTCSS tones in RX and TX
1. Turn on the radio.
2. Select the desired channel.
3. Press twice
MENU [17] until the Display shows the channel with the CTCSS tone [9] ashing
on the right (“of” default condition).
4. Select the desired CTCSS tone by pushing the
/ [19] controls.
5. To conrm the setting, press the
PTT [11] key or wait for approximately 5 seconds.
To deactivate CTCSS tones
If you want to operate with no CTCSS code:
1. Press twice the
MENU [17] key until the display shows the desired channel and the CTCSS
[9] tone blinking on the right.
2. Select “
of” with / [19] buttons.
6.3 Choosing high or low transmission power (PMR band)
Batteries are drained more quickly during transmission. In order to extend the battery life you can
select the low power when transmitting over short distances.
Procedure:
1) Press the
MENU [17] button for 3 times and Pr will be displayed.
2) Select
L [7] using the scroll buttons / [19].
3) Press
PTT [11] to conrm, or wait for 5 seconds.
If you want to transmit a longer distance repeat the above procedure to select the high power. At
step 2 select H [7]. When the batteries are in good conditions, high power is 500mW, whereas
low power is 10mW.
A low battery level during transmission will reduce the performance of your device.
6.4 VOX function
MIDLAND G7 enables hands free conversations through VOX function. The sensitivity of VOX
function can be adjusted in 2 different levels. You can enable VOX function with or without
accessories.
To activate VOX function press the MENU [17] button 4 times in the PMR band and VOX [1] will
appear on the display.
Use the scroll / [19] buttons to select:
• OFF: Disabled;
• 1: 1st Level (low sensitivity);
• 2: 2nd Level (high sensitivity);
Press PTT [11] to conrm or wait for 5 seconds.
To disable the VOX function follow the instructions above and select option oF.
6.5 Vibra-Call function
MIDLAND G7 is equipped with the “Vibra-Call” feature, which provides a silent alert for incoming
calls.
To activate it, follow these steps:
1. In the PMR band, press the
MENU [17] button for 5 times, until the display shows [6];
2. Use the
/ [19] buttons to disable or enable this feature (on: enables, oF:disables);
3. Push
PTT [11] to conrm or wait for 5 seconds.
Everytime MIDLAND G7 receives a call, it will vibrate.
When the Vibracall function is enabled, the call tone won’t be heard.
6.6 ROGER BEEP (End transmission tone)
Every time you end transmission (PTT [11] released), MIDLAND G7 gives out a sound that
indicates to the other party that s/he can start talking. This function is factory disabled. To activate
it:
1) Press six times the
MENU [17] button in the PMR band until the display shows “rb oF”;
2) Using the scroll buttons
/ [19] select “on” and “rb on” will be displayed;
3) To conrm the roger beep activation, press
PTT [11] button or wait for 5 seconds.
6.7 CALL function
MIDLAND G7 can send 5 different call tones. To send this audio signal to other users, press the
CALL/ [12] key.
To select the call tones:
1. Push the
MENU [17] button 7 times in the PMR band, until the display shows “CA 1”.
2. By pushing
/ [19] you will hear the 5 pre-set melodies.
3. Conrm by pressing the
PTT [11] key or wait for 5 seconds.
Now, each time your MIDLAND G7 sends out a tone call, it will beep with the selected melody.
If the Vibracall function is activated (See par. 6.5), the call tone won’t be heard.
6.8 Dual Watch function
This function allows the monitoring of 2 channels of your choice. Procedure:
1. Select one of the 2 channels you want to monitor.
2. Press 9 times the
MENU [17] button in the PMR band until the display shows “TX oF RX”.
3. With the
/ [19] button select the second channel to monitor.
4. Push the
PTT [11] key or wait for 5 seconds for conrmation.
To disable the function, press the MON/SCAN [18] button.
6.9 Keypad beep
To deactivate the keypad beep, follow these steps:
1. Press for 8 times the MENU [17] button in the PMR band, until “bP on” is displayed.
2. Use the
/ [19] buttons until the display shows “bP of”.
3. Conrm by pushing the
PTT [11] or wait for 5 seconds.
Now you won’t hear any beep at the pressure of any button.
7. TROUBLESHOOTING
Your MIDLAND G7 is designed to provide you with years of optimal performance. If for some
reason problems arise, refer to this chapter before contacting a service centre in your region.
7.1 Reset
If your transceiver experiences a logical malfunction (improper symbols on the display, blocking of
functions, etc.), it may not be experiencing a true failure, but rather a problem caused by external
factors. For example, it may have an incorrect setting brought on by a noise or spikes in the
electrical system during battery recharging. In such cases, you can reset the transceiver to its
factory-programmed settings, by resetting all parameters:
1) Turn off the transceiver
2) Remove the batteries for about 60 seconds (Par.4.4)
Before you go ahead with the reset, we recommend that you take note of all the setting you
have carried out as they will be deleted.
8 TECHNICAL SPECIFICATIONS
Channels ......................................................................................................1~8 PMR, 1~69 LPD
Frequency range ................................................................. 446.00625 ÷ 446.09375MHz (PMR)
....................................................................................................... 433.075 ÷ 434.775MHz (LPD)
Channel spacing ..........................................................................12.5 KHz (PMR); 25 KHz (LPD)
Power supply ............................................................................................................6+/- 10% Vdc
Temperature .................................................................................................... from -20° to +55°C
Dimensions (w/o batteries) ................................................................. 58 (L)x 122 (H)x34 (D) mm
Weight (w/o batteries) ...........................................................................................................123gr
Duty cycle ...................................................................................... TX 5%, RX 5%, stand-by 90%
8.1 Transmitter
Output power ...................................................................................... 10 or 500 mW (Selectable)
Modulation ................................................................................................................................ FM
Spurious rejection ..............................................................................within European legal terms
8.2 Receiver
Sensitivity @ 12dB Sinad ...................................................................................................0,35µV
Adjacent channel rejection ....................................................................................................70dB
Audio output power.......................................................................................300mW @ 10% THD
Intermediate frequencies ................................................................. 1st :21,4 MHz ; 2nd:450 KHz
Jack for ext.mike and recharge ..............................................................................stereo 2,5 mm
Jack for ext. speaker ...............................................................................................mono 3.5 mm
Specications are subject to change without notice.
9 FREQUENCY CHART
PMR446 channels
Channel Frequency RX/TX (MHz) Channel Frequency RX/TX (MHz)
P1 446.00625 P5 446.05625
P2 446.01875 P6 446.06875
P3 446.03125 P7 446.08125
P4 446.04375 P8 446.09375
LPD channels
Channel Frequency RX/TX (MHz) Channel Frequency RX/TX (MHz)
1 433.0750 36 433.9500
2 433.1000 37 433.9750
3 433.1250 38 434.0000
4 433.1500 39 434.0250
5 433.1750 40 434.0500
6 433.2000 41 434.0750
7 433.2250 42 434.1000
8 433.2500 43 434.1250
9 433.2750 44 434.1500
10 433.3000 45 434.1750
11 433.3250 46 434.2000
12 433.3500 47 434.2250
13 433.3750 48 434.2500
14 433.4000 49 434.2750
15 433.4250 50 434.3000
16 433.4500 51 434.3250
17 433.4750 52 434.3500
18 433.5000 53 434.3750
19 433.5250 54 434.4000
20 433.5500 55 434.4250
21 433.5750 56 434.4500
22 433.6000 57 434.4750
23 433.6250 58 434.5000
24 433.6500 59 434.5250
25 433.6750 60 434.5500
26 433.7000 61 434.5750
27 433.7250 62 434.6000
28 433.7500 63 434.6250
29 433.7750 64 434.6500
30 433.8000 65 434.6750
31 433.8250 66 434.7000
32 433.8500 67 434.7250
33 433.8750 68 434.7500
34 433.9000 69 434.7750
35 433.9250
2. ABOVE ALL….SAFETY!
2.1 Simbols used
For ease and convenience of use, this manual uses symbols to highlight urgent situations,
practical advice, and general information.
! Exclamation marks such as this one indicate a crucial description regarding technical
repairs, dangerous conditions, safety warnings, advice, and/or other important
information. Ignoring these symbols may result in serious problems and/or damage
and/or personal injury.
Notes such as this one indicate practical advice that we suggest be followed for the optimal
performance of the equipment
2.2 Warnings
! BATTERIES - Strictly follow all the directions and warnings on the batteries stated at
chapter 4.1
! Do not open the radio for any reason! The radio’s precision mechanics and electronics
require experience and specialized equipment; for the same reason, the radio should
under no circumstances be realigned as it has already been calibrated for maximum
performance. Unauthorized opening of the transceiver will void the warranty.
! Do not use detergents, alcohol, solvents, or abrasives to clean the equipment. Just use
a soft, clean cloth. If the radio is very dirty, slightly dampen the cloth with a mixture of
water and a neutral soap.
3. IDENTIFYING THE PARTS
3.1 Display
Your MIDLAND G7 keeps you constantly updated about its operational status through a Liquid
Crystal Display (LCD). The symbols and their corresponding parameters that may appear,
according to the operational status of the device, are described as follows:
1.
VOX - Activation of VOX function.
2.
TX- during transmission (PTT pressed).
3.
This symbol appears when the keypad lock is
activated.
4.
CHANNEL - These two large digits indicate the channel
selected (P1~P8 PMR, 1~69 LPD).
5.
It warns you of the battery pack / AA batteries low
charge.
6.
Vibra-Call function activated.
5.BASIC OPERATION
5.1 Turning on/off
To turn on the transceiver, turn the VOLUME [10] knob clockwise until you hear it clicks: the
LCD display will light up and do an Auto-Test. Subsequently you will hear 3 beeps of different
tones. To turn off the transceiver, turn the knob counter-clockwise until you hear another click.
The LCD display will turn off and subsequently you will hear 3 beeps of different tones.
5.2 Volume control
Turn the knob VOLUME[10] to about half way and adjust it to a comfortable level as soon
as you receive a signal. If you do not receive a signal you can use the button MON/SCAN
[18] described at par. 5.4.
5.3 Transmission and reception
The button PTT [11] is located on the top left side of the device. To transmit:
1) Make sure that no one else is currently talking on the selected channel;
2) Keep button PTT [11] rmly pressed: TX [2]will appear on the display;
3) Before you start talking wait for a fraction of a second then speak normally, in the direction
of the microphone, and hold the device at a distance of about 5 cm.
4) When you have nished, release the PTT [11]: TX [2]will disappear from the display;
5) When the radio is in reception mode (PTT [11] not pressed) you will automatically receive
any communication (RX [8] displayed).
During transmission and reception try, as far as possible, to keep the antenna in vertical
position and to avoid obstacles towards the direction of the other party.
5.4 MON button (Monitor)
The Monitor button is for temporarily excluding (opening) the squelch, in order to listen to
signals that are too weak to keep the squelch permanently opened. By excluding the squelch
you will avoid listening the communication “chopped” by the squelch. In order to activate
the Monitor function, so as to listen to all trafc on the selected channel, keep pressed the
MON/SCAN [18] button for about 2 seconds. Keep pressed the button MON/SCAN [18] for
about 2 seconds to disable this function.
5.5 Scanning all channels
MIDLAND G7 can automatically search for signals throughout the PMR/LPD bands by
scanning, i.e. selecting the channels in rapid sequence. When a signal is detected, the
scanning pauses on that channel and you can transmit by pushing PTT [11] . If you press
PTT [11] during scanning you can transmit on the channel from which the scanning started.
The scroll buttons / [19] allow you to change the direction of scanning (from lower
ENGLISHENGLISH
ENGLISHENGLISH
Main functions
• Dual Band LPD/PMR transceiver
• VIBRACALL function
• LCD display with backlight
• Low battery indicator
• Auto power save: automatic current
economy circuit
• 38 CTCSS tones in TX and RX
• CALL button with 5 tones selectable
• Automatic squelch adjustment
• Buttons for the channel selection
• SCAN function
• Keypad lock
• Hi/low power selection (PMR band)
• Roger Beep on/off
• VOX for hands-free communications
• Jack for ext. mike / ext. speaker /
battery (AA type) recharge
NOTE: The manufacturer, with its effort
to constantly improve product quality,
reserves the right to change characteristics
and features without prior notice.
Picture 1 Picture 2
Accessori originali - Original accessories
Accessoires originals - Originalzubehör
Accessorios originales - Acessórios
Consultate il nostro sito www.cte.it per l’elenco aggiornato degli
accessori compatibili.
For a detailed and updated list of suitable accessories, please
go to www.cte.it
Eine ständig aktualisierte Übersicht für passendes Zubehör
können Sie auf unserer website
www.alan-germany.com abrufen oder Sie informieren sich über
Neuerungen bei Ihrem Fachhändler.
Pour voir la liste de nôtres accessoires compatibles, vous pou-
vez consulter notre website www.cte.it
Consulte nuestra web www.alan.es para una lista actualizada
de los accesorios compatibles
Consulte o nosso website www.cte.it para uma lista actualizada
de acessórios
Για την αναλυτική και ενημερωμένη λίστα των αξεσουάρ,
παρακαλούμε επισκεφθείτε το website www.cte.it
Prodotto o importato da:
CTE INTERNATIONAL s.r.l.
Via. R.Sevardi 7- 42010 Reggio Emilia Italia
L’uso di questo prodotto può essere soggetto a restrizioni nazionali (per l’uso in Italia in modalità
PMR446, è richiesta l’autorizzazione generale (come da D.L. 259 del 01/08/03 art. 99 comma 3;
All. 25 art. 36). Prima dell’uso leggere attentamente le istruzioni. Se il prodotto contiene batterie:
non gettare nel fuoco, non disperdere nell’ambiente dopo l’uso, usare gli appositi contenitori per
la raccolta.
Produced or imported by:
CTE INTERNATIONAL s.r.l.
Via. R.Sevardi 7 42010 Mancasale Reggio Emilia Italy
Produced or imported by:
ALAN UK
Unit 2, Callenders, Paddington Drive, Churchward Park, Swindon, Wiltshire, SN5 7YW - UK
The use of this transceiver can be subject to national restrictions. Read the instructions carefully
before installation and use. if the product contains batteries: do not throw the battery into re.
To disperse after use, throw into the appropriate containers.
Producido o importado por:
ALAN COMMUNICATIONS, S.A.
C/Cobalto, 48 - 08940 Cornellà De Llobregat - España Tel 902384878
El uso de este transceptor puede estar sujeto a restricciones nacionales. Lea atentamente
las instrucciones antes de usar el equipo. si el producto contiene pilas o baterías no las
tire al fuego ni las disperse en el ambiente después de su uso, utilice los contenedores
apropiados para su reciclaje.
Herstellung/Vertrieb durch:
ALAN ELECTRONICS GmbH
Daimlerstraße 1K - D-63303 Dreieich Deutschland
Die Benutzung dieses Handfunkgerätes ist von den landesspezischen Bestimmungen
abhängig. Vor Benutzung Bedienungsanleitung beachten. Bei Verwendung von Batterien
beachten Sie bitte die Umweltbestimmungen. Batterien niemals ins offene Feuer werfen,
und nur in dafür vorgesehene Sammelbehälter entsorgen.
 Loading...