

Page 1
OWNER’S MANUAL FOR THE F-20 (FRS W/532 CODES)
OWNER’S MANUAL FOR THE F-20 FRS
For all accessories please go to http://www.midlandradio.com
http://www.midlandradio.com 1
Page 2

OWNER’S MANUAL FOR THE F-20 (FRS W/532 CODES)
TABLE OF CONTENTS
OPTIONAL ACCESSORIES FOR YOUR RADIO...............................................................3
TIPS FOR GETTING THE MOST FROM YOUR F-20........................................................4
A NOTE ABOUT THE CTCSS CODES ..............................................................................4
PREPARATION...................................................................................................................4
BATTERIES.........................................................................................................................4
To Install Batteries:.......................................................................................................4
Low Battery Indicator:...................................................................................................5
Instructions for optional charger...................................................................................5
BELT CLIP...........................................................................................................................5
QUICK USE INSTRUCTIONS:............................................................................................5
Operating the Radio ............................................................................................................5
TO TURN THE RADIO ON OR OFF...................................................................................6
TO CHANGE THE CHANNEL IN USE................................................................................6
ACTIVATING SCAN FUNCTIONS......................................................................................6
Busy Channel Scan:.....................................................................................................6
Activating Dual Watch ..................................................................................................6
TO USE CALL BUTTON .....................................................................................................6
TO ENABLE/DISABLE “ROGER-BEEP”.............................................................................6
TO ENABLE / DISABLE KEY BOARD LOCK .....................................................................5
POWER SAVE CIRCUIT.....................................................................................................5
USING THE MONITOR FUNCTION ...................................................................................6
TO OPERATE HANDS FREE VOX.....................................................................................8
Setting VOX Functions. .......................................................................................................8
TO ENABLE / DISABLE VOX MODE..................................................................................8
DISPLAY SYMBOLS ...........................................................................................................9
ACTIVATING “PRIVACY” CODES ......................................................................................9
TROUBLESHOOTING ......................................................................................................10
CARE OF RECHARGEABLE NI-CAD AND NI-MH BATTERIES .....................................10
SERVICE: ..........................................................................................................................12
CHANNEL FREQUENCIES ..............................................................................................11
LIMITED WARRANTY.......................................................................................................12
http://www.midlandradio.com 2
Page 3

OWNER’S MANUAL FOR THE F-20 (FRS W/532 CODES)
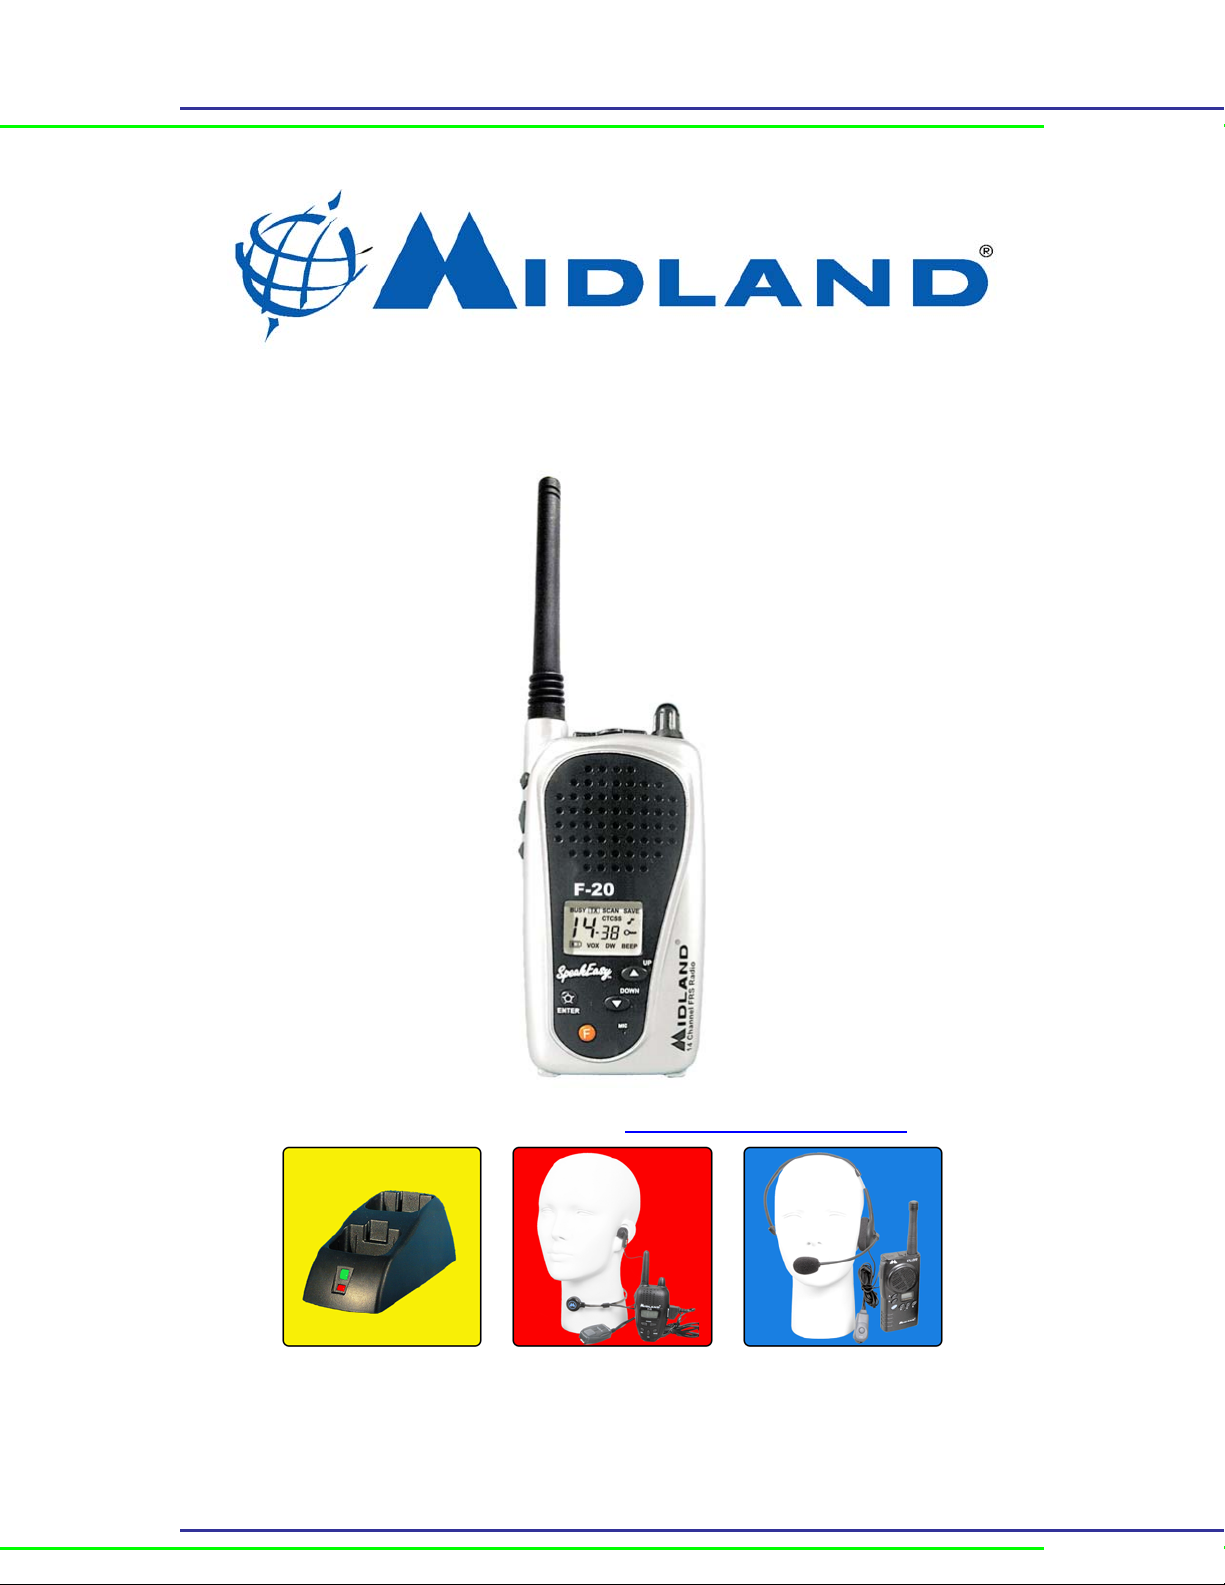
OPTIONAL ACCESSORIES FOR YOUR RADIO
Accessory Name Model Number
Ni-cad Battery (single “AA” 3 required).......................………..18-BATT
Standard Charger……………..………………………………..…..18-396
Charger Stand ……………………………………………......……18-383
Dual Charger Stand …………………………………………….…18-385
Lapel Microphone with Ear-bud Speaker………………………….22-405
Speaker/Microphone…………………………………………..…...22-411
Boom Microphone Headset ……………………………………….22-540
Call 816 241 8500 ext. 200 to order accessories.
This device complies with Part 15 of the FCC Rules. Operation is subject to the following
two conditions: (1) This device may not cause harmful interference, and (2) This device
must accept any interference received, including interference that may cause undesired
operation.
Your Midland model F-20 brings the new FRS (Family Radio Service) to your fingertips. The
Family Radio Service is provided for by the FCC and is totally license free. For the first time
business and the general public can use the quiet UHF FM band for personal communications at
no air time charge. The F-20 uses maximum allowable power for range up to 2 miles. Use for
fishing, hunting, picnics, biking, business, or any other activity where communications are needed
for convenience or safety. The model F-20 incorporates all 14 channels with 38 different CTCSS
and 83 DCS codes to provide the best in quiet communications. Also this radio offers scan, power
save, 9 memory channels and a multifunction back-lighted liquid crystal display. This unit also
incorporates VOX (voice operated transmit) that allows hands free use when the radio is
equipped with certain accessories.
WARNING
Your wireless hand-held portable transceiver contains a low power transmitter. When the Pushto-Talk (PTT) button is pressed it sends out radio frequency (RF) signals. The device is
authorized to operate at a duty factor not to exceed 50%. In August 1996, the Federal
Communications Commission (FCC) adopted RF exposure guidelines with safety levels for handheld wireless devices.
To maintain compliance with the FCC's RF exposure guidelines, this transmitter and its antenna
must maintain a separation distance of least 2 inches (5 centimeters) from your face. Speak in a
normal voice, with the antenna pointed up and away from the face at the required separation
distance. The belt clip is for storage purposes only. DO NOT TRANSMIT WHILE USING THE
BELT CLIP. To transmit, hold the device away from your body and ensure the antenna is at least
2 inches (5 centimeters) from your body when transmitting.
http://www.midlandradio.com 3
Page 4

OWNER’S MANUAL FOR THE F-20 (FRS W/532 CODES)
TIPS FOR GETTING THE MOST FROM YOUR F-20
Due to the band of operation (462/467 MHz) the F-20 provides communications that are virtually
free of atmospheric interference (skip) that is common on lower frequency bands. Along with this
and an antenna system that is very efficient as compared to other unlicensed radio bands,
communications range is surprisingly good. Many times the limit to maximum possible range is
environmental factors such as blockage caused by trees, buildings, hills, or other obstructions. If
you find communication is not possible, many times this can be overcome by moving only a few
feet to a new location. Range is greatly reduced while operating from a metal building or from a
vehicle. Battery condition also affects range. The F-20 operates on rechargeable Ni-Cad batteries
or alkaline batteries. While this unit has been designed with gaskets for water resistance and
ruggedness it is a precision piece of electronic equipment that should not be exposed to water or
handled carelessly. Normal care should result in years of trouble free operation. Do not leave
batteries installed over a long period of time as leakage may occur, that can destroy the radio. If
you experience problems operating the radio, turn off the radio, press and hold the “F” button
and turn on the radio.This will cause the radio to return to the factory settings. Always save your
receipt, as it is required for warranty consideration.
A NOTE ABOUT THE CTCSS CODES
This radio incorporates 38 CTCSS (Continuous Tone Coded Squelch System) codes and 83 DCS
(Digital Coded Squelch) codes that, when activated, prevent the user from hearing other radios
that do not have the same code. These codes do not make your
conversation private. If you
experience difficulties contacting or hearing other radios in your group make sure the CTCSS or
DCS code is set the same on all radios. If you are using the F-20 where interference from other
radios or electrical devices are present, enabling the CTCSS codes will usually mute the
interference. Many times interference will be noticed by the presence of loud static from the
speaker.
PREPARATION
BATTERIES
F-20 radios operate with 3 AA Alkaline, Ni-Cad (nickel cadmium) or Ni-MH (nickel metal hydride)
batteries (optional). Ni-Cad batteries provide about 15 hours of use. Alkaline batteries will provide
about 45 hours of use and Ni-MH batteries will provide about 24 hours of use. The F-20 may be
supplied with Ni-Cad batteries and a wall charger. Ni-Cad batteries must be charged prior to use.
Charge at least 10 hours with the standard charger. If you are using Ni-MH batteries charge at
least 24 hours. DO NOT
attempt to charge any type of Alkaline batteries in this radio.
To Install Batteries:
Hold the radio face down. Press the latch so it swings away from the cover.
1. Lift the battery cover slightly. Gently slide the cover off the unit.
2. Insert 3 AA batteries observing the proper polarity.
Replace the battery cover over the batteries and fasten with the latch.
Low Battery Indicator:
The battery icon in the lower left of the display will flash when the batteries are in need of
charging.
http://www.midlandradio.com 4
Page 5

OWNER’S MANUAL FOR THE F-20 (FRS W/532 CODES)
CHARGING THE BATTERIES
Instructions for optional charger
Install NI-Cad (nickel cadmium) batteries observing their polarity. Plug the 18-396 charger into
any 110/115 V wall socket. Plug the cord into the jack on the bottom of the radio under the
rubber plug marked “CHG”. Charge the batteries for at least 10 hours for Ni-Cad and 16
hours for Ni-MH.. When using a drop-in charger (models 18-383 or 18-385) follow the setup
instructions then simply set the radio in the charger stand and observe that the LED on the
charger is lit. The radio should be turned off while charging.
DO NOT
attempt to charge any type of Alkaline batteries in this radio.
BELT CLIP
The F-20 comes standard with a belt clip. Attach it to the radio back by sliding the top of the clip
up over the two rectangular bosses on the back of the radio until it snaps into place. To detach
the belt clip, press the lever inside the top of the clip away from the radio body and slide the clip
toward the bottom of the radio.
QUICK USE INSTRUCTIONS
1. Install fresh alkaline or fully charged Ni-Cad or Ni-MH batteries.
2. Turn the unit on by turning the ON/OFF/VOLUME clockwise until a click is heard.
3. Use the ON/OFF/VOLUME control to adjust the volume. To test the volume setting, press
and hold the “MON” button so static noise can be heard. The noise can be used as a
reference level for volume setting.
4. To talk press the PTT (push to talk) button on the left side of the radio and talk in a normal
voice into the front of the radio about three inches away from your mouth.
To listen release the PTT button.
POWER SAVE CIRCUIT
This part of the operation of the radio is completely automatic and not adjustable. When the radio
has not transmitted or received a signal for several seconds it will begin to cycle from a sleep
mode to fully on. This occurs several times a minute. If a signal is received or you cause the radio
to transmit, the radio will become fully awake. This cycling from sleep to fully on increases the
battery life more than 50%. An icon in the upper right of the display flashing “SAVE” will verify
this.
RANGE OF RADIOS
The best range between portable FRS radios is achieved when they are operating in open terrain
outside of buildings and vehicles. Anyone using a portable unit inside a vehicle will experience a
significant loss of range.
ENABLE/DISABLE KEYBOARD LOCK
To enable the KEYBOARD LOCK press and hold the “ENTER” button for 2 seconds. The display
will contain a key symbol (9). PTT, MON and CALL buttons will still be active. The “ENTER”
button will also activate the backlight for 5 seconds. When radio is in lock mode and any other
keys are pressed a tone will be heard. To disable the KEYBOARD LOCK, press and hold the
“ENTER” button for about 2 seconds.
http://www.midlandradio.com 5
Page 6

OWNER’S MANUAL FOR THE F-20 (FRS W/532 CODES)
USING THE MONITOR FUNCTION
1. Press and hold the “MON” button on the side of the radio to open the squelch.
This allows you to override the squelch and the “CTCSS” tones. This is useful to monitor
the channel before you transmit to ensure there is not someone using the channel when
you have “CTCSS” tones programmed. This is also useful if you suspect someone in your
group does not have the proper “CTCSS” tones programmed.
Release the “MON” button to restore the squelch to normal.
FEATURES & LOCATIONS OF CONTROLS
TURNING THE RADIO ON OR OFF
The ON/OFF/VOLUME control at the top of the radio controls power and volume. A series of
tones will be heard confirming that radio is working.
TO CHANGE THE CHANNEL IN USE
Press and release the channel button /\ or \/ to select the desired channel. To change channel
rapidly, press and hold the channel button /\ or \/ until the desired channel appears on the display.
ADJUSTING THE VOLUME
Rotate the ON/OFF Volume control clockwise to increase the volume. Rotate the ON/OFF
Volume control counter clockwise to decrease the volume.
TO USE CALL BUTTON
Press and release the CALL button. A call signal of alternating tones will be sent for about 2
seconds. Both radios must be on the same channel and the radios must be turned on.
If any function is selected and no buttons are pressed in 10 seconds, the current settings
are retained and the radio switches back to normal operation.
ENABLE/DISABLE ROGER BEEP
TO ENABLE/DISABLE “ROGER-BEEP”
The radio transmits a rapid tone sequence when the PTT button is released if this feature is
active. The default condition is for the “roger beep” to be off.
1. Press the “F” button until you on the display “oF” (depending on previous programming) with
a music note ♪ (8) flashing in the display.
2. Press the channel /\ or \/ buttons to select off or on.
“oF” is roger beep off. “oN” is roger beep on.
3. Press "ENTER" to store your selection.
http://www.midlandradio.com 6
Page 7

OWNER’S MANUAL FOR THE F-20 (FRS W/532 CODES)
ACTIVATING SCAN FUNCTIONS
ACTIVATING SCAN FUNCTIONS
The F-20 has two scan modes. The most popular and most used is the “BUSY” channel scan.
This allows the radio to stop on a channel that someone is talking on.
When the radio stops on a “Busy” channel, the scan will stop and resume after about 5 seconds.
The other is “DUAL WATCH”. This allows you to scan only two channels. This is useful when
you want to keep track of two other people.
Busy Channel Scan:
1. Press and release the ”F” button the ”SCAN” icon (5) will begin flashing.
2. Press and release the “UP” or “DOWN” channel button to activate scan. The unit will now
begin scanning through the channels.
Pressing the “UP” or “DOWN” channel button during scan will determine if the channels
are scanned up or down.
Pressing the “PTT” (push to talk) button will cause the radio to stop scanning and return
to normal operate mode.
ACTIVATING DUAL WATCH
Activating Dual Watch
Dual watch is a function that allows you to scan only two channels.
1. Select channel one.
2. Press the “F” button three times until “DW” (11) is flashing.
3. Select the second channel to be scanned.
About 1 second after your selection of the second channel is complete the radio will begin
switching between the two channels.
When the radio hears activity on either channel, scanning will stop on that channel for
about 5 seconds and then resume scanning.
If communication is desired on the channel scanning stopped on, press the “PTT” button.
This will deactivate Dual Watch and allow you to communicate normally.
To reactivate Dual Watch repeat steps above.
ACTIVATING PRIVACY CODES
Activating the “CTCSS” code will prevent you from hearing any conversation that is not
using the same
1. Press the “F” button twice to cause the icon “CTCSS” to be displayed in the upper left of the
display to flash.
2. Press and release the “UP” or “DOWN” buttons to select the “CTCSS” code you desire.
3. Press “ENTER” to store the code setting for that channel.
“CTCSS” code. This does not make your conversation private.
A code of “oF” means no code is programmed.
You must do this for each of the channels you want CTCSS codes on.
Activating the “CTCSS” code will prevent you from hearing any conversation that is not
using the same
4. If you wish to set another channel for CTCSS code, choose a different code than the ones
in use.
The following is a list of frequencies of the CTCSS codes. Different brands of radios may use a
different number code for the frequencies. For operation with other brands of radios the selected
CTCSS frequency must match.
“CTCSS” code. This does not make your conversation private.
http://www.midlandradio.com 7
Page 8

OWNER’S MANUAL FOR THE F-20 (FRS W/532 CODES)
01=67.0 Hz 11=97.4 Hz 21=136.5 Hz 31=192.8 Hz
02=71.9 Hz 12=100.0 Hz 22=141.3 Hz 32=203.5 Hz
03=74.4 Hz 13=103.5 Hz 23=146.2 Hz 33=210.7 Hz
04=77.0 Hz 14=107.2 Hz 24=151.4 Hz 34=218.1 Hz
05=79.7 Hz 15=110.9 Hz 25=156.7 Hz 35=225.7 Hz
06=82.5 Hz 16=114.8 Hz 26=162.2 Hz 36=233.6 Hz
07=85.4 Hz 17=118.8 Hz 27=167.9 Hz 37=241.8 Hz
08=88.5 Hz 18=123.0 Hz 28=173.8 Hz 38=250.3 Hz
09=91.5 Hz 19=127.3 Hz 29=179.9 Hz 00=OFF
10=94.8 Hz 20=131.8 Hz 30=186.2 Hz
RESETTING THE RADIO
If the radio stops responding to button presses or otherwise does not function properly in some
cases the radio can be reset to restore normal operation.
To reset the radio: With the radio off, press and hold the “F” button and turn the radio on.
Release the “F” button when the radio powers up. (see turning the radio on)
This operation will reset the radio to factory settings and will erase all memory channels
that have been programmed.
WARNING
To get the most use from the “VOX” feature you must first determine what sensitivity level is
needed to activate the “VOX” control. Sensitivity is how loud you have to talk to activate the
“VOX” circuit. The “VOX” has three levels of sensitivity that can be adjusted. The 1 option you can
talk in a normal voice with no background noise to activate the “VOX” circuit. The option 2 will
require more voice level to activate the “VOX” circuit. This is useful in slightly noisier areas that
might activate the “VOX” without talking. The option 3 will require the most voice level to activate
the “VOX” circuit. This will be useful in very noisy areas. The next adjustment is the delay. This is
a function of the “VOX” that keeps the radio in transmit mode after you stop talking. A delay that
is set to short will cause the “VOX” circuit to stop between some words. The delay is adjustable to
three levels. Level 1 will give about one half second of delay, level three will give you about one
and one half seconds of delay. By activating the “VOX” you only have to talk into the front of the
radio or use a headset to make the radio transmit. The PTT (push to talk) button is not functional
in “VOX” mode. It is recommended to use a headset when using the “VOX” feature.
NOTE: It is recommended to disable the Roger Beep when VOX is in use. See page 8 for
instructions.
Setting VOX Functions.
1. With the radio in the off position, press and hold the “CALL” button and turn the radio on. The
display will show “L” followed by a 1, 2 or three depending on previous settings.
2. Press the channel “UP” or “DOWN” buttons to select the level desired.
Be sure radio has not been switched to “VOX” mode before resetting radio.
OPERATING THE HANDS FREE VOX (VOICE OPERATED TRANSMIT)
Setting VOX Levels
As described earlier L 1 will be the most sensitive and L 3 will be the least sensitive.
3. Press the “F” button to switch to the Delay setting. A “d” followed by a d1, d2 or a d3 will
show on the display depending on previous settings.
4. Press the channel “UP” or “DOWN” buttons to select the level desired.
As described earlier d 1 will be the shortest and d 3 will be the longest delay.
5. Press the “ENTER button to store your settings and return to normal operation mode.
TO ENABLE / DISABLE VOX MODE
Press and hold the “VOX” button on the front of the radio for about 2 seconds. “VOX” will be
displayed when enabled. Talk into the front of the radio or the headset microphone. (head set is
recommended) To listen stop talking.
http://www.midlandradio.com 8
Page 9

OWNER’S MANUAL FOR THE F-20 (FRS W/532 CODES)
DISPLAY SYMBOLS
CAUTION: DON'T EXPOSE THE DISPLAY TO EXTREME HOT OR COLD TEMPERATURE
1. Channel number: Displays channel number 1-14.
2. BUSY Symbol: Indicates activity on the channel.
3. TX Symbol: Indicates the unit is transmitting.
4. CTCSS Code: Displays the number of the code selected for the channel in use.
5. SCAN Symbol Indicates the scan mode is in use
6. CTCSS Symbol: Indicates a “Privacy” code is in use.
7. SAVE Symbol: Flashes indicating battery save is active.
8. Musical note indicates ROGER BEEP is on.
9. Key Symbol indicates when the keypad has been locked. Only the “PTT” and “CALL”
buttons are active when this indicator is on.
10. BEEP indicates the button press tone and power up tones are active.
11. DW Symbol: Indicates Dual Watch channel selection is active.
12. VOX Symbol: Indicates “VOX” is activated
13. Battery symbol shows the battery condition. Replace or recharge the batteries when this
indicator displays 2 or fewer segments of the battery.
http://www.midlandradio.com 9
Page 10

OWNER’S MANUAL FOR THE F-20 (FRS W/532 CODES)
TROUBLESHOOTING
PROBLEM SOLUTION
No Power
Cannot receive messages
Range is short
Radio squeals when
receivnng messages
Messages not transmitted.
Interference/Static
1. Check battery installation and/or replace batteries
1. Make sure the volume is set high enough.
2. Change your location, you may be out of range.
3. Disable CTCSS code. Make sure all parties are using the
same code.
4. Install batteries properly or replace.
1. Operating the radio in a vehicle or metal building will
decrease the range. If possible operate outside of vehicles or
buildings.
2. Carrying the radio so that the antenna is very near the body
will decrease the range. Hold the radio in the open for the best
range.
3. Battery condition can affect range. Replace or recharge
batteries.
1. Check battery condition. Usually lowering the volume stops
the squealing. This indicates weak batteries.
1. If PTT button is not responding, check to see if VOX is active.
2. If VOX is in use, check for correct VOX level setting.
1. Change your location. The interference may be caused by
nearby electronic or electrical equipment.
Cannot change channels
1. Make sure keyboard is not locked.
2. Make sure the radio is not transmitting.
Battery icon flashes
1. Replace alkaline batteries or recharge rechargeable batteries.
Display is dim
Reposition or replace batteries.
CARE OF RECHARGEABLE NI-CAD BATTERIES
ALWAYS DISPOSE OF BATTERIES PROPERLY!
Always follow the battery manufactures recommendations for
Charging and disposing of Ni-cad batteries.
The following is meant as general information regarding Ni-cad batteries;
1. Occasionally allow the batteries to fully discharge before recharging. The battery indicator
showing less than two segments will indicate full discharge.
2. Always allow the battery to fully charge before using. This requires 10 hours with
the approved charger. (Ni-MH batteries require 16 hours for full charge.)
3. The above will prevent the batteries from developing “memory” which effectively reduces their
capacity.
4. It is better to store Ni-cad batteries that are discharged rather than charged.
Note: Do not charge any type of alkaline batteries in this unit.
http://www.midlandradio.com 10
Page 11

OWNER’S MANUAL FOR THE F-20 (FRS W/532 CODES)
TECHINCAL SPECIFICACIONS
GENERAL
Frequency range..................................................................................462/467 MHz
Channels...............................................................................................................14
Modulation type................................................................................................. FM
Antenna impedance ....................................................................................50 Ohm
Loud-speaker..........………..................................................................8 Ohm 0.5W
Microphone...................................................................................…electronic type
Power supply.............................................3 AA Ni-cads or Alkaline(3.6/4.5VDC)
RECEIVER
Sensitivity at 12dB Sinad..............................................................................0.35µV
Selectivity........................................................................................................50 dB
Squelch range...................................................................................…...Automatic
Audio output power...........................................0.25W @ 8 Ohm (10% distortion)
Distortion at 500 mV.........................................................................................7%
Audio frequency response.....................................................................400-2400 Hz
TRANSMITTER
RF Output Power...........................................….........nominal 500 mW @ 4.5VDC
Frequency Tolerance.................................................................................0.00025%
Harmonic Suppression...................................................................more than 50 dB
Modulation......................................................................................FM +/- 2.5 kHz
*Specifications are nominal and subject to change
CHANNEL FREQUENCIES
01=462.5625 05=462.6625 09=467.5875 13=467.6875
02=462.5875 06=462.6875 10=467.6125 14=467.7125
03=462.6125 07=462.7125 11=467.6375
04=462.6375 08=467.5625 12=467.6625
http://www.midlandradio.com 11
Page 12

OWNER’S MANUAL FOR THE F-20 (FRS W/532 CODES)
SERVICE
If you have a problem, which you believe requires service, please call first and speak with a service
technician. Many problems can be remedied over the phone without returning the unit for service.
If it ever becomes necessary to return your unit for service:
♦ Pack the unit in its original box and packing. Improper packing may result in damage during shipment.
♦ Include a full description of any problems.
♦ Include a daytime telephone number.
♦ Include a money order for $7.50 to cover shipping and handling (this may not be required in some
states).You do not need to return accessory items (charger, batteries, wrist strap, owners guide) unless
they maybe directly related to the problem.
♦ Include a photocopy of the bill of sale or other proof of purchase showing the date of sale. This
information must be included before warranty service can be considered.
♦ A flat rate of $35.00 will apply to repairs not covered by the 1 year warranty. These items include but not
limited to Abuse, Internally modified circuits, damage caused by water , battery leakage or liquid spilled
into the radio.
♦ Payment is accepted by Cashiers Check, Money Order, Master Card or Visa only. Personal checks will
not be accepted.
Items not covered by the warranty include abuse, water damage, battery leak damage, broken antennas,
broken battery latch
LIMITED WARRANTY
Midland Consumer Radio will repair or replace, at its option without charge, any Midland (FRS) transceiver
which fails due to a defect in material or workmanship within one year following the initial consumer
purchase.
This warranty does not include any carrying cases, earphones, or telescoping antennas which may be a part
of or included with the warranted product, or the cost of labor for removal or re-installation of the product in a
vehicle or other mounting.
Performance of any obligation under this warranty may be obtained by returning the warranted product,
freight prepaid, along with proof of purchase date, to Midland Consumer Radio, Warranty Service
Department 1120 Clay Street North Kansas City, MO 64116 , or to any “ Midland Authorized Warranty
Service Station,” or to the place of purchase ( if a participating dealer).
Warranty information and the location of the nearest “Midland Authorized Warranty Service Station,” may be
obtained by writing Midland Consumer Radio, Warranty Service Department.
This warranty gives you specific legal rights, and you may also have other rights which vary from state to
state.
Note: The above warranty applies only to merchandise purchased in the United States of America or any
of the territories or possessions or from U.S. military exchange. For warranty coverage on merchandise
purchased elsewhere, consult the supplemental warranty information included with this product or ask your
dealer.
MIDLAND RADIO CORPORATION
1120 Clay Street
North Kansas City, MO 64116
Phone 816-241-8500. Fax 816-241-5713
E-mail: midlndcb@midlandradio.com
Or visit us at www.midlandradio.com
http://www.midlandradio.com 12
 Loading...