Midland Enerjump Mini INSTRUCTION GUIDE [ml]

Midland Enerjump Mini INSTRUCTION GUIDE

ISTRUZIONI INSTRUCTION GUIDE BEDIENUNGSANLEITUNG MANUAL DE USUARIO GUIDE D’UTILISATION

ΟΔΗΓΙΕΣ ΧΡΗΣΗΣ

ITALIANO

PRECAUZIONI/SICUREZZA


Caricare ENERJUMP MINI prima dell’uso.

Attenzione: Tenere l’apparato lontano dall’acqua e dal fuoco.

Attenzione: Pericolo di scossa. Tenere il dispositivo fuori dalla portata dei bambini. Non inserire oggetti nella presa destinata ai cavi, nella porta USB o nella presa Input DC. Non aprire Enerjump Mini.

Pericolo di esplosione. Non utilizzare Enerjump Mini nelle vicinanze di sostanze o vapori infiammabili,o gas.

Pericolo d’incendio. Non schiacciare o forare Enerjump Mini. Non cortocircuitare i cavi.

Dopo l’utilizzo scollegare sempre le pinze da Enerjump Mini e conservarle separatamente. Enerjump Mini è stato studiato per avviamenti brevi non superiori a 3 secondi. Tra un avviamento e un altro lasciate raffreddare Enerjump Mini per almeno 1/2 minuti.

Non toccare i cavi immediatamente dopo l’uso, potrebbero essere molto caldi.

Non eseguite più di 3 avviamenti di seguito.

Una volta avviato il veicolo, rimuovete ENERJUMP MINI dalla batteria del vostro mezzo.

1

PRECAUZIONI PER LA SICUREZZA

Temperatura di funzionamento: L’utilizzo di Enerjump Mini a temperature troppo elevate o troppo basse può ridurre la capacità della batteria e ridurne l’autonomia.

Nota: In condizioni di freddo estremo, consigliamo di conservare Enerjump Mini in ambienti chiusi.

PRECAUZIONI GENERALI

Enerjump Mini non è da intendersi come un dispositivo sostitutivo della batteria del veicolo o come un caricatore di batterie.

Quando utilizzate Enerjump Mini togliersi oggetti metallici come anelli, braccialetti, collane ed orologi.

Enerjump Mini contiene una batteria Li-Ion ricaricabile. La batteria è interna e non può essere sostituita. La batteria deve essere appositamente smaltita quando non tiene più la carica.

Assicuratevi che i contatti delle batterie da avviare siano puliti e non corrosi.

Per poter avviare un veicolo, Enerjump Mini deve essere quasi completamente carico (3 o 4 led accesi)

2

JUMP STARTER ENERGY PACK

CONTENUTO DELLA CONFEZIONE

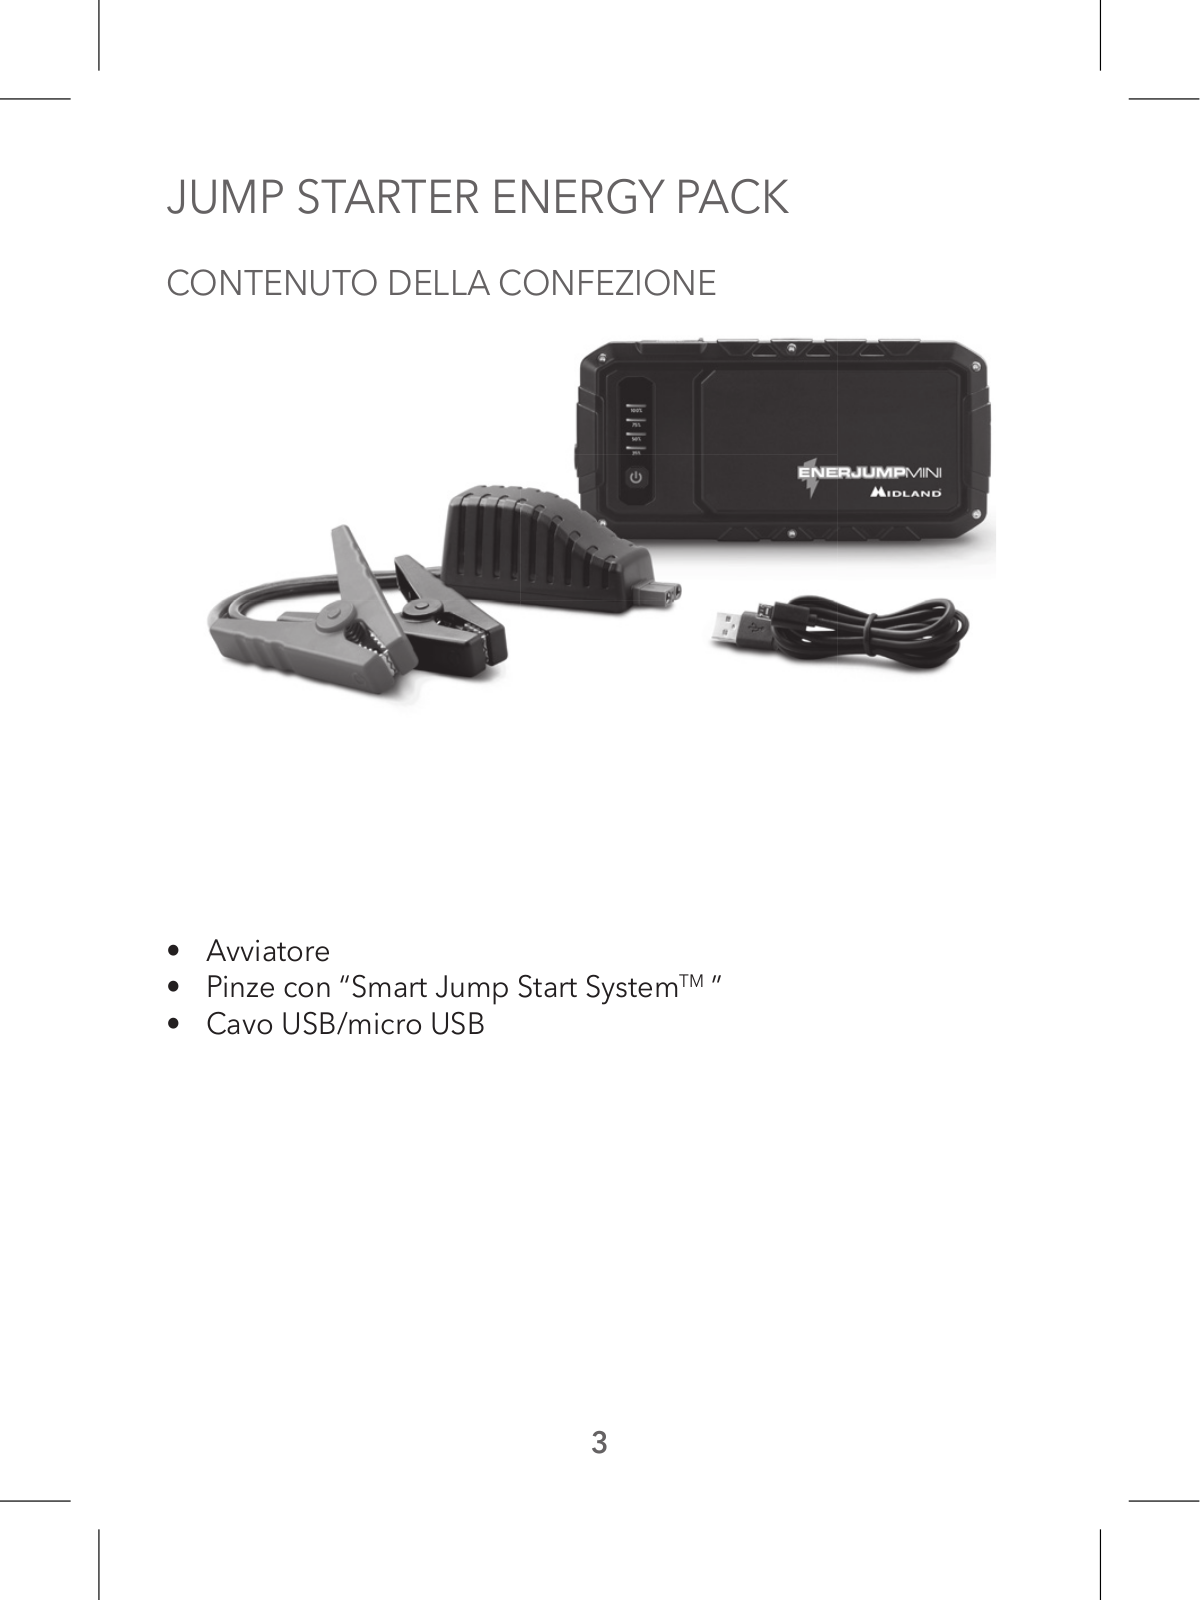
Avviatore

Pinze con “Smart Jump Start SystemTM

Cavo USB/micro USB

3

FUNZIONAMENTO

1

6


5


3


2


4


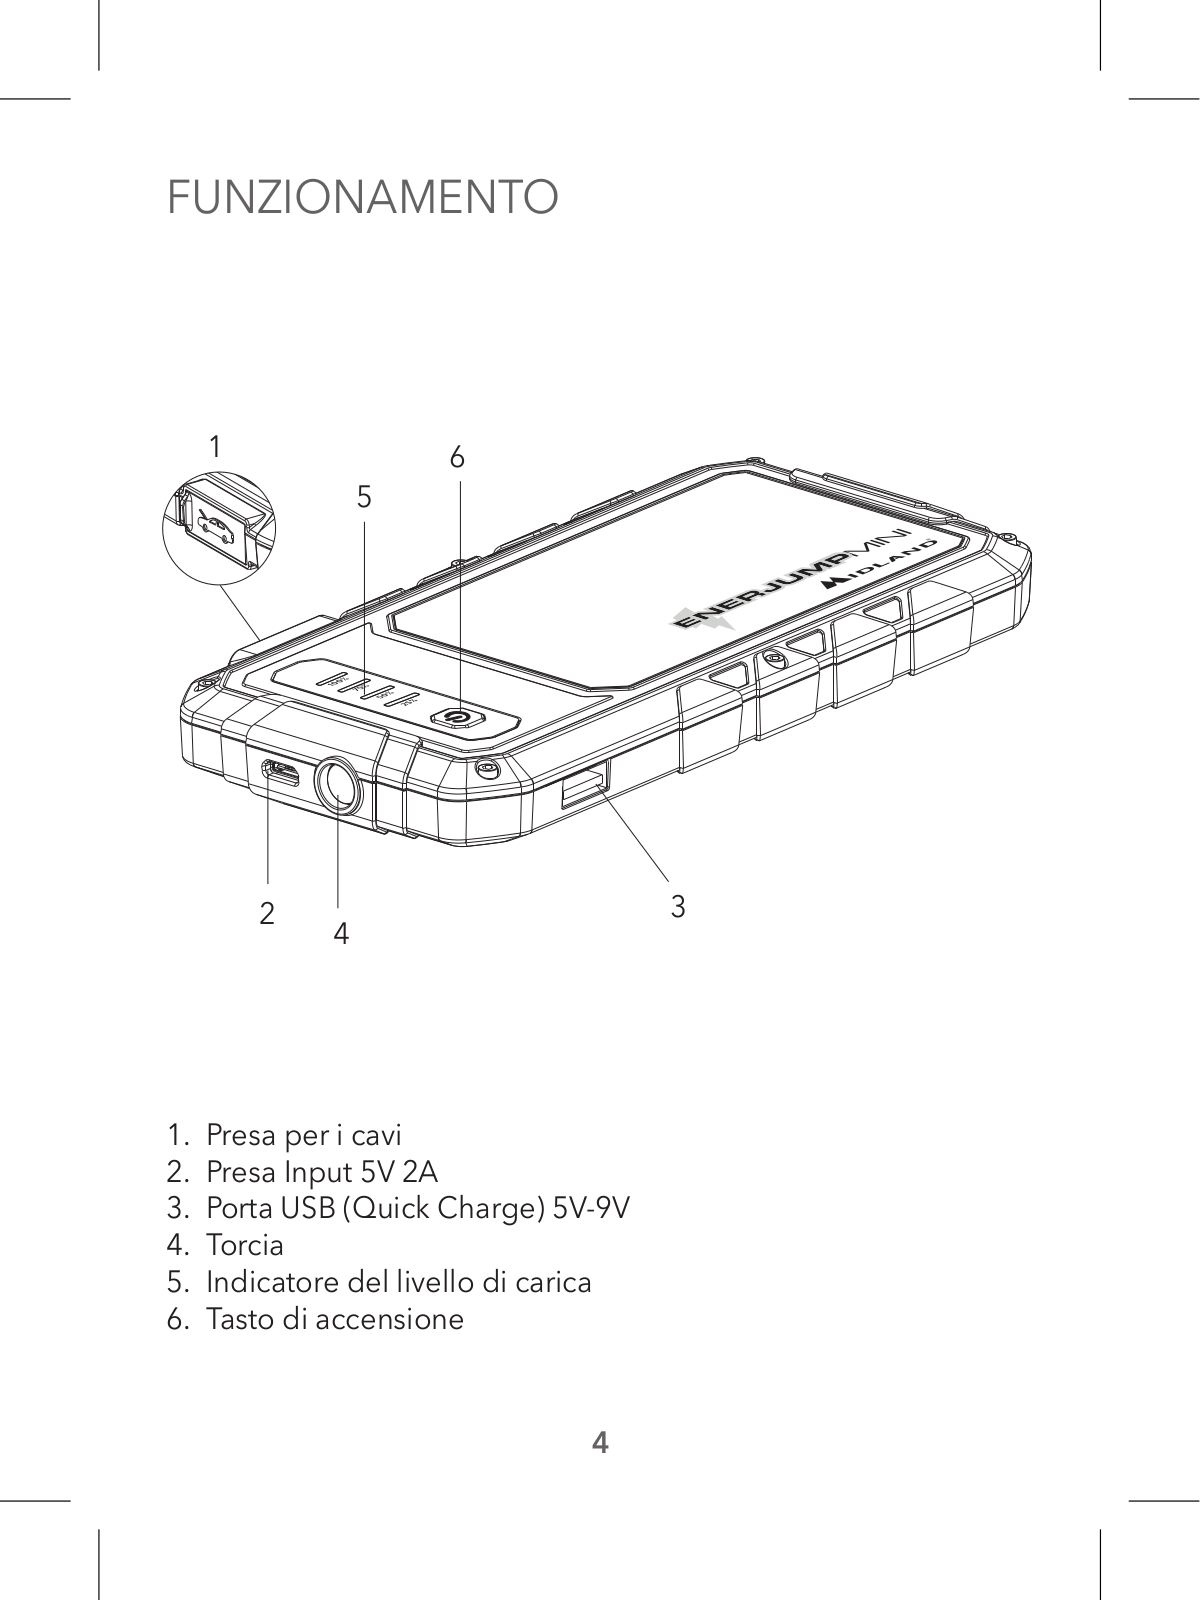
1.Presa per i cavi

2.Presa Input 5V 2A

3.Porta USB (Quick Charge) 5V-9V

4.Torcia

5.Indicatore del livello di carica

6.Tasto di accensione

4

INDICATORE DEL LIVELLO DI CARICA

Premete il tasto di accensione per visualizzare il livello di batteria. Durante la carica, i led lampeggeranno uno dopo l’altro.

Il numero di led accesi indica la capacità della batteria:

Indicatori

Spento

1 fisso

2 fissi

3 fissi

4 fissi

Livello di carica

0%

25%

50%

75%

100%

Al termine della carica tutti i led si spengono.

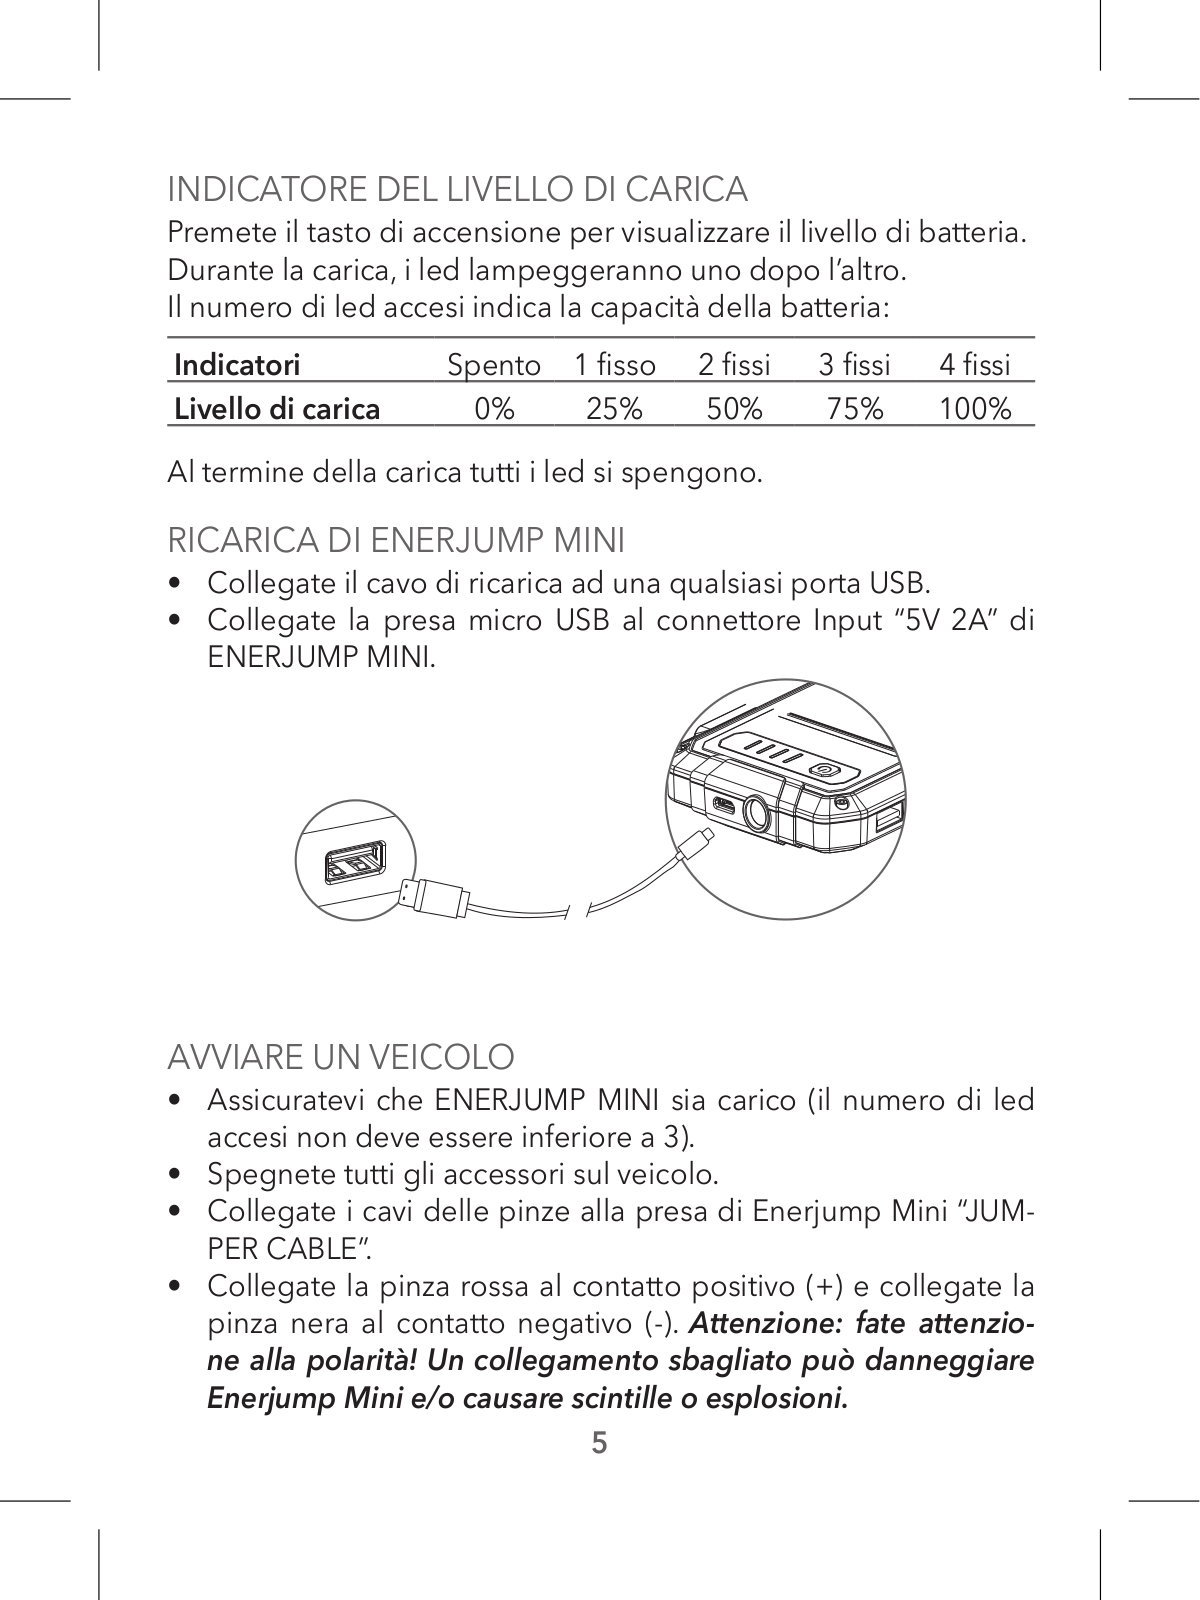
RICARICA DI ENERJUMP MINI

Collegate il cavo di ricarica ad una qualsiasi porta USB.

Collegate la presa micro USB al connettore Input “5V 2A” di ENERJUMP MINI.

AVVIARE UN VEICOLO

Assicuratevi che ENERJUMP MINI sia carico (il numero di led accesi non deve essere inferiore a 3).

Spegnete tutti gli accessori sul veicolo.

Collegate i cavi delle pinze alla presa di Enerjump Mini “JUMPER CABLE”.

Collegate la pinza rossa al contatto positivo (+) e collegate la pinza nera al contatto negativo (-). Attenzione: fate attenzione alla polarità! Un collegamento sbagliato può danneggiare Enerjump Mini e/o causare scintille o esplosioni.

5

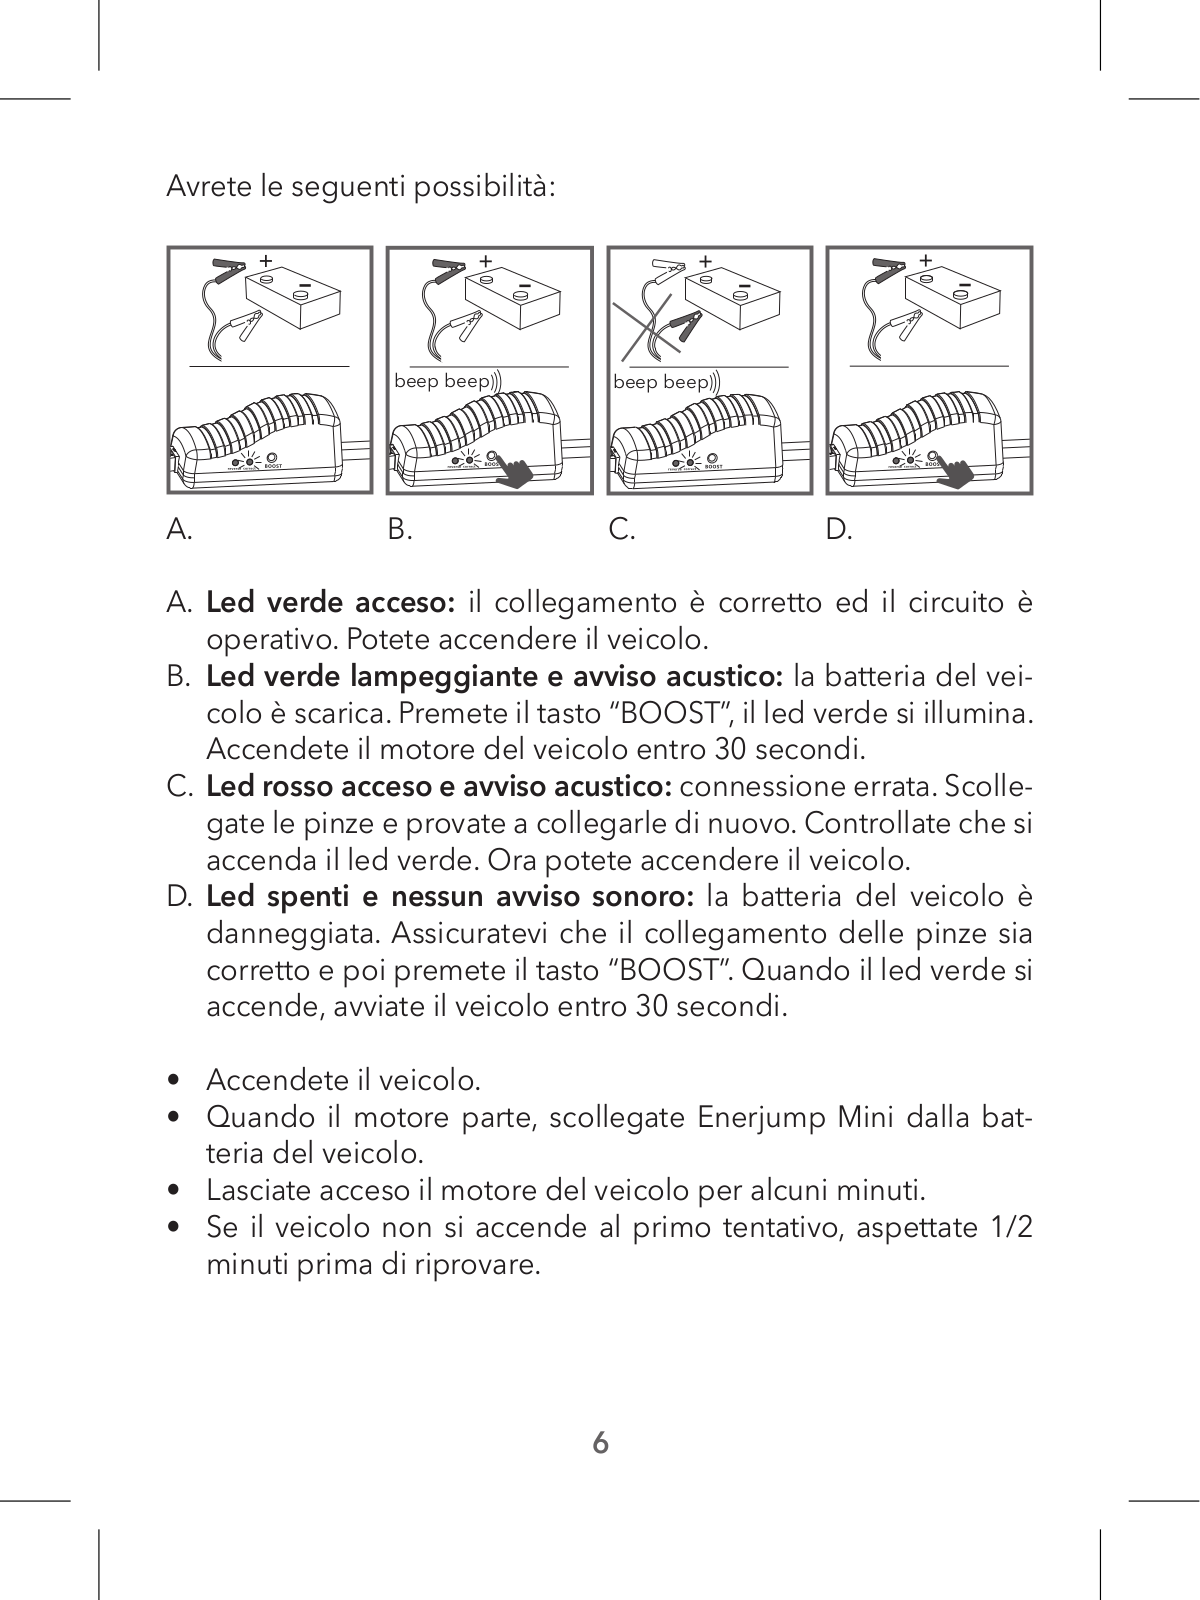
Avrete le seguenti possibilità:

A.

beep beep

B.

beep beep

C.

D.

A.Led verde acceso: il collegamento è corretto ed il circuito è operativo. Potete accendere il veicolo.

B.Led verde lampeggiante e avviso acustico: la batteria del veicolo è scarica. Premete il tasto “BOOST”, il led verde si illumina. Accendete il motore del veicolo entro 30 secondi.

C.Led rosso acceso e avviso acustico: connessione errata. Scollegate le pinze e provate a collegarle di nuovo. Controllate che si accenda il led verde. Ora potete accendere il veicolo.

D.Led spenti e nessun avviso sonoro: la batteria del veicolo è danneggiata. Assicuratevi che il collegamento delle pinze sia corretto e poi premete il tasto “BOOST”. Quando il led verde si accende, avviate il veicolo entro 30 secondi.

Accendete il veicolo.

Quando il motore parte, scollegate Enerjump Mini dalla batteria del veicolo.

Lasciate acceso il motore del veicolo per alcuni minuti.

Se il veicolo non si accende al primo tentativo, aspettate 1/2 minuti prima di riprovare.

6

RICARICARE TELEFONI CELLULARI O DISPOSITIVI PORTATILI

Inserite la presa del cavo USB nella porta Quick Charge 5V/9V di Enerjump Mini.

Nel caso in cui il cavo USB in dotazione non è compatibile con il vostro dispositivo, utilizzate il vostro cavo di ricarica.

Accendete ENERJUMP MINI premendo il tasto . Durante la carica, i led si accenderanno.

TORCIA LED

Per accendere la torcia premete il tasto di accensione per 3 secondi. Se lo premete di nuovo, ogni volta la torcia lampeggerà in modo diverso (normale, stroboscopico, SOS, off).

SPECIFICHE TECNICHE

Dimensioni

170x81x17mm

Peso

250g


Tempo di carica

2h circa

Capacità

6000mAh


Input

5V-2A


Output

5V – 2.4A / 9V – 2A


Avviamento auto

12V


Corrente di avvio

150A


Picco di corrente

300A


Temperatura operativa

-10°C / +60°C


Le specifiche sono soggette a modifiche senza preavviso.

Per informazioni sulla garanzia visitate il sito www.midlandeurope.com.

Il prodotto è marcato CE ed è di libero uso in tutti i paesi EU.

7

ENGLISH

SAFETY INSTRUCTIONS / WARNINGS


Charge ENERJUMP MINI fully prior to use.

WARNING: Keep the unit clear of fire and water.

WARNING: Shock Hazard. Keep away from children. Do not insert foreign objects into the jumper cables port/jack, the USB output port, or the DC input jack. Do not open Enerjump Mini.

WARNING: Explosion Hazard. Do not use this product where there are flammable fumes or gases, such as in the bilge of a gasoline-powered boat, or near propane tanks.

WARNING: Fire Hazard. Do not crush or puncture Enerjump Mini. Do not short circuit cables.

Always disconnect the clamps from Enerjump Mini after each use and store separately. The jump start feature is designed for short term operation only (not more than 3 seconds). Allow Enerjump Mini to cool down for at least 1/2 minutes after each jump start attempt.

Do not touch cables immediately after use, they could be overheated.

Do not jump start more than 3 times in a row.

Remove the product from the vehicle battery.

8

IMPORTANT SAFETY INSTRUCTIONS

Operating temperature: Using Enerjump Mini at high or low temperatures may reduce the internal battery capacity and shorten the battery life.

Note: In extreme cold weather conditions, please bring Enerjump Mini indoors for best results.

GENERAL WARNINGS

Do not use Enerjump Mini in place of a vehicle battery or as a battery charger.

Remove personal metal items such as rings, bracelets, necklaces, and watches when working with batteries.

Enerjump Mini is supplied with a rechargeable Li-Ion battery. This battery is self-contained and not consumer replaceable. Battery must be disposed of properly when it no longer holds a charge. Proper charging practices will increase the life of the batteries.

Make sure all the battery connections are clean and not corroded before jump starting.

Only jump start when Enerjump Mini is almost fully charged (3 or 4 indicators are on).

9

JUMP STARTER ENERGY PACK

WHAT’S IN THE BOX

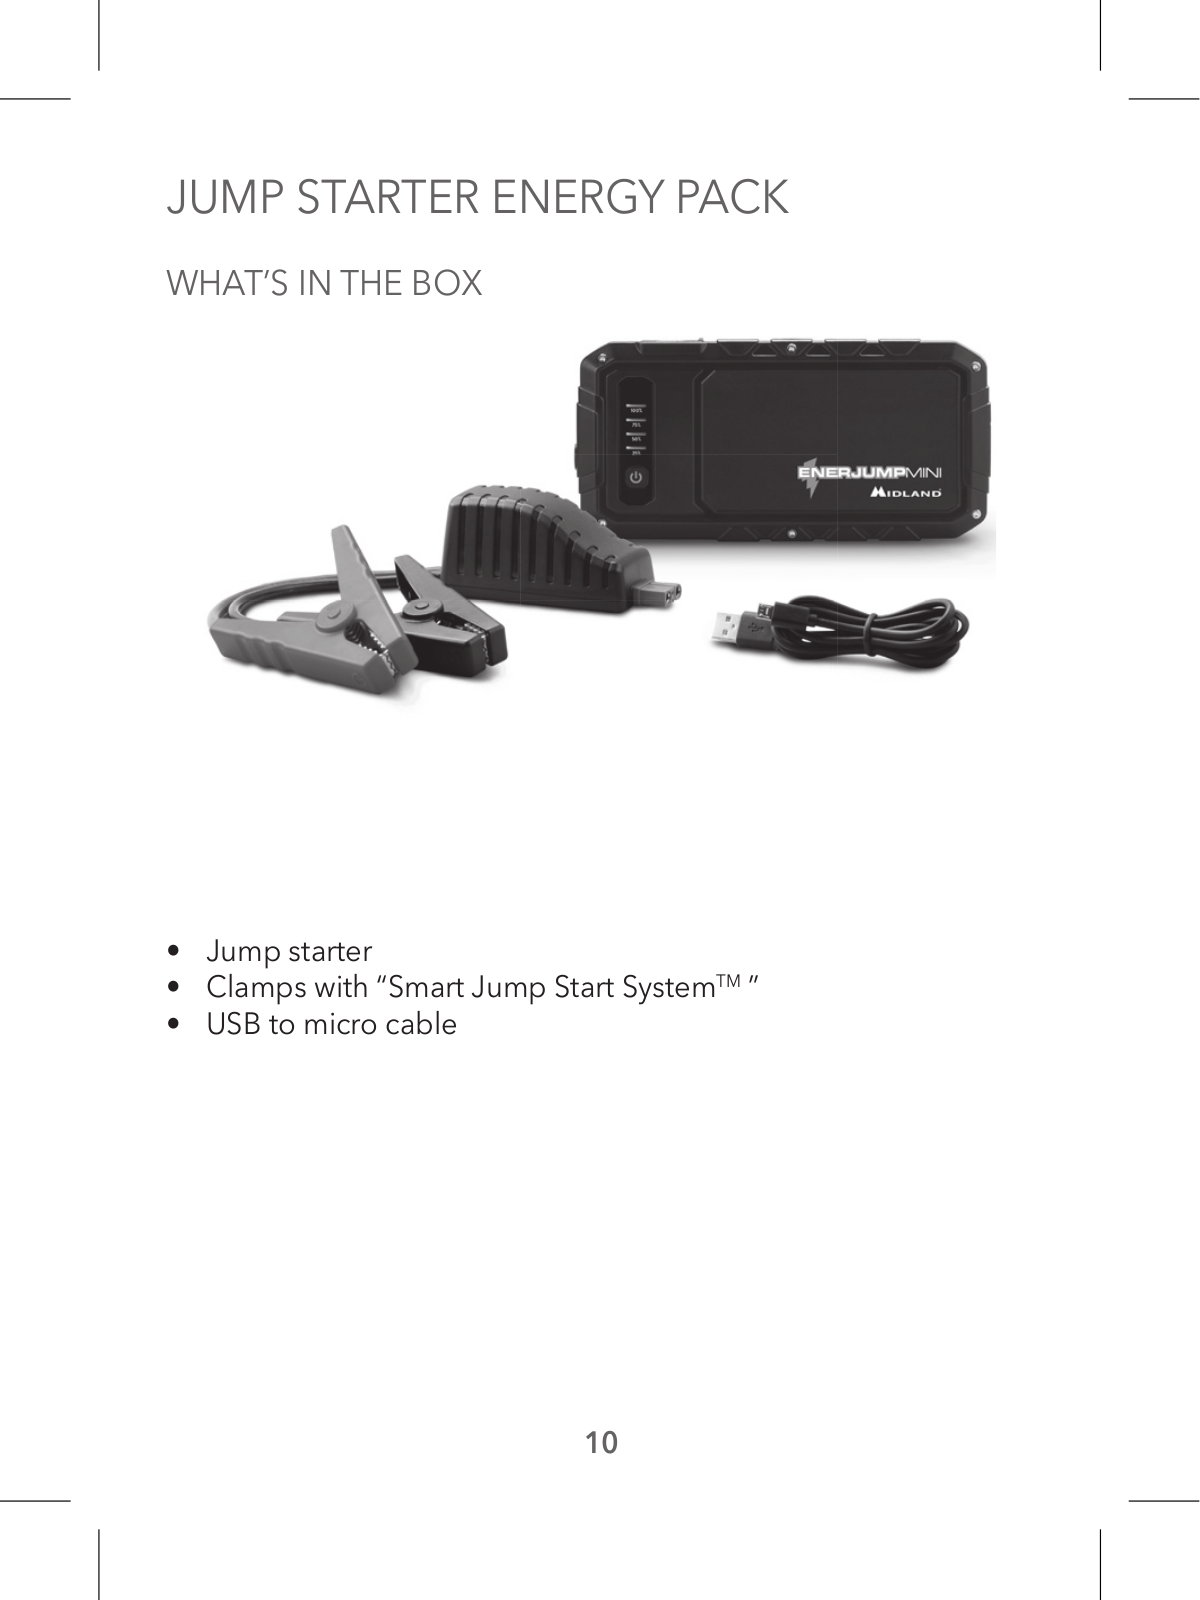
Jump starter

Clamps with “Smart Jump Start SystemTM

USB to micro cable

10

OPERATIONS

1

6


5


3


2


4


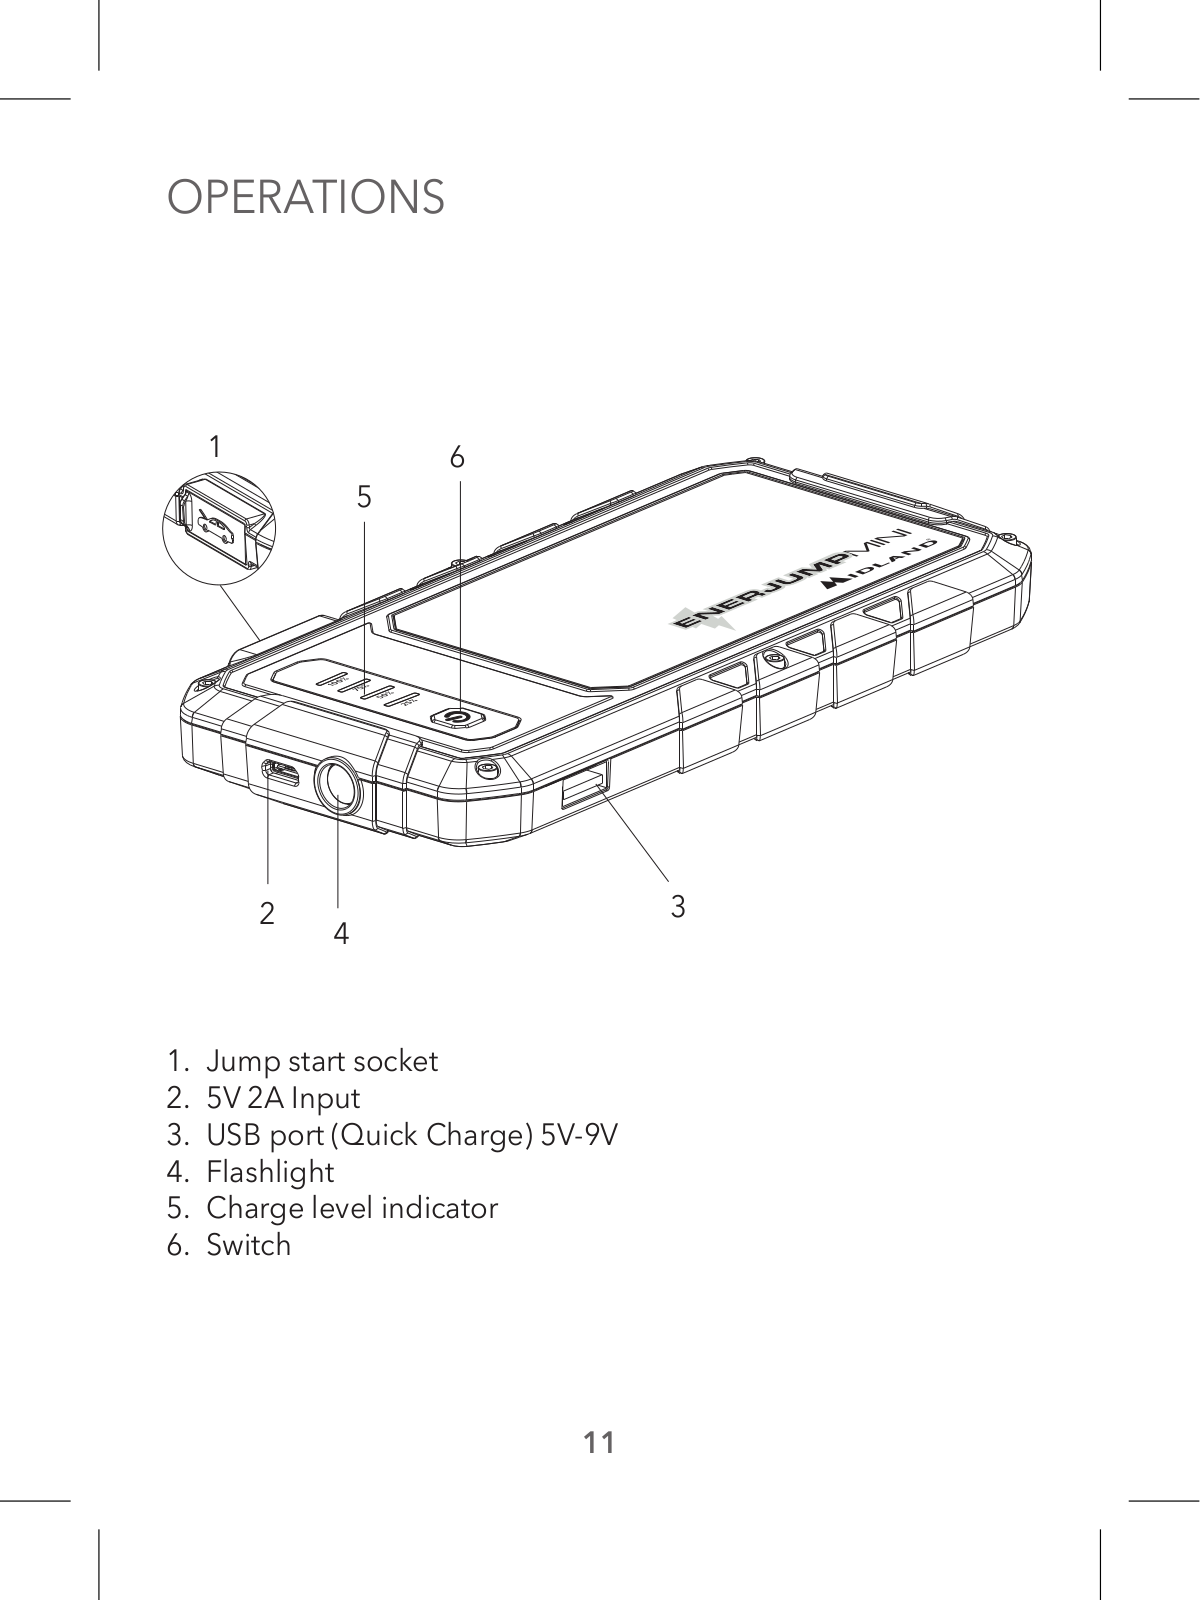
1.Jump start socket

2.5V 2A Input

3.USB port (Quick Charge) 5V-9V

4.Flashlight

5.Charge level indicator

6.Switch

11

CHARGE LEVEL INDICATOR

Press the switch button to check the battery level.

When charging,the indicator lights will flash one by one.

The number of steady indicator lights indicates the battery capacity:

Indicators

No

1 steady

2 steady

3 steady

4 steady

Storage level

0%

25%

50%

75%

100%

All indicator lights will turn off when charging is complete.

CHARGING ENERJUMP MINI

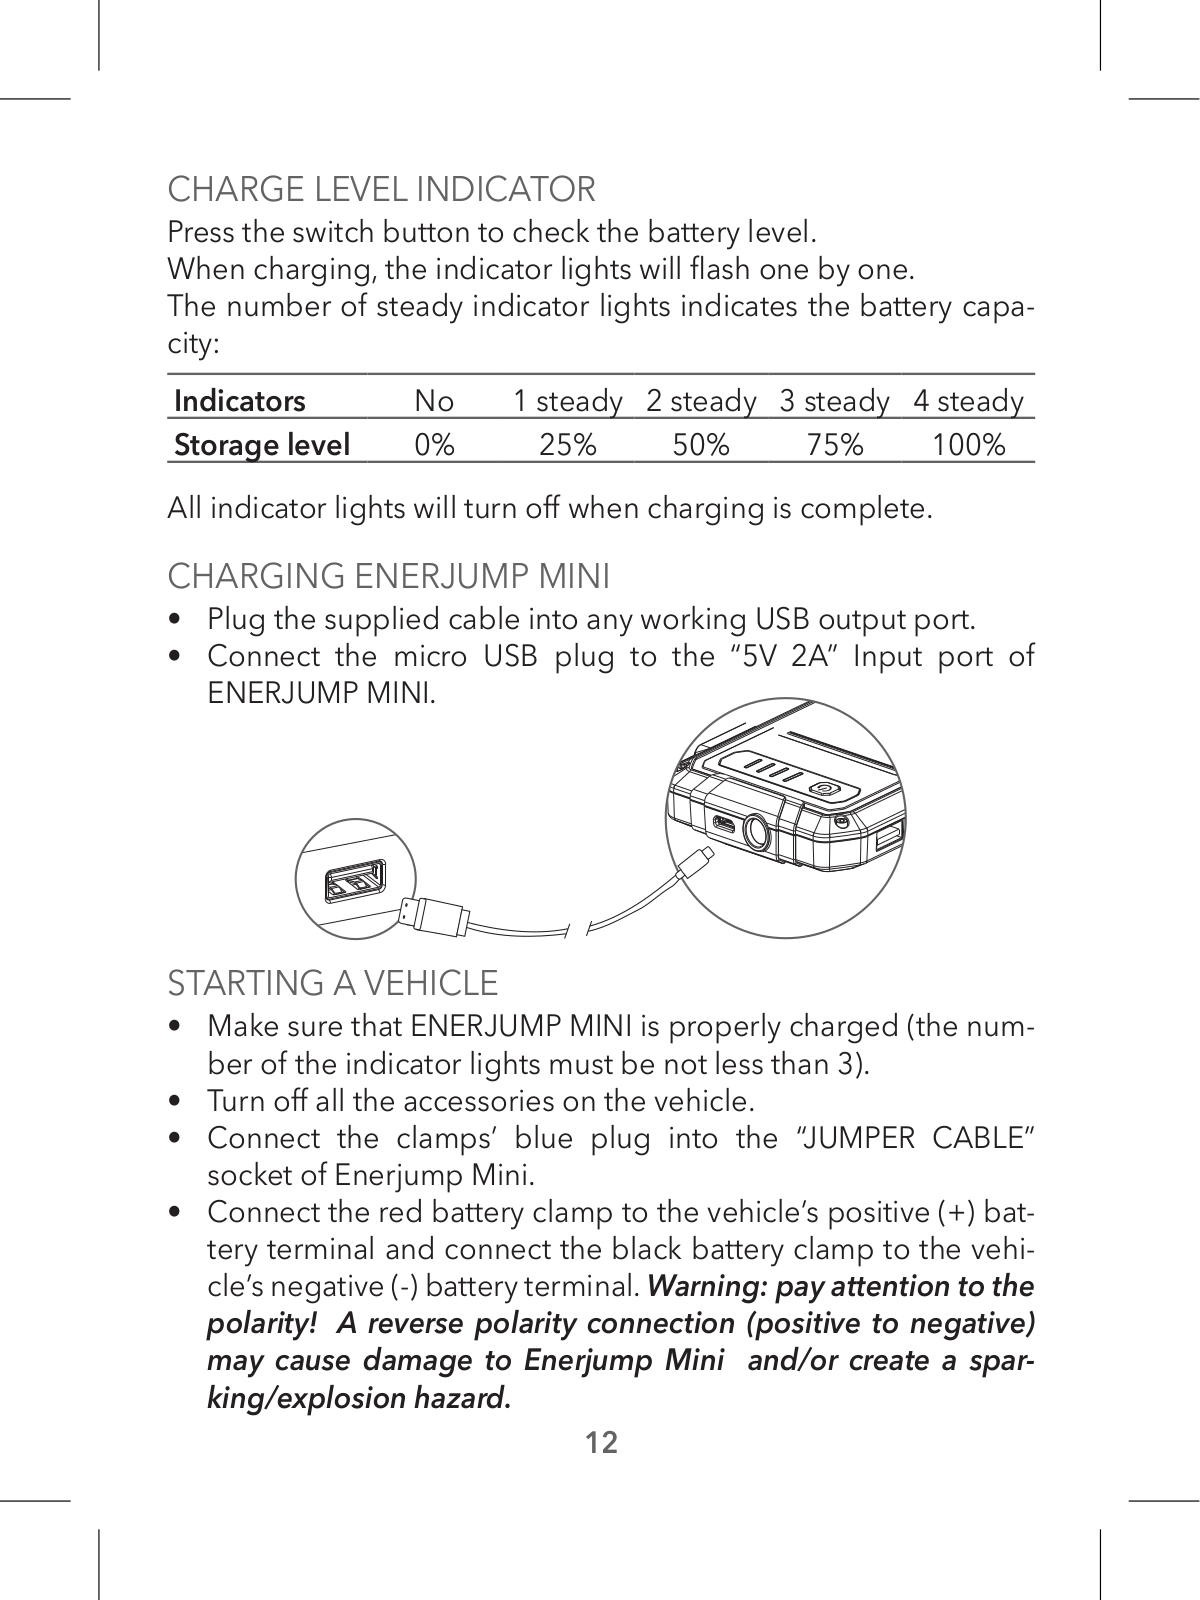
Plug the supplied cable into any working USB output port.

Connect the micro USB plug to the “5V 2A” Input port of ENERJUMP MINI.

STARTING A VEHICLE

Make sure that ENERJUMP MINI is properly charged (the number of the indicator lights must be not less than 3).

Turn off all the accessories on the vehicle.

Connect the clamps’ blue plug into the “JUMPER CABLE” socket of Enerjump Mini.

Connect the red battery clamp to the vehicle’s positive (+) battery terminal and connect the black battery clamp to the vehicle’s negative (-) battery terminal. Warning: pay attention to the polarity! A reverse polarity connection (positive to negative) may cause damage to Enerjump Mini and/or create a sparking/explosion hazard.

12

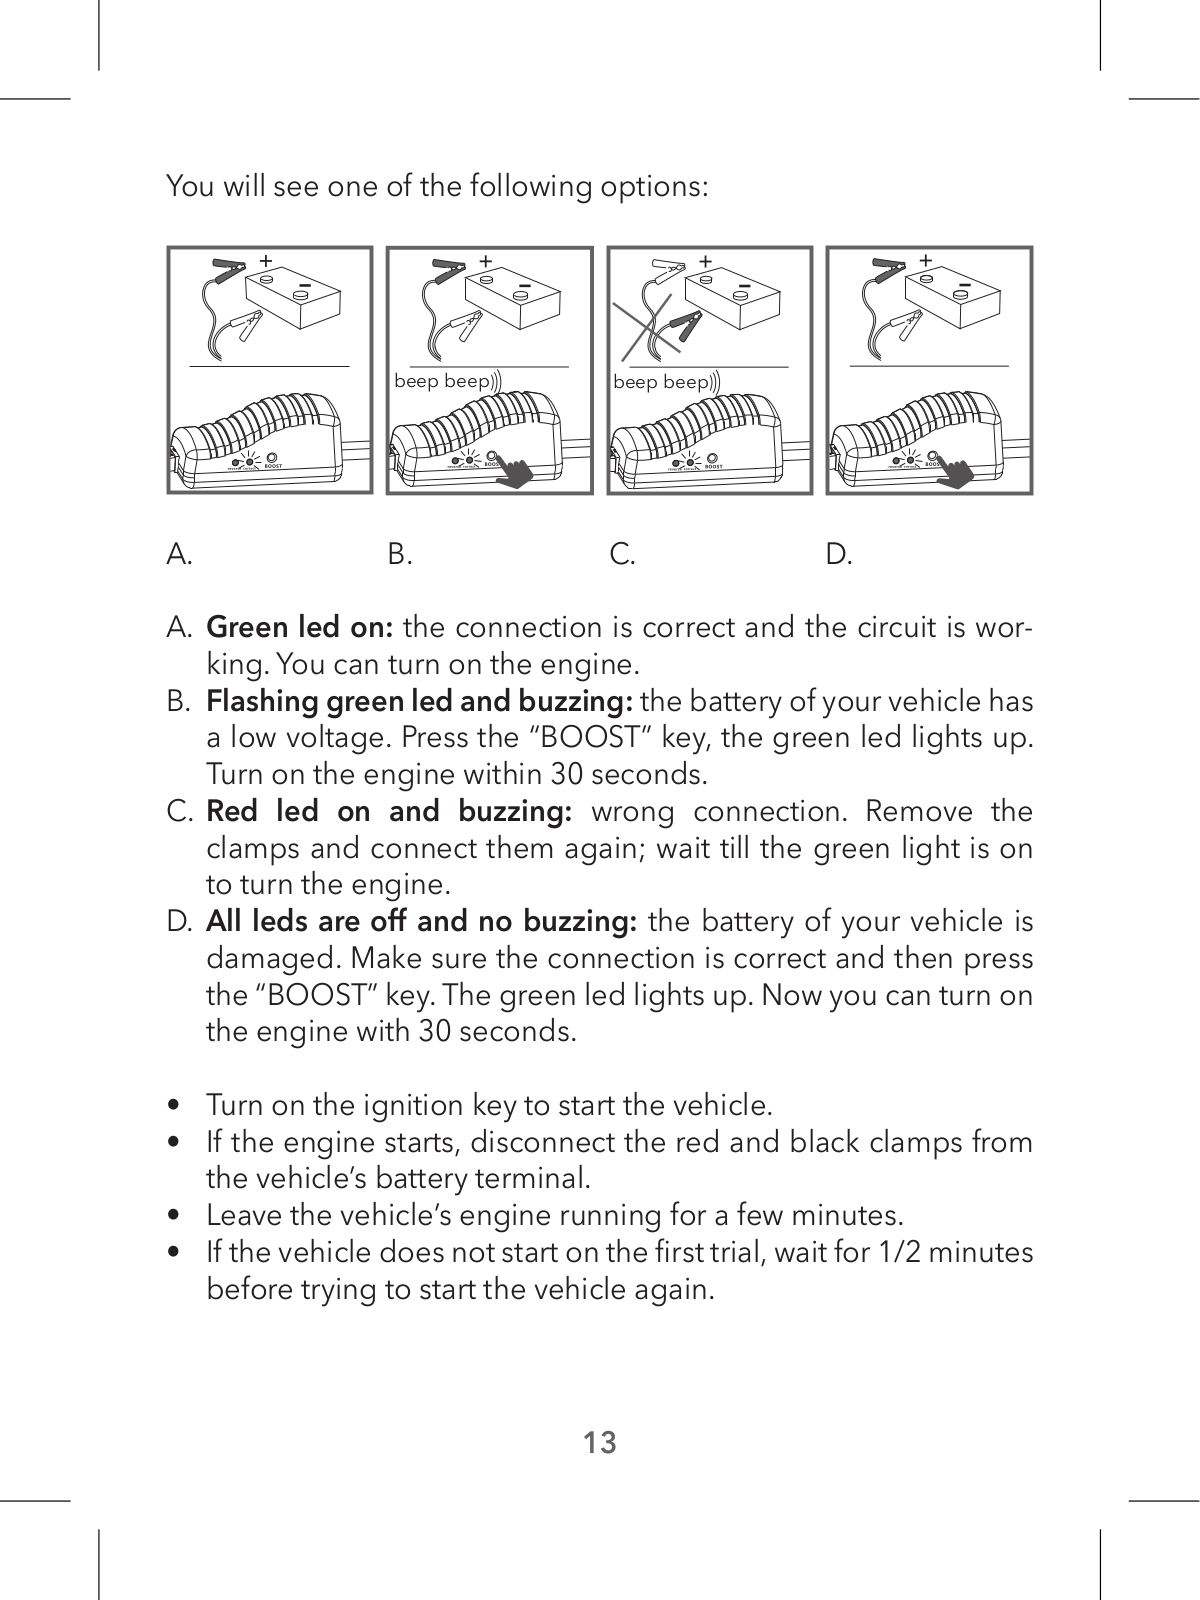
You will see one of the following options:

A.

beep beep

B.

beep beep

C.

D.

A.Green led on: the connection is correct and the circuit is working. You can turn on the engine.

B.Flashing green led and buzzing: the battery of your vehicle has a low voltage. Press the “BOOST” key, the green led lights up. Turn on the engine within 30 seconds.

C.Red led on and buzzing: wrong connection. Remove the clamps and connect them again; wait till the green light is on to turn the engine.

D.All leds are off and no buzzing: the battery of your vehicle is damaged. Make sure the connection is correct and then press the “BOOST” key. The green led lights up. Now you can turn on the engine with 30 seconds.

Turn on the ignition key to start the vehicle.

If the engine starts, disconnect the red and black clamps from the vehicle’s battery terminal.

Leave the vehicle’s engine running for a few minutes.

If the vehicle does not start on the first trial,wait for 1/2 minutes before trying to start the vehicle again.

13

Loading...
+ 33 hidden pages