

Page 1
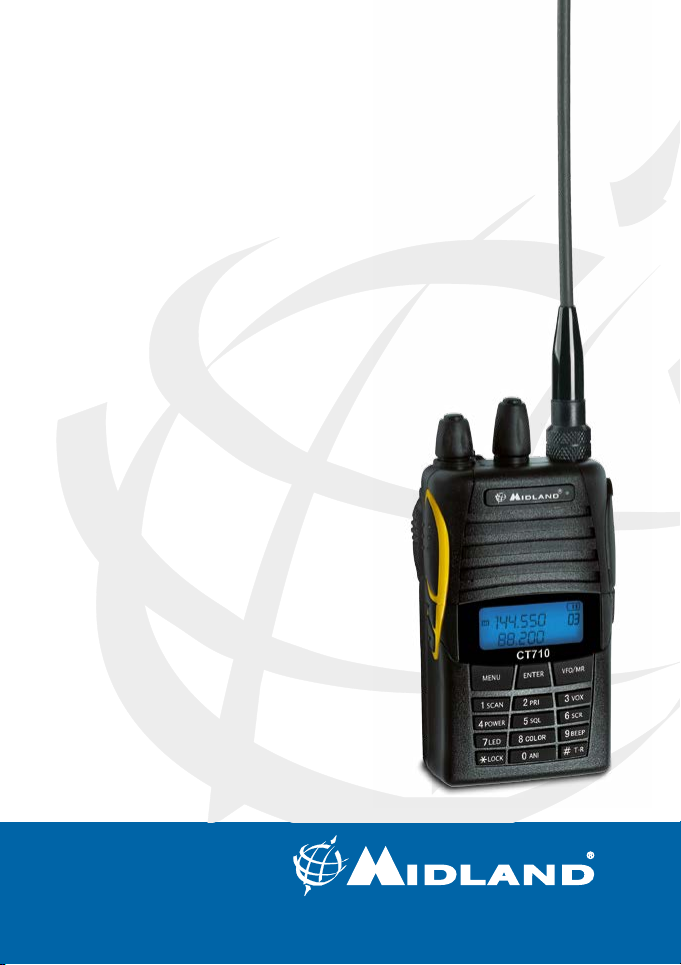
CT 710
” Manuale d’uso
RICESTRASMETTITORE VHF/UHF |
Page 2

Contenuto della confezione 4
Precauzioni 4
Principali funzioni 5
Descrizione dell’apparato 6
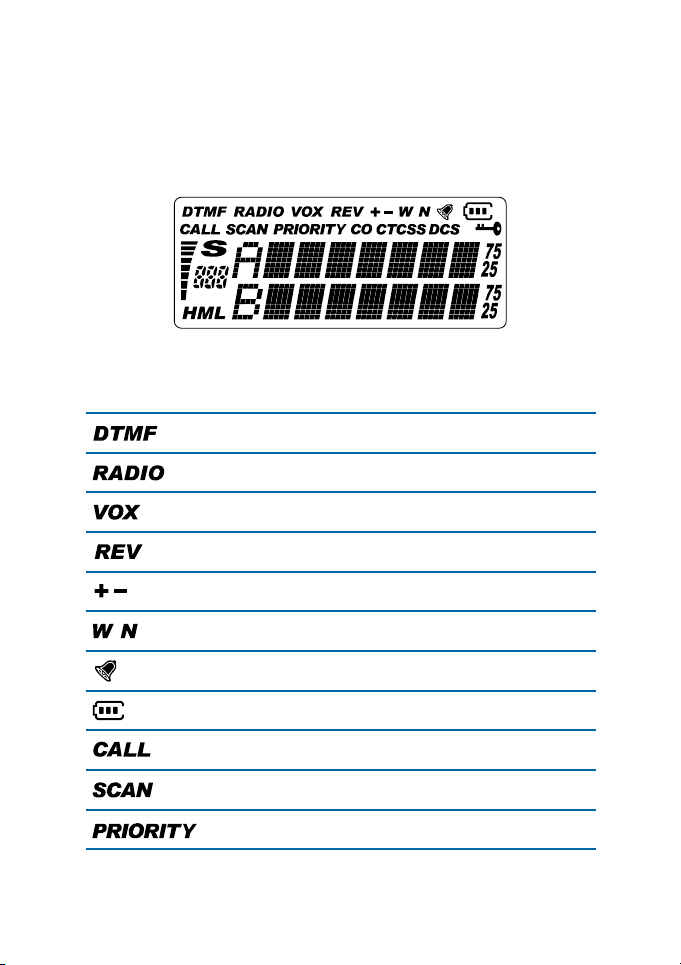
Display LCD 6
Ricetrasmettitore 8
Operazioni di base 10
Antenna 10
Accensione/spegnimento 10
Funzione Monitor 10
Trasmissione 10
Selezione del modo operativo 10
Modalità bi-banda 11
Modalità banda singola 11
Modalità canale 11
Modalità frequenza 12
Funzione Radio 12
Tasto laterale 2 12
Codice DTMF 13
DTMF programmato da software 13
ANI PTT-ID 13
Shortcuts Operation 14
Funzione Cloning 14
2 | Manuale d’uso Midland CT710
Page 3

Funzioni del menu 15
Operazioni del Menu 15
Lista delle funzioni Menu 16
Impostazione funzioni del Menu 18
Allarme d’emergenza 18
Funzione frequenza invertita 18
Scansione 18
Selezione del tipo di scansione 18
Sensibilità VOX 19
Selezione alta/bassa potenza 20
Impostazione livello squelch 20
Impostazione Scrambler 20
Retroilluminazione On/Off 21
Selezione del colore retroilluminazione 21
Beep On/Off 21
Funzione blocco tastiera 21
Funzione TOT 22
Funzione vocale (solo in inglese) 22
Offset di frequenza 22
Selezione dei toni CTCSS e codici DCS 23
Impostare i toni CTCSS/DCS in ricezione (R-CDC) 23
Impostare i toni CTCSS/DCS in trasmissione (T-CDC) 23
Scostamento di frequenza +/- (per comunicazioni con ponti
ripetitori). 24
Selezione dello step di frequenza 24
Banda larga/stretta 24
Roger Beep 24
Memorizzare/cancellare un canale 24
Tabella dei toni CTCSS (50) 26
Tabella dei codici DCS (105) 27
Soluzione dei problemi 28
Specifiche tecniche 29
Manuale d’uso Midland CT710 | 3
Page 4

Contenuto della confezione
• Ricetrasmettitore CT 710
• Antenna
• Pacco batteria al litio 1600mAh
• Clip aggancio a cintura
• Caricatore da tavolo con adattatore da muro
• Guida rapida
Se l’elenco non coincide con ciò che trovate nella confezione, contattate
il vostro rivenditore MIDLAND.
Precauzioni
Il vostro ricetrasmettitore è stato progettato per darvi anni di prestazioni
sicure ed affidabili. Come per tutte le apparecchiature elettriche, esistono
alcune precauzioni alle quali consigliamo di atte nervi.
• Non cercate di aprire la radio. Potreste danneggiarla e invalidare così
la garanzia.
• Non esponete l’apparato ad eccessive temperature e non lasciatelo in
ambienti polverosi
• Non bagnate l’apparato. L’umidità può corrodere i circuiti elettrici
• Se dalla radio esce fumo, spegnetela immediatamente e rimuovete
la batteria.
• Non trasmettete senza antenna.
• Non utilizzate alcol, solventi o abrasivi per pulire l’apparecchio.
Utilizzate solo un panno morbi do e pulito leggermente inumidito con
acqua.
4 | Manuale d’uso Midland CT710
Page 5

Principali funzioni
• Visualizzazione di doppia banda VHF/UHF sul display
• Banda di frequenza:144-146MHz & 430-440MHz (Rx / Tx).
• Modo operativo: UHF-VHF, VHF-VHF o UHF-UHF
• Potenza d’uscita: 5W VHF /4W UHF
• 128 canali memorizzabili
• Scrambler (i livelli sono programmabili via software)
• Compander (programmabile via software)
• Funzione VOX
• 210 codici DCS e 50 toni CTCSS
• Funzione “VOICE”
• Funzione SOS d’emergenza
• Passo di canalizzazione selezionabile tra 25kHz e 12,5 kHz
• Sul display possono essere visualizzate le seguenti opzioni: nome
canale + numero canale, numero canale + frequenza, numero canale,
o frequenza
• Funzione di frequenza invertita
• Scan
• Radio FM
• Passo di frequenza: 5 kHz, 6.25 kHz, 10 kHz, 12.5 kHz, 25 kHz,
• Potenza di trasmissione selezionabile: alta (4-5W) o bassa (1W)
• Pacco batteria al litio 1600mAh
• Offset di frequenza: 0-69.950 MHz
• Ripetitore shift
• Funzione di blocco canale occupato (programmabile via software)
• Indicatore sul display del livello di potenza di trasmissione
• Indicazione vocale di batteria scarica
• Tono Roger Beep ad inizio/fine trasmissione
• TOT (Time out timer)
• Blocco tastiera
• Scansione delle frequenze con CTCSS/DCS
• Scansione prioritaria
• DTMF
• Reset delle funzioni e dei canali
• Tono 1750 / 1450 / 2315 per collegamento a ponti ripetitori
(programmabile via software)
• Presa per microfono/altoparlante esterno: 2 Pin tipo KENWOOD
Manuale d’uso Midland CT710 | 5
Page 6
Descrizione dell’apparato
Display LCD
Indicatori:
Codici DTMF
FM radio
Funzione Vox
Frequenza invertita
Scostamento frequenza +/-
Spaziatura canali larga/stretta
Invio codice ID
Livello batteria
Chiamata d’emergenza
Scansione
Scansione prioritaria
6 | Manuale d’uso Midland CT710
Page 7
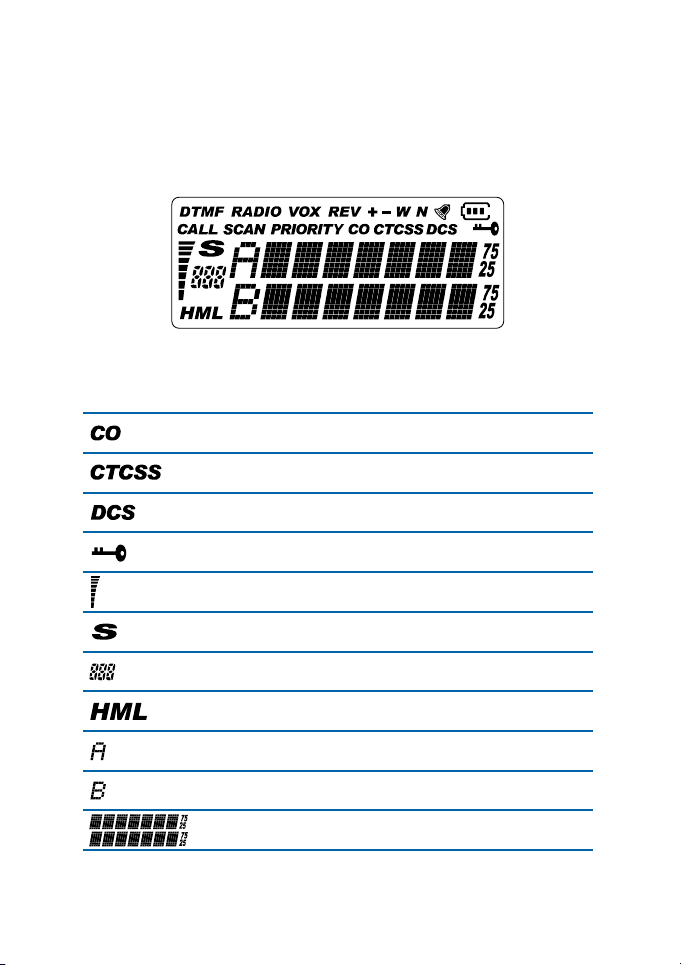
Compander
Toni CTCSS
Codice DCS
Blocco tastiera
RSSI - Potenza segnale ricevuto/trasmesso
Scrambler
Menu/numero canale
Potenza di trasmissione alta/media/bassa
Banda A selezionata
Banda B selezionata
Frequenza
Manuale d’uso Midland CT710 | 7
Page 8
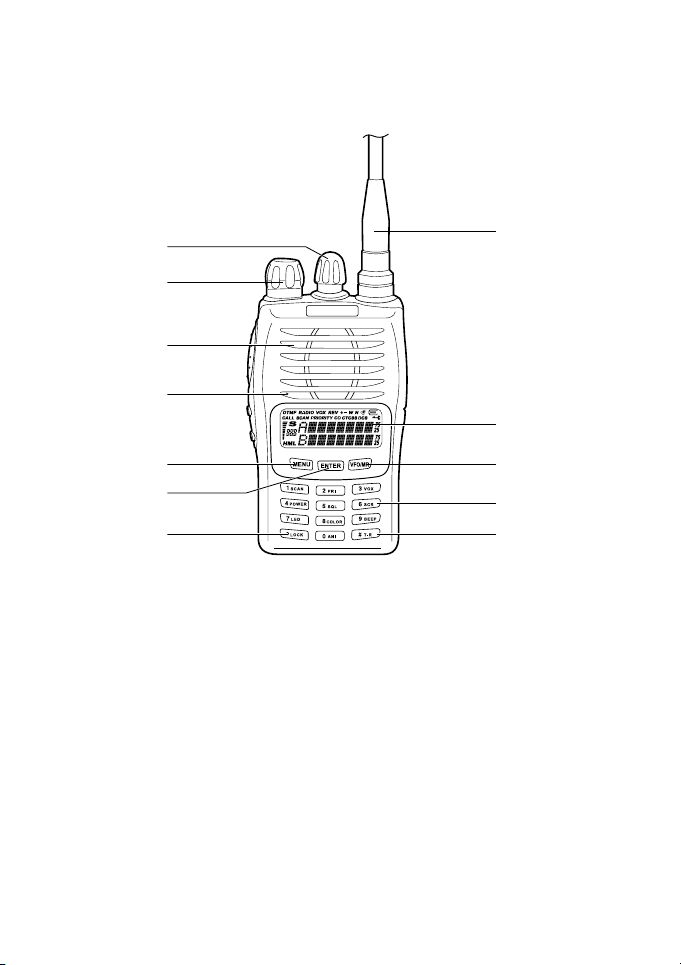
Ricetrasmettitore
2
3
1
1
1
4
5
6
8
1 Accensione/ Controllo volume
2 Manopola Encoder
3 Antenna
4 Display LCD
5 MENU
6 ENTER (per entrare nelle funzioni menu e confermare le impostazioni
selezionate)
7 Tastiera alfanumerica
8 LOCK (Blocco tastiera)
9 T-R (Attivazione dell’inversione di frequenza)
10 VFO/MR (Per cambiare la modalità radio)
10
7
9
8 | Manuale d’uso Midland CT710
Page 9

E
A
D
B
C
A PTT (push to talk)
B Tasto laterale 1: selettore frequenza A/B - mono o bi-banda -, radio
FM
C Tasto laterale 2: selettore per tono 1750/1450/2315 o DTMF
(programmabili)
D Presa per microfono/altoparlante esterno
E Tasti di rilascio della batteria
Manuale d’uso Midland CT710 | 9
Page 10

Operazioni di base
Antenna
Inserite l’antenna nel connettore SMA della radio ruotandola in senso
orario, ed assicuratevi che sia inserita correttamente.
Ruotatela in senso antiorario per estrarla dal connettore SMA.
Accensione/spegnimento
Per accendere l’apparato, ruotate in senso orario la manopola di
accensione finchè non sentirete un beep. Sul display compaiono tutte
le icone e le frequenze (con lo squelch automatico, l’altoparlante non
emetterà nessun suono prima di ricevere una chiamata).
Il volume si regola ruotando la manopola.
Per spegnere l’apparato, ruotate la manopola in senso antiorario.
Funzione Monitor
Se tenete premuto il tasto ENTER per 2 secondi e regolate il volume
tramite la manopola PWR/VOL, potete sentire un rumore di fondo senza
che la radio riceva un segnale. Premendo il PTT, lo squelch si spegne.
Trasmissione
Premete il tasto PTT e parlate verso la radio. Durante la trasmissione,
l’indicatore di trasmissione si accende di rosso.
Se parlate a voce alta o siete troppo vicino al microfono della radio, la
ricezione non sarà disturbata.
Rilasciate il PTT quando avete terminato la trasmissione.
Selezione del modo operativo
Si possono selezionare 4 diversi modi operativi:
1. Modalità bi-banda
2. Banda singola
3. Modalità canale
4. Modalità frequenza
Premete il tasto laterale 1 per 2 secondi per entrare od uscire dalla
modalità mono o bi-banda.
10 | Manuale d’uso Midland CT710
Page 11

Modalità bi-banda
Se è attiva la modalità bi-banda, il display mostrerà le bande A o B.
Quando viene visualizzata la banda A, significa che la frequenza A può
ricevere e trasmettere, ma le altre frequenze sulla banda B possono solo
ricevere. Stessa cosa se viene visualizzata la banda B.
Per passare dalla banda A a B o viceversa, premete brevemente il tasto
laterale 1.
Modalità banda singola
Premete il tasto laterale 1 per due secondi. Il display mostrerà:
R 145.025
T 145.025
Ora la radio opera solamente in modalità mono-banda. Per passare da
una banda all’altra, premete il tasto laterale 1.
Modalità canale
Premete il tasto VFO/MR per passare alla modalità canale. Vedrete
visualizzate sul display diverse opzioni:
• Visualizzare il numero del canale in uso
CH-001 il canale in uso è il canale 1
• Il canale in uso e il nome del canale
CH-001 il nome del canale in uso (in questo caso
CH 1). Il nome è programmabile via
software.
001
canale in uso
• La frequenza di ricezione / trasmissione e il canale in uso
R 145.025 frequenza di ricezione
T 145.025 frequenza di trasmissione
001
canale in uso
Manuale d’uso Midland CT710 | 11
Page 12

Modalità frequenza
SINGLE BAND
R 430.02500 frequenza di ricezione
T 430.02500 frequenza di trasmissione
DUAL BAND
A 145.025
B 430.025
Premete il tasto laterale 1 per 2 secondi per entrare od uscire dalla
modalità mono o bi-banda.
Funzione Radio
CT 710 è dotato di radio FM.
Premete MENU e successivamente il tasto laterale 1 o 2 per entrare nella
modalità radio.
Ruotate l’encoder per selezionare la frequenza radio desiderata.
Le stazioni radio possono essere programmate tramite software; per
passare alle frequenze radio programmate premete VFO/MR.
Per uscire da questa modalità, premete MENU e successivamente i tasti
laterali 1 o 2.
Tasto laterale 2
Tramite il software di programmazione, con il tasto laterale 2 si possono
impostare:
1. chiamata col codice DTMF;
2. invio del codice a 1450Hz;
3. invio codice 1750Hz;
4. invio codice 2315Hz.
Quando avete impostato una di queste funzioni, premete il tasto laterale
e attiverete la funzione impostata.
12 | Manuale d’uso Midland CT710
Page 13

Codice DTMF
CT 710 è dotato di funzione DTMF.
Nella modalità trasmissione, premete i numeri sulla tastiera o i tasti
laterali ed il codice DTMF sarà inviato. Il codice DTMF dei tasti corrisponde
come sotto:
MENU sta per A, ENTER sta per B, VFO/MR sta per C, FM sta per D.
MENU → A VFO/MR → C
ENTER → B Tasto laterale 2 → D
DTMF programmato da software
(vedi istruzioni del Software di programmazione)
Una volta che la funzione opzionale di tono chiamata DTMF è
programmata sui canali desiderati, premete il tasto laterale 2 ed il display
mostrerà DTMF.
Ora potete digitare i codici DTMF a 8 cifre.
Se avete digitato un numero sbagliato e volete cambiarlo, ruotate la
manopola encoder.
Se la ruotate in senso antiorario, li cancellate uno ad uno; in senso orario
invece, uscite dalla modalità DTMF. Digitate il numero desiderato e
premete il PTT per eseguire una chiamata. Quando il vostro interlocutore
riceve il codice corretto, verrà eseguita l’identificazione della radio o la
funzione DTMF programmata via software.
ANI PTT-ID
ANI significa codice automatico di identificazione numerica.
Potete impostare un numero identificativo che viene visualizzato
sulla radio del vostro interlocutore ogni volta che inviate il segnale
di chiamata. La funzione deve essere attivata su entrambe le radio e
deve essere programmata da software (vedi istruzioni del software di
programmazione).
Manuale d’uso Midland CT710 | 13
Page 14

Shortcuts Operation
MENU + 0 per impostazione ANI
MENU + 1 modalità scansione
MENU + 2 scansione prioritaria (solo in modalità VFO)
MENU + 3 impostazione della sensibilità VOX
MENU + 4 impostazione Potenza d’uscita
MENU + 5 regolazione squelch
MENU + 6 attivazione/disattivazione scrambler
MENU + 7 attivazione/disattivazione retroilluminazione
MENU + 8 impostazione colore retroilluminazione
MENU + 9 attivazione/disattivazione beep
MENU + # impostazione CTCSS/DCS in ricezione/trasmissione
MENU + * S-D +/- impostazione scostamento di frequenza
Funzione Cloning
Questa funzione permette di copiare tutti i dati/impostazioni (programmazione) da una radio ad un’altra senza l’ausilio del PC. A radio spente inserire il cavetto cloning (opzionale) nella radio ‘master’ (radio che si vuole
copiare) e nella radio ‘slave’ (radio che si deve programmare). Accendere
la radio ‘master’ tenendo premuto il tasto PTT. Il display mostrerà CLONE?.
Premere una volta il tasto PTT. Entro 10 secondi accendere la radio ‘slave’.
Sul display della radio ‘slave’ apparirà la scritta PC ed il led posto sul frontale inizierà a lampeggiare di verde. Al termine della programmazione la
radio ‘slave’ eseguirà un boot e si accenderà con i nuovi dati programmati.
Durante la fase di programmazione la radio ‘master’ mostrerà sul display
CLONE ed il led verde lampeggerà. Al termine della transazione dei dati
il display mostrerà END.
Ripetere la stessa procedura per eseguire nuove programmazioni.
14 | Manuale d’uso Midland CT710
Page 15

Funzioni del menu
Operazioni del Menu
Per entrare nelle funzioni del menu, seguite queste indicazioni:
1. Premete MENU.
2. Ruotate l’encoder per selezionare il menu desiderato.
3. Premete ENTER nella modalità menu per impostare le funzioni
desiderate: potete premere direttamente il tasto del numero
corrispondente sulla tastiera ma per alcune funzioni (tipo Voice, TOT,
Offset di frequenza) dovete ruotare l’encoder per cercare la funzione
da impostare. Premete ENTER per confermare l’impostazione
selezionata.
4. Quando avete completato tutte le impostazioni, premete VFO/MR
per uscire dalla modalità MENU.
Manuale d’uso Midland CT710 | 15
Page 16

Lista delle funzioni Menu
Menu Sul display Descrizione Opzioni da impostare
10
11
12
13
14
15
16
17
18
19
20
21
22
1
2
3
4
5
6
7
8
9
SCAN
PRI
VOX
POW
SQL
SCRM
LED
LIGHT
BEEP
ANI
KEYBO
TOT
SCANS
VOICE
DIFFR
C-CDC
R-CDC
T-CDC
S-D
STEP
N/W
ROGER
Scansione frequenza o canale
Scansione canale prioritario
Sensibilità VOX
Potenza di trasmissione
Impostazione livello squelch
Scrambler
Retroilluminazione On/Off
colore retroilluminazione
Beep
Codice automatico di identificazione numerica
programmabile via software
Blocco tastiera
Time Out Timer
Selezione scansione
Funzione vocale
Scostamento
CTCSS/DCS in ricezione/trasmissione
CTCSS/DCS in ricezione
CTCSS/DCS in trasmissione
+/- scostamento di frequenza
Passo di canalizzazione
Banda larga/stretta
Roger Beep
16 | Manuale d’uso Midland CT710
Page 17

CHANNEL OR FREQUENCY SCAN
PRIORITY CHANNEL SCAN
OFF~9
HIGH/LOW
0~9
OFF/ON
OFF/ON/AUTO
BLUE/ ORANGE/PURPLE
OFF/ON
OFF/ON
MANUAL/AUTO
OFF~270
CO/TO/SE
OFF/ENG
0-38.000(VHF) - 0-69.950(UHF)
OFF-254.1/D023-D754 I/N
OFF-254.1/D023-D754 I/N
OFF-254.1/D023-D754 I/N
+/-/0
5K/10K/6.25K/12.5K/25K
WIDE/NARROW
ROG ON/ROG OFF
Manuale d’uso Midland CT710 | 17
Page 18

Impostazione funzioni del Menu
Allarme d’emergenza
L’allarme può essere inviato in due modi:
1. Premete contemporaneamente i tasti laterali 1 e 2 : la radio andrà
in allarme ed emetterà allo stesso momento il suono di avviso e
il codice ANI al vostro interlocutore (se programmato). L’allarme
rimane attivo finchè non premete il PTT.
2. Potete anche impostare un vostro canale d’emergenza (tramite il
software di programmazione). Per attivarlo, premete brevemente
# T/R: ora potete trasmettere segnali d’emergenza su questo canale.
Per uscire, premete VFO/MR.
Funzione frequenza invertita
In modalità canale/frequenza, tenete premuto # per due secondi, finchè
sul display compare “T*R?”. Quando “REV” compare sul display, la
funzione di frequenza invertita è abilitata.
Per disattivare la funzione, tenete premuto di nuovo # per due secondi.
Scansione
La funzione Scan è molto utile per monitorare i canali prima della
trasmissione.
Selezione del tipo di scansione
Premete MENU e ruotate l’encoder al numero 13: il display mostrerà
“013 SCANS?”.
Premete ENTER: ora siete nella modalità scansione.
Potete scegliere tra tre diversi tipi di scansione: TO,CO,SE.
Time-operated scan (TO)
Anche se l’apparato si ferma su un canale occupato per 5 secondi, la
scansione prosegue ugualmente sugli altri canali.
Carrier-operated scan (CO)
La radio si ferma su un canale occupato fino a quando non riceve più il
segnale.
Search Scan (SE)
La radio si ferma su un canale occupato e la scansione si interrompe.
18 | Manuale d’uso Midland CT710
Page 19

Scansione frequenza o canale
In modalità canale/frequenza, premete MENU e 1SCAN: la radio inizierà
a scansionare tutti i canali a partire dal canale in uso e, quando rileva
un segnale, si ferma per 8 secondi. Premete il PTT per trasmettere: la
scansione riprenderà dopo 8 secondi.
Per terminare la scansione premete un qualsiasi tasto tranne il PTT: la
radio ritornerà al canale o alla frequenza in uso prima di aver iniziato la
scansione.
Scansione canale prioritario
La radio inizia ad eseguire la scansione dal canale prioritario, poi sugli
altri canali.
Per esempio, se il canale prioritario è 1, la scansione avviene nel seguente
modo: 1-2; 1-3; 1-4;...
Procedura:
Nella modalità canale, premete MENU e 2PRI: l’apparato esegue la
scansione sul canale prioritario, e quando rileva un segnale, la scansione
si interrompe per 8 secondi; per trasmettere premete il PTT. La radio
riprende la scansione dopo 8 secondi.
Per terminare la scansione premete un qualsiasi tasto tranne il PTT.
Sensibilità VOX
Questa funzione permette di comunicare a mani libere: la trasmissione
viene attivata automaticamente quando si parla vicino al microfono della
radio e non è necessario premere il tasto PTT; la trasmissione termina
quando si smette di parlare. Il VOX ha diversi livelli di sensibilità che si
possono impostare a seconda dell’ambiente in cui si trova.
Procedura:
In modalità frequenza, premete i tasti MENU and 3VOX: il display
mostrerà “003 VOX?”.
Premete ENTER e sul display appare “VOX OFF”.
Per impostare il livello di sensibilità desiderato, digitate un numero (0-9)
sulla tastiera o ruotate l’encoder.
Premete ENTER per confermare la vostra scelta e VFO/MR per uscire da
questa impostazione.
Manuale d’uso Midland CT710 | 19
Page 20

Selezione alta/bassa potenza
Con questa funzione, si seleziona il livello di Potenza: alta (high – H) o
bassa (low – L).
In modalità canale/frequenza, premete MENU e 4PWR: il display
mostrerà ”004 POW?”.
Premete ENTER: sul display viene visualizzato ”POW L” (low - bassa
potenza) o ”POW H” (high – alta potenza): ruotate l’encoder per
selezionare il livello desiderato e confermate tramite il tasto ENTER.
Uscite premendo VFO/MR.
Impostazione livello squelch
Con questa funzione lo squelch viene abilitato quando il segnale è forte,
mentre rimane disattivo se il segnale è debole.
Impostate lo stesso codice DCS del vostro gruppo e attivate lo squelch.
Se impostate un livello di squelch troppo alto, non riceverete i segnali
deboli, mentre se lo impostate troppo basso, riceverete disturbi e rumori
di fondo fastidiosi.
NOTA:
Potete scegliere tra 10 livelli diversi (0~9): 0 significa che lo squelch è
attivo; i diversi livelli di riduzione del rumore si possono scegliere da 1 a 9.
Più alto è il livello impostato, più basso sarà lo squelch.
Procedura:
Premete MENU e 5SQL: il display mostrerà “005 SQL?”.
Premete ENTER; il display mostrerà ”SQL 5” (Impostazione di default
“SQL 5”).
Selezionate il livello di squelch desiderato tramite i numeri sulla tastiera
(0-9) o ruotate l’encoder.
Confermate tramite il tasto ENTER e premete VFO/MR per uscire.
Impostazione Scrambler
Lo scrambler è un dispositivo utile per la sicurezza delle vostre
comunicazioni, rendendole comprensibili solo agli utenti che hanno
impostato il vostro stesso livello .
Procedura:
Premete MENU e 6SCR: sul display compare “006 SCRM?”.
Premete ENTER: sul display vedrete “ON” (scrambler on), “OFF”
(scrambler off).
20 | Manuale d’uso Midland CT710
Page 21

Ruotate l’encoder per selezionare on/off e confermate con il tasto ENTER
per confermare; per uscire da questa impostazione premete VFO/MR.
Retroilluminazione On/Off
In modalità canale/frequenza premete MENU e 7LED.
Il display mostrerà “007 LED?”. Premete ENTER e sul display compare
”ON” (retroilluminazione attiva). Ruotate l’encoder per selezionare “ON”
“OFF” “AUTO”.
Confermate la vostra scelta premendo il tasto ENTER ed uscite
dall’impostazione premendo VFO/MR.
Selezione del colore retroilluminazione
Nella modalità canale/frequenza, premete MENU e 8COLOR: il display
mostrerà “008 LIGHT?”.
Premete ENTER e ruotando l’encoder, vedrete le opzioni da scegliere:
“ORANGE”, “PURPLE”, “BLUE”.
Confermate il colore scelto tramite il tasto ENTER e premete VFO/MR per
uscire.
Beep On/Off
Se questa funzione è attivata, ogni volta che premete un tasto, verrà
emesso un beep.
Nella modalità canale/frequenza, premete MENU e 9BEEP: sul display
appare “009 BEEP?” .
Premete ENTER: “ON” significa che il beep è attivato, “OFF” è disattivato.
Scegliete una delle due opzioni ruotando l’encoder. Confermate la vostra
scelta premendo il tasto ENTER ed uscite dall’impostazione premendo
VFO/MR.
Funzione blocco tastiera
Il blocco tastiera è molto utile per evitare pressioni accidentali dei tasti.
Per attivarlo:
Premete MENU e ruotate l’encoder fino al numero 11: il display
visualizzerà “011 KEYBO?”.
Si possono attivare 2 tipi di blocco tastiera: automatico e manuale.
Premete ENTER: il display mostrerà “AUTO” (il blocco tastiera si attiva
automaticamente).
Ruotate l’encoder per selezionare “MANUAL/AUTO”, e confermate con il
Manuale d’uso Midland CT710 | 21
Page 22

tasto ENTER; premete VFO/MR per uscire da questa impostazione.
Il blocco tastiera si può anche eseguire premendo *LOCK: sul display
compare “LOCK?” .
Per bloccare la tastiera tenete premuto per 2 secondi *LOCK; per
sbloccarla premetelo di nuovo.
Funzione TOT
Questa funzione, se abilitata, evita il prolungarsi delle trasmissioni. La
radio infatti blocca tempo raneamente la trasmissione se utilizzata oltre
un tempo massimo predeterminato. Quando si rag giunge il tempo
predefinito nel timer, l’apparecchio commuta in ricezione.
Sull’apparato si può impostare il tempo di trasmissione: OFF (funzione
disabilitata) e l’intervallo 30-270 secondi; prima di superare questo limite,
CT710 invierà un suono di avviso.
Procedura:
Premete MENU e ruotate l’encoder fino al numero 12: sul display compare
“012 TOT?”. Premete ENTER: il display mostrerà ”OFF” (funzione
TOT disabilitata). Ruotate l’encoder per scegliere “OFF~270”; premete
ENTER per confermare e VFO/MR per uscire da questa funzione.
Funzione vocale (solo in inglese)
Con questa funzione si attiva una voce che vi informa su qualsiasi
operazione/selezione che eseguite sulla radio. Per attivarla:
Premete MENU e ruotate l’encoder al menu numero 14: il display mostra
“014 VOICE?”. Premete ENTER.
Ruotate l’encoder per selezionare “ENG”; confermate con ENTER ed
uscite premendo il tasto VFO/MR.
Offset di frequenza
L’offset è la differenza di frequenza tra la trasmissione e la ricezione.
L’offset di frequenza di questo ricetrasmettitore è tra 0 MHz e 69.950 MHz.
In modalità frequenza, premete MENU e ruotate l’encoder al menu 15;
il display mostrerà “015 DIFFR?”. Premete ENTER per impostare la
frequenza tramite tastiera o con l’encoder.
La gamma VHF è 00.000-38.000(MHz) e quella UHF è 00.000-69.950(MHz).
Premete ENTER per conferma e VFO/MR per uscire da questa
impostazione.
22 | Manuale d’uso Midland CT710
Page 23

L’offset di frequenza può essere abilitato solo nella modalità VFO. Lo
scostamento di frequenza massimo dipende dal range di frequenza
selezionato.
Selezione dei toni CTCSS e codici DCS
I toni CTCSS/DCS sono una sorta di codici di accesso; consentono di
comunicare solo con gli utenti sintonizzati sulla stessa frequenza radio e
con lo stesso tono CTCSS/DCS.
I toni CTCSS sono 50, mentre i codici DCS sono 105I e 105N.
Procedura:
Premete MENU e #T-R: il display mostrerà “016 C-CDC?”.
Premete ENTER e ruotate l’encoder per selezionare il tono CTCSS
desiderato (OFF-254.1).
Premete * per passare dai CTCSS ai DCS. I toni DCS si possono selezionare
tra OFF-D754N.
Confermate con ENTER ed uscite premendo il tasto VFO/MR.
Impostare i toni CTCSS/DCS in ricezione (R-CDC)
Premete MENU e ruotate l’encoder per selezionare “017 R-CDC?”.
Premete ENTER e ruotate l’encoder per selezionare il tono CTCSS
desiderato (OFF-254.1).
Premete * per passare dai CTCSS ai DCS. I toni DCS si possono selezionare
tra OFF-D754N.
Confermate con ENTER ed uscite premendo il tasto VFO/MR.
Impostare i toni CTCSS/DCS in trasmissione (T-CDC)
Premete MENU e ruotate l’encoder per selezionare “018 T-CDC?”.
Premete ENTER e ruotate l’encoder per selezionare il tono CTCSS
desiderato (OFF-254.1).
Premete * per passare dai CTCSS ai DCS. I toni DCS si possono selezionare
tra OFF-D754N.
Confermate con ENTER ed uscite premendo il tasto VFO/MR.
Nota
quando selezionate il menu dei codici DCS, premete # per poter
selezionare i codici DCS invertiti (OFF-D754I).
Manuale d’uso Midland CT710 | 23
Page 24

Scostamento di frequenza +/- (per comunicazioni con
ponti ripetitori).
Questa funzione può essere abilitata solo se è attiva la modalità VFO.
In modalità frequenza, premete MENU e *: il display mostra “019 S-D?”.
Premete ENTER e il display mostra “S-D 0” (stessa frequenza); ruota
l’encoder per selezionare “S-D+” o “S-D-“. Premi ENTER per confermare
e VFO/MR per uscire.
Selezione dello step di frequenza
Questa funzione può essere abilitata solo se la radio è settata nella
modalità VFO.
In modalità frequenza, premete MENU e ruotate l’encoder fino al menu
20: sul display compare “020 STEP?”.
Premete ENTER e ruotate l’encoder per selezionare lo step di frequenza:
5k, 10k, 6.25k, 12.5k, 25k. Confermate la vostra selezione tramite il tasto
ENTER ed uscite dal menu con il tasto VFO/MR.
Banda larga/stretta
In modalità canale/frequenza, premete MENU e ruotate l’encoder al
menu numero 21: sul display compare “021 N/W?”. Premete ENTER e
sul display compare “WIDE” (banda larga).
Ruotate l’encoder per selezionare “NARROW/WIDE”; confermate la
vostra selezione premendo ENTER. Uscite da questa impostazione
premendo VFO/MR.
Roger Beep
In modalità canale/frequenza, premete MENU e ruotate l’encoder al
menu 22: “022 ROGER?” verrà visualizzato sul display.
Premete ENTER e sul display compare “ROGER” (roger beep off disattivato); ruotate nuovamente l’encoder per selezionare “OFF/ON”;
confermate la vostra selezione premendo ENTER ed uscite dal menu
premendo VFO/MR.
Memorizzare/cancellare un canale
• Memorizzare un canale
In modalità frequenza selezionate la frequenza desiderata o un’altra
opzione come i toni CTCSS, codici DCS, scostamento di frequenza, ecc.
24 | Manuale d’uso Midland CT710
Page 25

Premete MENU e successivamente VFO/MR.
Il numero del canale da memorizzare lampeggia sul display in basso a
sinistra. Ruotate l’encoder o selezionate il numero del canale (da 1 a
128) sul quale memorizzare la frequenza.
Premete VFO/MR per completare la memorizzazione del canale e per
ritornare alla modalità frequenza.
• Cancellare un canale
Cancellare un canale programmato
Spegnete la radio. Accendetela di nuovo premendo
contemporaneamente VFO/MR.
”001 DEL?” compare sul display. Tramite l’encoder selezionate il
numero del canale da cancellare (da 1 a 128).
Selezionate il canale che volete cancellare ruotando l’encoder.
Premete ENTER ed il display mostra: “001 YES?”.
Premete ENTER per cancellarlo; se non volete cancellarlo, premete
VFO/MR per uscire da questo menu.
• Reset
Cancellare i parametri nella modalità frequenza (Reset VFO)
Accendete la radio tenendo premuto contemporaneamente il tasto
MENU. Il display mostrerà “RESET?”.
Premete ENTER; il display indicherà “VFO?”.
Premete ENTER per confermare e tutte le impostazioni della modalità
frequenza saranno cancellate.
Cancellare le impostazioni della modalità frequenza e canale (Reset FULL)
Accendete la radio tenendo premuto contemporaneamente il tasto
MENU. Il display indicherà “RESET?”.
Premete ENTER; il display mostrerà “VFO?”.
Ruotate l’encoder e selezionate “FULL?”; confermate con il tasto
ENTER. Tutte le impostazioni in modalità frequenza e canale saranno
cancellate.
Manuale d’uso Midland CT710 | 25
Page 26

Tabella dei toni CTCSS (50)
Num. Freq.(Hz) Num. Freq.(Hz) Num. Freq.(Hz)
01 67.0 18 118.8 35 183.5
02 69.3 19 123.0 36 186.2
03 71.9 20 127.3 37 189.9
04 74.4 21 131.8 38 192.8
05 77.0 22 136.5 39 196.6
06 79.7 23 141.3 40 199.5
07 82.5 24 146.2 41 203.5
08 85.4 25 151.4 42 206.5
09 88.5 26 156.7 43 210.7
10 91.5 27 159.8 44 218.1
11 94.8 28 162.2 45 225.7
12 97.4 29 165.5 46 229.1
13 100.0 30 167.9 47 233.6
14 103.5 31 171.3 48 241.8
15 107.2 32 173.8 49 250.3
16 110.9 33 177.3 50 254.1
17 114.8 34 179.9
26 | Manuale d’uso Midland CT710
Page 27

Tabella dei codici DCS (105)
Num Cod DCS Num Cod DCS Num Cod DCS Num Cod DCS
01 023 31 165 61 356 91 627
02 025 32 172 62 364 92 631
03 026 33 174 63 365 93 632
04 031 34 205 64 371 94 645
05 032 35 212 65 411 95 654
06 036 36 223 66 412 96 662
07 043 37 225 67 413 97 664
08 047 38 226 68 423 98 703
09 051 39 243 69 431 99 712
10 053 40 244 70 432 100 723
11 054 41 245 71 445 101 731
12 065 42 246 72 446 102 732
13 071 43 251 73 452 103 734
14 072 44 252 74 454 104 743
15 073 45 255 75 455 105 754
16 074 46 261 76 462
17 114 47 263 77 464
18 115 48 265 78 465
19 116 49 266 79 466
20 122 50 271 80 503
21 125 51 274 81 506
22 131 52 306 82 516
23 132 53 311 83 523
24 134 54 315 84 526
25 143 55 325 85 532
26 145 56 331 86 546
27 152 57 332 87 565
28 155 58 343 88 606
29 156 59 346 89 612
30 162 60 351 90 624
Manuale d’uso Midland CT710 | 27
Page 28

Soluzione dei problemi
PROBLEMA SOLUZIONE
La radio non si
accende
La batteria si scarica
rapidamente
Il led indicatore di
ricezione si illumina
ma non si sente niente
La tastiera non
funziona
In modo standby,
il ricetrasmettitore
trasmette senza
premere il tasto PTT
Non è possibile
accedere ad alcuna
funzione
Mentre è in corso una
conversazione con
il proprio gruppo, si
ricevono interferenze
da altri gruppi
Batteria scarica. Procedere alla ricarica
Batteria non installata correttamente.
Riposizionarla in modo corretto
Il pacco batteria è a fine ciclo. Sostituirlo con
uno nuovo.
La batteria non è totalmente carica.
Assicurarsi che il livello del volume non sia
troppo basso.
Assicurarsi che i sub-toni CTCSS e i codici DCS
siano gli stessi degli altri utenti del vostro
gruppo.
Non è stata attivata la funzione di Blocco
tastiera
Assicurarsi di non aver premuto qualche altro
pulsante
Il livello di VOX impostato è troppo basso
Non siete in modalità Canale. In modalità
Canale, alcune funzioni possono essere
impostate solo tramite software di
programmazione.
Cambiare il tono CTCSS o il codice DCS del
vostro gruppo.
28 | Manuale d’uso Midland CT710
Page 29

Specifiche tecniche
Generali
Gamma di frequenza 144-146MHz / 430-440MHz
Temperatura operativa -20° +55°C
Alimentazione 7.4V 1600mAh
Modalità operative mono banda / bi-banda
Dimensioni 95 (A) x 55(L) x 31(P) mm
Peso 230gr (antenna inclusa)
Impedenza antenna 50Ω
Ciclo di utilizzo 5/5/90
Trasmettitore
Stabilità di frequenza ±2.5ppm
Potenza in uscita VHF: 5W / UHF: 4W
Deviazione max di frequenza ±5KHz
Distorsione audio ≤ 3%
Potenza canale adiacente nei limiti di legge europea
Radiazione spurie nei limiti di legge europea
Ricevitore
Sensibilità RF <0.2μV
Distorsione audio ≤ 3%
Risposta audio 300Hz ÷ 3KHz
Selettività canale adiacente nei limiti di legge europea
Reiezione intermodulazione nei limiti di legge europea
Le specifiche sono soggette a modifica senza preavviso.
Manuale d’uso Midland CT710 | 29
Page 30

Prodotto o importato da:
CTE INTERNATIONAL s.r.l.
Via. R.Sevardi 7- 42124 Reggio Emilia Italia
www.cte.it - www.midlandradio.eu
L’uso di questo apparato può essere soggetto a restrizioni nazionali . Prima dell’uso leggere attentamente le istruzioni. Se il prodotto contiene batterie: non gettare nel fuoco, non disperdere nell’ambiente
dopo l’uso, usare gli appositi contenitori per la raccolta.
Produced or imported by:
CTE INTERNATIONAL s.r.l.
Via. R.Sevardi 7 42124 Mancasale Reggio Emilia Italy
Imported by:
ALAN - NEVADA UK
Unit 1 Fitzherbert Spur Farlington Portsmouth Hants.
P06 1TT - United Kingdom
www.nevada.co.uk
The use of this transceiver can be subject to national restrictions. Read the instructions carefully before
installation and use. If the product contains batteries: do not throw the battery into fire. To disperse
after use, throw into the appropriate containers.
Importado por:
ALAN COMMUNICATIONS, SA
C/Cobalt, 48 - 08940 Cornellà de Llobregat Barcelona España Tel: +34 902 384878 Fax: +34 933 779155
www.midland.es
El uso de este equipo puede estar sujeto a la obtención de la correspondiente autorización administrativa.
Lea atentamente las instrucciones antes de usar el equipo. si el producto contiene pilas o baterías no
las tire al fuego ni las disperse en el ambiente después de su uso, utilice los contenedores apropiados
para su reciclaje.
Vertrieb durch:
ALAN ELECTRONICS GmbH
Daimlerstraße 1K - D-63303 Dreieich Deutschland
www.alan-electronics.de
Die Benutzung dieses Handfunkgerätes ist von den landesspezifischen Bestimmungen abhängig. Vor
Benutzung Bedienungsanleitung beachten. Bei Verwendung von Batterien beachten Sie bitte die
Umweltbestimmungen. Batterien niemals ins offene Feuer werfen, und nur in dafür vorgesehene
Sammelbehälter entsorgen.
WWW.MIDLANDRADIO.EU |
Page 31

CT 710
” Instruction guide
VHF/UHF TRANSCEIVER |
Page 32

Content: 4
Maintenance 4
Main functions 5
Description of the device 6
LCD display 6
Transceiver 8
Basic operations 10
Antenna 10
Turning on and off the power 10
Monitoring function 10
Transmitting 10
Select Mode 10
Dual-band mode 11
Channel Mode 11
Frequency Mode 12
Radio Function 12
The Flank Key Definition 12
DTMF Code 12
DTMF programmed by software 13
ANI PTT-ID Operation 13
Shortcuts Operation 14
Cloning function 14
2 | CT710 Instruction Guide
Page 33

Menu function 15
Menu Operation 15
Menu Function List 16
Menu Function introduction and setting 18
Emergency Alarm 18
Setting Reverse Frequency Function 18
Scanning 18
Select scan type 18
VOX Sensitivity Setting 19
Power Setting (high or low) 19
Squelch Threshold Setting 20
Scrambler Setting 20
Backlight On/Off Setting 20
Backlight Color Selection 21
Beep On/Off 21
Keypad Lock Function Setting 21
Transmitting TOT Setting 22
Voice Function (only in English) 22
OFFSET DIFFR 22
Selecting the CTCSS tones and DCS codes 22
Setting the receiver CTCSS/DCS (R-CDC) 23
Setting the transmitting CTCSS/DCS (T-CDC) 23
+/- Frequency shift direction (for through repeaters) 23
Selecting the Frequency Step 23
Wide/Narrow Band 24
Roger Beep 24
To Save/delete a channel 24
CTCSS tone table: 50 tones 26
DCS: Digital code 105 tones 27
Table of solutions 28
Technical Specification 29
CT710 Instruction Guide | 3
Page 34

Content:
• CT 710 transceiver
• Antenna
• Li-ion battery pack 1600mAh
• Belt clip
• Desktop charger with wall adaptor
• Quick Guide
If any items are missing or have been damaged during shipment, please
notify your MIDLAND dealer.
Maintenance
Your transceiver is an electronic product of exact design and should be
treated with care .The suggestions below will help you to fulfill any warranty obligations and to enjoy this product for many years.
• Do not attempt to open the unit. Non-expert handling of the unit may
damage it.
• Do not store the radio under the sunshine or in hot areas. High temperatures can shorten the life of electronic devices, and warp or melt
certain plastics.
• Do not store the radio in dusty and dirty areas.
• Keep the radio dry. Rainwater or damp will corrode electronic circuits.
• If it appears that the radio diffuses peculiar smell or smoke, please
shut off its power immediately and take off the charger or battery
from the radio.
• Do not transmit without antenna.
4 | CT710 Instruction Guide
Page 35

Main functions
• Dual band (VHF/UHF) displayed
• Frequency band:144-146MHz & 430-440MHz (Rx / Tx).
• Working mode: UHF-VHF, VHF-VHF or UHF-UHF
• Output power: 5W VHF /4W UHF
• 128 stored channels
• Scrambler (levels can be programmed via software)
• Compander (programmable via software)
• VOX function
• 210 DCS codes and 50 CTCSS tones
• “VOICE” function
• SOS emergency function
• Channel spacing selectable between 25kHz and12,5 kHz
• Following options can be shown on the display: channel name +
channel number, channel number + frequency, channel number, or
frequency
• Inverted frequency function
• Scan function
• FM radio receiver
• Frequency Step: 5 kHz, 6.25 kHz, 10 kHz, 12.5 kHz, 25 kHz,
• Selectable tx power: high (4-5W)or low (1W)
• Li-Ion battery pack 1600mAh
• Frequency Offset: 0-69.950 MHz
• Shift repeater
• ”Busy channel lockout” frequency (programmable via software)
• Tx signal strength indicator on the display
• Low battery vocal indication
• Roger Beep tone at the beginning or end transmission
• TOT (Time out timer)
• Keypad lock
• Scan of frequencies with CTCSS/DCS
• Scan priority
• DTMF
• Reset of functions and channels
• 1750 / 1450 / 2315 tone to connect to repeaters (programmable via
software)
• Jack for external speaker/mike: 2 Pin KENWOOD type
CT710 Instruction Guide | 5
Page 36

Description of the device
LCD display
Indicators:
DTMF codes
FM radio
Vox function
Inverted frequency (reverse)
Frequency offset +/-
Channel spacing wide/narrow
ID code activation
Battery level
Emergency call
Scan
Priority scan
6 | CT710 Instruction Guide
Page 37

Compander
CTCSS tone
DCS code
Keypad lock
RSSI - Potenza segnale ricevuto/trasmesso
Scrambler
Menu/channel number
High/middle/low power transmitting
Band A selected
Band B selected
Frequency
CT710 Instruction Guide | 7
Page 38

Transceiver
2
3
1
1
1
4
5
6
8
1. Power switch/volume control
2. Encoder Knob
3. Antenna
4. LCD display
5. MENU
6. ENTER (To enter the menu functions and confirm your selections)
7. Alphanumerical keypad
8. LOCK (keypad lock)
9. T-R (Frequency inversion activation)
10. VFO/MR (to change the radio modes)
10
7
9
8 | CT710 Instruction Guide
Page 39

E
A
D
B
C
A PTT (push to talk) key
B Flank key1: A/B frequency selector - single or dual band -, FM radio
C Flank key2: 1750/1450/2315 tone (programmable) or DTMF (pro-
grammable)
D Ext. speaker/microphone jack
E Battery latches
CT710 Instruction Guide | 9
Page 40

Basic operations
Antenna
Insert the base of the supplied antenna into the SMA connector by rotating the antenna clockwise, then make sure that it has set down. Take out
the antenna from the base by counter clockwise rotation until pull out it
from SMA connector.
Turning on and off the power
If you want to turn on the power, rotate the PWR/VOL (turning on) knob
clockwise until a beep sound is heard. All icons and frequencies appear
on the screen. (Due to the automatic squelch function, the speaker will
not send out any sound before receiving a call). You can adjust your desired volume by turning the button. If you want to turn off the power, turn
PWR/VOL knob in counter clockwise rotation until a beep is heard. All
icons and frequencies disappear from the display.
Monitoring function
If you hold down the ENTER key for two seconds and adjust your desired
volume by PWR/VOL knob, you can directly hear a background noise without waiting to receive any signals. If you press the PTT key, the squelch
will turn off.
Transmitting
Press the PTT key then speak to the radio in ordinary tone. The transmitting indicator lights up red while the PTT key is pressed.
If you are too close to the microphone or your voice is too loud, the reception won’t sound clear.
Release the PTT key so as to listen a response from your partner.
Select Mode
You can select four different operative modes:
1. Dual-band mode
2. Single band mode
3. Channel mode
10 | CT710 Instruction Guide
Page 41

4. Frequency mode.
Press flank key1 for two seconds to enter or exit the dual-band or singleband mode.
Dual-band mode
When the dual-waiting mode is selected, the display will show two bands
A or B. When the band A is displayed, it means that frequency A can receive and transmit, but the other frequencies on the B band can only receive
and cannot transmit. Same thing if the band B is displayed. To switch to A
or B band press briefly flank key1.
Single-band mode
Press flank key1 for two seconds. The display will show:
R 145.025
T 145.025
Now the radio works in single band mode only. To switch from one band
to another, press flank key1.
Channel Mode
Press the VFO/MR key to switch to channel mode. Different options can
be displayed:
• Display the current channel number
CH-001 the current channel is the first channel.
• Display the current channel name and channel name
CH-001 current channel name in use
(in this case channel 1).
The name is programmable via software.
001
• Display the receive / transmit frequency and the current channel
current channel
R 145.025 receive frequency
T 145.025 transmit frequency
001
current channel.
CT710 Instruction Guide | 11
Page 42

Frequency Mode
‘SINGLE BAND’
R 430.02500 receive frequency
T 430.02500 transmit frequency
‘DUAL BAND’
A 145.025
B 430.025
Press flank key1 for two seconds to enter or exit the dual-band or singleband mode.
Radio Function
This radio comes with the FM function.
Press MENU and then flank key 1 or 2 to enter the radio status.
To select your favorite radio frequency to listen directly, turn the encoder.
Radio stations can be programmed by software and push the VFO/MR to
switch to the programmed radio frequencies.
To exit the radio encoder, press the MENU and then flank key 1 or 2.
The Flank Key Definition
By using the programming software, you can define the flank key 2 as:
1. DTMF code call
2. send 1450Hz code
3. send 1750Hz code
4. send 2315Hz code
When defined as one of the above, push the flank key to activate the
selected function.
DTMF Code
This radio has the DTMF function.
In the transmitting status, press the numbers on the keypad or the flank
keys and the corresponding DTMF code will be issued. The DTMF code
issued by the key buttons are as follows:
MENU stands for A, ENTER stands for B, VFO/MR stands for C, FM stands
for D.
12 | CT710 Instruction Guide
Page 43

MENU → A VFO/MR → C
ENTER → B Tasto laterale 2 → D
DTMF programmed by software
(see the instructions of the Programming software)
Once the optional call signaling DTMF function is programmed on the
desired channels, press the flank key2 and the display will show DTMF.
Now you can input the 8-digit DTMF codes.
If the input number is wrong and you want to change it, rotate the en-
coder.
Counterclockwise rotation delete one by one, clockwise to exit the DTMF
function. Input your desired number, press PTT key to make a call. When
your partner receives the correct code, the programmed DTMF function
or the radio identification will be done.
ANI PTT-ID Operation
ANI means Automatic Numbering Identification.
You can set an automatic number identifier visible from the radio’s display of your partner each time you send a call signal. This function must
be activated on both radios and must be programmed by software (see
the instructions of the Programming software).
CT710 Instruction Guide | 13
Page 44

Shortcuts Operation
MENU + 0 ANI setting
MENU + 1 scan mode
MENU + 2 priority scan mode (only in VFO mode)
MENU + 3 VOX Sensitivity setting
MENU + 4 output power setting
MENU + 5 SQ adjust
MENU + 6 scrambler on/off setting
MENU + 7 backlight on/off setting
MENU + 8 backlight color setting
MENU + 9 beep on/off
MENU + # receive and transmit CTCSS/DCS setting
MENU + * S-D +/- potential difference setting
Cloning Function
This function allows to copy all data/settings (programming) from a radio
to another one, without using PC. Turn off both radios and connect the
optional cloning cable to the radio ‘master’ (radio to be copied) and to the
radio ‘slave’ (radio to program). Turn on the radio ‘master’ while keeping
pressed the PTT button at the same time. The display will show CLONE?.
Press PTT once. Turn on the radio ‘slave’ within 10 seconds. The display of
the radio ‘slave’ will show PC and the led on the front will start flashing
green. At the end of this procedure, the radio ‘slave’ will be rebooted and
will turn on with the new programmed data. During the programming,
the radio ‘master’ will show CLONE on the display and the green led will
blink. When all data have been copied, END will appear on the display.
Repeat the same procedure for further programming procedures.
14 | CT710 Instruction Guide
Page 45

Menu function
Menu Operation
To enter the Menu functions, follow this procedure:
Press MENU to enter the menu mode.
Turn the encoder to select the menu.
Press ENTER into the menu mode to set the desired function: you can
press the number key directly, but for some functions (such as TOT, Voice,
Frequency offset) you have to rotate the encoder to find the desired option. Press ENTER to confirm the selected setting.
When you have completed all the setting, press VFO/MR to exit the Menu
mode.
CT710 Instruction Guide | 15
Page 46

Menu Function List
Menu display Instruction Setting contents
10
11
12
13
14
15
16
17
18
19
20
21
22
1
2
3
4
5
6
7
8
9
SCAN
PRI
VOX
POW
SQL
SCRM
LED
LIGHT
BEEP
ANI
KEYBO
TOT
SCANS
VOICE
DIFFR
C-CDC
R-CDC
T-CDC
S-D
STEP
N/W
ROGER
Channel or frequency scan
Priority Channel Scan
VOX Sensitivity
Transmission power
Squelch threshold setting
Scrambler
Backlight On/Off setting
Backlight color select
Beep
Automatic number identification
programmable via software
Keypad lock
Time Out Timer
Scan selection
Voice prompts
Offset
Receiving and transmitting CTCSS/DCS
Receiving CTCSS/DCS
Transmitting CTCSS/DCS
Potential difference
Channel stepping
Narrow/wide bandwidth
Roger Beep
16 | CT710 Instruction Guide
Page 47

CHANNEL OR FREQUENCY SCAN
PRIORITY CHANNEL SCAN
OFF~9
HIGH/LOW
0~9
OFF/ON
OFF/ON/AUTO
BLUE/ ORANGE/PURPLE
OFF/ON
OFF/ON
MANUAL/AUTO
OFF~270
CO/TO/SE
OFF/ENG
0-38.000(VHF) - 0-69.950(UHF)
OFF-254.1/D023-D754 I/N
OFF-254.1/D023-D754 I/N
OFF-254.1/D023-D754 I/N
+/-/0
5K/10K/6.25K/12.5K/25K
WIDE/NARROW
ROG ON/ROG OFF
CT710 Instruction Guide | 17
Page 48

Menu Function introduction and setting
Emergency Alarm
There are two types of alarms:
1. Press flank key 2 and flank key 1 at the same time: the radio will go to
emergency alarm and will send out, at the same time, the alarm sound
and ANI to your partner (if programmed). The alarm stays active till
the PTT is pressed.
2 By means of the programming software, an emergency channel can
be specially set. To activate it, press briefly # T/R: now you can transmit
on the selected emergency frequency. To exit, press VFO/MR.
Setting Reverse Frequency Function
In channel/Frequency mode, hold down # for two seconds until “T*R?”
appears. When “REV” is displayed on the LCD, the Reverse frequency
function is enabled. To deactivate this function, hold down # for two
seconds.
Scanning
The Scan version is very useful to monitor the channels before transmitting.
Select scan type
Press MENU and rotate the encoder to item 13, the screen will display
“013 SCANS?”.
Press ENTER: now you are into the scanning mode selection.
You have three types of scanning to choose amongst: TO, CO, SE.
Time-operated scan (TO)
When the radio detects a signal it will stop scanning; the status will remain about 5 seconds but the radio will continue to scan even if the signal is still there.
Carrier-operated scan (CO)
The radio will stop scanning when detects a signal and remains on the
same frequency until the signal is missing.
Search Scan (SE)
When the radio detects a signal, it remains on that channel and stop
18 | CT710 Instruction Guide
Page 49

scanning.
Frequency or channel scan
In channel /frequency mode, press MENU and 1SCAN: the radio will scan
from current channel through all the channels and, whenever any signal
is detected, the radio will stop scanning for 8 seconds. Then press PTT to
transmit: it will then continue to scan after 8 seconds.
Press any key except PTT to end scanning: the radio will return to the
channel or frequency in use before starting the scan function.
Priority channel scan
Priority scan means that the radio starts scanning from the priority channel first and then scans the other channels. For example, if the priority
channel is 1, the scan will be 1-2;1-3;1-4;…….
Procedure:
In channel mode ,press MENU and 2PRI: the radio will scan priority channel, whenever any signal is detected, the radio will suspend the scan for
8 seconds, then press PTT key to transmit. It will then continue to scan
after 8 seconds.
Press any key except PTT key to end scanning.
VOX Sensitivity Setting
This function allows hand-free communications: you activate the
transmission when you speak to the microphone without pressing the
PTT button. It stops transmitting automatically once you stop speaking.
The sensitivity can be adjusted in different levels that can be set upon
your needs.
Procedure:
In Frequency mode, press MENU and 3VOX keys: the screen will display
“003 VOX?”.
Press ENTER and the display will show “VOX OFF”.
To adjust the desired sensitivity level, press any number key (0-9) on the
keypad or rotate the encoder.
To confirm your selection press ENTER and VFO/MR to exit.
Power Setting (high or low)
With this function you can select the power level, you can choose between High (H) and Low (L).
CT710 Instruction Guide | 19
Page 50

In channel/frequency mode, press MENU and 4PWR: the screen will display ”004 POW?”.
Press ENTER and the display will show ”POW L” (low power) or ”POW H”
(high power): turn the encoder knob to select the desired power level.
To confirm your selection press ENTER and VFO/MR to exit.
Squelch Threshold Setting
This function turns on the Squelch when the signal is strong; the Squelch
will stay off when the signal is weak. Set the same DCS codes of your
group and turn on the squelch.
By setting the level too high, you may not receive the weak signals; while
by setting it too low you may receive noises or undesired signals.
NOTE:
This transceiver has ten (0~9) available levels: 0 means that the Squelch
is turned on. From level 1 to level 9 you will have different levels of noises
reduction. The higher is the level, the louder will be the Squelch.
Procedure:
Press MENU and 5SQL: the screen will show “005 SQL?”.
Press ENTER and the display will show ”SQL 5”(Factory Settings ” SQL
5”).
Press any number (0-9) on the keypad or rotate the encoder to select the
desired squelch level.
Press ENTER as confirmation and press VFO/MR to exit.
Scrambler Setting
The scrambler is designed to protect communications.
This feature prevents parties of other networks from hearing and understanding voice communications.
Procedure:
Press MENU and 6SCR key and the display will show “006 SCRM?”.
Press ENTER: you will see on the display “ON” (scrambler on), “OFF”
(scrambler off).
Turn the encoder to select on/off and press ENTER to confirm; press VFO/
MR to exit.
Backlight On/Off Setting
In channel/frequency mode, press MENU and 7LED.
20 | CT710 Instruction Guide
Page 51

The screen will show “007 LED?”. Press ENTER and you will see on
the display ”ON” (backlight on). Turn the encoder to select “ON” “OFF”
“AUTO”.
Press ENTER to confirm, and VFO/MR to exit.
Backlight Color Selection
In channel/frequency mode, press MENU and 8COLOR: the display will
show “008 LIGHT?”.
Press ENTER and by turning the encoder, you have the color options:
“ORANGE”, “PURPLE”, “BLUE”.
Press ENTER to confirm the desired backlight color and VFO/MR to exit.
Beep On/Off
If you enable this function, every time a button is pressed, you will hear
a Beep tone.
In channel/frequency mode, press MENU and 9BEEP: “009 BEEP?” will
appear on the display.
Press ENTER: “ON” means beep on, “OFF” means beep off; turn the enco-
der to choose one of the two options. Press ENTER to confirm and VFO/
MR to exit.
Keypad Lock Function Setting
This function is useful to lock the keypad and so, avoid any accidental
pressure of the buttons.
Press MENU and turn the encoder to item 11: the screen will display
“011 KEYBO?”.
This transceiver has 2 types of Keypad lock available: Auto-lock and Manual-lock.
Press ENTER: the display will show “AUTO” (keypad lock turns on automatically).
Turn the encoder to select “MANUAL/AUTO”, then press ENTER to
confirm and VFO/MR to exit.
You can also press *LOCK: the display will show “LOCK?” .
If you want to lock the keypad hold down *LOCK for 2 seconds. To unlock
the keypad, press *LOCK again for 2 seconds: the keypad will be unlocked.
CT710 Instruction Guide | 21
Page 52

Transmitting TOT Setting
The TOT function is used to prevent a too long transmission. This function
temporarily blocks transmissions if the radio has been used beyond the
maximum time permitted. Once reached the preset timer, the radio will
be forced in reception mode.
This unit can set OFF/30-270 seconds continued transmitting limit, it will
send out warning sound when the limit transmitting time is coming.
Procedure:
Press MENU and turn the encoder to item 12: “012 TOT?” will be displa-
yed. Press ENTER : the display shows ”OFF” (TOT off). Turn the encoder to
choose “OFF~270”, then press ENTER to confirm and VFO/MR to exit.
Voice Function (only in English)
With this function, you activate a voice that informs about any operation/
selection you are doing.
Press MENU and turn the encoder to menu item 14: the display will show
“014 VOICE?”. Press ENTER.
Turn the encoder to choose “ENG”; press ENTER as confirmation and
VFO/MR to exit.
OFFSET DIFFR
This function is used to determine the difference (Potential Difference)
between sending frequency and receiving frequency.
In frequency mode, press MENU and turn the encoder to item 15; the
display will show “015 DIFFR?”. Press ENTER to set the frequency with
the keypad or by rotating the encoder.
The VHF range is 00.000-38.000(MHz) and the UHF range is 00.000-
69.950(MHz).
Press ENTER to confirm and VFO/MR to exit.
This function can only be enabled in VFO mode. The maximum offset depends on the selected frequency range.
Selecting the CTCSS tones and DCS codes
Set the CTCSS tones to ignore unwanted signals from other users of the
same frequency.
CTCSS tones enable the radio to communicate with the users that are
tuned on the same channel and have set the same CTCSS tone.
22 | CT710 Instruction Guide
Page 53

The CTCSS tones available are 50, while DCS codes are 105I and 105N.
Procedure:
Press MENU and #T-R keys, the display will show “016 C-CDC?”.
Press ENTER and turn the encoder to select desired CTCSS (OFF-254.1).
Press * to switch CTCSS and DCS. The DCS range is OFF-D754N.
Press ENTER to confirm and VFO/MR to exit.
Setting the receiver CTCSS/DCS (R-CDC)
Press MENU and turn the encoder to select “017 R-CDC?”.
Press ENTER and turn the encoder to select desired CTCSS (OFF-254.1).
Press * to switch CTCSS and DCS. The DCS range is OFF-D754N.
Press ENTER to confirm and VFO/MR to exit.
Setting the transmitting CTCSS/DCS (T-CDC)
Press MENU and turn the encoder to select “018 T-CDC?”.
Press ENTER and turn the encoder to select desired CTCSS (OFF-254.1).
Press * to switch CTCSS and DCS. The DCS range is OFF-D754N.
Press ENTER to confirm and VFO/MR to exit.
Note:
when you set the Menu of DCS codes, press [#] and you can select OFF-
D754I (Inverted).
+/- Frequency shift direction (for communications
through repeaters)
This function can only be enabled in VFO (frequency) mode.
In frequency mode, press MENU and *: the display will show “019
S-D?”.
Press ENTER and the display shows “S-D 0” (same frequency); turn the
encoder and you can select “S-D+” or “S-D-“. Press ENTER to confirm
and VFO/MR to exit.
Selecting the Frequency Step
This function can only be enabled in VFO (frequency) mode.
In frequency mode, press MENU and turn the encoder to item 20: “020
STEP?” will be displayed.
Press ENTER and turn the encoder to select the frequency stepping: 5k,
10k, 6.25k, 12.5k, 25k. Press ENTER to confirm and VFO/MR to exit.
CT710 Instruction Guide | 23
Page 54

Wide/Narrow Band
In channel/frequency mode, press MENU and turn the encoder to item
21: “021 N/W?” will be displayed. Press ENTER and the display will show
“WIDE” (wide band).
Turn the encoder to select “NARROW/WIDE” and confirm by pressing
ENTER. Press VFO/MR to exit.
Roger Beep
In channel/frequency mode, press MENU and turn the encoder to item
22: “022 ROGER?” will be displayed.
Press ENTER and you will see on the display “ROGER” (roger beep off);
turn the encoder to select “OFF /ON”; press ENTER to confirm and VFO/
MR to exit.
To Save/delete a channel
• Saving a channel
In frequency mode select the desired frequency or any other items
(like CTCSS, DCS, potential difference , frequency difference direction).
Press MENU and then VFO/MR keys.
The channel to store blinks on the left bottom of the display. Turn en-
coder or select the number (from 1 to 128).
Press VFO/MR key to complete the channel storage, and return to the
state of the frequency mode.
• Deleting a channel
Delete one programmed channel
Turn off the radio. Turn it on again while keeping pressed the VFO/MR
key at the same time.
”001 DEL?” will be displayed. Turn the encoder to delete the chan-
nel number (from 1 to 128).
Select the channel number that must be deleted (rotate encoder).
Press the ENTER key and the display shows: “001 YES?”.
If you really want to delete this channel, press ENTER to confirm; if you
don’t want to delete it, press VFO/MR to exit.
• Reset
Delete the parameters of frequency mode (Reset VFO)
Turn on the radio while keeping pressed the MENU key at the same
24 | CT710 Instruction Guide
Page 55

time. The display will show “RESET?”.
Press the ENTER key, the LCD will show “VFO?”.
Press ENTER to confirm and all the settings of frequency mode will be
deleted.
Delete all contents of frequency mode and channel mode (Reset FULL)
Turn on the radio while keeping pressed the MENU key at the same
time. The display will show “RESET?”.
Press the ENTER key, the LCD will show “VFO?”.
Rotate the encoder and choose “FULL?”, then press ENTER as confir-
mation. All settings of channel and frequency mode will be deleted.
CT710 Instruction Guide | 25
Page 56

CTCSS tone table: 50 tones
No Freq.(Hz) No Freq.(Hz) No Freq.(Hz)
01 67.0 18 118.8 35 183.5
02 69.3 19 123.0 36 186.2
03 71.9 20 127.3 37 189.9
04 74.4 21 131.8 38 192.8
05 77.0 22 136.5 39 196.6
06 79.7 23 141.3 40 199.5
07 82.5 24 146.2 41 203.5
08 85.4 25 151.4 42 206.5
09 88.5 26 156.7 43 210.7
10 91.5 27 159.8 44 218.1
11 94.8 28 162.2 45 225.7
12 97.4 29 165.5 46 229.1
13 100.0 30 167.9 47 233.6
14 103.5 31 171.3 48 241.8
15 107.2 32 173.8 49 250.3
16 110.9 33 177.3 50 254.1
17 114.8 34 179.9
26 | CT710 Instruction Guide
Page 57

DCS: Digital code 105 tones
No DCS code No DCS code No DCS code No DCS code
01 023 31 165 61 356 91 627
02 025 32 172 62 364 92 631
03 026 33 174 63 365 93 632
04 031 34 205 64 371 94 645
05 032 35 212 65 411 95 654
06 036 36 223 66 412 96 662
07 043 37 225 67 413 97 664
08 047 38 226 68 423 98 703
09 051 39 243 69 431 99 712
10 053 40 244 70 432 100 723
11 054 41 245 71 445 101 731
12 065 42 246 72 446 102 732
13 071 43 251 73 452 103 734
14 072 44 252 74 454 104 743
15 073 45 255 75 455 105 754
16 074 46 261 76 462
17 114 47 263 77 464
18 115 48 265 78 465
19 116 49 266 79 466
20 122 50 271 80 503
21 125 51 274 81 506
22 131 52 306 82 516
23 132 53 311 83 523
24 134 54 315 84 526
25 143 55 325 85 532
26 145 56 331 86 546
27 152 57 332 87 565
28 155 58 343 88 606
29 156 59 346 89 612
30 162 60 351 90 624
CT710 Instruction Guide | 27
Page 58

Table of solutions
PROBLEM SOLUTION
The radio doesn’t switch onThe battery may be exhausted. Recharge it.
Uncorrected installation. Re-install it.
Battery recharge doesn’t
last long
Reception led turns on
but no sound heard
The keypad doesn’t work The keypad lock function hasn’t been ena-
In standby, the radio
transmits without
pressing PTT
Some functions cannot
be stored
Reception of other
group signal while
transmitting
The battery pack is over. Change it with a
new one.
Battery pack is not completely charged.
Make sure the volume is not too low
Make sure to have the same CTCSS and DCS
codes of your group
bled.
VOX level has been set too low. Adjust it.
Ensure to be on Channel mode. In Channel
mode some functions can be set only
through the programming software.
Select another CTCSS/DCS for your group
28 | CT710 Instruction Guide
Page 59

Technical Specification
General
Frequency range 144-146MHz / 430-440MHz
Operative temperature -20° +55°C
Operating voltage 7.4V 1600mAh
Operating mode mono band / dual band
Dimensions 95(H) x 55(L) 31(D) mm
Weight 230gr (antenna included)
Antenna impedance 50Ω
Duty cycle 5/5/90
Transmitter
Frequency stability ±2.5ppm
Output power VHF: 5W / UHF: 4W
Max frequency deviation ±5KHz
Audio distortion ≤ 3%
Adjacent Channel Power within European legal terms
Spurious Radiation within European legal terms
Occupied Bandwidth within European legal terms
Receiver
RF sensitivity <0.2μV
Audio distortion ≤ 3%
Audio response 300Hz ÷ 3KHz
Adjacent Channel Selectivity within European legal terms
Intermodulation Rejection within European legal terms
Blocking within European legal terms
Specifications are subject to change without notice.
CT710 Instruction Guide | 29
Page 60

Prodotto o importato da:
CTE INTERNATIONAL s.r.l.
Via. R.Sevardi 7- 42124 Reggio Emilia Italia
www.cte.it - www.midlandradio.eu
L’uso di questo apparato può essere soggetto a restrizioni nazionali . Prima dell’uso leggere attentamente le istruzioni. Se il prodotto contiene batterie: non gettare nel fuoco, non disperdere nell’ambiente
dopo l’uso, usare gli appositi contenitori per la raccolta.
Produced or imported by:
CTE INTERNATIONAL s.r.l.
Via. R.Sevardi 7 42124 Mancasale Reggio Emilia Italy
Imported by:
ALAN - NEVADA UK
Unit 1 Fitzherbert Spur Farlington Portsmouth Hants.
P06 1TT - United Kingdom
www.nevada.co.uk
The use of this transceiver can be subject to national restrictions. Read the instructions carefully before
installation and use. If the product contains batteries: do not throw the battery into fire. To disperse
after use, throw into the appropriate containers.
Importado por:
ALAN COMMUNICATIONS, SA
C/Cobalt, 48 - 08940 Cornellà de Llobregat Barcelona España Tel: +34 902 384878 Fax: +34 933 779155
www.midland.es
El uso de este equipo puede estar sujeto a la obtención de la correspondiente autorización administrativa.
Lea atentamente las instrucciones antes de usar el equipo. si el producto contiene pilas o baterías no
las tire al fuego ni las disperse en el ambiente después de su uso, utilice los contenedores apropiados
para su reciclaje.
Vertrieb durch:
ALAN ELECTRONICS GmbH
Daimlerstraße 1K - D-63303 Dreieich Deutschland
www.alan-electronics.de
Die Benutzung dieses Handfunkgerätes ist von den landesspezifischen Bestimmungen abhängig. Vor
Benutzung Bedienungsanleitung beachten. Bei Verwendung von Batterien beachten Sie bitte die
Umweltbestimmungen. Batterien niemals ins offene Feuer werfen, und nur in dafür vorgesehene
Sammelbehälter entsorgen.
WWW.MIDLANDRADIO.EU |
Page 61

CT 710
” Bedienungsanleitung
VHF/UHF SENDEEMPFÄNGER |
Page 62

Inhalt: 4
Wartung 4
Die Hauptfunktionen 5
Beschreibung des Geräts 6
LCD-Display 6
Sendeempfänger 8
Grundoperationen 10
Antenne 10
Ein- und Ausschalten der Stromversorgung 10
Monitorfunktion 10
Übertragung 10
Modus wählen 11
Dualband-Modus 11
Singleband-Modus 11
Kanalmodus 11
Frequenzmodus 12
Radiofunktion 12
Die Definition der Seitentaste 2 12
DTMF-Code 13
DTMF programmiert per Software 13
ANI PTT-ID-Betrieb 13
Tastaturbefehle Funktion 14
Cloning Funktion 14
2 | CT710 Bedienungsanleitung
Page 63

Menüfunktion 15
Menübedienung 15
Menü Funktionsliste 16
Menüfunktionen - Einleitung und Einstellung 18
Notfallalarm 18
Einstellen Frequenzinvertierung 18
Scannen 18
Scantyp wählen 18
VOX Empfindlichkeitseinstellung 19
Leistungs-Einstellung (hoch oder niedrig) 20
Rauschsperren-Einstellung 20
Scrambler-Einstellung 20
Hintergrundbeleuchtung ein/aus 21
Hintergrundbeleuchtung Farbauswahl 21
Piepton ein/aus 21
Einstellung der Tastensperre 21
Senden TOT-Einstellung 22
Sprachansagen (nur in englischer Sprache) 22
Repeatershift-Einstellung 22
Die Auswahl der CTCSS-Töne und DCS-Codes 23
CTCSS/DCS (R-CDC) Einstellung für Empfang 23
CTCSS/DCS (T-CDC) Einstellung für Senden 23
+/- Die Richtung der Frequenzverschiebung (für die Kommunikation
über Repeater) 24
Frequenzschritt wählen 24
Breites/schmales Band 24
Roger Piepton 24
Zum Speichern/Löschen eines Kanals 25
CTCSS-Tontabelle: 50 Töne 26
DCS: Digitalcode 105 Töne 27
Lösungstabelle 28
Spezifikationen 29
CT710 Bedienungsanleitung | 3
Page 64

Inhalt:
• CT 710 Sendeempfänger
• Antenne
• Li-Ionen-Akku 1600mAh
• Gürtelclip
• Tischladegerät mit Steckernetzteil
• Kurzanleitung
Im Falle, dass die Ware unvollständig ist oder beim Transport beschädigt
wurde, wenden Sie sich bitte an Ihren MIDLAND Händler.
Wartung
Ihr Sendeempfänger ist ein elektronisches Produkt und sollte mit Sorgfalt
behandelt werden. Die nachstehenden Wartungshinweise helfen Ihnen, die
Gewährleistungspflichten zu erfüllen, damit Sie dieses Produkt viele Jahre
genießen können.
• Öffnen Sie das Gerät nicht, denn unbefugte Eingriffe können Schäden am
Gerät verursachen.
• Schützen Sie das Gerät vor Sonneneinstrahlung und hohen
Temperaturen. Lagern Sie das Funkgerät nicht in der Sonne und in
heißer Umgebung. Hohe Temperaturen verkürzen die Lebensdauer
elektronischer Bauteile und können zur Verformung und Verschmelzung
von Kunststoffteilen führen.
• Schützen Sie das Gerät vor Staub und Schmutz, sowie vor Feuchtigkeit.
• Lagern Sie das Funkgerät nicht in staubiger und schmutziger Umgebung.
• Halten Sie das Funkgerät trocken. Regen oder Feuchtigkeit führen zu
Korrosion der elektronischen Schaltkreise. Schalten Sie das Funkgerät
aus und nehmen Sie den Akku ab, wenn Sie merkwürdige Gerüche oder
Rauch feststellen.
• Übertragen Sie nicht ohne Antenne.
4 | CT710 Bedienungsanleitung
Page 65

Die Hauptfunktionen
• Duoband (VHF/UHF) angezeigt
• Frequenzbereiche: 144-146 MHz und 430-440 MHz (Rx / Tx).
• Betriebsmodus: UHF-VHF, VHF-VHF oder UHF-UHF
• Ausgangsleistung: 5W VHF /4W UHF
• 128 gespeicherte Kanäle
• Scrambler (Level kann per Software programmiert werden)
• Kompander (programmierbar per Software)
• VOX-Funktion
• 210 DCS-Codes und 50 CTCSS-Töne
• „VOICE“-Funktion
• SOS-Notruffunktion
• Kanalabstand wählbar zwischen 25 kHz und 12,5 kHz
• Folgende Optionen können auf dem Display angezeigt werden:
Kanalnamen + Kanalnummer, Kanalnummer + Frequenz, Kanalnummer
oder Frequenz
• Invertierte Frequenzfunktion
• Scanfunktion
• UKW-Radioempfänger.
• Frequenzschritt: 5 kHz, 6,25 kHz, 10 kHz, 12,5 kHz, 25 kHz,
• Auswahl TX-Leistung: hoch (4-5W) oder gering (1W)
• Li-Ionen-Akku 1600mAh
• Frequenzoffset: 0-69,950 MHz
• Repeater-Shift
• „Busy channel lockout“-Frequenz (programmierbar per Software)
• Anzeige der TX-Signalstärke auf dem Display
• Alarm Akku schwach
• Roger Piepton am Anfang oder Ende der Übertragung
• TOT (Time-Out-Timer)
• Tastensperre
• Scannen von Frequenzen mit CTCSS/DCS
• Prioritäts-Scan
• DTMF
• Rückstellung der Funktionen und Kanäle
• 1750 / 1450 / 2315 Ton zum Anschließen an Repeater (programmierbar
per Software)
• Buchse für externe Lautsprecher/Mikrofon: 2 Pin KENWOOD Typ
CT710 Bedienungsanleitung | 5
Page 66

Beschreibung des Geräts
LCD-Display
Indikatoren:
DTMF-Codes
UKW-Radio
Vox-Funktion
Invertierte Frequenz
Frequenzoffset +/-
Kanalabstand breit/schmal
ID-Code-Aktivierung
Batterieanzeige
Notruf
Scan
Prioritäts-Scan
6 | CT710 Bedienungsanleitung
Page 67

Kompander
CTCSS-Ton
DCS-Code
Tastensperre
RSSI – Signalstärke empfangen/gesendet
Scrambler
Menü-/Kanalnummer
Übertragung mit hoher/mittlerer/niedriger Leistung
Band A gewählt
Band B gewählt
Frequenz
CT710 Bedienungsanleitung | 7
Page 68

Sendeempfänger
2
3
1
1
1
4
5
6
8
1. Netzschalter/Lautstärke-Regler
2. Drehwahlschalter
3. Antenne
4. LCD-Display
5. MENÜ
6. ENTER (Um die Menüs aufzurufen und die Auswahl zu bestätigen)
7. Alphanumerische Tastatur
8. Lock (Tastatursperre)
9. T-R (Aktivierung der Frequenzinversion)
10. VFO/MR (um die Funkgerät-Modi zu wechseln)
10
7
9
8 | CT710 Bedienungsanleitung
Page 69

E
A
D
B
C
A PTT (push to talk)-Taste
B Seitentaste 1: A/B Frequenzwahlschalter – Single- oder Dualband -,
UKW-Radio
C Seitentaste 2: 1750/1450/2315 Ton (programmierbar) oder DTMF
(programmierbar)
D Ext. Lautsprecher-/Mikrofon-Buchse
E Akkuverriegelung
CT710 Bedienungsanleitung | 9
Page 70

Grundoperationen
Antenne
Setzen Sie den Fußpunkt der gelieferten Antenne auf den SMAAntennenanschluss, indem Sie die Antenne im Uhrzeigersinn zum
Anschrauben drehen. Überdrehen Sie die Antenne nicht. Schrauben Sie die
Antenne ab, indem Sie diese gegen den Uhrzeigersinn drehen.
Ein- und Ausschalten der Stromversorgung
Wenn Sie das Gerät einschalten wollen, drehen Sie den PWR/VOL
(Einschalter) im Uhrzeigersinn, bis ein Piepton zu hören ist. Alle Symbole
und Frequenzen erscheinen auf dem Bildschirm. (Durch die automatische
Rauschsperre-Funktion, wird der Lautsprecher keinen Ton vor dem Empfang
eines Funkspruchs wiedergeben). Sie können die gewünschte Lautstärke
durch Drehen des Knopfes einstellen. Wenn Sie das Gerät ausschalten
wollen, drehen Sie PWR/VOL gegen den Uhrzeigersinn, bis ein Piepton zu
hören ist. Alle Frequenzen und Symbole verschwinden aus dem Display.
Monitorfunktion
Wenn Sie die ENTER-Taste zwei Sekunden lang gedrückt halten aktivieren
Sie die Monitorfunktion. Wählen Sie Ihre gewünschte Lautstärke mit dem
Drehknopf PWR/VOL ohne darauf zu warten, ein Signal zu empfangen.
Außerdem können Sie so selbst Funksprüche mit sehr niedriger Signalstärke
empfangen Wenn Sie die PTT-Taste drücken, wird die Monitorfunktion
ausgeschaltet.
Übertragung
Drücken Sie die PTT-Taste, dann sprechen Sie in das Funkgerät. Der
Übertragungsindikator leuchtet rot, während die PTT-Taste gedrückt wird.
Wenn Sie zu nahe am Mikrofon sind oder Ihre Stimme zu laut ist, kann Sie Ihr
Kommunikationspartner unter Umständen nicht klar verstehen.
Lassen Sie die PTT-Taste los, um eine Rückmeldung von Ihrem Partner zu
hören.
10 | CT710 Bedienungsanleitung
Page 71

Modus wählen
Sie können vier verschiedene Betriebsmodi wählen:
1. Dualband-Modus
2. Singleband-Modus
3. Kanalmodus
4. Frequenzmodus.
Drücken Sie die Seitentaste 1 zwei Sekunden lang, um zwischen Dualbandund Singleband-Modus zu wechseln.
Dualband-Modus
Wenn der Dual-Wartemodus ausgewählt ist, zeigt das Display zwei Bänder
A oder B. Falls das Band A angezeigt wird, bedeutet dies, dass auf Frequenz
A empfangen und gesendet werden kann, auf den anderen Frequenzen im
Band B kann nur empfangen und nicht übertragen werden. Das Gleiche gilt,
wenn das Band B angezeigt wird. Um zwischen Band A und B zu wechseln,
drücken Sie kurz Seitentaste 1.
Singleband-Modus
Drücken Sie die Seitentaste 1 zwei Sekunden lang. Das Display zeigt:
R 145.025
T 145.025
Jetzt funktioniert das Funkgerät im Singleband-Modus. Um von einem Band
zum anderen zu wechseln, drücken Sie die Seitentaste 1 kurz.
Kanalmodus
Drücken Sie die VFO/MR Taste, um zum Kanalmodus zu wechseln. Es können
verschiedene Optionen angezeigt werden:
• Zeigt die aktuelle Kanalnummer
CH-001 der aktuelle Kanal ist Kanal 1.
• Zeigt den aktuellen Sendernamen und Kanalnamen
CH-001 Name des aktuellen Kanals
(in diesem Fall Kanal 1).
Der Name ist per Software
programmierbar.
001
Der aktuelle Kanal
CT710 Bedienungsanleitung | 11
Page 72

• zeigt die Empfangs-/Sendefrequenz und den aktuellen Kanal.
R 145.025 Empfangsfrequenz
T 145.025 Sendefrequenz
001
Frequenzmodus
‘SINGLEBAND’
der aktuelle Kanal
R 430.02500 Empfangsfrequenz
T 430.02500 Sendefrequenz
‘DUALBAND’
A 145.025
B 430.025
Drücken Sie die Seitentaste 1 zwei Sekunden lang, um zwischen Dualbandund Singlebandmodus zu wechseln.
Radiofunktion
Dieses Funkgerät verfügt über die UKW-Funktion.
Drücken Sie MENU und dann die Seitentaste 1 oder 2, um das UKW-Radio
zu starten.
Um Ihre Lieblings-Radiofrequenz zu wählen und direkt zu hören, drehen Sie
den Drehwahlschalter.
Radiosender können per Software programmiert werden. Drücken Sie VFO/
MR, um zu den programmierten UKW-Frequenzen zu wechseln.
Um die Radiofunktion zu beenden, drücken Sie MENU und dann die
Seitentaste 1 oder 2.
Die Definition der Seitentaste 2
Indem Sie die Programmier-Software verwenden, können Sie die Seitentaste
2 wie folgt definieren:
1. DTMF-Code Anruf
2. 1450Hz-Code senden
3. 1750Hz-Code senden
4. 2315Hz-Code senden
Wenn Sie als eine der oben genannten definiert ist, drücken Sie die
Seitentaste 2, um die Auswahl zu aktivieren.
12 | CT710 Bedienungsanleitung
Page 73

DTMF-Code
Dieses Funkgerät hat die DTMF-Funktion.
Bei der Statusübertragung drücken Sie die Zahlen auf dem Tastenfeld oder
die Seitentasten, und der entsprechende DTMF-Code wird ausgegeben.
Einige Tasten andere DTMF-Codes aus:
MENU steht für A, ENTER steht für B, VFO/MR steht für C, FM steht für D.
MENU → A VFO/MR → C
ENTER → B Tasto laterale 2 → D
DTMF programmiert per Software
(Lesen Sie auch die Anleitung der Programmier-Software)
Sobald die optionale DTMF-Funktion für die Anrufsignalisierung auf den
gewünschten Kanälen programmiert ist, drücken Sie die Seitentaste 2, und
das Display zeigt DTMF.
Jetzt können Sie den 8-stelligen DTMF-Code eingeben.
Wenn die eingegebene Nummer falsch ist, und Sie möchten diese ändern,
drehen Sie den Drehwahlschalter.
Mit der Drehung gegen den Uhrzeigersinn werden die Nummern
nacheinander gelöscht, mit der Drehung im Uhrzeigersinn verlassen
Sie die DTMF-Funktion. Geben Sie Ihre gewünschte Nummer ein und
drücken Sie die PTT-Taste, um einen Anruf zu tätigen. Wenn Ihr Partner den
richtigen Code empfängt, wird die programmierte DTMF-Funktion oder die
Funkidentifizierung aktiviert.
ANI PTT-ID-Betrieb
ANI bedeutet Automatische Nummernidentifizierung.
Sie können eine automatische Nummernidentifizierung, sichtbar auf dem
Funkgerät-Display Ihres Partners, einstellen, jedes Mal wenn Sie einen
Funkspruch senden. Diese Funktion muss auf beiden Funkgeräten aktiviert
und durch Software programmiert werden (Lesen Sie auch die Anleitung der
Programmier-Software).
CT710 Bedienungsanleitung | 13
Page 74

Tastaturbefehle Funktion
MENU + 0 ANI-Einstellung
MENU + 1 Scanmodus
MENU + 2 Prioritäts-Scanmodus (nur in VFO-Modus)
MENU + 3 VOX Empfindlichkeitseinstellung
MENU + 4 Ausgangsleistung-Einstellung
MENU + 5 Rauschsperre einstellen
MENU + 6 Scrambler ein/aus-Einstellung
MENU + 7 Hintergrundbeleuchtung ein/aus-Einstellung
MENU + 8 Farbe der Hintergrundbeleuchtung-Einstellung
MENU + 9 Piepton ein/aus
MENU + # CTCSS/DCS-Einstellung beim Empfangen und Senden
MENU + * Repeatershift-Einstellung
Cloning Funktion
Mit dieser Funktion können Sie alle Daten/Einstellungen (Programmierung)
von einem Funkgerät auf ein anderes (ohne Zuhilfenahme eines PC‘s)
kopieren. Schalten Sie beide Funkgeräte aus und schließen Sie das
Klonkabel an das zu kopierende Gerät („Master“) und das Empfängergerät
(„Slave“) an. Schalten Sie danach das „Master“ Funkgerät ein und halten
Sie währenddessen die PTT-Taste gedrückt. Das Display zeigt CLONE an.
Drücken Sie die PTT-Taste einmal. Schalten Sie innerhalb von 10 Sekunden
das „Slave“ Funkgerät ein. Das Display zeigt PC an und die LED Anzeige
auf der Vorderseite beginnt während des Klonvorgangs grün zu blinken.
Nach erfolgreichem Abschluss wird sich das „Slave“ Funkgerät automatisch
ausschalten und dann mit den neuen Einstellungen starten. Während des
Klonvorgangs zeigt das Display des „Master“ Funkgerätes CLONE an und die
grüne LED Anzeige blinkt. Nach erfolgreichem Abschluss erscheint auf dem
Display END.
Wiederholen Sie den Vorgang für weitere Geräte.
14 | CT710 Bedienungsanleitung
Page 75

Menüfunktion
Menübedienung
Um die Menüfunktionen aufzurufen, gehen Sie folgendermaßen vor:
Drücken Sie MENU, um den Menümodus aufzurufen.
Drehen Sie den Drehwahlschalter, um das Menü zu wählen.
Drücken Sie ENTER im Menü-Modus, um die gewählte Funktion einzustellen:
Einige Funktionen stellen Sie über die Zifferntasten ein, aber andere (wie
TOT, Voice-, Frequenz-Offset) müssen Sie über den Drehwahlschalter
einstellen. Drücken Sie ENTER, um die gewählte Einstellung zu bestätigen.
Wenn Sie alle Einstellungen abgeschlossen haben, drücken Sie VFO/MR, um
den Modus Menu zu verlassen.
CT710 Bedienungsanleitung | 15
Page 76

Menü Funktionsliste
Menü Display Anweisung Einstellungsangaben
10
11
12
13
14
15
16
17
18
19
20
21
22
1
2
3
4
5
6
7
8
9
SCAN
PRI
VOX
POW
SQL
SCRM
LED
LIGHT
BEEP
ANI
KEYBO
TOT
SCANS
VOICE
DIFFR
C-CDC
R-CDC
T-CDC
S-D
STEP
N/W
ROGER
Kanal oder Frequenz Scan
Prioritätskanal Scan
VOX Empfindlichkeit
Sendeleistung
Rauschsperren-Einstellung
Scrambler
Hintergrundbeleuchtung ein/aus
Farbe der Hintergrundbeleuchtung
Piepton
Automatische Nummernidentifizierung,
programmierbar per Software
Tastensperre
Scan-Einstellungen
Scan-Einstellungen
Sprachansagen
Offset
CTCSS/DCS Einstellungen für Senden und Empfangen
CTCSS/DCS Einstellungen für Empfang
CTCSS/DCS Einstellungen für Senden
Repeatershift
Kanalschritte
Schmale/breite Bandbreite
Roger Piepton
16 | CT710 Bedienungsanleitung
Page 77

CHANNEL OR FREQUENCY SCAN
PRIORITY CHANNEL SCAN
OFF~9
HIGH/LOW
0~9
OFF/ON
OFF/ON/AUTO
BLUE/ ORANGE/PURPLE
OFF/ON
OFF/ON
MANUAL/AUTO
OFF~270
CO/TO/SE
OFF/ENG
0-38.000(VHF) - 0-69.950(UHF)
OFF-254.1/D023-D754 I/N
OFF-254.1/D023-D754 I/N
OFF-254.1/D023-D754 I/N
+/-/0
5K/10K/6.25K/12.5K/25K
WIDE/NARROW
ROG ON/ROG OFF
CT710 Bedienungsanleitung | 17
Page 78

Menüfunktionen - Einleitung und Einstellung
Notfallalarm
Es gibt zwei Arten von Alarmen:
1. Drücken Sie die Seitentaste 2 und Seitentaste 1 zur gleichen Zeit: das
Funkgerät schaltet zum Notfallalarm um und sendet gleichzeitig den
Alarmton und ANI (falls programmiert) zu Ihrem Partner. Der Alarm bleibt
solange aktiv, bis die PTT gedrückt wird.
2. Mit Hilfe der Programmier-Software kann ein Notfall-Kanal speziell
eingestellt werden. Um ihn zu aktivieren, drücken Sie kurz # T/R: nun
können Sie auf dem programmierten Notfallkanal senden. Zum Beenden
drücken Sie VFO/MR.
Einstellen Frequenzinvertierung
Im Kanal-/Frequenzmodus, halten Sie # zwei Sekunden lang gedrückt,
bis „T*R?“ erscheint. Wenn „REV“ auf dem LCD angezeigt wird, wird die
Frequenzinvertierung aktiviert. Um diese Funktion zu deaktivieren, halten
Sie # zwei Sekunden lang gedrückt.
Scannen
Die Scan-Funktion ist sehr nützlich, um die Kanäle vor der Übertragung zu
überwachen.
Scantyp wählen
Drücken Sie MENU und wählen Sie mit dem Drehwahlschalter Punkt 13, der
Bildschirm wird „013 SCANS?“ zeigen.
Drücken Sie ENTER: jetzt sind Sie in Scan Einstellungen.
Sie können drei verschiedene Scanmodes auswählen: TO, CO, SE.
Zeitgesteuerter Scan (TO)
Wenn das Funkgerät ein Signal erkennt, wird das Scannen für 5 Sekunden
angehalten, das Funkgerät wird den Scan nach Ablauf der Zeit wieder
starten, auch wenn das Signal immer noch da ist.
Trägergesteuerter Scan (CO)
Das Funkgerät wird das Scannen anhalten, wenn ein Signal erkannt wird,
und auf der gleichen Frequenz bleiben, bis das Signal verschwindet.
Such Scan (SE)
Wenn das Funkgerät ein Signal erkennt, bleibt es auf diesem Kanal, und das
Scannen wird angehalten.
18 | CT710 Bedienungsanleitung
Page 79

Frequenz oder Kanalscan
Im Kanal-/Frequenzmodus drücken Sie MENU und 1SCAN: das Funkgerät
wird von dem aktuellen Kanal durch alle Kanäle scannen und, wann immer
ein Signal erkannt wird, wird das Funkgerät das Scannen 8 Sekunden lang
anhalten. Dann drücken Sie PTT, um zu senden: Es wird dann weiter nach
8 Sekunden scannen.
Drücken Sie eine beliebige Taste, außer PTT, um das Scannen zu beenden:
das Funkgerät wird auf den Kanal oder die Frequenz vor dem Starten der
Scanfunktion zurückkehren.
Prioritäts-Kanalscan
Prioritäts-Scan bedeutet, dass das Funkgerät abwechselnd den
Prioritätskanal und die anderen Kanäle scannt. Zum Beispiel, wenn der
Prioritätskanal 1 ist, würde das Funkgerät folgendermaßen scannen 1-2;
1-3;1-4;……
Aktivierung:
Im Kanalmodus drücken Sie MENU und 2PRI: das Funkgerät wird den
Prioritätskanal scannen, und sobald ein Signal erkannt wird, wird das
Funkgerät den Scan 8 Sekunden lang aussetzen, dann drücken Sie die
PTT-Taste zur Übertragung. Das Funkgerät wird dann nach 8 Sekunden
weiterscannen.
Drücken Sie eine beliebige Taste, außer der PTT-Taste, um das Scannen zu
beenden.
VOX Empfindlichkeitseinstellung
Mit Hilfe dieser Funktion können Sie das Gerät freihändig nutzen: Sie
aktivieren die Übertragung, indem Sie in das Mikrofon sprechen, ohne die
PTT-Taste zu drücken. Die Übertragung wird automatisch gestoppt, sobald
Sie nicht mehr sprechen.
Die Empfindlichkeit können Sie, je nach ihren Bedürfnissen, auf verschiedene
Level einstellen.
Aktivierung:
Im Frequenzmodus drücken Sie MENU und 3VOX: der Bildschirm zeigt „003
VOX?“.
Drücken Sie ENTER und „VOX OFF“ erscheint auf dem Display.
Um die gewünschte Empfindlichkeit einzustellen, drücken Sie eine beliebige
Zifferntaste (0-9) auf dem Tastenfeld oder drehen Sie den Drehwahlschalter.
Um die Auswahl zu bestätigen, drücken Sie ENTER, und VFO/MR, um das
Menü zu verlassen.
CT710 Bedienungsanleitung | 19
Page 80

Leistungs-Einstellung (hoch oder niedrig)
Mit dieser Funktion können Sie die Leistungsstufe wählen; Sie können
zwischen High (H) und Low (L) zu wählen.
Im Kanal-/Frequenzmodus drücken Sie MENU und 4PWR: der Bildschirm
zeigt „004 POW?“.
Drücken Sie ENTER, und das Display zeigt „POW L“ (niedrige Leistung) oder
„POW H“ (hohe Leistung). Drehen Sie den Drehknopf, um die gewünschte
Leistungsstufe zu wählen.
Um die Auswahl zu bestätigen, drücken Sie ENTER, und VFO/MR, um das
Menü zu verlassen.
Rauschsperren-Einstellung
Wenn das Signal stärker als die Rauschsperrenschwelle ist, dann wird es über
den Lautsprecher wiedergegeben. Falls das Signal schwächer ist, wird es
unterdrückt.
Stellen Sie die gleichen DCS-Codes Ihrer Gruppe ein und schalten Sie die
Rauschsperre ein.
Wenn das Level zu hoch eingestellt wird, können Sie die schwachen
Signale nicht empfangen; falls das Level zu niedrig ist, empfangen Sie auch
unerwünschte Störungen und Rauschen.
HINWEIS:
Dieser Sendeempfänger verfügt über zehn (0 ~ 9) verfügbare Level: 0
bedeutet, dass die Rauschsperre geöffnet ist. Vom Level 1 bis Level 9 haben
Sie eine unterschiedliche Signalunterdrückung. Je höher das Level, desto
stärker muss das Empfangssignal sein.
Aktivierung:
Drücken Sie MENU und 5SQL: Der Bildschirm zeigt „005 SQL?“.
Drücken Sie ENTER, und das Display zeigt „SQL 5“ (Werkseinstellungen
„SQL-5“).
Drücken Sie eine beliebige Zahl (0-9) auf dem Tastenfeld oder drehen Sie
den Drehwahlschalter, um das gewünschte Rauschsperrenlevel zu wählen.
Drücken Sie ENTER zur Bestätigung, und drücken Sie VFO/MR, um das Menü
zu verlassen.
Scrambler-Einstellung
Der Scrambler wurde entwickelt, um Ihre Kommunikation zu schützen.
Diese Funktion verhindert, dass andere Nutzer desselben Kanals Ihre
Kommunikation verstehen können.
20 | CT710 Bedienungsanleitung
Page 81

Aktivierung:
Drücken Sie MENU und 6SCR Taste, und das Display zeigt „006 SCRM?“.
Drücken Sie ENTER: Das Display wird „ON“ (Scrambler an) bzw „OFF“
(Scrambler aus) anzeigen.
Nutzen Sie den Drehwahlschalter, um ein/aus zu wählen, und drücken Sie
ENTER zur Bestätigung; drücken Sie VFO/MR um das Menü zu verlassen.
Hintergrundbeleuchtung ein/aus
Im Kanal-/Frequenzmodus drücken Sie MENU und 7LED.
Der Bildschirm zeigt „007 LED?“. Drücken Sie ENTER und das Display zeigt
„ON“ (Hintergrundbeleuchtung ein). Drehen Sie den Drehwahlschalter, um
„ON“ „OFF“ „AUTO“ zu wählen.
Drücken Sie ENTER zur Bestätigung und VFO/MR um das Menü zu verlassen.
Hintergrundbeleuchtung Farbauswahl
Im Kanal-/Frequenzmodus drücken Sie MENU und 8COLOR: das Display
zeigt „008 LIGHT?“.
Drücken Sie ENTER und Sie haben durch Drehen des Drehwahlschalters die
Farboptionen: „ORANGE“, „PURPLE“, „BLUE“.
Drücken Sie ENTER zur Bestätigung der gewünschten Farbe für die
Hintergrundbeleuchtung und VFO/MR um das Menü zu verlassen.
Piepton ein/aus
Wenn Sie diese Funktion aktivieren, werden Sie jedes Mal, wenn eine Taste
gedrückt wird, einen Signalton hören.
Im Kanal-/Frequenzmodus drücken Sie MENU und 9BEEP: „009 BEEP?“
erscheint auf dem Display.
Drücken Sie ENTER: „ON“ bedeutet Piepton ein, „OFF“ bedeutet Piepton
aus; drehen Sie den Drehwahlschalter, um eine der beiden Optionen zu
wählen. Drücken Sie ENTER zur Bestätigung, und VFO/MR um das Menü zu
verlassen.
Einstellung der Tastensperre
Diese Funktion ist nützlich, um ein unbeabsichtigtes Drücken der Tasten zu
vermeiden.
Drücken Sie MENU und wählen Sie mit dem Drehwahlschalter den Punkt
11: der Bildschirm zeigt „011 KEYBO?“.
Dieser Sendeempfänger verfügt über zwei Arten von Tastensperren:
Automatische Sperre und Manuelle Sperre.
CT710 Bedienungsanleitung | 21
Page 82

Drücken Sie ENTER: das Display zeigt „AUTO“ (Tastensperre schaltet sich
automatisch ein).
Nutzen Sie den Drehwahlschalter, um zwischen „MANUAL und AUTO“
zu wählen, dann drücken Sie ENTER zur Bestätigung und VFO/MR zum
Beenden.
Sie können auch *LOCK drücken: das Display zeigt „LOCK?“.
Wenn Sie die Tastatur sperren möchten, drücken Sie *LOCK 2 Sekunden lang.
Um die Tastensperre aufzuheben, drücken Sie *LOCK wieder 2 Sekunden
lang: die Tastatur wird entriegelt.
Senden TOT-Einstellung
Der Time Out Timer wird verwendet, um eine zu lange Übertragung zu
verhindern. Diese Funktion blockiert vorübergehend die Übertragungen,
wenn das Funkgerät über die maximal erlaubte Zeit benutzt wird.
Beim Erreichen des voreingestellten Timers wird das Funkgerät in den
Empfangsmodus gezwungen.
Sie können den TOT entweder ausschalten oder einen beliebigen Wert
zwischen 30-270 Sekunden einstellen. Sobald das Limit der Sendezeit
erreicht wird gibt das Gerät einen Warnton aus.
Aktivierung:
Drücken Sie MENU und wählen Sie mit dem Drehwahlschalter Punkt 12:
„012 TOT?“ wird angezeigt. Drücken Sie ENTER: das Display zeigt „OFF“
(TOT aus). Drehen Sie den Drehwahlschalter, um „OFF~270“ zu wählen,
dann drücken Sie ENTER zur Bestätigung und VFO/MR um das Menü zu
verlassen.
Sprachansagen (nur in englischer Sprache)
Mit dieser Funktion aktivieren Sie die Sprachansagen, die Sie über jede von
Ihnen ausgeführte Operation/Auswahl informiert.
Drücken Sie MENU und wählen Sie mit dem Drehwahlschalter Menüpunkt
14: das Display zeigt „014 VOICE?“. Drücken Sie ENTER.
Drehen Sie den Drehwahlschalter, um „ENG“ zu wählen; drücken Sie ENTER
als Bestätigung und VFO/MR um das Menü zu verlassen.
Repeatershift-Einstellung
Diese Funktion wird verwendet, um die Differenz zwischen dem
Sendefrequenz und Empfangsfrequenz einzustellen.
Im Frequenzmodus drücken Sie MENU und drehen Sie den
Drehwahlschalter auf den Punkt 15; das Display zeigt „015 DIFFR?“.
22 | CT710 Bedienungsanleitung
Page 83

Drücken Sie ENTER, um die Frequenz mit der Tastatur oder durch Drehen des
Encoders einzustellen.
Der VHF-Bereich ist 00.000-38.000(MHz), und UHF-Bereich ist 00.000-
69.950(MHz).
Drücken Sie ENTER zur Bestätigung und VFO/MR um das Menü zu verlassen.
Diese Funktion kann nur im VFO-Modus aktiviert werden. Der maximale
Offset ist abhängig vom gewählten Frequenzbereich.
Die Auswahl der CTCSS-Töne und DCS-Codes
Stellen Sie die CTCSS-Töne bzw. DCS-Codes ein, um unerwünschte Signale
von anderen Nutzern der gleichen Frequenz zu ignorieren.
Mit Hilfe dieser Töne hören Sie nur Funksprüche, welche den gleichen Ton
wie Ihr Gerät nutzen. Alle anderen werden ausgeblendet.
Die Anzahl der wählbaren CTCSS-Töne ist 50, während die DCS-Codes 105i
und 105N sind.
Aktivierung:
Drücken Sie MENU und #T-R, das Display zeigt „016 C-CDC?“.
Drücken Sie ENTER und drehen Sie den Drehwahlschalter, um den
gewünschten CTCSS-Ton (AUS-254.1) zu wählen.
Drücken Sie *, um zwischen CTCSS und DCS zu wechseln. Der DCS-Bereich
ist AUS-D754N.
Drücken Sie ENTER zur Bestätigung und VFO/MR zum Beenden.
CTCSS/DCS (R-CDC) Einstellung für Empfang
Drücken Sie MENU und drehen Sie den Drehwahlschalter, um „017
R-CDC?“ zu wählen.
Drücken Sie ENTER und drehen Sie den Drehwahlschalter, um die
gewünschten CTCSS (AUS-254.1) zu wählen.
Drücken Sie *, um CTCSS und DCS zu wechseln. Der DCS-Bereich ist AUSD754N.
Drücken Sie ENTER zur Bestätigung und VFO/MR um das Menü zu verlassen.
CTCSS/DCS (T-CDC) Einstellung für Senden
Drücken Sie MENU und drehen Sie den Drehwahlschalter, um „018
T-CDC?“ zu wählen
Drücken Sie ENTER und drehen Sie den Drehwahlschalter, um die
gewünschten CTCSS (AUS-254.1) zu wählen.
Drücken Sie *, um CTCSS und DCS zu wechseln. Der DCS-Bereich ist AUSD754N.
Drücken Sie ENTER zur Bestätigung und VFO/MR um das Menü zu verlassen.
CT710 Bedienungsanleitung | 23
Page 84

Hinweis:
wenn Sie im Menü den DCS-Code eingestellt haben, drücken Sie [#] und Sie
können AUS-D754I (invertiert) wählen.
+/- Die Richtung der Frequenzverschiebung (für die
Kommunikation über Repeater)
Diese Funktion kann nur im VFO-(Frequenz-)Modus aktiviert werden.
Im Frequenzmodus drücken Sie MENU und *: das Display zeigt „019
S-D?“.
Drücken Sie ENTER und das Display zeigt „S-D 0“ (gleiche Frequenz);
drehen Sie den Drehwahlschalter und Sie können „S-D+“ oder „S-D-“
wählen. Drücken Sie ENTER zur Bestätigung und VFO/MR um das Menü zu
verlassen.
Frequenzschritt wählen
Diese Funktion kann nur im VFO-(Frequenz-)Modus aktiviert werden.
Im Frequenzmodus drücken Sie MENU und drehen Sie den
Drehwahlschalter auf den Punkt 20: „020 STEP?“ wird angezeigt.
Drücken Sie ENTER und drehen Sie den Drehwahlschalter, um die
Frequenzschritte zu wählen: 5k, 10k, 6,25k, 12,5k, 25k. Drücken Sie ENTER
zur Bestätigung und VFO/MR um das Menü zu verlassen.
Breites/schmales Band
Im Kanal-/Frequenzmodus drücken Sie MENU und drehen Sie den
Drehwahlschalter auf den Punkt 21: „021 N/W?“ wird angezeigt. Drücken
Sie ENTER, und das Display zeigt „WIDE“ (breites Band).
Drehen Sie den Drehwahlschalter, um „NARROW/WIDE“ zu wählen,
und bestätigen Sie, indem Sie ENTER drücken. Drücken Sie VFO/MR zum
Beenden.
Roger Piepton
Im Kanal-/Frequenzmodus drücken Sie MENU und drehen Sie den
Drehwahlschalter auf den Punkt 22: „022 ROGER?“ wird angezeigt.
Drücken Sie ENTER und Sie werden auf dem Display „ROGER“ (Roger
Piepton aus) sehen; drehen Sie den Drehwahlschalter, um „OFF /ON“ zu
wählen; drücken Sie ENTER zur Bestätigung und VFO/MR zum Beenden.
24 | CT710 Bedienungsanleitung
Page 85

Zum Speichern/Löschen eines Kanals
• Speichern eines Kanals
Im Frequenzmodus wählen Sie die gewünschte Frequenz oder andere
Punkte (wie CTCSS, DCS, Repeatershift, Richtung der Frequenzdifferenz).
Drücken Sie MENU und dann VFO/MR.
Während des Speichervorgangs blinkt der Kanal am linken unteren
Rand des Displays. Wählen Sie mit dem Drehwahlschalter die
Speichernummer (von 1 bis 128).
Drücken Sie die VFO/MR Taste, um das Speichern des Kanals
abzuschließen, und kehren Sie zum Frequenzmodus zurück.
• Löschen eines Kanals
Löschen eines programmierten Kanals
Schalten Sie das Funkgerät aus. Schalten Sie es wieder ein, während Sie
die VFO/MR Taste gedrückt halten.
„001 DEL?“ wird angezeigt. Wählen Sie den zu löschenden Kanal (von
1 bis 128) mit dem Drehwahlschalter.
Drücken Sie die ENTER Taste, und das Display zeigt: „001 YES?“.
Wenn Sie diesen Kanal wirklich löschen möchten, drücken Sie ENTER zur
Bestätigung; wenn Sie ihn nicht löschen möchten, drücken Sie VFO/MR
zum Beenden.
• Reset
Löschen Sie die Parameter des Frequenzmodus (Reset VFO)
Schalten Sie das Funkgerät ein, während Sie die MENU Taste gedrückt
halten. Das Display zeigt „RESET?“.
Drücken Sie die ENTER Taste, das LCD zeigt „VFO?“.
Drücken Sie ENTER zur Bestätigung, und alle Einstellungen des
Frequenzmodus werden gelöscht.
Löschen Sie alle Inhalte des Frequenzmodus und Kanalmodus
(VOLLSTÄNDIGER Reset)
Schalten Sie das Funkgerät ein, während Sie die MENU Taste gedrückt
halten. Das Display zeigt „RESET?“.
Drücken Sie die ENTER Taste, das LCD zeigt „VFO?“.
Drehen Sie den Drehwahlschalter und wählen Sie „FULL?“, dann
drücken Sie ENTER zur Bestätigung. Alle Einstellungen des Kanal- und
Frequenzmodus werden gelöscht.
CT710 Bedienungsanleitung | 25
Page 86

CTCSS-Tontabelle: 50 Töne
Nr. Freq.(Hz) Nr. Freq.(Hz) N r. Freq.(Hz)
01 67,0 18 118,8 35 183,5
02 69,3 19 123,0 36 186,2
03 71,9 20 127,3 37 189,9
04 74,4 21 131,8 38 192,8
05 77,0 22 136,5 39 196,6
06 79,7 23 141,3 40 199,5
07 82,5 24 146,2 41 203,5
08 85,4 25 151,4 42 206,5
09 88,5 26 156,7 43 210,7
10 91,5 27 159,8 44 218,1
11 94,8 28 162,2 45 225,7
12 97,4 29 165,5 46 229,1
13 100,0 30 167,9 47 233,6
14 103,5 31 171,3 48 241,8
15 107,2 32 173,8 49 250,3
16 110,9 33 177,3 50 254,1
17 114,8 34 179,9
26 | CT710 Bedienungsanleitung
Page 87

DCS: Digitalcode 105 Töne
Nr. DCS code Nr. DCS code Nr. DCS code Nr. DCS code
01 023 31 165 61 356 91 627
02 025 32 172 62 364 92 631
03 026 33 174 63 365 93 632
04 031 34 205 64 371 94 645
05 032 35 212 65 411 95 654
06 036 36 223 66 412 96 662
07 043 37 225 67 413 97 664
08 047 38 226 68 423 98 703
09 051 39 243 69 431 99 712
10 053 40 244 70 432 100 723
11 054 41 245 71 445 101 731
12 065 42 246 72 446 102 732
13 071 43 251 73 452 103 734
14 072 44 252 74 454 104 743
15 073 45 255 75 455 105 754
16 074 46 261 76 462
17 114 47 263 77 464
18 115 48 265 78 465
19 116 49 266 79 466
20 122 50 271 80 503
21 125 51 274 81 506
22 131 52 306 82 516
23 132 53 311 83 523
24 134 54 315 84 526
25 143 55 325 85 532
26 145 56 331 86 546
27 152 57 332 87 565
28 155 58 343 88 606
29 156 59 346 89 612
30 162 60 351 90 624
CT710 Bedienungsanleitung | 27
Page 88

Lösungstabelle
PROBLEM LÖSUNG
Funkgerät lässt sich
nicht einschalten
Kurze Nutzungsdauer
des Akkus
Empfangs-LED lässt sich
einschalten, aber kein
Ton wird wiedergegeben
Die Tastatur funktioniert
nicht
Im Standby sendet das
Funkgerät, ohne PTT zu
drücken
Einige Funktionen
können nicht
gespeichert werden
Empfang des anderen
Gruppensignals
während der
Übertragung
Der Akku ist leer. Laden Sie ihn.
Der Akku ist nicht korrekt eingesetzt. Bitte
setzen Sie ihn erneut korrekt ein.
Der Akku ist erschöpft und muss ausgetauscht
werden.
Der Akku wird nicht vollständig geladen.
Vergewissern Sie sich, dass die Lautstärke nicht
zu niedrig ist.
Vergewissern Sie sich, dass Sie die gleichen
CTCSS und DCS-Codes Ihrer Gruppe haben.
Stellen Sie die Rauschsperre nicht zu hoch ein.
Die Tastensperre-Funktion wurde aktiviert.
VOX-Level wurde zu niedrig eingestellt.
Passen Sie es an.
Vergewissern Sie sich, dass Sie im
Kanalmodus sind. Im Kanalmodus
können einige Funktionen nur durch die
Programmier-Software eingestellt werden.
Wählen Sie andere CTCSS/DCS für Ihre
Gruppe.
28 | CT710 Bedienungsanleitung
Page 89

Spezifikationen
Allgemeines
Frequenzbereich 144-146MHz / 430-440MHz
Betriebstemperatur -20° +55°C
Betriebsspannung 7,4V 1600mAh
Betriebsmodus Monoband / Dualband
Abmessungen 95(H) x 55(L) 31(T) mm
Gewicht 230gr (Antenne im Lieferumfang)
Antennenimpedanz 50Ω
Einschaltdauer 5/5/90
Sender
Frequenzstabilität ±2,5ppm
Ausgangsleistung VHF: 5W / UHF: 4W
Max. Frequenzabweichung ±5 KHz
Audioverzerrung ≤ 3%
Nachbarkanalleistung innerhalb der europäischen Rechtsnormen
Nebenaussendungen innerhalb der europäischen Rechtsnormen
Belegte Bandbreite innerhalb der europäischen Rechtsnormen
Empfänger
RF-Empfindlichkeit <0.2μV
Audioverzerrung ≤ 3%
Audioausgabe 300Hz ÷ 3KHz
Trennschärfe innerhalb der europäischen Rechtsnormen
Intermodulationsunterdrückung innerhalb der europäischen Rechtsnormen
Sperrung innerhalb der europäischen Rechtsnormen
Änderung der Spezifikationen vorbehalten.
CT710 Bedienungsanleitung | 29
Page 90

Prodotto o importato da:
CTE INTERNATIONAL s.r.l.
Via. R.Sevardi 7- 42124 Reggio Emilia Italia
www.cte.it - www.midlandradio.eu
L’uso di questo apparato può essere soggetto a restrizioni nazionali . Prima dell’uso leggere attentamente
le istruzioni. Se il prodotto contiene batterie: non gettare nel fuoco, non disperdere nell’ambiente dopo
l’uso, usare gli appositi contenitori per la raccolta.
Produced or imported by:
CTE INTERNATIONAL s.r.l.
Via. R.Sevardi 7 42124 Mancasale Reggio Emilia Italy
Imported by:
ALAN - NEVADA UK
Unit 1 Fitzherbert Spur Farlington Portsmouth Hants.
P06 1TT - United Kingdom
www.nevada.co.uk
The use of this transceiver can be subject to national restrictions. Read the instructions carefully before
installation and use. If the product contains batteries: do not throw the battery into fire. To disperse
after use, throw into the appropriate containers.
Importado por:
ALAN COMMUNICATIONS, SA
C/Cobalt, 48 - 08940 Cornellà de Llobregat Barcelona España Tel: +34 902 384878 Fax: +34 933 779155
www.midland.es
El uso de este equipo puede estar sujeto a la obtención de la correspondiente autorización administrativa.
Lea atentamente las instrucciones antes de usar el equipo. si el producto contiene pilas o baterías no
las tire al fuego ni las disperse en el ambiente después de su uso, utilice los contenedores apropiados
para su reciclaje.
Vertrieb durch:
ALAN ELECTRONICS GmbH
Daimlerstraße 1K - D-63303 Dreieich Deutschland
www.alan-electronics.de
Die Benutzung dieses Handfunkgerätes ist von den landesspezifischen Bestimmungen abhängig. Vor
Benutzung Bedienungsanleitung beachten. Bei Verwendung von Batterien beachten Sie bitte die
Umweltbestimmungen. Batterien niemals ins offene Feuer werfen, und nur in dafür vorgesehene
Sammelbehälter entsorgen.
WWW.MIDLANDRADIO.EU |
Page 91

CT 710
” Manual de instrucciones
TRANSCEPTOR VHF/UHF |
Page 92

Contenido: 4
Mantenimiento 4
Funciones Principales 5
Descripción del dispositivo 6
Display LCD 6
Transceptor 8
Operaciones básicas 10
Antena 10
Encendido / Apagado 10
Monitor 10
Transmitiendo 10
Selección de Modo 10
Modo Doble-banda 11
Modo Canal 11
Modo Frecuencia 12
Función Radio 12
Definición de las Teclas Laterales 12
Código DTMF 12
DTMF programado por software 13
Operación ANI PTT-ID 13
Acceso Rápido a Funciones 14
Función clonación 14
2 | CT710 Manual de instrucciones
Page 93

Menú de funciones 15
Modo de Operación 15
Lista de Funciones del Menú 16
Introducción y Ajustes del Menú de Funciones 18
Alarma de Emergencia 18
Ajuste de función frecuencia inversa (REV) 18
Escáner 18
Selección del modo de escáner 18
Ajuste de sensibilidad del VOX 19
Ajuste de Potencia (alta o baja) 19
Ajuste del nivel de squelch (silenciador) 20
Secrafonía 20
Ajuste de la retroiluminación 20
Selección del color de la retroiluminación 21
Tonos Beep On/Off 21
Bloqueo de teclado 21
Ajuste de temporizador TOT 22
Sintetizador de voz (solo en inglés) 22
Ajuste OFFSET 22
Selección de subtonos CTCSS y códigod DCS 22
Ajuste CTCSS/DCS (R-CDC) en recepción 23
Ajuste CTCSS/DCS (T-CDC) en transmisión 23
Desvío de Frecuencia +/- (a través de repetidor) 23
Selección de paso de frecuencia 23
Banda ancha/estrecha 24
Roger Beep 24
Guardar/borrar un canal 24
Tabla de subtonos CTCSS: 50 tonos 26
Tabla de códigos DCS: 105 tonos 27
Solución de problemas 28
Especificaciones técnicas 29
CT710 Manual de instrucciones | 3
Page 94

Contenido:
• Transceptor CT 710
• Antena
• Pack de baterías Li-ion de 1600mAh
• Clip de cinturón
• Cargador de sobremesa con adaptador de corriente
• Guía rápida
Si falta alguno de los artículos mencionados o se ha dañado en el transporte, por favor notifíquelo a su distribuidor MIDLAND.
Mantenimiento
El CT710 es un producto electrónico de diseño avanzado y debe ser tratado con cuidado. Los consejos que le damos le ayudarán a cumplir las
obligaciones de la garantía y a disfrutar de él durante muchos años.
• No intente abrir la unidad. La manipulación por personal inexperto
puede dañarla.
• No almacene la radio bajo el sol o en zonas calientes. Las altas temperaturas pueden acortar la vida de los dispositivos electrónicos y puede
deformar o derretir ciertos plásticos.
• No almacene la radio en sitios sucios o con polvo.
• Mantenga la radio seca. El agua de lluvia o la humedad corroen los
circuitos electrónicos.
• Si nota que la radio echa humo o huele de forma peculiar, apáguela
inmediatamente y retire la bateria o retírela del cargador.
• No transmita nunca sin antena o si no está bien fijada (enroscada hasta el fondo).
4 | CT710 Manual de instrucciones
Page 95

Funciones Principales
• Visualización de las dos bandas (VHF/UHF)
• Banda de frecuencias: 144-146MHz & 430-440MHz (Rx / Tx)
• Modo de trabajo: UHF-VHF, VHF-VHF o UHF-UHF
• Potencia de salida: 5W VHF /4W UHF
• 128 canales
• Secrafonía (se puede ajustar el nivel mediante el software)
• Compander (Compresor) (programable vía software)
• Función VOX
• 210 códigos DCS y 50 subtonos CTCSS
• Sintetizador de VOZ (sólo en inglés)
• Función emergencia SOS
• Ancho de banda de canales seleccionable entre 25kHz y12,5 kHz
• El display puede mostrar las siguientes opciones: nombre de canal +
número de canal, número de canal + frecuencia, número de canal o
frecuencia
• Función de frecuencia invertida
• Escáner + Escaner canal prioritario
• Receptor de radio FM
• Pasos de frecuencia: 5 kHz, 6,25 kHz, 10 kHz, 12,5 kHz, 25 kHz,
• Potencia de transmisión seleccionable: alta (4-5W) o baja (1W)
• Pack de baterias de Li-Ion de 1600mAh
• Frecuencia Offset: 0-69,950 MHz
• Shift repetidor
• Bloqueo de canal ocupado (programable vía software)
• Indicador en el display del nivel de señal en Tx
• Indicación por voz de batería baja
• Tono Roger Beep al principio o fin de la transmisión
• Temporizador TOT (Time out timer)
• Bloqueo del teclado
• Escáner de frecuencias con CTCSS/DCS
• DTMF
• Reset de funciones y canales
• Tonos 1750 / 1450 / 2315 Hz para acceder a repetidor (programable
vía software)
• Jack para microauricular externo: 2 Pin tipo Kenwood
CT710 Manual de instrucciones | 5
Page 96

Descripción del dispositivo
Display LCD
Indicadores:
Códigos DTMF
Radio FM
Función Vox
Frecuencia invertida (reverse)
Frecuencia offset +/-
Espaciado de canales ancho/estrecho
Activación código ID
Nivel de batería
Llamada de emergencia
Escáner
Escáner canal prioritario
6 | CT710 Manual de instrucciones
Page 97

Compander (Compresor)
Subtonos CTCSS
Códigos DCS
Bloqueo de teclado
RSSI - Potencia de señal recepción/transmisión
Secrafonía
Número de menú/canal
Potencia de transmisión alta/media/baja
Banda A seleccionada
Band B seleccionada
Frecuencia
CT710 Manual de instrucciones | 7
Page 98

Transceptor
2
3
1
1
1
4
5
6
8
1. Encendido/Apagado y control de volumen
2. Mando de Selección
3. Antena
4. Display LCD
5. MENU
6. ENTER (Entrar en el menú de funciones y confirmar la selección)
7. Teclado alfanumérico
8. LOCK (Bloqueo del teclado)
9. T-R (Activación de la inversión de frecuencia)
10. VFO/MR (para cambiar los modos de la radio)
10
7
9
8 | CT710 Manual de instrucciones
Page 99

E
A
D
B
C
A Pulsador PTT (push to talk)
B Tecla lateral 1: Selector de frecuencia A/B - single o dual band - radio
FM
C Tecla lateral 2: Tono 1750/1450/2315 (programable) o DTMF (pro-
gramable)
D Jack para microauricular externo
E Seguro batería
CT710 Manual de instrucciones | 9
Page 100

Operaciones básicas
Antena
Inserte la base de antena suministrada en el conector SMA girando en el
sentido de las agujas del reloj, asegurándose de que está bien fija. Retírela girando en sentido contrario a las agujas del reloj, hasta que esté fuera
del conector SMA.
Encendido / Apagado
Si quiere encender la radio, gire el mando PWR/VOL en sentido horario hasta oir un pitido. Todos los iconos se enciende en el display. (Si el
squlsch está activado, el altavoz no emite ningún sonido hasta recibir
una señal). Puede ajustar el volumen deseado girando el mando. Si desea
apagar la radio, gire el mando PWR/VOL en sentido anti-horario hasta
escuchar un pitido. Los iconos y frecuencias desaparecen del display.
Monitor
Si mantiene pulsada la tecla ENTER durante dos segundos y ajusta el volumen deseado con el mando PWR/VOL, escuchará un ruido de fondo
sin esperar a recibir ninguna señal. Si pulsa la tecla PTT, el silenciador se
activa.
Transmitiendo
Pulse la tecla PTT y hable de forma normal. Durante la transmisión el indicador se enciende en color rojo.
Si habla muy cerca del micrófono (menos de 10cm) o en un tono muy
alto, el audio se distorsionará y la recepción no será clara.
Suelte la tecla PTT para poder recibir una respuesta de su interlocutor.
Selección de Modo
Puede seleccionar cuatro modos operativos diferentes:
1. Modo Doble-banda
2. Modo mono-banda
3. Modo canal
4. Modo frecuencia
10 | CT710 Manual de instrucciones
 Loading...