

Page 1

CT 510
” Manuale d’uso
” Instruction Guide
” Manual de Instruções
” Bedienungsanleitung
” Οδηγίες Χρήσης
RICESTRASMETTITORE VHF/UHF |
Page 2

Sommario
Contenuto della confezione 4
Precauzioni 4
Principali funzioni 5
Descrizione dell’apparato 6
Display LCD 6
Ricetrasmettitore 8
Installazione antenna/accessori 10
Pacco batteria 10
Antenna 11
Installazione belt clip 11
Installazione microfono/altoparlante esterno 11
Cinghietta da polso 12
Carica batteria 12
Modalità operativa 13
Modo a frequenza variabile “VFO” 13
Modo memoria “MR” 13
Modo canale “CH” 13
Modo FM 13
Modo menu 13
Operazioni di base 14
Accensione/spegnimento 14
Regolazione sintonia 14
Trasmissione 14
2 | Manuale d’uso Midland CT510
Page 3

Blocco Tastiera 14
Descrizione ed impostazione
Memorizzazione e Cancellazione
Operatività tasti multifunzionali laterali
(via software) 15
Impostazioni rapide 16
Operatività tasti numerati 17
Menù 20
passi menù 21
Reset 26
Memoria 27
Memorizzare una frequenza 27
Cancellazione memoria 27
Memorizzazione e cancellazione
stazioni radiodiffusione FM 28
Memorizzazione radiodiffusione FMW 28
Selezione modo radiodiffusione FMW 28
Cancellazione memoria radiodiffusione FMW 28
Specifiche tecniche 29
Manuale d’uso Midland CT510 | 3
Page 4

Contenuto della confezione
• Ricetrasmettitore CT 510
• Antenna
• Pacco batteria al litio 1300mAh
• Clip aggancio a cintura
• Caricatore da tavolo
• Cavo d’alimentazione USB
• Auricolare
• Cinghietta da polso
• Guida rapida
Se l’elenco non coincide con ciò che trovate nella confezione, contattate
il vostro rivenditore MIDLAND.
Precauzioni
Il vostro ricetrasmettitore é stato progettato per darvi anni di prestazioni
sicure ed affidabili. Come per tutte le apparecchiature elettriche, esistono
alcune precauzioni alle quali consigliamo di attenervi.
• Non cercate di aprire la radio. Potreste danneggiarla e invalidare cosi
la garanzia.
• Non utilizzare la radio se l’antenna è danneggiata
• Non esponete l’apparato ad eccessive temperature e non lasciatelo in
ambienti polverosi
• Non bagnate l’apparato. L’umidità può corrodere i circuiti elettrici
• Se dalla radio esce fumo, spegnetela immediatamente e rimuovete
la batteria.
• Non trasmettete senza antenna.
• Non utilizzate alcol, solventi o abrasivi per pulire l’apparecchio. Utilizzate solo un panno morbido e pulito leggermente inumidito con
acqua.
• Prima di entrare in ambienti contenenti esplosivi o infiammabili,
spegnere la radio.
4 | Manuale d’uso Midland CT510
Page 5

Principali funzioni
• Visualizzazione di doppia banda VHF/UHF sul display e del nome del
canale
• Banda di frequenza:144-146MHz & 430-440MHz (Rx / Tx).
• Modo operativo: UHF-VHF, VHF-VHF o UHF-UHF
• Potenza d’uscita: 2W VHF / UHF
• 128 canali memorizzabili
• Scrambler
• Compander
• Funzione VOX
• 212 codici DCS e 50 toni CTCSS
• Funzione “VOICE”
• Funzione SOS d’emergenza
• Passo di canalizzazione selezionabile tra 25kHz e 12,5 kHz
• Visualizzazione opzionale sul display del numero di canale,del numero canale + frequenza o la sola frequenza
• Funzione di frequenza invertita
• Scan
• Radio FM
• Passo di frequenza: 5 kHz, 6.25 kHz, 10 kHz, 12.5 kHz, 25 kHz, 37,5 kHz,
50 kHz, 100 kHz
• Potenza di trasmissione selezionabile: alta o bassa
• Pacco batteria al litio 1300mAh
• Offset di frequenza: 0-69.950 MHz
• Shift ponte ripetitore
• Funzione di blocco canale occupato
• Tono Roger Beep ad inizio/fine trasmissione
• TOT (Time out timer)
• Blocco tastiera
• Scansione delle frequenze con CTCSS/DCS
• Scansione prioritaria
• DTMF
• Reset delle funzioni / dei canali
• Tono 1750 per collegamento a ponti ripetitori
• Presa accessori: 1 Pin 2,5mm
Manuale d’uso Midland CT510 | 5
Page 6
Descrizione dell’apparato
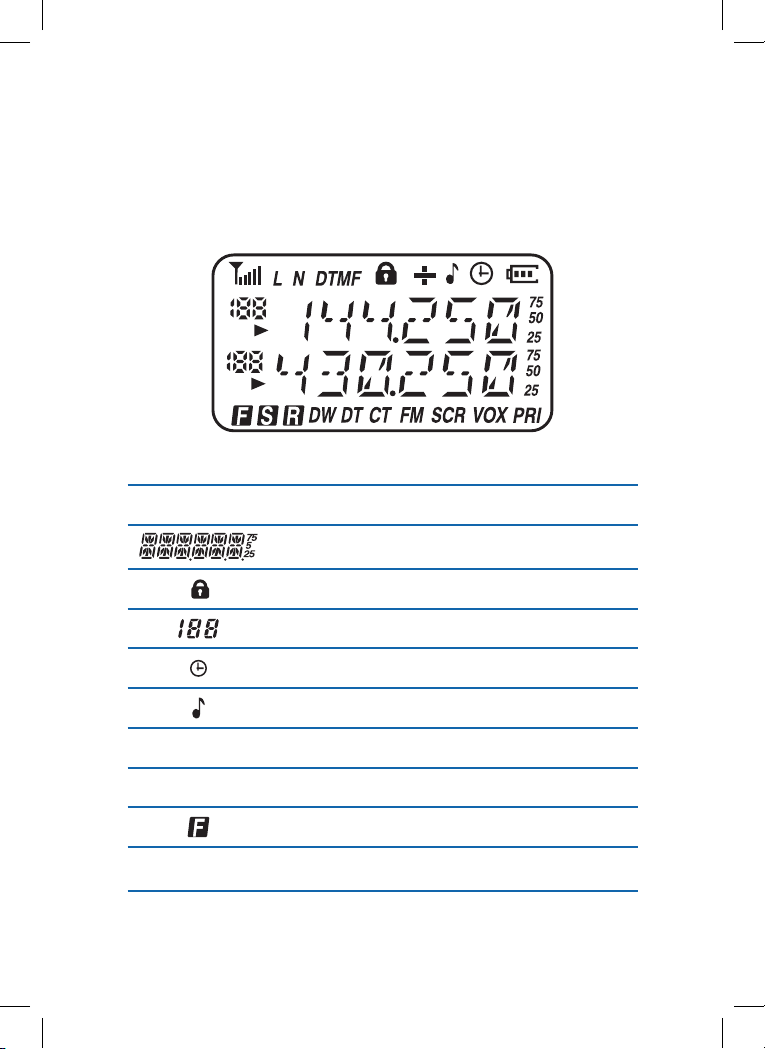
Display LCD
Indicatori Funzione
Riporta la frequenza di lavoro corrente, il numero
canale o il passo menù.
Numero canale corrente, in modo MR
Blocco tastiera
Spegnimento automatico
Tono cicalino
CT
DT DCS
DW
6 | Manuale d’uso Midland CT510
Monitoraggio contemporaneo segnale, sia in modo
CTCSS
Selezione menù
VFO, sia MR
Page 7
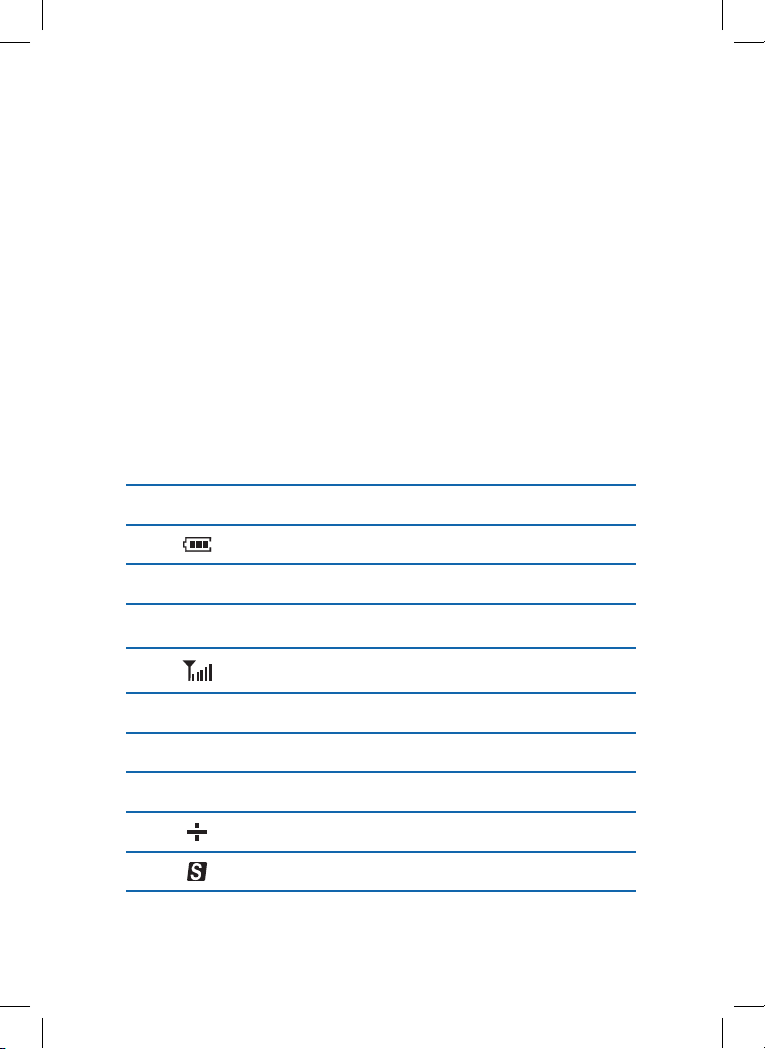
VOX
Funzionalità VOX
Indicazione carica residua batteria
FM
PRI
L
N
DTMF
Manuale d’uso Midland CT510 | 7
Attivazione / disattivazione radio FM
Ricezione canale prioritario mentre si riceve un
segnale o lo si scansiona
Segnala l’intensità del segnale ricevuto e della
potenza in trasmissione
Indicatore bassa potenza
Indicatore larghezza di banda (N: narrow = stretta)
Funzione DTMF attivata
Icona scostamento negativo / positivo
Scrambler attivato
Page 8
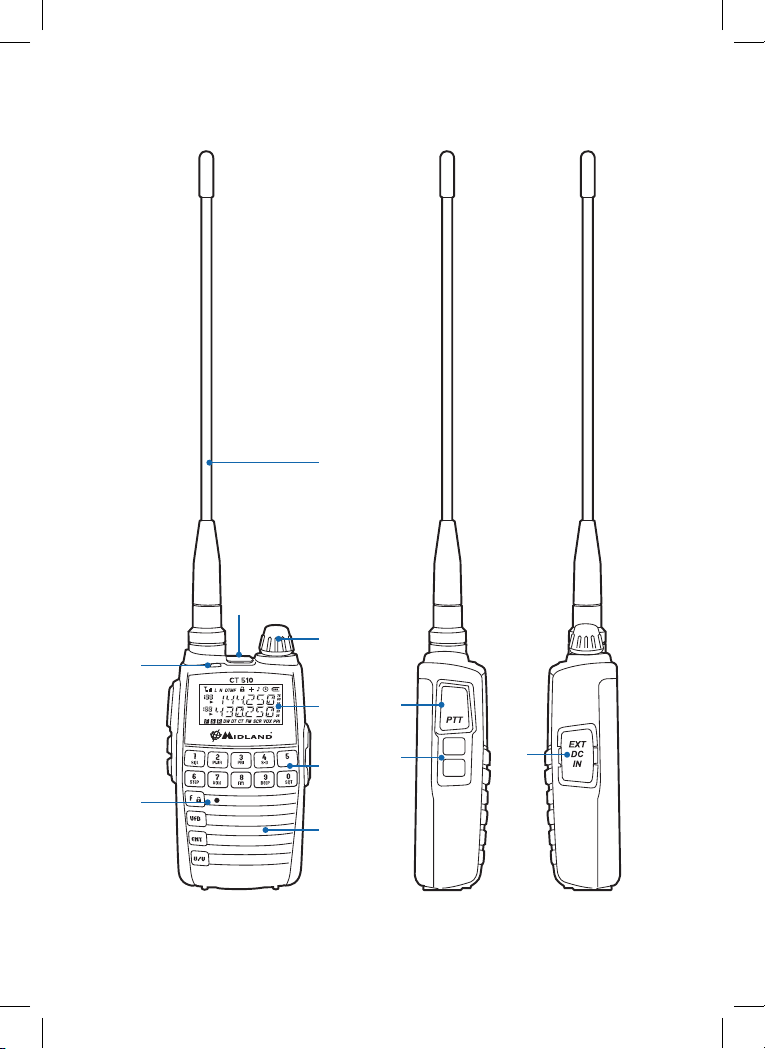
Ricetrasmettitore
3
2
1
464
5
7
8
9
8 | Manuale d’uso Midland CT510
10
11
Page 9

1. Antenna. Collegare a questa presa l’antenna in dotazione.
2. BUSY/TX. Questo led si accende di verde durante la ricezione e di
rosso in trasmissione.
3. MIC/SP. Ingresso microfono/auricolare esterno
4. Tasto OFF/Sintonia: Per accendere la radio, tenere premuto questo
tasto per 3 secondi. Si usa anche per variare la frequenza sintonizzata, selezione passi menu e regolazione volume.
5. Display LCD
6. Presa per alimentazione esterna (CC) / cavo di programmazione
7. Tastiera multifunzione
8. Microfono incorporato
9. Altoparlante incorporato
10. Tasto PTT. Premere per trasmettere e rilasciarlo per ritornare in ri-
cezione.
11. Tasto multifunzione. Tasto nero: Monitor. Premerlo per forzare l’a-
pertura dello squelch. Per regolare il volume, tenerlo premuto e ruotare il comando di sintonia. Tasto arancione: tasto chiamata emergenza
Manuale d’uso Midland CT510 | 9
Page 10
Installazione antenna/accessori
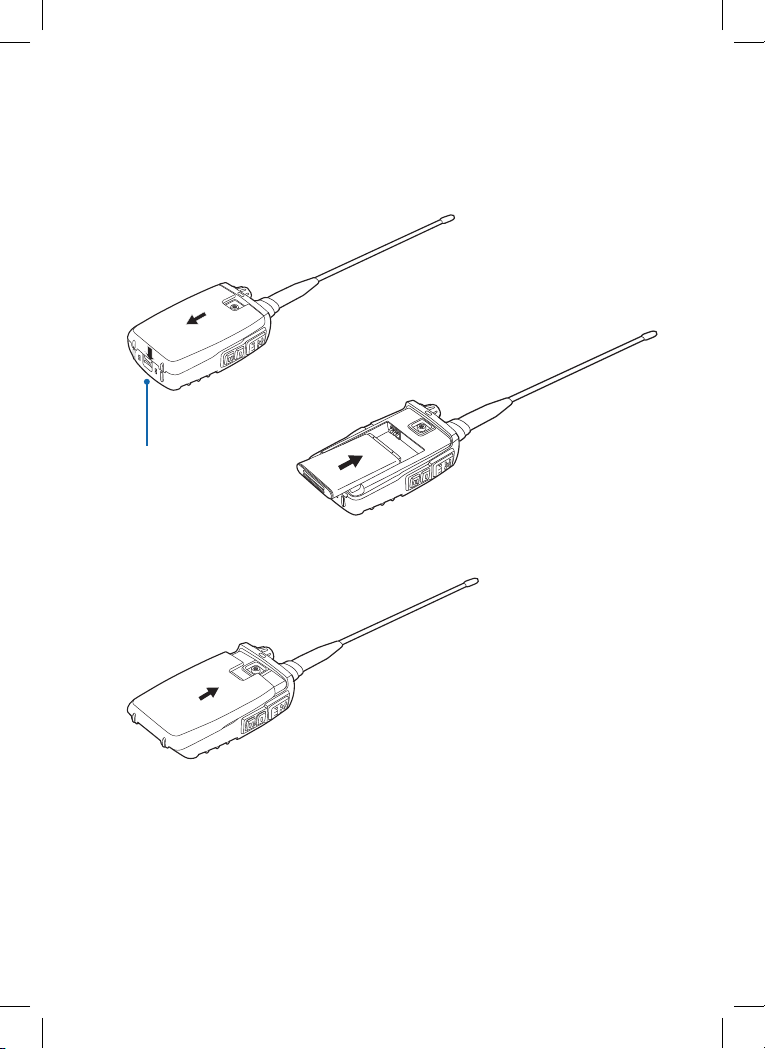
Pacco batteria
Gancio
Per inserire il pacco batteria dovete rimuovere il coperchio vano batteria:
sbloccate il gancio nella parte inferiore della radio in posizione ‘UNLOCK’
e fate scorrere il coperchio vano batteria verso il basso.
Inserite il pacco batteria in dotazione e richiudete il coperchio.
Spostate il gancio nella posizione ‘LOCK’.
10 | Manuale d’uso Midland CT510
Page 11
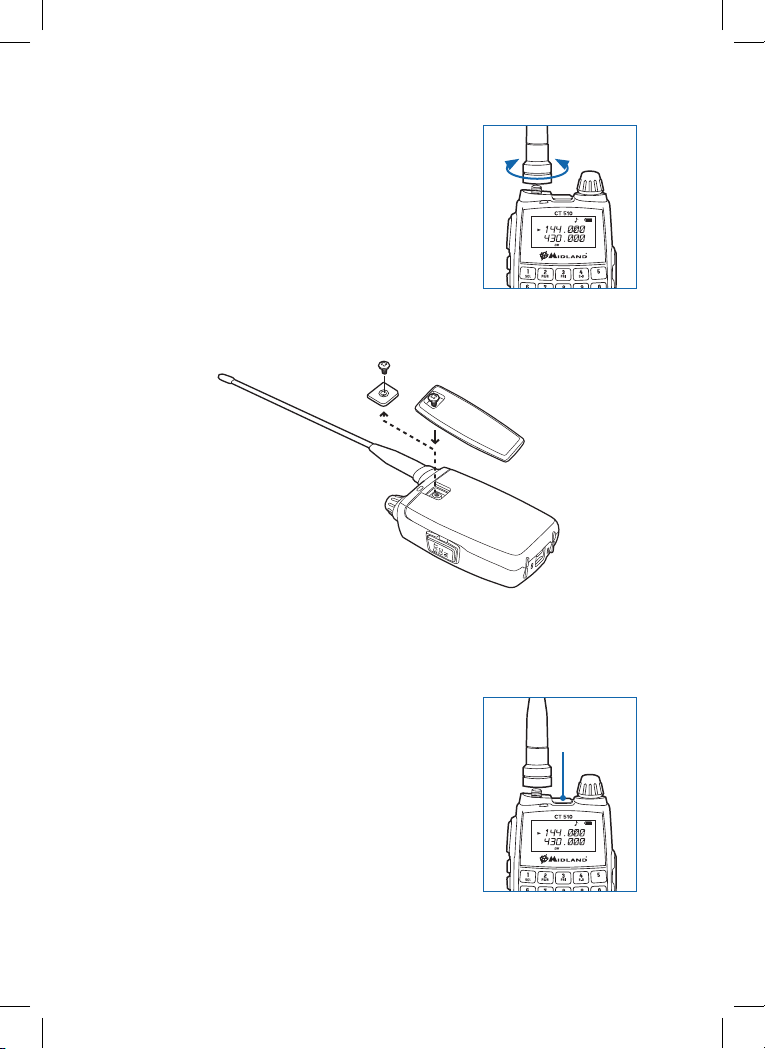
Antenna
L’antenna in dotazione presenta un’ottima
resa in banda VHF o UHF.
Inserite l’antenna nel connettore della radio
ruotandola in senso orario.
Ruotatela in senso antiorario per estrarla dal
connettore.
Nota: Non trasmettere in assenza di antenna.
Installazione belt clip
Utilizzate le viti in dotazione per fissare la clip da cintura alla radio.
Installazione microfono/altoparlante esterno
Rimuovete la copertura della presa
microfono/altoparlante sulla radio
ed inserire la spina jack.
Copertura
Manuale d’uso Midland CT510 | 11
Page 12
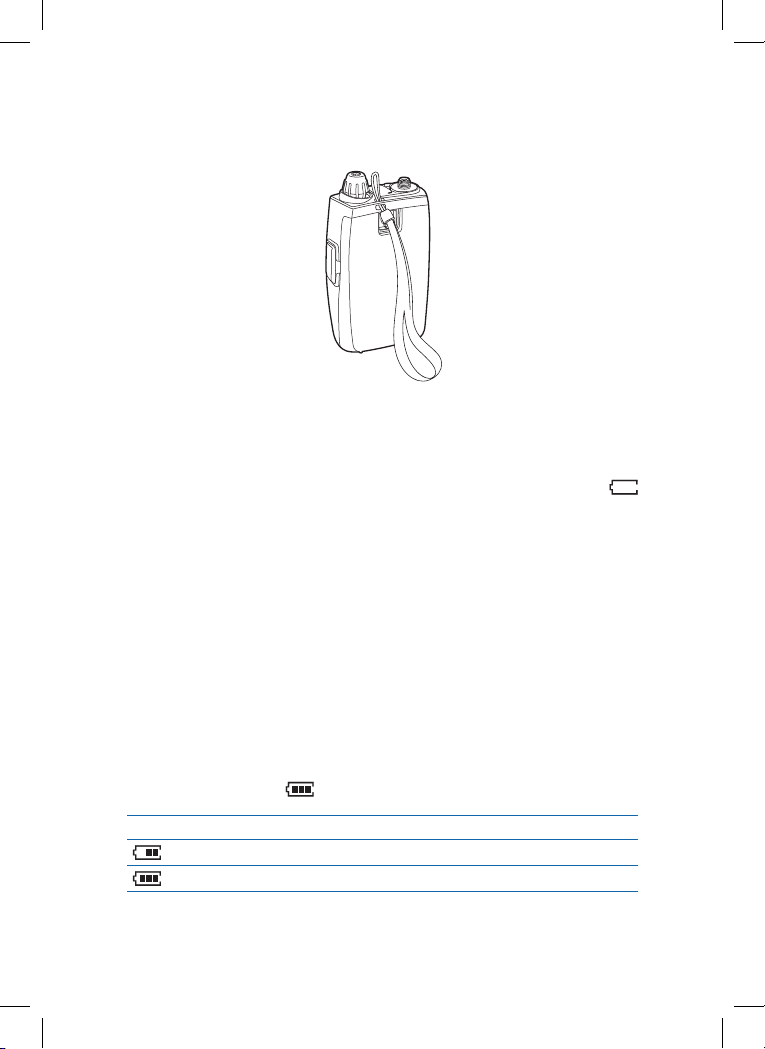
Cinghietta da polso
RESET
YES ?
DEL ?
12
Inserire il laccio nel foro dedicato, presente sul dorso della radio.
Carica batteria
Quando il display visualizza l’icona batteria senza nessuna tacca
significa che il pacco batteria è scarico e si deve procedere subito alla
carica.
1. Carica con il solo caricatore da muro. Si può eseguire il ciclo di ri-
carica collegando il caricabatteria direttamente al CT 510, tramite la
presa EXT DC.
2. Carica tramite il caricatore da tavolo. Si può eseguire la ricarica
della batteria tramite il caricatore da tavolo in dotazione; in questo
modo la batteria verrà ricaricata senza l’ausilio della radio. Il led rosso sul caricatore indica che la batteria è in fase di carica; il led verde
significa che la carica è stata completata.
3. Carica tramite il cavo d’alimentazione USB. Se si dispone di un PC
si può caricare la batteria del ricetrasmettitore con il cavo USB in dotazione.
L’icona della batteria
Icona Stato carica
lampeggia
stabile
sul display vi informa dello stato di carica.
In carica
Carica completata
12 | Manuale d’uso Midland CT510
Page 13

Modalità operativa
Modo a frequenza variabile “VFO”
In questa modalità operativa, la frequenza sintonia si varia ruotando la
manopola OFF/Sintonia, oppure immettendola direttamente tramite la
tastiera numerica.
Modo memoria “MR”
Se avete memorizzato una frequenza su almeno un canale, in modalità
VFO, premete il tasto VFO per passare in modalità memoria.
Lo schermo riporta la frequenza ed in alto a sinistra il numero canale.
Modo canale “CH”
Avendo memorizzato una frequenza su almeno un canale, accendete la
radio tenendo premuto il tasto ENT: si passa in modo CH.
Modo FM
CT 510 opera anche nella banda riservata alla radio diffusione FM: 88.00
– 108.00 MHz. Per impostare la gamma in scansione e memorizzare le
stazioni preferite, consultate il paragrafo “Impostazioni rapide”, passo 7.
Modo menu
Per passare in modo menù premete i tasti F/ e ENT, vengono presentati
complessivamente 26 passi d’impostazione, consultate la sezione dedicata.
Manuale d’uso Midland CT510 | 13
Page 14

Operazioni di base
Accensione/spegnimento
Per accendere o spegnere l’apparato, premete il comando OFF/SINTONIA
per 3 secondi.
Se all’accensione non viene riprodotto l’annuncio ‘POWER ON’, la funzione vocale potrebbe essere disattivata. Vedi par. “Impostazioni rapide”.
Regolazione sintonia
CT 510 può operare in modo VFO, consentendo la variazione libera della
frequenza. Tramite la manopola di sintonia, la rotazione oraria incrementa la frequenza sintonizzata, ruotando la sintonia in senso antiorario, ci si
sintonizza su frequenze inferiori.
Trasmissione
1. Per trasmettere premere il PTT; durante la trasmissione la spia BUSY/
TX è in colore rosso.
2. Per tornare in ricezione, rilasciare il PTT.
3. Durante la trasmissione, nella parte superiore a sinistra dello scher-
mo, appare indicazione livello potenza relativa in trasmissione.
4. Mentre si opera a potenza ridotta, appare anche l’icona ‘L’.
Blocco Tastiera
Per prevenire pressioni accidentali della tastiera è prevista la funzionalità
di blocco tasti, che si può attivare manualmente o automaticamente.
Consultare il passo 21 del menù.
1. Passare in modo menù premendo F/
2. Selezionare il passo 21: KEY LK, ruotando la manopola di sintonia.
3. Confermare premendo il tasto ENT.
4. Selezionare una delle due opzioni “Manual” o “Auto”, ruotando la
manopola di sintonia.
e ENT.
14 | Manuale d’uso Midland CT510
Page 15

5. Confermare premendo ENT.
6. Il display visualizza l’icona
7. Per disattivare il blocco tastiera premete F/
Nota:
• In questo modo ruotando la manopola di sintonia si regola il volume.
• Per bloccare manualmente la tastiera, premete il tasto F/
.
per 3 secondi.
per 2 secondi.
Operatività tasti multifunzionali laterali
(via software)
CT 510 dispone di due tasti multifunzionali, entrambi prevedono le stesse opzioni operative.
Tramite il software di programmazione si può impostare la funzionalità
che si vuole assegnare ad entrambi, tra quelle previste.
1. Nessuna.
2. Regolazione monitor e volume (Default: tasto multifunzionale
nero). Tenendo premuto il tasto, si passa alla funzione monitor; il
volume audio è riportato sullo schermo LCD. Ruotando la sintonia si
regola il livello a piacere.
3. Tono chiamata a 1750 Hz. La funzione invio tono chiamata a 1750
Hz può essere assegnata ad un tasto laterale. Alla pressione di questo tasto, viene generata una nota a 1750Hz che permette di agganciarsi ai ponti ripetitori e comunicare tramite loro. Successivamente
rilasciate il tasto di chiamata ed usate il PTT per trasmettere.
4. Chiamata emergenza (Default: tasto multifunzionale arancione).
Quando si assegna questa funzionalità, premete brevemente questo tasto e il PTT per inviare un segnale d’allarme. Per uscire premere
un altro tasto qualsiasi.
Manuale d’uso Midland CT510 | 15
Page 16

Impostazioni rapide
Per velocizzare alcuni comandi si può usare il tasto F/ in combinazione
con un altro.
1. Regolazione soglia squelch.
Premendo il tasto F/
golazione livello soglia squelch (da 0 a 9, ruotando la manopola di
sintonia).
2. Regolazione potenza Alta / Bassa .
Premendo il tasto F/
golazione potenza alta/bassa (viene selezionata tramite la manopola di sintonia). Selezionando la bassa potenza, nella parte inferiore
dello schermo appare l’indicazione “L” .
3. Impostazione scansione prioritaria.
Premendo il tasto F/
scansione prioritaria, disponibile solo in modo MR o CH.
4. Impostazione direzione spaziatura (Shift ponte ripetitore).
Premendo il tasto F/
stazione direzione spaziatura in modo VFO. Ruotando la manopola
di sintonia si può selezionare tra ‘-‘ o ‘+’. Quando è attiva la spaziatu-
ra per operare via ponte ripetitore, sulla parte superiore dello schermo appare l’icona relativa (‘+’ o ‘-‘ a seconda della vostra scelta).
5. Impostazione spaziatura canali.
Premendo il tasto F/
la spaziatura canali. Ruotate la manopola di sintonia per selezionare
il valore desiderato tra 5/6.25/10/12.5/25.0/37,5/50.0/100.0 KHz.
6. Attivare / disattivare il VOX.
Premendo il tasto F/
disattivare la funzione VOX. Ruotare la manopola sintonia per selezionare ON o OFF.
7. Radio FMW.
Premendo il tasto F/
ricezione radiodiffusione FMW. Nella parte inferiore dello schermo
appare l’indicazione FM. Per selezionare la frequenza desiderata
utilizzate la manopola di sintonia o immettere la stessa tramite la
tastiera. La gamma di frequenza selezionabile è compresa tra 88.00
e 108.00 MHz. Per uscire premere di nuovo F/
ed il tasto numerico 1/SQL si accede alla re-
ed il tasto numerico 2/PWR si accede alla re-
ed il tasto numerico 3/PRI si può impostare la
ed il tasto numerico 4 S-D si accede alla impo-
ed il tasto numerico 6 STEP si può impostare
ed il tasto numerico 7 VOX si può attivare/
ed il tasto numerico 8 FM si passa in modo
e 8 FM. Anche se è
16 | Manuale d’uso Midland CT510
Page 17

attivata la modalità radio, il CT 510 tiene monitorata la ricezione in
banda amatoriale. Se si riceve una chiamata mentre si è in modalità
FMW, il ricetrasmettitore commuta temporaneamente nel modo FM.
Al termine della chiamata, trascorsi 5 secondi, la radio ritorna in modalità FMW.
8. Impostazione beep tastiera.
Premendo il tasto F/
beep tastiera. Ruotando la sintonia si può selezionare tra OFF/ TONE/
VOICE (escluso, nota, parlato).
9. Impostazione CTCSS / DCS.
Premendo il tasto F/
stare i toni sub-audio CTCSS o i codici digitali DCS. Premendo di nuovo il tasto F/
commutare tra i CTCSS e DCS premete ripetutamente il tasto VFO.
OFF ➔ CTCSS ➔ DCS N ➔ DCS I ➔ OFF.
Per selezionare un tono CTCSS o codice DCS ruotate la ma-
nopola di sintonia e per confermare utilizzate il tasto ENT.
Uscite premendo U/V.
10. Scansione.
Premendo il tasto F/
tire la direzione ruotare la manopola di sintonia. La scansione può
essere avviata in modo VFO, MR e CH.
11. Memorizzazione canale.
Premete i tasti F/
buire la memoria alla frequenza. Confermate premendo ENT.
12. Modo menù
Premendo il tasto F/
funzioni impostabili da menu vedi capitolo ‘MENU’.
ed il tasto 9 BEEP si accede alla impostazione
ed il tasto numerico 0 SQT si possono impo-
si impostano i toni in ricezione e/o trasmissione. Per
ed il tasto VFO si avvia la scansione. Per inver-
e U/V; ruotate la manopola di sintonia per attri-
ed il tasto ENT si passa in modo menù. Per le
Operatività tasti numerati
In modo VFO si può sintonizzare una specifica frequenza immettendola
direttamente tramite la tastiera. Se il valore immesso è oltre la gamma
coperta appare la segnalazione errore “ERROR”. In modo memoria invece
la cifra immessa seleziona una specifica locazione della memoria canali.
Manuale d’uso Midland CT510 | 17
Page 18

LISTA DELLE FUNZIONI IMPOSTABILI
Passo Sigla e funzionalità
1 TX_SEL (trasmissione priorità)
2 APRO (modo voce)
3 BCLO (blocco canale occupato)
4 W/N (banda larga / stretta)
5 SCAN (lista scansione)
6 OFFSET (spaziatura frequenza)
7 CH_NAM (nome canale)
8 NAM_SW (modalità nome/frequenza)
9 OPENS (schermata iniziale)
10 MSG (impostazione messaggio accens.)
11 D_WAIT (doppio monitor)
12 LAMP (impostazione retroilluminazione)
13 DC (tensione batteria)
14 1750_S (impostazione nota chiamata)
15 TOT (temporizzatore durata massima TX)
16 RX_SAV (risparmio energia RX)
17 SCANS_S (selezione modo scansione)
18 SCAN_V (impostazione velocità scansione)
19 APO_SW (spegnimento automatico)
20 RX_ALT (ricezione avviso emergenza)
21 KEY_LK (modalità blocco)
22 VOX_LV (regolazione livello VOX)
23 VOX_DV (ritardo caduta VOX)
24 FM_STP (passo ricevitore radiodiffusione)
25 SK_CTS (scansione CTCSS)
26 SK_DCS (scansione DCS)
18 | Manuale d’uso Midland CT510
Page 19

Selezioni disponibili Passo
BUSY / EDIT 1
OFF / COMP / BCLO / ON / SCRM 2
OFF / ON 3
WIDE / NARROW 4
ADD / DEL 5
0.000 - 99.950 MHz 6
0 - 9, A - Z, +, -, /, _ 7
OFF / ON 8
OFF / DC / MSG 9
0 - 9, A - Z, +, -, /, _ 10
OFF / ON 11
OFF / ON / AUTO 12
CURRENT VOLTAGE 13
OFF / 1 - 15 S 14
OFF / 30 - 360 S 15
OFF / 1-1 / 1-2 / 1-3 / 1-4 16
CO / TO / SE 17
100, 150, 500 mS 18
OFF / 30 - 180 S 19
OFF / ON 20
AUTO / MANUAL 21
1 - 9 22
0.5, 1.0, 2.0, 3.0 S 23
5/6,25/10/12,5/25/37,5 - 50/100kHz 24
67.0 - 2541.0 Hz 25
D023N - D754N, D023I - D0754I 26
Manuale d’uso Midland CT510 | 19
Page 20

Menù
Premendo F/ , nell’angolo sinistro in basso del display appare l’indicazione “F”.
Per entrare nelle voci del menu, premete ENT; sul display compare
“MENU”.
Selezionate la funzione desiderata ruotando la manopola di sintonia e
premete ENT.
Selezionare il parametro / impostazione, confermate col tasto ENT.
Per uscire e tornare al livello precedente premete U/V, e successivamente VFO per uscire dal modo menu.
20 | Manuale d’uso Midland CT510
Page 21

Descrizione ed impostazione
passi menù
1. Trasmissione priorità (TX_SEL)
Il CT 510 può trasmettere in banda secondaria anche se si sta lavorando
in banda operativa.
EDIT trasmissione in banda operativa.
BUSY trasmissione sull’ultima banda utilizzata per comunicazioni.
L’impostazione di default è EDIT.
2. Modalità voce (APRO)
OFF voce esclusa.
COMP compressione / espansione voce.
BCLO Blocco canale occupato
ON blocco su canale occupato attivo.
SCRM Scrambler
3. Blocco canale occupato (BCLO)
ON Funzione blocco canale attivata
OFF Funzionalità disattivata
4. Selezione larghezza banda larga/stretta (W/N)
Wide 25kHz
Narrow 12,5kHz
5. Lista scansione (SCAN)
Questa funzione è disponibile solo in modalità memoria ed è utile per
aggiungere o togliere dalla lista scansione il canale memoria corrente.
Una volta entrati in questa funzione, utilizzate la manopola sintonia per
selezionare “ADD” (aggiungere) o “DEL” (eliminare); confermate la vostra
selezione premendo PTT o ENT ed uscite premendo U/V.
Manuale d’uso Midland CT510 | 21
Page 22

6. Spaziatura frequenza (OFFSET)
L’offset é la differenza di frequenza tra la trasmissione e la ricezione.
L’offset di frequenza di questo ricetrasmettitore è compreso tra 00.000 a
99.950 MHz e viene impostato con la manopola di sintonia. Confermate
l’impostazione premendo il PTT o ENT ed uscite premendo U/V.
7. Nome canale (CH_NAM)
Ad ogni canale memoria si può associare un nome alfanumerico fino a 6
caratteri, per facilitarne l’identificazione.
Questa funzione è disponibile solo in modo CH e MR.
Quando siete in questa modalità, utilizzate la manopola sintonia per selezionare il primo carattere tra “0” – “9” e “A” – “Z”.
Per passare al carattere successivo premere 2 PWR; per tornare indietro
premere 1 SQL.
Per cancellare le vostre impostazioni utilizzate il tasto 0 SQT. Confermare
premendo ENT.
8. Modalità nome/frequenza (NAM_SW)
In modo CH e MR, ruotate la manopola per selezionare “ON” / “OFF”.
ON sul display appare il nome associato al canale (se impostato).
OFF sul display viene riportata la frequenza.
Nota: Prima di attivare questa funzione si deve impostare il nome canale
(vedi par. precedente).
9. Schermata iniziale all’accensione (OPENS)
OFF normale avvio, appare subito la frequenza o il numero canale
corrente.
MSG appare il messaggio che è stato impostato per l’accensione.
DC sul display viene riportato il livello batteria.
10. Impostazione messaggio accensione (MSG)
In questa modalità si può inserire un messaggio lungo fino a 6 caratteri
personalizzato. Tramite la sintonia selezionare il primo carattere tra “0” –
“9”, “A” – “Z”, “ ”, “+”, “-“, “/” e “_”, per passare al carattere successivo premere
2 PWR; per tornare indietro premere 1 SQL. Per cancellare le vostre impostazioni utilizzate il tasto 0 SQT. Confermate premendo ENT.
22 | Manuale d’uso Midland CT510
Page 23

11. Doppio monitor (D_WAIT)
OFF doppio monitor attivato, la radio lavora su entrambi i canali.
ON doppio monitor disattivato, la radio lavora solo sul canale cor-
rente.
12. Impostazione retroilluminazione (LAMP)
La retroilluminazione può essere attivata /disattivata.
Nella funzione LAMP, utilizzate il comando sintonia per selezionare l’opzione desiderata.
ON retroilluminazione sempre attiva.
OFF retroilluminazione sempre disattivata.
AUTO ogni volta che si utilizza un comando, la retroilluminazione ta-
sti e display si attiva per 5 secondi.
Confermate premendo PTT o ENT ed uscite premendo U/V.
13. Tensione batteria (DC)
Sul display compare la tensione attuale della batteria.
14. Impostazione tono di chiamata (1750 Hz) abbinata
al tasto PTT.
Si può scegliere se inviare o meno il tono di chiamata a 1750 Hz ai ponti
ripetitori direttamente quando si preme il PTT.
OFF non si trasmette il tono chiamata.
ON si invia il tono di chiamata per un tempo impostabile da 1 a 15
secondi
15. Temporizzatore durata massima trasmissione (TOT)
Questa funzione evita che la radio rimanga in trasmissione per un tempo
eccessivo: per questo si può impostare il temporizzatore che ne limita la
durata massima.
È regolabile da 30 a 360 secondi oppure lo si può escludere (OFF).
Nella modalità TOT, utilizzate la manopola sintonia per impostare la selezione desiderata; poi confermate premendo PTT o ENT ed uscite premendo U/V.
Manuale d’uso Midland CT510 | 23
Page 24

16. Risparmio energia in ricezione (RX_SAV)
Il risparmio energia in ricezione si può impostare su alcuni livelli (da 1-1 a
1:4). Per disattivarlo selezionate OFF.
In modalità RX_SAV ruotate l’interruttore sintonia per selezionare l’impostazione. Confermate premendo PTT o ENT ed uscite premendo U/V.
17. Selezione modo scansione (SCAN_S)
La funzione Scan é molto utile per monitorare i canali prima della trasmissione.
I tipi di scansione che si possono impostare sono tre.
Nella modalità SCAN_S, ruotate la manopola sintonia per selezionare il
tipo di scansione desiderato:
Time-operated scan (TO )
Anche se l’apparato si ferma su un canale occupato per 5 secondi, la scansione prosegue ugualmente sugli altri canali.
Carrier-operated scan (CO )
La radio si ferma su un canale occupato fino a quando non riceve più il
segnale.
Search Scan (SE)
La radio si ferma su un canale occupato e la scansione si interrompe.
Confermate premendo PTT o ENT ed uscite premendo U/V.
18. Impostazione velocità scansione
Si regola la velocità di avanzamento scansione: i valori disponibili vanno
da 100 a 500mS con passo 50 mS.
19. Spegnimento automatico (APO_SW)
In questa modalità potete impostare lo spegnimento automatico: ruotate la manopola sintonia finchè compare sul display il temporizzatore
“APO”; confermate la selezione premendo PTT o ENT ed uscite premendo
U/V. In assenza di operatività, trascorso il tempo impostato, la radio si
spegnerà automaticamente.
OFF spegnimento automatico “APO” escluso.
Intervalli impostabili da 30’ a 180’ con passo 30’.
24 | Manuale d’uso Midland CT510
Page 25

20. Ricezione avviso emergenza (RX_ALT)
In questa modalità si può attivare/disattivare la ricezione dell’avviso di
emergenza.
OFF non si riceve l’avviso emergenza.
ON si riceve l’avviso emergenza.
21. Modalità blocco (KEY_LK)
AUTO trascorsi 8 secondi dall’ultima conversazione, i comandi ven-
gono bloccati automaticamente.
MANUAL per bloccare la tastiera premere il tasto F/
per 2 secondi.
22. Regolazione livello VOX (VOX_LV)
In questa modalità si regola la sensibilità del “VOX”. Il livello 1 è il meno
sensibile.
23. Regolazione ritardo del VOX (VOX_DV)
Il ritardo è una funzione del VOX che mantiene la radio in trasmissione,
in modo che la conversazione non si interrompa improvvisamente. Può
essere regolato in diversi livelli: 1.5 / 1.0 / 2.0 / 3.0 secondi.
24. Passo ricevitore radiodiffusione FM (FM_STP)
Si può selezionare tra 25, 50, 100 o 200 KHz.
25. Scansione CTCSS (SK_CTS)
In questo passo, potete eseguire la scansione dei toni CTCSS.
Avviate la scansione dei toni e confermate premendo PTT o ENT ; uscite premendo U/V. Quando la radio riceve un segnale con lo stesso tono
CTCSS impostato, la scansione si ferma e sul display lampeggia CTCSS.
Per invertire la direzione della scansione ruotate la manopola di sintonia.
26. Scansione DCS (SK_DCS)
Scansione dei codici DCS.
Quando la radio riceve un segnale con lo stesso codice digitale impostato, la scansione si ferma e l’indicazione DCS lampeggia sul display.
Per invertire la direzione ruotate la manopola di sintonia.
Manuale d’uso Midland CT510 | 25
Page 26

Reset
Se volete cancellare le impostazioni personalizzate nel menu, potete eseguire un reset della radio:
1. Accendete la radio tenendo premuto il tasto F/
2. Sul display compare una richiesta di conferma: “RESET YES?”.
3. Per proseguire premete ENT ; viene riprodotta una prima nota, a se-
gnalare l’inizio del reset. Al termine viene riprodotta una seconda
nota per segnalare il termine.
4. Poi automaticamente la radio commuta in modalità VFO.
.
RESET
YES ?
26 | Manuale d’uso Midland CT510
Page 27

Memorizzazione e Cancellazione
RESET
YES ?
Memoria
Memorizzare una frequenza
In modalità VFO selezionate la frequenza che volete memorizzare digitandola direttamente tramite la tastiera o con la manopola di sintonia.
Premete F/ e U/V; a sinistra della indicazione di frequenza lampeggia
sul display la locazione memoria corrente (su cui verrà memorizzata la
frequenza sintonizzata).
Selezionate la locazione desiderata digitando direttamente il numero
sulla tastiera o ruotando la manopola sintonia. Confermate la memorizzazione premendo ENT.
Cancellazione memoria
1. In modo MR o CH, spegnete la radio. Riaccendetela premendo contemporaneamente il tasto U/V . Sul display compare la richiesta locazione memoria da cancellare “DEL ?”. A sinistra dell’indicazione di
frequenza lampeggia la locazione corrente.
DEL ?
2. Selezionate il canale memoria che si vuole cancellare ruotando la
manopola sintonia o immettendo il numero tramite la tastiera, poi
premete ENT.
3. A cancellazione avvenuta la radio si riporta sul canale successivo. Se
si vuole cancellare anche questo ripetere le operazioni sopraelencate.
Manuale d’uso Midland CT510 | 27
Page 28

Memorizzazione e cancellazione
RESET
YES ?
stazioni radiodiffusione FM
Memorizzazione radiodiffusione FMW
In modo FMW, premete F/ e U/V; sul display, a sinistra della indicazione
di frequenza, lampeggia la locazione memoria corrente (su cui verrà memorizzata la frequenza sintonizzata).
Selezionate quella desiderata digitando direttamente il numero mediante la tastiera o ruotando la sintonia. Confermate la memorizzazione premendo ENT.
Selezione modo radiodiffusione FMW
In modo radio FMW premete VFO per passare dal modo memoria stazioni radiodiffusione FMW alla modalità normale frequenza. (Questo è possibile solo se sono stati memorizzati canali in radiodiffusione).
Cancellazione memoria radiodiffusione FMW
In modo memoria FMW, spegnere la radio. Riaccendetela premendo contemporaneamente U/V. Sul display compare richiesta locazione memoria
da cancellare “DEL ?”.
DEL ?
A sinistra dell’indicazione di frequenza lampeggia la locazione corrente.
Selezionate la memoria da cancellare ruotando la manopola sintonia o
immettendo il numero tramite la tastiera, poi premete ENT.
Ripetete questa operazione se si vogliono cancellare altri canali dei 25
disponibili.
28 | Manuale d’uso Midland CT510
Page 29

Specifiche tecniche
Generali
Gamma di frequenza VHF: 144-146MHz / UHF: 430- 440MHz
FMW: 88 – 108 MHz (solo RX)
Temperatura operativa -20° +55°C
Alimentazione 3.7V 1300mAh
Memoria 128 canali
Modalità operativa simplex
Dimensioni 95 (A) x 52(L) x 31(P)
Peso 139gr (batteria ed antenna incluse)
Impedenza antenna 50Ω
Ciclo di utilizzo 5/5/90
Trasmettitore
Potenza in uscita alta~ 2 W / bassa ~ 1 W
Deviazione max di frequenza banda larga < 5 KHz, stretta < 2,5 KHz
Distorsione modulazione ≤ 5%
Assorbimento ≤1.5 A
Ricevitore
Sensibilità -122 dBM @ 12 dB SINAD
Distorsione audio ≤ 5%
Potenza audio ≥0.5 W
Le specifiche sono soggette a modifica senza preavviso.
ATTENZIONE: L’adattatore di alimentazione è il dispositivo di disconnessione dell’apparato; la base di carica della corrente deve restare vicino
all’apparato e facilmente accessibile.
Manuale d’uso Midland CT510 | 29
Page 30

What’s in the box 32
Maintenance 32
Main Function 33
Description of the device 34
LCD Display 34
Transceiver 36
Antenna/accessories installation 38
Battery Pack 38
Antenna 39
Installing the belt clip 39
Installing an external microphone/speaker 39
Wrist belt 40
Battery charger 40
Operating modes 41
Frquency M ode “VFO” 41
Memory Mode “MR” 41
Channel Mode “CH” 41
Modo FM 41
MENU mode 41
Basic operations 42
Switching power on/off 42
Frequency adjustment 42
Transmission 42
Keypad lock 42
Multi-function side keys operation (via software) 43
30 | Instruction Guide Midland CT510
Page 31

Shortcut operations 44
Number key operation 45
Menu operations 48
Description and setting of the menu functions 49
Reset 54
Storing and deleting a memory channel 55
Storing a frequency 55
Deleting a memory 55
Storing and deleting FM radio channels 56
FM radio channels storage 56
FMW mode selection 56
Deleting FMW memory channels 56
Technical specifications 57
Instruction Guide Midland CT510 | 31
Page 32

What’s in the box
• CT 510 transceiver
• Antenna
• Li-Ion battery pack 1300mAh
• Belt clip
• Desktop charger with wall adaptor
• Earphone
• Wrist belt
• Quick guide
If any item is missing, please contact your MIDLAND dealer.
Maintenance
Your transceiver is an electronic product and should be treated with
care .The suggestions below will help you to fulfill any warranty obligations and to enjoy this product for many years.
• Do not attempt to open the radio. Non-expert handling of the unit
may damage it and will void the warranty.
• Do not use the radio if the antenna is damaged.
• Do not store the radio under the sunshine or in hot areas.
• Keep the radio dry. Rainwater or damp will corrode electronic cir-
cuits
• Do not store the radio in dusty or dirty areas.
• If it appears that the radio diffuses peculiar smell or smoke, please
shut off its power immediately and take off the battery from the
radio.
• Do not transmit without antenna.
• Do not use detergents, alcohol or abrasive substances. Clean the
radio with a soft cloth.
• Switch off the radio before entering inflammable or explosive areas.
32 | Instruction Guide Midland CT510
Page 33

Main Function
• Dual band (VHF/UHF) and channel name displayed
• Frequency band:144-146MHz & 430-440MHz (Rx / Tx).
• Working mode: UHF-VHF, VHF-VHF or UHF-UHF
• Output power: 2W VHF / UHF
• 128 stored channels
• Scrambler
• Compander
• VOX function
• 212 DCS codes and 50 CTCSS tones
• “VOICE” function
• SOS emergency function
• Channel spacing selectable between 25kHz and 12,5 kHz
• Optional viewing on display display of channel number, channel
number + frequency or only frequency
• Inverted frequency function
• Scan
• FM radio
• Frequency step: 5 kHz, 6.25 kHz, 10 kHz, 12.5 kHz, 25 kHz, 37,5 kHz,
50 kHz, 100 kHz
• Selectable tx power: high or low
• Li-Ion battery pack 1300mAh
• Frequency Offset: 0-69.950 MHz
• Shift repeater
• BCLO (Busy Channel Lock Out) function
• Roger Beep tone at start/end transmission
• TOT (Time out timer)
• Keypad lock
• Frequency scan with CTCSS/DCS
• Priority scan
• DTMF
• Function/channel reset
• 1750 Hz tone for repeaters
• Accessory jack: 1 Pin 2,5mm
Instruction Guide Midland CT510 | 33
Page 34

Description of the device
LCD Display
Indicators Functions
Indicates the working frequency, the channel
number on function menu
Displays the selected channel number or function
menu when the radio is in MR mode (memory)
Keypad lock
Automatic power off
Beep Tone
CT
DT DCS
Function menu Selection
DW
34 | Instruction Guide Midland CT510
Monitors a signal in both VFO and MR mode at the
CTCSS
same time
Page 35

VOX
VOX Function
Battery capacity indicator
FM
PRI
L
N
DTMF
Instruction Guide Midland CT510 | 35
Activation / deactivation FM radio
Reception of priority channel while receiving or
scanning a signal
Shows the received signal strength and tx power
Low power indicator
Narrow band indicator
DTMF function activated
Positive/Negative shift icon
Scrambler attivato
Page 36

Transceiver
2
1
3
464
5
7
8
9
36 | Instruction Guide Midland CT510
10
11
Page 37

1. Antenna. Connect here the supplied antenna.
2. BUSY/TX. The led turns green during reception and turns red du-
ring transmission.
3. MIC/SP. Jack for microphone/earphone connection.
4. POWER/DIAL: Press and hold for 3 seconds to turn on and off the
transceiver. It is also used for the frequency setting, menu selections
and volume adjustment.
5. LCD Display
6. External DC. This jack allows the connection to an external DC po-
wer source and to a programming cable
7. Multifunction keypad
8. Built-in microphone
9. Speaker. The internal speaker is located here.
10. P TT. Press it to transmit and release it to receive after your transmis-
sion is completed
11. Multi-function keys. Black key: Monitor. Press it to open the
squelch. To adjust the volume hold it down and rotate the DIAL key.
Orange key: Emergency call button
Instruction Guide Midland CT510 | 37
Page 38

Antenna/accessories installation
Battery Pack
Battery Cover
latch
Slide the battery cover latch to unlock and then slide the battery cover
towards the bottom to remove it.
Install the battery pack into the battery compartment.
Return the battery cover back and slide the battery cover latch to the
lock position.
38 | Instruction Guide Midland CT510
Page 39

Antenna
The supplied antenna provides good
performances in either VHF or UHF bands.
To install the antenna screw it clockwise onto
the connector of the transceiver.
Turn it counter-clockwise to remove it.
Note: Do not transmit without antenna.
Installing the belt clip
Use the screws to fix the belt clip to the radio.
Installing an external microphone/speaker
Open the cover of the mic/speaker jack and
insert the mic/speaker plug.
Cover
Instruction Guide Midland CT510 | 39
Page 40

Wrist belt
RESET
YES ?
DEL ?
12
Lace the wrist belt through the hole on the back of the radio.
Battery charger
When the display shows the icon it means that the battery pack is
out of power and needs to be recharged.
1. Charging with wall adaptor only. CT 510 can be charged directly
with the wall adaptor (EXT DC jack).
2. Desktop charger. The battery recharge can also be done with the
supplied desktop charger: there’s no need of the whole radio, just
place the battery pack into the proper cradle. The red led indicates
that the battery is being charged, while the green led means that
the recharge has been completed.
3. USB power supply cable. If you have a PC, the battery can be char-
ged with the supplied USB power cable.
The icon will inform you about the battery status.
Icon State
Blinking
Full
40 | Instruction Guide Midland CT510
Charging
Completed
Page 41

Operating modes
Frquency Mode “VFO”
In this mode, you can use the POWER/DIAL knob to change the frequency or input the frequency by keypad directly.
Memory Mode “MR”
Under VFO mode, if you have stored one memory channel at least, press
VFO to enter Memory mode MR.
The display will show the frequency and the channel number at the left
top.
Channel Mode “CH”
When you have stored one memory channel at least, turn on the radio
while keeping pressed ENT: you enter CH mode.
Modo FM
CT 510 operates also on the FM radio frequency FM: 88.00 – 108.00 MHz.
To set the scan frequency range and store your favorite channels, see
paragraph “Shortcut operations”, step 7.
MENU mode
To enter MENU mode, press F/ and ENT. The options to choose are 26 in
total. See chapter “Menu operations”.
Instruction Guide Midland CT510 | 41
Page 42

Basic operations
Switching power on/off
To turn on the radio press the POWER/DIAL knob for 3 seconds.
If the ‘POWER ON’ voice is not heard, it means that the vocal announcement is disabled. See par. “Shortcut operations”.
Frequency adjustment
CT 510 can operate in VFO mode, allowing a free tuning throughout the
frequency band.
If you turn the POWER/DIAL knob clockwise, you will select a higher frequency, while counter-clockwise you will select a lower frequency.
Transmission
1. Push PTT to transmit; the led BUSY/TX will turn red.
2. Relase PTT to return to reception.
3. During transmission, the tx power level indicator will appear in the
left upper side of the LCD.
4. When the low power is activated, the display shows ‘L’.
Keypad lock
To prevent accidental pressure of the keys, you can activate the keypad
lock function (manual or automatic). See step 21 in chapter “Menu operations”.
1. Enter Menu mode by pressing F/
2. Rotate the POWER/DIAL knob to select item 21: KEY LK.
3. Confirm by pressing ENT.
4. Rotate the POWER/DIAL knob to choose one of the two options:
Manual and Auto.
5. Confirm by pressing ENT.
and ENT.
42 | Instruction Guide Midland CT510
Page 43

6. The display shows
7. To unlock the keypad press F/
Note:
• In this mode, if you rotate the POWER/DIAL knob you will adjust the
volume.
• To lock manually the keypad, push the F/
.
for 3 seconds.
button for 2 seconds.
Multi-function side keys operation (via software)
CT 510 provides two multifunction side keys, that have the same options.
By the programming software, you can set their functions according to
your requirements.
1. None.
2. Monitor and volume adjustment (Default: multi-functional black
key). If you keep pressed this button, the radio will turn to monitor
function; the volume will be indicated on the LCD. Rotate the PO-
WER/DIAL knob to adjust the desired level.
3. 1750 Hz CALL Tone. This function can be assigned to the side key.
When you press this button, you generate a 1750Hz tone that allows to communicate through repeaters. Then, release this key and
transmit by pressing PTT.
4. Emergency call (Default: multi-functional orange key). When this
function is activated, press briefly this button and PTT to send an
alarm signal. Exit by pushing any key.
Instruction Guide Midland CT510 | 43
Page 44

Shortcut operations
To speed up the activation of some functions, you can press F/ along
with another one. Here below the list.
1. Squelch threshold adjustment.
Press F/
the desired level (from 0 to 9) by rotating the POWER/DIAL knob.
2. High/low power adjustment
Press F/
select it by rotating the POWER/DIAL knob. If the low power is
selected, “L” will appear at the bottom of the LCD.
3. Priority scan setting
To set the priority scan press F/
ble in MR or CH mode.
4. Shift offset direction setting (Repeater shift)
Press F/
Rotate the POWER/DIAL knob to select downwards ‘-‘ or upwards
‘+’. When the repeater shift is enabled, the LCD will show the relative icon (‘+’ or ‘-‘ depending on what you chose).
5. Channel spacing setting
Press F/
the POWER/DIAL knob to select the desired setting; you can choose amongst: 5/6.25/10/12.5/25.0/37,5/50.0/100.0 KHz.
6. Enabling / disabling the VOX function
Press F/
ON or OFF by rotating the POWER/DIAL knob.
7. FMW Radio mode
Press F/
the LCD, the FM icon will appear. To select the desired frequency rotate the POWER/DIAL knob or edit it directly with the keypad. The
frequency range is 88.00 - 108.00 MHz. To exit push again F/
8 FM. In FMW radio mode, CT 510 can monitor the receiver signals
in the amateur band. When you receive a call, the radio switches
temporarily in FM mode. After 5 seconds from the end of the call,
the radio returns to FMW mode.
and 1/SQL to enter the squelch threshold setting. Select
and 2/PWR to enter the high/low power setting; you can
and 3/PRI; this function is availa-
and 4S-D to enter the shift offset direction in VFO mode.
and 6 STEP to enter the channel spacing setting. Rotate
and 7 VOX to activate/deactivate the VOX function. Select
and 8 FM to enter the FMW radio mode; at the bottom of
and
44 | Instruction Guide Midland CT510
Page 45

8. Keypad beep setting
Press F/
POWER/DIAL knob to select amongst OFF / TONE /VOICE.
9. CTCSS / DCS setting
Press F/
codes. If you push again F/ you set the tones in reception and/or
transmission. To switch between CTCSS and DCS press repeatedly
the VFO key.
OFF → CTCSS → DCS N → DCS I → OFF.To select a CTCSS tone or a
DCS code rotate the POWER/DIAL knob; press ENT to confirm and
U/V to exit.
10. Scan
Press F/
tion rotate the POWER/DIAL knob.
The scan can be done in VFO, MR and CH modes.
11. Channel storage
Press F/
desired channel. Press ENT to confirm.
12. Menu mode
Press F/
tions”.
and 9 BEEP to enter the keypad beep setting. rotate the
and 0 SQT to set CTCSS sub-audio tones and DCS digital
and VFO to start scanning. To change the scanning direc-
and U/V; rotate the POWER/DIAL knob to store the
ENT to enter the menu mode. See chapter “Menu opera-
Number key operation
In VFO mode, you can select a frequency directly by editing the number
on the keypad. If this number is out of band, the display will show “ERROR”. In MR mode this number selects a stored channel.
Instruction Guide Midland CT510 | 45
Page 46

FUNCTIONS SET BY MENU
Step Icon and Function
1 TX_SEL (priority transmission)
2 APRO (voice mode)
3 BCLO (busy channel lockout)
4 W/N (wide/narrow band)
5 SCAN (scan list)
6 OFFSET (shift frequency setting)
7 CH_NAM (channel name)
8 NAM_SW (channel name displayed)
9 OPENS (Power-on display)
10 MSG (Power-on message)
11 D_WAIT (dual watch)
12 LAMP (Black light setting)
13 DC (battery voltage)
14 1750_S (note setting)
15 TOT (time-out-timer)
16 RX_SAV (battery saving)
17 SCANS_S (scan mode selection)
18 SCAN_V (scan velocity setting)
19 APO_SW (automatic power off)
20 RX_ALT (emergency alert reception)
21 KEY_LK (keypad lock)
22 VOX_LV (VOX level adjustment)
23 VOX_DV (VOX delay adjsutment)
24 FM_STP (FM radio frequency step setting)
25 SK_CTS (CTCSS scan)
26 SK_DCS (DCS scan)
46 | Instruction Guide Midland CT510
Page 47

Available Selection Step
BUSY / EDIT 1
OFF / COMP / BCLO / ON / SCRM 2
OFF / ON 3
WIDE / NARROW 4
ADD / DEL 5
0.000 - 99.950 MHz 6
0 - 9, A - Z, +, -, /, _ 7
OFF / ON 8
OFF / DC / MSG 9
0 - 9, A - Z, +, -, /, _ 10
OFF / ON 11
OFF / ON / AUTO 12
CURRENT VOLTAGE 13
OFF / 1 - 15 S 14
OFF / 30 - 360 S 15
OFF / 1-1 / 1-2 / 1-3 / 1-4 16
CO / TO / SE 17
100, 150, 500 mS 18
OFF / 30 - 180 S 19
OFF / ON 20
AUTO / MANUAL 21
1 - 9 22
0.5, 1.0, 2.0, 3.0 S 23
5/6,25/10/12,5/25/37,5 - 50/100kHz 24
67.0 - 2541.0 Hz 25
D023N - D754N, D023I - D0754I 26
Instruction Guide Midland CT510 | 47
Page 48

Menu operations
Press F/ : “F” will appear at the left bottom of the LCD.
To enter the menu mode, press ENT; “MENU” will be displayed.
Rotate the POWER/DIAL to select the menu items and press ENT to enter
the desired menu.
Choose the desired setting and confirm by pushing ENT.
Press U/V to exit and return to the latest setting. Then push VFO to exit
the menu mode.
48 | Instruction Guide Midland CT510
Page 49

Description and setting of the menu functions
1. Priority transmission (TX_SEL)
CT 510 can operate on a sub-band despite you are working on the operating band.
EDIT: transmission on the operating band.
BUSY: transmission on the latest used band.
The default setting is EDIT.
2. Voice mode (APRO)
OFF: voice off.
COMP: voice compander.
BCLO: busy channel lockout
ON: busy channel lockout function is active.
SCRM: Scrambler
3. Busy channel lockout (BCLO)
ON: busy channel lockout function is activated.
OFF: busy channel lockout function is off.
4. Bandwidth selection wide / narrow (W/N)
Wide: 25kHz
Narrow: 12,5kHz
5. Scan list (SCAN)
This function is available only in MR mode and is useful to add or delete
the current memory channel to the scan list.
Select this menu and rotate the POWER/DIAL knob to select “ADD” or
“DEL”; confirm by pushing PTT or ENT and exit with U/V key.
Instruction Guide Midland CT510 | 49
Page 50

6. Frequency offset
Offset is the frequency difference between transmission and reception;
in this radio it is from 00.000 to 99.950 MHz and is set with the POWER/
DIAL knob. Confirm by pressing PTT or ENT and exit with U/V.
7. Channel name (CH_NAM)
Each memory channel can be associated with an alphanumeric name up
to 6 characters.
This function can be enabled only in CH or MR mode.
Enter this mode and rotate the POWER/DIAL knob to choose the first
digit from “0” – “9” to “A” – “Z”.
To switch to the next digit push 2 PWR; to go back to the previous character press 1 SQL.
To delete your settings use the 0 SQT key and push ENT for confirmation.
8. Name/frequency mode (NAM_SW)
In CH and MR mode, rotate the POWER/DIAL knob to select “ON” / “OFF”.
ON: the display shows the channel name (if set).
OFF: the display shows the frequency.
Note: Before enabling this function, you must edit the channel name first
(see previous par.).
9. Power-on message (OPENS)
OFF: standard power on: the display shows the frequency or the
channel number.
MSG: the display shows the ‘power-on’ message that you set.
DC: the current battery voltage is displayed.
10. Power-on message setting (MSG)
With this function you can edit your power-on message up to 6 characters.
With the POWER/DIAL knob, select the first digit from “0” – “9”, “A” – “Z”, “
”, “+”, “-“, “/” and “_”. Press 2 PWR to switch to the next character and 1 SQL
to go back to the previous one.
To delete your settings use the 0 SQT key and push ENT for confirmation.
50 | Instruction Guide Midland CT510
Page 51

11. Dual monitor (D_WAIT)
OFF: dual monitor activated: the radio works on both channels.
ON: dual monitor deactivated: the radio works only on the current
channel.
12. Backlight setting (LAMP)
The backlight can be enabled/disabled.
After having selected the LAMP function, rotate the POWER/DIAL knob
to select the desired option:
ON: backlight enabled.
OFF: backlight disabled.
AUTO: the backlight will be turned on upon any operation and will
stay active for 5 seconds.
Confirm by pushing PTT or ENT and exit with the U/V key.
13. Battery voltage (DC)
The current battery voltage is displayed.
14. 1750 Hz tone call setting and PTT button.
The 1750Hz tone call can be sent to repeaters when you press PTT.
OFF: the tone is not sent.
ON: you sent the 1750Hz tone and the transmitting time can be
adjusted between 1 and 15 seconds.
15. TOT time-out-timer
The TOT function is used to prevent a too long transmission. This function
temporarily blocks transmissions if the radio has been used beyond the
maximum time permitted. Once reached the preset timer, the radio will
be forced in reception mode.
It is adjustable from 30 to 360 seconds or can be disabled (OFF).
In TOT mode, rotate the POWER/DIAL knob to select the desired option;
confirm by pushing PTT or ENT and exit with U/V key.
Instruction Guide Midland CT510 | 51
Page 52

16. RX power saving (RX_SAV)
You can set the RX power saving in different levels from 1-1 to 1:4. Select
OFF to deactivate it.
In RX_SAV mode rotate the POWER/DIAL knob to select your choice.
Confirm by pushing PTT or ENT and exit with U/V key.
17. Scan mode selection (SCAN_S)
The Scan function is very useful to monitor the channels before transmitting. You can set three different scan modes.
In SCAN_S mode, rotate the POWER/DIAL knob to select the desired
scan type:
Time-operated scan (TO)
When the radio detects a signal it will stop scanning; the status will remain about 5 seconds but the radio will continue to scan even if the signal is still there.
Carrier-operated scan (CO)
The radio will stop scanning when detects a signal and remains on the
same frequency until the signal is missing.
Search Scan (SE)
When the radio detects a signal, it remains on that channel and stop
scanning.
Confirm your selection by pushing PTT or ENT and exit with the U/V key.
18. Scan velocity setting
You can adjust the scan velocity from 100 to 500mS with a step of 50 mS.
19. Auto power-off (APO_SW)
To set the automatic power-off rotate the POWER/DIAL knob till the display shows “APO”; confirm by pushing PTT or ENT and exit with the U/V
key. The radio will automatically turn off if there’s not operation after the
pre-set time.
OFF: “APO” off.
You can set the automatic power-off time from 30 to 180 minutes with a
step of 30 minutes.
52 | Instruction Guide Midland CT510
Page 53

20. Emergency alert reception (RX_ALT)
In this mode, you can enable/disable the emergency alert reception.
OFF: Emergency alert is not received
ON: Emergency alert received
21. Keypad lock (KEY_LK)
AUTO: after 8 seconds from the last conversation, the keypad will be
automatically locked.
MANUAL: to unlock the keypad press F/ for 2 seconds.
22. VOX level adjustment (VOX_LV)
In this mode you can adjust the VOX sensitivity. Level 1 is the least sensitive.
23. VOX delay adjustment (VOX_DV)
This option keeps the radio in transmit mode after you stop talking and
allows you to speak at a steady rate with no loss of transmission. The delay can be adjusted in different levels (if it is set too short it may cause
transmission to stop between some words): 1.5 / 1.0 / 2.0 / 3.0 seconds.
24. FM radio frequency step (FM_STP)
It can be selected in the following values: 25, 50, 100 or 200 KHz.
25. CTCSS scanning (SK_CTS)
With this function, you scan through the CTCSS tones.
Start the CTCSS tones scanning and confirm with PTT or ENT; exit by
pushing U/V.
When the radio detects a signal with the same CTCSS tone, the scan will
stop and CTCSS blinks on the display.
To invert the scanning direction rotate the POWER/DIAL knob.
26. DCS scanning (SK_DCS)
DCS codes scanning.
When the radio detects a signal with the same DCS code, the scan will
stop and DCS blinks on the display.
Instruction Guide Midland CT510 | 53
Page 54

To invert the scanning direction rotate the POWER/DIAL knob.
Reset
To delete all the settings of the menu, you can make a reset:
Press and hold the F/ key to turn on the radio.
The display shows: “RESET YES?”.
To proceed, press ENT ; you will hear a first beep indicating the reset is
beginning. At the end, you will hear a second beep to confirm that the
reset has finished.
Then, the radio automatically switches to VFO mode.
RESET
YES ?
54 | Instruction Guide Midland CT510
Page 55

Storing and deleting a memory channel
RESET
YES ?
Storing a frequency
In VFO mode edit the desired frequency directly with the keypad or by
rotating the POWER/DIAL knob.
Press F/ and U/V; the digits (where you will store the frequency tuned)
blink at the left of the frequency.
Edit the desired frequency with the keypad or by rotating the POWER/
DIAL knob. Confirm your selection with ENT key.
Deleting a memory
1. In MR or CH mode, switch off the radio. Turn it on again and push
U/V at the same time. The display shows the message “DEL ?”. The
channel number blinks at the left of the frequency on the LCD.
DEL ?
2. Select the channel to delete with the keypad or by rotating the POWER/DIAL knob, then press ENT.
3. Now the radio will skip to the next channel. If you want to delete it,
repeat the same procedure.
Instruction Guide Midland CT510 | 55
Page 56

Storing and deleting FM radio channels
RESET
YES ?
FM radio channels storage
In FMW mode, press F/ and U/V; the channel number to store blinks at
the left of the frequency on the LCD.
Select the desired FM radio channel with the keypad or by rotating the
POWER/DIAL knob. Push ENT to confirm.
FMW mode selection
In FMW radio mode push VFO to skip from FMW memory mode and FMW
frequency mode. (This is possible only if some FMW radio channels have
been stored).
Deleting FMW memory channels
In FMW memory mode, turn off the radio. Switch it on again and push
U/V at the same time. The message “DEL ?” will appear on the display and
the channel number blinks at the left of the frequency.
DEL ?
Select the channel to delete with the keypad or by rotating the POWER/
DIAL knob. Push ENT to confirm.
Repeat the same procedure to delete other channels (25 maximum).
56 | Instruction Guide Midland CT510
Page 57

Technical specifications
General
Frequency range VHF: 144-146MHz / UHF: 430- 440MHz
FMW: 88 – 108 MHz (RX only)
Operating temperature -20° +55°C
Voltage 3.7V 1300mAh
Memory 128 channels
Working mode simplex
Dimensions 95 (H) x 52(L) x 31(D)
Weight 139gr (with battery and antenna)
Antenna impedance 50Ω
Duty cycle 5/5/90
Transmitter
Output power high ~ 2 W / low ~ 1 W
Max deviation wide band < 5 KHz, narrow < 2,5 KHz
Modultation distortion ≤ 5%
Current drain ≤1.5 A
Receiver
Sensitivity -122 dBM @ 12 dB SINAD
Audio distortion ≤ 5%
Audio power ≥0.5 W
Specifications are subject to change without notice.
WARNING: Direct plug-in ac/dc power supply must be used for disconnecting the transceiver from the mains; the desktop charger must be positioned close to the unit and easily accessible.
Instruction Guide Midland CT510 | 57
Page 58

Resumo
Artigos na caixa 60
Manutenção 60
Função principal 61
Descrição do dispositivo 62
Ecrã de LCD 62
Emissor-recetor 64
Instalação da antena/acessórios 66
Conjunto da bateria 66
Antena 67
Instalação da presilha do cinto 67
Instalação de um microfone/altifalante externos 67
Faixa de pulso 68
Carregador da bateria 68
Modos de funcionamento 69
Modo de frequência “VFO” 69
Modo de memória “MR” 69
Modo do canal “CH” 69
Modo FM 69
Modo MENU 69
Operações básicas 70
Ligar e desligar 70
Ajuste das frequências 70
58 | Manual de Instruções CT510
Page 59

Transmissão 70
Bloqueio de teclado 70
Funcionamento das teclas laterais multifunções (através do
software) 71
Atalhos 72
Funcionamento das teclas numéricas 73
Operações do menu 76
Descrição e definição das funções do menu 77
Reposição 82
Armazenamento e eliminação de um canal de
memória 83
Armazenamento de uma frequência 83
Eliminar uma memória 83
Armazenamento e eliminação dos canais de rádio FM
84
Armazenamento dos canais de rádio FM 84
Seleção do modo FMW 84
Eliminar canais de memória FMW. 84
Especificações técnicas 85
Manual de Instruções CT510 | 59
Page 60

Artigos na caixa
• Emissor-recetor CT 510
• Antena
• Conjunto de bateria Li-lon 1300 mAh
• Presilha de cinto
• Carregador de mesa com adaptador de parede
• Auricular
• Faixa de pulso
• Guia rápido
Se algum artigo estiver em falta, entre em contacto com o seu fornecedor
MIDLAND.
Manutenção
O emissor-recetor é um produto eletrónico e deve ser manuseado
com cuidado. As sugestões que se seguem irão ajudá-lo a preencher
quaisquer obrigações da garantia e desfrutar deste produto durante
muitos anos.
• Não tente abrir o rádio. O manuseio sem conhecimento da unida-
de pode danificá-la e origina a anulação da garantia.
• Não use o rádio se a antena estiver danificada.
• Não armazene o rádio num local exposto à luz solar ou em áreas
quentes.
• Mantenha o rádio seco. A água da chuva e a humidade corroem
os circuitos eletrónicos
• Não armazene o rádio em áreas poeirentas ou sujas.
• Caso o rádio emane um odor ou fumo peculiares, desligue-o ime-
diatamente e retire a bateria do rádio.
• Não efectue transmissões sem a antena.
• Não use detergentes, álcool ou substâncias abrasivas. Limpe o
rádio com um pano macio.
• Desligue o rádio antes de entrar em áreas inflamáveis ou explo-
sivas.
60 | Manual de Instruções CT510
Page 61

Função principal
• Exibição de banda dupla (VHF/UHF) e nome do canal
• Banda de frequência:144-146MHz e 430-440MHz (Rx / Tx).
• Modo de funcionamento: UHF-VHF, VHF-VHF ou UHF-UHF
• Potência de saída: 2W VHF / UHF
• 128 canais armazenados
• Misurador
• Dispositivo de compansão
• Função VOX
• 212 Códigos DCS e 50 tons CTCSS
• Função “VOZ”
• Função de emergência SOS
• Possibilidade de seleção do espaçamento de canais entre 25kHz e
12,5 kHz
• Visualização opcional no ecrã do número do canal, número de canal +
frequência ou apenas da frequência
• Função de frequência invertida
• Varrimento
• Rádio FM
• Escalão de frequência: 5 kHz, 6.25 kHz, 10 kHz, 12.5 kHz, 25 kHz, 37,5
kHz, 50 kHz, 100 kHz
• Seleção da potência tx: alta ou baixa
• Conjunto de bateria Li-lon 1300 mAh
• Desvio de frequência: 0-69,950 MHz
• Repetidor de variação
• Função BCLO (bloqueio de canal ocupado)
• Tom do sinal Roger no início/fim da transmissão
• TOT (Temporizador de tempo limite)
• Bloqueio de teclado
• Pesquisa de frequência com CTCSS/DCS
• Pesquisa prioritária
• DTMF
• Reinicialização de função/canal
• Tom de 1750 Hz para repetidores
• Tomada acessória: 1 Pino 2,5mm
Manual de Instruções CT510 | 61
Page 62

Descrição do dispositivo
Ecrã de LCD
Indicadores Funções
Indica a frequência de funcionamento, o número
do canal e o menu de funções
Exibe o número do canal selecionado ou o menu de
funções, sempre que o rádio se encontra no modo
Bloqueio de teclado
MR (memória)
Desligamento automático
Tom do sinal sonoro
CT
DT DCS
Seleção do menu de funções
62 | Manual de Instruções CT510
CTCSS
Page 63

DW
VOX
Monitoriza um sinal no modo VFO e MR ao mesmo
tempo
Função VOX
Indicador de capacidade da bateria
FM
PRI
L
N
DTMF
Manual de Instruções CT510 | 63
Ativação/desativação do rádio FM
Receção de um canal prioritário ao receber ou
detetar um sinal
Apresenta a força do sinal recebido e a potência tx
Indicador de energia baixa
Indicador da banda estreita
função DTMF ativa
Ícone de alternância positiva/negativa
Distorcedor de voz ativo
Page 64

Emissor-recetor
1
3
464
2
5
7
8
9
64 | Manual de Instruções CT510
10
11
Page 65

1. Antena. Ligue aqui a antena fornecida.
2. Busy (ocupado)/TX. O indicador led ilumina-se a verde durante a
receção e a vermelho, durante a transmissão.
3. MIC/SP. Tomada para a ligação do microfone/auricular.
4. POWER/DIAL (energia/marcação): Prima e mantenha premido
durante 3 segundos para ligar ou desligar o emissor-recetor. Esta
opção é também utilizada para definir frequências, selecionar
opções do menu e ajustar o volume.
5. Ecrã de LCD
6. CC externa. Esta tomada permite-lhe ligar a uma fonte de alimen-
tação de CC externa e a um cabo de programação
7. Teclado multifunções
8. Microfone embutido
9. Altifalante. O altifalante interno situa-se aqui.
10. PTT (premir para transmitir). Prima para transmitir e liberte-o para
receber, após a sua transmissão ter sido concluída.
11. Teclas multifunções. Tecla preta: monitor. Prima-a para ativar
a eliminação do ruído de fundo. Para ajustar o volume, prima-a e
rode a tecla DIAL (marcação). Tecla laranja: Botão de chamada de
emergência
Manual de Instruções CT510 | 65
Page 66

Instalação da antena/acessórios
Conjunto da bateria
Trinco da tampa da bateria
Deslize o trinco da tampa da bateria para desbloqueá-la e, de seguida,
deslize a tampa da bateria em direção à parte inferior, para a remover.
Instale o conjunto da bateria no compartimento da bateria.
Coloque novamente a tampa da bateria e deslize o trinco da tampa da
bateria para a posição de bloqueio.
66 | Manual de Instruções CT510
Page 67

Antena
A antena fornecida proporciona bons
desempenhos, tanto com bandas VHF como
UHF.
Para instalar a antena, enrosque-a no conetor
do emissor-recetor em sentido horário.
Desenrosque-a no sentido anti-horário para
removê-la.
Nota: Não efectue transmissões sem a antena.
Instalação da presilha do cinto
Utilize os parafusos para adaptar a presilha do cinto ao rádio.
Instalação de um microfone/altifalante externos
Abra a tampa da tomada do microfone/altifalante e
insira uma ficha do microfone/altifalante.
Tampa
Manual de Instruções CT510 | 67
Page 68

Faixa de pulso
RESET
YES ?
DEL ?
12
Enfie a faixa do pulso através do orifício na parte traseira do rádio.
Carregador da bateria
Sempre que o ecrã exibir o ícone , o conjunto da bateria está descarregado e deve ser colocado a carregar.
1. Carregamento apenas com o adaptador de parede. O CT 510
pode ser carregado diretamente no adaptador de parede (tomada
CC EXT).
2. Carregador de mesa. O carregamento da bateria também pode
ser feito usando o carregador de mesa fornecido. Não é necessário
colocar o rádio inteiro na base, basta colocar o conjunto da bateria.
O indicador vermelho indica que a bateria está a ser carregada e o
indicador verde indica que o carregamento já foi concluído.
3. Cabo de alimentação da USB. Se tiver um computador, a bateria pode
ser carregada usando o cabo de alimentação USB disponibilizado.
O ícone informa-lhe sobre o estado da bateria.
Ícone Estado
Intermitente
Contínuo
68 | Manual de Instruções CT510
A carregar
Completa
Page 69

Modos de funcionamento
Modo de frequência “VFO”
Neste modo, pode utilizar o botão POWER/DIAL para alterar a frequência ou introduzir a frequência diretamente através do teclado.
Modo de memória “MR”
No modo VFO, se tiver pelo menos um canal de memória armazenado,
prima VFO para introduzir o modo de memória MR.
O ecrã apresenta a frequência e o número do canal no canto superior
esquerdo.
Modo do canal “CH”
Quando tiver armazenado pelo menos um canal de memória, ligue o
rádio mantendo premida a tecla ENT: acede ao modo CH.
Modo FM
O CT 510 funciona ainda no modo de frequência de rádio FM: 88,00 –
108,00 MHz.
Para definir o intervalo das frequências da deteção e armazenar os seus
canais preferidos, consulte a alínea “Atalhos”, no passo 7.
Modo MENU
Para aceder ao modo MENU, prima F/ e ENT. Pode selecionar uma de 26
opções, no total. Consulte o capítulo “Operações do menu”.
Manual de Instruções CT510 | 69
Page 70

Operações básicas
Ligar e desligar
Para ligar o rádio, prima o botão POWER/DIAL durante 3 segundos.
Se a mensagem “LIGADO” não for ouvida, os avisos de voz encontram-se
desligados. Consultar a alínea “Atalhos”.
Ajuste das frequências
O CT 510 também pode funcionar no modo VFO, permitindo sincronizar
livremente por toda a banda de frequências.
Se rodar o botão POWER/DIAL no sentido horário, irá selecionar uma
frequência mais elevada; se rodar no sentido anti-horário, irá selecionar
uma frequência mais baixa.
Transmissão
1. Prima o PTT para transmitir; o indicador led BUSY/TX (ocupado/tx)
ilumina-se a vermelho.
2. Liberte o botão PTT para voltar à receção.
3. Durante a transmissão, o indicador do nível de energia tx é exibido
no canto superior esquerdo do ecrã LCD.
4. Sempre que o dispositivo tiver pouca bateria, o ecrã exibe a letra
“L” (baixo).
Bloqueio de teclado
Para impedir a pressão acidental de qualquer tecla, pode ativar a função
de bloqueio do teclado (manual ou automático). Consulte o passo 21 do
capítulo “Operações do menu”.
1. Aceda ao modo Menu, premindo F/
2. Rode o botão POWER/DIAL para selecionar o item 21: KEY LK (blo-
queio do teclado).
3. Confirme, premindo ENT.
70 | Manual de Instruções CT510
e ENT.
Page 71

4. Rode o botão POWER/DIAL para selecionar uma de duas opções:
Manual ou Automático.
5. Confirme, premindo ENT.
6. O visor exibe
7. Para desbloquear o teclado, prima F/
Nota:
• neste modo, se rodar o botão POWER/DIAL irá ajustar o volume.
• Para bloquear manualmente o teclado, prima o botão F/
segundos.
.
durante 3 segundos.
durante 2
Funcionamento das teclas laterais multifunções
(através do software)
O CT 510 inclui duas teclas laterais multifunções que contêm as mesmas
opções.
Ao programar o software, pode definir as funções de acordo com os requisitos pretendidos.
1. Nenhum.
2. Ajuste do monitor e do volume (Pré-definição: tecla preta multi-
funções). Se mantiver premido este botão, o rádio liga a função do
monitor; o volume é indicado no ecrã LCD. Rode o botão POWER/
DIAL para selecionar o nível desejado.
3. Tom de CHAMADA 1750 Hz. Pode atribuir uma tecla lateral a esta
função. Sempre que premir este botão, pode gerar um tom de 1750
Hz que lhe permite comunicar através de repetidores. De seguida,
liberte esta tecla e transmita, premindo a tecla PTT.
4. Chamada de emergência (pré-definição: tecla laranja multifuncio-
nal). Sempre que esta função for ativada, prima brevemente este
botão e a tecla PTT para enviar um sinal de alarme. Saia, premindo
qualquer tecla.
Manual de Instruções CT510 | 71
Page 72

Atalhos
Para acelerar a ativação de algumas funções, pode premir F/ em conjunto com outra tecla. Segue-se a lista.
1. Ajuste do limiar de eliminação do ruído de fundo.
Prima F/
eliminação do ruído de fundo (SQL). Selecione o nível desejado (de
0 a 9), rodando o botão POWER/DIAL.
2. Ajuste de potência alta/baixa
Prima F/
pode selecioná-la, rodando o botão POWER/DIAL. Se for selecionada
uma potência baixa, será exibido um “L” na parte inferior do ecrã de LCD.
3. Definição da deteção prioritária
Para definir a deteção prioritária, prima F/
está disponível nos modos MR e CH.
4. Variar a direção do desvio (Comutar repetidor)
Prima F/
VFO. Rode o botão POWER/DIAL para selecionar menos “-” ou mais “+”.
Sempre que a opção variar o repetidor estiver ativa, o ecrã LCD apresenta o ícone correspondente (“+” ou “-”, consoante a opção selecionada).
5. Definição de espaçamento de canais
Prima F/
canais. Rode o botão POWER/DIAL para selecionar a definição pretendida; pode selecionar entre: 5/6,25/10/12,5/25,0/37.5/50,0/100,0 KHz.
6. Ativação/desativação da função VOX
Prima F/
ON (ligado) ou OFF (desligado), rodando o botão POWER/DIAL.
7. Modo de rádio FMW
Prima F/
inferior do ecrã LCD, é exibido o ícone FM. Para selecionar a frequência pretendida, rode o botão POWER/DIAL ou edite diretamente com o teclado. O intervalo de frequência é de 88,00 - 108,00
MHz. Para sair, prima novamente F/ e 8 FM. No modo de rádio
FMW, o CT 510 pode monitorizar os sinais do recetor na banda
amadora. Sempre que receber uma chamada, o rádio comuta
temporariamente para o modo FM. 5 segundos após o final da
chamada, o rádio regressa ao modo FMW.
e 1/SQL para introduzir uma definição do limiar de
e 2/PWR para introduzir uma definição de potência alta/baixa;
e 3/PRI; esta função
e 4S-D para introduzir variar a direção do desvio no modo
e 6 STEP para introduzir a definição de espaçamento de
e 7 VOX para ativar/desativar a função VOX. Selecione
e 8 FM para introduzir o modo de rádio FMW; na parte
72 | Manual de Instruções CT510
Page 73

8. Definição de som do teclado
Prima F/
Rode o botão POWER/DIAL para selecionar OFF / TONE / VOICE
(desligar/tom/voz).
9. Definição de CTCSS / DCS
Prima F/
códigos digitais DCS. Se premir F/ de novo, define os tons na receção e/ou na transmissão. Para comutar entre CTCSS e DCS, prima
repetidamente a tecla VFO.
OFF → CTCSS → DCS N → DCS I → OFF. Para selecionar um tom
CTCSS ou um código DCS, rode o botão POWER/DIAL; prima ENT,
para confirmar e U/V para sair.
10. Varrimento
Prima F/
deteção, rode o botão POWER/DIAL.
A deteção pode ser feita nos modos VFO, MR e CH.
11. Armazenamento do canal
Prima F/
canal pretendido. Prima ENT para confirmar.
12. Modo de menu
Prima F/
lo “Operações do menu”.
e 9 BEEP para introduzir a definição de som do teclado.
e 0 SQT para definir os tons de sub-áudio CTCSS e os
e VFO para dar início à deteção. Para alterar a direção de
e U/V; rode o botão POWER/DIAL para armazenar o
ENT para introduzir o modo de menu. Consulte o capítu-
Funcionamento das teclas numéricas
No modo VFO, pode selecionar diretamente uma frequência, editando o
número no teclado. Se o número estiver fora do intervalo da banda, será
exibida no ecrã a mensagem “ERRO”. No modo MR, este número seleciona um canal armazenado.
Manual de Instruções CT510 | 73
Page 74

FUNÇÕES DEFINIDAS POR MENU
Passo Ícone e Função
1 TX_SEL (transmissão prioritária)
2 APRO (modo de voz)
3 BCLO (bloqueio de canal ocupado)
4 W/N (banda larga/estreita)
5 SCAN (lista de deteção)
6 OFFSET (definição de variação da frequência)
7 CH_NAM (nome do canal)
8 NAM_SW (nome do canal apresentado)
9 OPENS (Ligar o ecrã)
10 MSG (Ativar mensagens)
11 D_WAIT (escuta dupla)
12 LAMP (definição de luz preta)
13 DC (tensão da bateria CC)
14 1750_S (definição de nota)
15 TOT (tempo limite excedido do cronómetro)
16 RX_SAV (poupança de bateria)
17 SCANS_S (seleção do modo de deteção)
18 SCAN_V (definição da velocidade de deteção)
19 APO_SW (desligamento automático)
20 RX_ALT (recebimento de alerta de emergência)
21 KEY_LK (bloqueio do teclado)
22 VOX_LV (ajuste do nível de VOX)
23 VOX_DV (ajuste do atraso de VOX)
24
25 SK_CTS (deteção CTCSS)
26 SK_DCS (deteção DCS)
FM_STP (definição dos escalões de fre-
quência de radio FM)
74 | Manual de Instruções CT510
Page 75

Seleção disponível Passo
BUSY / EDIT 1
OFF / COMP / BCLO / ON / SCRM 2
OFF / ON (ligado/desligado) 3
WIDE / NARROW (larga/estreita) 4
ADD / DEL (adicionar/eliminar) 5
0.000 - 99.950 MHz 6
0 - 9, A - Z, +, -, /, _ 7
OFF / ON (ligado/desligado) 8
OFF / DC / MSG 9
0 - 9, A - Z, +, -, /, _ 10
OFF / ON (ligado/desligado) 11
OFF / ON / AUTO (ligado/desligado/automático) 12
TENSÃO DA CORRENTE 13
OFF / 1 - 15 S 14
OFF / 30 - 360 S 15
OFF / 1-1 / 1-2 / 1-3 / 1-4 16
CO / TO / SE 17
100, 150, 500 mS 18
OFF / 30 - 180 S 19
OFF / ON (ligado/desligado) 20
AUTO / MANUAL 21
1 - 9 22
0,5; 1,0; 2,0; 3,0 S 23
5/6,25/10/12,5/25/37,5 - 50/100kHz 24
67.0 - 2541.0 Hz 25
D023N - D754N, D023I - D0754I 26
Manual de Instruções CT510 | 75
Page 76

Operações do menu
Se premir F/ : é exibido um “F” no canto superior esquerdo do ecrã de
LCD.
Para aceder ao modo do menu, prima ENT; é exibida a mensagem
“MENU”.
Rode o POWER/DIAL para selecionar os itens do menu e prima ENT para
introduzir o menu desejado.
Selecione a definição desejada e confirme, premindo ENT.
Prima U/V para sair e regressar à última definição. De seguida, prima VFO
para sair do modo do menu.
76 | Manual de Instruções CT510
Page 77

Descrição e definição das funções do menu
1. Transmissão prioritária (TX_SEL)
O CT 150 pode funcionar numa sub-banda, inclusive se estiver a usar a
banda de operação.
EDIT (editar): transmissão na banda de operação
BUSY (ocupado): transmissão na última banda usada.
A definição padrão é EDIT.
2. Modo Voice (voz) (APRO)
OFF: sem voz.
COMP: dispositivo de compansão de voz.
BCLO: bloqueio de canal ocupado
ON: a função de bloqueio de canal ocupado está ativa.
SCRM: Misturador
3. Bloqueio de canal ocupado (BCLO)
ON: a função de bloqueio de canal ocupado está ativa.
OFF: a função de bloqueio de canal ocupado está inativa.
4. Seleção de largura de banda larga/estreita (W/N)
Larga: 25kHz
Estreita: 12,5kHz
5. Lista de deteção (SCAN)
Esta função está disponível apenas no modo MR e é útil para acrescentar
ou eliminar o canal de memória atual à lista de deteção.
Selecione o menu e rode o botão POWER/DIAL para selecionar “ADD”
(adicionar) ou “DEL” (eliminar), confirme premindo em PTT ou ENT e saia
com a tecla U/V.
Manual de Instruções CT510 | 77
Page 78

6. Desvio de frequência
O desvio consiste na diferença de frequência existente entre a transmissão
e a receção; neste rádio, corresponde a um intervalo de 00,000 a 99,950
MHz e é configurado com o botão POWER/DIAL. Confirme premindo
PTT ou ENT e saia em U/V.
7. Nome do canal (CH_NAM)
Cada canal de memória pode ser associado a um nome alfanumérico de
até 6 caracteres.
Esta função só se encontra ativa nos modos CH e MR.
Aceda a este modo e rode o botão POWER/DIAL para selecionar o primeiro dígito de “0” – “9” e “A – Z”.
Para passar ao próximo dígito, prima 2 PWR; para regressar ao carácter
anterior, prima 1 SQL.
Para eliminar as definições, use a tecla 0 SQT e prima ENT para confirmar.
8. Nome/frequência do modo (NAM_SW)
Nos modos CH e MR, rode o botão POWER/DIAL para selecionar “ON”/”OFF”.
ON: o ecrã exibe o nome do canal (se configurado).
OFF: o ecrã exibe a frequência.
Nota: antes de ativar esta função, deve editar primeiro o nome do canal
(ver o parág. anterior).
9. Mensagem de ativação (OPENS)
OFF: ativação padrão: o ecrã apresenta a frequência ou o número
do canal.
MSG: o ecrã apresenta a mensagem “ligar” que definir.
DC (CC): é apresentada a tensão atual da bateria.
10. Configuração da mensagem de ativação (MSG)
Com esta função, pode editar a sua mensagem de ativação usando até
6 caracteres.
Com o botão POWER/DIAL, selecione o primeiro dígito de “0” – “9”, “A” –
“Z”, “ ”, “+”, “-“, “/” e “_”. Prima 2 PWR para passar ao carácter seguinte e 1
SQL para regressar ao carácter anterior.
Para eliminar as definições, use a tecla 0 SQT e prima ENT para confirmar.
78 | Manual de Instruções CT510
Page 79

11. Monitor duplo (D_WAIT)
OFF: monitor duplo ativo: o rádio funciona em ambos os canais.
ON: monitor duplo inativo: o rádio funciona apenas no canal atual.
12. Definição de retroiluminação (LAMP)
A retroiluminação pode ser ativada/desativada.
Após selecionar a função LAMP, rode o botão POWER/DIAL para selecionar a opção desejada:
ON: retroiluminação ativa.
OFF: retroiluminação inativa.
AUTO: a retroiluminação acende-se sempre que é efetuada qualquer
operação e permanece acesa durante 5 segundos.
Confirme premindo PTT ou ENT e saia através da tecla U/V.
13. Tensão da bateria (CC)
É apresentada a tensão atual da bateria.
14. Definição de chamada com tom de 1750 Hz e o
botão PTT.
A chamada com um tom de 1750 Hz pode ser enviada para repetidores,
sempre que prime PTT.
OFF: o tom não foi enviado.
ON: enviou um tom de 1750 Hz e o tempo de transmissão pode ser
ajustado com um valor entre 1 a 15 segundos.
15. TOT tempo limite excedido do cronómetro
A função TOT é utilizada para impedir uma transmissão demasiado longa. A função bloqueia temporariamente as transmissões, se o rádio foi
usado para além do máximo de tempo permitido. Uma vez alcançado
o tempo predefinido, o rádio passa forçosamente ao modo de receção.
Este tempo pode ser ajustado com 30 a 360 segundos ou pode ser desativado (OFF).
Rode o botão POWER/DIAL para selecionar a opção desejada, confirme
premindo PTT ou ENT e saia com a tecla U/V.
Manual de Instruções CT510 | 79
Page 80

16. Poupança energética RX (RX_SAV)
Pode definir a poupança energética RX em vários níveis, de 1:1 a 1:4. Selecione OFF para desativá-la.
No modo RX_SAV, rode o botão POWER/DIAL para selecionar a sua opção.
Confirme premindo PTT ou ENT e saia através da tecla U/V.
17. Seleção do modo de deteção (SCAN_S)
A função Deteção é muito útil para monitorizar os canais antes da
transmissão. Pode selecionar três modos de deteção diferentes.
No modo SCAN_S, rode o botão POWER/DIAL para selecionar o tipo de
deteção desejado:
Deteção em função do tempo (TO)
Sempre que o rádio detetar um sinal, para de detetar; o estado permanece ativo durante cerca de 5 segundos, mas o rádio continua a deteção,
mesmo se o sinal continuar presente.
Deteção em função de uma transportadora (CO)
O rádio para a deteção quando deteta um sinal e permanece na mesma
frequência até o sinal desaparecer.
Deteção de pesquisa (SE)
Sempre que o rádio deteta um sinal, permanece no canal e para a digitalização.
Confirme a sua seleção, premindo PTT ou ENT e saia através da tecla U/V.
18. Definição da velocidade de deteção
Pode ajustar a velocidade de deteção de 100 a 500 mS com um escalão
de 50 mS.
19. Desligamento automático (APO_SW)
Para definir o desligamento automático, rode o botão POWER/DIAL até
o ecrã exibir “APO”; confirme premindo PTT ou ENT e saia através da tecla U/V. O rádio desliga-se automaticamente se não for operado após o
tempo predefinido.
OFF: Desligamento automático inativo.
Pode configurar o tempo de desligamento automático com um valor do
80 | Manual de Instruções CT510
Page 81

intervalo de 30 a 180 minutos e um escalão de 30 minutos.
20. Receção do alerta de emergência (RX_ALT)
Neste modo, pode ativar/desativar a receção do alerta de emergência.
OFF: o alerta de emergência não é recebido
ON: alerta de emergência recebido
21. Bloqueio do teclado (KEY_LK)
AUTO: 8 segundos após o final da última conversa, o teclado bloque-
ia-se automaticamente.
MANUAL: para desbloquear o teclado, prima F/ durante 2 segundos.
22. Ajuste do nível da VOX (VOX_LV)
Neste modo, pode ajustar a sensibilidade da VOX. O nível 1 é o menos sensível.
23. Ajuste do atraso da VOX (VOX_DV)
Esta opção mantém o rádio no modo de transmissão após ter parado de
falar e permite-lhe falar a um ritmo constante, sem perda de transmissão.
O atraso pode ser ajustado com diferentes níveis (se for demasiado curto,
pode fazer com que a transmissão seja interrompida entre algumas palavras): 1,5; 1,0; 2,0; 3,0 segundos.
24. Escalões de frequência do rádio FM (FM_STP)
Pode ser selecionado para os seguintes valores: 25, 50, 100 ou 200 KHz.
25. Deteção CTCSS (SK_CTS)
Com esta função, pode detetar todos os tons CTCSS.
Dê início aos tons CTCSS detetando e confirmando com as teclas PTT ou
ENT; saia, premindo U/V.
Sempre que o rádio detetar um sinal com o mesmo tom CTCSS, a digitalização é interrompida e o CTCSS pisca no ecrã.
Para inverter a direção de deteção, rode o botão POWER/DIAL.
26. Deteção DCS (SK_DCS)
Deteção dos códigos DCS.
Manual de Instruções CT510 | 81
Page 82

Sempre que o rádio detetar um sinal com o mesmo código DCS, a digitalização é interrompida e o DCS pisca no ecrã.
Para inverter a direção de deteção, rode o botão POWER/DIAL.
Reposição
Para eliminar todas as definições do menu, pode reinicializar:
prima e mantenha premida a tecla F/ para regressar ao rádio.
O ecrã mostra: “RESET YES?” (REINICIALIZAR?)
Para avançar, prima ENT; ouvirá um sinal sonoro inicial indicando o início
da reinicialização. No final, irá ouvir um segundo sinal sono para confirmar que a reinicialização foi concluída.
De seguida, o rádio comutará automaticamente para o modo VFO.
RESET
YES ?
82 | Manual de Instruções CT510
Page 83

Armazenamento e eliminação de um
RESET
YES ?
canal de memória
Armazenamento de uma frequência
No modo VFO, edite a frequência desejada diretamente com o teclado
ou rodando o botão POWER/DIAL.
Prima F/ e U/V; os dígitos (onde irá armazenar a frequência sintonizada)
piscam à esquerda da frequência.
Edite a frequência desejada com o teclado ou rodando o botão POWER/
DIAL. Confirme a sua seleção com a tecla ENT.
Eliminar uma memória
1. Nos modos MR ou CH, desligue o rádio. Ligue-o novamente e prima
em simultâneo a tecla U/V. O ecrã exibe a mensagem “DEL?” (eliminar?). O número do canal pisca à esquerda da frequência, no ecrã
LCD.
DEL ?
2. Selecione o canal que pretende eliminar com o teclado ou rodando
o botão POWER/DIAL e, de seguida, prima ENT.
3. O rádio passa agora ao canal seguinte. Se pretender eliminá-lo, repi-
ta o mesmo procedimento.
Manual de Instruções CT510 | 83
Page 84

Armazenamento e eliminação dos ca-
RESET
YES ?
nais de rádio FM
Armazenamento dos canais de rádio FM
No modo FMW, prima F/ e U/V; o número do canal que pretende armazenar pisca à esquerda da frequência no ecrã LCD.
Selecione o canal de rádio FM desejado com o teclado ou rodando o
botão POWER/DIAL. Prima ENT para confirmar.
Seleção do modo FMW
No modo de rádio FMW, prima VFO para passar ao modo de memória
FMW e ao modo de frequência FMW. (Tal só é possível se alguns canais
de rádio FMW tiverem sido armazenados).
Eliminar canais de memória FMW.
No modo de memória FMW, desligue o rádio. Ligue-o novamente e prima em simultâneo a tecla U/V. É exibida no ecrã a mensagem “DEL?” e o
número do canal pisca à esquerda da frequência.
DEL ?
Selecione o canal que pretende eliminar com o teclado ou rodando o
botão POWER/DIAL. Prima ENT para confirmar.
Repita o mesmo procedimento para eliminar outros canais (máximo de
25).
84 | Manual de Instruções CT510
Page 85

Especificações técnicas
Geral
Intervalo da frequência VHF: 144-146MHz / UHF: 430- 440MHz
FMW: 88 – 108 MHz (RX apenas)
Temperatura de funcionamento -20° +55°C
Tensão 3,7V 1300mAh
Memória 128 canais
Modo de funcionamento simples
Dimensões 95 (A) x 52(C) x 31(P)
Peso 139gr (com a bateria e a antena)
Impedância da antena 50Ω
Ciclo de funcionamento 5/5/90
Transmissor
Potência de saída alta ~ 2 W / baixa ~ 1 W
Desvio máx. banda larga < 5 KHz, estreita < 2,5 KHz
Distorção da modulação ≤ 5%
Consumo da corrente ≤1,5 A
Receptor
Sensibilidade -122 dBM @ 12 dB SINAD
Distorção de áudio ≤ 5%
Potência de áudio ≥0,5 W
As especificações estão sujeitas a alteração sem aviso prévio.
AVISO: Deve ser usada um fonte de alimentação ca/cc de tomada direta
para desligar o emissor-recetor da rede elétrica; o carregador de mesa
deve ser guardado nas proximidades da unidade e deve estar facilmente
acessível.
A CTE INTERNATIONAL
declara que este aparelho cumpre com o disposto na Directiva 1999/5/CE do
Parlamento Europeu e do Conselho de 9 de Março de 1999, transposta para a
legislação nacional pelo Decreto-Lei n.º 192/2000, de 18 de Agosto.
Manual de Instruções CT510 | 85
Page 86

INHALT
Verpackungsinhalt 88
Wartung 88
Hauptfunktionen 89
Beschreibung des Gerätes 90
LCD-Display 90
Funkgerät 92
Montage der Antenne/des Zubehörs 94
Batteriepack 94
Antenne 95
Montage des Gürtelclips 95
Montage eines externen Mikrofons/Lautsprechers 95
Riemen für das Handgelenk 96
Akkuladegerät 96
Betriebsmoden 97
Frequenzmodus „VFO” 97
Speichermodus „MR” 97
Kanalmodus „CH” 97
FM-Modus 97
MENÜ-Modus 97
Grundbetrieb 98
Ein-und ausschalten 98
Einstellung der Frequenz 98
86 | Bedienungsanleitung CT510
Page 87

Getriebe 98
Tastatursperre 98
Betrieb der Multifunktions-Seitentasten (über Software) 99
Kurzbefehle 100
Betrieb der Nummerntasten 101
Menüfunktionen 104
Beschreibung und Einstellung der Menüfunktionen
104
Reset 110
Speichern und Löschen der gespeicherten Kanäle 111
Speichern einer Frequenz 111
Speicher löschen 111
Speichern und Löschen von FM-Radiokanälen 112
Speichern von FM-Radiokanälen 112
Löschen von FMW-Speicherkanälen. 112
Technische Daten 113
Bedienungsanleitung CT510 | 87
Page 88

Verpackungsinhalt
• CT 510 Funkgerät
• Antenne
• Li-Ion Akkusatz 1300 mAh
• Gürtelclip
• Standlader mit Netzadapter
• Ohrhörer
• Riemen für das Handgelenk
• Schnellstartanleitung
Falls ein Einzelteil fehlen sollte, kontaktieren Sie bitte Ihren MIDLANDHändler.
Wartung
Ihr Funkgerät ist ein elektronisches Produkt und sollte pfleglich behandelt werden. Folgende Empfehlungen helfen Ihnen, die Gewährleistungsverpflichtungen zu erfüllen und dienen dazu, viele Jahre lang die
Freude an diesem Produkt zu erhalten.
• Versuchen Sie nicht, das Funkgerät zu öffnen. Fachunkundiger
Umgang mit dem Gerät kann zu Beschädigungen führen und lässt den
Gewährleistungsanspruch entfallen.
• Benutzen Sie das Funkgerät nicht mit beschädigter Antenne.
• Platzieren Sie das Gerät nicht an einem Ort mit direkter Sonneneinstrahlung oder an heißen Orten.
• Achten Sie darauf, dass das Funkgerät trocken bleibt. Regenwasser oder
Feuchtigkeit führt zur Korrodierung der elektronischen Schaltkreise.
• Stellen Sie das Funkgerät nicht in staubiger oder schmutziger Umgebung auf.
• Falls Sie einen seltsamen Geruch oder Rauch vom Funkgerät wahrnehmen, schalten Sie es bitte unverzüglich aus und entnehmen Sie die
Batterien.
• Nehmen Sie ohne Antenne keine Übertragungen vor.
• Verwenden Sie keine Reinigungsmittel, Alkohol oder Ähnliches. Reinigen Sie das Funkgerät mit einem weichen Tuch.
• Schalten Sie das Funkgerät aus, bevor Sie eine brennbare oder explosive Umgebung betreten
88 | Bedienungsanleitung CT510
Page 89

Hauptfunktionen
• Dualband (VHF/UHF) und Anzeige des Kanalnamens
• Frequenzband: 144-146 MHz & 430-440 MHz (Rx/Tx).
• Betriebsmodus: UHF-VHF, VHF-VHF oder UHF-UHF
• Ausgangsleistung: 2Watt VHF/UHF
• 128 gespeicherte Kanäle
• Scrambler
• Kompandersystem
• VOX-Funktion
• 212 DCS-Codes und 50 CTCSS-Töne
• „VOICE”-Funktion
• SOS Notfallfunktion
• Kanalabstand wählbar zwischen 25 kHz und 12,5 kHz
• Optionale Anzeige der Kanalnummer, der Kanalnummer + der Frequenz oder nur der Frequenz auf dem Display
• Invertierte Frequenzfunktion
• Scannen
• FM Radio
• Frequenzeingabe: 5 kHz, 6,25 kHz, 10 kHz, 12,5 kHz, 25 kHz, 37,5 kHz,
50 kHz, 100 kHz
• Wählbare TX-Leistung: hoch oder niedrig
• Li-Ion Akkusatz 1300 mAh
• Frequenzversatz: 0-69,950 MHz
• Shift-Repeater
• BCLO-Funktion (Busy Channel Lock Out)
• Roger-Piepton bei Beginn/Ende der Übertragung
• TOT (Time-Out Timer)
• Tastatursperre
• Frequenzsuche mit CTCSS/DCS
• Vorrangiger Scan-Vorgang
• DTMF
• Funktion/Kanal zurücksetzen
• 1750 Hz Ton für Repeater
• Zubehörbuchse: 1 Stift 2,5 mm
Bedienungsanleitung CT510 | 89
Page 90

Beschreibung des Gerätes
LCD-Display
Symbol Funktionen
Zeigt die gerade genutzte Frequenz
und die Kanalnummer des Funktionsmenüs
Zeigt die ausgewählte Kanalnummer
oder das Funktionsmenü, wenn das Radio im
Tastatursperre
MR-Modus (Speicher) ist
Automatische Abschaltung
Tastenton
CT
DT DCS
Funktion Menüauswahl
90 | Bedienungsanleitung CT510
CTCSS
Page 91

DW
VOX
Gleichzeitige Überwachung von Signalen im VFOund im MR-Modusand MR mode at the same time
VOX Funktion
Batteriestandsanzeige
FM
PRI
L
N
DTMF
Bedienungsanleitung CT510 | 91
Empfang eines Prioritäts-Kanals beim Empfang oder
UKW Radio aktiviert
Scannen eines Signales
Signalstärke empfangen/gesendet
Anzeige für niedrige Leistung
Anzeige für Niedrigfrequenz
DTFM Codes
Frequenzoffset +/-
Scrambler
Page 92

Funkgerät
2
1
3
464
5
7
8
9
92 | Bedienungsanleitung CT510
10
11
Page 93

1. Antenne. Schließen Sie hier die mitgelieferte Antenne an.
2. BUSY/TX. Die LED-Anzeige leuchtet während des Empfangs grün
und wechselt während der Übertragung zur Farbe Rot.
3. MIC/SP. Buchse für Mikrofon-/Kopfhöreranschluss.
4. POWER/DIAL. Halten Sie diese Taste drei Sekunden lang gedrückt,
um den Funkgerät ein- und auszuschalten. Diese Taste wird außerdem zum Einstellen der Frequenz, zur Bedienung des Menüs und für
die Lautstärkeeinstellung verwendet.
5. LCD-Display
6. Externes DC. Diese Buchse ermöglicht den Anschluss einer exter-
nen DC-Stromquelle und eines Programmierkabels
7. Multifunktionstastatur
8. Eingebautes Mikrofon
9. Lautsprecher. Der interne Lautsprecher befindet sich hier.
10. P TT. Drücken Sie die Taste, um die Übertragung zu beginnen und
lassen Sie die Taste los, wenn die Übertragung beendet ist.
11. Multifunktionstasten. Schwarze Taste: Bildschirm. Drücken Sie
diese Taste, um die Rauschsperre zu aktivieren. Zur Lautstärkenregelung, halten Sie die Taste gedrückt und drehen Sie die Taste DIAL.
Orangefarbene Taste: Notruftaste
Bedienungsanleitung CT510 | 93
Page 94

Montage der Antenne/des Zubehörs
Verriegelung
Batteriefach
Batteriepack
Verschieben Sie den Riegel der Batterieabdeckung, um diese zu entriegeln und schieben Sie dann die Batterieabdeckung nach unten, um sie zu
entfernen. Legen Sie die Batterien in das Batteriefach ein.
Platzieren Sie die Abdeckung des Batteriefachs wieder an ihren Platz und
schieben Sie den Riegel auf die Verriegelungsposition.
94 | Bedienungsanleitung CT510
Page 95

Antenne
Die mitgelieferte Antenne können Sie sowohl
im VHF- als auch im UHF-Band verwenden.
Schrauben Sie die Antenne im Uhrzeigersinn
auf den Anschluss des Funkgeräts, um sie zu
montieren.
Drehen Sie sie entgegen des Uhrzeigersinns,
um sie zu entfernen.
Hinweis: Nehmen Sie ohne Antenne keine
Übertragungen vor.
Montage des Gürtelclips
Befestigen Sie den Gürtelclip mit Schrauben an ihrem Funkgerät.
Montage eines externen Mikrofons/Lautsprechers
Öffnen Sie die Abdeckung der Mikrofon-/
Lautsprecherbuchse und stecken Sie den
Mikrofon-/Lautsprecherstecker ein.
Abdeckung
Bedienungsanleitung CT510 | 95
Page 96

Riemen für das Handgelenk
RESET
YES ?
DEL ?
12
Führen Sie den Riemen für das Handgelenk durch die Öffnung auf der
Rückseite des Funkgeräts.
Akkuladegerät
Wenn auf dem Display Folgendes angezeigt wird: bedeutet dies,
dass der Akkusatz leer ist und wieder aufgeladen werden muss
1. Aufladen mit Netzteil. Das CT 510 kann direkt über ein Netzteil
(externe Steckdose) aufgeladen werden.
2. Standlader. Die Akkus können außerdem über den mitgelieferten
Standlader aufgeladen werden: Sie müssen hierzu lediglich die
Akkus in die dafür vorgesehene Aufnahmevorrichtung platzieren.
Die rote LED-Anzeige weist darauf hin, dass die Akkus aufgeladen
werden, die grüne LED-Anzeige bedeutet, dass der Ladevorgang
beendet wurde.
3. USB-Netzkabel. Die Akkus können außerdem mit dem mitgelieferten
USB-Kabel über einen Computer geladen werden.
Das Symbol
zeigt Ihnen den Akkuladestand an.
Symbol Ladestand
Blinkt
vollständig geladen
Aufladen
Aufladen beendet
96 | Bedienungsanleitung CT510
Page 97

Betriebsmoden
Frequenzmodus „VFO”
In diesem Modus können Sie mit Hilfe des Reglers POWER/DIAL die Frequenz ändern oder direkt über die Tastatur eine Frequenz eingeben.
Speichermodus „MR”
Wenn Sie im VFO-Modus mindestens einen Kanal gespeichert haben,
drücken Sie VFO, um in dem Speichermodus MR zu gelangen.
Auf dem Display werden oben links die Frequenz und die Kanalnummer
angezeigt.
Kanalmodus „CH”
Wenn Sie mindestens einen Kanal gespeichert haben, schalten Sie das
Funkgerät ein, während Sie ENT gedrückt halten und Sie gelangen in den
CH-Modus.
FM-Modus
CT 510 arbeitet außerdem mit der Radiofrequenz FM: 88,00 – 108,00
MHz.
Wie Sie den Frequenzbereich einstellen und ihre Favoritenkanäle speichern, sehen Sie im Abschnitt „Kurzbefehle” unter Schritt 7.
MENÜ-Modus
Um in den Menümodus zu gelangen, drücken Sie F/ und ENT. Sie können insgesamt 26 Varianten wählen. Siehe Kapitel „Menüfunktionen”.
Bedienungsanleitung CT510 | 97
Page 98

Grundbetrieb
Ein-und ausschalten
Um das Funkgerät einzuschalten, drücken Sie drei Sekunden lang den
Regler POWER/DIAL.
Wenn Sie das „POWER ON”-Signal nicht wahrnehmen, bedeutet dies, dass
die Sprachankündigung deaktiviert ist. Siehe Abschnitt „Kurzbefehle”.
Einstellung der Frequenz
CT 510 kann im VFO-Modus betrieben werden, womit Sie sich beliebig
im gesamten Frequenzbereich bewegen können.
Wenn Sie den Regler POWER/DIAL im Uhrzeigersinn drehen, wählen Sie
eine höhere Frequenz. Drehen Sie den Regler entgegen des Uhrzeigersinns, gelangen Sie zu den niedrigeren Frequenzen.
Getriebe
1. Drücken Sie PTT für die Übertragung, die LED-Anzeige BUSY/TX
leuchtet rot.
2. Lassen Sie die Taste PTT los und Sie gelangen wieder in den
Empfangsmodus.
3. Während der Übertragung sehen Sie die TX-Leistungsanzeige links
oben auf dem LCD.
4. Bei niedriger Leistung wird „L” auf dem Display angezeigt.
Tastatursperre
Um das unbeabsichtigte Drücken von Tasten zu verhindern, aktivieren
Sie die Tastensperren (manuell oder automatisch). Siehe Schritt 21 im Kapitel „Menüfunktionen”.
1. Um in den Menümodus zu gelangen, drücken Sie F/
2. Drehen Sie den Regler POWER/DIAL und wählen Sie die Position
21: KEY LK
98 | Bedienungsanleitung CT510
und ENT
Page 99

1. Bestätigen Sie Ihre Wahl, indem Sie ENT drücken.
2. Drehen Sie den Regler POWER/DIAL um eine der folgenden zwei
Optionen zu wählen: Manuell und Auto.
3. Bestätigen Sie Ihre Wahl, indem Sie ENT drücken.
4. Auf dem Display wird
5. Drücken Sie drei Sekunden lang F/
nen.
Hinweis:
• Sie können in diesem Modus die Lautstärke anpassen, indem Sie den
Regler POWER/DIAL drehen.
• Um die Tastensperren manuell zu aktivieren, drücken Sie zwei Sekunden lang die Taste F/
angezeigt.
, um die Tastensperre zu entfer-
.
Betrieb der Multifunktions-Seitentasten (über
Software)
CT 510 ist mit zwei Multifunktions-Seitentasten ausgestattet, die über die
gleichen Funktionen verfügen.
Sie können mittels einer Programmiersoftware ihre Funktionen nach Ihren
Anforderungen festlegen.
1. Keine.
2. Display - und Lautstärkeeinstellungen (Voreinstellung: schwarze
Multifunktionstaste). Wenn die diese Taste gedrückt halten, schaltet
das Funkgerät in die Displayfunktion. Die Lautstärke wird auf dem
LCD angezeigt. Drehen Sie den Regler POWER/DIAL, um die gewünschte Lautstärke einzustellen.
3. 1750 Hz Rufton Diese Funktion kann der Seitentaste zugewiesen
werden. Wenn Sie diese Taste drücken ertönt ein 1750 Hz-Rufton, der
es Ihnen ermöglicht über die Repeater zu kommunizieren. Lassen Sie
diese Taste los und starten Sie die Übertragung, indem Sie PTT drücken.
4. Notruftaste (Voreinstellung: orangefarbene Multifunktionstaste).
Wenn diese Funktion aktiviert ist, drücken Sie kurz diese Taste und
PTT, um ein Alarmsignal zu senden. Sie verlassen diese Funktion, indem Sie eine beliebige Taste drücken.
Bedienungsanleitung CT510 | 99
Page 100

Kurzbefehle
Um die Aktivierung einiger Funktionen zu beschleunigen, können Sie die
Taste F/ zusammen mit anderen drücken. Im Folgenden finden Sie eine
Liste.
1. Einstellung der Rauschsperre.
Drücken Sie F/
vorzunehmen. Wählen Sie den gewünschten Level (0 bis 9), indem
Sie den Regler POWER2.
2. Einstellung hohe/niedrige Leistung
Drücken Sie F/
einzustellen. Nehmen Sie die Einstellungen vor, indem Sie den Regler
POWER/DIAL drehen. Falls die niedrige Leistung gewählt wird,
erscheint „L” im unteren Teil des Displays.
3. Einstellung vorrangiger Scan-Vorgang
Um Einstellungen am vorrangigen Scan-Vorgang vorzunehmen,
drücken Sie F/
MR oder CH verfügbar.
4. Einstellung Ausdehnrichtung (Shift-Repeater)
Drücken Sie F/
einzustellen. Drehen Sie den Regler POWER/DIAL und wählen Sie
nach unten „-” oder nach oben „+”. Wenn der Shift-Repeater aktiviert
ist, wird auf dem LCD in entsprechendes Symbol angezeigt („+” oder
„-”, je nachdem was Sie gewählt haben).
5. Einstellung des Kanalabstands
Drücken Sie F/
vorzunehmen. Drehen Sie den Regler POWER/DIAL, um die gewünschte Einstellung zu wählen. Sie können Folgendes wählen: 5/6,25/1
0/12,5/25,0/37,5/50,0/100,0 KHz.
6. Aktivierung/Deaktivierung der VOX-Funktion
Drücken Sie F/
aktivieren. Wählen Sie ON oder OFF, indem Sie den Regler POWER/
DIAL drehen.
FMW-Radiomodus
Drücken Sie F/
gen. Im unteren Teil des LCD leuchtet das FM-Symbol auf.Um die
gewünschte Frequenz zu wählen, drehen Sie den Regler POWER/
und 1/SQL, um Einstellungen an der Rauschsperre
und 2/PWR, um eine hohe/niedrige Leistung
und 3/PRI. Diese Funktion ist in den Betriebsarten
und 4 S-D, um im VFO-Modus die Ausdehnrichtung
und 6 STEP, um Einstellungen am Kanalabstand
und 7 VOX , um die VOX-Funktion zu aktivieren/de-
und 8 FM, um in den FMW-Radiomodus zu gelan-
100 | Bedienungsanleitung CT510
 Loading...