

Page 1

Contents
Maintenance .......................................................................................................... 2
Features ................................................................................................................2
Main indicators/controls
LCD display
Basic operations
Advanced operations
Menu operations
Self-Programming mode
Self-programming chart
Technical specications ....................................................................................... 19
Troubleshooting guide
........................................................................................................... 5
.........................................................................................3
.................................................................................................... 6
...........................................................................................15
...................................................................................... 17
....................................................................................... 18
......................................................................................... 20
E N G L I S H
1
Page 2

Content
• 1 transceiver
• 1 antenna
E N G L I S H
• 1 battery pack
• 1 belt clip
• 1 fast desktop charger
• User manual
If any items are missing, contact your dealer.
Maintenance
Your Two Way Radio is an electronic product of exact design and should be treated
with care .The suggestions below will help you to fulll any warranty obligations
and to enjoy this product for many years.
▪ Do not attempt to open the unit. Non-expert handling of the unit may damage it.
▪ When using regulated power supply, take notice of power voltage that must be
between 6V and 8V to avoid damaging the unit.
▪ Do not store the Radio under the sunshine or in hot areas.
▪ High temperatures can shorten the life of electronic devices, and warp or melt
certain plastics.
▪ Do not store the radio in dusty, dirty areas
▪ Keep the Radio dry. Rainwater or damp will corrode electronic circuits.
▪ If it appears that the Radio diffuses peculiar smell or smoke, please shut off its
power immediately and take off the charger or battery from the Radio.
▪ Do not transmit without antenna.
Features
▪ 4W Output power (VHF/UHF)
▪ 128 groups of memory channels
▪ 25KHz/12.5KHz Channel spacing compatible
▪ Automatic Numbering Identication (ANI) code
▪ Built-in VOX function
▪ All channels scan and priority channel scan
▪ Scrambler
▪ LCD backlight adjustable in 3 different colours
▪ Emergency alarm
▪ 50 CTCSS and 104 DCS Normal/Inverted selectable
▪ Time-out Timer (TOT)
▪ Busy channel lockout
2
Page 3
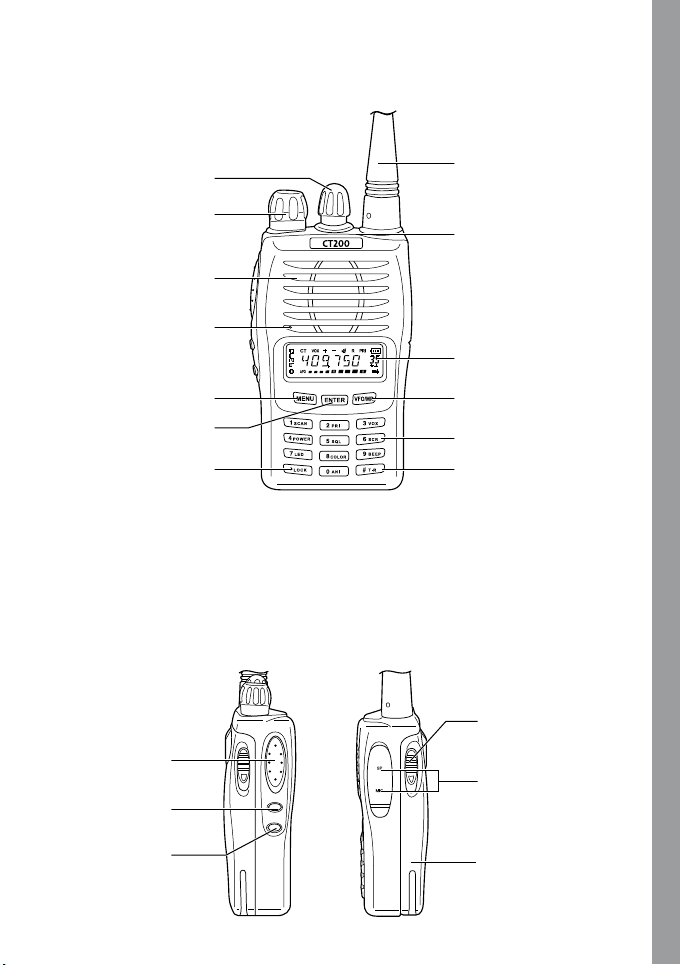
Main indicators/controls
1. Encoder
E N G L I S H
2. Antenna
3. Power/Volume on-off
5. Speaker
6. Microphone
8. Function key
10. Enter key
12. Keypad Lock
14. PTT key
15. Monitor key
4. Sending indicator
7. LCD
9. Clear key
11. keypad
13. Reverse freq key
17. Battery release
key
18. Speaker/
microphone jack
16. Call key
19. Battery (Li-ion)
3
Page 4
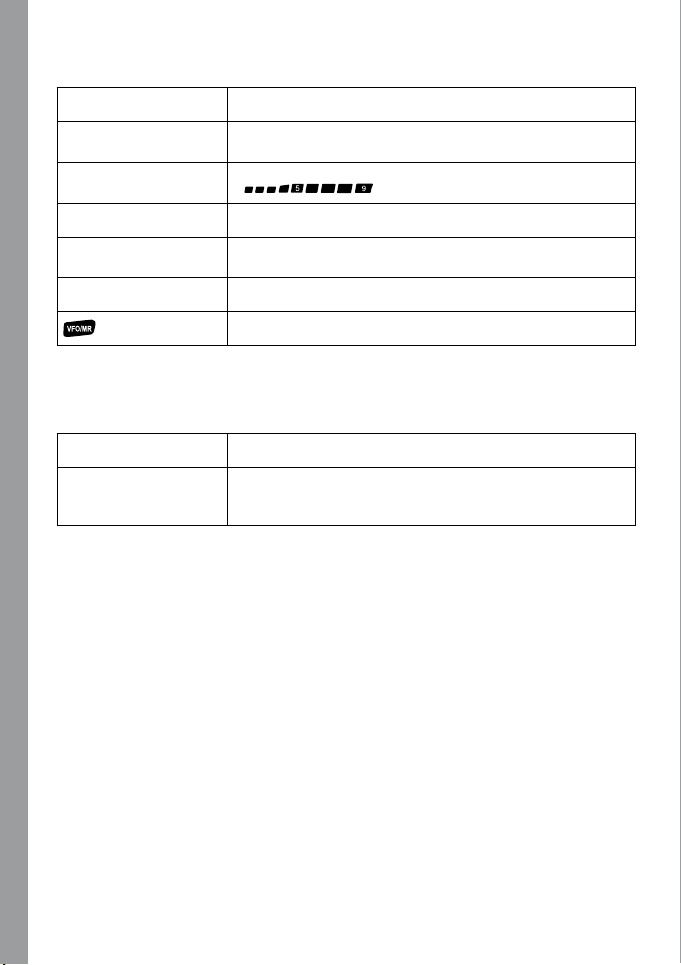
Main indicators/controls - description
Power/volume on-off To turn on/off the radio and adjust the volume level.
E N G L I S H
Sending indicator
Busy indicator
Press the
status.
When the channel is busy, the display shows
PTT is pressed, it glows to indicate the transmitting
PTT key
MONI (monitor) key
Call key To call your partner
When pressed, it enables the transmission.
Hold down this key in receiving mode: the channel in use will
be monitored. The busy channel indicator will glow.
To exit the menu and to switch from VFO to Memory mode.
Socket and connector
SMA Connector For connecting the supplied antenna
Speaker/microphone
jack
If you want to use a speaker or a microphone, connect
them to this socket. If not, prevent water from dropping into
it.
4
Page 5
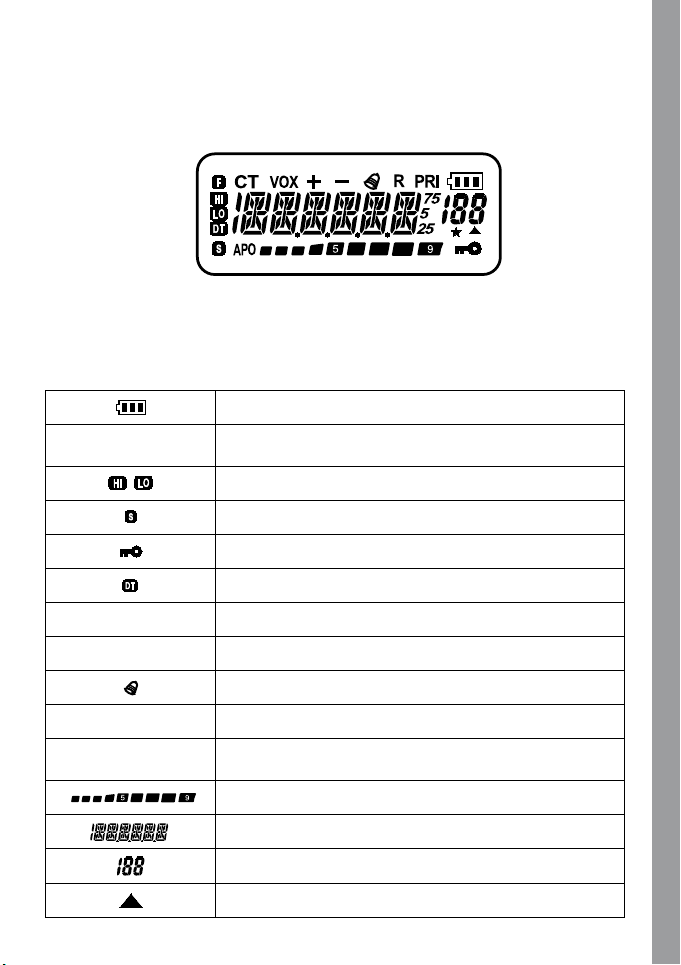
LCD display
Many icons are shown on the display when the radio is on. The following table can
help you to identify each of them.
Battery level indicator
+/-
/
CT CTCSS turned on
Shows the TX offset direction in relation to the RX
frequency
Power level indicator (HI=High/LO=Low)
Frequency scanning indication
Keypad lock
Displays when DCS is turned on
E N G L I S H
VOX VOX turned on
R Display reverse frequency
PRI
Call Function
Priority scan activated
Received signal strength and TX power
Frequency in use
Function menu
The scan nds a signal(open squelch)
5
Page 6

Basic operations
E N G L I S H
Supplied antenna
Insert the base of the supplied antenna into the SMA connector
and rotate it clockwise. Make sure the antenna has set down.
Take out the antenna from the base by rotating it counterclockwise rotation.
Turn on and off the power
If you want to turn on the power, rotate the PWR/VOL knob
clockwise until a beep is heard. All icons and frequencies
appear on the screen. You can adjust your desired volume by
turning the knob.
To turn off the power, rotate the
clockwise rotation. All the icons on the display will disappear
and the radio is off.
PWR/VOL knob counter-
Adjusting volume
After turning on the radio, rotate the PWR/VOL knob clockwise
to increase the volume and counter -clockwise to decrease.
Transmitting/Receiving
Firstly, hold down briey the MONI button to make sure that
the frequency is not busy and then press the
4/10cm far from the unit.
The TX indicator lights up.
Release the
PTT key to receive.
PTT. Speak
Emergency Alarm
Hold down the CALL key for 1 second and press MONI: the
radio will switch to emergency alarm.
Repeater tone
When you press any key, a note at 1750Hz is generated.
It gives the possibility to link to repeaters.
Keypad Lock
To Lock or unlock the buttons.
In channel/Frequency mode, press and hold down the
key for two seconds. The keypad will lock. Repeat the same
procedure to unlock it.
6
Page 7

Setting Reverse Frequency Function
This function is possible only when you are linked to a repeater:
it permits to invert the TX frequency with the RX frequency.
In Channel/Frequency mode, hold down
“R” appears on the display. Repeat the same procedure
until
to return to the previous frequency setting.
for two seconds
Scanning
The Scan version is very useful to monitor the channels before
transmitting.
1. Scan all the channels
In Channel/Frequency status, press
, : the radio will scan from the channel in use
through all the channels. Whenever any activity is detected,
the radio will suspend the scan for 5 seconds. It will then
continue to scan unless you press
scanning.
2. Priority channel scan
In Frequency Mode, press
. The radio will scan from the current frequency through
all the frequency range within 1MHz. Whenever any activity
is detected, the radio will suspend the scan for 5 seconds. It
will then continue to scan unless you press the
key to end scanning.
, , and
PTT or key to end
, , and
PTT or
Select scan type
In Frequency mode, press and rotate the Encoder until the
display shows “
knob again to select the scan type (TO/CO/SE). Conrm your
selection with
SCAN 13”. Press and turn the Encoder
and exit by pressing twice.
E N G L I S H
TO: Time-operated scan
Even though the radio stops on a busy channel, it will continue
scanning the other channels.
CO: Carrier-operated scan
The radio stops on a busy channel until there is no activity, and
then radio begins scanning the other channels.
SE: Search scan
The radio stops on a busy channel and exits the Scan mode.
7
Page 8

DTMF Code
In Channel/Frequency mode, press
E N G L I S H
Flank keys
PTT and digit a number on the keypad.
PTT: push to transmit and release
it to receive
PTT + CALL: push to enable a
1750Hz tone
MONI: push it to monitor the
frequency in use
Select Mode
Hold down and turn on the power: the radio can switch between the Channel
and Frequency mode. Repeat the procedure to pass to the other mode.
In Frequency mode, press
Channel+Frequency mode.
to switch between the Frequency mode and
To store a frequency
To store a frequency and its settings (CTCSS,DCS, SHIFT REPEATERS etc)
follow the procedure below:
1. at rst, choose all the settings to store,
2. press the
3. then, push
4. rotate the
store the frequency and its settings.
5. conrm your selection by pressing
(note: a triangle displayed underneath the channel number indicates that it has
already been stored).
8
button,
,
Encoder knob and select the memory number where you want to
.
Page 9

Delete a memory
1.Delete one stored channel
In
Hold down the
2. Reset (Delete all the settings in Frequency mode)
Hold down the
3. Delete all settings
Hold down
Mode turn off the power.
and the stored channel number will be displayed. Turn
the Encoder knob or select the channel to delete. Push
until “YES?” appears on the display; push it again to
conrm.
“RESET?” is displayed. Press until “VFO?” is shown
on the display; push it again for conrmation.
on the display. Turn the Encoder knob to select “FULL?”,
then press
VFO modes.
key and turn on the unit. “DEL?”
button and turn on the unit until
and turn on the unit until “VFO?” is shown
to delete all the settings in Frequency and
E N G L I S H
9
Page 10

Advanced Operations
Selecting the VOX sensitivity level
E N G L I S H
The VOX function is deactivated by default. To activate it follow
the procedure here below:
1. press the
2. turn the
03);
3. push the
4. turn again the
level (you can choose amongst 9 different levels);
5. push the
6. to exit, press twice
To activate and select rapidly the VOX function, you can do
it also by operating on the fast menu: press the key and
then
from point 3.
button;
Encoder knob until the display shows ‘VOX’ (menu
key;
Encoder knob and select the desired VOX
key again;
.
and follow the procedure above described starting
Setting the transmission power
To select the desired power level:
1. press the
2. turn the
3. push
4. turn the
(you can choose between 2 levels: ‘H’ ed ‘L’);
5. press
6. press twice the
To activate and select rapidly the power level, you can also
use the fast menu: press the key and then and
follow the procedure above described starting from point 3.
button;
Encoder knob until ‘POW’ (menu 04) is displayed
;
Encoder knob and select the desired power level
;
knob to exit.
10
Setting squelch
To select the squelch level:
1. press the
2. turn the
3. push
4. turn the
(9 different levels are available);
5. press
6. press twice the knob to exit.
To activate and select rapidly the squelch level, you can also
button;
Encoder knob until ‘SQL’ (menu 05) is displayed
;
Encoder knob and select the desired squelch level
;
Page 11

use the fast menu: press the key and then and
follow the procedure above described starting from point 3.
Scrambler on/off
To activate the scrambler, follow this procedure:
1. press the
2. turn the
displayed
3. push
4. turn the
(ON = activated; OFF = deactivated);
5. press
6. press twice the
To activate/deactivate rapidly this function, you can also use
the fast menu: press the key and then and follow
the procedure above described starting from point 3.
button;
Encoder knob until ‘SCRM’ (menu 06) is
;
Encoder knob and activate/deactivate the scrambler
;
knob to exit.
Backlight on/off
To select the LCD backlight:
1. press the
2. turn the
3. push
4. turn the
3 different options are available (AUTO, ON, OFF);
5. press
6. press twice the
To activate/deactivate rapidly the backlight, you can also use
the fast menu: press the key and then and follow
the procedure above described starting from point 3.
button;
Encoder knob until ‘LED’ (menu 07) is displayed
;
Encoder knob and activate/deactivate the function:
;
knob to exit.
E N G L I S H
Select the backlight colour
To select the backlight colour:
1. press the
2. turn the
displayed
3. push
4. turn the
different colours are available);
5. press
6. press twice the
To select it rapidly, you can also use the fast menu: press
button;
Encoder knob until ‘LIGHT’ (menu 08) is
;
Encoder knob and choose the desired colour (3
;
knob to exit.
11
Page 12

the key and then and follow the procedure above
described starting from point 3.
E N G L I S H
Beep on/off
The keypad beep is activated by default. To deactivate it:
1. press the
2. turn the
3. push
4. turn the
(ON = beep enabled; OFF = beep disabled);
5. press
6. press twice the
To activate/deactivate the keypad beep, you can use the
fast menu: press the key and then and follow the
procedure above described starting from point 3.
button;
Encoder knob until ‘BEEP’ (menu 09) is displayed
;
Encoder knob and activate/deactivate the beep
;
knob to exit.
Automatic Numbering Identication
(ANI) on/off
You can set an automatic number identier visible from the
radio’s display of your partner each time you send a call signal.
To activate this function:
1. press the
2. turn the
3. press
4. rotate the
function. ON = activated, OFF = deactivated;
5. push
6. press twice
To activate/deactivate the keypad beep, you can also use the
fast menu: press the key and then and follow the
procedure above described starting from point 3.
button;
Encoder knob until ‘ANI’ (menu 10) is displayed;
;
Encoder knob and activate/deactivate the
again;
to exit.
12
Repeater shift (for communications through
repeaters)
To select this function, follow these steps:
1. press the
2. rotate the
3. press
4. turn the
can choose amongst the following options +, - and 0
5. press
6. press twice
button;
Encoder knob until ‘S-D’ (menu 19) is displayed;
;
Encoder knob and select the repeater shift. You
;
again;
to exit
Page 13

To select the repeater shift you can use the fast menu: press
the
key and then and follow the procedure above
described starting from point 3.
Repeater shift adjustment
(for communications through repeaters)
1. press the button;
2. turn the
displayed
3. push
4. turn the
can also enable it by digiting the frequency directly on the
keypad.
5. press
Encoder knob until ‘DIFFR’ (menu 15) is
;
Encoder knob and select the repeater shift. You
;
Select the frequency step
1. press the button;
2. turn the
3. push
4. turn the
5. press twice the
Encoder knob until ‘STEP’ (menu 20) is displayed
;
Encoder knob and select the desired frequency
step. You can choose amongst: 5 KHz, 10 KHz, 6.25 KHz,
12.5 KHz and 25 KHz;
knob to exit
Select the CTCSS and DCS tones
To select a CTCSS tone
1. press the
2. turn the
displayed
3. push
4. turn the
tone;
5. press
button;
Encoder knob until ‘C-CDC’ (menu 16) is
;
Encoder knob and select the desired subaudio
to conrm.
E N G L I S H
To select a DCS tone:
1. select
2. Press
3. Press the button;
4. turn the
5. press
‘C-CDC’ (menu 16) either with the Encoder knob or
with the fast access;
Encoder knob and select the desired DCS level;
again for conrmation.
13
Page 14

While selecting the DCS codes, if you press , you will
select the normal (N) or inverted (I) DCS codes.
E N G L I S H
Voice function (only in English)
With this function, you activate a voice that informs about any
operation/selection you are doing. To activate it, follow these
steps:
1. press the
2. turn the Encoder knob until ‘VOICE’ (menu 14) is
displayed;
3. push ;
4. turn the Encoder knob and activate/deactivate the function.
(ON = enabled; OFF = disabled);
5. Push again;
6. press twice the
button;
knob to exit.
14
Page 15

Menu Operation
To operate with all the parts/settings of the menu, you have to follow these general
steps:
1 Press the
2 Turn the Encoder knob to select the desired menu.
3 Press and turn the Encoder knob to choose the desired setting.
4 Press to conrm.
Voice Menu Selection Operation
button.
E N G L I S H
scanning all the
channels
scanning within
1 MHz
VOX activation
and sensitivity
power level
selection
squelch selection
scrambler
activation/
deactivation
Backlight
colour of the LCD
backlight
keypad beep
automatic
number identier
SCAN? 01
PRI? 02
VOX? 03 OFF-9
POW? 04 H/L
SQL? 05 0-9
SCRM? 06 ON/OFF
LED? 07 ON/OFF/AUTO
LIGHT? 08 1/2/3
BEEP? 09 ON/OFF
ANI? 10 ON/OFF
Scan entire
channel
Priority channel
scan
Press
Press any key to return
Press
to exit scan
SAME AS ABOVE
Turn encoder to select
to conrm
Press
SAME AS ABOVE
SAME AS ABOVE
SAME AS ABOVE
SAME AS ABOVE
SAME AS ABOVE
SAME AS ABOVE
SAME AS ABOVE
to exit
keypad lock
KEYBO? 11
MANUAL/AUT SAME AS ABOVE
15
Page 16

time out
transmission
TOT? 12 OFF-270
SAME AS ABOVE
E N G L I S H
type of scanning
voice function
activation
shift repeater
ctcss/dcs rx/tx
ctcss/dcs only rx R-CDC? 17
ctcss/dcs only rx
+ / - shift
frequency step
selection
wide/narrow band
selection
Exit VFO/MR
SCANS?13 TO/CO/SE
VOICE?14 ON/OFF
DIFFR? 15 0-70.995
C-CDC? 16
T-CDC? 18
S-d? 19 +/-/cancel
STEP? 20
N/W ? 21
Turn encoder to select Press
Input frequency or turn encoder
See CTCSS chart SAME AS ABOVE
See CTCSS chart
See CTCSS chart SAME AS ABOVE
5k/10k/6.25k/
12.5k/25k
Wide
Narrow
to conrm
Press twice
Turn encoder to select
Press
Press
Press
Press
Turn Encoder to select
Press
Turn encoder to select
Press
Press
SAME AS ABOVE
SAME AS ABOVE
to exit
to conrm
to exit
to conrm
to exit
to conrm
to conrm
to exit
Note: parts from 16 to 21 are available only in Frequency mode.
In Channel mode only parts from 1 to 15 are active.
To pass rapidly from Frequency to Channel mode or vice versa, switch on the unit
and hold down the
NAME ON/OFF
button.
Turn encoder to select
Press
Press
to conrm
to exit
16
Page 17

Self-Programming mode
To enter in Self-Programming mode, follow these steps:
1. while turning on the unit, hold down ‘
2. press
3. turn the
4. push
5. digit the desired rx frequency;
6. press
7. press
press it again, you can select a DCS code);
8. press
9. digit the desired tx frequency;
10. push
11. press
press it again, you can select a DCS code);
12. press
13. with the
choose: OFF, 1 carrier, 2 CTCSS/DCS);
14. press
15. by turning the
scanning;
16. press
17. turn the
18. press
19. turn the
NARROW;
20. push
21. rotate the
programmed channel. To switch to the next channel, push the
and turn the
22. press
23. switch off the unit to nish the programming procedure and return to the
standard modality.
;
Encoder knob and select the memory number to program;
again;
;
and with the Encoder knob select the desired CTCSS in RX (if you
;
;
and with the Encoder knob select the desired CTCSS in TX (if you
;
Encoder knob, enable/disable the busy channel lockout (you can
;
Encoder knob, you can enable/disable the priority channel
;
Encoder knob and select the power level in tx H (high) or L (low);
;
Encoder knob and select the transmission mode: WIDE or
;
Encoder knob and select the rst letter for the name of the
Encoder knob;
;
MONI’ and until ‘SELF’ is displayed;
button
E N G L I S H
17
Page 18

Self-programming chart
MONI
+ + switch on
E N G L I S H
the radio for 2 seconds
Self-programming
Display example
Channels
Receiving frequency
Receiving codes
Transmitting frequency
Transmitting codes
Busy channel Lockout
Priority channel scan
Output Power
Channel spacing
Encoder
Encoder
Encoder
Encoder
Encoder
Encoder
Encoder
Encoder
Encoder
Select channel 1 to 128
Select receiving frequency
Select CTCSS / DCS
Press *LOCK to switch
Select transmitting frequency
Select CTCSS / DCS
Press *LOCK to switch
OFF: close
1. Carrier
2.CTCSS/DCS
Add: Add priority - Channel scan
Del: Delete priority
Channel scan
H: High power
L: Low power
WIDE: 25KHz
NARROW: 12.5KHz
18
Program CH name
END
Encoder
Press
to the next channel
to conrm and switch
Page 19

Technical specications
General
Frequency Range CT200: 144-146MHz; CT400: 430-440MHz
Working Temperate -20°-+50°
Operating Voltage DC 7.4V
Operate Mode Simplex or Semi-duplex
Dimension 100mm×58mm×33mm (Antenna excluded)
Weight 203g (Including battery)
Antenna impedance
Duty cycle
Transmitter
Frequency Stability
Output Power ≤4W
Max Frequency Deviation
Audio Distortion
Adjacent Channel Power
Spurious Radiation
Occupied Bandwidth Within European legal terms
Receiver
RF Sensitivity
Audio Distortion
Audio Response
Adjacent Channel Selectivity
Intermodulation Rejection
Spurious Response
Blocking Within European legal terms
50Ω
5/5/90
±2.5PPM
≥5KHz
≤3%
Within European legal terms
Within European legal terms
<0.2µV
≤3%
300Hz ÷ 3KHz
Within European legal terms
Within European legal terms
Within European legal terms
E N G L I S H
19
Page 20

Troubleshooting guide
Problem Solution
E N G L I S H
No Power
Battery power dies
shortly after charging
Cannot talk to or hear
other members in your
group
Other voices (besides
group members) are
present on the channel.
The battery pack may be dead.
Recharge or replace it.
The battery pack may not be installed correctly.
Remove it and install it again.
The battery pack life is nished.
Replace the battery pack with a new one.
Make sure you are using the same frequency and
CTCSS/DCS tone as the other members in your
group.
Other group members may be too far away. Make
sure you are within the range of the other radios.
Change the CTCSS/DCS tone.
Be sure to change the tone on all radios in your
group.
20
 Loading...