

Page 1
› MANUALE D’USO
› INSTRUCTION GUIDE
› BEDIENUNGSANLEITUNG
DUAL CORE INTERCOM SYSTEM
BTNEXT PRO
Page 2

Sommario
Principali caratteristiche: ........................................................................................................................................................................................................................................................2
Caratteristiche tecniche Midland BTNEXT PRO ...............................................................................................................................................................................................................2
Ricarica delle batterie ..............................................................................................................................................................................................................................................................3
Descrizione dispositivo e sistema di fissaggio .......................................................................................................................................................................................................................3
Distanza .....................................................................................................................................................................................................................................................................................5
Modalità operative ...................................................................................................................................................................................................................................................................5
Priorità .......................................................................................................................................................................................................................................................................................6
Come abbinare un altro dispositivo Midland BTNEXT PRO ..............................................................................................................................................................................................6
Conference.............................................................................................................................................................................................................................................................................. 8
Talk 2 All - Abbinamento a dispositivi non Midland. ............................................................................................................................................................................................................9
Utilizzo della funzionalita’ Radio FM ...................................................................................................................................................................................................................................12
Utilizzo dell’ingresso audio a filo ........................................................................................................................................................................................................................................... 13
Utilizzo di un ricetrasmettitore PMR446 con cavo ............................................................................................................................................................................................................ 13
Configurazioni speciali ...........................................................................................................................................................................................................................................................13
Configurazione e aggiornamento firmware ........................................................................................................................................................................................................................14
Uso e avvertimenti specifici ..................................................................................................................................................................................................................................................14
Garanzia .................................................................................................................................................................................................................................................................................. 15
Page 3

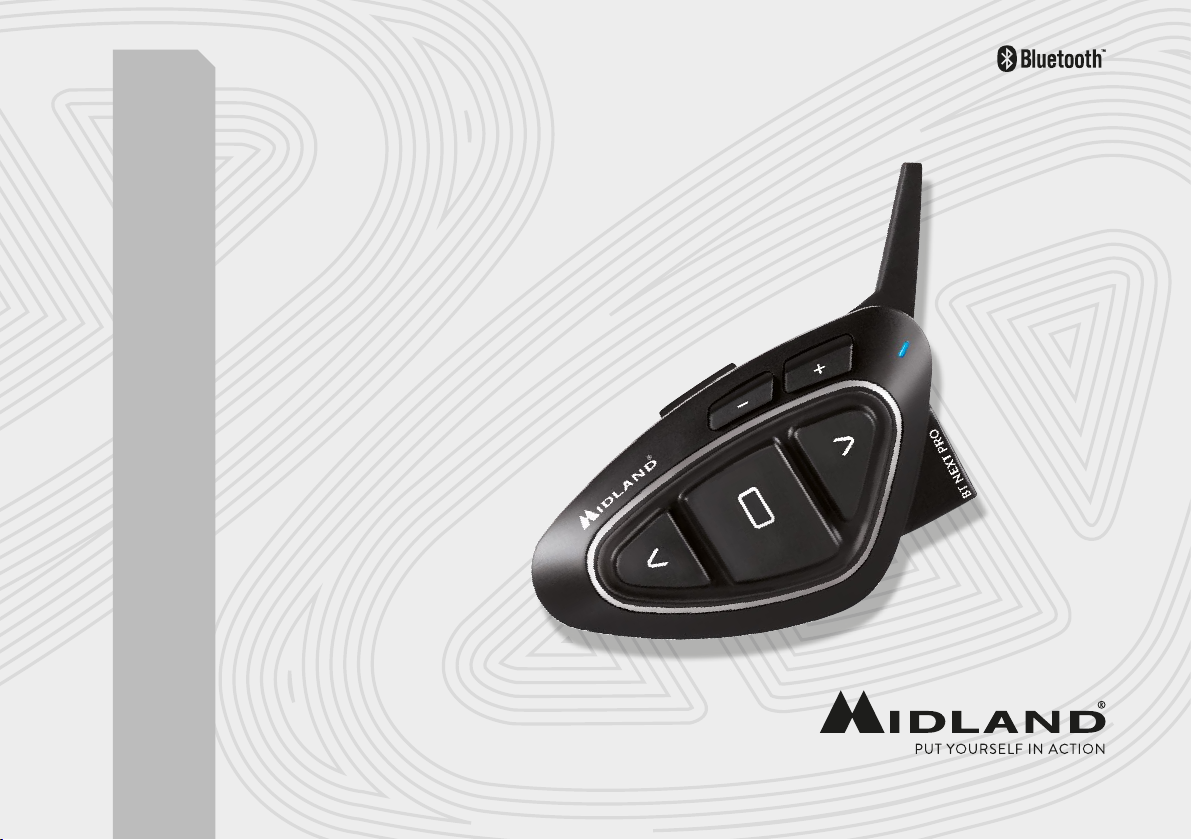
MIDLAND BTNEXT PRO
Intercom dual core
Midland BT NEXT PRO è un sistema intercom con Bluetooth Dual Core per comunicazioni
Conference e con funzione background anche in stereo. Estremamente sottile e dal design
aerodinamico, BT NEXT PRO è dotato di molteplici funzioni che si attivano facilmente grazie ai 3 grandi tasti posti sul frontale del dispositivo.
Midland BT NEXT PRO si può fissare al casco in due modi: tramite basetta adesiva o tramite
l’aggancio a morsetto.
L’audio kit con i suoi altoparlanti ultra-sottili vi permette di ascoltare perfettamente la musica con un audio di ottima qualità durante i vostri spostamenti in moto!
Principali caratteristiche:
›
Bluetooth Dual Core per background audio anche in stereo
›
Intercom Pilota/Passeggero oppure da moto a moto fino ad una distanza massima di
1,6Km.
›
Conference fino a 8 persone (4 coppie)
›
Connessione fino a 6 persone per comunicazioni “one to one”
›
Funzionalità Talk2All per collegare intercom di altre marche
›
Radio FM stereo con RDS
›
Music share (condivisione musica con passeggero)
›
Connessione al telefonino/MP3 player
›
Supporto per 2 Telefoni
›
Connessione a sistemi di navigazione GPS
›
Connessione a Radio PMR446 con Bluetooth integrato o esterno
›
Connessione AUX a filo per MP3 player (cavo opzionale)
›
Configurazione ed aggiornamento firmware da PC via USB
Midland BTNEXT PRO è disponibile in due versioni:
›
Midland BTNEXT PRO confezione singola con un solo dispositivo
›
Midland BTNEXT PRO TWIN confezione doppia con due dispositivi.
In base alla versione in vostro possesso nella confezione troverete:
Midland BTNEXT PRO SINGLE
›
›
›
›
›
›
Midland BTNEXT PRO TWIN
›
›
›
›
›
›
I dispositivi della confezione TWIN sono già abbinati tra loro sul pulsante centrale per poter
attivare immediatamente la funzione Intercom.
Caratteristiche tecniche Midland BTNEXT PRO
Generali:
›
›
›
›
›
›
›
Connessioni Bluetooth:
Con un dispositivo dello stesso tipo per comunicazioni intercom Pilota-Passeggero o Moto-Moto fino ad una distanza massima di 1.6km senza ostacoli o interferenze.
Con dispositivo Bluetooth:
›
I
1 dispositivo di comunicazione Midland BTNEXT PRO
1 kit di montaggio a slitta completo di speaker stereo
1 microfono a braccetto e 1 microfono a filo
1 sistema di fissaggio bi-adesivo
1 sistema di fissaggio a morsetto
1 kit di ricarica USB-Micro USB
2 dispositivi di comunicazione Midland BTNEXT PRO
2 kit di montaggio a slitta completo di speaker stereo
2 microfoni a braccetto e 2 microfoni a filo
2 sistemi di fissaggio bi-adesivo
2 sistemi di fissaggio a morsetto
1 kit di ricarica USB-Micro USB con doppio connettore
Bluetooth ver. 4.2 stereo (protocollo Headset/Handsfree/A2DP/AVRCP)
Sistema AGC per il controllo automatico del volume in base al rumore di fondo
Attivazione della comunicazione intercom vocale (VOX) o manuale
Comandi manuali per: attivazione telefono, interfono, Radio FM e connessione a filo
Completamente resistente all’acqua
Batteria al Litio con autonomia fino a 35 ore di conversazione
Tempo di ricarica: circa 2 ore
Telefonino con MP3 player Stereo (protocollo A2DP) e GPS
www.midlandeurope.com 3
Page 4
I
Volume - Volume +
›
Ricetrasmettitori PMR446 (con Bluetooth integrato o esterno) per comunicazioni di
gruppo moto a moto
Connessioni a filo:
›
Per sorgente audio stereo tipo iPod/MP3 player (cavo opzionale)
Attenzione: Midland BTNEXT PRO è stato progettato per essere resistente alla pioggia. Verificate
sempre che il gommino di protezione della presa di ricarica sia ben chiuso in caso di pioggia.
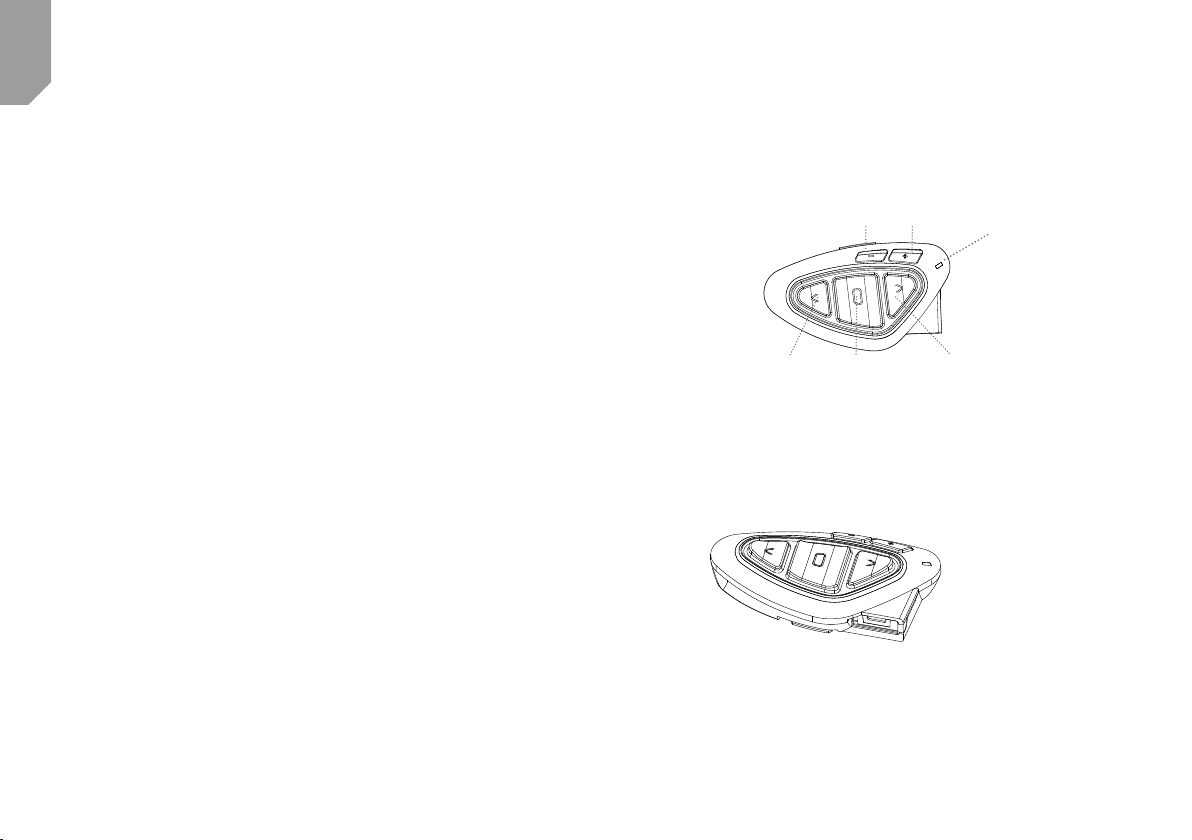
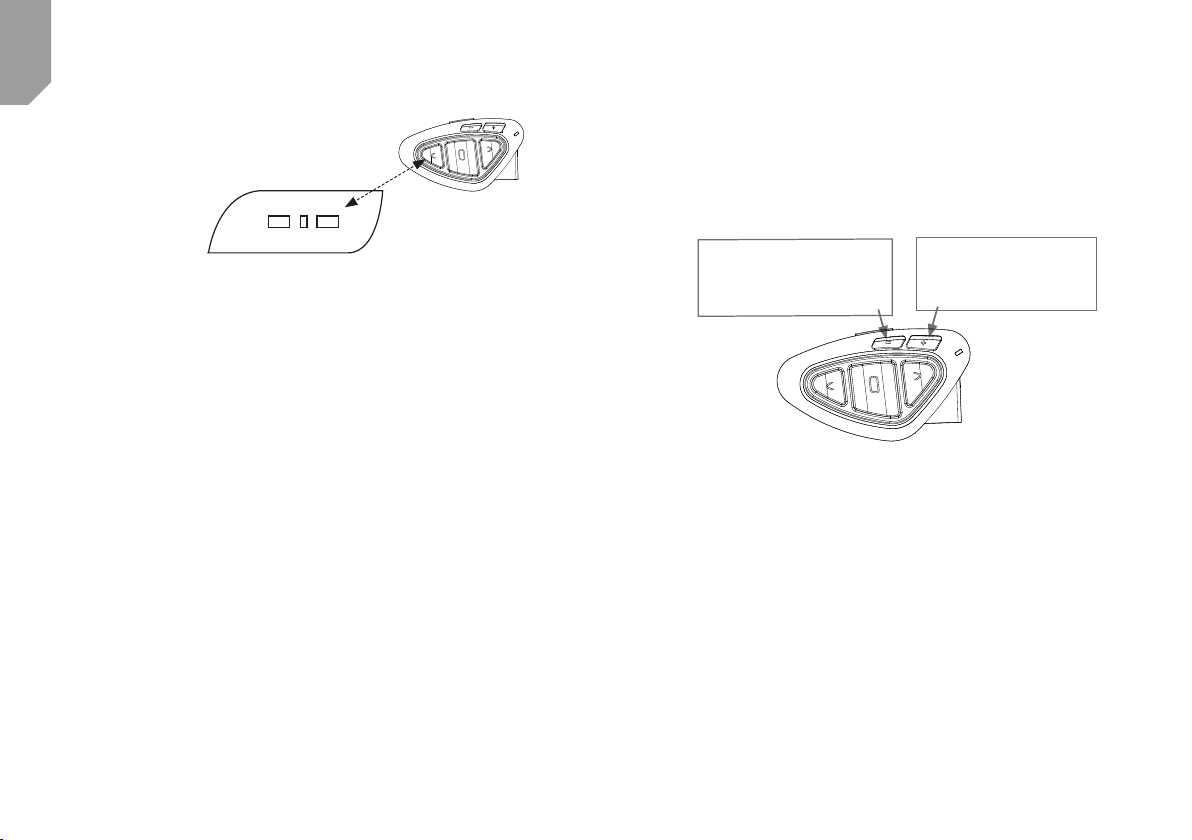
Descrizione dispositivo e sistema di fissaggio
Descrizione Midland BTNEXT PRO
Il dispositivo Midland BTNEXT PRO è dotato di 5 pulsanti, tutti nella parte frontale.
I tre pulsanti principali sono pulsanti multifunzione: pulsante Avanti (a sinistra), pulsante
Centrale e pulsante Indietro (a destra).
I due pulsanti più piccoli, in alto a destra, sono invece il Volume + ed il volume -.
Ricarica delle batterie
Assicuratevi che il dispositivo di comunicazione sia completamente carico prima di iniziare ad utilizzarlo. La prima volta sono necessarie almeno 3 ore. Successivamente il tempo
si riduce mediamente a 2 ore per una ricarica completa. Per ragioni di comodità, il dispositivo può essere rimosso dal casco per essere ricaricato. Per caricare il dispositivo
di comunicazione, sollevate la protezione in gomma della presa di ricarica e collegate ad
essa lo spinotto del caricatore, quindi innestate la spina CA del caricatore ad una presa
di rete elettrica.
Il LED rosso lampeggerà per tutto il tempo della ricarica. Lasciate l’apparecchio collegato
fino a che il LED rosso si spegne e il LED blu rimane acceso fisso.
Quando la carica è completa, (LED rosso non più lampeggiante) scollegate il dispositivo
dal caricatore.
Attenzione: ogni volta che viene inserito (o disinserito) il plug di ricarica, il dispositivo si spegne (per utilizzarlo mentre è in carica è necessario quindi riaccenderlo con il plug inserito).
Avanti Indietro
Centrale
Descrizione delle connessioni a filo
Presa Ricarica: Permette la ricarica del dispositivo tramite alimentatore microUSB stan-
dard. La stessa presa microUSB della ricarica, permette la connessione di una sorgente
audio a filo come un iPod/MP3 player stereo.
Attenzione: Il cavo necessario per collegare una sorgente audio a filo è opzionale.
Presa ricarica
Descrizione Kit Audio
Il sistema audio comprende due altoparlanti stereo ultra piatti e due microfoni intercambiabili: uno a braccetto e l’altro a filo. Entrambi hanno un mini connettore che vi permette
di scegliere il microfono che più si adatta al vostro tipo di casco.
LED
4 www.midlandeurope.com
Page 5
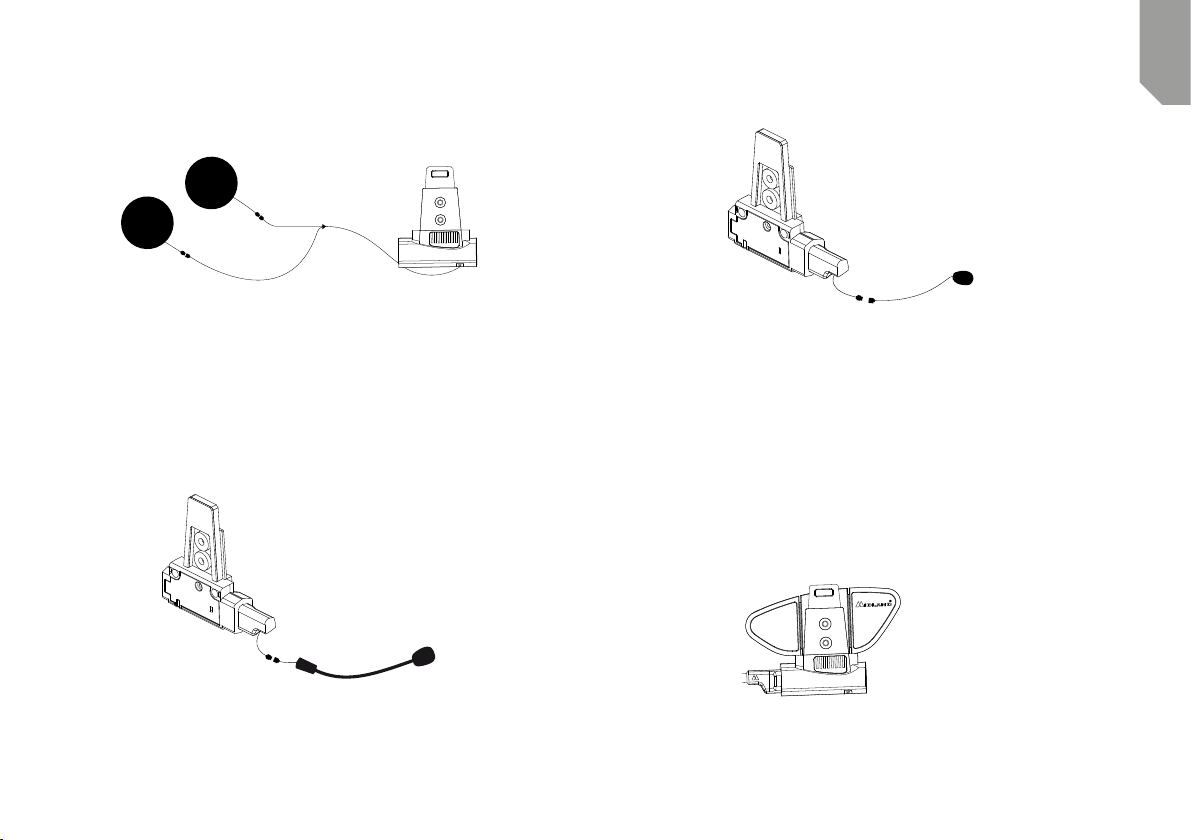
Altoparlanti stereo
I due altoparlanti stereo hanno una fascia adesiva/velcro che facilita il loro fissaggio all’interno del casco. Raccomandiamo di non tenere il volume troppo alto, in quanto è importante mantenere l’attenzione in mezzo al traco e durante i vostri spostamenti in moto.
Microfono
Il microfono può essere fissato al casco in due modi, in base alla tipologia di microfono
scelta.:
Microfono a braccetto
Posizionate il braccetto del microfono con il velcro/ adesivo tra l’imbottitura e la parte
rigida del casco, in modo che il microfono e il simbolo bianco sul microfono siano posizionati correttamente di fronte alla bocca. Questa soluzione è adatta per caschi modulari.
Per i caschi aperti (Jet) è disponibile un microfono specifico opzionale.
Microfono a filo
Posizionate il microfono, grazie al velcro/adesivo, all’interno del casco di fronte alla bocca.
Questo tipo di microfono è l’ideale per i caschi integrali.
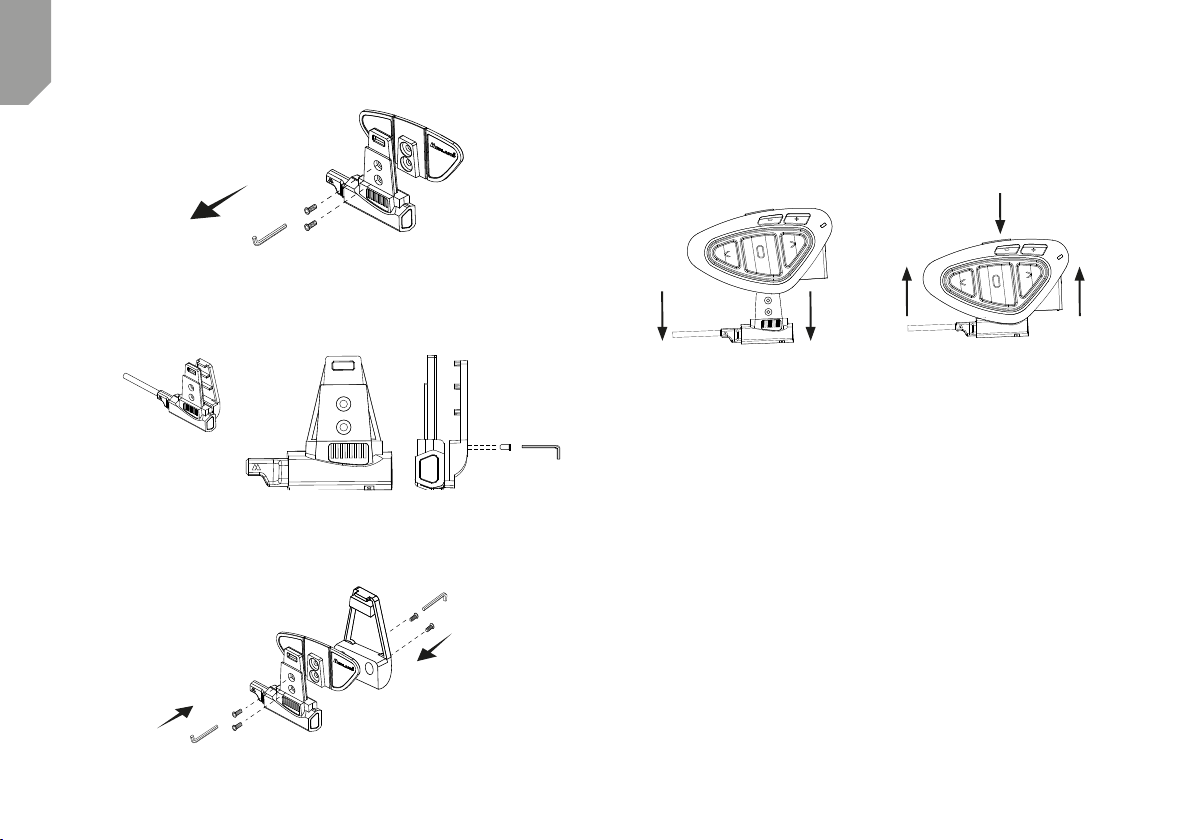
Descrizione sistema di fissaggio al casco
Il Midland BTNext PRO è fornito con due sistemi di fissaggio al casco, uno tramite base
con biadesivo e l’altro con aggancio a morsetto.
Il dispositivo, grazie al sistema di contatti a slitta, può essere sganciato dal sistema di fissaggio scelto ogni volta che si rende necessaria la ricarica o per custodirlo altrove
Fissaggio con bi-adesivo
Il sistema di fissaggio con bi-adesivo è già montato sulla base con contatti a slitta.
Assicuratevi che la parte del casco dove andrà fissata la base bi adesiva sia pulita. Rimuovete la pellicola dal biadesivo e fissate la base sulla parte sinistra del casco esercitando una
leggera pressione per alcuni secondi.
I
www.midlandeurope.com 5
Page 6
I
Fissaggio con morsetto
1) Rimuovere la basetta bi-adhesiva dalla slitta utilizzando la chiave presente nella confezione
2) Tramite le due viti in dotazione avvitate la base a morsetto alla slitta.
3) Quando avete trovato il punto esatto dove fissare l’interfono, stringete maggiormente
le due viti per fissare la slitta al morsetto nella parte sinistra del casco
Se necessario utilizzate anche la basetta gommata per una maggiore tenuta del fissaggio a morsetto. Grazie alle due viti più corte fissate la basetta gommata alla slitta e
avvitate poi la la base a morsetto.
Inserimento e sgancio del Midland BTNEXT PRO
Il BTNEXT PRO si inserisce facilmente al casco facendolo scorrere verso il basso sull’apposita slitta del kit di fissaggio. Il dispositivo viene mantenuto in sede grazie alla clip di
fissaggio nella parte superiore della slitta (A).
Per rimuoverlo, basta semplicemente premere la clip di fissaggio e spingere il BTNEXT
PRO verso l’alto
A
SgancioAggancio
Accensione e spegnimento del Midland BTNEXT PRO
Accensione:
›
Tenete premuto il pulsante “Centrale” per circa 3 secondi, fino all’accensione della
luce BLU lampeggiante.
Spegnimento:
›
Tenete premuti i pulsanti “Centrale” e “Indietro” insieme per circa 3 secondi, fino a
che la luce ROSSA emette 3 lampeggi.
›
In questo modo non è possibile spegnere il dispositivo in modo involontario durante
l’uso (cosa che potrebbe succedere, specialmente se si utilizzano i guanti).
Modalità operative
Midland BTNEXT PRO ha tre modalità di funzionamento distinte: Intercom, Telefono
e Radio FM.
6 www.midlandeurope.com
In base alla modalità attiva in un dato momento, le funzioni del Midland BTNEXT PRO
Page 7

cambiano e di conseguenza anche i tre pulsanti centrali assumono funzionalità diverse.
›
La modalità “Intercom” permette la gestione della funzionalità intercom per la comunicazione pilota/passeggero o moto a moto. I tre pulsanti permettono di aprire e
chiudere la connessione verso gli altri dispositivi collegati .
›
La modalità “Telefono” (Phone), permette la gestione del telefono e le funzioni di
player musicale del telefono stesso e le indicazioni del GPS. I tre pulsanti gestiscono
le funzionalità del telefono e della musica (play/pausa- avanti e indietro).
›
La modalità “Radio FM” (FM radio) permette l’ascolto della radio; i tre pulsanti ge-
stiscono la ricerca e la memorizzazione delle stazioni preferite (6 memorie disponibili)
E’ possibile passare da una modalità all’altra semplicemente premendo per 3 secondi il
pulsante Centrale. Un annuncio vocale vi indicherà in quale modalità state entrando. La
sequenza con cui è possibile scorrere le 3 modalità è la seguente:
›
Intercom (se è stata abbinata almeno ad un altro dispositivo)
›
FM Radio
›
Phone (se è stato abbinato un telefono)
Per esempio se siete nella modalità “Intercom” potete utilizzare i tre pulsanti per aprire
e chiudere la comunicazione verso gli altri dispositivi. Se passate, premendo il pulsante
centrale, alla modalità “FM Radio” potete ascoltare la radio ed i tre pulsanti serviranno per
cambiare stazione e memorizzare quelle preferite.
E’ possibile sapere in quale modalità si trova il dispositivo semplicemente premendo brevemente insieme i pulsanti “Volume+” e “Volume -“ . Un annuncio vocale vi
indicherà in quale modalità vi trovate.
Di seguito un esempio delle principali funzioni dei pulsanti nelle tre modalità:
Modalità Pulsante Avanti (sinistro) Pulsante Centrale Pulsante Indietro (destro)
Intercom
Phone (telefono)
Phone (con musica attiva)
FM Radio
Apre/chiude l’intercom al primo dispositivo
collegato
Richiama l’ultimo numero, accetta o rifiuta la
chiamata se abbinato al “Vol+”
Canzone avanti Play/Pausa Canzone indietro
Ricerca avanti FM Radio On/o Ricerca indietro
Distanza massima
La modalità intercom è attiva fino ad una distanza massima di 1.6km in condizioni ottimali:
questo significa che i piloti devono sempre essere a vista, senza ostacoli o interferenze.
Come abbinare un altro dispositivo Midland BTNEXT PRO
Per utilizzare la funzionalità Intercom è necessario avere due dispositivi Midland BTNEXT
PRO accesi ed in precedenza abbinati tra loro.
I due dispositivi presenti nella stessa confezione (Midland BTNEXT PRO TWIN) sono
già accoppiati tra loro e pronti all’uso, quindi non è necessario attivare questa procedura
di abbinamento. Se invece i dispositivi non fanno parte della stessa confezione o avete
acquistato un altro Midland BTNEXT PRO in un secondo momento (per esempio per il
passeggero), dovete prima eseguire la procedura di abbinamento.
Abbinamento di un altro dispositivo Midland BTNEXT PRO
1.
Attivate la modalità “Setup” su entrambi i dispositivi (Spegnete il Midland BTNEXT PRO
Tenere premuto il pulsante “Centrale” fino a che la luce non rimane di colore rosso fisso)
2.
Tenere premuto il pulsante “Centrale” per 3 sec. sul primo dispositivo, fino a che la luce
lampeggia alternativamente Rossa e Blu.
3.
Tenere premuto il pulsante “Centrale“ sull’altro dispositivo fino a che la luce Rossa e Blu
lampeggia alternativamente.
4.
Ora i due dispositivi si cercano per completare l’abbinamento. Se l’abbinamento è avvenuto in modo corretto, su entrambi si accende, per un secondo, la luce Blu, per poi
Apre/chiude l’intercom al secondo
dispositivo collegato
Apre/chiude l’intercom al terzo dispositivo collegato
Ripeti l’ultimo numero/accetta o rifiuta
la chiamata in entrata sul tasto “Vol-”.
I
www.midlandeurope.com 7
Page 8

I
tornare in modalità “Setup” con la luce Rossa fissa.
5.
Per utilizzare i due dispositivi è necessario uscire dalla modalità di abbinamento (setup):
6.
Fare un doppio click sul pulsante “Centrale” . La luce Rossa si spegne e al suo posto
lampeggia la luce Blu. Ora potete utilizzare il Midland BTNEXT PRO
Se per qualsiasi ragione si vuole interrompere la ricerca (luce lampeggiante rossa e blu) e
tornare alla fase di setup (luce rossa fissa), è suciente fare due click sul pulsante centrale.
Attenzione: Durante l’abbinamento devono essere accesi solo i due dispositivi interessati.
Spegnete tutti gli altri dispositivi Bluetooth.
Utilizzo della funzionalita’ Intercom con due dispositivi
Per utilizzare la funzionalità intercom, assicuratevi che entrambi i dispositivi siano accesi e
precedentemente abbinati tra loro.
Attivazione manuale:
Quando siete in modalità Intercom premendo il pulsante “Centrale”, indierentemente
da uno dei due dispositivi, la comunicazione dopo alcuni secondi si attiva e rimarrà attiva
fino a che non verrà premuto nuovamente il pulsante “Centrale”. Sentirete 1 tono audio
a conferma dell’attivazione dell’Intercom e 2 toni audio a conferma della disattivazione.
Attivazione vocale (VOX):
La funzionalità VOX per l’attivazione vocale dell’Intercom è attiva di fabbrica. E’ sufficiente parlare per aprire la comunicazione Intercom, senza dover togliere le mani dal
manubrio. Potrebbero essere necessari alcuni secondi per l’eettiva apertura della comunicazione intercom (un tono audio vi avvisa dell’apertura). Se nessuno parla, dopo 40
secondi l’intercom viene automaticamente chiuso. Per riaprire la comunicazione sarà
suciente parlare nuovamente. Quando l’Intercom è aperto tramite VOX è possibile
comunque chiuderlo senza aspettare il tempo predeterminato, semplicemente premendo il pulsante “Centrale”.
Attenzione: L’attivazione vocale VOX funziona solo con i dispositivi abbinati tramite il tasto
“Centrale”. Se i dispositivi sono stati abbinati con il pulsante “Avanti” o “Indietro”, l’attivazione può avvenire solo manualmente.
Se necessario, è comunque possibile disattivare la funzione VOX, premendo per 7 secondi il pulsante “Indietro”. Un annuncio vocale vi avviserà dell’avvenuta disattivazione. Per
riattivarlo è necessario ripetere la stessa procedura
Regolazione del volume
Midland BTNext PRO è dotato della tecnologia AGC che regola automaticamente il
volume di ascolto in base al rumore di fondo. Potete comunque regolare manualmente il
volume agendo sui pulsanti “Volume+” e “Volume -“.
La regolazione del volume è indipendente per ciascuna sorgente audio: Intercom, musica,
telefono e FM Radio.
Attenzione: la regolazione del volume avviene solo nel momento in cui c’è un audio attivo
Impostazione della funzione AGC
Per regolare la sensibilità dell’AGC è necessario utilizzare il software per PC “BT UPDATER” o l’applicazione per smartphone “BT SET-APP”. È possibile scegliere diverse impostazioni a seconda del tipo di moto che avete (Touring, naked o sportiva) o se siete il
passeggero. La funzione AGC può essere disabilitata premendo contemporaneamente
per 3 secondi i tasti “Volume +” e “Volume –“.
Come abbinare più di due dispositivi ad un Midland BTNEXT PRO
Un Midland BT NEXT PRO può essere abbinato ad un massimo di 5 dispositivi, per un
totale di 6 unità abbinate (3 dispositivi Midland + 2 Talk2All + voi).
Midland BT NEXT PRO dispone di 3 tasti principali (Avanti, Centrale, Indietro). Potete
decidere liberamente quale tasto utilizzare per l’abbinamento, lo stesso tasto sarà poi
utilizzato anche per attivare la comunicazione intercom. L’abbinamento può anche avvenire “incrociato”, come mostrato nell’immagine qui sotto. Per esempio potete decidere di
abbinare il dispositivo di un pilota al tasto Avanti, il dispositivo del passeggero al pulsante
Centrale e il dispositivo di un altro pilota al tasto Indietro.
In questo modo avrete 3 dispositivi abbinati tra di loro e potrete parlare con ognuno di
loro, uno alla volta, semplicemente premendo il pulsante corrispondente (lo stesso utilizzato per eseguire l’abbinamento). Ogni volta che aprite la connessione intercom con un
vostro interlocutore la conversazione precedente verrà chiusa.
Quando due persone stanno comunicando non è possibile interrompere la conversazione
da parte degli altri dispositivi
8 www.midlandeurope.com
Page 9
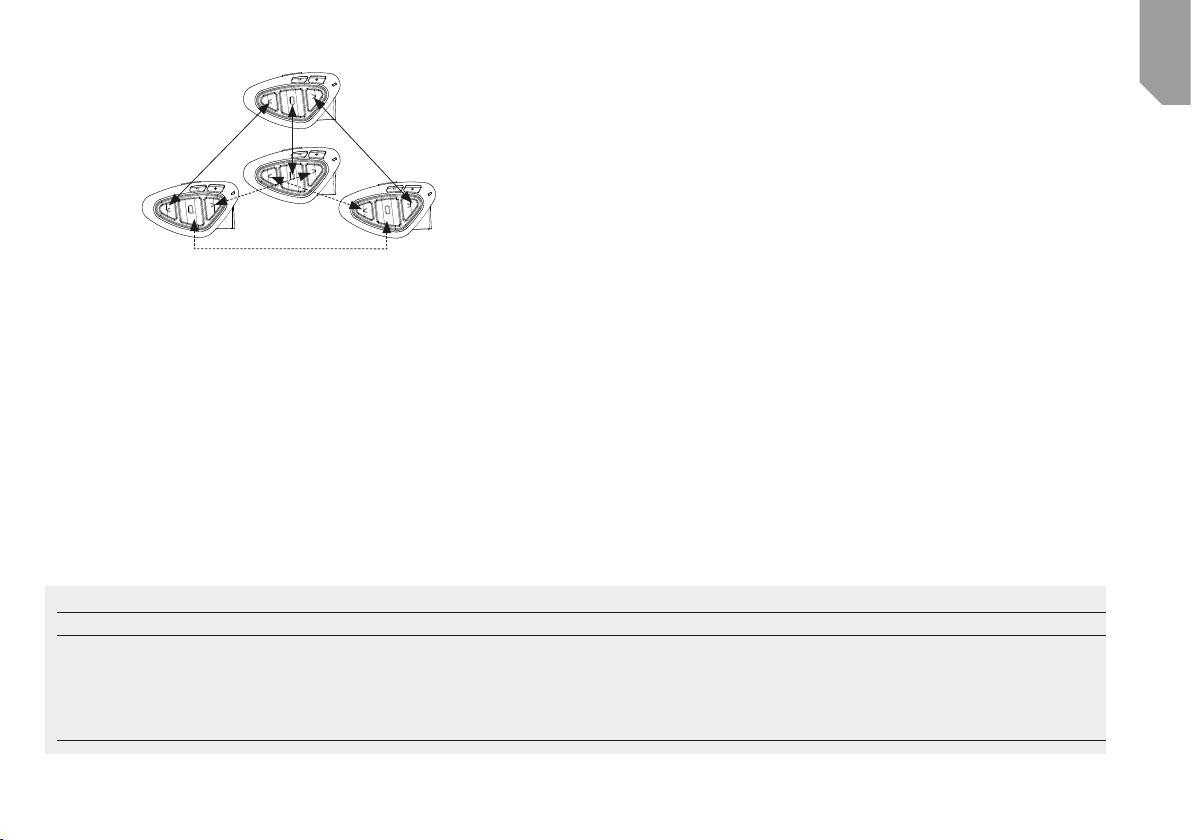
Pilota 1
Pilota 2
Utilizzo della funzionalita’ Intercom con più di due dispositivi
Per utilizzare la funzionalità intercom, assicuratevi che tutti i dispositivi siano accesi e
precedentemente abbinati tra loro.
Attivazione manuale:
Premete il pulsante relativo alla persona a cui volete collegarvi, la comunicazione dopo
alcuni secondi si attiva e rimarrà attiva fino a che non viene premuto nuovamente il pul-
Passeggero 1
Pilota 3
1.
Attivate la modalità “Setup” (Spegnete il Midland BTNEXT PRO, Tenere premuto il pulsante “Centrale” fino a che la luce non rimane di colore rosso fisso)
2.
Scegliete il pulsante a voi più congeniale (Avanti, Centrale o Indietro) e tenetelo premuto per 3 secondi, fino a che la luce lampeggia alternativamente Rossa e Blu. Il pulsante
scelto sarà anche lo stesso che verrà usato per aprire/chiudere l’intercom.
3.
Fate la stessa procedura descritta al punto 2 , sull’altro dispositivo che intendete abbinare (non è obbligatorio utilizzare lo stesso pulsante su entrambe le unit).
4.
Ora i due dispositivi si cercano per completare l’abbinamento. Se l’abbinamento è avvenuto in modo corretto, su entrambi si accende, per un secondo, la luce Blu, per poi
tornare in modalità abbinamento con la luce Rossa fissa.
5.
Ora potete procedere ad un secondo e poi ad un terzo abbinamento, basta ripetere il
punto n.2, utilizzando però un pulsante dierente.
sante. Sentirete 1 tono audio a conferma dell’attivazione dell’Intercom e 2 toni audio a
conferma della disattivazione (vedi tabella A)
Attivazione vocale (VOX):
La funzionalità VOX per l’attivazione vocale dell’Intercom è attiva di default e può avvenire solo verso il dispositivo abbinato tramite il tasto “Centrale”.
Suggerimento: La funzionalità VOX può essere molto utile per comunicare con la persona a
cui si pensa di voler parlare più spesso (per esempio il passeggero).
Utente già occupato in un’altra conversazione
Se tentate di aprire la comunicazione Intercom verso un utente che sta già parlando con
qualcun altro o che è impegnato al telefono, avrete un segnale di “occupato” (2 toni audio). Aspettate qualche minuto e riprovate, fino a che non trovate la “linea” libera! La persona che è stata chiamata verrà avvisata che qualcuno la sta cercando con un messaggio
vocale che indica il numero del pulsante da cui è giunta la richiesta.
Per utilizzare i due dispositivi è necessario uscire dalla modalità di abbinamento (setup):
›
Fare un doppio click sul pulsante “Centrale” . La luce Rossa si spegne e al suo posto
lampeggia la luce Blu. Ora potete utilizzare il Midland BTNEXT PRO.
A - Attivazione manuale
Modalità Pulsante “Avanti” Pulsante “Centrale” Pulsante “Indietro”
Intercom Corto: Apre/chiude l’intercom
verso l’altro dispositivo accoppiato
Lungo: Apre/chiude l’intercom verso i dispotivi non
Midland
Corto: Apre/chiude l’intercom
verso l’altro dispositivo accoppiato
Lungo: Cambia modalità
Corto: Apre/chiude l’intercom
verso l’altro dispositivo accoppiato
Lungo: Apre/chiude l’intercom verso i
dispotivi non Midland
I
www.midlandeurope.com 9
Page 10

I
1 2 3
1 2 3 4
In questo modo appena la conversazione sarà terminata, l’utente potrà contattare la persona che lo cercava, semplicemente aprendo l’intercom utilizzando il pulsante corrispondente all’avviso ricevuto.
Conference
La modalità “conference” permette la comunicazione contemporanea di 4 persone oppure fino a 8 persone (4 coppie) se si abbina un dispositivo intercom anche sul pulsante
VOL-.
Il vostro BTNext PRO può funzionare sia in modalità classica, con la comunicazione “uno
ad uno”, oppure in modalità “conference” dove tutti parlano contemporaneamente.
La comunicazione in “Conference” può essere molto interessante ma obbliga che tutti e
quattro i dispositivi siano sempre presenti e tutti con l’intercom aperto!
Per prima cosa è necessario che l’abbinamento dei dispositivi sia fatto seguendo una
sequenza ben specifica, definita a “catena”, poi su ogni dispositivo deve essere attiva la
modalità “Conference”.
Abbinamento
Per poter utilizzare la funzione “Conference” è necessario abbinare i dispositivi a “catena”, ovvero il pulsante “Indietro” del primo dispositivo deve essere abbinato al pulsante
“Avanti” del secondo. Il pulsante “Indietro” del secondo deve essere abbinato al pulsante
“Avanti” del terzo dispositivo e così via, fino ad un massimo di 4 . Il primo e l’ultimo dispositivo NON devono essere abbinati tra loro (la catena non va chiusa)
Attivazione della modalità conference
In modalità Intercom senza nessun audio attivo, tenete premuto il tasto Avanti per 7
secondi. L’annuncio vocale “Conference” confermerà che ora questa funzione è attiva.
Quando il Conference è attivo i dispositivi Bluetooth abbinati al tasto Vol+ sono scollegati, l’abbinamento al tasto CTRL e l’Universal Intercom non sono disponibili.
Sono possibili solo l’abbinamento ai tasti Avanti e Indietro, insieme al dispositivo abbinato
al tasto Vol -. Quando la modalità conference è attiva, potete sempre spostarvi su “FM
radio” per ascoltare la vostra stazione radio preferita, oppure su “Phone” per controllare il
telefono abbinato al pulsante VOL-
Attenzione: in modalità “Conference” anche la funzione “Talk2All-Universal Intercom”, per
parlare con dispositivi non Midland non è disponibile.
Disabilitare la modalità “Conference”
In modalità Conference e senza audio attivo, tenete premuto il tasto Avanti per 7
secondi. Un annuncio vocale vi informerà che siete di nuovo in modalità intercom
“One to One” e il dispositivo collegato al tasto “Vol+”, al tasto centrale CTRL e
l’abbinamento Universal Intercom saranno di nuovo disponibili.
Modalità “Conference a 4 persone”
Quando la modalità conference è attiva sarà possibile aprire la comunicazione intercom
premendo sia il pulsante “Avanti” che “Indietro”.
Premendo nuovamente, l’intercom viene chiuso. Entrambi i dispositivi al centro della
catena (dispositivo num. 2 e 3) dovranno avere l’intercom aperto su entrambi i pulsanti
(“Avanti” e “Indietro”) per permettere al dispositivo num. 1 e num. 4 di parlare tutti assieme.
10 www.midlandeurope.com
Page 11

Funzione “One Click Talk”
Quando la modalità “Conference” è attiva, premendo il pulsante centrale si può aprire la
comunicazione a tutti e quattro i dispositivi della catena “in un colpo solo”. Questa funzione può essere molto utile per aprire la conference velocemente quando per esempio
c’è qualche pericolo o avviso da comunicare a tutti.
Modalità Conference con un dispositivo Bluetooth sul “Vol –“.
Quando la modalità Conference è attiva, il dispositivo Bluetooth collegato al tasto “Vol
–“ è ancora disponibile: ciò significa che potete ascoltare le indicazioni stradali dal GPS
o rispondere alle chiamate telefoniche senza interrompere la ”catena” della connessione
Conference. L’audio proveniente dalla connessione al tasto “Vol –“ può essere “Privato”
o “Pubblico” (non condiviso o condiviso con gli altri utenti in Conference).
Di default l’audio sul VOL - è Privato.
In modalità “Private”, se ricevete una chiamata o un’indicazione vocale dal GPS, siete
momentaneamente scollegati dalla connessione Conference ma non le altre persone che
possono continuare la conversazione tra di loro. Non appena la telefonata è terminata o il
GPS torna silenzioso, automaticamente l’audio ritorna alla modalità Conference.
Attivazione modalità Audio Pubblico: tenete premuto il tasto “Vol –“ per 3 sec., sentirete l’annuncio vocale “Public”.
Attivazione modalità Audio Privato: tenete premuto il tasto “Vol –“ per 3 sec., sentirete
l’annuncio vocale “Private”.
Attenzione: le telefonate in entrata sono sempre in modalità “Private” anche se siete
in modalità “Public”.
Modalità Conference con 8 persone (4 coppie)
Per avere 8 persone in conference è necessario abbinare un dispositivo intercom anche
sul tasto “Vol -”. Attenzione: i dispositivi intercom abbinati sul tasto VOL-, devono essere
abbinati in modalità “Universal Intercom”.
Assicuratevi anche di aver selezionato la modalità “Public”.
Di default la modalità è “Private”: questo significa che dovete tenere premuto il pulsante
“Vol –“ per 3 sec. , e sentirete l’annuncio vocale “Public”, a conferma che siete passati
all’altra modalità. Nel caso in cui voliate tornare in modalità “Private” premete ancora il
pulsante “Vol –“ fino a che sentirete l’annuncio vocale “Private”.
Come abbinare un dispositivo Intercom al tasto “Vol –“:
›
Andate in “Setup mode” (modalità Impostazione) e tenete premuto il pulsante “Vol –“
per tre secondi. I led blu e rosso iniziano a lampeggiare.
›
Sull’altro dispositivo invece seguite la procedura per l’abbinamento come “Universal
Intercom”.
Come aprire il Conference per il dispositivo collegato al tasto “Vol –“.
Per aprire il Conference dal BT NEXT PRO al dispositivo collegato al tasto “Vol –“, tenete premuto lungo il tasto Avanti.
Per aprire il Conference dall’altro dispositivo collegato al pulsante “Vol –“, utiilzzate il
tasto per aprire la connessione Universal Intercom.
La distanza massima del dispositivo collegato al tasto “Vol –“ è di 10m, per questo la
connessione è disponibile solo per il passeggero.
Talk 2 All - Abbinamento a dispositivi non Midland.
Grazie alla funzione “Talk2 All - Universal Intercom” è possibile abbinare al BT Next C.
fino a due dispositivi intercom di un‘altra marca.
Si possono abbinare al massimo 2 dispositivi Intercom non Midland, uno sul tasto Avanti
e l’altro sul pulsante Indietro.
›
Attivate la modalità “Setup” (spegnete il dispositivo, tenete premuto il pulsante “Centrale” fino a che la luce non rimane di colore rosso fisso)
›
Tenete premuti per 7 secondi i tasti Avanti o Indietro: i led rosso e blu inizieranno a
lampeggiare rapidamente; continuate a tenerli premuti e lampeggeranno lentamente.
Ora lo potete rilasciare.
Sull’intercom non Midland, seguite le istruzione per abbinare un telefono, infatti il Midland BTNEXT PRO verrà abbinato al posto del telefono.
Ad abbinamento concluso (la luce rossa/blu smetterà di lampeggiare e il dispositivo uscirà
automaticamente dalla modalità “Setup”).
Attenzione: Durante l’abbinamento devono essere accesi solo i due dispositivi interessati
(spegnete tutti gli altri dispositivi Bluetooth).
Per aprire la comunicazione Universal Intercom sul Midland BT NEXT PRO mentre siete
in modalità Intercom, tenete premuto per 3 secondi il tasto Avanti o Indietro (in base al
I
www.midlandeurope.com 11
Page 12
I
Talk2All - Universal Intercom
Dispositivo Non Midland
tasto che avete utilizzato per l’abbinamento). Sull’altro dispositivo intercom semplicemente premete il tasto per la chiamata vocale (Voice Dial) o richiamo ultimo numero
(redial).
Sul dispositivo non Midland invece, potete aprire la comunicazione manualmente premendo il tasto per la chiamata telefonica (potrebbe essere necessario premere il tasto di
chiamata due volte , dipende dal modello del dispositivo non Midland).
Attenzione: in questa configurazione il dispositivo non Midland non potrà utilizzare il telefono (essendo già stato abbinato il Midland BTNEXT PRO al posto del telefono stesso).
E’ possibile abbinare anche un dispositivo Midland in modalità “Talk2ALL-Universal Intercom”
a patto che uno dei due dispositivi utilizzi la modalità di abbinamento ad un telefono (un dispositivo usa la procedura Talk2All e l’altro quella per abbinare un telefono).
Compatibilità con i dispositivi BT Midland
BTNEXT PRO è compatibile con BTX1 PRO, BTX2 PRO, BT NEXT Conference, BTX2
FM e BTX1 FM.
Una volta che i due dispositivi sono abbinati, la massima distanza intercom possibile è
stabilita dal dispositivo con minor potenza.
Il BTNEXT PRO è compatibile anche con le precedenti serie MIDLAND BT (BT Next,
BTX1 e BTX2) solo se aggiornate con la versione firmware 2014 o successive.
Abbinare il Midland BT NEXT PRO a dispositivi Bluetooth
Il Midland BT NEXT PRO può essere abbinato ad altri dispositivi Bluetooth come telefoni, navigatori GPS o ricetrasmettitori PMR446 con Bluetooth integrato o esterno
(Dongle).
La procedura di abbinamento si esegue utilizzando i tasti “Volume +” o “Volume –“.
›
Abbinamento al tasto “Volume +”: per telefoni con musica stereo A2DP, navigatori
GPS con audio A2DP o dongle esterni mono/stereo A2DP. Tutti i dispositivi abbinati
al tasto “Vol +” hanno la priorità maggiore e quindi interromperanno tutte le altre comunicazioni (intercom, musica, radio FM).
›
Abbinamento al tasto “Volume –“: per telefoni con musica stereo A2DP, navigatori
GPS con audio A2DP o dongle esterni mono/stereo A2DP. Tutti i dispositivi abbinati
al pulsante “Vol –“ sono sempre attivi in background durante la comunicazione intercom.
›
›
VOL- (sempre in background)
›
Telefono (HFP/A2DP Stereo)
›
GPS (HFP/A2DP Stereo)
›
Dongle (HFP/A2DP Stereo)
VOL+ (priorità alta)
›
Telefono (HFP/A2DP Stereo)
›
GPS (HFP/A2DP Stereo)
›
Dongle (HFP/A2DP Stereo)
Quando un dispositivo è abbinato ai pulsanti Vol+ o Vol -, la modalità “Phone” sarà disponibile.
Funzione Background
Tutti i dispositivi abbinati al pulsante “VOL-” avranno sempre l’audio in sottofondo (background) rispetto alla comunicazione intercom. In questo modo l’intercom non verrà interrotto per esempio dalle indicazioni del GPS o da altra sorgente audio.
Potete decidere invece se condividere l’audio della connessione del tasto “Vol –“quando
l’Intercom o il Conference sono aperti (abilitando la modalità “Public”), oppure se l’audio
deve rimanere privato (modalità Private).
Per condividere l’audio dal tasto “Vol –“ con l’intercom: tenete premuto 3 sec il pulsante
“Vol –“ ; sentirete l’avviso sonoro “public” come conferma della vostra selezione.
Per mantenere l’audio del tasto “Vol –“ privato: tenete premuto3 sec il tasto “Vol –“ e
sentirete l’annuncio vocale “private” come conferma.
Attenzione: di default è attiva la modalità “Private”.
12 www.midlandeurope.com
Page 13

L’audio dal tasto “Vol –“ ha sempre una priorità inferiore rispetto all’intercom: questo significa che quando l’intercom è aperto l’audio viene ridotto del 50% per permettere una
corretta comprensione della comunicazione Intercom. É possibile modificare questa configurazione tramite il software per PC BT Updater.
Telefono cellulare (abbinamento fino a due telefoni)
Il telefono cellulare può essere abbinato sia al pulsante Vol + che al pulsante Vol -.
Quando il telefono è abbinato, la modalità “Phone” sarà disponibile.
La telefonata entrante avrà sempre la priorità più alta e interromperà le altre comunicazioni attive (Intercom, Radio FM, Musica). Se arriva una seconda telefonata sull’altro
telefono, durante una telefonata già attiva, riceverete una segnalazione audio di notifica
ATTENZIONE!
Per garantire il corretto funzionamento con il vostro telefono è consigliato riporlo il
più vicino possibile al dispositivo BT NEXT PRO, quindi sul lato sinistro del corpo e
possibilmente nelle tasche superiori.
Come abbinare un telefonino
1. Attivate sul vostro telefonino la modalità di ricerca dispositivi Bluetooth. Questa funzione dipende dalla marca e modello del vostro telefono (fate riferimento al manuale del
telefonino).
2. Attivate la modalità “Setup: spegnete il Midland BTNEXT PRO e tenete premuto il
pulsante “Centrale” fino a che la luce non rimane di colore rosso fisso.
3. Premere il pulsante “Volume+” o “Volume -” fino a quando la luce lampeggia Rosso
e Blu.
4. Dopo pochi secondi sul telefonino comparirà il nome “Midland BTNEXT PRO”, selezionatelo e seguite le istruzioni del vostro telefonino per accettare l’abbinamento. Quan-
B - Utilizzo pulsanti in modalità Phone
Modalità Pulsante Avanti (Telefono su Vol+) Pulsante Centrale Pulsante Indietro (Telefono su Vol-)
Phone Breve: Chiamata vocale /Accetta o termina chiamata
Lungo: Richiama ultimo numero/ rifiuta chiamata
Phone (con musica attiva ) Breve: Avanti una canzone Breve: Play/pause
do viene richiesto, immettete il codice di abbinamento: 0000 (quattro zeri). Il telefono
confermerà se il processo di abbinamento è stato completato con successo.
5. Il Midland BTNEXT PRO uscirà dalla modalità setup (luce rossa fissa) e passerà automaticamente allo stato di funzionalità normale (luce blu lampeggiante). Ora il telefono è
abbinato correttamente.
Come utilizzare il telefonino
Per utilizzare le funzionalità del telefono è necessario essere in modalità “Phone”. Tenete
premuto per 3 secondi il pulsante Centrale. Un annuncio vocale vi indicherà in quale modalità state entrando, quando sentirete “Phone” potrete utilizzare i pulsanti del Midland
BTNEXT PRO per gestire il vostro telefono (vedi tabella B)
Rispondere ad una chiamata
Quando sentite il telefonino squillare, potete rispondere utilizzando due modalità:
Risposta vocale:
E’ suciente pronunciare una parola qualunque e quindi iniziare a parlare dopo il primo
squillo del telefono.
Risposta manuale:
Premere brevemente il pulsante “Avanti” o “Indietro” ed iniziare a parlare.
Rifiutare una chiamata
Se non intendete rispondere al telefono potete lasciarlo squillare, oppure tenere premuto
per 3 secondi il pulsante “Avanti” o “Indietro” (sentirete un tono audio di conferma).
Chiamare l’ultimo numero:
Telefono collegato al pulsante “Vol+”: tenete premuto per 3 secondi il pulsante “Avanti”,
l’ultimo numero utilizzato verrà richiamato (sentirete un tono audio di conferma)
Lungo: Cambio modalità Breve: Chiamata vocale /Accetta o termina chiamata
Lungo: Richiama ultimo numero/ rifiuta chiamata
Breve: Indietro una canzone
Lungo: Cambio modalità
I
www.midlandeurope.com 13
Page 14

I
Telefono collegato al pulsante “Vol-”: tenete premuto per 3 secondi il pulsante “Indietro”,
l’ultimo numero utilizzato verrà richiamato (sentirete un tono audio di conferma)
Chiamata vocale:
Telefono collegato al pulsante “Vol+”: premete brevemente il pulsante “Avanti”, se il
vostro telefonino supporta la chiamata vocale, vi verrà chiesto di pronunciare il nome del
contatto che volete chiamare.
Telefono collegato al pulsante “Vol-”: premete brevemente il pulsante “Indietro”, se il
vostro telefonino supporta la chiamata vocale, vi verrà chiesto di pronunciare il nome del
contatto che volete chiamare.
Priorità: La telefonata è prioritaria, quindi tutte le altre comunicazioni vengono temporaneamente interrotte.
Chiudere una telefonata
Ci sono diversi modi per chiudere una telefonata:
›
Aspettare che l’altra parte chiuda la telefonata
›
Premere brevemente il pulsante “Avanti” (sentirete un tono audio di conferma)
›
Premere il pulsante “Chiuso” sul telefonino
Speed dial – Selezione rapida di un numero di telefono
Solo per il telefono abbinato sul Vol+, è possibile memorizzare un numero di telefono per
poterlo utilizzare all’occorrenza. Innanzitutto si deve salvare il numero tramite il software
per PC “BT UPDATER” o l’applicazione per smartphone “BT SET-APP”. Poi quando
siete in modalità Telefono, premete semplicemente per 7 secondi il tasto “Avanti”.
Utilizzo della funzionalità MP3 player del telefonino
I telefonini abbinati sia sul Vol+ che sul Vol-, possono essere utilizzati anche come player
musicali Stereo. Il dispositivo Midland BTNEXT PRO supporta completamente i protocolli A2DP e AVRCP, i quali consentono di ascoltare musica stereo e di comandare
le principali funzioni dell’MP3 player. E’ infatti possibile utilizzare i pulsanti presenti sul
Midland BTNEXT PRO per gestire le seguenti funzioni: Play, Stop/Pause, Avanti ed Indietro.
É possibile gestire le funzioni di un solo telefono alla volta, scegliendo quale telefono controllare: Tenete premuto il pulsante VOL + per 3 sec. e sentirete l’annuncio
vocale “Control ON VOL up” per indicarvi che verrà controllato il telefono abbinato
sul VOL +. Se premete ancora per tre secondi sentirete l’annuncio vocale “Control on
VOL down” per indicarvi che il controllo è passato ora al telefono abbinato al tasto Vol-.
Play/PausaAvanti Indietro
Comandi disponibili in modalità “Phone”:
›
Play/pausa della musica: fare click sul pulsante “Centrale”.
›
Avanti di una canzone: premere il pulsante “Avanti”
›
Indietro di una canzone: premere il pulsante “Indietro”
Attenzione: Per poter utilizzare le funzionalità del player musicale (Play, Pausa, Avanti, Indietro) dovete essere in modalità “Phone
Se state ascoltando la musica A2DP proveniente dal VOL- e vi spostate su “FM radio” o
su “Intercom”, potrete continuare ad avere la musica attiva ma non avrete tutti i comandi
di controllo. Solo Play/Pausa è disponibile con un doppio click sul tasto centrale
Condividere la musica
La condivisione della musica è possibile solo per il telefono abbinato al pulsante Vol+. Per
poter condividere la musica A2DP con il passeggero, il cui dispositivo è già abbinato con il
tasto Centrale (distanza massima 10m), tenete premuto il tasto “Indietro” per 3 secondi
mentre state ascoltando la musica. Il passeggero deve essere in modalità Telefono o Intercom senza nessun audio aperto.
Il passeggero non può controllare la musica ma può interrompere la condivisione premendo brevemente il tasto “Centrale”.
Il pilota invece può interrompere la condivisione della musica tenendo premuto nuovamente il tasto “Indietro”. Mentre la condivsione della musica è attiva non è possibile
mantenere la comunicazione Intercom attiva.
14 www.midlandeurope.com
Page 15

Navigatore GPS
Il GPS può essere abbinato tramite il pulsante “Volume+” oppure “Volume-“.
Pulsante “Vol+” (supporto per l’audio stereo A2DP e mono HSP, HFP )
Tutti i dispositivi abbinati al pulsante “VOL+” hanno una priorità più alta e interromperanno la cuminucazione Intercom
Pulsante “Vol-” (supporto per l’audio stereo A2DP e mono HSP, HFP)
Potete invece utilizzare l’abbinamento al pulsante “Vol-“ per avere sempre l’audio in sottofondo e non iterrompere la comunicazione intercom.
E possibile inoltre stabilire se l’audio proveniente dal dispositivo abbinato sul “VOL-” deve
essere anche condiviso con le altre persone quando l’intercom è aperto.
Se la modalità “Public” è attiva, le indicazioni stradali del GPS poptranno essere sentite
anche dall’altra persona.
Se la modalità “Private” è attiva, le indicazioni stradali saranno sentite solo da chi ha il GPS
collegato. Vedi il paragrafo “Funzione Background”, più indietro.
Abbinamento ad un Navigatore GPS
In generale è possibile abbinare qualunque navigatore GPS per moto che accetti un auricolare Bluetooth.
1. Attivate sul vostro GPS la modalità di ricerca dispositivi auricolari Bluetooth. Questa
funzionalità dipende dalla marca e modello del vostro GPS (fate riferimento al manuale del GPS).
2. Attivate la modalità “Setup (Spegnete il Midland BTNEXT PRO Tenere premuto il
pulsante “Centrale” fino a che la luce non rimane di colore rosso fisso). Premere il
pulsante “Volume + o Volume -” fino a quando la luce lampeggia Rosso e Blu.
3. Sul GPS comparirà il nome “Midland BTNEXT PRO”, selezionatelo e seguite le istruzioni per accettare l’abbinamento. Se viene richiesto, immettete il codice di abbina-
mento: 0000 (quattro zeri). Il GPS confermerà se il processo di abbinamento è stato
completato con successo.
4. Il Midland BTNEXT PRO uscirà dalla modalità setup (luce rossa fissa) e passerà automaticamente allo stato di funzionalità normale (luce blu lampeggiante). Ora il GPS è
abbinato correttamente.
Ricetrasmettitore PMR446 con Bluetooth integrato o esterno
Se possedete un ricetrasmettitore con Bluetooth esterno o integrato potete abbinarlo al
Midland BTNEXT PRO tramite il pulsante “Volume +“ o “Volume-”. Se abbinato al pulsante “Volume -” sarà possibile avere la comunicazione radio in sottofondo all’intercom.
Abbinamento ed utilizzo
Attivate la modalità “Setup (Spegnete il Midland BTNEXT PRO Tenere premuto il pulsante “Centrale” fino a che la luce non rimane di colore rosso fisso).
›
Premere il pulsante “Volume+” o “Volume -“ fino a quando la luce lampeggia Rosso e Blu.
›
Attivate la modalità di abbinamento sul ricetrasmettitore PMR446, seguendo le istruzioni
riportate sul manuale del ricetrasmettitore stesso.
Utilizzo della funzionalita’ Radio FM
Il Midland BTNEXT PRO è dotato di un ricevitore radio FM integrato. Per utilizzarlo è
suciente passare alla modalità “FM Radio”.
Modalità “ FM Radio”
Tenete premuto per 3 secondi il pulsante Centrale. Un annuncio vocale vi indicherà in
quale modalità state entrando, quando sentirete “FM Radio” potrete utilizzare i pulsanti
del Midland BTNEXT PRO per gestire il ricevitore radio (vedi tabella C).
Con un click sul pulsante “Avanti” o “Indietro”potete ricercare una stazione radio (funzionalità seek), la ricerca si fermerà automaticamente quando incontrerà una stazione con
I
C - Modalità con Radio FM
Modalità Pulsante Avanti (sinistro) Pulsante Centrale Pulsante Indietro (destro)
FM Radio Corto: ricerca stazione avanti
Lungo: scansione memorie avanti
Corto: On/o
Lungo: Cambio modalità
Corto : ricerca stazione indietro
Lungo: Scansione memorie indietro
www.midlandeurope.com 15
Page 16

I
un segnale sucientemente forte per garantire una buona ricezione. Se invece tenete
premuto lungo (3 sec.) scorrerete avanti e indietro le 6 stazioni memorizzate. Ogni volta
che passate da una stazione registrata all’altra un annuncio vocale vi indicherà il numero
di memoria in cui vi trovate. Per registrare una stazione radio tenere premuto per 3 sec
contemporaneamente i pulsanti “Avanti” e “Indietro”. Sentirete un tono di conferma. La
nuova stazione verrà registrata al posto dell’ultima memoria ascoltata. Grazie al sistema
RDS, la radio sceglierà sempre il segnale radio più forte disponibile per la stazione che
state ascoltando. Il sistema RDS è spento per default, potete attivarlo premendo insieme
i pulsanti “Volume+” e “Volume-“ per 3 sec. Un annuncio vocale vi indicherà lo stato. Per
disattivarlo ripetete la stessa procedura.
Disabilitare/Abilitare la Modalità Radio FM
Per default la radio FM è attiva.
Disattivazione:
›
Attivate la modalità “Setup (Spegnete il Midland BTNEXT PRO Tenere premuto il pulsante “Centrale” fino a che la luce non rimane di colore rosso fisso).
›
Premete contemporaneamente i pulsanti “Centrale” e “Volume+” per 3 sec.
La luce Blu farà 3 lampeggi per indicare la disattivazione.
›
Uscite dalla modalità “Setup” premendo due volte il pulsante Centrale.
Attivazione: Fate la stessa procedura; questa volta un lampeggio della luce blu indicherà
l’attivazione.
Uscite dalla modalità “Setup” premendo due volte il pulsante Centrale.
Intercom con Radio FM
In modalità FM radio non è possibile attivare l’intercom in modo manuale, ma può essere
utilizzata l’attivazione vocale (VOX) solo verso il dispositivo abbinato sul pulsante “Centrale”. Per attivare l’intercom in modo manuale dovete uscire dalla modalità “FM Radio”
e passare alla modalità “Intercom”.
Utilizzo dell’ingresso audio a filo
BTNEXT PRO ha un ingresso audio per collegare una sorgente audio a filo, per esempio
un iPod o un qualsiasi MP3 player.
Ascolto della musica
Per ascoltare la musica dall’ingresso a filo collegate la sorgente audio tramite il cavo AUX
opzionale. I tasti volume (Vol + e Vol - ) regolano il volume della sorgente audio a filo (ma
non indipendentemente dal volume dell’Intercom).
Il sistema AGC aumenta automaticamente il volume ad una maggiore velocità.
Attenzione: non alzate mai il volume dell’MP3 Player al massimo, normalmente un volume
al 70% può essere quello corretto.
Consiglio: fate alcune prove, regolando il volume del vostro iPod/MP3 Player in modo che a bassa
velocità il volume in cua sia ad un livello ottimale, poi annotatevi il valore in modo che la prossima
volta possiate immediatamente riconfigurarlo con il valore corretto.
Attivazione/disattivazione dell’ingresso a filo
E’ possibile attivare e disattivare l’ingresso a filo semplicemente premendo contemporaneamente per 3 sec. i tasti “Centrale” e “Avanti”. Un tono audio vi segnala quando la
connessione è aperta, mentre un doppio tono audio quando è chiusa.
Ingresso audio in background
L’audio dalla connessione a filo può essere in sottofondo (background) all’Intercom o
alla comunicazione telefonica. Di default questa opzione è attiva; per disabilitarla fate
riferimento al paragrafo “Connessione audio sempre in background”.
Questo tipo di connessione audio non può essere in background alla radio FM.
Segnalatore di frenata d’emergenza
Sul retro del kit di montaggio del BTNEXT PRO è posizionata una luce di emergenza
a led molto luminosa. Ad ogni frenata questa luce si accende come
ulteriore segnalazione a chi guida dietro di voi.
Nel caso in cui vogliate spegnerla, per esempio in presenza di un
passeggero, premete a lungo contemporaneamente i tasti “Indietro” e “Avanti” in modalità “Telefono” o “Intercom”. Un annuncio
vocale vi confermerà la vostra selezione. Il dispositivo rimane nell’ultimo stato selezionato e per accendere di nuovo la luce di emergenza dovete premere contemporaneamente i tasti “Indietro” e
“Avanti”.
Attenzione: questa funzione è disabilitata di default. Stop Light
16 www.midlandeurope.com
Page 17

Configurazioni speciali
Reset di tutti i dispositivi accoppiati
Potrebbe essere necessario eliminare tutti i riferimenti di abbinamento registrati nel Midland BTNEXT PRO (reset). Procedete quindi come segue:
Spegnete il Midland BTNEXT PRO Tenere premuto il pulsante centrale (“Centrale”) fino
a che la luce non rimane di colore rosso fisso.
Tenete ora premuto contemporaneamente i pulsanti “Volume +” e “Volume –“ per 3
secondi, la luce Blu si accenderà fissa per un secondo e poi tornerà di colore rosso fisso.
Fate doppio click sul tasto “Centrale” per uscire dalla modalità Set-Up.
Da questo momento il Midland BTNEXT PRO non avrà più nessun dispositivo Bluetooth
in memoria e potrete procedere ad una nuova sessione di accoppiamento (pairing).
Attenzione: dopo il reset degli abbinamenti, solo l modalità “Radio FM” sarà disponibile.
Ritorno alla configurazione di default
Potrebbe essere necessario ritornare alla configurazione “di fabbrica” , in modo da ottenere un dispositivo “pulito” esattamente come la prima volta che è stato tolto dalla scatola. Spegnete il Midland BTNEXT PRO Tenere premuto il pulsante centrale (“Centrale”)
fino a che la luce non rimane di colore rosso fisso.
Tenete ora premuto contemporaneamente i tre pulsanti “Avanti”, “Centrale” e “Indietro“
per 3 secondi, la luce Blu si accenderà fissa per un secondo e poi tornerà di colore rosso
fisso. Fate doppio click sul pulsante “Centrale” per uscire dalla modalità Set-Up e per
tornare ad utilizzare il Midland BTNEXT PRO
Attenzione: questa procedura elimina anche i riferimenti ai dispositivi accoppiati.
Regolazione/disattivazione della funzione Vox (per Intercom e telefono)
L’apertura della comunicazione Intercom, può avvenire oltre che manualmente, anche
tramite attivazione vocale (VOX). Il corretto funzionamento del VOX dipende dal rumore di fondo, quindi dalla velocità ma anche dal tipo di casco utilizzato.
Per ottenere il migliore risultato, è possibile decidere la soglia di attivazione, scegliendo 4
livelli di sensibilità del microfono: alta, media bassa e molto bassa.
In aggiunta, è possibile anche disabilitare completamente la funzione VOX e quindi attivare l’Intercom e la risposta alla telefonata solo in modalità manuale.
Regolazione della sensibilità del VOX
1.
Spegnete il Midland BTNEXT PRO
2.
Tenere premuto il pulsante Centrale fino a che la luce non rimane di colore rosso fisso.
Ora il Midland BTNEXT PRO è in modalità “Setup” .
3.
Premete brevemente il pulsante “Indietro” fino a che la luce non diventa Blu fissa.
4.
Ora premete “Volume +” o “Volume -“ per aumentare o diminuire la sensibilità. La
luce Rossa lampeggerà indicando che il pulsante è stato premuto (quando raggiungete
il limite della regolazione la luce smette di lampeggiare).
5.
Premete brevemente il pulsante “Indietro”, la luce Blu lampeggerà diverse volte in
base alla configurazione della sensibilità in quel momento attiva:
1 volta= Vox disattivo
2 volte=sensibilità bassa
3 volte=sensibilità media
4 volte= sensibilità alta
5 volte= sensibilità molto alta
Ora la luce rossa tornerà ad essere accesa fissa per indicare che le modifiche sono
state registrate e siete tornati alla modalità di setup.
6.
Se dovete modificare ulteriormente la configurazione della sensibilità ripetete i passi
dal punto 2, altrimenti uscite dalla modalità di “Setup” facendo un doppio click sul
pulsante “Centrale” . La luce Rossa si spegne e al suo posto lampeggia la luce Blu. Ora
potete utilizzare il Midland BTNEXT PRO.
Disattivazione della funzione VOX (per Intercom e Telefono)
Seguite tutta la procedura spiegata sopra ma selezionate l’opzione 1 del punto 5 cioè un
unico lampeggio (corrispondente al Vox disattivo).
Attenzione: ricordate che disattivando la funzione di Vox anche la risposta alla telefonata
potrà avvenire solo in modalità manuale (premendo il pulsante “Avanti”).
Connessione a filo sempre attiva
Questa funzione permette di avere la connessione audio sempre attiva, anche quando il
telefono o l’intercom sono aperti (tranne quando siete in modalità Radio FM).
Di default questa funzione è abilitata.
I
www.midlandeurope.com 17
Page 18

I
Disattivazione:
›
Entrare in Modalità Set-Up:
›
Spegnete il dispositivo
›
Tenete premuto il tasto “Centrale” per 7 Sec. fino a che la luce non diventa Rossa fissa.
›
Premete i tasti “Avanti” e “Centrale” per 3 sec la luce Blu lampeggerà tre volte.
›
Fate doppio click sul tasto centrale per uscire dalla modalità Set-Up ora potete utilizzare il vostro BTNext Pro.
Attivazione:
Seguite la stessa procedura descritta nel paragrafo precedente; ora la luce Blu lampeggerà una volta. Fate doppio click sul tasto “Centrale” per uscire dalla modalità Set-Up.
Configurazione e aggiornamento firmware
Midland BTNEXT PRO può essere configurato e aggiornato tramite connessione USB
al vostro PC, per migliorare la compatibilità con i dispositivi Bluetooth, quali telefoni e
GPS o per risolvere problematiche legate alla funzionalità. Il software per PC insieme
agli eventuali aggiornamenti del firmware sono disponibili per il download sul sito www.
midlandeurope.com nella pagina del prodotto stesso.
ATTENZIONE: NON COLLEGATE IL DISPOSITIVO AL COMPUTER PRIMA DI AVER
SCARICATO ED INSTALLATO IL SOFTWARE.
Uso e avvertimenti specifici
L’uso assiduo di questi dispositivi può diminuire la vostra capacità di udire suoni esterni e
chi vi sta intorno.
L’uso di questo dispositivo mentre si sta guidando può diventare un pericolo per voi e per
chi vi sta intorno e in alcuni paesi, l’utilizzo del dispositivo potrebbe non essere consentito.
L’uso ad un volume troppo alto può causare la perdita permanente dell’udito.
Se si avverte un qualsiasi dolore alle orecchie, o fastidio all’udito, diminuite il volume o
spegnete il dispositivo. L’uso continuativo ad alto volume, fa sì che l’udito si abitui a tale
volume, il quale a lungo andare può causare danni permanenti.
È fortemente consigliato l’utilizzo di tale apparato ad un volume adeguato.
Garanzia
La durata della garanzia è di 24 mesi per l’apparato e di 6 mesi per gli accessori (batterie,
caricatori, antenne, auricolari e microfoni).
Per maggiori informazioni visitate il sito www.midlandeurope.com
Certificazioni e Conformità di Sicurezza
CE/Informazioni generali
Questo prodotto è conforme alla direttiva 99/05/CE
2014/53/UE)
Agli utenti non è permesso eettuare variazioni o modifiche di qualsiasi tipo all’apparecchio. Queste ultime, se non espressamente approvate dal produttore, annullano la
possibilità di utilizzo dell’apparecchio ed invalidano la garanzia.
Per ulteriori informazioni, fate riferimento al nostro sito web: www.midlandeurope.com
e può essere liberamente utilizzato nei paesi dell’UE.
(dal 13/06/2017 alla Direttiva
18 www.midlandeurope.com
Page 19

I
www.midlandeurope.com 19
Page 20

INDEX
Main features ......................................................................................................................................................................................................................................................................... 21
Technical specifications of Midland Midland BTNEXT PRO ........................................................................................................................................................................................... 21
UK
Charging batteries ................................................................................................................................................................................................................................................................ 22
Unit and fixing system description ......................................................................................................................................................................................................................................22
Switching ON and OFF your Midland BTNEXT PRO ....................................................................................................................................................................................................24
How to pair two Midland BTNEXT PRO units .................................................................................................................................................................................................................25
Set up of the AGC system .................................................................................................................................................................................................................................................. 26
Conference mode with one Bluetooth device on “VOL-” .............................................................................................................................................................................................. 28
Conference mode up to 8 people (4 couple) ...................................................................................................................................................................................................................28
Talk 2 All - Universal Intercom with dierent brand unit. ................................................................................................................................................................................................ 29
Compatibility with Midland BT line units ...........................................................................................................................................................................................................................29
Pairing the Midland BTNEXT PRO to Bluetooth devices ...............................................................................................................................................................................................30
How to listen to the FM Radio ............................................................................................................................................................................................................................................ 33
Wired audio input ..................................................................................................................................................................................................................................................................34
Emergency Stop light ...........................................................................................................................................................................................................................................................34
Setup and special configurations ........................................................................................................................................................................................................................................34
Setup and Firmware update.................................................................................................................................................................................................................................................36
Warranty ................................................................................................................................................................................................................................................................................36
European CE Notice Certification and Safety Approval Information ...........................................................................................................................................................................36
20 www.midlandeurope.com
Page 21

MIDLAND BTNEXT PRO
Dual core intercom system
Midland BTNEXT PRO is an intercom system solution with Dual Bluetooth Core for conference communication and real background stero audio. The design is very slim and aerodynamic, all the main functions are easy to operate thanks to the three big buttons placed
on the front of the unit. Midland BTNEXT PRO is fixed on the helmet using the adhesive
plate or the screw mounting clamp. Thanks to the audio kit with ultra slim speakers you can
enjoy high quality stereo music while riding.
Main features
›
Dual Bluetooth core system.
›
Intercom “one to one” up to 1 mile (1.6 Km) distance.
›
Conference up to 8 people (4 couples)
›
Connect up to 6 people for “one to one” intercom communication
›
Universal Intercom Talk2All features to connect other brand intercom
›
FM Radio Stereo with RDS
›
Music Share (Driver and Passenger)
›
Connect your phone to receive and place phone call and listen to stereo music
›
Support for 2 phones
›
Connect your GPS for voice street indications
›
Connection for PMR466 radio with internal or external Bluetooth
›
AUX wired connection for MP3 player (optional cable)
›
Setup and Firmware update via USB connection to a PC
Midland BTNEXT PRO is available in two versions:
›
Single Midland BTNEXT PRO Intercom kit with one unit only
›
Twin Midland BTNEXT PRO Intercom kit with with two units
Depending on the model purchased, the package contains the following parts:
Midland BTNEXT PRO single
›
1 BTNEXT PRO communication unit
›
1 Slide-in mounting kit with two stereo speakers
›
›
›
›
Midland BTNEXT PRO Twin
›
›
›
›
›
›
The units included in the TWIN kit are already paired on Middle button and can therefore be
immediately used in Intercom mode.
Technical specifications of Midland Midland BTNEXT PRO
General:
›
›
›
›
›
›
›
›
Bluetooth connections:
With identical device for Rider to Pillion or Bike-to-Bike Intercom mode, up to a maximum distance range of 1.6Km without obstructions and interferences (the riders must
be always in sight).
Bluetooth devices:
›
›
1 microphone with boom and 1 wired microphone
1 plate with bi-adhesive strip to fix the unit onto the helmet
1 plate with screw to fix the unit onto the helmet
1 micro USB wall-mounting power supply
2 BTNEXT PRO communication units
2 Slide-in mounting kit with two stereo speakers
2 microphones with boom and 2 wired microphones
2 plates with bi-adhesive strip to fix the unit onto the helmet
2 plates with screw to fix the unit onto the helmet
1 micro USB wall-mounting power supply with double plug
Bluetooth ver. 4.2 Stereo (Handsfree/A2DP/AVRCP protocol)
Dual Bluetooth core for real Stereo Background
AGC system automatically controls the volume in relation to background noise
Voice (VOX) or manual communications activation
Manual controls to enable: telephone, intercom, FM Radio and wire connection
Fully waterproof
Lithium battery with 35 hours talk time
Recharge time: app. 2 hours
Mobile phone with MP3 player Stereo (A2DP protocol) and GPS navigator
PMR446 transceivers (with built-in or external Bluetooth connection) for group
bike-to-bike communications
UK
www.midlandeurope.com 21
Page 22

Wire connections:
Middle
Forward Backward
›
For stereo audio input like iPod/MP3 player (with optional cable)
Attention: Midland BTNEXT PRO is designed to withstand rain and water. However, if it is
raining, always verify that the rubber cap protecting the recharging sockets is fully fitted.
UK
Charging batteries
Attention: Make sure that the unit is fully charged before use. Allow at least 3 hours for a
full charge before using the unit for the first time.
Charge the unit by inserting the wall-charger into the charging socket (lift the rubber
cover to insert the plug). The red LED on the unit will start flashing when charging begins.
Allow the headset to charge until the unit stops flashing and the blue LED turns on.
When the charge is complete (the red LED is not flashing), release the headset from the
charger. Normally, after the first time, it takes 2 hours for a full charge.
Attention: every time the micro USB recharging plug is inserted (or detached), the device
is automatically turned o. To use it while it is in charge, you should turn the device on with
the plug already inserted.
Unit and fixing system description
Description of the wired connections
On the bottom of the unit you can find the Charger jack that enables to recharge the
unit using a standard microUSB power supply
The same micro USB charger plug can be used to connect an audio source, like a stereo
iPod/MP3 player;
Attention: you need an optional AUX cable not included in the box.
Charger plug
Description of the audio kit
The audio system includes two ultra-flat stereo speakers and two interchangeable
microphones, which are both supplied with a bracket and wired connection. The mini
connector on the microphone allows you to choose the microphone that best suits the
helmet you are using.
BTNEXT PRO description
The BTNEXT PRO has five buttons on the front; the main three big button are multi
functions buttons: the Forward (on the left), the middle button and the Backward (on
the right), the two squared buttons are the Volume + and Volume -.
Volume - Volume +
Fixing the stereo speakers
The two stereo speakers have a Velcro/adhesive strip that aids their fixing into your helmet. Beware not to keep the volume too high, you must always be able to listen to the
trac sound.
22 www.midlandeurope.com
Page 23

Fixing the microphone
Boom Microphone
Place the section with the Velcro/adhesive strip between the padding and the rigid cover
of the helmet, so that the microphone is correctly positioned in front of your mouth and
that the white symbol is facing your mouth. This type of microphone is suited for Open
Faced and Flip Front helmets.
Description of the Slide-in mounting kit
The Midland BTNext PRO can be fixed onto the helmet, installing the slide-in mounting
kit in two dierent ways: By either using the plate with bi-adhesive strip, or the screw
plate. These methods allow you to safely “fix” the BTNext PRO unit onto your helmet
and to remove it at any time in order to recharge or store it.
PPlate with bi-adhesive strip
The Bi-adhesive plate is already assembled on the slide-in mounting kit. Clean the application area on the helmet surface, remove the bi-adhesive film and place the fixing plate
on the left side of the helmet by keeping it contact with the surface for a few seconds.
UK
Wired microphone
Using the Velcro/adhesive strip, place the microphone inside the helmet in front of your
mouth. This type of microphone is more suited for Full Faced helmets. The mini connector on the microphone allows you choose the microphone that best suits the helmet
you are using.
Screw Clamp
Step 1. remove the bi-adhesive plate from the slide mount using the allen wrench too
included in the box.
Step 2. Tighten the screw plate to the slide-in mounting kit with the two provided screws.
Step 3.Then, tighten more the two screws in order to firmly fix the clamp in place on the
left side of the helmet.
.
www.midlandeurope.com 23
Page 24

Fitting and removing your Midland BTNEXT PRO
The BTNEXT PRO can be easily fitted onto the helmet by sliding it downwards on the
sliding mounting kit. BTNEXT PRO is maintained in position thanks to the fixing clip
located on the upper section (A).
To detach the BTNEXT PRO, simply press the fixing clip and push the unit upwards.
UK
A
If necessary, you can use also the rubber plate in order to have more grip for the screw
clamp. Just use the two short screw to fix the rubber plate on the slide-in mount and
tighten the screw plate again.
Here is an example of the buttons main functionality based on the mode you are on.
Mode Forward (Left button) Middle button Rear (Right button)
Intercom Open/close the intercom to the first rider Open/close the intercom to the second rider Open/close the intercom to the Third rider
Phone
Phone (while music play) Forward the song Play/pause Backward the song
FM Radio Scan up FM Radio On/o Scan down
Redial last number/accept or reject incoming call on
“Vol+”
Redial last number/accept or reject incoming call on “Vol-”
UnlockLock
24 www.midlandeurope.com
Page 25

Switching ON and OFF your Midland BTNEXT PRO
Switching the unit on:
Press and hold “Middle” button for approximately 3 seconds until the BLUE indicator
lights.
Switching the unit o:
Press and hold both “Middle” and “Backward” buttons together for approximately 3 seconds until the RED indicator flashes 3 times, thus lessening the chances that you might
turn o the unit accidentally (especially whilst wearing gloves).
Maximum Distance
You can reach 1.6 Km intercom distance if you are in line of sight without obstructions and interferences (the riders must be always in sight).
How to pair two Midland BTNEXT PRO units
The two units supplied in the same Midland BTNEXT PRO box, are already paired and
ready to use, this means you don’t need to perform this procedure. The units are already
paired using the Middle button.
If the devices are not part of the same kit, or the units has been purchased separately, you
need to first pair them in order to use them.
Operative “mode”
The BTNEXT PRO can operate in three main “mode”: Intercom, Phone and FM Radio.
The 3 multi function buttons can have dierent functionality depending on which mode
the unit is at that moment.
›
In “Intercom mode” the three buttons let you manage the Intercom communications
between driver and passenger or bike to bike.
›
In “Phone mode” you can manage your Bluetooth mobile phone to place/answer a
phone call or to listen to the music or GPS App. announcement (in stereo mode).
Please use your phone responsibly and safely.
›
In “FM Radio mode” you can listen to your favourite radio station in stereo, seek for a
specific radio station and save it (6 memory are available).
You can switch (toggle) from one mode to the other simply pressing the Middle button
for 3 seconds. A voice announcement will tell in which mode you are on.
The toggle sequence is the following:
›
Intercom mode (if another unit has been paired)
›
FM Radio
›
Phone mode (if a phone has been paired)
Every time you turn on the unit, the default mode is the last used mode.
The Intercom mode and Phone mode are avalaible only if it was previously paired to
another unit or to a phone.
If you need to know in which mode the unit currently is, just press the “Volume + “ and
“Volume –“ button together. A voice announcement will tell you the current mode.
To pair the Midland BTNEXT PRO to another Midland BTNEXT PRO unit
To pair the Midland BTNEXT PRO to another Midland BTNEXT PRO unit, you must first
enter the setup mode:
1.
2.
3.
4.
5.
6.
You can use now your Midland BTNEXT PRO
Attention: remember to switch o all the other Bluetooth device that are not part of the pairing procedure, only the two devices involved in the pairing must be turned on.
How to use the Intercom with two units
To use the intercom feature, be sure that both units are turned on and correctly paired
together.
UK
Turn o the unit
Press and hold down the middle button about 7 sec., until the Red light is on permanently.
Now press the Middle button for 3 seconds. The Blue and Red lights will flash.
Do the same procedure on the other unit. When successfully paired, each unit will have
the Blue light on for one second and then go back to the setup mode (Red light always
on).
Now the pairing procedure is complete, you just need to exit the setup mode before
you can use the units.
Double click on the Middle button, the Red light will turn o and the Blue light will start
flashing.
www.midlandeurope.com 25
Page 26

Manual activation
When in “Intercom Mode” press the Middle button on one of the two units in “Intercom”
mode. Communication is enabled and remains active until you press again the middle
button. The intercom need some seconds to activate, you will hear a beep tone when the
intercom is open.
UK
Voice activation (VOX)
Simply say something, after some seconds the communication will be opened and will
remain active for the time you are talking. If there is no conversation the intercom will be
closed after 40 seconds. If needed you can close the intercom manually without waiting
40 seconds (just press the middle button).
If needed, you can disable the VOX feature simply by pressing the Backward button for
7 sec. A voice announcement will advise you when the VOX is disabled. To turn the VOX
on again, just press the same button and a voice announcement will advise you that the
VOX is now active. This setting is remembered also if you turn o the unit.
Attention: The Voice activation (VOX) can open the intercom communication only to the
unit that was paired with the Middle button. If you choose to use a dierent button (Forward
or Backward ), you will be able to active the intercom only manually.
Adjusting the volume
Your Midland BTNEXT PRO uses AGC technology, which automatically adjusts the listening volume in relation to background noises.
However, it is also possible to manually adjust the volume by means of the “Volume +”
and “Volume -“buttons. The volume setting is indipendent for each audio source:
intercom, stereo music, phone call, FM radio.
Attention: volume can be adjusted only when an audio connection is active.
Set up of the AGC system
To adjust the sensitivity of the AGC system you can use the ”BT UPDATER” Pc Software or the smartphone “BT SET-APP” application. You can choose dierent set up based
on your motorbike type (naked, touring, sport) or if you are riding as a passenger. You can
disable the AGC system pressing “Volume +” and “Volume -” togheter for 3 sec.
How to pair the Midland BTNEXT PRO to more than two units
One Midland BTNEXT PRO unit can be paired to maximum five other BT units, that
means six in total (3 Midland unit + 2 Talk2All + yourself).
The Midland BTNEXT PRO has three main buttons (Forward, Middle and Rear). It is up to
you which button to use to pair and activate the intercom, you are totally free to choose the
button you like more. The same button you will use to pair the unit will be also used to activate
the intercom communication. Remember that each device can always be paired with other
3 units at your choice; as shown in the picture here below, also ‘crossed’ pairing can be done.
Rider 1
Passenger 1
Rider 2
Rider 3
A- Manual activation
Mode Forward button Middle button Rear button
Intercom Short press: Open/Close intercom to paired raider
Short press: Open/Close intercom to paired raider
Long press: Change mode
Short press: Open/Close intercom to paired raider
Long press: Toggle on/o wired
26 www.midlandeurope.com
Page 27

For example you can decide to pair one motorbike rider unit to the Forward button, your
passenger to the Middle button and another rider to the Rear button.
In this way you can have in total 4 units paired together and talk to each person, one by
one, simply by pressing the corresponding button (the same used for the pairing). Every
time you open the intercom connection to one person, the previous connection will be
closed. The connection is not a “chain”, when two persons are talking it is not possible to
break (interrupt) the communication by one of the other two units.
Pair the Midland BTNEXT PRO to another Midland BTNEXT PRO unit
To pair the Midland BTNEXT PRO to another Midland BTNEXT PRO unit, you must
first enter the setup mode:
1.
Turn o the unit
2.
Press and hold down the middle button about 7 sec., until the Red light is on permanently.
3.
Now press one of the three buttons (Forward, Middle or Backward) for 3 seconds
depending on which button you would like use to open the intercom to the other unit.
The Blue and Red lights will flash.
4.
Repeat the same procedure on the other unit, you don’t need to use the same button,
you can choose one of the three buttons not previously used.
5.
When successfully paired, each unit will have the Blue light on for one second and
then go back to the setup mode (Red light always on).
6.
Now the unit is ready for another pairing procedure, and you can pair another Midland
BTNEXT PRO unit following the same procedure, but using a dierent button.
If you don’t have more devices to pair, you must exit the setup mode before you can use
the units:
›
Double click on the Middle button, the Red light will turn o and the Blue light will
start flashing. You can use now your Midland BTNEXT PRO
How to use the Intercom with more than two units
To use the intercom feature, be sure that all the units are turned on and correctly paired
together.
Manual activation in Intercom mode
When in “Intercom Mode” press the button corresponding to the unit you would like
to communicate with. After some seconds the intercom communication will open. The
communication remains active until you press again the same button. To quickly open the
intercom to another person, just press the button corresponding to the other unit, the
intercom will be automatically closed and the new connection will be open (see Table A).
Voice activation (VOX)
The voice activation feature can open the intercom only to the unit paired to the Middle
button.
Hint: this feature is very useful when you have a specific person that you like to talk to more
often (for example your passenger). In this way you don’t need to press a button to open the
communication.
Unit already busy in a conversation
If you try to open an intercom connection to another person that is already talking with
some one else (or is in a middle of a phone conversation), you will hear a “busy” double
beep tone. Just wait sometime and try again, maybe this time the “line” is not busy.
The person who is called, will be advised that someone is trying to call and will hear a voice
announcement with the number of the button from which the request is coming.
In this way as soon as the first conversation is over, the person can easily contact the caller by
opening the intercom of the specific button number (indicated by the voice announcement).
1 2 3
Conference
The “Conference” mode allow the simultaneously communication between 4 people or,
if you pair a intercom device also on VOL-, up to 8 people (4 couple). You can decide to
use the BTNext Pro in “one to one” communication up to 6 people (“classic” Intercom
mode) or with 8 people (4 couples) conference intercom (Conference mode).
How to use the conference mode
First of all you need to pair all the units in a “chain” mode, second the “Conference”
feature must be active on all the units paired.
UK
www.midlandeurope.com 27
Page 28

Pairing
To use the conference mode you need to pair all the units in a “chain” configuration. The
BWD button of the first unit must be paired to the FWD button of the second unit. The
BWD button of the second unit must be paired to the FWD button of the third unit and
so on, till the fourth!
UK
1 2 3 4
Conference mode 4 people
When the conference mode is active, it is possible to open the conference communication pressing both the FWD and BWD buttons. One click on the button will open the
intercom communication, one click on the same button will close it. The two units that
are in the middle of the chain (unit 2 and 3) must keep the intercom open on both FWD
and BWD buttons to allow the full communication of the four units together.
“One Click Talk” function
When the conference mode is active, is possible to open the conference communication
to all the 4 users just in “one click”. Press short the CTRL (middle) button and you will
automatically open the conference to the four unit connected.
The first and the last unit must not be paired together (the chain must stay open).
The unit number 1 can talk to the last unit (number 4) only “through” the unit number
2 and number 3. That means to have the conference with four people, all the unit must
have the intercom open.
Activate Conference mode:
In “Intercom Mode” with no active audio, keep pressed the FWD button for 7 sec. The
voice announcement “Conference” will tell you that it is active.
When the Conference mode is active the bluetooth devices paired on Vol+ button are
disconnected, the paring on CTRL button and the Universal Intercom are not available.
Now only the paring on FWD and BWD buttons are available, together with the device
paired on the “Vol -” button.
When in Conference mode, you can always move to “FM radio” mode to listen your
favorite radio station or to “Phone” mode to control the phone connected on the VOLbutton.
Disable Conference mode:
In “Conference Mode” with no active audio, keep pressed the FWD button for 7 sec.
The voice announcement “Intercom” will tell you that you are back to the “One to One”
Intercom mode and the device connected to the “Vol +” is available again, together with
the Phone, the pairing on CTRL button and the Universal Intercom.
Conference mode with one Bluetooth device on “VOL-”
When the conference mode is active the Bluetooth device connected on VOL- is still
available, that mean you can listen to GPS street indication or answer your phone call
without “brake” the Conference connection chain.
The audio from the VOL- button connection can be “Private” (not shared in the Confe-
rence) or “Public” (the audio is shared with conference).
By default the setting of conference mode is “Private”.
When you are in “private” mode if you receive a phone call or the GPS talk, you are
temporary disconnected from the Conference, but the other people can keep on talking
to each other. As soon as the Phone call is over (or the GPS stop talking), you are automatically back to the Conference.
Activate Public mode: long press the “VOL-“ button , you will here the voice “Public”
Activate Private mode: long press again the VOL- button, the voice will tell you “Pri-
vate”.
Attention: the incoming phone call is always “private” even if you are in “public” mode.
Conference mode up to 8 people (4 couple)
To have 8 people conference you need to pair one intercom device also to the “VOL- “
button and be sure you selected the “Public” option.
28 www.midlandeurope.com
Page 29

Attention: The paring of the intercom device on VOL- must be as “Universal Intercom”.
By default the setting of conference mode is “Private”, that mean the first time you press
long the “VOL-“ button, you will hear the voice “Public”. In case you heare “Private” you
need to press again “VOL-“ long untill you hear the voice “Public” mode.
How to pair an Intercom device on the “VOL-” button:
›
On the BTNext Pro go in “Setup mode”, press the “VOL-” button for 3 sec. The Blue
and Red Led lights will start flashing
›
On the other device, follow the procedure to pair as an Universal Intercom
How to open the Conference for the “VOL-” unit
To open the conference from the BTNext Pro to the unit connected to the “VOL-”, just
press the FWD button long.
To open the conference from the other unit connected to the “VOL-”, just use the command to open the Universal intercom connection.
The maximum distance of the device connected to the VOL- button is 10 mt, this is why
is suitable only for Passenger.
Talk 2 All - Universal Intercom with dierent brand unit.
Thanks to the “Talk2 All - Universal Intercom” feature it is now possible to pair your Midland BTNEXT PRO to a dierent brand intercom available on the market.
You can pair a maximum of two not Midland Intercom devices, one on the “Forward”
button and the other one on the Backward button.
•
On the Midland BTNEXT PRO enter the setup mode: (with the unit OFF press
and hold down
the Middle button about 7 sec. until the Red light is on permanently).
•
Keep pressed the “Forward” button or “Backward” button for 7 seconds: the
Red and Blu LED light will start flashing fast, then (while you still keep the button
pressed) the Red and Blu LED lights will change to slow flashing. Now you can
release the button.
On the other intercom (not Midland brand) follow the procedure to pair to a phone,
because the BTNEXT PRO is paired as a Phone.
If successfully paired the red/blue lights will stop flashing and the blu light will slowly
flash instead.
Talk2All - Universal Intercom
Not Midland Unit
Passenger
Talk2All - Universal Intercom
Midland Unit paired as a phone
Attention: remember to switch OFF all the other Bluetooth devices during the pairing procedure, only the two devices involved in the pairing must be turned on.
To open the “Universal Intercom” communication on the Midland BTNEXT PRO while
you are in “Intercom Mode”, press long (3 sec) the Forward button or “Backward”
button (depending on wich button you used for pairing) . On the other intercom just
press the phone redial or voice dial button.
Maybe it will be necessary to press the redial button two times, depending on the model
of the not Midland intercom.
Attention: In order to use the “Talk2All-Universal Intercom” feature the pairing on the other
unit must be done as a phone. The other intercom (not Midland brand) will be able to be paired
to a phone only if two phones are supported.
You can pair also a Midland unit as Talk2All, that means the pairing must be done as a phone
(one unit use the Talk2All procedure and the other unit use the pairing to “Phone” procedure).
Compatibility with Midland BT line units
The BTNEXT PRO is compatible with BTX1 PRO, BTX2 PRO, BT Next Conference,
BTX2 FM and BTX2 FM.
When paired the max distance of the intercom is defined from the lower possible.
The BTNEXT PRO is compatible with the previous line of Midland BT (BT Next, BTX2
and BTX2) only if updated to firmware version 2014 or later.
UK
www.midlandeurope.com 29
Page 30

Pairing the Midland BTNEXT PRO to Bluetooth devices
The Midland BTNEXT PRO unit can be paired to other Bluetooth devices, like Phone, GPS Navigator or PMR446 Radio with built-in or external Bluetooth (dongle).
The pairing procedure must be done using the “Volume +” or the “Volume -“ buttons.
›
Pairing to the “Volume +” button: for Phone with music A2DP stereo, GPS Naviga-
UK
tor with A2DP audio or external mono/Stereo A2DP dongle.
All devices paired to “Volume +” button has higher priority and will interrupt all the other
communication (like Intercom, FM Radio and Music).
›
Pairing to the “Volume -” button: for Phone with music A2DP stereo, GPS Navigator
with A2DP audio or external mono/Stereo A2DP dongle.
All devices paired to “Volume -” button are always in active in background during the
Intercom communication.
VOL - Always in background
›
Phone (HFP/A2DP Stereo)
›
GPS (HFP/A2DP Stereo)
›
Dongle (HFP/A2DP Stereo)
VOL + High Priority
›
Phone (HFP/A2DP Stereo)
›
GPS (HFP/A2DP Stereo)
›
Dongle (HFP/A2DP Stereo)
When a device is paired to the “Vol +” or “Vol –“ buttons the “Phone” mode is activated.
Background feature
The audio connection on any device paired on “Vol-” button, even if it is stereo, is always
in background. In this way the Intercom communication will not be interrupted, for
example, by the GPS’s street indication or other audio source. You can decide if the
audio from the “Vol -” connection is shared with other people when the intercom is open
(public) or if it must be private (private).
To share the audio from “Vol -” with the intercom: long press the “Vol-” button the voice
will tell you “public”
To keep the audio from “Vol -” private: long press the “Vol-” button again the voice will
tell you “private”
Attention: By default the audio is private
The audio from “Vol -” has always lower priority against the Intercom, that means when
the intercom is open the audio is lowered by default to 50%. You can change this setting
using the BTUpdater PC Software
Pairing with one or two phones
The cellular phone can be paired to the “Vol +” or to the “Vol –“.
When a phone is paired to the “Vol +” or “Vol-“ the “Phone” mode is activated.
An incoming call has always the higher priority, that means all other communications will
be closed (Intercom, FM Radio, Music).
If another incoming call will arrive on the second phone, an alert sound will notify it.
WARNING!
In order to have the best performance with your mobile phone, it is suggested to keep
it as close as possible to your BT NEXT PRO unit, on the left side of your body and in
the upper pocket of your jacket if it’s possible.
How to pair the Midland BTNEXT PRO to a Phone
To pair the Midland BTNEXT PRO to a Phone, you must first enter the setup mode:
1.
Turn o the unit
2.
Press and hold down the middle button about 7 sec., until the Red light is on permanently.
3.
Now press for 3 seconds the “Volume +” or “Volume -” button, the Blue and Red lights
will flash.
4.
Enable the Bluetooth device search feature on your mobile phone
5.
After some seconds, “Midland BTNEXT PRO” will be displayed on your mobile phone.
Follow the pairing procedure of your Phone. If a pin code is requested you must enter
“0000” (four time zero).
When successfully paired, the Blue light of the unit will be on for one second and than
the unit will exit the setup mode and switch to the working mode (the Blue light will start
flashing).
30 www.midlandeurope.com
Page 31

You can use now your Midland BTNEXT PRO together with the Phone.
How to use a Phone
After pairing your phone to the Midland BTNEXT PRO unit you must switch to the “Phone” mode in order to use it. Press the middle button until you hear “Phone” from the voice
announcement. Now all the three main buttons are dedicated to the phone (see Table B)
Answering a call
When you hear the phone ring, you can answer in two dierent ways:
Vocally:
Simply say one word just after the first ring to answer the call and start talking.
Manually:
Tap the “Forward” or “Backward” button and start talking.
Rejecting a call
If you don’t wish to answer, you can let the mobile phone ring or press the “Forward” or
“Backward” button for 3 seconds (you will hear one audio confirmation tone).
Making a call
There are several ways to make a call.
To redial the last number:
Phone on Vol+: Press“Forward”button for 3 seconds in order to redial the last number (you
will hear one audio confirmation tone).
Phone on Vol-: Press“Backward”button for 3 seconds in order to redial the last number
B-Phone mode
Mode Forward button (Phone on Vol+) Middle button Backward button (Phone on Vol-)
Phone
Phone (when music is plaing and
paired on “Vol +”)
Short press:
progress
Long press:
Short press: Forward the song
Voice dial /accept or close if it is in
redial last number/ or reject
(you will hear one audio confirmation tone).
To make a voice call:
Phone on Vol+: Briefly press“Forward”button. If your mobile phone supports voice calls,
you will be asked to speak the name of the contact you wish to call.
Phone on Vol-: Briefly press“Backward”button. If your mobile phone supports voice calls,
you will be asked to speak the name of the contact you wish to call.
Priority: Calls have a high priority, which means that all other communications are temporarily
disabled when a call arrives.
Ending a call
There are several ways to end a call:
›
Wait for the called person to end the call.
›
Press the “Forward” button (you will hear an audio confirmation tone).
›
Press “End” button on the mobile phone.
Speed dial
Only for the phone paired on Vol+ is possible to store one phone number in the unit memory and use it when needed. You must first save the number using the “BT UPDATER”
Pc software or the smartphone “BT SET-APP” application. Then when you are in phone
mode, just press 7 sec. the “Forward” button.
Using the MP3 player feature of the mobile phone
The mobile phone, when paired on “Volume +” or “Volume -” can be used as stereo MP3
players. The Midland BTNEXT PRO device fully supports the A2DP and AVRCP protocols that enable you to listen to stereo music and remotely control your mobile phone’s
Long press:
Short press:
Long press:
Change mode
Play/pause
Change mode
Short press:
if it is in progress
Long press:
Short press:
Voice dial /accept or close
redial last number/ or reject
Backward the song
UK
www.midlandeurope.com 31
Page 32

MP3 player. You can even use the buttons on the Midland BTNEXT PRO unit to control
the following play options: Play, Pause, Forward and Backward the songs.
It is possible to control only one phone at the time. You can choose which phone to control, pressing 3 sec. the VOL+ button:
You will hear the voice “Control on volume up” . Now you can control the phone paired on
VOL+ button. If you want to switch the control to the other phone just press again for 3
UK
sec. the VOL+ button and you will hear the voice “Control on volume down“
Play/PausaForward Backward
Available controls:
›
To play/pause music: click on the “Middle” button.
›
To skip forward to the next song: press the “Forward” button.
›
To skip backwards to the previous song: press the “Back” button.
Priority: the music listening mode has the lowest priority. Therefore, it will always be disabled
when another audio communication comes in.
To chanage the priority behaviour you can use the ”BT UPDATER” Pc Software or the
smartphone “BT SET-APP” application
.Attention: It is possible to have all the controls (Play/Pausa, FWD, BWD) of the A2DP
music only in “Phone mode”.
If you are listening to A2DP music from the VOL- and you move from “Phone” mode
to “FM Radio” or “Intercom” mode, you can still listening to A2DP music but you don’t
have all the controls buttons available. Only Play/Pause is available with double click on
the “Middle” button.
Music Share
Music Share is possible only from the phone paired on the VOL+ button. To start sharing
your A2DP music with the passenger already paired on the middle button (maximum
distance 10mt), you must press the “Backward” button long (3 sec.) while the music is
playing. The passenger must be either in “Phone” or “Intercom” mode without any open
audio. The passenger can only stop the music share pressing short the middle button (but
cannot control the music). The driver can stop the music sharing just pressing again the
“Backward” button long. With music share active you can not keep open the Intercom
communication.
GPS Navigator
The GPS Navigator can be paired using the “Volume+” or the “Volume-“ button.
Volume + button (support for stereo A2DP audio and HFP mono)
All devices paired to “Vol +” button has higher priority and will interrupt all the other communication (like Intercom, and FM Radio).
Volume - button (support for stereo A2DP audio and HFP mono)
All devices paired on “Vol -” button are always active in background during the Intercom
communication. You can decide if the audio from the “Vol -” connection is shared with
other people when the intercom is open (“Public” feature on) or if it must be private
(“Private” feature on). See the “Background” paragraph above.
GPS Stereo (A2DP) voice announcement
Midland BTNEXT PRO support Stereo (A2DP) voice announcement from GPS Navigators or smartphone application on both Vol+ or Vol- connection. When connected
on “Volume +” button, the GPS street voice announcements will interrupt all other
communication. Only when connected on Vol- the GPS voice announcements are in
backgroud.
How to pair the Midland BTNEXT PRO to a GPS
In general it is possible to pair the Midland BTNEXT PRO to all the GPS for motorbike that
support Bluetooth headset connection.
To pair the Midland BTNEXT PRO to a GPS, you must first enter the setup mode:
1.
Turn o the unit
32 www.midlandeurope.com
Page 33

2.
Press and hold down the “Middle” button about 7 sec., until the Red light is on permanently.
3.
Now press firmly (3 sec) the “Volume +” or “Volume -” button, the Blue and Red lights
will flash.
4.
Enable the Bluetooth device search feature on your GPS
5.
After some seconds, “Midland BTNEXT PRO” will be displayed on your GPS.
6.
Follow the pairing procedure of your GPS. If a pin code is requested you must enter
“0000” (four times zero).
When successfully paired, the Blue light of the unit will be on for one second and then
the unit will exit the setup mode and switch to the working mode (the Blue light will start
flashing).
You can now use your Midland BTNEXT PRO with the GPS for street voice announcement.
Pairing to a PMR446 radio with integrated or external Bluetooth
The PMR446 Radio can be paired to the “Volume +“ or “Volume -” button. If paired
on “Volume -”, the PMR446 radio is always in the background even when you talk on
the intercom.
Pairing procedure
›
Turn o the unit
›
Press and hold down the “Middle” button about 7 sec., until the Red light is on perma-
nently.
›
Now press firmly (3 sec) the “Vol +” or “Vol -” button, the Blue and Red light will flash.
›
Follow now the pairing procedure explained on the manual of the transceiver itself
How to listen to the FM Radio
The FM Radio receiver is integrated inside the unit. You just need to switch to the “FM Radio”
mode in order to use it.
Long press the middle button until you hear “FM radio” from the voice announcement. Now
all the three main buttons are dedicated to the FM Radio (See Table C).
Press short the “Forward” or the “Backward” button to seek the FM Radio station.
When you press long the Forward or the Backward button, you can scan up or down the 6
recorded stations. A voice announcement will tell you the number of which memory you
are entering.
To save the station you are listening to, press the Forward and Backward buttons together
for 3 sec. You will hear a beep tone for confirmation.
The station is saved over the last recorded station used.
Thanks to the RDS system, the FM Radio will choose the strongest signal available for the
radio station you like to listen. The RDS system is OFF by default, if needed you can toggle
on/o the RDS pressing together the “Volume +” and “Volume –“ buttons for 3 sec when
the radio is on. A voice announcement will tell you the RDS status.
How to Disable/Enable the FM Radio
By default the FM radio is on
Disabling:
›
Enter the “Setup” mode: turn o the unit and hold down the “Middle” button about 7
sec., until the Red light is on permanently.
›
Press “Middle” and “Volume+” buttons together for 3 seconds. The blue LED will flash
three times.
›
Double click on the “Middle” button to exit the “Setup” mode and use the Midland BTNEXT PRO
Enabling:
›
Follow the same procedure up described; now the blue LED will flash once.
.
UK
C-Radio FM mode
Mode Forward button Middle button Rear button
FM Radio Short press:
Long press:
seek station up
Scan recorded
Short press:
Long press:
On/o
Change mode
Short press:
Long press:
seek station up
Scan recorded
www.midlandeurope.com 33
Page 34

To exit the “Setup” mode, double click the “Middle” button.
FM Radio with intercom
When you are in “FM Radio” mode it is not possible to manually open the intercom, you
can only open it using VOX feature (just talk) to the unit paired on the “Middle” button. To
manually activate the intercom you must switch to “Intercom” mode.
UK
Wired audio input
Your Midland BTNEXT PRO can be connected to a wired audio source, like an iPod (or
any other MP3 Player).
Listening to music
To listen to music from the wired input, connect the audio source using the optional AUX
cable. The volume buttons (Vol + and Vol -) can be used to adjust the volume of the wired
audio source (but not independently from the Intercom Volume). The AGC system will
automatically increase the volume on higher speed.
Attention: never set the volume of the MP3 Player to the maximum possible. Normally the
best level is about the 70% of the maximum.
Hint: We recommend that you perform a few tests adjusting the volume of your iPod/MP3
player so at the normal speed the Headset volume is suited to your needs. The AGC system
will automatically increase the volume on higher speed, so you don’t need the VOL+ or VOLbuttons to adjust it.
Enabling/disabling the wired input
If needed the wired input can be enabled or disabled:
Enabling/Disabling: Make a Long press (3 sec.) on the “Forward” and “Middle” buttons
(you will hear one audio beep tone for enabling confirmation and two audio beep tones
for disabling).
Wired audio in background
The audio from the wired connection can be in background to your Intercom or Phone
communication. By default this option is ON. Please refer to the paragraph “Wired connection always in background” below to disable it.
Note that is not possible to have the wired audio source in background to the FM radio.
This setting is rembered also after turning On/O the unit.
Emergency Stop light
On the back of your BTX1 PRO mounting kit you have an ultra
bright LED emergency stop light. Every time you make a full brake, the stop light will turn ON to give an extra alert to the drivers
behind you. In case you need to turn it OFF temporarily (for example when you ride with a passenger), just press long “Backward” and
“Forward” button together while in “Phone” or “Intercom” mode
(a voice announcement will confirm the status). The unit will remember the last setting used, that mean you need to turn ON
manually the stop light pressing again “Backward” and “Forward”
button togheter.
Attention: By default the stop light is OFF
Stop Light
Setup and special configurations
Resetting all paired devices
Sometimes you may find it necessary to delete all the pairing references stored in the
Midland BTNEXT PRO unit (reset operation).
To perform this operation you must first enter the setup mode:
›
Turn o the unit
›
Press and hold down the “Middle” button about 7 sec., until the Red light is on permanently.
›
Then simultaneously press and hold down the “Volume +” and “Volume –“ buttons for
3 seconds. The Blue Light will be lit on for 1 sec and then back to steady RED.
›
Double click on the “Middle” button to exit the “Setup” mode and use the Midland
BTNEXT PRO.
This procedure deletes all the paired Bluetooth devices stored in the memory and it is
therefore possible to start a new “clean” pairing session.
Attention: after resetting all the pairting, only the “FM Radio” mode wil be available.
Back to factory setting
Sometimes you may find it necessary to go back to the factory setting, to reset all the
changes/setup already made and have a “clean” unit.
34 www.midlandeurope.com
Page 35

To perform this operation you must first enter the setup mode:
›
Turn o the unit
›
Press and hold down the “Middle” button about 7 sec., until the Red light is on permanently.
›
Then simultaneously press and hold down all the three buttons “Forward”-“Middle”-“Backward” for 3 seconds. The Blue Light will be lit on for 1 sec and than back to
steady RED.
›
Double click on the “Middle” button to exit the “Setup” mode and use the Midland
BTNEXT PRO
Adjusting/ Disabling the VOX feature (Intercom and telephone)
The Intercom feature can be enabled both manually and vocally (VOX). The VOX activation is influenced by the helmet type, the background noise and therefore by the speed.
For optimum results, it is possible to choose one of the following four microphone sensitivity levels: high, medium, low and very low. It is also possible to disable the VOX feature
in order to activate the Intercom and phone call answering features in manual mode only.
Adjusting the sensitivity of the (VOX)
To perform this operation you must first enter the setup mode:
1.
Turn o the unit
2.
Press and hold down the “Middle” button about 7 sec., until the Red light is on permanently.
3.
Your Midland BTNEXT PRO is now in “Set up mode”.
4.
Press the “Backward” button shortly and the red light changes to a steady blue.
5.
Now, press “Volume +” or “Volume -“ to increase or reduce sensitivity. Every time you
press the Volume buttons the RED light will flash for confirmation. When you reach
the end of the upper and lower limit, the RED light will not flash.
6.
Press again the “Backward” button shortly; the Blue light will flash several times, in
order to let you know the selected sensitivity:
One flash = VOX disabled
Twice = low sensitivity
3 times= normal sensitivity
4 times= high sensitivity
5 times = Highest sensitivity
The light indicator is now back to steady RED (“Set up mode”) and the changes are
confirmed
7.
If needed, you can adjust again the sensitivity repeating the steps from point 1,
otherwise exit the Setting mode by double clicking the “Middle” button. Once the red
light turns o, the blue led starts blinking. Now you can use your Midland BTNEXT
PRO
Disabling the VOX feature (Intercom and telephone)
Follow all the procedure described in the previous steps and choose the option of only
one flash (VOX disabled).
Attention! If you disable the VOX feature, you will be able to answer incoming phone calls
only by pressing the “Forward” button.
Wired connection always in background
This feature lets you keep the wired connection always on, even when the phone or the
intercom is open (but not when you are in FM radio mode).
By default the Background feature is ON.
Disabling:
›
Enter the “Setup” mode:
›
Turn o the unit
›
Press and hold down the “Middle” button about 7 sec., until the Red light is on permanently.
›
Press the “Forward” and “Middle” button together for 3 seconds. The blue LED will
flash three times.
›
Double click on the “Middle” button to exit the “Setup” mode and use the BTNEXT
PRO
Enabling:
Follow the same procedure up described; now the blue LED will flash once.
To exit the “Setup” mode, double click the “Middle” button.
Setup and Firmware update
It is possible to configure and update the firmware of your Midland BTNEXT PRO using
the USB connection to your PC. On the Midland web site www.midlandeurope.com in
UK
www.midlandeurope.com 35
Page 36

the Midland BTNEXT PRO page you can find the PC software and the new firmware
updates if available.
ATTENTION DO NOT CONNNECT THE UNIT TO THE PC BEFORE you DOWNLOAD AND INSTALL THE SOFTWARE
Use at your own risk
UK
The use of the device will impair your ability to hear other sounds and others around you.
Listening to music or speaking on a telephone may prevent you from hearing others
around you and distract you from riding safely. The use of such device while riding may
endanger you and others, and its use, in some areas, could not be allowed.
Using this device at a high volume may result in permanent hearing loss.
If you experience ringing in your ear or any other hearing related pain, reduce the volume or discontinue using this device. With continued use at high volume, your ears may
become accustomed to the sound level, which may result in permanent damage to your
hearing.
Please use this device at a safe volume level.
Warranty
The warranty lasts 24 months for the main device and 6 months for the accessories (batteries, chargers, antennas, headsets, microphones).
For further information about the warranty, please visit
www.midlandeurope.com.
European CE Notice Certification and Safety Approval
Information
This product is CE marked according to the RTTE Directive 99/5/EC
of Directive 2014/53/UE)
Users are not permitted to make any changes or modifications to the device.
Modifications which are not expressly approved by the producer invalidate the warranty
card.
For further information, please go to our website: www.midlandeurope.com
and is free use in all the EU countries.
(from 13/06/2017,
36 www.midlandeurope.com
Page 37

UK
www.midlandeurope.com 37
Page 38

Inhalt
Hauptmerkmale ....................................................................................................................................................................................................................................................................34
Technische Daten des Midland BTNEXT PRO ................................................................................................................................................................................................................34
Aufladen des Akkus .............................................................................................................................................................................................................................................................. 35
Ein-/Ausschalten des Midland BTNEXT PRO ................................................................................................................................................................................................................. 37
Betriebsarten ......................................................................................................................................................................................................................................................................... 37
D
Max. Reichweite .................................................................................................................................................................................................................................................................... 37
Koppeln (Pairen) von Zwei Midland BTNEXT PRO- Geräten ....................................................................................................................................................................................... 37
Konferenz .............................................................................................................................................................................................................................................................................. 40
Talk2 All – Koppeln mit einem Fremdhersteller-Gerät ....................................................................................................................................................................................................41
Koppeln von Bluetooth Geräten mit dem Midland BTNEXT PRO .................................................................................................................................................................................41
Hintergrund“-Funktion ........................................................................................................................................................................................................................................................ 42
Kopplung mit einem GPS Navigator ..................................................................................................................................................................................................................................43
Wiedergabe Vom Ukw-Radio ..............................................................................................................................................................................................................................................44
Verwenden eines PMR 446 Funkgeräts mit integriertem Bluetooth ............................................................................................................................................................................45
Setup und spezielle Konfiguration .......................................................................................................................................................................................................................................46
Setup und Firmware-Aktualisierung...................................................................................................................................................................................................................................47
Benutzung auf eigene Gefahr ............................................................................................................................................................................................................................................. 47
Gewährleistung .....................................................................................................................................................................................................................................................................48
38 www.midlandeurope.com
Page 39

MIDLAND BTNEXT PRO
Dual Core Gegensprechanlage
Midland BTNEXT PRO ist ein Gegensprechsystem mit 2 Bluetooth Chipsätzen für
Konferenz-kommunikation und echte Stereo Audioübertragung im Hintergrund. Das Design
ist extrem flach und aerodynamisch, alle Kernfunktionen lassen sich dank der 3 großen Tasten
auf der Gerätefront komfortabel steuern. Midland BTNEXT PRO wird am Helm mittels einer
Klebe- oder Klemmhalterung befestigt. Dank des Audiokits mit ultraflachen Lautsprechern
können Sie Stereomusik in hervorragender Qualität auch während der Fahrt genießen.
Hauptmerkmale
›
Dual Core Bluetooth System
›
„Eins-zu eins“-Gegensprechen mit bis zu 1.6 km Reichweite.
›
Konferenz mit bis zu 8 Teilnehmern (4 Bikes)
›
Verbinden Sie bis zu 6 Personen mittels “Eins-zu-Eins” Kommunikation
›
Talk2All Funktion zum Verbinden mit Freisprecheinrichtungen verschiedener
Hersteller
›
Stereo UKW-Radio mit RDS
›
Music Share (Fahrer und Beifahrer)
›
Anschluss eines Mobiltelefons, um Anrufe anzunehmen und zu tätigen, sowie für die
Wiedergabe von Stereo-Musik
›
Kopplung von 2 Telefonen möglich
›
Anschluss eines GPS-Navigationsgeräts zur Übertragung von Navigationsanweisungen
›
Anschluss eines PMR466 Funkgeräts mit eingebauter oder externer
Bluetooth-Verbindung
›
Kabelgebundener AUX-Anschluss für MP3-Player (optionales Kabel)
›
Setup und Firmware-Update über USB-Verbindung mit einem PC
Das Midland BTNEXT PRO ist in zwei Versionen erhältlich:
›
BTNEXT PRO Einzel-Intercom Set mit nur einem Gerät
›
BTNEXT PRO Twin-Intercom Set mit zwei Geräten
Je nach gekauftem Modell enthält die Packung folgenden Inhalt:
BTNEXT PRO Einzel-Intercom Set
›
1 BTNEXT PRO-Kommunikationsgerät
›
1 Slide-In Halterungssatz mit zwei Stereolautsprechern
›
1 Klapphelmmikrofon und 1 Integralhelmmikrofon
›
1 Platte mit Klebestreifen, um das Gerät am Helm zu befestigen
›
1 Platte mit Schraube, um das Gerät an den Helm zu klemmen
›
1 Micro-USB-Netzteil
BTNEXT PRO Twin- Intercom Set
›
2 BTNEXT PRO Geräte Sets
›
2 Slide-In Halterungssätze mit zwei Stereolautsprechern
›
2 Klapphelmmikrofone und 2 Integralhelmmikrofone
›
2 Platten mit Klebestreifen, um das Gerät am Helm zu befestigen
›
2 Platten mit Schrauben, um das Gerät an den Helm zu klemmen
›
1 Micro-USB-Netzteil mit zwei Anschlüssen
Die Gerätesets im TWIN-Kit sind bereits gekoppelt (gepairt) und können daher sofort
als Motorrad-Intercom (Gegensprech- Modus) benutzt werden.
Technische Daten des Midland BTNEXT PRO
Allgemein:
›
Bluetooth ver. 4.2 Stereo (Handsfree/A2DP/ AVRCP Protokoll)
›
Bluetooth Dual Core für echte Stereo Hintergrundfunktionalität
›
Das AGC System regelt automatisch die Lautstärke in Abhängigkeit von den
Umgebungs- und Fahrgeräuschen
›
Sprachgesteuerte (VOX) oder manuelle Intercom-Aktivierung
›
Manuelle Steuerung zum Aktivieren von: Telefon, Intercom (Gegensprechanlage)
UKW Radio und Kabelverbindung
›
UKW-Stereo-Radio mit RDS
›
Vollständig Regenwasserdicht
›
Lithium Akku mit 35 Stunden Sprechzeit
›
Ladezeit: ca. 2 Stunden
Bluetooth-Verbindungen:
Mit 2 BT Next Pro können Sie von Fahrer zu Beifahrer oder von Bike-zu-Bike gegen-
D
www.midlandeurope.com 39
Page 40

sprechen, bis zu einer maximalen Reichweite von 1,6km ohne Hindernisse oder Interfe-
Mittlere Taste
Vorwärts Zurück
renzen (Fahrer müssen immer in Sichtweite sein).
Bluetooth-Geräte:
›
Mobiltelefon mit MP3-Player-Stereo (A2DP-Protokoll), GPS
›
PMR446-Funkgerät (mit eingebauter oder externer Bluetooth-Verbindung) für Motorrad zu Motorrad-Gruppenkommunikation
Kabelverbindungen:
›
Für Stereo-Tonquellen wie iPod/MP3-Player (mit optionalem Kabel)
Achtung: Das Midland BTNEXT PRO ist regen- und wasserfest konzipiert. Stellen Sie aber
D
dennoch sicher, dass bei Regen die Gummischutzkappen die Anschlüsse vollständig abdecken.
Aufladen des Akkus
Achtung: Stellen Sie sicher, dass das Gerät vor der Benutzung komplett geladen ist. Laden
Sie das Gerät mindestens 3 Stunden bevor es zum ersten Mal genutzt wird.
Zum Laden das Steckerladegerät in die Ladebuchse stecken (nehmen Sie die
Gummischutzkappe ab, um den Stecker einzustecken).
Die rote LED am Gerät fängt an zu blinken, sobald der Ladevorgang startet.
Laden Sie das Gerät bis die LED von rot-blinkend zu konstant-blau wechselt.
Wenn der Ladevorgang abgeschlossen ist (die rote LED blinkt nicht mehr), ziehen Sie
den Ladestecker vom Headset ab.
Nach dem ersten Laden benötigt eine komplette Ladung normalerweise 2 Stunden.
Achtung: Wenn das Micro-USB-Netzteil angeschlossen oder getrennt wird, schaltet sich das
Gerät automatisch aus. Wenn Sie das Gerät verwenden wollen, während es aufgeladen wird,
sollten Sie es einschalten, nachdem Sie das Netzteil angeschlossen haben.
Beschreibung des Geräts und Montagehalterung
Das BTNEXT PRO hat fünf Tasten auf der Vorderseite, wobei die drei großen Tasten
Multifunktionstasten sind: Vorwärts (links), die mittlere Taste und Zurück (rechts); die
zwei rechteckigen Tasten sind für Lautstärke+ und Lautstärke–.
-
Lautstärke+
Lautstärke
Kabelanschlüsse
Auf der Unterseite des Gerätes finden Sie die Ladebuchse, welche kompatibel zu Standard Micro USB Netzteilen ist.
Der Micro USB Anschluss erlaubt Ihnen außerdem Audioquellen, wie iPod/MP3 Player
anzuschließen.
Achtung: Hierfür benötigen Sie ein optional erhältliches AUX-Kabel, das nicht im Lieferumfang
enthalten ist.
Ladeanschluss
Beschreibung des Audiokits
Das Audiosystem umfasst zwei extrem flache Stereo-Lautsprecher und zwei
austauschbare Mikrofone, eine Klapphelmversion und eine Integralhelmversion. Mit
dem Mini-Stecker am Mikrofon können Sie für jeden Helmtyp das passende Mikrofon
auswählen.
Die Stereo-Lautsprecher befestigen
Die beiden Stereo-Lautsprecher sind mit Klettband/Klebestreifen versehen, womit sie
sich leichter im Helm befestigen lassen. Beachten Sie außerdem die Lautstärke des
40 www.midlandeurope.com
Page 41

Gerätes nicht zu weit zu erhöhen. Sie müssen weiterhin den Verkehr um Sie herum
wahrnehmen können.
Slide-In Halterungssatz
Mikrofonbefestigung
Schwanenhalsmikrofon
Befestigen Sie den Bereich mit dem Klettband/Klebestreifen zwischen der Polsterung
und der harten Innenschale des Helms, sodass sich das Mikrofon in der richtigen Position
vor Ihrem Mund befindet und das weiße Symbol in Richtung Ihres Mundes weist. Dieser
Mikrofontyp ist für Jethelme und für Klapphelme geeignet.
Kabelgebundenes Mikrofon
Bringen Sie das Mikrofon mithilfe des Klettbandes/Klebestreifens im Helm vor Ihrem
Mund an. Dieser Mikrofontyp ist eher für Integralhelme geeignet.
Das Midland BTNEXT PRO kann am Helm befestigt werden, indem man die Slide-In
Halterung auf zwei verschiedene Weisen anbaut: entweder mittels des Klebestreifens
oder mittels der Schraubenplatte. Mit beiden Verfahren können Sie das BTNEXT PRO
sicher an Ihrem Helm befestigen und es jederzeit wieder abnehmen, um es aufzuladen
oder zu lagern.
Platte mit Klebestreifen
Die Klebehalterung wird bereits vormontiert mitgeliefert. Säubern Sie die Klebestelle auf
der Helmoberfläche. Entfernen Sie die Folie vom Klebestreifen und bringen Sie die Befestigungsplatte auf der linken Seite des Helms an, indem Sie sie einige Sekunden gegen
den Helm drücken.
Schraubklemme
Schritt 1. Entfernen Sie die Klebehalterung von der Slide-In Halterung mit
Hilfe des mitgelieferten Inbusschlüssels.
www.midlandeurope.com 41
D
Page 42

Schritt 2: Befestigen Sie die Klemmhalterung an der Slide-In Halterung mittels der 2
Schrauben.
Schritt 3: Schieben Sie die Halterung zwischen Helmschale und Polsterung und ziehen
D
die beiden Schrauben fest an.
Sofern notwendig können Sie auch auch die gummierte Grundplatte verwenden, um die
Rutschfestigkeit zu erhöhen. Nutzen Sie einfach die beiden kurzen Schrauben, um die
Platte an der Slide-In Halterung zu befestigen.
Das Midland BTNEXT PRO anbauen und abbauen
Das BTNEXT PRO kann problemlos am Helm befestigt werden, indem es nach unten
auf die Slide-In Halterung geschoben wird. Das BTNEXT PRO wird durch den Befestigungsclip auf der Oberseite (A) in Position gehalten. Um das BTNEXT PRO abzunehmen, drücken Sie einfach auf den Befestigungsclip und drücken das Gerät nach oben.
A
Befesgen
Lösen
Ein-/Ausschalten des MIDLAND BTNEXT PRO
Einschalten des Geräts:
›
Halten Sie die „mittlere“ Taste für ca. 3 Sekunden gedrückt, bis die BLAUE LED
aufleuchtet.
Ausschalten des Geräts:
›
Halten Sie die „mittlere“ und die „Zurück“-Taste gleichzeitig für ca. 3 Sekunden
gedrückt, bis die ROTE LED 3-mal aulinkt. Dadurch wird die Gefahr des
versehentlichen Ausschaltens des Geräts minimiert (vor allem mit Handschuhen).
Betriebsarten
Das BTNEXT PRO besitzt drei Hauptbetriebsarten: Gegensprechen (Intercom), Telefon
und UKW- Radio.
Die 3 Multifunktions-Tasten haben unterschiedliche Funktionen und hängen von der
Betriebsart ab, in der sich das Gerät aktuell befindet.
›
Im Intercom - Modus können Sie mit den Tasten die Sprechverbindung mit bis zu 6
Teilnehmern steuern, indem jeweils einer mit einem der anderen spricht. Drücken Sie
einfach auf eine der drei Tasten, um das Intercom zu aktivieren.
42 www.midlandeurope.com
Page 43

›
Im Telefon – Modus können Sie mit Ihrem Bluetooth-Mobiltelefon einen Anruf
tätigen/annehmen oder Musik wiedergeben (in Stereo).
›
Im UKW-Radio - Modus können Sie Ihren Lieblings-Stereo-Radiosender
wiedergeben. Suchen Sie einen bestimmten Radiosender und speichern Sie ihn (Es
sind 6 Speicherplätze vorhanden).
Sie können von einem Modus in einen anderen umschalten (hin- und herschalten),
indem Sie einfach die „mittlere“ Taste gedrückt halten (3 Sekunden). Eine Sprachansage
teilt Ihnen den aktuellen Modus mit.
Die Modi schalten in folgender Reihenfolge um:
›
Gegensprech- Modus (wenn ein anderes BTNEXT PRO früher schon gekoppelt wurde)
›
UKW-Radio-Modus
›
Telefon-Modus (wenn vorher schon ein Mobiltelefon gekoppelt wurde)
Standardmäßig aktiviert das Gerät beim Einschalten die Betriebsart, in der es zuletzt
verwendet wurde.
Der Gegensprechmodus (Intercommodus) und der Telefonmodus (Phonemodus) sind
nur verfügbar, wenn das Gerät vorher mit einem anderen BT-Gerät oder einem Handy
gekoppelt wurde.
Wenn Sie wissen möchten, in welchem Modus sich das Gerät gerade befindet, drücken
Sie einfach gleichzeitig die Tasten „Lautstärke +“ und „Lautstärke –“ für 3 Sekunden.
Eine Sprachansage teilt Ihnen den aktuellen Modus mit.
Max. Reichweite
Die maximale Reichweite zwischen 2 BT Next Pro liegt bei 1,6km ohne Hindernisse oder
Interferenzen (Fahrer müssen immer in Sichtweite sein).
Modus Weiter (linke Taste) Mittlere Taste Zurück (rechte Taste)
Intercom
Telefon
Telefon (während der Musikwiedergabe)
UKW-Radio
Aktivieren/Deaktivieren der Intercomverbindung mit dem ersten Fahrer
Wahlwiederholung/Rufannahme bzw. -ablehnung für Gerät auf “Vol+”
Einen Titel weiter Wiedergabe/Pause Einen Titel zurück
Sendersuche aufwärts UKW-Radio ein/aus Sendersuchlauf abwärts
Koppeln (Pairen) von Zwei BTNEXT PRO- Geräten
Die beiden Geräte im BTNEXT PRO - Set sind bereits miteinander gekoppelt und
betriebsbereit. In diesem Fall muss das Verfahren nicht durchführt werden. Das jeweils
andere Gerät wurde bereits mit der „mittleren“ Taste gekoppelt.
Wenn die Geräte nicht aus demselben Kit stammen oder eines der Geräte später
zugekauft wurde, müssen Sie die Geräte zuerst koppeln.
Um ein BTNEXT PRO mit einem anderen BTNEXT PRO zu koppeln, müssen Sie
zunächst den Setup-Modus aufrufen:
1.
Schalten Sie das Gerät aus.
2.
Halten Sie die „mittlere“ Taste ca. 7 Sek. gedrückt, bis die rote LED ständig leuchtet.
3.
Jetzt halten Sie die „mittlere“ Taste gedrückt (3 Sek.), bis die BLAUE und die ROTE LED
blinken.
4.
Führen Sie dasselbe Verfahren auf dem anderen Gerät durch. Nach erfolgreichem Kop-
peln leuchtet die blaue LED für eine Sekunde an beiden Geräten auf und sie gehen
anschließend in den Setup-Modus zurück (die rote LED leuchtet ständig). Nun ist die
Kopplung abgeschlossen und Sie müssen nur den Setup-Modus verlassen, bevor Sie
die Geräte benutzen können:
5.
Doppelklicken Sie auf die „mittlere“ Taste. Die rote LED erlischt und die blaue LED blinkt.
6.
Ihre beiden BTNEXT PRO sind jetzt betriebsbereit.
Achtung: Alle anderen Bluetooth Geräte müssen ausgeschaltet sein. Lediglich die zwei zu kop-
pelnden Geräte sind angeschaltet.
Aktivieren/Deaktivieren der Intercomverbindung mit dem zweiten Fahrer
Aktivieren/Deaktivieren der Intercomverbindung mit dem dritten Fahrer
Wahlwiederholung/Rufannahme bzw. -ablehnung für Gerät auf “Vol-”
D
www.midlandeurope.com 43
Page 44

Intercom zwischen zwei Geräten
Achten Sie darauf, dass beide Geräte eingeschaltet und richtig miteinander gekoppelt sind.
Manuelle Aktivierung
Im Intercommodus können Sie die Kommunikation starten, indem Sie die mittlere Taste
an einer der beiden Einheiten drücken. Die Intercomanlage benötigt einige Sekunden zur
Aktivierung. Sie hören einen Signalton, wenn die Intercom-Funktion aktiviert ist.
Sprachsteuerung (VOX)
Fangen Sie einfach an zu reden. Nach einigen Sekunden wird die Sprechverbindung
aktiviert und bleibt eingeschaltet, solange Sie reden. Wenn nicht mehr geredet wird, wird
D
die Sprechverbindung nach 40 Sekunden wieder abgeschaltet. Bei Bedarf können Sie die
Intercom- Funktion ohne eine Wartezeit von 40 Sekunden jederzeit manuell abschalten
(drücken Sie einfach die „mittlere“ Taste).
Wenn nötig, können Sie die VOX-Funktion deaktivieren, indem Sie einfach die „Zurück“-Taste
für 7 Sek. gedrückt halten. Eine Sprachansage weist darauf hin, dass die VOX-Funktion
deaktiviert wurde. Um die VOX-Funktion erneut zu aktivieren, drücken Sie einfach die gleiche
Taste. Die Sprachansage weist darauf hin, dass die VOX-Funktion nun aktiviert wurde. Diese
Einstellung bleibt auch nach dem Ausschalten des Gerätes erhalten.
ACHTUNG: Die Sprachsteuerung (VOX) kann die Sprechverbindung nur auf dem Gerät
aktivieren, das mit der „mittleren“ Taste gekoppelt wurde. Wenn Sie eine andere Taste („Zurück“
oder „Weiter“) verwenden möchten, können Sie die Intercomanlage nur manuell aktivieren.
A - Manuelle Aktivierung
Modus Weiter-Taste Mittlere Taste Zurück-Taste
Intercom (Gegensprechen) Kurzer Tastendruck: Sprechverbindung
mit dem gekoppelten Fahrer einschalten /
ausschalten
Kurzer Tastendruck: Sprechverbindung mit dem
gekoppelten Fahrer einschalten oder ausschalten
Langer Tastendruck: Modus wechseln
Anpassen der Lautstärke
Ihr Midland BTNEXT PRO benutzt AGC-Technologie, welche automatisch die
Hörerlautstärke den Hintergrundgeräuschen anpasst.
Sie können aber auch die Lautstärke manuell mit den Tasten „Lautstärke+“ und
„Lautstärke-“ anpassen. Die gewählte Lautstärke wird für jede Quelle (Intercom,
Stereomusik, Telefonanrufe, UKW Radio) gesondert gespeichert.
Achtung: Die Lautstärke kann nur während einer gerade bestehenden Audioverbindung
angepasst werden.
Das AGC-System einrichten
Die Empfindlichkeit des AGC-Systems können Sie mit der PC-Software „BT UPDATER“
oder der Smartphone-App „BT SET-APP“ einstellen. Sie können je nachdem, was für ein
Motorrad Sie besitzen (Naked-, Touren- oder Sportmotorrad) oder ob Sie als Beifahrer
mitfahren, unterschiedliche Konfigurationen wählen. Sie können das AGC-System
deaktivieren, indem Sie 3 Sekunden lang gleichzeitig „Lautstärke+“ und „Lautstärke–“
drücken.
Kurzer Tastendruck: Sprechverbindung mit
dem gekoppelten Fahrer ein- oder ausschalten
Langer Tastendruck: Kabelverbindung ein- oder
ausschalten
44 www.midlandeurope.com
Page 45

Kopplung des BTNEXT PRO zwischen mehr als zwei Geräten
Beifahrer
Ein Midland BTNEXT PRO kann mit maximal 5 anderen Intercomgeräten verbunden
werden.
Das Midland BTNEXT PRO hat drei Haupttasten (Vorwärts, Mittel und Zurück). Sie
können frei entscheiden, welchen Kommunikationspartner Sie mit welcher Taste koppeln. Die Taste, welche Sie zum koppeln verwenden dient im Intercommodus auch dazu,
die Kommunikation zu aktivieren. Beachten Sie bitte, dass Sie auf diese Weise bis zu 3
weitere Geräte miteinander koppeln können.
Fahrer 1
Fahrer 2
Fahrer 3
Sie können zum Beispiel einen weiteren Biker mit der Vorwärts-Taste koppeln, Ihren Beifahrer mit der mittleren Taste und einen weiteren Fahrer mit der Zurück-Taste.
Auf diese Weise können insgesamt 4 Gerät miteinander verbunden werden. Sie können
sich mit jeder Person mittels “Eins-zu-Eins” Gegensprechen verbinden, indem Sie einfach nur die jeweilige Taste kurz drücken. Sobald Sie die Verbindung zu einem Partner
auauen, werden etwaige bestehende Verbindungen automatisch geschlossen. Wenn
sich 2 Personen unterhalten, ist es für die anderen beiden Personen nicht möglich diese
Verbindung zu unterbrechen.
3.
Nun die Taste (Vorwärts, Mitte oder Zurück) für 3s gedrückt halten, auf die der
Gesprächspartner gespeichert werden soll. Die LED blinkt abwechselnd rot und blau.
4.
Schritte 1-3 mit dem zweiten Gerät wiederholen. Sobald die beiden Geräte erfolgreich
gekoppelt wurden blinkt die LED für 1 Sekunde blau und wechselt dann zurück in den
Setupmodus (LED konstant rot)
5.
Nun ist die Kopplung abgeschlossen. Es können nun weitere Geräte gekoppelt
werden, indem Schritt 3 und 4 wiederholt werden. Um den Setupmodus zu verlassen
wird die mittlere Taste schnell doppelt geklickt. Die LED wechselt von konstant rot auf
blau blinkend. Sie können Ihr BTNEXT PRO nun verwenden.
Auswahlmöglichkeiten beim Intercom mit mehr als 2 Geräten
Um alle Gegensprechfunktionen zu nutzen, müssen alle beteiligten Geräte auch
eingeschaltet und richtig miteinander gekoppelt sein.
Manuelle Aktivierung
Wenn Sie im Intercommodus sind, drücken Sie die jeweilige Taste auf die der Partner
gekoppelt wurde. Nach ca. 4 Sekunden wird die Intercom-Sprechverbindung aktiviert.
Die Sprechverbindung bleibt solange eingeschaltet, bis Sie noch einmal die Taste
drücken. Um schnell zu einer anderen Person umzuschalten, drücken Sie einfach die
Taste, die der anderen Person zugeordnet wurde. Die aktuelle Verbindung wird dann automatisch beendet und die neue Verbindung wird gestartet.
Sprachsteuerung (VOX)
Die Sprachaktivierung kann nur genutzt werden, um die Intercomverbindung zu Ihrem
Partner auf der mittleren Taste herzustellen.
Hinweis: diese Funktion ist sehr nützlich, wenn Sie einen Kommunikationspartner haben, mit
dem Sie häufiger sprechen (wie z.B. Ihr Beifahrer). Auf diese Weise brauchen Sie nicht jedes
Mal die Taste zu drücken.
D
Kopplung des Midland BTNEXT PRO mit einem anderen Midland BTNEXT PRO
Um zwei Midland BTNEXT PRO miteinander zu koppeln, müssen diese zuerst in den
Setupmodus gebracht werden:
1.
Gerät ausschalten
2.
Die mittlere Taste für etwa 7 Sekunden gedrückt halten, bis die LED konstant rot leuchtet.
Gerät bereits belegt
Wenn Sie eine Gegensprech-Verbindung mit einer anderen Person herstellen möchten,
die sich bereits in einem Gespräch befindet (oder telefoniert), hören Sie zwei „Besetzt“Signaltöne. Warten Sie einfach einen Moment und versuchen Sie es erneut.
Die angerufene Person wird über den versuchten Anruf informiert und hört eine Ansage
www.midlandeurope.com 45
Page 46

mit der Nummer der Taste, von der die Anfrage kommt. Sobald das erste Gespräch
beendet ist, kann die Person auf diese Weise einfach den Anrufer kontaktieren, indem Sie
das Intercom mit der entsprechenden Nummer (per Sprachansage mitgeteilt) aktiviert.
1 2 3
D
Konferenz
Der Konferenzmodus erlaubt die gleichzeitige Kommunikation zwischen 4 Personen oder,
sofern auch Intercomgeräte mittels “Vol-” gekoppelt wurden, bis zu 8 Personen (4 Bikes). Sie
können das BTNext Pro entweder im “Eins-zu-Eins” Modus mit bis zu 6 Personen (klassisches
Intercom) oder mit bis zu 8 Personen (4 Bikes) im Konferenzmodus verwenden.
Wie verwende ich den Konferenzmodus
Zuerst müssen alle Einheiten in einer „Kette“ gekoppelt werden. Im zweiten Schritt muss
die Konferenz auf jedem der Geräte aktiviert werden
Kopplung
Um den Konferenzmodus zu nutzen, müssen alle Geräte in einer „Kette“ gekoppelt werden. Für die Kopplung von Gerät 1 und 2, nutzt Gerät 1 den Zurück Knopf und Gerät 2
den Vorwärts Knopf.
Für die Kopplung von Gerät 2 und 3, nutzt Gerät 2 den Zurück Knopf und Gerät 3 den
Vorwärts Knopf. Für die Kopplung von Gerät 3 und 4, nutzt Gerät 3 den Zurück Knopf
und Gerät 4 den Vorwärts Knopf. Die Geräte 1 und 4 dürfen nicht miteinander gekoppelt
werden.
Nummer 1 und 4 können sich nur durch die Kette unterhalten. Das bedeutet, dass alle
Teilnehmer das Intercom aktivieren und in Reichweite sein müssen.
1 2 3 4
Konferenzmodus An:
Wenn Sie sich im Intercom-Modus ohne oene Verbindung befinden, halten Sie die
Vorwärts-Taste für 7 Sekunden gedrückt. Die Sprachansage “Conference” zeigt an, dass
die Konferenz aktiviert wurde. Nach der Aktivierung werden Geräte, welche über Vol+
gekoppelt wurden, getrennt. Das Pairing über die mittlere Taste und Universal Interom
sind nicht verfügbar.
Alle Kopplungen über Vorwärts- und Rückwärtstaste, sowie das Gerät auf Vol- sind
weiterhin verfügbar. Während der Konferenz können Sie jederzeit in den “UKW Radio”
Modus wechseln und Ihre Lieblingsstation hören oder in den “Telefon” Modus, um das
Telefon auf Vol- zu steuern.
Konferenzmodus deaktivieren
Wenn Sie sich im Konferenzmodus ohne oene Verbindung befinden, halten Sie die
Vorwärts-Taste für 7 Sekunden gedrückt. Die Sprachansage “Intercom” signalisiert, dass
sich das Gerät wieder im “Eins-zu-Eins” Modus befindet. Geräte auf Vol+, das Pairing
auf der mittleren Taste, sowie das Universal Intercom stehen wieder zur Verfügung.
Konferenzmodus 4 Personen
Wenn der Konferenzmodus aktiv ist, können Sie die Intercomverbindung auauen,
indem Sie den Vorwärts und den Rückwärts Knopf drücken.
Ein Knopfdruck önet die Verbindung, ein erneuter Knopfdruck schließt sie wieder. Um
die Kommunikation zwischen allen Geräten in der Kette zu gewährleisten, müssen die
Geräte in der Mitte (Nr. 2 und 3) beide Verbindungen aktivieren
“One Click Talk” Funktion
Ist der Konferenzmodus aktiv, ist es möglich die Kommunikation zwischen allen 4 Nutzern mit einem “Klick” zu aktivieren. Drücken Sie einfach die mittlere Taste kurz und die
komplette Konferenzkette wird aktiviert.
46 www.midlandeurope.com
Page 47

Konferenzmodus mit Zusatzgerät auf Vol-
Wenn der Konferenzmodus aktiviert ist, dann ist die Kopplung über Vol- weiterhin verfügbar. Das bedeutet, dass Sie weiterhin Ihre Navigationsansagen hören oder Anrufe
beantworten können, ohne die Konferenzkette zu unterbrechen.
Für das Audiosignal von Vol- kann entweder Privat (wird nicht mit Konferenz geteilt)
oder Public (wird mit Konferenz geteilt) gewählt werden. Die Standardeinstellung ist
Privat.
Ist Privat gewählt, werden Sie, wenn Sie einen Anruf oder eine Navigationsansage erhalten, vorübergehend von der Konferenz getrennt. Alle anderen Konferenzteilnehmer
können sich weiterhin unterhalten. Ist der Anruf bzw. die Ansage beendet, wechseln Sie
automatisch zurück in die Konferenz.
Wechseln zwischen Public oder Privat: Halten Sie die Vol- gedrückt, bis sie die Sprachansage “Public” oder “Private” hören, welche den aktuell gewählten Modus anzeigt.
Achtung: Eingehende Anrufe sind immer Privat, selbst wenn Sie Public gewählt haben.
Konferenzmodus mit bis zu 8 Personen (4 Bikes)
Um 8 Personen in die Konferenz einzubinden, müssen weitere Intercomgeräte mittels
der Vol- Taste verbunden werden und die Option Public muss gewählt werden.
Achtung: Die Kopplung des Gerätes auf Vol- muss als “Universal Intercom” durchgeführt
werden
Wechseln zwischen Public oder Privat: Halten Sie die Vol- gedrückt, bis sie die Sprachansage “Public” oder “Private” hören, welche den aktuell gewählten Modus anzeigt.
›
Önen der Konferenz für die Vol- Einheit
Um die Konferenz vom BT Next Pro aus zu önen, drücken Sie lange die Vorwärts-Taste.
Um die Konferenz von der anderen Einheit aus zu önen, benutzen Sie einfach das Kommando, um das Universal Intercom zu önen.
Die maximale Intercomreichweite zur Einheit auf Vol- beträgt 10 Meter, deshalb eignet
sich diese nur für Fahrer-Sozius-Verbindungen.
Talk 2 All - Universelles Gegensprechen mit einem Gerät einer
anderen Marke.
Dank der „Talk2 All“ Funktion ist es jetzt auch möglich, das BT Next mit
Gegensprechanlagen von Fremdherstellern zu koppeln.
Sie können bis zu 2 nicht-Midland Geräte verbinden: eines auf der „Vorwärts“- und eines
auf der „Zurück“-Taste.
›
Rufen Sie den Setup-Modus auf. Im ausgeschalteten Zustand halten Sie die mittlere
Taste ca. 7 Sekunden gedrückt, bis die rote LED ständig leuchtet
›
Halten Sie jetzt die „Vorwärts“ oder „Zurück“ für ca. 7 Sekunden gedrückt. Die
rot-blaue LED blinkt zuerst schnell und danach (während Sie weiter die Taste gedrückt
halten) langsam. Sie können die Taste nun loslassen.
D
Verbinden eines Intercomgerätes mittels Vol-:
›
Schalten Sie das Gerät aus und halten Sie beim Einschalten die mittlere Tastesolange
gedrückt, bis die LED rot leuchtet. Sie befinden sich nun im Setup Modus. Halten Sie
nun die Vol- für 3 Sekunden gedrückt. Die LED beginnt rot/blau zu blinken.
›
Folgen Sie am anderen Gerät den Anweisungen zum Koppeln eines Universal Intercoms.
Talk2All - Universal Intercom
Fremdhersteller-Gerät
Bei der nicht-Midland Gegensprechanlage befolgen Sie bitte die Angaben des Herstellers
um ein Telefon zu verbinden, da das BT Next sich nun wie ein Telefon verhält. Wenn der
Verbindungsvorgang erfolgreich war, wird die LED nur noch langsam in blau blinken.
Beifahrer
Talk2All - Universal Intercom
Gerät der BT Serie
über Talk2All
www.midlandeurope.com 47
Page 48

Achtung: Bitte denken Sie daran, alle anderen Bluetooth Geräte (außer den Beiden zu kop-
pelnden) auszuschalten.
Um die Kommunikation zu starten, drücken Sie beim BT Next 3Sek. die „Vorwärts“- oder
„Zurück“-Taste (je nachdem, auf welcher Sie das Gerät verbunden haben). Möchten Sie
die Verbindung vom Gerät des Fremdherstellers starten, drücken Sie bitte die Telefon
Wahlwiederholungstaste. Möglicherweise kann es nötig sein, die Wahlwiederholungstaste
2x zu drücken.
Achtung: Um die „Talk2 All“ Funktion zu nutzen, muss die Verbindung auf dem Gerät des
Fremdherstellers als Telefon erfolgen. Ein weiteres Telefon kann danach nicht auf dem
Fremdgerät gekoppelt werden.
D
Sie können auch ein Midland Gerät per „Talk2 All“ Funktion verbinden. Hierfür
verwenden Sie auf der einen Gegensprechanlage die „Talk2 All“ Funktion und koppeln
das andere Midland-Gerät als Telefon.
Kompatibilität mit Geräten der Midland BT-Produktlinie
Das BTNEXT PRO ist mit BTX1 PRO, BTNext PRO, BT Next Conference, BTX1 FM
und BTX2 FM kompatibel. Wenn sie gekoppelt sind, hängt die Reichweite der Gegensprechfunktion von dem Gerät ab, das die geringere Reichweite hat. Das BTNEXT
PRO ist mit Geräten der vorigen Midland BT-Produktlinie (BT Next, BTX1 und BTX2)
nur kompatibel, wenn sie auf eine Firmware-Version von 2014 oder neuer aktualisiert
wurden.
Kopplung des Midland BTNEXT PRO mit Bluetooth Geräten
Das Midland BTNEXT PRO kann mit anderen Bluetooth Geräten gekoppelt werden, wie
z.B. Telefonen, GPS Navigationsgeräten oder PMR446 Funkgeräten mit integriertem
oder externem Bluetooth (Dongle).
Die Kopplung muss mittels Volume + oder Volume - vorgenommen werden.
›
Kopplung über Volume +: alle Geräte, welche über Volume + gekoppelt wurden, haben die höchste Priorität und unterbrechen jegliche andere Funktion (wie z.B Intercom, UKW Radio und Musik)
›
Kopplung über Volume -: alle Geräte, welche über Volume - gekoppelt wurden, sind
im Hintergrund der Intercomkommunikation und unterbrechen diese nicht.
VOL - Immer im Hintergrund VOL + Höhe Priorität
›
›
Telefon (HFP/A2DP Stereo)
›
Navigation(HFP/A2DP Stereo)
›
Dongle (HFP/A2DP Stereo)
Telefon (HFP/A2DP Stereo)
›
Navigation(HFP/A2DP Stereo)
›
Dongle (HFP/A2DP Stereo)
”Hintergrund“-Funktion
Jedes Audiosignal von einem Gerät, welches über Vol- gekoppelt wurde, ist im
Hintergrund hörbar (selbst Stereosignale). Auf diese Weise wird die Intercomkommunikation nicht durch Fahranweisungen des Navigationsgerätes o.ä. unterbrochen. Sie können entscheiden, ob Audiosignale von Vol- Geräten mit Ihrem
Partner geteilt werden, wenn das Intercom geönet ist.
Kopplung mit einem oder zwei Telefonen
Ein Mobiltelefon kann entweder mittels Vol+ oder Vol- gekoppelt werden.
Sobald ein Gerät über die „Vol+“ bzw. die „Vol-“ Taste gekoppelt wurde, ist der
Telefonmodus während des Betriebs verfügbar.
Ein eingehender Telefonanruf hat immer die höchste Priorität, das heißt, dass alle
anderen Kommunikationen (Intercom, UKW Radio, Musik) unterbrochen werden.
Erhalten Sie währenddessen einen weiteren Anruf auf dem zweiten Telefon, dann hören
Sie einen Piepton
ACHTUNG!
Um eine möglichst gute Performance mit Ihrem Mobiltelefon zu gewährleisten, empfehlen wir
es möglichst nah am BT NEXT PRO zu tragen. Idealerweise auf der linken Seite Ihres Körpers
in der Brusttasche.
48 www.midlandeurope.com
Page 49

Das BTNEXT PRO mit einem Mobiltelefon koppeln
Um das BTNEXT PRO mit einem Mobiltelefon zu koppeln, müssen Sie zunächst den
Setup-Modus aufrufen:
›
Schalten Sie das Gerät aus.
›
Halten Sie die „mittlere“ Taste ca. 7 Sek. gedrückt, bis die rote LED ständig leuchtet.
›
Drücken Sie nun die „Volume+“ oder die „Volume-“ Taste für 3 Sekunden. Die LED
beginnt abwechselnd blau und rot zu blinken
›
Halten Sie jetzt die „Lautstärke +“ Taste länger gedrückt (3 Sek.), die blaue und die
rote LED blinken. Nach einigen Sekunden sehen Sie im Display des Telefons „Midland
BT NEXT“ . Befolgen Sie den Kopplungsvorgang Ihres Telefons. Wenn ein PIN-Code
erforderlich ist, geben „0000“ (vier mal Null) ein.
Wenn der Kopplungsvorgang erfolgreich war, leuchtet die blaue LED des Geräts für eine
Sekunde auf. Anschließend verlässt das Gerät den Setup-Modus automatisch wieder
und wechselt in den Betriebsmodus (die blaue LED blinkt).
Sie können nun Ihr BTNEXT PRO zusammen mit dem Telefon benutzen.
Mobiltelefon über das BTNEXT PRO bedienen
Nachdem Sie Ihr Mobiltelefon mit dem BTNEXT PRO gekoppelt haben, müssen Sie
in den „Telefon“-Modus wechseln, um es zu verwenden. Wechseln Sie durch langes
Drücken der mittleren Taste durch die Modi, bis Sie die Ansage „Telefon“ hören. Nun
bedienen alle drei Tasten das Telefon (siehe die Tabelle B).
B – TELEFON MODE
Modus Weiter-Taste Mittlere Taste Zurück-Taste
Telefon Kurzer Tastendruck: Sprachanwahl/Akzeptieren oder
beenden, solange die Anwahl oder das Gespräch noch
stattfindet
Langer Tastendruck: Wahlwiederholung/ oder eingehenden Anruf ablehnen
Telefon (wenn Musik abgespielt wird und über “Vol+”
gekoppelt wurde)
Kurzer Tastendruck: Einen Titel weiter Kurzer Tastendruck: Wiedergabe/Pause
Einen Anruf beantworten
Wenn Sie das Telefon klingeln hören, können Sie auf zwei Arten antworten:
Sprachgesteuert:
Sagen Sie einfach ein Wort direkt nach dem ersten Klingeln, um den Anruf anzunehmen.
Manuell:
Tippen Sie auf die „Vorwärts“-Taste und fangen Sie zu reden.
Anruf ablehnen
Falls Sie den Anruf nicht annehmen wollen, können Sie das Mobiltelefon klingeln
lassen oder halten Sie die „Vorwärts“-Taste für 3 Sekunden gedrückt (Sie werden einen
Bestätigungston hören).
Anruf tätigen
Es gibt mehrere Möglichkeiten einen Anruf zu starten.
Mit der Tastatur des Mobiltelefons:
Wählen Sie die Nummer auf der Tastatur des Mobiltelefons.
Achtung: Dies ist während der Fahrt nicht erlaubt!
Drücken Sie „Senden“ auf dem Mobiltelefon.
Wahlwiederholung:
Telefon über Vol+: Drücken Sie die „Vorwärts”-Taste für 3s, um die Wahlwiederholung zu
starten (Sie erhalten einen Bestätigungston).
Telefon über Vol-: Drücken Sie die „Zurück”-Taste für 3s, um die Wahlwiederholung zu
starten (Sie erhalten einen Bestätigungston)
Langer Tastendruck: Modus wechseln Kurz drücken: Sprachwahl / Gespräch
annehmen oder auflegen während eines
Telefonats
Lang drücken: Wahlwiederholung oder
Gespräch ablehnen
Kurzer Tastendruck: Einen Titel zurück
Langer Tastendruck: Modus wechseln
D
www.midlandeurope.com 49
Page 50

Mit Sprachsteuerung:
Telefon über Vol+: Drücken Sie kurz auf die „Vorwärts”-Taste. Wenn Ihr Telefon die Spracheingabe unterstützt, werden Sie aufgefordert, den Namen des gewünschten Kontaktes
zu sagen.
Telefon über Vol-: Drücken Sie kurz auf die „Zurück”-Taste. Wenn Ihr Telefon die Spracheingabe unterstützt, werden Sie aufgefordert, den Namen des gewünschten Kontaktes
zu sagen.
Priorität: Anrufe haben eine hohe Priorität, was bedeutet: Wenn ein Anruf ankommt, wird jede
andere Verbindung vorübergehend deaktiviert.
Nächster Titel
Play/Pause
Lezter Titel
Anruf beenden
D
Es gibt verschiedene Wege, einen Anruf zu beenden:
›
Warten Sie, bis die angerufene Person den Anruf beendet.
›
Halten Sie die „Vorwärts“-Taste für 3 Sekunden gedrückt (Sie hören einen
Bestätigungston).
›
Drücken Sie auf dem Mobiltelefon auf die Taste „Beenden“.
Schnellwahl
Das BT NEXT PRO kann nur eine Nummer für das Telefon, welches über Vol+ gekoppelt
wurde, speichern. Sie müssen die Nummer zuerst über die PC-Software „BT UPDATER“
oder die Smartphone-App „BT SET-APP“ auf dem Gerät speichern. Im Handy-Modus
drücken Sie dann einfach 7 Sekunden lang die „Vorwärts“-Taste.
Die MP3-Player-Funktion des Mobiltelefons benutzen
Ein Mobiltelefon kann, sofern über Vol- oder Vol+ gekoppelt, als Stereo-MP3-Player
verwendet werden. Das BTNEXT PRO unterstützt die A2DP- und AVRCP-Protokolle,
die es Ihnen ermöglichen, Stereo-Musik zu hören und Ihren MP3 Player im Mobiltelefon fernzusteuern. Sie können die Tasten am BTNEXT PRO- Gerät nutzen, um die
Abspielfunktionen (Wiedergabe, Pause, Vorspulen und Zurückspulen) zu steuern. Es ist
nur möglich ein Telefon auf diese Weise zu steuern. Sie können ein Telefon auswählen,
indem Sie die Vol+ Taste für 3 Sekunden gedrückt halten.
Sie werden die Sprachansage “Control on volume up” hören. Nun können Sie die Wiedergabe des Telefons auf Vol+ steuern. Wenn Sie die Steuerung wechseln möchten,
halten Sie die Vol+ erneut für 3 Sekunden gedrückt. Nun hören Sie die Sprachansage
“Control on volume down”
Verfügbare Bedienelemente:
›
Musik-Wiedergabe/Pause: Klicken Sie auf die „mittlere“ Taste.
›
Zum nächsten Titel springen: Drücken Sie die „Vorwärts“-Taste.
›
Zum vorherigen Titel gehen: Drücken Sie die „Zurück“-Taste.
Priorität: Die Musikwiedergabe hat die niedrigste Priorität. Deshalb wird die Musik immer
deaktiviert, wenn ein anderer Kommunikationstyp aktiviert ist. Das Priorisierungsverhalten
können Sie mit der PC-Software „BT UPDATER“ oder der Smartphone-App „BT SET-APP“
einstellen.
Achtung: Die komplette A2DP Steuerung (Play/Pause, Vorwärts, Zurück) steht nur im “Telefon”
Modus zur Verfügung.
Während Sie Musik hören, können Sie den Modus auf “UKW Radio” oder “Intercom” wechseln und weiterhin die Musik im Hintergrund hören. Es steht dann aber nicht mehr die
komplette Steuerung zur Verfügung. Lediglich Play/Pause ist weiterhin über die mittlere
Taste verfügbar.
Music Share (Musik weiterleiten)
Music Share kann nur mit dem Telefon, welches über Vol+ gekoppelt wurde, genutzt
werden. Um Musik per A2DP mit Ihrem Beifahrer zu teilen, dessen Gerät bereits auf
der mittleren Taste gekoppelt ist (maximale Distanz 10 m), müssen Sie während der
Musikwiedergabe 3 Sekunden lang die „Zurück“-Taste drücken. Das Gerät des Beifahrers
muss sich entweder im „Handy-“ oder im „Gegensprechen“-Modus befinden, ohne dass
eine Tonquelle geönet ist. Der Beifahrer kann das Teilen der Musik beenden, indem er
kurz die mittlere Taste drückt, die Musikwiedergabe kann er nicht steuern. Der Fahrer kann
50 www.midlandeurope.com
Page 51

das Teilen der Musik beenden, indem er lange noch einmal auf die „Zurück“-Taste drückt.
Wenn Sie Music Share aktiviert haben, können Sie die Intercom-Verbindung nicht geönet
lassen.
Kopplung mit einem GPS Navigator
Das GPS Navigationsgerät kann entweder über „Volume +“ oder „Volume –“ gekoppelt
werden.
Volume + Taste (unterstützt A2DP Audio und HFP Mono) Mit Vol+ gekoppelte Geräte
haben eine höhere Priorität und unterbrechen jegliche andere Kommunikation (wie Intercom oder UKW Radio)
Volume - Taste (unterstützt A2DP Audio und HFP Mono) Mit Vol- gekoppelte Geräte
sind immer im Hintergrund aktiv und unterbrechen die Intercomkommunikation nicht.
Sie können außerdem entscheiden, ob das Audiosignal über das Intercom mit anderen
Personen geteilt werden soll (Option “Public”) oder nicht (Option “Privat”)
Siehe Kapitel Hintergrundfunktion.
Stereo (A2DP)-Routenanweisungen des Navigationsgerätes
Das Midland BTNEXT PRO unterstützt Stereo (A2DP)-Routenanweisungen von
Navigationsgeräten, wenn Sie auf der „Lautstärke+“-Taste gekoppelt sind. Bei einem
„brake in“ einer Routenanweisung werden Intercom und UKW-Modus unterbrochen,
und die Routenanweisung hat Priorität. Standardmäßig ist diese Funktion aktiviert;
mittels der PC-Software „BT Updater“ oder der Smartphone-App „BT SET-APP“ kann
die Priorität jedoch geändert werden.
Das BTNEXT PRO mit einem GPS-Navigationsgerät koppeln
Allgemein ist es möglich, das BTNEXT PRO mit jedem GPS-Navigationsgerät für Motorräder zu koppeln, das Bluetooth Headsets unterstützt.
Hinweis: Die meisten für PKW angebotenen Bluetooth-Navigationsgeräte sind auf dem
Motorrad nicht brauchbar, da deren Bluetoothmodul nicht headsetfähig ist!
Um das BTNEXT PRO mit einem GPS-Navigationsgerät zu koppeln, müssen Sie zunächst
den Setup-Modus aufrufen:
›
Schalten Sie das Gerät aus.
›
Halten Sie die mittlere Taste ca. 7 Sek. gedrückt, bis die rote LED ständig leuchtet.
›
Halten Sie jetzt die Taste „Lautstärke +“ oder „Lautstärke -“ gedrückt (3 Sek.), bis die
blaue und die rote LED anfangen zu blinken. Befolgen Sie den Kopplungsvorgang für Ihr
GPS-Navigationsgerät. Wenn ein PIN-Code erforderlich ist, geben Sie „0000“ (vier
mal Null) ein.
Wenn der Kopplungsvorgang erfolgreich war, leuchtet die blaue LED des BTNEXT
PRO für eine Sekunde auf. Anschließend verlässt das Gerät den Setup-Modus und ist
betriebsbereit (die blaue LED blinkt).
Nun können Sie mit Ihrem Midland BT NEXT PRO die Fahranweisungen Ihres Navigationsgerätes hören.
Verwenden eines PMR 446 Funkgeräts mit integriertem Bluetooth
Wenn Sie über ein Funkgerät mit integriertem Bluetooth verfügen. Dann koppeln Sie
das Funkgerät über die „Lautstärke –“ oder „Lautstärke +“ Taste. Wenn es über Volume
- gekoppelt wird, ist das PMR446 Gerät immer im Hintergrund hörbar., selbst wenn Sie
sich über das Intercom unterhalten.
›
Schalten Sie das Gerät aus.
›
Halten Sie die „mittlere“ Taste ca. 7 Sek. gedrückt, bis die rote LED ständig leuchtet.
›
Drücken Sie jetzt (3 sec lang) die „Lautstärke – “ Taste. Die blaue und rote LED
blinken.
›
Folgen Sie jetzt der Kopplungs- (Pairing) Prozedur, wie Sie im Handbuch des
Funkgeräts beschrieben ist.
Ukw-Radio
Der UKW-Radioempfänger ist in das Gerät integriert. Sie müssen nur in den
„UKW-Radio“-Modus wechseln, um ihn zu benutzen. Drücken Sie die „mittlere“
Taste, bis Sie die Sprachansage „UKW-Radio“ hören. Nun bedienen alle drei Tasten das
UKW-Radio (siehe die Tabelle C):
Drücken Sie die „Vorwärts“ – oder „Zurück“-Taste kurz, um nach neuen Radiostationen
zu suchen.
Wenn Sie die „Vorwärts“ – oder „Zurück“-Taste lange drücken, können Sie die 6
gespeicherten Sender auf- oder abwärts durchschalten. Eine Sprachansage teilt lhnen
die Nummer des Speicherplatzes mit, den Sie gerade aufgerufen haben. Sie hören
zwei Signaltöne, wenn der letzte oder der erste vorbelegte Sender erreicht wurde.
Um den aktuellen Sender zu speichern,halten Sie für 3 Sekunden gleichzeitig die
„Weiter” - und „Zurück” - Taste gedrückt. Sie hören einen Bestätigungs-Signalton. Der
D
www.midlandeurope.com 51
Page 52

Sender überschreibt den vorbelegten Sender, der zuletzt verwendet wurde. Dank des
RDS-System wählt das UKW-Radio für das aktuelle radioprogramm das jeweils stärkste
Signal. Das RDS-System ist standardmäßig deaktiviert. Sie können die RDS-Funktion
ein-bzw. Auszuschalten, indem Sie bei eingeschaltetem UKW Radio die Tasten
„Lautstärke +” und „Lautstärke -” gleichzeitig für 3 Sekunden gedrückt halten.
Eine Sprachansage teilt Ihnen den RDS-Status mit.
Aktivierung / Deaktivierung des UKW Radios
Standardmäßig ist das UKW Radio aktiviert.
Deaktivierung:
- Gehen Sie in den „Setup“-Modus: schalten Sie das Gerät aus und drücken Sie die
D
„mittlere“-Taste ca. 7sek. bis die LED rot leuchtet.
- Drücken Sie die „mittlere“- und die „Vol+“ Taste für 3sek. Die LED blinkt zweimal blau.
- Per Doppelklick auf die „mittlere“-Taste verlassen Sie den „Setup“-Modus.
Aktivierung:
- Folgen Sie den Anweisungen wie bei der „Deaktivierung“. Die blaue LED blinkt nun
einmal. Sie verlassen den „Setup“-Modus per Doppelklick auf die „mittlere“-Taste.
UKW-Radio und Intercom betreiben
Während des Radiohörens können Sie das Intercom nicht manuell starten, sondern Sie
können nur die VOX Funktion benutzen. Das funktioniert durch einfaches Sprechen,
aber nur dann, wenn Sie vorher das jeweils gewünschte Partnergerät auf die mittlere Taste
gekoppelt hatten.
Für eine manuelle Intercomfunktion müssten Sie dann vorher erst in den Intercom Mode umschalten.
Kabelgebundener Audioeingang
Sie können Ihr Midland BTNEXT PRO mit einer kabelgebundenen Tonquelle wie zum
Beispiel einem iPod oder einem anderen MP3-Player verbinden.
Musik wiedergeben
Um Musik über den Kabeleingang wiederzugeben, schließen Sie die Tonquelle mithilfe
des optional erhältlichen AUX-Kabels an. Mit den Lautstärketasten (Lautstärke+ und
Lautstärke–) stellen Sie die Lautstärke der kabelgebundenen Tonquelle ein (nicht
unabhängig von der Lautstärke der Gegensprechfunktion). Das AGC-System hebt die
Lautstärke bei
Tipp: Wir empfehlen Ihnen, ein paar Tests durchzuführen, um die Lautstärke Ihres iPod/
MP3-Players so einzustellen, dass sie Ihren Wünschen entspricht. Das AGC-System hebt die
Lautstärke bei höherer Geschwindigkeit automatisch an, Sie müssen sie also nicht über die
„Lautstärke +“- oder „Lautstärke–“-Tasten regeln.
Aktivieren/Deaktivieren des Kabeleingangs
Der Kabeleingang kann bei Bedarf aktiviert oder deaktiviert werden:
Aktivieren/Deaktivieren: Halten Sie etwas länger die „Weiter” - oder „Mittlere” Taste gedrückt (Sie hören bei Aktivierung einen Signalton und bei Deaktivierung zwei
Signaltöne zur Bestätigung).
Kabelgebundene Tonquelle im Hintergrund
Der Ton der kabelgebundenen Verbindung kann im Hintergrund der Gegensprechfunktion
oder eines Telefongesprächs laufen. Diese Option ist standardmäßig eingeschaltet. Zur
Aktivierung dieser Funktion siehe Abschnitt unten „Kabelgebundene Verbindung immer
im Hintergrund“.
Beachten Sie bitte, dass es nicht möglich ist, eine kabelgebundene Tonquelle als
Hintergrund für UKW-Radio einzustellen.
C – UKW RADIO MODE
Modus Weiter-Taste Mittlere Taste Zurück-Taste
UKW-Radio Kurzer Tastendruck: Gefundene Sender speichern
Langer Tastendruck: Gespeicherte Sender aufwärts
Kurzer Tastendruck: Ein- und Ausschalten
Langer Tastendruck: Modus wechseln
Kurzer Tastendruck: Gefundene Sender speichern
Langer Tastendruck: Gespeicherte Sender abwärts
52 www.midlandeurope.com
Page 53

Bremslicht
Auf der Rückseite des Montagesatzes Ihres BTNEXT PRO
befindet sich ein extrem helles LED-Bremslicht. Wenn Sie eine
Vollbremsung ausführen, leuchtet dieses Bremslicht auf, um
den nachfolgenden Verkehr zusätzlich zu warnen. Wenn Sie das
Bremslicht vorübergehend deaktivieren möchten (etwa weil Sie
mit einem Beifahrer unterwegs sind), drücken Sie lange gleichzeitig
die „Zurück“- und die „Vorwärts“-Taste, wenn sich das Gerät im
Handy- oder Gegensprechen-Modus befindet. Eine Ansage
bestätigt den neuen Status. Das Gerät speichert die zuletzt
verwendete Einstellung, sodass Sie das Bremslicht manuell wieder
aktivieren müssen, indem Sie gleichzeitig die „Zurück“- und die
„Vorwärts“-Taste drücken.
Achtung: Standardmäßig ist das Bremslicht AUS.
Stop Light
Setup und spezielle Konfiguration
Alle Pairing- (Kopplungs-) Informationen zurücksetzen
Wurde Ihr BT Next bereits öfter mit anderen Geräten gekoppelt, dann kann die Zahl der
gekoppelten Verbindungen irgendwann unübersichtlich werden und es kann angebracht
sein, alle im BTNEXT PRO gespeicherten Kopplungsdaten zu löschen (Reset).
Für diese Prozedur rufen Sie zunächst den Setup-Modus auf:
›
Schalten Sie das Gerät aus.
›
Halten Sie die „mittlere“ Taste ca. 7 Sek. gedrückt, bis die rote LED ständig leuchtet.
›
Halten Sie anschließend die „Lautstärke +“ und „Lautstärke –“ Tasten für 3 Sekunden
gedrückt. Die blaue LED leuchtet für 1 Sekunde auf und anschließend leuchtet
ständig die rote LED.
›
Doppelklicken Sie auf die „mittlere“ Taste, um den Setup-Modus zu verlassen und das
BTNEXT PRO wieder zu verwenden.
Dieses Vorgehen löscht alle gespeicherten und gekoppelten Bluetooth-Geräte und
ermöglicht einen neuen „sauberen“ Kopplungsablauf.
Achtung: nach dem Löschen sämtlicher Pairings steht nur noch der UKW Radio Modus zur
Verfügung.
Auf die Werkseinstellungen zurücksetzen
Manchmal kann es notwendig sein, zu den Werkseinstellungen zurückzukehren, um
alle Änderungen oder Setupeinstellungen zurückzusetzen und ein „sauberes“ Gerät zu
erhalten.
Zuerst schalten Sie wieder in den Setup-Modus:
›
Schalten Sie das Gerät aus.
›
Halten Sie die „mittlere“ Taste ca. 7 Sek. gedrückt, bis die rote LED ständig leuchtet.
›
Anschließend halten Sie gleichzeitig alle 3 Tasten „Vorwärts“ – „mittlere Taste“ –
„Zurück“ für 3 Sekunden gedrückt. Die blaue LED leuchtet für 1 Sekunde auf und
anschließend leuchtet ständig die rote LED.
›
Doppelklicken Sie auf die „mittlere“ Taste, um den Setup-Modus zu verlassen und das
BTNEXT PRO zu verwenden.
Einstellen/Deaktivieren der VOX-Funktion
(Gegensprechanlage und Telefon)
Die Gegensprechfunktion kann manuell oder durch Sprache (VOX) aktiviert werden.
Diese Funktion wird durch je nach Hemart verursachten Hintergrundgeräusche
beeinflusst und deshalb auch durch die Geschwindigkeit.
Für optimale Resultate kann einer der folgenden vier Mikrofon-Empfindlichkeitspegel gewählt werden: hoch, mittel, niedrig und sehr niedrig. Die Werkseinstellung des
BTNEXT PRO ist „niedrig“. Sie können die VOX Funktion auch deaktivieren, um die
Gegensprech- und Telefon-Antwortfunktion nur im manuellen Modus zu aktivieren.
Einstellen der Mikrofonempfindlichkeit (VOX)
Um diese Prozedur auszuführen, müssen Sie zuerst den Setup-Modus aufrufen:
›
Schalten Sie das Gerät aus.
›
Halten Sie die „mittlere“ Taste ca. 7 Sek. gedrückt, bis die rote LED ständig leuchtet.
Ihr BTNEXT PRO befindet sich jetzt im „Setup-Modus“.
1.
Drücken Sie kurz die „Zurück“-Taste, und die rote LED wechselt in ein dauerhaftes
blaues Licht.
2.
Erhöhen oder verringern Sie jetzt die Empfindlichkeit mit den Tasten „Lautstärke +“
oder „Lautstärke –“. Jedes Mal, wenn Sie die Lautstärketasten drücken, blinkt die rote
LED zur Bestätigung auf. Wenn Sie den oberen oder unteren Grenzwert erreicht
haben, blinkt die rote LED nicht mehr.
D
www.midlandeurope.com 53
Page 54

3.
Drücken Sie erneut kurz die „Zurück“-Taste. Die blaue LED blinkt mehrmals auf, um
Ihnen die ausgewählte Empfindlichkeit anzuzeigen:
1x Aulinken = VOX deaktiviert
2x Aulinken = niedrige Empfindlichkeit
3x Aulinken= mittlere Empfindlichkeit
4x Aulinken= hohe Empfindlichkeit
5x Aulinken = sehr hohe Empfindlichkeit
4.
Nun leuchtet rote LED erneut ständig auf („Setup-Modus“) und die Änderungen
werden bestätigt.
5.
Bei Bedarf kann die Empfindlichkeit durch Wiederholen der Schritte ab Punkt 1 erneut
D
angepasst werden. Ansonsten können Sie den Einstellmodus durch Doppelklicken der
„mittleren“ Taste verlassen. Sobald die rote LED erlischt, beginnt die blaue LED zu
blinken. Jetzt ist Ihr BTNEXT PRO betriebsbereit.
Deaktivieren der VOX-Funktion
(Gegensprechanlage und Telefon)
Wiederholen Sie die Prozedur für die Empfindlichkeitseinstellung des Mikrofons (siehe
oben) und wählen Sie die Option, bei der LED nur einmal aulinkt (VOX deaktiviert).
Achtung: Wenn Sie die VOX-Funktion ausgeschaltet haben, können eingehende Anrufe nur
durch drücken der „Weiter“-Taste angenommen werden.
Kabelgebundene Verbindung immer im Hintergrund
Mit dieser Funktion können Sie die kabelgebundene Verbindung stets geönet halten,
auch wenn der Handy- oder Gegensprechen-Modus aktiv ist (jedoch nicht im UKW-Radio-Modus). Die Hintergrundoption ist standarmäßig eingeschaltet.
Deaktivieren:
Rufen Sie den „Setup“-Modus auf:
›
Schalten Sie das Gerät aus.
›
Halten Sie die „mittlere“ Taste ca. 3 Sek. gedrückt, bis die rote LED ständig leuchtet.
›
Halten Sie gleichzeitig die „Vorwärts“-Taste und die „mittlere“ Taste für ca. 3 Sekunden
gedrückt. Die blaue LED blinkt dreimal auf.
›
Doppelklicken Sie auf die „mittlere“ Taste, um den „Setup“-Modus zu verlassen und das
BTNEXT PRO zu verwenden.
Aktivieren:
›
Wiederholen Sie das oben beschriebene Verfahren. Jetzt blinkt die blaue LED einmal auf.
›
Doppelklicken Sie zum Verlassen des „Setup“-Modus auf die „mittlere“-Taste.
Setup und Firmware-Aktualisierung
Die Firmware Ihres BTNEXT PRO kann mittels einer USB-Verbindung mit Ihrem PC
konfiguriert und aktualisiert werden. Auf der Website von Midland
www.midlandeurope.com oder unter www.btupdater.de finden Sie auf der BTNEXT
PRO-Seite die PC-Software und die neuen Firmware-Aktualisierungen, falls verfügbar.
ACHTUNG DAS GERÄT NUR AN DEN PC ANSCHLIESSEN, WENN DIE SOFTWARE
HERUNTERGELADEN UND INSTALLIERT WURDE
Benutzung auf eigene Gefahr
Das Benutzen von beidseitigen Audiosets in Helmen kann kann Ihre Fähigkeit, Geräusche
und das Verkehrsgeschehen in Ihrer Umgebung wahrzunehmen, beeinträchtigen. Benutzen
Sie daher das Bluetooth Set nur, wenn die Verkehrssituation es erlaubt.
Beim Motorradfahren kann das Hören von Musik oder das Führen von Telefonaten oder das
Benutzen des Intercoms Sie von anderen Ereignissen und vom sicheren Fahren ablenken.
Das Benutzen des Bluetooth Sets beim Führen eines Fahrzeugs oder beim Fahrradfahren
kann ein ernsthaftes Risiko für Sie oder Ihre Mitmenschen bedeuten und kann, von Land zu
Land unterschiedlich, verboten sein.
Das Benutzen eines Headsets mit extremer Lautstärkeeinstellung kann bleibende
Gehörschäden hervorrufen.
Sollten Sie Klingeln in Ihren Ohren oder andere Hörprobleme feststellen, so verringern Sie
sofort die Lautstärke oder schalten Sie das Gerät aus. Bei ständigem Gebrauch mit hohen
Lautstärken kann sich Ihr Gehör and den erhöhten Lautstärkepegel so gewöhnen, dass die
Folge eine permanente Hörschädigung sein kann.
Bitte benutzen Sie dieses Gerät nur mit einer sicheren Lautstärke.
54 www.midlandeurope.com
Page 55

Gewährleistung
Gewährleistungsfrist beträgt 24 Monate ab Kauf-/Lieferdatum (bei Teilen mit beschränkter Lebensdauer wie, Akkus, Ladegeräte, Headsets, mikrofone und Antennen 6 Monate).
Für allen Informationen über die Garantie der Artikel, besuchen Sie bitte unsere www.midlandeurope.com
Europäische CE Erklärung und Sicherheitshinweise
Hiermit erklärt Cte International Srl, dass das Produkt die grundlegenden Anforderungen
und anderen relevanten Bestimmungen der Richtlinie 1999/5/EC erfüllt (ab dem
13.06.2017, erfüllt es die Auflagen der Richtlinie 2014/53/UE).
Es ist gültig für alle EU Staaten.
Es ist nicht zulässig, nicht mit uns abgesprochene Veränderungen an den Geräten
vorzunehmen. Sie gefährden mit Änderungen nicht nur die Gewährleistung, sondern
auch das Einhalten der gesetzlichen Grenzwerte.
Näheres an technischen Informationen finden Kunden aus dem deutschsprachigen
Raum auch unter http://hobbyradio.de, in der Rubrik “Biker Sets”, wo Sie die jeweils
neueste Ausgabe der Geräteunterlagen zum Download finden Informationen für Kunden
in Deutschland gibt es unter www.alan-electronics.de.
D
www.midlandeurope.com 55
Page 56

• INFORMAZIONE AGLI UTENTI: i sensi dell’art. 13 del decreto legislativo 25 luglio
2005, n.151 “Attuazione delle Direttive 2002/95/CE, 2002/96/CE e 2003/108/CE,
relative alla riduzione dell’uso di sostanze pericolose nelle apparecchiature elettriche ed
elettroniche, nonché allo smaltimento dei rifiuti”.
Il simbolo del cassonetto barrato riportato sull’apparecchiatura indica che il prodotto alla
fine della propria vita utile deve essere raccolto separatamente dagli altri rifiuti. L’utente
dovrà, pertanto, conferire l’apparecchiatura giunta a fine vita agli idonei centri di raccolta
dierenziata dei rifiuti elettronici ed elettrotecnici, oppure riconsegnarla al rivenditore al
momento dell’acquisto di una nuova apparecchiatura di tipo equivalente, in ragione di uno
a uno. L’adeguata raccolta dierenziata per l’avvio successivo dell’apparecchiatura dismessa al riciclaggio, al trattamento e allo smaltimento ambientalmente compatibile contribuisce ad evitare possibili eetti negativi sull’ambiente e sulla salute e favorisce il riciclo
dei materiali di cui è composta l’apparecchiatura. Lo smaltimento abusivo del prodotto
da parte dell’utente comporta l’applicazione delle sanzioni amministrative di cui al dlgs.
n.22/1997 (articolo 50 e seguenti del dlgs. n.22/1997).
• All articles displaying this symbol on the body, packaging or instruction manual of same,
must not be thrown away into normal disposal bins but brought to specialised waste disposal centres. Here, the various materials will be divided by characteristics and recycles, thus
making an important contribution to environmental protection.
• Alle Artikel, die auf der Verpackung oder der Gebrauchanweisung dieses Symbol tragen,
dürfen nicht in den normalen Mülltonnen entsorgt werden, sondern müssen an gesonderten Sammelstellen abgegeben werden. Dort werden die Materialien entsprechend ihrer
Eigenschaften getrennt und, um einen Beitrag zum Umweltschutz zu liefern, wiederverwertet.
• Todos los artículos que exhiban este símbolo en el cuerpo del producto, en el embalaje o en
el manual de instrucciones del mismo, no deben ser desechados junto a los residuos urbanos normales sino que deben ser depositados en los centros de recogida especializados. En
estos centros, los materiales se dividirán en base a sus características y serán reciclados,
para así poder contribuir de manera importante a la protección y conservación del medio
ambiente.
• Tous les articles présentant ce symbole sur le corps, l’emballage ou le manuel d’utilisation de celui-ci ne doivent pas être jetés dans des poubelles normales mais être amenés
dans des centres de traitement spécialisés. Là, les diérents matériaux seront séparés par
caractéristiques et recyclés, permettant ainsi de contribuer à la protection de l’environnement.
•
Όλα τα προϊόντα στα οποία εμφανίζεται το ακόλουθο σύμβολο στο σώμα, τη
συσκευασία ή το εγχειρίδιο χρήσης τους, δεν πρέπει να εναποθέτονται στους κοινούς
κάδους απορριμάτων αλλά να προσκομίζονται στα ειδικά κέντρα αποκομιδής. Εκεί,
τα διάφορα υλικά θα πρέπει να διαχωρίζονται ανάλογα με τα χαρακτηριστικά και
τα ανακυκλούμενα υκλικά, συμμετέχοντας έτσι ουσιαστικά στην προστασία του
περιβάλλοντος.
56 www.midlandeurope.com
Page 57

Prodotto o importato da: CTE INTERNATIONAL srl
Via. R.Sevardi 7 42124 Reggio Emilia - Italia.
Prima dell’uso leggere attentamente le istruzioni.
Produced or imported by: CTE INTERNATIONAL srl
Via. R.Sevardi 7 42124 Reggio Emilia - Italy.
Read the instructions carefully before installation and use.
Vertrieb durch: ALAN ELECTRONICS GmbH
Daimlerstraße 1K - D-63303 Dreieich Deutschland.
Vor Benutzung Bedienungsanleitung beachten.
Importado por: ALAN COMMUNICATIONS, SA
C/Cobalt, 48 - 08940 Cornellà de Llobregat, Barcelona - España.
Antes de utilizar, lea atentamente el manual de uso.
www.midlandeurope.com 57
Page 58

www.midlandeurope.com
 Loading...