

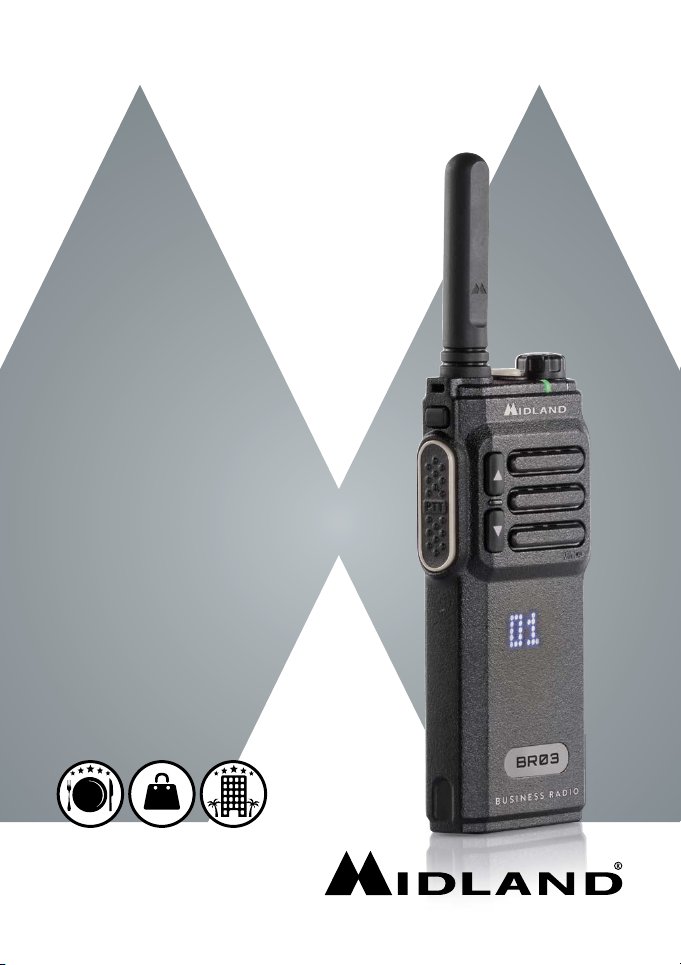
BR03
BUSINESS RADIO
Instruction guide
Suitable for:
Restaurants Fashion Stores Hospitality


Index
The package includes 3
Main features 3
Coverage/Range 4
Maintenance 4
Programming software (optional) 4
Main controls and parts of the radio 5
Operations 7
Power on/o and volume adjustment 7
Transmission 7
Monitor 7
Scan 8
Vox 8
Voice announcement 9
Squelch 9
Keypad Beep 10
Recharging the battery pack 10
Battery save 11
Adjusting the brightness of the hidden led display 11
Firmware version indication 11
Troubleshooting 12
Technical specifications 14
BR03 instruction guide | 1

2 | BR03 instruction guide

The package includes
• BR03 transceiver
• Swivelling belt clip
• Micro USB cable
• Rechargeable Li-Ion battery pack 3.7V 2300mAh
• Double desktop charger (to recharge tha radio+battery or the battery
only)
• Wall adaptor
Main features
• Compact radio with elegant design
• PMR446 transceiver
• Channels 99 (8+91 pre-programmed)
• Output power: 500mW
• Channel spacing: 12.5KHz
• Voice announcement on/o
• VOX function adjustable in 10 dierent levels
• Splashproof IPX2
• Scan function
• Keypad beep on/o
• Roger Beep
• Battery save
• Monitor
• Squelch adjustable in 10 dierent levels
• Customizable hidden led display with adjustable brightness
• Low battery voice indication
• Speaker/mike jack 2 Pin Kenwood
• 2300 mAh Li-Ion battery pack
• PC programmable
BR03 instruction guide | 3

Coverage/Range
The maximum range depends on terrain condition and is obtained during
use in an open space.
The only limitation to maximum possible range are environmental factors
such as blockage caused by trees,buildings, or other obstructions. Inside a
car or metallic constructions, the range can be reduced. Normally the coverage in the city, with buildings or other obstructions is about 1 or 2 Km.
In open space but with obstructions like trees, leaves or houses the maximum possible range is about 4-6 Km. In open space, without obstructions
and in sight, like for example in mountain, the coverage can be more than
12 Km.
Maintenance
Your BR03 was designed to fulfill any warranty obligations and to enjoy
this product for many years.
As for all the electronically devices, we recommend you to follow some
suggestions:
Do not attempt to open the unit. Non-expert handling of the unit may
damage it and/or void the warranty.
High temperatures can shorten the life of electronic devices, and warp or
melt certain plastics. Do not store the radio in dusty or dirty areas.
Keep the Radio dry. Rainwater or damp will corrode electronic circuits.
If it appears that the Radio diuses peculiar smell or smoke, please shut o
its power immediately and take o the charger or battery from the Radio.
Do not transmit without antenna.
Programming software (optional)
Thanks to Midland Programming software PRG-10 specifically made for
BR03, it is possible to increase the performance of your radio.
For further information, please consult the Programming software manual.
Any attempt to change frequencies or output power of the radio invalidates the approval.
4 | BR03 instruction guide

Main controls and parts of the radio
SP/MIC
PTT
SP/MIC
1
2
4
3
9
10
8
5
PTT
6
SP/MIC
11
12
7
13
1. Antenna
2. Side key2: The functions of this control can be customized through
the optional programming software PRG-10. Push it briefly to enter
the radio’s menu; while if you keep it pressed the scan feature will be
activated.
3. Power/Volume knob: turn clockwise to power on and increase the
volume level. Turn counter-clockwise to decrease the volume level
and power o.
BR03 instruction guide | 5

4. Led indicator:
red: transmission;
orange: transmission with CTCSS/DCS tones;
green: reception.
5. Speaker
6. Microphone
7. Customizable hidden display
8. UP/DOWN controls: Press briefly to go forwards/backwards of
1 channel; if you keep the button pressed you will skip 10 channels
forwards/backwards.
In scan mode, the UP/DOWN controls allow to change the scan di-
rection.
If you press UP or DOWN, the channel in use will be shown even
though the display is turned o.
9. Side key1: the functions of this control can be personalized through
the programming software PRG-10. Briefly press this button to activate the Monitor function; or keep it pressed to display the battery
status.
10. PTT: press to transmit, release to receive.
11. Speaker/mike jack 2 Pin Kenwood: allows the connection with exter-
nal accessories such as microphones, headsets, etc. When this jack is
not used, protect it with the proper rubber cap.
12. Micro USB port: the radio’s battery can also be recharged via USB.
Connect the USB cable supplied in the package into this port.
13. Li-Ion battery pack 3.7V 2300mAh
6 | BR03 instruction guide

Operations
Power on/o and volume adjustment
Rotate the Power/Volume knob clockwise to turn the radio on.
Rotate the control clockwise /counter-clockwise to adjust the volume level as you prefer.
Rotate the control counter-clockwise till hearing a mechanical “click”, to
turn the radio o.
Transmission
To communicate, all radios in your group must be set to the same channel.
Briefly press the Function key 1 to enable the Monitor feature that will
verify if the frequency is not busy, then press the PTT button.
Release the PTT key to receive.
Only one user at a time can talk during radio communications. Therefore, it is
important not to transmit when you are receiving a communication and use the
transmission mode sparingly to allow other users to talk.
Transmission consumes a significant amount of energy and should therefore be
used sparingly to prolong the battery life.
If you are unable to contact a station that you have no problems in receiving,
the station may be using CTCSS tones or DCS codes.
Monitor
The Monitor feature is for temporarily excluding (opening) the Squelch,
in order to listen to signals that are too weak to keep the Squelch permanently opened.
Briefly press the Function key 1 to enable such function.
BR03 instruction guide | 7

Scan
Keep pressed the Function key 2 for about 3 sec. to enable the SCAN
function: the radio will scan all channels starting from the channel in use.
The display of the radio will show a flowing arrow from left to right (scan
upwards); with the UP/DOWN controls it is possible to change the scan
direction (scan downwards).
Whenever a signal is detected, the scan will stop on a busy channel.
With the optional programming software PRG-10 you can choose 3 different scan modes.
The scan mode set by default is the one on the received carrier.
When the signal is no longer detected, the scan will automatically start
again after 7 seconds roughly.
Pressing the PTT will stop the scan and the radio will transmit on the channel in use.
To start the scana gain, press the Function key 2.
Vox
BR03 enables hands-free conversations through the VOX function: just
speak in the direction of the microphone and the communication will be
automatically activated.
The VOX sensitivity can be adjusted in 10 dierent levels (OFF,1,2,3…9)
through the programming software or the radio menu.
OFF means that the VOX is turned o, 1 is the lowest VOX sensitivity
level and 9 is the highest one.
To adjust the VOX to the desired level through the radio menu, follow
these steps:
• Briefly press the Function key 2.
• Press twice the Function key 1. The display will show the sensitivity level
with the indication “ ”. With the UP/DOWN keys set the desired
level from 0 to 9.
• Confirm by pushing PTT or wait for about 3 seconds.
8 | BR03 instruction guide

Voice announcement
BR03 comes with voice announcement: this feature informs you about
any operation/selection you are doing with the radio.
To activate/deactivate the voice annoucement follow these steps:
Press briefly the Function key 2.
Press the Function key 1 for three times. The display will show “ ” followed by “ ” (in case the voice announcement is enabled) or by “ ” if it
is deactivated.
With the UP/DOWN keys you can enable/disable this function. To confirm your selection press PTT or wait for about 3 seconds.
The voice announcement can also be enabled/disabled through the optional programming software.
Squelch
The Squelch function suppresses noises on free channels and allows to
receive even weak signals.
BR03 has 10 dierent Squelch levels: 0 means that the Squelch is permanently on; from level 1 to level 9 you will have dierent levels of noise
reduction.
By default, the Squelch level of BR03 is set on level 5.
The levels can be set through the optional programming software or
through the radio menu.
Make sure you do not set an excessively high squelch level because in this
case you may not be able to receive weaker signals. On the other hand
an excessively low Squelch value could enable the Squelch even when no
signals are present.
Squelch must always be adjusted when no signals are present.
The squelch has to be adjusted without received signals.
Procedure:
• Press briefly the Function key 2.
• Press once the the Function key 1. The display will show “ ”.
• Select the squelch level through the UP/DOWN keys; confirm with
the PTT control or wait for about 3 seconds.
BR03 instruction guide | 9

Keypad Beep
With this function, BR03 emits an audio beep everytime a button is pressed.
To activate/deactivate the keypad beep:
Press the Function key 2.
Push the Function key 1 for 5 times till the display will show
Enable or disable the keypad beep with the UP/DOWN keys.
= ON ; = OFF.
Confirm by pushing PTT or wait for 3 seconds.
and ).
Recharging the battery pack
BR03 is equipped for using a 3.7V 2300mAh Li-Ion rechargeable battery
pack.
It is possible to recharge the complete radio or the battery pack only.
Place the radio into the bigger slot of the desktop charger or the battery
pack into the smaller slot.
Connect the socket of the AC/DC wall adaptor to a mains power socket
and insert the jack of the wall adaptor into the desktop charger plug.
It takes 5-6 hours to fully recharge the radio.
For maximum battery life, we recommend charging the battery pack when
the BR03 is o and the battery pack is fully discharged.
! Using a dierent battery charger other than the one specified can cause
damage to your device or may even cause explosions and personal injuries.
It is also possible to recharge the battery pack by connecting the supplied
USB cable into the micro USB port on the radio.
In this case, the led indicator on the front side of the radio (control n. 4)
will turn red while charging, and will turn o when the battery pack is fully
charged.
If you turn on the radio and then connect the micro USB cable, the display
will show the battery level while the radio is being charged, exactly like in
the smartphones.
The Battery power saving feature enables a reduction in consumption of
up to 50%. If it has been set, it comes on automatically when the transceiver does not receive any signal for more than 7 seconds in order to save the
battery life. Power saving can be set only through Programming software.
10 | BR03 instruction guide

Battery save
The battery save allows a reduction of the battery consumption; this feature is enabled by default.
The battery save can be disabled and enabled again.
Enter the radio’s menu and follow these steps:
Briefly press the Function key 2.
Press the the Function key 1 4 times. The display will show “BAT” follo-
wed by “ ” (if the battery save is enabled) or by “ ” (disabled).
The battery save can also be activated/decativated through the programming software.
Adjusting the brightness of the hidden led display
Press briefly the Function key 2.
The display will show the current level of the brightness followed by the
icon .
Select the desired level (from 1 to 4) through the UP/DOWN keys and
confirm by pushing PTT or wait for about 3 seconds.
Firmware version indication
To show the firmware version of the radio follow this procedure:
Press the the Function key 2.
Premere the Function key 1 6 times.
The firmware version will appear on the display.
BR03 instruction guide | 11

Troubleshooting
Problem Possible Cause Solution
The radio doesn’t switch
on
The radio switches o
shortly after it has been
switched on
The battery pack does
not recharge
The radio switches on
but is unable to receive
signals
Noise is always present in
reception mode
It is not possible to
communicate with other
parties
The battery pack is discharged and/or has not
been installed correctly.
Discharged battery pack.
The battery has not been
connected or installed
correctly.
The site of installation is
too shielded.
The volume is too low Adjust the volume level.
Incorrect CTCSS or
DCS
The Monitor function is
enabled.
An incorrect radio channel has been selected.
The radio is installed in a
shielded area or is too far
from the party you are
communicating with
Incorrect CTCSS or
DCS
Verify that the battery
pack is charged and that
it has been correctly
installed.
Recharge the battery
pack.
Inspect the connections
of the battery-charger
and the installation of the
batteries.
Move to an another area.
Check that the CTCSS
tone or DCS code
corresponds to the one
set by the parties you are
communicating with.
Disable the Monitor
function.
Select the same radio
channel used by the
parties you are communicating with.
Move to another area.
Check that the CTCSS
tone or DCS code
corresponds to the one
set by the parties you are
communicating with.
12 | BR03 instruction guide

Reception is fragmented
and/or disturbed
Transmission is not
always possible
VOX causes the radio
to accidentally enable
transmission
The VOX feature
requires speaking in a
loud voice
The autonomy of the
battery pack is limited
Logic related faults
(unreadable displayed
symbols, functions
blocked, etc.)
The signal is very weak.
The transmission distance
is excessive and/or
there are obstacles in the
transmission path
Other parties are using
the same channel
The radio has been
installed too close to
equipment that causes
interference (televisions,
computers, etc.)
The channel is used by
an excessive number of
parties or the transmission has been barred due
to a busy channel.
The sensitivity and/or
environmental
noise is too high.
The sensitivity is too low.
Commission time is too
high.
Incorrect setting caused
by a problem with the
power supply.
Try temporarily to disable
the Squelch by means of
the Monitor feature.
Move closer to the party
you are communicating
with or to another area.
Check the trac on the
radio channel by means
of the Monitor feature
and select another channel if required.
Increase the distance
between the radio and
this equipment.
Select another channel.
Ask the radio link provider to disable the block
due to busy channel.
Reduce the VOX sensitivity.
If the environmental
noise is not high, increase
the sensitivity or use an
optional microphone.
Try reducing the
transmission time and/or
using a low power.
Recharge the battery
pack
BR03 instruction guide | 13

Technical specifications
General
Frequency band 446.00625- 446.09375 MHz (PMR446)
Channels 99 PMR446 (8+91 pre-programmed)
Operating temperature -20° / +55°
Voltage 3,7V
Operating mode Simplex
Dimensions 126mm×57mm×27mm (w/out antenna)
Weight 142g (Battery included)
Antenna impedance 50Ω
Duty cycle 5/5/90%
Transmitter
Frequency stability ±2.5PPM
Output power ≤500Mw ERP
Max frequency deviation ≤2,5KHz
Audio Distortion ≤3%
Adjacent channel power < 60 dB
Spurious emissions Within European legal terms
Occupied bandwidth Within European legal terms
Receiver
RF sensitivity <0.2UV@20 dB SINAD
Audio distortion ≤3%
Audio response 300Hz ÷ 3KHz
Category B
Adjacent channel selectivity Within European legal terms
Intermodulation rejection Within European legal terms
Spurious emissions Within European legal terms
Blocking Within European legal terms
Specifications are subject to change without notice.
14 | BR03 instruction guide

BR03 instruction guide | 15

Prodotto o importato da: CTE INTERNATIONAL s.r.l.
Via R. Sevardi 7- 42124 Reggio Emilia Italia
www.midlandreurope.com
L’uso di questo apparato può essere soggetto a restrizioni nazionali. In Italia l’uso di questo apparato è
soggetto ad una dichiarazione. Prima dell’uso leggere attentamente le istruzioni. Se il prodotto contiene
batterie: non gettare nel fuoco, non disperdere nell’ambiente dopo l’uso, usare gli appositi contenitori per
la raccolta.
Produced or imported by: CTE INTERNATIONAL s.r.l.
Via R. Sevardi 7 - 42124 Mancasale Reggio Emilia Italy
Imported by: ALAN - NEVADA UK
Unit 1 Fitzherbert Spur Farlington Portsmouth Hants.
P06 1TT - United Kingdom
www.nevada.co.uk
The use of this transceiver can be subject to national restrictions. Read the instructions carefully before
installation and use. If the product contains batteries: do not throw the battery into fire. To disperse after
use, throw into the appropriate containers.
Importado por: MIDLAND IBERIA, SA
C/Cobalt, 48 - 08940 Cornellà de Llobregat (Barcelona - España)
www.midland.es
El uso de este equipo puede estar sujeto a la obtención de la correspondiente autorización administrativa.
Lea atentamente las instrucciones antes de usar el equipo. si el producto contiene pilas o baterías no las
tire al fuego ni las disperse en el ambiente después de su uso, utilice los contenedores apropiados para su
reciclaje.
Vertrieb durch: ALAN ELECTRONICS GmbH
Daimlerstraße 1K - D-63303 Dreieich Deutschland
www.alan-electronics.de
Die Benutzung dieses Handfunkgerätes ist von den landesspezifischen Bestimmungen abhängig. Vor
Benutzung Bedienungsanleitung beachten. Bei Verwendung von Batterien beachten Sie bitte die
Umweltbestimmungen. Batterien niemals ins oene Feuer werfen, und nur in dafür vorgesehene Sammelbehälter entsorgen.
Importé par: ALAN FRANCE S.A.R.L.
5, Rue Ferrie, Zac les Portes du Vexin 95300 Ennery - France
www.alan-midland.fr
L’utilisation de cet appareil peut être sujet à des restrictions nationales. Avant l’utilisation, lire les
instructions. Si le produit contient des piles/piles rechargeables, ne les jeter pas dans le feu.
Après l’utilisation, ne jetez pas les batteries dans l’environment mais utilisez les conteneurs appropriés.
 Loading...