

Page 1
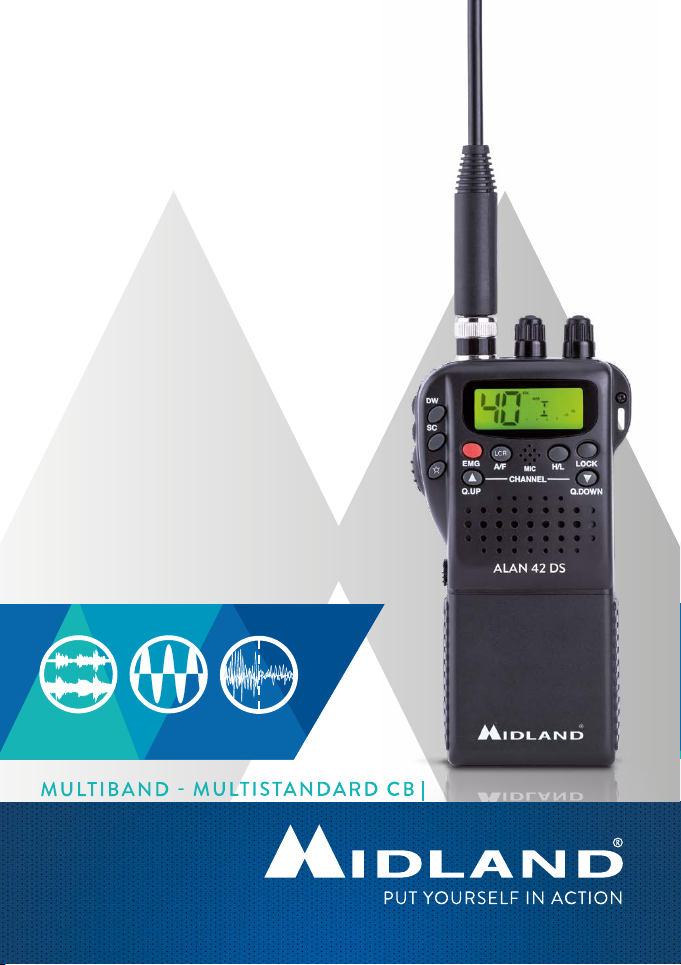
Alan 42 DS
> RICETRASMETTITORE CB PORTATILE
> HANDHELD CB TRANSCEIVER
> CB HANDFUNKGERÄT
> TRANSCEPTOR CB PORTATIL
> EMETTEUR-RÉCEPTEUR
CB PORTATIF
> RADIO CB
> STATIE RADIO CB
THE BEST CB AUDIO
DIGITAL
SQUELCH
NOISE
BLANKER
SYSTEM
ANL
FILTER
Page 2

ITALIANO
ENGLISH
DEUTSCH
ESPAÑOL
FRANÇAIS
POLSKI
Page 3

Contenuto
› 1 ricetrasmettitore CB portatile
› caricatore da muro per pacco batterie da 8 stili
› pacco vuoto per batterie alcaline da 6 stili tipo AA
› pacco batterie vuoto da 8 stili tipo AA per batterie ricaricabili con presa di ricarica
› adattatore per uso in auto con presa per antenna esterna
› custodia antigrao
› antenna
› attacco a cintura
› cinghia da polso
Manuale d’uso Alan 42 DS | 1
Page 4

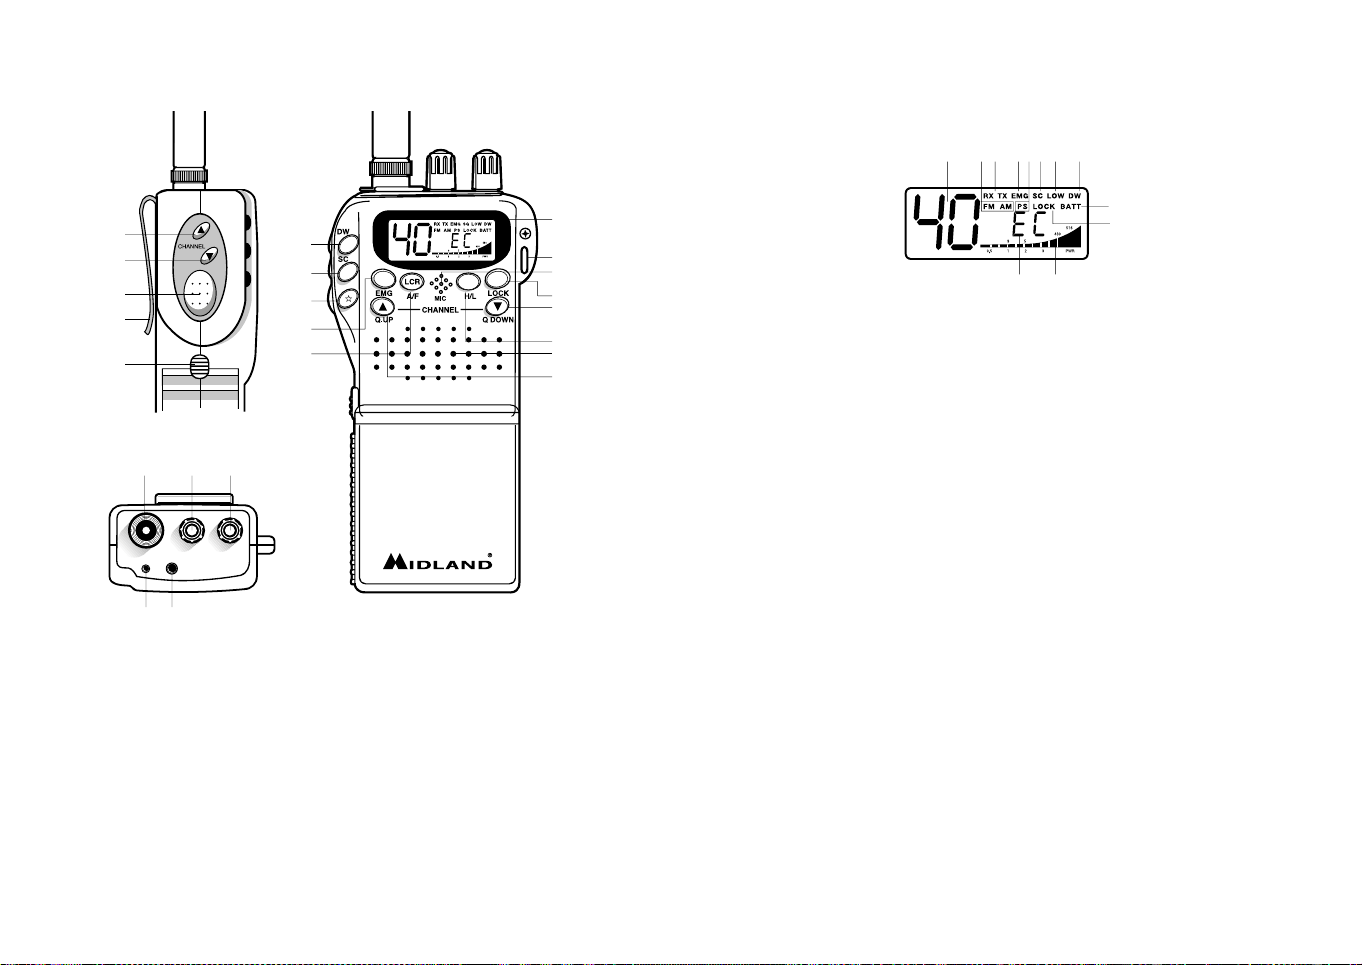
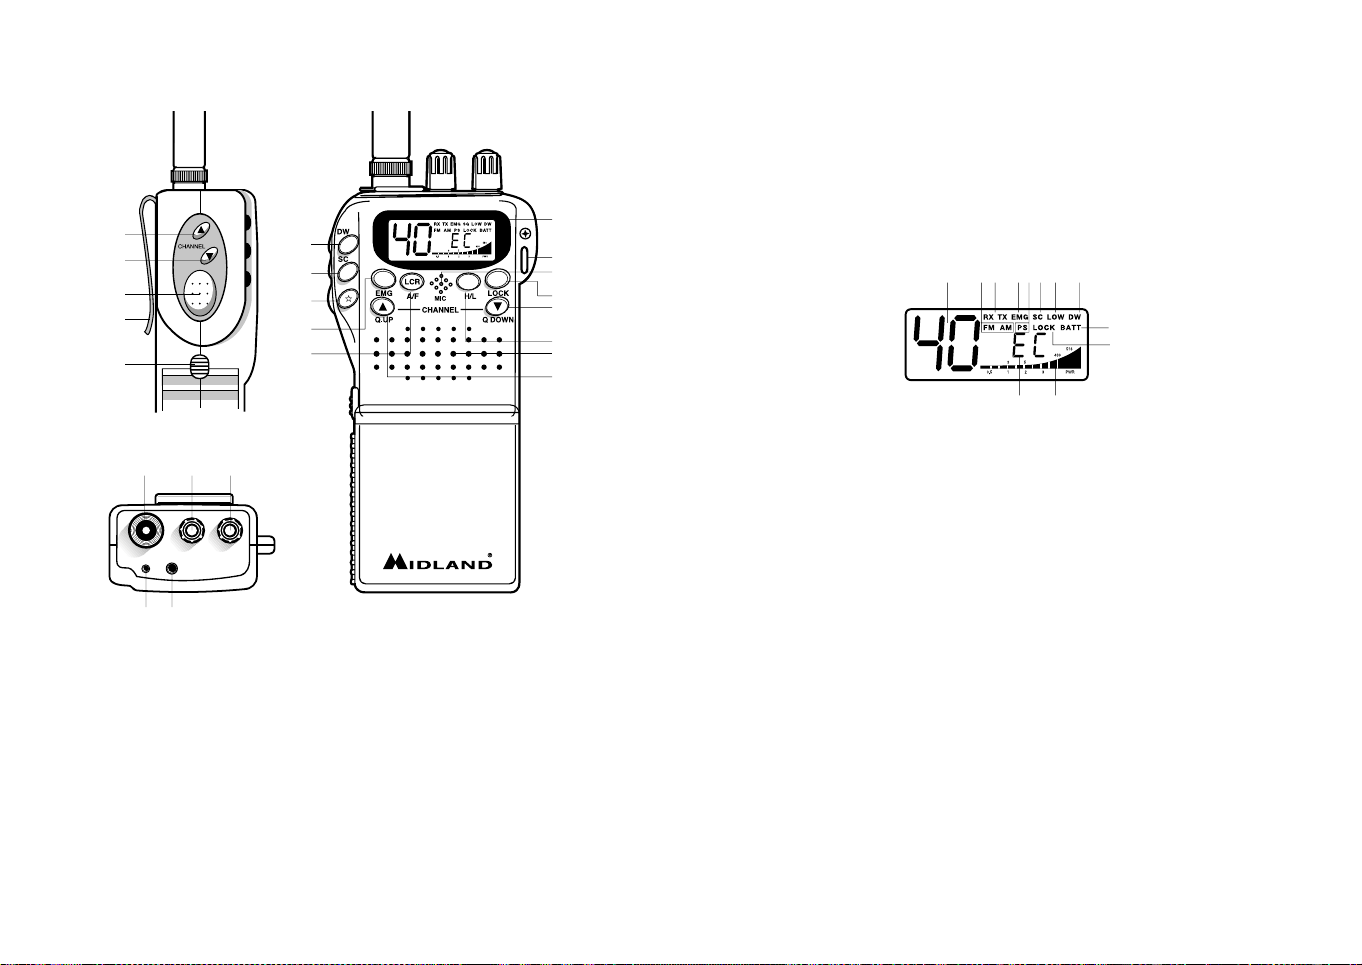
Descrizione comandi
4 5
1 2 3
4 5
MIC SPK
OFF/VOLDS/SQ
21
22
18
6
23
15
16
17
8
9
ALAN 42 DS
7
20
10
12
13
11
14
13
4. Presa microfono esterno: Collegare inserendo nell’ apposito spinotto il
microfono altoparlante (o vox) accessorio.
5. Presa altoparlante esterno: Collegare inserendo all’apposito spinotto il
microfono altoparlante (o vox) accessorio.
6. Attacco cintura
7. Display retroilluminato multifunzione
Il display a cristalli liquidi è stato espressamente progettato per indicare la
modalità operativa.
ab e k hf i g
d
c
jl
1 2 3
a. EMG: indicatore lampeggiante canale d’emergenza attivato
b. Numero canali selezionati (da 1 a 40)
c. LOCK: indicatore funzione blocco tastiera attivata
OFF/VOLDS/SQ
MIC SPK
d. BATT: indicatore batterie scariche
e. AM/FM: indicatore del modo di emissione e dell’attivazione del filtro N.B.
(in questo caso l’indicatore è lampeggiante)
f. SC: indicatore funzione SCAN attivata
g. DW: Dual Watch
h. P. S.: indicatore funzione SAVE attivata
i. LOW: indicatore di bassa potenza
j. Indicatore di intensità del segnale ricevuto e di potenza di segnale trasmes-
so.
k. RX/TX: indicatore ricezione (RX) e trasmissione (TX)
l. Banda di frequenza selezionata
1. Connettore antenna: A questa presa va inserita l’antenna in dotazione con
l’innesto a baionetta. Per estendere il raggio di copertura, si possono utilizzare
antenne esterne veicolari o più ecienti.
2. Manopola squelch: permette di eliminare i fastidiosi rumori in fase di ricezione
e di operare in modalità DS (Digital Squelch).
3. Manopola O-Volume
Posizione OFF: Apparato spento
Posizione Volume: Ruotando la manopola, regolare il volume al livello
desiderato.
Ruotando la manopola verso destra, il volume viene alzato, ruotando la stessa
manopola verso sinistra, il volume viene abbassato.
8. Pulsante EMG: canale d’emergenza. Premendo questo tasto l’apparato si
posizionerà automaticamente sul canale 9 canale d’emergenza. Sul display
lampeggerà EMG e non sarà possibile cambiare accidentalmente il canale. Per
disinserire questa funzione, premere di nuovo il tasto.
9. Pulsante A/F-LCR:per selezionare il modo di emissione (AM/FM). La relativa
scelta sarà visualizzata sul display. Se inoltre si seleziona una banda di frequenza
2 | Manuale d’uso Alan 42 DS Manuale d’uso Alan 42 DS | 3
Page 5
che opera solamente la modalità FM, il tasto “A/F-LCR” attiva la funzione LCR
(richiamo ultimo canale utilizzato).
10. Microfono: durante la trasmissione, parlare con un tono di voce normale verso
il microfono
11. Pulsante H/L: Selezione livello di potenza in trasmissione. All’accensione
l’apparato trasmette sempre con il livello più alto (“HIGH”) di potenza.
Premendo questo tasto l’apparato trasmetterà con potenza ridotta,
visualizzando nel contempo sul display la scritta “LOW”. Premere nuovamente
questo tasto per tornare in alta potenza. In alta potenza l’apparato eroga 4W, in
bassa potenza 1W
12. Pulsante LOCK: tramite questo tasto è possibile bloccare la tastiera evitando
accidentali pressioni dei tasti.
13. Pulsanti QUICK UP/DOWN: per spostarsi di dieci canali verso l’alto (UP) o
verso il basso (DOWN).
14. Altoparlante
15. Dual Watch: con questo tasto si ha la possibilità di rimanere sintonizzati
contemporaneamente su due canali a scelta dell’utente.
Con tale funzione si monitorizzerà ciclicamente un secondo canale. In presenza
di un segnale sul secondo canale, la conversazione sul canale prescelto si
interromperà e il ricevitore commuterà automaticamente sul secondo canale. Il
monitoraggio riprenderà dopo 4 secondi dal cessare del segnale.
Per attivare questa funzione, operare come segue:
- Selezionare il canale desiderato mediante il selettore canali
- Premere il tasto DW
- Selezionare il secondo canale
- Ripremere il tasto DW
- Per annullare la funzione premere il tasto DW o il PTT.
16. Pulsante SCAN e Noise Blanker
Tramite questo comando si potrà ricercare automaticamente un canale sul
quale ci sono comunicazioni (occupato). Operare come segue:
- Ruotare lo squelch in senso orario fino a quando non sparisce il rumore di
fondo in un canale libero; oppure ruotare totalmente la manopola in senso
antiorario per utilizzare il Digital Squelch.
- Premere il pulsante SCAN. Il ricetrasmettitore scansionerà automaticamente e ripetutamente tutti i canali fino a quando non troverà un canale in
uso.
- Quando trova il canale in uso si ferma e riparte alcuni secondi dopo la fine
della comunicazione sul canale.
- Mandando in trasmissione la radio, la funzione SCAN si disattiva.
- Tenendo premuto il tasto SCAN per 2 secondi si attiva la funzione N.B.; In
questo caso le icone AM /FM lampeggiano sul display.
17. Pulsante : Tasto illuminazione display (temporizzata) che consente di poter
operare anche in condizioni di oscurità. Questo tasto permette l’illuminazione
del display per 5 secondi.
18. Interruttore PTT: tasto di commutazione RX/TX. Premendolo si attiva il
trasmettitore, rilasciandolo viene attivato il ricevitore.
19. Vano batterie: l’apparato funziona con 6 batterie alcaline o 8 batterie Ni-Mh
ricaricabili.
19
ALAN 42 DS
24
20. Foro per cinghia da polso
21. Pulsante Channel UP: Permette di sintonizzarsi al canale successivo.
Mantenendo premuto questo tasto si ottiene la funzione di autorepeat.
22. Pulsante Channel DOWN: Permette di sintonizzarsi al canale precedente.
Mantenendo premuto questo tasto, si ha la funzione di autorepeat.
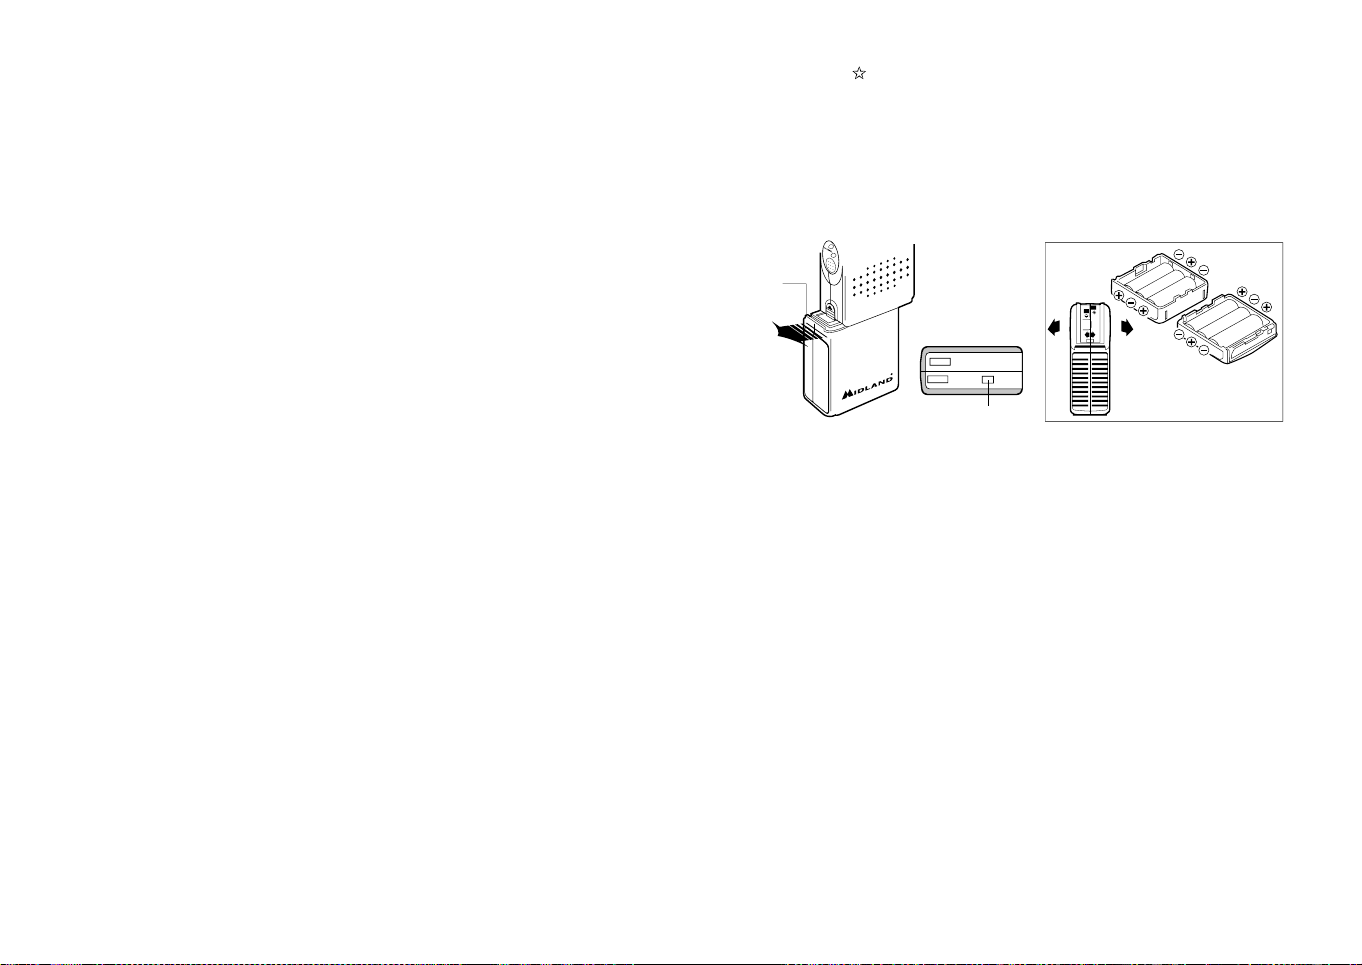
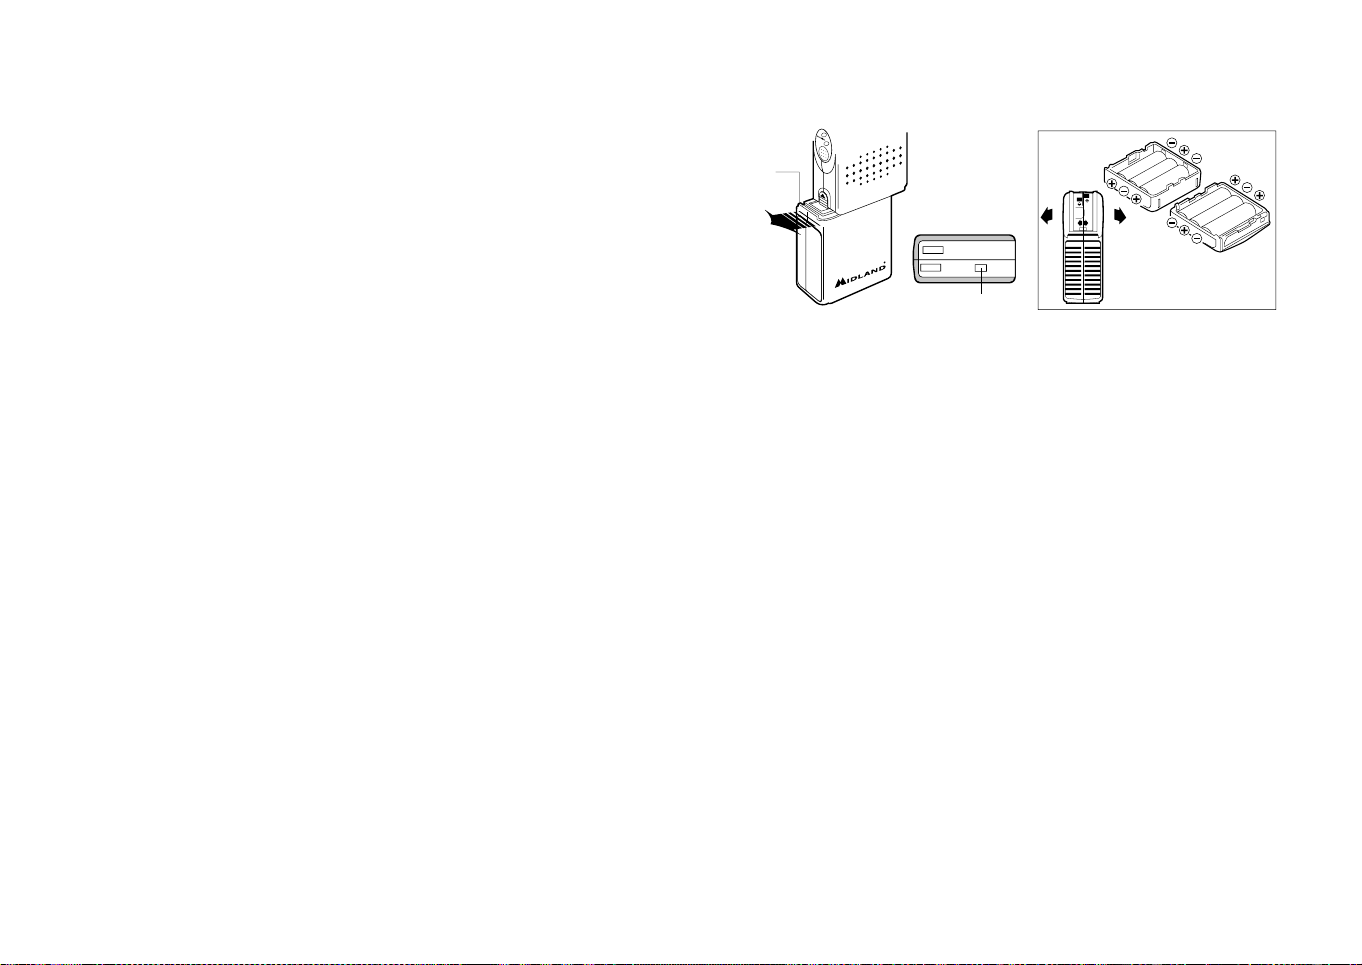
23. Aggancio pacco batterie: sollevare il pulsante e sfilare le batterie (vedi disegno).
24. Contatto antenna ausiliare: per il collegamento all’adattatore veicolare.
Fissaggio/rimozione del pacco batteria
Alan 42 DS funziona sia con batterie alcaline che con batterie ricaricabili NI-Mh.
Per questo motivo vengono forniti due tipi di pacco batterie: pacco batterie vuoto
con presa di ricarica per la carica di 8 stili ricaricabili tipo A A e pacco batterie per
l’uso di 6 stili A A alcaline.
Per rimuovere il pacco batteria vuoto occorre prima di tutto sollevare la leva
laterale; dopo di che sfilate il pacco batteria. Inserire le batterie.
Per fissare nuovamente il pacco batterie posizionatelo nell’apposita scanalatura
posta nella parte inferiore del ricetrasmettitore e fatelo scorrere finché non
udirete scattare un click.
4 | Manuale d’uso Alan 42 DS Manuale d’uso Alan 42 DS | 5
Page 6

Ricarica delle batterie
La ricarica delle batterie può avvenire solo utilizzando il pacco batterie per stili
ricaricabili.
Non cercate di ricaricare batterie alcaline o non ricaricabili; accertatevi che
nel pacco batterie dell’apparecchio, con il caricabatterie collegato, vi siano
esclusivamente batterie ricaricabili del tipo consigliato.
Inserite la spina del cavo di ricarica in una presa di alimentazione di rete CA e l’altra
estremità nella presa della radio.
Al termine della carica, scollegate la spina del cavo di ricarica dalla presa da
alimentazione di rete CA.
Per ottenere la capacità massima ricordiamo che normalmente è necessario, al
primo utilizzo della radio, ripetere due/tre volte il ciclo completo di scarica/carica
delle batterie.
Attenzione:
! L’adattatore da muro in dotazione utilizza il metodo di ricarica standard. La corren-
te di ricarica utilizzata è quindi circa il 10% della capacità. Quando le batterie sono
completamente cariche, il processo di carica non si blocca automaticamente.
! E’ consigliato non tenere l’apparecchio perennemente connesso al caricatore; se
non necessario, staccare il ricetrasmettitore dal caricabatteria non appena é trascorso il tempo necessario di ricarica.
! Il caricatore è stato progettato per caricare esclusivamente batterie ricaricabili
NiMh e non può essere utilizzato per caricare batterie Alcaline o altre batterie non
ricaricabili. Batterie non idonee potrebbero perdere liquido, esplodere, bruciare e
causare danni o lesioni personali!
! Per la ricarica, utilizzate il caricatore in dotazione. L’utilizzo di un caricabatterie
non originale può causare danni al vostro apparecchio o causare esplosioni e lesioni
personali.
! Smaltite le batterie esclusivamente seguendo le normative locali.
! La presa di rete deve rimanere prontamente utilizzabile.
Uso dell’apparato
1. Collegare l’antenna al ricetrasmettitore
2. Inserire le batterie nell’apposito vano, facendo attenzione alla giusta polarità.
3. Ruotare la manopola di accensione in senso orario, quindi regolare il volume per
un livello normale di ascolto.
4. Regolare lo squelch come descritto al punto 2.
5. Selezionare il canale desiderato mediante i tasti UP/DOWN (oppure QUICK
UP /QUICK DOWN)
Nota: se il canale non cambia, controllare che non sia stato premuto il tasto EMG o
LOCK. In tal caso premere di nuovo il tasto EMG o LOCK per disattivare la funzione
d’emergenza.
Per le altre funzioni fare riferimento alle istruzioni precedentemente descritte.
Per trasmettere: premere e mantenere premuto il tasto PTT situato sul lato sinistro
dell’apparato. Parlare verso il microfono con normale tono di voce .
Per ricevere: rilasciare semplicemente il tasto PTT.
ATTENZIONE: NON ESPORRE IL DISPLAY A TEMPERATURE TROPPO ALTE O
TROPPO BASSE.
6 | Manuale d’uso Alan 42 DS Manuale d’uso Alan 42 DS | 7
Page 7

Selezione bande di frequenza
La scelta delle bande di frequenza deve essere eseguita a seconda del paese nel
quale si intende operare.
Procedimento:
1. Spegnere la radio.
2. Accendere l’apparecchio premendo contemporaneamente i tasti A/F-LCR e
SC.
3. Tramite i tasti ▲ e ▼ posizionati sul lato sinistro della radio, selezionare la banda
di frequenza desiderata (vedi tabella bande).
4. Premere il tasto A/F-LCR per terminare la selezione.
1
NOTA
: Se si seleziona una banda di frequenza che opera solamente in modalità FM,
il tasto A/F-LCR attiva la funzione LCR (richiamo ultimo canale selezionato).
2
: nella banda di frequenza UK è possibile selezionare direttamente la banda I
NOTA
(Italia) premendo il tasto “AM/FM” per 2 secondi circa.
Tabella bande di frequenza
Sigla sul display Paese
I Italia 40 CH AM/FM 4Watt
I2 Italia 34 CH AM/FM 4Watt
D4 Germania 80 CH FM 4Watt / 40 CH AM 4 Watt
EU Europa 40 CH FM 4Watt / 40 CH AM 1 Watt
EC CEPT 40 CH FM 4Watt
E Spagna 40 CH AM/FM 4Watt
F Francia 40 CH FM 4Watt / 40 CH AM 1 Watt
PL Polonia 40 CH AM/FM 4W
UK Inghilterra 40 CH FM 4Watt frequenze inglesi +
ATTENZIONE:
Lo standard sicuramente riconosciuto in tutti i paesi europei è 40CH FM 4W
(EC) - Vedi tabella “Restrizioni all’uso”
I (Italia) 40 CH AM/FM 4Watt
Caratteristiche tecniche
Canali...................................................................................40 FM (vedi tabella bande)
Gamma di frequenza* ............................................................26.565 - 27.99125 MHz
Modulazione ............................................................................... F3E (FM), A3E (AM)
Impedenza antenna .............................................................................................50 ohm
Altoparlante .................................................................................................8 ohm 0.5W
Microfono ................................................................................................a condensatore
Alimentazione ................................................ min 7.2Vcc;max 13,8Vcc; nom 12,6Vcc
Dimensioni .............................................................................................30x70x140 mm
Peso ........................................................................................... 220 gr. (senza batterie)
RICEVITORE
Sensibilità 10dB S/N.........................................................0.5µV (AM), 0.25µV (FM)
Selettività ........................................................................................... maggiore di 60 dB
Gamma squelch ......................................................................................0.25V-500µV
Potenza d’uscita audio ................................................ 0.5W 8 ohm (10% distorsione)
Distorsione con un’ingresso di 1000µV....................................................................3%
Risposta in frequenza ............................................................................ 400-2400 Hz
Frequenze intermedie ............................................................................ I° 10.695 MHz
........................................................................................................................ II° 455 KHz
Reiezione alle risposte spurie ...........................................................maggiore di 60 dB
Corrente assorbita in standby ............100 mA quando é disinserita la funzione save
...................................................................... 45 mA quando é inserita la funzione save
TRASMETTITORE
Potenza d’uscita ..............................................................duty cycle 10% 4W AM/FM
Tolleranza di frequenza ...................................................................................... 0.005%
Soppressione emissioni armoniche ................................................. maggiore di 70 dB
Corrente assorbita .............................................................................................900 mA
Modulazione .........................................................................................AM 90% (± 5%)
................................................................................................................ FM dev. 2.0KHz
* (considerando tutte le bande di frequenza europee approvate)
Le specifiche sono soggette a modifiche senza preavviso.
ATTENZIONE: L’adattatore di alimentazione è il dispositivo di disconnessione dell’apparato; la
base di carica della corrente deve restare vicino all’apparato e facilmente accessibile.
8 | Manuale d’uso Alan 42 DS Manuale d’uso Alan 42 DS | 9
Page 8

Content
› 1 portable CB transceiver
› wall charger for 8 penlight battery pack
› empty pack for 6 penlight AA type alkaline batteries
› empty pack for 8 penlight AA type rechargeable batteries with charge jack
› car adapter with SO 239 external antenna jack
› scratch proof case
› antenna
› belt clip
› wrist band
Alan 42 DS instruction guide | 110 | Manuale d’uso Alan 42 DS
Page 9
Function and location of the controls
4 5
1 2 3
4 5
MIC SPK
OFF/VOLDS/SQ
21
22
18
6
23
15
16
17
8
9
ALAN 42 DS
1 2 3
MIC SPK
OFF/VOLDS/SQ
1. Antenna connector: insert into this plug the antenna supplied with the radio. It
is possible to use external vehicular antennas to obtain a better performance.
2. Squelch knob : it allows to eliminate the background noises in rx and to operate
in DS mode (Digital Squelch).
3. On/O Volume Control.
In ‘’o’’ position your transceiver is o. Turn this control clockwise to switch on
the unit. Turn the knob clockwise a little more to set the audio level, until you
get a comfortable reception.
4. MIC jack: connect by inserting the loudspeaker mike to the plug.
7
20
10
12
13
11
14
13
5. External loudspeaker jack: connect by inserting the loudspeaker mike to the
plug.
6. Belt clip
7 Multifunction backlighted display.
ab e k hf i g
d
c
jl
This liquid crystal display has been projected to show the operative modality:
a. EMG function activated
b. Channel selected number( from 1 up to 40)
c. Lock: keyboard lock function activated
d. BATT: Run-down batteries indicator
e. AM/FM: it shows the emission mode and the Noise Blanker activation (in
this case, the indication will blink)
f. SC: SCAN function activated
g. DW: DUAL WATCH function
h. P. S.: Save function activated
i. LOW function activated
j. The received signal strength and the power of the transmitting signal
k. RX/TX: TX=transmit mode; RX=receive mode
l. Frequency band selected
8. EMG button: emergency channel. By pressing this button, the unit
automatically skips to Channel 9 (emergency channel). The display will shows
EMG. It will not be possibile to change accidentally the channel. To cancel this
function, press the button again.
9. A/F–LCR button: to select AM mode or FM mode; the modulation you
choose will appear on the display. If you select a frequency band operating
in FM mode only, the A/F–LCR button will activate the LCR function (Last
Channel Recall).
10. Microphone: during transmission, speak with a normal tone of voice to the
microphone.
11. H/L button: it selects the output power level during trasmission.When the unit
2 | Alan 42 DS instruction guide Alan 42 DS instruction guide | 3
Page 10

is turned on, it always transmits with high power (4W). By pressing this button,
the unit will transmit with low power (1W). The display will show “LOW”. Press
again the H/L button to return to “HIGH” power level.
12. LOCK button: it allows you to lock the keyboard, thus avoiding accidental use
of the keys.
13. Q.UP - Q.DOWN buttons: to skip 10 channels up (Q.UP) or 10 channels
down (Q.DOWN).
14. Loudspeaker
15. Dual Watch: this function allows the synthonization on two dierent channels
at the same time. Thanks to this function, you can monitor a second channel.
When a signal on the second channel is received, the conversation on the first
channel is automatically interrupted and the receiver switches on the second
channel. The monitoring starts again 4 seconds after the signal end.
To activate this function, operate as follows:
- Select the desired channel through the channel selector
- Press the DW button
- Select the second channel
- Press the button DW again
- To cancel the function press again the DW button or the PTT button.
16. SCAN /Noise Blanker button: with this control, you can automatically seek for
a busy channel.
- Rotate the squelch clockwise until the background noise is no longer heard; or rotate the knob totally anti-clockwise to use the digital squelch.-
Press the ‘’SCAN’’ button: the transceiver will scan automatically all the
channels until a carrier is being received.
- When it finds the carrier, it stops and starts again some seconds after the
end of the communication on the channel.
- When the radio is transmitting, the scan function is deactivated.
- Keep pressed the SCAN button for 2 seconds to activate the Noise Blanker filter; “AM” or “FM” will blink on the display.
button: display lighting (temporized).This function allows to operate
17.
in darkness conditions. By pressing this button, the display is lighted for 5
seconds.
18. Push to talk button (PTT): Its pressure activates the transmission. When it is
released, the receiver is activated.
19. Battery compartment: insert 6 alkaline batteries or 8 rechargeable
Ni-Mh batteries.
20. Hole for wrist belt
21. Channel UP: to skip to the next channel. Keeping this button pressed, the
“autorepeat” function is obtained.
22. Channel DOWN: to skip to the previous channel. Keeping this button pressed,
the “autorepeat” function is obtained.
23. Battery pack contact: lift the button and take the batteries out (see drawing).
24. Auxiliary antenna contact: for the connection to the vehicular adaptor.
19
ALAN 42 DS
24
Installing/removing the battery case
Alan 42 DS works with both Alkaline and with Ni-Mh rechargeable batteries.
For this reason, 2 kinds of battery case are supplied: empty battery case for 8
penlight AA type rechargeable batteries with charge jack and an empty battery case
for 6 penlight AA type alkaline batteries.
To remove the battery case, lift the side trigger and slide the battery case o. Put
the batteries in.
To replace the battery case, slide it again onto the dual track system of the back side
of the transceiver.
4 | Alan 42 DS instruction guide Alan 42 DS instruction guide | 5
Page 11

Recharge of the batteries
The battery recharge can be possible only by using the NiMH rechargeable battery
case.
Do not try to charge alkaline batteries or non rechargeable batteries. Make sure that
when you charge the radio, only rechargeable NI-MH batteries should be contained
in the battery compartment!
Use a socket ready accessible for ac/dc adaptor; Connect the socket of the wall
adaptor to a mains power socket and insert the jack of the wall adaptor into the
charge jack of the battery case.
When charging is complete detach the socket of the wall adaptor from the mains.
To obtain the maximum performance and capacity, at the first use of the radio, it is
highly recommended to completely discharge/recharge the batteries 2 or 3 times.
Warnings
! The supplied wall charger is using “standard charging” method. This is a method,
where the charging current is about 10 % of the capacity. Using this method, chargers do not automatically disconnect charging when batteries are fully charged.
! You should avoid to keep the radio permanently connected to the wall charger,
when you do not need it.
! The charger is only designed for NiMH rechargeable batteries and cannot be used
for standard Alkaline or other not chargeable batteries. Trying to charge such kind
of batteries can be a risk. Such batteries may leak, explode or even burn and cause
damage or personal injuries!
! Please use only the supplied wall charger type and no other charger.
! Dispose of the batteries according to the procedures set out by local regulations.
! Mains plug used shall remain readily operable.
How to operate with your Alan 42 DS
1. Insert the antenna in the antenna connector.
2. Insert the batteries into the battery compartment, noting polarity.
3. Rotate the ON/OFF volume control clockwise to turn the unit on. Adjust the
volume for a normal listening level.
4. Adjust the SQUELCH control
5. Select the desired channel by the UP/DOWN or QUICK UP/QUICK/DOWN
buttons
Note: if the channel does not change,control that the EMG or LOCK button has not
been pressed. In this case, press the EMG or LOCK button to deactivate this function.
As far as the other functions are concerned, refer to previous instructions.
To transmit: press and hold the PTT button, then talk to the microphone.
To receive: simply release the PTT button.
CAUTION: DON’T EXPOSE THE DISPLAY TO EXTREME TEMPERATURES.
Frequency band selection
The frequency bands must be chosen according to the country where you are operating.
Procedure:
1. Switch o the unit.
2. Turn it on while pushing the “A/F-LCR” and “SC” buttons.
3. By pushing the ▲ and ▼ buttons at the left hand side of the radio, select the
desired frequency band (see the chart).
4. To fix your selection, press the “A/F-LCR” button.
1
: If you select a frequency band which operates in FM mode only, the “A/F-
NOTE
LCR” control activates the LCR function (Last Channel Recall).
2
: In the UK frequency band, you can select directly the I (Italy) band by pushing
NOTE
the “AM/FM” button for 2 seconds.
6 | Alan 42 DS instruction guide Alan 42 DS instruction guide | 7
Page 12

Frequency band chart
Displayed digits Country
I Italy 40 CH AM/FM 4Watt
I2 Italy 34 CH AM/FM 4Watt
D4 Germany 80 CH FM 4Watt / 40 CH AM 4 Watt
EU Europe 40 CH FM 4Watt / 40 CH AM 1 Watt
EC CEPT 40 CH FM 4Watt
E Spain 40 CH AM/FM 4Watt
F France 40 CH FM 4Watt / 40 CH AM 1 Watt
PL Poland 40 CH AM/FM 4Watt
UK England 40 CH FM 4Watt English frequencies
+ I (Italy) 40 CH AM/FM 4Watt
ATTENTION!
The frequency band allowed all over Europe is 40CH FM 4W (EC) – See the
“Restrictions on the use” table.
Technical specifications
Channels ...................................................... 40 FM (see the Frequency band chart)
Frequency Range* ................................................................26.565 - 27.99125 MHz
Operating mode ........................................................................ F3E (FM), A3E (AM).
Antenna impedance ........................................................................................50 Ohm.
Loudspeaker.............................................................................................. 8 Ohm 0.5W.
Microphone ............................................................................................ condenser type
Power supply..................................................min 7.2Vdc;max 13,8Vdc; nom 12,6Vdc
Dimensions ...........................................................................................30x70x140 mm.
Weight .................................................................................220 gr. (without batteries).
RECEIVER
Sensitivity at 10dB S/N ....................................................0.5µV (AM), 0.25µV (FM)
Selectivity ............................................................................................. more than 60dB
Squelch range ..........................................................................................0.25V-500µV
Audio output power ......................................................0.5W 8 ohm (10% distortion)
Distortion at 1000 µV ...............................................................................................3%
Audio frequency response .................................................................... 400-2400 Hz
Intermediate frequency..........................................................................I° 10.695 MHz
........................................................................................................................ II° 455 KHz
Spurious response ............................................................................... more than 60 dB
Current drain at stanby ........................................ 100 mA when the save mode is o
...................................................................................45 mA when the save mode is on
TRANSMITTER
RF Output Power ............................................................duty cycle 10% 4W AM/FM
Frequency Tolerance ......................................................................................... 0.005%
Harmonic Suppression ........................................................................more than 70 dB
Current Drain .....................................................................................................900 mA
Modulation ............................................................................................AM 90% (± 5%)
................................................................................................................ FM dev. 2.0KHz
* (covering all approved EU frequency bands)
Specifications are subject to change without notice.
WARNING: Direct plug-in ac/dc power supply must be used for disconnecting the transceiver
from the mains; the desktop charger must be positioned close to the unit and easily accessible.
8 | Alan 42 DS instruction guide Alan 42 DS instruction guide | 9
Page 13

Lieferumfang
› 1 CB Handfunkgerät
› Stecker-Ladegerät für 8 Mignonzellen
› Batterie/Akkuleerpack für 6 Alkalibatterien vom Typ AA
› Batterie-/Akkuleerpack für 8 aufladbare Mignonzellen vom Typ AA mit Netzan-
schluss
› Bordspannungsadapter mit Antennenanschluss SO 239 für den Mobilbetrieb
› Schutzhülle
› Antenne
› Gürtelclip
› Trageschlaufe
Alan 42 DS Bedienungsanleitung | 110 | Alan 42 DS instruction guide
Page 14

Beschreibung der Bedienelemente
4 5
1 2 3
4 5
MIC SPK
OFF/VOLDS/SQ
5. Externer Lautsprecheranschluss: An diese Buchse kann ein externer
Wiedergabelautsprecher angeschlossen werden.
6. Gürteltrageclip
7. Multifunktions-Display mit Hintergrundbeleuchtung
ab e k hf i g
21
22
18
6
23
15
16
17
8
9
ALAN 42 DS
20
10
12
13
11
14
13
1 2 3
7
MIC SPK
OFF/VOLDS/SQ
1. Antennenanschluss BNC
Zum Anschluss der mitgelieferten Flexantenne oder einer anderen geeigneten
CB-Funk Antenne an das Alan 42 DS.
2. Squelch Knopf
Ermöglicht, den Schwellwert der Rauschsperre einzustellen, oder die
automatische Rauschsperre (Digital Squelch) einzuschalten.
3. Ein-/Ausschalter, Lautstärkeregler OFF-VOL
Über diesen Drehregler wird das Gerät ein- und ausgeschaltet sowie die
Lautstärke eingestellt. Drehen im Uhrzeigersinn erhöht die Lautstärke.
4. Mikrofonbuchse: Hier können Sie ein externes Mikrofon mit Sendetaste (PTT)
oder VOX-Funktion anschließen.
d
c
jl
In dem Display werden die folgenden Informationen angezeigt:
a) EMG: Direktschaltung auf den Notruanal
b) Kanalanzeige (von 1 bis 40)
c) LOCK: Tastatursperre ist eingeschaltet
d) BATT: Batteriezustandsanzeige
e) AM/FM: Zeigt die Modulationsart und ob der Noise Blanker aktiviert ist
(in diesem Fall blinkt dieser Indikator)
f) SC: Kanalsuchlauf aktiviert
g) DW: Zweikanalüberwachung (Dual Watch)
h) P. S.: Energiesparmodus aktiviert
i) LOW: erscheint, wenn das Funkgerät auf niedrige Sendeleistung schaltet
j) Anzeige für relative Empfangs- und Sendeleistung
k) RX-/TX-Anzeige, TX=Sendebetrieb, RX=Empfangsbetrieb
l) Anzeige des gewählten Frequenzbandes.
8. Taste EMG: Auf Knopfdruck läßt sich der Notruanal 9 direkt einschalten. In
der Anzeige erscheint der Schriftzug EMG. Die manuelle Kanalumschaltung
ist gesperrt, solange die EMG-Funktion aktiv ist. Zum deaktivieren dieser
Funktion, drücken Sie erneut die Taste „EMG“.
9. Taste A/F–LCR: Auswahl der gewünschten Betriebsart (AM/FM). Die
eingestellte Betriebsart wird entsprechend im Display angezeigt. Wird ein
Frequenzband gewählt, das nur in der Betriebsart FM arbeitet, übernimmt die
Taste “A/F-LCR” statt der Betriebsartwahl die LCR-Funktion (Last Channel
Recall – Aufruf des zuletzt genutzten Kanals).
10. Mikrofon: Sprechen Sie beim Senden mit normaler Lautstärke in das Mikrofon.
11. Taste H/L: Mit diesem Schalter läßt sich die HF-Sendeleistung umschalten.
Im Display wird die aktuell eingestellte Sendeleistungsstufe angezeigt: High
(hohe Leistung, 4 W) oder Low (niedrige Leistung, 1 W).
12. Taste LOCK: Drücken dieser Taste sperrt alle Funktionstasten. Dadurch ist
2 | Alan 42 DS Bedienungsanleitung Alan 42 DS Bedienungsanleitung | 3
Page 15

eine versehentliche Betätigung von Tasten ausgeschlossen. Erneutes Drücken
der LOCK-Taste entriegelt die Tastatur.
13. Tasten QUICK UP/DOWN’: Die Taste QUICK UP schaltet 10 Kanäle höher,
während die Taste Quick DOWN 10 Kanäle tiefer schaltet.
14. Lautsprecher
15. Taste Dual Watch: Taste zum Aktivieren der Zweikanalüberwachung (DUAL
WATCH), die eine zeitgleiche Überwachung von zwei beliebigen Kanälen Ihrer
Wahl erlaubt.
Sobald auf einem dieser Kanäle ein Empfangssignal anliegt, das die eingestellte
Schwelle der Rauschsperre überschreitet, stoppt das Funkgerät auf diesem
Kanal und Sie hören das empfangende Signal. Fällt das Signal für längere Zeit
aus, schaltet das Funkgerät nach ca. 4 Sekunden wieder zwischen den beiden
eingestellten Kanälen hin und her. Einstellen der Zweikanalüberwachung:
- Schalten Sie das Funkgerät ein.
- Stellen Sie den Squelch Regler auf die gewünschte Ansprechschwelle.
- Mit dem Kanalwahltasten den ersten gewünschten Kanal einstellen.
- Taste „DW“ drücken.
- Mit dem Kanalwahltasten den zweiten Kanal einstellen
- Taste „DW“ erneut betätigen.
- Zum Ausschalten der Zweikanalüberwachung drücken Sie erneut die Taste
„DW“ oder betätigen Sie die Sendetaste (PTT).
16. Taste SC/Noise Blanker
Taste zum Aktivieren der Kanalsuchlauunktion “SCAN”. Durch Einschalten
des Suchlauetriebs lassen sich belegte Kanäle automatisch finden.
- Den Squelch-Knopf im Uhrzeigersinn drehen bis das Hintergrundrauschen verstummt. Oder den Knopf ganz gegen den Uhrzeigersinn drehen,
um den digitalen Squelch zu verwenden.
- Drücken Sie die Taste “SC”. Das CB-Funkgerät startet den Suchlauf.
- Der Suchlauf stoppt, sobald ein belegter Kanal gefunden ist.
- Im Sendemodus ist die Funktion „SCAN“ deaktiviert.
- Halten Sie die SCAN-Taste 2 Sekunden gedrückt, um den Noise BlankerFilter zu aktivieren. “AM” oder “FM” blinkt auf dem Display.
17. Taste ✩: Einmaliges Drücken dieser Taste schaltet die Hintergrundbeleuchtung
des Displays für ca. 5 Sekunden ein.
18. Sendetaste PTT: Durch Drücken der PTT-Taste wird der Sender des Alan 42
DS aktiviert.
19. Batterie-/Akkufach: Batterie-/Akkufach für 6 Alkali oder 8 Ni-Mh Akku.
20. Aufnahme für die Trageschlaufe
21. Taste Channel UP: Durch Drücken der Kanalwahltaste „CHANNEL
UP“ schalten Sie einen Kanal höher. Längeres Drücken aktiviert den
Schnelldurchlauf.
19
ALAN 42 DS
24
22. Taste Channel DOWN: Durch Drücken der Kanalwahltaste „CHANNEL
DOWN“ schalten Sie einen Kanal niedriger. Längeres Drücken aktiviert den
Schnelldurchlauf.
23. Batterie-/Akkufachentriegelung
Zur Entriegelung des Batterie-/Akkufachs den Knopf nach oben schieben.
24. Kontakt für Zusatzantenne: Antennenanschluss über Bordspannungsadapter
für den Mobilbetrieb.
Installation / Abringen und Entfernen des
Batteriekastens
Alan 42 DS arbeitet wahlweise mit Alkali-Batterien oder wiederaufladbaren NiMH
Akkus.
Aus diesem Grund werden den Geräten 2 verschiedene Leerbatteriekästen beigefügt:
› 1 Leer-Batteriekasten für 8 wiederaufladbare AA Akkuzellen (NiMH) mit Lade-
buchse
› 1 Leer Batteriekasten für 6 nicht-wiederaufladbare AA Alkali-Batteriezellen
(ohne Ladebuchse)
Zum Herausnehmen des Batteriekastens ziehen Sie an der seitlichen Rastung und
lassen den Batteriekasten aus der Halterung gleiten. Zum Einsetzen des Batteriekastens schieben Sie den Kasten seitlich in die Führung am Funkgerät, bis er einrastet.
4 | Alan 42 DS Bedienungsanleitung Alan 42 DS Bedienungsanleitung | 5
Page 16

Aufladen der Akkus
Batterieladen im Batteriekasten ist nur möglich, wenn Sie NiMH Akkus und den 8x
AA Batteriekasten benutzen.
Versuchen Sie niemals, herkömmliche Alkalibatterien oder andere nicht aufladbare
Batterien aufzuladen. Vergewissern Sie sich, dass sich nur wiederaufladbare NiMH
Akkus im Batteriekasten befinden, bevor Sie die Ladebuchse benutzen!
Stecken Sie den Steckerlader in eine 230 V Steckdose und den DC Stecker des
Steckerladegeräts in die Ladebuchse am Batteriekasten.
Nach erfolgter Batterieladung ziehen Sie bitte den Steckerlader auch aus der Netzsteckdose.
Sie erhalten bei fabrikneuen Akkus erst dann optimale Ladekapazität, nachdem Sie
die Akkus 2-3 mal aufgeladen und entladen (d.h. benutzt) haben. Während dieser
Zeit haben die meisten neuen Akkus noch nicht ihre volle Leistung.
Warnhinweise
! Der mitgelieferte Steckerlader arbeiten nach dem Prinzip der “Normalladung” mit
einem Ladestrom von etwa 10 % der Kapazität. Bei dieser Methode schalten die
Ladegeräte nicht automatisch ab, wenn die Batterien voll geladen sind. Gelegentliches Überladen schadet den Akkus bei dieser Methode nicht, jedoch sollten Sie
vermeiden, Akkus permanent am Ladegerät zu lassen, wenn Sie das Gerät nicht
brauchen!
! Trennen Sie möglichst nach ca. 14 Stunden die Ladeverbindung.
! Der mitgelieferte Steckerlader ist nur für NiMH Akkus und für keine andere Bat-
terie- oder Akkusorte geeignet. Sollten Sie versuchen, andere Batterien oder Akkus
aufzuladen, besteht ein Risiko, dass diese Batterien auslaufen, explodieren oder
sogar zu Brand, zu Beschädigungen oder zu Verletzungen führen können. Andere
als NiMH Akkus laden sie ggf. nur nach Herausnehmen aus dem Batteriekasten in
den Original-Ladegeräten der Akkuhersteller auf.
! Bitte benutzen Sie nur den mitgelieferten Steckerlader und keinen anderen!
! Entsorgen Sie gebrauchte Batterien und Akkus nur nach den örtlichen Vorschriften
(z.B. in die Sammelboxen der Supermärkte).
! Benutzen Sie Steckerlader nicht mehr, wenn Kabel, Gehäuse oder Stecker be-
schädigt sind!
Bedienung des Funkgerätes
1. Stecken Sie die mitgelieferte Flexantenne oder eine andere geeignete CBFunk-Antenne mit BNC-Anschluss auf die auf der Oberseite befindliche Antennenbuchse und arretieren Sie den BNC-Anschluss durch drehen im Uhrzeigersinn.
2. Legen Sie die Alkali oder NiMh-Zellen polaritätsrichtig in das Batterie-Akkufach ein.
3. Schalten Sie das Gerät ein und stellen Sie den gewünschten Lautstärkelevel ein.
4. Vergewissern Sie sich, dass die Rauschsperre (Squelch) geönet ist, d. h. der
Regler bis zum Anschlag gegen den Uhrzeigersinn gedreht ist.
5. Stellen Sie über die Taste UP/DOWN oder QUICK UP/QUICK DOWN den
gewünschten Funkkanal ein.
Hinweis: Sollte keine Kanalwahl möglich sein, prüfen Sie bitte, ob der Notruanal
(EMG) oder die LOCK-Funktion eingeschaltet ist. Sollte dies der Fall sein, drücken
Sie erneut die Tasten EMG oder LOCK um die Direktschaltung auf den Notruanal
zu deaktivieren.
Senden: Zum Senden drücken Sie die PTT-Taste auf der linken Seite des
Funkgerätes. Sprechen Sie aus in das Mikrofon. Ihr Funkgerät befindet sich solange
auf Sendung, bis Sie die PTT-Taste des Mikrofons wieder loslassen.
Empfangen: Sendetaste loslassen.
Achtung! Setzen Sie das Display niemals Feuchtigkeit oder extremen Temperaturen
aus, beispielsweise direkter Sonneneinstrahlung durch Ablegen des Gerätes auf der
Hutablage oder auf dem Armaturenbrett im Auto.
6 | Alan 42 DS Bedienungsanleitung Alan 42 DS Bedienungsanleitung | 7
Page 17

Auswahl der Frequenzbänder
Bei der Auswahl der Frequenzbänder sind die Vorschriften der Länder zu beachten,
in denen das Funkgerät betrieben wird.
Umschalten der Ländereinstellung:
1. Schalten Sie das Funkgerät aus.
2. Schalten Sie das Funkgerät wieder ein und halten Sie dabei gleichzeitig die Ta-
sten A/F-LCR und SC gedrückt.
3. Wählen Sie über die Tasten ▲ und ▼ auf der linken Seite des Gerätes das
gewünschte Frequenzband aus (siehe Frequenzbandtabelle)
4. Drücken Sie die Taste A/F-LCR zum Bestätigen der Auswahl.
1
NOTIZ
: Auf dem Frequenzband UK besteht die Möglichkeit das Frequenzband I
(Italien) direkt auszuwählen. Halten Sie dazu die Taste “AM/FM” ca. zwei Sekunden
gedrückt.
2
: Wird ein Frequenzband gewählt, das nur in der Betriebsart FM arbeitet, über-
NOTIZ
nimmt die Taste “AM/FM” statt der Betriebsartwahl die LCR-Funktion (Last Channel
Recall – Aufruf des zuletzt genutzten Kanals).
Frequenzbandtabelle
Anzeige im Display Land
I Italien 40 Kanäle, AM/FM, 4 Watt
I2 Italien 34 Kanäle, AM/FM, 4 Watt
D4 Deutschland 80 Kanäle FM, 4 Watt / 40 Kanäle AM, 4
EU Europa 40 Kanäle FM, 4 Watt / 40 Kanäle AM, 1 Watt
EC CEPT 40 Kanäle FM, 4 Watt
E Spanien, 40 Kanäle AM/FM, 4 Watt
F Frankreich 40 Kanäle FM, 4 Watt / 40 Kanäle AM, 1 Watt
PL Polen 40 CH AM/FM 4Watt
UK England 40 Kanäle FM 4 Watt Englische Frequenzen + I (Italien)
ACHTUNG:
In den meisten europäischen Ländern wird die Standardeinstellung 40 Kanäle FM, 4
W (EC) – akzeptiert. Einstellungen mit AM sind nur in bestimmten Ländern gestattet. Beachten Sie hierzu auch die “Nutzungshinweise” im Anhang.
Watt
40 Kanäle AM/FM 4 Watt
Technische Daten
ALLGEMEIN
Kanäle ................................................... 40 FM bzw. entspr. der Frequenzbandtabelle
Frequenzbereich* ...................................................................26.565 - 27.99125 MHz
Modulationsarten ....................................................................... F3E (FM), A3E (AM)
Antennenimpedanz............................................................................................50 Ohm
ext. Lautsprecher .................................................................................... 8 Ohm, 0,5 W
Mikrofon ...................................................................................... Elektret-Kondensator
Spannungsversorgung .........................................7,2 bis 13,8 V, je nach Batteriefach,
.............................................................................................sowie nominell 12,6V extern
Abmessungen ........................................................................................30x70x140 mm
Gewicht ................................................................................... 220 gr. (ohne Batterien)
EMPFÄNGER
Empfindlichkeit bei 10dB S/N .........................................0.5µV (AM), 0.25µV (FM)
Spiegelfrequenzunterdrückung ..........................................................besser als 60 dB
Squelchempfindlichkeit ..........................................................................0.25V-500µV
NF-Wiedergabeleistung an 8 Ohm ................................... 0.5W bei 10 % Klirrfaktor
Wiedergabeverzerrung bei 1000mV ......................................................................... 3%
NF-Bandbreite ...................................................................................... 400-2400 Hz
Zwischenfrequenzen ......................................................................... 1. ZF:10.695 MHz
..................................................................................................................2. ZF: 455 KHz
Nachbarkanaldämpfung .......................................................................besser als 60 dB
Ruhestromaufnahme ..............................................................100 mA, Normalbetrieb
...............................................................................................45 mA, Energiesparmodus
SENDER
Sendeleistung .....................................................4 Watt bzw. 1 Watt AM/ 4 Watt FM
Frequenztoleranz ............................................................................................... 0.005%
Geräuschspannungsabstand ................................................................ besser als 70 dB
Stromaufnahme .................................................................................................900 mA
Modulation .......................................................................Mod-Grad AM: 90% (± 5%)
............................................................................................................. Hub FM: 2.0 KHz
* (Abdeckung aller in der EU erlaubten Frequenzbänder)
WARNUNG: Um im Bedarfsfall die Funkanlage sicher vom Stromnetz trennen zu können,
ziehen Sie bitte - falls notwendig- den Stecker des Ladeadapters hinaus. Das Ladegerät muss
sich in der Nähe der Funkanlage befinden und jederzeit leicht zugänglich sein.
8 | Alan 42 DS Bedienungsanleitung Alan 42 DS Bedienungsanleitung | 9
Page 18

Contenido
› 1 transceptor CB portátil
› cargador de pared para portapilas 8 pilas
› portapilas para 6 pilas alcalinas tipo AA
› portapilas para 8 pilas tipo AA recargables con toma de recarga
› adaptador para el uso en coche con toma para antena externa SO 239
› funda protectora
› antena
› pinza cinturón
› correa de muñeca
Alan 42 DS Manual de Instrucciones | 110 | Alan 42 DS Bedienungsanleitung
Page 19
Funciones y sus controles
4 5
1 2 3
4 5
MIC SPK
OFF/VOLDS/SQ
6. Soporte cinturón.
7. Pantalla retroiluminada multifunción: Esta pantalla de cristal líquido permite
visualizar todos los parámetros operativos:
ab e k hf i g
21
22
18
6
23
15
16
17
8
9
ALAN 42 DS
20
10
12
13
11
14
13
1 2 3
7
MIC SPK
OFF/VOLDS/SQ
1. Conector de antena: con un conector del tipo BNC. Para mejorar sus
comunicaciones, utilice una antena telescópica (AT-38) o bien de ganancia
(CB-FLEX B).
2. Control Squelch (silenciador): para eliminar el ruido de fondo durante la
transmisión en rx y para operar en modo DS (Digital Squelch).
3. Control ON/OFF-Volume (encendido y volumen): En la posición OFF el
transceptor está apagado. Gire este control hacia la derecha para encender la
unidad. Gírelo todavía un poco más hacia la derecha para alcanzar el nivel de
audio deseado.
4. Toma Micrófono exterior: para conectar el micro-altavoz (o vox) opcional.
5. Toma altavoz exterior: para conectar el micro-altavoz (o vox) opcional.
d
c
jl
a. EMG: indicador intermitente de canal de emergencia activado
b. Número de canal seleccionado (de 1 a 40)
c. LOCK: función de bloqueo del teclado activada.
d. BATT: Indicador de batería descargada
e. AM/FM: muestra el modo de emisión y la activación del Supresor de Rui-
do (en este caso, la indicación parpadeará)
f. SC: indicador de función SCAN activada
g. DW: Dual Watch (doble escucha)
h. P. S.: indicador función ahorro activada
i. LOW: indicador de baja potencia activada
j. Indicador de intensidad de señal recibida y de potencia de la señal en
transmisión
k. RX / TX: TX = modo de transmisión; RX = modo de recepción
l. Banda de frecuencia seleccionada (vea tabla Bandas de Frecuencias)
8. Botón EMG: Canal de emergencia. Pulse este botón para posicionarse
automáticamente en el CH 9 (canal de emergencia). La pantalla muestra
EMG y no será posible cambiar accidentalmente de canal. Para inhabilitar esta
función, pulsar de nuevo EMG.
9. Botón A/F-LCR: Para seleccionar el tipo de modulación AM o FM. Si
selecciona una banda de frecuencia que sólo opera en FM, la tecla “A/F-LCR”
activa la función LCR (rellamada último canal utilizado).
10. Micrófono: Durante la transmisión, hable en un tono de voz normal.
11. Botón H/L: selecciona el nivel de salida de potencia durante la transmisión.
Al encenderse la unidad, ésta siempre transmite con potencia alta (4 W).
Pulsando este botón, la unidad transmitirá con potencia baja (1 W). La pantalla
mostrará LOW (baja). Pulse el botón H/L de nuevo para volver al nivel de
potencia alta (HIGH).
2 | Alan 42 DS Manual de Instrucciones Alan 42 DS Manual de Instrucciones | 3
Page 20
12. Botón LOCK (bloqueo): Permite bloquear el teclado y evitar el uso accidental
de las teclas.
13. Botones QUICK UP/DOWN: Para saltar diez canales hacia arriba “Q.UP” o
diez hacia abajo “Q.DOWN”. Manteniendo pulsado este botón, se consigue la
función de auto-repetición.
14. Altavoz
15. DUAL WATCH: habilita la función que permite monitorizar cíclicamente un
segundo canal. Con señal en el segundo canal, la conversación en el canal actual
se interrumpirá y el receptor conmutará automáticamente al segundo canal. La
monitorización reemprenderá 4 segundos después de finalizar la señal.
Para activar esta función, opere como sigue:
- Seleccione el canal deseado mediante el selector de canales
- Pulse la tecla DW
- Seleccione el segundo canal
- Pulse de nuevo DW
Para anular la función, pulse la tecla DW o el PTT.
16. Botón SCAN/Noise Blanker: Con este control puede buscar automáticamente
cualquier canal ocupado:
- Gire el Squelch (silenciador) en el sentido de las agujas del reloj hasta que
no se oiga el ruido de fondo; o gire el mando totalmente hacia la izquierda
para utilizar el Squelch digital.
- Pulse el botón SCAN: el transceptor efectuará el barrido automático de
todos los canales hasta que encuentre uno ocupado.
Cuando lo encuentra, para el barrido durante unos segundos o bien reem-
prende éste algunos segundos después de la finalización de la señal en el
canal.
- Pulsando el PTT se desactiva esta función.
- Mantenga presionado el botón SCAN durante 2 segundos para activar la
función Silenciador de Ruido; “AM” o “FM” parpadearán en la pantalla.
17. Botón ✩ (luz): Iluminación de la pantalla (temporizada a 5 segundos). Esta
función permite utilizar el equipo en ambientes oscuros.
18. Interruptor PTT (pulsar para hablar): Al pulsar este botón, se activa el
transmisor. Al soltarlo, se activa el receptor.
19. Compartimento de baterías: El equipo funciona con 6 pilas alcalinas o 8 NiMH
recargables.
20. Fijación para correa de mano.
21. Botón Channel UP: Sirve para pasar al siguiente canal. Manteniendo pulsado
este botón se consigue la función de auto-repetición.
22. Botón Channel DOWN: Sirve para pasar al canal precedente. Manteniendo
pulsado este botón se consigue la función de auto-repetición.
23. Fijador pack de baterías: eleve el pulsador y deslice la batería (vea el dibujo).
24. Contacto antena auxiliar: para la conexión del adaptador móvil.
19
ALAN 42 DS
24
Instalación/extracción de la batería
Alan 42 DS funciona tanto con pilas alcalinas como con baterías recargables Ni-
MH.
Por este motivo, se suministran dos tipos de packs: portapilas con toma de recarga
para 8 pilas recargables tipo AA y portapilas para 6 pilas AA alcalinas.
Para quitar el portapilas deberá primero deslizar la pestaña lateral y deslizar el portapilas hacia ese lado. Inserte las pilas (alcalinas o recargables).
Para fijar el portapilas, colóquelo en las guías inferiores del equipo y deslícelo hasta
que oiga un click.
Recarga de las baterías
La recarga de las baterías sólo se puede realizar utilizando el portapilas para pilas
recargables.
No intente recargar pilas alcalinas o no recargables; verifique que en el portapilas sólo hay pilas recargables NiMH y que todas sean de las mismas características
(capacidad).
Enchufe el cargador a la red e inserte el cable en la toma de recarga del equipo.
Al final de la carga, desconecte el cable del cargador del equipo.
Para obtener la máxima capacidad le recordamos que normalmente es necesario
repetir dos o tres veces un ciclo completo de carga/descarga de las baterías.
4 | Alan 42 DS Manual de Instrucciones Alan 42 DS Manual de Instrucciones | 5
Page 21

Atención:
! El cargador en dotación utiliza un método de recarga estándar. La corriente de re-
carga usada es de aproximadamente el 10% de la capacidad de las baterías. Cuando las baterías están completamente cargadas, el proceso de carga no se detiene
automáticamente.
! Aconsejamos no tener el equipo permanentemente conectado al cargador; si no es
necesario, desconecte el cargador una vez haya transcurrido el tiempo necesario
para la recarga.
! El cargador ha sido diseñado para cargar exclusivamente baterías recargables
NiMH y no puede usarse para cargar pilas alcalinas u otro tipo de baterías. ¡Baterías no adecuadas podrían perder líquidos corrosivos, explosionar, quemarse y
causar daños a las personas y a las cosas!
! Para la recarga utilice exclusivamente el cargador en dotación. El uso de un car-
gador no original puede causar daños al equipo o causar explosiones y lesiones
personales.
! No tire las baterías o pilas a la basura, deposítelas en los contenedores especiales
que podrá encontrar en los centros de reciclaje y en la mayoría de comercios de
electrónica.
! La toma de red debe ser fácilmente accesible.
Funcionamiento del transceptor
1. Inserte la antena en su conector correspondiente.
2. Inserte las pilas en el compartimento de baterías, comprobando la polaridad).
3. Gire el botón de encendido/volumen hacia la derecha para encender la unidad.
Ajuste el volumen para un nivel de escucha normal.
4. Ajuste el nivel de silenciador (SQUELCH) tal como se indicó en el apartado 2.
5. Seleccione el canal deseado mediante los botones “UP/DOWN” o “QUICK
UP/QUICK DOWN”.
Nota: Si el canal no cambia, verifique que el botón EMG o LOCK no han sido pulsados.
En este caso, pulse de nuevo el botón EMG o LOCK para desactivar la función.
Si desea usar el barrido, etc., consulte las instrucciones descritas anteriormente.
Para transmitir: pulse y mantenga pulsado el botón PTT y hable frente al micrófono.
Para recibir: simplemente libere el botón PTT.
Precaución: No exponga el DISPLAY a temperaturas extremas.
Selección bandas de frecuencia
La selección de las bandas de frecuencia debe efectuarse en función del país en el
que se va a utilizar el equipo.
Procedimiento:
1. Apague el equipo
2. Enciéndalo pulsando simultáneamente las teclas A/F-LCR y SC
3. Mediante las teclas ▲ y ▼, seleccione la banda de frecuencia deseada (“E” para
España -vea la tabla de bandas-).
4. Pulse la tecla A/F-LCR para finalizar la selección
1
NOTA
: en la banda de frecuencia UK se puede seleccionar directamente la banda I
(Italia) pulsando la tecla “AM/FM” durante 2 segundos
2
: si selecciona una banda de frecuencia que opera sólo en modo FM, la tecla
NOTA
“AM/FM” activa la función LCR (llamada del último canal seleccionado)
6 | Alan 42 DS Manual de Instrucciones Alan 42 DS Manual de Instrucciones | 7
Page 22

Tabla bandas de frecuencia
Siglas en el display País
I Italia 40 CH AM/FM 4W
I2 Italia 34 CH AM/FM 4W
D4 Alemania 80 CH FM 4W / 40 CH AM 4 W
EU Europa 40 CH FM 4W / 40 CH AM 1 W
EC CEPT 40 CH FM 4W
E España 40 CH AM/FM 4W
F Francia 40 CH FM 4W / 40 CH AM 1 W
PL Polonia 40 CH AM/FM 4W
UK Inglaterra 40 CH FM 4W frecuencias inglesas + I (Italia)
40 CH AM/FM 4W
ATENCIÓN:
El estándar reconocido en todos los países europeos es 40CH FM 4W (EC) - Vea
tabla de “Restricciones al uso”
Especificaciones tecnicas
GENERALES
Canales .......................................................40 FM (Vea Tabla Bandas de Frecuencia)
Rango de frecuencias ............................................................... 26.965 - 27.405 MHz
Modo de operación .................................................................... F3E (FM), A3E (AM)
Impedancia de la antena ....................................................................................50 Ohm
Altavoz ......................................................................................................8 Ohm, 0.5 W
Micrófono ............................................................................................Tipo condensador
Alimentación .......................................... min 7.2Vcc;max 13,8Vcc; Nominal 12,6Vcc
Tamaño ...............................................................................................30 x 70 x 140 mm
Peso ................................................................................................ 220 gr. (sin baterías)
RECEPTOR
Sensibilidad a 10 dB S/N ................................................0.5 µV (AM); 0.25 µV (FM)
Selectividad ......................................................................... mejor que 60 dB @ 5 KHz
Rango del silenciador ......................................................................... 0.25 V - 500 µV
Potencia salida de audio ....................................0.5 W a 8 Ohm (distorsión del 10%)
Distorsión con entrada 1000 µV ...............................................................................3%
Respuesta de frecuencia de audio ....................................................... 400-2400 Hz
Frecuencia intermedia ................................................................Primera: 10.695 MHz
............................................................................................................Segunda: 455 KHz
Radiación de espúreas ....................................................................... menor que 60 dB
Consumo en espera .............................................100 mA (modo SAVE desactivado)
........................................................................................45 mA (modo SAVE activado)
TRANSMISOR
Potencia de salida de RF ................................. ciclo de trabajo del 10% 4 W AM/FM
Tolerancia de la frecuencia ................................................................................ 0.005%
Supresión de armónicos ...................................................................... mejor que 70 dB
Consumo ............................................................................................................900 mA
Modulación ...........................................................................................AM 90% (± 5%)
....................................................................................................................... FM 2.0 KHz
Todas las especificaciones están sujetas a cambio sin previo aviso.
El cable de alimentación incorpora un dispositivo de fácil desconexión.
Dicho dispositivo desconecta los dos polos simultáneamente.
8 | Alan 42 DS Manual de Instrucciones Alan 42 DS Manual de Instrucciones | 9
Page 23

Contenue
› 1 émetteur-récepteur CB portatif
› chargeur mural pour jeu de 8 piles AA
› jeu vide pour piles alcalines de 6 piles type AA
› jeu vide de 8 piles type AA pour piles rechargeables avec prise de recharge
› adaptateur pour voiture avec prise pour antenne extérieure SO 239
› gaine anti-rayures
› antenne
› fixation à la ceinture
› bracelet
10 | Alan 42 DS Guide de utilisation Alan 42 DS Guide de utilisation | 1
Page 24
Fonction et emplacement des commandes
4 5
1 2 3
4 5
MIC SPK
OFF/VOLDS/SQ
21
22
18
6
23
15
16
17
8
9
ALAN 42 DS
7
20
10
12
13
11
14
13
à tourner ce bouton dans le sens des aiguilles d’une montre jusqu’à obtenir un
niveau sonore de réception optimal.
4. Prise MIC
Pour connecter le microphone, insérez la fiche de ce dernier dans cette prise.
5. Prise haut-parleur externe
Pour connecter un haut-parleur externe, insérez la fiche de ce dernier dans
cette prise.
6. Pince de ceinture
7. Acheur rétroéclairé multifonction
ab e k hf i g
d
c
jl
1 2 3
Cet acheur à cristaux liquides vous permet de contrôler le fonctionnement
de l’émetteur-récepteur à l’aide des indications suivantes :
OFF/VOLDS/SQ
MIC SPK
a. Fonction EMG activée
b. Numéro de canal sélectionné (1 à 40)
c. Lock : fonction de verrouillage du clavier activée
d. BATT : Indicateur du niveau de charge de la pile
e. AM/FM: Il montre le mode émission et l‘activation de brouilleur (dans ce
cas, l‘indicateur clignote).
f. SC : Fonction SCAN activée
g. DW: Fonction DUAL WATCH
1. Connecteur d’antenne
Introduisez dans cette fiche l’antenne livrée avec l’émetteur-récepteur. Pour
obtenir les meilleures performances, vous pouvez utiliser une antenne externe
montée sur le véhicule.
2. Commande Squelch
pour éliminer le bruit de fond en réception et pour activer la modalité DS (Digital Squelch).
3. Commande On/O (Marche/Arrêt) – Volume
Lorsque cette commande est en position « O » (Arrêt), votre émetteur-
récepteur est hors tension. Pour mettre votre CB sous tension, tournez ce
bouton de commande dans le sens des aiguilles d’une montre. Puis, continuez
h. P. S. : fonction « SAVE » (économie d’énergie) activée
i. Fonction LOW activée
j. Niveau de signal (réception) et puissance de sortie (émission)
k. RX/TX : TX = mode émission, RX = mode réception
l. Bande de fréquence selectionnée
8. Touche EMG (Canal d’urgence)
Lorsque vous appuyez sur cette touche, l’appareil passe automatiquement sur
le canal 19 (canal d’urgence). L’acheur indique alors « EMG » et l’émetteurrécepteur est protégé contre tout changement accidentel de canal. Pour
annuler le verrouillage du canal 19, appuyez à nouveau sur la touche EMG.
2 | Alan 42 DS Guide de utilisation Alan 42 DS Guide de utilisation | 3
Page 25

9. Bouton A/F–LCR
Ce bouton de commande permet de commuter entre les modes AM et FM. Si
vous sélectionnez une bande de fréquence opérant seulement en modulation
FM, la touche A/F–LCR active la fonction LCR (rappel du dernier canal
utilisé).
10. Microphone
En émission, parlez d’une voix normale.
11. Bouton H/L (Haut/Bas)
Ce bouton de commande permet de sélectionner le niveau de puissance de
sortie en émission. Lors de la mise sous tension de l’émetteur-récepteur, le
niveau de puissance de sortie est automatiquement à son maximum (4 W/1 W
FM). Si vous appuyez sur ce bouton, l’émetteur-récepteur émettra à puissance
réduite (1 W/0,2 W AM). L’acheur indiquera LOW (BAS). Pour revenir au
niveau d’émission HIGH (HAUT), Appuyez à nouveau sur le bouton H/L.
12. Bouton LOCK
Ce bouton permet de verrouiller le clavier afin d’éviter tout déréglage
intempestif par activation involontaire des commandes.
13. Touches Q.UP - Q.DOWN
Les touches permettent de vous déplacer de 10 canaux vers le haut (Q.UP) ou
de 10 canaux vers le bas (Q.DOWN).
14. Haut-parleur
15. Dual Watch (Double veille)
Cette fonction permet d’accorder l’émetteur-récepteur simultanément sur
deux canaux diérents. Ainsi, vous pouvez « surveiller » un deuxième canal.
Lorsqu’un signal est reçu sur le deuxième canal, la communication en cours sur
le premier canal est automatiquement interrompue et le récepteur commute
sur le deuxième canal. La surveillance reprend 4 secondes après la fin du signal.
Pour activer cette fonction, procédez de la façon suivante :
- Sélectionnez le canal souhaité à l’aide du sélecteur de canal
- Appuyez sur le bouton DW
- Sélectionnez le deuxième canal
- Pour annuler cette fonction, appuyez à nouveau sur le bouton DW ou sur
la touche PTT
16. Bouton SCAN/Noise Blanker
Cette fonction permet de rechercher automatiquement un canal « occupé ».
- Tournez le squelch dans le sens des aiguilles d’une montre jusqu’à ce que
le bruit de fond ne soit plus entendu; Ou tournez le bouton complètement dans le sens inverse des aiguilles d’une montre pour utiliser le squelch
numérique.
- Appuyez sur le bouton SCAN: l’émetteur-récepteur balaye automatiquement tous les canaux jusqu’à réception d’une porteuse.
- Lorsque l’émetteur-récepteur rencontre une porteuse le balayage est interrompu quelques secondes, puis il reprend après la fin de la communication sur ce canal.
- Lorsque l’émetteur-récepteur est en émission, la fonction de balayage est
désactivée.
- Maintenez enfoncée la touche SCAN pendant 2 secondes pour activer le
filtre anti-bruit; “AM” ou “FM” clignotent sur l’acheur.
17. Touche ✩
Cette touche commande l’éclairage temporisé de l’acheur et permet
d’utiliser l’émetteur-récepteur dans des conditions d’éclairage diciles
(lumière insusante). Lorsque vous appuyez sur cette touche, l’acheur est
éclairé pendant 5 secondes.
18. Touche Push to talk (PTT)
Cette touche permet d’activer ou de désactiver l’émetteur. Pour activer
l’émetteur, appuyez sur cette touche et maintenez-la enfoncée. Pour
désactiver l’émetteur, relâchez cette touche.
19. Compartiment des piles
Cet émetteur-récepteur fonctionne avec 6 piles alcalines/8 accumulateurs
NiMh.
19
ALAN 42 DS
24
20. Orifice pour sangle de poignet
21. Bouton Channel UP
Ce bouton de commande permet de passer au canal suivant. Pour obtenir un
défilement automatique des canaux, laissez ce bouton enfoncé.
22. Bouton Channel DOWN
Ce bouton de commande permet de passer au canal précédent. Pour obtenir
un défilement automatique des canaux, laissez ce bouton enfoncé.
23. Bouton de contact des piles
Pour retirer les piles de leur logement, soulevez ce bouton (voir illustration).
24. Contact pour antenne auxiliaire
Ce contact permet le raccordement à un adaptateur pour véhicule.
4 | Alan 42 DS Guide de utilisation Alan 42 DS Guide de utilisation | 5
Page 26

Installation/retrait du boîtier à piles
Le modèle Alan 42 fonctionne avec des piles rechargeables Alcalines et Ni-Mh.
Pour cette raison, 2 modèles de boîtiers à piles sont fournis : Un boîtier à piles pour
8 mini-piles rechargeables de type AA avec connecteur de charge et un boîtier à
piles pour 6 mini-piles rechargeables alcalines de type AA.
Pour retirer le boîtier à piles, levez le déclic droit puis sortez le boîtier à piles. Insérez
les piles.
Pour replacer le boîtier à piles, faites-le glisser dans les deux rails situés sur le panneau latéral de l’émetteur-récepteur.
Mise en charge des piles
Il est seulement possible de recharger les piles via le boîtier à piles rechargeables
NiMH.
Ne tentez pas de charger des piles alcalines et non rechargeables. Assurez-vous de
seulement insérer des piles rechargeables de type NI-MH lors de la mise en charge
de la radio !
Utilisez une prise de courant disponible ; raccordez une extrémité de l’adaptateur de
courant CA/CC à une prise de courant murale puis raccordez l’autre extrémité de
l’adaptateur au connecteur de charge du boîtier à piles.
Une fois la charge terminée, débranchez l’adaptateur de la prise de courant murale.
Pour des performances et une capacité optimales, rechargez puis déchargez entièrement la batterie à deux/trois reprises lors e la première utilisation de la radio.
Avertissements
! L’adaptateur de courant fourni emploie une méthode de « charge standard ». Avec
cette méthode, le courant de charge représente 10 % de la capacité. En utilisant
cette méthode, la charge n’est pas automatiquement désactivée lorsque la batterie
est pleine.
! Evitez de laisser la radio raccordée en permanence à l’adaptateur de courant mural,
notamment lorsque vous ne l’utilisez pas.
! Le chargeur est seulement conçu pour charger des piles rechargeables de type
NiMH et ne peut être utilisé avec des piles standards Alcalines ou autres types de
piles non rechargeables. Essayer de charger de tels types de piles peut créer des
risques. Ces piles peuvent fuire, exploser, brûler, causer des dommages ou blessures
corporelles!
! Utilisez seulement l’adaptateur de courant mural fourni.
! Mettez au rebut les piles conformément aux lois en vigueur dans votre région.
! La prise de courant murale utilisée doit rester facilement accessible.
Comment utiliser votre émetteur-récepteur
1. Introduisez l’antenne dans le connecteur d’antenne.
2. Insérez les piles dans le compartiment prévu à cet eet, en veillant à respecter la
polarité.
3. Tournez le bouton ON/OFF (Marche/Arrêt) - Volume dans le sens des aiguilles
d’une montre pour mettre l’émetteur-récepteur sous tension. Réglez le volume
sonore à un niveau d’écoute confortable.
4. Ajustez la commande de Squelch.
5. Sélectionnez le canal souhaité à l’aide des commandes UP/DOWN et Q.UP/Q.
DOWN.
Remarque: si vous ne parvenez pas à changer de canal, vérifiez que les boutons EMG et
LOCK ne sont pas enfoncés. Si l’un de ces boutons est enfoncé, appuyez dessus afin de
désactiver la fonction correspondante.
Pour toute information sur les autres fonctions, reportez-vous aux instructions
précédentes.
Pour émettre: maintenez la touche PTT enfoncée et parlez dans le microphone.
Pour recevoir: relâchez simplement la touche PTT.
Attention : n’exposez pas l’acheur à des températures extrêmes
6 | Alan 42 DS Guide de utilisation Alan 42 DS Guide de utilisation | 7
Page 27

Selection des bandes de frequence
Les bandes de fréquence doivent être choisies selon le pays ou vous voulez opérer.
1. Eteignez l’appareil.
2. Allumez la radio et appuyez en même temps les touches A/F-LCR et SC.
3. Avec les touches ▲ et ▼, sélectionnez la bande de fréquence désirée (voir le
tableau des fréquences).
4. Appuyez sur la touche A/F-LCR pour terminer la sélection.
1
NOTE
: dans la bande de fréquence UK, c’est possible de sélectionner directement la
bande I (Italie) en appuyant la touche “AM/FM” pour 2 secondes environ.
2
:Quand vous sélectionnez une bande de fréquence seulement en modalité FM,
NOTE
la touche “AM/FM” active la fonction LCR (rappeler le dernier canal utilisè).
TABLEAU DES BANDES DE FREQUENCE
Sigle sur le display Pays
I Italie 40 CH AM/FM 4Watt
I2 Italie 34 CH AM/FM 4Watt
D4 Allemagne 80 CH FM 4Watt / 40 CH AM 4 Watt
EU Europe 40 CH FM 4Watt / 40 CH AM 1 Watt
EC CEPT 40 CH FM 4Watt
E Espagne 40 CH AM/FM 4Watt
F France 40 CH FM 4Watt / 40 CH AM 1 Watt
PL Pologne 40 CH AM/FM 4Watt
UK Angleterre 40 CH FM 4Watt fréquences anglais
ATTENTION!
La bande de fréquence reconnue sûrement dans tous les pays européens est
40CH FM 4W (EC) - voir le tableau pour les restrictions à l’usage.
+ I (Italie) 40 CH AM/FM 4Watt
Caracteristiques techniques
Nombre de canaux ......................................................... 40 FM (voir tableau bandes)
Gamme de fréquence* ..........................................................26.565 - 27.99125 MHz
Mode de fonctionnement ......................................................... F3E (FM), A3E (AM)
Impédance de l’antenne ....................................................................................50 ohms
Haut-parleur ...........................................................................................8 ohms, 0,5 W
Microphone .............................................................................. Modèle à condensateur
Alimentation .................................................... min 7.2V;max 13,8V; 12,6Vdc nominal
Dimensions ........................................................................................30 x 70 x 140 mm
Poids .............................................................................................220 gr. (sans les piles)
RÉCEPTEUR
Sensibilité à 10 dB S/B ................................................... 0,5 µV (AM), 0,25 µV ‘FM)
Sélectivité ........................................................................................ Supérieure à 60 dB
Plage de suppression du bruit de fond .............................................0,25 V - 500 µV
Puissance de sortie audio ..........................................0,5 W 8 ohms (distorsion 10 %)
Distorsion à 1000 µV.................................................................................................3 %
Bande passante audio .......................................................................... 400 - 2400 Hz
Fréquence intermédiaire ..........................................................................I 10,695 MHz
...........................................................................................................................II 455 kHz
Suppression des parasites .............................................................. Supérieure à 60 dB
Consommation électrique en veille ...............100 mA lorsque le mode économique
.......................................................................................................................est désactivé
.............................................................45 mA lorsque le mode économique est activé
EMETTEUR
Puissance de sortie ............................................................. cycles à 10% 4 W AM/FM
Tolérance en fréquence .................................................................................... 0,005 %
Suppression des harmoniques ........................................................Supérieure à 70 dB
Consommation électrique ................................................................................900 mA
Modulation ..........................................................................................AM 90 % (± 5 %)
................................................................................................................FM dev. 2,0 kHz
* (conformément à toutes les bandes de fréquence européennes approuvées)
Toutes ces caractéristiques peuvent être modifié sans préavis.
AVERTISSEMENT: Plug-in Direct alimentation AC / cc doit être utilisé pour déconnecter
l’émetteur-récepteur du réseau; le chargeur de bureau doit être positionné près de l’appareil
et facilement accessible.
8 | Alan 42 DS Guide de utilisation Alan 42 DS Guide de utilisation | 9
Page 28

Zawartość
› 1 przenośne radio CB
› ładowarka ścienna do pojemnika na 8 akumulatorów
› pusty pojemnik na 6 baterii alkalicznych typ AA
› pusty pojemnik z gniazdem ładowania na 8 akumulatorów typ AA
› adaptor samochodowy z gniazdem antenowym SO239
› pokrowiec
› antena
› klips do paska
› pasek na nadgarstek
Alan 42 DS Instrukcja obsługi | 110 | Alan 42 DS Guide de utilisation
Page 29

Funkcje i rozmieszczenie elementow sterowania
4 5
1 2 3
4 5
MIC SPK
OFF/VOLDS/SQ
21
22
18
6
23
15
16
17
8
9
ALAN 42 DS
1 2 3
MIC SPK
OFF/VOLDS/SQ
1. Gniazdo antenowe: Sluzy do podlaczenia anteny bedacej na wyposazeniu
radiotelefonu. Istnieje mozliwosc korzystania z zewnetrznej anteny
samochodowej, znacznie poprawiajacej zasieg, opisana w dalszej czesci
instrukcji.
2. Blokada szumów SQUELCH: pokrętło reguluje poziom blokady szumów i
uruchamia automatyczną blokadę cyfrową DS.
3. Pokretlo On/O Volume:
Wlacza/wylacza radiotelefon i reguluje sile glosu.
4. Gniazdo mikrofonowe: sluzy do podlaczenia dodatkowego mikrofonu
5. Gniazdo glosnika: umozliwia podlaczenie zewnetrznego glosnika.
6. Zaczep do paska
7
20
10
12
13
11
14
13
7 Wielofunkcyjny wyswietlacz.
ab e k hf i g
d
c
jl
Cieklokrystaliczny wyswietlacz pokazuje nastepujace informacje o stanie i
funnkcjonowaniu radiotelefonu:
a. EMG uzywany kanal ratunkowy
b. numer wybranego kanalu (od 1 do 40)
c. LOCK: aktywna blokada klawiatury
d. BATT: Wyczerpane baterie
e. AM/FM: pokazuje rodzaj emisji i aktywację filtra zaklóceń Noise Blanker
(jeżeli jest włączony symbol rodzaju emisji miga)
f. SC: wlaczona funkcja skanowania
g. DW: wlaczony rownoczesny nasluch dwoch kanalow
h. P. S.: akktywna funkcja oszczedzania pradu
i. LOW: mala moc nadawania
j. moc sygnalu odbieranego i emitowanego
k. RX/TX: TX=nadawanie; RX=odbior
l. wybrany standard czestotliwosci
8. Przycisk EMG: przelacza radiotelefon na kanal 9, uznawany powszechnie za
ratunkowy. Na wyswietlaczu pojawia sie symbol “EMG”.Zmiana kanalow nie
bedzie mozliwa. Ponowne wcisniecie wylacza funkcje EMG.
9. Przycisk A/F–LCR: sluzy do wyboru rodzaju emisji (modulacji) AM lub FM. Na
wyswietlaczu pojawia sie stosowna informacja. Jezeli radio pracuje w standardzie
“tylko FM” przycisk aktywuje funkcje LCR - przywolanie ostanio uzywanego
kanalu.
10. Mikrofon
11. Przycisk H/L: sluzy do wyboru mocy nadawania. Po kazdorazowym wlaczeniu
radio ustawia sie zawsze w pozycji H czyli duzej mocy nadawania wynoszacej
4 W. Naciskajac przycisk obnizamy skokowo moc nadawania do 1 W, co
sygnalizowane jest na wyswietlaczu komunikatem LOW. Kolejne wcisniecie
zmienia moc na duza.
12. Przycisk LOCK: Aktywuje blokade przyciskow.
2 | Alan 42 DS Instrukcja obsługi Alan 42 DS Instrukcja obsługi | 3
Page 30

13. Przyciski Q.UP - Q.DOWN: szybkie przelacznie kanalow co 10 w gore (Q.UP)
lub w dol (Q.DOWN).
14. Glosnik
15. Dual Watch (podwojny nasluch): funkcja DW pozwala na rownoczesny nasluch
dwoch kanalow. Radio przechodzi na odbior jesli na jednym z nich pojawi sie
sygnal i wraca do monitorowania po 4sek. gdy transmisja ustaje.
Fnkcje DW uruchamia sie w sposob nastepujacy:
- Wybierz kanal uzywajac przyciskow przelaczania.
- Wcisnij przycisk “DW”:
- Wybierz nastepny kanal, ktory chcesz monitorowac;
- Wcisnij ponownie “DW”:
- Kolejne nacisniecie “DW” lub przycisku nadawania PTT wylacza te funkcje.
16. Przycisk SCAN/Noise Blanker: steruje funkcja skanowanie czyli szybkiego
przeszukiwania kanlow:
- Obracaj pokrętłem blokady w prawo, aż szumy tła przestaną być słyszalne
lub obróć do skrajnej pozycji w lewo, aby włączyć automatyczną, cyfrową
blokadę.
- Nacisnij przycisk “SCAN”: “SCAN” pojawi sie na wyswietlaczu i radio
bedzie szybko zmieniac kanaly do czasu odnalezienia fali nosnej o poziomie
wyzszym od szumu.
- Przeszukiwanie zostaje wznowione w kilka sekund po ustaniu odbioru
transmisji
- Podczas nadawania funkcja jest nieaktywna
- Wciśnij i przytrymaj przez 2 sek. przycisk SCAN, aby włączyć filtr zakłóceń
Nose Blanker. “AM lub “FM” będzie migac na wyświetlaczu.
17. Przycisk podswietlania ✩: nacisniecie podswietla wyswietlacz na 5 sekund.
18. Przycisk nadawania (PTT): wcisniecie i trzymanie umozliwia nadawanie.
Puszczenie przycisku przelacza radio w tryb odbioru.
19. Pojemnik na baterie: Włóż 6 baterii alkalicznych lub 8 akumulatorów Ni-MH.
20. Mocowanie petli
19
ALAN 42 DS
24
21. Przycisk Channel UP: przelacza radio na nastepny kanal o wyzszym numerze.
22. Przycisk Channel DOWN: przelacza radio na sasiedni kanal o nizszym numerze.
23. Zatrzask pojemnika baterii: wymiana baterii wymaga podniesienia zatrzasku i
wysuniecia pojemnika.
24. Zlacze anteny zewnetrznej: laczy sie z adaptorem samochodowym.
Wkładanie/wyjmowanie pojemnika zasilającego
Alan 42 DS może być zasilany zarówno bateriami alkalicznymi jak i akumulatorami Ni-MH. Producent dostarcza dwa oddzielne, puste pojemniki, jeden z gniazdem
ładowania na 8 akumulatorów AA, drugi na 6 baterii alkalicznych AA (R6).
Pojemnik odłącza się od radia przez podniesienie zatrzasku z boku radia i wysuniecie pojemnika w bok. Pojemnik otwiera się ściskając go lekko kciukami od góry i
rozchylając na boki.
Pojemnik dołącza się wsuwając aż do zatrzaśnięcia.
Ładowanie akumulatorów
Ładować można tylko akumulatory NiMH odpowiedniego rozmiaru. Nigdy nie próbuj
ładować baterii. Przed ładowaniem upewnij się, że w pojemniku są odpowiednie
ogniwa. Podłącz ładowarkę do prądu
i wetknij wtyczkę do gniazda w pojemniku.
Dla wykorzystania maksymalnej pojemności akumulatorów zalecamy pierwsze 2, 3
cykle pracy ładować je do końca dopiero po pełnym rozładowaniu.
Uwagi
! Dostarczana w komplecie ładowarka oferuje „standardową” metodę ładowania.
Prąd ładowania jest utrzymywany na poziomie około 10% pojemności ( w
wielkościach bezwzględnych ). Przy użyciu tej metody ładowarka nie przerywa au-
tomatycznie procesu ładowania po pełnym naładowaniu akumulatorów.
! Nie podłączaj ładowarki, gdy nie jest potrzebne ładowanie akumulatorów.
! Ładowarka jest przeznaczona do ładowania akumulatorów typu NiMH. Nie wolno
podejmować prób ładowania baterii i nie zalecamy ładowania akumulatorów inne-
go typu, gdyż może to prowadzić do wycieku zawartości ogniw, wybuchu, pożaru,
zniszczenia radia, bądź zranienia użytkownika.
! Używaj tylko oryginalnej ładowarki.
! Utylizuj zużyte baterie z godnie z zasadami ochrony środowiska.
! Dbaj o dobry stan wtyczki prądowej.
4 | Alan 42 DS Instrukcja obsługi Alan 42 DS Instrukcja obsługi | 5
Page 31

Uzywanie Alana 42 DS
1. Podlacz antene dostarczana razem z radiem do gniazda antenowego.
2. Włóż ogniwa do pojemnika uważając na właściwą polaryzację.
3. Przekrec pokretlo ON/OFF zgodnie z ruchem wskazowek zegara i ustaw wla-
sciwy poziom dzwieku.
4. Wyregukuj SQUELCH blokade szumow
5. Wybierz kanal przyciskami UP/DOWN lub QUICK UP/QUICK/DOWN
Uwaga!: Jezeli nie mozna zmienic kanalu uaktywniona jest funkcja EMG lub LOCK.
Nacisnij przycisk sterujacy dana funkcja aby ja wylaczyc.
Nadawanie: Wcisnij i trzymaj PTT mowiac do mikrofonu.
Odbior: Po prostu pusc PTT
Korzystanie z anteny samochodowej podlaczonej do adaptora wymaga odlaczenia
krotkiej, fabrycznej anteny helikalnej.
UWAGA!: WYSWIETLACZ JEST WRAZLIWY NA EKSTREMALNE TEMPERATURY.
Zmiana standardu czestotliwosci
Standard czestotliwosci ma byc wybrany zaleznie od kraju w ktorym radio jest
uzywane
Procedura:
1. Wylacz radiotelefon.
2. Wlacz radiotelefon trzymajac wcisniete przyciski A/F-LCR i SC.
3. Uzywajac przyciskow ▲ i ▼ wybierz odpowiedni standardbuttons, (patrz tabela).
4. Potwierdz wybor przyciskiem A/F-LCR.
1
Uwaga
: Jezeli wybierzesz standard dopuszczjacy prace tylko w modulacji FM przycisk
zmiany emisji AM/FM pelni funkcje przywolania ostatnio uzywanego kanalu.
2
: Bedac w standardzie UK mozesz szybko wybrac standard I (Włochy) wciskajac
Uwaga
i przytrzymujac przycisk “LCR-A/F” przez 2 sekundy.
Tabela czestotliwosci
Wyswietlane
Oznacznie
I Wlochy 40 kanalow AM/FM, 4 W
I2 Wlochy 34 kanaly AM/FM, 4 W
D4 Niemcy 80 kanalow FM, 4 W/40 kanalow AM, 4W
EU Europa 40 kanalow FM, 4 W/40 kanalow AM, 1 W
EC CEPT 40 kanalow FM, 4 W
E Hiszpania 40 kanalow AM/FM, 4 W
F Francja 40 kanalow FM, 4 W/40 kanalow AM, 1 W
PL Polska 40 kanalow AM/FM, 4 W, "0"
PX Polska czterystukanalowa AM/FM, 4 W, "0"
RU Rosja czterystukanalowa AM/FM, 4 W
SW Szwecja 24 kanaly FM, 4 W, 31 MHz
UK Wielka Brytania 40 kanalow FM, 4 W, angielski zakres + I
Uwaga!
Standardem dopuszczonym w calej Europie jest 40CH FM 4W (EC) .
W Polsce zwyczajowo uzywa sie standardu AM/FM „0”, który nie jest dostepny bez
ingerencji autoryzowanego serwisu.
Radzimy nie zmieniac standardu w radiach z polska specyfikacja.
Kraj, zakres
(Włochy) 40CH AM/FM 4 W
6 | Alan 42 DS Instrukcja obsługi Alan 42 DS Instrukcja obsługi | 7
Page 32

Dane techniczne
PODSTAWOWE
Kanaly .......................................................................................... 40 FM (Patrz tabela)
Zakres czestotliwosci* ..........................26.960-27.400 (26.565 - 27.99125) MHz
Rodzaje emisji ........................................................................... F3E (FM), A3E (AM).
Impedancja anteny .............................................................................................50 Ohm
Glosnik .....................................................................................................0,5 W/ 8 Ohm
Mikrofon ..................................................................................................pojemnosciowy
Zasilanie .........................................................min 7.2Vdc;max 13,8Vdc; nom 12,6Vdc
Wymiary ............................................................................30(L) x 140(H) x 70(D)mm
Waga ........................................................................................................190g bez baterii
ODBIORNIK
Czulosc .............................................. 0.5µV (AM), 0.25µV (FM) przy 10dB SINAD
Selektywnosc. ........................................................................................................ >60dB
Moc wyjsc. audio @10% THD .........................................................0.5 W @ 8 Ohm
Znieksztalcenia audio ............................................................................................. 3% @
Pasmo przenoszenia .......................................................................400 Hz ÷ 2400 Hz
Tlumienie cz. lustrzanej ........................................................................................... 60dB
czestotliwosci posrednie..................................... ................................ I°IF:10.695 MHz
.....................................................................................................................II°IF:455 KHz
Separacja kanalow ................................................................................................... 60dB
Pasmo audio ..................................................................Pobor pradu podczas czuwania
..............................................................................100mA, 45mA wlaczony tryb SAVE
NADAJNIK
Moc wyjsciowa ................................................................. cykl pracy 10% 4W AM/FM
Modulacja.......................................................................................FM:1.8KHz ± 0.2khz
........................................................................................................................ AM: 90% ±
Tolerancja czestotliwosci ................................................................................... 0,005%
Tlumienie czestotliwosci harmonicznych ............................................................>70dB
Pobor pradu ........................................................................................................900 mA
Continut
› 1 statie CB portabila
› Incarcator de perete pentru 8 bucati acumulatori
› Compartiment gol pentru 6 baterii alcaline tip AA
› Compartiment gol pentru 8 baterii reincarcabile cu mufa pentru incarcare
› Incarcator de masina cu mufa exetrna pentru antena SO 239
› Carcasa de protectie
› Antena
› Clema de prindere la curea
› Snur de prindere la mana
* (pokrywa wszystkie legalne pasma w UE)
Dane mogą ulec zmianie bez uprzedzenia.
Alan 42 DS Manualul de utilizare | 18 | Alan 42 DS Instrukcja obsługi
Page 33

Functii si localizarea comenzilor
4 5
1 2 3
4 5
MIC SPK
OFF/VOLDS/SQ
21
22
18
6
23
15
16
17
8
9
ALAN 42 DS
7
20
10
12
13
11
14
13
4. MIC jack: acest jack poate fi folosit pentru a conecta un microfon mai
performant.
5. Mufa pentru difuzorul extern: aici se poate conecta o boxă externa pentru a
îmbunătăţi volumul.
6. Clapeta pentru agaţare staţie.
7. Afisajul multifunctional luminat din spate. El arata:
Acest ecram cu cristale lichide a fost proiectat pentru afisarea modului de
operare al staţiei:
ab e k hf i g
d
c
jl
1 2 3
a. EMG funcţie activă
b. Canalul selectat ( de la 1 la 40)
c. Lock: Blocare tastatura activă
OFF/VOLDS/SQ
MIC SPK
d. BATT: indicator nivel baterie
e. AM/FM: acest indicator arata banda utilizata si activarea filtrului de zgo-
mot NB ( in acest caz indicatorul va clipi)
f. SC: Funcţia SCAN activată
g. DW: Funţia dual wach
h. P. S.: Salvare automata funcţii
i. LOW funcţie activată
j. Nivelul semnalului la emisie şi recepţie RX şi TX
1. Conector antena: introduceti in aceasta mufă antena venită odată cu staţia.
Este posibil şi recomandat folosirea unei antene externe pentru o mai bună
k. RX/TX: TX = modul de transmisie; RX = modul de recepţie
l. Banda de sefrecvenţă selectat.
performanţă.
2. Potentiometru Squelch: acesta va permite eliminarea manuala a zgomotelor de
fond de pe receptie sau activarea functiei DS (Squelch digital), ce va elimina
automat zgomotele.
3. On/O Volum Control.
În poziţia „o” staţia este închisă. Prin rotirea acestui buton spre dreapta se
porneşte statia, iar prin continuarea rotirii spre dreapta se reglează nivelul
volumului până la un nivel confortabil al sunetului.
8. Butonul EMG: canalul de urgenţă. Prin apasarea butonului staţia va porni
automat pe canalul de urgenţă 9. Pe display va apărea EMG. Astfel nu va fi
posibilsa schimbi din greşeală canalul. Pentru a închide acestă funcţie se apasă
din nou pe acelaşi buton.
9. Butonul A/F–LCR: pentru a selecta banda AM sau FM; modulaţia aleasă va
apărea pe ecran. Dacă selectaţi o frecvenţă doar în banda FM, butonul A/F–
LCR va activa funcţia LCR (Ultimul canal folosit).
2 | Alan 42 DS Manualul de utilizare Alan 42 DS Manualul de utilizare | 3
Page 34
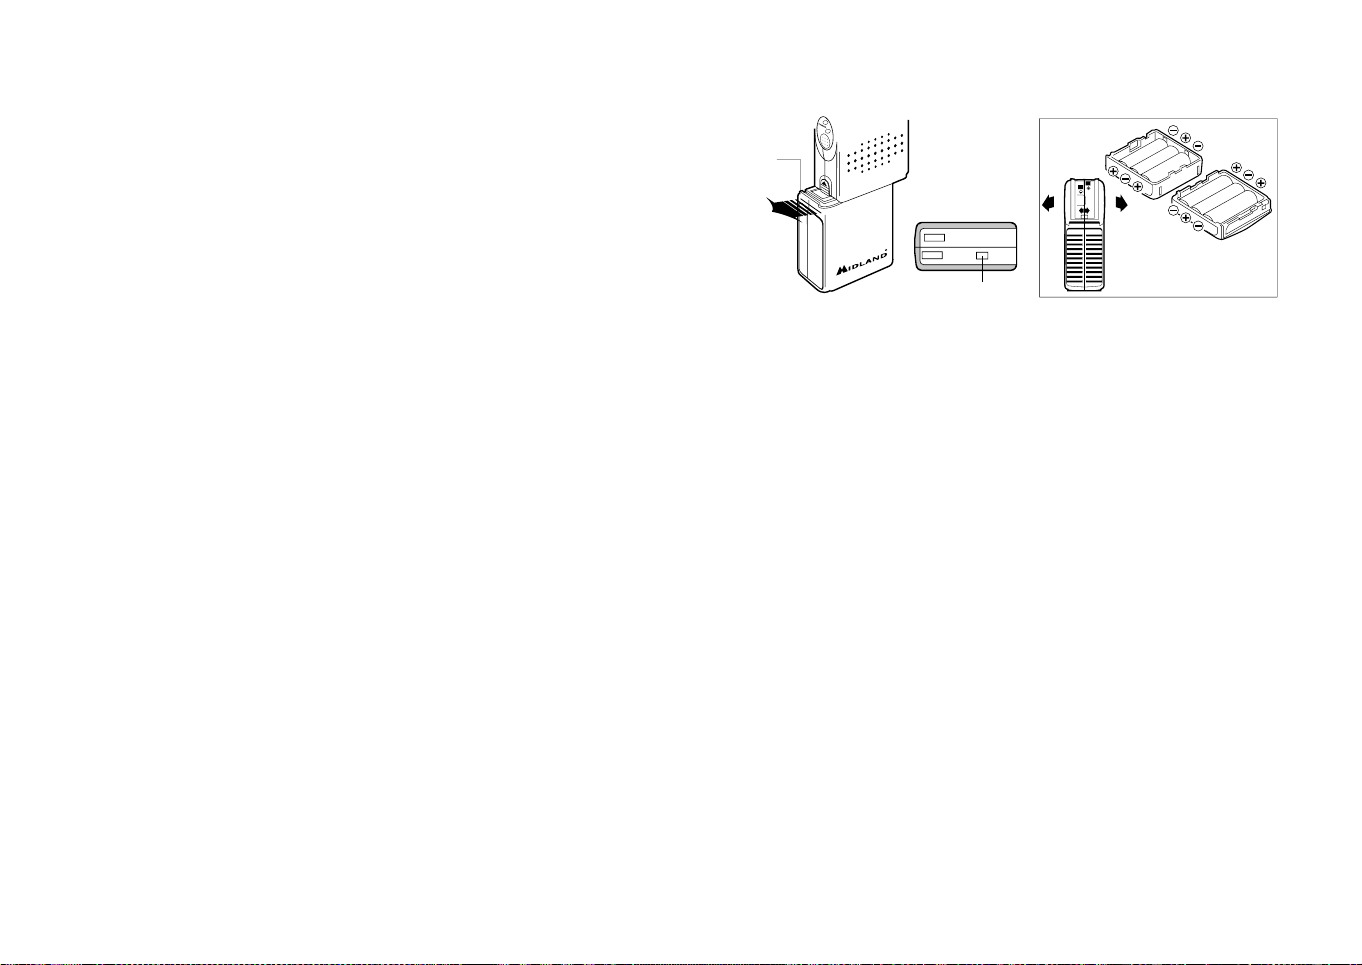
10. Microfon: în timpul transmisiei vorbiţi cu voce normală în microfon.
11. Butonul H/L: acesta selectează puterea emisă .Când staţia este pornită ea
emite mereu cu (4W). Apăsând acest buton ea va emite cu (1W). Pe ecran va
apare “LOW”. Trebuie să apăsaţi din nou butonul H/L pentru a va reîntoarce la
nivelul maxim de putere “HIGH”.
12. Butonul LOCK: vă sa posibilitatea sa blocaţi tastatura, pentru a evita modificări
accidentale ale setărilor.
13. Butoanele Q.UP - Q.DOWN: pentru a sări 10 canale în sus (Q.UP) sau 10
canale în jos (Q.DOWN).
14. Difuzor
15. Dual Watch: această funcţie permite sa recepţionaţi pe 2 canale în acelaşi timp.
Datorită acestei funcţii dvs. Puteţi monitoriza un canal secundar. Când este
primit un semnal de pe canalul doi, conversaţia de pe canalul 1 este automat
întreruptă şi se cuplează automat pe acel canal. Monitorizarea reporneşte
automat după 4 secunde de la terminarea convorbirii.
Pentru a activa această funcţie procedaţi în felul următor:
- Selectaţi canalul dorit
- Apăsaţi butonul DW
- Selectaţi al doilea canal
- Apăsaţi butonul DW din nou
- Pentru a şterge această funcţie apăsaţi butonul DW din nou sau butonul
PTT.
16. Butonul SCAN/Noise Blanker: cu aceasta comanda, puteti cauta automat un
canal ocupat.
- Rotiti butonul de squelch spre dreapta pana cand zgomotul de fond dispare
sau rotiti-l maxim stanga pentru a utiliza squelch-ul digital
- Apasati butonul “SCAN”: aparatul va scana automat toate canalele pana
cand se va receptiona unul. Daca porniti unitatea si apasati “SCAN” si
“AM/FM (LCR) in acelasi timp, veti selecta banda de functionare, care se
va vedea pe afisaj.
- Atunci cand gaseste canalul, se opreste si incepe din nou, dupa cateva secunde dupa terminarea convorbirii pe acel canal.
- Atunci cand statia transmite, functia de scanare este dezactivata.
- Apasati lung butonul SCAN pentru a sctiva filtrul de zgomot NB; “AM”
sau “FM” va clipi pe ecran
17. Butonul: Luminarea ecranului (temporizata). Aceasta functie permite utilizarea
statiei in conditii de intuneric. Prin apasarea acestui buton, ecranul va fi luminat
timp de 5 secunde.
18. Butonul PTT: Apasarea acestui buton activeaza transmisia. Atunci cand acest
buton este eliberat, este activata receptia.
19. Compartimentul pentru baterii: se introduc 6 sau 8 acumulatori R6.
20. Gaură pentru incheietura mainii.
21. Channel UP: Pentru a trece la canalul următor. Ţinând apăsat acest buton se
activează funcţia de autorepetare.
19
ALAN 42 DS
24
22. Channel DOWN: pentru sari la următorul canal. Ţinând apăsat acest buton se
activează funcţia de autorepetare.
23. Contactul pentru baterii: Se ridica clăpiţa şi se trage compartimentul bateriilor
afară (vedeţi în desen).
24. Modul auxiliar pentru conectare antena şi alimentare externa: pentru
conectarea la alimentare şi antena auto.
Instalarea/indepartarea compartimentului
pentru baterii
Statia Alan 42 DSfunctioneaza atat cu baterii alcaline cat si cu baterii reincarcabile
Ni-Mh. Din acest motiv, sunt furnizate doua tipuri de compartimente: un compartiment gol pentru 8 baterii reincarcabile de tip AA cu mufa pentru incarcare si un
compartiment gol pentru 6 baterii alcaline de tip AA.
Pentru indepartarea compartimentului pentru baterii ridicati clăpiţa şi trageti compartimentul bateriilor afară. Introduceti bateriile.
Pentru schimbarea compartimentului pentru baterii, ridicati din nou clăpiţa din partea stanga si glisati usor spre stanga.
Reincarcarea bateriilor
Reincarcarea bateriilor poate fi posibila doar utilizand baterii reincarcabile NiMH.
Nu incercati sa incarcati bateriile alcaline sau baterii non reincarcabile. Fiti siguri ca
atunci cand incarcati statia, doar baterii NI-MH trebuie sa fie in compartimentul
4 | Alan 42 DS Manualul de utilizare Alan 42 DS Manualul de utilizare | 5
Page 35

bateriilor!
Utilizati o priza accesibila pentru a adaptorul ac/dc; Conectati incarcatorul de perete la o priza nu inainte de a conecta si compartimentul pentru baterii la mufa adaptorului de perete.
Atunci cand incarcarea este completa, scoateti adaptorul din priza de perete.
Pentru obtinerea unei maxime performante si capacitate, l aprima utilizare a statiei,
este recomandat sa incarcati/descarcati complet bateriile de 2 sau 3 ori.
Avertismente
! Incarcatorul de perete inclus trebuie utilizat dupa metoda standard de incarcare.
Aceasta este o metoda, unde puterea de incarcare este de aproximativ 10% din capacitate. Utilizand aceasta metoda, incarcatoarele nu intrerup automat incarcarea
atunci cand bateriile sunt complet incarcate.
! Trebuie sa evitati de a tine statia conectata permanent la incaractor, atunci cand
nu o utilizati.
! Incarcatorul este proiectat doar pentru baterii reincarcabile NiMH si nu poate fi
utilizat pentru baterii alcaline standard sau alte baterii care nu pot fi incarcate.
Poate fi un risc incercarea incarcarii unor astfel de baterii. Astfel de baterii pot
avea scurgeri, exploda sau chiar arde si pot cauza daune sau vatamari corporale!
! Va rugam sa utilizati doar tipul de incarcator de perete furnizat si nu un altul.
! Aruncati bateriile in conformitate cu procedurile stabilite prin regulamentele locale.
! Stecherul utilizat trebuie sa ramana usor operabil.
Utiilizarea statiei Alan 42 DS
1. Introduceţi antena în conectorul staţiei.
2. Introduceţi 6 baterii sau acumulatori R6 respectând polaritatea.
3. Rotiţi butonul ON/OFF pentru a porni staţia. Ajustaţi volumul la nivelul dorit.
4. Ajustaţi nivelul la SQUELCH până se elimină zgomotele de fond.
5. Selectaţi canalul dorit cu ajutorul butoanelor UP/DOWN sau QUICK UP/
QUICK/DOWN, de obicei canalul 22.
Notă: dacă canalul nu se schimbă verificaţi butoanele EMG sau LOCK să nu fie
apăsate. În acest caz apăsaţi din nou pe ele pentru a dezactiva funcţia de blocare.
Pentru a transmite: apăsaţi şi menţineţi butonul PTT, apoi vorbiţi în microfon.
Pentru a recepţiona: doar eliberaţi butonul PTT
ATENŢIE: Nu expuneţi ecranul la temperaturi ridicate!
Selectarea benzii de frecventa
Benzile de frecvenţă trebuie sa fie alese in funcţie de ţara în care folosiţi aparatul.
Procedura:
1. Opriţi unitatea.
2. Porniţi-o in timp ce apasati butoanele “A/F-LCR” si “SC”.
3. Prin apasarea butoanelor si , selectaţi banda de frecventa dorita (vezi schema
de mai jos).
4. Pentru a opri selecţia, apăsaţi butonul “ A/F-LCR”.
NOTA: Daca selectaţi o banda de frecventa care funcţionează numai in modul FM,
comanda “AM/FM” permite funcţionarea LCR (reapelarea ultimului canal).
NOTA: În banda de frecventa UK, puteţi selecta direct banda I (Italia) apăsând butonul “AM/FM’ timp de 2 secunde.
Schema benzii de frecventa
Litere afisate Tara
I Italia 40CH AM/FM 4 watt
I2 Italia 34CH AM/FM 4 watt
D4 Germania 80 CH FM 4watt/ 40 CH AM 4watt
EU Europa 40 CH FM 4 watt/ 40 CH AM 1watt
EC CEPT 40 CH FM 4watt
E Spania 40 CH AM/FM 4watt
F Franta 40 CH FM 4watt/ 40 CH AM 1watt
UK Anglia 40 CH FM 4watt frecvente engleze + I (Italia) 40
CH AM/FM 4 watt
ATENTIE!
Banda de frecventa permisa in toata Europa este 40 CH FM 4W (EC) – Vedeti
tabelul cu restrictiile de utilizare.
6 | Alan 42 DS Manualul de utilizare Alan 42 DS Manualul de utilizare | 7
Page 36

SPECIFICATII TEHNICE
GENERALE
Canale ......................................................... 40 FM (vezi schema benzii de frecventa)
Sirul frecventelor* ..................................................................26.565 - 27.99125 MHz
Modul de operare ....................................................................... F3E (FM), A3E (AM)
Comanda frecventei .................................................................................................. PLL
Sirul temperaturii de functionare .................................................................. -10/+55C
Voltajul de intrare DC ..................................min 7.2Vcc;max 13,8Vcc; nom 12,6Vcc
Marimea ...........................................................................30(L) x 140(H) x 70(D) mm
Greutatea ........................................................................................220 gr. (fără baterii)
RECEPTOR
Sistemul de receptionare ..........................................conversie duala superheterodina
Frecventa intermediara .............................................IºIF: 10.695MHz; IIº: 455 MHz
Sensibilitatea ..............................................0.5µV (AM), 0.25µV (FM) in Modul FM
Puterea de scoatere audio @10% THD .................................................8 Ohm 0.5W
Distorsiunea audio la 1000 µV ..................................................................................3%
Scurgerea curenta in standby ...............................................................................45mA
TRANSMITATOR
Puterea de iesire..........................................................................ciclu 10% 4WAM/FM
Modulatia .....................................................................................AM: de la 85% la 95%
....................................................................................................FM: 1,8 KHz ± 0,2 KHz
Raspunsul frecventei ..............................................................de la 400 Hz la 2.5 KHz
Impedanta de iesire ................................................................RF 50 Ohm neechilibrat
Rata semnalului/ zgomot ..............................................................................40 dB MIN
Scurgerea curenta...........................................100mA (pozitia poterii fara modulatie)
* (acoprind toate benzile de frecvente aprobate in EU)
Toate specificatiile se pot modifica fara preaviz.
8 | Alan 42 DS Manualul de utilizare
Page 37

• INFORMAZIONE AGLI UTENTI: Ai sensi dell’art. 13 del decreto legislativo 25 luglio
2005, n.151 “Attuazione delle Direttive 2002/95/CE, 2002/96/CE e 2003/108/
CE, relative alla riduzione dell’uso di sostanze pericolose nelle apparecchiature elettri
che ed elettroniche, nonché allo smaltimento dei rifiuti”. Il simbolo del cassonetto barrato riportato sull’apparecchiatura indica che il prodotto alla fine della propria vita utile
deve essere raccolto separatamente dagli altri rifiuti. L’utente dovrà, pertanto, conferire
l’apparecchiatura giunta a fine vita agli idonei centri di raccolta dierenziata dei rifiuti
elettronici ed elettrotecnici, oppure riconsegnarla al rivenditore al momento dell’acqui
sto di una nuova apparecchiatura di tipo equivalente, in ragione di uno a uno. L’adeguata
raccolta dierenziata per l’avvio successivo dell’apparecchiatura dismessa al riciclaggio,
al trattamento e allo smaltimento ambientalmente compatibile contribuisce ad evitare
possibili eetti negativi sull’ambiente e sulla salute e favorisce il riciclo dei materiali di cui
è composta l’apparecchiatura. Lo smaltimento abusivo del prodotto da parte dell’utente
comporta l’applicazione delle sanzioni amministrative di cui al dlgs. n.22/1997 (articolo
50 e seguenti del dlgs. n.22/1997).
• All articles displaying this symbol on the body, packaging or instruction manual of
same, must not be thrown away into normal disposal bins but brought to specialised
waste disposal centres. Here, the various materials will be divided by characteristics and
recycles, thus making an important contribution to environmental protection.
• Alle Artikel, die auf der Verpackung oder der Gebrauchanweisung dieses Symbol tra
gen, dürfen nicht in den normalen Mülltonnen entsorgt werden, sondern müssen an
gesonderten Sammelstellen abgegeben werden. Dort werden die Materialien entspre
chend ihrer Eigenschaften getrennt und, um einen Beitrag zum Umweltschutz zu liefern, wiederverwertet.
• Todos los artículos que exhiban este símbolo en el cuerpo del producto, en el emba
laje o en el manual de instrucciones del mismo, no deben ser desechados junto a los
residuos urbanos normales sino que deben ser depositados en los centros de recogida
especializados. En estos centros, los materiales se dividirán en base a sus características
y serán reciclados, para así poder contribuir de manera importante a la protección y
conservación del medio ambiente.
• Tous les articles présentant ce symbole sur le corps, l’emballage ou le manuel d’utilisa
tion de celui-ci ne doivent pas être jetés dans des poubelles normales mais être amenés
dans des centres de traitement spécialisés. Là, les diérents matériaux seront séparés
par caractéristiques et recyclés, permettant ainsi de contribuer à la protection de l’en
vironnement.
• Zużyte towary oznaczone tym znakiem mogą stanowić zagrożenie dla środowiska natu
ralnego, dlatego nie należy ich wyrzucać tylko oddać sprzedawcy, który przekaże je do
przedsiębiorstwa zajmującego się utylizacja odpadów.
• Toate produsele care au aplicat acest simbol pe ambalaj sau in manualul de utilizare, nu
trebuie să fie aruncate in coşurile de gunoi, ci duse in centrele de colectare a deşeurilor
electrice si electronice. Aici, diversele materialele vor fi impărţite in funcţie de caracte
ristici si reciclate, aducându-se astfel o contribuţie importantă la protectia mediului.
-
-
-
-
-
-
-
-
-
Page 38

RED
IT / RSM
Cte International Srl dichiara che il prodotto è
conforme ai requisiti essenziali e alle disposizioni
della Direttiva 2014/53/UE. La Dichiarazione di
conformità si può scaricare dal sito http://www.
midlandeurope.com/it/pagina/10090-certifi
cations
GB / CY / MT
Hereby Cte International Srl declares that this
product is in compliance with the essential re
quirements and other relevant provisions of
Directive 2014/53/UE. The declaration of con
formity is available on the web site http://www.
midlandeurope.com/it/pagina/10090-certifi
cations
AT / DE / CH / LI
Hiermit erklärt Cte International Srl, dass das
Produkt die grundlegenden Anforderungen und
anderen relevanten Bestimmungen der Richt
linie 2014/53/UE. Die Konformitätserklärung
ist unter folgendem Link verfügbar: http://www.
midlandeurope.com/it/pagina/10090-certifi
cations
ES
CTE International SRL. declara, bajo su re
sponsabilidad, que este aparato cumple con
lo dispuesto en la Directiva 2014/53/UE, del
Parlamento Europe. La Declaración de Confor
midad está disponible en http://www.midland-
europe.com/it/pagina/10090-certifications
FR / LU / CH
Par la présente Cte International Srl déclare
que le modèle est conforme aux exigences
essentielles et autres dispositions pertinentes
de la directive 2014/53/UE. La déclaration
de conformité est disponible sur le site inter
net http://www.midlandeurope.com/it/pagi-
na/10090-certifications
PT
A CTE INTERNATIONAL declara que este
aparelho cumpre com o disposto na Directi
va 2014/53/UE do Parlamento Europeu. A
Declaração de Conformidade está disponível
no sitio na Internet em http://www.midland
europe.com/it/pagina/10090-certifications
GR
Με το παρών, η Cte International Srl δηλώνει
οτι το όνομα του μοντέλου συμμορφώνεται
ως προς τις βασικές απαιτήσεις και άλλες
σχετικές διατάξεις του Κανονισμού
2014/53/UE. Η δήλωση συμμόρφωσης είναι
διαθέσιμη στην ιστοσελίδα http://www.
midlandeurope.com/it/pagina/10090-certifi
cations
NL
Hierbij verklaard CTE International Srl dat dit
model voldoet aan de essentiële eisen en andere
relevante bepalingen van richtlijn 2014/53/UE.
De verklaring van conformiteit is beschikbaar
op de website http://www.midlandeurope.com/
it/pagina/10090-certifications
BE
CTE INTERNATIONAL Srl verklaart dat het
product overeenstemt met de voorschriften
en andere bepalingen van de richtlijn 2014/53/
UE. De conformiteitsverklaring is voorhanden
op de website http://www.midlandeurope.com/
it/pagina/10090-certifications
PL
CTE International Srl deklaruje, że ten model
jest zgodny z wymaganiami zasadniczymi i in
nymi istotnymi postanowieniami Dyrektywy
2014/53/UE. Deklaracja Zgodności jest do
stepna na stronie http://www.midlandeurope.
com/it/pagina/10090-certifications
RO
Cte International Srl declara ca acest mod
el este in conformitate cu cerintele esentiale
si alte prevederi ale Directivei 2014/53/UE.
Declaratia de confomitate este disponibila si
pe site-ul http://www.midlandeurope.com/it/
-
pagina/10090-certifications.
BG
С настоящото CTE international Srl
декларира, че продукта е в съответствие
с основните изисквания и съответните
-
модификации на Директива 2014/53/UE.
Декларацията за съвместимост е налична
на сайта: http://www.midlandeurope.com/it/
pagina/10090-certifications
NO
CTE INTERNATIONAL Srl erklærer at pro
duktet er i overensstemmelse med de viktigste
kravene og andre relevante betingelser i Direk
tivet 2014/53/UE. Samsvarserklæringen finnes
tilgjengelig på nettstedet http://www.midlan
-
-
-
-
deurope.com/it/pagina/10090-certifications
DK
Hermed erklærer Cte International Srl , at dette
apperat er i overensstemmelse med kravene
og andre relevante bestemmelser i direktiv
2014/53/UE. Overensstemmelseserklærin
gen findes på webstedet http://www.midlan-
deurope.com/it/pagina/10090-certifications
SE
CTE INTERNATIONAL Srl förkunnar att
produkten överensstämmer med de väsent
liga kraven och övriga bestämmelser i direktiv
2014/53/EU. Denna försäkran om överens
stämmelse finns på webbplatsen http://www.
midlandeurope.com/it/pagina/10090-certifi
cations
FI
CTE INTERNATIONAL Srl vakuuttaa, että
tuote täyttää direktiivin 2014/53/UE. Vaa
timuksenmukaisuusvakuutus on saatavilla
http://www.midlandeurope.com/it/pagi
na/10090-certifications –verkkosivuilla.
HR
Cte International Srl ovime izjavljuje da je ime
ovog modela u suglasnosti sa bitnim zahtjevi
ma te ostalim relevantnim odredbama Propisa
2014/53/EU. Ova Izjava o suglasnosti je dos
tupna na web stranici http://www.midland-
europe.com/it/pagina/10090-certifications.
EE
Käesolevaga kinnitab Cte International Srl
selle mudeli vastavust direktiivi 2014/53/
UE. Vastavusdeklaratsioon on kättesaadav
veebilehel http://www.midlandeurope.com/it/
pagina/10090-certifications
LT
CTE International patvirtina, kad šis
modelis atitinka visus esminius Direktyvos
2014/53 / UE. Atitikties deklaracija yra
pateikiama internetinėje svetainėje http://
www.midlandeurope.com/it/pagina/10090-
certifications
LV
CTE INTERNATIONAL Srl deklarē, ka
produkts atbilst pamatprasībām un citiem
ar to saistītajiem Direktīvas 2014/53 / UE.
Atbilstības deklarācija ir pieejama mājas
lapā: http://www.midlandeurope.com/it/
pagina/10090-certifications
SK
Týmto Cte International Srl prehlasuje, že
tento názov model je v zhode so základnými
požiadavkami a ďalšími príslušnými
ustanoveniami smernice 2014/53 /UE.
Vyhlásenie o zhode je k dispozícii na webových
stránkach http://www.midlandeurope.com/it/
pagina/10090-certifications
SI
Cte International Srl deklarira da je ta model
skladen z bistvenimi zahtevami in drugimi
relevantnimi določili EU direktive 2014/53/UE.
Deklaracija o skladnosti je na voljo na spletni
strani http://www.midlandeurope.com/it/
pagina/10090-certifications
CZ
CTE INTERNATIONAL SRL prohlašuje,
-
že výrobek je v souladu s 2014/53/UE.
Prohlášení o shodě je k dispozici na webových
-
stránkách http://www.midlandeurope.com/it/
pagina/10090-certifications
H
Mi, a CTE International Srl. saját felelősségre
kijelentjük, hogy ezen elnevezésű termék
megfelel az 2014/53 /UE. A megfelelőségi
nyilatkozat elérhető weboldalunkon a http://
www.midlandeurope.com/it/pagina/10090certifications címen.
Page 39

Prodotto o importato da:
Compliant
CTE INTERNATIONAL s.r.l.
Via. R.Sevardi 7
42124 Mancasale Reggio Emilia Italia
www.midlandeurope.com
In Italia l’uso è soggetto a dichiarazione.
Prima dell’uso leggere attentamente le istruzioni.
Produced or imported by:
CTE INTERNATIONAL s.r.l.
Via. R.Sevardi 7 - 42 124 Mancasale Reg gio
Emilia Italy
Imported by: ALANNEVADA UK
Unit 1 Fitzherber t Spur Farlington Portsmouth
Hants. P06 1TT - United Kingdom
www.nevada.co.uk
The use of this transceiver can be subject to
national restrictions. Read the instructions
carefully before installation and use.
Importado por:
MIDLAND IBERIA , S.A.
C/Cobalt, 48 - 08940 Cornellá de Llobregat
España - www.midland.es
El uso de este equipo puede estar sujeto a la
obtención de la correspondiente autorización
administrativa. A ntes de utilizar, lea atentamente
el manual de uso.
Vertrieb durch: ALAN ELECTRONICS GmbH
Daimlerstraße 1K - D-63303 Dreieich
Deutschland - www.alan-electronics.de
Die Benutzung dieses Funkgerätes ist von den
landesspezifischen Bestimmungen abhängig. Vor
Benutzung Bedienungsanleitung beachten.
Importowane przez:
ALAN TELEKOMUNIKAC JA SP. z o.o.
Jawczyce, Poznańska 64 - 05-850 Ożarów
Maz. Polska - www.alan.pl
Używanie tego radiotelefonu może podlegać
pewnym ograniczeniom. Przed instalacją
i pierwszym uż yciem przeczytaj uważnie
instrukcję.
 Loading...