

Page 1

Document Number: A-718C, Revision # 1
7733 Gross Point Road • Skokie, IL 60077 • (847) 677-0333 • Fax (847) 677-0138 • www.midlandmfg.com
Issue Date: March 9, 2017
1" Angle Valves
A-718C Series
Installation, Operation & Maintenance Manual
Page 1 of 36
Page 2

Table of Contents
1.0 Introduction ................................................................................................................................... 3
1.1 Technical Specifications ............................................................................................................ 3
1.2 Torque Values for Bolts ............................................................................................................. 4
1.3 Valve Perspectives.................................................................................................................... 5
1.4 Pre-Installation Regulations / Requirements.............................................................................. 7
2.0 Valve Installation ........................................................................................................................... 9
2.1 Preliminary Considerations ....................................................................................................... 9
2.2 Installation Procedure ............................................................................................................... 9
3.0 Operating Instructions ................................................................................................................. 12
3.1 Valve Operation Notes and Precautions .................................................................................. 12
4.0 Maintenance Instructions ............................................................................................................ 13
4.1 Prior to Maintenance Tasks Performed ................................................................................... 13
5.0 Valve Disassembly ...................................................................................................................... 14
6.0 Valve Inspection & Replacement of Parts ................................................................................... 20
6.1 Inspection & Replacement Procedure ..................................................................................... 20
6.2 Special Inspection Considerations .......................................................................................... 23
7.0 Cleaning...................................................................................................................................... 24
8.0 Valve Reassembly ...................................................................................................................... 25
9.0 Valve Testing Procedure ............................................................................................................. 35
9.1 Testing Procedure ................................................................................................................... 35
9.2 Post-Test Procedures ............................................................................................................. 35
10.0 Warranty ................................................................................................................................... 36
Doc. #: A-718C, Rev. 1
Page 2 of 36
Page 3

1.0 Introduction
The A-718C Series 1" angle valves are top loading transfer valves with a unique seat design that permits selfdraining and ease of maintenance and repair. The energized and adjustable stem packing and soft, self-centering
valve seat eliminates potential leak paths and further increasing the long life and reliability in Chlorine transportation.
Successfully used in Chlorine-transfer applications
Self-centering valve seat permits positive shut-off with lower operating torque
Utilized in the top-loading of pressure cars
1.1 Technical Specifications
Figure 1-1 Valve Specifications
Doc. #: A-718C, Rev. 1
Page 3 of 36
Page 4

1.2 Torque Values for Bolts
Item #
Description
Material
Torque Value
6
Cap Screws
1/2-13 UNC 2B
Monel
48 ft-lb
CS
38 ft-lb
13
Top Nut
1/2-13 UNC 2B
SS
20 ft-lb
16
Hex Nut
3/8-16 UNC 2A
Monel
22 ft-lb
CS
20 ft-lb
19
Slotted Nut
7/18-20 UNF 2B
Inconel
38 ft-lb
SS
32 ft-lb
Table 1-1 Torque Values for Bolts
Doc. #: A-718C, Rev. 1
Page 4 of 36
Page 5
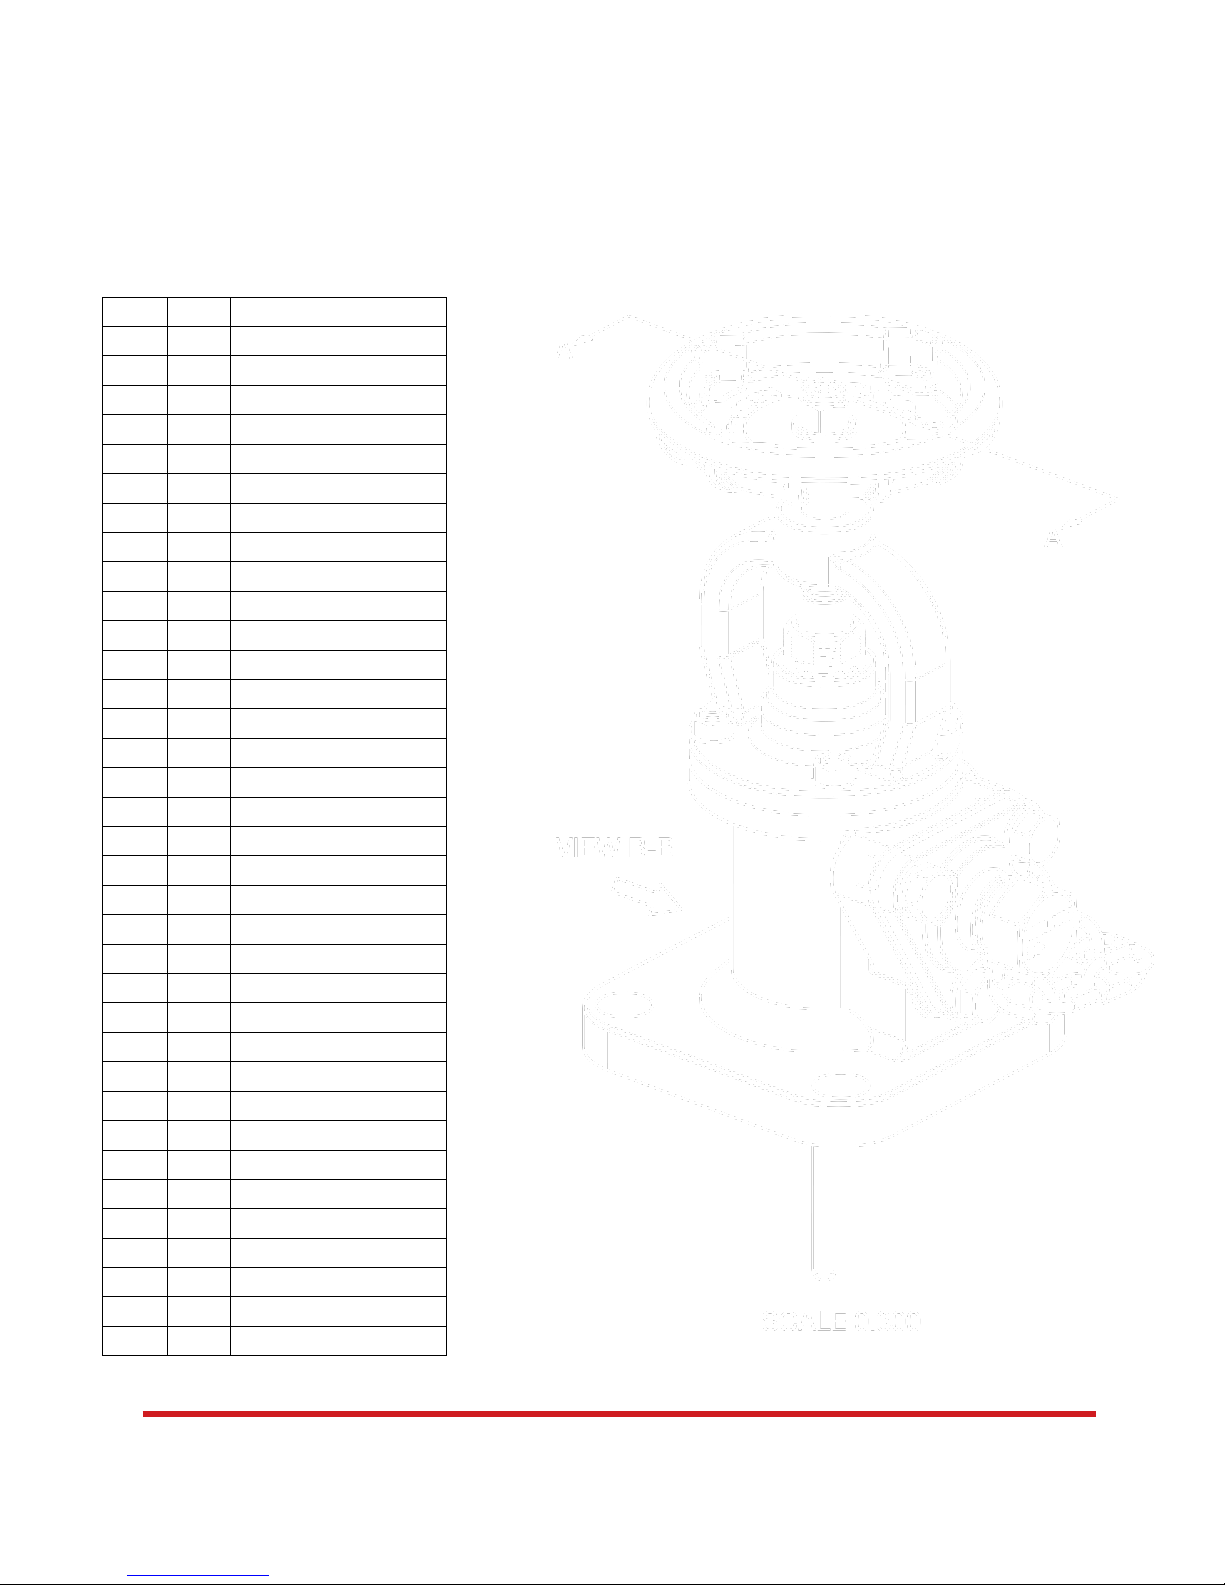
1.3 Valve Perspectives
Item
Qty.
Part Name
1 1 Hand Wheel
2 1 Stem
3 1 Seal Retainer
4 1 Body
5 1 1" Bonnet
6 3 Cap Screw
7 1 Packing Screw w/Insert
8 1 Packing Insert
9 1 Seat Seal-VV
10 1 Packing Ring Assembly
11 2 O-Ring-Stem
12 2 O-Ring-Flange
13 1 Lock Nut
14 4 Stud
15 4 3/8" Split Lock Washer
16 4 Hex Nut
17 1 O-Ring
18 1 Retaining Pin
19 1 Slotted Nut
20 1 Male Packing Adapter
21 3 1/2" Split Lock Washer
22 1 Outlet Flange Gasket
23 1 Instruction Plate
24 1 Wiper
25 1 Washer
26 1 Name Plate
27 1 Retaining Seal Washer
28 1 Packing Spring
29 1 1" Pipe Plug Assembly
30 1 Outlet Flange
31 1 Seat Insert
32 1 Lower Gasket
33 2 O-Ring-Seat Insert
34 2 Drive Screw
35 1 Placard (Not Shown)
Figure 1-2 Isometric View
Doc. #: A-718C, Rev. 1
Page 5 of 36
Page 6

Figure 1-3 Side View and Cross-Sectional View with Callouts
Doc. #: A-718C, Rev. 1
Page 6 of 36
Page 7

1.4 Pre-Installation Regulations / Requirements
1.4.1 Regulations
Midland Top Transfer, Angle Valves are used in contact with a variety of products, many of which are
hazardous materials. The acceptance and transportation of products are regulated by the DOT and AAR in
the U.S.A., and in Canada by CTC and Transport Canada. Regulations of other governmental bodies must
be complied with for stationary and mobile applications. All personnel should be familiar with and follow these
regulations. Nothing in these instructions is intended to conflict with or supersede these regulations. The
information in this document was gathered from knowledgeable sources, but Midland Manufacturing
Corporation makes no representations or guarantees about its accuracy or completeness and assumes no
liability for this information.
Specifications are subject to engineering updates and may change without notice.
1.4.2 Safety Precautions
Midland valves are used in connection with a variety of products, many of which are hazardous materials and
could cause serious injury or damage.
CAUTION: Toxic Hazard. Always use extreme caution and proper equipment when involved with
hazardous materials. To avoid exposure to toxic or hazardous materials, make sure the tank car is
empty and clean, and that the work area is free of hazardous chemicals before removing or
installing any valve.
1.4.3 Precautions for Mounted-Valve Repair
When performing maintenance on an angle valve that is mounted on a railcar, observe the following
precautions.
o Wear protective clothing and equipment suitable for withstanding the materials to which you may
be exposed
o Position yourself on the upwind side of the valve when possible
o Work with a partner who can help you in the event of an emergency
o Follow approved safety precautions for hazardous or toxic materials
Doc. #: A-718C, Rev. 1
Page 7 of 36
Page 8

1.4.4 Required Tools
Recommended Wrenches
SAE
Component
Material
Torque [ft-lb (N·m)]
Item #
1/2” Socket/Wrench
Cap Screws
Monel
48 ft-lb (65 N·m)
6
CS
38 ft-lb (52 N·m)
1/2” Socket/Wrench
Top Nut
SS
20 ft-lb (27 N·m)
13
3/8” Socket/Wrench
Hex Nut
Monel
22 ft-lb (30 N·m)
16
CS
20 ft-lb (27 N·m)
7/16” Socket/Wrench
Slotted Nut
Inconel
38 ft-lb (52 N·m)
19
SS
32 ft-lb (43 N·m)
1-1/16” Crow Feet/Wrench
Packing Nut
Inconel
65 ft-lb (88 N·m)
8
Other Tools and Supplies
Screwdrivers
Pipe Wrench
Loctite® (or equivalent adhesive)
Lint-free Cloth
Silicone Grease (or equivalent lubrication)
Emery Paper (400 grit, cut in 1" strips)
Torque Wrench
Wire Brush
Before arriving at the installation site obtain the required tools and supplies prior to performing the procedures
indicated in this guide.
Table 1-2 Required Tools
Table 1-3 Additional Recommended Tools & Supplies
Doc. #: A-718C, Rev. 1
Page 8 of 36
Page 9

2.0 Valve Installation
2.1 Preliminary Considerations
2.1.1 New valves are tested, adjusted and sealed at Midland. If a new valve has been left in its original packaging,
is undamaged and is not more than six (6) months old, it may be installed on a tank car without retesting or
recalibration. However, if the valve’s shelf life exceeds six (6) months, retesting or recalibration is
recommended.
2.1.2 Prior to installation, ensure that the valve remains clean and that the gasket-sealing surfaces are not
damaged.
2.2 Installation Procedure
2.2.1 Remove the old valve and then insert a soft rubber plug into the tank opening to prevent debris from entering
the tank during cleaning of the valve-mounting groove and studs on the man-way cover plate.
2.2.2 Wire-brush the 3/4” stud threads of the cover plate until clean.
2.2.3 Remove the gasket in the groove of the cover plate. Avoid scratching the metal in the bottom of the groove.
Discard the used gasket.
2.2.4 Examine the sides of the groove to verify that there are no dents or burrs. Since the valve fits tightly in the
groove, any peening of the groove edges may make it difficult to properly fit the valve’s tongue into the
groove. Install a new 1/8"-thick gasket.
2.2.5 Up to this point, the new valve should have been kept in its original shipping container. Cradle the valve in
your arm and unwind the hand wheel (in the “clockwise” direction) to be in the closed position when it is
bolted onto the cover plate. The valve is in the closed position when the stem is all the way up.
2.2.6 Inspect the tongue by running your finger around the edge of the tongue to be sure it is free of nicks, dents
and burrs. The tolerance on the tongue is plus or minus 0.003", so any irregularity on this surface will make
it difficult to fit the tongue cover plate groove. Similarly, the flat surface of the tongue should be free of
imperfections that could cause a gasket leak when the valve is positioned on the cover plate.
Doc. #: A-718C, Rev. 1
Page 9 of 36
Page 10

2.2.7 Take out the rubber plug from the cover plate opening.
Figure 2-1 Maintenance Checkpoints
Packing
Area
Seat
Side-Port
2.2.8 The valve should be “closed” with the stem all the way up. Under no circumstances should a “cheater” or
handle extension be used to close this valve, as over-tightening will damage the valve’s Teflon® seat. The
hand wheel has been purposely weakened to break if excessive force is used.
NOTE: To operate of the valve closed, turn the handle clockwise, the stem will travel all the way
up.
2.2.9 Holding the valve by the bonnet (item 5) lower it slowly onto the studs. Start all four (4) nuts on the studs
while the valve is still held off the cover plate. It may be necessary to lift the valve to make room to insert
nuts adjacent to the outlet flange to allow room to start nuts while the valve is held up. Insert the remaining
nuts and gently move the valve back and forth until the tongue goes down into the groove on the cover
plate. Hand-tighten all four (4) nuts.
2.2.10 Wrench-tighten the nuts a little bit at a time, going alternately from 1 to 3, then 2 to 4. Do not tighten down
too much on one side because this will shift the valve at an angle and may make it impossible to get a tight
gasket seal.
2.2.11 Torque the nuts according to the torque specifications from the gasket manufacture’s recommendations
and to not exceed the torques specified in Section 1.2.
2.2.12 Inspect the valve for leaks according to your company’s procedures for this testing. The primary areas to
check are in the side-port area, the packing gland area, the flange connection between the cover plate, and
the valve and seat. In order to check the seat for leaks on an
installed valve on the tank car, pressure may be applied to the
outlet flange with the valve in the “closed” position. Look for any
pressure decay. Keep in mind that some compensation would
need to be made for pressure changes as temperature changes.
This is recommended in the event that there is no procedure in
Gland
place from your company to test the valve’s seat when installed
on a tank car. When closing the valve, hand-tighten. If it does not
seal, remove the valve for repair per Maintenance Instructions in
Section 4.0.
Area
Insert
Doc. #: A-718C, Rev. 1
Page 10 of 36
Page 11

2.2.13 Attached to the bonnet is a tag that indicates operating instructions on one side of the tag and on the reverse
Figure 2-2 Valve Information Tag
Figure 2-3 Important Operating Instructions
side are blanks to be filled in. The record of the valve’s service experience will be valuable information in
evaluating the valve’s performance. Fill in the appropriate information on this tag.
2.2.14 A placard with an adhesive backing has been provided with each car set of valves. This gives important
operating instructions. The placard should be placed on the underside of the hinged protective housing
cover for the guidance of the personnel using these angle valves.
Doc. #: A-718C, Rev. 1
Page 11 of 36
Page 12

3.0 Operating Instructions
Figure 3-1 Pipe Plug
Figure 3-2 Tighten Packing Screw
3.1 Valve Operation Notes and Precautions
NOTE: Operation of the valve must conform with all applicable CTC, AAR, DOT specifications
(Parts 173.31, 174.67, etc.), other governmental bodies, and the operating instructions of your
company.
3.1.1 Bear in mind with the Midland angle valve that it will seal completely with much less torque than a metalto-metal seated valve. It should close with the same approximate torqueing as with a faucet on a wash
basin. Turn the hand wheel clockwise to close the valve; turn the hand wheel counterclockwise to open the
valve.
CAUTION: Do not apply a “cheater” or handle extension to the hand wheel. Excessive force
will shear through the valve’s Teflon® seal, making it difficult or impossible to close off. If the valve
is leaking at the seat inside the valve and you cannot stop it by a firm closing (by hand) of the hand
wheel, inform your supervisor that the valve is defective and must be removed for reworking.
3.1.2 Examine the pipe plug. Be sure its threads are clean, free from corrosion and not worn or crossed. Also,
examine the threads on the side port to see that they are in good operating condition.
3.1.3 This valve has an adjustable packing gland. Use a 1-1/16" wrench to tighten the packing screw (item 8). In
the event of a packing leak, ensure the packing screw is torqued to a minimum of 30 ft-lb. Tighten the
packing screw in 1/4-turn increments until the leak stops, then turn an additional 1/4 turn.
Unnecessary overtightening of the packing screw will cause excessive frictional drag on the valve stem.
Doc. #: A-718C, Rev. 1
Page 12 of 36
Page 13

4.0 Maintenance Instructions
NOTE: It is important that a periodic retest and preventative maintenance program be
established. The DOT and AAR have set forth a retesting interval that should be considered the
maximum length of time between tests. To assist in scheduling valves for retest, a tag showing
the installation date is attached to the valve. However, there are two measurements that will
indicate if the valve should be repaired sooner, regardless of the scheduled retest date:
1. If there is more than 7/8" between the bottom of the hand wheel and the top of the bonnet in the
closed position, the Teflon® seat has been deformed and needs immediate replacement;
Figure 4-1 Hand Wheel and Bonnet
2. If the top of the packing screw (item 7) is within 3/8" of being flush with the yoke surface, the valve
must be repacked since no adjustment is remaining.
Figure 4-2 Packing Screw
If either condition exists, the valve must be removed and repaired. When the valve is removed from
the cover plate, ensure the valve and stem is protected from damage.
NOTE: It is an AAR requirement (refer to D4.04) that new O-rings be installed when a valve is
retested.
4.1 Prior to Maintenance Tasks Performed
4.1.1 Retesting of Valves in Storage
Midland valves are factory set and sealed. If they have been left in their original shipping containers, are
undamaged, and are no more than six (6) months old; they may be installed without being retested.
Doc. #: A-718C, Rev. 1
Page 13 of 36
Page 14

5.0 Valve Disassembly
Figure 5-1 Test Hand Wheel
and Stem
Figure 5-2 Remove Bolts
Figure 5-3 Remove Bolts and Washers
5.1.1 Before valve disassembly, open and close the hand wheel to run the stem (item 2) up and down to ensure
that the stem is neither bent nor binding in the threaded part of the bonnet (item 5). Bent stems must be
straightened to proceed with the disassembly.
5.1.2 Remove the three (3) side-port bolts and lock washers (items 6 and 21, respectively).
Doc. #: A-718C, Rev. 1
Page 14 of 36
Page 15

5.1.3 Remove the outlet flange (item 30). If it is difficult to dislodge, screw a 1" threaded nipple about 10" long
Figure 5-5 Loosen Packing Screw
Figure 5-6 Lower Stem
into the port. Move it back and forth gently to loosen the flange and work it off the valve body (item 4).
Figure 5-4 Remove Outlet Flange
5.1.4 Loosen the packing screw (item 7). Take care that any trapped chlorine fumes do not release on the person
disassembling the valve.
5.1.5 Using the hand wheel (item 1), lower the stem (item 2) so that the seal retainer (item 3) is below the sealing
area of body (seat).
Figure 5-7 Seal Retainer Below Body (Seat)
Doc. #: A-718C, Rev. 1
Page 15 of 36
Page 16

5.1.6 Rest the end portion of the stem on wood block leveled with body. Make sure there is only 3" between the
Figure 5-8 Remove Retaining Pin
Figure 5-9 Unscrew Slotted Nut
Figure 5-10 Remove Retainer
Figure 5-11 Remove Nuts and Washers
Figure 5-12 Lift Bonnet from Body
body and the wood block. Drift out retaining pin using a standard 1/8" diameter drift. Then unscrew the
retainer slotted nut, remove the retainer assembly, retainer O-ring and retainer seal washer. Cut the Teflon
seat seal out. Do so with care, as so the metallic retainer surface beneath is not damaged.
5.1.7 Take off the four (4) bonnet nuts and lock washers (items 15 and 16, respectively). The body should then
be able to be disengaged from the bonnet.
®
Doc. #: A-718C, Rev. 1
Page 16 of 36
Page 17

5.1.7.1 At this point, remove the seat insert (item 31) from the body
Figure 5-14 Remove Nut and Washer
Figure 5-15 Lower the Stem
Figure 5-13 Remove Seat Insert
(item 4). The seat insert will be held in place by pressure exerted
by the two (2) O-rings (item 33). One possible option to assist
in the removal of the seat insert is by placing a circular piece of
hardwood or plastic on top of the seat insert on the inside of the
body through the outlet hole. Once this block of wood or plastic
is in place, insert a 3/4" diameter plastic or aluminum rod
through the top of the body until it contact the block of
wood/plastic sitting inside the body, resting against the seat
insert. Once contact is made, using a hammer or mallet, lightly
tap the top portion of the rod until the insert is pushed out of the
body. Handle the insert with care, as this is where the crowned
seat is located.
ATTENTION: Do not use a steel block to assist in the
removal of the seat insert as it might nick or damage the top surface of the insert. Additionally,
ensure that the body assembly is supported by the body flange outer edges, as so when the insert
is being pushed out it can come out easily with its path being obstructed.
ATTENTION: The seat insert is not threaded into the body; it is held in place only by the
compressive force of two (2) O-rings. Do not place the bottom of the insert in a vise to assist in
removing it as it may deform the tongue and gasket surfaces, which are machined to a close
tolerance to fit into the groove in the cover plate.
5.1.8 Use a 1-1/16" open-end wrench to unscrew the packing screw (see Figure 5-5). Then remove the hand
wheel nut and washer (items 13 and 25, respectively). Using the hand wheel, screw the stem down through
the bonnet as far as it can go. It should be possible, gripping by hand on the retainer end of the stem, to
screw it all the way out of the bonnet. If it binds on the last threads, put the retainer end of the stem into the
vise, gripping it lightly and proceed to back the bonnet off from the stem.
Doc. #: A-718C, Rev. 1
Page 17 of 36
Page 18

If the packing (item 10) remains in the body, a hook-shaped tool will dislodge it, as well as the male adapter
Figure 5-18 Remove Bonnet/
Stem from Body
Figure 5-16 Dislodge Packing, Male Adapter,
Spring and O-rings
Figure 5-17 Packing, Male
Adapter, Spring and O-rings
Table 5-19 Exploded
View
Item 10
Item 20
Item 18
Item 28
Item(s) 11
(item 20) , wave spring (item 28) and the two (2) stem O-rings in the body (item 11). The hook-shaped tool
can be obtained from Midland (P/N: 712-27-CS). This tool should also be used to remove the stem O-rings
(item 11), the outlet O-rings (item 12) and insert O-rings (item 33).
very critical and must be examined carefully. The crown of the seat has a full radius
5.1.9 The seat surface of the insert is
Doc. #: A-718C, Rev. 1
Page 18 of 36
Page 19

(approximately 1/16"). Run your fingernail around the crown to be sure it is free of any nicks, scratches or
Figure 5-20 Inspect Seat Surface
Figure 5-22 Inspect Seat Seal
Figure 5-23 Retainer, Seal, Washer, Pin and Nut
Figure 5-24 Exploded View
Figure 5-21 Exploded View
Inspect
Thoroughly
Item 19
Item 17
Item 27
Item 9
Item 3
Item 18
pits. Also, any chatter or tool marks on the seat crown should removed. The overall height of the crown
should not be less than 7/32". If the tongue needs to be re-dressed, the tongue’s dimensions are 4.745 ±
0.005” ID by 4.005 ± 0.003” OD. If tolerances are exceeded or the condition is questionable, do not take a
chance on it; replace with a new part.
5.1.10 Inspect the retainer assembly [retaining pin (item 18), retaining nut (item 19), seal retainer assembly and
retaining washer (item 27)] that was removed in Step 5.1.7. Inspect O-ring and seal seat for any sign of
degradation; replace with new parts.
Doc. #: A-718C, Rev. 1
Page 19 of 36
Page 20

6.0 Valve Inspection & Replacement of Parts
Follow the guidelines in this section for inspecting the condition of valve components after disassembly. In some
instances a component can be properly evaluated for damage or cracks only with the use of specialized techniques,
such as dye-penetration or magnetic-particle testing, according to a qualified procedure by certified trained
personnel. Such testing is indicated within this document where mandatory.
Additionally, specific inspections must be performed during and after reassembly of the valve to ensure proper and
reliable operation.
ATTENTION: The Teflon® seat seal, packing, gaskets and O-rings should be replaced periodically
based upon experience. All replacement parts must be obtained from Midland Manufacturing Corp.
No remachinging of any parts is permitted, excepted where noted herein. By not observing these
prohibitions that purchaser assumes full repsonsibility and liability for the proper functioning of the
valves.
CAUTION: O-Ring Degradation. O-rings develop micro cracks, can swell or shrink, and become
harder or softer with age and chemical exposure. An O-ring that fits loosely in the cap, or can only
be pushed into the O-ring retainer with difficulty, is quite likely not the correct size. Many of
Midland’s O-rings are made on special molds to non-standard sizes and are obtainable only from
Midland.
CAUTION: Defective Parts. If any parts appear defective, it is recommended they be replaced, or
consult with Midland for recommended repair techniques when applicable.
6.1 Inspection & Replacement Procedure
6.1.1 Hand Wheel (item 5). The part is designed to fail when the stem is over-torqued. The metal around the
square fragments. If this metal is cracked in the corners or broken off, the hand wheel must be replace.
Figure 6-1 Hand Wheel
Doc. #: A-718C, Rev. 1
Page 20 of 36
Page 21

6.1.2 Stem (item 2). Roll the stem in “V” blocks or on a flat surface. It will be apparent if the stem is bowed. If
Figure 6-4 Valve Bonnet and
Packing Screw
straightening is required, do not grip or deflect it on the ground surface of the packing zone, in the Acme
thread zone, in the 1/16"-20 thread area and below, where deformation of the metal would foul the threads
or damage stem straightness. All nicks, burrs, pits, scratches, etc., must be removed. Inspect for cracks in
the thread root area.
Figure 6-2 Valve Stem
6.1.3 Body (item 4). Inspect the part for corrosive degradation, particularly in areas where O-rings and flat gasket
seals are positioned. Clean off these areas to be sure they are free of pits, scratches, etc. that could form
leak paths. The threads are 3/8"-16 on top flange and 1/2"-13 on side flange. If any of the threads are
stripped or corroded, remove and replace the studs.
Figure 6-3 Valve Body
6.1.4 Bonnet (item 5). Since this is not a pressure containing part, a visual
evaluation of its general condition should be made. The Acme thread
is 3/4"-6. The thread for the packing screw 1-1/4"-12. If either thread is
stripped, crossed or pitted, the part should be discarded and replaced.
6.1.5 Packing Screw (item 7). The thread is 1-1/4"-12. It must be clean
without nicks, scratches, pits and other defects that would strip or gall
the bonnet thread when assembled.
6.1.6 Retainer Seal Washer (item 27). If this has been dished due to overtorqueing the stem, flatten in a vise.
Figure 6-5 Retainer Washer
Doc. #: A-718C, Rev. 1
Page 21 of 36
Page 22

6.1.7 Outlet Flange (item 30). The O-ring groove and the flat gasket surfaces must be free of nicks, scratches
and pits. Similarly, the 1" NPT must be in good condition. If necessary, clean the 1" NPT with a tap.
However, a thread gauge should be used to be sure the thread is not oversized. The standard hand
engagement is 0.400 inches and the acceptable tolerance is plus or minus one full turn (0.087 inches). If
this tolerance is exceeded, the outlet flange must be replaced.
Figure 6-6 Outlet Flange
6.1.8 Pipe Plug (item 29). Using a wire brush, clean the 1" NPT threads. Inspect for worn, rusted or galled
threads. The proper thread profile is a pointed “V”. Rounded thread will not seal. Replace the pipe plug if
the threads are imperfect.
Figure 6-7 Pipe Plug
6.1.9 Seat Seal (item 9). If the Teflon® seat is deformed by the body sealing to a depth of 1/16", or if it has
embedded debris, discard it. Replace with a new seal. This part is made of a special blend of Teflon® and
other materials to provide high strength and resistance to cold flow and is not commercially available except
from Midland.
Figure 6-8 Seat Seal
Doc. #: A-718C, Rev. 1
Page 22 of 36
Page 23

6.1.10 Seat Insert (item 31). This is a critical part that must be examined carefully. The crown of the seat has a
full-radius (approximately 1/16"). Run your fingernail around the crown to be sure it is free of any nicks,
scratches or pits. This is a difficult part to re-machine because it has to be trued up with a dial indicator and
held with special jaws that grip just above the collar. Do not choke on the collar because any jaw marks
there may distort it out of tolerance. Also, any chatter or tool marks on the seat crown are potential leak
paths. The O-ring grooves and flat gasket seat surfaces must be free of imperfections that could potentially
cause a leak. If the tongue is to be redressed, use very light choking force to avoid distorting the tongue.
Use a dial indicator to get the part to run true. Do not face the thickness of the collar. The tongue’s
dimensions are 2.245 ± 0.003 inches OD by 1.505 ± 0.003 inches ID. If tolerances are exceeded or the
condition is questionable, do not to take a chance on it; replace it with a new part.
Figure 6-9 Seat Insert
6.2 Special Inspection Considerations
Previous procedures may not cover all conditions encountered in the field. Therefore, it is the responsibility
of the repair agency to obtain approval from Midland for inspection, evaluation, repair and maintenance
procedures not covered herein.
Facilities performing recommended dye-penetration and magnetic-particle testing must carry out such testing
according to a qualified procedure conducted by certified trained personnel.
Evaluation of critical component metal surfaces of the valves after cleaning, inspection and specialized
testing performed by agencies other than the repair facility are the responsibility of the repair facility.
Where numerical tolerances cannot be provided, the disposition of the internal integrity and surface quality
of parts is under the jurisdiction of the repair facility and dependent on its experience and judgment.
Doc. #: A-718C, Rev. 1
Page 23 of 36
Page 24

7.0 Cleaning
Figure 7-1 Clean Threads
Figure 7-2 Clean Side Port
Figure 7-4 Clean Outlet
Flange and Threads
Figure 7-5 Clean
Packing Screw
NOTE: In preparation for reassembly, all metallic parts should be cleaned. Do not use
solvents or grease lubricants that are incompatible with the products in the tank. For example, a
petroleum-based grease may cause a chemical reaction when it comes in contact with chlorine.
Contact your supervising engineer for suitable cleaning and lubricating material
recommendations. O-rings and metallic parts that fit together should be lightly greased.
7.1.1 Use a wire brush or pad to clean out the threads of the bonnet and the recess for the packing in the top of
the body. Also, clean the grooves and the bore where the seat inserts fit into the body. Clean the side port
where the outlet O-rings and the outlet flange gasket seal.
7.1.2 With a buffing wheel, clean out the threads of the stem and remove all traces of chlorine deposits on the
unthreaded part of the stem.
Figure 7-3 Clean Stem Threads and Smooth Areas
7.1.3 On the outlet flange, remove all traces of chlorine by buffing the flat flange and the O-ring seal areas. Clean
all solidified product, Teflon® tape, etc. from the threads.
7.1.4 Clean the underside of the packing screw. It may also be necessary to buff the exterior male threads, as
well; but take care to not remove part of the Teflon® insert that is used to lock the thread.
Doc. #: A-718C, Rev. 1
Page 24 of 36
Page 25

8.0 Valve Reassembly
Figure 8-1 Grease Threads
Figure 8-2 Grease Inside Threads
Figure 8-3 Grease Stem
Figure 8-4 Grease Stem Threads
8.1.1 Place the bonnet on the body to ensure an accurate fit. Ensure that the body and bonnet flanges mate with
no space in-between. Then take the bonnet off the body. Lightly grease the inside threads, the bore and
the bottom flange face of the bonnet.
8.1.2 Apply grease to the Acme thread and entire length of stem (item 2). Screw it into the bonnet (item 5) and
run it up and down the full length of the thread. It should thread into the bonnet loosely. Take the stem out
from the bonnet; it will be reinserted later.
Doc. #: A-718C, Rev. 1
Page 25 of 36
Page 26

8.1.3 If the packing screw and white PTFE wiper (item 24) are in good condition, apply a light film of grease on
Figure 8-5 Inspect Packing Screw and Wiper
Figure 8-6 Grease Packing Screw
Figure 8-7 Insert Packing Insert in Bonnet
the inside and outside surfaces of the packing screw.
8.1.4 Place packing screw (item 8) into the bonnet yoke. Engage the screw by only a few threads, so the bottom
of the screw does not protrude below the threaded part of the bonnet. Tighten the packing screw to 30 ±
3 ft-lb (40 ± 4 N·m) to seat the Teflon® packing rings. Prevailing drag on the stem due to the packing
will be about 3 ft-lb (4 N·m).
8.1.5
Carefully screw the stem all the way up into the bonnet.
Figure 8-8 Reapply Grease to Stem Figure 8-9 Insert Stem into Bonnet
Doc. #: A-718C, Rev. 1
Page 26 of 36
Page 27

8.1.6 Assemble five (5) Teflon® V-rings (item 11) in a stack and apply grease to the inside and outside of the
Male Packing Adaptor
packing.
Figure 8-10 Lubricate Rings
8.1.7 Lubricate interior of the body neck. Insert packing spring into the neck of the body as shown.
Figure 8-11 Lubricate Body Neck Figure 8-12 Insert Packing Spring
8.1.8 Insert the male packing adapter (item 20) with the pointed end nesting into the “V” of the packing facing
upwards. See image below for reference.
Figure 8-13 Insert Male Packing Adaptor
Doc. #: A-718C, Rev. 1
Page 27 of 36
Page 28

8.1.9 Apply grease to the two (2) O-ring grooves recessed in the top of the body. Grease both O-rings. It should
Figure 8-14 Install First O-ring in Lower Groove
Figure 8-15 Install Second O-ring in Upper Groove
be easier to position the top O-ring, then install the other one into the lower groove. Be sure both O-rings
are properly installed in the grooves.
8.1.10 Insert packing rings. Ensure to the place the packing rings with the pointed end facing upward.
Figure 8-16 Insert Packing Rings
Doc. #: A-718C, Rev. 1
Page 28 of 36
Page 29

8.1.11 Grease the top part of the body flange and put the bonnet assembly on it, inserting the valve stem through
Figure 8-17 Insert Stem into
a Greased Valve Body
Figure 8-18 Place Lock
Washers and Nuts
Figure 8-19 Tighten Lock
Washers and Nuts
the two installed O-rings of the body. Make sure the bonnet arms are in-line with the triangular outlet of the
valve body as shown below.
8.1.12 Grease the top flange studs (item 14) on the body and put on the lock washers and nuts. Using the
appropriate-sized wrench tighten the nuts down alternately 1 to 3, then 2 to 4, and tightening to 30 in-lb
(40.7 N·m).
Doc. #: A-718C, Rev. 1
Page 29 of 36
Page 30

8.1.13 Put the hand wheel (item 1) on the stem and run it up and down to be sure the stem moves freely.
Figure 8-20 Place Hand Wheel on Stem
8.1.14 Tighten the packing screw to 30 ± 3 ft-lb (40 ± 4 N·m) to seat the Teflon® packing rings. Prevailing drag on
stem due to packing will be about 3 ft-lb (4 N·m).
Figure 8-21 Tighten Packing Screw
8.1.15 Apply grease to the seat insert O-rings (item 33). Insert the two (2) seat insert O-rings into the O-ring
grooves located on the seat insert.
Figure 8-22 Install O-Rings on Seat Insert
Doc. #: A-718C, Rev. 1
Page 30 of 36
Page 31

8.1.16 Grease the cavities in the base of the body, the lower gasket (item 32) and insert gasket.
Figure 8-23 Grease Body Base
Figure 8-24 Install Lower Gasket
Figure 8-25 Grease Seat Insert
Figure 8-26 Install Seat Insert
8.1.17 Grease the exterior surface of the seat insert and insert it into the body by pushing it down with the palm of
your hang and slowly rotating it.
Doc. #: A-718C, Rev. 1
Page 31 of 36
Page 32

8.1.18 Rotate the stem until 7/16"-20 threaded area is well below tongue on the seat insert. Lightly grease the
Figure 8-27 Insert Retainer Washer
Figure 8-28 Secure Retaining Nut
Figure 8-29 Insert Retaining Pin
Figure 8-30 Install Flange Gasket
Figure 8-31 Install Flange O-rings
Figure 8-32 Grease the O-rings
7/16"-20 threads. Insert retainer seal washer, O-ring and retainer assembly through the bottom of the stem
and secure the seat seal in place with retaining nut. Once nut is tightly secured, insert retaining pin to
prevent retainer assembly and nut from backing out. Ensure that the retainer assembly is inserted with a
Teflon® seat seal (item 9) facing the body and with an O-ring (item 17) in the respective groove.
NOTE: Extra care should be exercised when handling, mounting and un-mounting valves as the
stem extends out of the body. Any damage to the stem will make the valve inoperable with the
mating check valve. The stem must be protected at all times.
8.1.19 Try inserting the outlet flange (item 30), without an O-ring (item 12) or gasket (item 22), into the side port
of the body. It should go down all the way, so that the facing flanges are touching or are within 1/32 " of
touching.
8.1.20 Apply grease to the three (3) cap screws (item 6), in the bore body and on the flange of the side port of the
body. Also, apply grease on the flange face (item 7) and in the O-ring grooves. Put the outlet flange gasket
(item 23) on the outlet flange and then put the O-rings (item 13) on. Rotate the flange to verify that the Orings are evenly recessed into the grooves of the hub of the flange. Be sure to apply a light coating of
grease to the exterior of the O-rings after they are in place on the outlet flange.
Doc. #: A-718C, Rev. 1
Page 32 of 36
Page 33

8.1.21 Press the outlet flange into the side port of the body. Install lock washers and bolts; tighten bolts to 45 ft-lb
Figure 8-33 Install Outlet Flange
Figure 8-34 Install Washers/Bolts
Figure 8-35 Tighten Bolts
Figure 8-36 Assemble Hand Wheel Components
Figure 8-37 Install Hand Wheel
(61 N·m).
8.1.22 Assemble the instruction plate (item 23), hand wheel washer rounded edge facing upwards (item 25) and
hand wheel nut (item 13) on the stem. Ensure that the nut’s plastic lock in on top. Tighten nut.
Doc. #: A-718C, Rev. 1
Page 33 of 36
Page 34

8.1.23 Install the outlet pipe plug (item 29) in the outlet flange.
Figure 8-38 Install Pipe Plug
Figure 8-39 Attach Chain to Body
Figure 8-40 Secure Chain to Body
8.1.24 Attach the chain to the body.
Doc. #: A-718C, Rev. 1
Page 34 of 36
Page 35

9.0 Valve Testing Procedure
If your company has an approved test procedure, follow it. If it does not, these procedures provide essential
guidelines in regards to pressure testing.
CAUTION: Safety Protection. Wear appropriate safety glasses or face-shield and protective
clothing when conducting this procedure. Valve testing involves high-velocity air and water flow
that can cause injury.
9.1 Testing Procedure
9.1.1 Locate the valve onto a test fixture.
9.1.2 Secure the valve to the test fixture.
9.1.3 Close the valve. It should only be necessary to torque the hand wheel approximately 20 ft-lb (27 N·m) to
achieve a bubble tight seal in the valve. Remove the pipe plug.
9.1.4 There are several acceptable methods of checking for a seat leak, but one simple way is to put a piece of
2"-wide masking tape across the side port. Poke a small hole in the center of the tape and cover the hole
with a little soap-suds solution. Any leak will result in bubbles forming at the hole.
9.1.5 After the seat has been satisfactorily tested for no leakage, thread the pipe plug into the side port, open the
valve to pressurize the body cavity and inspect for leaks around the pipe plug, the outlet flange and the
packing area.
9.1.6 Verify the proper setting of the packing screws by repeating Steps 8.1.13 of Valve Reassembly.
9.2 Post-Test Procedures
9.2.1 After satisfactorily testing the valve, close-off the supply pressure to the test stand, relieve the pressure and
un-mount from test fixture.
9.2.2 Open valve to drain any water that may have accumulated, then wipe or blow away, with an air hose, any
soap suds and water used during testing.
9.2.3 Do not paint the valve. The Monel bonnet and Hastalloy body do not need it. If paint gets into the threads
of the stem or bonnet, the valve will be inoperable.
9.2.4 Fill in the test date information on the tag located on the valve. Store the valve in a dry place until ready to
use.
Doc. #: A-718C, Rev. 1
Page 35 of 36
Page 36

10.0 Warranty
Midland warrants the products of its own manufacture to be free of defects in material and workmanship for a period
of one (1) year from the date of invoice. Furnished materials and accessories purchased from other manufacturers
are warranted only by and to the extent of those manufacturers’ warranties, if any.
MIDLAND MAKES NO WARRANTY OF ANY KIND WHATSOEVER, EXPRESS OR IMPLIED, OTHER THAN AS
SPECIFICALLY STATED HERE MIDLAND MAKES NO WARRANTIES OF MERCHANTABILITY OR FITNESS
FOR ANY PARTICULAR PURPOSE OR USE.
Midland’s obligation under this warranty is strictly limited, at its option, to 1) repair or replacement at its factory of a
like quantity of product: 2) refunding to purchaser money paid to Midland for its product: or 3) issuance of written
authorization for the Purchaser to repair or replace, at costs comparable to Midland’s n ormal manufacturing costs
those parts proven defective, provided that Purchaser has given to Midland immediate notice upon discovery of
such defect Merchandise claimed to be defective shall not be returned without first obtaining Midland’s written
consent. The undertaking of repair or replacement by the Purchaser, or its agents, without Midland’s written
consent, shall void Midland’s warranty and relieve Midland of all responsibility. Under no circumstances shall
Midland be liable for any direct, incidental, consequential or other damages of any kind in connection with the
installation, operation, maintenance, repair, inspection or other use of any product purchased from it.
Doc. #: A-718C, Rev. 1
Page 36 of 36
 Loading...