

Page 1

Встраиваемая духовка
Page 2

Встраиваемая
духовка
Руководство по эксплуатации
Модель:
MO 72000 GB
MO 72039 X
Page 3

Содержание
Вступление ............................................................................................................................ 4
Предупреждение ................................................................................................................... 4
Инструкция по подключению ................................................................................................ 5
Панель управления ............................................................................................................... 6
Функции духового шкафа ...................................................................................................... 7
Принадлежности .................................................................................................................
Инструкции по эксплуатации .............................................................................................. 1
Энергоэффективное использование .................................................................................. 1
Обслуживание ..................................................................................................................... 1
Дверца духового шкафа ..................................................................................................... 18
Устранение неисправностей ............................................................................................... 21
Рецепты ............................................................................................................................. 2
Технические характеристики .............................................................................................. 25
9
1
4
5
4
Page 4

• Ни при каких обстоятельствах не ремонтируйте устройство самостоятельно. Ремонт,
выполненный не специалистами, может привести к повреждениям или более
серьезным сбоям в работе устройства.
• Не прикасайтесь к устройству влажными частями тела, это может привести к удару
электрическим током.
• Не используйте шлифующие моющие средства и металлические скребки для очистки
стекла духовки, это может поцарапать поверхности и нанести непоправимый ущерб
стеклу.
• Не используйте шнур питания с адаптером или удлинителем, это может привести к
пожару.
• Если кабель поврежден, то он должен быть заменен на новый кабель типа H05W-F или
H05V2V2-F квалифицированным электриком. Поперечное сечение используемого
кабеля должно быть минимум 1,5 мм2.
• Электропитание должно быть должным образом заземлено и подключено в розетку не
менее 250 вольт и 20 ампер.
Панели кухонного гарнитура рядом с духовым шкафом должны быть изготовлены из _
термостойкого материала. Убедитесь, что клей, которым склеены фанерные панели, может I
выдерживать температуру 120°С. Пластиковые панели или клей фанерных панелей могут
не выдержать высокой температуры и начать плавиться и деформироваться. После того, как
шкаф будет установлен, необходимо изолировать электрические части шкафа.
• Все крепления должны быть привинчены на местах так, чтобы их невозможно было
вытащить без специальных инструментов.
• Снимите заднюю панель кухонного шкафа для обеспечения нормальной циркуляции
воздуха округ духовки. Зазор с задней стороны духовки должен быть не менее 45 мм.
Производитель оставляет за собой право вносить изменения в конструкцию,
комплектацию и характеристики изделия без предварительного уведомления. Только
для домашнего использования.
4
Page 5

Инструкция по подключению
Распаковка духового шкафа
Когда вы распаковали духовку, удостоверьтесь, что она не была повреждена. Если у вас
есть какие-нибудь сомнения: свяжитесь с сервисным центром или продавцом, у которого
вы приобрели духовку.
Духовой шкаф тяжелый. Соблюдайте осторожность при его перемещении. Перед
началом использования духового шкафа убедитесь, что вся упаковка внутри и снаружи
была извлечена.
Подключение
_ Духовой шкаф должен быть подключен согласно прилагаемым инструкциям.
I Любые работы связанные с электричеством должны проводиться квалифицированным
электриком.
Встраивание
Важно, чтобы размеры и материалы ниши в которую будет встраиваться духовка были
подходящими и могли выдерживать температуру как минимум 120°С. Размеры
устройства и ниши представлены ниже.
5
min.
min.
550
550
560
560
560
105
446600
500
min.35
min.585
max.595
590
min.
min.
550
550
105
+
88
20
546
min.
min.
600
600
mmiinn.. 55
560
559966
5576
mmiinn.. 55
560
500
446600
500
+88
559955
566
min.35
min.35
min.35
Page 6

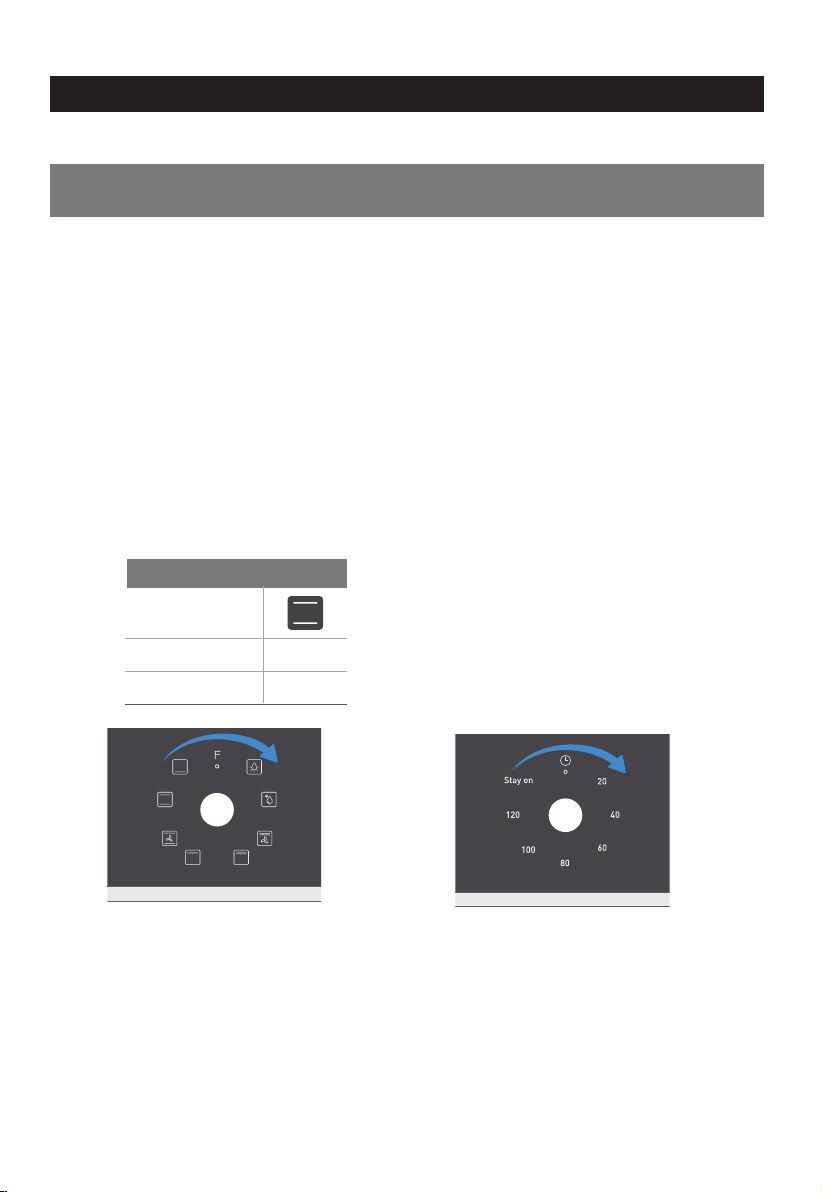
Панель управления
Ручки управления
Поворачивая данные ручки, установите нужный режим работы. Каждая ручка оснащена
расположенными рядом значками на стекле панели управления, чтобы Вы могли легко
могли выбрать и настроить нужный вам режим.
Индикатор
Индикатор — это такой световой огонек, который отображает, работают ли нагреватели
внутри прибора или нет, когда прибор включен. Индикатор будет периодически
загораться и гаснуть.
Управление
Отдельные элементы управления адаптированы для различных функций Вашего
устройства. Вы можете настроить свой прибор просто и напрямую. Нет никаких
ограничений для порядка работы с ручками, что делает вас полностью свободным во
время использования прибора.
Ручка выбора функций Ручка таймера Ручка выбора температуры
6
Page 7

Функции духового шкафа
Символ
Описание функций
Освещение духовки: позволяет увидеть процесс готовки без открытия дверцы
Размораживание: циркуляция воздуха комнатной температуры позволяет быстрее
разморозить замороженные продукты без использования нагрева.
Нижний нагрев: скрытый нагревательный элемент в нижней части духовки
обеспечивает более концентрированный нагрев основания блюд без краев. Этот
режим идеально подходит для приготовления запеканок, выпечки, пиццы и других
блюд с зажаристым основанием.
Верхний и нижний нагрев: духовка должна быть разогрета перед этим режимом. Этот
режим идеально подходит для отдельных больших блюд, таких как торт. Лучший
результат обеспечивается, если поставить блюдо в центр духовки. Температура может
быть выбрана в диапазоне 50-250°С.
Конвекционный нагрев: работают верхний и нижний нагревательные элементы и
конвектор. Благодаря более равномерному нагреву достигается 30-40% экономии
энергии. Блюда слегка запекаются снаружи и хорошо пропекаются внутри. Режим
идеален для жарки на гриле или вертеле больших кусков мяса при высокой
температуре.
Гриль: температура может быть установлена в диапазоне от 50 до 250°С.
Рекомендуется использовать температуру 180-240°С. Используйте для маленьких или
тонких кусков мяса. Во время приготовления воздержитесь от открытия двери
духовки. Расположите пищу как можно выше.
Двойной гриль: температура может быть установлена в диапазоне от 50 до 250°С.
Рекомендуется использовать температуру 180-240°С. Идеально для больших кусков
мяса. Во время приготовления воздержитесь от открытия двери духовки.
Расположите пищу как можно выше.
Двойной гриль с конвекцией: подходит для равномерного зажаривания больших
кусков мяса. Рекомендуется использовать вертел.
7
Page 8

Примечания.
• Чтобы разморозить большие порции пищи, можно снять боковые направляющие стойки
и поставить контейнер с пищей на дно рабочей камеры.
• Для подогрева посуды целесообразно снять боковые стойки, и выбрать режимы
«Двойной гриль с конвекцией» или «Верхний и нижний нагрев с вентилятором» с
настройкой температуры 50 °C. «Двойной гриль с конвекцией» следует использовать,
если столовая посуда покрывает более половины дна камеры.
• Благодаря оптимальному равномерному распределению тепла внутри камеры во
время режима «Верхний и нижний нагрев с вентилятором» вентилятор будет работать в
определенные моменты процесса нагрева, чтобы гарантировать наилучшую
возможную производительность.
Осторожно!
• Если вы откроете дверцу прибора во время процесса приготовления, процесс не будет
приостановлен. Пожалуйста, будьте особенно осторожны с открыванием дверцы —
| существует высокий риск получения ожогов.
• • Не закрывайте вентиляционные отверстия. В противном случае прибор может
перегреться.
• Чтобы духовой шкаф быстрее остыл после процесса приготовления, охлаждающий
вентилятор может продолжать работать еще некоторое время.
Осветительные приборы
В процессе приготовление пищи лампа всегда будет гореть, до самого окончания
приготовления. Вы можете отдельно включать функцию «Освещение» во время любых
операций, т. е. очистки, подготовки процесса приготовления, приостановки режимов
нагрева при открытии дверцы и т.д.
Вентилятор
| Вентилятор охлаждения включается и выключается по мере необходимости. Горячий
• воздух выходит над дверью.
8
Page 9

Принадлежности
К вашему духовому шкафу прилагаются несколько принадлежностей. Здесь Вы можете
найти обзор включенных принадлежностей и информацию о том, как правильно их
использовать.
Решетка Универсальный противень
Для форм для выпечки и Для запекания больших и малых
жаропрочной посуды. Хорошо блюд,
подходит для приготовления
жаркого и блюд на гриле.
Вы можете использовать противень для предотвращения стекания жидкостей или
приготовления жирной пищи.
Используйте только оригинальные аксессуары и принадлежности. Они специально
адаптированы для вашего духового шкафа. Вы можете купить аксессуары и
принадлежности в отделе послепродажного послепродажном обслуживании вашего
магазина, в специализированных магазинах или через интернет.
Примечание: принадлежности могут слегка деформироваться, когда они становятся
горячими. Это не влияет на их функционал. При остывании они возвращают свою
первоначальную форму.
Вставка принадлежностей
Рабочая камера духового шкафа имеет пять положений уровней направляющих полок.
Уровни отсчитываются снизу вверх. Принадлежности можно вытаскиваются без
опрокидывания примерно до середины направляющей.
Примечание:
1. Убедитесь, что вы всегда вставляете принадлежность в духовой шкаф в правильном
направлении.
2. Всегда вставляйте принадлежности полностью, чтобы они не касались дверцы духовки.
9
Page 10

Функция блокировки
Принадлежности можно вытаскивать из камеры примерно наполовину, пока они не
зафиксируются на месте. Функция блокировки предотвращает наклон и падение
принадлежностей при их извлечении. Всегда аккуратно и правильно вставляйте
принадлежности в духовку, чтобы обезопасить их от наклонов и падений.
Вставляя решетку, убедитесь, что вы вставили ее в правильном направлении, как на
рисунках 1,3.
Вставляя противень, убедитесь, что Вы вставили его в правильном направлении, как на
рисунках 1,4.
4
10
1
3
2
5
4
3
2
1
4
Page 11

Инструкции по эксплуатации
Перед первым использованием духового шкафа для приготовления пищи необходимо
обеспечить чистоту рабочей камеры и принадлежностей.
1. Удалите все наклейки, защитные пленки и защитные детали транспортной тары.
2. Извлеките из рабочей камеры все принадлежности и боковые стойки- направляющие.
3. Тщательно очистите направляющие боковые стойки с помощью мыльной воды и
тряпки для мытья посуды или мягкой щетки.
4. Убедитесь, что в рабочей камере нет остатков упаковки, таких как гранулы
полистирола или деревянные детали, которые могут привести к пожару.
5. Протрите гладкие поверхности в рабочей камере и на дверце мягкой влажной тканью.
6. Чтобы избавиться от запаха нового прибора, раз-
огрейте пустую духовку до максимальной температуры
и оставьте работать пустой духовой шкаф на 1 час.
7. Держите кухню хорошо проветриваемой, пока духовка
прогревается в первый раз. В это время не допускайте
детей и домашних животных на кухню. Закройте дверь
в соседние комнаты.
Настройки
Функция
(=]
Температура
250°С
Время
1 час
8. Настройте необходимые параметры. Вы можете узнать, как установить тип нагрева и
температуру, в следующем разделе.
После того, как прибор остыл:
1. Очистите гладкие поверхности и дверь с мыльной водой и тряпкой для посуды.
2. Просушите все поверхности.
3. Установите боковые стойки.
Выбор режимов
Режим работы по умолчанию выключен. Если вы хотите
выбрать нужный режим приготовления, вы можете
сделать это, используя левую ручку управления
режимами.
На ручке есть указатель — поверните его, чтобы
указатель указывал на режим, который вы хотели бы
выбрать.
11
Page 12

Установка температуры
Если вы хотите выбрать температуру для приготовления,
то это выполняется аналогично выбору режима работы.
Вы можете сделать это, используя правую ручку на
панели управления (ручку контроля температуры).
На ручке есть указатель — поверните его, чтобы
указатель указывал на температуру, которую вы хотите
выбрать.
Включение
Когда вы закончили настройку режима работы и
температуры и хотите включить духовку, вы можете
сделать это с помощью ручки контроля времени.
На ручке есть указатель — поверните его, чтобы
указатель указывал на время приготовления, которое вы
хотели бы выбрать.
Максимальное время приготовления составляет 2 часа.
Примечание.
• На данном приборе установка времени означает запуск прибора.
• После поворота ручки от исходного положения прибор начнет работать.
• Если повернуть ручку управления временем против часовой стрелки, то активируется
режим «Задержки», что означает, что духовка будет работать непрерывно без
управления таймером. Используйте его только в том случае, если духовка находится
под пристальным надзором со стороны ответственного лица, которое хорошо знает,
как безопасно пользоваться прибором, и понимает связанные с ним опасности.
• После того, как прибор начнет работать, ручка контроля времени будет слегка и
непрерывно поворачиваться против часовой стрелки (кроме режима «Задержки»), и
когда приготовление закончится, указатель вернется в исходное положение, и вы
услышите характерный звук.
Индикатор
После начала приготовления пищи загорится индикатор. В течение периода
приготовления индикатор будет периодически включаться и выключаться. Это зависит от
того, работают ли нагревательные элементы или нет.
12
Page 13

Изменение режима приготовления
Во время работы прибора вы можете поворачивать ручки на панели управления
соответствии с вашими потребностями и с целью замены программы приготовления.
Поверните ручку управления режимом из текущего режима в другой, когда прибор
работает, чтобы изменить режим во время приготовления пищи. Если в это время Вы
повернете ручку на режим «Освещение» или «Размораживание», нагревательные
элементы отключатся. Если вы вернете ручку в исходное положение, прибор выключится,
но таймер все равно будет отсчитывать время.
Поверните ручку регулировки температуры во время приготовления пищи в иное
положение, когда прибор работает, чтобы изменить температуру приготовления. Если
после этого вы вернете ручку в исходное положение, нагревательные элементы будут
отключатся. Лампа и таймер по-прежнему будут включены, если на данной температуре
продолжит работать вентилятор.
Во время приготовления пищи поверните ручку управления временем, чтобы изменить
время приготовления пищи. Если после этого вы вернете ручку обратно в исходное
положение, то прибор выключится. Сигнальный индикатор также потухнет.
Помните, что после выключения прибор остается некоторое время очень горячим, особенно
внутри рабочей камеры. Никогда не касайтесь внутренних поверхностей прибора I или
нагревательных элементов. Дайте прибору остыть и всегда используйте прихватки,
* чтобы извлечь принадлежности или посуду из духовки. Так же держите детей на безопасном
расстоянии от духовки, чтобы избежать ожогов.
Примечание: изменение режимов/температуры / времени приготовления может оказать
негативное влияние на результат приготовления, поэтому мы настоятельно рекомендуем
вам этого не делать, если вы не обладаете достаточным кулинарным опытом.
I Если духовой шкаф не используется, всегда устанавливайте все ручки на «О».
13
Page 14

Энергоэффективное использование
1. Извлеките все принадлежности, которые вам не понадобятся в процессе приготовления пищи.
2. Не открывайте дверцу во время приготовления пищи.
3. Если вы открываете дверцу во время приготовления пищи, переключите режим на
«Освещение» (без изменения настройки температуры).
4. В режимах, в которых не используется вентилятор, уменьшите настройку температуры
до 50°С за 5-10 минут до окончания времени приготовления пищи. Таким образом. Вы
сможете использовать остаточное накопленное тепло духовки для завершения
процесса.
5. Используйте «Конвектор», когда это возможно. Вы сможете снижать температуру на
20°С- 30°С.
6. Вы можете готовить и выпекать, используя «Конвекцию» на нескольких уровнях
одновременно.
7. Если невозможно готовить разные блюда одновременно, вы можете нагревать одно за
другим, используя состояние предварительного нагрева духовки.
8. Не нагревайте пустую духовку, если это не требуется. При необходимости поместите
продукты в духовку сразу же после достижения температуры, указанной при первом
выключении светового индикатора.
9. Не накрывайте дно духовки фольгой.
10. По максимуму используйте таймер и/или датчик температуры.
11. Используйте темные матовые и легковесные контейнеры и формы для выпечки.
Старайтесь не использовать тяжелые принадлежности с блестящими поверхностями,
например, из нержавеющей стали или алюминия.
14
Page 15

Обслуживание
Чистящее средство
При надлежащем уходе и чистке ваш духовой шкаф сохранит свой внешний вид и будет
функционировать долгое время. Для чистки и ухода за духовкой всегда выключайте
духовку из розетки и дайте ей остыть.
Чтобы убедиться, что поверхности не повреждены при использовании неправильного
чистящего средства, соблюдайте информацию из таблицы. В зависимости от модели
прибора, не все из перечисленных частей могут быть на / в вашей модели.
Внимание! Риск повреждения поверхности!
Не используйте:
1. Жесткие или абразивные чистящие средства.
I 2. Чистящие средства с высоким содержанием спирта.
* 3. Твердые губки.
4. Очистители высокого давления или пароочистители.
5. Специальные чистящие средства, пока духовка не остыла.
Советы:
• Соблюдайте соответствующие инструкции производителя.
• Тщательно вымойте новые губчатые салфетки перед использованием.
• Рекомендуемые производителем моющие и чистящие средства можно приобрес
ти у вашего поставщика.
• Соблюдайте соответствующие инструкции производителя.
• Тщательно вымойте новые губчатые салфетки перед использованием.
Часть духового шкафа
Способ очистки
Передняя сторона
духового шкафа.
Нержавеющая сталь.
• Горячий мыльный раствор. Протрите сначала влажной тряпкой, а затем
вытрите мягкой тряпкой насухо.
• Сначала удалите пятна известкового налета, жира, крахмала и
альбумина (например, яичный белок). Так как под такими пятнами
может образовываться коррозия.
• Специальные чистящие средства для нержавеющей стали, подходящие
для нагреваемых поверхностей, можно приобрести в нашем сервисном
центре или в специализированных магазинах. При уборке наносите
очень тонкий слой чистящего средства при помощи мягкой ткани.
Пластик
• Горячий мыльный раствор. Протрите сначала влажной тряпкой, а затем
вытрите мягкой тряпкой насухо.
• Не используйте скребок для стекол.
Окрашенные
поверхности
Горячий мыльный раствор. Протрите сначала влажной тряпкой, а затем
вытрите мягкой тряпкой насухо.
15
Page 16

Часть духового шкафа
Способ очистки
Панель управления
• Горячий мыльный раствор. Протрите сначала влажной тряпкой, а затем
вытрите мягкой тряпкой насухо.
• Не используйте скребок для стекол.
Дверца
* Горячий мыльный раствор. Протрите сначала влажной тряпкой, а затем
вытрите мягкой тряпкой насухо.
• Не используйте скребок для стекол.
Ручка дверцы
* Горячий мыльный раствор. Протрите сначала влажной тряпкой, а затем
вытрите мягкой тряпкой насухо.
• Если средство для удаления накипи вступает в контакт с ручкой дверцы,
немедленно вытрите его. В противном случае в дальнейшем пятна не
смогут быть удалены.
Эмалированные и
самоочищающиеся
поверхности
Соблюдайте инструкции по уходу за поверхностью рабочей камеры,
которые следуют за таблицей.
Стеклянный плафон
лампочки в духовом
шкафу
• Горячий мыльный раствор. Протрите сначала влажной тряпкой, а затем
вытрите мягкой тряпкой насухо.
• Если рабочая камера сильно загрязнена, используйте средство для
чистки духовки.
Уплотнитель.
Не снимать!
Горячий мыльный раствор. Вытрите слегка влажной тряпкой не растирая
слишком сильно.
Дверная крышка из
нержавеющей стали
Очиститель из нержавеющей стали:
• Соблюдайте инструкции производителя.
• Не используйте средства по уходу за поверхностями из нерж, стали.
• Снимите дверную крышку перед очисткой.
Принадлежности
• Горячий мыльный раствор. Замочите и затем очистите принадлежности
при помощи тряпочки или щетки.
• Если есть большие отложения грязи, используйте губку из нержавеющей
стали.
Направляющие
Горячий мыльный раствор. Замочите и затем очистите при помощи
тряпочки или щетки.
Выдвижная система
(полозья)
• Горячий мыльный раствор. Очистите при помощи тряпочки или щетки.
• Не удаляйте смазку с полозьев.
• Лучше очищать в задвинутом состоянии.
• Не мыть в посудомоечной машине.
Термометр для мяса
• Горячий мыльный раствор. Очистите при помощи тряпочки или щетки.
• Не мыть в посудомоечной машине.
16
Page 17

Примечания
1. Небольшие различия в цвете на передней панели прибора вызваны использованием
различных материалов, таких как стекло, пластик и металл.
2. Тени на дверных панелях, которые выглядят как полосы, вызваны отражением от
внутреннего освещения.
3. Эмаль запекается при очень высоких температурах. Это может вызвать небольшое
изменение цвета. Это нормально и не влияет на работу. Края тонких лотков нельзя
полностью покрыть эмалью. В результате эти края могут быть шероховатыми. Это не
ухудшает антикоррозийную защиту.
4. Всегда содержите прибор в чистоте и незамедлительно удаляйте грязь, чтобы не
накапливались грязные отложения.
Советы:
1. Очищайте рабочую камеру после каждого использования. Это поможет предотвратить
накопление грязи.
2. Всегда незамедлительно удаляйте капли накипь, жира, крахмала и альбумина
(например, от яичного белка).
3. Незамедлительно удаляйте пятна от сахара, не дав им застыть.
4. Используйте подходящую посуду для жарки, например, специальные формы или
противни.
17
Page 18

Дверца духового шкафа
При хорошем уходе и чистке ваш духовой шкаф сохранит хороший внешний вид и
прослужит вам долгое время.
Дверные петли прибора имеют запорный рычаг. Когда запирающие рычаги закрыты,
дверца прибора закреплена на месте. В таком положении ее нельзя снять. Если открыть
фиксирующие рычаги, двери можно будет снимать. В таком положении дверь закрыть не
получится.
Осторожно! Опасность получения травмы!
1. Если петли не заблокированы, они могут закрыться с большой силой. Убедитесь, что |
запорные рычаги всегда полностью закрыты или, при отсоединении дверцы прибора, •
полностью открыты.
2. При открывании и закрывании дверцы петли на дверце прибора двигаются, и вы
можете случайно прищемить пальцы. Держите руки подальше от петель.
Снятие дверцы прибора
1. Полностью откройте дверцу прибора.
2. Раскройте два фиксирующих рычага слева и справа.
3. Закройте дверцу прибора до упора.
4. Обеими руками возьмитесь за дверь слева и справа и вытяните ее вверх.
18
Page 19

Установка дверцы прибора
Дверца устанавливается на место так же, как и снимается, только в обратном порядке.
1. При установке дверцы прибора убедитесь, что обе петли правильно вставляются в
установочные отверстия в передней части рабочей камеры. Петли должны
вставляться легко. Если вы чувствуете какое-либо сопротивление, убедитесь, что
правильно ли вы вставляете петли.
2. После установки полностью откройте дверцу прибора. Открывая дверцу прибора. Вы
сможете еще раз проверить, находятся ли петли в правильном положении. Если Вы
неправильно их установили, вы не сможете полностью открыть дверцу прибора.
Сложите оба фиксирующих рычага.
3. После установки дверцы проверьте не оказались ли перекрыты вентиляционные
отверстия.
Снятие дверной крышки
Пластиковая вставка в дверном покрытии может ос временем сменить свой цвет. Чтобы
провести тщательную очистку, Вы можете снять эту крышку. Снимите дверцу прибора, как
указано выше.
1. Нажмите на правую и левую сторону крышки.
2. Снимите крышку.
3. После снятия крышки дверцы можно легко снять остальную часть дверцы прибора (для
очистки). После завершения очистки дверцы прибора установите
4.
крышку на место и надавите на нее до щелчка.
Установите дверцу прибора и закройте ее.
19
Page 20

Замена шнура питания.
Положение А показывает расположение терминала на задней стороне корпуса в
закрытом положении.
Шаги:
A. Отключите питание. Используя маленькую плоскую отвертку, откройте защелки №1,2.
Б. Используя крестовую отвертку, выньте винты №3,4, 5, 6.
B. Замените на новый шнур питания, закрепив желто-зеленый провод на 3 разъеме,
коричневый на 4, синий провод на 5.
Г. Закрутите винт 6, закройте крышку терминала.
20
4
3
2
A
коричневый
желто-зеленый
синий
{L}
{N}
шнур питания
1
6
задний наружный корпус
терминал
5
Page 21

Устранение неисправностей
В случае возникновения неисправности, прежде чем обращаться в службу
послепродажного обслуживания, убедитесь, что это происходит не из-за неправильной
эксплуатации прибора. Обратитесь к таблице неисправностей и попробуйте устранить
неисправность самостоятельно.
Вы можете легко устранить часть технических неисправностей на приборе
самостоятельно. Если блюдо не получилось именно так, как вы хотели, вы можете найти
много советов и инструкций по приготовлению в конце руководства по эксплуатации.
Неисправность
Возможная причина
Решение
Прибор не работает
Неисправный
предохранитель
Проверьте автоматический выключатель в блоке
предохранителей.
Обрыв сети питания
Проверьте, есть ли на кухне свет и работают ли
другие электроприборы на кухне.
Ручки выпали из
подставки на панели
управления
Случайно отцепились
ручки управления
Ручки можно снимать. Просто поместите ручки
обратно в их опору на панели управления и
вставьте их так, чтобы они зацепились и их
можно было поворачивать.
Ручки управления
тяжело
поворачиваются
Возможно скопилась
грязь под ручками
• Ручки можно снимать. Чтобы снять ручки,
проста извлеките их из держателя.
• Тщательно очистите ручки с помощью ткани и
мыльной воды.
• Вытрите насухо мягкой тканью.
• Не используйте для очистки острые или
абразивные материалы.
• Не мочите и не чистите ручки в посудомоечной
машине.
• Не снимайте ручки слишком часто, чтобы
держатели ручек оставались устойчивыми.
Вентилятор в режиме «Конвекция» временами
перестает работать.
Это нормально, т.к идет перераспределение
тепла для лучшей производительности.
После приготовления пищи можно услышать
шум от потока воздуха в непосредственной
близости от панели управления.
Вентилятор охлаждения по-прежнему работает,
чтобы снизить высокую влажность в рабочей
камере и охладить духовку для вашего удобства.
Он отключится автоматически.
Еда не успевает приготовится за время, указанное
в рецепте
Возможно использовали иные от рецепта
температуру или количество ингредиентов.
Проверяйте соответствие температуры и
ингредиентов рецепту дважды.
21
Page 22

Неравномерное потемнение блюда
Установлена слишком высокая температура, или
уровень полки с противнем слишком низко
расположен. Дважды проверьте рецепт и
настройки.
Поверхность и/или цвет и/или материал лотка
для выпечки были не подходящими для
выбранной функции духовки. При использовании
лучистого тепла, например как при режиме
«Верхний и нижний нагрев», используйте
матовую, темную и легковесную посуду.
Не включается освещение
Необходимо заменить лампу
Советы
Вы хотите приготовить свой рецепт
Попробуйте сначала использовать настройки
подобных рецептов и оптимизировать процесс
приготовления под ваше блюдо.
Готов ли торт?
Поместите деревянную палочку в торт примерно
за 10 минут до того окончания выпекания. Если
после извлечения на палочке
не осталось сырого теста, торт готов.
Торт теряет большой объем во время
охлаждения после выпекания
Попробуйте понизить температуру на 10°С и
дважды проверьте инструкции по приготовлению
пищи, касающиеся механической обработки
теста.
Высота торта посередине намного выше, чем у
внешнего кольца
Не смазывайте внешнее кольцо формы
Торт слишком коричневый сверху
Используйте более низкий уровень полки и / или
используйте более низкую температуру
приготовления (это может привести к
увеличению времени приготовления)
Торт слишком сухой
Установите температуру выше на 10°С (это может
привести к сокращению времени приготовления)
Еда хорошо выглядит, внутри слишком влажная
Используйте температуру ниже на 10°С (это
может привести к увеличению времени
приготовления) и дважды сверьте рецепт.
Неровное потемнение
Используйте температуру ниже на 10°С (это
может привести к увеличению времени
приготовления). Используйте режим «Верхний и
нижний нагрев» на одном уровне.
22
Page 23

Торт снизу менее румянен
Установите блюдо на уровень ниже.
Выпечка на более чем одном уровне
одновременно: блюдо на одной полке темнее
чем на другой.
Используйте режимы с вентиляторами для
выпечки на более чем одном уровне. Вынимайте
противни по отдельности. Не обязательно, что
блюда будут готовы одновременно.
Конденсация воды во время выпекания
Пар является частью процесса выпечки пищи и
обычно выходит из духовки вместе с потоком
охлаждающего воздуха. Этот пар может
конденсироваться на разных поверхностях в
духовке или рядом с духовкой и образовывать
капли воды. Это физический процесс, и его
нельзя избежать полностью.
Какую форму для выпечки лучше использовать?
Можно использовать любую термостойкую
посуду для выпечки. Не рекомендуется
использовать алюминиевую посуду для
приготовления кислой пищи. Обеспечьте
хорошее крепление между контейнером и
крышкой посуды.
Как правильно использовать функцию гриля?
Предварительно разогрейте духовку в течение 5
минут. Держите дверцу духовки закрытой, когда
используете любой режим гриля. Не используйте
духовку, когда дверца открыта, за исключением
загрузки/извлечения/проверки пищи.
Как сохранить чистоту духовки при
использовании гриля?
Используйте лоток, наполненный 2 литрами воды
на уровне 1. Почти все жидкости, стекающие с
пищи, помещенной на полку, попадут в лоток.
Нагревательный элемент во всех режимах гриля
со временем включается и выключается
Это является нормой и зависит от температуры
процесса приготовления.
Как рассчитать настройки духового шкафа, когда
масса жаркого не указана в рецепте?
Выберите режим соседний с режим зажарки и
немного измените время приготовления.
Если возможно, используйте датчик мяса, чтобы
определить температуру внутри мяса. Аккуратно
поместите головку мясного зонда в мясо в
соответствии с инструкциями производителя.
Убедитесь, что головка зонда находится в
середине большей части мяса, но не в области
кости или отверстия.
23
Page 24

Что произойдет, если во время выпекания пищи
жидкость будет прольется на продукты в
духовке?
Возникновение пара при закипании жидкости
является нормой. Пожалуйста, будьте осторожны, потому что пар горячий.
Если жидкость содержит спирт, процесс кипения
будет быстрее и может привести к воспламенению в рабочей камере. Убедитесь, что дверца
духовки закрыта во время подобных процессов.
Тщательно контролируйте процесс приготовления пищи. Открывайте дверцы очень аккуратно
и только при необходимости.
Осторожно! Опасность поражения электрическим током!
Неправильный ремонт может быть опасен! Замену поврежденных шнуров питания I
разрешается выполнять только квалифицированным специалистам. Если прибор •
неисправен, отключите прибор от электросети или выключите автоматический
выключатель в блоке предохранителей. Обратитесь в сервисную службу.
Максимальное время работы
Максимальное время непрерывной работы прибора составляет 9 часов. Замена лампы в
рабочей камере.
Если лампа рабочей камеры перегорела ее необходимо заменить. Термостойкие
галогенные лампы мощностью 25 Ватт, 230 В можно приобрести магазине, где вы
приобрели ваш духовой шкаф, или в специализированных магазинах.
Замена лампы
При замене галогенной лампы используйте сухую ткань. Это увеличит срок службы
лампы.
Опасность удара током!
| При замене лампы контакты гнезда лампы находятся под напряжением. Перед заменой
• лампы, отключите прибор от сети или выключите автоматический выключатель в блоке
предохранителей.
Опасность ожога!
| Прибор становится очень горячим. Никогда не касайтесь внутренних поверхностей прибора
• или нагревательных элементов. Всегда дайте прибору остыть. Держите детей на безопасном
расстоянии.
1. При снятии стеклянного плафона лампы используйте полотенце или тряпку.
2. Вытащите стеклянный плафон.
3. Вытащите лампу — вставьте новую.
4. Вставьте обратно плафон, чтобы он плотно сел в предназначенное для него место.
5. Уберите полотенце и включите автоматический выключатель, чтобы увидеть,
включается ли лампа.
Вставляя новую лампу, убедитесь, что штифты находятся в правильном положении.
Нажмите на лампу до упора.
24
Page 25

Модель
Цвет
Черный
Управление
Механическое
Количество режимов нагрева
7
Объем
2 л
Питание
220-240 В;
Мощность
2300 Вт
Класс энергоэффективности
А
Размеры (ВхШхГ)
59,5x56,6x59,6 см
Количество стекол в дверце
3
Таймер
120 мин
25
Технические характеристики
MO 720 39 X
MO 72000 GB
7
50 Гц60-Гц
Производитель: GUANGDONG MIDEA KITCHEN APPLIANCES MANUFACTURING CO.,LTD
Адрес: 'NO.6, YONG AN ROAD,BEIJIAO,SHUNDE,FOSHAN,GUANGDONG,CHINA
Импортер в РК: ТОО "Technoman"
Адрес: 050011, Алматы, Бурундайская 93А
Page 26

Page 27

Page 28

Midea
Built in Oven
Instruction
MO 72000 GB
MO 72039 X
SAVE THESE INTRUCTIONS CAREFULLY
Read these instructions carefully before using your oven, and keep it carefully.
If you follow the instructions, your oven will provide you with many years of good service.
Page 29

CONTENTS
SAFETY INFORMATION
2
Intended use
2
Warning
3
Causes of Damage
6
8
INSTALLATION
KNOW YOUR APPLIANCE
9
Control Panel
9
Operating Modes
10
Accessories
12
AIR SAFEGUARD SYSTEM
15
OPERATE YOUR APPLIANCE
16
First use
16
Selecting Modes
16
ENERGY EFFICIENT USE
19
ENVIRONMENT
19
HEALTH
20
MAINTENANCE YOUR APPLIANCE
20
Cleaning Agent
Appliance Door
CURE YOUR APPLIANCE WHEN NEEDED
26
CUSTOMER SERVICE
29
30
TIPS AND TRICKS
32
TYPICAL RECIPES
33
Cakes
33
Bread
33
Meat
TEST FOOD ACCORDING TO EN 60350-1
34
ENERGY EFFICIENCY ACCORDING TO EN 60350-1
35
DATASHEET (EU 65/2014 & EU 66/2014)
35
Page 30

SAFETY INFORMATION
2
Intended Use
Thank you for buying Midea Built-in Oven. Before unpacking
it, please read these instructions carefully. Only then will you
be able to operate your appliance safely and correctly.
Warmly recommend retain the instruction manual and
installation instructions for future use or for subsequent
owners.
The appliance is only intended to be fitted in a kitchen.
Observe the special installation instructions.
Check the appliance if there is any damage after unpacking
it. Do not connect the appliance if it has been damaged. Only
a licensed professional may connect appliances without
plugs. Damage caused by incorrect connection is not
covered under warranty. Only use this appliance indoors.
The appliance must only be used for the preparation of food
and drink. The appliance must be supervised during
operation. This appliance may be used by children over the
age of 8 and by persons with reduced physical, sensory or
mental capabilities or by persons with a lack of experience
or knowledge if they are supervised or are instructed by a
person responsible for their safety how to use the appliance
safely and have understood the associated hazards.
Children must not play with, on, or around the appliance.
Children must not clean the appliance or carry out general
maintenance unless they are at least 8 years old and are
being supervised.
Keep children below the age of 8 years old at a safe distance
from the appliance and power cable.
And please always slide accessories into the cavity the right
way round.
Page 31
WARNING
3
Risk of electric shock!
1.
Incorrect repairs are dangerous. Repairs may only be
carried out and damaged power cables replaced by one of
our trained after-sales technicians. If the appliance is
defective, unplug the appliance from the mains or switch
o the circuit breaker in the fuse box. Contact the
aftersales service.
The cable insulation on electrical appliances may melt
2.
when touching hot parts of the appliance. Never bring
electrical appliance cables into contact with hot parts of
the appliance.
3.
Do not use any highpressure cleaners or steam cleaners,
which can result in an electric shock.
A defective appliance may cause electric shock. Never
4.
switch on a defective appliance. Unplug the appliance
box. Contact the after-sales service.
Risk of burns!
The appliance becomes very hot. Never touch the interior
1.
surfaces of the appliance or the heating elements.
2.
Always allow the appliance to cool down.
Keep children at a safe distance.
3.
Accessories and ovenware become very hot. Always use oven
4.
gloves to remove acces sories or ovenware from the cavity.
Alcoholic vapors may catch fire in the hot cooking
5.
compartment. Never prepare food containing large
Page 32

quantities of drinks with high alcohol content. Only use
4
small quanti ties of drinks with high alcohol content. Open
the appliance door with care.
Risk of scalding!
1.
The accessible parts become hot during operation. Never
touch the hot parts. Keep children at a safe distance.
When you open the appliance door, hot steam can
2.
escape. Steam may not be visible, depending on its
temperature. When opening, do not stand too close to
the appliance. Open the appliance door carefully. Keep
children away.
Water in a hot cavity may create hot steam. Never pour
3.
water into the hot cavity.
Risk of injury!
1.
Scratched glass in the appliance door may develop into a
crack. Do not use a glass scraper, sharp or abrasive
cleaning aids or detergents.
2. The hinges on the appliance door move when opening
and closing the door, and you may be trapped. Keep your
hands away from the hinges.
Risk of fire!
Combustible items stored in the cavity may catch fire.
1.
Never store combustible items inthe cavity. Never open
the appliance door if there is smoke inside. Switch o the
Page 33

appliance and unplug it from the
5
circuit breaker in the fuse box.
A draught is created when the appliance door is opened.
2.
Greaseproof paper may come into contact with the
heating element and catch fire. Do not place greaseproof
paper loosely over accessories during preheating. Always
weight down the greaseproof paper with a dish or a
baking tin. Only cover the surface required with
greaseproof paper. Greaseproof paper must not protrude
over the accessories.
Hazard due to magnetism!
Permanent magnets are used in the control panel or in the
ectronic implants, e.g.
heart pacemakers or insulin pumps. Wearers of electronic
implants must stay at least 10 cm away from the control
panel.
Page 34

Causes of Damage
6
1.
Accessories, foil, greaseproof paper or ovenware on the
cavity floor: do not place accessories on the cavity floor.
Do not cover the cavity floor with any sort of foil or
greaseproof paper. Do not place ovenware on the cavity
floor if a temperature of over 50 ºC has been set. This will
cause heat to accumulate. The enamel will be damaged.
Aluminum foil: Aluminum foil in the cavity must not come
2.
into contact with the door glass. This could cause
permanent discoloration of the door glass.
Silicone pans: Do not use any silicone pans, or any mats,
3.
covers or accessories that contain silicone. The oven
sensor may be damaged.
Water in a hot cooking compartment: do not pour water
4.
into the cavity when it is hot. This will cause steam. The
temperature change can cause damage to the enamel.
Moisture in the cavity: Over an extended period of time,
5.
moisture in the cavity may lead to corrosion. Allow the
appliance to dry after use. Do not keep moist food in the
closed cavity for extended periods of time. Do not store
food in the cavity.
6.
Cooling with the appliance door open: Following operation
at high temperatures, only allow the appliance to cool
down with the door closed. Do not trap anything in the
appliance door. Even if the door is only left open a crack,
the front of nearby furniture may become damaged over
Page 35

time. Only leave the appliance to dry with the door open if
7
a lot of moisture was produced while the oven was
operating.
7. Fruit juice: when baking particularly juicy fruit pies, do not
pack the baking tray too generously. Fruit juice dripping
from the baking tray leaves stains that cannot be
removed. If possible, use the deeper universal pan.
8.
Extremely dirty seal: If the seal is very dirty, the appliance
door will no longer close properly during operation. The
fronts of adjacent units could be damaged. Always keep
the seal clean.
9. Appliance door as a seat, shelf or worktop: Do not sit on
the appliance door or place or hang anything on it. Do not
place any cookware or accessories on the appliance door.
10.
Inserting accessories: depending on the appliance model,
accessories can scratch the door panel when closing the
appliance door. Always insert the accessories into the
cavity as far as they will go.
11. Carrying the appliance: do not carry or hold the appliance
by the door handle. The door handle cannot support the
weight of the appliance and could break.
12.
If you use the residual heat of the switched
keep food warm, a high mois
ture content inside the cavity
can occur. This may lead to condensation and can cause
corrosion damage of your high quality appliance as well as
harm your kitchen. Avoid condensation by opening the
door or use “Defrost” mode.
Page 36

INSTALLATION
8
To operate this appliance safe , please
be sure that it has been installed to a
professional standard respecting the
installation instructions . Damages occur
because of incorrect installation are not
within the warranty.
While doing the installation , please
wear protective gloves to prevent
yourself from getting cut by sharp
edges .
Check the appliance if there is any
damage before installation and do not
connect the appliance if there is .
Before turning on the appliance , please
clean up all the packaging materials and
adhe-sive film from the appliance.
The dimensions attached are in mm.
It is necessary to have the plug
accessible or incorporate a switch in the
fixed wiring, in order to disconnect the
appliance from the supply after
installation when necessary.
Warning:The appliance must not be
installed behind a decorative door in
order to avoid overheating.
min.585
max.595
590
mmiinn.. 55
min.
min.
550
550
105
560
560
500
446600
500
+88
min.35
min.35
min.35
546
min.
min.
550
550
560
560
105
446600
500
min.35
88
+
559966
20
559955
560
566
5576
min.
min.
600
600
mmiinn.. 55
Page 37

KNOW YOUR APPLIANCE
9
IDENTIFYING THE APPLIANCE
In this chapter, we will explain the control panel and accessories. At the same time you
will also find out about the various functions of your appliance.
Note: Depending on the appliance model, individual details and colors may dierent.
CONTROL PANEL
Knobs
Turn these knobs to set operating mode, each knob is well fitted with the nearby
silk-screening icons on the control panel glass so that you can easily operate your appliance with your fingers.
Indicator light
Indicator is sort of a light that notice you if heaters inside the appliance are working or
not, while the appliance is switched on, the indicator will be on and o intermittently.
Controls
The individual controls are adapted for the various functions of your appliance. You can
set your appliance simply and directly. There is no constraint for the orders of operating
the knobs, making your-self fully free while using the appliance.
→"Operate Your Appliance" on page 16
Page 38

OPERATING MODES
10
Your appliance has various operating modes which make your appliance easier to use.
To enable you to find the correct type of heating for your dish, we have explained the
dierences and scopes of application here.
The symbols for each type help you to remember them.
Types of heating
Heating Mode
Lamp /
Defrost For gently defrosting frozen food.
Double Grill + Fan 50°C~250°C
Double Grill
Radiant Heat
Conventional + Fan
Conventional
Bottom
Temperature Use
For lightening the cavity without any
heating element switch on.
/
For roasting poultry, fish and larger
pieces of meat. The heating element and
the fan switch on and o alternately.
The fan circulates the hot air around the
food.
For grilling flat items for grilling, such as
50°C~250°C
50°C~250°C
50°C~250°C
50°C~250°C
50°C~250°C
steaks,sausages,toast and so on.
The whole area below the heating element
becomes hot.
For grilling small amounts of steaks or
sausages.
The center area under the heating heating
element becomes hot
For baking and roasting on one or more
levels.(But no more than 3)
The fan distributes heat from heating
elements evenly around the cavity.
For traditional baking and roasting on
one level.
Especially suitable for cakes with moist
toppings.
For preparing pizza and dishes which
require a lot of heat from underneath.
The bottom heating element heats up
and the fan distributes heat evenly
around the cavity.
Page 39

Notes
11
1.
To defrost big portions of food, it is possible to remove the side-racks and place the
container on the cavity floor.
2.
To warming tableware, it is beneficial to remove the side-racks and the heating modes
“Hot Air Grilling” and “Fan Heating” with temperature setting of 50°C are useful. “Hot
Air Grilling” should be used, if more than half of the cavity floor is covered by the
tableware.
3.
Due to an optimum evenness of heat distribution inside the cavity during “Fan Heating”, the fan will work at certain times of the heating process, to guaranty the best
possible performance.
Caution
1.2.If you open the appliance door during an on-going operation, the operation will not be
paused. Please be especially careful with the risk of burns.
Do not cover the ventilation slots. Otherwise, the appliance may overhea.
To make the appliance cools down more quickly after the operation, the cooling fan
may continue to run for a period afterwards.
Lighting
When you switch the appliance on to any mode, the lamp will be always on until the
operation has finished. You can use the main mode: “Lamp” during dierent operations,
i.e. cleaning, preparing the cooking process, pause heating modes during opening the
door.
Cooling fan
The cooling fan switches on and o as required. The hot air escapes above the door.
Page 40

ACCESSORIES
12
Your appliance is accompanied by a range of accessories. Here, you can find an overview
of the accessories included and information on how to use them correctly.
Accessories included
Your appliance is equipped with the following accessories:
Wire Rack Baking Tray
For ovenware, cake tins and
ovenproof dishes. For roasts
and grilled food
You can use the tray to place liquid or cooking food with juice.
Only use original accessories. They are specially adapted for your appliance.
You can buy accessories from the after-sales service, from specialist retailers or online.
Note
The accessories may deform when they become hot. This does not aect their function.
Once they have cooled down again, they regain their original shape.
For tray bakes and small
baked products.
Inserting accessories
The cavity has five shelf positions. The shelf positions are counted from the bottom up.
The accessories can be pulled out approximately halfway without tipping.
Notes
1.
Ensure that you always insert the accessories into the cavity the right way round.
2.
Always insert the accessories fully into the cavity so that they do not touch
the appliance door.
Page 41

1
4
13
2
5
4
3
2
1
3
4
Locking function
The accessories can be pulled out approximately halfway until they lock in place. The
locking function prevents the accessories from tilting when they are pulled out. The
accessories must be inserted into the cavity correctly for the tilt protection to work properly.
When inserting the wire rack, ensure the wire rack is onto the right facing direction like
the picture . 3 1
When inserting the backing tray, ensure the backing tray is onto the right facing direction
like the picture .
Optional accessories
You can buy optional accessories from the after-sales service, from specialist retailers or
online. Please see your sales brochures for more details.
When purchasing, please always quote the exact order number of the optional accessory.
1 3
1 4
Page 42

Note
14
Not all optional accessories are suitable for every appliance. When purchasing, please
always quote the exact identification number of your appliance. → "Customer Service" on
page 29
Optional accessories
Wire Rack
For ovenware, cake tins and ovenproof dishes. For
roasts and grilled food
Baking Tray
For tray bakes and small baked products.
Universal pan
For moist cakes, pastries, frozen meals and large roasts.
Order number
7NM20M1-17030
7NM20M1-17012
7NM20M1-17011
Page 43

AIR SAFEGUARD SYSTEM
15
An advanced air diversion technology.
If your appliance is equipped with an Air Safeguard (depends on the actual machine),
please note :
An active-protection system that keeps you away from the unexpected heat: from
cool-touch door which prevents unconscious burn, to air curtain which blocks hot air
inside the cavity flows over your face.
Every time when the oven door is opened, air safeguard will be activated automatically. it redirects the cool air and forms an invisible curtain in front of the caviy, blocking
the burning-hot air flows directly to your face. keep you safe with a more comfortable
cooking experience.
When oven is running, the door is closed and air-safeguard is in a contractive state;
like the picture .
After cooking, when the door is opened, the air-safeguard will automatically pop open
and change the wind direction at the exhaust port to make the hot air blow downward.
like the picture .
1
2
2
A
1
I
R
2
Page 44
OPERATE YOUR APPLIANCE
16
First use
Before using the appliance to prepare food for the first time, you must clean the
cavity and accessories.
1.
Remove all stickers, surface protection foils and transport protection parts.
2.
Remove all accessories and the side-racks from the cavity.
3.
Clean the accessories and the side-racks thoroughly using soapy water and a dish
cloth or soft brush.
4.
Ensure that the cavity does not contain any leftover packaging, such as polystyrene
pellets or wooden piece which may cause risk of fire.
5.
Wipe the smooth surfaces in the cavity and the door with a soft, wet cloth.
6.
To remove the new-appliance smell, heat up the appliance when empty and with the
oven door closed.
7.
Keep the kitchen highly ventilated while the appliance is heating up first time. Keep
children and pets out of the kitchen during this time. Close the door to the adjacent
rooms.
8.
Adjust the settings indicated. You can find out how to set the heating type and the
temperature in the next section.
Settings
Heating Mode
Temperature
Time
250°C
1h
Selecting Modes
The default operating mode is switching off.
If you would like to select a cooking
operating mode, you can do so using left
mode-control knob. There is a pointer on the
knob, turn this knob to make the pointer to
point to the mode which you would like to
choose.
After the appliance has cooled down:
Clean the smooth surfaces and the
1.
door with soapy
Dry all surfaces.
2.
Install the side-racks.
3.
water and a dish cloth.
Temperature Setting
If you would like to select a temperature
for cooking, the way to operate is similar
with the way to select the operating mode.
You can do so using right temperature
-control knob. There is a pointer on the
knob, turn this knob to make the pointer
to point to the temperature which you
would like to choose.
Page 45

Switching On
17
As now you already finished the setting of the operating mode and temperature. If you
would like to turn the appliance on, you can do so using time-control knob. There is a
pointer on the knob, turn this knob to make the pointer to point to the cooking time
which you would like to choose. The maximum cooking time is 2 hours.
Note
For this appliance, to finish the setting of cooking time means to operate the appliance
started.
Since the second that you turn the knob away from the original position, the appliance
will start to work.
If you turn the time-control knob anti-clockwise, the gear that the knob will arrive is
STAY ON, which means the oven will work continuously without timer controlling. Only
use this when the appliance is well supervised by a person responsible for safety who is
well aware of how to use the appliance safely and have understood the associated
hazards.
After the appliance starts to be operated, the time-control knob will slightly and continuously turn anti-clockwise (except STAY ON), when the cooking has finished, the pointer
will turn back to the original position and you will hear a clear tinkle of bell to notice you.
Indicator
While the appliance starts to cook food or drink, the indicator will be switched on to
notice you . During the period of cooking, the indicator will be on & o intermittently.
This depends on if the heating elements are working or not.
Changing
During the period of appliance operating, knobs on the control panel can be turned again
to meet your needs or changing.
Turn the mode-control knob from the present mode to another one while the appliance is
operating means to get the mode changed while food is being cooked. By this time, if
you turn the knob to LAMP or DEFROST, the heating elements will be switched o. If you
turn the knob back to the original position, the appliance will be switched o but the
timer will still count.
Page 46

Turn the temperature-control knob from present to others while the appliance is operat-
18
ing means to get the cooking temperature changed while food is being cooked. By this
time, if you turn the knob back to the original position, the heating elements will be
switched o. Lamp and timer will still be switched on, if cooking fan works depends on
the temperature of the circumstance inside the appliance.
Turn the time-control knob from present to others while the appliance is operating means
to get the rest cooking time changed while food is being cooked. By this time, if you turn
the knob back to the original position, it means the appliance is ocially switched o.
You will see the indicator also be switched o to notice you about this.
Caution!
After the appliance switched o, it becomes very hot especially inside the cavity. Never
touch the interior surfaces of the appliance or the heating elements. Use oven gloves to
remove accessories or ovenware from the cavity, and allow the appliance to cool down.
Keep children at a safe distance at the same time to avoid the injury of burns.
Note
Changing modes/temperature/rest cooking time may have some negative influences for
the result of cooking, we warmly recommend you not to do so unless you are well experienced on cooking.
Page 47

ENERGY EFFICIENT USE
19
Remove all accessories, which are not necessary during the cooking & baking process
1.
Do not open the door during the cooking & baking process.
2.
If you open the door during cooking & baking, switch the mode to “Lamp” (Without
3.
change the temperature setting).
Decrease the temperature setting in not fan assisted modes to 50°C at 5min to 10min before
4.
end of cooking & baking time. So you can use the cavity heat to complete the process.
Use “Fan Heating”, whenever possible. You can reduce the temperature by 20°C to 30°C.
5.
You can cook and bake using “Fan Heating” on more than one level at the same time.
6.
If it is not possible to cook and bake dierent dishes at the same time, you can heat
7.
one after the other to use the preheat status of the oven.
Do not preheat the empty oven, if it is not required.
8.
If necessary put the food into the oven immediately after reaching the temperature
indicated by switching o the indicator light the first time.
Do not use reflective foil, like aluminum foil to cover the cavity floor.
9.
Use the timer and or a temperature probe whenever possible.
10.
Use dark matt finish and light weighted baking molds and containers. Try not to use
11.
heavy accessories with shiny surfaces, like stainless steel or aluminum.
ENVIRONMENT
The packaging is made for protect your new appliance against damages during transport.
The materials used are selected carefully and should be recycled. Recycling reduces the
use of raw materials and waste. Electrical and electronic appliances often contain valuable materials. Please do not dispose of it with your household waste.
Page 48

HEALTH
20
Acrylamide occurs mainly by heating up starchy food (i.e. potato, French fries, bread) to
very high temperatures over long times.
Tips
1.
Use short cooking times.
2.
Cook food to a golden yellow surface color, do not burn it to dark brown colors.
3.
Bigger portions have less acrylamide.
4.
Use “Fan Heating” mode if possible.
5.
French fries: Use more than 450g per tray, place them evenly spread and turn them
time by time. Use the product information if available to get the best cooking result.
MAINTENANCE YOUR APPLIANCE
Cleaning Agent
With good care and cleaning, your appliance will retain its appearance and remain fully
functioning for a long time to come. We will explain here how you should correctly care
for and clean your appliance.
To ensure that the dierent surfaces are not damaged by using the wrong cleaning
agent, observe the information in the table. Depending on the appliance model, not all of
the areas listed may be on/in your appliance.
Caution!
Risk of surface damage
Do not use:
Harsh or abrasive cleaning agents.
1.
Cleaning agents with a high alcohol content.
2.
Hard scouring pads or cleaning sponges.
3.
High-pressure cleaners or steam cleaners.
4.
Special cleaners for cleaning the appliance while it is hot.
5.
Wash new sponge cloths thoroughly before use.
Tip
Highly recommended cleaning and care products can be purchased through
theafter-sales service.
Observe the respective manufacturer's instructions.
Page 49

Appliance exterior
21
Stainless steel front
CleaningArea Appliance exterior
Hot soapy water:
Clean with a dish cloth and then dry with a soft cloth.
Remove flecks of limescale, grease, starch and albumin (e.g. egg
white) immediately.
Corrosion can form under such flecks.
Special stainless steel cleaning products suitable for hot surfaces
are available from our after-sales service or from specialist retailers.
Apply a very thin layer of the cleaning product with a soft cloth.
Plastic
Painted surfaces
Control panel
Door panels
Door handle
Enamel surfaces
and self-cleaning
surfaces
Glass cover for the
interior lighting
Hot soapy water:
Clean with a dish cloth and then dry with a soft cloth. Do not
use glass cleaner or a glass scraper.
Hot soapy water:
Clean with a dish cloth and then dry with a soft cloth.
Hot soapy water:
Clean with a dish cloth and then dry with a soft cloth. Do not use
glass cleaner or a glass scraper.
Hot soapy water:
Clean with a dish cloth and then dry with a soft cloth.
Do not use a glass scraper or a stainless steel scouring pad.
Hot soapy water:
Clean with a dish cloth and then dry with a soft cloth.
If descaler comes into contact with the door handle, wipe it o
immediately. Otherwise, any stains will not be able to be removed.
Observe the instructions for the surfaces of the cooking compartment that follow the table.
Hot soapy water:
Clean with a dish cloth and then dry with a soft cloth.
If the cooking compartment is heavily soiled, use oven cleaner.
Door seal
Do not remove
Stainless steel door
cover
Hot soapy water:
Clean with a dish cloth. Do not scour.
Stainless steel cleaner:
Observe the manufacturer's instructions.
Do not use stainless steel care products.
Remove the door cover for cleaning.
Page 50

CleaningArea Appliance exterior
22
Accessories
Rails
Pull-out system
Meat thermometer
Hot soapy water:
Soak and clean with a dish cloth or brush.
If there are heavy deposits of dirt, use a stainless steel scouring pad.
Hot soapy water:
Soak and clean with a dish cloth or brush.
Hot soapy water:
Clean with a dish cloth or a brush.
Do not remove the lubricant while the pull-out rails are pulled
out. It is best to clean them when they are pushed in.
Do not clean in the dishwasher.
Hot soapy water:
Clean with a dish cloth or a brush. Do not clean in the dishwasher.
Notes
1.
Slight dierences in color on the front of the appliance are caused by the use of
dierent materials, such as glass, plastic and metal.
2.
Shadows on the door panels, which look like streaks, are caused by reflections made
by the interior lighting.
3.
Enamel is baked on at very high temperatures. This can cause some slight color
variation. This is normal and does not aect operation. The edges of thin trays cannot
be completely enameled. As a result, these edges can be rough. This does not impair
the anti-corrosion protection.
4.
Always keep the appliance clean and remove dirt immediately so that stubborn
deposits of dirt do not build up.
Tips
1.
Clean the cooking compartment after each use. This will ensure that dirt cannot be baked on.
2.
Always remove flecks of lime scale, grease, starch and albumin (e.g. egg white) immediately.
3.
Remove flecks of food with sugar content immediately, if possible, when the fleck is still warm.
4.
Use suitable ovenware for roasting, e.g. a roasting dish.
Page 51

APPLIANCE DOOR
23
With good care and cleaning, your appliance will retain its appearance and remain fully
functional for a long time to come. This will tell you how to remove the appliance door and
clean it.
For cleaning purposes and to remove the door panels, you can detach the appliance door.
The appliance door hinges each have a locking lever.
When the locking levers are closed, the appliance door is secured in place. It cannot be detached.
When the locking levers are open in order to detach the appliance door, the hinges are
locked. They cannot snap shut.
Warning – Risk of injury!
If the hinges are not locked, they can snap shut with great force. Ensure that the
1.
locking levers are always fully closed or, when detaching the appliance door, fully open.
The hinges on the appliance door move when opening and closing the door, and you
2.
may be trapped. Keep your hands away from the hinges.
Removing the appliance door
Open the appliance door fully.
1.
Fold open the two locking levers on the left and right
2.
Close the appliance door as far as the limit stop.
3.
With both hands, grip the door on the left- and right-hand side, and pull it out upwards.
4.
Page 52

Fitting the appliance door
24
Reattach the appliance door in the opposite sequence to removal.
When attaching the appliance door, ensure that both hinges are placed right onto
1.
the installing holes of the front panel of the cavity.
Ensure that the hinges are inserted into the correct position. You must be able to
insert them easily and without resistance. If you can feel any resistance, check that
the hinges are inserted into the holes right.
Open the appliance door fully. While opening the appliance door , you can make
2.
another check if the hinges areonto the right position . If you make the fitting
wrong , you will not be able to make the appliance door fully opened.
Fold both locking levers closed again.
Close the cooking compartment door. By the same time , we warmly recommend
3.
you to check one more time , if the door is onto the right position and if the
ventilation slots are not half-sealed .
Removing the door cover
The plastic inlay in the door cover may become discolored. To carry out thorough
cleaning, you can remove the cover.
Remove the appliance door like instructed above.
Press on the right and left side of the cover.
1.
Remove the cover.
2.
3.
After removing the door cover , that rest parts of the appliance door can be easily taken
o so that you can go on with the cleaning . When the cleaning of the appliance door
has finished , put the cover back in place and press on it until it clicks audibly into place.
4.
Fitting the appliance door and close it.
Page 53

Change the power cord
25
Position A show the terminal box position on the back of the back outer case and it’s
closed.
Steps: a. cut o the power, use small flat screwdriver to open two snap 1,2.
b. use Phillips crewdriver to take o screws 3,4 ,5and6.
c. change the new power cord ,fix the yellow/green wire on 3,brother wire on 4,
blue wire on 5.
d. twist screw 6 closed the terminal box cover finish the changing.
A
brown {L}
yellow/green
power cord
blue {N}
21
3
4
terminal boxback outer case
Caution!
While the appliance door is well installed, the door cover can also be taken o, by this time.
Removing the door cover means to set the inner glass of the appliance door free, the
1.
glass can be easily moved and cause damage or injury.
As removing the door cover and inner glass means to reduce the overall weight of
2.
the appliance door. The hinges can be easier to be moved when closing the door and
you may be trapped. Keep your hands away from the hinges.
Because of the 2 points above, we strongly recommend you not to remove the door
cover unless the appliance door removed. Damage caused by incorrect operation is not
covered under warranty.
6
5
Page 54

CURE YOUR APPLIANCE WHEN NEEDED
26
If a fault occurs, before calling the after-sales service, please ensure that is not because
of incorrect operations and refer to the fault table, attempt to correct the fault yourself.
You can often easily rectify technical faults on the appliance yourself.
If a dish does not turn out exactly as you wanted, you can find many tips and instructions for preparation at the end of the operating manual.
Fault Possible Cause Notes/remedy
The appliance
does not work.
Knobs have
fallen out of the
support in the
control panel.
Knobs can no
longer be
turned easily.
Faulty fuse.
Power cut
Knobs have
been accidentally
disengaged.
There is dirt
under knobs
Check the circuit breaker in the fuse box.
Check whether the kitchen light or other kitchen
appliances are working.
Knobs can be removed.
Simply place knobs back in their support in the
control panel and push them in so that they engage
and can be turned as usual.
Knobs can be removed.
To disengage knobs, simply remove them from the
support.
Alternatively, press on the outer edge of knobs so
that they tip and can be picked up easily.
Carefully clean the knobs using a cloth and soapy water.
Dry with a soft cloth.
Do not use any sharp or abrasive materials.
Do not soak or clean in the dishwasher.
Do not remove knobs too often so that the support
remains stable
Page 55

Fan does not work all the time in
27
the mode: “Fan Heating”
This is a normal operation due to the best possible heat
distribution and best possible performance of the oven.
After a cooking process a noise
can be heard and a air flow in the
near of the control panel can be
observed.
The food is not sucient cooked
in the time given by the recipe .
Uneven browning
The lamp doesn’t turn on The lamp needs to be replaced.
The cooling fan is still working, to prevent high
moisture conditions in the cavity and cool down the
oven for your convenience. The cooling fan will
switch o automatically.
A temperature dierent from the recipe is used. Double
check the temperatures. The ingredient quantities are
dierent to the recipe. Double check the recipe.
The temperature setting is too high, or the shelf level
could be optimized. Double check the recipe and settings.
The surface finish and or color and or material of the
baking ware were not the best choice for the selected oven function. When use radiant heat, such as
“Top & Bottom Heating” mode, use matt finished,
dark colored and light weighted oven ware.
Warning-Risk of electric shock!
Incorrect repairs are dangerous. Repairs may only be carried out and damaged power
cables replaced by one of our trained after-sales technicians. If the appliance is defective, unplug the appliance from the mains or switch o the circuit breaker in the fuse
box. Contact the after-sales service.
Maximum operating time
The maximum operating time of this appliance is 9 hours, to prevent that you forget
shot o the power.
Replacing the lamp on the corner of the cavity
If the cavity lamp fails, it must be replaced. Heat-resistant, 25 watt, 230 V halogen lamps
are available from the after-sales service or specialist retailers.
When handling the halogen lamp, use a dry cloth. This will increase the service life of the lamp.
Page 56

WARNING
28
Risk of electric shock!
When replacing the lamp, the lamp socket contacts are live. Before replacing the lamp,
unplug the appliance from the mains or switch o the circuit breaker in the fuse box.
Risk of burns!
The appliance becomes very hot. Never touch the interior surfaces of the appliance or
the heating elements. Always allow the appliance to cool down. Keep children at a safe
distance.
Place a towel in the cold cavity to prevent damage.
1.
Turn the glass cover anti-clockwise to remove it.
2.
Pull out the lamp – do not turn it.
3.
Screw the glass cover back in.
4.
Remove the towel and switch on the circuit breaker to see if lamp switches on.
5.
Insert the new lamp, making sure that the pins are in the correct position. Push the lamp
in firmly.
Glass cover
If the glass cover of the halogen lamp is damaged, it must be replaced. You can obtain a
new glass cover from the after-sales service. Please specify the E number and FD
number of your appliance.
Page 57

CUSTOMER SERVICE
29
Our after-sales service is there for you if your appliance needs to be repaired. We will
always find an appropriate solution. Please contact the dealer where you by this appliance. When calling us, please give the model number and S/N so that we can provide you
with the correct advice. The rating plate bearing these numbers can be found when you
open the appliance door.
Model:
Rated voltage:
Rated frequency:
Electric power:
Company: Guangdong Midea Kitchen Appliances Manufacturing Co., Ltd
Address: No.6 YongAn Road, Beijiao, Shunde, Foshan, Guangdong, China
To save time, you can make a note of the model of your appliance and the telephone
number of the aftersales service in the space below, should it be required.
MO 7200 GB MO 72039 X0
220-240V~
50Hz-60Hz
2.3 kW
/
MAINTENANCE CARD
Model number
Serial number
Warning
This appliance shall be installed in accordance with the regulations in force and only used
in a well ventilated space.Read the instructions before installing or using this appliance.
Purchasing date
Purchasing store
Note
Please note that a visit from an after-sales service engineer is not free of charge, even
during the warranty period.
Rely on the professionalism of the manufacturer. You can therefore be sure that the
repair is carried out by trained service technicians who carry original spare parts for your
appliances.
Above, thank you again for buying Midea Built-in Oven, and we wish that our appliance
will bring you delicious food and happy life.
Page 58

TIPS AND TRICKS
30
You want to cook your
own recipe
Is the cake baked ready?
The cake loses massive
volume during cooling
down after baking
The height of the cake is
in the middle much higher
than at the outer ring
The cake is too brown at
the top
The cake is too dry
The food is good looking
but the humidity inside is
too high
The browning is uneven
Try to use settings of similar recipes first and optimize
the cooking process due to the result.
Put a wooden stick inside the cake about 10 minutes
before the given baking time is reached. If there is no raw
dough at the stick after pulling out, the cake is ready.
Try to lower the temperature setting by 10°C and
double check the food preparing instructions regarding
the mechanical handling of the dough.
Do not grease the outer ring of the spring form
Use a lower shelf level and or use a lower set
temperature (this may lead to a longer cooking time)
Use a 10°C higher set temperature (this may lead to a
shorter cooking time)
Use a 10°C lower set temperature (this may lead to a
longer cooking time) and double check the recipe
Use a 10°C lower set temperature (this may lead to a
longer cooking time).
Use the “Top & Bottom Heating” mode on one level.
The cake is less browned
on the bottom
Baking on more than one
level at the same time:
One shelf is darker than
the other.
Condensing water
during baking
Choose a level down
Use a fan assisted mode for baking at more than one
level and take out the trays individually when ready. It is
not necessary that all trays are ready at the same time.
Steam is part of baking and cooking and moves normally
out of the oven together with the cooling air flow. This
steam may condensate at dierent surfaces at the oven
or near to the oven and build water droplets. This is a
physical process and cannot be avoid completely.
Page 59

Which kind of baking
31
ware can be used?
How to use the
grill function?
Every heat resistant baking ware can be used. It is
recommended not to use aluminum in direct contact with
food, especially when it is sour.
Please ensure a good fitting between container and lid.
Preheat the oven for 5 minutes and place the food in the
level given by this manual.
Close the oven door when you use any grilling mode. Do
not use the oven when the door is open, except for load /
remove / check the food.
How to keep clean the
oven during grilling ?
The heating element in all
grilling modes are switching
on and o over the time.
How to calculate the oven
settings, when the weight
of a roast is not given by
a recipe?
What happens if a fluid is
poured to a food in the
oven during the baking or
cooking process?
Use the tray filled with 2 liter of water in at level 1. Nearly
all fluids drip down from the food placed on the rack will
captured by the tray.
It is a normal operation and depends on the temperature
setting.
Choose the settings next to the roast weight and change
the time slightly.
Use a meat probe if possible to detect the temperature
inside the meat.
Place the head of the meat probe carefully in the meat,
due to the manufacturer instructions.
Make sure, that the head of the probe is placed in the
middle of the biggest part of the meat, but not in the
near of a bone or hole.
The fluid will boil and steam will arise as a normal
physical process.
Please be careful, because the steam is hot. See also
“Condensing water during baking” for more information.
If the fluid contains alcohol, the boiling process will be
quicker and can lead to flames in the cavity. Make sure,
that the oven door is closed during such kind of
processes. Please control the baking or cooking process
carefully. Open the door very gentle and only if
necessary.
Page 60

TYPICAL RECIPES
32
CAKE
LevelForm
Mode Temp.in °C
Duration
in minutes
Sponge Cake (simple)
in a Box shape
Sponge Cake (simple)
in a Box shape
Sponge Cake with
Fruits in a round Form
Sponge Cake with
Fruits on a Tray
Raisins Brioche
Muns (Yeast Cake)
Gugelhupf
(with Yeast)
Muns
Muns
Apple Yeast
Cake on a Tray
Water Sponge
Cake ( 6 Eggs)
Box
Box
Round form Conventional
Tray Conventional
Mun form p.h.t.:19:00
Tray p.h.t.:11:00
Mun form
Mun form
Tray p.h.t.: 10:00
Spring form
2
Conventional
with Fan
1
Conventional 70
1
with Fan
1
2
Conventional
1
Conventional
1
Conventional
Conventional
1
with Fan
Conventional
1
with Fan
1
Conventional
170
140
150
140
220
150
160
150
160
160
50
50
70
b.t.: 11:00
b.t.:60:00
p.h.t.: 8:30
b.t.: 30:00
p.h.t.: 8:30
b.t.: 30:00
b.t.: 42:30
p.h.t.: 9:30
b.t.: 41:00
Water Sponge
Cake ( 4 Eggs)
Apple Yeast
Cake on a Tray
Note: p.h.t means preheat time, b.t. means baking time.
Spring form
Tray 2 p.h.t.: 8:00
1 Conventional
Conventional
with Fan
160
150
p.h.t.: 9:00
b.t.: 26:00
b.t.: 42:00
Page 61

CAKE
33
LevelForm
Mode Temp.in °C
Duration
in minutes
Hefezopf (Callah) Tray
Butter Yeast Cake
Shortbread 170
Shortbread 2 Trays
Vanilla Cookies
Vanilla Cookies
Tray
Tray
Tray
Tray
Tray
BREAD
White Bread ( 1 kg
Flour) Box shape
White Bread ( 1 kg
Flour) Box shape
Box 1 170 p.h.t.: 9:20
Box 1 170 p.h.t.: 12:00
LevelForm
2
Conventional
with Fan
2
Conventional
2
Conventional
Conventional
2+4
with Fan
2
Conventional
Conventional
2+4
with Fan
Mode Temp.in °C
Conventional
Conventional
with Fan
ConventionalTray 2 170Fresh Pizza (thin) p.h.t.: 9:30
ConventionalTray 2 170Fresh Pizza (thick) p.h.t.: 10:00
150
150
160
160
150
40
p.h.t.: 8:00
b.t.: 30:00
p.h.t.: 8:00
b.t.: 13:00
p.h.t:8:20
b.t.: 12:00
p.h.t.: 8:00
b.t.: 10:00
p.h.t.:8:00
b.t.: 14:00
Duration
in minutes
b.t.: 50:00
b.t.: 45:00
b.t.: 21:00
b.t.: 45:00
MEAT
1,6 KG
Tray 2 170Fresh Pizza (thick) p.h.t.:8:00
LevelForm
Tray 2Beef Tender Loin
Tray 180Meatloaf 1 kg Meat 1 Conventional 75
Tray 180Chicken 1 kg L2:Rack
L1:Tray
Tray 2 170 70ConventionalFish (2,5 kg )
Conventional
with Fan
Mode Temp.in °C
Double Grill
with fan
Double Grill
with fan
b.t.: 41:00
Duration
in minutes
180 55
50
Page 62

TEST FOOD ACCORDING TO EN 60350-1
34
RECIPESA
Sponge cake
Sponge cake
Small cake
Cheese cake
Apple pie
Apple pie
Bread
Toast
chicken
In chicken recipe, begin with the backside on top and turn the Chicken after 30 min.
1.
to the top side
Use a dark, frosted mold and place it on the rack
2.
Take out the trays at the moment, when the food is ready, even when it is not at the
3.
end of the given baking time.
Choose the lower temperature and check after the shortest time, given in the table.
4.
If using the tray to capture fluids dripping from the food placed on the rack during
5.
any grilling mode, the tray should be set to level 1 and filled with some water.
The burger patties should turned around after 2/3 of the time.
6.
Springform Φ26cm
Springform Φ26cm
1 tray
Springform Φ26cm
Springform Φ20cm
Springform Φ20cm
1 tray
Rack
Rack & tray
FAccessories
Level Time(min) Pre-heat
℃
170
160
150
170
170
160
200
Max
180
1
2
2
2
1
1
2
5
Rack 2
Tray 1
35-45
35-45
40-50
70-80
70-80
70-80
35-45
6-8
55-65
Yes 5min
Yes
Yes
Yes
No
No
No
Yes
Yes
Page 63

ENERGY EFFICIENCY ACCORDING
35
TO EN 60350-1
Please note the following information:
The measurement is carried out in the “ECO” mode to determine the data regarding
1.
the forced air mode and the label-class
The measurement is carried out in the “Top & Bottom Heating” mode to determine
2.
the data regarding the conventional mode
During the measurement only the necessary accessory is in the cavity.All other parts
3.
have to be removed
The oven is installed as described in the installation guide and placed in the middle of
4.
the cabinet
It is necessary for the measurement to close the door like in the household, even
5.
when the cable disturbs the sealing function of the gasket during the measurement.
To make sure, that there are no negative eects regarding the disturbed sealing due
to the energy data, it is necessary to close the door carefully during the measurement. It is may be required to use a tool to guaranty the sealing of the gasket like in
the household, where no cable disturbs the sealing function.
The determination of the cavity volume carried out for the usage “Defrost” as
6.
described on page 14. To ensure an ecient use of the oven, all accessories including
side-racks are removed.
DATASHEET (EU 65/2014 & EU 66/2014)
Midea MO 72000 GB/MO 7203
No of Cavities
Heat Source
Usable Volume
ECelectric, cavity (Conventional)
ECelectric, cavity (Forced Air)
Energy Eciency Class (A+++ to D)
Note
All oven modes described on Page 7 are main functions of the oven.
9
X
1
Electric
72L
0.8 kWh/cycle
5
0.78kWh/cycle
A
PN:16171100A33122
Page 64

 Loading...