

Page 1
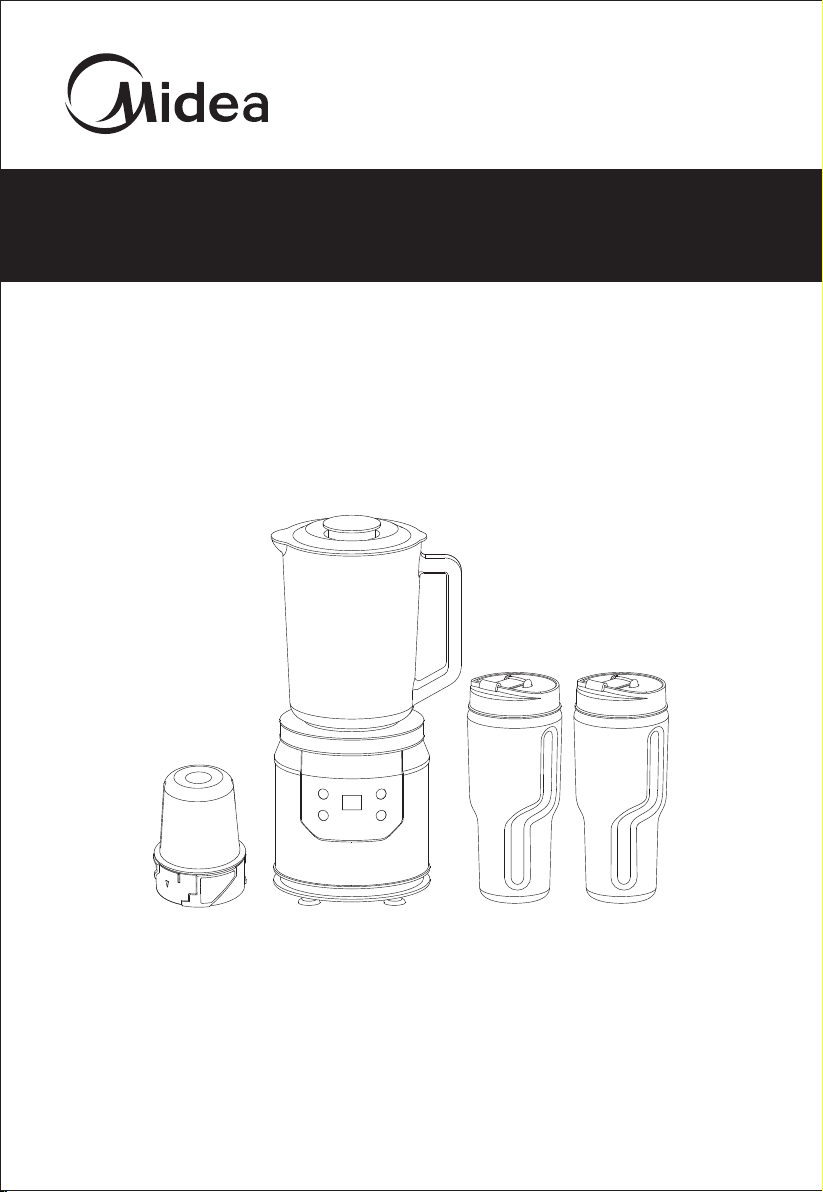
USER MANUAL
BLENDER
MBL17PB
Please read the manual carefully before operating your product.
Reserve it for future reference.
Page 2

IMPORTANT SAFEGUARDS
Cautions Before Use
When using electrical appliances, basic safety precautions
should always be followed including the following:
1.Read all instructions.
2.To protect against risk of electrical shock do not put in
water or other liquid.
3.Close supervision is necessary when any appliance is
used by or near children.
4.Unplug from outlet when not in use, before putting on or
taking off parts, and before cleaning.
5. Avoid contacting moving parts.
6.Do not operate any appliance with a damaged cord or
plug or after the appliance malfunctions, or is dropped or
damaged in any manner. Return appliance to the nearest
authorized service facility for examination, repair or
electrical or mechanical adjustment.
7.The use of attachments not recommended or sold by the
manufacturer may cause fire, electric shock or injury.
8.Do not use outdoors.
9.Do not let cord hang over edge of table or counter.
10.Flashing light indicates ready to operate. Avoid any
contact with blades or moveable parts.
11.To reduce the risk of injury, never place cutter-assembly
blades on base without jar properly attached.
12.Keep hands and utensils out of container while blending
to reduce the risk of severe injury to persons or
damage to the blender. A scraper may be used but
must be used only when the blender is not running
(does not apply to an acceptable scraper integral with
the appliance).
13.Blades are sharp. Handle carefully.
14.Always operate blender with cover in place.
1
Page 3

IMPORTANT SAFEGUARDS
15.The use of attachments, including canning jars, not
recommended by the manufacturer may cause a risk of
injury to persons.
16.Do not blend hot liquids.
17.This appliance has a polarized plug (one blade is wider
than the other). To reduce the risk of electric shock, this
plug is intended to fit into a polarized outlet only one
way. If the plug does not fit fully into the outlet, reverse
the plug. If it still does not fit, contact a qualified
electrician. Do not attempt to modify the plug in any
way.
18.A short power supply cord is provided to reduce the
risk resulting from becoming entangled in or tripping
over a longer cord.
19.Extension cords are available and may be used if care
is exercised in their use.
20.If an extension cord is used
·the marked electrical rating of the extension cord
should be at least as great as electrical rating of the
appliance
·the longer cord should be arranged so that it will not
drape over the counter or table top where it could be
pulled on by children or tripped over unintentionally.
21.Check hopper for presence of foreign objects before
using grinder.
SAVE THESE INSTRUCTIONS.
This product is for Household use only.
2
Page 4
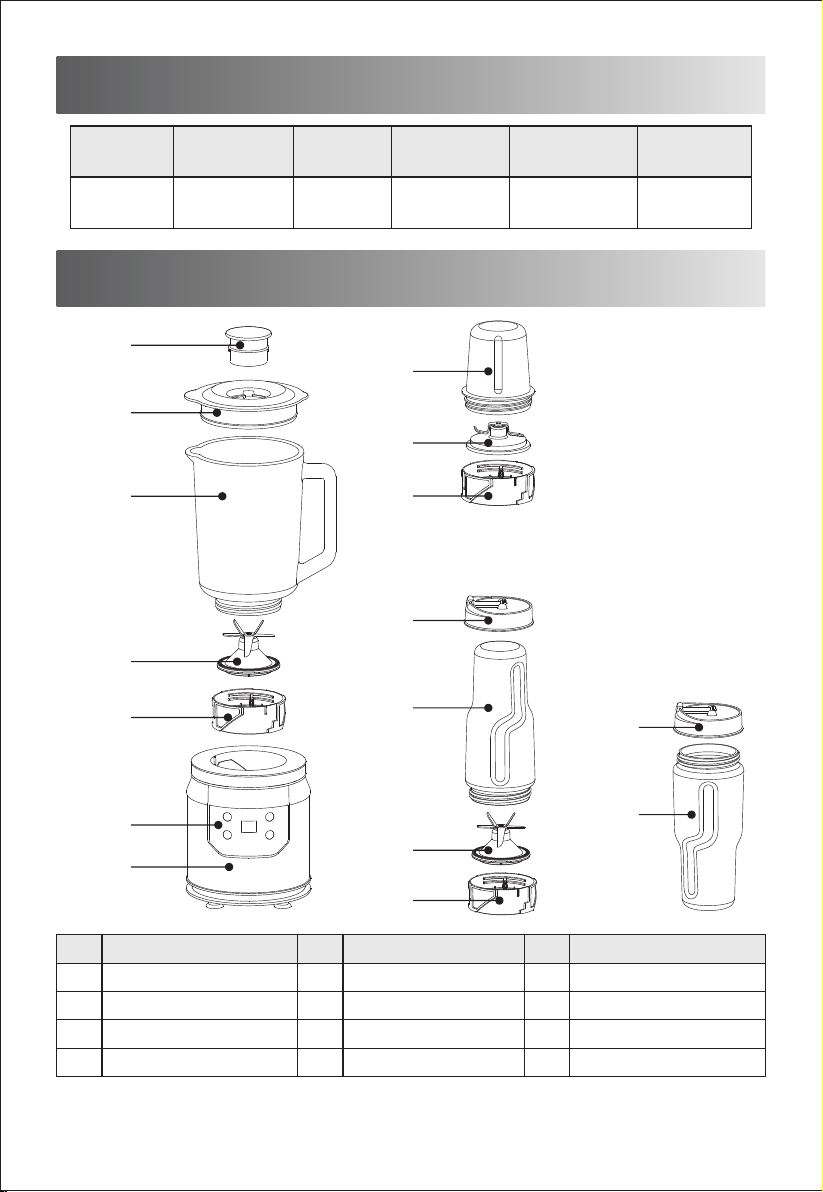
Technicaldata
Product
name
Blender
Model
MBL17PB
Voltage
120V~
Frequency
60Hz
Generaldescription
1
8
2
9
3
4
5
5
10
11
MAX Power
550W
10
Capacity
1500ml
6
7
No.
1
2
3
4
Description
inner lid
lid
jar
blending blade assembly
No.
jar base
5
touch control panel
6
base
7
small jar
8
4
5
Description
3
11
No.
9
10
11
Description
grind blade assembly
personal blending cup lid
personal blender cup
Page 5

Usingyourproduct
Preparing for use:
1.Wash all detachable parts (see chapter cleaning)
2.Be sure all parts are properly assembled in place before use.
3.The temperature for the food to be mixed shall not exceed 140 F, the
volume of food to be processed shall not exceed the maximum mark
level on the jar.
Using Blending Jar
Max power can be obtained under using this jar.
1.Install the blending blade
assembly into jar base.
2.Rotate the jar base to the
jar in clockwise until it
tightened in place.
3.Place ingredients (fruit and
liquids in the ratio of 2 to 3
by weight) into the jar, less
than the Max. level 1500ml.
4.Place the lid on top of the jar.
4
Page 6
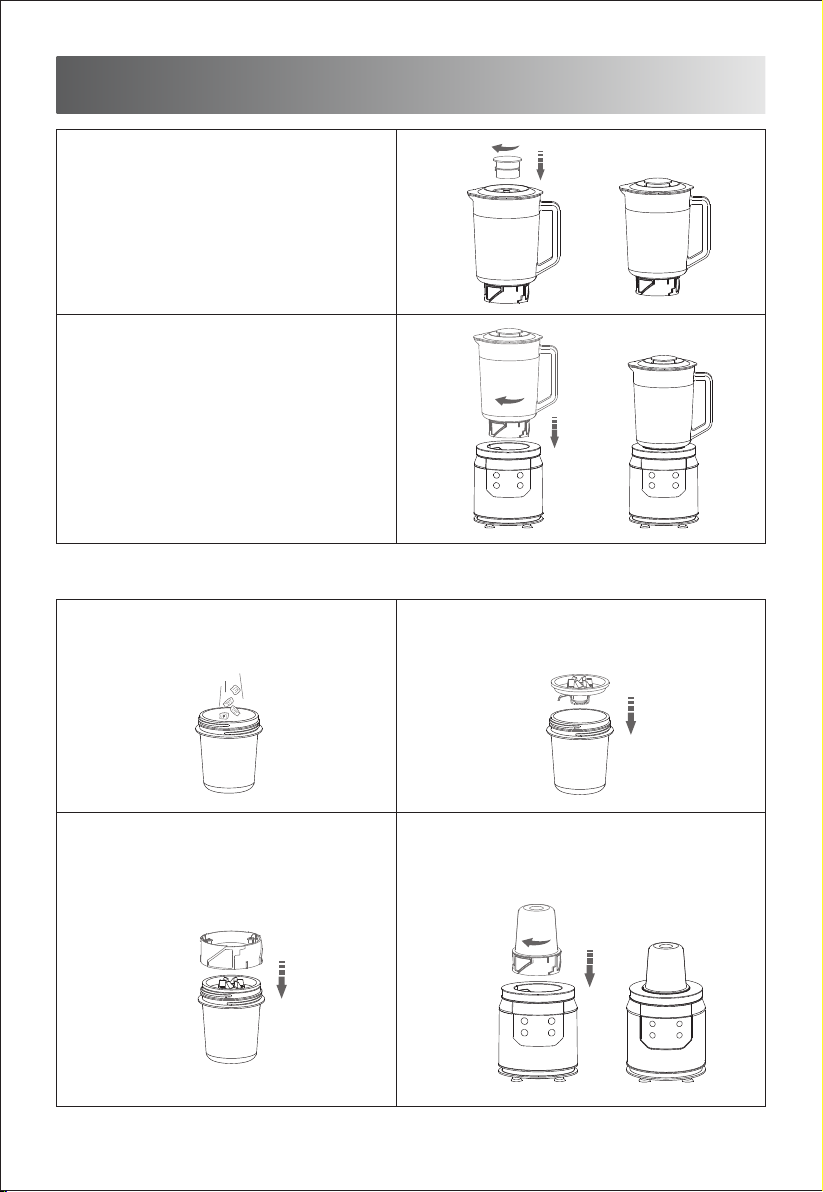
Usingyourproduct
5. Place the inner lid onto the
lid and rotate clockwise to
lock it.
6. Place the jar assembly onto
the unit base and rotate
clockwise jar assembly will
lock in with a click.
Using Grinder accessory
1.Place ingredients into the
small jar, less than the
Max. level.
3.Rotate the jar base to small
jar in clockwise until it
tightened in place.
2.Place the grinding blade assembly
into small jar.
4. Place the grinder accessory onto
the unit base and rotate clockwise
grinder accessory will lock in with
a click.
5
Page 7

Usingyourproduct
Using Personal Blending Cup
1. Place ingredients (fruit and
liquids in the ratio of 2 to 3
by weight) into the personal
blending cup, less than the
Max. level.
CAUTION: To reduce the
risk of injury, do not blend
when ingredients over the
Max. level.
2.Place the blending blade
assembly into personal
blending cup.
4. Place the personal blending
cup onto the unit base and
rotate clockwise and will lock
in with a click.
3.Rotate the jar base to personal
blending cup in clockwise until it
tightened in place.
6
Page 8
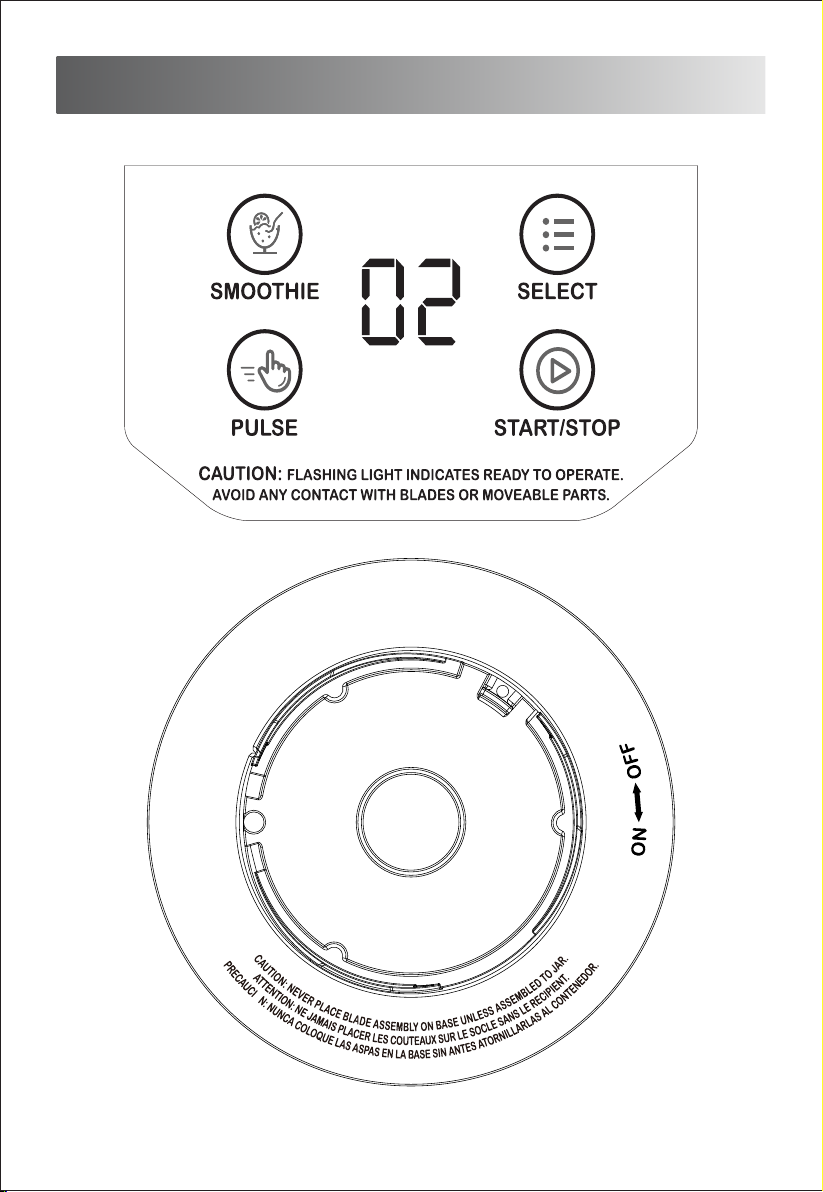
Usingyourproduct
Touch control panel
7
Page 9

Usingyourproduct
ON/OFF: When you already place the jar, the main switch is on and LED
lights flashing, the machine is ready in standby mode.
SMOOTHIE: Make very smooth sauces or food.
SELECT:
Speed 1 for blending soft fruit and vegetables.
Speed 2 for blending hard fruit and vegetables.
Speed 3 for grinding nuts like beans or sugar grain to powder, only for
using Grinder accessory.
Speed 4 for ice crush, only for using Glass Jar.
PULSE: Bursts of high power blending.
START/STOP: After you select function, you can start running the unit,
OR stop running unit.
CAUTION: flashing light indicates ready to operate.
Avoid any contact with blades or moveable parts.
The lights flashing include bellow conditions:
1.When the jar is ready on the base but not select the function, LED
flashing.
2.When the machine is stopped but the jar is not removed, LED flashing.
3.When you select some function, LED flashing.All these conditions and
other not mentioned, DO NOT contact with blades or moveable parts.
Tips for use
1. liquid ingredients: dairy produce、juice、soup、drink、paste、milk
shake and so on.
2. a combination of soft ingredients: milk、papaya、mayonnaise.
3. make cooked pulpy ingredients: baby food
8
Page 10

Cleaning and caring
Cleaning
The appliance is easier to clean if you do so immediately after use.
1. Unplug the appliance, remove the jar, personal blending cup or small jar,
remove the blade assembly.
2. Clean these parts with the cleaning brush in warm water with some
washing-up liquid and rinse them under the tap.
3. Clean the base with a damp cloth, never immerse the motor base
in water nor rinse it under the tap caring.
4. Avoid touching the sharp blades, especially when the appliance is
plugged in.
5. Add water to glass jar and press PULSE to clean blades and jars.
Caring
1. Please store the appliance in dry environment.
2. Never put the jar, or any other parts, in a microwave oven.
Troubleshooting
1. If, during use, the product is subjected to such abnormality as noise,
smell, smoke and increased temperature, disconnect the power supply
and stop the use.
2. In case the appliance fails to work, please check whether the power
supply is properly connected, whether the switch is rotated to the on
position and whether the fittings are in place.
3. If appliance is still working improperly or you need assistance please
contact customer service 1-866-646-4332
9
Page 11

MANUAL DEL USUARIO
LICUADORA
MBL17PB
Lea atentamente este manual de instrucciones antes de utilizar
el producto. Conserve este manual de instrucciones para
referencia futura.
Page 12

INSTRUCCIONES DE SEGURIDAD
IMPORTANTES
Advertencias antes de utilizar el artefacto
Cuando utilice electrodomésticos, siga siempre las medidas
básicas de seguridad incluyendo las siguientes:
1. Lea todas los instrucciones.
2. Para evitar el riesgo de descargas eléctricas, no sumerja
este artefacto en agua ni en ningún otro líquido.
3. Se requiere estricta supervisión cuando se utilice el
artefacto por o cerca de los niños.
4. Desconecte el artefacto del tomacorriente cuando no esté
en uso, antes de colocar o retirar las piezas y antes de
limpiarlo.
5. Evite el contacto con las partes móviles.
6. No utilice el artefacto si el cable o el enchufe están dañados,
si el artefacto no funciona correctamente o si se ha caído o
dañado de alguna manera. Devuelva el artefacto al centro
de servicio autorizado más cercano para su revisión,
reparación o ajuste eléctrico o mecánico.
7. El uso de accesorios no recomendados ni vendidos por el
fabricante pueden provocar incendios, descargas elé
ctricas o provocar lesiones.
8. No utilice este artefacto al aire libre.
9. No permita que el cable cuelgue sobre el borde de la
mesa o mostrador.
10. La luz intermitente indica que el artefacto está listo para
funcionar. Evite el contacto con las cuchillas o con las
piezas móviles.
11. Para reducir el riesgo de lesiones personales, nunca
coloque las cuchillas de montaje de corte en la base sin
que la jarra esté debidamente ajustada.
12. Mantenga las manos y los utensilios fuera del recipiente
mientras esté licuando para reducir el riesgo de sufrir
lesiones graves o provocar daños a la licuadora. Se
1
Page 13

INSTRUCCIONES DE SEGURIDAD
IMPORTANTES
13. Las cuchillas son filosas. Manipúlelas con cuidado.
14. Utilice siempre la licuadora con la tapa en su lugar.
15. El uso de accesorios, incluidas las jarras de conserva,
no recomendados por el fabricante pueden provocar
lesiones personales.
16. No licue líquidos calientes.
17. Este artefacto tiene un enchufe polarizado (un contacto
es más ancho que el otro). Para reducir el riesgo de una
descarga eléctrica, este enchufe está diseñado para
entrar en un tomacorriente polarizado de una sola
manera. Si el enchufe no entra correctamente en el
tomacorriente, colóquelo al revés. Si aun así no entra,
póngase en contacto con un electricista calificado. No
intente modificar el enchufe de ninguna manera.
18. Se provee un cable eléctrico corto para reducir el riesgo
de enredos o tropiezos que pueda causar un cable largo.
19. Se dispone de cables de extensión que pueden utilizarse
solo si se tiene cuidado en su uso.
20. Si utiliza un cable de extensión
La clasificación eléctrica marcada en el cable de
extensión debe ser por lo menos igual que la
clasificación eléctrica del artefacto.
El cable más largo debe arreglarse de modo que no
quede colgando del borde de una mesa o mostrador
donde los niños puedan tropezarse o engancharse
accidentalmente.
21. Verifique si existen objetos extraños dentro del recipiente
antes de utilizar el moledor.
GUARDE ESTAS INSTRUCCIONES.
Este artefacto es solo para uso doméstico.
2
Page 14

Licuadora
MBL17PB
120 V~
60 Hz
550W
1500 ml.
Datos técnicos
No.
Descripción
No.
Descripción
No.
Descripción
1
tapa interior
5
base de la jarra
9
unidad de cuchillas para molido
2
tapa6panel de control táctil
10
tapa del vaso para licuado personal
3
jarra7base11vaso para licuado personal
4
unidad de cuchillas para licuado
8
jarra pequeña
Modelo Voltaje Frecuencia Potencia MAX
Descripción general
1
2
3
4
5
CapacidadNombre del
8
9
5
10
11
10
6
7
11
4
5
3
Page 15

Modo de uso del artefacto
Antes de utilizar por primera vez:
1. Lave todas las partes desmontables (consulte el capítulo limpieza)
2. Asegúrese de que todas las partes estén ensambladas y colocadas
correctamente antes de utilizar el artefacto.
3. La temperatura de los alimentos que serán mezclados no debe exceder
los 140 F, y el volumen de los alimentos que serán procesados no debe
exceder la marca de nivel máximo indicada en la jarra.
Modo de uso de la jarra de la licuadora
Utilice esta jarra para obtener la potencia máxima.
1. Instale la unidad de
cuchillas para licuado sobre
la base de la jarra.
2. Coloque la jarra en base de
la jarra y gírela en sentido
horario hasta que encaje en
su lugar.
3. Coloque los ingredientes
(frutas y líquidos en
cantidades de 2 a 3 según
el peso) en la jarra sin
exceder el nivel máximo de
1500 ml.
4. Coloque la tapa sobre la
parte superior de la jarra.
4
Page 16

Modo de uso del artefacto
5. Coloque la tapa interior en la
tapa y gírela en sentido
horario para bloquearla.
6. Coloque la jarra en la base
de la unidad y gírela en
sentido horario hasta oír el
clic de bloqueo.
Modo de uso del accesorio del moledor
1. Coloque los ingredientes en
la jarra pequeña sin exceder
el nivel máximo.
3. Coloque la jarra en base de
la jarra y gírela en sentido
horario hasta que encaje en
su lugar.
2. Coloque la unidad de cuchillas
para molido en la jarra pequeña.
4. Coloque el accesorio del moledor
en la base de la unidad y gírelo en
sentido horario hasta oír el clic de
bloqueo.
5
Page 17

Modo de uso del artefacto
Modo de uso del vaso para licuado personal
1. Coloque los ingredientes
(frutas y líquidos en
cantidades de 2 a 3 según el
peso) en el vaso para licuado
personal sin exceder el nivel
máximo.
PRECAUCIÓN: Para reducir
el riesgo de lesiones
personales, no licue los
ingredientes sobre el nivel
máximo.
MAX
2. Coloque la unidad de
cuchillas para licuado en el
vaso para licuado personal.
4. Coloque el vaso para licuado
personal en la base de la
unidad y gírelo en sentido
horario hasta oír el clic de
bloqueo.
3. Coloque el vaso para licuado
personal en la base de la jarra y
gírelo en sentido horario hasta
que encaje en su lugar.
6
Page 18

Modo de uso del artefacto
Panel de control táctil
7
Page 19

Modo de uso del artefacto
ON/OFF: Una vez que se haya colocado la jarra, se encienda el
interruptor principal y las luces LED parpadeen, esto indica que el
artefacto está en modo de espera y listo para ser utilizado.
SMOOTHIE: Prepare salsas o alimentos muy suaves.
SELECT:
Velocidad 1 para licuar frutas y verduras.
Velocidad 2 para licuar frutas y verduras sólidas.
Velocidad 3 para moler nueces, frijoles o granos de azúcar en polvo.
Utilice solo con el accesorio del moledor.
Velocidad 4 para triturar hielo. Utilice solo la jarra de vidrio.
PULSE: Produce ráfagas de licuado de alta potencia.
START/STOP: Después de seleccionar esta función, puede empezar a
utilizar la unidad. O detener el funcionamiento de la unidad.
PRECAUCIÓN: la luz intermitente indica que el
artefacto está listo para funcionar. Evite el contacto
con las cuchillas o con las piezas móviles.
Las luces parpadeantes incluyen las siguientes condiciones:
1) Cuando la jarra está sobre la base lista para ser utilizada pero no se
selecciona ninguna función, el LED parpadeará.
2) Cuando el artefacto está detenido pero no se ha retirado la jarra, el LED
parpadeará.
3) Cuando se selecciona alguna función, el LED parpadeará.
Para todas estas condiciones y otras no mencionadas, evite el contacto
con las cuchillas o con las piezas móviles.
Consejos de utilización
1. ingredientes líquidos: productos lácteos, jugos, sopas, bebidas, pastas,
batido de leche, etc.
2. combinación de ingredientes blandos: leches, papayas, mayonesa.
3. ingredientes pulposos cocidos: comida para bebés
8
Page 20

Limpieza y mantenimiento
Limpieza
Para una fácil limpieza, limpie siempre el artefacto inmediatamente
después de cada uso.
1. Desenchufe el artefacto y retire la jarra, el vaso para licuado personal o
la jarra pequeña y la unidad de cuchillas.
2. Limpie estas partes con un cepillo de limpieza con agua caliente y
detergente líquido y enjuáguelas bajo el grifo.
3. Limpie la base con un paño húmedo, nunca sumerja la base del motor
en agua ni lo enjuague bajo el grifo.
4. No toque las cuchillas, sobre todo si el artefacto está enchufado.
5. Agregue agua a la jarra de vidrio y presione PULSE para limpiar las
cuchillas y las jarras.
Mantenimiento
1. Conserve el artefacto en un ambiente seco.
2. No coloque nunca la jarra o cualquier otra parte del artefacto en un
horno microondas.
Solución de problemas
1. Si durante su funcionamiento, el producto presenta problemas de
ruidos, olores extraños, humo o aumento de la temperatura,
desconéctelo de la fuente de alimentación y detenga inmediatamente su
funcionamiento.
2. Si el artefacto no funciona, verifique si la fuente de alimentación está
conectada debidamente, si el interruptor está en la posición de
encendido y si los accesorios están colocados correctamente.
3. Si el funcionamiento incorrecto del artefacto persiste o necesita
ayuda, póngase en contacto con el servicio de atención al cliente
1-866-646-4332
9
Page 21

MODE D’EMPLOI
MÉLANGEUR
MBL17PB
Lisez attentivement ce manuel avant l’utilisation de cet appareil.
Le conserver pour toute référence future.
Page 22

MESURES DE SÉCURITÉ IMPORTANTES
Précautions avant l'utilisation
Lors de l’utilisation des appareils électriques, des pré
cautions de sécurité basiques doivent toujours être suivies
y compris les points suivants :
1. Lire toutes les instructions.
2. Pour éviter tout risque de choc électrique, ne plongez
pas l’appareil dans l’eau ou tout autre liquide.
3. Une attention particulière est nécessaire lorsque
l'appareil est utilisé par ou à proximité d'enfants.
4. Débranchez l’appareil lorsqu’il n’est pas utilisé, avant d’
installer ou de retirer des pièces et avant de le nettoyer.
5. Évitez de toucher les pièces en mouvement.
6. N’utilisez aucun appareil si le cordon ou la fiche est
endommagée, s’il est défectueux, ou s’il est tombé ou a
été endommagé d’une manière ou d’une autre.
Retournez l’appareil au centre de services après-vente
agréé le plus proche pour réparation/réglage électrique
ou mécanique.
7. L’utilisation d’accessoires non recommandés ou non
vendus par le fabricant pourrait provoquer un incendie,
choc électrique ou blessures.
8. Ne pas utiliser à l'extérieur.
9. Ne laissez pas le cordon pendre du bord d’une planche
de travail ou d’un comptoir.
10. Le témoin clignote lorsque l'appareil est prêt à l’emploi.
Évitez tout contact avec les lames et les pièces mobiles.
11. Pour réduire les risques de blessures, ne placez jamais
les lames sur la base avant de fixer le pot correctement.
12. Pour éviter tout risque de blessures ou d'endommager
le mélangeur ne mettez pas les mains ni des
ustensiles dans le récipient du mélangeur pendant
l'utilisation. Vous pouvez utiliser une raclette à
condition que le mélangeur soit à l’arrêt (ne s’applique
pas à un racleur intégré à l’appareil).
1
Page 23

MESURES DE SÉCURITÉ IMPORTANTES
13. Les lames sont tranchantes. À manipuler avec précaution.
14. Utilisez toujours le mélangeur avec le couvercle installé.
15. L’utilisation d’accessoires, y compris les pots, non
recommandés par le constructeur peut causer des
blessures.
16. Ne mélangez pas de liquides chauds.
17. Cet appareil à une prise polarisée (une lame est plus
large que l’autre). Pour réduire le risque d’électrocution,
la fiche est prévue pour une prise de courant polarisée
qui ne s’insère que dans un sens. Si la fiche ne rentre
pas complètement dans la prise de courant, l’inverser.
Si elle ne rentre toujours pas, faire appel à un
électricien qualifié. Ne pas essayer de modifier la fiche
de quelque façon que ce soit.
18. Un cordon d’alimentation court est fourni afin de réduire
les risques de s’emmêler ou de trébucher sur un cordon
plus long.
19. Des cordons de rallonge sont disponibles et peuvent
être utilisés si une attention particulière est portée.
20. Si un cordon de rallonge est utilisé
Les caractéristiques électriques marquées sur le
cordon de rallonge doivent être au moins aussi
grandes que les caractéristiques électriques de l’
appareil.
Le cordon plus long doit être rangé de sorte qu’il ne
repose pas sur le comptoir ou le haut de la table où il
pourrait être tiré par des enfants, ou de sorte à ne
pas trébucher dessus.
21. Vérifier si la trémie contient des objets étrangers avant
d'utiliser le broyeur.
CONSERVER CES INSTRUCTIONS.
Ce produit n'est destiné qu'à un usage domestique.
2
Page 24

Mélangeur
MBL17PB
120 V~
60Hz
550W
1500ml
Caractéristiques techniques
N°
Description
N°
Description
N°
Description
1
couvercle intérieur
5
base du pot
9
lames de broyage
2
couvercle
6
panneau de contrôle tactile
10
couvercle de pot de mélange individuel
3
pot7base11pot de mélange individuel
4
lame de mélange
8
petit pot
Modèle Tension Fréquence Puissance max.
Description générale
1
2
3
4
5
CapacitéNom du produit
8
9
5
10
11
10
6
7
11
4
5
3
Page 25

Utilisation du produit
Préparation avant l’utilisation :
1. Lavez toutes les pièces amovibles (voir le chapitre Nettoyage)
2. Assurez-vous que toutes les pièces sont bien assemblées avant
l'utilisation.
3. La température des aliments à mélanger ne doit pas dépasser 60°C, le
volume d'aliments à traiter ne doit pas dépasser le niveau maximal
marqué sur le pot.
Utilisation du pot de mélange
La puissance maximale peut être atteinte en utilisant ce pot.
1. Installez la lame de mé
lange dans la base du pot.
2. Tournez à droite la base du
pot dans le pot jusqu'à ce
qu'elle soit bien serrée.
3. Mettez les ingrédients
(fruits et liquides dans un
rapport en poids 2/3) dans
le pot, ne dépassez pas le
niveau max. de 1500 ml.
4. Placez le couvercle au
dessus du pot.
4
Page 26

Utilisation du produit
5. Placez le couvercle intérieur
et le tourner à droite pour le
fermer.
6. Placez le pot sur la base de
l'unité et le tourner à droite
jusqu’à ce qu’il soit bien
serré.
Utilisation de l'accessoire broyeur
1. Placez les ingrédients dans le
petit pot, ne dépassez pas le
niveau Max.
3. Tournez la base du pot du
petit pot à droite jusqu’à ce
qu’elle soit bien serrée.
2. Placez la lame de broyage dans le
petit pot.
4. Placez l'accessoire broyeur sur la
base de l'unité et le tourner à
droite jusqu’à ce qu’il se verrouille
en place.
5
Page 27

Utilisation du produit
Utilisation du bol mélangeur
1. Placez les ingrédients (fruits
et liquides dans le rapport de
2 à 3 en poids) dans la tasse
de mélange personnelle, ne
dépassez pas le niveau Max.
ATTENTION : Pour réduire le
risque de blessure, ne
mélangez pas lorsque les
ingrédients sont dépassent le
niveau Max.
MAX
2. Placez les lames de mélange
dans un pot de mélange
individuel.
4. Placez le pot de mélange
individuel sur la base de
l'unité et le tourner à droite
jusqu’à ce qu’il se verrouille
en place.
3. Tournez la base du pot dans le
petit pot à droite jusqu'à ce qu'elle
soit bien serrée.
6
Page 28

Utilisation du produit
Panneau de contrôle tactile
7
Page 29

Utilisation du produit
ON/OFF : Lorsque le pot est déjà placé, l'interrupteur principal activé
et le voyant clignote, cela indique que la machine est en mode veille.
SMOOTHIE : Permet de préparer des sauces ou des aliments tendres.
SELECT :
Vitesse 1 pour mélanger des fruits et légumes tendres.
Vitesse 2 pour mélanger des fruits et légumes secs.
Vitesse 3 pour broyer des fruits durs tels que haricots, sucre en cube,
uniquement avec l'accessoire broyeur.
Vitesse 4 pour écraser de la glace, uniquement avec un pot en verre.
PULSE : Broyage à haute puissance.
START/STOP : Vous pouvez utiliser l'unité juste après avoir
sélectionné une fonction. OU l'arrêter.
ATTENTION : Le témoin clignote lorsque l'appareil
est prêt à l’emploi. Évitez tout contact avec les
lames et les pièces mobiles.
Les voyant clignote dans les conditions suivantes :
1) Le pot est placé sur la base, mais aucune fonction n'est sélectionnée.
2) La machine est arrêtée mais le pot n'est pas retiré.
3) Lorsqu'une fonction est sélectionnée.
Dans toutes ces conditions et autres non mentionnées, NE touchez
PAS les lames et les pièces mobiles.
Conseils d'utilisation
1. Ingrédients liquides : produits laitiers, jus, soupe, boisson, pâte,
milk shake et ainsi de suite.
2. Une combinaison d'ingrédients tendres : lait, papaye, mayonnaise.
3. Ingrédients pulpeux cuits : aliments pour bébés
8
Page 30

Nettoyage et Entretien
Nettoyage
L'appareil est facile à nettoyer si vous le faites aussitôt après utilisation.
1. Débranchez l'appareil, retirez le pot, le pot de mélange individuel ou le
petit pot et la lame.
2. Nettoyez les accessoires à l'aide d'une brosse de nettoyage dans de
l'eau chaude avec un peu de détergent puis les rincer sous le robinet.
3. Nettoyez la base avec un chiffon humide, ne plongez jamais la base du
moteur dans l'eau ni la rincer sous un robinet.
4. Évitez de toucher les lames tranchantes, surtout lorsque l'appareil est
branché.
5. Ajoutez de l'eau dans le pot en verre et utilisez PULSE pour nettoyer les
lames et les pots.
Entretien
1. Rangez l'appareil dans un environnement sec.
2. Ne placez jamais le pot, ni aucune autre pièce, dans un four à microondes.
Dépannage
1. Si, pendant l'utilisation, le produit émet un bruit, odeur, fumée ou
surchauffe, le débranche immédiatement et cessez de l'utiliser.
2. Dans le cas où l'appareil ne fonctionne pas, vérifiez s’il est correctement
branché, si l'interrupteur est positionné sur marche et si les accessoires
sont en place.
3. Si l'appareil fonctionne toujours de manière anormale ou si vous avez
besoin d'assistance, appelez le service à la clientèle au 1-866-646-4332.
9
 Loading...