

Page 1
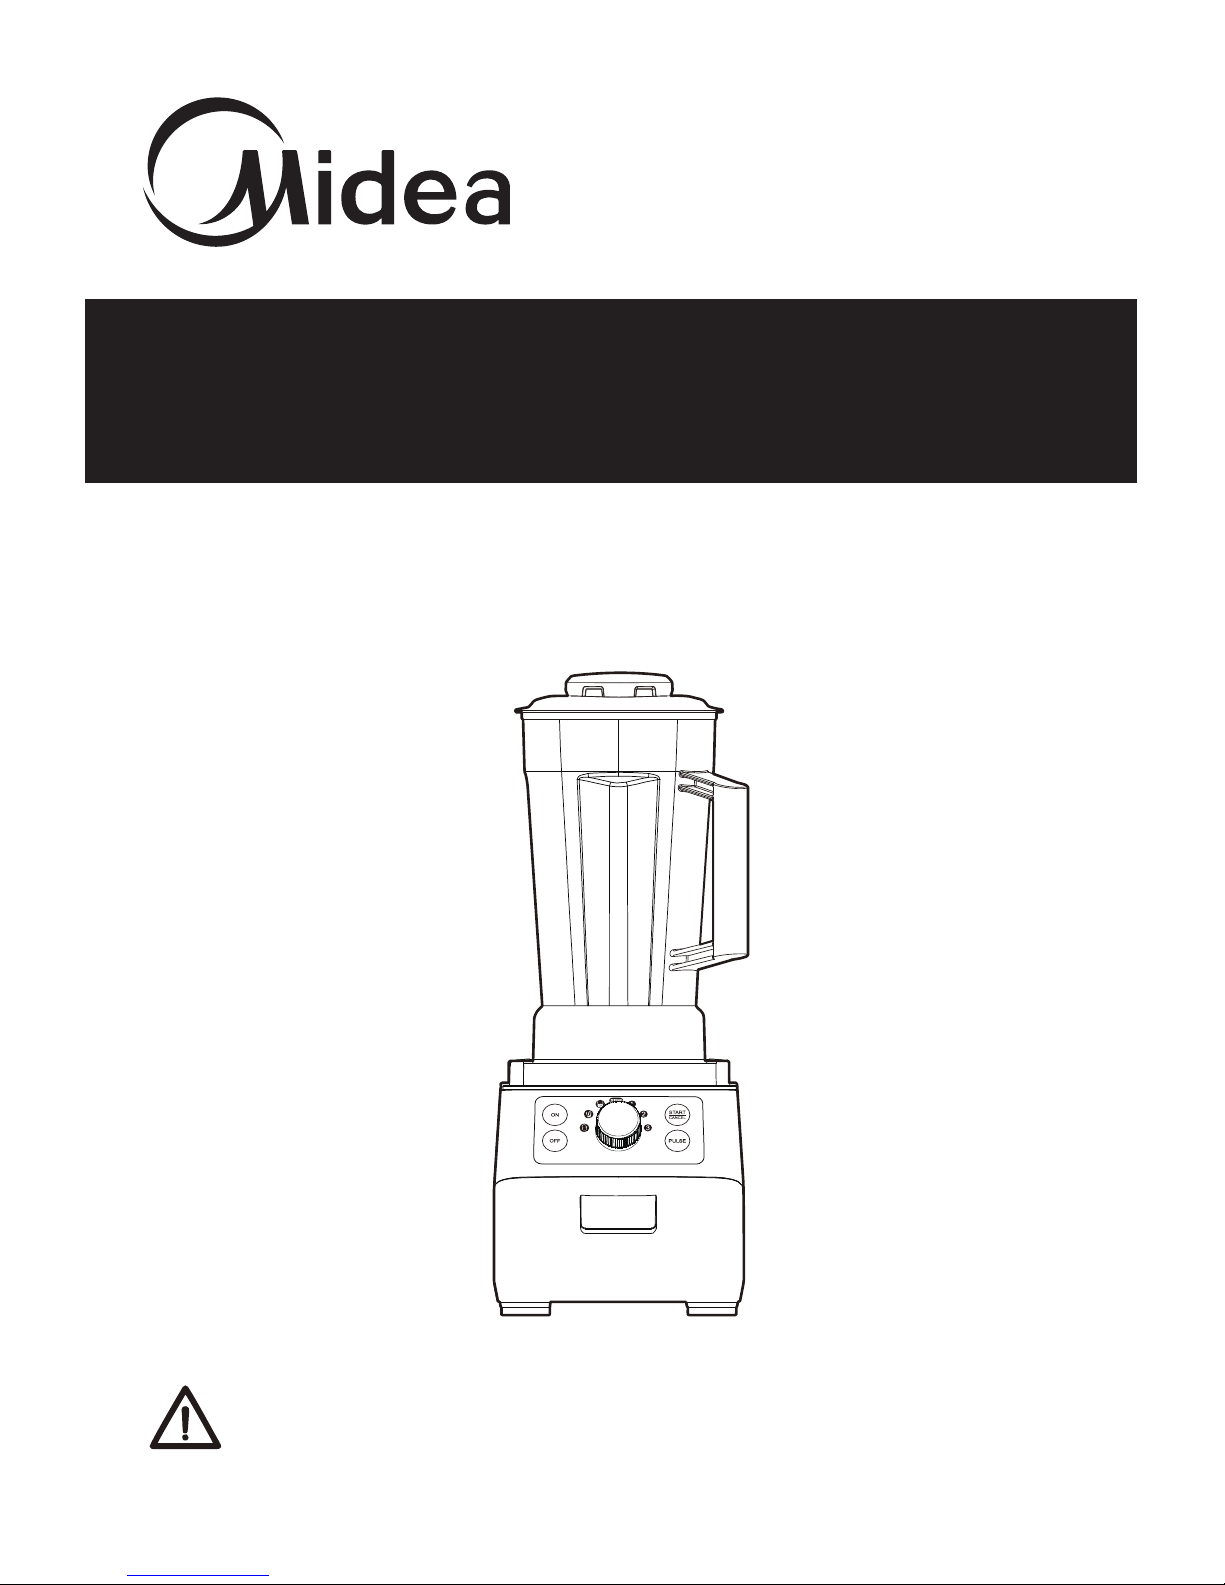
Instruction Manual
MBL17HS
High Speed CyclonBlade™ Blender
Please read the instructions carefully before use the machine
Please properly retention of the instructions for your future reference
Page 2
1
Welcome
IMPORTANT SAFEGUARDS
When using electrical appliances, basic safety precautions should always be
followed including the following: outdoor use.
1. Read all instructions.
2. To protect against risk of electrical shock do not put this appliance in water or
other liquid.
3. Close supervision is necessary when any appliance is used by or near
children.
4. Unplug from outlet when not in use, before putting on or taking off parts, and
before cleaning.
5. Flashing light indicates ready to operate. Avoid any contact with blades or
moveable parts.
6. Do not operate any appliance with a damaged cord or plug or after the
appliance malfunctions, or is dropped or damaged in any manner. Return
appliance to the nearest authorized service facility for examination, repair or
electrical or mechanical adjustment.
7. Do not use outdoors.
8. Do not let cord hang over edge of table or counter.
9. A protection system is designed, blending process would be stopped
automatically after 3 minutes running at any speed setting.
Warning
You are about to see how quick, easy, and delicious healthy eating can be!
Please read all the safety information, warnings, and instructional material found in
this booklet before getting start. Set your machine on a dry, level surface. Make
sure that the power switch is set to Off, and that the machine is plugged into a
grounded electrical outlet. Then, follow the cleaning instructions on page 6 to
prepare your machine for use. Always clean your machine before the first use.
To avoid the risk of serious injury when using your blender, basic safety
precautions should be followed, including the following.
Page 3
2
10. Keep hands and utensils out of container while blending to reduce the risk of
severe injury to persons or damage to the blender. A scraper may be used
but must be used only when the blender is not running.
11. Blades are sharp. Handle carefully.
12. To reduce the risk of injury, never place cutter-assembly blades on base
without jar properly attached.
13. Always operate blender with cover in place.
14. The use of attachments, including canning jars, not recommended by the
manufacturer may cause a risk of injury to persons.
15. For Normal Jar and Personal Jar, Do not blend hot liquids.
16. Avoid contacting moving parts.
17. The use of attachments not recommended or sold by the manufacturer may
cause fire, electric shock or injury.
SAVE THESE INSTRUCTIONS
The failure to follow any of the important safeguards and the important
instructions for safe use is a misuse of your Main power blender that can void
your warranty and create the risk of serious injury.
Note
The appliance must not be disposed of with household waste, but taken to an
authorised waste separation and recycling centre.
Recycling
IMPORTANT SAFEGUARDS
Page 4
3
Personal jar seal
Personal jar assembly
Personal jar seal
Personal jar cover
Seal cover
ON
OFF
PULSE
START
CANCEL
STOP
1
2
3
4
5
6
7
8
9
10
11
12
13
14
15
8
1
2
3
4
6
7
9
5 0
2
3
411
1
1
1
511
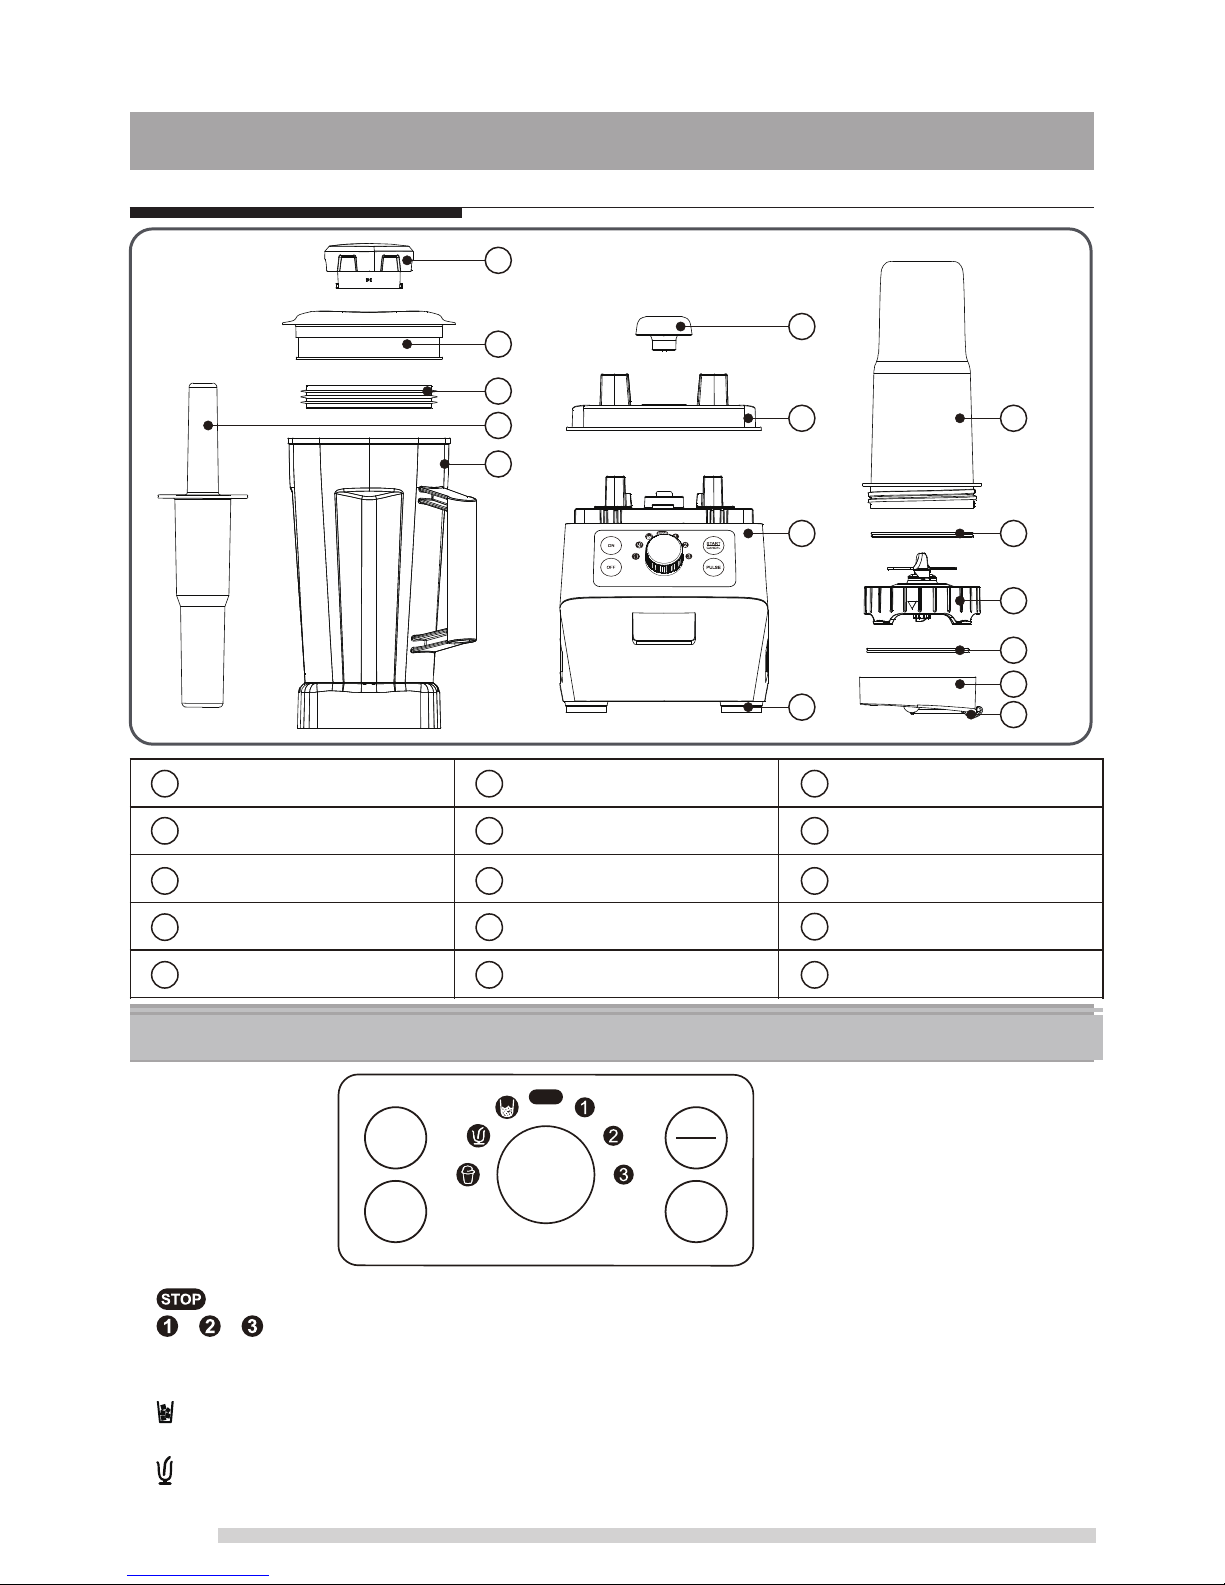
Parts & features
Measuring cup
Jar lid
Jar seal
Temper
Jar
Drive clutch
Top housing pad
Main Unit
Rubber feet
Personal jar
1. : When knob set at 0, the machine stop and not operate.
2. : 1, 2, 3 are low/middle/high speed.
3. Pulse: Set the knob at any position instead of 0, push pulse button the machine will operate
at high speed. Release the button the machine stop.
4. : Set the knob here, the machine operate 1 second On, 4 seconds off, repeat this for 12
cycles, then auto stop, total 1 minute.
5. : Set the knob here, the machine speed increase gradually to high for 0~10s, keep high
speed for rest 50s, then auto stop, total 1 minute.
Control panel
Page 5
4
6. : Set the knob here, the machinespeed increase to high quickly, and keep high speed
for 30s, then auto stop.
7. Start/Cancel: When the machine is in the ice/snow/dessert set program run in the
process, press the Start/Cancel, the machine stops running, automatic memory program
has been running time, press the START/CANCEL button again, according to the current
gear machine continues to run, when the set time to the post, the machine stops running.
8. ON/Off: Put the jar, press the ON key, blue LED lights had flashing, the machine is in
standby mode, turn the knob to the left speed 1, 2, 3 at different speeds, or turn the knob
to the right program Ice crush; smoothie; dessert press the set program to run, or press
the PULSE key to run at maximum speed, loosen or stop. When rotated to different stalls,
its corresponding blue LED lights. Then press the OFF key machine power off state.
Measuring cup:
Insert through the lid and secure by turning clockwise. Remove the measuring cup to use
the tamper or add ingredients.
Warning
Warning
Blade Container:
Designed for processing liquids, including juice, frozen mixtures, sauces, soups, purees,
batters, and for wet chopping.
• Rotating Blades Can Cause Severe Injury.
• DO NOT reach into container while machine is running.
How to use the tamper
Rotating Blades Can Cause Severe Injury.
• DO NOT put hands, spatulas, etc. in the container while the machine is running or
while the container is still on the base.
• Lids and tampers are not interchangeable between different container styles, types,
and sizes. Use the tamper that was supplied with your machine.
Important
• The splash disk (near the top of the tamper) and lid prevent the tamper from hitting the
blades when the lid is secured properly in the locked position.
• The container should not be more than two-thirds full when the tamper is used during
blending.
• To avoid overheating during blending, DO NOT use the tamper for more than 30
consecutive seconds.
Control panel
Page 6

5
How to use the tamper
• If the food does not circulate, the machine may have trapped an air bubble. Carefully
remove the measuring cup while making sure the lid stays firmly in place. Release the air
bubble by inserting the tamper through the lid plug opening.
• Holding the tamper straight down may not help the ingredients circulate. If necessary,
point the tamper toward the sides or corners of the container. DO NOT try to force the
tamper deeper into the container.
Page 7
6
STOP
ON
OFF
START
CANCEL
PULSE
1
START
CANCEL
PULSE
STOP
ON
OFF
STOP
ON
OFF
START
CANCEL
PULSE
2
1
1
2
ON
OFF
STOP
PULSE
START
CANCEL
2
3
STOP
ON
OFF
START
CANCEL
PULSE
STOP
ON
OFF
START
CANCEL
PULSE
2
1
3
ON
OFF
STOP
PULSE
START
CANCEL
4 5
6
1 2
4
5 6
8
97
2
1
ON
OFF
STOP
PULSE
START
CANCEL
2
1
1
2
How to use the blender
How to use the personal jar
1
2
3
★Please check if the interlock eject or not before using.
★
Page 8
7
Pulse
Troubleshooting
Motor doesn’t start or blade
doesn’t rotate
• Check that the power plug is properly inserted into the power outlet.
• Motor Overload Protection may have operated (see Overload Protection System
section).
Food is lumpy or unevenly
chopped
• This can happen when too much food is being blended at one time. Try a less amount,
and work in batches if necessary.
• The ingredients may be too large. Try cutting into smaller pieces. For best results,
ingredients should be in pieces no larger than 2cm.
Food is chopped too fine or is
watery
• Try blending for shorter period of time. Use PULSE for better control. Food sticks
Food sticks to blade and jug • The mixture may be too thick. Try adding more liquid, pulsing, and/or using a slower
speed for blending.
Blender stopped suddenly
while in use
• This blender has overload protection to prevent damage to the motor. Unplug and allow
the blender to cool down for 30 minutes. Once cooled, you will be able to use the
blender as usual again.
• We recommend blending in smaller batches, or cutting ingredients into smaller batches.
Hints for setting speeds
Suggested uses
Speed Function
Lower Raw nuts
To make nut meal.
Use in cakes,
biscuits and muffins.
5.29oz-10.58oz
1-2cups
5-15 seconds
Middle Raw soup
Use for soup
14.1oz potatoes, 14.1oz carrots,
14.1ozonions, 28.21oz water
90 seconds
High
Carrot
juice
Use for beverage
Carrot 28.21oz, water
42.32oz
2 mins
Ice crush Ice cube Use for cooling 8-12 pieces 5-10 pulses
Smoothie
Strawberry
smoothie
Use for milk shake
4.4oz frozen strawberry,
hulled and cut in half +
8.81oz chilled milk
1 mins
Dessert
Coconut
mango
gelato
Use for dessert
21.16oz chilled mango
pieces1 lime, peeled,
deseeded halved; 1/2 cup
(125ml) chilled coconut
milk, 1/2 cup (5.29oz)
sweetened condensed milk
1 mins
Pulse
Biscuits/c
ookies
Break
biscuits/cookies in
half.
Blend to form
crumbs.
Use for cheesecake
crusts.
8.81oz 3-8 pulses
Food
Preparation &
Usage
Quantity Time
Page 9
8
Operating instructions
Caution
• Never start on speeds at high with Hot Liquids to avoid possible burns. Use
caution; escaping steam or splashes may scald.
• Place the lid in jar completely. This will prevent expansion from affecting the
position of the lid when the machine is turned on.
• Start from low speed, slowly increase to high.
• Blades are sharp! Use extreme caution when handling the blade
assemblies. Always hold them by the base of the blade assembly.
• DO NOT PROCESS HOT FOODS OR HOT LIQUIDS. Do not process food
that is hotter than158°F. Allow very hot ingredients to cool before
processing. This product is not suitable for mixing dry food.
• Never attempt to remove the jar while the appliance is still running.
1. Due to the machine speed, processing times are much quicker than standard
appliances. Unless you are accustomed to the machine, count your time
carefully to avoid over-processing.
2. After turning the machine off, wait until the blades stop completely before
removing the lid or container from the motor base.
3. Note how to lock the personal blender into place with the micro switch in rear of
machine, with the lock or unlock arrows aligning.
Care and cleaning
Container
To prepare your new machine for initial use, the follow steps is under Normal
Cleaning.
Normal Cleaning:
1. Fill up container with half full warm water and add a couple of drops liquid dish
washing detergent to the container.
2. Push the lid completely.
3. Turn machine at "ON" position, start from low, and increase the speed to high
slowly.
4. Run the machine on High speed for 30 to 60 seconds.
5. Turn off the machine, rinse and drain the container.
Page 10

9
Warning
Care and cleaning
• Electrical shock hazard.
• Disconnect power before cleaning machine.
• Failure to follow instructions can cause death or electrical shock.
2. Wash the outside surface with a damp soft cloth or sponge, which has been
rinsed in a mild solution of liquid detergent and warm water. Do not place the
motor base in water.
3. The centering pad can be removed for more thorough cleaning.
4. Thoroughly clean the switches so they work freely. They may become sticky
from use. Use a moistened cotton swab to clean machine. Immediately dry any
excess water.
5. Polish with a soft cloth.
To Sanitize:
1. Follow Normal Cleaning instructions above.
2. Fill up container with half full water and adding 1 1/2 teaspoons of bleach
agent.
3. Push the lid completely in jar.
4. Turn machine at "ON" position, start from low, and increase the speed to high
slowly.
5. Run the machine on High speed for 30 to 60 seconds.
6. Turn off the machine, and allow mixture to stand in the container for an
additional 1 1/2 minutes.
7. Pour bleach mixture out. Allow container to air dry.
8. Do not rinse after sanitizing.
Lid, Measuring Cup
Separate the lid and measuring cup. Wash the parts in warm soapy water. Rinse
clean under tap water, and dry. Reassemble before use.
Motor Base
1. Unplug the power cord
Page 11

Mixeur haute vitesse CyclonBlade™Mixeur haute vitesse CyclonBlade™
Guide d’utilisation
Lisez attentivement le manuel avant d’utiliser la machine
Conservez ce manuel pour toute référence future
MBL17HS
Page 12

1
Bienvenue
PROTECTIONS IMPORTANTES
Lors de l’utilisation d’un appareil électrique, des précautions élémentaires de sécurité
doivent toujours être respectées notamment les suivantes : utilisation à l’extérieur.
1. Lire toutes les instructions.
2. Pour éviter tout risque de choc électrique, ne plongez pas l’appareil dans l’eau ou tout
autre liquide.
3. Une attention particulière est nécessaire lorsque l'appareil est utilisé par ou à proximité
d'enfants.
4. Débranchez l’appareil lorsqu’il n’est pas utilisé, avant d’installer ou de retirer des pièces
et avant de le nettoyer.
5. Le témoin clignote lorsque l'appareil est prêt à l’emploi. Évitez tout contact avec les
lames et les pièces mobiles.
6. N’utilisez aucun appareil si le cordon ou la fiche est endommagée, s’il est défectueux,
ou s’il est tombé ou a été endommagé d’une manière ou d’une autre. Retournez
l’appareil au centre de services après-vente agréé le plus proche pour
réparation/réglage électrique ou mécanique.
7. Ne pas utiliser à l'extérieur.
8. Ne laissez pas le cordon pendre du bord d’une planche de travail ou d’un comptoir.
9. L’appareil est doté d’un système de protection qui l’arrête automatiquement après 3
minutes de fonctionnement continu.
10. Pour éviter tout risque de blessures ou d'endommager le mélangeur ne mettez pas les
mains ni des ustensiles dans le récipient du mélangeur pendant l'utilisation. Vous
pouvez utiliser une raclette à condition que le mélangeur soit à l'arrêt.
Avertissement
Vous allez découvrir à quel point il est facile d’avoir une alimentation saine, rapide et délicieuse!
Lisez toutes les consignes de sécurité, avertissements et instructions d’utilisation contenus
dans ce manuel avant de commencer. Placez la machine sur une surface sèche et
horizontale. Assurez-vous que l’interrupteur d’alimentation est positionné sur arrêt et que
l’appareil est branché dans une prise secteur avec mise à la terre. Suivez ensuite les
consignes de nettoyage de la page 6 pour préparer votre machine. Nettoyez toujours votre
machine avant la première utilisation.
Pour réduire tout risque de blessure, des précautions élémentaires doivent être
respectées, notamment les suivantes.
Page 13

2
11. Les lames sont tranchantes. À manipuler avec précaution.
12. Pour réduire les risques de blessures, ne placez jamais les lames sur la base avant de
fixer le pot correctement.
13. Utilisez toujours le mélangeur avec le couvercle installé.
14. L’utilisation d’accessoires, y compris les pots, non recommandés par le constructeur
peut causer des blessures.
15. Ne mélangez pas des liquides chauds dans le pot normal et le pot individuel.
16. Évitez de contacter les pièces mobiles.
17. L'utilisation de pièces jointes non recommandées ou vendues par le fabricant peut
provoquer un incendie, une électrocution ou des blessures.
CONSERVER CES INSTRUCTIONS
Le non respect des consignes de sécurité importantes et des instructions
d’utilisation est considéré comme une mauvaise utilisation de votre mélangeur
qui peut annuler votre garantie et causer des risques de blessures graves.
Remarque
L’appareil ne doit pas être jeté avec les ordures ménagères, mais ramené à un
centre agréé de tri et de recyclage des déchets.
Recyclage
PROTECTIONS IMPORTANTES
Page 14

3
Joint d’étanchéité
individuel du pot
Ensemble pot individuel
Joint d’étanchéité
individuel du pot
Couvercle individuel du pot
Couvercle étanche
ALLUMER
ÉTEINDRE
IMPULSIONS
DÉMARRER
ANNULER
ARRÊT
1
2
3
4
5
6
7
8
9
10
11
12
13
14
15
ARRÊT
ALLUMER
ÉTEINDRE
8
1
2
3
4
6
7
9
5 0
2
3
411
1
1
1
511
IMPULSIONS
DÉMARRER
ANNULER
Pièces et caractéristiques
Verre-doseur
Couvercle du pot
Joint d’étanchéité du pot
Poussoir
Pot
Embrayage d’attaque
Bloc supérieure du boîtier
Unité principale
Pieds en caoutchouc
Pot individuel
1. : Lorsque le bouton est positionné sur 0, la machine s’arrête et ne fonctionne pas.
2. : 1, 2, 3 sont représentent vitesse faible/moyenne/élevée.
3. Impulsions : Positionnez le bouton sur autre que 0, appuyez sur le bouton d’impulsions pour que la
machine tourne à grande vitesse. Relâchez le bouton pour arrêter la machine.
4. : Positionnez le bouton ici, la machine tourne pendant 1 seconde puis reste au repos pendant
4 secondes, répétez cette opération 12 fois pour totaliser 1 minute.
5. : Positionnez le bouton ici, la vitesse de la machine augmente progressivement de 0 à
10 secondes, maintient la vitesse élevée puis reste au repos pendant 50 secondes, totalisant ainsi
1 minute.
Panneau de commande
Page 15

4
6. : Positionnez le bouton ici, la vitesse de la machine augmente rapidement, maintient la vitesse
élevée pendant 30 secondes, puis s’arrête automatiquement.
7. Démarrer/Annuler : Lorsque la machine est programmée pour glace/granité/dessert, appuyez sur le
bouton DÉMARRER/ANNULER pour arrêter la machine, le programme dispose de mémoire
automatique, appuyez de nouveau sur le bouton DÉMARRER/ANNULER, la machine se remet en
marche, lorsque le temps fixé est atteint, la machine s’arrête.
8. Allumer/Éteindre : Placez le pot, appuyez sur le bouton ALLUMER, les témoins LED se mettent à
clignoter en bleu, la machine passe en mode veille, tournez le sélecteur de vitesse à gauche pour
choisir une vitesse 1, 2 ou 3, ou le tourner vers la droite pour choisir un programme Glace, Broyage,
Smoothie, Dessert et appuyez sur programme pour l’exécuter, ou appuyez sur le bouton
IMPULSIONS pour utiliser la vitesse maximale ou arrêter. Lorsqu’il est tourné vers différents
positions, le témoin bleu correspondant s’allume. Appuyez sur ÉTEINDRE pour arrêter la machine.
Verre-doseur :
Insérez la tasse à mesurer à travers le couvercle et la fixer en tournant dans le sens horaire. Enlevez la
tasse à mesurer pour utiliser le pressoir ou ajouter des ingrédients.
Avertissement
Avertissement
Pot pour lames :
Destiné aux liquides, y compris le jus, mélanges congelés, sauces, soupes, purées, mêlées
et pour le hachage dans un liquide.
• Les lames rotatives peuvent causer des blessures graves.
• NE mettez PAS vos doigts dans le pot lorsque la machine est en marche.
Comment utiliser le poussoir
Les lames rotatives peuvent causer des blessures graves.
• NE mettez PAS les mains, spatules, etc. dans le pot pendant que la machine tourne
ou lorsque le pot est connecté à la base.
• Le couvercle et le poussoir ne sont pas interchangeables entre différents styles, types
et tailles de pot. Utilisez le poussoir qui a été fournie avec votre machine.
Important
• Le disque anti-éclaboussures (en haut du poussoir) et le couvercle empêchent le poussoir
de toucher les lames lorsque le couvercle est correctement fixé dans la position verrouillée.
• Le pot ne doit pas être rempli au delà des deux tiers lorsque le poussoir est utilisé pendant
le mélange.
• Pour éviter toute surchauffe pendant le mélange, N’utilisez PAS le poussoir pendant plus
de 30 secondes sans interruption.
Panneau de commande
Page 16

5
Comment utiliser le poussoir
• Si les aliments ne se mélangent pas, il se peut que la machine ait piégé une bulle d’air. Retirez
délicatement la tasse à mesurer tout en veillant à ce que le couvercle reste bien en place.
Essayez de libérer la bulle d’air en insérant le poussoir à travers l’ouverture du couvercle.
• Si vous tenez le sabot droit, vous n’allez pas libérer les aliments coincés. Il faut plutôt
remuer le poussoir sur les côtés et coins du pot. N’essayez PAS de forcer le poussoir à
descendre plus profondément dans le pot.
Page 17

6
ARRÊT
ALLUMER
ÉTEINDRE
DÉMARRER
ANNULER
IMPULSIONS
1
DÉMARRER
ANNULER
IMPULSIONS
ARRÊT
ALLUMER
ÉTEINDRE
ARRÊT
ALLUMER
ÉTEINDRE
DÉMARRER
ANNULER
IMPULSIONS
2
1
1
2
ALLUMER
ÉTEINDRE
ARRÊT
IMPULSIONS
DÉMARRER
ANNULER
2
3
ARRÊT
ALLUMER
ÉTEINDRE
DÉMARRER
ANNULER
IMPULSIONS
ARRÊT
ALLUMER
ÉTEINDRE
DÉMARRER
ANNULER
IMPULSIONS
2
1
3
ALLUMER
ÉTEINDRE
ARRÊT
IMPULSIONS
DÉMARRER
ANNULER
4 5
6
1 2
4
5 6
8
9
7
2
1
ALLUMER
ÉTEINDRE
ARRÊT
IMPULSIONS
DÉMARRER
ANNULER
2
1
1
2
Comment utiliser le mélangeur
Comment utiliser le pot individuel
1
2
3
★Vérifiez si l'interverrouillage éjecte ou non avant d'utiliser.
★
Page 18

7
Impulsions
Guide de dépannage
Le moteur ne démarre pas
ou la lame ne tourne pas
• Vérifiez si la fiche d'alimentation est correctement insérée dans la prise de courant.
• Il se peut que la protection contre la surcharge du moteur a été activée (voir la section Système de
protection contre les surcharges).
Les aliments sont en gros
morceaux ou hachés de
manière non uniforme
• Cela peut arriver lorsque trop d'aliments sont mélangés en même temps. Essayez de mélanger par
petites quantités d'aliments.
• Il se peut que les ingrédients soient trop gros. Essayez en coupant les aliments en petits morceaux. Pour
obtenir de meilleurs résultats, les ingrédients doivent être en morceaux ne dépassant pas 2 cm.
Le hachage est trop fin ou
les aliments sont juteux
• Essayez de mélanger pendant une période plus courte. Utilisez le bouton PULSE pour mieux
contrôler le hachage. Les aliments collent
Les aliments collent à lame
et au pot
• Il se peut que le mélange soit trop épais. Essayez en ajoutant plus de liquide, hachez par
impulsions et/ou utilisez une vitesse plus lente.
Le mélangeur s'est arrêté
soudainement pendant
l’utilisation
• Ce mélangeur est équipé d'un système de protection contre les surcharges pour éviter
d'endommager le moteur. Débranchez le mélangeur et le laisser refroidir pendant 30 minutes. Une
fois refroidi, vous pourrez réutiliser normalement le mélangeur.
• Nous recommandons de mélanger par petites quantités ou de couper les ingrédients en petits morceaux.
Conseils pour régler la vitesse
Utilisation recommandée
Vitesse Fonction
Faible Noix brutes
Préparer un plat au noix.
Utilisé dans des
gâteaux, biscuits et
muffins.
150-300 g
1-2 tasses
5-15 secondes
Moyen
Soupe
populaire
Utiliser pour la soupe
400 g de pomme de terre, 400 g
de carottes, 400 g d’oignons,
800 ml d’eau
90 secondes
Élevé
Jus de
carottes
Utilisé comme boisson
800 g de carottes,
1,2 L d’eau
2 minutes
Granité Glaçon
Utilisé pour le
refroidissement
8-12 pièces
5-10
impulsions
Smoothie
Smoothie à
la fraise
Utilisé pour le
milk-shake
125 g de fraise congelée,
décortiquée et coupée en
moitié + 250 ml de lait glacé
1 minutes
Dessert
Glace
italienne
au noix de
coco et
mangue
Utilisé comme dessert
600 g de mangue réfrigérée,
1 citron vert épluchée,
épépinée et coupées en deux;
1/2 tasse (125 ml) de lait de
coco glacé, 1/2 tasse (150 ml)
de lait condensé sucré
1 minutes
Impulsions
Biscuits/
petits
gâteaux
Biscuits/ petits gâteaux
coupés en moitié.
Mélanger pour former
des miettes.
Utilisé pour gâteaux au
fromage.
250 g 3-8 impulsions
Aliment
Préparation et
utilisation
Quantité Minuteur
Page 19

8
Consignes d’utilisation
Attention
• Ne démarrez jamais la machine à haute vitesse avec des liquides chauds pour éviter
d’éventuelles brûlures. Faites attention, la vapeur qui s’échappe ou les
éclaboussures peuvent causer des brûlures.
• Placez le couvercle complètement dans le pot. Cela empêche l’augmentation du
volume d’atteindre la position du couvercle lorsque la machine est allumée.
• Commencez par une vitesse faible et augmentez progressivement jusqu’à la vitesse
élevée.
• Les lames sont tranchantes. Soyez très prudent lors de la manipulation des lames. Il
faut toujours les tenir par la base de l’ensemble lames.
• N’UTILISEZ PAS LA MACHINE AVEC DES ALIMENTS OU LIQUIDES CHAUDS.
Ne préparer pas des aliments chauds de température supérieure à 70°C. Laissez les
ingrédients très chauds refroidir avant de le préparer. Ce produit n’est pas adapté
pour mélanger des aliments secs.
• N’essayez jamais d’enlever le pot lorsque la machine est en marche.
1. Grâce à la vitesse de la machine, les temps de préparation sont beaucoup plus courts
qu’avec des appareils ordinaires. À moins que vous soyez habitué à la machine, il faut
compter le temps avec précaution pour éviter tout excès.
2. Après avoir éteint la machine, attendez l’arrêtent complet des lames avant de retirer le
couvercle ou le pot de la base du moteur.
3. Apprenez comment verrouiller le mélangeur individuel en place avec le
micro-interrupteur situé à l’arrière de la machine, avec les flèches de
verrouillage/déverrouillage alignées.
Entretien et nettoyage
Pot
Pour préparer votre nouvelle machine à une première utilisation, suivez les étapes
dans Nettoyage normal.
Nettoyage normal :
1. Remplissez à moitié le pot avec de l’eau chaude et ajoutez un peu de
détergent à lessive liquide.
2. Insérez complètement le couvercle.
3. Appuyez sur « ALLUMER » pour allumer la machine, commencez par la
vitesse faible et l’augmenter progressivement.
4. Laissez la machine tourner à haute vitesse pendant 30 à 60 secondes.
5. Éteignez la machine, rincez et laissez égoutter le pot.
Page 20

9
Avertissement
Entretien et nettoyage
• Risque d’électrocution.
• Débranchez la machine avant de la nettoyer.
• Le non-respect des ces consignes peut entraîner un choc électrique voir la mort.
2. Lavez la surface extérieure avec un chiffon ou une éponge douce humidifiée
avec une solution de détergent liquide doux et d’eau chaude. Ne plongez pas
la base du moteur dans l’eau.
3. Le coussin de centrage peut être retiré pour un nettoyage plus poussé.
4. Nettoyez soigneusement les interrupteurs pour qu’ils se mouvoir librement. Ils
risquent de devenir collants à cause de l’utilisation fréquente. Utilisez un
coton-tige humidifié pour nettoyer la machine. Faites sécher immédiatement
tout excès d’eau.
5. Polissez avec un chiffon doux.
Pour désinfecter :
1. Suivez les consignes du Nettoyage normal ci-dessus.
2. Remplissez le pot à moitié d’eau et ajoutez 1,5 cuillère à café d’eau de Javel.
3. Placez le couvercle complètement dans le pot.
4. Appuyez sur « ALLUMER » pour allumer la machine, commencez par la
vitesse faible et l’augmenter progressivement.
5. Laissez la machine tourner à haute vitesse pendant 30 à 60 secondes.
6. Éteignez la machine et laissez le mélange reposer dans le pot pendant 1,5 minute.
7. Videz le mélange d’eau de Javel. Laissez le pot sécher à l’air.
8. Ne rincez pas après une désinfection.
Couvercle, Tasse à mesurer
Séparez le couvercle et la tasse à mesurer. Nettoyer chaque pièce à l’eau chaude
savonneuse. Rincez sous l’eau de robinet et laissez sécher. Assemblez les pièces
avant l’utilisation.
Base du moteur
1. Débranchez le cordon d’alimentation
Page 21

MBL17HS
Licuadora CyclonBlade™ de alta velocidad
Manual de instrucciones
Lea las instrucciones con atención antes de usar este artefacto
Conserve debidamente las instrucciones para referencias futuras
Page 22

1
Bienvenido
INSTRUCCIONES DE SEGURIDAD
IMPORTANTES
Al usar electrodomésticos, siempre se deben tomar medidas de precaución básicas incluido
en lo siguiente: uso en el exterior.
1. Lea todas los instrucciones.
2. Para evitar el riesgo de descargas eléctricas, no sumerja este artefacto en agua ni en
ningún otro líquido.
3. Se requiere estricta supervisión cuando se utilice el artefacto por o cerca de los niños.
4. Desconecte el artefacto del tomacorriente cuando no esté en uso, antes de colocar o
retirar las piezas y antes de limpiarlo.
5. La luz intermitente indica que el artefacto está listo para funcionar. Evite el contacto
con las cuchillas o con las piezas móviles.
6. No utilice el artefacto si el cable o el enchufe están dañados, si el artefacto no funciona
correctamente o si se ha caído o dañado de alguna manera. Devuelva el artefacto al
centro de servicio autorizado más cercano para su revisión, reparación o ajuste
eléctrico o mecánico.
7. No utilice este artefacto al aire libre.
8. No permita que el cable cuelgue sobre el borde de la mesa o mostrador.
9. El sistema de protección está diseñado para que el proceso de licuado se detenga
automáticamente después de funcionar 3 minutos a cualquier velocidad.
10. Mantenga las manos y los utensilios fuera del recipiente mientras esté licuando para
reducir el riesgo de sufrir lesiones graves o provocar daños a la licuadora. Se puede
Advertencia
¡Está a punto de ver lo rápido, fácil y delicioso que puede ser comer saludablemente!
Por favor lea toda la información de seguridad, advertencias e instrucciones de este manual
antes de empezar. Coloque su artefacto en una superficie seca y nivelada. Asegúrese de
que el interruptor de encendido se encuentre en la posición Apagar y que el artefacto esté
enchufado en un tomacorriente eléctrico con conexión a tierra. Luego, siga las instrucciones
de limpieza que se encuentran en la página 6 para preparar el artefacto para usarlo.
Siempre limpie su artefacto antes de usarlo por primera vez.
Para evitar el riesgo de lesiones graves, al usar la licuadora, tome las medidas
de precaución básicas, incluidas las que se encuentran a continuación.
Page 23

2
utilizar una espátula, pero solo se debe utilizar cuando la licuadora no esté en
funcionamiento.
11. Las cuchillas son filosas. Manipúlelas con cuidado.
12. Para reducir el riesgo de lesiones personales, nunca coloque las cuchillas de montaje
de corte en la base sin que la jarra esté debidamente ajustada.
13. Utilice siempre la licuadora con la tapa en su lugar.
14. El uso de accesorios, incluidas las jarras de conserva, no recomendados por el
fabricante puede ser causa de riesgo de lesiones para las personas.
15. No licue líquidos calientes en la jarra personal ni en la jarra normal.
16. evite el contacto con piezas móviles.
17. El uso de accesorios no recomendados o vendidos por el fabricante puede causar
incendios, descargas eléctricas o heridas.
GUARDE ESTAS INSTRUCCIONES.
El incumplimiento de cualquiera de los resguardos importantes y de las instrucciones
importantes para usar de forma segura es un uso indebido bajo su propia
responsabilidad con respecto a la licuadora que puede invalidar la garantía y causar el
riesgo de lesiones graves.
Nota
No se debe desechar este electrodoméstico con residuos domésticos, sino llevarse
a un centro autorizado de reciclaje y separación de desperdicios.
Reciclaje
INSTRUCCIONES DE SEGURIDAD
IMPORTANTES
Page 24

3
Sello de la jarra personal
Montaje de la jarra personal
Sello de la jarra personal
Tapa de la jarra personal
Tapa selladora
ENCENDER
APAGAR
PRESIONAR
INICIAR
CANCELAR
DETENER
ENCENDER
APAGAR
1
2
3
4
5
6
7
8
9
10
11
12
13
14
15
DETENER
8
1
2
3
4
6
7
9
5 0
2
3
411
1
1
1
511
PRESIONAR
INICIAR
CANCELAR
Partes y funciones
Taza medidora
Tapa de la jarra
Sello de la jarra
Varilla de agitación
Jarra
Acoplamiento de transmisión
Panel de la carcasa superior
Módulo principal
Pies de goma
Jarra personal
1. : Cuando la perilla se encuentra en 0, el artefacto está detenido o no funciona.
2. : 1, 2, 3 son las velocidades baja/media/alta.
3. Pulsar: Pone la perilla en cualquier posición distinta de 0 y pulsa el botón «Pulsar» el artefacto
funcionará a alta velocidad. Suelte el botón y el artefacto se detendrá.
4. : Si ubica la perilla aquí, el artefacto funciona 1 segundo encendido, 4 segundos apagado, lo repite
durante12 ciclos, después se detiene automáticamente; en total, 1 minuto.
5. : Si ubica la perilla aquí, la velocidad del artefacto aumenta gradualmente a la posición rápida en
0~10s, mantiene la velocidad alta durante los 50s restantes y después se detiene automáticamente;
en total, 1 minuto.
Panel de control
Page 25

4
6. : Si ubica la perilla aquí, la velocidad del artefacto aumenta rápidamente hasta alcanzar la
velocidad rápida y se mantiene allí durante 30s. Después se detiene automáticamente.
7. Iniciar/cancelar: Cuando el artefacto se encuentra en el programa hielo/nieve/postre ejecutando el
proceso, si presiona Iniciar/cancelar, el artefacto deja de funcionar. El programa de memoria automática
ha hecho correr el tempo, vuelva a pulsar el botón INICIAR/CANCELAR, el artefacto continúa
funcionando según la velocidad actual. Cuando el tiempo termina, el artefacto deja de funcionar.
8. Encender/Apagar: Coloque la jarra, pulse la tecla ENCENDER, las luces de LED azules parpadean,
el artefacto está en el modo «en espera». Gire la perilla hacia la izquierda a las diferentes
velocidades 1, 2, 3 o gire la perilla hacia la derecha para indicar el programa correcto: hielo triturado,
licuado, postre. Pulse el programa para que funcione, o la tecla PRESIONAR para que funcione a la
velocidad máxima, para soltar o detenerlo. Cuando se gira hacia diferentes posiciones se encienden
las correspondientes luces de LED azules. Después pulse la tecla APAGAR del artefacto para pasar
al estado apagado.
Taza medidora:
Insértela a través de la tapa y asegúrese de girarla en sentido horario. Extraiga la taza medidora para
usar la barra de agitación o para agregar los ingredientes.
Advertencia
Advertencia
Recipiente de las cuchillas:
Diseñado para procesar líquidos, incluido el jugo, las mezclas congeladas, las salsas, las
sopas, los purés, las mezclas y para trozados húmedos.
• Las cuchillas giratorias pueden causar lesiones graves.
• NO acceda dentro del recipiente mientras el artefacto está funcionando.
Cómo usar la barra de agitación
Las cuchillas giratorias pueden causar lesiones graves.
• NO ponga las manos, espátulas, etc. en el recipiente mientras el artefacto está
funcionando o mientras el recipiente aún se encuentra en la base.
• Las tapas y las barras de agitación no son intercambiables entre diferentes estilos, tipos
o tamaños de recipientes. Use la barra de agitación que se proveyó con su artefacto.
Importante
• El disco para salpicaduras (cerca de la parte superior de la barra de agitación) y la tapa evitan
que la barra de agitación se golpee contra las cuchillas cuando la tapa está debidamente
asegurada en la posición de bloqueo.
• El recipiente no debe estar lleno a más de dos tercios cuando se usa la barra de agitación
mientras se mezcla.
• Para evitar el recalentamiento durante el proceso de mezcla, NO use la barra de agitación por
más de 30 segundos seguidos.
Panel de control
Page 26

5
Cómo usar la barra de agitación
• Si los alimentos no circulan, es posible que en el artefacto se haya atrapado una burbuja de aire.
Extraiga la taza medidora con cuidado y asegúrese de que la tapa quede firme en su lugar. Libere
la burbuja de aire insertando la barra de agitación a través de la abertura del tapón de la tapa.
• Es probable que si mantiene la barra de agitación derecha hacia abajo esto no ayude a que los
ingredientes circulen. Si es necesario, dirija la barra de agitación hacia los lados o las esquinas
del recipiente. NO intente forzar la barra de agitación a más profundidad dentro del recipiente.
Page 27

6
DETENER
ENCENDER
APAGAR
INICIAR
CANCELAR
PRESIONAR
1
DETENER
INICIAR
CANCELAR
PRESIONAR
ENCENDER
APAGAR
DETENER
ENCENDER
APAGAR
INICIAR
CANCELAR
PRESIONAR
2
1
1
2
DETENER
ENCENDER
APAGAR
PRESIONAR
INICIAR
CANCELAR
2
3
DETENER
ENCENDER
APAGAR
INICIAR
CANCELAR
PRESIONAR
DETENER
ENCENDER
APAGAR
INICIAR
CANCELAR
PRESIONAR
2
1
3
DETENER
ENCENDER
APAGAR
PRESIONAR
INICIAR
CANCELAR
4 5
6
1 2
4
5 6
8
97
DETENER
2
1
ENCENDER
APAGAR
PRESIONAR
INICIAR
CANCELAR
2
1
1
2
Cómo usar la licuadora
Cómo usar la jarra personal
1
2
3
★Compruebe por favor si el interbloqueo expulsa or no antes de usar la jarra.
★
Page 28

7
PRESIONAR
Solución de problemas
El motor no enciende o las
cuchillas no giran
• Verifique que el cable de alimentación esté insertado correctamente en el tomacorriente.
• Verifique si se ha activado la protección contra sobrecargas del motor (ver la sección del
Sistema de protección contra sobrecargas).
Los alimentos están
grumosos o licuados
desigualmente
• Esto ocurre cuando se licua demasiados alimentos al mismo tiempo. Intente con cantidades
pequeñas, en tandas si fuera necesario.
• Los ingredientes son demasiado grandes. Intente cortar en pedazos más pequeños. Para obtener
mejores resultados, corte los ingredientes en pedazos de 2 cm. como máximo.
Los alimentos están licuados
muy finos o están aguados.
• Intente licuar durante un período de tiempo más corto. Utilice PULSO para un mejor control. Los
alimentos se pegan
Los alimentos se pegan a
las cuchillas y a la jarra.
• La mezcla está demasiado espesa. Intente agregar más líquido, pulsando o utilizando una
velocidad de licuado más lenta.
La licuadora se detiene
repentinamente durante su
funcionamiento
• Esta licuadora cuenta con un sistema de protección contra sobrecargas para evitar daños al motor.
Desconecte y deje enfriar la licuadora durante 30 minutos. Una vez enfriado, vuelva a utilizar la licuadora
normalmente.
• Se recomienda licuar en tandas más pequeñas o cortar los ingredientes en pedazos más pequeños.
Consejos para definir las velocidades
Usos sugeridos
Velocidad Función
Bajo
Nueces
crudas
Para hacer una comida
con nueces.
Para usar en tortas,
galletas y muffins.
150 g (5.29oz)-300 g
(10.58oz)
1-2 tazas
5-15 segundos
Medio Sopa cruda Uso para sopas.
400 g (14.1oz) de papas, 400 g (14.1oz)
de zanahorias, 400 g (14.1oz) de
cebollas, 800 ml (28.21oz) agua
90 segundos
Alto
Jugo de
zanahorias
Uso para bebidas
Zanahorias 800 g (28.21oz),
agua 1200 ml (42.32oz)
2 minutos
Hielo
triturado
Cubitos de
hielo
Uso para enfriar 8-12 partes
5-10 presiones
en pulsar
Batido
Licuado de
frutilla
Uso para batidos con
leche
125 g (4.4oz ) de frutillas
congeladas, sin palillo y
cortadas por la mitad + 250 ml
(8.81oz) de leche fría
1 minutos
Postre
Helado de
mango y
coco
Uso para postres
600 g (21.16oz) de trozos de
mango helado, 1 lima, pelada, sin
semillas cortada por la mitad;
1/2 taza (125 ml) de leche de coco
helada, 1/2 taza (150 ml, 5.29oz)
de leche condensada endulzada
1 minutos
PRESIONAR
Galletas/
galletitas
Romper las
galletas/galletitas por la
mitad.
Mezclar hasta formar
migas.
Uso para pasta para
cheesecake.
250 g (8.81oz)
3-8 presiones
en pulsar
Alimentos Preparación y uso Cantidad Tiempo
Page 29

8
Instrucciones para el funcionamiento
Precaución
• Nunca empiece a velocidades altas con los líquidos calientes para evitar posibles
quemaduras. Tenga precaución, el vapor que escapa o las salpicaduras pueden
causar escaldaduras.
• Coloque la tapa completa en la jarra. Con ello evitará que la expansión afecte la
posición de la tapa cuando se encienda el artefacto.
• Comience a baja velocidad, aumente lentamente hasta llegar a alto.
• ¡Las cuchillas son filosas! Tenga extrema precaución al manipular los montajes de
las cuchillas. Siempre sosténgalas por la base del montaje de las cuchillas.
• NO PROCESE LOS ALIMENTOS NI LOS LÍQUIDOS CALIENTES. No procese
alimentos que se encuentren a más de 70 °C (158 °F). Deje que los ingredientes
muy calientes se enfríen antes de procesarlos. Este producto no es apto para
mezclar alimentos secos.
• Nunca intente extraer la jarra mientras el artefacto está funcionando.
1. Debido a la velocidad del artefacto, los tiempos de procesamiento son mucho más
rápidos que los de los artefactos estándares. A menos que esté acostumbrado al
artefacto, cuente el tiempo con cuidado para evitar el procesamiento excesivo.
2. Después de apagar al artefacto, espere a que las cuchillas se detengan por completo
antes de extraer la tapa o el recipiente de la base del motor.
3. Tenga en cuenta cómo cerrar con bloqueo la licuadora personal en el lugar con el
microinterruptor de la parte trasera del artefacto, alineando las flechas de bloqueo y
desbloqueo.
Limpieza y cuidado
Recipiente
Para preparar el artefacto nuevo para el uso inicial, siga los pasos que se
encuentran en la sección Limpieza normal.
Limpieza normal:
1. Llene el recipiente con agua tibia hasta la mitad y agregue un par de gotas de
detergente líquido para lavavajilla en el recipiente.
2. Empuje la tapa por completo.
3. Encienda el artefacto, en la posición «ENCENDER», comience en «bajo» y
aumente la velocidad hacia «alto» lentamente.
4. Haga funcionar el artefacto a velocidad alta entre 30 y 60 segundos.
5. Apague el artefacto, enjuague y drene el recipiente.
Page 30

9
Advertencia
Limpieza y cuidado
• Peligro de descarga eléctrica.
• Desconecte la alimentación eléctrica antes de limpiar el artefacto.
• El incumplimiento de las instrucciones puede causar la muerte o una descarga eléctrica.
2. Lave la superficie exterior con una esponja o un paño suave empapados, que
se hayan enjuagado en una solución suave de detergente líquido y agua tibia.
No coloque la base del motor en agua.
3. El panel de centrado se puede extraer para lograr una limpieza más a fondo.
4. Limpie los interruptores a fondo para que funcionen sin problemas. Se pueden
poner pegajosos con el uso. Use una compresa de algodón humedecido para
limpiar el artefacto. Seque inmediatamente cualquier exceso de agua.
5. Lustre con un paño suave.
Para higienizar:
1. Siga las instrucciones de Limpieza normal que se detallan arriba.
2. Llene el recipiente hasta la mitad con agua y agregue 1 1/2 cucharaditas de té
de lavandina.
3. Empuje la tapa por completo en la jarra.
4. Encienda el artefacto, en la posición «ENCENDER», comience en «bajo» y
aumente la velocidad hacia «alto» lentamente.
5. Haga funcionar el artefacto a velocidad alta entre 30 y 60 segundos.
6. Apague el artefacto y deje que la mezcla descanse dentro del recipiente
durante 1 1/2 minuto adicionales.
7. Vierta la mezcla con lavandina. Deje que el recipiente se seque al aire.
8. No enjuague antes de higienizar.
Tapa, taza medidora
Separe la tapa y la taza medidora. Lave las partes en agua tibia jabonosa. Enjuague
hasta limpiar bajo agua potable y seque. Vuelva a montar después de usar.
Base del motor
1. Desenchufe el cable de alimentación
 Loading...