

Page 1
Midea Rice Cooker
Instruction Manual (Sweet IH Smart Rice Cooker)
Product Model:
MB-FZ15IH
Thanks for your purchase of a Midea product. Please read this manual
thoroughly before use and keep it carefully for future reference.
All pictures are for reference only, please refer to the actual products.
Page 2
In order to ensure the safety in use and avoid causing injury
and property damage to you or others, please observe the
following safety precautions. Failure to follow the safety
warnings and incorrect use may lead to accidents.
The following situations require special attention: In case the
product is used by children and the disabled people untended
or in case the children may play with the instruments.
Contents
Safety Precautions
Product Description
Use Instructions
Cleaning and Maintenance
Abnormality Analysis and Troubleshooting
Warranty Service
Circuit Principle
The meaning of the icon:
Stands for "forbidden" contents
Stands for the items which may cause casualties
Stands for "compulsory" contents
Stands for the items which may cause minor injuries or property damages
Safety Precautions
Page 3
Safety Precautions
Warnings
DO NOT get your face to the steam vent or touch it with your hand while
cooking. It may cause a burn.
DO NOT use any cloth to cover the steam vent while cooking. It may
cause accidents or product damage.
DO NOT modify, disassemble or repair the appliance unless it is performed by a repair technician. Otherwise, it may cause fire, electric shock
or injury.
Use only AC 220v for power supply. Otherwise, it may cause fire or
electric shock. Do no use the appliance if the power cord is damaged.
DO NOT do the following actions which may damage the power cord:
forcefully bending the power cord, placing it near heat, bundling it, or
putting heaving objects on top of it. It may cause fire or electric shock.
DO NOT use the appliance if the power plug is damaged. It may cause
fire, electric shock, or short circuit.
DO NOT plug or unplug the power plug with wet hands. It may cause
electric short or injury.
DO NOT let your child to operate the appliance alone. Always keep it
out of the reach of children. It may cause electric shock or burn.
DO NOT put the appliance at any place that is uneven, wet or near heat
source. It may damage the appliance or cause accidents.
DO NOT insert the metal pin, steel wire or any other objects into the vent
on the bottom. It may cause electric shock or injury.
DO NOT immerse the appliance in water or splash water on it.
Use the appliance separately on a power outlet rated at 13A.
with ground wire. Plugging other devices into the same outlet may cause
electric overheating which may result in fire.
Clean the power plug immediately if there is dirt or water mark on it to
avoid fire, electric shock or short circuit.
DO NOT use the appliance to cook any food which may block the filter,
such as food in shape of flakes (seaweed, Chinese cabbage), or stripes
(kelp), or grains (corn grit), to avoid accidents or product damage.
Page 4
If there is any difference between the pictures and the actual product,
please refer to your product.
Please check if the Inner pot, steam valve, removable inner lid and
turbine installed properly to avoid accidents.
The tick or hiss while cooking is the normal sound. Please stay calm.
Please use the appliance at an interval of at least fifteen minutes for
cooking so as to cool down the heat shroud to room temperature.
Please do not use hot water for cooking, otherwise it may influence the
temperature controller and affect the cooker’s performance.
To ensure the cooker’s performance, please do not use the steam tray
if the rice is more than four cups.
If there is slight steady sound while cooking, it is normal because the
turbine is working. If the sound is unsteady or there is abnormal noise,
please check if the turbine is installed properly.
Please clean the steam valve, removable inner lid and turbine regularly.
If there is a short buzz (about tens of seconds) when it starts cooking, it
is normal because the turbine is performing self-checking before work to
see if the turbine is installed properly. The icon “ ” will display on the
screen.
Tips
If there is not enough earthing device, the sensitive users may be
sensitive to the induction. Please check whether the earthing device is
reliable, or else do not touch the metal frame or the inner pot.
The operating altitude is 0~2000 m.
If servicing or replacement of parts is needed, please go to the repair
center authorized by Midea to get professional and quality service.
Please keep the instruction manual carefully. Thank you.
Safety Precautions
Tips
Tips
Page 5
Insert the plug into the power outlet firmly to avoid any fire, electric shock
or short circuit.
If the power cord is damaged, it must be replaced by a special cord or
other assembly available from the manufacturer or its service center.
This product is for indoor use only.
Users with cardiac pacemakers, hearing aids, or cochlear implant shall
consult certified medical personnel and refer to the instructions provided
by the medical equipment providers before use.
Notes: Improper repair or short circuit of some important parts, such as
the fuse, may cause protection failure, thus resulting in overheat or fire.
If servicing or replacement of parts is needed, please go to the repair
center authorized by Midea, so as to avoid any potential problems cause
by improper repair or use of wrong parts.
Safety Precautions
Warnings
Only use the Inner Pot provided by the manufacturer, otherwise, it may
cause overheat or malfunction.
DO NOT drop the Inner Pot to avoid deformation.
Always dry the Inner Pot before cooking to avoid malfunction.
Always remove the foreign objects, such as water or rice in between the
inner pot and coil, to avoid overheat or short circuit.
DO NOT impact the Inner Pot against hard objects to avoid deformation.
DO NOT touch the Inner Pot with your hand while cooking or immediately
after cooking. It may cause a burn.
Safety Precautions
Cautious
Page 6
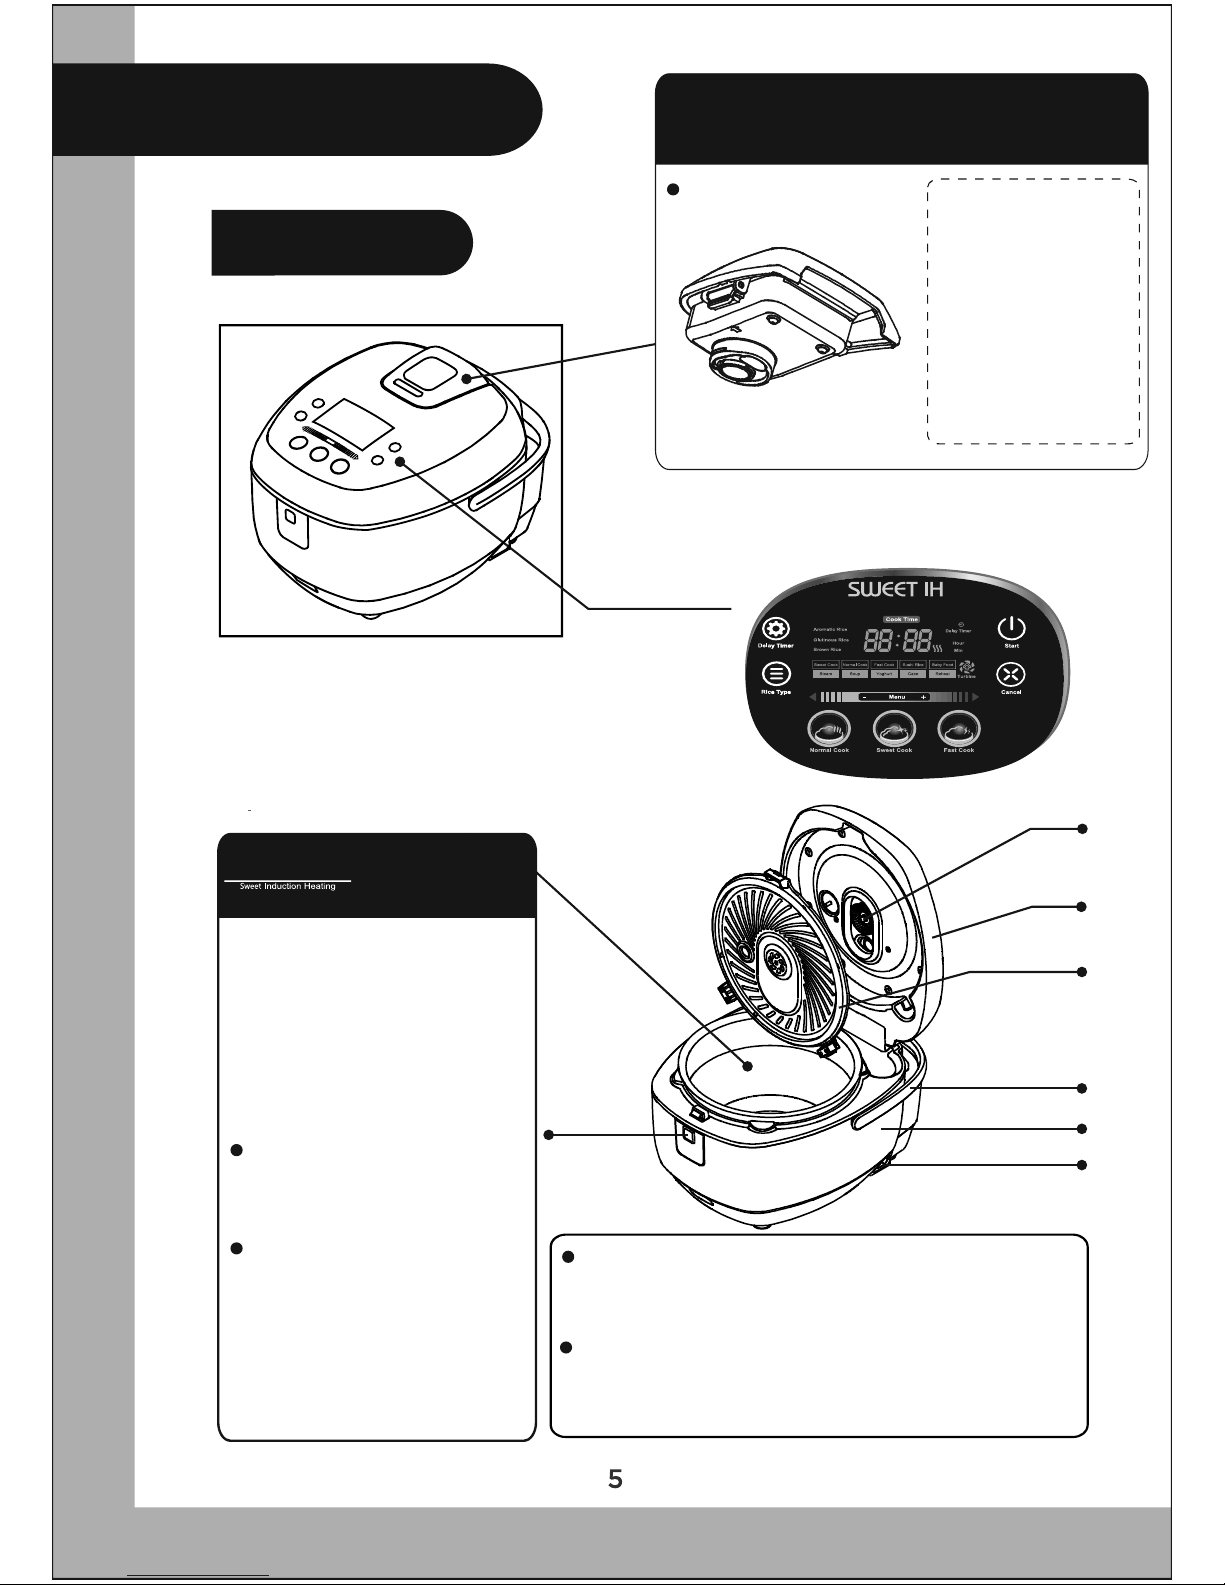
Product Description
Part description
Inner Pot
Anti-spill Steam Valve with Good
Moisturizing Performance
Disassemble method:
buckle closing
Control Panel
Turbine
Outer Lid
Removable Inner Lid
Handle
Heat Shroud
Power Jack
Lid release
button
Cautious:
If there are foreign
things in the steam
valve, please removethem immediately to avoid affecting the cooker’s
performance.
“Titanium Pot” supporting
sweet induction heating
is fitted with double composite sheets on the inside
and coated with hard alloy
of Titanium nitride on the
surface.Please note:
Do not use the Inner
Pot on other stoves. It
may be deformed.
To clean it, remove the
Inner Pot from the Heat
Shroud, and use the household detergent and
soft cloth to wash it, then
dry it.
Avoid using wire brush or any rough and hard
cleaning utensils to clean the Inner Pot. It may
damage the Inner Pot.
Discoloration or stain may appear on the Inner
pot depending on the use frequency. It does not
affect human health or cooker performance.t.
Page 7
The accessories may vary by different models.
Product FZ4085 is taken as an example for the pictures used in
this instruction manual. It is for reference only. The actual product
may vary due to different models and batches.
The function of the Turbine specified herein is only for the product
supporting such function.
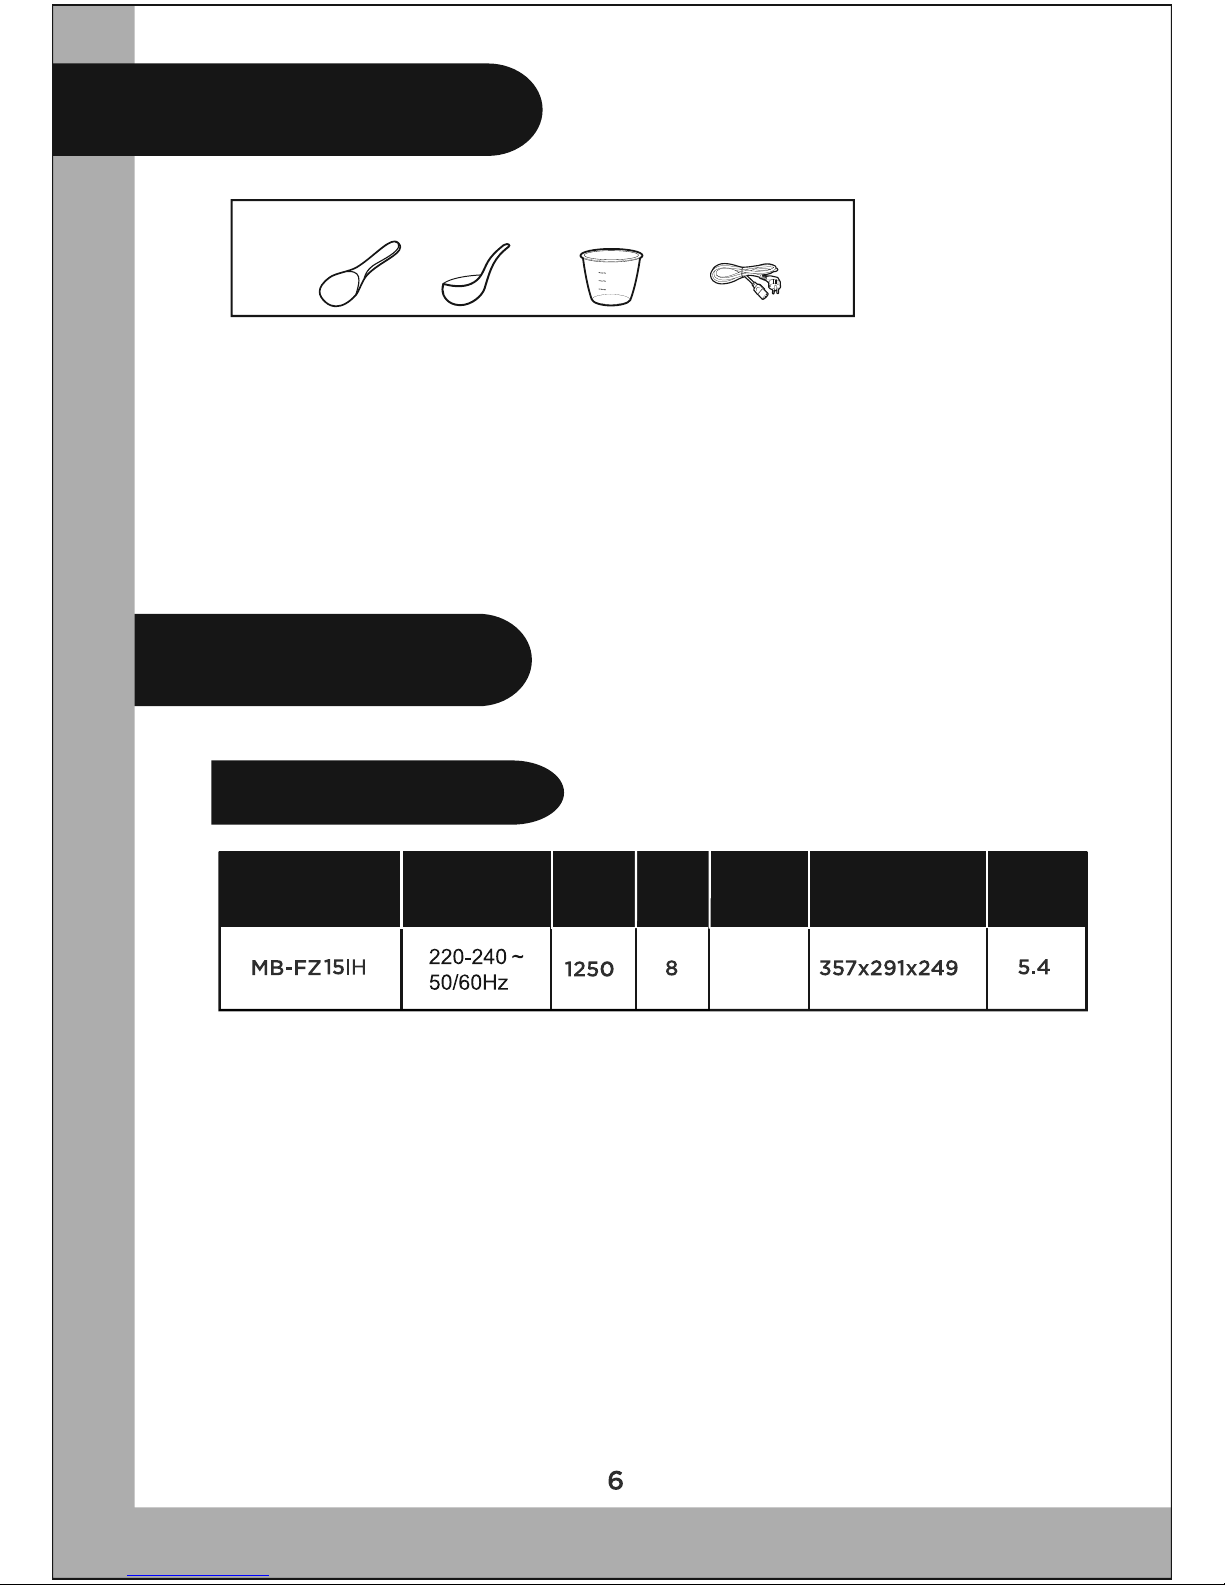
Product Description
Technical specifications
Model
Power source
Rated
power
(W)
Cooking
capacity
(Cup)
Method of
heating
Electromagnetic
Heating
Dimension
Width x Depth
x Height (mm)
Weight
(kg)
V
Rice Spatula Soup Ladle Measuring Cup Cord Set
Product Description
Page 8
Use Instructions
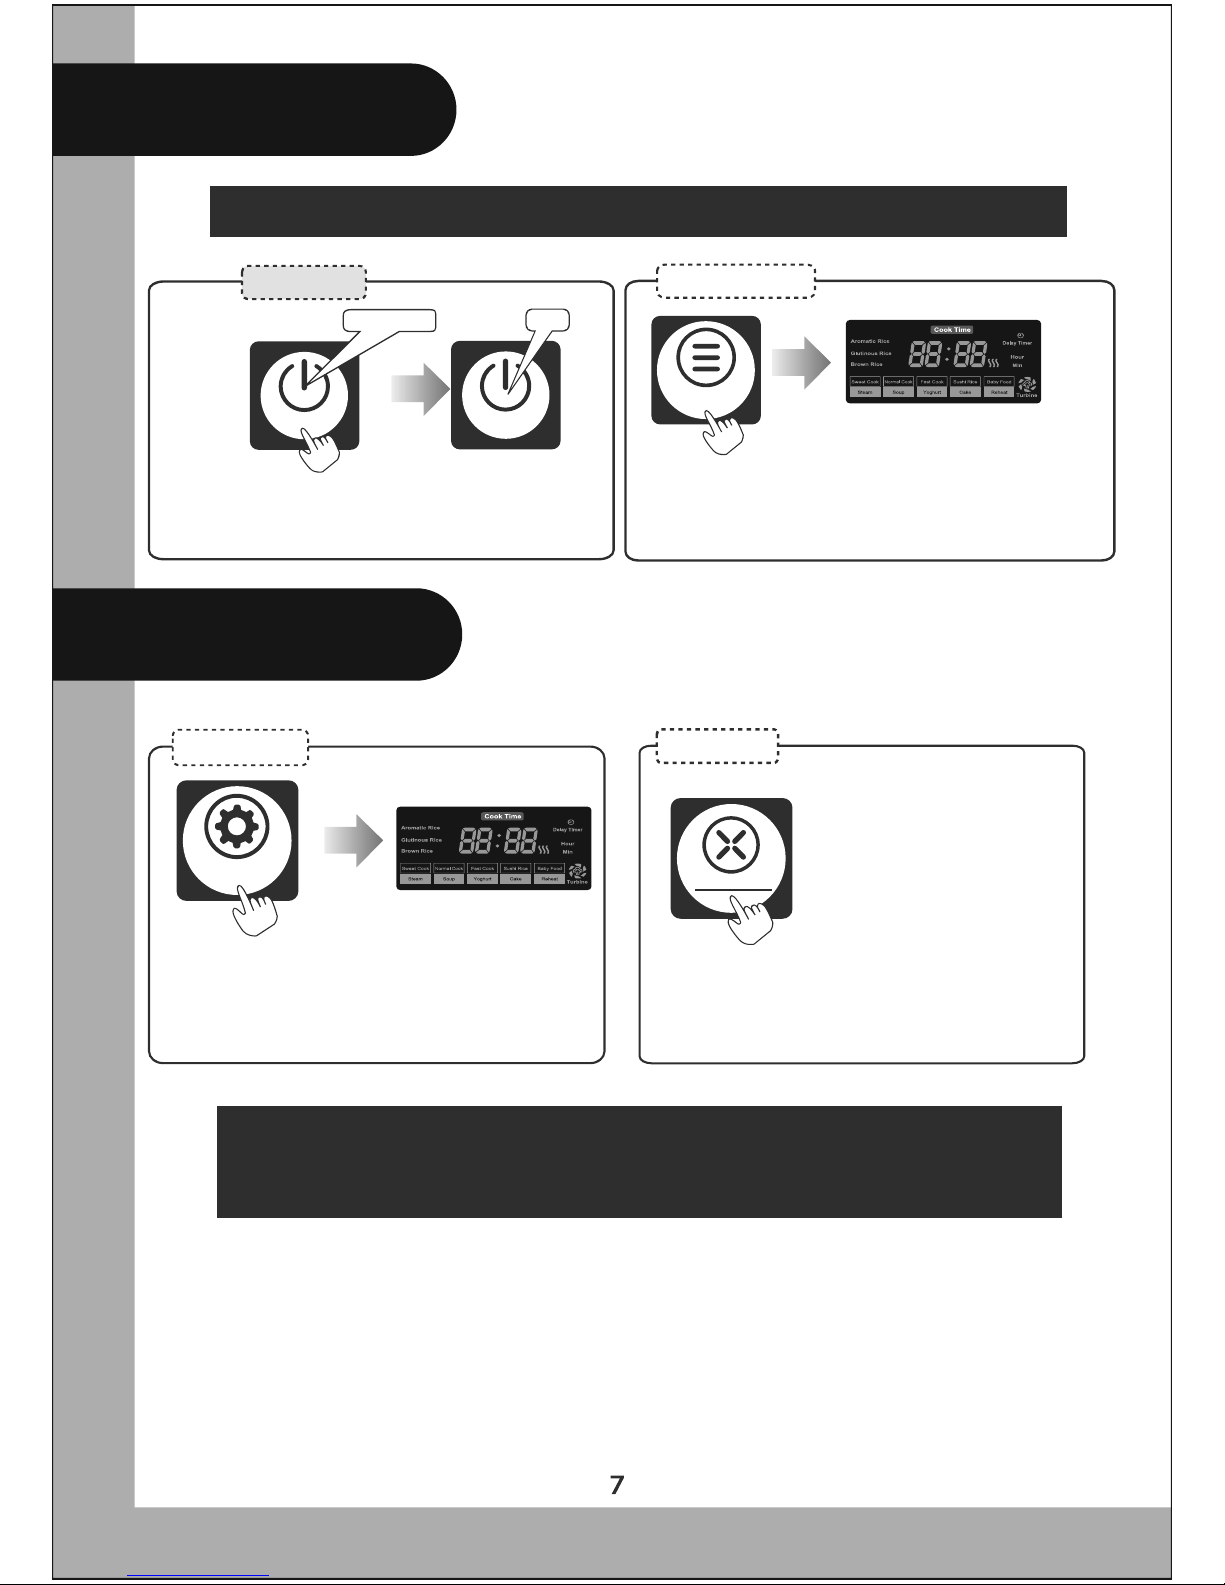
Using the buttons
Start button
Flickering/Off On
Start Start
Rice Type
Mode select button
Press the “Start” button, the indicator changes
from flickering or off to on. It indicates it starts
working, and your settings have been confirmed.
Press the “Mode” button, the cooking modes turn
from dark to bright, and the flickering item is the
mode being selected. Press the “Start” button to
confirm the selection.
Description of the Turbine operation (only
applicable to product supporting this function)
Description of the Turbine operation (only applicable to product supporting this function)
In normal use, the Turbine will work at Sweet, Quick, Congee, Porridge, Brown rice,
Children’s Congee and Sushi Rice cooking modes. The Turbine will enter auto-checking
in the first few minutes after starting Sweet, Quick, Congee, Porridge, Children’s Congee
and Sushi Rice cooking modes. And then the Turbine starts running when it is boiling
and steaming. The Turbine is off in other cooking modes.
Use Instructions
Setting button
Cancel button
Setting
Cancel
Press the “Setting” button to scroll among
Timer, Texture and Rice Varieties settings.
And then set the Timer, Texture and Rice
Varieties usingthe slider.
It enters Keep Warm status
after the cooking is finished.
The Keep Warm and Start
light is on. Press the “Keep
Warm/Cancel” button to enter
the standby mode, and press
it again to enter Keep Warm
status.
Page 9
Usage
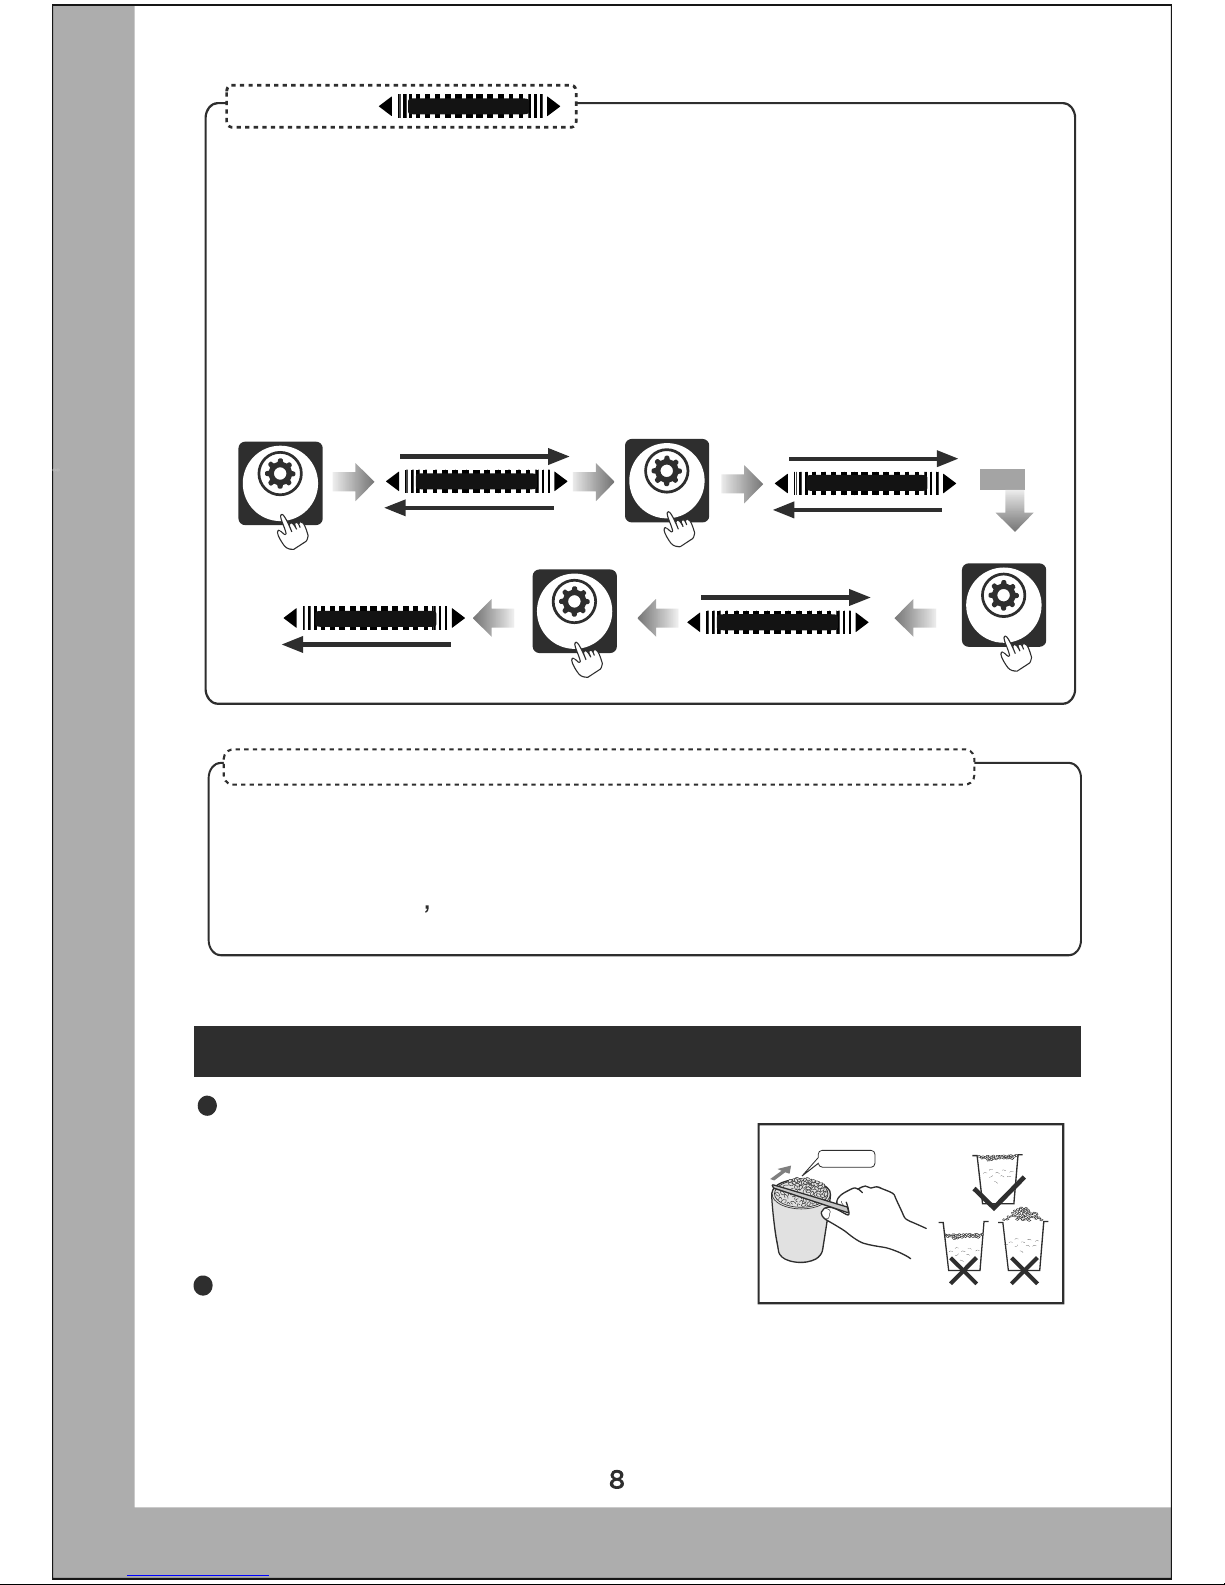
Use the measuring cup (approx. 150 g/cup) to add the rice.
approx.150g/cup
Put the rinsed rice in the Inner Pot, and then add water
up to the water line which matches the number of cups
of rice. The amount of water can be increased or decreased to your taste.
Note: Do not add water above the maximum water line. It may cause overflow or short circuit.
1.Do not use the Inner Pot to rinse the rice. It may
scratch the Inner Pot.
2.If the dry and hard brown rice is to be cooked,
please soak it in hot water for two or three hours
before cooking.
Using the slider
Setting
Setting
Increase the time Regular, Sticky, Hard
Sticky, Hard, Regular
Dongbei Rice, Zengcheng
Simiao Rice, Jasmine Rice
Jasmine Rice, Zengcheng
Simiao Rice, Dongbei Rice
Decrease the time
Setting
Setting
Special descriptions for “Quick Congee”, “Sweet Rice” and “Quick Rice” button
You just need to press the shortcut keys below to start cooking your desired food.
For example, if your need to cook Congee, just press the “Quick Congee” button.
Tips: “Quick” means that it takes less time to cook than the similar products of Midea.
(It takes approximate twenty minutes to cook two cups of white rice and about sixty
minutes to cook the Congee.) Please keep the cooked rice warm for ten minutes after
using “Quick Rice” function for cooking so that it can be more delicious.
In the standby mode, slide the bar to select the mode. Slide to the right to select the
modeson the right; slide to the left to select the modes on the left. Press the “Setting”
button once, the Timer is flickering, increase the time by sliding the bar to the right or
pressing the right arrow; decrease the time by sliding the bar to the left or pressing the
left arrow. Press the “Setting” button again, the Texture is flickering, select Regular,
Sticky, and Hard in sequence by sliding the bar to the right or pressing the right arrow;
select Regular, Hard, and Sticky in sequence by sliding the bar to the left or pressing
the left arrow. Press the “Setting” button once more, the Rice Varieties is flickering,
select Dongbei Rice, Zengcheng Simiao Rice, and Jasmine Rice in sequence by sliding
the bar to the right/left or pressing the right/left arrow. Press and hold the left and right
arrow to scroll through the above settings.
Adjustable and slideable
Adjustable and slideable
Adjustable and slideable
Adjustable and slideable
Adjustable and slideable
Page 10
Use Instructions
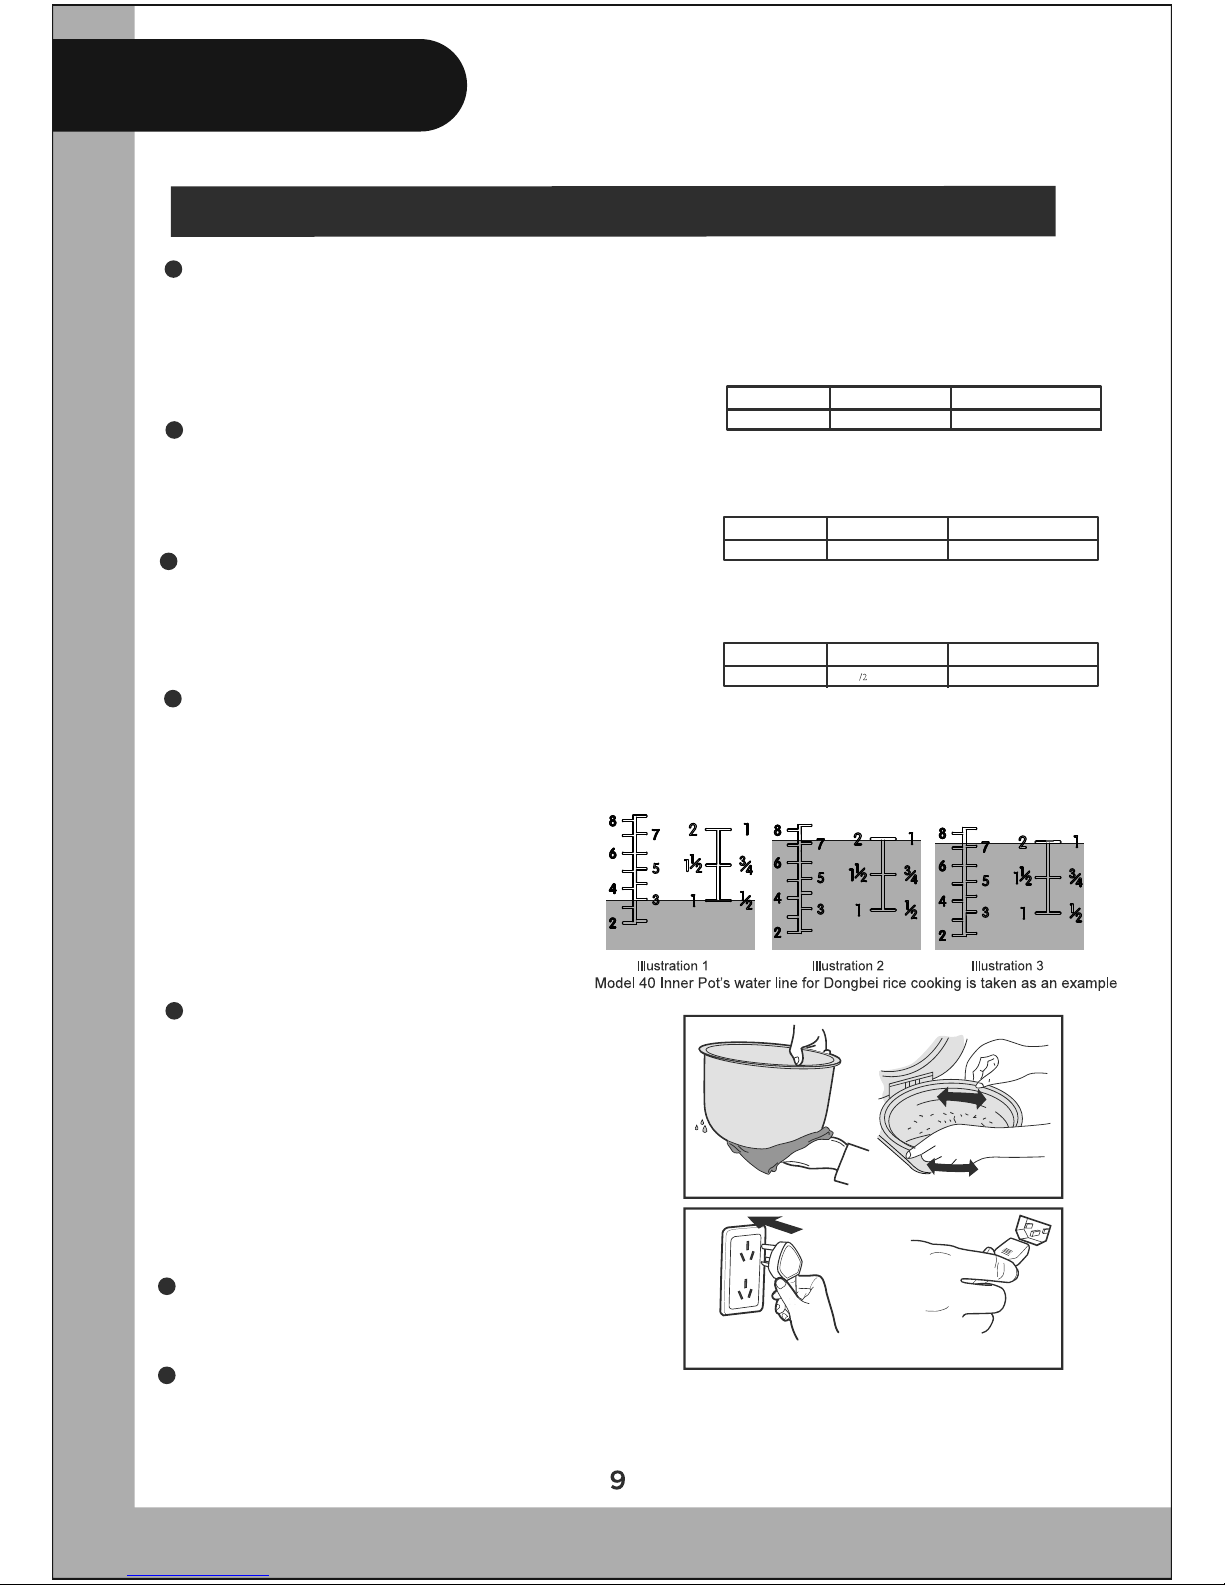
Wipe away any water on the outside of the Inner
Pot, and then place it in the Heat Shroud. Rotate
the Inner Pot to the left and right two or three
times to make sure that the Inner Pot and the
coil have been attached properly. Then press
down the Outer Lid until you hear a “click”
Do not use the Inner Pot on other stoves. It
may be deformed because of overheating.
Do not use the other containers other than
the Inner Pot specified.
Insert the power plug.
Power plug Cooker connector
Make sure that the cooker connector and the
power plug are firmly connected.
Press the “Mode” button to select the desired
mode, and then press “Start” button to start
cooking, or press the desired functional buttons.
Dongbei
Rice
Zengcheng
Simiao Rice
Dongbei
Rice
Zengcheng
Simiao Rice
Dongbei
Rice
Zengcheng
Simiao Rice
Porridge
Congee
Porridge
Congee
Porridge
Congee
How to use the water line
Rice cooking (Sweet, Quick, Brown rice, Sushi rice)
See the water line on the left for Dongbei Rice and
Zengcheng Simiao Rice cooking when adding water.
For example, when cooking three cups of rice, put
the rinsed rice in the Inner Pot, and then add the
water up to the line marked 3.
Congee cooking
See the water line in the middle for Congee cooking
when adding water. For example, when cooking two
cups of rice, put the rinsed rice in the Inner Pot, and
then add the water up to the line marked 2.
Porridge cooking
See the water line on the right for Porridge cooking
when adding water. For example, when cooking one
cup of rice, put the rinsed rice in the Inner Pot, and
then add the water up to the line marked 1.
Steaming
Add suitable water according to your actual need
to prevent the water from overflowing the steam tray
or basket.
You can adjust the rice/water ratio to
suit your taste. But please do not add
too much water to exceed the maximum water line.
White rice
Model specifications
2 cups
8 cups
MB-FZ15IH
Maximum rice capacity Minimum rice capacity
Porridge
Model specifications
2 cups
1 cups
MB-FZ15IH
Maximum rice capacity Minimum rice capacity
Congee/Children’s Congee
Model specifications
1/2 cups
1 cupsMB-FZ15IH
Maximum rice capacity Minimum rice capacity
Page 11
Use Instructions
Start
Setting
Setting
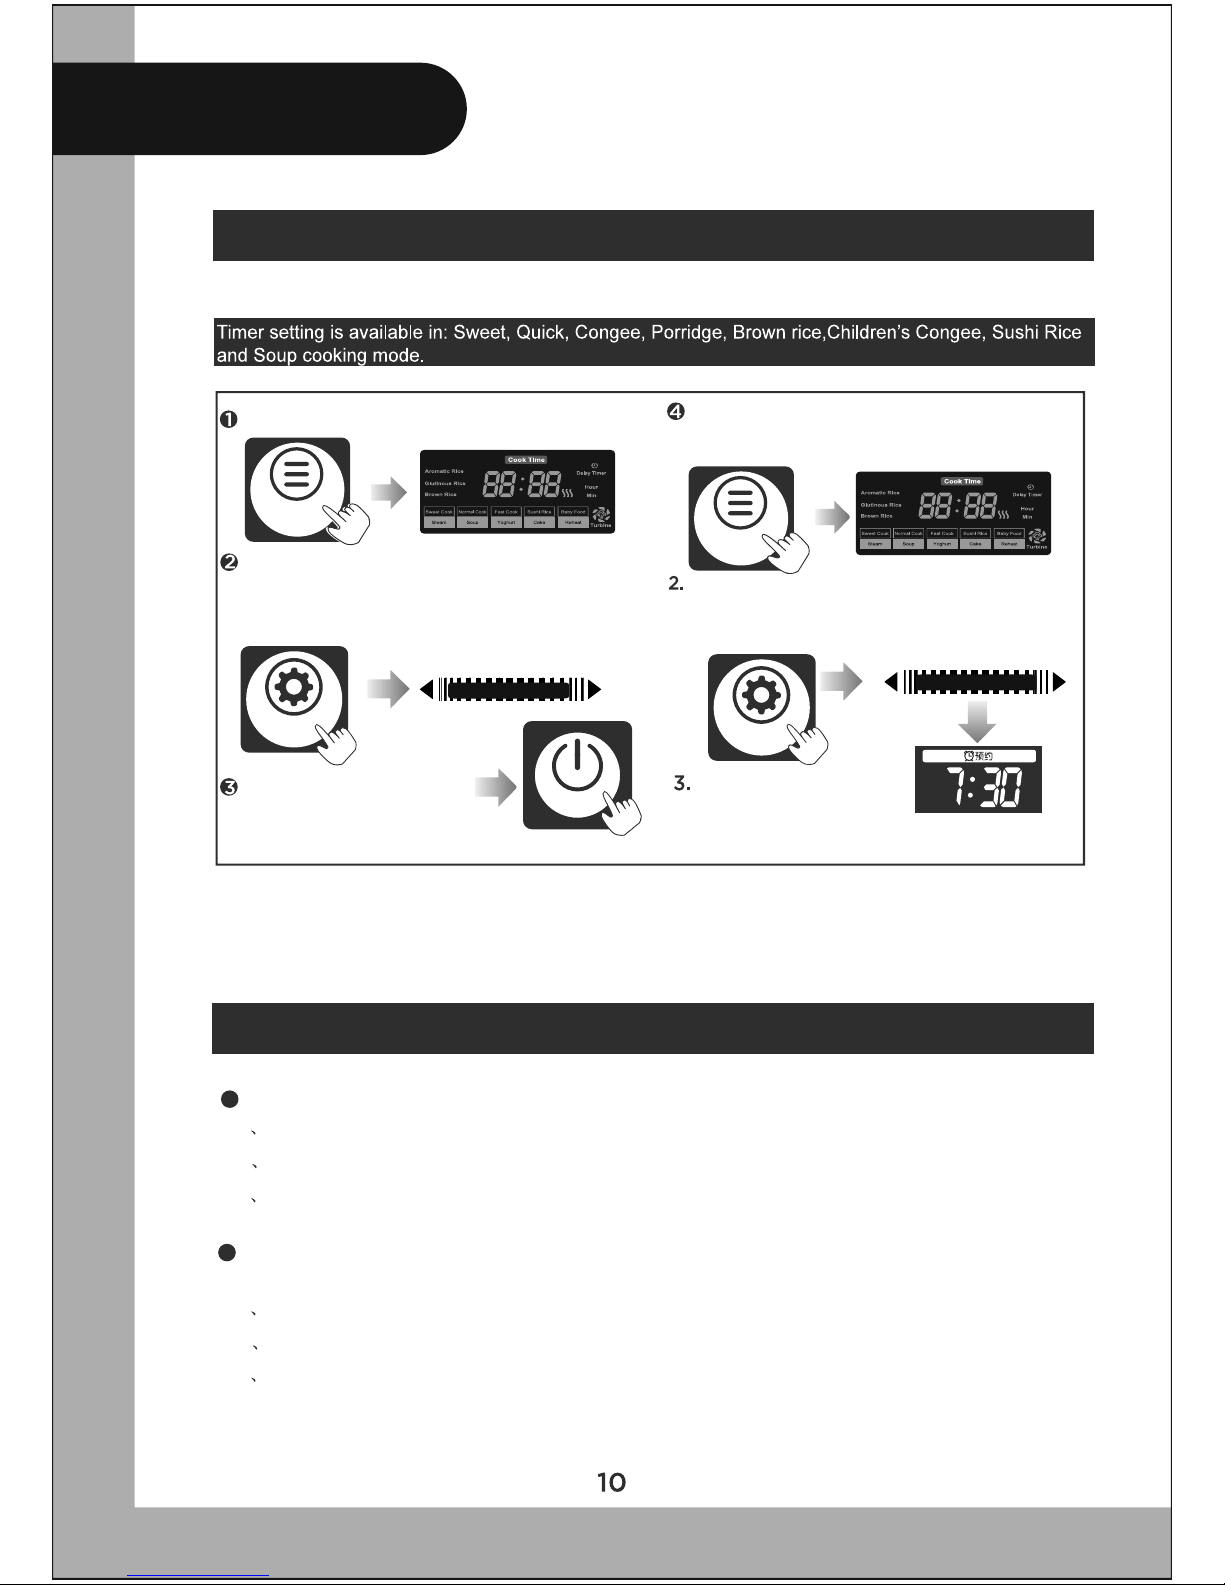
Using the Timer
Choosing the Texture and Rice Varieties
Only applicable to product supporting this function
Press the “Mode” button to select a mode
for timer setting.
For example: Set the timer at half past seven
on the next morning to finish cooking Congee.
Press the “Setting” button once, the “Timer” is
flickering. And then slide the bar or press the
right arrow to set the time at half past seven.
Press the “Start” button
to finish setting. You can
have tasty Congee at half
past seven on the next morning.
1. Press the “Mode” button to select Congee.
Press the “Start” button to
finish setting.
1 Press the “Mode” button to select a mode for texture setting. For example, Sweet cooking mode.
1 Press the “Mode” button to select a mode for rice varieties setting. For example, Sweet cooking.
2 Press the “Setting” button twice, and then one of the Texture settings is flickering.
2 Press the “Setting” button three times, and then one of the Rice settings is flickering.
3 Select the desired Texture setting by sliding the bar or pressing the left or right arrows. The cooker
can auto save the setting when you finish it. It will select this setting by default at next time.
3 Select the desired rice by sliding the bar or pressing the left or right arrows. The cooker can auto
save the setting when you finish it. It will select this setting by default at next time.
Press the “Setting” button once, the “Timer”
is flickering. And then slide the bar or press
the right and left arrows to adjust the time
Tips: Do not set the timer to 12 hours or longer. Otherwise, it may generate undesirable
odors.
Please calibrate the clock in time to ensure the Timer’s accuracy.
Texture setting is available in: Sweet, Quick, Brown rice and Sushi rice cooking mode.
Rice varieties setting is available in: Sweet, Quick, Congee, Porridge, Grown rice,
Children’s Congee and Sushi rice cooking mode.
Rice Type
Rice Type
Adjustable and slideable
Adjustable and slideable
Page 12
Use Instructions
Brown Rice
Sushi Rice
Usually, the five varieties of Brown rice are what we call rice, wheat, sorghum, soybeans and maize.
But conventionally, we call grains except rice and flour as the Brown rice.
Sushi is mainly made of the cold rice flavored with vinegar (vinegar rice for short), supplemented
with fish, seafood, vegetables or eggs. Sushi rice is critical to good Sushi, because the rice needs
to be in good quality and hard texture. If it is the special rice variety for Sushi rice, it is better.
How to cook Sushi rice:
The following kinds of Brown rice are available on the market:
Cereals: maize, millet, red rice, black rice, purple rice, sorghum, barley, oats, buckwheat and etc.
Miscellaneous beans: soybeans, mung beans, red beans, black beans, green beans, kidney beans,
broad beans, peas and etc.
Tubers: Sweet potatoes, Chinese yams, potatoes and etc.
Others: peanuts, wolfberry, red dates, walnuts and etc.
The Brown rice is mainly made of the White rice with some of the above ingredients. The advantage
is that it is a nutritious and balanced diet.
Tips: Usually, the brown rice is dry, we need to soak it in the water before cooking so that it can fully
absorb the nutrients. The insoluble fiber contained in the hard shell of the brown rice may promote
the intestinal peristalsis. But we need to drink plenty of water to fully absorb the nutrients. Otherwise,
it may cause the intestinal obstruction. Therefore, we cannot eat too much brown rice at a time. We
should take it step by step.
Cooking methods and steps:
1.Soak the dry and hard brown rice in hot water for two or three hours. This step may be omitted if the
cereal is peeled, fresh and soft.
2.Rinse the White rice and Brown rice after soaking is finished.
3.Use the measuring cup to add White rice and Brown rice into the Inner Pot. Add water to the corresponding lines, press the Start button to start the Brown rice cooking.
4.If cooking is finished, whisk the Brown rice at first after opening the Outer Lid. Let the steam go. The
rice may look very good and the moisture is preserved.
1.Place the rinsed rice in the Inner Pot, add water to the water line which matches the number of cups of
rice (use the water line for Dongbei rice cooking)
2.Press the Mode button to select Sushi rice, and then press the Start button. It may take one hour to finish
Sushi rice cooking.
3.Add the ingredients immediately when the rice is cooked. Whisk the rice. And cool it down by using a fan
to prevent the rice from sticking together. The ratio of Sushi vinegar and rice is 1:6.
4.Whisk the cooked rice, and pour the Sushi vinegar on the rice evenly and whisk well. Do not press the rice
so that the rice can remain intact and soft.
5.Place a piece of seaweed on the Sushi mat, and then place the rice from left to right. Gently spread the rice
from bottom to top evenly. Please use little force and do not press the rice to ensure a good taste.
6.Add the ingredients in the middle to suit your taste. For example, fish, seafood, vegetables or eggs. Roll
the seaweed up using the mat and let it sit for one minute before cutting.
7.Put some water on the knife when cutting the Sushi so that the sticky rice will not stick to your knife. One
cut to bottom every time to make a clean cut for Sushi. According to your personal preferences and needs,
one Sushi can be cut into four to eight pieces.
Page 13

Use Instructions
Setting
Steaming
Reheat
Clock setting
Keep warm
1 Add water to the water line marked 3 in the Inner Pot.
2 Place the steam tray or basket.
3 Put the food in the steam tray or basket, or put the food in a plate before putting it in the steam
tray or basket. For example, to steam the pork ribs. Cut the ribs into chunks. Pickle it after putting
the cooking wine, dark soy sauce, ginger and salt. Place the pickled ribs in the plate. Add the oil.
And then add some fermented soya beans on it. Placed it in the steam tray or basket.
4 Press the Mode button to select Steam. And then press the Start button. It may take thirty minutes to finish the cooking.
1 Whisk the rice. Sprinkle 50-80g water on the rice.
2 Press the Mode button to select Reheat. And then press the Start button to start cooking.
3 It enters Keep warm status when reheat is finished.
4 Please whisk the rice in thirty minutes to get more delicious rice.
1 The product enters Keep warm status automatically after cooking.
2 In Keep warm status, it will reheat to maintain the temperature at 73 .
3 Press the Mode button or slide the bar to select “Keep Warm” to enter Keep Warm mode manually.
Power on the product
and enter the standby
mode.
Tips:
Time setting is unavailable if powered off.
If the time is wrong, it may affect the Timer
function. Please calibrate the time.
If no change is made after entering the clock setting,
the time on the display Panel will flicker for twelve
seconds and will be confirmed automatically as the
set time. .
Press and hold the
“Setting” button for three
seconds to enter the clock
setting.
Press “ ” or “ ” to adjust the time.
Press “ ” to increase 1 minute at a time, press and
hold it to increase continuously.
Ten seconds after the setting, the time is confirmed
automatically or press “Start” to confirm the
Press “ ” to decrease 1 minute at atime, press and
hold it to decrease continuously.
Note: The set time for steaming cannot be adjusted. The set time is thirty minutes.
We suggest the maximum amount of rice should not exceed the water line marked
4 when using the reheat function.
If you find the clock on the product is not accurate, please calibrate it as bellows:
Keep the rice warm: in case the rice caking may affect its tasty, whisk the rice in thirty
minutes when the Keep warm function is enabled.
Note: the product can provide the keep-warm function up to twelve hours. We suggest
you to keep the rice warm for no more than five hours; otherwise, the rice may have
discoloration or smell.
Page 14

Use Instructions
Congee
Fast Cook
Turn the Voice on and off
Battery and power-off memory function
Turbine settings (applicable to product supporting this function)
When powered on, press the “Congee cooking” and “Quick rice” button
at the same time to turn the Voice off.
Press them again to turn on the Voice.
When the Voice is turned off, the icon “ ” is displayed. There is
only keypad tone and music.
In the standby mode, press and hold the “Keep Warm/Cancel” button for five seconds, when the “OFF”
displays on the screen and the beep sounds once, the turbine is disabled. Press and hold the “Keep
Warm/Cancel” button for five seconds again, when the “ON” displays on the screen and the beep sounds
once, the turbine resumes running.
Tips: if the turbine running is not needed, press and hold the “Keep Warm/Cancel” button for five
seconds to turn it off. We do not suggest you to take out the turbine directly. It may cause overflow
in congee and rice cooking. It will not affect the normal working if the turbine is turned off, but it
may take longer time for cooking.
Only applicable to the product with clock display.
Power cut when using the Timer: if the product is powered on before the set time of the Timer, it can continue working, but the end time may be different. If it is powered on after the set time, it enters the standby
mode.
Power cut when keeping warm: the product continues working if it is powered on within 2 hours. It enters
the standby mode if it is powered on later than 2 hours.
Power cut when reheating: the product continues working if it is powered on within 2 hours. It enters the
standby mode if it is powered on later than 2 hours.
The product has an embedded battery to supply power for clock display.
When the batteries run out.
There is no power-off memory function. The clock is flickering when powered on. Press the “Keep Warm/
Cancel” button to enter the standby mode. And then you can start the cooking.
The battery has a service life of 5 years. Never put the battery into fire or water.
Never heat, decompose or recharge the
battery.
Please go to the authorized repair center to
replace the batteries if they run out.
Tips
Page 15

Cleaning and Maintenance
Cleaning the Heat Shroud
Removing, cleaning and installation of the Removable Inner Lid
Use a wet cloth to wipe the Inner Lid. Do
not rinse it under
the water.
Use the dry cloth to wipe the water on the
water-storage tank.
Please use the toothpick or cloth to wipe
the rice on the surface of Heat Shroud.
Open the Outer Lid, and
remove the Inner Lid.
Press here
Wash the Lid
Install the Lid.
Please use the cloth to wipe the water and rice
off the coil.
Please wipe the water and rice around and on the
bottom of the Inner Pot before placing it in.
Page 16

Cleaning and Maintenance
Removing, cleaning and installation of the Turbine (applicable
to the product with this assembly)
Tips:
Remove the Turbine after taking out the Inner Lid.
Wash the Turbine.
The first generation
The second generation
After washing, install the Turbine by
aligning the shaft hole with the shaft.
To increase the product life cycle, for products
using the first generation Turbine, please apply
some plant oil (such as peanut oil and blend oil)
on the shaft regularly (once a week) to enhance
the lubricity. The second generation Turbine uses
different structure, please also clean it regularly,
but you need not to apply the oil. The difference
on the Turbine structure is as illustrated below.
Note: We suggest you to clean the Turbine regularly to ensure its performance. Please
wash it after it cools down to avoid a burn.
Page 17

Cleaning and Maintenance
Removing, cleaning and installation of the Steam Vent
Hold the Steam Vent and pull it up
As illustrated, to open the Steam Vent,
use your hand to press the Steam Vent,
and open the buckle at the same time.
As illustrated: Align the two buckles to
close the Steam Valve. The Steam Vent
is properly installed when you hear a click.
Remove the Steam Vent
Use water to wash it afterwards
Note: If the seal ring falls off, please insert
it back.
Install the Steam Vent back by pressing it
downwards by force.
Page 18

Abnormality Analysis and Troubleshooting
In case of a potential failure
Buttons failure,
the “Start” light
not flickering;
not in the standby mode
Weather the power plug
is loose
“Start” light is on
Cannot close
the Outer Lid
Water on the outside of the
Inner Pot is not wiped out
The Inner Pot is damaged
or deformed
The Outer Lid is not
installed properly.
The pressure Lid is damaged, the seal ring is damaged
Please wipe it.
Close the Outer Lid.
The Outer Lid
opens automatically
Slight clatter
sounds
Steady sound
Dim letters on
the display
panel
There is water
vapor on the
display panel.
Dim display
Abnormal sound
Plastic smell
There is induction when touching
It is the sound of the rotating Turbine. It is normal.
The Turbine is not installed
properly. Bad lubricity..
View from every angle
The water on the outside of the Inner Pot is not wiped out.
The seal ring of the Inner Lid is damaged or has foreign objects on it.
There is plastic smell for the new product, but it will disappear slowly
after a period of time..
Please check whether the earthing device is sufficient.
The LCD and digital screen
has a certain viewing angle.
(The viewing angle is not
directly above the product).
It is about 60-degree angle
to the surface.
It is the sound of the
running relay. It is normal.
No failure. Please continue your cooking.
No failure. Please adjust the viewing angle.
Low battery. Please change a new one.
No failure. Please continue your cooking. It
is better to apply some plant oil (such as
peanut oil and blend oil) on the shaft.
Install the Turbine correctly. Please apply some
plant oil (such as peanut oil and blend oil) on the
shaft regularly (once a week) to enhance the lubricity.
Go to change a new one in the store or
service center.
Go to change a new one in the store or
service center.
Steam leaking
from the place
other than the
Steam Vent
Do not install the
removable Inner Lid
Please install the removable Inner Lid
When powered on, the
“12:00” is always flickering
on the display panel.
Firmly connect the power plug
Press “Cancel” button to return to standby mode
When powered on, the “12:00” is always flickering on
the display panel. It does not affect the normal use. It
is because that the battery runs out. You can go to the
service center to replace it.
Before
cooking
Cooking
Abnormal
display
Smell
Housing
When there is any potential failure of the product, please check your product as per the
following list before you send it to the service center.
Page 19

Abnormality Analysis and Troubleshooting
Judgment of the cause of abnormal display
Flickering
Flickering
Constantly
On
Constantly
On
Open circuit of the bottom sensor.
If it remains after powering off and
on, please send it to service center
for repairing.
Short circuit of the Outer Lid sensor.
If it remains after powering off and
on, please send it to service center
for repairing.
Short circuit of the Outer Lid sensor.
If it remains after powering off and
on, please send it to service center
for repairing.
Failure of communication
Press the “Off” button to cancel
the warning. If the warning remains,
please send it to service center for
repairing.
Short circuit of the IGBT sensor.
If it remains after powering off
and on, please send it to service
center for repairing.
Short circuit of the IGBT sensor.
If it remains after powering off
and on, please send it to service
center for repairing.
Open circuit of the IGBT sensor.
If it remains after powering off
and on, please send it to service
center for repairing.
Failure of communication
Press the “Off” button to cancel
the warning. If the warning
remains, please send it to service
center for repairing.
Short circuit of the bottom sensor.
If it remains after powering off and
on, please send it to service center for repairing.
Open circuit of the Outer Lid sensor.
If it remains after powering off and
on, please send it to service center
for repairing.
Page 20

Warranty Service
Circuit Principle
Turbine’s motor
Current fuse
Coil
Thermal fuse
Fan
Control PCB
Power PCB
Thermistor for
the Outer Lid
Thermistor on
the bottom
IGBT temp. sensor
The Midea Rice Cooker has a warranty period of three years. (this policy only applies to products
for home use)
The start date of the warranty period is from the date of invoice.
Any of the following circumstances will not be covered by the warranty:
1.Damage caused by consumers’ improper use, custody and maintenance.
2.Damage caused by customers’ own maintenance and repair which are not performed by the
professionals designated by the company.
3.The model on the invoice is different from that requiring repair. The invoice has been altered.
4.Not a valid invoice.
5.Damage caused by force majeure factor.
6.If the product is not used for home use, it is not covered by the warranty.
7.Damage caused by human error or improper use is not covered by the warranty.
For the products not covered by the warranty, the company's customer service center is still happy
to serve you.
220-240V~50/60Hz
Page 21

Periuk Nasi Midea
Panduan Pengguna (Periuk Nasi Sweet IH Smart)
Model:
MB-FZ15IH
Terima kasih kerana telah membeli Periuk Nasi Elektrik Midea. Sila baca
buku panduan ini dengan teliti sebelum menggunakan unit ini. Simpan buku
panduan ini untuk rujukan kelak.Gambarajah dalam buku panduan hanya
sebagai rujukan, sila rujuk kepada produk sebenar.
Page 22

Pastikan anda patuhi langkah-langkah keselamatan seperti berikut
bagi memastikan keselamatan penggunaan dan mengelakkan
kecederaan dan kerosakan harta benda terhadap diri anda dan orang
lain. Gagal mematuhi langkah-langkah keselamatan dan penggunaan
yang tidak betul mungkin menyebabkan kemalangan.
Situasi berikut memerlukan perhatian khas: Jika perkakas ini
digunakan oleh kanak-kanak atau orang kurang upaya tanpa
pengawasan atau perkakas ini dipermainkan oleh kanak-kanak.
Kandungan
Langkah-langkah keselamatan
Huraian Produk
Arahan Penggunaan
Pembersihan dan Penyelenggaraan
Analisis Keabnormalan dan Penyelesaian Masalah
Perkhidmatan Jaminan
Prinsip Litar Pendawaian
Maksud bagi ikon-ikon berikut:
Merujuk kepada perkara yang “dilarang”
Merujuk kepada perkara yang mungkin mengakibatkan kemalangan.
Merujuk kepada perkara yang “diwajibkan”
Merujuk kepada perkara yang mungkin mengakibatkan kecederaan
ringan atau kerosakan harta benda.
Langkah-langkah keselamatan
Page 23

Langkah-langkah Keselamtan
Amaran
Jangan gunakan perkakas ini untuk memasak sebarang makanan yang mudah
menyebabkan penapis tersumbat, contohnya makanan berbentuk kepingan
(contohnya rumpair air, kubis Cina) atau makanan berbentuk jalur
(contohnya kelp) dan makanan berbentuk bijian (contohnya cebisan jagung)
bagi mengelakkan kemalangan atau kerosakan produk.
Dalam proses memasak, jangan dekatkan muka atau tangan anda dengan
bukaan wap bagi mengelakkan kelecuran.
Dalam proses memasak, jangan tutup bukaan wap dengan sebarang kain. Ini
mungkin mengakibatkan kemalangan atau kerosakan produk.
Hanya gunakan bekalan kuasa 240V AC. Jika tidak, ia mungkin mengakibatkan
kebakaran atau renjatan elektrik. Jangan gunakan kord kuasa yang rosak.
Jangan melakukan perkara seperti berikut yang akan merosakkan kord kuasa:
kord kuasa dibengkok dengan kuat, diletakkan berdekatan dengan suhu tinggi,
diikat, dihimpit oleh objek yang berat dan sebagainya. Ini mungkin
mengakibatkan kebakaran dan renjatan elektrik.
Jangan gunakan unit ini jika plag kuasa sudah rosak. Ini mungkin mengakibatkan
kebakaran, renjatan elektrik atau litar pintas.
Jangan pasang atau cabut plag dengan tangan yang basah. Ini mungkin
mengakibatkan renjatan elektrik dan kecederaan.
Jangan biarkan kanak-kanak mengendalikan unit ini dengan sendiri. Jauhkan
unit ini daripada dicapai oleh bayi. Ini mungkin mengakibatkan kejutan elektrik
atau kelecuran.
Jangan letakkan unit ini di tempat yang tidak rata, basah atau berdekatan dengan
sumber haba. Ini mungkin merosakkan unit ini atau mengakibatkan kemalangan.
Jangan cucukkan pin, dawai keluli atau benda lain pada lubang di bahagain
bawah. Ini mungkin mengakibatkan renjatan elektrik atau kecederaan.
Unit ini tidak boleh direndam dalam air atau dibasuh di bawah simbahan air.
Jikat terdapat sebarang habuk atau kesan air pada plag kuasa,
bersihkan dengan serta merta bagi mengelakkan kebakaran, renjatan
elektrik atau litar pintas.
Gunakan soket dibumikan dengan bekalan kuasa kadaran 13A
secara berasingan, penggunaan soket yang sama dengan perkakas
lain mungkin mengakibatkan kepanasan berlebihan yang mengundang
kepada kebakaran.
Jangan mengubah suai, membaiki atau menanggalkan unit ini, melainkan
dijalankan oleh juruteknik, bagi mengelakkan kebakaran, renjatan elektrik
atau kecederaan.
Page 24

Jika terdapat sebarang perbezaan antara gambarajah dalam buku
panduan ini dengan produk sebenar, sila rujuk kepada produk anda.
Sila periksa sama ada periuk dalaman dan injap wap berkeadaan baik
sebelum memasak bagi mengelakkan sebarang kemalangan.
Bunyi detikan atau desiran yang kedengaran ketika proses memasak
adalah bunyi yang normal.Sila bawa bertenang.
Jangan teruskan proses memasak yang berikutnya sebaik sahaja
tamatnya proses memasak. Biarkan diselang selama 15 minit untuk
membiarkan unit ini menyejuk ke suhu bilik.
Jangan menanak nasi dengan air panas. Jika tidak, ia mungkin
mempengaruhi kawalan suhu dan menjejaskan prestasi periuk nasi.
Bagi memastikan prestasi periuk nasi tidak terjejas, jangan gunakan
dulang pengukus jika kuantiti beras yang dimasak melebihi 4 cawan.
Bunyi lemah tetapi mantap yang kedengaran ketika proses memasak
adalah normal kerana turbin sedang bekerja. Jika kedengaran bunyi
yang tidak mantap atau bunyi bising yang luar biasa, sila periksa
sama ada turbin telah dipasang dengan betul.
Injap wap, penutup dalaman boleh ditanggalkan dan turbin hendaklah
dicuci secara berkala.
Bunyi desingan pendek (kira-kira 10 saat) yang kedengaran apabila
proses memasak bermula adalah normal kerana turbin sedang
menjalankan pemeriksaan kendiri sebelum bekerja bagi memastikan ia
telah dipasang dengan baik. Ikon “ ” akan dipaparkan pada skrin.
Petua
Jika peranti pembumian tidak mencukupi, pengguna-pengguna sensitif
mungkin sensitif terhadap induksi. Sila periksa bagi memastikan sama
ada peranti pembumian boleh dipercayai, jika tidak, jangan sentuh
rangka logam atau periuk dalaman.
Altitud pengendalian unit ini adalah 0~2000 m.
Sila kunjung ke pusat penyelenggaraan yang ditetapkan oleh Midea
jika produk anda perlu dibaiki atau ditukar alat ganti bagi memastikan
anda menerima perkhidmatan berkualiti dan profesional. Sila simpan
buku panduan dengan baik-baik untuk rujukan kelak. Terima kasih.
Langkah-langkah keselamatan
Petua
Page 25

Nota: Jika mana-mana alat ganti seperti fius tidak dibaiki dengan
baiknya, ia mungkin mengakibatkan kegagalan perlindungan dan
menyebabkan berlakunya kepanasan berlebihan atau kebakaran.
Sila kunjung ke pusat penyelenggaraan yang ditetapkan oleh Midea
jika produk anda perlu dibaiki atau ditukar alat ganti bagi mengelakkan
sebarang masalah terpendam yang disebabkan oleh pembaikan yang
tidak betul atau penggunaan alat ganti yang salah
Masukkan plag ke dalam outlet kuasa dengan kemas bagi mengelakkan
sebarang kebakaran, renjatan elektrik atau litar pintas.
Perkakas ini hanya untuk kegunaan di dalam rumah.
Orang yang memakai perentak jantung atau pengguna yang memakai
alat bantuan pendengaran atau diimplan koklea harus dapatkan nasihat
daripada pakar perubatan dan merujuk kepada arahan pembekal
peralatan perubatan sebelum menggunakan produk ini.
Kord kuasa yang rosak mesti ditukar ganti dengan kord kuasa yang
khas atau komponen khas yang dibeli dari pengilang atau pusat
perkhidmatannya.
Langkah-langkah keselamatan
Amaran
Hanya menggunakan periuk dalaman yang dibekalkan oleh pengilang.
Jika tidak, ia mungkin mengakibatkan kepanasan berlebihan atau
malfungsi.
Periuk dalaman jangan dijatuh bagi mengelakkan perubahan bentuknya.
Sebelum proses memasak, keringkan titisan air pada bahagian luar
periuk dalaman bagi mengelakkan malfungsi.
Sentiasa bersihkan sebarang bendasing seperti titisan air dan nasi
yang terlekat di antara periuk dalaman dan plat pemanas bagi
mengelakkan kepanasan berlebihan atau litar pintas.
Periuk dalaman jangan dihantuk dengan objek yang keras bagi
mengelakkan perubahan bentuknya.
Jangan sentuh periuk dalaman dengan tangan ketika proses memasak
atau sebaik sahaja selepas tamatnya proses memasak. Ini mungkin
menyebabkan kelecuran.
Langkah-langkah keselamatan
Peringatan
Page 26

Huraian produk
Huraian alat ganti
Periuk dalaman
Injap wap Anti Melimpah Dengan Kesan
Pengekalan Lembapan Yang Baik
Panel kawalan
Turbin
Penutup
luaran
Penutup dalaman
boleh ditanggalkan
Pemegang
Badan periuk
(penebat haba)
Soket kuasa
Butang
buka penutup
Nota: Jika terdapat
sebarang bendasing
di dalam injap wap,
ia mesti dibuang
dengan segera bagi
mengelakkan
prestasi periuk nasi
daripada terjejas.
“Periuk Titanium” yang
menyokong pemanasan induksi
Sweet hadir dengan dua kepingan
komposit pada bahagian dalam
dan disalut dengan sejenis aloi
keras, Titanium nitrida, pada
lapisan permukaannya. Sila
ambil perhatian:
Jangan panaskan periuk
dalaman di atas dapur gas
yang lain kerana bentuknya
mungkin berubah di bawah
suhu tinggi.
Elakkan dicuci dengan berus dawai atau peralatan yang
kasar dan keras kerana ia mungkin akan merosakkan
periuk dalaman.
Periuk dalaman mungkin mengalami perubahan warna
atau tanda berdasarkan kekerapan penggunaan,
tetapi ianya tidak akan mempengaruhi kesihatan atau
prestasi periuk nasi.
Page 27

Aksesori yang disediakan adalah berbeza mengikut modelnya.
Model MB-FZ15IH diambil sebagai contoh untuk gambarjah
yang digunakan dalam buku panduan ini. Ia hanya sebagai rujukan.
Produk sebenar mungkin berbeza mengikut model dan kelompok.
Fungsi Turbin seperti dinyatakan dalam buku panduan ini hanya
untuk produk yang menyokong fungsi seumpama.
Huraian Produk
Spesifikasi Teknikal
Model
Sumber Kuasa
Kuasa
Kadaran
(W)
(Cup)
Cara
pemanasan
Pemanasan
Elektromagnetik
Dimensi
W x D x H (mm)
V
Senduk nasi Senduk sup Cawan penyukat Set kord
Huraian Produk
Page 28

Arahan Penggunaan
Cara-cara mengendalikan butang
Butang “Mula”
Berkelip-kelip/Off On
Mula Mula
Jenis Beras
Butang Pemilihan Mod
Apabila butang “Mula” ditekan, lampu petunjuk
akan bertukar daripada berkelip-kelip atau Off
menjadi On. Ini menunjukkan unit ini mula
berfungsi dan penetapan anda telah disahkan.
Apabila butang “Mod” ditekan, mod memasak akan
bertukar daripada gelap menjadi terang, bahagian
yang berkelip-kelip merupakan mod yang telah
dipilih. Tekan butang “Mula” untuk mengesahkan
pemilihan anda.
Huraian mengenai pengendalian Turbin
(hanya sesuai untuk produk yang menyokong
fungsi ini)
Dalam penggunaan normal, Turbin akan berfungsi pada mod memasak Manis, Segera,
Bubur Nasi, Bubur, Beras Perang, Bubur Untuk Kanak-kanak dan Nasi Sushi. Turbin akan
mengadakan pemeriksaan automatik pada beberapa minit setelah mod memasak Manis,
Segera, Bubur Nasi, Bubur, Beras Perang, Bubur Untuk Kanak-kanak dan Nasi Sushi
dimulakan. Lepas itu, Turbin akan mula berfungsi apabila unit ini sedang mendidih dan
mengeluarkan wap. Turbin tidak akan berfungsi pada mod memasak yang lain.
Arahan Penggunaan
Butang Penetapan Butang Batal
Penetapan
Cancel
Tekan butang “Penetapan” untuk mengskrol
di antara penetapan Pemasa, Tekstur dan
Jenis Beras. Lepas itu tetapkan Pemasa,
Tekstur dan Jenis Beras menggunakan
penggelongsor.
Unit ini akan masuk ke status
Kekal Panas apabila tamatnya
proses memasak. Lampu
petunjuk Kekal Panas dan
Mula akan bernyala. Tekan
butang “Kekal Panas/Batal”
untuk masuk ke mod Sedia,
dan tekan sekali lagi untuk
masuk ke status Kekal Panas.
Page 29

Persediaan sebelum memasak
Menyukat beras dengan cawan penyukat (kira-kira 150 g/cawan).
kira-kira 150g/
cawan
Tuangkan beras yang telah dibasuh ke dalam periuk
dalaman dan tambahkan air sehingga ke paras air yang
serasi dengan bilangan cawan beras. Kuantiti air boleh
ditambah atau dikurangkan mengikut citarasa individu.
1.Jangan basuh beras di dalam peruik dalaman bagi
mengelakkan periuk dalaman daripada tercalar.
2.Untuk memasak beras perang yang kering dan keras,
ia harus direndam dalam air panas selama 2 atau 3
jam sebelum memasak.
Nota: Air yang ditambah jangan melebihi tanda MAX. Ini mungkin mengakibatkan air melimpah
keluar atau litar pintas.
Cara-cara mengendalikan
penggelongsor
Penetapan
Setting
Tambahkan masa
Sederhana, Lembut, Keras
Keras, Lembut, Sederhana
Penetapan / Beras Dongbei,
Beras Zengcheng Simiao,
Beras Jasmine
Beras Jasmine, Beras
Zengcheng Simiao, Beras Dongbei
Kurangkan masa
Setting
Penetapan
Huraian khas mengenai Butang “Bubur Nasi Segera”, “Beras Manis” dan “Beras Segera”
Anda hanya perlu tekan butang pintas seperti berikut untuk memulakan proses memasak hidangan yang
dikehendaki. Contohnya, jika anda hendak memasak Bubur Nasi, tekan butang “Bubur Nasi Segera”.
Petua: “Segera” bermaksud unit ini mengambil masa memasak yang lebih pendek jika berbanding dengan
produk Midea yang serupa. (Unit ini mengambil masa kira-kira 20 minit untuk memasak 2 cawan beras
putih dan kira-kira 60 minit untuk memasak Bubur Nasi). Biarkan beras yang baru siap dimasak berada
dalam mod Kekal Panas selama 10 minit selepas memasak dengan mod “Beras Segera” agar hidangan
menjadi lebih enak dimakan.
Pada mod Sedia, menggelongsor bar untuk memilih mod yang dikehendaki. Gelongsor ke sebelah kanan
untuk memilih mod di sebelah kanan, dan gelongsor ke sebelah kiri untuk memilih mod di sebelah kiri.
Apabila butang “Penetapan” ditekan sekali, Pemasa akan berkelip-kelip, tambahkan masa dengan
menggelongsor bar ke kanan atau tekan anak panah sebelah kanan; kurangkan masa dengan
menggelongsor bar ke kiri atau tekan anak panah sebelah kiri. Apabila butang “Penetapan” ditekan
sekali lagi, “Tekstur” akan berkelip-kelip, pilih Sederhana, Lembut dan Keras mengikut urutan dengan
menggelongsor bar ke kanan atau tekan anah panah kanan; pilih Keras, Lembut dan Sederhana
mengikut urutan dengan menggelongsor bar ke kiri atau tekan anah panah kiri. Apabila butang
“Penetapan” ditekan sekali lagi, Jenis Beras akan berkelip-kelip, pilih Beras Dongbei, Beras Zengcheng
Simiao dan Beras Jasmine mengikut urutan dengan menggelongsor bar ke kanan/kiri atau tekan anak
panah kanan/kiri. Tekan anak panah kiri dan kanan secara berterusan untuk mengskrol penetapan di
atas secara bergilir-gilir.
Adjustable and slideable
Adjustable and slideable
Adjustable and slideable
Adjustable and slideable
Adjustable and slideable
Page 30

Arahan Penggunaan
Lap permukaan luar periuk dalaman dengan kain
kering sebelum dimasukkan ke dalam periuk nasi
elektrik. Putar periuk dalaman ke kiri dan ke kanan
sebanyak 2 atau 3 kali bagi memastikan bahagian
bawahnya bersentuhan sepenuhnya dengan
gegelung pemanas. Tutup penutup periuk dengan
kemas sehingga kedengaran bunyi “klik”.
Jangan panaskan periuk dalaman di atas dapur
gas yang lain bagi mengelakkan bentuknya
daripada berubah akibat kepanasan. Jangan
gunakan bekas lain yang selain daripada periuk
dalaman yang dibekalkan.
Plag kuasa Penyambung Periuk Nasi
Beras
Dongbei
Beras Zengcheng
Simiao
Bubur
Beras
Dongbei
Beras Zengcheng
Simiao
Bubur
Beras
Dongbei
Beras Zengcheng
Simiao
Bubur
Cara-cara mengendalikan tanda paras air
Ketika memasak nasi (Manis, Segera, Beras Perang, Beras Sushi)
Tambahkan air berdasarkan tanda paras air sebelah kiri
untuk Beras Dongbei dan Zengcheng Simiao. Contohnya,
untuk memasak 3 cawan beras, tuangkan beras yang
sudah dibasuh ke dalam periuk dalaman, lepas itu
tambahkan air sehingga mencapai tanda “3”.
Ketika memasak bubur nasi
Tambahkan air berdasarkan tanda paras air di
tengah-tengah untuk memasak Bubur Nasi. Contohnya,
untuk memasak 2 cawan beras, tuangkan beras yang
sudah dibasuh ke dalam periuk dalaman, lepas itu
tambahkan air sehingga mencapai tanda “2”.
Ketika memasak bubur
Tambahkan air berdasarkan tanda paras air sebelah
kanan. Contohnya, untuk memasak 1 cawan beras,
tuangkan beras yang sudah dibasuk ke dalam periuk
dalaman, lepas itu tambahkan air sehingga mencapai
tanda “1”.
Ketika mengukus
Tambahkan air yang bersesuaian berdasarkan
keperluan sebenar bagi mengelakkan air
memenuhi dulang pengukus apabila
mendidih.
Pasangkan plag kuasa
Pastikan plag periuk nasi dan plag kuasa sudah
dipasang dengan baik.
Tekan butang “Mod” untuk memilih mod yang
dikehendaki, lepas itu tekan butang “Mula” untuk
memulakan proses memasak, atau tekan butang fungsi
yang dikehendaki.
Anda boleh melaraskan nisbah beras
dan air berdasarkan citarasa individu.
Bagaimananpun, jumlah air dan beras
tidak boleh melebihi tanda paras MAX.
suit your taste. But please do not add
too much water to exceed the maximum water line.
Beras Putih
Spesifikasi Model
2 cups
8 cupsMB-FZ15IH
Kapasiti beras Minimum
Spesifikasi Model Kapasiti beras Minimum
Bubur
1 cups2 cups
MB-FZ15IH
Bubur Nasi / Bubur Nasi Untuk Kanak-kanak
Spesifikasi
1/2 cups1 cups
MB-FZ15IH
Kapasiti beras Minimum
Page 31

Arahan penggunaan
Start
Setting
Setting
Cara-cara mengendalikan Pemasa
Cara-cara Memilih Tekstur dan Jenis Beras
Hanya untuk produk yang menyokong fungsi ini.
Tekan butang “Mod” bagi memilih mod untuk
menetapkan Pemasa.
Tekan butang “Mula” untuk
menamatkan penetapan.
Sebagai contoh: tetapkan Pemasa pada pukul
7:30 pagi keesokan untuk menamatkan proses
memasak Bubur Nasi.
3. Tekan butang “Mula” untuk
menamatkan penetapan.
Anda akan dapat menikmati
Bubur Nasi yang enak pada pukul 7:30
pagi keesokan.
1. Press the “Mode” button to select Congee.
2. Tekan butang “Penetapan” sekali, “Pemasa”
akan berkelip-kelip. Menggelongsor bar atau
tekan anak panah kanan dan kiri untuk
melaraskan masa pada 7:30.
1. Tekan butang “Mod” bagi memilih mod untuk penetapan tekstur. Contohnya, mod memasak
Nasi Manis.
2. Tekan butang “Penetapan” sebanyak dua kali, salah satu penetapan Tekstur akan
berkelip-kelip.
3. Pilih Tekstur yang dikehendaki dengan menggelongsor bar atau tekan anak panah kiri atau
kanan. Unit ini akan menyimpan penetapan tersebut secara automatik apabila tamatnya
proses penetapan. Unit ini akan menjadikan penetapan itu sebagai Tetapan Asal bagi
penggunaan berikutannya.
1. Tekan butang “Mod” bagi memilih mod untuk penetapan Jenis Beras. Contohnya, mod
memasak Manis.
2. Tekan butang “Penetapan” sebanyak tiga kali, salah satu penetapan Beras akan
berkelip-kelip.
3. Pilih Beras yang dikehendaki dengan menggelongsor bar atau tekan anak panah kiri atau
kanan. Unit ini akan menyimpan penetapan secara automatik apabila tamatnya proses
penetapan. Unit ini akan menjadikan penetapan itu sebagai Tetapan Asal untuk
penggunaan berikutannya
Tekan butang “Penetapan” sekali, “Pemasa” akan
berkelip-kelip. Menggelongsor bar atau tekan anak
panah kanan dan kiri untuk melaraskan masa yang
dikehendaki.
Petua:Jangan tetapkan Pemasa yang melebihi 12 jam. Jika tidak, ia mungkin
menghasilkan bau yang tidak menyenangkan.
Sila betulkan masa untuk Jam bagi memastikan kejituan masa preset.
Penetapan Tekstur disediakan untuk mod untuk mod memasak: Manis, Segera, Beras Perang dan
Beras Sushi.
Penetapan Jenis Beras disediakan untuk mod untuk mod memasak: Manis, Segera,
Bubur Nasi, Bubur, Beras Perang, Bubur Nasi Untuk Kanak-kanak dan Beras Sushi
Rice Type
Rice Type
Adjustable and slideable
Adjustable and slideable
Page 32

Arahan Penggunaan
Beras Perang
Beras Sushi
Secara lazimnya terdapat lima jenis Beras Perang yang biasanya dinamakan sebagai beras, gandum,
sekoi, kacang soya dan jagung. Tetap secara konvensional, kita menamakan bijirin sebagai Beras
Perang, kecuali beras dan tepung.
Berikut merupakan Beras Perang yang sedia ada di dalam pasaran:
Bijirin: Jagung, sekoi, beras merah, beras hitam, beras ungu, barli, oat, gandum hitam dan lain-lain.
Pelbagai kacang: kacang soya, kacang hijau, kacang merah, kacang hitam, kacang hijau, kacang buah
pinggang, kacang pis dan lain-lain.
Ubi: ubi keledek, ubi keladi, ubi kentang dan lain-lain.
Lain-lain: kacang tanah, Goji, kurma merah, walnut dan lain-lain.
Beras Perang diperbuat terutama dengan Beras Putih dan sesetengah daripada ramuan tersebut di atas.
Kelebihan Beras Perang adalah ia merupakan pemakanan berkhasiat dan seimbang.
Petua: Beras Perang biasanya kering, jadi ia perlu direndam dalam air sebelum dimasak agar kandungan
khasiatnya dapat diserap dengan sepenuhnya. Fiber tidak larut dalam air yang terkandung dalam kulit
Beras Perang yang keras mungkin dapat menggalakkan peristalsis usus. Bagaimanapun, kita perlu
mengambil kuantiti air yang banyak bagi membolehkan kandungan khasiatnya diserap sepenuhnya.
Jika tidak, ia mungkin menyebabkan usus tersumbat. Oleh itu, Beras Perang tidak sesuai diambil secara
berlebihan sekaligus. Ia harus diambil secara langkah demi langkah.
Cara-cara dan langkah-langkah memasak:
1. Rendam Beras Perang yang kering dan keras dalam air panas selama dua atau tiga jam. Langkah ini
boleh diabaikan jika bijirin telah dibuang kulitnya, segar dan lembut.
2. Bilas Beras Putih dan Beras Puerang apabila tamatnya proses merendam.
3. Gunakan cawan penyukat untuk tambahkan Beras Putih dan Beras Perang ke dalam periuk dalaman.
Tambahkan air sehingga mencapai paras air yang berkenaan, lepas itu tekan butang “Mula” untuk
memulakan proses memasak Beras Perang.
4. Apabila tamatnya proses memasak, kacau Beras Perang apabila penutup luarannya buat kali pertama
dibuka. Biarkan wap terlepas. Dengan itu, nasi akan kelihatan enak dan lembap.
Sushi diperbuat dengan nasi sejuk yang dicampur aduk dengan cuka (cuka beras), ditambah
dengan ikan, makanan laut, sayur-sayuran atau telur. Nasi Sushi adalah penting untuk
menghasilkan Sushi yang enak, di mana berasnya hendaklah berkualiti dan mempunyai tekstur
yang keras. Adalah bagus jika dapat menggunakan jenis beras yang khas untuk memasak nasi
Sushi. Cara-cara memasak nasi Sushi:
1. Tuangkan beras yang sudah dibasuh ke dalam periuk dalaman, tambahkan air sehingga mencapai paras
yang serasi dengan bilangan cawan beras (berpandukan paras air untuk Beras Dongbei).
2. Tekan butang “Mod” untuk memilih Beras Sushi, lepas itu tekan butang “Mula”. Unit ini akan mengambil
masa 1 jam untuk menamatkan proses memasak Nasi Sushi.
3. Tambahkan bahan-bahannya sebaik sahaja nasi siap dimasak. Kacau nasi dan sejukkan nasi dengan
kipas bagi mencegah beras daripada melekit. Nisbah cuka Sushi dengan nasi adalah 1:6.
4. Kacau beras yang sudah dimasak, taburkan cuka Sushi pada beras dan dikacau dengan sekata. Jangan
menekan nasi agar nasi kekal dalam keadaan baik dan lembut.
5. Letakkan sekeping rumpai laut di atas tikar Sushi, lepas itu taburkan nasi dari kiri ke kanan. Ratakan
nasi dari bawah ke atas dengan sedikit tenaga tetapi jangan ditekan dengan kuat bagi memastikan ia
enak dimakan.
6. Susunkan bahan-bahannya di bahagian tengah mengikut citarasa anda. Contohnya ikan, makanan laut,
sayur-sayuran dan telur. Gulung rumpai laut menggunakan tikar Sushi dan biarkan satu minit sebelum
dipotong.
7. Letakkan sedikit air pada pisau ketika memotong Sushi bagi memastikan nasi melekit tidak melekat pada
pisau anda. Dipotong dari atas ke bawah sekaligus bagi memastikan Sushi kelihatan cantik. Sebatang
Sushi boleh dipotong
menjadi 4 hingga 8 keping mengikut keperluan dan kesukaan individu.
Page 33

Tekan butang “ ” atau “ ” untuk melaraskan masa.
Setiap kali butang “ ” ditekan, masa akan bertambah
sebanyak 1 minit. Masa akan bertambah dengan cepat
jika butang ini ditekan secara berterusan.
Setiap kali butang “ ” ditekan, masa akan berkurangan
sebanyak 1 minit. Masa akan berkurangan dengan cepat
jika butang ini ditekan secara berterusan.
Arahan Penggunaan
Setting
Mengukus
Panaskan Nasi
Penetapan Jam
Kekal Panas
1. Tambahkan air ke dalam periuk dalaman sehingga mencapai tanda 3.
2. Letakkan dulang pengukus.
3. Letakkan makanan di atas dulang pengukus, atau letakkan makanan di atas pinggan
sebelum diletakkan di atas dulang pengukus. Contohnya, mengukus tulang rusuk.
Potong tulang rusuk menjadi ketulan. Perap dengan arak, kicap pekat, halia dan garam.
Susunkan tulang rusuk yang diperap di dalam pinggan. Tambahkan minyak dan kacang
soya tapai di atasnya. Letakkan di atas dulang pengukus.
4.Tekan butang “mod” untuk memilih fungsi Mengukus. Lepas itu tekan butang “Mula”. Unit
ini mengambil masa 30 minit untuk menamatkan proses memasak.
1. Kacau nasi, taburkan 50-80 g air di atas nasi.
2. Tekan butang “Mod” untuk memilih “Panaskan Nasi”, lepas itu tekan butang “Mula” untuk
memulakan proses memasak.
3. Unit ini akan masuk ke mod Kekal Panas apabila tamatnya proses pemanasan.
4. Kacau nasi dalam masa 30 minit untuk menjadikan nasi yang lebih enak dimakan.
1.
Produk ini akan masuk ke status Kekal Panas secara automatik apabila tamatnya proses memasak.
2. Pada status Kekal Panas, suhunya akan dikekalkan pada 73°C.
3. Tekan butang “Mod” atau menggelongsor bar untuk memilih “Kekal Panas” untuk masuk
ke mod Kekal Panas secara manual.
Pasangkan kuasa dan
unit ini akan masuk
ke mod sedia.
Petua:
Penetapan Jam tidak boleh
dilakukan dalam keadaan
kuasa dipadamkan.
Masa yang tidak betul akan mempengaruhi fungsi Pemasa. Sila
betulkan masa paparan. Jika tiada sebarang perubahan dibuat setelah
masuk ke mod penetapan Jam, masa pada panel paparan akan
berkelip-kelip selama 12 saat, dengan itu masa itu akan disahkan
secara automatik sebagai masa tetapan.
Tekan butang
“Penetapan” selama 3
saat untuk masuk ke
mod penetapan Jam.
Masa yang ditetapkan akan disahkan secara automatik
dalam masa 10 saat selepas penetapan, atau dengan
menekan butang “Mula” untuk mengesahkan penetapan tersebut.
Nota: Masa untuk proses mengukus adalah selama 30 minit dan tidak boleh
ditetapkan dengan sendiri.
Adalah disyorkan kuantiti nasi yang maksimum tidak harus melebihi tanda paras
air 4 apabila fungsi “Panaskan Nasi” dipilih.
Jika didapati jam pada produk adalah tidak tepat, sila membuat penyelarasan
mengikut langkah-langkah berikut:
Biarkan nasi kekal panas: Nasi hendaklah dikacau dalam masa 30 minit apabila fungsi
Kekal Panas dimulakan kerana nasi bergumpal akan menjejaskan keenakannya.
Nota: Produk ini boleh menyediakan fungsi Kekal Panas selama 12 jam. Anda
disyorkan supaya jangan membiarkan nasi berada pada mod kekal panas melebihi
5 jam, jika tidak, nasi mungkin berubah warnanya atau menjadi berbau.
Page 34

Apabila kuasa dipasang, tekan butang “Masak Bubur Nasi” dan
“Nasi Segera” secara serentak untuk memadamkan Suara.
Tekan kedua-duabutang tersebut sekali lagi untuk
menghidupkan Suara. Apabila Suara telah dipadamkan,
ikon “ ” akan dipaparkan. Dengan itu, hanya kedengaran
nada kekunci dan muzik.
Arahan Penggunaan
Congee
Fast Cook
Hidupkan/Padamkan Suara
Bateri dan fungsi ingatan apabila bekalan elektrik tergendala
Penetapan Turbin (Hanya untuk produk yang menyokong fungsi ini)
Pada mod Sedia, tekan butang “Kekal Panas/Batal” selama 5 saat, apabila “OFF” terpapar pada
skrin dan kedengaran bunyi Beep, dengan itu Turbin telah dimatikan. Tekan butang “Kekal
Panas/Batal” selama 5 saat sekali lagi, “ON” akan terpapar pada skrin dan kedengaran bunyi
Beep, dengan itu Turbin akan kembali berfungsi.
Petua: Jika Turbin tidak diperlukan, tekan butang “Kekal Panas/Batal” selama 5 saat bagi
memadamkannya. Adalah tidak disyorkan untuk menanggalkan Turbin secara langsung
kerana ia mungkin menyebabkan air melimpah keluar ketika memasak Bubur Nasi atau
Nasi. Turbin dipadamkan tidak akan menjejaskan prestasi memasak yang normal tetapi
masa memasak mungkin menjadi lebih panjang.
Hanya untuk produk yang hadir dengan paparan Jam.
Bekalan elektrik tergendala ketika Pemasa digunakan
Jika bekalan elektrik dipulihkan sebelum tamatnya masa tetapan, unit ini akan terus berfungsi dengan masa
tamatnya proses memasak yang mungkin berbeza. Jika bekalan elektrik dipulihkan selepas tamatnya masa
tetapan, maka unit ini akan masuk ke mod Sedia.
Bekalan elektrik tergendala pada mod Kekal Panas: Jika bekalan elektrik tergendala dipulihkan dalam masa
2 jam, unit ini akan teruskan prosesnya. Jika bekalan elektrik tergendala melebihi 2 jam, maka unit ini akan
masuk ke mod Sedia apabila bekalan elektrik dipulihkan.
Bekalan elektrik tergendala pada mod Panaskan Nasi: Jika bekalan elektrik tergendala dipulihkan dalam
masa 2 jam, unit ini akan teruskan prosesnya. Jika bekalan elektrik tergendala melebihi 2 jam, maka unit ini
akan masuk ke mod Sedia apabila bekalan elektrik dipulihkan.
Unit ini akan membekalkan kuasa untuk paparan Jam dengan bateri terbina dalam.
Apabila bateri sudah kehabisan: Tiada fungsi ingatan apabila bekalan elektrik tergendala. Jam akan
berkelip-kelip apabila kuasa dihidupkan. Tekan butang “Kekal Panas/Batal” untuk kembali ke mod Sedia,
dengan itu, anda boleh memulakan proses memasak.
Bateri mempunyai jangka hayat 5 tahun; Bateri jangan dibuang ke dalam api atau air.
Bateri jangan dipanaskan, diungkai atau
dicaj semula.
Apabila bateri sudah kehabisan, sila bertukar
ganti di Pusat Penyelenggaraan yang ditetapkan.
Petua:
Page 35

Pembersihan dan Penyelenggaraan
Cara-cara membersihkan Badan Periuk (Penebat Haba)
Cara-cara menanggalkan, membersihkan dan memasang plat penutup boleh
ditanggalkan
Lap penutup dalaman dengan kain basah, jangan
dibilas secara terus di bawah simbahan air.
Lap air pada bekas air dengan kain kering.
Bersihkan air dan nasi yang terlekat pada
gegelung dengan kain.
Lap titisan air dan beras pada bahagian luar dan
bawah periuk dalaman sebelum ianya dimasukkan ke
dalam periuk nasi.
Jika bahagian permukaannya terdapat sisa nasi,
bersihkan dengan pencungkil gigi atau kain.
Buka penutup luaran dan
tanggalkan penutup dalaman.
Tekan sini.
Cuci penutup
dalaman.
Pasangkan semula penutup dalaman.
Page 36

Pembersihan & Penyelenggaraan
Cara-cara menanggalkan, membersihkan dan memasang Turbin
(Hanya untuk produk yang hadir dengan komponen ini)
Petua:
Tanggalkan Turbin selepas penutup dalaman ditanggalkan. Cuci Turbin dengan air.
Turbin Generasi Pertama
Turbin Generasi Kedua
Setelah dicuci, pasangkan Turbin dengan
serasikan lubang aci dengan aci.
Petua untuk memanjangkan jangka hayat produk,
bagi produk yang hadir dengan Turbin Generasi
Pertama, sila sapukan sedikit minyak tumbuhan
(contohnya minyak kacang tanah atau minyak
campuran) pada aci turbin secara berkala (sekali
setiap minggu) bagi meningkatkan pelinciran. Turbin
Generasi Kedua hadir dengan struktur yang berbeza
Ia juga perlu dicuci secara berkala, tetapi tidak perlu
disapu minyak. Perbezaan struktur turbin adalah
seperti ditunjukkan dalam gambarajah di bawah:
Nota: Turbin hendaklah dicuci secara berkala bagi mengekalkan prestasinya. Cuci
setelah ia menyejuk bagi mengelakkan kelecuran.
Page 37

Pembersihan & Penyelenggaraan
Cara-cara menanggalkan, membersihkan dan memasang Bukaan Wap
Pegang Bukaan Wap dan ditarik ke atas.
Seperti ditunjukkan dalam gambarajah di bawah,
tekan Bukaan Wap dengan tangan anda untuk
membukanya, pada masa sama juga membuka
pengancingnya.
Seperti ditunjukkan dalam gambarajah di bawah,
serasikan dua pengancing untuk menutup Bukaan
Wap. Ia telah dipasang dengan baik apabila
kedengaran bunyi “klik”,
Tanggalkan Bukaan Wap.
Cuci dengan air. Nota: Jika gelang
pengedapnya sudah jatuh, sila
masukkan kembali.
Tekan ke bawah dengan kuat bagi
memastikan Bukaan Wap telah
dipasang dengan baik.
Page 38

Analisis Keabnormalan Dan Penyelesaian Masalah
Kegagalan yang mungkin terjadi
Kegagalan
butang: lampu
“Mula” tidak
berkelip-kelip;
tidak berada
pada mod Sedia
Sama ada plag kuasa
berkeadaan longgar.
Lampu “Mula” bernyala
Penutup luaran tidak
dipasang dengan baik.
Penutup tekanan sudah rosak
gelang pengedap sudah rosak.
Periuk dalaman sudah rosak
atau berubah bentuknya.
Air di bahagian luar periuk
dalaman tidak dilap.
Sila lap bahagian luar periuk dalaman.
Penutup luaran
terbuka secara
automatik
Bunyi dentingan
yang lemah
Bunyi yang
mantap
Huruf pada
panel paparan
kelihatan malap
Terdapat wap
air pada panel
paparan. Paparan
kelihatan malap.
Bunyi yang
luar biasa
Bau plastik
Terasa ada arus
elektrik apabila
disentuh
Turbin tidak dipasang
dengan baik. Tidak lincir.
Ia merupakan bunyi dari
Turbin yang sedang berputar.
Ini adalah keadaan normal.
Pandang dari setiap sudut
Air pada bahagian luar periuk dalaman tidak dilap.
Gelang pengedap pada penutup dalaman sudah rosak atau terdapat bendasing di dalamnya.
Produk baru akan keluarkan bau plastik, namun bau itu akan hilang selepas satu
tempoh masa.
Sila periksa sama ada peranti pembumian adalah menc
Skrin LCD dan digital
mempunyai sudut pandang
tertentu. (Sudut pandang
bukan secara terus di atas
produk) Ia adalah kira-kira
60 darjah dari permukaan.
Ia merupakan bunyi dari pemancar
(relay) yang sedang berfungsi. Ini
adalah keadaan normal.
Bukan kerosakan. Sila teruskan proses memasak.
Bukan kerosakan. Sila selaraskan sudut pandang anda.
Bateri hampir kehabisan, sila tukar yang baru.
Bukan kerosakan. Sila teruskan proses memasak. Disyorkan
sapu sedikit minyak tumbuhan (seperti minyak kacang tanah
atau minyak campuran) pada aci.
Pasangkan Turbin dengan baik. Disyorkan supaya sapu
sedikit minyak tumbuhan seperti minyak kacang tanah atau
minyak campuran) pada aci secara berkala (contohnya
sekali seminggu) untuk meningkatkan pelinciran.
Tutup penutup luaran.
Kunjung ke stor atau pusat perkhidmatan untuk menukar
satu yang baru.
Kunjung ke stor atau pusat perkhidmatan untuk menukar
satu yang baru.
Wap terlepas
dari tempat yang
selain daripada
Bukaan Wap
Sila pasangkan penutup dalaman yang boleh ditanggalkan.
Apabila kuasa dihidupkan,
“12:00” sentiasa berkelipkelip pada panel paparan.
Sambungkan plag kuasa dengan ketat.
Tekan butang “Batal” untuk kembali ke mod Sedia.
Apabila kuasa dihidupkan, “12:00” sentiasa berkelipkelip pada panel paparan. Ini tidak akan mempengaruhi
penggunaan normal. Ini adalah kerana bateri sudah
kehabisan. Anda boleh kunjung ke pusat perkhidmatan
untuk menukar ganti bateri yang baru.
Sebelum
memasak
Keabnormalan yang
mungkin timbul
Sila memastikan Cara-cara penyelesaian
Ketika
memasak
Paparan
abnormal
Bau
Badan
periuk
Jika produk ini mengalami sebarang kegagalan yang mungkin terjadi, sila periksa produk
anda berdasarkan jadual seperti berikut sebelum dihantarkan ke pusat perkhidmatan.
Page 39

Analisis Keabnormalan Dan Penyelesaian Masalah
Membuat penilaian terhadap punca bagi paparan luar biasa
Berkelip-kelip
Berkelip
kelip
terpapar
secara konstan
terpapar
secara konstan
Sensor bahagian bawah mengalami
litar terbuka. Jika ia tetap wujud
apabila kuasa dipadamkan dan
dihidupkan, sila hantar ke pusat
perkhidmatan untuk dibaiki.
Sensor penutup luaran mengalami
litar pintas. Jika ia tetap wujud
apabila kuasa dipadamkan dan
dihidupkan, sila hantar ke pusat
perkhidmatan untuk dibaiki.
Sensor penutup luaran mengalami
litar pintas. Jika ia tetap wujud
apabila kuasa dipadamkan dan
dihidupkan, sila hantar ke pusat
perkhidmatan untuk dibaiki.
Kegagalan komunikasi. Tekan
butang “Off” untuk membatalkan
amaran. Jika amaran ini tetap
wujud, sila hantar ke pusat
perkhidmatan untuk dibaiki.
Sensor IGBT mengalami litar pintas.
Jika ia tetap wujud apabila kuasa
dipadamkan dan dihidupkan, sila
hantar ke pusat perkhidmatan
untuk dibaiki.
Sensor IGBT mengalami litar
pintas. Jika ia tetap wujud
apabila kuasa dipadamkan
dan dihidupkan, sila hantar ke
pusat perkhidmatan untuk dibaiki.
Sensor IGBT mengalami litar
terbuka. Jika ia tetap wujud
apabila kuasa dipadamkan dan
dihidupkan, sila hantar ke pusat
perkhidmatan untuk dibaiki.
Kegagalan komunikasi. Tekan
butang “Off” untuk membatalkan
amaran. Jika amaran ini tetap
wujud, sila hantar ke pusat
perkhidmatan untuk dibaiki.
Sensor bahagian bawah mengalami
litar pintas. Jika ia tetap wujud apabila
kuasa dipadamkan dan dihidupkan,
sila hantar ke pusat perkhidmatan
untuk dibaiki.
Sensor penutup luaran
mengalami litar terbuka.
Jika ia tetap wujud apabila
kuasa dipadamkan dan
dihidupkan, sila hantar ke
pusat perkhidmatan untuk d
ibaiki.
Page 40

Perkhimdatan Jaminan
Prinsip litar pendawaian
Motor Turbin
Fius arus elektrik
Gegelung
Fius Termal
Kipas
PCB kawalan
PCB Kuasa
Termistor untuk
penutup luaran
Termistor pada
bahagian bawah
Sensor suhu IGBT
Periuk Nasi Midea hadir dengan tempoh jaminan selama tiga tahun (Polisi ini
hanya sesuai untuk produk kegunaan rumahtangga).
Tempoh jaminan bermula dari tarikh invois dikeluarkan.
Sebarang keadaan seperti berikut tidak terlindung di bawah jaminan ini:
1. Kerosakan yang disebabkan oleh cara penggunaan, penjagaan dan penyelenggaraan tidak
betul yang dilakukan oleh pengguna.
2. Kerosakan yang disebabkan oleh penyelenggaraan dan pembaikan yang dilakukan oleh
pengguna sendiri, dan bukannya oleh pakar yang dilantik oleh pihak syarikat.
3. Model pada invois adalah berlainan dengan produk yang perlu dibaiki. Ini menunjukkan invois
telah dipinda.
4. Invois yang tidak sah.
5. Kerosakan yang disebabkan oleh faktor-faktor yang tidak dapat dielakkan (force majeure).
6. Jaminan ini tidak melindungi produk yang bukan digunakan untuk kegunaan rumahtangga.
7. Kerosakan yang disebabkan oleh kesilapan manusia, atau penggunaan yang salah yang tidak
dilindungi oleh jaminan ini.
Untuk produk yang tidak dilindungi oleh jaminan ini, pusat khidmat pelanggan
kami tetap sudi memberi layanan kepada anda.
220-240V~50/60Hz
 Loading...