


OWNER’S MANUAL
Air Cooler
MODEL: MAC-107AR
READ AND SAVE THESE INSTRUCTIONS
Attention: Pictures in the IM are for reference only.

CAUTION
Read Rules for Safe Operation and Instructions Carefully.
WARNING
1. If the supply cord is damaged, it must be replaced by manufacturer
or its service agent or a similarly qualified person in order to avoid
a hazard.
2. To protect against the risk of electrical shock, do not immerse the
unit, cord or plug in water or other liquid.
3. This appliance is not intended for use by persons (including
children) with reduced physical, sensory or mental capabilities, or
lack of experience and knowledge, unless they have been given
supervision or instruction concerning use of the appliance by a
person responsible for their safety. Young children should be
supervised to ensure that they do not play with the appliance.
4. When the appliance is not in use and before cleaning, unplug the
appliance from the outlet.
5. Keep electrical appliances out of reach from Children or infirm
persons. Do not let them use the appliances without supervision.
6. When the fan was assembled, the rotor blade guard shall not be
taken off anymore
- Prior cleaning unplug the fan
- The rotor guard shall not be dissembled/opened to clean the
rotor blades.
- Wipe the fan enclosure and rotor blade guard with a slightly
damp cloth.
RULES FOR SAFE OPERATION
1. Never insert fingers, pencils, or any other object through the grille when fan is
running.
2. Disconnect fan when moving from one location to another.
3. Be sure fan is on a stable surface when operating to avoid overturning.
4. DO NOT use fan in window, rain may create electrical hazard.
5. Indoor use only.
1
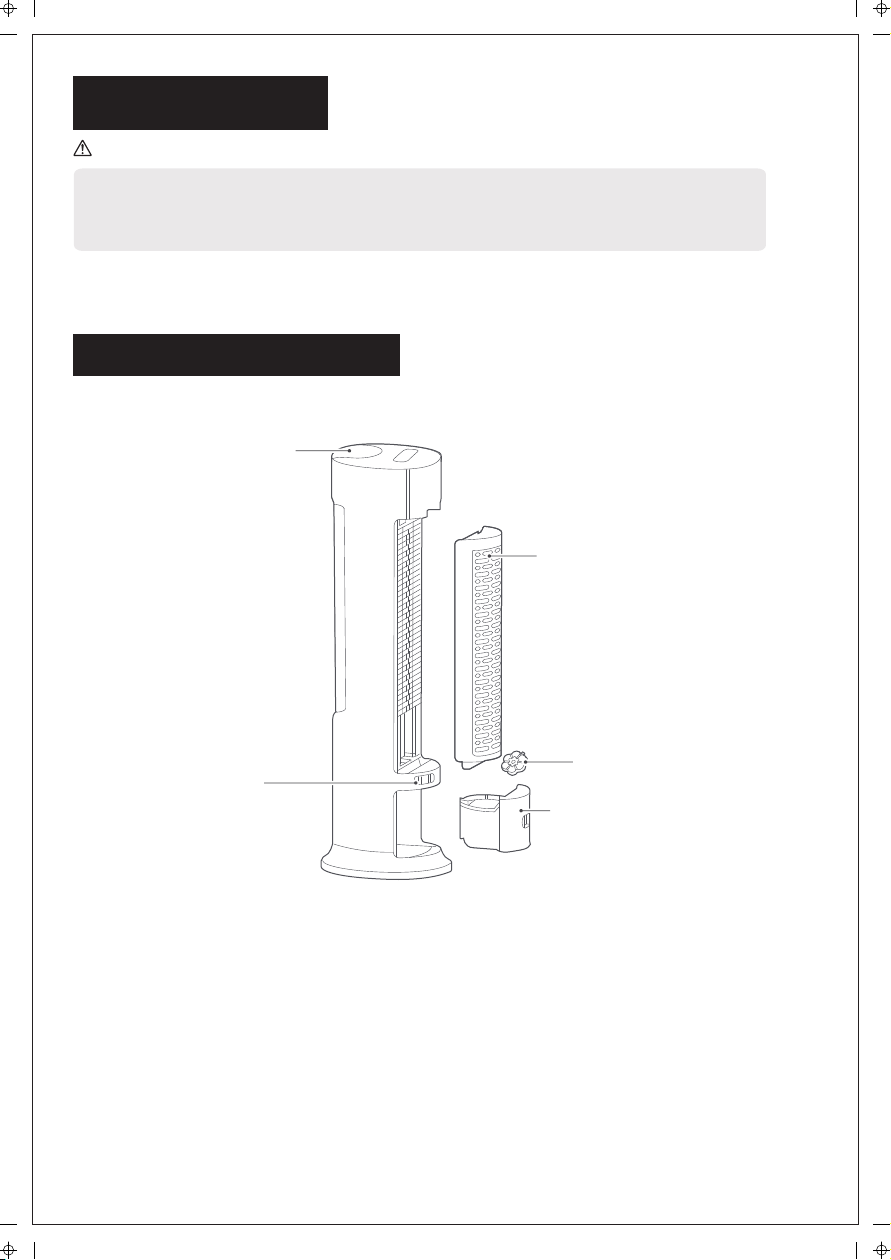
Product Profile
Note
The pictures contained in the Manual are for reference only, and it
is subject to the physical product in the packing box.
Name of components
Control part
Wetted pad
Reel
Ice crystal box
The ice crystal box
is a random gift
Water tank
2

Operating Manual
Water adding in water tank and instructions for disassembly and washing
Note
• Please clear the water collected at the bottom of the water tank when the machine is idle.
• When adding water and cleaning, the power plug should be unplugged.
• Before the start of the machine, a guarantee must be provided that the pump module is
fixed in place, and if the pump module is placed at random, the product may be humidified abnormally.
• There are two water adding ways:
① The half of the water in the water tank should be pumped out, the water pump module
should not be disassembled, and the water should be directly added.
② The water chestnut module should be separated, the water in the water tank should be pumped out
completely, and then the water should be added or the water tank should be cleaned.
1 The water tank buckle should be
unlocked to the horizontal state
3 The water tank should be separated from
pump module (including water tube) by
turning the knob with a hand (90 degrees
counterclockwise)
2 The half of the water in the water tank should
be pumped out(the water tank should be pushed
after the water is added)
4 The water tank should be cleaned and
the water should be added after the water
tank is slowly pulled out.
3

5 After use, the water tank should be pushed, the water pump module should be fixed,
and then the water tank buckle should be locked to lock the water tank
Use of Ice Crystal Box
Note
① The ice crystal box can be repeatedly frozen and recycled; It can also not be used depending on the temperature.
② The ice crystal box cover must not be opened to prevent damage.
③ The ice crystal box material is environmentally friendly, non-toxic and harmless, which can be safely placed in the
refrigerator for freezing.
④ The frozen ice crystal box should be used in the water tank, and after the humidification is turned on,
the temperature at the air outlet will be lowered.
⑤ The freezing of the ice crystal box can be replaced by ice, which also has a cooling effect.
⑥ When adding water, the water level of the water tank should be controlled not to exceed the "MAX" (maximum)
indicating scale. If the water level is lower than the "MIN" (minimum) indicating scale, please add water in time.
1 Pull out half of the water in
the water tank from the
bottom of the machine.
Water tank scale
2 Remove the ice crystal box from the
package and put it in the refrigerator
for more than 3 hours. Place the frozen
ice crystal box in the water tank and add
water not exceeding the "MAX" (maximum)
indicating scale.
4

Operating Manual for Machine Body
Machine body key Display panel
Key
Circuit Diagram
-、+
Function description
Product start or stop.
Touch the swinging wind key to start or stop swinging wind.
Short press in the start state to start or stop humidification. In the dry or
hot weather, start the humidification function to have a better
experience.
Three wind classes available: Normal wind (level 4, normal wind indicator
light is lit up), sleep wind (level 2, sleep wind indicator light is lit up), natural
wind (level 2, natural wind indicator light is lit up).
Short press in the standby state. If the state is set at the scheduled start time,
the scheduled startup time can be reduced / increased.
Short press in the start state. If the state is set at the timing shutdown time,
the timing shutdown time can be reduced / increased. If the state is not set at
the timing/reservation time, the wind speed can be reduced / increased.
Note: When timing/reservation, press this key, the time will be reduced/increased by 0.5 hours every time for 0-3 hours, and 1 hour for 3-10 hours.
When adjusting the wind speed, short press this key to increase or decrease
wind speed by 1 level every time.
In the start state, press this key, the display will flash. Set the time, and then
the display flashes 3 times, this is, the timing is completed.
In the standby state, press this key, the display will flash. Set the time, and
then the display flashes 3 times, this is, the reservation is completed.
After pressing this key, the wind class mode and class can be set at the
same time.
Cancel timed operation:
Cancel timing in shutdown state: when timing has been set, press the timing
button (the pattern on the screen will flicker at this time), and then long press
the timing button 2S within 6S to cancel timing.
Cancel timing in the startup state: when timing has been set, press the timing
button (the pattern on the screen will flicker at this time), and press the timing
button 2S again immediately to cancel timing.
5

Note
Instructions of remote controller buttons
· The remote controller can be used normally within the scope of 5 meters
and 30 degrees of the deviation angle in front of the product.
· The battery contains many heavy metals, acid-base and other materials,
being a threat to human health; The wasted and old batteries should be
recovered after classification.
Turn on/off
swing
Turn on/adjust/
turn off humidification
Circuit Diagram
Display circuit
board
Key circuit
board
Float switch
On/Off
Set wind type/
Smart
Timer/Delay start
3A Battery, 1.5V
Battery
Swinging
wind motor
Water
pump
Power supply board
Main
motor
Disassemble
protection
6

MAINTENANCE INSTRUCTION
The fan requires little maintenance. Do not try to fix it by yourself. Refer it to
qualified service personnel if service is needed.
1. Before cleaning and assembling, fan must be unplugged.
2. To ensure adequate air circulation to the motor, keep vents at the rear of the
motor free of dust. Do not disassemble the fan to remove dust.
3. Please wipe the exterior parts with a soft cloth soaking a mild detergent.
4. Do not use any abrasive detergent or solvents to avoid scratching the surface.
Do not use any of the following as a cleaner: gasoline, thinner.
5. Do not allow water or any other liquid into the motor housing or interior parts.
CLEANING
1. Be sure to unplug from the electrical supply source before cleaning.
2. Plastic parts should be cleaned with a soft cloth moisten with mild soap.
Thoroughly remove soap film with dry cloth.
7
 Loading...