

Page 1
REFRIGERATOR-FREEZER
Model: FF.567L.SB.ICE
Page 2
1
Page 3
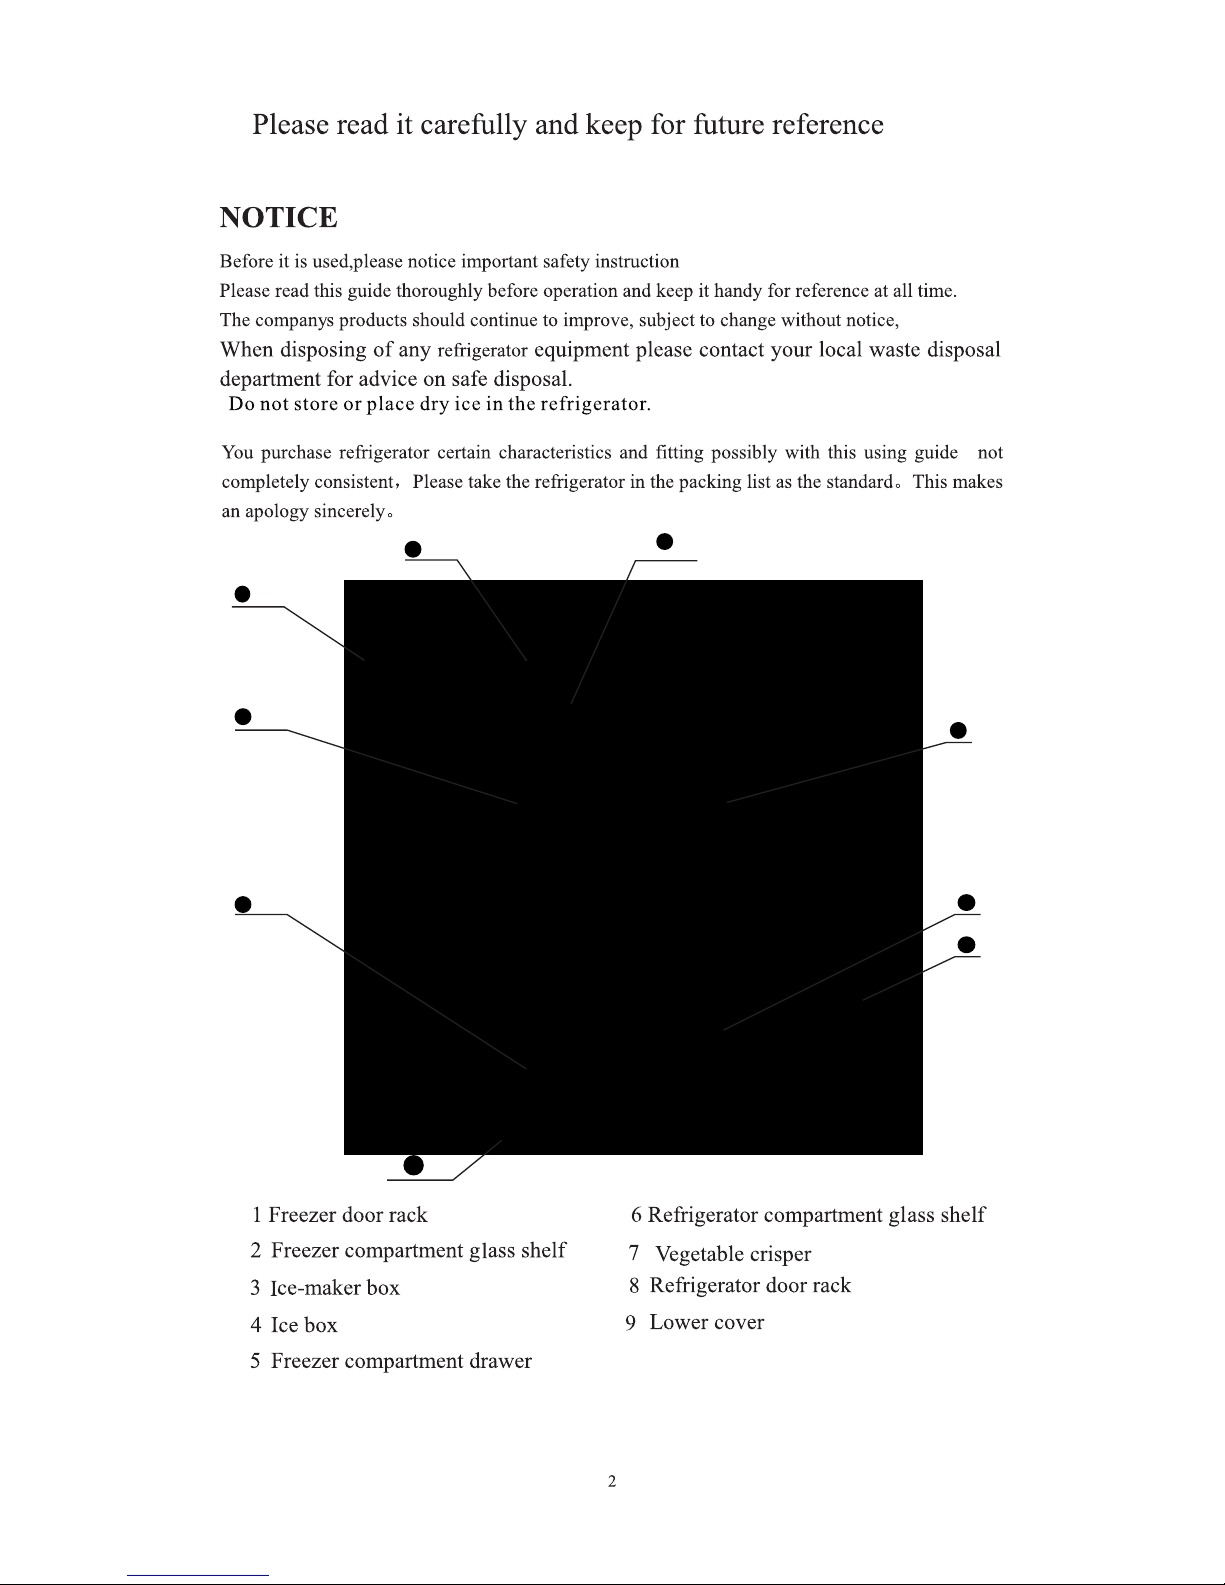
3
5
9
7
2
4
1
88
6
Page 4
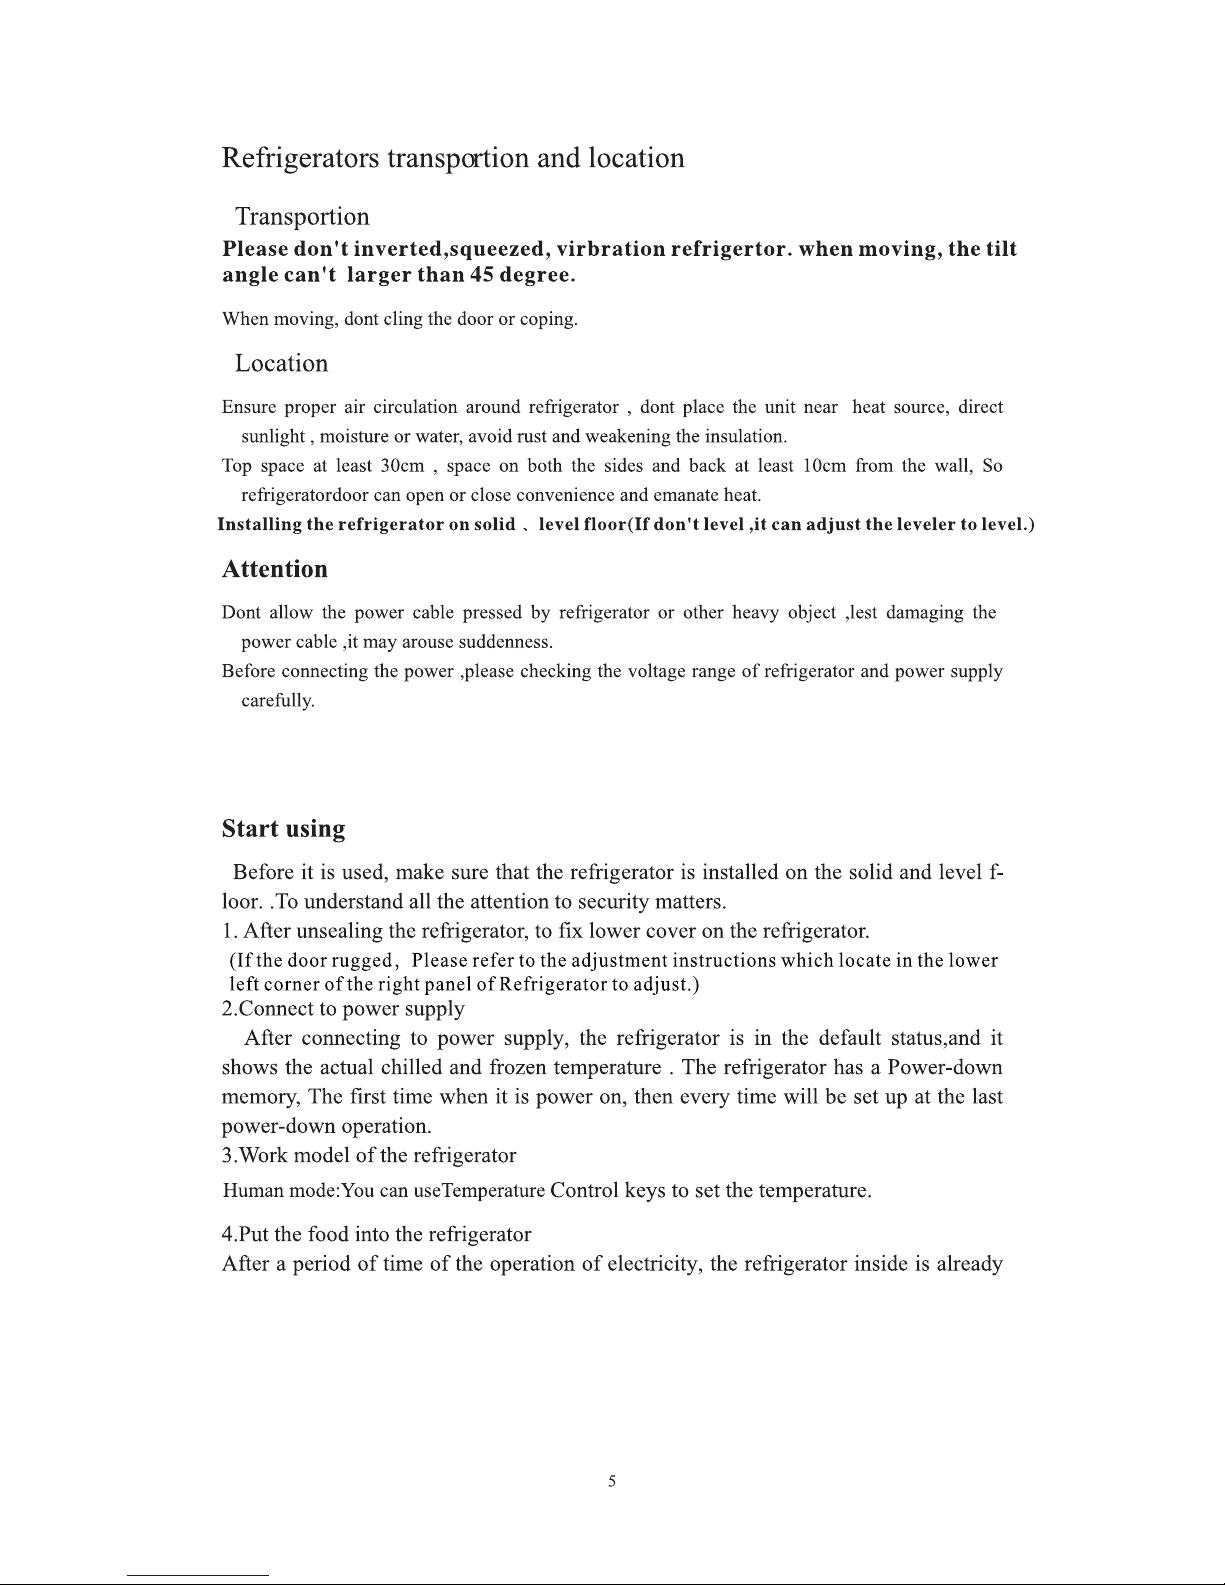
Page 5
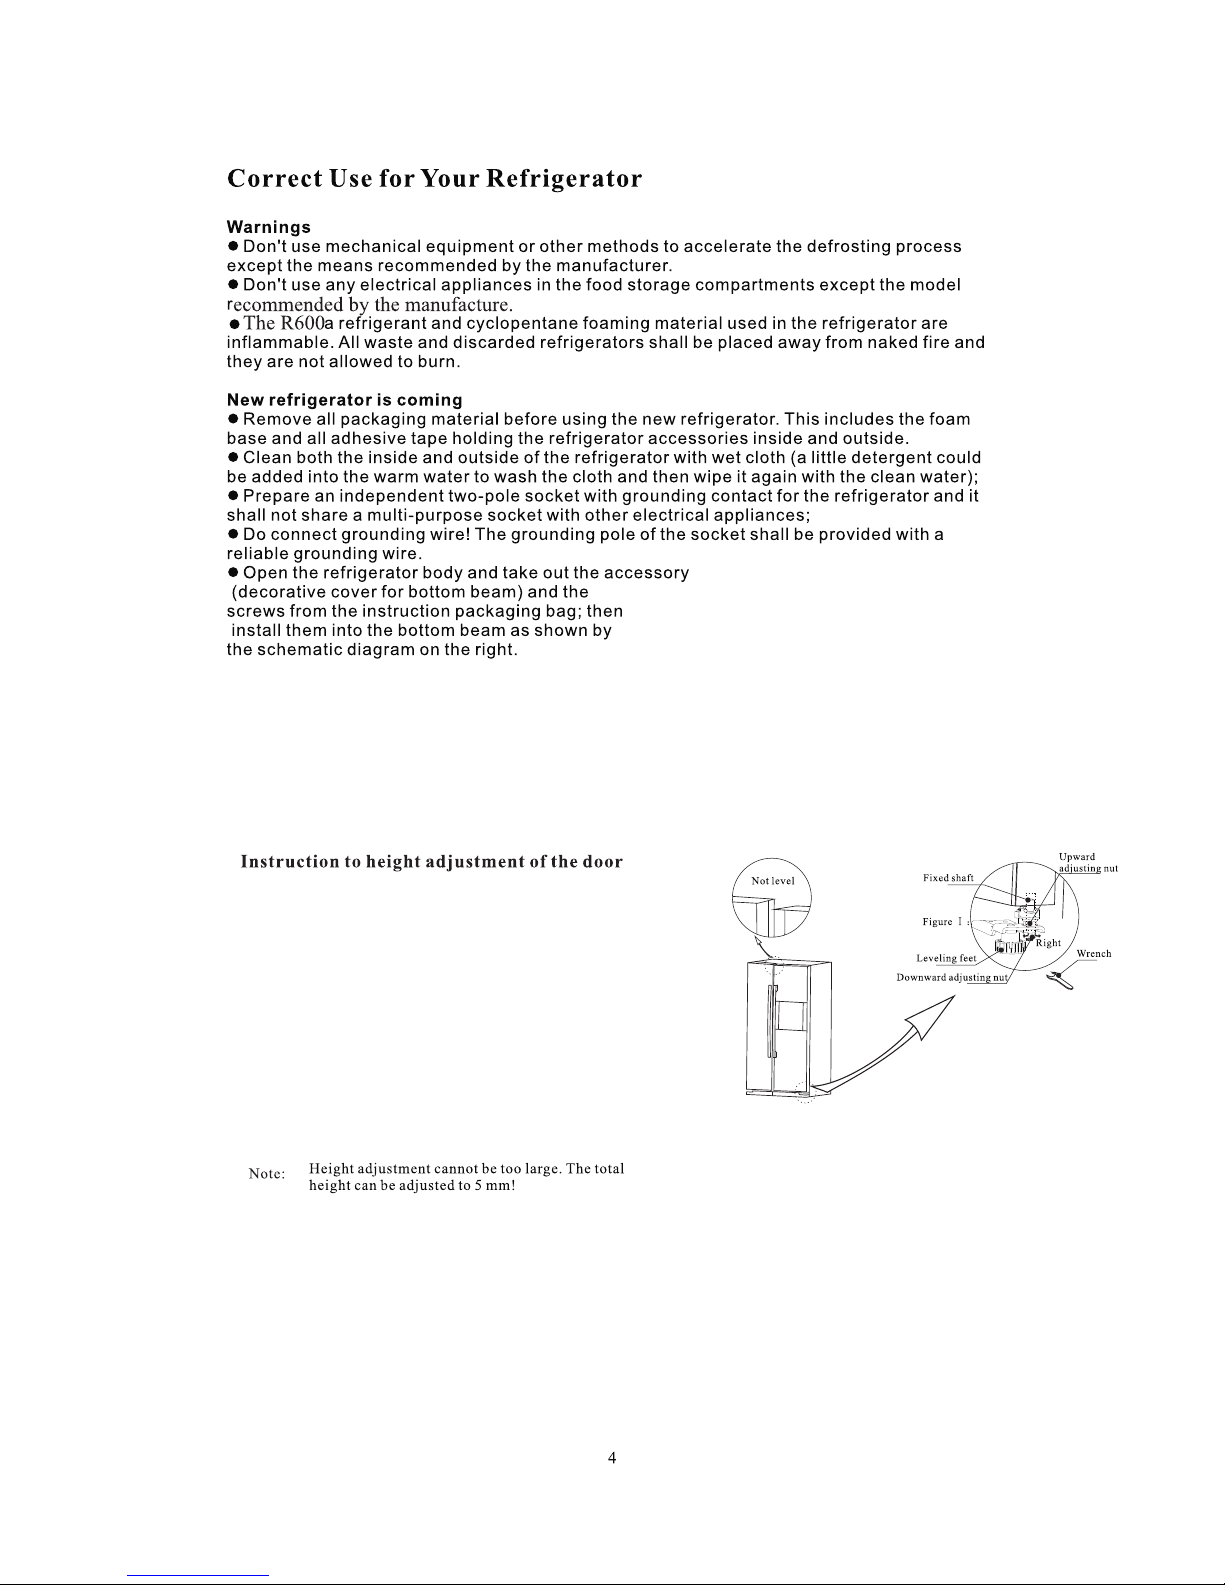
two
Lef t
Bef ore adj ustin g the hei ght o f the d oor, r ota te the downwar d adj ust ing
nut c lockw ise (as s hown in F igure I ) for 2 cir cle s wit h a wre nch,
and l oosen t he down ward ad justi ng nu t. Ro tat e the upward adj ust ing n ut
(as s hown in F igure I ) to adju st the he ight, a nd th en ti ght en the downwar d
adj ustin g nut cou nterc loc kwi se ag ain.
1.Wh en the do or of ref riger ati ng ch amb er is low:
Ope n the doo r, use the acco mpany ing wre nch to ro tate th e upw ard a dju sting
nut c ounte rcloc kwi se ac cor ding to the meth od as s how n in Fi gure I, to mo ve
it up ward un til it is p ara lle l and l evel.
2.Wh en the do or of ref riger ati ng ch amb er is high:
Ope n the doo r, use the acco mpany ing wre nch to ro tate th e upw ard a dju sting
nut c lockw ise acc ord ing t o the m ethod as shown i n Fig ure I , to mo ve it
dow nward , until i t is para lle l and l eve l.
Page 6
Page 7

Page 8

Refrigerator compartment
1
2
3
3
4
5
6
7
7
7
7
Page 9

1
1
4
5
6
2
6
3
Page 10

9
Operation and precautions for ice maker
Note:
Connection of water pipes: please contact the after-s ales Servi ce Department of the
Company or profes sionals to install to avoid an y risk.
Warning!
The water pipes must be connected under the condition of power-off. El ectric sh ock may
cause serious inj ury or death.
Notices!
The water pipe cannot be used where environmental tempera ture is under 0 , Or it
may lead to freezing.
The water pipe cann ot be connected to hot water, whi ch may lead to deformation.
The water pipe shou ld be used in the pressure range 30-100psi.
Lower pressure may cause smaller ice pieces and l onger water exiting time.
But higher pressu re may damage the filter.
The pipe cannot be co nnected to drinks, alcohol o r other liquids except for water.
1.Turn off the water-tap .
2.Connect water pipe onto the water-tap. The water pip e should be long enough to
prevent the drop-off of the water pipe caused by removing of refrigeratory.
3.Turn off the refrigera tory.
4.Use a connecting pipe to connect the water pipes behind the refrigeratory and on
the water-tap.
5.To prevent the drop-off or leaking of the water pipes, they mus t be fixed by fixed
pins.
6.Turn on the water tap to check leakage.
7.The refrigeratory is energized an used normally.
<Use of Automatic Ice Maker/ Ice& Water Dispenser>
Notices!
The water pipes are u sed in the pressure range of 30- 100psi.
Water softeners may damage the ice maker and must not be
used.
Please check the ic e pieces in the storage box when p oweroff above 1h. If the ice piec es are thawing and binding together,
please empty them , because the bound ice pieces may cause
Failure of the ice system.
When t he ice pieces in th e storage box are binding together, you had better t o melt it with
warm water rather than smash and take out them with a sharp tool, which may damage
the refrigeratory.
A. Supply of cold water
1. Choose the ice/water button on the display board, and make sure the wat er in dicator
turns on.
2. When the water switch plate is pressed by the cup, th e cold water comes out.
3. When using the refrigeratory the first time, water does not come out before the water
tank in the refrigerator is filled up. The normal manner to get water is pushing and
holding the switc h plate for 2-3 minutes.
4. After the water comes out, plea se discharge wate r for about 3 minutes to purge the
air and smell of plas tic in the water pipe.
5. When cold water is re quired, it's better to get som e ice before getting water.
6. When getting wate r, it is normal for noise of valve op eration.
User shall determin e whether to require a n anti-reflux valve upon the installation of water
pipe. If required, user shall purchase it in dividually and i nstall a single-wa y valve or an antireflux v alve on the joint of water rout e, or make it installed by a spec ialized person.
Ice maker
Page 11

10
Page 12

[Way to replace the filter]
1.The filter installed in this refrigeratory is refined by NSF42, which can filter the smell,
chlorine and so on in running water.
2.The replacement cycle of the filter is about 6 mouths. When replacement is needed, the
indicator on the display board will turn on. The replacement cycle may be shortened
according to operating environment.
3.With the function of BY-PASS, it can supply water normally without the filter. If necessary,
additional filter can be installed and used out of the refrigeratory by yourself.
4.During replacement, little water in the connection part may drop out, a container can be
located under it to receive the drops.
5.The filter is installed in the liner of the refrigerator. You can seize the lower bugle and whirl it
leftward to take it out. When it is difficult to take out, you can detach the lampshade in the
refrigerator before detaching the filter.
6.The assembling is in opposite order. Push it upwards and whirl it rightward at the same time.
11
Page 13

See the following figure for keys and display configuration of man-machine interface (Operation interface is
subject to material object)
Display Control
Power on the display panel to reach full display after 3s, the start-up tone rings and the panel displays the
systemic memory mode and temperature settings. This is a lock mode. The factory default memory status
of main control board: temperature of refrigerating chamber and freezing chamber is set to 5 ℃and -18℃
respectively; there is no setting for special mode; the ice-maker is off by default. After the operation of
display panel, the status is changed and memorized to main control board.
In normal cases, display screen enters standby state and then dies out after display board is locked without
operation of door opening and key operations for 30s.
Where there are key operation, communication failure, sensor failure and ice-making malfunction when the
door is opened, the display screen will light up and prompt relative information. Numeric area displays the
temperature settings of all chambers; when a communication failure occurs, the area of freezing
temperature gives a prompt of communication failure; when a sensor failure occurs, the area of freezing
temperature give a prompt of all fault codes in turns under the lock state; in unlock state, the unlock pattern
lights up; in lock state, the lock pattern lights up. To operate the unlocked keys under the lock state (except
option key of ice water and filter reset), the lock pattern will flash lights.
Key Operation
FRZ.TEMP.:Freezing temperature key
REF.TEMP.:Refrigerating temperature key
MODE.SEL:Option Key of Function
LOCK/UNLOCK:Lock/Unlock Key
ICE OFF:Ice-maker On/Off Key
DISPENSER:Option Key of Ice Water
1.LOCK/UNLOCK
Hold "LOCK/UNLOCK" key for 2s under the unlock state, the system enters the lock state; hold "LOCK/
UNLOCK" key for 2s under the lock state, the system enters the unlock state.
In unlocking, the unlock pattern lights up; in locking, the lock pattern lights up.
To operate the unlocked keys under the lock state (except option key of ice water and filter reset), the lock
pattern will flash lights.
Without any key operation for 30s under the unlock state, the system enters the lock state automatically.
Except the key "DISPENSER" and operation of filter rest, the operations of following keys must be
conducted under unlock state. For any operation under the lock state, the lock icon will flash and prompt
a buzzing sound for fault operation.
The following settings must be valid upon locking.
2.MODE.SEL
Press "MODE.SEL" for cycle setting of the mode "Holiday" → "Super Freezing" → "Super Cooling +
Super Freezing" → "Super Freezing" → "None" → "Holiday"... Display panel and relative setting icon will
display/die out synchronously.
Holiday mode: Freezing chamber is operating upon the temperature setting of ℃and refrigerating chamber
is off (not freezing). (Closedown of refrigerating chamber has no effect on its lamp control)
Super Freezing mode: Freezing chamber is operating upon the temperature setting of -24℃; the Super
Freezing mode will exit automatically after operation for h. Then, freezing chamber restores to the valid 26
temperature setting before Super Freezing mode.
℃
-18
(Power off and then on, the Super Freezing mode exits. After
that, the set temperature of freezing chamber is restored to -18 )
12
Page 14

Super Cooling mode: Refrigerating chamber is operating upon the temperature setting of 2℃; the Super
Cooling mode will exit automatically after operation for . Then, refrigerating chamber restores to the
original temperature setting. (Power off and then on, Super-cooling mode exits) After that, the set temperature
of refrigerating chamber restores to 5℃)
Press "FRZ. TEMP." or "REF. TEMP.", holiday mode exits; refrigerating chamber and freezing chamber restore
to original temperature settings;
Press "FRZ. TEMP.", Super Freezing mode exits; freezing chamber restores to operation under the original
temperature setting;
Press "REF.TEMP.", Super Cooling mode exits; refrigerating chamber restores to operation under the original
temperature setting;
3.REF.TEMP.
1) Temperature setting of refrigerating chamber
Press "REF.TEMP." key to choose refrigerating chamber, the temperature setting of refrigerating chamber
blinks; press "REF.TEMP." again to set the temperature of refrigerating chamber; set the refrigerating
chamber circulating under the state of "8→7→6→5→4→3→2→8→……" Without key operation, the area
of refrigerating temperature stops blinking after 5s.
4.FRZ.TEMP.
1) Temperature Setting of Freezing Chamber
Press "FRZ.TEMP." key to choose freezing chamber, the temperature setting of freezing chamber blinks;
press "FRZ.TEMP." again to set the temperature of freezing chamber; set the refrigerating chamber circulating
under the state of "-16→-17→-18→-19→-20→-21→-22→-23→-24→-16…… " Without key operation, the area
of refrigerating temperature stops blinking after 5s.
5.ICE OFF
Press "ICE OFF" key, the relative words and icon die out/lights up, activating/inactivating the ice-making
function.
6.DISPENSER
Press "DISPENSER" key to choose ice/water state; set it circulate under the state of "Get IceCrushed IceGet
Water , the relative icon on the panel will light up/die out in turns.
7.Ice-maker Water Intake Time Setting
Hold the composition key "FRZ.TEMP." + "REF.TEMP." for 2s to enter the setting state; press "REF.TEMP."
and "FRZ.TEMP." to increase or decrease the grade of water intake for ice-marker (adjustable between5-25s).
(Setting time is displayed on the area of freezing temperature). Enter the setting state of ice-maker water intake
time or holding the combination key "FRZ.TEMP." + "REF.TEMP." for s, such mode may exit.
150min
Hold "MODE.SEL" for 2s to cancel/set the function of door-opening sound. To power on the display panel for
the first time, the system defaults a sound for door opening. Press the key again to cancel the sound of door
opening. To open the door, the buzzer does not prompt a sound (but the timeout warning of door opening is still
valid).
None"
2
two plug complies with the standard two-socket,
13
Page 15

14
Page 16

Arr ow indi cates t he
dir ectio n of dism antle .
Shade
Freezer lam p
Replacement on lights in freezer and refrigerator, and specification of lights
Freezer lamp replacement
●Unplug the plug to cut off the power.
●Push and remove the lampshade
according to the direction in the attached
drawing. Remove the screws and the LED lamp.
refrigera tor lamp
Specification: direct current 12V, LED
Refrigerator lamp replacement
Shut off the power
As per the photo, remove the shade along the
driver direction of the arrow, and then tighten
the screws, remove the LED lights;
Restore, replace anti-steps
Replaced by professionals
15
Page 17

16
Page 18

Energy Saving Tips
· The appliance should be located in the coolest area of the room, away from heat producing
appliances or heating ducts, and out of the direct sunlight.
· Let hot foods cool to room temperature before placing in the appliance. Overloading the appliance
forces the compressor to run longer. Foods that freeze too slowly may lose quality, or spoil.
· Be sure to wrap foods properly, and wipe containers dry before placing them in the appliance. This
cuts down on frost build-up inside the appliance.
· Appliance storage bin should not be lined with aluminum foil, wax paper, or paper toweling. Liners
interfere with cold air circulation, making the appliance less efficient.
· Organize and label food to reduce door openings and extended searches. Remove as many items as
needed at one time, and close the door as soon as possible.
17
 Loading...