

Page 1
USER MANUAL OF SMART KIT
IMPORTANT NOTE:
Read the manual carefully before connecting your
Smart kit(Wireless module). Make sure to save this
manual for future reference.
SPECIFICATION
1
Model:
EU-OSK103,US-OSK103
Standard: IEEE 802. 11b/g/n
Antenna Type: External omnidirectional Antenna
Frequency Band: 2400-2483.5MHz
Operation Temperature:0 C~45 C/32 F~113 F
Operation Humidity: 10%~85%
Power Input: DC 5V/300mA
Maximum TX Power: 19.8dBm
NOTE:
Company will not be liable for any issues
and problems caused by Internet, Wi-Fi/Wireless
Router and Smart Devices. Please contact
the original provider to get further help.
2
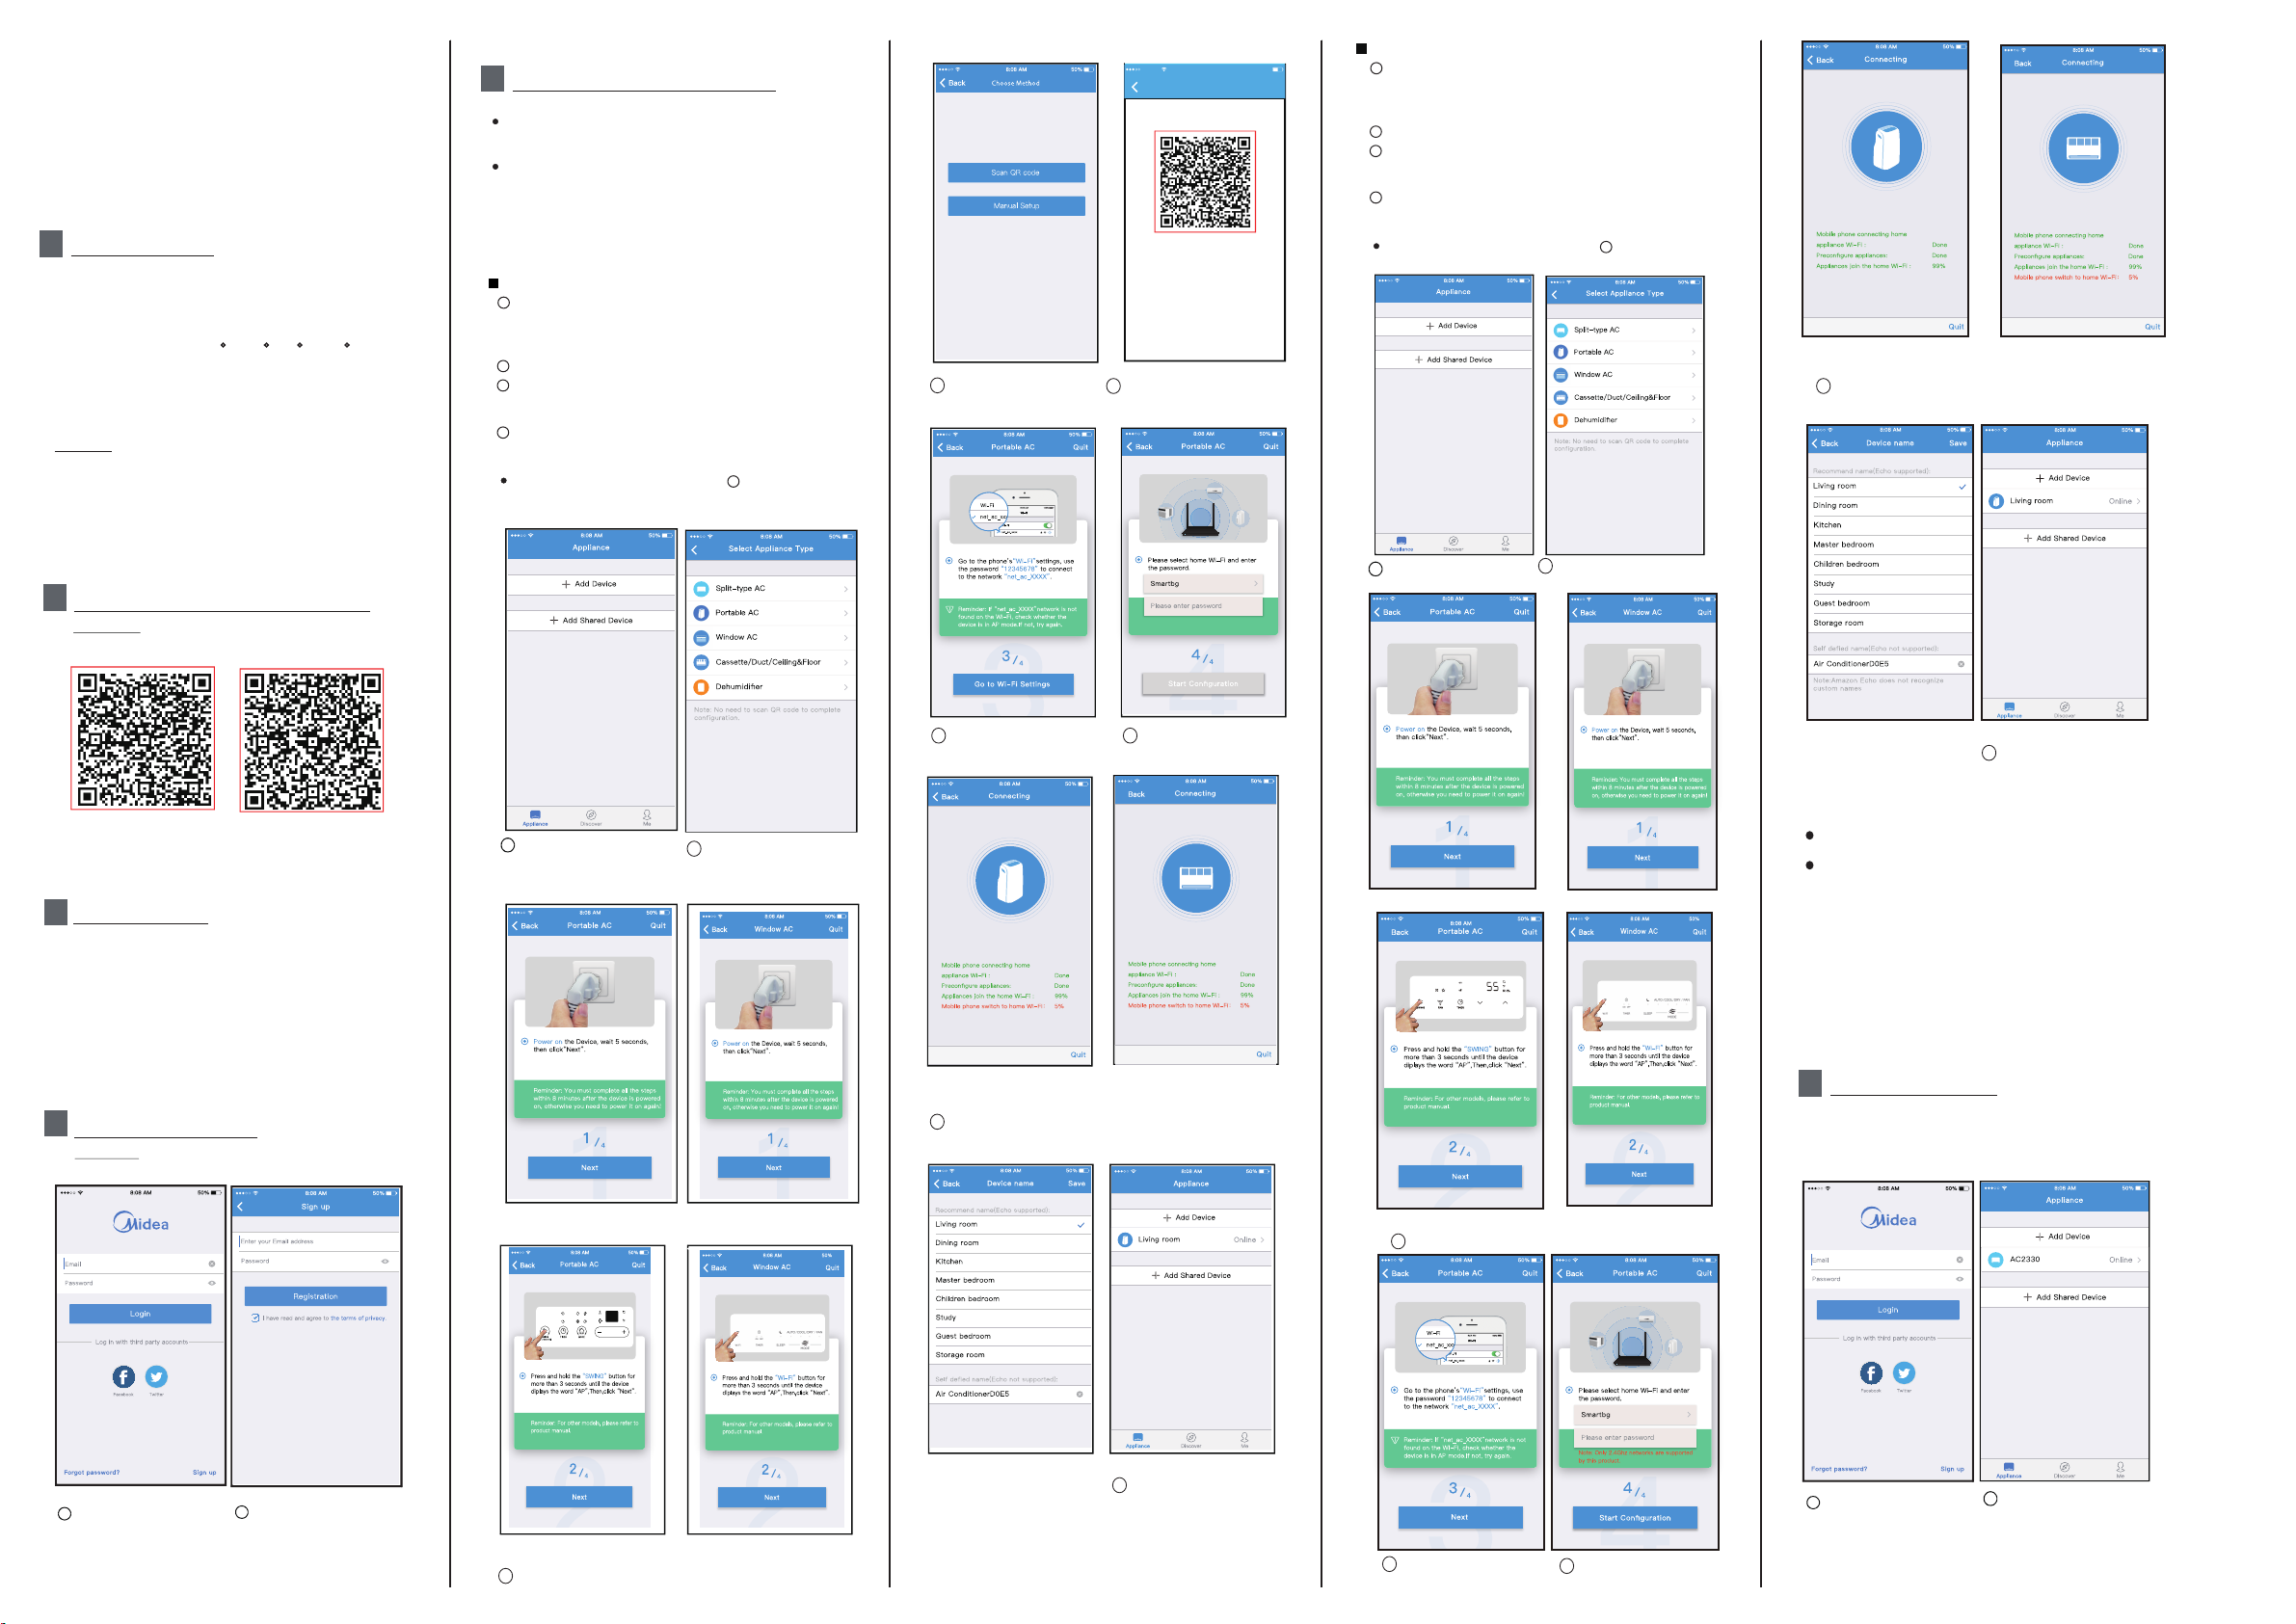
DOWNLOAD AND INSTALL APP
CA UTION : The fol lo win g QR C ode is only a vaila ble
fo r dow nl oadin g APP. It is total ly d iff er ent w it h
th e QR c ode packe d wi th unit.
NETWORK CONFIGURATION
5
Cautions
It is nec essar y to forg et any ot her a round n etwor k and
make su re the And roid or i OS dev ice jus t conne ct to
the Wi-Fi/Wireless network you want to configure.
Make su re the And roid or i OS dev ic
works w ell and c an be con necte d back to y our o ri gin al
Wi-Fi/Wireless network automatically.
e Wi-Fi/Wireless function
Kindly reminder:
User must finish all the steps in 8 minutes after powering on
AC, otherwise you need to power on it again.
Using Android device to do network configuration
1
Make su re your m obile d evice h as alre ady bee n
connect to the Wi-Fi/Wireless network which you want to use.
Also, you need to forget other irrelevant Wi-Fi/Wireless
network in case it influences your configuration process.
2
iscon nect th e power s upply o f AC.
D
3
Connect the power supply of AC, activate the AP mode
(Read the WIRELESS MODE IN USER’S MANUAL or
INSTRUCTION MANUAL for detailed operations.).
4
When AP appears in the display, It means that the AC
WIRELESS has already entered into AP Mode. User can
do the next step configuration.
Some t yp e of AC do not n eed the s tep t o be i n AP
mode
2
8
Choose the network
configuration method.
8:08 AM 50%
QR Code
Alig n the QR c ode wit hin the f ram et os can
9
Choose the “Scan the
QR code” method.
Using iOS device to do network configuration
1
Make su re your m obile d evice h as alre ady bee n
connect to the Wi-Fi/Wireless network which you want to use.
Also, you need to forget other irrelevant Wi-Fi/Wireless
network in case it influences your configuration process.
2
iscon nect th e power s upply o f AC.
D
3
Connect the power supply of AC, activate the AP mode
(Read the WIRELESS MODE IN USER’S MANUAL or
INSTRUCTION MANUAL for detailed operations.).
4
When AP appears in the display, It means that the AC
WIRELESS has already entered into AP Mode. User can
do the next step configuration.
Some t yp e of AC do not n eed the s tep t o be i n AP
mode
5
Press “ + Add Device ”
6
2
Select appliance type
For Portable AC
10
Network configuration is
successful
For Window AC
Android
Sc an QR c ode to do wnloa d the “ Midea Air ” APP
or g et it f ro m G oo gle pl ay and a pp st or e by ma nu al ly
se ar chin g.
PREPARATION
3
1) P leas e e ns ur e y ou r mo bi le devi ce is c onnected
i/Wireless routre. Also, the Wifi/Wireless router has
to W if
al ready co nnected t o In te rn et be fo re do in g us er
re gi st ra ti on a nd ne tw or k con figu ra ti on.
2) M ake su re yo ur m ob ile d ev ice has a lread y been
connect ed t o the wif i/Wireless net work whic h yo u
wa nt to us e. Al so, y ou n eed to fo rg et o the r ir relevant
wifi/Wireless
co nfigu ratio n p roc ess.
4
CREATE ACCOUNT
Reminder: When you register to use app, you
need read and agree the Data Privacy Notice.
VI5
netwo rk i n case it in flu en ces y ou r
iOS
5
Press “ + Add Device ”
For Portable AC
6
Select appliance type
(Select Portable AC or
Window AC depending on
your unit type.)
For Window AC
10
Or choose the “Manual
Setup” method.
For Portable AC
12
Network configuration is
successful
11
Please enter password
For Window AC
For Portable AC
For Portable AC
7
Follow the above steps to enter “AP” mode.
For Window AC
For Window AC
Configuration Success,
11
you can see the device
on the list.
NOTE:
When finishing network configuration, APP will
display success cue words on the screen.
Due to different internet environment, it is possible
that the device status still display “offline” . If this
situation occurs, it is necessary to pull and refresh
the device list on the APP and make sure the device
status become “online” . Alternatively, user can
turn off the AC power and turn on it again, the device
status will become “online” after few minutes.
6 HOW TO USE APP
Please ensure both your mobile device and air
conditioner are connected to the Internet before
using app to control the air conditioner via internet,
please follow the next steps:
!
SIM
082
Fo
rg ot pas swor d?
1
Cl ick " "
Sign up
Creat Acc
2
En ter your email address
an d pas sw ord, an d th en
cl ick " "Registration
For Portable AC
7
Follow the above steps to enter “AP” mode.
For Window AC
Configuration Success,
13
you can see the device
on the list.
8
Connect to the
Wi-Fi/Wireless network.
9
Please enter password
1
Cl ick "Lo gin "
cc
2
Choose the air conditioner.
Page 2
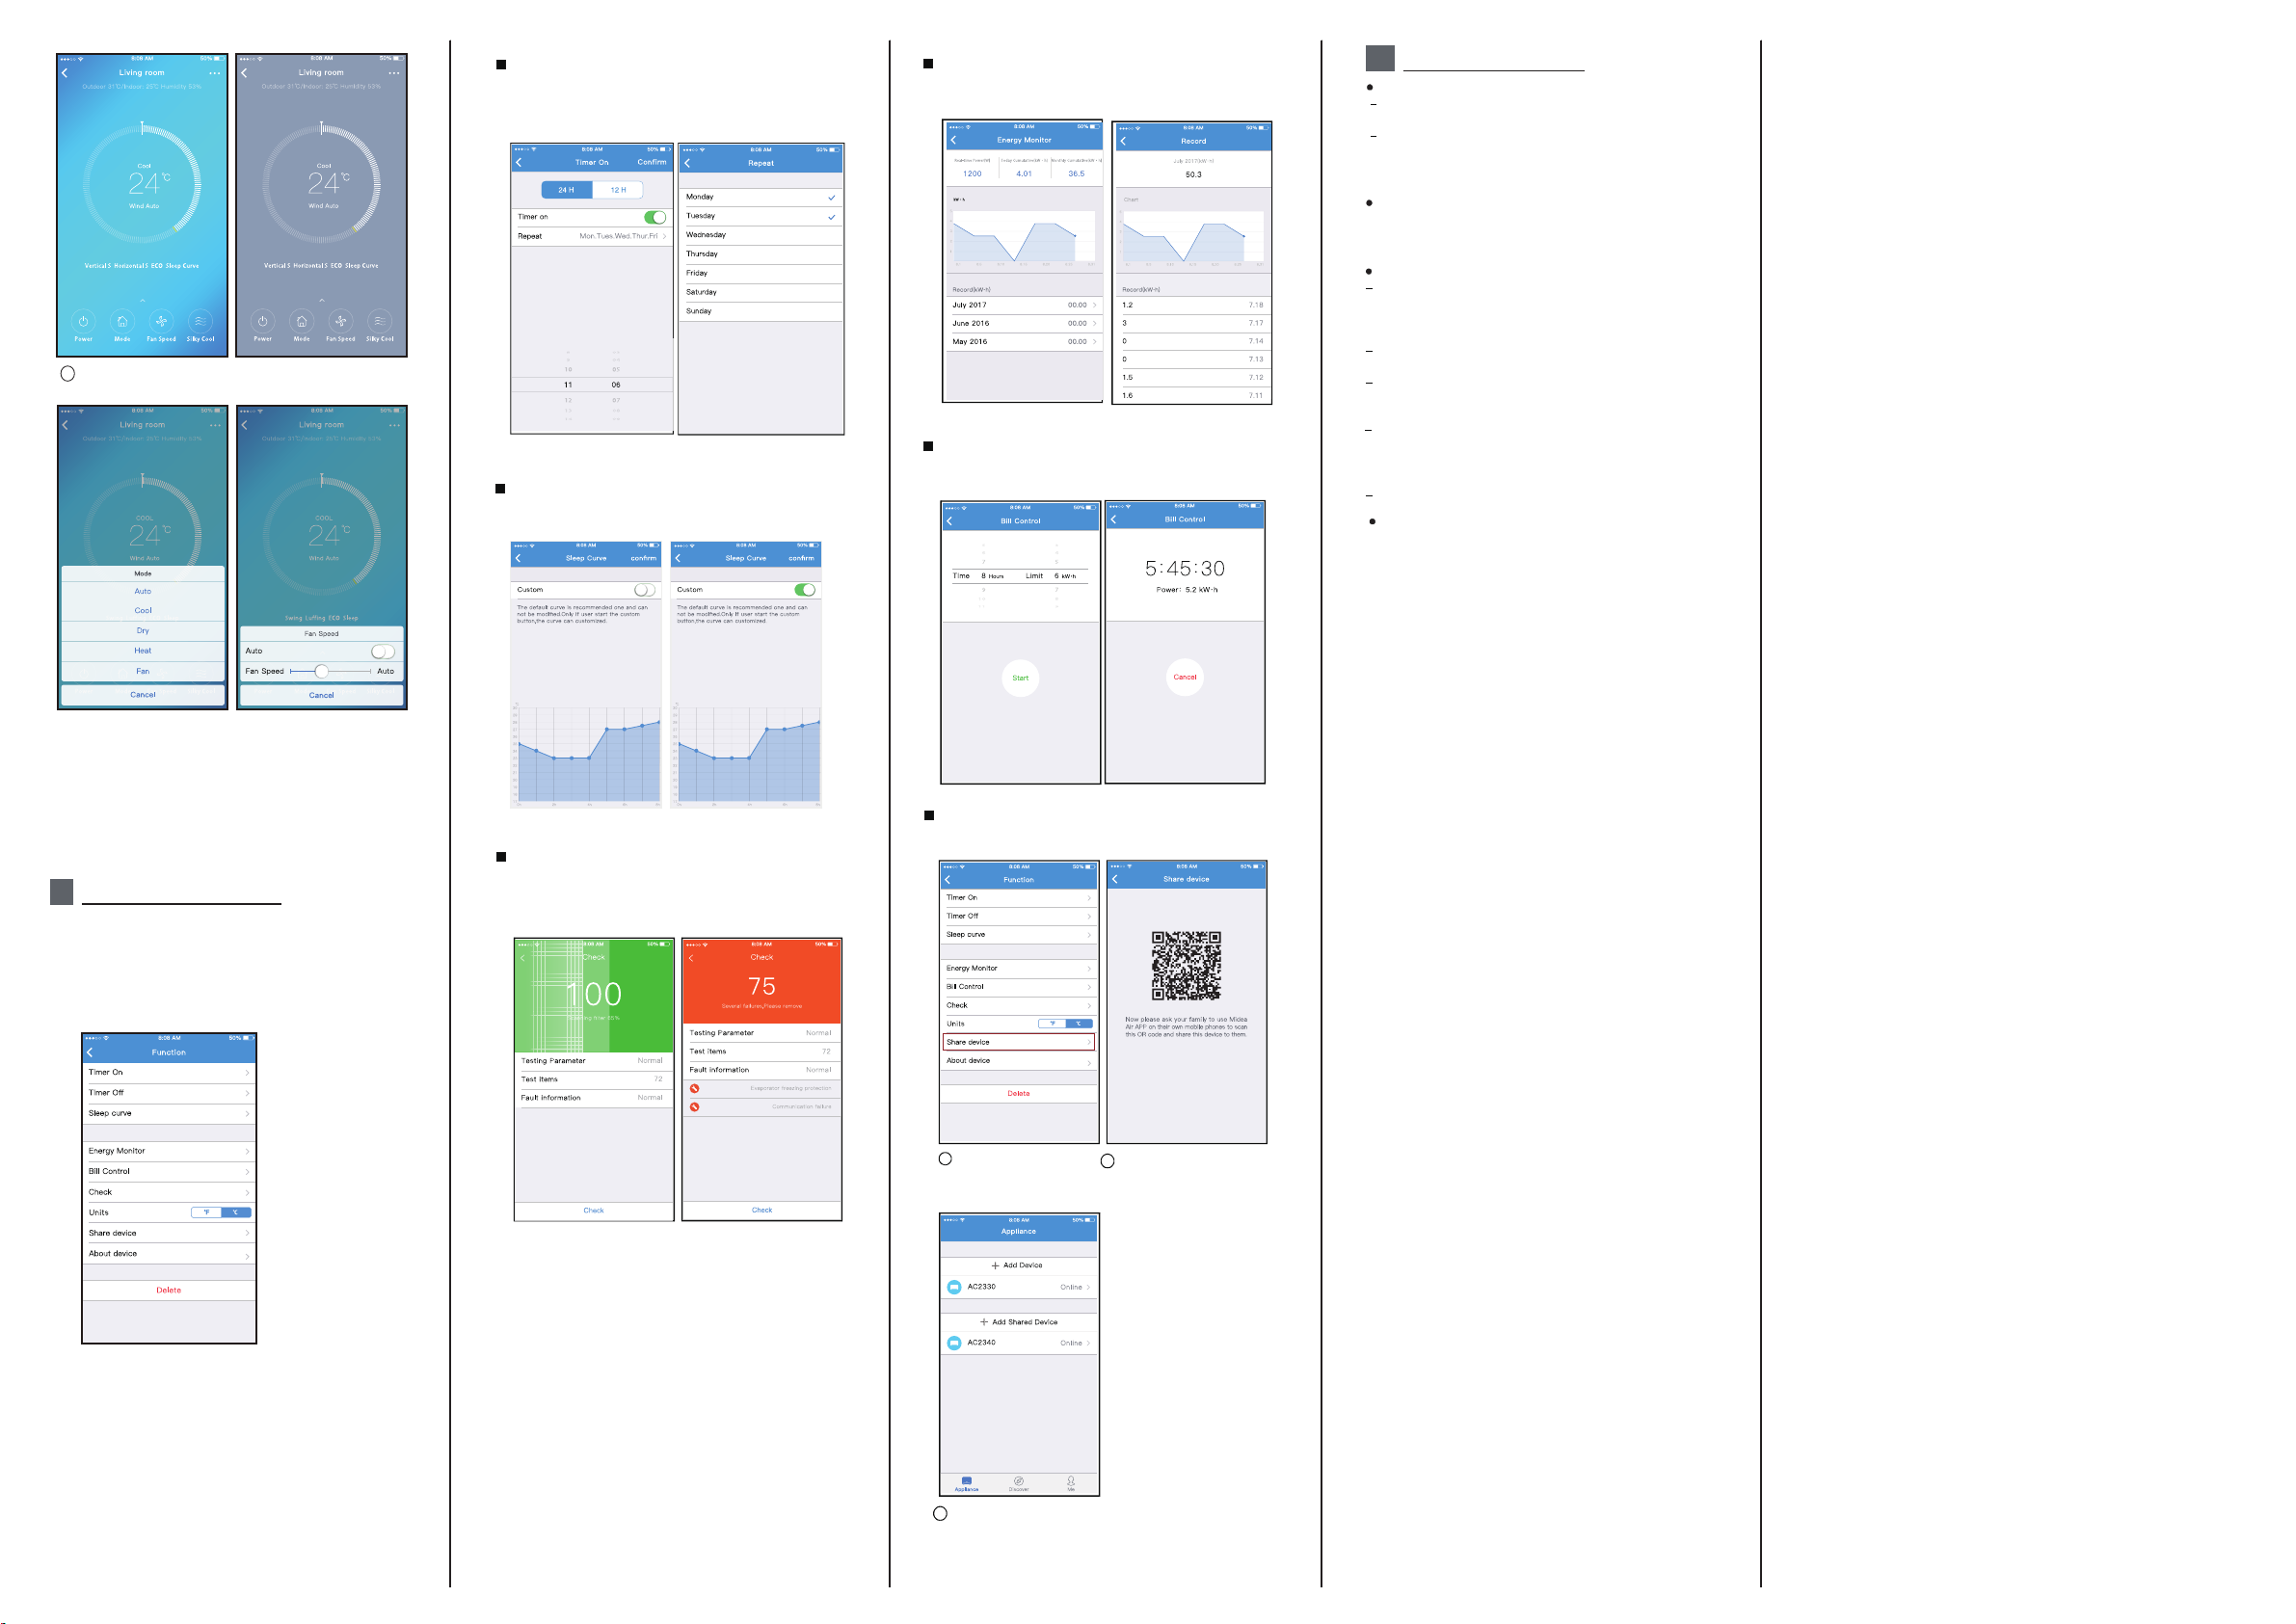
Thus, user can control air conditioners on/off status,
3
operation mode, temperature, fan speed and so on.
NOTE:
Not all the function of the APP is available on air
conditioner. For example: ECO, Turbo, Swing function,
please check the user manual to find more information.
7 SPECIAL FUNCTIONS
In cluding : Time r on, Tim er off, Sleep curv e, Ch ec k,
En ergy Monitor, Bil l Co ntro l Check.
NO TE:
No a ll th e unit c an us e thes e spe cial functi on o n
th e APP. Thus, i f the air con ditio ne r do not su pp ort
th e above fun ction , th e fun ct ion will be h ided fr om
th e funct io n lis t.
Ti mer o n/ Timer off
We ekl y, user ca n make an appo in tment to tu rn on or
off AC on spec ific ti me . Use r al so c an ch oose
circulatio n to k eep the AC under s chedu le cont ro l
ev ery wee k.
Sleep
Us er ca n cu st omize their o wn comfor table s le ep
by set ti ng ta rg et temperat ure.
Check
Us er ca n si mp ly ch eck the AC run ning s tat us w ith
th is fu nc tion. W hen fi nis hin g th is p roced ure, it can
di spl ay t he nor mal i te ms, a bn orm al items, a nd
de tail in formation.
En ergy Mo ni tor
Use r ca n si mply mo nitor th e elect ric it y consu mption
of AC u nit b y ch ec kin g th e cha rt and h ist or y recor d.
Bill Cont rol
User ca n se t param et er s to li mi t the elect rici ty
consu mp tion ov er a per iod of t ime .
Share Device
The air conditioner can be controlled by multi-users
at the same time by Share Device function.
1
Cl ick ""Share device
2
Let the others to scan the
displayed QR code.
8
APP DECLARATION
A
pp licab le sy stem: IOS , Android.
AP P can not sup port the la test so ft ware ve rsion o f
An droid a nd I OS sy st em.
Du e to spec ial sit uatio n ma y be occu rred, w e expli citly
cl aims be low: Not al l of the Andro id and IOS syst em
ar e compa tible wit h APP. We will n ot be re spons ible
fo r any iss ue a s a re sul t of t he incomp at ibili ty.
W
ir ele ss saf et y str ate gy
Smart kit onl y support W PA-PSK /WPA2- PSK
en crypt ion an d none en cr ypt ion .
WPA- PSK/ WPA2 -PSK encr yptio n is reco mm ended .
Cautions
Due to di ffer ent n et work si tu ati on , co ntr ol p roc es s
may r et urn time- ou t somet imes. I f this situat ion
occur s, the disp lay be twe en b oard an d App may not
be th e sa me , pleas e do n ot feel c onfused .
Sma rt Pho ne c amera n ee ds to be 5 m illio n pixel s or
abo ve to ma ke s ur e sca n QR c ode we ll.
Due to di ffer ent n et work situ at ion, some times ,
request tim e-out c ould ha pp en , thu s, it is n ec ess ary
to do ne two rk c onf igurati on a ga in.
The APP system is subject to update without prior notice for
product function improvement. The actual network configuration
process may be slightly different from the manual, the actual
process shall prevail.
Pl ea se Chec k The Servi ce Web site F or Mo re Information.
Declaration of conformity
CONTAINS FCC ID: 2ADQOMDNA19
CONTAINS
This d evi ce co mpl ies with P a rt 1 5 o f the F CC R ules and
In dus try Can ada's lice nce-exemp t RSSs .
Operat ion is sub jec t to the f ollowin g two con di tion s:
(1) This d evic e may not cause i nt er feren ce; and
(2) This d evic e mus t acc ep t any in terferenc e , incl uding
inte rference tha t may ca use und es ire d op erat ion of
the de vice .
Only operate the device in accordance with the instructions
supplied.
Changes or modifications to this unit not expressly
approved by the party responsible for compliance could
void the user's authority to operate the equipment.
This device complies with FCC radiation exposure limits
set forth for an uncontrolled environment. In order to avoid
the possibility of exceeding the FCC radio frequency
exposure limits, human proximity to the antenna shall not
be less than 20cm (8 inches) during normal operation.
NOTE: This equipment has been tested and found to
comply with the limits for a Class B digital device,
pursuant to part 15 of the FCC Rules. These limits are
designed to provide reasonable protection against
harmful interference in a residential installation. This
equipment generates, uses and can radiate radio
frequency energy and, if not installed and used in
accordance with the instructions, may cause harmful
interference to radio communications. However, there
is no guarantee that interference will not occur in a
particular installation. If this equipment does cause
harmful interference to radio or television reception,
which can be determined by turning the equipment off
and on, the user is encouraged to try to correct the
interference by one or more of the following measures:
--Reorient or relocate the receiving antenna.
--Increase the separation between the equipment
and receiver.
--Connect the equipment into an outlet on a circuit
different from that to which the receiver is connected.
--Consult the dealer or an experienced radio/TV
technician for help.
IC : 1 257 5A- MD NA 19
3
Add the shared device.
Hereby, we declare that this AC is in compliance with the
essential requirements and other relevant provisions of
RE Directive 2014/53/EU. A copy of the full DoC is attached.
NOTE:
All the illustrations in the manual are for explanation
purpose only. Your unit may be slightly different.
The actual shape shall prevail.
Manufacturer:
GD Midea Air-Conditioning Equipment Co,.Ltd.
Lingang Road Beijiao Shunde Foshan
Guangdong People’s Republic of China 528311
CP060IU-PQAP(OBM)REDG
16120600001170
20191122
 Loading...