

Page 1

说明书技术要求
Instruction manual for induction cooker
编 码
工厂型号/客户型号
客户名称
环 保
印刷颜色
专 色
尺寸规格(单位:mm)
钉装或胶装
材 质
其他要求
变更记录
选择项打
C21-RT2120
马来西亚SEE
环保
√
单色 双色 三色
√
无
145x210
钉装 胶装
√
105g铜版纸
共28P
单黑(100%K)
√
不环保
A0:141125
1个
制作 何霞
2个 3个
四色
Model: C21-RT2120
Thank you for purchasing this induction cooker. Please thoroughly read through this
instruction manual before use and store it carefully for future use.The pictures are only
for reference, please keep the real product as a standard.
Page 2

Safety instructions .......................................................
Product summary ........................................................
Part list .................................................................
Preparation ..............................................................
Instructions for use .......................................................
Proper pots ..............................................................
Cleaning and maintenance ................................................
Self-diagnosis for abnormalities ............................................
Specifications
220-240V 50/60
Model
Rated
power
Power adjustment
range
120W -2100W 358x280x62 2.3C21-RT2120 2100W
Appearance
dimension
(mm)
1
6
6
6
7
10
11
11
Weight
(kg)
Page 3

Safety instructions
Never heat food in sealed containers
such as compressed products like cans
or coffee pots, to avoid explosion caused
by heat expansion.
To avoid affecting product performance and
to prevent injury, do not heat empty pots.
When in use, do not leave the appliance
without supervision for a long time. When
leaving the appliance without supervision,
make sure there is enough water in the pot.
Do not heat iron items on the induction
cooker heating plate. It can get heated due
to high temperature.
Do not rinse this induction cooker under
water. Avoid spilling water and soup into
the internal parts of the induction cooker.
Do not place the induction cooker when
in use, on a gas stove (the magnetic
lines can heat the metal parts of the
gas stove)
1
Page 4

Safety instructions
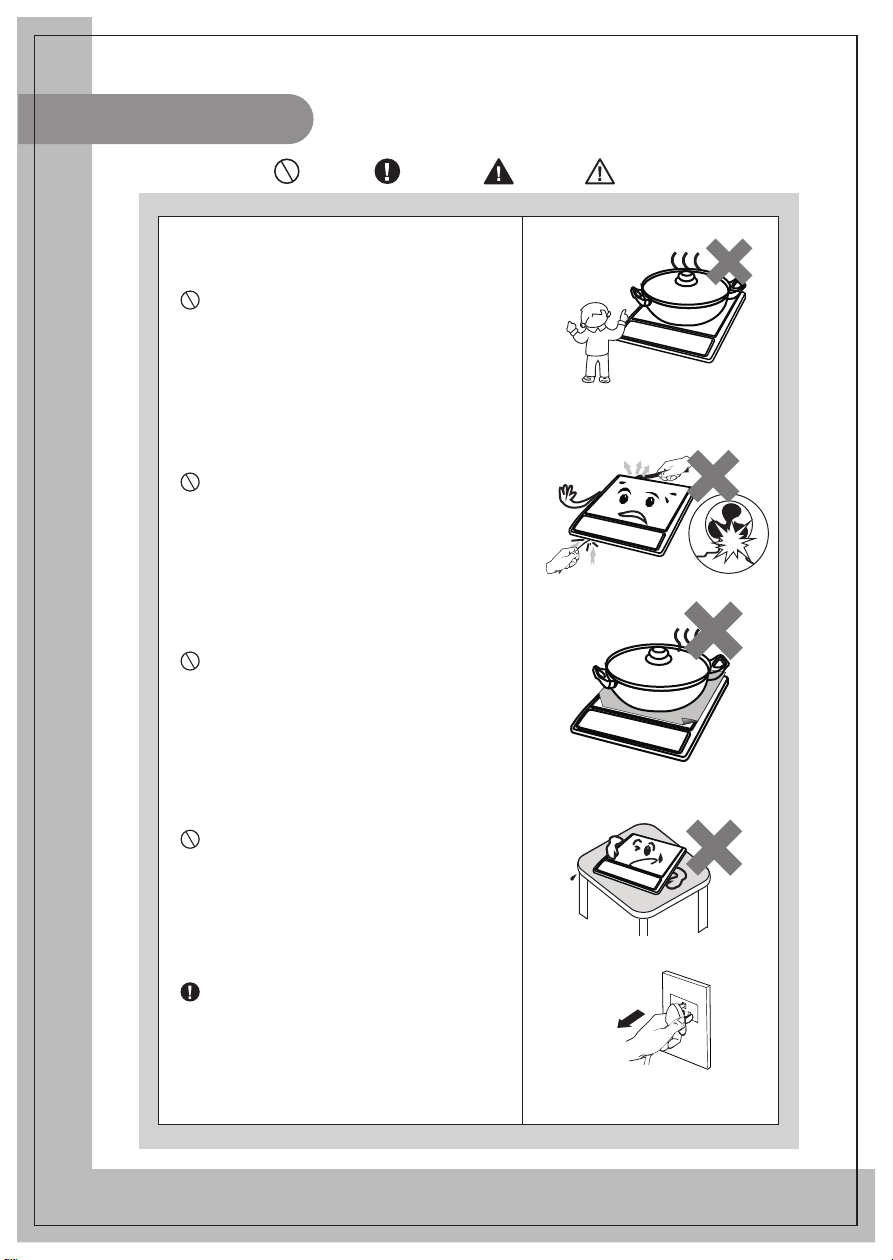
Keep electrical appliance out of reach from
children or inform person. Do not let them
use the appliances without supervision.
To avoid danger, do not insert any foreign
objects, such as iron wire, nor block the air
ventilation opening or entry port.
Do not place paper, aluminium foil, cloth or
other unsuitable articles onto the induction
cooker heating plate.
Do not put it on any metal platforms (such
as iron, stainless steel, aluminium), or
place a non-metal pad less than 10 cm
thick on the heating plate while the cooker
is in use.
Unplug the power cord from the outlet after
use to avoid fire and/or damaging the
electronic components caused by prolonged
electrical connection.
2
Page 5

Safety instructions
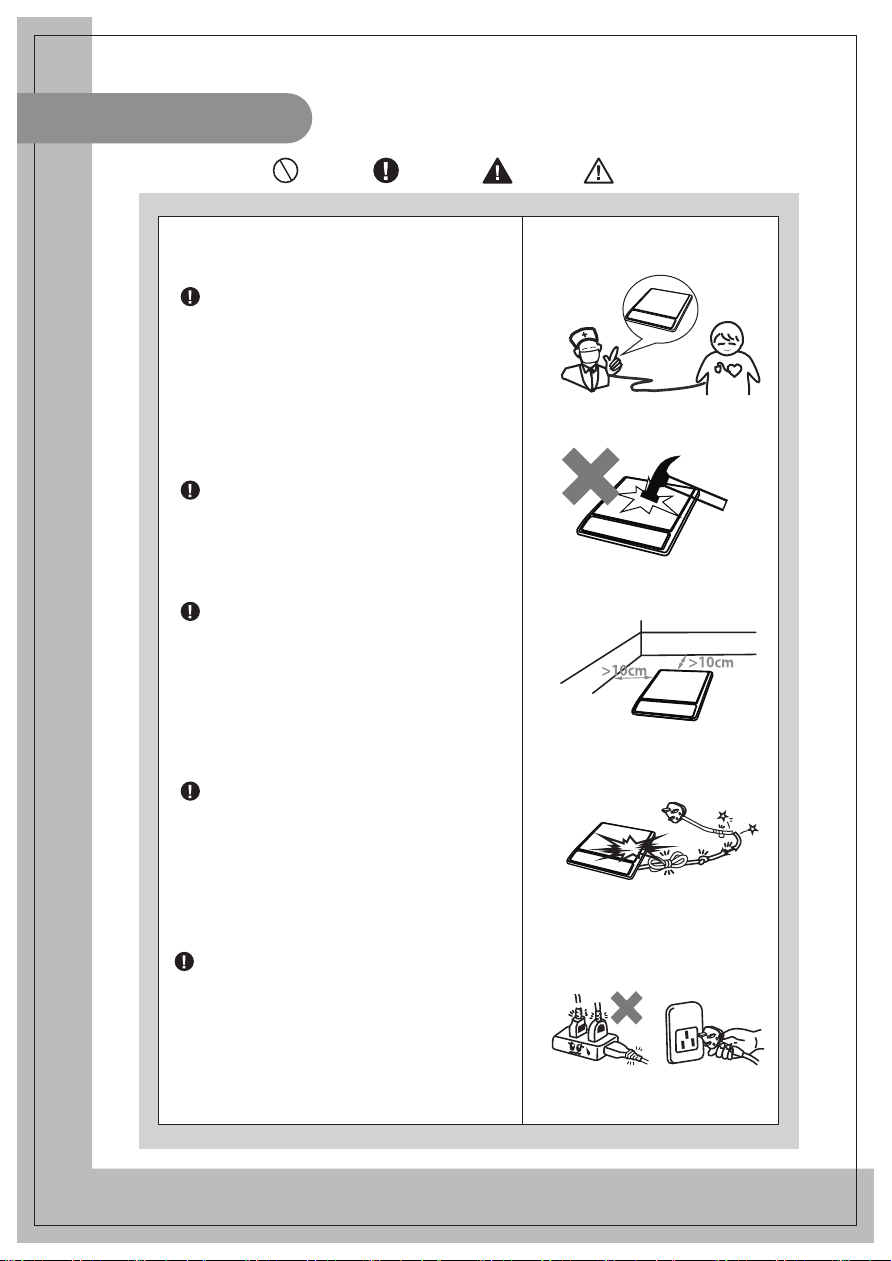
People with heart pacemakers should consult
a doctor. Only use the appliance after
confirming that it does not affect the
pacemaker.
Avoid causing impacts on the heating plate.
It may damage the plate. If cracking is found
on the cooker plate, turn off the appliance to
avoid any electrical shock that might occur.
When using the induction cooker, place it
horizontally and allow atleast 10 cm of
free space between the sides and back of
the induction cooker and the wall. Do not
use the induction cooker in narrow spaces.
Please keep the ventilation opening free,
for release of heat.
Do not use the appliance if the plug or the
main cord or the appliance is damaged. If
the power cord is damaged, have it
replaced by agent of the manufacturer, its
service department or specialized person
from a similar department.
Please use a dedicated and high quality
power outlet, with high power rating (13A).
Do not use poor quality outlets. It is advisable
not to share the power outlet with electrical
appliances with high power ratings, such
as an air conditioners, electrical stoves etc.
to avoid fires caused by overburdening
the outlet.
3
13A
Page 6

Safety instructions
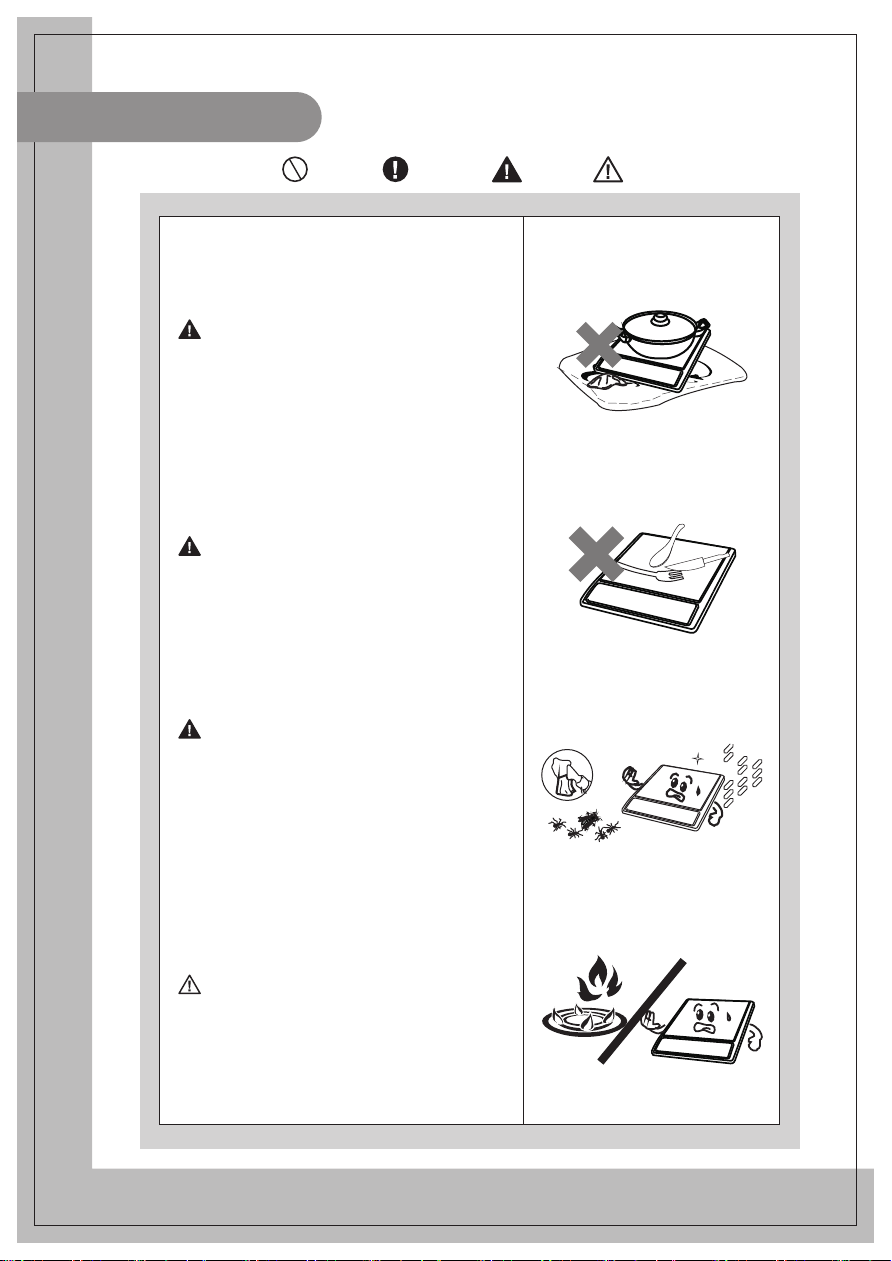
Do not place the induction cooker onto a
carpet, tablecloth or thin paper while on
use to avoid blocking the air inlet opening
or air outlet opening, which will affect the
heat emission.
Metal objects, such as knives,forks,spoons
and lids should not be put on the surface
of the cooking area, as they will be heated.
When using the induction cooker or after
use, please keep it clean. Protect the
induction cooker from bugs, dust and
humidity. Avoid letting cockroaches etc
fall into the internal parts of the induction
cooker and causing a short circuit of the
electrical board. When not in use for a
long period, please clean it and put into a
plastic bag to store it.
Do not place the induction cooker near a
gas stove, kerosene stove, gas cooker or
in any space with an open fire or in an
environment with high temperature.
4
Page 7

Safety instructions
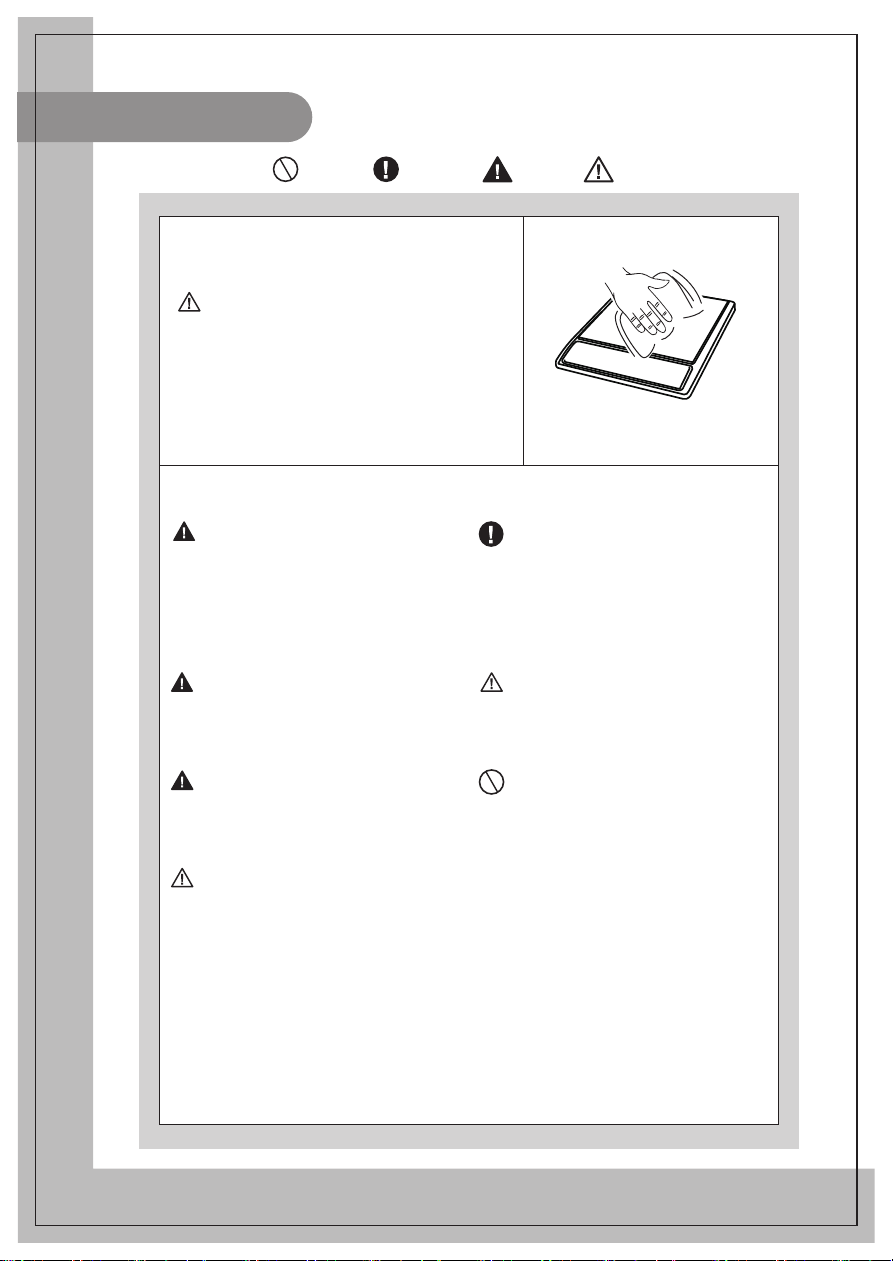
Always clean the induction cooker to
prevent mess from getting into the fan,
which could influence the normal
operation of the appliance.
This appliance is intended to be used in
household and similar applications such
as: -staff kitchen areas in shops, offices
and other working environments; -farm
houses;-by clients in hotels, motels and
other residential type environments ;
-bed and breakfast type environments.
The instructions shall state that
appliance are not intended to be
operated by means of an external timer
or separate remote-control system.
When operating the appliance or after
moving the pot, the cooking area will
remain hot for a period of time. Do not
touch it, be careful of scalding caused
by the high temperature.
The utensils provided for the induction
cooker can only be used for cooking with
it. These cooking utensils cannot be used
on both induction cooker and gas stove.
Always make sure the plug is inserted
firmly into the socket.
The cooker cannot be overloaded.
Overloading the plate may damage
the plastic cover and cooker plate.
This appliance can be used by children
aged from 8 years and above and persons
with reduced physical, sensory or mental
capabilities or lack of experience and
knowledge if they have been given
supervision or instruction concerning use
of the appliance in a safe way and
understand the hazards involved. Children
shall not play with the appliance. Cleaning
and user maintenance shall not be made
by children without supervision.
5
Page 8

Pro d uct su mma ry
This ind ucti on coo ke r is design e d for ho usehol d use. Ple a se refer to
the instr ucti ons for de ta iled co oking metho ds.
Pa rt list
Ai r o u tl e t
Co o ke r p l ate
Co o king zone
Ai r i n ta ke
Po we r co r d
Co n tr o l p a nel
Pre pa ra tio n
Be fo r e usin g , p lease fir st check if th e powe r plug co nnects we ll with the
po we r outle t.
Before pla cing the pot on the cooker plate, p lease clean up wa ter stains,
oil spots or any other adherent dirt from the outsid e surface of the pot and
cooker plate.
Pl e ase put th e pot to b e heated o n th e ce ntral pa rt o f the in d uction
cooker. Do not put an emp ty po t on th e cooker p late to be hea te d .
6
Page 9

Instructions for use
Spe cia l notice: Pl ease r e ad th e corr e spo n d ing instr u ction
manual for each specific i n ducti o n cooker purchased.
Connecting the power and switching on
After pressing the “ ” key, press the function keys to select
the required mode. The induction cooker enters working mode.
After pressing the “ ” key, if no function key is pressed for 10
seconds, the induction cooker will switch off automatically.
After pressing the function key, if there is no proper pot on the cooker plate,
the induction cooker will not heat up and the alarm will sound to indicate that
a pot is required. One minute later, it will switch off automatically.
Function selection
After switching on the appliance, press the “Function” to enter the desired
cooking mode.
Please refer to “Functional cooking mode instructions” for the details of the
corresponding heating process for each cooking mode.
Power adjustment
After selecting a mode, you can press “+” or “-” to adjust
the power.
For some modes, during the heating procedure, the
induction cooker can automatically adjust the power
according to the cooking requirement.
For certain modes, the power is restricted complying
with the cooking requirement.
Timer adjustment
If timer function is not activated, the induction cooker
will heat the ingredients for the default time duration.
If timer is needed, first press the “Timer” key. When
the numbers blink on the display, press the key “+” or
“-” to adjust the time duration.
When the adjustment is finished, the number on the display
will be shown after blinking for several seconds. The induction
cooker starts counting down.
When the counting down is over, the induction cooker automatically
stops heating and switches off.
7
Timer
Page 10
Instructions for use
Pause adjustment
The pause function is designed for temporarily stopping heating during the
normal operation process. You can switch to pause status in any cooking mode.
During operation, when pause is needed, please press the function key “Pause”.
Now, the pause indicator lights up, the display and other function indicators stay in the
previous status.The power indicator turns off and the induction cooker stops heating.
When the induction cooker is in pause, press the “Pause” key again or select any
cooking mode to quit the pause status and return to the normal heating process.
After setting pause, the induction cooker stops heating. The default pause time
interval is 10 minutes. After 10 minutes, if the pause mode is not
cancelled, the induction cooker will sound an alarm. The alarm
will last for several seconds, then the induction cooker will switch
off automatically.
Child Lock
Press the“+” and “-” key at the same time to lock. The “child lock” indicator
lights up. Now only the “ ” key can be used to switch off the appliance.
Press the “+” and “-” key at the same time to quit the lock function.
The indicator turns off.
Switch off
When the operating time is over, the induction cooker switches off automatically.
If switch off is needed in advance, press the “ ” key to turn the appliance off.
Pause
Functional cooking mode instructions
Users can select among the different cooking modes according to cooking
purpose. For your convenience, we provide the following instructions:
The cooking modes of “Hot pot” individually fit to heating requirements, such
as hotpot and boiling water. In the heating procedure, the time and power can
be adjusted at any time. If the water in the pot dries up or the temperature is
abnormally high, the induction cooker automatically switches off or starts
protection function.
Hot pot
The cooking modes of Fry fit to high temperature cooking. In the heating
procedure, the time and power can be adjusted at any time. When the
temperature of the ingredients reaches the temperature level provided by
the selected mode (the highest temperature of various modes are different),
the induction cooker will switch to interval heating or stops heating. After the
temperature cools down, the induction cooker restarts heating.
Fry
8
Page 11
Instructions for use
Functional cooking mode instructions
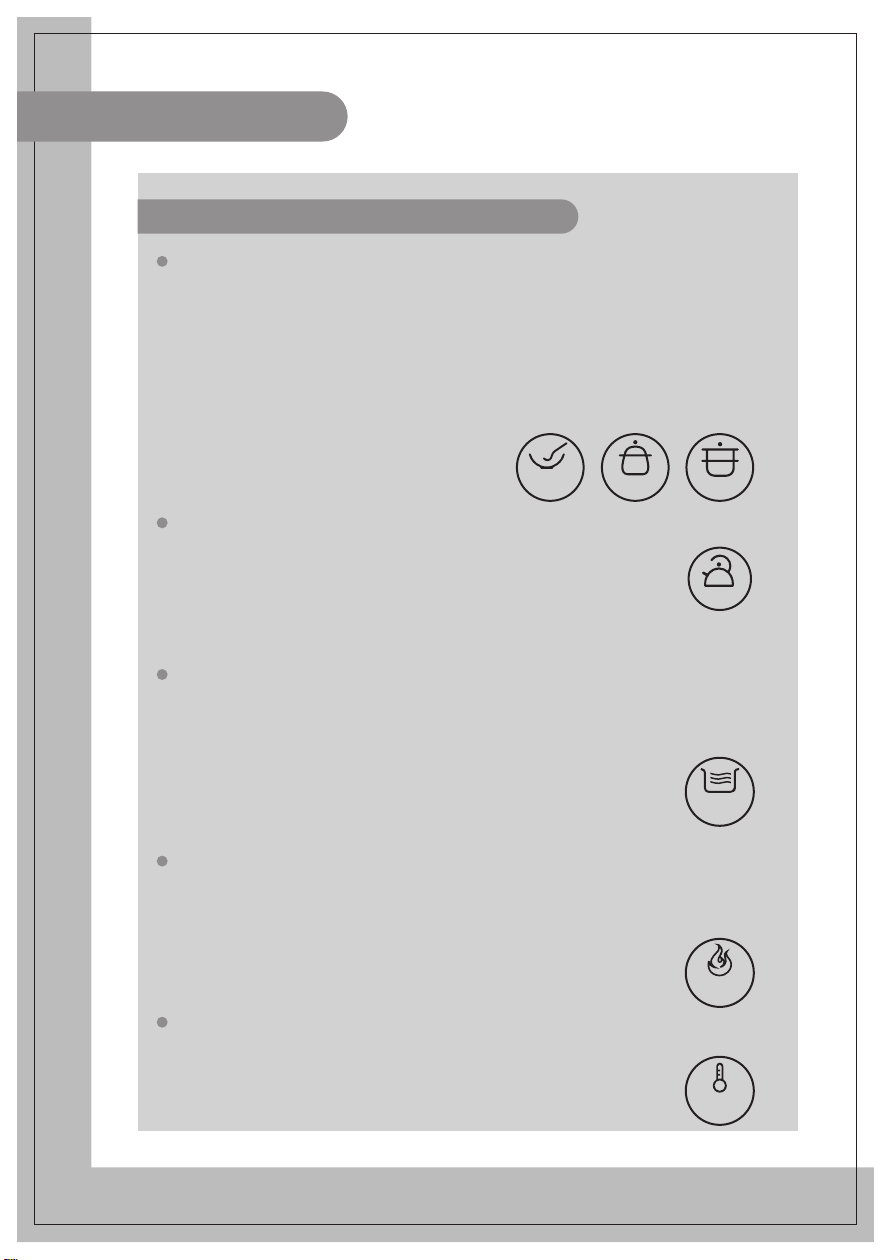
For the cooking modes of Porridge, Soup and Braise, the induction cooker
can automatically control the power according to the time duration that has
been set and the temperature of the ingredients. Under these modes, the
power can be adjusted within the adjustable power range at any time. After
this manual adjustment, the induction cooker will return to auto power control
according to the cooking purpose two minutes later. Among these modes,
when Porridge, or Soup mode is selected, the induction cooker will start the
auto two-hour keeping warm function after the operation is finished.
Porridge
Soup
Braise
The mode is for boiling water. After the water is boiled, the induction cooker
can switch off automatically.
Note:
1.It is recommended to put water that occupies 30% to 80% of the pot capacity
when boiling water.
2.When boiling water, factors such as uneven pot bottom, scale or weather
conditions could influence the boiling effect.
3.Please use the specific stock pot or water kettle when boiling water.
Boil
The cooking mode of gentle heat with slow fire fits to the situation that needs
continuous heating with gentle power. When using this mode to stew soup or
boil congee, please first use the “Hot pot” mode to make the ingredients boil,
and then heat it by using “Slow fire”. The stewing time duration can be set
according to the feature of original material or personal taste.
Note:
Under this mode, the power cannot be adjusted. If adjustment is needed,
please switch to the other modes, such as “Hot pot”. Then the power can be
adjusted at will.
Slow fire
The cooking mode is for heating with strong power. When the temperature
of the ingredients reaches the temperature level provided by the selected
mode (the highest temperature of various modes are different), the induction
cooker will switch to interval heating or stops heating. After the temperature
cools down, the induction cooker restarts heating.
Fierce fire
The cooking mode fits for cooking that needs gentle heat to maintain warmth.
Under this mode, the induction cooker heats the ingredients with gentle power
to maintain a certain temperature inside the pot.
Note: Under this mode, the power cannot be adjusted.
Keep
warm
9
Page 12
Proper pots
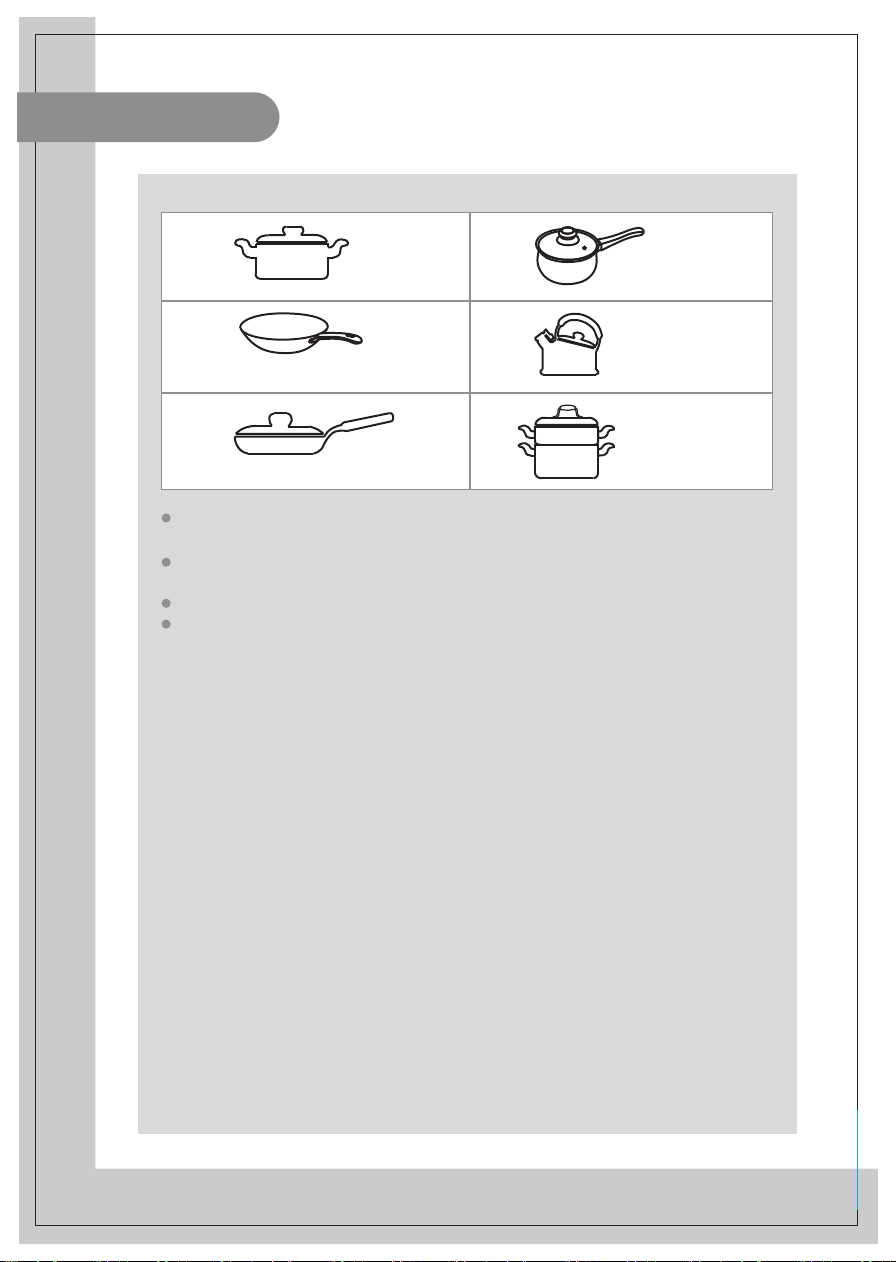
a
Ir on sto ck p ot Ir on mi l k po t
c
Ir on wo k Ir on wa ter ke t tle
e
Ir on fr yin g p a n Ir on ste ame r p a n
Pl e ase use the attached po ts sol d by Mi dea. Do no t use oth er po ts as
re p lacements to avoi d influe ncing the perfor ma nce.
The maxi mu m lo ad for the frying pa n is 4kg. When usi n g it, do no t l e t
the wei ght of th e ing r edie nts e xcee d this weigh t to avo i d dan ger.
In particular, do not use pressure containers to avoid danger.
If other po ts a r e used, pl e ase comply with the fol lowing co nditio n s:
1. Requi rements for po t mater i al: contain i ng ir on materi a l.
2. Re quir ement o f p
le ss than 14.5cm while not more than 20cm.
Note: For optimum perfo r ma nce, plea se use the standard pots
pr o vi ded.
ot sh ape: with even bo ttom, th e diamete r i s no t
b
d
f
10
Page 13
Cleaning and maintenance
Be fo r e cl ea n i n g, p l e ase swi tch of f th e ap p l ia n ce fi r st an d th e n
di sco nne ct the p owe r p l ug f r o m th e p o w e r o u t l e t. Wa i t ti l l th e co oke r
pl a t e of the in d u ctio n co oke r i s n ot h o t an d sta r t cl ean i n g.
Aft e r usi n g th e in d u cti o n coo ke r fo r a lo ng t i m e , th e op eni n g of ai r
in l e t/ai r o u tl e t wi l l p i le u p wi th d u st o r o t h e r d i rt, pl e a s e wi pe i t wi th a
so f t d ry clo th. Du st i n th e a i r i n l et a n d o u t l e t ca n b e cl ea n e
a so ft b r u sh o r a mi n i vacu um cle a n er.
Note: Please do not rinse it with water
Fo r oi l s p o ts o n t h e coo ke r pl a t e , wi pe t h e coo ke r p l a t e by usi n g a
so f t mo i st cl o t h with a l i t tle to o th pa s te or m i l d d ete r ge n t. A n d t h e n
use a so ft mo i s t cl o t h to wi pe i t u n ti l n o sta i n r e m a i ns.
Wh en n o t u sin g i t fo r a l ong ti m e , p le a se di sco nne ct the p owe r p l ug
fr om th e p o we r o u t l e t an d p r o t e ct th e in d u ctio n
or b ug s.
Self-diagnosis for abnormalities
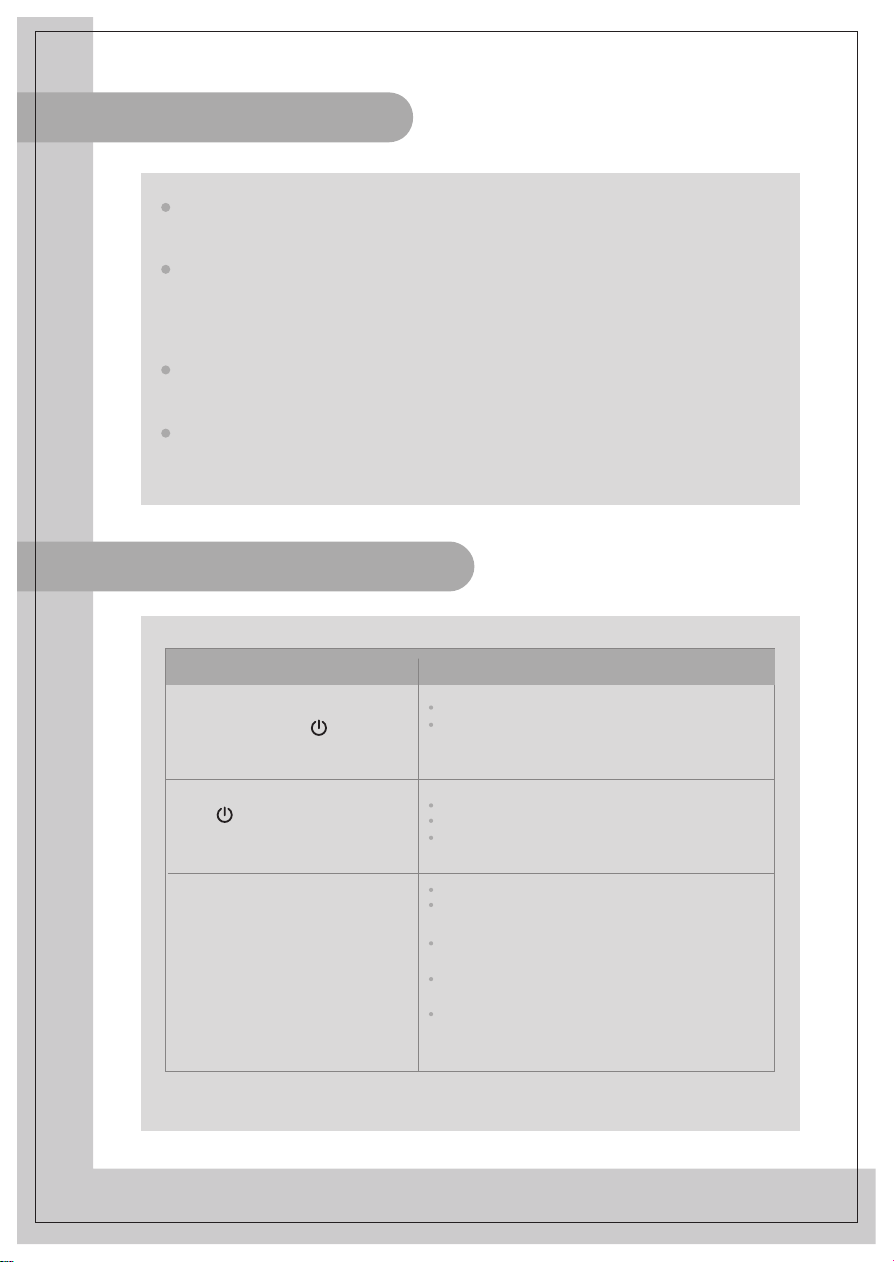
Abnormal ities Key checking points and trouble shooting
d b y u sin g
co o k e r fr om a n y d u st
After plugging in the power cord
and pressing the “ ” key,
the indicator and display do not
light up.
The “ ” indicator lights up
and the display works normally, but
heating does not start.
Heating suddenly stops during the
process.
Is the power plug properly connected?
Is the switch, power outlet, fuse or power cord
damaged?
Is the pot material prop
Is the appliance in a “Preset” working status?
For other causes, please take the appliance to a
repairing and maintenance site to be fixed.
Is the temperature of the oil too high when frying dishes?
Is the temperature of the surroundings very
high?
Is the air inlet or air outlet of the induction
cooker blocked?
Is the default heating time of the induction
cooker over?
The self-safety protection of th
cooker starts, wait for several minutes and
connect power to use it.
er?
e induction
11
Page 14
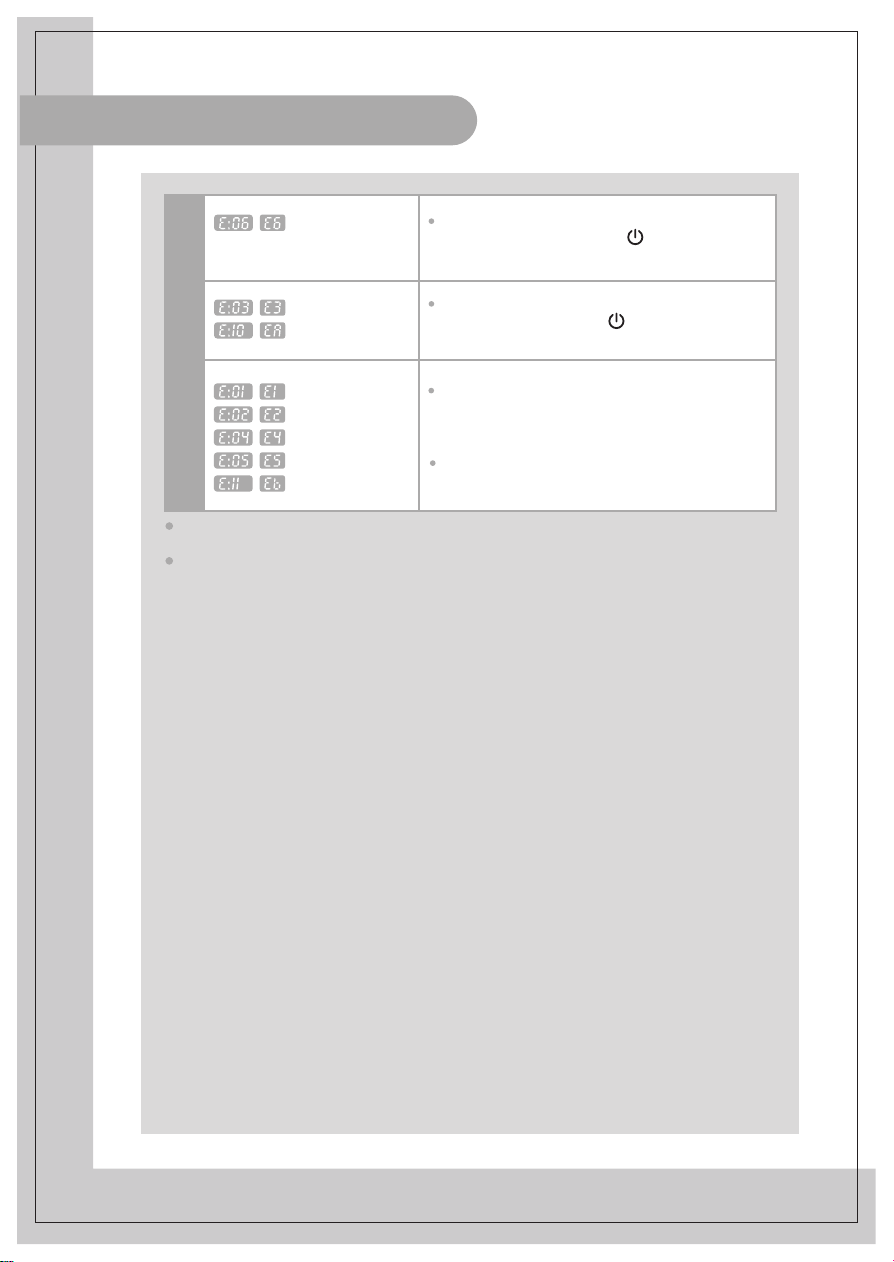
Self-diagnosis for abnormalities
Protection for over-high
temperature of the
induction cooker
Protection for over-high
temperature of the
cooker plate
Protection for the inner
sensor of the induction
cooker
The protection codes appear
The temperature inside the induction cooker is too high. When
the temperature lowers, press the “ ” key, the heating
can start normally.
The temperature of the cooker plate is too high. When the
temperature lowers, press the “ ” key, the heating
can start normally.
When using the induction cooker, if the temperature of the
surroundings is too low, the auto protection function will start.
With switching on the appliance again or switching after simple
warm-up, the appliance can return to normal working status
automatically.
Call the service number or the professional repair and
maintenance site to make an inquiry.
The descripti on above i s for diagnosing and checking common i ssues. If the problems cannot be
solved, please send the product to a repair and maintenance site or inquiry by calling service number.
Do not di sassemble or repair the product by yourself to avoid product damage or personal inj ury.
12
Page 15

If there is technical amendment for the
product, it will be edit ed into the updated
version of the instruc tion manual. Please
be aware that we will not inform customers
of this separately. If the appearance or
color of the product is modified, please
refer to the real appliance as a standard.
Page 16
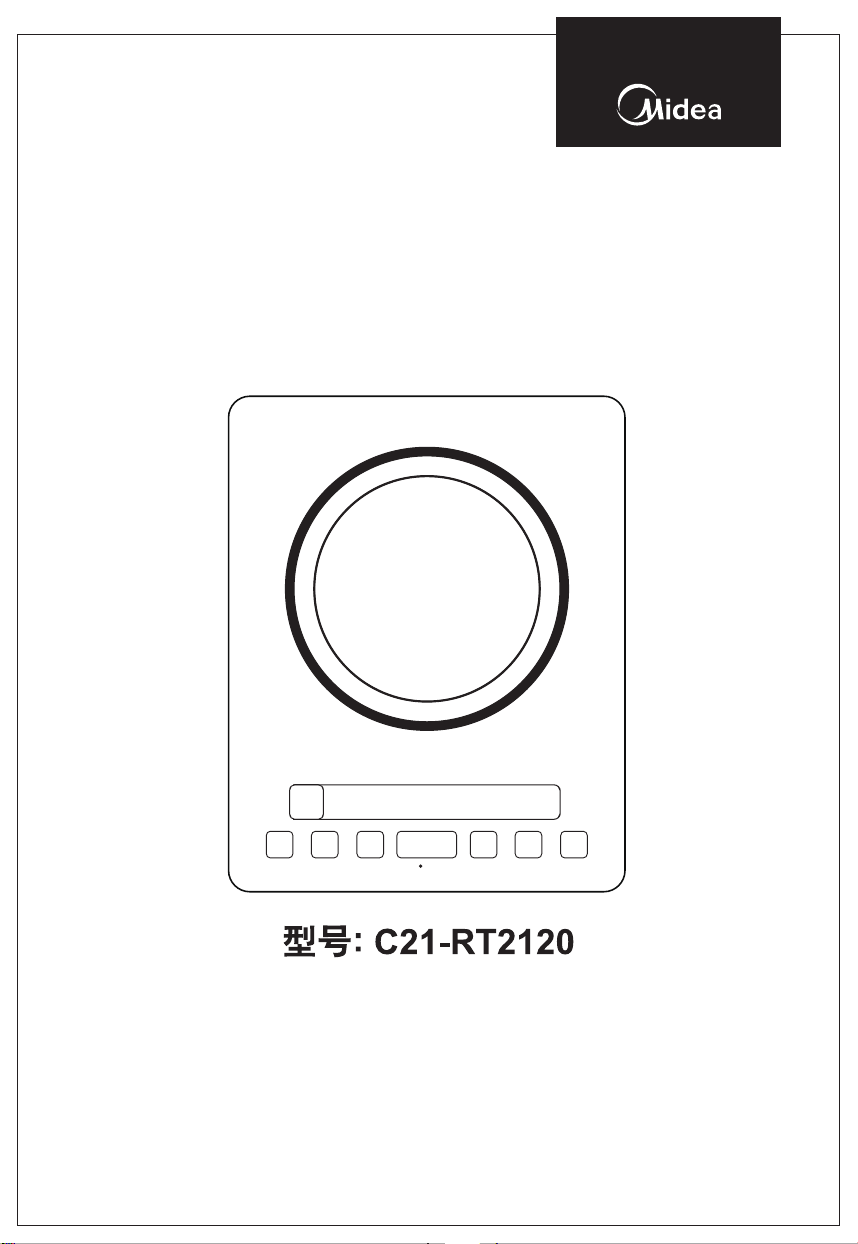
电磁炉说明书
感谢您购买该电磁炉,在使用前请先详细阅读此说明书,阅后请小心收藏,以备日后查阅。
图片仅供参考,产品以实物为准。
Page 17
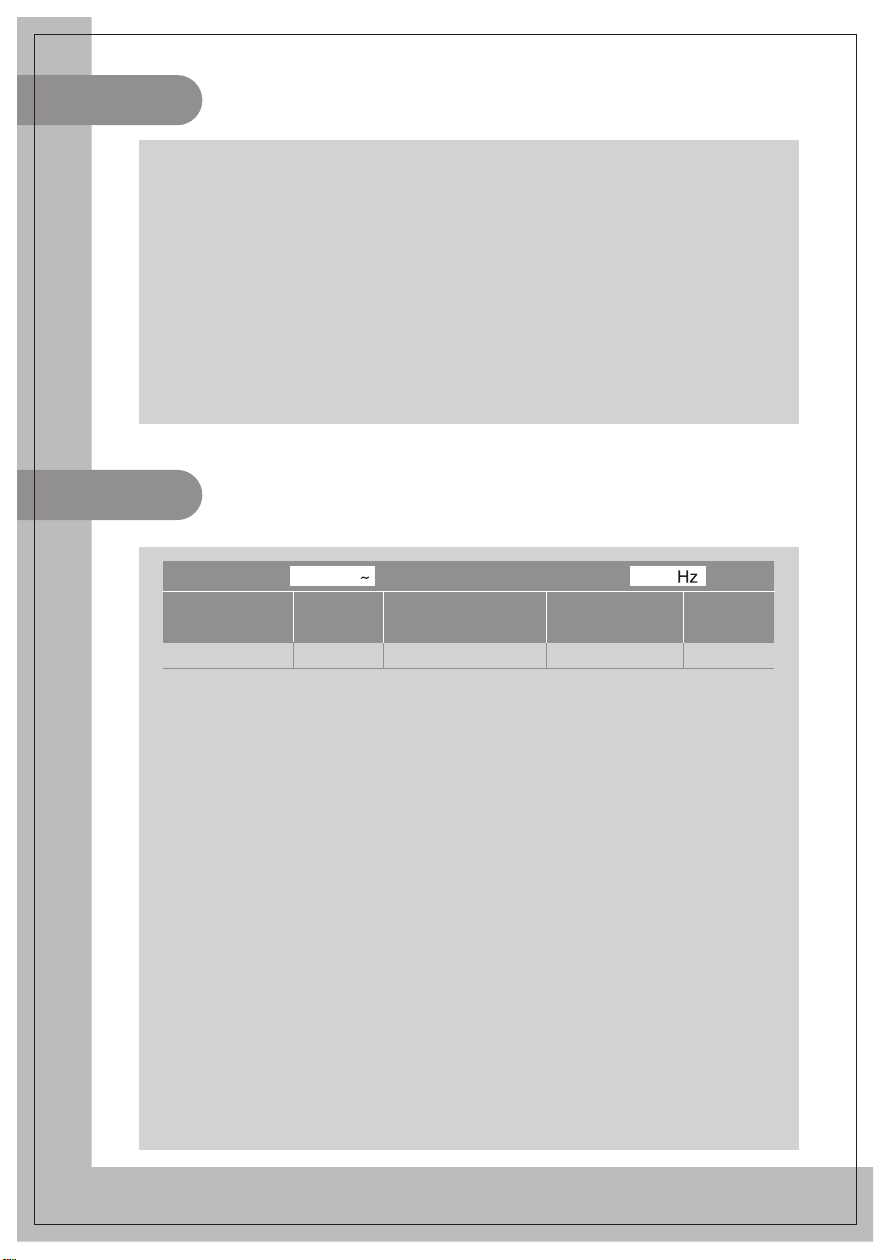
目录
安全注意事项 ............................................................
产品简介 ................................................................
零部件说明 ..............................................................
准备工作 ................................................................
使用说明 ................................................................
适用锅具 ................................................................
清洁保养 ................................................................
异常现象自检 ............................................................
规格
220-240V 50/60
型号 额定功率 功率调节范围 外形尺寸
120W -2100W 358x280x62 2.3C21-RT2120 2100W
额定频率额定电压
(mm)
1
6
6
6
7
9
10
10
重量
(kg)
Page 18
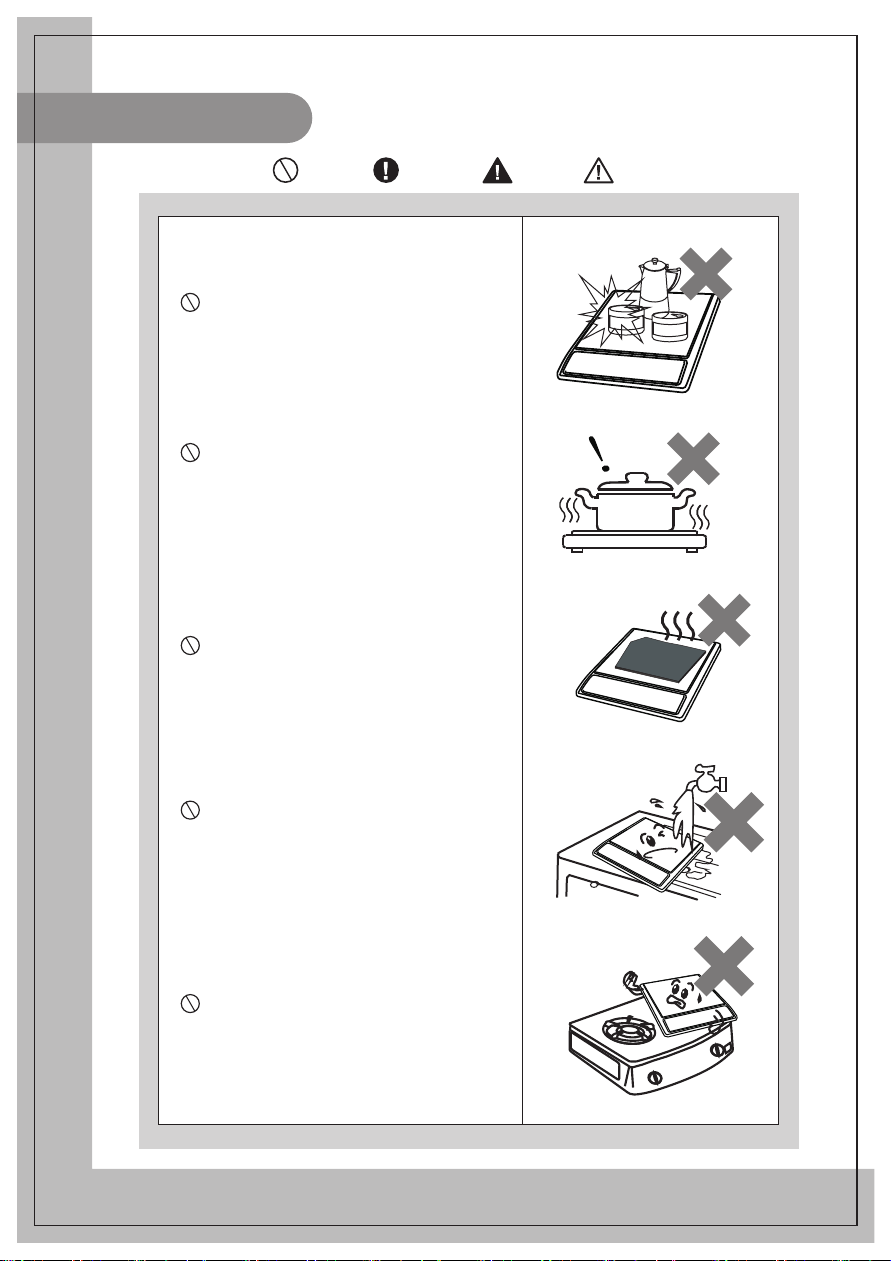
安全注意事项
标记的含义: 禁止 强制 警告 注意
密封容器或密封食品不能放在电磁炉上加热,
如高压类、罐头类、咖啡壶等, 避免受热膨胀
而产生爆炸危险。
切勿空锅干烧,以免影响产品使用性能,甚至
发生危险。使用中,请勿长时间离开,若需离
开,请确保锅具内的水量。
请勿将铁片放在灶面板上加热,避免因高温而
产生危险。
请勿用水直接冲洗电磁炉,注意勿将水、汤溅
入电磁炉内部,以免发生危险。
请勿将电磁炉放置在燃气灶上使用(磁力线会
将燃气灶的铁质金属件加热),以免发生意外。
1
Page 19
安全注意事项
标记的含义: 禁止 强制 警告 注意
器具应放置在儿童、语言有障碍的人不能随便
拿得到的地方,以免他们不当使用器具。
不能插入铁丝等异物或堵塞排气口及吸气口,
以免发生危险。
请勿以纸张、铝箔纸、布等无关物品垫在灶面
板上间接加热。
请勿将电磁炉放在任何金属(铁质、不锈钢、
铝质等)平台上使用,包括在其上垫厚度小
于10cm的非金属垫。
使用完后将电源线插头拔离插座,避免长时间
通电引起电子元器件损坏,甚至起火。
2
Page 20
安全注意事项
标记的含义: 禁止 强制 警告 注意
使用心脏起搏器者,请与专业医生研究确认无
影响后方可使用本产品。
请避免用力冲击板,以免板损坏。如果灶面有
裂纹,关掉器具以避免可能出现的电击。
使用时,电磁炉应水平放置,侧面、背面与墙
要有10cm以上的距离。请勿将电磁炉放在狭
窄的空间内使用,不要被异物挡住吸排风口而
影响散热。
如果电源线损坏,为了避免危险,必须由制
造商、其维修部或类似部门的专业人员更换。
请单独使用13A的大功率优质插座,不要使
用劣质插座。不要与空调、电炉等大功率电器
共用一个插座。以免出现电流过大引起火灾。
3
13A
Page 21
安全注意事项
标记的含义: 禁止 强制 警告 注意
避免将电磁炉放置在地毯、台布、薄纸上使
用,以免堵塞吸气或排气口,影响炉腔散热。
金属物体如刀、叉、勺和盖不应放在烹饪区
域表面,因为它们可能变热。
电磁炉使用过程中和使用完成后,请注意保
持清洁,做好炉体的防虫、防尘、防潮保护,
避免蟑螂等进入电磁炉内部造成电路板短路;
长期不使用时,建议清洁后套上塑料袋收存。
请勿将电磁炉摆放在靠近瓦斯炉、煤油炉、
燃气灶等有明火或高温环境中使用。
4
Page 22
安全注意事项
标记的含义: 禁止 强制 警告 注意
经常进行电磁炉的清洁,避免杂物等进入风
扇内,影响电磁炉的正常工作。
器具打算用于家庭和以下类似场所使用:
商店,办公室和其他工作环境的厨房区
域;农家;旅馆;汽车旅馆和其他住宿
环境里供客人使用的,床和吃早餐的地
方。
器具不能在外接定时器或独立的摇控控
制系统的方式下运行。
器具工作时及锅体移开后一段时间,烹
饪区域留有余热,请勿触摸,小心高温
烫伤。
电磁炉专用炊具只能放在电磁炉上使用,
炊具不能在电磁炉和燃气灶上混合使用。
务必使插头插入到牢固的插座中
电磁炉的灶面板的承重是有限的,不
要放太重的东西在灶面板上,否则会
导致损坏塑料面盖及灶面板。
本设备只适合8岁以上儿童使用,对于
身体有缺陷的残疾人、感官或精神上
有障碍或缺乏经验和知识的人,他们
需要得到监督或指导使用该设备,以
使该设备在一个安全的方式下运行,
不产生危险。儿童不得玩耍设备。清
洁和用户维护不得由孩子们来完成,
除非他们是有人监督。
5
Page 23
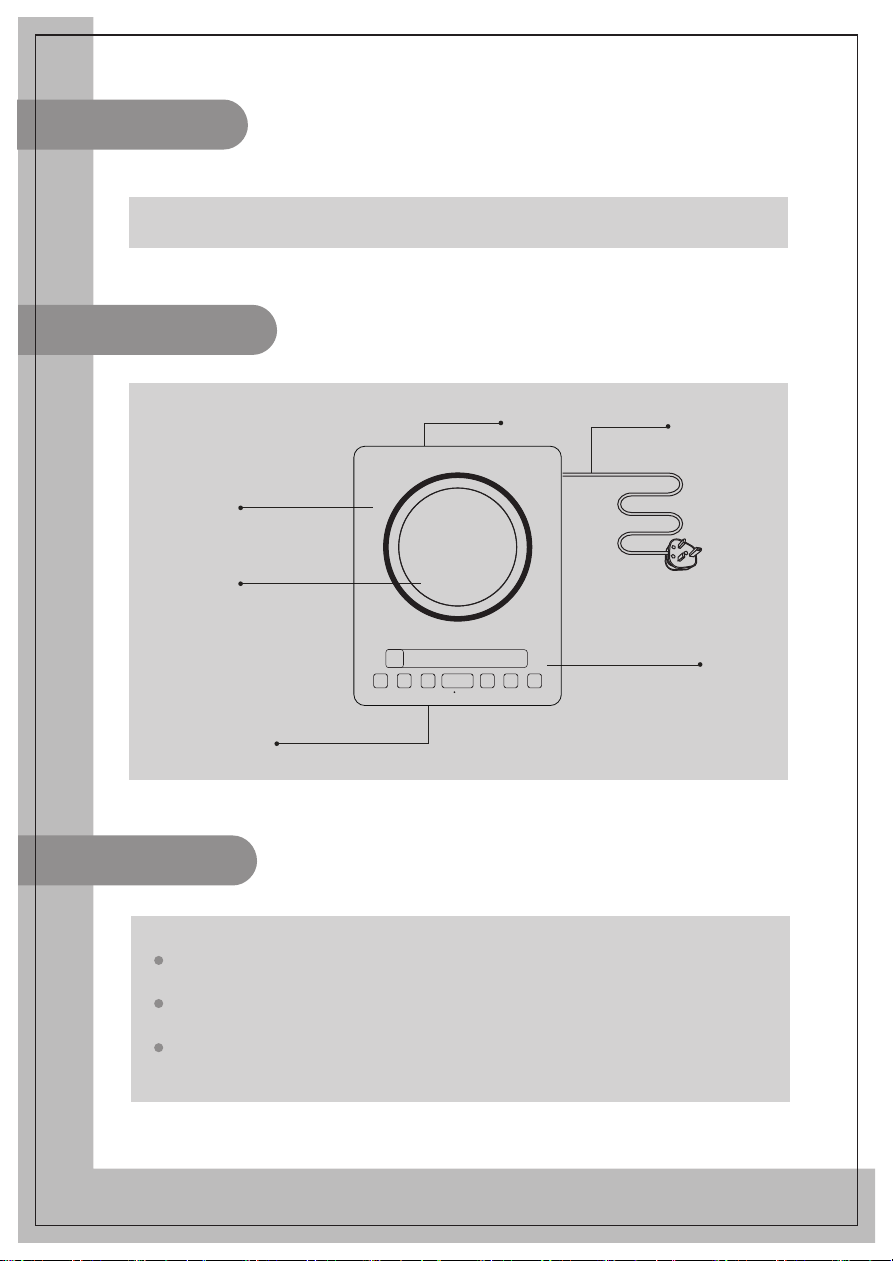
产品简介
本电磁炉适用于家庭烹饪,具体烹饪方法请参见使用说明。
零部件说明
灶面板
烹饪区域
进风口
准备工作
使用前,请先检查插头与插座的接触是否良好。
出风口
电源线
控制区域
放置锅具前,请将锅具外表面和灶面板上的水渍、油污或其它粘附物清洁干净。
把需要加热的锅具放置在电磁炉的正中央,请勿将空锅放置于灶面板上加热。
6
Page 24
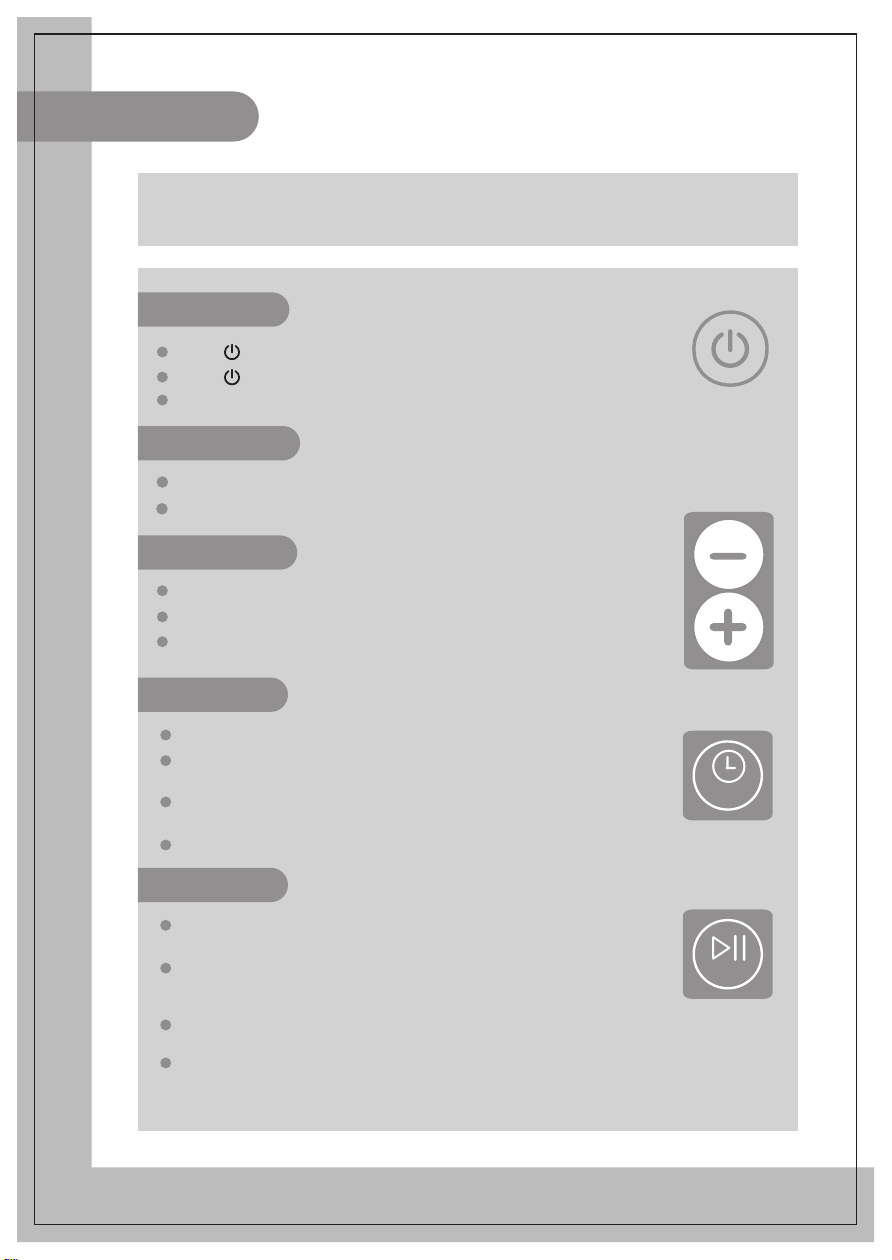
使用说明
特别注意:购买的电磁炉阅读相应的说明。
上电开机
按下“ ”按键后,再按功能键选择相应功能,电磁炉进入工作状态。
按下“ ”按键后,约10秒未按功能键则自动关机。
按下功能键,若不放置合适的锅具,电磁炉将不加热并无锅报警, 约一分钟自动关机。
功能选择
开机后,按下功能键选择想要进入的烹饪功能。
相应的烹饪功能加热过程详见功能烹饪模式说明。
火力调节
选择功能后,若要调节火力,可按火力"+" "-"键进行调节。
部分功能在加热过程中,电磁炉会根据烹饪效果自动控制火力。
个别功能会因烹饪效果而有火力调节限制。
定时调节
若不进行定时操作或无定时功能,电磁炉会以默认加热时间进行加热。
若要定时,先按"定时"键,在定时指示灯亮,显示屏数字闪烁时,
可以按"+" "-"键进行定时时间调节。
定时调节完毕后,显示屏数字闪烁几秒后稳定显示,电磁炉开始
定时时间倒计。
倒计时时间到后,电磁炉自动停止加热并关机。
暂停调节
暂停功能是为了在电磁炉正常工作过程中暂时停止加热而设置。
任意烹饪功能均可切换至暂停状态。
在电磁炉使用过程中,当需要暂停加热时,请按下暂停功能键,
此时,电磁炉暂停指示灯亮,数码管和其他功能灯保持原来状态,
火力指示灯不亮, 电磁炉停止加热。
当电磁炉处于暂停工作状态时,再按“暂停”键或任意烹饪功能
可解除暂停状态,返回正常加热状态。
设定暂停后,电磁炉处于不加热状态;默认暂停时间约为10分钟,
约10分钟后若未取消暂停状态,则电磁炉发出警示声音,持续几
秒后自动关机。
7
定时
暂停
Page 25
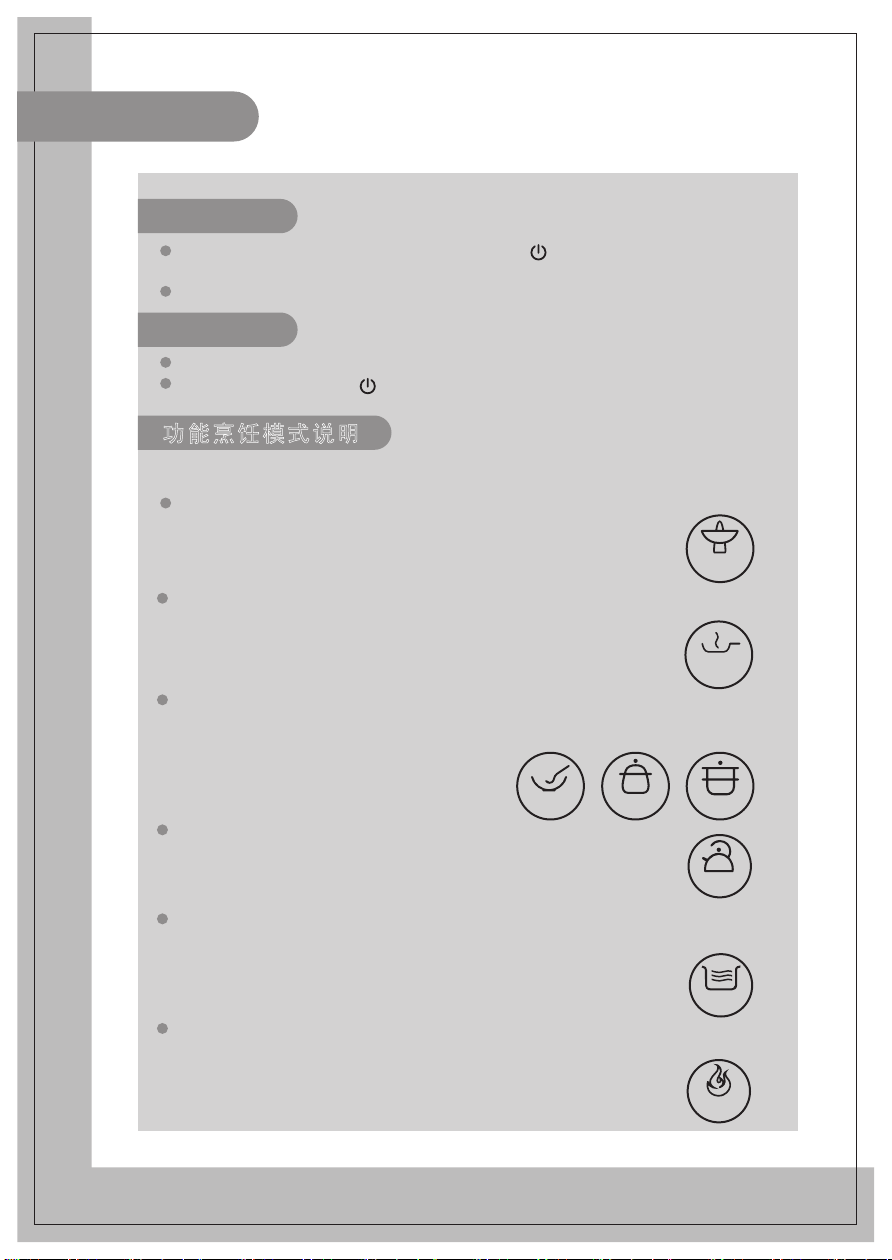
使用说明
童 锁
同时按下"+" "-"键,童锁指示灯亮,这时除可以按" "键关机之外,不能进行
其他按键操作。
再次长按"+" "-"键,即退出童锁状态,童锁指示灯熄灭。
关 机
工作时间到后,电磁炉自动关机。
若要提前关机,请先按下" "键关机。
功能烹饪模式说明
可以根据烹饪效果选择不同的功能烹饪模式,为了方便操作,作以下说明:
火锅烹饪模式适用于火锅、煮水等加热模式,在加热过程中,可随时调节时间和火力。
当锅内水烧干后或者温度偏高异常,电磁炉会自动关机或保护。
炒菜等烹饪模式,适用于炒菜等高温烹饪。在加热过程中,可随时调节时间和火力,
当锅内食物温度达到功能要求的温度点后(不同的功能的最高温度有差异),
电磁炉会出现间歇加热或者停止加热,待温度降低后再恢复加热。
粥、汤、蒸煮等烹饪模式,电磁炉会根据定时时间和锅内食物温度变化自动控制加热
火力。在这些模式下,火力在可调范围内随时可调,约2分钟后电磁炉根据烹饪效果恢
复自动控制火力。其中,煮粥、煲汤功能在工作时间结束后,自动进入两小时的保温。
火锅
炒菜
粥
烧水烹饪模式适用于烧开水,电磁炉在水烧开一段时间后可自动关机。
注意:
1. 建议烧水的水量为锅具容量的30%~80%。
2. 锅具底部不平整,锅具内有水垢或者天气等影响因素,会引起烧水的效果有所偏差。
3. 烧水请选配专用汤锅或水壶。
文火烹饪模式适用于需小火力持续加热的场合。使用此功能进行炖汤、煮粥等烹饪操作时,
请先使用"火锅"模式大火力煮至沸腾,再使用"文火"进行加热。炖煮时间可根据原料的性
质和个人口味而定。
注意:
此功能下火力不可调节。如需调节火力,请切换至" 火锅" 等功能,即可随意调节火力。
武火烹饪模式适用于大火力加热,当锅内食物温度达到功能要求的温度点后(不同的功能的
最高温度有差异),电磁炉会出现间歇加热或者停止加热,待温度点减低后再恢复加热。
蒸煮汤
烧水
文火
武火
8
Page 26
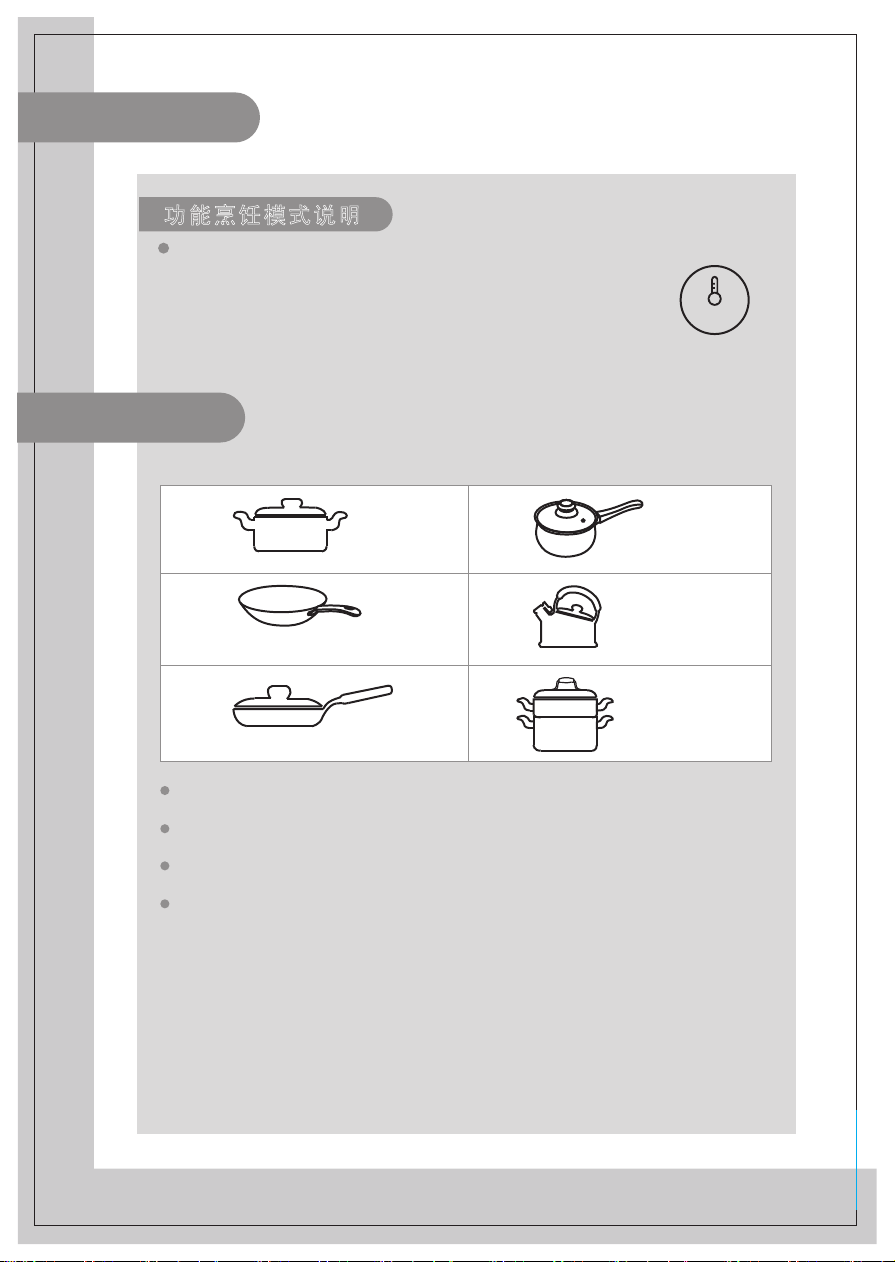
使用说明
功能烹饪模式说明
保温烹饪模式适用于小火保温的烹饪,在此模式下,电磁炉以小火力进行加热,
保持锅内适当温度。
注意:此功能下火力不可调节。
适用锅具
保温
a
铁制汤锅 铁制奶锅
c
铁制炒锅 铁制水壶
e
铁制煎锅 铁制蒸锅
请使用美的配售的锅具,不要使用其它代替锅具,以免使用性能受影响。
炒锅的最大承载重量为4kg,使用时所容纳的食物不要超过此重量,以免产生危险。
尤其不要使用压力类容器,以免发生意外。
如果使用其它锅具,请遵守以下条件:
1 . 锅具材质要求:含有铁质材料。
2 . 形状要求:底部平坦,直径不小于14.5cm,不大于20cm。
注:为了实现良好的效果,请使用标配锅具。
b
d
f
9
Page 27
清洁保养
清洁前请先关机并把电源插头拔离插座,待电磁炉灶面板不烫手后进行。
电磁炉长时间使用后,进/ 出风口会积聚一些灰尘或其它脏污,清洁时请以柔软干布轻拭。
吸气口及排气口灰尘,可用柔软的毛刷子或微型吸尘器清理。
注:请勿用水冲洗。
灶面板的油污垢,可用柔软的湿抹布沾少量牙膏或中性洗洁剂擦拭,然后再以柔软的湿抹
布擦拭至不留残渣。
长时间不使用时,请将电源插头拔离插座,并注意做好炉体的防尘防虫保护。
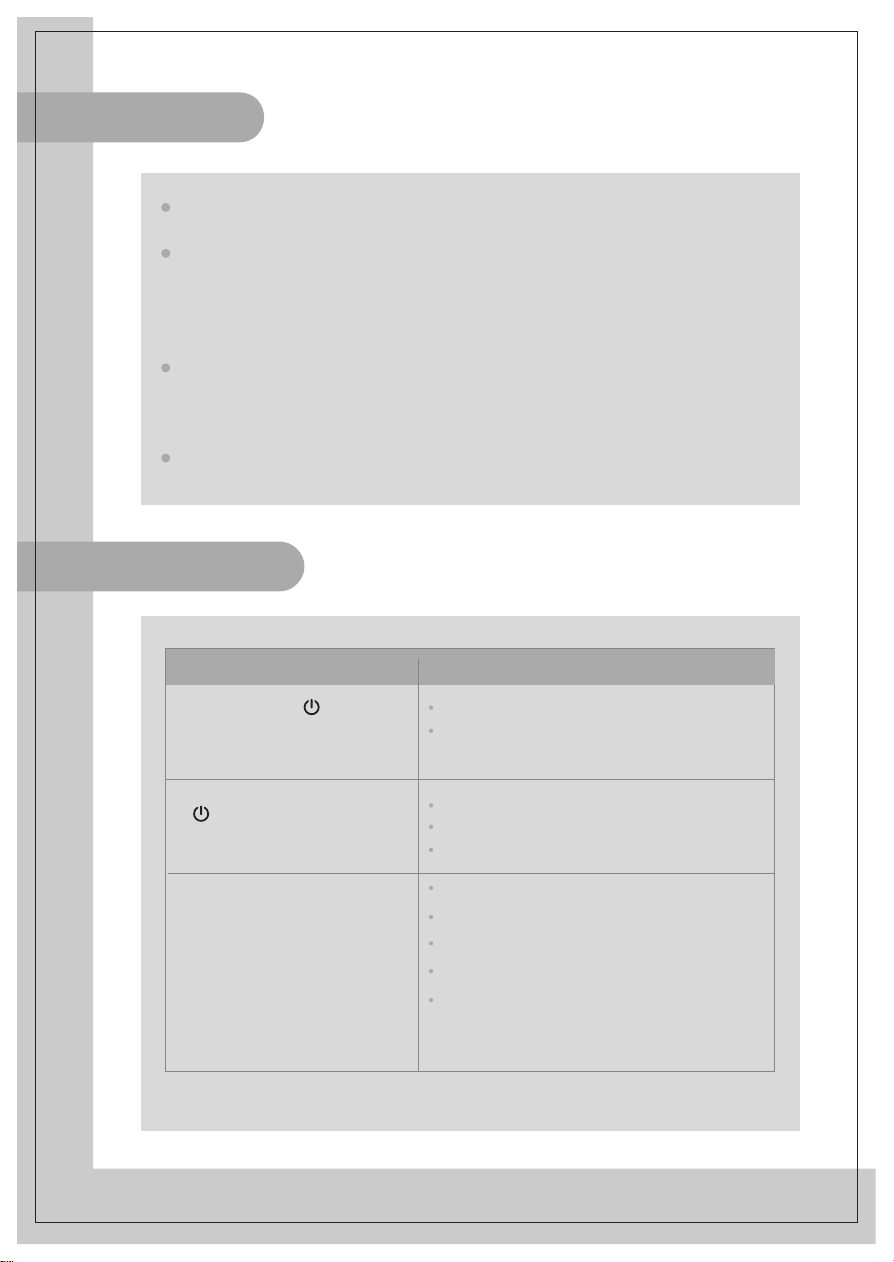
异常现象自检
异 常 现 象 检 查 要 点 及 排 除
插上电源线,按“ ”键后,
指示灯及数码管不亮。
“ ”指示灯亮,
显示正常但不加热。
使用过程中突然停止加热。
插头是否插紧?
开关、插座、保险丝、电源线是否完好?
锅具材料是否符合?
是否处于预约工作状态?
其它原因,请送特约维修网点维修。
是否炒菜时锅具内油温过高?
四周环境的温度是否很高?
电磁炉进风口、出风口是否堵塞?
是否电磁炉加热默认时间已到?
电磁炉安全保护,等几分钟后再通电使用。
10
Page 28
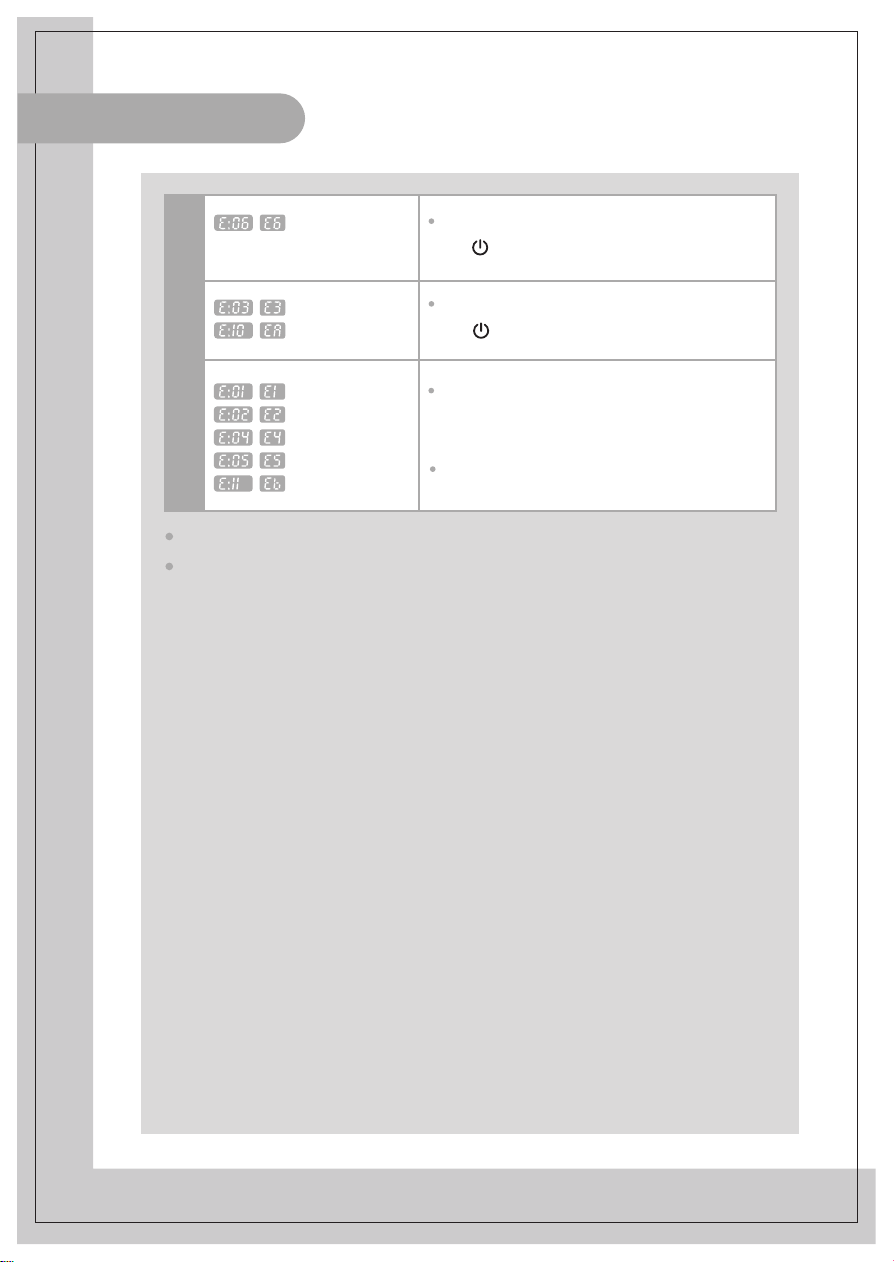
异常现象自检
炉内温度高保护
灶面板温度高保护
电磁炉内部传感
器异常保护
出现保护代码
以上为常见异常的判断与检查,若简单处理无法排除,请送维修网点或向客服进行咨询。
请不要自行拆卸修理,以免发生危险或者对电磁炉造成损害。
电磁炉内部温度高,等温度下降后,
按“ ”键可正常加热
灶面板温度过高保护,待温度下降后,
按“ ”键可正常加热。
电磁炉使用环境温度过低会自动保护,重新开机
或对产品简单预热后,可自动恢复正常工作。
致电客服或专业维修网点进行咨询。
11
Page 29

产品若有技术改进,会编进新版说明书中,
恕不另行通知;产品外观、颜色如有改动,
以实物为准。
 Loading...