

Page 1

OPERATORS MANUAL
Klark Teknik Group,
Klark Teknik Building,
Walter Nash Road,
Kidderminster.
Worcestershire.
DY11 7HJ.
England.
Tel:+44 1562 741515
Fax:+44 1562 745371
Email: sales@ktgplc.com
Website: www.midasconsoles.com
Page 2

Page 3
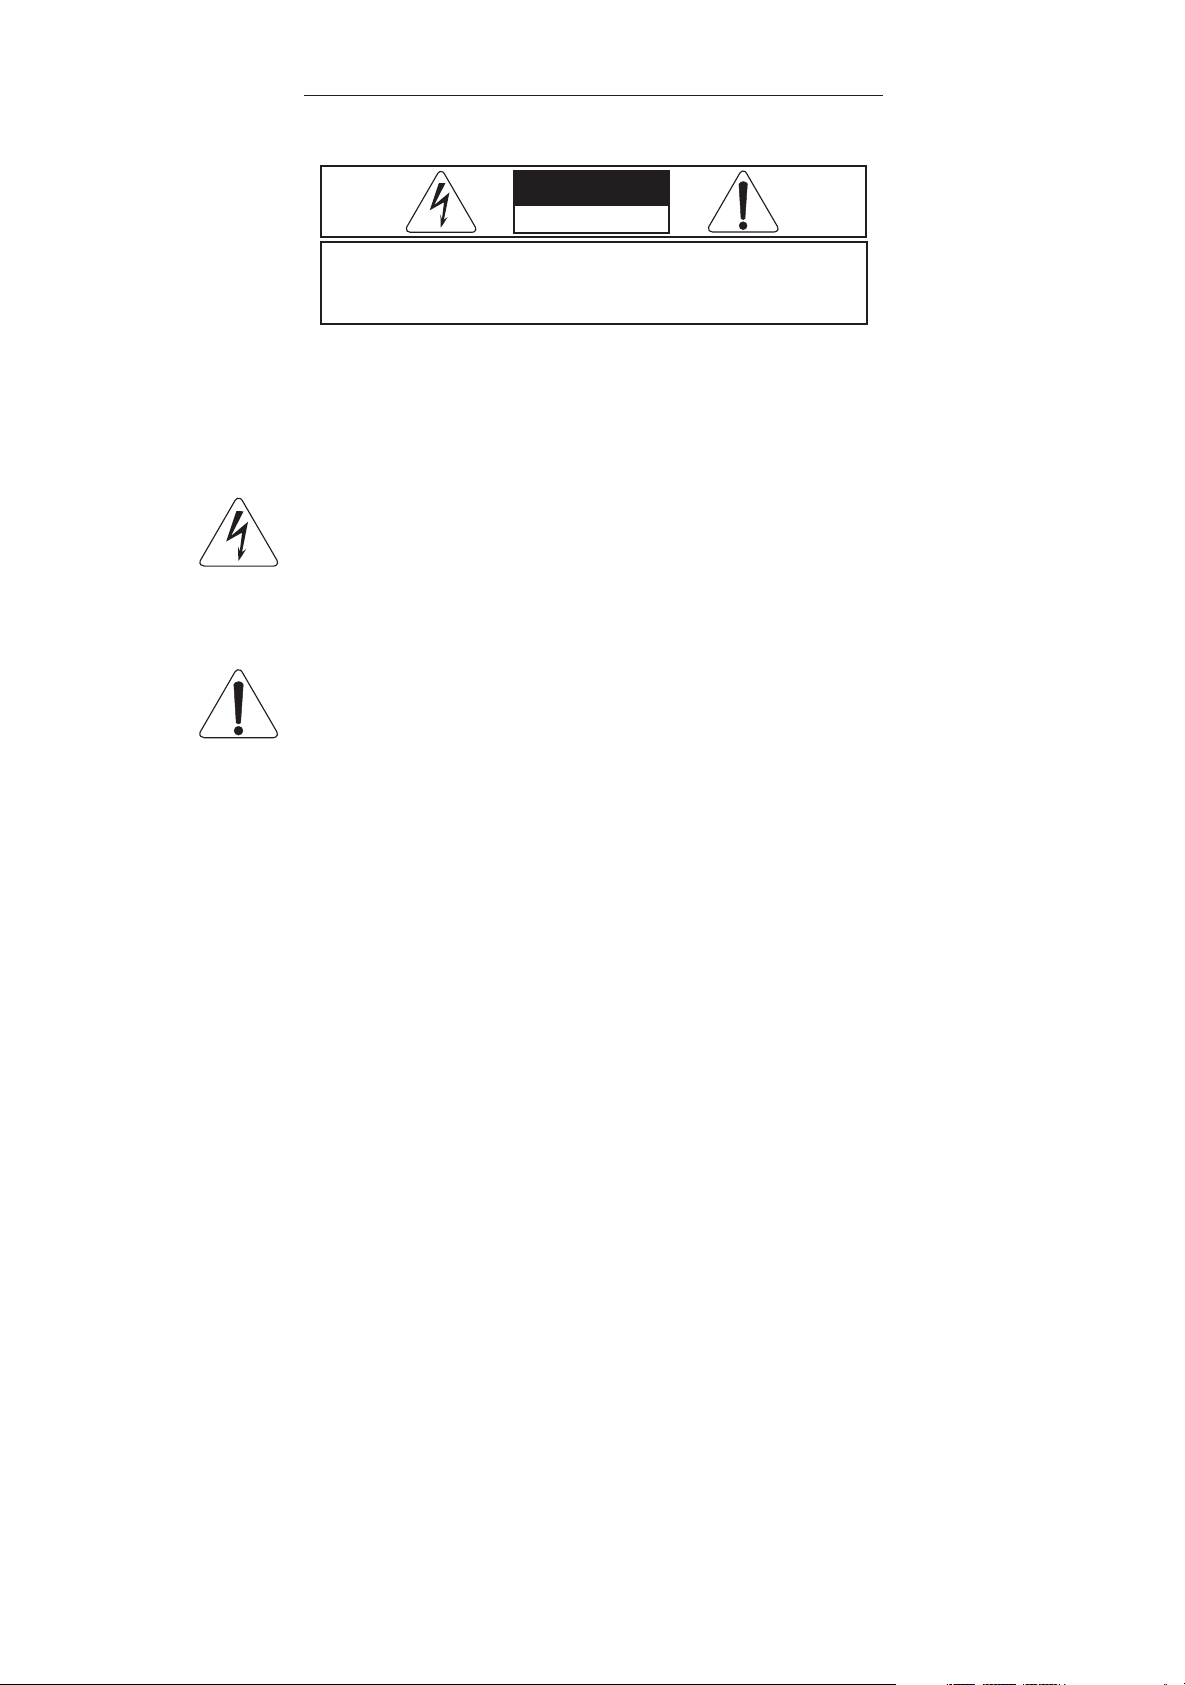
IMPORTANT SAFETY INSTRUCTIONS
CAUTION
RISK OF ELECTRIC SHOCK
DO NOT OPEN
WARNING: TO REDUCE THE RISK OF FIRE OR ELECTRIC SHOCK,
DO NOT EXPOSE THIS APPLIANCE TO RAIN OR MOISTURE
AVIS: RISQUE DE CHOC ELECTRIQUE. NE PAS OUVRIR
These symbols are internationally accepted symbols that warn of potential hazards with
electrical products.
The lightning flash with arrowhead symbol, within an equilateral
triangle is intended to alert the user to the presence of uninsulated
“dangerous voltage” within the product's enclosure that may be of
sufficient magnitude to constitute a risk of electric shock to persons.
The exclamation point within an equilateral triangle is intended to alert
the user to the presence of important operating and maintenance
(servicing) instructions in the literature accompanying the appliance.
1. Read these instructions.
2. Keep these instructions.
3. Heed all warnings.
4. Follow all instructions.
5. Do not use this apparatus near water.
6. Clean only with a dry cloth.
7. Do not block any of the ventilation openings. Install in accordance with the manufacturers
instructions.
8. Do not install near any heat sources such as radiators, heat registers, stoves, or other apparatus
(including amplifiers) that produce heat.
9. Do not defeat the safety purpose of the polarized or grounding-type plug. A polarized plug has two
blades with one wider than the other. A grounding type plug has two blades and a third grounding
prong. The wide blade or the third prong are provided for your safety. If the provided plug does not
fit into your outlet, consult an electrician for replacement of the obsolete outlet.
10. Protect the power cord from being walked on or pinched particularly at plugs, convenience
receptacles, and the point where they exit from the apparatus.
11. Only use attachments / accessories specified by the manufacturer.
12. Unplug this apparatus during lightning storms or when unused for long periods oftime.
13. Refer all servicing to qualified personnel. Servicing is required when the apparatus is damaged in
any way, such as power-supply cord or plug is damaged, liquid has been spilled or objects have
fallen into the apparatus, the apparatus has been exposed to rain or moisture, does not operate
normally, or has been dropped.
Page 4

Page 5
Walter Nash Road, Kidderminster, Worcestershire. DY11 7HJ. England
Tel: +44 1562 741515. Fax: +44 1562 745371
Company Registration No: 2414018
abc abc
SIGNAL PROCESSING BY DEFINITION DESIGNEDFOR APUREPERFORMANCE
DECLARATION OF CONFORMITY
We,
Klark Teknik Group (UK) Plc
of, Klark Teknik Building, Walter Nash Road, Kidderminster, Worcestershire, DY11 7HJ.
Declare that a sample of the following product:-
Product Type Number Product Description Nominal Voltage (s) Current Freq
Verona Professional Audio 115V AC 2.2A 50/60Hz
Mixing Desk 230V AC 1.1A
to which this declaration refers, is in conformity with the following directives and/or standards:-
Directive(s) Test Standard(s)
Generic Standard using EN55103 Limits and Methods
Class B Conduct Emissions EN55103
Class B Radiated Emissions EN55103
Fast Transient Bursts EN61000-4-4
Static Discharge EN61000-4-2
Electrical Safety
EN60065:2002
UL60065-03
Pending
CAN/CSA60065-03
IEC60065-2001
Pending
Pending
Signed:............................ Date: 1st January 2004
Name: Simon Harrison
Authority: Research and Development Director, Klark Teknik Group (UK) Plc
Attention!
Where applicable, the attention of the specifier, purchaser, installer or user is drawn to special limitations
of use which must be observed when these products are taken into service to maintain compliance with
the above directives. Details of these special measures and limitations to use are available on request
and are available in product manuals.
A Subsidiary of Telex Communications, Inc.
Page 6

Page 7

Thank You for using a Midas Verona mixing console. The Verona has been developed to meet the needs of demanding
live sound engineers and meets the quality of build and performance that you would expect from a Midas.
The Verona is an all purpose FOH, Monitor or FOH and Monitor Hybrid console that is quickly and easily configurable.
Each mono input channel offers microphone and line inputs, direct output and insert points and four band sweep
equaliser stage. In addition the Verona has a flexible buss structure allowing the engineer to mix in stereo or LCR.
The Verona, also allows the user to route to any of 20 other busses (8 Auxiliary Busses, 8 Group Busses and 4 Matrix
Busses) for even the most demanding application.
All backed up, of course, by the standard Midas Three Year Warranty.
Please take the time to complete and return the registration card and, to obtain the best results with a minimum of
effort, also read this operators manual.
Finally,
Enjoy your new Midas Verona Console!
Contents
ATTENTION: Installation and power 6
Mono Input Channels 7
Rear Panel and Gain 8
Equalisation 9
Auxiliary Outputs 10
Pan and Routing 11
Metering and Automutes 12
Multifunction Input Channels 13
Rear Panel and Gain 14
Channel Equalisation 15
Auxiliary Outputs 16
Pan and Routing 17
Metering, Automutes and Hints and Tips 18
Output Module 19
Output Module notes 20
Groups 21
Matrix 22
Meters 24
Features 26
Setting up the Verona 27
Functional Block Diagrams 33
Mono Input 34
Multifunction Input 35
Group/Matrix Module 36
Master Module 37
Dimensions and Weights 39
Rear Panel Description 41
Specification and Features 43
Crib Sheet 47
Operators Manual - Page 5
Page 8
ATTENTION
The following special limitations must be observed in order to maintain safety and electromagnetic
compatibility performance.
Power Connection
The console should only be operated with the power
supply connected to ground via the ground in the mains
connector.
Audio Connections
The console should only be operated with high quality
twisted-pair audio cables. All connector shells should be
of metal construction so that they provide a screen when
connected to the console. All jack connector shells should
be connected to the cable screen. All XLR plugs should
have pin one (1) connected to the cable screen.
INSTALLATION
Position
The position of the console will vary from venue to venue. However, when positioning the console for front of house usage it
is worth placing the console in a position where the sound system used can be heard properly from the mix position. Try to
avoid placing the console behind pillars or large objects , or mixing from a level above the speaker position (e.g. from a
balcony).
Also try to avoid placing the console near or on any power distribution units or power amplifiers.
Power
If using an external power supply, it should be located as far away from the console as the connecting cable will allow. The
power supply should be set for the voltage supply available in your area and plugged into the mains outlet using the cable
provided.
Electric Fields
If the console is operated in an electromagnetic field that is
amplitude modulated by an audio frequency signal, the signal to
noise ratio may be degraded. Degradation of up to 60dB may be
experienced under extreme conditions (3V/m, 90%
modulation).
THE POWER SUPPLY SHOULD NEVER BE OPERATED WITH
THE MAINS EARTH DISCONNECTED
Please note that the power supply contains LETHAL VOLTAGES greatly in excess of
the mains voltage and that it’s rails can produce extremely large currents which
!
could burn out equipment and wiring if shorted. All testing and servicing should
ONLY be carried out by a qualified engineer.
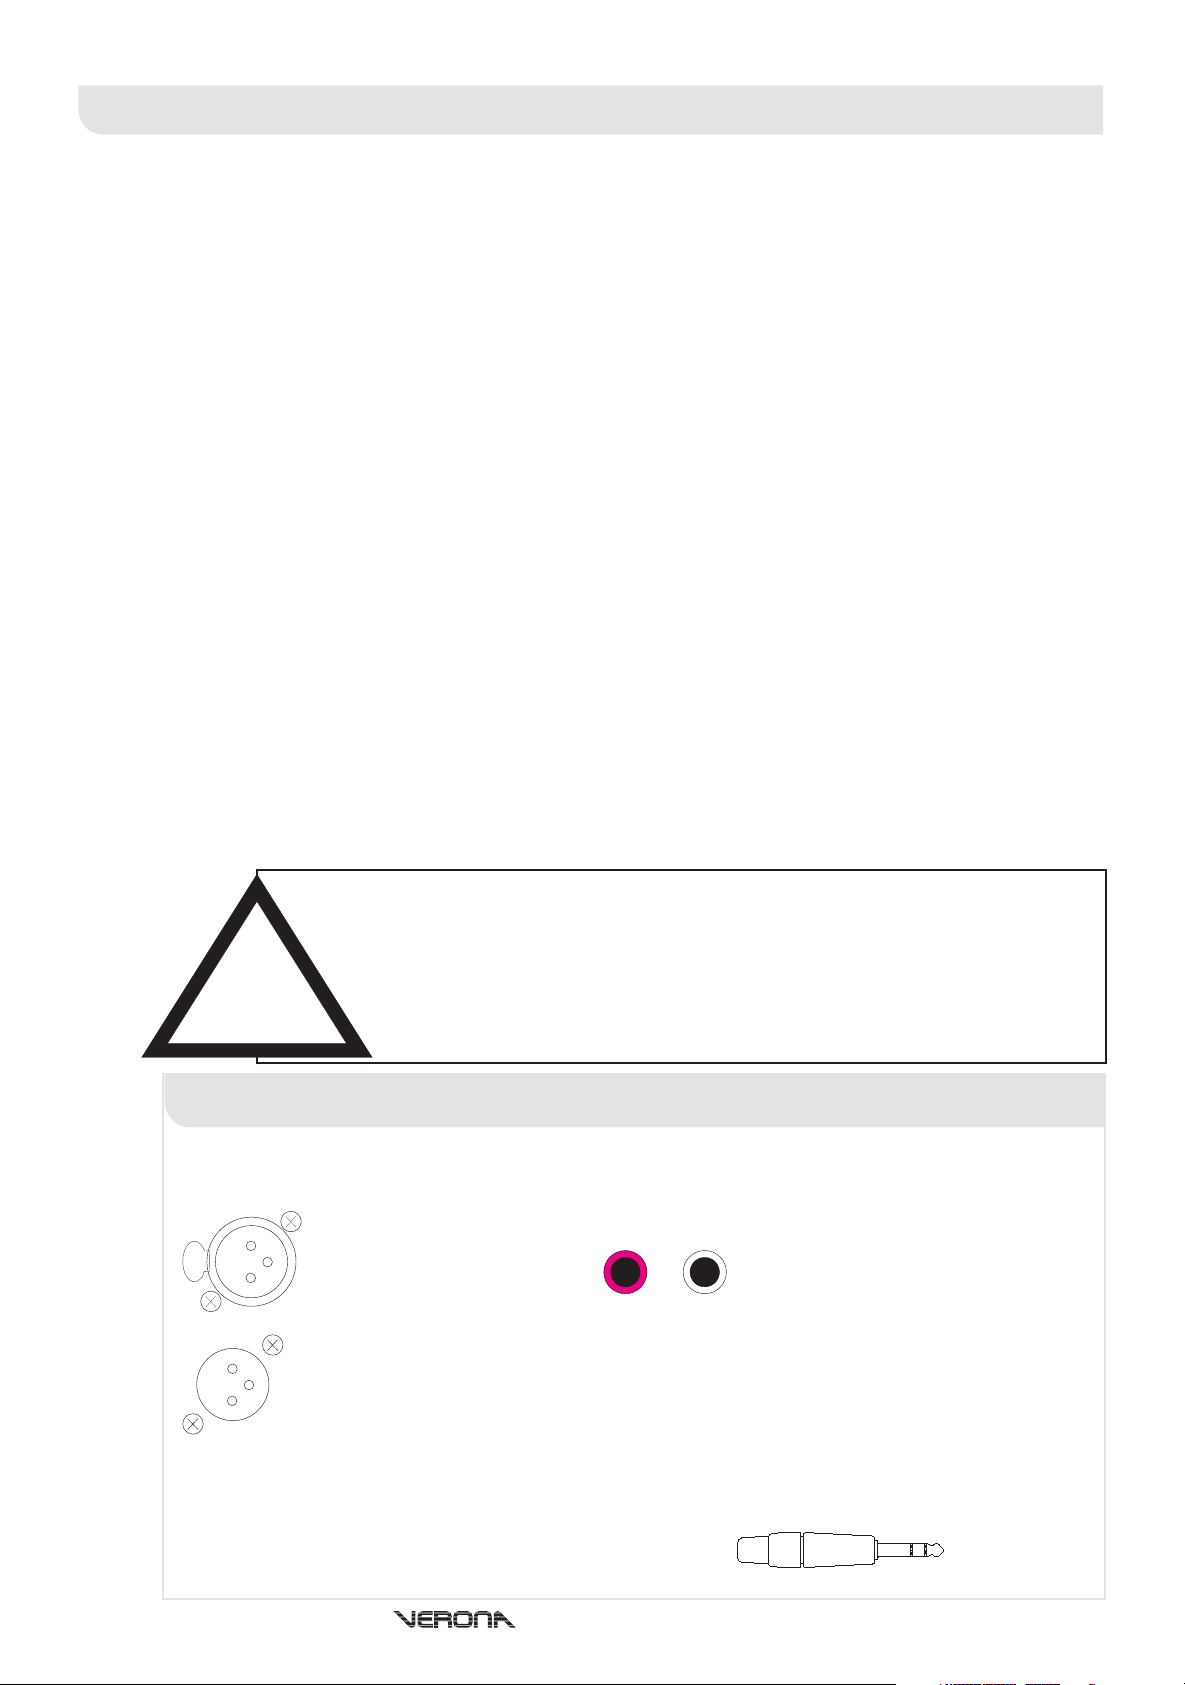
Connections
To ensure the correct and reliable operation or your Midas Verona console, only high quality screened twisted pair
audio cable and metal bodied connectors should be used.
Female XLR
1
2
Pin 1 - Screen/Ground
3
Pin 2 - Hot Signal
Pin 3 - Cold Signal
Male XLR
2
3
1
Note: Sockets are viewed from the front face.
Quarter Inch Jack
TRS Signal TRS Insert TRS Headphone
Sleeve Screen/Ground Screen/Ground Screen/Ground
Ring Cold Signal Insert Return Right
Tip Hot Signal Insert Send Left
Pin 1 - Screen/Ground
Pin 2 - Hot Signal
Pin 3 - Cold Signal
RCA (Tape In/Out)
Centre - Signal
Surround - Screen
The Venice’s Tape In/Out sockets are
unbalanced and operate at a nominal
signal level of -10dBu.
For increased protection against
interference use metal bodied RCA plugs.
Operators Manual - Page 6
Page 9
Mono Input Channel
Operators Manual - Page 7
Page 10
Mono Input ChannelsMono Input Channels
48v -15
padpower
+30 +45
mic gain
O
mic
60
hi-pass
20
-15 +15
5k 10k
treble
2k
-15 +15
1k
hi-mid
4003k8k
300 1k
lo-mid
100
-15 +15
50 100
bass
20
-15
aux pre
eq
off
aux 1
aux 2
aux 3
aux 4
aux 5
aux 6
aux 7
pre
aux 8
pre
groups
1-2
3-4
5-6
7-8
mono
stereo
c
lr
pan
groups master
pan si s
MUTE
SOLO
10
18
12
5
-18
0
5
mute 1
10
15
mute 2
20
mute 3
30
40
mute 4
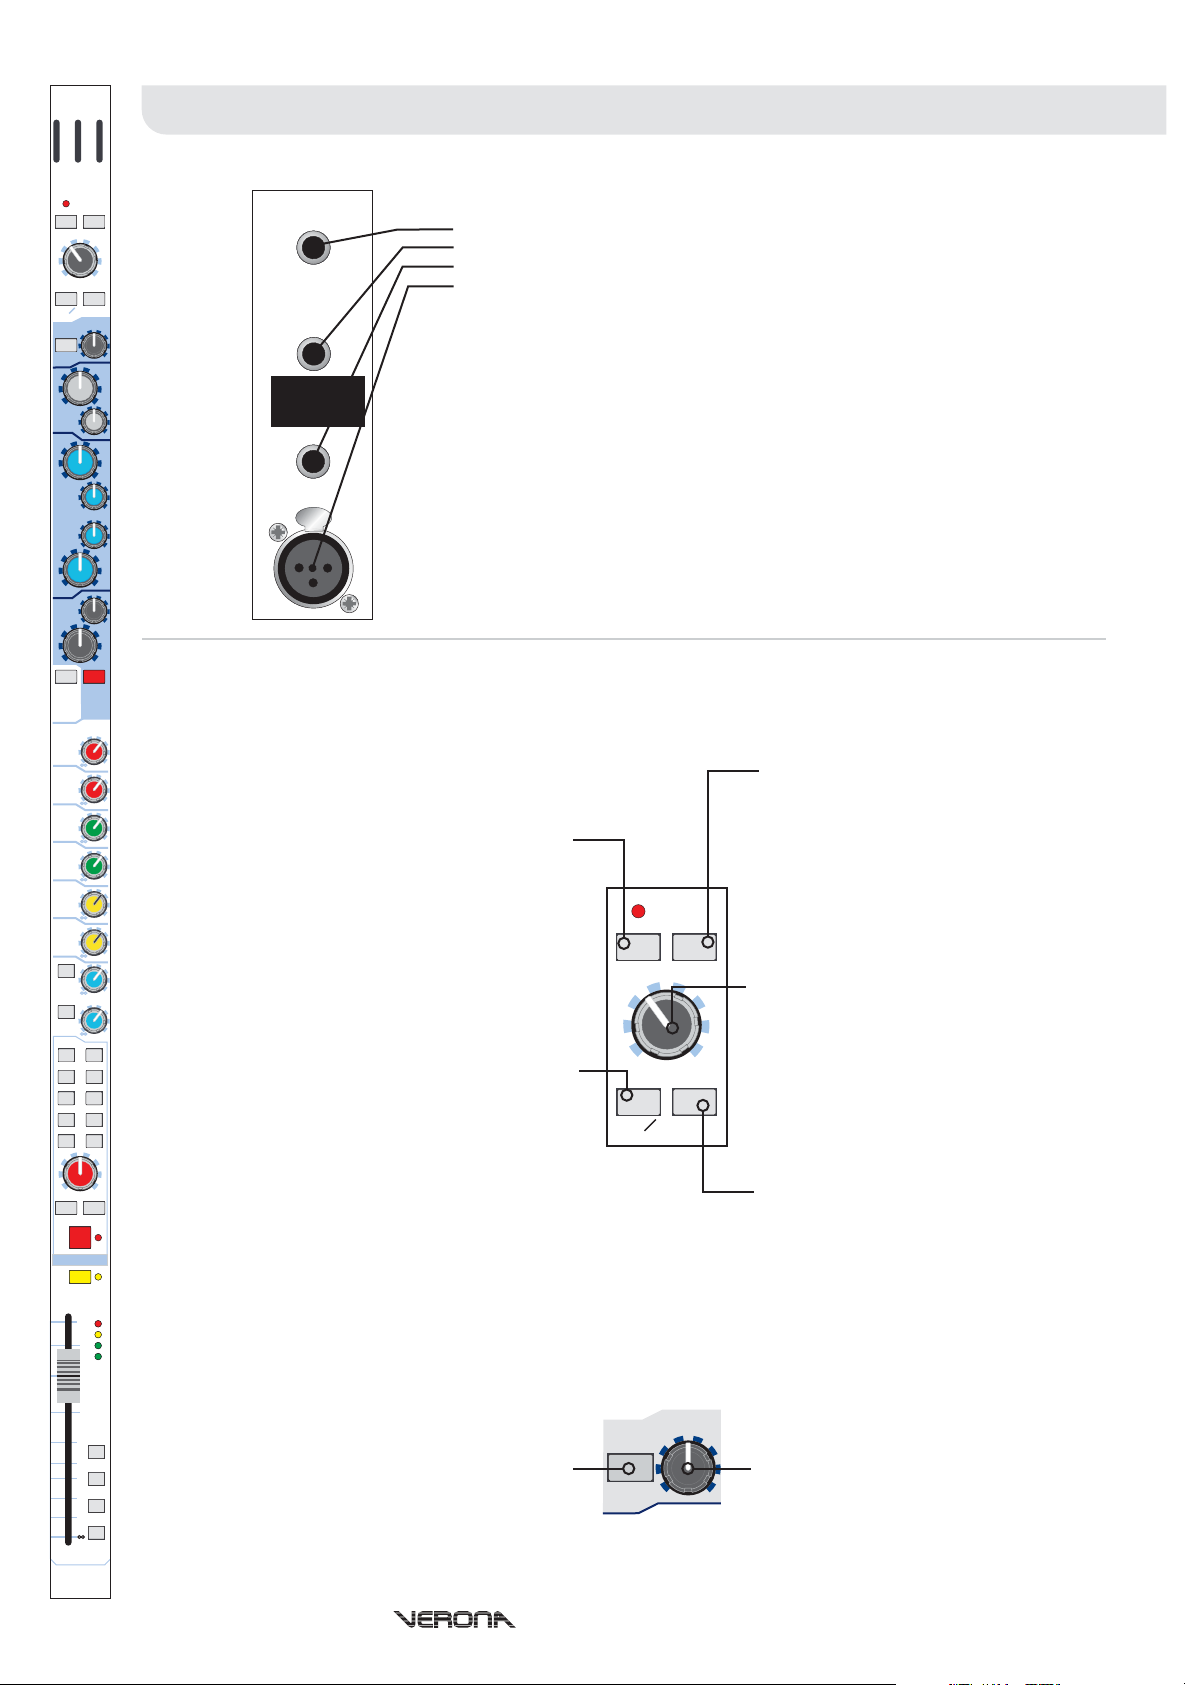
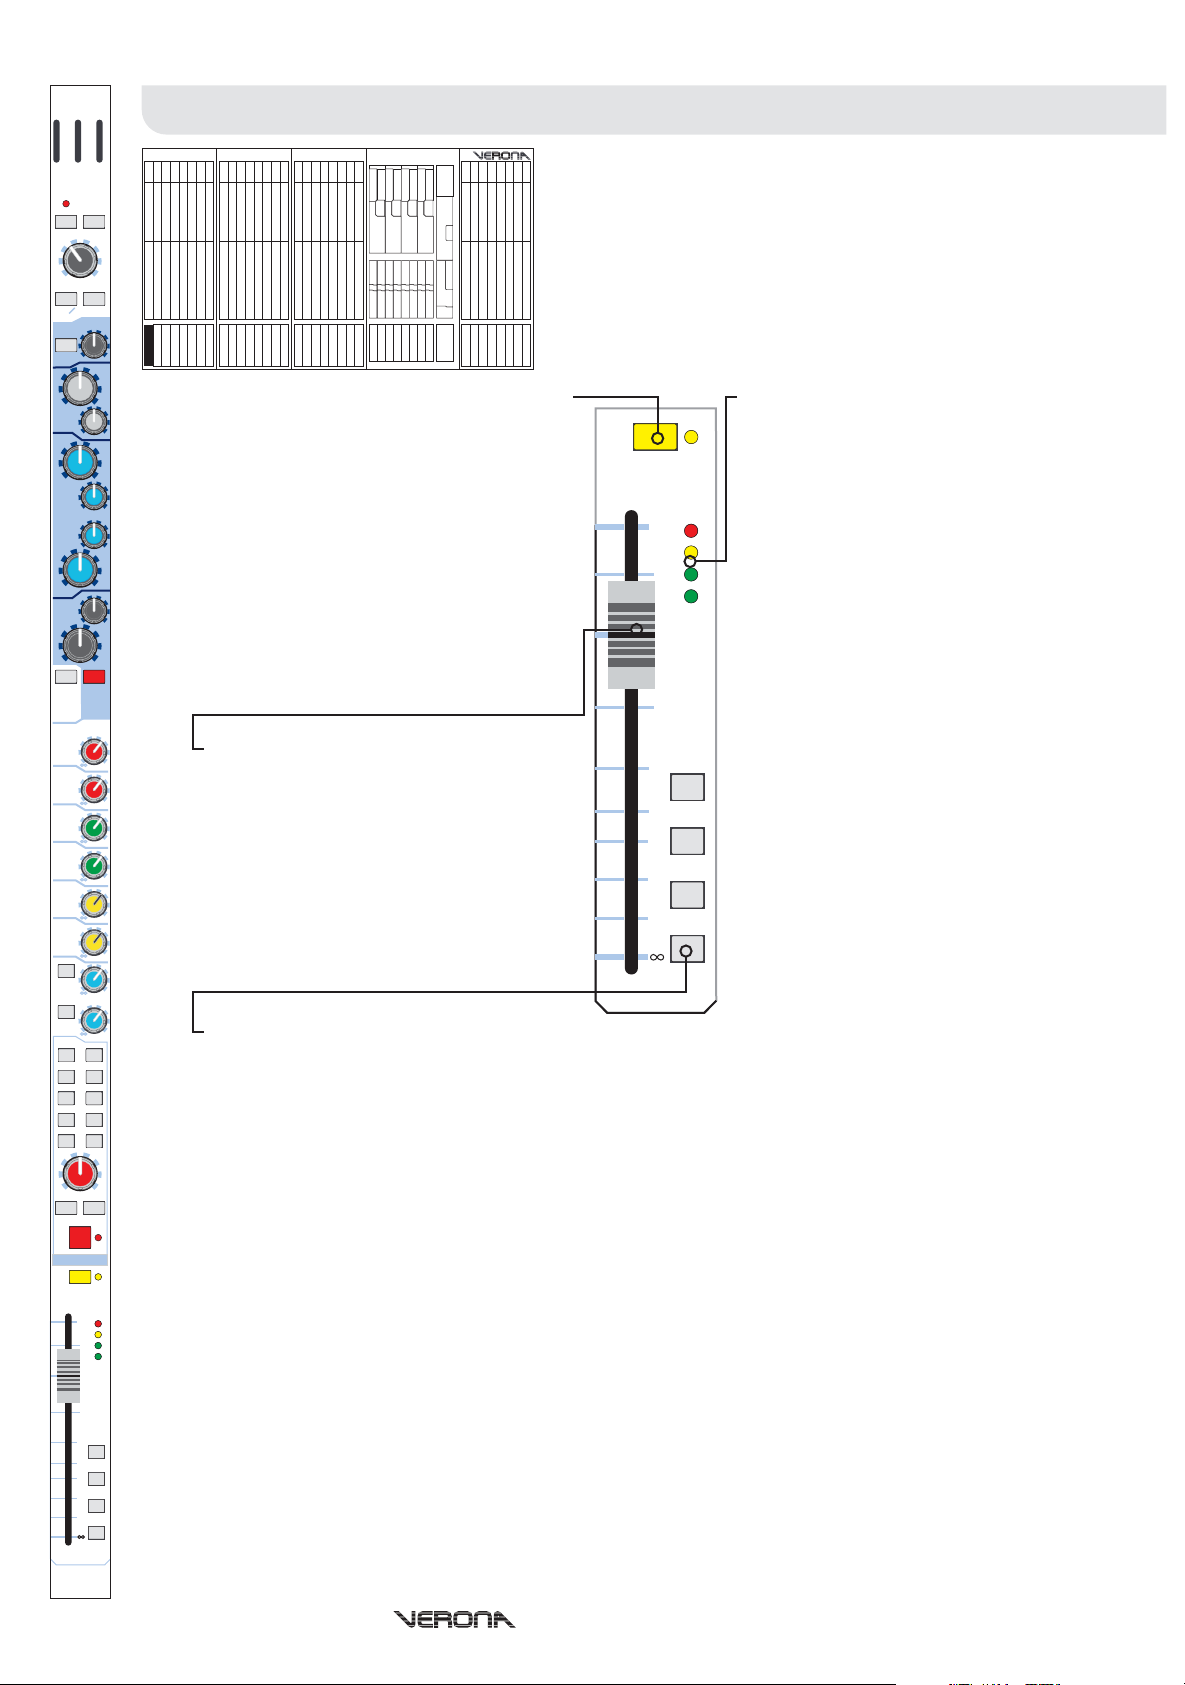
Rear Panel
insert
The Verona channel inputs are located on the rear of the console.
Each mono channel provides
one insert point on a single TRS jack socket.
one direct output on a single impedance balanced quarter-inch jack socket
+60+15
ins
160
400
51
direct
out
line L
line in left
(stereo only)
line in right
20k
line
in
one line in quarter-inch TRS balanced jack socket
one mic XLR female
The insert point is unbalanced and requires a conventionally wired insert lead where:
- Channel Signal Send
Tip
- Channel Signal Return
Ring
Sleeve
- Signal Common Ground
The direct out and insert points operate at a nominal level of 0dBu.
Balanced XLR and Jack inputs are conventionally wired:
mic
PUSH
2k
200
+15
Front Panel
eq
on
The actual number of mono input channels on your Verona will depend upon your choice of frame, however functionality
0
remains the same
+6
0
+6
0
+6
0
+6
0
+6
0
+6
0
+6
0
+6
48V Power - When depressed, the Verona
will apply 48 volts phantom power to the
microphone input. This is used to power
condenser microphones, direct inject boxes
and other devices that require phantom
power.
The red phantom LED will light to indicate
that 48V phantom is in operation.
Mic Ø - The mic phase switch, when
depressed, causes a 180 degree phase
change (with respect to the input signal) to
occur in the input amplifier such that the
channel signal will have opposite polarity to
- 1. Screen - 2. Hot Signal - 3. Cold Signal
XLR
- T. Hot Signal - R. Cold Signal - S. Screen
TRS
: Direct outputs as standard are set post EQ pre mute, however there is an
Note
internal jumper which will set them pre EQ and pre insert
(refer to the service manual
or contact your authorised Midas service agent).
-15dB Pad - The Pad switch provides 15dB
attenuation to the input signal allowing for
the connection of high output microphones
and line level signals without overloading
the channel input amplifier. Overloads are
indicated on the in-channel meter by the
red LED at the top.
48v -15
padpower
+30 +45
Mic Gain - The mic gain is continuously
variable from +15dB to +60dB (0dB to
+45dB with the Pad enabled). The actual
value of the gain required will depend upon
the source and should ideally be set such
mic gain
+60+15
that peaks in level on the input should not
mic
O
ins
cause the input amplifier to overload
(occasional peaks of +12dB is okay, +18dB
is too high).
the input signal.
Ins - The ins switch enables the channel
The mic phase switch is commonly needed
where two microphones are used facing
each other (for example when using a
microphone on both the top and bottom of a
insert point by connecting the insert return
to the channel signal path so that
compressors, gates or other dynamic and
signal processors or effects can be used.
snare drum). Ordinarily the two
microphones would be out of phase causing
0
cancellation when the console sums the two
signals into the output. Reversing the phase
of one signal causes the microphones to
have the same phase and no cancellation.
60
160
Hi-Pass - The high pass switch enables
high pass filter on the microphone input.
This is commonly used to remove handling
hi-pass
20
400
High Pass Frequency - The cutoff
frequency of the high pass filter is
continuously variable from 20Hz to 400Hz.
noise, bass rumble through coupling with
the stage or mains hum.
MIDAS
Operators Manual - Page 8
Page 11
48v -15
padpower
+30 +45
mic gain
O
mic
60
hi-pass
20
-15 +15
5k 10k
treble
2k
-15 +15
1k
hi-mid
4003k8k
300 1k
lo-mid
100
-15 +15
50 100
bass
20
-15
aux pre
eq
off
aux 1
aux 2
aux 3
aux 4
aux 5
aux 6
aux 7
pre
aux 8
pre
groups
1-2
3-4
5-6
7-8
mono
stereo
c
lr
pan
groups master
pan si s
MUTE
Mono Input ChannelsMono Input Channels
Channel Equalisation
+60+15
ins
160
400
20k
-15 +15
5k 10k
treble
Treble (Gain)
a centre detent at 0dB.
Treble (frequency)
- The gain of the treble equaliser is continuously variable from -15dB to +15dB with
2kHz to 20kHz.
2k
Hi-Mid (Gain)
200
+15
eq
on
0
+6
0
+6
0
+6
0
+6
0
+6
0
+6
0
+6
0
+6
-15 +15
1k
hi-mid
4003k8k
300 1k
lo-mid
100
-15 +15
50 100
bass
20
-15
aux pre
eq
off
with a centre detent at 0dB.
Hi-Mid (frequency)
400Hz to 8kHz.
Lo-Mid (frequency)
100Hz to 2kHz.
2k
Lo-Mid (Gain)
with a centre detent at 0dB.
Bass (frequency)
to 200Hz.
200
Bass (Gain)
centre detent at 0dB.
+15
- The Equaliser can be enabled by depressing the EQ On switch. Otherwise changes on the
EQ On
Equaliser controls have no effect. This can be used to compare the sound with and without EQ
eq
during sound check.
on
EQ Off (aux pre)
- The gain of the hi-mid equaliser is continuously variable from -15dB to +15dB
- The gain of the lo-mid equaliser is continuously variable from -15dB to +15dB
- The centre frequency of the bass equaliser is continuously variable from 20Hz
- The gain of the bass equaliser is continuously variable from -15dB to +15dB with a
- If desired, the channel signal can be sent to the auxiliary outputs without
equalisation. Depressing the EQ Off (Aux Pre) switch causes pre-fader auxiliary sends 1-6 to be
sourced before the channel equaliser (Pre-EQ) as the factory standard. However aux sends 7-8 can be linked to
the pre EQ off switch, as well as 1-6, via an internal jumper (refer to the service manual or contact your
authorised Midas service agent). Note: Post fader sends are always Post EQ.
Each mono input channel of the Verona has a four (4) band sweep EQ
allowing tonal control over the input signal.
- The centre frequency of the treble equaliser is continuously variable from
- The centre frequency of the hi-mid equaliser is continuously variable from
- The centre frequency of the lo-mid equaliser is continuously variable from
SOLO
10
10
15
20
30
40
MIDAS
5
0
5
18
12
0
-18
mute 1
mute 2
mute 3
mute 4
Operators Manual - Page 9
Page 12
48v -15
padpower
+30 +45
mic gain
O
mic
60
hi-pass
20
-15 +15
5k 10k
treble
2k
-15 +15
1k
hi-mid
4003k8k
300 1k
lo-mid
100
-15 +15
50 100
bass
20
-15
aux pre
eq
off
aux 1
aux 2
aux 3
aux 4
aux 5
aux 6
aux 7
pre
aux 8
pre
groups
1-2
3-4
5-6
7-8
mono
stereo
c
lr
pan
groups master
pan si s
MUTE
Mono Input ChannelsMono Input Channels
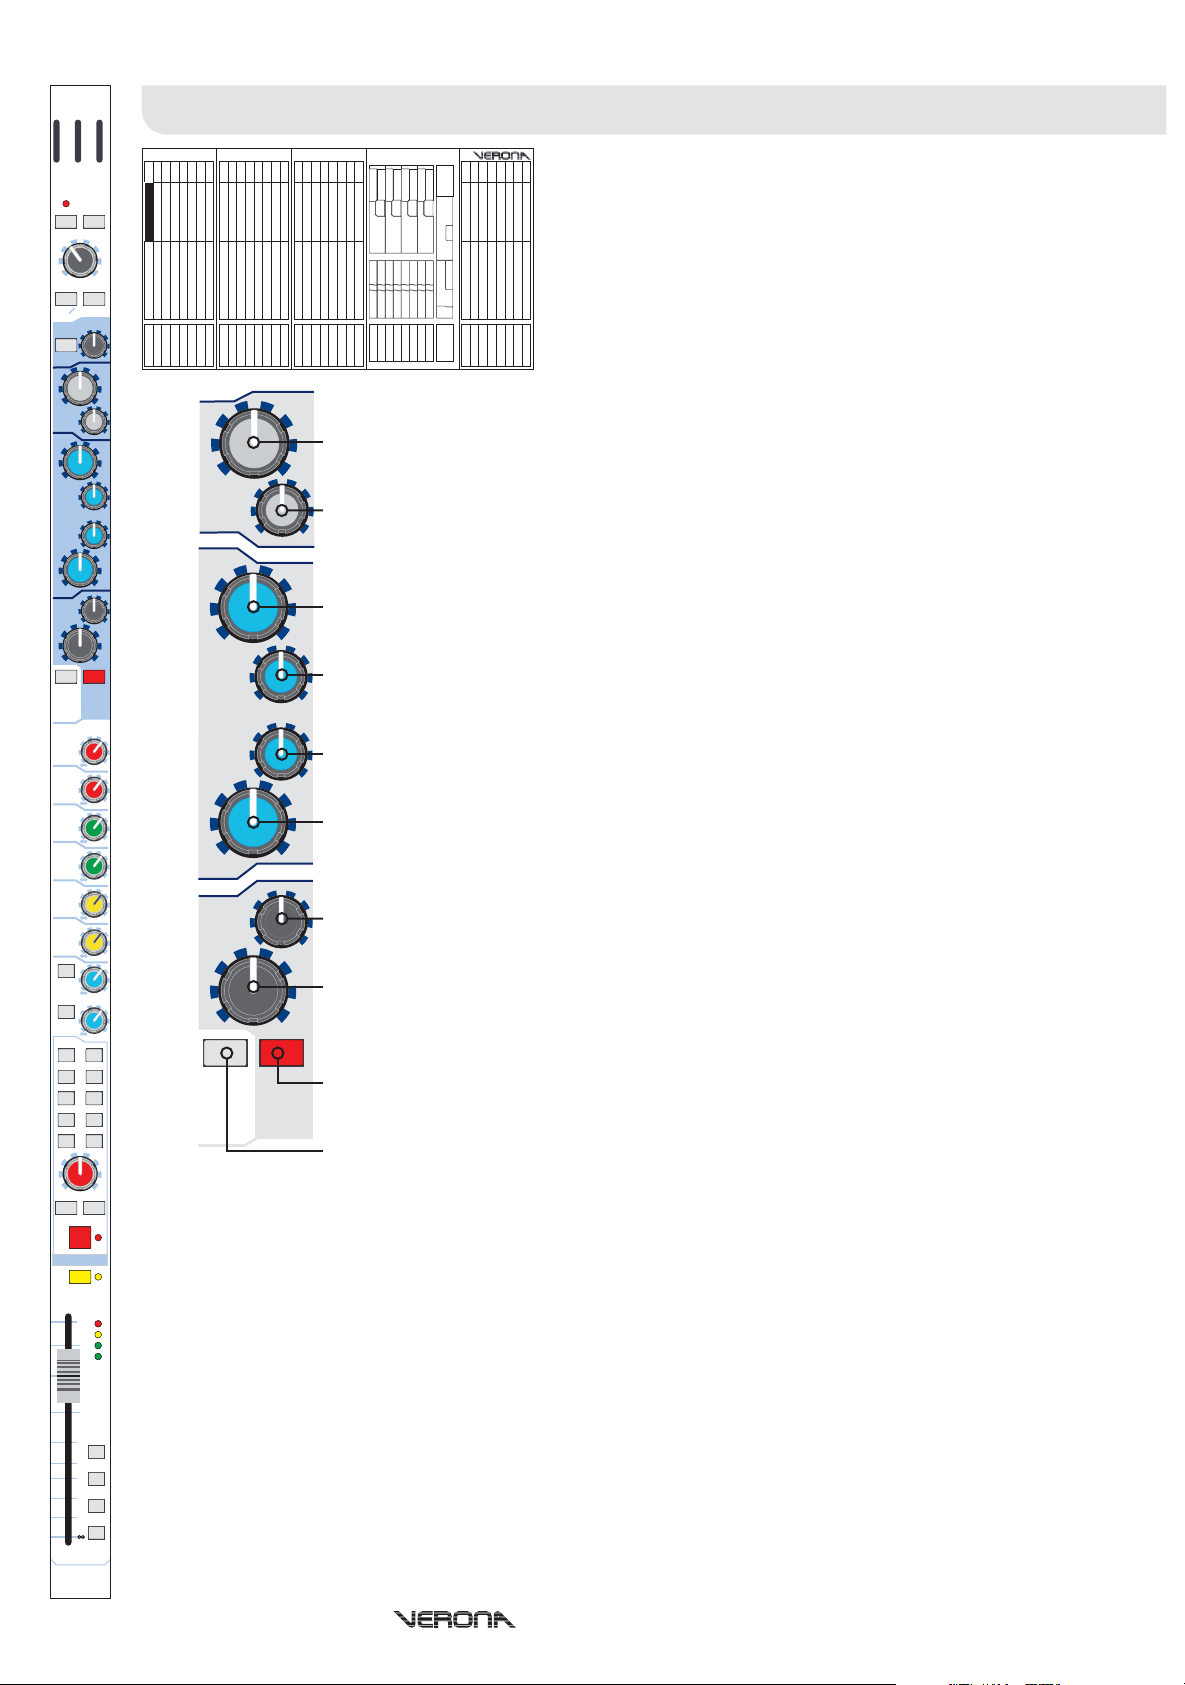
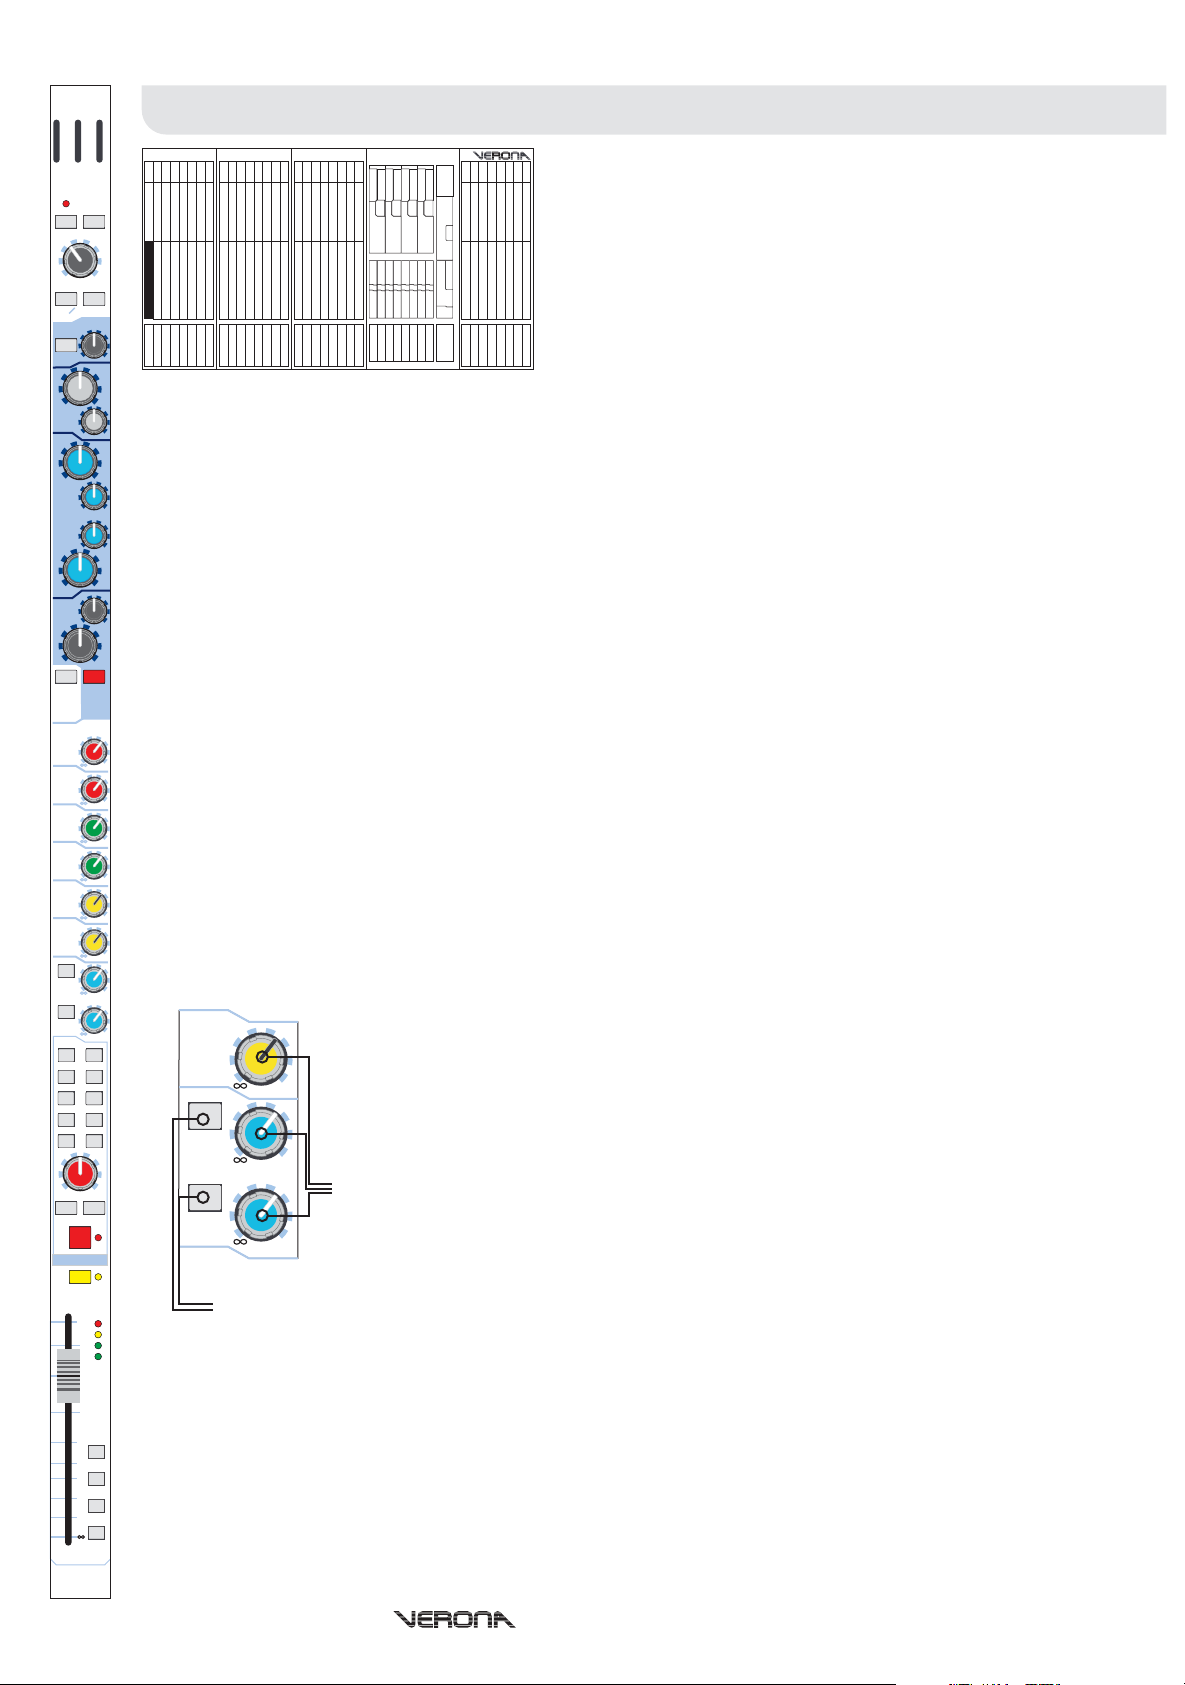
Auxiliary Outputs
+60+15
ins
160
400
20k
switch is depressed). As a result, the actual level sent to the aux buss is proportional to the aux send control only.
Post-Fade
aux sends are sourced after the channel Insert, Mute, EQ and channel Fader. As a result, the actual
level sent to the aux buss is proportional to the aux send control AND the channel fader.
Typical uses of auxiliaries are:
2k
Application Pre/Post Fade Reason
Stage Monitors Pre (Post-EQ) The level in the monitor stays constant so that
200
+15
eq
on
0
+6
0
+6
0
+6
0
+6
0
+6
0
+6
0
+6
0
+6
aux 6
aux 7
pre
aux 8
pre
Effects Sends Post The level sent to the effects is proportional to the
Multi Track Recording Pre (Pre-EQ) The recording is made at constant level without
or Monitors from FOH any equalisation so that changes in the mix level
Mixed Recording Post(Post-EQ) If the aux is set to unity, the FOH mix is
(for the artist) replicated on the aux output including EQ but
Aux sends 1 through 6 are globally switched Pre or Post Fader. However, Aux 7 and 8 may be
0
individually sourced either Post Fader or Pre Fader using the selector switch on the channel and
can not be set pre-EQ. However aux sends 7-8 can be linked to the pre EQ off switch, as well as 16, via an internal jumper (refer to the service manual or contact your authorised Midas service
+6
0
agent).
Please note that, for illustration purposes, auxiliary 1 through 5 sends have been omitted but work
in the same manner as auxiliary 6 (illustrated).
+6
0
+6
Aux Send Level
- The auxiliary send level is continuously variable from off (-inf) to +6dB.
The Verona has 8 auxiliary outputs which can be used for effects sends,
monitors or as extra assignable outputs from the console.
Pre-Fade
auxiliary (aux) sends are sourced after the channel Insert,
Mute and EQ but before the channel fader (and EQ if the Aux Pre EQ
the engineer can change the FOH level without
affecting the performer.
level on the fader so the balance between wet
(processed) and dry (un-processed) sound
stays the same even when the channel level is
changed
and EQ can be set in post-production. (You can
also use the Direct Out for this but the output will
be at unity).
excluding PAN
.
SOLO
10
10
15
20
30
40
MIDAS
5
0
5
18
12
0
-18
mute 1
mute 2
mute 3
mute 4
Aux 7/8 Pre
- Auxiliary 7 and 8 sends are assignable Pre of Post fader. When depressed, the auxiliary is sources
pre-fader (i.e. the channel fader has no effect upon the level of the signal sent to the auxiliary).
Note: When a channel Mute is enabled, aux sends for the channel are also muted.
Operators Manual - Page 10
Page 13
48v -15
padpower
+30 +45
mic gain
O
mic
60
hi-pass
20
-15 +15
5k 10k
treble
2k
-15 +15
1k
hi-mid
4003k8k
300 1k
lo-mid
100
-15 +15
50 100
bass
20
-15
aux pre
eq
off
aux 1
aux 2
aux 3
aux 4
aux 5
aux 6
aux 7
pre
aux 8
pre
groups
1-2
3-4
5-6
7-8
mono
stereo
c
lr
pan
groups master
pan si s
MUTE
SOLO
10
18
12
5
-18
0
5
mute 1
10
15
mute 2
20
mute 3
30
40
mute 4
MIDAS
Mono Input ChannelsMono Input Channels
Pan and Routing
+60+15
ins
160
400
20k
Group sends are post channel equalisation, mute and fader.
The group sends can be configured in either of two modes:-
1.
Pre-Pan (mono)
Each group is sent the same mono signal.
2k
i.e. Selecting 1, 2 & 3 will send to each group equally.
2.
Post-Pan (stereo)
200
Each pair of groups behave as if they were stereo groups. The mono signal is positioned in a stereo field by
the pan control. The Left signal is routed to the odd numbered buss and the right to the even numbered
+15
buss.
i.e. Selecting groups 1, 2 & 3 with pan hard left will result in signal being routed to groups 1 & 3 only.
eq
on
0
+6
0
+6
0
+6
0
+6
0
+6
0
+6
0
+6
0
+6
This configuration is made by depressing the ‘Groups Pan’ key for stereo group operation or released for mono
group mode.
This selection, however, is on a channel-by-channel basis and so some may be assigned to the groups as mono or
as stereo depending upon the desired usage.
For example:
Group 1-8
Similarly, with pan hard right, signal will be sent only to group 2.
Application Config. Reason
Multitrack Recording Mono Inputs can be sent to a particular input on the multitrack recorder
Alternative/Delay Output Stereo The Group would behave in the same manner as the stereo
- Depressing the group switch
routes the channel signal to the group
busses as described above.
Mono
- Depressing the mono switch routes
the channel signal to the mono buss (postEQ, mute and fader).
Pan
- The pan control allows the channel
signal to be positioned in a stereo field when
routed to the stereo buss or when group
sends are configured to be stereo. The pan
control allows continuous adjustment of the
0
image from hard left, to hard right with a
centre detent and obeys a constant power
law (i.e. -3dB at the centre so that the
output power remains at unity).
Groups Pan
- As described above the
Verona’s group sends may be configured by
depressing the ‘Groups Pan’ key for stereo
group operation or released for mono group
mode.
The Verona is a flexible mixing console with eight group buss outputs
plus stereo and mono outputs.
Groups
Signal can be routed to any of the eight group busses by depressing
the corresponding group select switch.
without affecting the stereo image used at FOH.
output allowing for separate levelcontrol but retaining the original
stereo image from FOH.
groups
mono
1-2
3-4
5-6
7-8
stereo
Stereo
routes the channel signal to the stereo
(main left and right) buss (post-EQ, pan,
mute and fader).
Master SIS
enable the spacial imaging system
whereby the channel pan control operates
in a different way. When panned hard left,
signal is routed to the stereo left output as
normal, similarly when panned hard right,
the signal is routed to the stereo right
- Depressing the stereo switch
- The master SIS switch will
output as normal. However, when panned
c
centre, the signal is routed ONLY to the
mono output creating a LCR (left-centreright) system instead of the normal LR
(left-right) system.
lr
pan
You may use SIS mode if using a centre
speaker for speech or solo instruments
groups master
pan s i s
MUTE
while retaining the stereo for backing
vocals and instruments.
Mute - The mute switch mutes the channel
signal. Note that signal will still be sent to
the insert point and to the direct output.
The mute status of the channel is indicated
by the corresponding mute LED
Operators Manual - Page 11
Page 14
48v -15
+30 +45
mic gain
O
mic
60
hi-pass
20
-15 +15
5k 10k
treble
2k
-15 +15
1k
hi-mid
4003k8k
300 1k
lo-mid
100
-15 +15
50 100
bass
20
-15
aux pre
eq
off
aux 1
aux 2
aux 3
aux 4
aux 5
aux 6
aux 7
pre
aux 8
pre
groups
1-2
3-4
5-6
7-8
mono
c
padpower
stereo
Mono Input ChannelsMono Input Channels
+60+15
ins
160
400
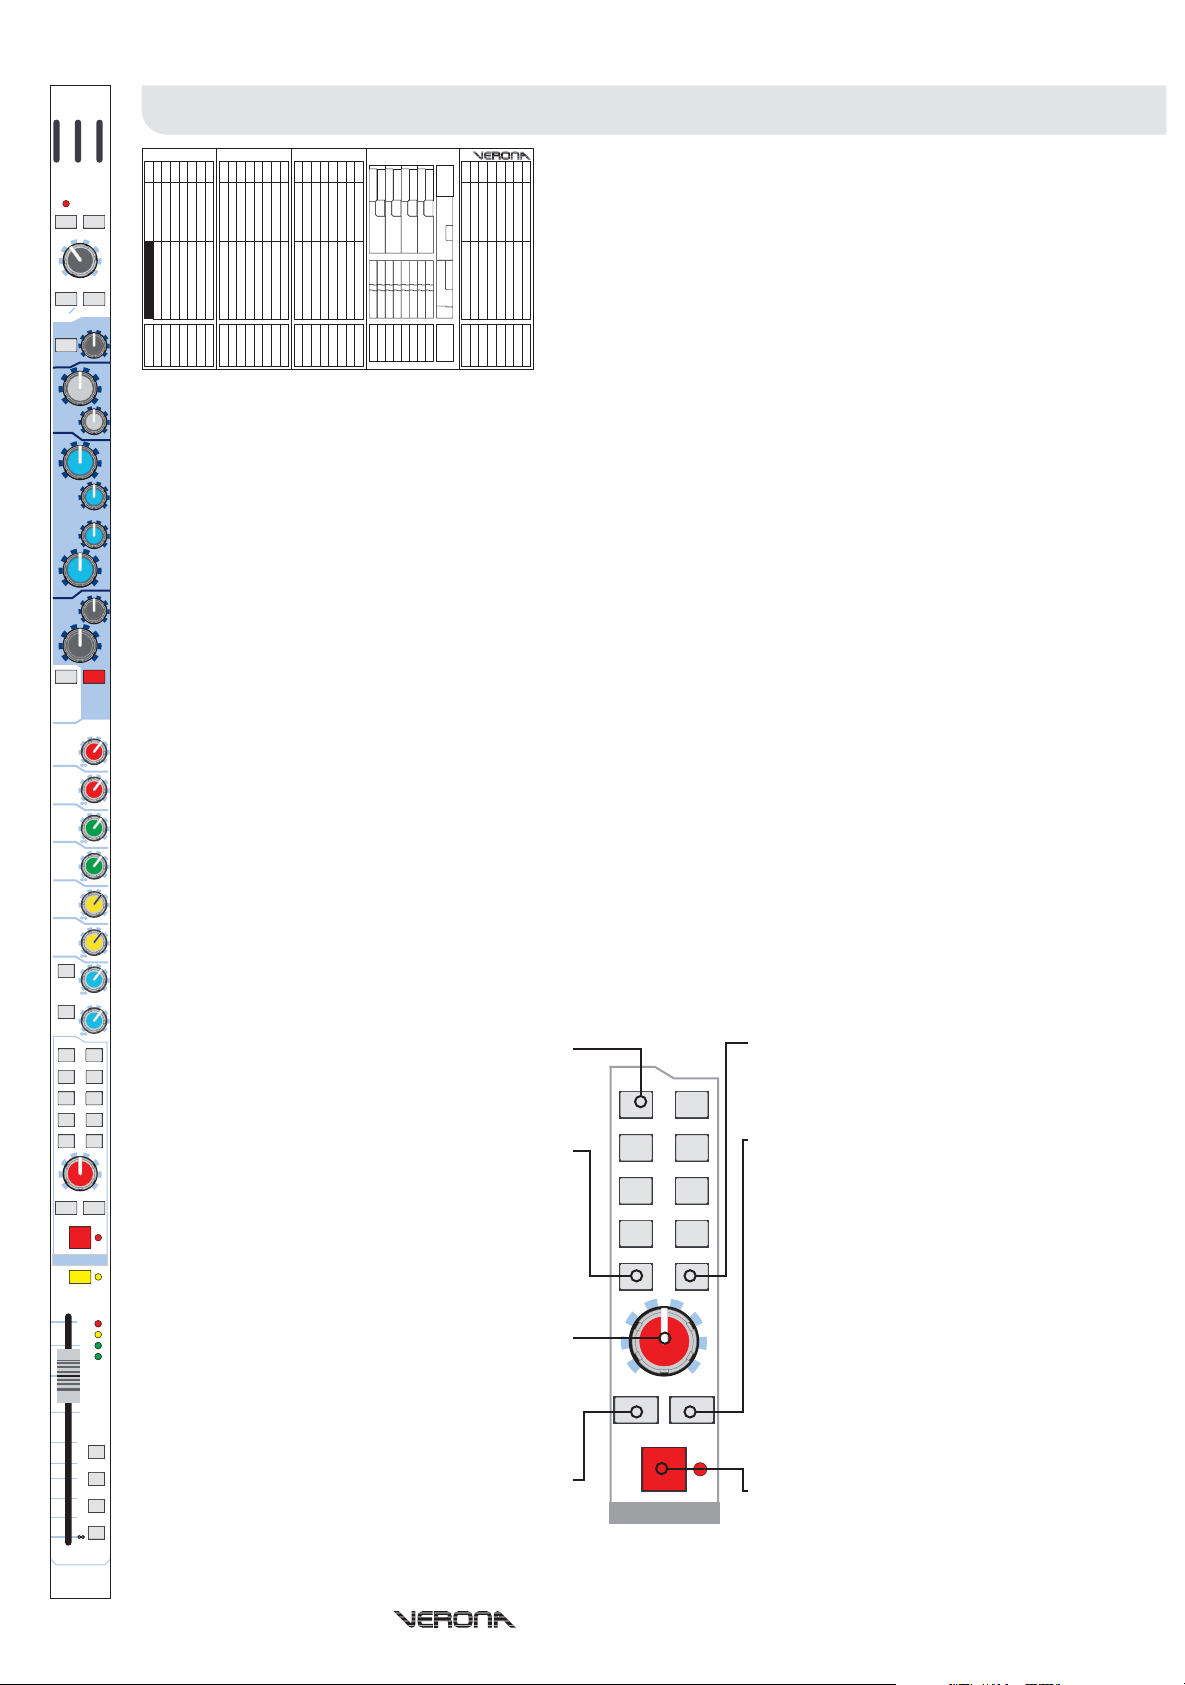
Solo
- When depressed, the channel signal
will be sent to the After Fade Listen (AFL)
20k
stereo and Pre Fade Listen (PFL) mono
SOLO
outputs. The solo LED indicator will
illuminate to show that the channel solo is
active.
10
10
15
20
30
40
18
12
5
-18
0
5
mute 1
mute 2
mute 3
mute 4
0
2k
The Left and Right Monitor and the PFL
console outputs can be used, for example,
when operating from within a booth to hear
selected solos and not the whole FOH mix.
200
+15
eq
on
0
+6
0
+6
0
+6
0
+6
0
+6
0
+6
0
+6
0
+6
Note: If Solo In Place is activated on the
console, any active input solos will replace
the master outputs completely until the solo
is removed.
Channel Fader
- The channel fader allows
for continuous adjustment of the channel
level from off (-inf) to +10dB.
At 0dB, the output of the channel to the
Stereo, Mono and Group busses will be at
unity (i.e. no boost or cut in level from the
input).
Mute 1,2,3 & 4
- The Verona has four (4) automute busses that can be controlled from the centre section of the
console. To assign an input channel to an automute, switch in the desired mute switch.
Commonly, these are used to mute similar channels, for example:
Channels Reason
Drum Mics Allows the engineer to mute the whole drum kit at once.
4 LED Meter - Each input channel contains
in-channel monitoring allowing the user to
monitor the input signal without the need for
using the PFL.
The in-channel meter is especially useful
when setting the microphone gain of a
channel. Also, as the, meter is post-EQ, it is
possible to see the effect that the channel
equalisation has upon the level. It may be
necessary to turn the input gain down when
excessive EQ is used to prevent the channel
from overloading.
-18db - Signal Present
0dB - Normal Level
+12dB - High Level
+18dB - Overload (Peak)
Note: The LED meter and the direct output
are fed from the same source and are PostInsert and EQ but Pre-Fader and Mute. The
channel in-line meter and direct output are
unaffected by the channel mute or
automutes.
lr
pan
groups master
pan si s
MUTE
SOLO
10
18
12
5
-18
0
5
mute 1
10
15
mute 2
20
mute 3
30
40
mute 4
MIDAS
Choir Overheads Allows the engineer to quickly remove all choir mics at once
Orchestra Parts Allows the engineer to zone mics together (e.g. Brass, Strings,
etc.) and mute sections together if they were not playing.
Note that if any assigned automute or the channel mute is activated then the channel will be muted until all
assigned automutes and the channel mute are removed (i.e. the mutes work like a logical OR where any single or
combination of mutes will mute the channel output).
0
Operators Manual - Page 12
Page 15
Multi Function
Input Channel
Operators Manual - Page 13
Page 16
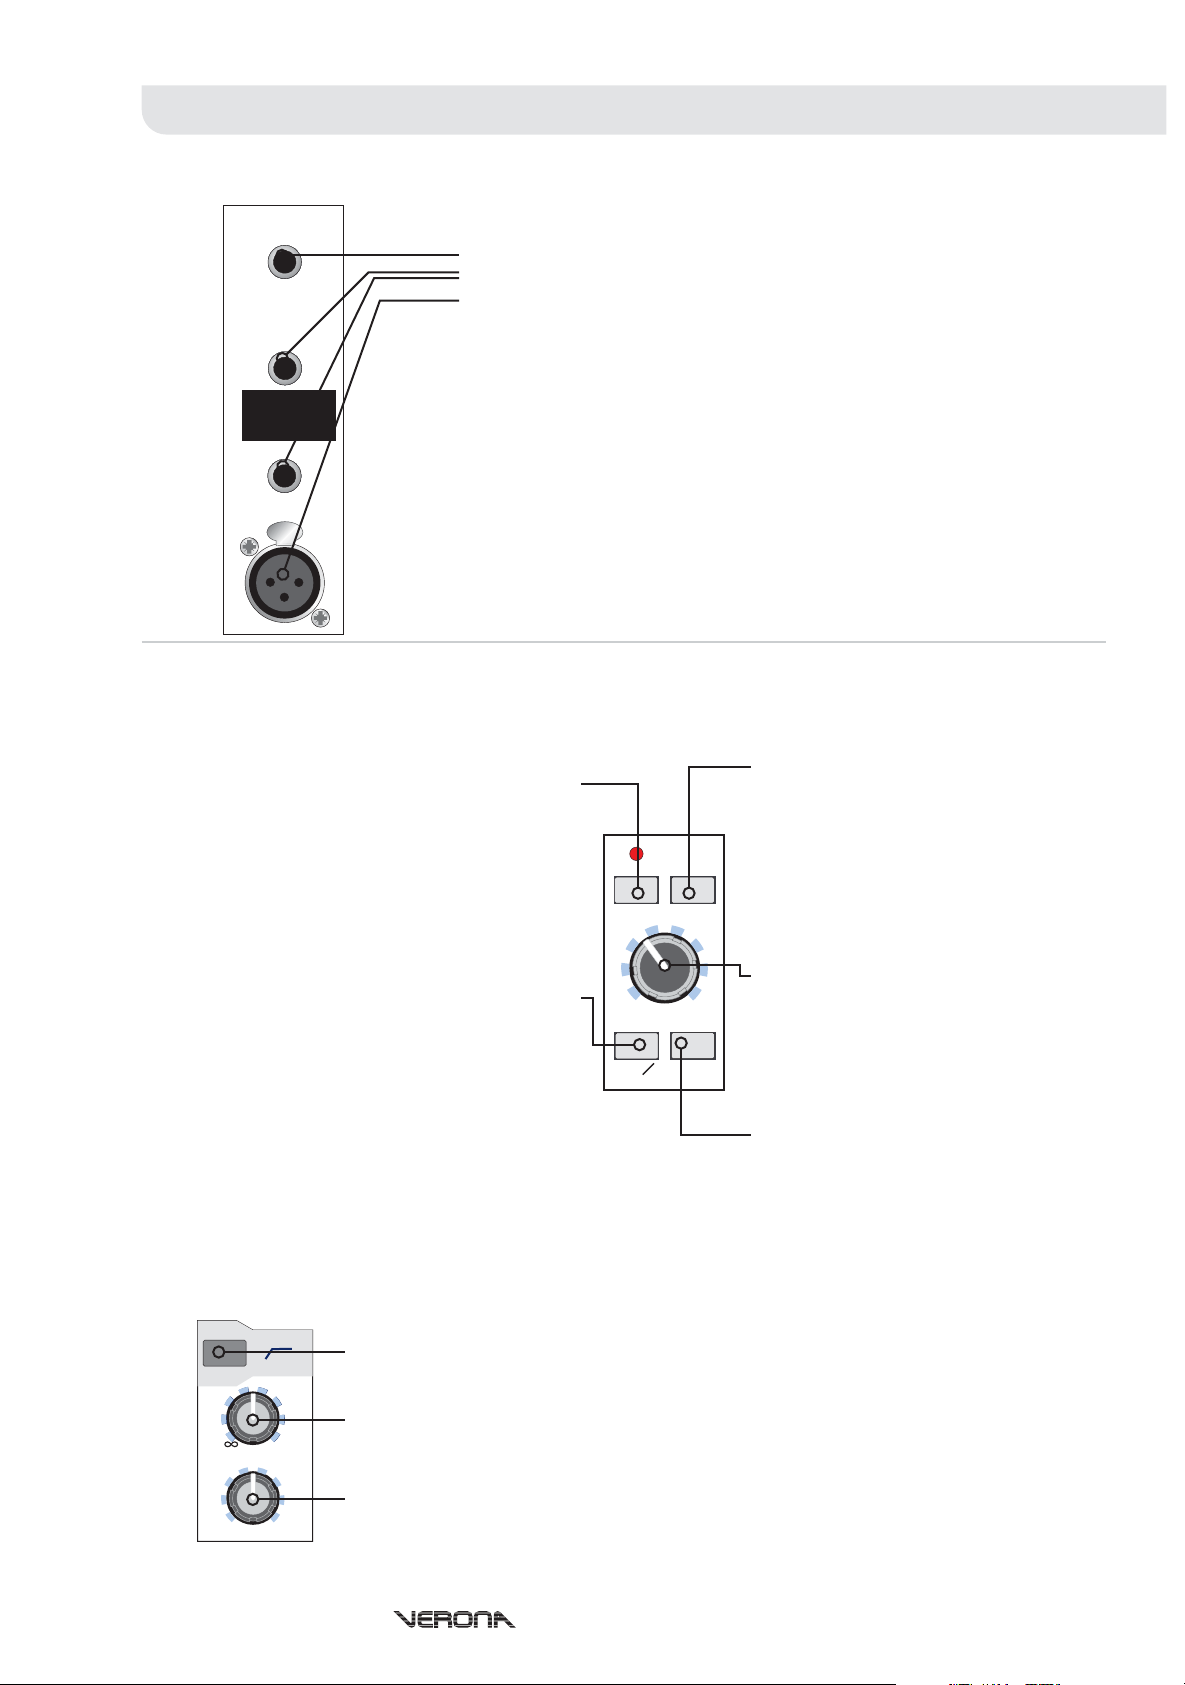
Rear Panel
51
insert
direct
out
Multi Function Input ChannelsMulti Function Input Channels
The Verona channel inputs are located on the rear of the console. Each multifunction channel
provides:
one insert point on a single TRS jack socket;
two quarter-inch TRS balanced line in jack socket inputs;
one mic XLR female.
The insert point operates on the XLR microphone input only (i.e. not on the line inputs) and is
unbalanced and conventionally
wired insert where:
line L
line in left
(stereo only)
line in right
line
in
- Channel Signal Send
Tip
- Channel Signal Return
Ring
Sleeve
- Signal Common Ground
The insert points operate at a nominal level of 0dBu and acts only upon the MIC input.
Balanced XLR and Jack inputs are conventionally wired:
mic
PUSH
- 1. Screen - 2. Hot Signal - 3. Cold Signal
XLR
- T. Hot Signal - R. Cold Signal - S. Screen
TRS
Front Panel
The actual number of multifunction input channels on your Midas Verona will depend upon your choice of frame. However,
each frame functions in essentially the same way.
48v Power
- When depressed, the Verona
will apply 48 volts phantom power the
channel’s microphone input to power
condenser microphones, direct inject boxes
or other devices that require phantom
power.
The red phantom power LED will light to
indicate that phantom power is being
applied.
Mic Ø
- The microphone phase switch
causes a 180 degree phase change (with
respect to the input) to occur in the input
amplifier inverting the phase of the
microphone signal to the channel. This is
generally desirable when trying to sum two
signals that are out of phase which would
lead to cancellation (especially at low
frequencies). For example, when trying to
use microphone signals from both the top
and bottom head of a snare drum.
Note: On stereo channels, the phase switch has no effect
upon the leftand right line inputs.
48v -15
+30 +45
mic gain
O
mic
Mic Pad
attenuation on the input to allow the
connection of high output microphones
and line level signals (to the microphone
input) without overloading the channel’s
input amplifier.
padpower
Note: On multifunction channels, the Pad
switch has no effect upon the left & right
line level inputs.
Mic Gain
+60+15
continuously variable from +15dB to
+60dB (effective channel input gain 0dB to
+45dB with pad enabled). The pre-fade
ins
channel input level can be monitored on
the in-channel LED meter (discussed later
in this section).
Ins
insert point by connecting the insert return
to the channel signal signal path. This
allows for the insertion of dynamic
processors or effects into the signal path
(for example, compression, limiting or
gating of microphone signals).
- The Pad switch provides 15dB
- The microphone gain is
- The insert switch enables the channel
hi-pass
line gain
mono
0
stereo
image
+20
80Hz
wide
Note: On stereo channels, the channel insert has no
effect upon theleft and right line inputs.
Hi-Pass
- The high pass switch enables an 80Hz high pass filter on the microphone input. This
is commonly used to remove handling noise, bass rumble through coupling with the stage or
mains hum.
Line Gain
Note: On stereochannels, the channel HPF has no effect upon the left andright line inputs.
- The line gain is continuously variable from off (-inf) to +20dB allowing for low
level line signals to be trimmed to obtain the optimal signal level. The pre-fade input signal
level can be monitored using the in-channel LED meter (discussed later in this section).
Image
- The image control controls the stereo image of the channel and is continuously
variable from mono through Left-Right stereo to a wide stereo image. The wide stereo image
uses phase cancellation techniques to create a ‘wider’ sounding signal by removing an
amount of signal common to both the left and right signals.
Note: The Lineand MIC inputs are summed together and can be used simultaneouslysharing the channel controls.
Operators Manual - Page 14
Page 17

48V -15
+30 +45
mic gain
mic
hi-pass
line gain
mono
treble
-15
-15
hi-mid
lo-mid
-15
bass
-15
aux pre
eq
off
aux 1
aux 2
aux 3
aux 4
aux 5
aux 6
aux 7
pre
aux 8
pre
groups
mono
O
0
stereo
image
1k5
6003k8k
300
100
1-2
3-4
5-6
7-8
c
padpower
+20
stereo
Multi Function Input ChannelsMulti Function Input Channels
+60+15
ins
80Hz
treble
wide
- The treble shelving EQ gain is continuously variable from -15dB to +15dB.
Treble
+15
+15
500
1k2
+15
+15
eq
on
0
+6
0
+6
0
+6
0
+6
0
+6
0
+6
0
+6
0
+6
-15
-15
hi-mid
lo-mid
-15
bass
-15
aux pre
eq
off
+15
+15
1k5
6003k8k
300
100
+15
+15
eq
on
Hi-Mid Gain
- The Hi-mid gain is continuously variable from -15dB to +15dB.
Hi-Mid Frequency
600Hz to 8kHz allowing the operator to select the desired centre frequency for the equaliser.
500
Lo-Mid Frequency
100Hz to 1.2kHz allowing the operator to select the desired centre frequency for the equaliser.
1k2
Lo-Mid Gain
Bass Gain
EQ On -
- The Lo-mid gain is continuously variable from -15dB to +15dB.
- The bass shelving EQ gain is continuously variable from -15dB to +15dB.
The channel equalisation stages are enabled by depressing the EQ on switch.
Otherwise the settings of the channel EQ will have no effect.
EQ Off (aux Pre)
equalisation. Otherwise auxiliary sends will be sourced post EQ. The use of this option depends
upon how the auxiliary sends are to be used.
switch, as well as 1-6, via an internal jumper (refer to the service manual or contact your
authorised Midas service agent).
Channel Equalisation
The Verona’s multifunction channels each have treble and bass
shelving EQ and hi and lo-mid sweep EQ stages for tonal control.
- The centre frequency of the hi-mid EQ is continuously variable from
- The centre frequency of the lo-mid EQ is continuously variable from
- When depressed, auxiliary sends 1 through 6 will be sourced pre-
Aux sends 7-8 can be linked to the pre EQ off
groups
pan
l
pan
MUTE
stereo
SOLO
10
10
15
20
30
40
MIDAS
5
0
5
r
18
12
0
-18
mute 1
mute 2
mute 3
mute 4
Operators Manual - Page 15
Page 18

48V -15
+30 +45
Multi Function Input ChannelsMulti Function Input Channels
padpower
mic
hi-pass
mono
treble
-15
-15
hi-mid
lo-mid
-15
bass
-15
aux pre
eq
off
aux 1
aux 2
aux 3
aux 4
aux 5
aux 6
aux 7
pre
aux 8
pre
groups
mono
groups
pan
mic gain
O
line gain
stereo
image
1k5
6003k8k
300
100
1-2
3-4
5-6
7-8
l
pan
MUTE
stereo
SOLO
10
10
15
20
30
40
+60+15
ins
80Hz
0
+20
wide
+15
console.
Pre-Fade
auxiliary (aux) 1-6 sends are sourced after the channel Insert, Mute and EQ but before the channel fader
(and EQ if the Aux Pre EQ switch is depressed). As a result, the actual level sent to the aux buss is proportional to
Auxiliary Outputs
Note: Multifunction L and R channel signals are summed into a
to be routed to the auxiliary busses by the channel aux sends.
signal
The Verona has eight (8) auxiliary outputs which can be used for
effects sends, monitor sends or as extra assignable outputs from the
mono
the aux send control only.
+15
500
1k2
+15
+15
eq
on
0
+6
0
+6
0
+6
0
+6
0
+6
0
+6
0
+6
0
+6
Post-Fade
aux sends are sourced after the channel Insert, Mute, EQ and channel Fader. As a result, the actual
level sent to the aux buss is proportional to the aux send control AND the channel fader.
Typical uses of auxiliaries are:
Application Pre/Post Fade Reason
Stage Monitors Pre (Post-EQ) The level in the monitor stays constant so that
the engineer can change the FOH level without
affecting the performer.
Effects Sends Post The level sent to the effects is proportional to the
level on the fader so the balance between wet
(processed) and dry (un-processed) sound
stays the same even when the channel level is
changed
Multi Track Recording Pre (Pre-EQ) The recording is made at constant level without
any equalisation so that changes in the mix level
and EQ can be set in post-production. (You can
also use the Direct Out for this but the output will
be at unity).
Mixed Recording Post (Post-EQ) If the aux is set to unity, the FOH mix is
replicated on the aux output including EQ but
excluding PAN
.
Aux sends 1 through 6 are always globally switchable pre or post fader. However, Aux 7 and 8 may individually be
sourced either Post Fader or Pre Fader using the selector switch on the channel and can not be pre-EQ.
Please note that, for illustration puposes, auxiliary 1 through 4 sends have been omitted but work in the same
manner as auxiliary 6 (illustrated).
stereo
c
aux 5
r
aux 6
5
0
5
18
12
0
-18
mute 1
mute 2
mute 3
mute 4
aux 7
pre
aux 8
pre
0
+6
0
+6
0
Aux Send Level
Aux 7/8 Pre
- The auxiliary send level is continuously variable from off (-inf) to +6dB.
- Both aux 7 and aux 8 are assignable Pre or Post fader. When depressed, the
auxiliary is sourced pre-fader (i.e. the channel fader has no effect upon the level of the
signal sent to the auxiliary).
+6
0
NOTE: Stereo modules can equally be used for mono signals (plugged in via the
microphone socket). The EQ on the stereo channels has fixed frequency high and low
+6
sections which are optimised for vocals.
MIDAS
Operators Manual - Page 16
Page 19

48V -15
+30 +45
mic gain
mic
hi-pass
line gain
mono
treble
-15
-15
hi-mid
lo-mid
-15
bass
-15
aux pre
eq
off
aux 1
aux 2
aux 3
aux 4
aux 5
aux 6
aux 7
pre
aux 8
pre
groups
mono
l
groups
pan
stereo
O
0
stereo
image
1k5
6003k8k
300
100
1-2
3-4
5-6
7-8
c
pan
MUTE
SOLO
10
10
15
20
30
40
MIDAS
5
0
5
padpower
+20
stereo
18
12
0
-18
mute 1
mute 2
mute 3
mute 4
Multi Function Input ChannelsMulti Function Input Channels
Pan and Routing
+60+15
ins
80Hz
Signal can be routed to any of the eight group busses by depressing the corresponding group select switch.
wide
+15
+15
500
1k2
Group sends are post channel equalisation, mute and fader.
The group sends can be configured in either of two modes:-
1.
Pre-Pan (mono)
The stereo signals are sent to the busses as a regardless of the pan control.
2.
Post-Pan (stereo)
Each pair of groups behave as if they were groups. The relative odd and even numbered send
+15
+15
eq
on
0
+6
0
+6
0
+6
0
+6
0
+6
0
+6
0
+6
0
+6
This configuration is made by depressing the ‘Groups Pan’ key for stereo group operation or released for mono
group mode.
This selection is on a channel-by-channel basis and so some may be assigned to the groups as mono or as stereo
depending upon the desired usage which is especially useful if the stereo input is to be used as a mono input.
For example:
Group 1-8
level is controlled by the pan control.
Application Config. Reason
Multitrack Recording Mono Inputs can be sent to a particular input on the
Alternative/Delay Output Stereo The Group would behave in the same manner as
- Depressing the group switch
routes the channel signals as described
above.
Mono
- Depressing the mono switch routes
the channel signals to the mono buss (postEQ and fader).
r
Pan
- The pan control allows continuous
reciprocal adjustment of the stereo image
created by the channel. In the case of a
mono microphone signal this will be a simple
L-R pan, where, with a stereo signal this will
be a balance allowing the user to determine
the relative output power to each the Left
and Right ouput. At all points the pan retains
constant power (i.e. -3dB at the centre, 0dB
at each extreme).
Groups Pan
- As described above the
Verona’s group sends may be configured by
depressing the ‘Groups Pan’ key for stereo
group operation or released for mono group
mode.
Note: That SISis not available on stereo input channels.
The Verona is a flexible mixing console with eight group buss outputs
plus stereo and mono outputs.
Groups
mono sum of L & R
stereo
multitrack recorder without affecting the stereo
image used at FOH.
the stereo output allowing for separate level
control but retaining the original stereo image
from FOH.
Stereo - Depressing the stereo switch
groups
1-2
3-4
routes the channel signals to the stereo
(main left and right) buss (post-EQ, pan
and fader).
Mute
- The mute switch mutes the channel
signal. Note that signal will still be sent to
5-6
the insert point and to the direct output.
The mute status of the channel is indicated
7-8
mono
stereo
c
lr
pan
by the corresponding mute LED.
The channel can also be muted by the four
(4) assignable mute groups which will be
explained later in this section.
Solo
- When depressed, the channel signal
will be sent to the AFL stereo and PFL mono
outputs. The solo LED indicator will
illuminate to show that the channel solo is
groups
pan
stereo
MUTE
SOLO
active.
The Left and Right Monitor and the PFL
console outputs can be used, for example,
when operating from within a booth to hear
selected solos and not the whole FOH mix.
Note: If Solo In Place is activated on the console, any
active solos will replace the master outputs completely
until the solois removed.
Operators Manual - Page 17
Page 20

48V -15
+30 +45
mic gain
mic
hi-pass
line gain
mono
treble
-15
-15
hi-mid
lo-mid
-15
bass
-15
aux pre
eq
off
aux 1
aux 2
aux 3
aux 4
aux 5
aux 6
aux 7
pre
aux 8
pre
groups
mono
l
groups
pan
stereo
O
0
stereo
image
1k5
6003k8k
300
100
1-2
3-4
5-6
7-8
c
pan
MUTE
SOLO
10
10
15
20
30
40
5
0
5
padpower
+20
stereo
18
12
0
-18
mute 1
mute 2
mute 3
mute 4
Multi Function Input ChannelsMulti Function Input Channels
+60+15
ins
80Hz
Mute 1,2,3 & 4
wide
automute busses that can be controlled
from the centre section of the console. To
assign an input channel to an automute,
+15
+15
500
1k2
+15
+15
eq
on
0
+6
0
+6
0
+6
0
+6
0
+6
0
+6
0
+6
0
+6
r
switch in the desired mute switch.
Commonly, these are used to mute similar
channels, for example:
Channels Reason
Drum Mics Allows the engineer to
Choir Overheads Allows the engineer to
Orchestra Parts Allows the engineer to
Note that if any assigned automute or the
channel mute is activated then the channel
will be muted until all assigned automutes
and the channel mute are removed (i.e. the
mutes work like a logical OR where any
single or combination of mutes will mute the
channel output).
I want direct outs for recording but multi function channels don’t have any . . .
The multi function channels don’t have a specifically labelled direct output BUT, if you are using a microphone
input and don’t need to use the insert channel, you can insert a standard unbalanced quarter-inch jack lead into
the insert point and use this as a direct output. This will work on the condition that you do not activate the insert
point on the channel strip (the insert switch) as this will cause signal to the channel to be lost.
To see for yourself why this works, look at the block diagrams later in the manual.
I’m running monitors from FOH and I've run out of auxes for effects . . .
To add effects to a mono mic input on a multifunction channel, use the insert send of the channel into the effects
unit input and the stereo outputs of the effects unit into the stereo line inputs of the same channel on the Verona.
Use the mic gain for the mic and the line gain for the effect return level. Now the aux sends and channel fader will
control both the mic level and effects return level.
- The Verona has four (4)
mute the whole drum kit
at once.
quickly remove all choir
mics at once
zone mics together (e.g.
Brass, Strings, etc.) and
mute sections together if
they were not playing.
4 LED Meter
- Each input channel
contains in-channel monitoring
allowing the user to monitor the input
signal without the need for using the
PFL.
10
18
12
0
5
-18
0
The in-channel meter is especially
useful when setting the microphone
gain of a channel. Also, as the, meter is
post-EQ, it is possible to see the effect
that the channel equalisation has upon
the level. It may be necessary to turn
the input gain down when excessive EQ
is used to prevent the channel from
overloading.
5
Note: The LED meter is Post-Insert and
EQ but Pre-Fader and Mute.
mute 1
10
15
mute 2
Channel Fader
- The channel fader
allows for continuous adjustment of the
channel level from off (-inf ) to +10dB.
20
At 0dB, the output of the channel to the
Stereo, Mono and Group busses will be
30
mute 3
at unity (i.e. no boost or cut in level
40
mute 4
from the input).
Multi Function Module hints & Tips
MIDAS
Operators Manual - Page 18
Page 21

Output Module
groups -
auxes -
masters -
matrices -
talk buss -
solo control -
automutes -
Operators Manual - Page 19
Page 22

Output Module NotesOutput Module Notes
Before looking at the function of the output section of the console it is essential that the user is first comfortable with a few of
the consoles features that affect groups, matrixes and auxes. Rather than discuss these features in each section (although
they will be repeated there) an understanding of their function in a more general context is desirable.
Group Aux Changeover
group
aux
c/o
The Verona achieves this flexibility using the (changeover) switch. Each output can be
individually ‘changed over’ so that the group output path becomes that of the aux output and vice versa.
Why not buy a monitor or FOH console?
The Verona has been developed with real world sound engineers in mind. The real flexibility of the Verona is
in the speed in which the change over can be made and also the ability to create a console that can
be used for FOH and monitors for the smaller venue where you still need monitors but don’t have space or
money for a monitor engineer or console.
Depressing the group aux changeover switch (using a pointed object such as a pencil) will connect the
auxiliary buss to the group , group , group , group and finally the group
XLR
The group buss is connected to the auxiliary output and to the auxiliary .
This routing flexibility is available on each group/aux buss.
aux
pre
.
Meter Changeover
The Verona is a dual purpose console. That is, that the Verona is equally as comfortable
as a monitor console as it is as a front of house console.
What does this actually mean?
Monitor
auxiliary outputs (for monitors) where engineers would rather have
engineers tend to prefer the output faders on their console to operate the
Front of House
their output faders for groups (either for sub mixes or delay/alternative outputs).
group aux c/o
hybrid
insert mute fader pan output
pot output XLR
aux aux
mtx
Direct Inputs
The Verona has four (4) direct inputs on balanced TRS quarter-inch jack sockets located next to the
matrix outputs on the rear panel which can be used for console linking or effects returns.
Mono
main mono buss.
Mtx
similarly numbered matrix buss (i.e. 1
through 4).
Solo
mono PFL and stereo AFL buss
group meters
+21 +21
+18 +18
+15 +15
+12 +12
+9 +9
+6 +6
+3 +3
00
-3 -3
-6 -6
-9 -9
-12 -12
-15 -15
-18 -18
-21 -21
-24 -24
It is possible on the Verona to change the group meters to monitor the aux or matrix
output rather than the group output. For example, if using the matrix outputs to drive
delay speakers, it may be desirable to monitor the output from those outputs.
When depressed, the switch will send the aux signal to the meter array (note that,
if you have used group aux c/o, the aux switch should really read group!).
When depressed, the switch will send the matrix signal to the meter array. This
switch ALWAYS overrides the aux meter select switch and must be released to allow the
aux signal to be sent to the meter array.
Note: Meters are Post Fader and Post Mute
TIP
If you wish to understand more about how the Verona routes it’s signals, please refer to
the block diagram section of this manual.
- Routes the direct input to the
- Routes the direct input to the
- Routes the direct input to the
aux
mtx
direct
input to
0
SOLO
mono
stereomtx
+20
Stereo
- Routes the mono direct input
to the main stereo Left and Right
busses equally.
Level
- The direct input level is
continuously variable from off (-inf) to
+20dB.
Operators Manual - Page 20
Page 23

group meters
+21 +21
+18 +18
+15 +15
+12 +12
+9 +9
+6 +6
+3 +3
00
-3 -3
-6 -6
-9 -9
-12 -12
-15 -15
-18 -18
-21 -21
-24
-24 -24
aux
aux aux
mtx
mtx
direct
mono
Rear Panel
insert
G2 G1
matrix direct
aux out aux out
group group
Verona Group OutputsVerona Group Outputs
insert
1
in 1
2
2
1
1
Each group buss can be connected to external equipment by means of one single
balanced male XLR socket (0dBu nominal level).
In addition to this, each group can be inserted into by means of a single
unbalanced quarter-inch TRS jack conventionally wired (0dBu nominal level).
Group Insert
Group Output
XLR Sockets
12 3
- Screen - Signal Hot - Signal Cold
TRS Insert Jacks
TR S
- Signal Send - Signal Return - Screen
Front Panel
aux 1
MUTE
SOLO
group
aux
c/o
group 1
group
to mtx
mono
c
lr
pan
MUTE
group 1
SOLO
+10
aux
pre
pre
fade
stereo
master
group
aux
c/o
aux
pre
Group Aux C/O - The group auxiliary
changeover switch is described on the
previous page. When enabled, auxiliary
signals are routed into the group output
controls and hence group should be
mentally changed to ‘aux’.
group 1
Group to Mtx - The group to mtx switch
routes the group signal to the matrix send
pots (discussed later in this section).
- When depressed, the signal will be
Mono
0
sent to the main mono buss via the master
group
to mtx
mono
stereo
c
pre
fade
Pre-Fade (Group to Mtx)
depressed, the signal sent to the matrix
send pots is sourced pre-fader and hence
the level will be proportional to the matrix
send pot only. This may be desirable if
using the matrix for recording or
monitoring (e.g. stage side fills).
- When
sis switch.
lr
Pan
- The pan control allows the channel
signal to be positioned in a stereo field when
routed to the stereo buss. The pan control
allows continuous adjustment of the image
from hard left, to hard right with a centre
detent and obeys a constant power law (i.e.
-3dB at the centre so that the output
remains at unity).
pan
master
MUTE
group 1
SOLO
sis
Stereo
- When depressed, the signal will
be sent to the main stereo buss via the pan
and master sis switch.
Master SIS - The master SIS switch will
enable the spacial imaging system
whereby the channel pan control operates
in a different way. When panned hard left,
signal is routed to the stereo left output as
normal, similarly when panned hard right,
Mute
- The mute switch mutes the group
signal at all points after the insert return
(and hence any matrix sends).
sis
Solo
- The solo switch sends the group
signal to the AFL stereo and PFL mono
10
5
0
the signal is routed to the stereo right
output as normal. However, when panned
centre, the signal is routed ONLY to the
mono output creating a LCR (left-centreright) system instead of the normal LR
(left-right) system.
busses.
10
5
0
5
10
15
20
30
40
Fader
- The fader allows continuous
adjustment of the group output level from
off (-inf ) to +10dB.
5
10
15
20
30
40
Operators Manual - Page 21
Page 24

group meters
+21 +21
+18 +18
+15 +15
+12 +12
+9 +9
+6 +6
+3 +3
00
-3 -3
-6 -6
-9 -9
-12 -12
-15 -15
-18 -18
-21 -21
-24
-24 -24
aux aux
mtx
direct
mono
Rear Panel
matrix matrix matrix matrixdirect direct direct direct
4321in 4 in 3 in 2 in 1
XLR Wiring
Pin 1 - Shield, Pin 2 - Hot Signal, Pin 3 - Cold Signal
Verona Matrix OutputsVerona Matrix Outputs
The Verona’s matrix outputs can
be found on the rear of the
console.
Four male XLR sockets are
provided, one for each matrix
output.
Front Panel
The matrix provides another four outputs from the console
which can be ‘made’ from a combination of the consoles
other outputs.
The matrix signal can be made by combination of the group
buss signals and mono, left and right master signals. They
can be used to drive additional speaker zones or as effects
sends from the groups (like the auxes from inputs)
aux 1
MUTE
SOLO
group
aux
c/o
group 1
group
to mtx
mono
c
lr
pan
MUTE
group 1
SOLO
+10
aux
pre
pre
fade
stereo
master
mono
direct
input to
0
+6
group 1
0
+6
group 2
0
0
stereomtx
0
+20
SOLO
0
Group (1-8) - The group level
sent to the matrix is continuously
variable from off (-inf) to +6dB.
Unity (0dB) is also marked on the
scale allowing signal to be routed
to the matrix without any
attenuation or gain.
Each of the groups (1-8) has it’s
own individual matrix send level.
sis
10
5
0
5
10
15
20
30
40
group 3
group 4
group 5
group 6
group 7
group 8
+6
0
+6
0
+6
0
+6
0
+6
0
+6
matrix 1
+6
mono master
0
+6
left master
0
+6
right master
+10
matrix 1
MUTE
SOLO
0
Mono Master - The master mono signal
sent to the matrix is continuously variable
from off (-inf) to +6dB. Unity (0dB) is also
marked on the scale allowing signal to be
routed to the matrix without any
attenuation or gain.
Left Master
- The master left signal sent to
the matrix is continuously variable from off
(-inf) to +6dB. Unity (0dB) is also marked
on the scale allowing signal to be routed to
the matrix without any attenuation or gain.
Right Master
- The master right signal
sent to the matrix is continuously variable
from off (-inf) to +6dB. Unity (0dB) is also
marked on the scale allowing signal to be
routed to the matrix without any
attenuation or gain.
Alternatively, the auxiliaries can be routed
to the matrix by depressing the group/aux
changeover switch. This is especially useful
for generating additional monitor mixes or
re-routing existing monitor mixes (for
example if artists are moving around to
other parts of the stage).
The overall level of the matrix output is
controlled by the pot (where x is
Matrix x
the number of the matrix 1 through 4) and
is continuously variable from off (-inf) to
+10dB.
- The matrix output can be muted
Mute
immediately after the group and master
matrix sends.
- The solo switch routes the matrix
Solo
signal to the mono PFL and the stereo AFL
buss.
Operators Manual - Page 22
Page 25

group meters
+21 +21
+18 +18
+15 +15
+12 +12
+9 +9
+6 +6
+3 +3
00
-3 -3
-6 -6
-9 -9
-12 -12
-15 -15
-18 -18
-21 -21
-24
-24 -24
aux aux
mtx
direct
mono
Verona Aux OutputsVerona Aux Outputs
Rear Panel
aux out aux out aux out aux outaux out aux out aux out aux out
86427531
XLR Wiring
Pin 1 - Shield, Pin 2 - Hot Signal, Pin 3 - Cold Signal
Front Panel
The Verona provides eight independent auxiliary outputs
which are controlled in this section.
The Verona’s auxiliary
outputs can be found on the
rear of the console.
Eight male XLR sockets are
provided, one for each
auxiliary output.
aux 1
MUTE
SOLO
group
aux
c/o
group 1
group
to mtx
mono
c
lr
pan
MUTE
group 1
SOLO
+10
aux
pre
pre
fade
stereo
master
- The group auxiliary
Aux Pre
group
aux
c/o
Group Aux C/O
changeover is described at the beginning of
this section. When depressed, group signals
aux
will be controlled in this section and hence aux
pre
should be mentally interchanged with ‘group’.
- The auxiliary pre switch is the global control which determines whether the auxiliary is taken from the
input channel pre fader or post fader. This switch can be found on each of the auxiliaries 1 through 6. On aux 7 and
8 these are assignable individually pre/post on the channel modules.
Pre-Fade
auxiliary (aux) sends are sourced after the channel Insert, Mute and EQ but before the channel fader
(and EQ on 1-6 if the Aux Pre EQ switch is depressed). As a result, the actual level sent to the aux buss is
proportional to the aux send control only.
Post-Fade
aux sends are sourced after the channel Insert, Mute, EQ and channel Fader. As a result, the actual
level sent to the aux buss is proportional to the aux send control AND the channel fader.
0
Typical uses of auxiliaries are:
Application Pre/Post Fade Reason
Stage Monitors Pre (Post-EQ) The level in the monitor stays constant so that
the engineer can change the FOH level without
affecting the performer.
Effects Sends Post The level sent to the effects is proportional to
the level on the fader so the balance between
wet (processed) and dry (un-processed) sound
stays the same even when the channel level is
changed
Multi Track Recording Pre (Pre-EQ) The recording is made at constant level without
or Monitors from FOH any equalisation so that changes in the mix level
and EQ can be set in post-production. (You can
also use the Direct Out for this but the output
sis
will be at unity).
Mixed Recording Post (Post-EQ) If the aux is set to unity, the FOH mix is
aux 1
(for the artist) replicated on the aux output including EQ but
excluding PAN
.
10
5
0
5
10
15
20
30
40
MUTE
SOLO
+10
0
Auxiliary Master Level
- The output level of the auxiliary is continuously variable from off (-
inf) to +10dB.
Auxiliary Mute
- When depressed, the auxiliary signal is muted at every point after the master
send level.
Auxiliary Solo
- When depressed, the auxiliary signal is sent to the stereo AFL and mono PFL
busses.
Operators Manual - Page 23
Page 26

Verona Master OutputsVerona Master Outputs
left
left
1505k500
50
freq
generator
on
+15 +60
talk
on
master meters
+21
+21
+18
+18
+15
+15
+12
+12
+9+9+9+9+9
+6+6+6+6+6
+3+3+3+3+3
00000
-3-3-3-3-3
-6-6-6-6-6
-9-9-9-9-9
-12
-12
-15
-15
-18
-18
-21
-21
-24
-24
mono
solo meters
pfl
+21
+21
+18
+18
+15
+15
+12
+12
-12
-12
-15
-15
-18
-18
-21
-21
-24
-24
0
mono
+10
stereo
right
right
tape
SOLO
12
talk
mic
insert
MR
insert insert
The Verona’s main outputs are located on the rear of the console and provide:
MLMC
Output Source Connector Nom. Level
+21
+18
+15
+12
PUSH
monitor
talk
talk out
in
R
tape
in
R
L
out
monitorpfl out
L
Master L Left Buss XLR Male (Bal) 0dBu
Master C Mono Buss XLR Male (Bal) 0dBu
Master R Right Buss XLR Male (Bal) 0dBu
Monitor L AFL Solo L Buss XLR Male (Bal) 0dBu
PFL Out PFL Solo Buss XLR Male (Bal) 0dBu
Monitor R AFL Solo R Buss XLR Male (Bal) 0dBu
Tape Out L Master Left RCA Phono -10dBu
-12
-15
-18
-21
-24
+21
+18
+15
+12
+9
+6
+3
0
-3
-6
-9
-12
-15
-18
-21
-24
0
+10
3
NEUTRIK
master
shown on the solo meters. The solo meters are pre monitor or phones output mute and level
R
master master
CL
and so are unaffected by changes in the headphone level or the level sent to the monitor
ouptuts.
Tape Out R Master Right RCA Phono -10dBu
Talk Out Talk Buss XLR Male (Bal) 0dBu
Also provided are Master L-C-R insert points on conventionally wired quarterinch TRS jacks (0dBu nominal level), tape inputs (RCA Phono, -10dBu nominal
level) and Talk Input (Male XLR balanced, 0dBu nominal level).
Master Meters
The master meters show the actual peak ouput
level from the console’s left, right and centre
(mono) busses (Post Fader).
Note that these meters are post master fader and
post master output mute.
Solo Meters
master meters
+21
+18
+15
+12
+9+9+9+9+9
+6+6+6+6+6
+3+3+3+3+3
00000
-3-3-3-3-3
-6-6-6-6-6
-9-9-9-9-9
-12
-15
-18
-21
-24
mono
left
solo meters
pfl
left
+21
+18
+15
+12
+21
+18
+15
+12
-12
-15
-18
-21
-24
right
right
+21
+18
+15
+12
The solo (AFL L, AFL R and PFL) buss levels are
-12
-12
-15
-15
-18
-18
-21
-21
-24
-24
+21
+18
+15
+12
-12
-15
-18
-21
-24
+21
+18
+15
+12
+9
+6
+3
0
-3
-6
-9
-12
-15
-18
-21
-24
master
talk
external
solo in
place
groups
1
1-2
auto
3-4
2
5-6
mute
7-8
mono
stereo
3
aux
matrix
masters
4
pfl
SOLO
monitor
phones
stereo pre
to mono
MUTE MUTE
left
SOLO SOLO
stereo mono
MUTE
local
0
+10
MUTE
insert
MUTE
right
mono
10
10
5
5
0
0
5
5
10
10
15
15
20
20
30
30
40
40
1505k500
0
The Verona provides a signal generator which can be routed to any of the
console’s outputs.
50
freq
0
tape
+20
Freq
- The output frequency of the generator is continuously variable from
50Hz to 5kHz allowing the user to test, for example, three or four bands of a
crossover system.
mono
+10
generator
stereo
SOLO
on
0
+10
+15 +60
talk
on
3
12
talk
mic
Generator Level
from off (-inf) to +10dB.
Generator On
Talk Mic Gain
is continuously variable from +15dB to +60dB.
NEUTRIK
Talk Mic
- The talk mic socket is a conventionally
wired XLR male and is supplied with 48v phantom
power allowing the connection of condenser
microphones.
Talk On
- When depressed, the talk microphone input
- The level of the generator output is continuously variable
- Enables the Signal Generator
- The gain of the talk microphone input
is enabled and routed to the talk buss. When enabled,
all local outputs are attenuated by 20dB to help
prevent feedback.
Operators Manual - Page 24
Page 27

1505k500
50
generator
+15 +60
external
groups
mono
aux
SOLO
phones
left
left
freq
on
talk
on
talk
1-2
3-4
5-6
7-8
pfl
master meters
+21
+21
+18
+18
+15
+15
+12
+12
+9+9+9+9+9
+6+6+6+6+6
+3+3+3+3+3
00000
-3-3-3-3-3
-6-6-6-6-6
-9-9-9-9-9
-12
-12
-15
-15
-18
-18
-21
-21
-24
-24
mono
solo meters
pfl
+21
+21
+18
+18
+15
+15
+12
+12
-12
-12
-15
-15
-18
-18
-21
-21
-24
-24
0
mono
+10
stereo
master
solo in
place
1
auto
2
mute
stereo
3
matrix
masters
4
monitor
local
0
right
right
tape
SOLO
12
talk
mic
Verona Master OutputsVerona Master Outputs
+21
+18
+15
+12
-12
-15
-18
-21
-24
talk
mono
aux
external
groups
1-2
3-4
5-6
7-8
stereo
matrix
solo insolo in
place
1
auto
2
mute
3
masters
4
+21
+18
+15
+12
+9
+6
+3
0
-3
-6
-9
-12
-15
-18
-21
-24
0
+10
3
NEUTRIK
pfl
SOLO
monitor
phones
0
+10
MUTE
0
local
0
+10
MUTE
Talk External
- Talk external enables the talk out and talk in signals on the
rear of the console. The talk in signal is summed with the internal talk mic
and generator signals.
Groups 1-8
- When depressed, the talk buss signal is routed to the group
buss.
- When depressed, the talk buss signal is routed to the mono buss.
Mono
Stereo
Aux
Matrix
- When depressed, the talk buss signal is routed to the stereo buss.
- When depressed, the talk buss signal is routed to all aux busses.
- When depressed, the talk buss signal is routed to all matrices.
Note: Essentially with all buttons depressed, the talk buss signal is routed to
all the consoles busses (except the local outputs and direct outputs).
PFL Solo
- When depressed, the local monitor and headphones signal is
sourced from the PFL mono signal rather than the AFL stereo default.
Phones/Local Level
- The local and headphones level is continuously
variable from off (-inf) to +10dB.
Phones/Local Mute
- The local and headphones signal can be muted by
depressing the mute switch.
+10
MUTE
MUTE
stereo pre
insert
to mono
MUTE MUTE
left
SOLO SOLO
stereo mono
MUTE
right
mono
10
10
5
5
0
0
5
5
10
10
15
15
20
20
30
30
40
40
+10
Operators Manual - Page 25
Page 28

left
left
1505k500
50
freq
generator
on
+15 +60
talk
on
master meters
+21
+21
+18
+18
+15
+15
+12
+12
+9+9+9+9+9
+6+6+6+6+6
+3+3+3+3+3
00000
-3-3-3-3-3
-6-6-6-6-6
-9-9-9-9-9
-12
-12
-15
-15
-18
-18
-21
-21
-24
-24
mono
solo meters
pfl
+21
+21
+18
+18
+15
+15
+12
+12
-12
-12
-15
-15
-18
-18
-21
-21
-24
-24
0
mono
+10
stereo
right
right
tape
SOLO
12
talk
mic
Verona Master OutputsVerona Master Outputs
The controls on this page are those directly responsible
for the main outputs from the console.
Stereo to Mono
+21
+18
+15
+12
a sum of the stereo left and right
signals are routed to the mono
signal buss via the pre insert switch.
Pre Insert
stereo signal sent to the mono buss
-12
-15
-18
-21
-24
+21
+18
+15
+12
+9
+6
+3
0
-3
-6
-9
-12
-15
-18
-21
-24
0
+10
The setting of this depends upon the circumstances (and the usage of the centre
mono ouptut). For example, if an independent graphic EQ or limiter is required to
control the mono centre speaker, then it may not be required (or desired) to have
the graphic EQ/limiter inserted into the left and right output affect the mono
centre.
Mute
- Each of the left right and centre outputs have individual channel mutes
which mute the signal post fader.
Solo
- When depressed, the stereo or mono signal is routed to the PFL mono and
AFL stereo busses.
Output Level
- Each output level is continuously variable from off (-inf) to
is sourced from the stereo signals
before the stereo insert points.
Otherwise the signal is taken after
the stereo inserts.
+10dB.
3
NEUTRIK
- When depressed,
- When depressed, the
stereo pre
insert
to mono
MUTE MUTE
left
SOLO SOLO
right
MUTE
mono
stereo mono
10
10
5
5
0
0
5
5
10
10
15
15
20
20
30
30
40
40
Verona FeaturesVerona Features
master
talk
external
solo in
place
groups
1
1-2
auto
3-4
2
5-6
mute
7-8
mono
stereo
3
aux
matrix
masters
4
pfl
SOLO
monitor
phones
stereo pre
to mono
MUTE MUTE
left
SOLO SOLO
stereo mono
MUTE
local
0
+10
MUTE
insert
MUTE
right
mono
10
10
5
5
0
0
5
5
10
10
15
15
20
20
30
30
40
40
The tape input on the rear of the console can be
0
routed to the main mono or stereo busses by
pressing the or switches. The level
of the tape input is continuously variable from off
(-inf) to +20dB (the nominal input level is
Mono Stereo
tape
+10
referenced to -10dB).
mono
- When depressed, the tape input signal is
Solo
routed to the stereo AFL and mono PFL busses.
0
+10
master
solo in
place
1
auto
2
mute
3
masters
4
WARNING: Solo in place is a major function and should be used for sound check
ONLY. Please read this information carefully!
Solo in Place
- When depressed with a small object (eg. screwdriver or pencil tip), the solo
in place switch causes all active input solos on the console to be exclusively routed to the
main outputs of the console. (i.e. mute all un-soloed inputs).
i.e. If a solo is in place, only those active solos will be heard from the main front of house
speakers. This is a major function worthy of note.
The solo in place function is more at home in studio surroundings where the engineer would
expect only to hear active solos through the monitors. It’s uses in live sound reinforcement
are limited but include:
At sound check, Solo In Place could be used to check or EQ (or adjust insertions,
effects etc.) for one or a number of channels at once without having to turn down or
mute each of the undesired channels (which may upset the onstage monitors an
hence the musicians!).
Auto Mute Masters
- The auto mute masters are used to enable the mute groups (1
stereo
SOLO
through 4) as assigned on the input channels.
Again, these switches are a major function worthy of note (i.e. don’t forget that you have them enabled and
the channels assigned or channel mutes will not be released).
Operators Manual - Page 26
Page 29

Setting up the
Verona
Operators Manual - Page 27
Page 30

Setting Up The VeronaSetting Up The Verona
The Verona was designed with real world sound engineers in mind, working in the real world. With it’s flexible
routing and dual purpose functionality, the Verona is as happy running monitors as it is front of house. For
engineers that haven’t got a great deal of experience in live sound engineering, here are a few helping guidelines.
Gain
The Verona has two types of input channel; Mono and Multi Function (Stereo) both of also have a mono
microphone input. Gain is provided on these channels to allow the operator to obtain the optimal signal for the
system.
Microphone Gain +15dB to +60dB (0dB to +45dB with pad switch enabled)
Mono Channel Line Gain 0dB to +45dB (-15dB to 30dB with pad switch enabled)
Stereo Channel Line Gain Off to +20dB
Each channel of the Verona includes an in-line channel LED meter indicating the channel level (measured after the
channel insert and EQ but before the channel fader). With the insert and EQ disabled, the in-channel meter will
show the level at the input in four stages:-
-18dB - Signal Present
0dB - Normal operating level
+12dB - High Signal Level
+18dB - 3dB before channel overload (clipping)
The input gain of the channel can be used to obtain the best operating level for the console. Too small a signal level
(too little gain) and the best signal to noise ratio will not be achieved; too high a signal level (too much gain) and
there is the chance of overloading the channel causing distortion.
Clearly, the gain should be positioned between these two points, to gain an optimal signal to noise ratio without
overloading the channel. The ideal level for input channels would be around +6dB with occasional illumination of
+12dB.
Headroom
A channel signal is only permitted to swing high and low by an amount fixed by the power supply. If the maximum
output of the Verona channel strip is +21dBu (0dBu = 0.775 volts RMS) then imagine the following situation:
Headroom is the amount of spare ‘swing’ available to the system. If 6dB headroom was desired at all times, a
maximum level of +15dB is required to retain the headroom.
To prevent overload, the gain must be set to a point that even the highest output from the microphone during
sound check has some headroom left to prevent any surprises during the show!
The consoles Busses (e.g. Left and Right Main buss) are the point where all channel signals are summed together.
In normal operation, it is unlikely that all channels will receive the same signal at the same time so typically when
48 channels are summed together a gain of around 6 to 9dB will be seen. It is important to leave some headroom
in the summing amplifiers so that they do not overload, should the sum exceed the maximum level.
The Effect of EQ
Channel equalisation should be used with care. Boosting or cutting equaliser bands can make monitoring your
actual input level very difficult. Excessive boosting of EQ (+15dB is available on each band)will have the same
effect as applying more gain to the input, taking up valuable headroom. Consider backing off the channel gain
when using large amounts of boost (if you have to use large amounts of boost) to retain a sensible level at the
output.
Excessive EQ cut can have a similarly undesirable effect. If a large amount of signal is cut in the equaliser section,
gain may be used to ‘make up’ the level lost in the equaliser. However, the input pre-amplifier still has the same
amount of available headroom. If gain, added to ‘make up’ the loss in the equaliser, exceeds the maximum level
into the microphone pre-amp then the channel won’t appear to be overloaded but the microphone pre-amp will.
Turning off the equaliser will reveal the true story, whereby the microphone pre-amp may be overloaded. It is
worth considering whether such large amounts of EQ cut is really required, or whether it is being used rather more
as a volume control (in which case the input gain could be set to a normal operating level and the output adjusted
on the channel fader).
TIP: You can monitor the level pre-EQ and post-EQ using the in-channel LED meter by switching the EQ in and out
during sound check.
Operators Manual - Page 28
Page 31

Setting Up The VeronaSetting Up The Verona
Dynamic Processing
When working with signals that are constantly at a high level, the channel gain can accommodate these signals
with ease. When working with varying signals (such as the vocalist discussed earlier) it may be desirable to reduce
the dynamic range of the signal so that the loud parts aren’t so loud (and don’t overload your channel input) and
the quiet bits aren’t too quiet (so the signal to noise ratio would be increased).
Limiters and Compressors have a similar function which is to reduce the dynamic range of a signal. The means by
which they do this won’t be discussed here but, these devices have the ability to reduce the level of loud signals
automatically and also raise the gain to ‘make up’ the level as desired. The channel gain can now be set with
adequate headroom to accommodate both loud and quiet signals and the compressor can reduce the dynamic
range and ‘make up’ any reduction in level. By inserting such a device into the channel’s insert point you have the
ability to remove the guesswork from setting your system gain.
However (and this is a big however), there are still sources of potential problems. The Verona is able to operate at
levels up to +21dBu on both the insert send and return. If the maximum input level of the compressor was less
than +21dBu then it is possible to overload the input of the compressor. The only way to resolve this situation
would be to drop the channel input gain so that the input level of the compressor was not being overloaded. Bear
in mind however, the level returned from the compressor would also be lower than +21dBu and excessive use of
the compressor ‘make up’ gain would overload the output of the compressor!
Unity Gain
Unity gain is a gain of 1 (i.e. no gain or attenuation is applied to a signal).
If a signal entered a mono line level input of the Verona at 0dBu and the gain was set to +15dB (an internal 15dB
attenuation sets the net gain to 0dB), then the signal was routed to each output at 0dB, the channel fader was set
to 0dB and each output fader was set to 0dB, the output should be 0dBu (or unity). Some console manufacturers
mark the 0dB level of their faders and pots ‘U’.
Simple. But that’s just one signal. If we have two 0dBu signals entering the Verona (assuming they are coherent i.e. the same level and phase) to be summed in the busses, the output would no longer be 0dBu.
Simply,
To retain an output of 0dBu (our previous unity level) each input must be reduced.
So each fader must be reduced to -6dB to retain the unity gain level of 0dBu on the console output. When using
four inputs at 0dBu, the faders must be reduced to -12dB. Real life signals are not continuous, but the principal is
the same. If you have a sinusoidal input that is nominally 0dBu on all 48 inputs with the channel faders at 0dB, the
output is likely to be well above the 21dBu maximum output of the console and leave no headroom spare. With
real world signals, 48channels summed together will give around 6 to 9dB gain because it is unlikely that all 48
channels will receive the same signal at the same time. Instead signals will occur at different times, and there will
be cancellation due to phase and frequency differences.
0dBu = 0.775 volts
0.775 volts + 0.775 volts = 1.55 volts
1.55 volts is 0.775 volts +6dB (or a gain of 2)
0.775 volts / 2 = 0.3875 volts
0.3875 volts is 0.775 volts -6dB (or a gain of 1/2)
Operators Manual - Page 29
Page 32

Setting Up The VeronaSetting Up The Verona
Signal Processing and Amplifiers
The final links in the system tend to be graphical equalisers, loudspeaker processors and finally amplifiers and
speakers.
Graphical equalisers have the same problems as the Verona’s EQ. If excessive boost is applied to the signal, the
graphic equaliser’s output may be overloaded. If, the output of the Verona is higher than the maximum input level
of the graphic, the input of the graphic may be overloaded.
Loudspeaker processors have similar problems. If the input level to the processor is too high, the input may be
overloaded and introduce distortion into the outputs (and to the speakers!). In addition to this, any boost on the
processors outputs (say you want 3dB more bass) will cause that output to overload earlier (in this case 3dB
before the other outputs).
Finally, amplifiers can introduce the most interesting results.
An amplifier has a sensitivity. That is, an input signal level that causes the amplifier to produce it’s maximum
output level. For many amps this is 0dBu (0.775 volts RMS), others use 0dBV (1 volt RMS) others use different
levels. Beyond this sensitivity, the amplifiers output will not be able to produce any more power and ‘CLIP’
(usually indicated by some serious looking red lights). Sending +21dBu level from the Verona will clip the output
of most amplifiers causing damage to your loudspeaker system.
There are a number of solutions to this problem:
Reduce the amplifiers input attenuators to a level where the amplifier and console clip at the same point.
e.g. The input sensitivity is 0dBu, setting the input attenuator
on the amplifier to -21dB would mean that the console would clip
at the same time as the amplifier. So operating the console sensibly
the amplifier should never be clipped. The console led Meters will also accurately show
the available headroom left in the entire system.
-21dB may not be a sensible level to set as many operators choose not
to run the output of the console so high. That is personal choice.
Run the output of the console at a level below 0dBu
This solution means that you won’t get full benefit of the console, and may
suffer a reduced signal to noise ratio especially when running over long signal cables. But the
amplifiers should be saved from clipping.
As with many things in the audio world, use your ears. If something sounds distorted check:
Input Gain too high? (lower input gain and check)
EQ Too Much Boost? (disable eq and check)
EQ Too Much Cut coupled with a High Input Gain? (disable eq and check)
Too High a level into Inserted Processor? (disable insert and check)
Clipping Loudspeaker controller or Amplifiers (Check CLIP lights on amps etc.)
Operators Manual - Page 30
Page 33

group
aux
c/o
group 1
group
to mtx
mono
lr
pan
MUTE
group 1
SOLO
aux 1
Setting Up The VeronaSetting Up The Verona
Routing
The flexible routing of the Verona allows the console to operate as both a Front of House (FOH) and Monitor
console, or as a combination of both. For operators that haven’t got a great deal of experience, here are a few
helping guidelines.
aux
Front of House Mode
pre
pre
The group aux changeover switch on each group should be released (i.e. off) so that the group fader controls the
fade
group buss signal.
stereo
c
Uses for groups vary, but include:
Submixes
master
sis
10
5
0
5
10
15
20
30
40
Submixes are a common way of saving time (and possibly embarrassment) when using a large
number of microphones at once. For example: Multiple Microphones for Choirs, Drum
Kits/Percussion, Orchestras, etc . . .
The channel to be submixed should be routed to the group and any aux sends ONLY (i.e. not to the
master L-C-R). The fader is, as normal, used to set the relative level between the channels in the
submix. The group chosen for the submix should then be routed to the master L-C-R and panned as
required.
The submix is now set up. The group level can be used to control the overall level of the channels
(retaining their relative levels), mute the submix output or solo the submix signal.
Note: Muting the submix is not the same as muting the channels. Aux sends and other group sends
will remain active. If channels in a submix are required to be muted, use the automute facility.
Common EQ/Processing
Often, it is either too expensive or undesirable to apply processing to each channel individually (for
example: compression on a whole choir, graphic eq on a number of microphones, etc...). Setting up
a submix as above, the signal is grouped together. Now the desired processor can be inserted into
the group inserts applying the process to all of the submix channels (in their relative levels).
Alternative Outputs
example:, you were mixing a number of speakers in a venue and each needed a different level and
processing.
Route the desired channels to any group or master output as necessary. Make sure the group is not
routed to the main outputs. The group outputs should be wired into the necessary amplification and
the insert points into any necessary processing (e.g. delay, EQ, etc...).
The levels are now individually controllable.
group
aux
c/o
MUTE
SOLO
aux
0
+10
pre
Monitor Mode
The group aux changeover switch on each group should be depressed (i.e. on) so that the group fader controls the
aux buss signal.
Channel signal should be sent to the auxiliary as required and the aux sends should usually be
configured to pre-fader. The console group output sockets should be wired into the necessary
amplification and the insert points into any necessary processing (e.g. EQ, etc...).
The monitor levels are now individually controllable on the group faders.
Dual FOH/Monitor Mode
The group aux changeover switch on each group should be depressed (i.e. on) so that the group fader controls the
aux buss signal for monitors or released (i.e. off) so that the group fader controls the group buss signal for FOH.
The usage in this split mode can be any combination of the above!
Note: When the group aux changeover switch is depressed, control over the groups is performed by
the auxiliary controls and hence, and group outputs may still be used. Submixes could be used by
connecting the auxiliary output sockets on the rear of the console to four unused stereo input
channels and routed to the Left and Right master busses.
Operators Manual - Page 31
Page 34

Page 35

Functional
Block Diagrams
Operators Manual - Page 33
Page 36

direct out
equaliser
insert
0
12
18
-18
pfl meter
group 1 bus
group 3 bus
group 5 bus
grp 7
grp 5
grp 3
grp 1
groups
group 7 bus
grp 8
grp 6
grp 4
grp 2
pan
aux 7 bus
aux 8 bus
master
left bus
aux 8
mono
stereo
sis
aux post 1 bus
aux post 2 bus
aux pre 2 bus
aux pre 1 bus
eq
on
+15
20k
10k
treble
2k
5k
-15
+15
3k
8k
hi-mid
1k
400
-15
+15
2k
1k
lo-mid
300
100
-15
+15
200
100
bass
20
50
-15
0
aux 1
aux pre 3 bus
0
0
+6
+6
aux 2
aux post 4 bus
aux post 3 bus
aux pre 5 bus
aux pre 4 bus
0
0
+6
+6
aux 3
aux 4
aux post 6 bus
aux post 5 bus
aux pre 6 bus
0
0
+6
+6
aux 5
+60+6
aux 7
aux 6
right bus
mono bus
SOLO
group 4 bus
group 6 bus
group 8 bus
pfl bus
right solo bus
left solo bus
group 2 bus
insert
send
return
direct option
pre
aux 7
L
R
+10dB
0
post eq
pan in stereo mode
L
r
c
pan
l
5
10
mute 1
mute 2
filter
hi-pass
hi-pass
160
400
20
60
/
mic O
pre
aux 8
aux 7&8 pre option
-
phase
reverse
+60
+45
mic gain
+15
+30
-15
pad
off
eq
aux pre
5
10
pre eq
line in
phantom
-15
48v
power
MUTE
R
C
pan in sis mode
20
40
30
15
BLOCK DIAGRAM
solo logic
mute 3
mute 4
VERONA MONO INPUT MODULE
mic
automute 2 bus
automute 3 bus
automute 1 bus
solo on bus
automute 4 bus
solo in place bus
Operators Manual - Page 34
Page 37

pfl bus
right solo bus
group 5 bus
group 3 bus
group 1 bus
aux 7 bus
aux 8 bus
aux post 1 bus
aux post 2 bus
aux post 3 bus
aux post 4 bus
aux post 5 bus
aux pre 2 bus
aux pre 3 bus
aux pre 4 bus
aux pre 1 bus
aux pre 5 bus
aux post 6 bus
aux pre 6 bus
mono bus
right bus
left bus
group 7 bus
group 8 bus
left solo bus
group 4 bus
group 6 bus
group 2 bus
insert
insert
80Hz
hi-pass
BLOCK DIAGRAM
VERONA MULTI FUNCTION INPUT MODULE
send
return
0
equaliser
0
0
0
+6
+6
aux 1
aux 2
aux 3
0
12
18
-18
pfl meter
eq
on
+15
0
+6
+6
aux 5
aux 4
treble
-15
+15
8k
3k
hi-mid
600
1k5
-15
+15
1k2
500
lo-mid
100
300
-15
+15
bass
-15
0
+6
0
+6
aux 6
pre
aux 7
pre
aux 8
0
+6
+6
aux 8
aux 7
mono
stereo
10
aux 7&8 pre option
off
eq
L
c
+10dB
5
grp 7
grp 5
grp 3
grp 1
groups
Pan
grp 8
grp 6
grp 4
grp 2
SOLO
R
r
pan
l
+10dB
0
5
20
40
10
30
15
aux pre
+45
+30
phantom
/
mic O
-
phase
reverse
+60
mic gain
+15
-15
pad
48v
power
lineinL
mic
wide
5k
stereo
image
mono
+20
0
line gain
lineinR
pre eq
MUTE
post eq
post eq
solo logic
mute 1
mute 2
mute 3
mute 4
solo on bus
automute 2 bus
automute 3 bus
automute 1 bus
automute 4 bus
solo in place bus
Operators Manual - Page 35
Page 38

aux out 1
group 1
pfl bus
right solo bus
left solo bus
matrix 1
solo on bus
right bus
left bus
mono bus
SOLO
aux
master
stereo
sis
10
pan in stereo mode
SOLO
group
SOLO
matrix
SOLO
dir input
mono
-24
-21
-18
-15
-12
-9
-6
-3
0
+3
+6
+9
+12
+15
+18
+21
stereo
mono
group meter 1
L
r
c
pan
l
R
C
pan in sis mode
L
R
mtx
meter source select
aux
+10dB
0
5
5
20
40
10
30
15
BLOCK DIAGRAM
group
pre
aux
aux
MUTE
aux 1
direct
mtx
input to
VERONA GROUP/MATRIX MODULE
MUTE
group
+10dB
return
0
insert G1
+10
send
to mtx
pre
fade
+10dB
MUTE
+20dB
0
+10
c/o
0
0
0
0
+6
+6
group 1
group 2
aux pre 1 bus
aux post 1 bus
group 1 bus
group 1-matrix
group 2-matrix
group 3-matrix
0
+6
+6
group 3
group 4
group 4-matrix
group 5-matrix
matrix 1
0
+6
+6
group 5
group 6-matrix
0
0
group 6
+6
group 7-matrix
+6
group 7
group 8-matrix
group 8
0
mono-matrix
0
mono master
left-matrix
0
+6
+6
left master
right-matrix
right master
direct in 1
talk-matrix
+6
+20
0
direct
Operators Manual - Page 36
Page 39

master L
master R
master C
solo on bus
solo in
place
solo in place bus
auto
mute
masters
automute 1 bus
automute 2 bus
automute 3 bus
automute 4 bus
pfl out
phones
monitor L
monitor R
SOLO
stereo
MUTE
SOLO
mono
1
2
SOLO
tape
3
4
MUTE
0
phones
MUTE
monitor
local
0
+10
+10
(dim)
-20dB
left solo bus
matrix
-20dB
right solo bus
talk-matrix
-6
-3
0
+3
+6
+9
+12
+15
-6
-3
0
+3
+6
+9
+12
+15
-6
-3
0
+3
+6
+9
+12
+15
-24
-21
-18
-15
-12
-9
-9
-9
right
-24
-21
-18
-15
-12
center
-24
-21
-18
-15
-12
left
solo meters
+9
+12
+15
+18
+21
right
+9
+12
+15
+18
+21
pfl
+9
+12
+15
+18
+21
left
-9
-6
-3
0
+3
+6
-9
-6
-3
0
+3
+6
-9
-6
-3
0
+3
+6
pfl
SOLO
-24
-21
-18
-15
-12
-24
-21
-18
-15
-12
-24
-21
-18
-15
-12
master meters
+21
+18
+21
+18
+21
+18
mono bus
mono
pfl bus
aux post 1 bus
aux post 2 bus
aux pre 1 bus
aux pre 2 bus
grp 2
+10dB
MUTE
right
+10dB
MUTE
mono
+10dB
stereo
left bus
right bus
BLOCK DIAGRAM
MUTE
left
VERONA MASTER MODULE
0
5
10
5
left
20
40
30
10
15
aux post 4 bus
aux post 3 bus
aux pre 4 bus
aux pre 3 bus
group 2 bus
group 4 bus
grp 6
grp 4
aux post 6 bus
aux post 5 bus
aux pre 5 bus
group 6 bus
aux 8 bus
aux 7 bus
aux pre 6 bus
right bus
left bus
group 8 bus
stereo
grp 8
left
0
right
5
5
10
20
40
10
30
15
0
5
20
40
10
30
15
+20dB
+20dB
0
+20
tape
group 1 bus
Grp 1
grp 3
group 5 bus
group 3 bus
grp 7
grp 5
mono bus
group 7 bus
mono
aux
5
10
talk out
mono
tape in
return
insert ML
insert MR
send
left bus
return
send
insert MC
stereo
to mono
right bus
pre
insert
return
send
mono bus
L
tape out
talk
+48V
phantom
on
talk
external
+60
+15
1
3
2
talk
mic
talk in
0
+10
generator
on
5k
500
freq
OSC
50
150
R
Operators Manual - Page 37
Page 40

Page 41

Dimensions and
Weights
Operators Manual - Page 39
Page 42

Dimensions and Weights
Operators Manual - Page 40
Page 43

Rear panel
Description
Operators Manual - Page 41
Page 44

1
Recessed Littlite clip
Rear Panel Description
Actual number of input banks depends Verona model2Refer to specifications for PSU fitting option
1
Standard location of
Mono Input module
Output module
module
Multi-function Input
Littlite connector
2
mains inlet
Internal switching
mode power supply
Operators Manual - Page 42
supply connector
External linear power
Page 45

Specification and
Features
Operators Manual - Page 43
Page 46

Verona FeaturesVerona Features
The following list of features is based upon the thirty-two channel frame size console.
The thirty-two channel Verona features:
24 mono input channels
8 stereo input channels
8 Auxiliary Outputs
1 through 6 with Global Pre/Post Fader selection and selectable Pre/Post EQ
7 & 8 with Channel selectable Pre/Post Fader selection and jumper selectable Pre/Post EQ
For jumper selection configurations, contact you local Midas service agent.
Inputs
Out
puts
8 Group Outputs
4 Band Equaliser
48 volt phantom power independantly switchable on each channel (always on talk mic)
Hi-Pass filter on all inputs (Mono Channels: Variable 20Hz to 400Hz, Stereo Channels: Fixed 80Hz)
Signal Generator
32 Channel Inserts (jumper selectable pre/post insert and eq)
Type Connector Impedance Balanced No.
Microphone XLR(f) 1k5 ohm Yes Variable (+21dBu) 32
M Ch Line Input 1/4” TRS Jack 10k ohm Yes Variable (+36dBu w/pad) 24
MF Ch Line Input 1/4” TRS Jack 10k ohm Yes Variable (+26dBu) 16
Direct Input 1/4” TRS Jack 10k ohm Yes Variable (+26dBu) 4
Tape Input RCA Phono 47k ohm No -10dBu (+26dBu) 2
Talk Mic XLR(f) 1k5 ohm Yes Variable (+6dBu) 1
Talk Input XLR(f) 10k ohm Yes 0dBu (+26dBu) 1
Direct Out 1/4” TRS Jack 100 ohm Impedance Bal. 0dBu (
Groups XLR(m) 50 ohm Yes 0dBu (+21dBu) 8
Auxiliary XLR(m) 50 ohm Yes 8
Matrix XLR(m) 50 ohm Yes 4
Talk Out XLR(m) 50 ohm Yes 1
Master Out XLR(m) 50 ohm Yes 3 (LCR)
Monitor Out XLR(m) 50 ohm Yes 2 (LR)
PFL Out XLR(m) 50 ohm Yes 1 (M)
Tape Out RCA Phono 600 ohm No -1 2
Headphones 1/4” TRS Jack To drive headphones > 100 ohm +1 1
With Aux/Group Changeover option for dual purpose FOH/Monitor applications
Mono Channels: 4 Swept Frequency Bands (Treble, Hi Mid, Lo Mid, Bass)
Stereo Channels: 2 Shelving Bands (Bass, Treble), 2 Swept Frequency Bands (hi mid, lo mid)
Level Nom (max)
+21dBu) 24
0dBu (+21dBu)
0dBu (+21dBu)
0dBu (+21dBu)
0dBu (+21dBu)
0dBu (+21dBu)
0dBu (+21dBu)
0dBu (+11dBu)
0dBu (+21dBu)
Inserts
2
1
Quarter Inch Jack
Sleeve Screen/Ground Screen/Ground Screen/Ground
Ring Cold Signal Insert Return Right
Tip Hot Signal Insert Send Left
Input 1/4” TRS Jack 50/10k ohm (s/r) No 32
Group
Master
Total XLR input count 34
Total Jack input count 44
Total RCA Phono input count 2
Total XLR output count 27
Total Jack output count 25
Total RCA Phono output count 2
Total insert count 43
XLR
1
3
2
Pin 1 - Screen/Ground
Pin 2 - Hot Signal
Pin 3 - Cold Signal
3
Note: Sockets are viewed from the front
face.
TRS Signal TRS Insert TRS Headphone
1/4” TRS Jack 50/10k ohm (s/r) No 0dBu (+21dBu) (send/ret) 8
1/4” TRS Jack 50/10k ohm (s/r) No 0dBu (+21dBu) (send/ret) 3
RCA (Tape In/Out)
Centre (Tip) - Signal
Surround (Sleeve) - Screen
0dBu (+21dBu) (send/ret)
Operators Manual - Page 44
Page 47

Verona SpecificationVerona Specification
Internal Power Supply
Type Switching
Line Voltage 90 - 240V AC
Line Frequency 50/60Hz
Input Impedance
Microphone 1k5 ohm Balanced
Line 10k ohm Balanced
Input Gain (all faders at 0dB)
Microphone Continuously variable from +15dB to +60dB
Microphone + Pad Continuously variable from 0dB to +45dB
Mono Channel Line Continuously variable from 0dB to +45dB
Stereo Channel Line Continuously variable from off to +20dB
Direct Inputs Continuously variable from off to +20dB
Maximum Input Level
Mic +6dBu
Mic + Pad +21dBu
Mono Channel Line +21dBu (+36dBu pad enabled)
Stereo Channel Line +26dBu
CMR at 100Hz
Microphone (Gain +40dB) Typ 95dB
Microphone + Pad (Gain 0dB) Typ 80dB
Line (Gain 0dB) Typ 80dB
CMR at 1kHz
Microphone (Gain +40dB) Typ 95dB
Microphone + Pad (Gain 0dB) Typ 80dB
Line (Gain 0dB) Typ 80dB
(-15dB to +30dB Pad enabled)
Frequency Response (20Hz to 20kHz)
Noise 20Hz to 20kHz
Microphone EIN ref. 150 ohms (Gain +60dB) -129dBu
System Noise (20Hz to 20kHz)
Distortion at 1kHz
Crosstalk at 1kHz
Output Impedance
Microphone to Mix +0 to -1dB
Summing Noise (48 channels
routed with faders down) -80dB
Line to Mix Noise (48 channels
routed at 0dB, pan centre) -75dB
Microphone to Mix (Gain +40dB,
0dBu output) <0.03%
Channel to Channel < -90dB
Mix to Mix < -90dB
Channel to Mix < -90dB
Max. Fader Attenuation > 100dB
Max. Mute Attenuation > 100dB
All Line Outputs 50 ohms Balanced Source to drive > 600 Ohms
Tape Output 600 ohms unbalanced
Direct Output 100 ohms impedance balanced
Insert Output 50 ohms unbalanced
Headphones to drive > 100 ohms
Maximum Output Level
All Line Outputs +21dBu
Headphones +21dBu
Nominal Signal Level
Microphone -60dBu to 0dBu
Line 0dBu
Headphones +10dBu
Operators Manual - Page 45
Page 48

Equalisation
Mono Hi-pass slope 12dB/octave
Channels
Treble Band Cut/Boost +/-15dB
Frequency range 2kHz to 20kHz
Verona SpecificationVerona Specification
Hi Mid Band Cut/Boost +/-15dB
Frequency range 400Hz to 8kHz
Bandwidth 1 Octave
Lo Mid Band Cut/Boost +/-15dB
Frequency range 100Hz to 2kHz
Bandwidth 1 Octave
Bass Band Cut/Boost +/-15dB
Frequency range 20Hz to 400Hz
Stereo
Channels
Treble Band Cut/Boost +/-15dB
Frequency (-3dB) 12kHz
Hi Mid Band Cut/Boost +/-15dB
Frequency range 600Hz to 8kHz
Bandwidth 1 Octave
Lo Mid Band Cut/Boost +/-15dB
Frequency range 100Hz to 1.2kHz
Bandwidth 1 Octave
Bass Band Cut/Boost +/-15dB
Frequency (-3dB) 100Hz
Power Supply Information
The number of power supplies shipped as standard with the Verona varies with the frame size as follows:
Channels Internal External Redundancy
24-32 1 0 NO
40 - 56 2 0 YES
64 2 1 YES
The internal supplies on the 64 channel Verona should be switched on at approximately the same time so that excessive
load is not applied to any single supply.
The external power supply can be used to add or increase redundancy or to replace the internal supplies. The external
supply has a “daisy chain” facility (as shown below) allowing for a number of power supplies to be used together adding
redundancy to the system in the event of a power supply failing.
Connection 6 Pin Male XLR
Pin 1 0V Analogue
Pin 2 +18V Analogue
Pin 3 -18V Analogue
Pin 4 +12V Gooseneck Light
Pin 5 +48V Phantom
Pin 6 0V Gooseneck Light
Case Chassis
Front View
Power
PSU 1
Power
PSU 2
To console
PUSHPUSH
DCOutput / Link
_
+
+
+
Low
48V
8V
8V
1
1
2V
1
Mains
PUSHPUSH
DCOutput / Link
_
+
+
+
Low
48V
8V
8V
1
1
2V
1
Mains
To subsequent supplies
Pin1-
0VA
+
8V
1
Pin2-
_
Pin3-
8V
1
+
Pin4-
2V
1
+
Pin5-
48V
Pin6-
0VL
DCOutput / Link
Pin1-
0VA
+
8V
1
Pin2-
_
Pin3-
8V
1
+
Pin4-
2V
1
+
Pin5-
48V
Pin6-
0VL
DCOutput / Link
CAUTION
RISKOFELECTRICSHOCK
DONOTOPEN
TOREDUCETHERISK OF ELECTRIC SHOCK,
WARNING:
DONOTEXPOSETHIS APPLIANCE TO RAIN OR MOISTURE
PUSH
AVIS:
RISQUEDECHOCELECTRIQUE. NE PAS OUVRIR.
NOUSERSERVICEABLEPARTS INSIDE REFER SERVICING TO
QUALIFIEDSERVICEPERSONNEL.
CAUTION:
FORCONTINUEDPROTECTIONAGAINST RISK OFFORCONTINUEDPROTECTIONAGAINST RISK OF
FIREREPLACEWITHTHE SAME TYPE AND VALUE FUSE INDICATED.FIREREPLACE WITH THE SAME TYPE AND VALUE FUSE INDICATED.
ATTENTION:
REMPLACERPARUMFUSIBLE DE MÊME TYPEREMPLACERPARUM FUSIBLE DE MÊME TYPE
COMMEINDIQUÉ.
THISDEVICECOMPLIESWITH PART 15 OF THEFCC RULES. OPERATION IS SUBJECT TO THE FOLLOWING CONDITIONS:
(1)THISDEVICEMAY NOTCAUSE HARMFUL INTERFERENCE, AND
(2)THISDEVICEMUST ACCEPT ANY INTERFERENCE RECEIVED,INCLUDING INTERFERENCE THAT MAY CAUSE UNDESIRED OPERATION.
Rear View
CHECKVOLTAGESELECTOR
BEFOREAPPLYINGMAINS.
MADEINKIDDERMINSTER, ENGLAND
SUPPLY
VOLTAGE
100V/120V/220V/240V
AC~50-60Hz460W
FUSE:5x20mm
T5AL250V
CHECKVOLTAGESELECTOR
BEFOREAPPLYINGMAINS.
MADEINKIDDERMINSTER, ENGLAND
SUPPLY
VOLTAGE
100V/120V/220V/240V
AC~50-60Hz460W
FUSE:5x20mm
T5AL250V
CUS
CUS
Under NO circumstances should the Venice series power supply be used with the Verona. Only the Midas
V190 Linear External Power Supply is approved for use with Verona consoles.
Servicing and Maintenance
Both the Verona and the Midas V190 linear external power supply both contain potentially lethal voltages and
should only be serviced by authorised Midas service agents. In the event of malfunction, please refer servicing
to qualified personnel. Contact your Midas dealer for more information.
Due to a policy of continual improvement, Midas reserves the right to alter the specification and performance at any time without prior notification.
Operators Manual - Page 46
Page 49

Crib Sheet Mono InputCrib Sheet Mono Input
Notes:
Page 50

Multi Function Input
Multi
Notes:
Crib Sheet
Crib Sheet
Function Input
Page 51

Page 52

Midas Verona Operators Manual
Issue 1.1 - February 2004
DOC02-Verona
Due to a policy of continual product improvement, specification and features
may be subject to change without notice.
 Loading...