

Page 1
Page 2

2
Copyright © 2005 Microtek International,Inc.
Microtek® is a registered trademark of Microtek International, Inc. All
other trademarks or registered trademarks are the property of their
respective holders. Specifications, software and hardware bundles
are subject to change without notice. Delivery of technical support
services subject to change without notice. Not responsible for
typographical errors.
219-20-990419 A
Page 3

3
Thank you for your purchase. Please read this manual carefully
before using your new player.
Unique Features
The Microtek MH-210 Media Player is a highly-portable storage
device & multi-CODEC color juke box that delivers crystal clear music
playback, and includes many other exciting functions:
• Portable storage disk
This player can be used as a 20/30/40/60GB portable storage
device to transfer files to any PC. No driver is necessary on
Win2000/XP or up. *Capacity depends on the version of the
player purchased.
• USB2.0 High speed transfer
The player suppors the USB 2.0 interface with maximum transfer
speed of 13Mb/s, backwards compatible with USB1.1.
• TFT color LCD
The player boasts a 65,536 colors 1.8 inches TFT LCD, and
supports a wide array of colorful icons and menus, bringing added
convenience.
• Movie player
• Music player
• Music playback background.
• Supports multiple music formats, including MP3 (MP3 of VBR
format supported), WMA.
• Graphical 10-band equalizer with 8 presets.
• Supports PlayList Function
Page 4

4
• Supports lyric synchronization
• Music encoding
The player provides easy recording via the FM tuner, line-in from
external audio devices as well as a mic for voice recording.
Various quality settings are available.
• e-Book
The player provides an e-Book Viewer for browsing text and e-
Book files. A Convenient bookmark function is supported as well.
The color screen can display 26 letters horizontal and 10 rows
vertical.
• e-Album
An image viewer for viewing photos stored downloaded from a
PC or Mac in JPEG, GIF or BMP format.
• Convenient firmware upgrade
New formats will be supported through a simple firmware
upgrade, while other functionality will remain the same.
• FM radio (76.0MHz~108.0MHz)
FM radio with auto-scan and station presets. FM channel list
editor provided.
• Multiple language support
Page 5

5
Caution
1. Do not expose the device to extreme temperatures (range from
5OC to 35OC).
2. Do not expose to moisture.
3. Do not apply excessive pressure to the device.
4. Do not place heavy objects on top of the device.
5. Do not expose the device to chemicals such as benzene or
thinners.
6. Do not expose the device to direct sunlight or heat sources.
7. Do not store in dusty areas.
8. Do not try to disassemble and repair the device yourself.
9. Release the hold button before operating the device.
10.Do not drop the device. This may cause internal damage or
scratches to the surface.
11.Do not turn up the volume too high.
12.Battery Life
This device is equipped with a high capacity lithium polymer
battery. With a full charge, continuous audio playback can be
sustained for over 12 hours under normal operating conditions.
The device can also record for over 12 hours. (Note: this is
limited by internal storage space) The battery can be charged
over 500 times. To prolong battery life, completely exhaust the
battery before recharging. Battery life differs from device to
device depending on operating conditions, state and time of
production.
Page 6

6
13. Stop using the device or turn the volume down if you experience
ringing in your ears.
14. Do not use wet or rough cleaning cloths. This may scratch or
even damage the device.
15. Some earphone plugs may not fit the remote properly. Use the
included earphone extension if your headphones will not plug in.
Page 7

7
Contents
1 - Getting Started 9
Turning on the player ..................................................... 9
Turning off the player .................................................... 9
Playing Music ............................................................... 9
Voice Recording ........................................................... 9
FM Radio................................................................... 10
Charging the Battery .................................................... 10
2 - Advanced Features 11
2-1 Desktop ............................................................. 11
Selecting Functions ............................................. 12
Menus ............................................................... 12
2-2 MP3 Player ........................................................ 14
Playback Mode ................................................... 14
Playing Music ..................................................... 15
Loop repeat ....................................................... 15
MP3 Player Menu Operation .................................. 16
Setting UserMode EQ: .......................................... 17
PlayList ............................................................. 18
PlayList Menu Operation ....................................... 19
Add Songs ......................................................... 19
2-3 Voice Recording .................................................. 20
Performing a recording ......................................... 21
Recording from External Devices ............................ 22
Record Quality Settings ........................................ 22
2-4 FM Radio ........................................................... 23
Listening to the Radio .......................................... 23
Automatic Tuning ............................................... 24
Manual Tuning .................................................... 25
Page 8

8
FM Radio Recording ............................................ 26
FM Channel editor ............................................... 26
2-5 Games .............................................................. 27
Russia Block ...................................................... 27
Box Game ......................................................... 29
Gobang ............................................................. 30
Black White Chess .............................................. 30
2-6 Disk Explorer ...................................................... 32
Exploring Files .................................................... 32
Managing Files .................................................... 33
Managing Directories ........................................... 34
2-7 e-Albums ........................................................... 35
2-8 e-Books ............................................................. 37
2-9 Movie Player ...................................................... 37
3 - Connecting to a Computer 38
3-1 System Requirements .......................................... 38
3-2 Connecting to a PC .............................................. 39
3-3 Installing the USB Driver ....................................... 39
3-4 Disconnecting the USB Cable ................................ 40
3-5 Using as Removable Storage ................................. 41
3-6 Disk Formatting ................................................... 42
4 - Troubleshooting 43
5 - Appendix 46
I Package Accessoies .................................................. 46
II Specifications .......................................................... 47
Page 9

9
1 - Getting Started
Turning on the player
Press and hold the POWER button until the player turns on.
Turning off the player
Press and hold the POWER button until the player turns off.
Playing Music
1. Press and hold the POWER button to power on the unit.
2. Press the PLAY button again to enter the music playback mode.
3. Press the LEFT and RIGHT and LEFT keys to select tracks.
4. Press the PLAY button to play the selected track.
5. Press the UP and DOWN keys to adjust the volume.
6. Press the PLAY button to pause playback.
7. If no buttons are pressed within 1 minute, the player
automatically powers off.
Pressing and holding the PLAY button for a few seconds will
switch to music playback mode directly.
Voice Recording
1. Press and hold the A-B button to enter the voice record mode.
2. Press the A-B button to begin voice recording.
3. Press the STOP button to stop recording, a new voice file will be
created.
4. Press the PLAY button to play the current voice file.
Page 10

10
FM Radio
1. Press the Stop/Power button to enter the mode selection screen.
Use the navigational pad to select the FM radio mode.
2. Press the PLAY button to enter the FM Radio mode.
3. Press and hold LEFT or RIGHT on the navigational pad to autosearch for FM channels
4. Press LEFT or RIGHT on the navigational pad to cycle through FM
channels.
Charging the Battery
• The player will charge automatically when the AC adapter is
connected to the device.
• Use only the AC power adapter supplied with the device.
• Connect the adapter to the player and to an AC outlet.
• While recharging, the Charge LED turns on.
When fully charged, the Charge LED turns off.
• Playback time is measured while playing a 128Kbps MP3 file
with a full charge.
• AC operating voltage: 100~240V, 50~60Hz.
• Charge time: ~ 3 hours (At full discharge)
• Playback time: over 12 hours (At full charge)
• You can also charge the player by connecting the player to a PC
via the USB cable.
Hold the MENU button, and then connect the player to PC, would
switch to charge mode directly.
Page 11
11
2 - Advanced Features
The Media Player is packed with several advanced features that
separate it from traditional MP3 players. These include an intuitive
desktop interface, an advanced MP3 Player, voice recording, FM
radio, games, and a disk explorer.
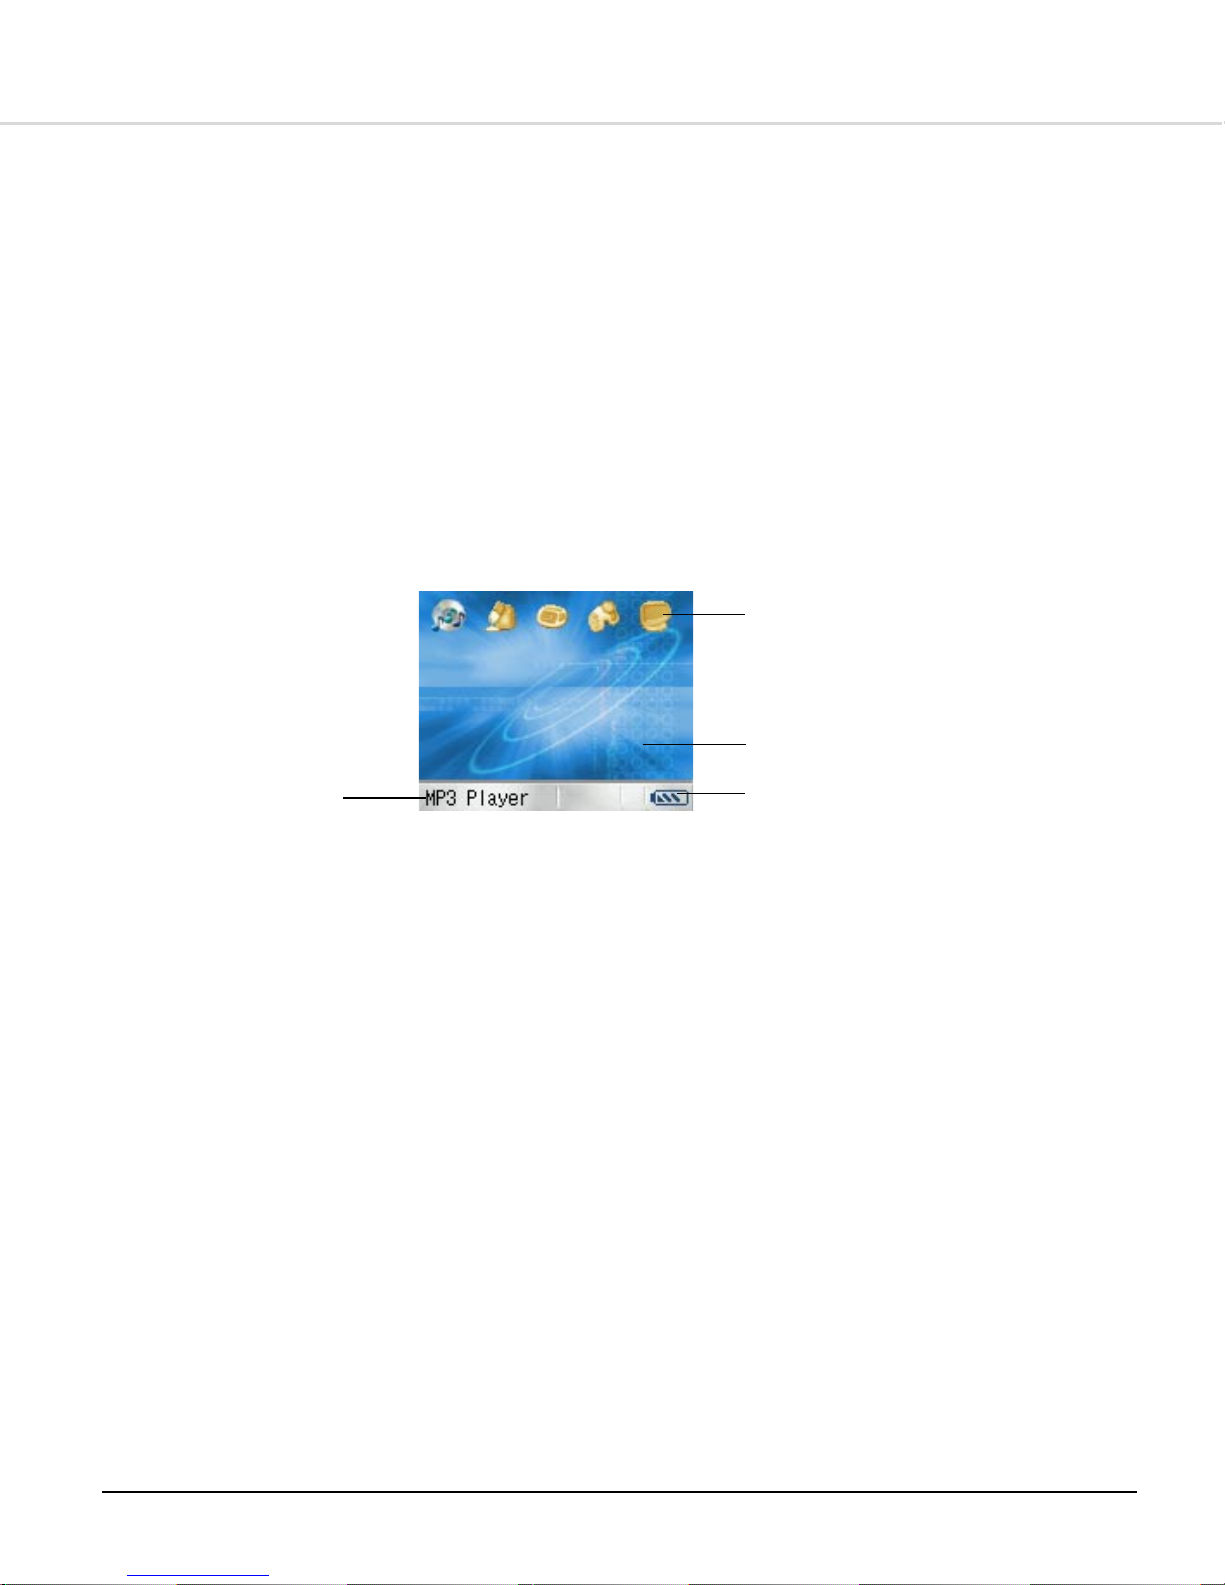
2-1 Desktop
The Desktop is where the main functions of the Media Player can be
accessed.
There are five items on the desktop:
• MP3 Player
• Record
• FM Radio
• Games
• Disk Explorer
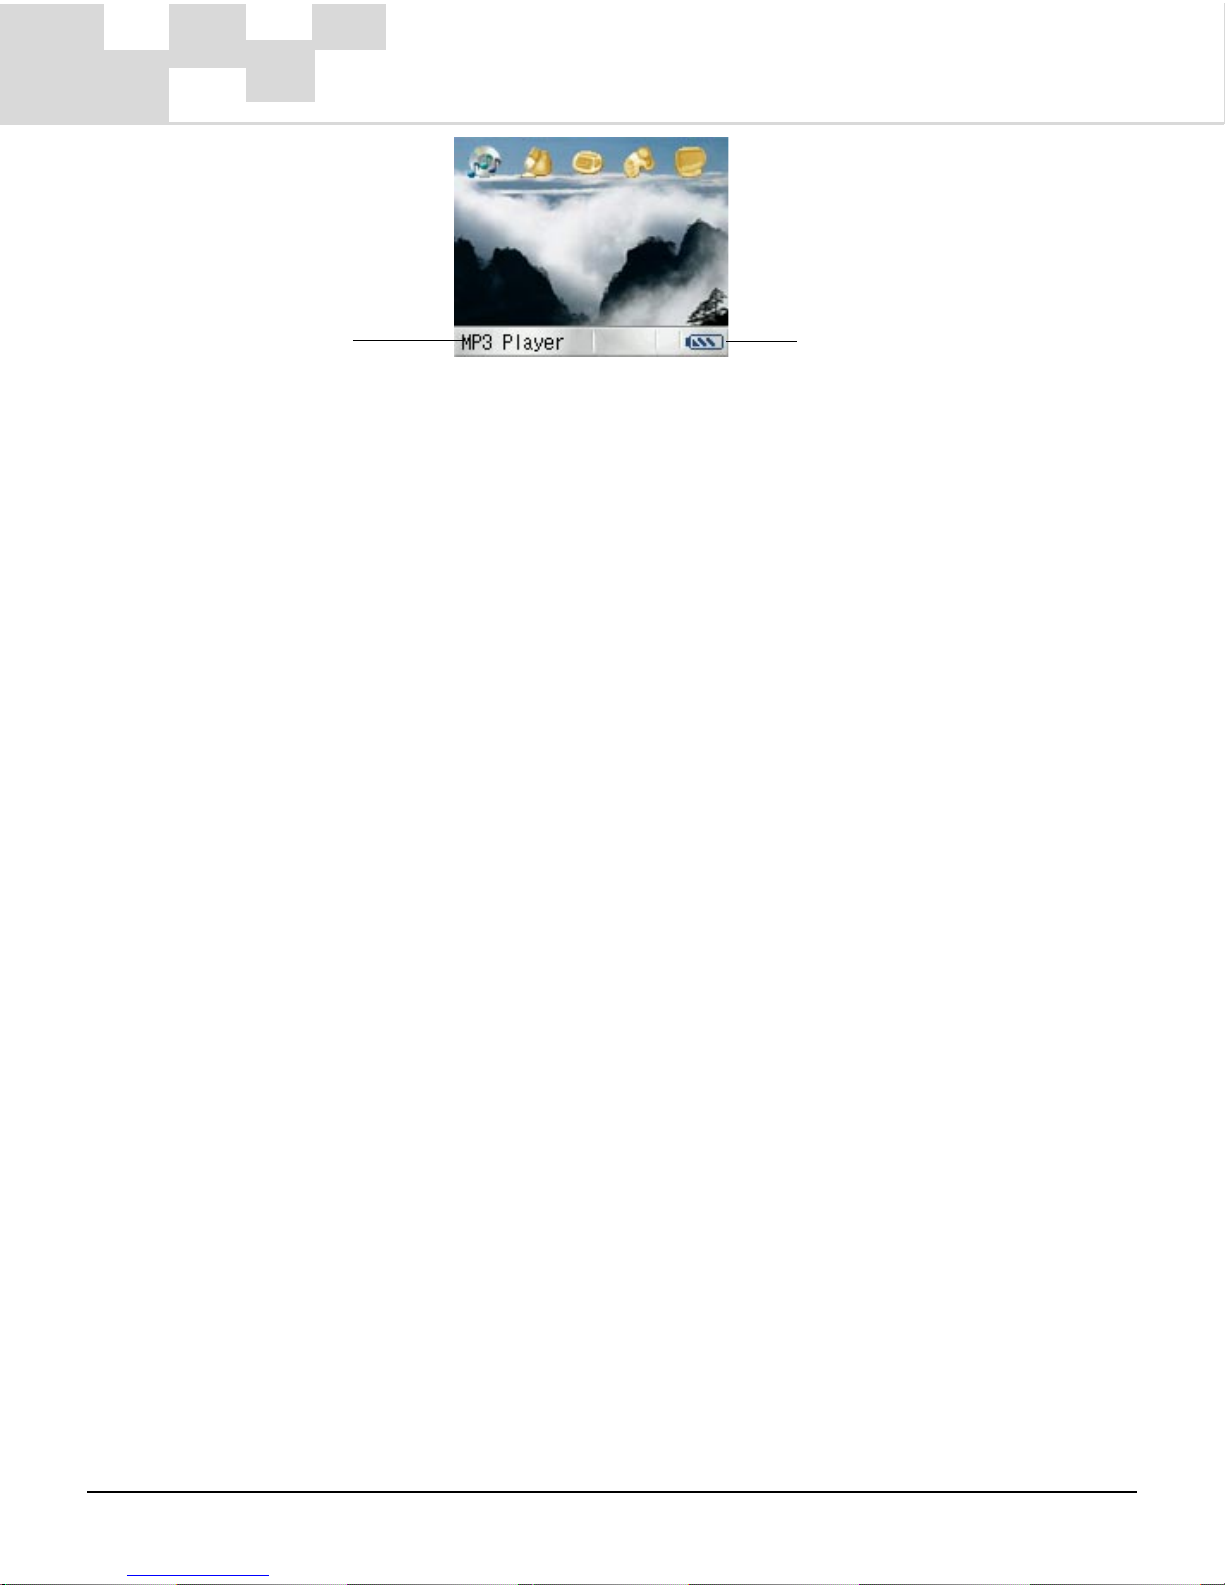
The background graphic can be customized with a picture
downloaded from a PC.
(Refer to Chapter 3 – Connecting to a Computer for more)
Current function
Press PLAY to start
Function list
LEFT or RIGHT on the
navigational pad
Background
Power indicator
Page 12
12
Selecting Functions
Follow these steps to select the function you want to use:
1. Press the LEFT or RIGHT button to cycle through the functions.
2. Press the PLAY button to select the currently displayed function.
Menus
Each function on the Media Player comes with menus, which offer
different options and settings that you can select and change.
With a function selected, press the MENU button to open the menu
for that function. When in menu mode:
1. Press the MENU button to close the menu.
2. Press the UP or DOWN on the navigational pad to navigate the
menu.
3. Press the LEFT or RIGHT on the navigational pad to change the
display settings.
4. Press the PLAY button to select the current option.
Pressing the MENU button while on the Desktop brings up a menu
with the following options:
Power indicator
Displays the name
of the currently
selected function
Page 13

13
• Brightness
Adjusts the brightness of the LCD display, press the LEFT or
RIGHT buttons to cycle through 0~12 available levels of
brightness.
• Language:
The player supports mult-language display, including simplified
Chinese, traditional Chinese, Japanese, Korean, English, etc.
Press the LEFT or RIGHT on the navigational pad to select the
desired language.
• About
Check the current firmware version.
More exciting functions can be acquired through the simple
firmware upgrading.
• Default Desktop
If default desktop has set to customized photo, select the option
and press the PLAY button to restore default desktop.
Page 14
14
2-2 MP3 Player
With quite a few advanced features such as ID3 tag support, 8 preset
equalizer settings and 10 user-defined equalizer settings, KTV
function, playlist editing capability, and over 12 hours of battery life,
the player is the perfect way to enjoy your entire digital music
collection - anytime, anywhere.
Press and hold the PLAY button to switch to music playback mode.
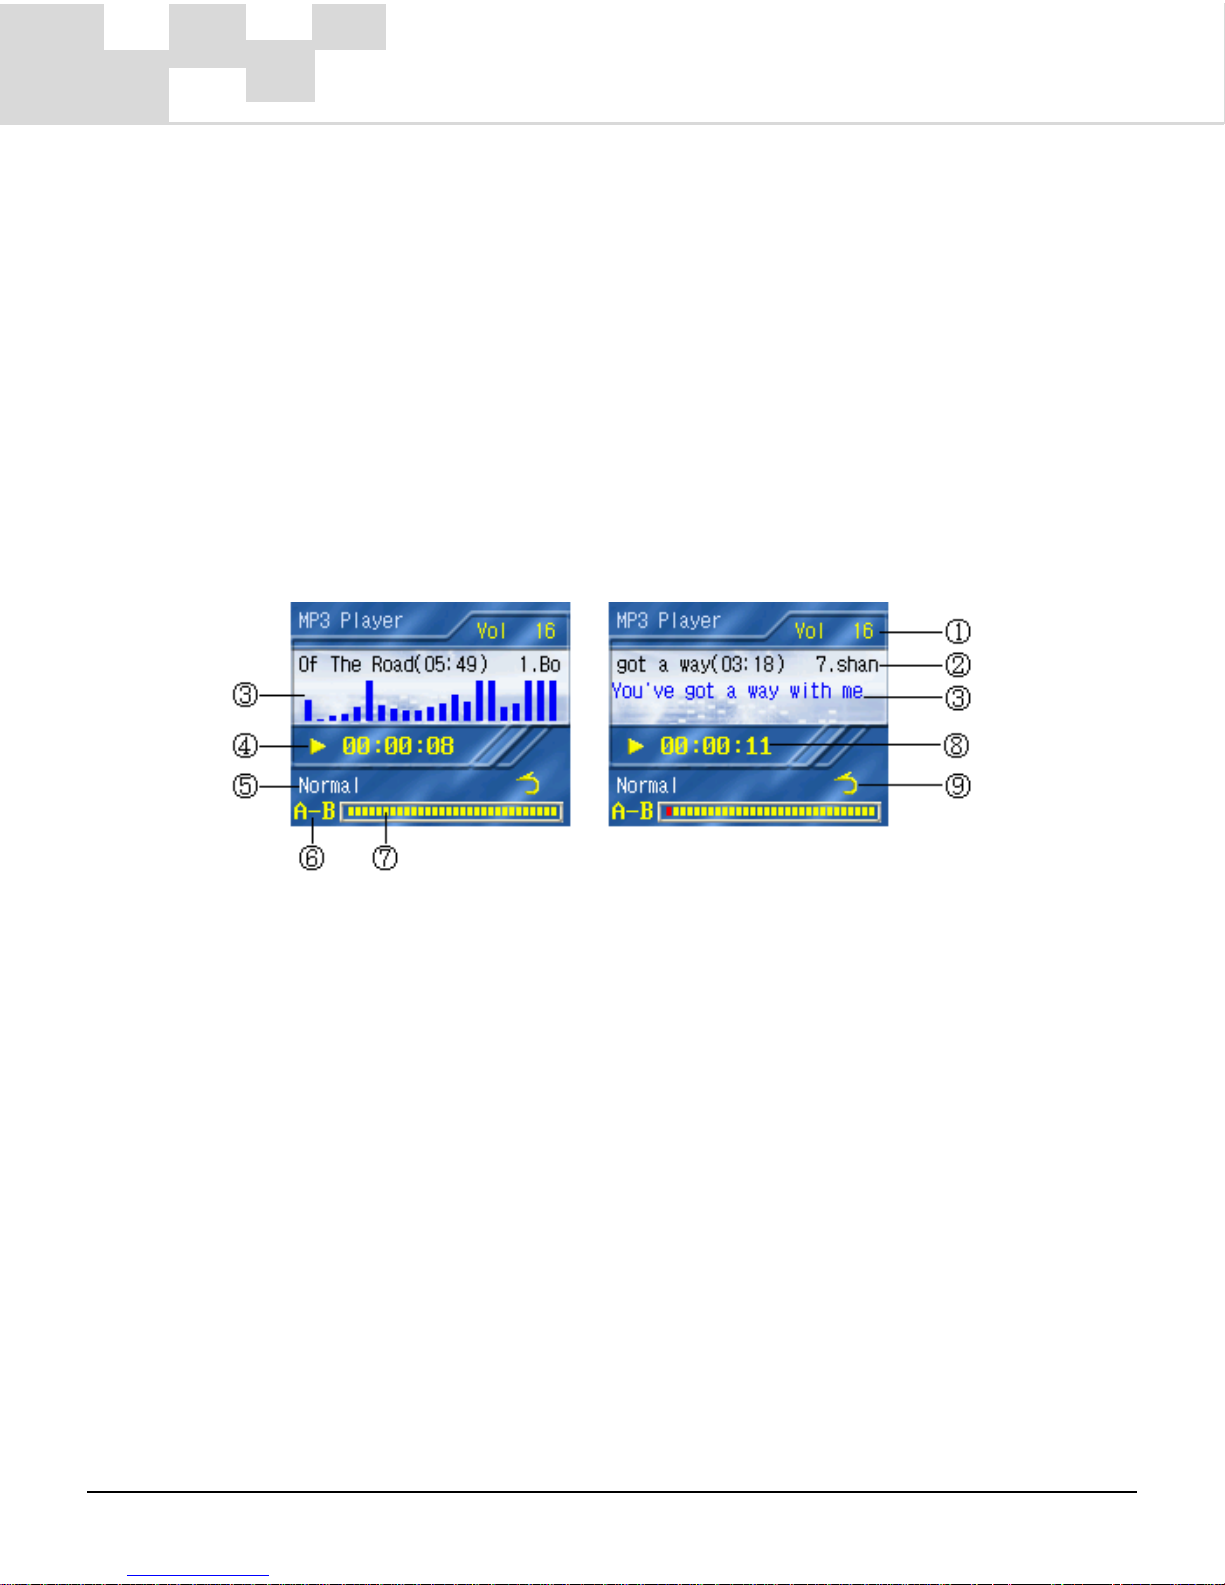
Playback Mode
1. Volume level: adjust Volume by pressing UP or DOWN on the
navigational pad.
2. Track title: displays current music file’s ID3 information.
3. Music wave, or show music lyric.
The player supports standard LRC format lyrics. Place the LRC file of
the same name as the audio file in the same folder and the audio and
lyrics will be synchronized.
Page 15

15
4. Music status:
: play
: pause
: stop
5. EQ mode indicator (Normal, Bass, Rock, Pop, Classic, Treble,
Live, Dance, UserMode).
6. Loop repeat indicator: becomes red in section repeat playback
mode.
7. Track position bar: indicates the current playback status.
8. Track position:
Elapsed: Current track played time.
Remaining: Current track remain time.
9. Repeat playback indicator:
: Normal, to play all the tracks in order one time.
: All Track, to repeat all tracks.
: Track, to repeat current track.
Playing Music
Press the PLAY button to play the current track.
Press the PLAY button during playback to pause the track.
Loop repeat
The loop repeat function makes it easy to repeat a particular section
of a music track. To do this, follow the steps below:
Page 16

16
MP3 Player Menu Operation
Pressing the MODE button in music playback
mode will bring up a menu with the following
options:
1. TimeMode - Changes the format of the track
length displayed. LEFT or RIGHT on the
navigational pad to select Elapsed or Remaining.
2. Repeat – Changes the track repeat mode. Use the LEFT or RIGHT
buttons to select from the following options:
Normal: No repeat. Plays all the tracks in order only once.
All tracks: Repeat all tracks.
Track: Repeat one track.
3. EQ – Adjusts the equalizer mode. Select from Normal, Bass,
Rock, Pop, Classic, Treble, Live, Dance and UserMode.
1. During music playback, press the A-B button briefly to mark the
beginning of the loop you want to repeat. Notice that the loop
repeat indicator will turn partially red in color.
2. Press the A-B button briefly again to mark the end of the loop.
The loop repeat indicator will be completely red.
3. The desired loop will now play repeatedly.
4. Press the A-B button again to cancel the
loop.
Page 17

17
Setting UserMode EQ:
Switch to menu mode; select EQ option;
Press the RIGHT to change the value to UserMode;
Press the PLAY button to enter the User
mode EQ setting mode:
The player provides 10 layer user self
definition EQ:
Press the LEFT or RIGHT button to select
desired option.
Press the UP or DOWN button to change
the EQ value.
4. Audio Channel
Stereo: Default is stereo.
Left: Only send left channel of the track to earphone.
Right: Only send right channel of the track to earphone.
You can enjoy KTV function through select differ track channel.
Page 18

18
PlayList Menu Operation
Append Song’s: to enter the Append Songs mode.
Delete: remove current song from the list.
Delete files: delete the current song file from the player.
Clear Playlist: empty the entire list.
5. Sleep Mode:
Disable: Sleep mode is disabled.
Enable: the player will power off after preset time.
6. Playlist – Playlist mode. Use the LEFT or RIGHT buttons to scroll
and press PLAY to enter this mode. For more details, refer to the
following:
PlayList
This mode allows you to edit the songs in your playlist directly on
the player.
In music playback mode, press the MENU button and move to the
PlayList option. Then press the PLAY button to switch to PlayList
mode.
Press the UP or DOWN button to select
tracks.
Press the PLAY button to play the track.
Press the STOP button return to normal
music play mode.
Press the MENU button to switch to the Playlist menu mode:
Page 19

19
Add Songs
To add all the songs stored in a directory you have the following
options.
1. Select the desired directory
2. Press the MENU button.
3. Select “Add to Playlist” option.
Through those same steps, add a single song file to Playlist.
Press the STOP button to return to the playlist.
The Playlist can carry over 100 songs, if the Playlist is full, please
delete some songs from Playlist before append operation.
Page 20

20
2-3 Voice Recording
The Media Player also functions as a high-quality voice recorder.
When combined with the programmable loop repeat function, the
Media Player is a perfect companion for language learning.
Performing a Recording
Press and hold the A-B button to enter voice recording mode.
1. Volume level
2. File name. File names are saved as REC001.MP3, REC002.MP3,
REC003.MP3 and so on.
3. Audio source indicator
Receiving sound from built in microphone
Receiving sound through line-in cable
4. Record status
5. Sample Rate
6. Bit rate
7. Elapsed recording time
Page 21

21
Press A-B to begin recording.
Press the STOP button to stop recording.
Press PLAY to play the current recording.
Press LEFT or RIGHT buttons to select the desired recording.
When memory is full, the recording stops automatically.
Recording from External Devices
With the player, you even can record from other devices equipped
with line-out functionality, such as CD players, MP3 players, and PCs.
To do so, do the following:
1. Plug one end of the line-in cable into the player’s line-in jack, and
the other end to line-out port of the external device.
2. Press and hold the A-B button to switch to recording mode.
3. Press the MENU button to open the record menu dialogue.
4. With the AudioSource selection highlighted, press the RIGHT
button to change the AudioSource to Line-in.
5. Press the PLAY button to return to recording mode.
6. Start the external device. Press the A-B button to start recording.
Page 22

22
Recording Quality Settings
The recording mode menu also allows you to change the default
recording quality.
1. Press and hold the A-B button to switch to recording mode.
2. Press the MENU button to display the recording mode menu.
3. From the recording mode menu, you have the following options:
AudioSource– Adjust the audio source for recording. Having
discussed in the previous section.
Sample Rate – Adjust the sample frequency. Select from the
following:
8 / 11.025 / 12 / 16 / 22.05 / 24 / 32 / 44.1 / 48kHz
BitRate – Adjust the bit rate. Select from the following:
32 / 40 / 48 / 56 / 64 / 80 / 96 / 112 / 128/160kbps
Use the LEFT and RIGHT buttons to adjust the various settings.
Press the PLAY button to exit the menu and return to recording
mode.
Page 23

23
2-4 FM Radio
Still not enough music? The Media Player also has a FM tuner built
right in.
The FM frequencies range from 87.0MHz to 108.0MHz.
Listening to the Radio
Select FM Radio on the Desktop, and then press the PLAY button to
enter FM Radio.
1. Volume level
2. Current FM frequency
3. Frequency name or Audio file name (Displayed when recording)
4. Status indicator
5. Audio file Sample Rate
6. Audio file Bit rate
7. Elapsed recording time
FM channel preset. Up to 30 channels can be stored.
Press the LEFT or RIGHT button to change to another preset channel.
Page 24

24
Automatic Tuning
The player has 30 FM preset slots, and can scan for these slots
automatically.
Press and hold the RIGHT or LEFT button to begin auto tuning. The
player will scan the FM spectrum for strong signals, and after a few
moments, populate the channel list with the strongest channels in the
area.
To rearrange the channel order:
1. Press the MENU button to enter the FM radio menu.
2. Press the DOWN button to select the Save Channel option.
3. Press the LEFT or RIGHT button to cycle to the desired preset
station slot.
4. Press the PLAY button to store the frequency to the selected FM
preset slot.
5. Repeat steps 1-4 until all the available channels have been
stored. The player allows up to 30 programmed FM channel
presets.
Page 25

25
Manual Tuning
If you would rather select FM frequencies manually, take the
following steps.
To change to manual tuning mode:
1. While in the FM radio mode, press the MENU button to enter the
FM radio menu.
2. Press the DOWN button to scroll to the Seek Mode option.
3. Press the RIGHT button to change the value to Manual.
4. Press the PLAY button to close the menu and return to FM radio
mode.
To tune manually:
1. Press and hold the LEFT or RIGHT button to begin manual tuning.
2. Release the MENU button when the desired frequency is reached.
3. Press the DOWN button to select the Save Channel option.
4. Press the LEFT or RIGHT button to cycle to the desired preset
station slot.
5. Press the PLAY button to store the frequency to the selected FM
preset slot.
6. Repeat steps 1-5 until all the available channels have been tuned
in.
Page 26

26
FM Channel editor
Even can edit FM frequency list on PC, and download it to the device
root directory.
You must edit a text file named “FM.txt”, and its content formatted
as following:
FM Radio Recording
To record FM radio, simple press the A-B button during FM playback.
The recorded FM radio will be saved as a MP3 file.
To stop the FM recording, press the STOP button.
To playback the FM recording, press and hold the PLAY button to
switch to music playback mode.
To set the default recording format, please refer to previous sections
of this manual to learn how to operate them.
Page 27

27
2-5 Games
The player also comes with a variety of challenging games for you to
take on the road.
There are four games: Russia Block, Box Game, Gobang, and Black
White Chess.
Follow these steps to enter the game you want to play:
1. On the Desktop, press the LEFT or RIGHT button to select
Games.
2. Press the PLAY button to enter game list screen.
3. Press the DOWN button to select the desired game.
4. Press the PLAY button to enter game.
Russia Block
Blocks will fall from the top of the screen. When they fill up an entire
row, that row will be destroyed. If the blocks reach the top of the
screen, the game is over.
Page 28

28
Controls:
- LEFT Move block left
- RIGHT Move block right
- UP Rotate block
- DOWN Move block downwards
Press the MENU button, and the LEFT or RIGHT button to select 1~9
level speed.
Then press the PLAY button, the game will restart the new speed.
Page 29

29
Box Game
Get the highest score by pushing boxes to the correct destinations as
fast as you can.
Controls:
- LEFT Move left or push box leftwards
- RIGHT Move right or push box rightwards
- UP Move up or push box upwards
- DOWN Move down or push box downwards
There are 180 preset modes you can select from the menu.
Page 30

30
Gobang
Gobang consists of 13 horizontal and 13 vertical lines. To win, build
the first “five-in-a-row” (an unbroken horizontal, vertical or diagonal
line with 5 stones of the same color).
Controls:
- RIGHT Move cursor right
- LEFT Move cursor left
- UP Move cursor up
- DOWN Move cursor down
- PLAY Place game piece
In menu mode:
First: you place the first piece or computer do.
Level: set game level: Low/Middle/Advanced.
Restart Game.
Repent: Backward to previous step.
Page 31

31
Black White Chess
The object of the game is to fill the game board with more game
pieces than your opponent. Players take turns placing game pieces on
the game board. If you surround your opponent’s game pieces with
yours, the surrounded game pieces will change to your color. The
game ends when there is no more space for more game pieces.
Controls:
- RIGHT Move cursor right
- LEFT Move cursor left
- UP Move cursor up
- WN Move cursor down
- PLAY Place game piece
If there is no place for a piece, open the menu, and select Skip option
to enter next step.
Page 32

32
2-6 Disk Explorer
Disk Explorer allows you to manage the files stored on the player
quickly and easily.
To enter Disk Explorer, navigate to the Disk Explorer icon using the
RIGHT button and hit PLAY.
Exploring Files
In Disk Explorer, the following 5 file types are displayed:
Directory – Select and press the PLAY button to enter the
directory.
E-book – Select and press the PLAY button to open.
MP3 audio file – Select and press the PLAY button to play the
song and add the song to the playlist.
Graphic file –Select and press the PLAY button to display. You
can also display your pictures as a slide-show.
Unsupported – this file cannot be opened by the device, but
can be transferred to a PC via the USB cable.
Page 33

33
Controls:
- RIGHT Enter current directory, or open current file
- LEFT Backward to parent directory
- UP Select previous item
- DOWN Select next item
- PLAY Enter current directory, or open current file
Managing Files
With a MP3 audio file selected, pressing the MENU button brings up
the following options:
Goto Root Directory: Return to the disk root directory directly.
Delete: Deletes the current file from disk (This will permanently delete
the file from the device.).
Add to Playlist: Adds the current music file to the Playlist.
HDD Capacity: Check the disk usage status.
Page 34

34
Managing Directories
With a directory selected, pressing the MENU button brings up the
following options:
Delete: Delete the directory from the device.
This will permanently delete all files stored in the current directory
including all subdirectories!
Add to Playlist - Adds the entire song directory to the Playlist.
Note: Songs stored in a subdirectory are not included.
Page 35

35
2-7 e-Albums
The player also provide e-Albums function, *.bmp, *.jpg, and *.gif
image files are supported.
In Disk Explorer, select photo file and press the PLAY button to enter
photo browse mode.
Press the MENU button to open menu mode:
Auto Play: Cycle through the entire photo store in the current
directory.
Set Desktop: refer to following:
The player can be as personal as you want it to be. You can
customize the device by replacing the desktop background by
following the steps below:
1. Download the desired photograph from your PC.
(Refer to Chapter 3 – Connecting to a Computer for more)
2. Select the photograph using Disk Explorer.
3. Press the MENU button to open its property menu.
Page 36

36
4. Select the Set background option and press the PLAY button.
5. Return to the desktop. The photograph has been saved as your
desktop.
If you want to restore the default background:
1. Press the MENU button on Desktop screen.
2. Select Default Desktop and press the PLAY button. The
background will revert to the original graphic.
Page 37

37
2-8 e-Books
The player provides *.txt, *.pdb type e-Book file.
In Disk Explorer, select the e-Book file and press the Play button to
browse.
The browse support auto bookmark function.
2-9 Movie Player
The player supports video playback. Current 3GP format files are
supported and can be accessed directly from DiskExplorer. More
supported formats may be available via firmware upgrade in the
future.
Page 38

38
3 - Connecting to a Computer
Before connecting to a PC or Mac, make sure there is an available
USB port.
Plug and Play is supported in Windows 2000 and XP or higher. For
Windows98 SE, you must first install the USB driver. (Please see
included software utility disk)
3-1 System Requirements
• IBM compatible personal computer
• Pentium 166MHz or greater
• Windows 98 SE / ME / 2000 / XP
• USB port ( USB 2.0 port is required for faster transfer speeds)
• 32MB RAM or more (64MB is recommended for Windows 2000,
XP)
• 20MB of available hard disk space
• CD-ROM drive (4x CD-ROM drive or greater)
• Sound Card (Optional)
• VGA graphics
• Internet access (recommended)
Page 39

39
3-2 Connecting to a PC
1. Turn on the player and the PC.
2. Plug one end of the USB cable into the player’s USB port.
3. Plug the other end of the USB cable into an open USB port on the
PC.
4. The player automatically switches to USB mode.
5. The player is recognized as removable storage and is assigned a
drive letter. You can view, add, and delete files by navigating to
the player via My Computer.
Caution: When recording, the player switches to USB mode after the
recording is finished.
3-3 Installing the USB Driver
Caution: Only Windows 98 SE users need to install the USB driver.
Follow these steps if the USB driver is not installed:
1. Turn on the player and the PC.
2. Insert the installation CD.
3. Connect the player to the PC.
4. The PC will detect a new media device.
5. Follow the prompts, and select the Win98DRV driver directory
from the installation CD.
6. After the PC auto-configures, the installation is complete.
Page 40

40
3-4 Disconnecting the USB Cable
Follow these steps to safety disconnect the USB cable:
1. When connected, a
icon is available on the system tray.
2. Move the cursor and click
.
3. Select Safely remove USB Mass Storage Device.
4. You can now safely disconnect the USB cable.
Caution: Do not directly disconnect the device, or it may cause player
malfunction. This is only for Windows 2000/XP users.
Page 41

41
3-5 Using as Removable Storage
The Media Player can also be used as a removable hard drive. Use it
to store important files for transport.
Uploading/Downloading Files:
1. Turn on the player and connect to PC.
2. Open the Windows Explorer on PC.
3. Select the file to download from PC and drag-and-drop it into the
removable disk icon.
4. Select the file to upload from the player and drag-and-drop it into
the PC disk icon.
Caution:
• During file downloading or uploading, do not disconnecting the
USB cable, or it may cause malfunction of the unit.
• Do not upload copyrighted files that you do not own.
Page 42

42
3-6 Disk Formatting
After connecting the player to the PC, follow these steps:
1. Select the removable disk icon in My Computer and click the right
mouse button to select Format.
2. Select Quick(erase) option only delete all file store on disk
Select Full option format the disk, and fix bad cluster
automatically.
3. You can change the name of the removable disk by entering the
name in the Label field.
4. Click the Start button.
Caution:
• All stored files will be deleted.
• Care must be taken as formatted files can not be recovered.
Page 43

43
4 - Troubleshooting
1. The player does not work and the LCD displays nothing.
• Make sure that the battery is charged and try again.
2. The buttons do not work.
• Check to see if key lock is activated.
3. Files can’t be downloaded.
• Check to see if the driver is installed correctly on the
computer (Windows 98 SE).
• Check the connection between the player and PC.
• Make sure that the battery is charged and try again.
• Check if the player has free memory.
4. The player keeps turning off.
The power is automatically turned off after 60 seconds of
inactivity to save.
5. The LCD window is dark.
• Change LCD brightness setting on Desktop menu.
• A dark photograph is displayed. Press the STOP button to exit.
6. While in music playback mode, the music doesn’t play after
pressing the PLAY button.
• The player skips over incompatible files.
7. I can’t create voice files.
• The player can recognize up to 999 files. Any additional files
will not be recognized.
Page 44

44
8. I can’t properly charge the device.
• Check whether the adapter plug is properly connected.
• Fully charged batteries will not change any further. The player
will not enter charge mode with a full battery.
• The battery level is below the minimum operating level. It
must be charged for more than 5 hours to restore normal
status.
9. I’m getting poor FM Radio reception.
• Adjust the position of the player and earphones.
• Turn off other electronic devices near the player.
• The headphone cord functions as an antenna. They must be
plugged in for best reception.
10.No sound is heard from the player or distortion is heard during
playback.
• Check whether the volume is set to 0.
• Check the remote control / earphone connection.
• Check whether the earphone plug is dirty. (if so, clean the
plug with a dry and soft cloth)
• Corrupted audio files may contain excessive noise or cut off
unexpectedly.
• If the player is disconnected suddenly during file transfer, it
may cause data loss or file corruption.
If this happens, connect the player to the PC and run the
Windows Scandisk utility.
Page 45

45
11.The player cannot be charged.
• Check if the AC adapter is properly connected.
• The fully charged battery cannot be further charged.
12.There is noise in playback
• Plug the earphone firmly. Check if the earphone pin is dirty
(clean with soft dry cloth). Or the MP3 file is damaged.
13.The PC doesn’t work well sometimes when connecting and
disconnecting the player.
It’s mainly caused by plugging and unplugging the USB port when
in the file transmission. Therefore, it is recommended not to
disconnect the device during the file transmission, to avoid any
abnormality in the PC end. Use the safe removal of device in the
PC end.
14.Some MP3 files can’t be played in the player.
As there are various compression format and compression rate
available, some music file formats are not supported by the
player. Usually the player will skip these files. When you
encounter files format that are not supported, please take one of
the following two measures:
Delete the music files that are not supported.
Select the MPEG Layer3 coding when compressing.
Page 46

46
5 - Appendix
Package Accessories
Note: The remote control is an optional accessory.
USB cable
Installation diskEarphones
AC adaptor
User’s manual
Line-in cable
Page 47

47
Specifications
Memory capacity 20/30/40/60 GB 1.8inch hard drive (built-in)
*Capacity depends on the version of the
player purchased.
Battery Rechargeable lithium battery (800 mAH)
Charge time Battery charge time: 3 hours (achieve 80%
battery after 1-hour fast charge)
LCD 160×128 1.8inch TFT LCD, 65536 colors
USB port USB 2.0 high speed transfer
USB 1.1 Compatible
FM channel range 87.0 MHz ~ 108.0 MHz/
76.0 MHZ ~ 108.0 MHZ
Playback Time 12+ hours (standard MP3 playback)
S/N rate 80 dB (max.)
Earphone output power 5 MW + 5 MW
Output frequency range 20 Hz ~ 20 KHz
Record bit rate 32 Kbps ~ 320 Kbps
Music file format MP3, WMA
Record file format MP3
Support ID3 language Simplified Chinese, traditional Chinese,
Korean; of the music file Japanese, English,
German, Italian, French, Portuguese, Dutch,
Spanish etc.
Support compression rate 8 Kbps ~ 320 Kbps (MP3) / VBR
8 Kbps ~ 320 Kbps (WMA)
* Specifications, bundles, and accessories are subject to change without
notice.
Page 48

48
FCC Compliance Statement
This equipment has been tested and found to comply with the limits for a Class B
digital device, pursuant to Part 15 of the FCC rules. These limits are designed to provide
reasonable protection against harmful interference in a residential installation. This
equipment generates, uses and can radiate radio frequency energy and, if not installed
and used in accordance with the instructions, may cause harmful interference to radio
communications. However, there is no guarantee that interference will not occur in a
particular installation. If this equipment does cause harmful interference to radio or
television reception, which can be determined by turning the equipment off and on, the
user is encouraged to try to correct the interference by one or more of the following
measures:
• Reorient or relocate the receiving antenna.
• Increase the separation between the equipment and receiver.
• Connect the equipment into an outlet on a circuit different from that to which the
receiver is connected.
• Consult the dealer or an experienced radio/TV technician for help.
Caution: Changes or modifications not expressly approved by the manufacturer
responsible for compliance could void the user's authority to operate the equipment.
This device complies with Part 15 of the FCC Rules. Operation is subject to the
following two conditions: (1) This device may not cause harmful interference, and (2)
this device must accept any interference received, including interference that may
cause undesired operation.
Responsible Party: Loi Han
Microtek Lab, Inc.
16941 Keegan Avenue
Carson, CA 90746
USA
Phone: 310-687-5800
Fax: 310-687-5950
 Loading...