

Page 1
Quick Start Guide
Easy steps to getting started
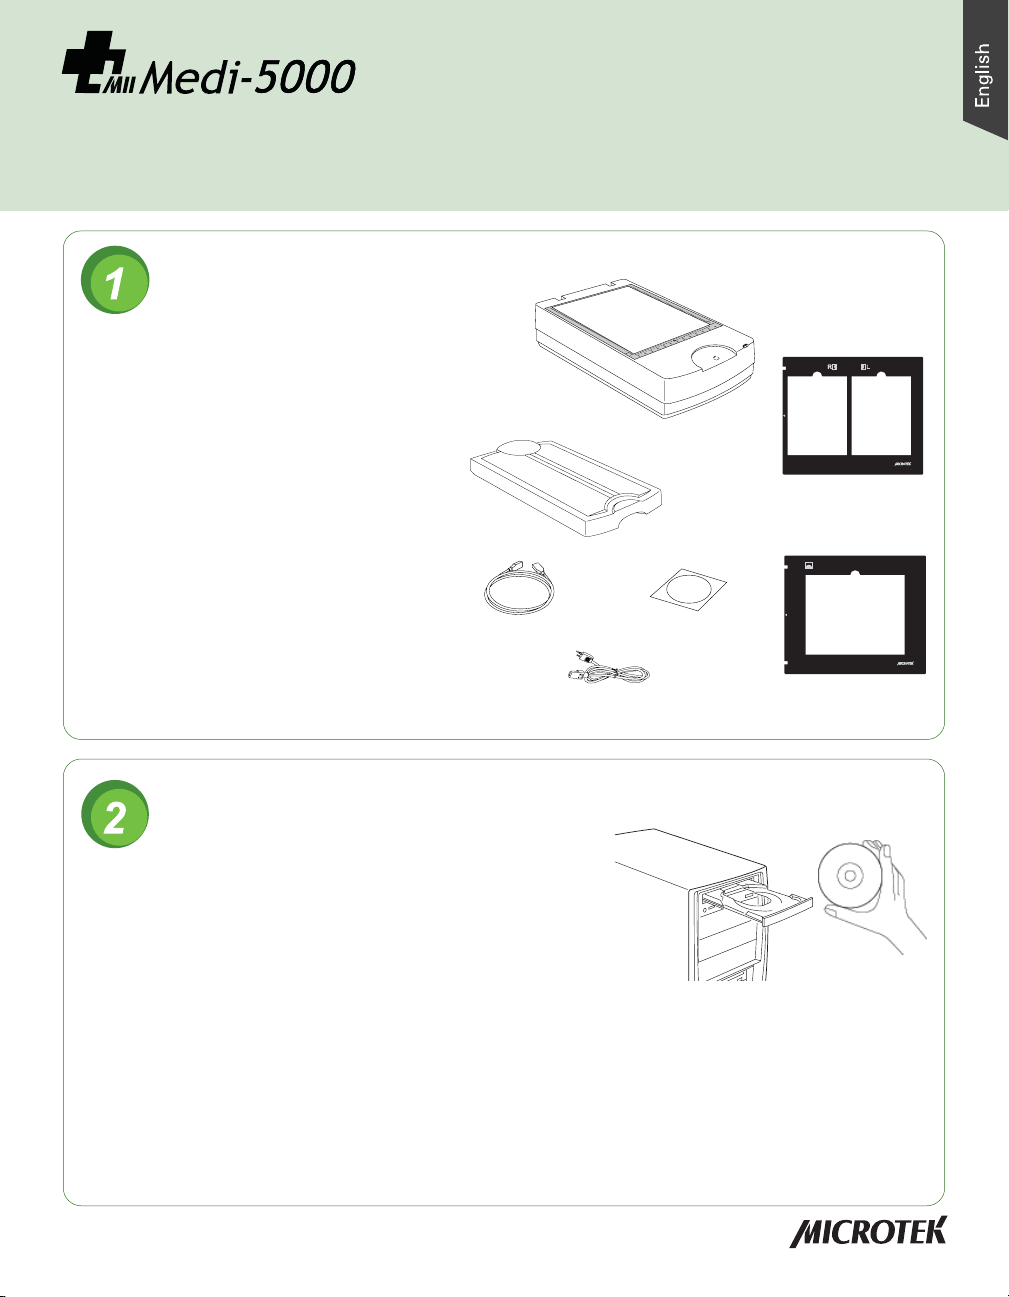
Unpack Contents
Unpack your digitizer package and check for
major components.
6
5
4
3
1
0
1
2
3
4
5
6
1. Medi-5000 Film Image Digitizer
(lower base)
2. Transparent Media Adapter
(TMA)
3. Hi-Speed USB Cable
4. Power Cord
5. Software CD
6. 18 x 24 cm Mammography Film Holder
7. 24 x 30 cm Mammography Film Holder
3
Install Software
Important: You must install software before connecting
your digitizer. Always close any open programs and turn
off Anti-virus utilities before installing software.
A. Turn on your computer.
1
Mammography
18 x 24 cm Film Holder
6
2
5
Mammography
24 x 30 cm Film Holder
7
4
B. Place the Medi-5000 CD-ROM into the CD-ROM drive, and follow the on-screen
instructions to install the driver and software.
C. Restart your computer.
NOTE: If the Software Installer screen does not come up automatically, double-click the following in
succession: “My Computer”; the CD-ROM icon; then cdsetup.exe to start the installer program.
Copyright © 2013 Microtek International, Inc. http://www.microtek.com
I49-004787 B, September 2013
1
Page 2
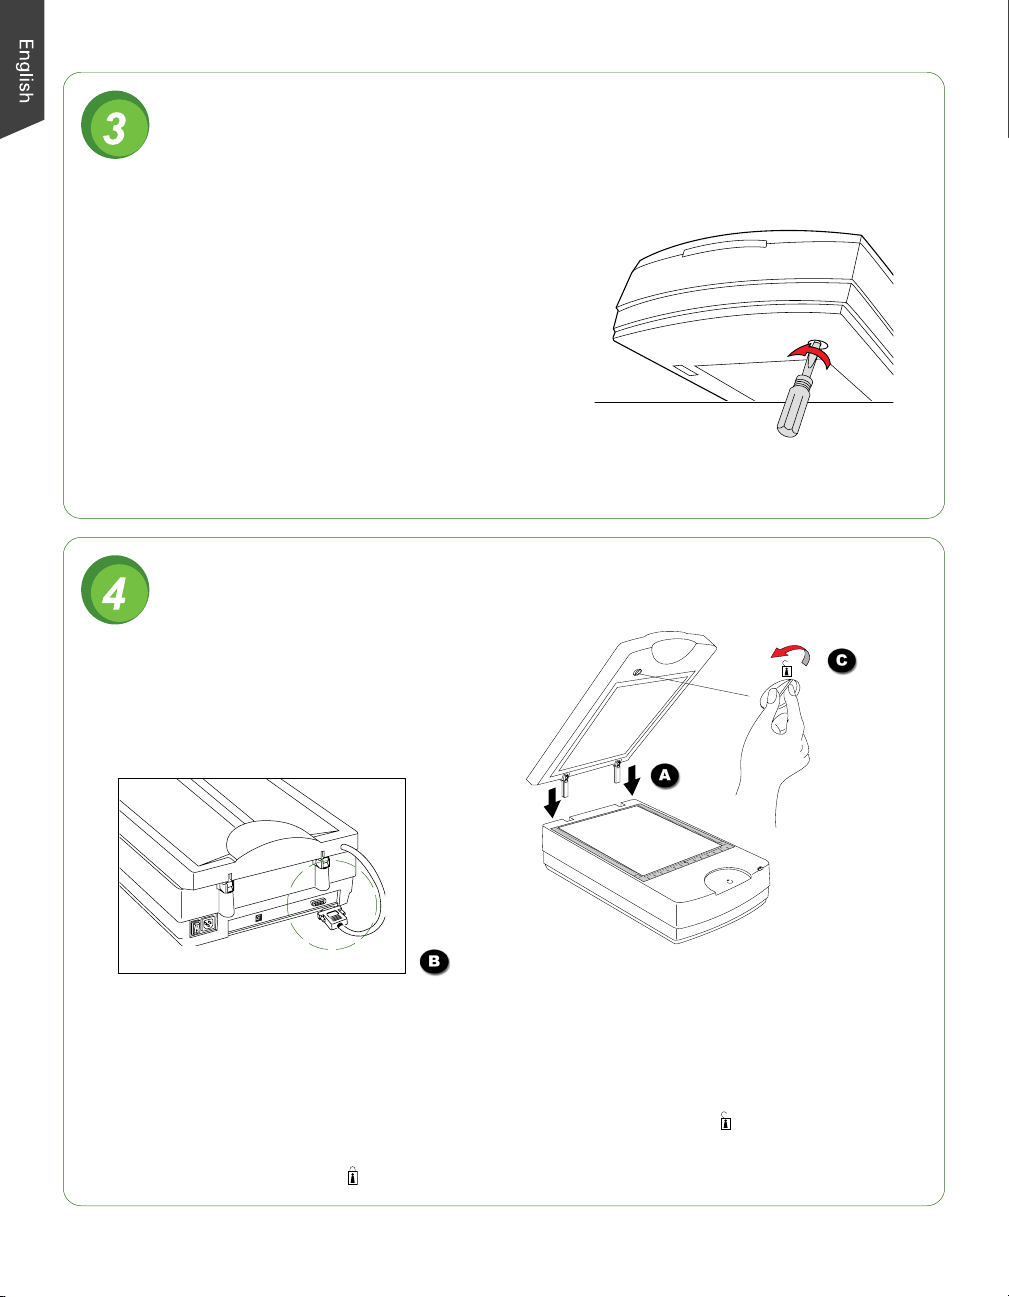
Unlock Digitizer
A. Remove the yellow “Unlock” sticker from your digitizer.
B. With the digitizer power off, turn the digitizer on its
side and locate the locking screw at the bottom of
the digitizer.
C. Using a screwdriver, push and turn the locking screw
counterclockwise to the unlock position.
When successfully unlocked, the screw will push out
a little, protruding slightly from the bottom of the
digitizer.
NOTE: To lock the digitizer (for shipping and other purposes),
push and turn the locking screw clockwise to the locked position.
Install TMA
A. Attach the TMA by sliding the posts at the
rear of the TMA into the holes.
Unlocked
Unlocked
B. Plug the connector of the TMA into the
digitizer’s 15-pin accessory port.
6
5
4
4
3
3
2
1
1
0
0
1
1
2
2
3
3
4
5
5
6
C. Unlock the TMA.
1) Remove the yellow “Unlock” sticker from the TMA.
2) Look for the locking knob at the base of the TMA.
3) Turn the locking knob counterclockwise to the unlock position “ ”.
NOTE: To lock the TMA (for shipping and other purposes), turn the locking knob
clockwise to the lock position “ ”.
2
Page 3
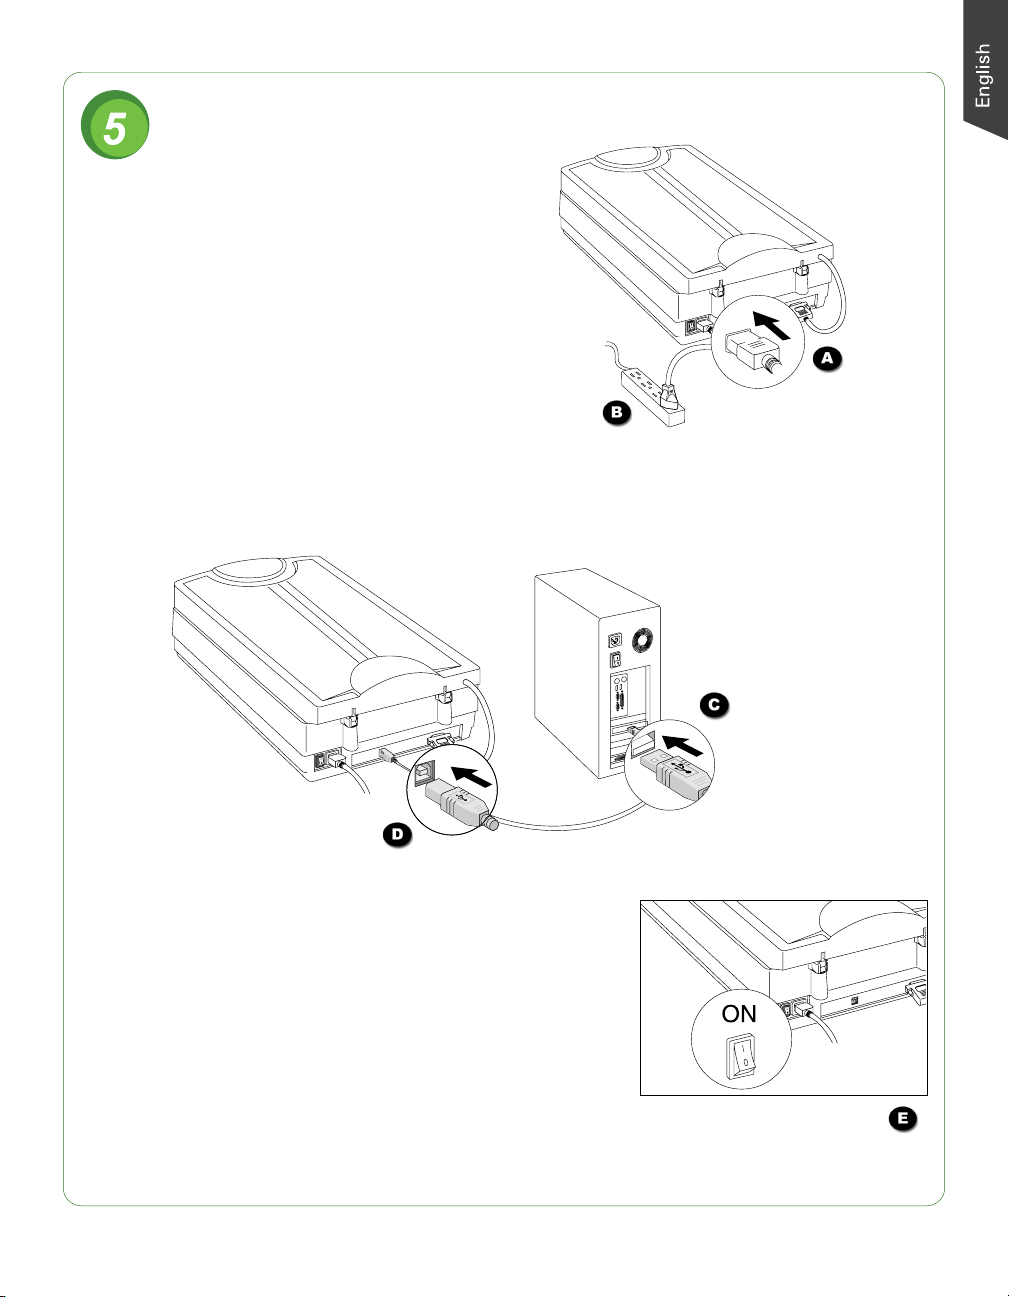
Connect Digitizer
To the power cord
A. Connect the power cord to the back of
the digitizer.
B. Plug one end of the power cord into a wall
outlet or other power source.
To the Hi-Speed USB cable
C. Connect one end of the Hi-Speed USB cable to your computer.
D. Connect the other end of the Hi-Speed cable to the digitizer’s USB port.
E. Turn the Power switch on the back of the digitizer to
“On”, and wait for the lights to stop blinking and stay
on steady.
The digitizer will be detected by your system
automatically.
NOTE: It takes a while for your digitizer to warm up. Do not
turn the digitizer off when your digitizer is in the warming-up
process; otherwise, it may cause serious damage to your
digitizer.
3
Page 4

Position Mammography Film
6
5
6
5
4
4
3
3
2
1
2
1
0
Mammography
18 x 24 cm Film Holder
Mammography
18 x 24 cm Film Holder
To scan mammography film, use the film holder included with your digitizer package, and
match it with the correct type of mammography film, such as 18 x 24 cm mammography film
or 24 x 30 cm mammography film.
Using the film holder ensures precise alignment of film to yield consistent scans, and aids in the
correct performance of the automatic cropping feature during film scanning. When you place
the film holder, please take note of the followings:
• Align the front corners of the film
holder firmly against the top corners of
the U-shaped ruler located at the scan
bed of the digitizer. Make sure to
orient the side with the “Microtek”
logo facing up.
• The arrow marks on both the film
holder and the digitizer are pointing to
each other.
• Keep the Calibration window on the
glass surface clear and unobstructed.
To place mammography film
• For 18 x 24 cm mammography film, use
the 18 x 24 cm Mammography Film
Holder .
Calibration
window
• For 24 x 30 cm mammography film, use
the 24 x 30 cm Mammography Film
Holder.
Microtek logo
r
r
18 x 24 cm Film Holde
18 x 24 cm Film Holde
Mammography
Mammography
0
1
2
3
4
5
6
U-shaped ruler (front
area of the scan bed)
6
5
4
3
2
1
Arrow marks
18 x 24 cm Film Holder
18 x 24 cm Film Holder
Mammography
Mammography
6
5
4
3
2
1
0
1
2
3
4
5
6
Position Reflective Originals
Place the side of the film
with the letter (R or L) facing
up and orient the breast
image towards the same
direction of the icon shown
on the holder.
(e.g., documents or prints)
Place the reflective to be scanned facing down on the scan
bed, with the top end of the reflective facing towards the
front of the digitizer.
4
6
5
4
3
2
1
0
1
2
3
4
5
Page 5
Scanning Basics
1. Place film holder and
mammography film
Follow the section of the ”Position
mammography Film” in this guide to place the
film holder and film properly on the scan bed.
18 x 24 cm Film Holder
18 x 24 cm Film Holder
Mammography
Mammography
6
5
4
3
2
1
0
1
2
3
4
5
6
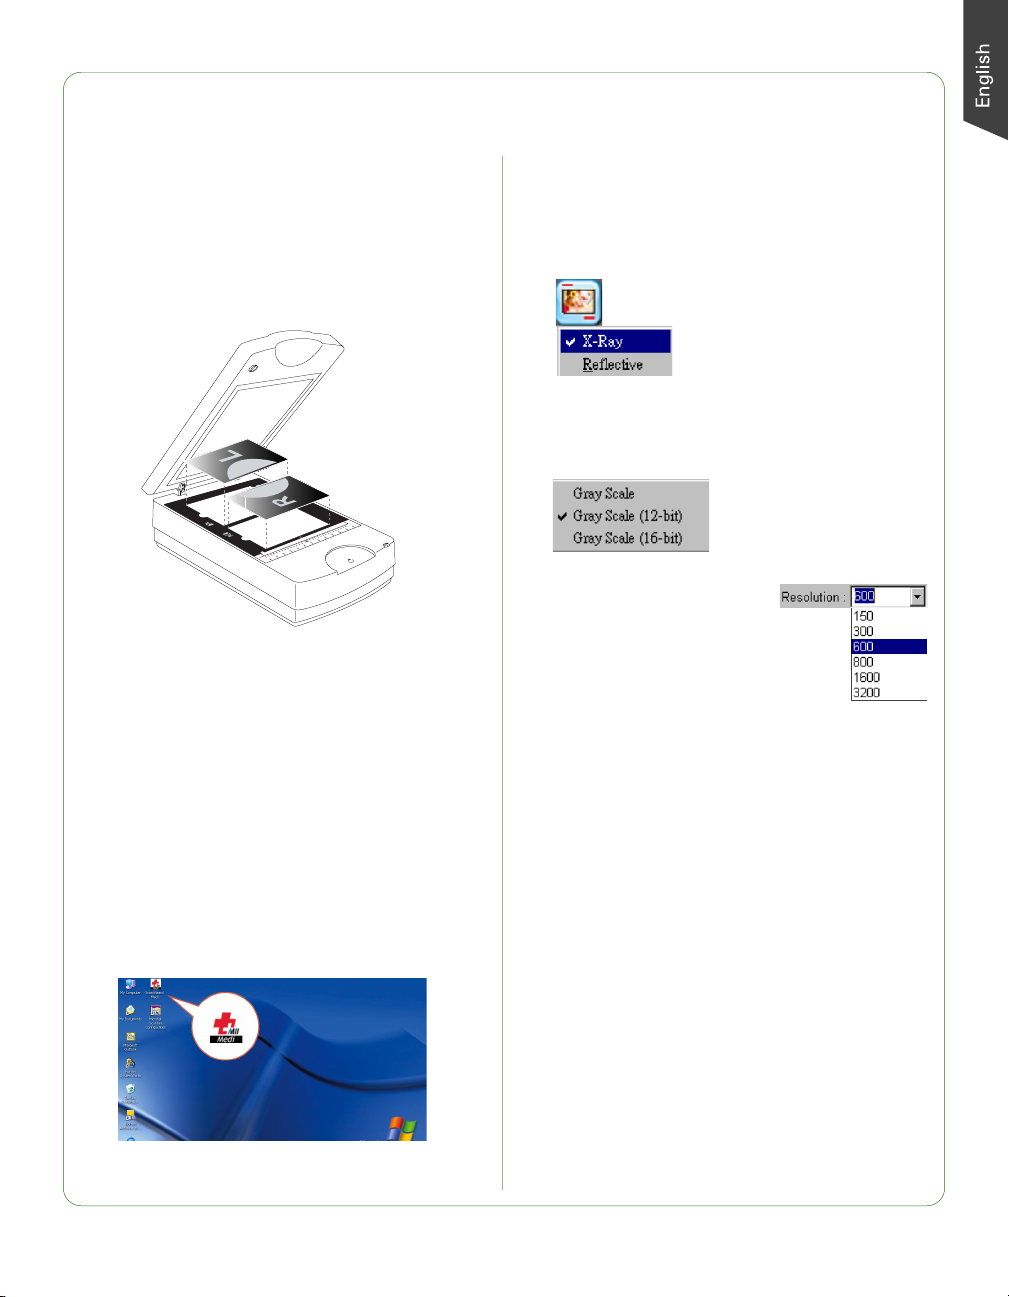
2. Launch ScanWizard Medi
To launch ScanWizard Medi as a stand-alone
program, double-click the ScanWizard Medi
icon on your desktop.
All four windows (Preview, Settings, Scan Job
Queue and Information) appear automatically
after the ScanWizard Medi is started up at
the first time. You may hide the Scan Job
Queue and Information windows from the
View menu.
3. Specify scanning
requirements
a) In the Preview window, choose “X-Ray”
from the Scan Material menu.
b) In Settings window, select the appropriate
image output type (e.g., Gray Scale) in
the Type drop-down menu.
c) In Settings window,
select a desired image
output resolution (e.g.,
600) in the Resolution
drop-down menu.
4. Scan mammography film
a) Click the Smart-Scan button on the
Preview window in the ScanWizard Medi
or the Scan button on the Medi-5000 unit.
b) When the “Scan To: Save As” dialog box
appears, specify the folder location, a file
name, and the format for the output
image, then click Save. The image is
scanned and saved to the specified
location.
5
Page 6

Send image to application after saving:
If this option is checked, the scanned image is saved
first and then automatically delivered to an application
software as indicated in the destination box.
To view the scanned image, double-click the
“Msmart Images” icon on the desktop, or
retrieve it from the folder you assigned in the
“ScanTo: Save As” dialog box.
Settings Window
Window Expansion button
(Click here to reveal the half bottom
of the Settings window if you need
to make further image adjustment.)
Preview Window
Scanning Reflective Originals
(e.g., documents or prints)
Follow the section ”Position Reflective Originals” to place the reflective on the scan bed, and
then follow the procedures (steps 2 through 4) outlined in the “Scanning Basics” section to
start to scan your reflective.
In step 3a, instead, choose “ Reflective” to switch to the Reflective scanning mode; a different
look of the Preview window appears. For more details about how to scan the reflectives, refer
to the Medi-5000 User’s Manual.
6
Page 7

Problems?
All On - Ready to scan
The green LED on the front panel indicates the
status of the digitizer. The amber LED beside it
stands for power and should always stay on
steady when the digitizer is on.
First, make sure that you have followed installation steps as described in this document. Then if
your problem is listed here, try the suggested solution.
1. No light comes on when the digitizer is turned on.
Make sure your digitizer is connected to your computer and plugged into a power source.
2. The Add/Remove Hardware Wizard appears on your screen.
Click the “Cancel” button and close the ScanWizard Medi software.
Disconnect the Hi-Speed USB cable from the back of your computer, and refer to the
installation instructions in this document.
3. When trying to scan, an error message appears on your screen that reads, “Can’t Find
Scanners”.
Make sure your digitizer is unlocked (see Step 3 and 4).
Make sure your digitizer is connected to your computer and plugged in to a power source
(see Step 5).
Uninstall and reinstall the ScanWizard Medi software.
Green Flashing - Scanning
All Off - digitizer is off
4. After clicking scan, a blank screen appears.
Make sure your digitizer is unlocked (see Step 3 and 4).
Uninstall and reinstall the ScanWizard Medi software.
5. Having trouble scanning X-ray films.
Make sure the TMA (Transparency Media Adapter) is properly installed, with its connector
securely connected to the digitizer’s 15-pin accessory port.
Make sure you place the film holder and film properly on the scan bed. Do not block the
calibration window (as indicated in the “Position Mammography Film” section).
Make sure you are in the “X-Ray” scanning mode. If not, click the “Scan Material” icon in
the Preview window; then, select “X-Ray” as your scanning mode.
Uninstall and reinstall the ScanWizard Medi software.
6. Having trouble scanning reflective originals.
Make sure you place the reflective original to be scanned properly on the scan bed.
Make sure you are in the “Reflective” scanning mode. If not, click the “Scan Material” icon
in the Preview window; then, select “Reflective” as your scanning mode.
Uninstall and reinstall the ScanWizard Medi software.
7
Page 8

Do You Need Assistance?
Manuals
If you have additional questions and need further instruction or information, we provide
electronic manuals for:
1. Using your Medi-5000
2. Using the ScanWizard Medi scanning software
To access the electronic manuals: Insert the Medi-5000 CD-ROM into your computer’s CDROM drive. Next, locate and click the “Manuals” option when the software installer window
appears on your screen. Finally, select and click the title of the manual you wish to view.
Missing Items
If your package is missing items, please call the Microtek Customer Service Department.
Drivers & Software Upgrades
After you finish the installation of software, if you found that the installed drivers and software
cannot run your product or your computer system properly later, please go to the Microtek
Download Service site at ww7.microtek.com.tw/service.php to download and install any
updates you may require.
For additional information about Microtek products, please visit our website at
www.microtek.com.
Microtek International, Inc.
No. 6, Industry East Road 3,
Science-Based Industrial Park,
Hsinchu 30077, Taiwan
EVESTAR GmbH
Linsellesstraße 127-129
D-47877 Willich, Germany
Copyright © 2013 Microtek International, Inc. The following are trademarks or registered
trademarks of their respective companies: Microtek, ScanMaker, ScanWizard, Medi logo of
Microtek International, Inc. All other trademarks or registered trademarks are the property
of their respective holders. Specifications, software and hardware bundles are subject to
change without notice. Delivery of technical support services subject to change without
notice. Not responsible for typographical errors.
8
 Loading...